


E SERIES OVENS
USE & CARE GUIDE
GUÍA DE USO Y MANTENIMIENTO
GUIDE D’UTILISATION ET D’ENTRETIEN
GUIDA ALL’USO E ALLA MANUTENZIONE
BEDIENUNGSUND PFLEGEANLEITUNG

E SERIES OVENS |
SAFETY PRECAUTIONS |
Contents
2Safety Precautions
3E Series Oven Features
3 Oven Operation
6Care Recommendations
7Troubleshooting
7 Wolf Warranty
Customer Care
The model and serial number are listed on the product rating plate. Refer to page 3 for rating plate location. For warranty purposes, you will also need the date of installation and name of your authorized Wolf dealer. Record this information below for future reference.
SERVICE INFORMATION
Model Number
Serial Number
Date of Installation
Certified Service Name
Certified Service Number
Authorized Dealer
Dealer Number
Important Note
To ensure this product is installed and operated as safely and efficiently as possible, take note of the following types of highlighted information throughout this guide:
IMPORTANT NOTE highlights information that is especially important.
CAUTION indicates a situation where minor injury or product damage may occur if instructions are not followed.
WARNING states a hazard that may cause serious injury or death if precautions are not followed.
IMPORTANT INSTRUCTIONS
GENERAL SAFETY PRECAUTIONS
•Read this guide carefully before using this appliance to reduce risk of fire, electric shock or injury.
 WARNING
Accessible parts may become hot during use. Young children should be kept away.
•This appliance must be properly installed and serviced by a qualified installer or service agency and grounded by a qualified technician.
•Clean only those parts listed in this guide.
•Do not use oven cleaners. No commercial oven cleaner or oven liner protective coating of any kind should be used in or around any part of the oven.
•Do not use steam cleaner.
•Interior surfaces become hot enough to cause burns. During and after use, do not touch, or let clothing or other flammable materials contact heating elements or interior surfaces of oven until they have had sufficient time to cool.
 WARNING
The appliance and its accessible parts become hot during use. Care should be taken to avoid touching heating elements inside the oven. Heating elements may be hot even though they are dark in color. Children less than 8 years of age shall be kept away unless continuously supervised.
•Always use dry pot holders when removing pans from this appliance. Wet or damp pot holders can cause steam burns. Do not use a towel or bulky cloth in place of pot holders.
•Exercise caution when opening the oven door. Let hot air or steam escape before looking or reaching into the oven.
•Be sure that the oven cool air intake (located above the door) and oven exhaust vent (located below the door) are unobstructed at all times.
•Position oven racks in desired locations when oven is cool. If a rack must be repositioned after the oven is already hot, be sure pot holder does not contact a hot heating element in the oven.
 CAUTION
Before using self-clean, remove excessive spillage, broiler pan, oven racks, oven rack guides and any other utensils.
•Do not repair or replace any part of this appliance unless specifically recommended in literature accompanying this appliance.
•Do not use aluminum foil to line any part of this appliance.
•Never use this appliance to warm or heat the room.
•This appliance can be used by children aged from 8 years and above and persons with reduced physical, sensory or mental capabilities or lack
of experience and knowledge if they have been given supervision or instruction concerning use of the appliance in a safe way and understand the hazards involved. Children shall not play with the appliance. Cleaning and user maintenance shall not be made by children without supervision.
•Do not use water on grease fires. Smother the flame or use a dry chemical or foam-type extinguisher.
•Do not heat unopened food containers, such as baby food jars and cans. Pressure build-up may cause the container to burst and cause injury.
•Do not store or use gasoline or other flammable vapors and liquids in the vicinity of this or any other appliance.
•Do not store items of interest to children above or at the back of this appliance, as they could climb on the appliance to reach items and be injured.
•Do not clean oven gasket; rubbing or moving the gasket may compromise the door seal.
•Wear proper apparel. Loose-fitting or hanging garments should never be worn while using this appliance.
2 | English

E SERIES OVEN FEATURES
E Series Oven Features
FEATURE |
PG |
|
1 |
Product Rating Plate |
2 |
|
|
|
2 |
Adjustable Oven Racks |
3 |
|
|
|
3 |
Control Panel and Display |
4 |
|
|
|
4 |
Convection Fans |
5 |
|
|
|
5 |
Temperature Probe Receptacle |
5 |
|
|
|
6 |
Halogen Lighting |
6 |
|
|
|
3 |
6 |
4 |
1 |
5 |
2 |
E series single oven.
Getting Started
We know you are eager to start cooking, but before you do, please take some time to read this use & care guide. Whether you are an occasional cook or an expert chef, it will be to your benefit to familiarize yourself with the safety practices, features, operation and care recommendations of your E series oven.
•Clean the oven thoroughly with hot water and mild detergent. Rinse and dry with a soft cloth to remove any residual oil and grease left from the manufacturing process. Refer to care recommendations on page 6.
•To ensure the best results, review cooking modes and special features on page 5.
 CAUTION
Do not place cookware on oven floor or use aluminum foil or other material to line oven floor or side walls. Failure to adhere to this notice will damage the porcelain interior and will void your warranty.
OVEN OPERATION
Oven Racks
OVEN RACK GUIDES
To insert rack guides in the oven, locate mounting screws on oven side walls. Place rack guide mounting tabs over the screws and slide down until fully seated. Refer to the illustration below.
OVEN RACKS
To insert a standard rack in the oven, place the rack anti-tip lock under side rack guide rails. Slide rack back and lift up to clear rack stops. Continue to slide rack back until completely inside the oven. Refer to the illustration below.
MOUNTING |
SCREW |
RACK STOP |
ANTI-TIP |
LOCK |
MOUNTING |
TAB |
Oven rack guides. |
Oven rack anti-tip lock. |
The bottom oven rack has a full-extension capability which is supported by the oven door. With the rack in the lowest rack guide position, slide it onto door guides for greater stability and accessibility. Refer to the illustration below.
To insert a full-extension easy glide rack, place the two rear tabs onto the rack guide (one tab above and one below). Refer to the illustration below. Angle rack slightly and slide back until the front rack notch engages the front rack guide.
|
REAR TABS |
|
NOTCH |
Bottom rack. |
Full-extension rack. |
wolfappliance.com | 3

OVEN OPERATION
Oven Operation
CONTROL PANEL
The electronic control panel features touch pads for cooking modes and other functions. Refer to the illustration below.
1Touch desired cooking mode on the control panel. For double ovens, touch  to select oven.
2Touch  to select preset temperature or use number pads to change temperature.
3Touch  .
.
CONTROL PANEL LOCK
The control lock feature prevents unwanted oven operation. Touch and hold  for 3 seconds to lock and unlock the control panel.
OVEN LIGHT
Oven light turns on automatically when the door is open and off when closed. To turn the light on while the door is closed, touch  on the control panel.
CONTROL PANEL TOUCH PADS |
|
|
Bake |
Oven Light |
|
Convection Bake |
Upper/Lower |
|
(double ovens only) |
||
|
||
Roast |
Oven Off |
|
(single ovens only) |
||
|
||
Convection Roast |
Upper Oven Off |
|
(double ovens only) |
||
|
||
Broil |
Lower Oven Off |
|
(double ovens only) |
||
|
||
Convection Broil |
Set Timer |
|
Bake Stone |
Set Clock |
|
Convection |
Timed Cook |
|
Proof |
Temperature Probe |
|
Dehydration |
Clear |
|
Self-Clean |
Enter |
|
Lock |
|
PRIOR TO USE
To ensure all residual oil from the manufacturing process has been removed, each oven must go through the following procedure.
1Clean oven thoroughly with hot water and a mild detergent. Rinse and dry with a soft cloth.
2Turn on ventilation. Some smoke and odor is normal.
3Touch  (
(  for lower oven) and set temperature to 290°C for one hour.
4Touch  and allow oven to cool with the door closed.
PREHEAT
During preheat, the oven is heated as quickly and evenly as possible and is not ideal for cooking. Preheat should be utilized for all cooking modes except broil and convection broil. Once preheat is complete, an audible chime indicates oven has reached set temperature.
CLOCK
The clock is visible on the control panel during all cooking modes, except when the timer is in use. It is very important the clock is set to the correct time if timed cook feature is used. Clock must be reset after a power failure.
Setting clock:
1Touch  on the control panel.
2Touch number pads to set time of day.
3Touch  , then touch 1 for AM or 2 for PM.
4Touch  .
.
TIMER
The timer can be set for a maximum of 9 hours, 59 minutes. Once a time is set, the countdown is illuminated on the control panel display. The last minute counts down in seconds. When complete, the oven will chime and time will flash. The timer will continue to chime every 10 seconds until  is touched. The timer is independent from the oven. Setting the timer does not affect cook time or stop time. For information regarding auto program features, refer to page 6.
Setting timer:
1Touch  on the control panel.
2Touch number pads to set time in hours and minutes.
3Touch  .
.
EXTENDED OPTIONS
The extended options feature allow the user to select preferences for language, temperature unit, temperature offset, 12/24 hour clock, backlight brightness, contrast adjustment, standby on/off, and beeper (chime) tone.
Setting extended options:
1To enter extended options mode, touch and hold  for 5 seconds.
2Touch  to scroll through options, then follow instructions on the control panel display.
3To exit, touch  .
.
|
1 |
2 |
3 |
4 |
5 |
|
6 |
7 |
8 |
9 |
0 |
Control panel (single oven shown).
4 | English

OVEN OPERATION
Cooking Modes
MODE |
TOUCH PAD |
PRESET |
RANGE |
PROBE |
USES |
||||
Convection |
|
|
|
|
|
165°C |
75 – 290°C |
• |
Uniform air movement makes it possible to multi-level rack |
|
|
|
|
|
|
|
|
|
cook with even browning. |
|
|
|
|
|
|
|
|
|
|
Convection Bake |
|
|
|
|
|
190°C |
75 – 290°C |
• |
Ideal for pie baking. |
|
|
|
|
|
|
|
|
|
|
|
|
|
|
|
|
|
|
|
|
Convection Roast |
|
|
|
|
|
165°C |
75 – 290°C |
• |
Perfect for roasting tender cuts of beef, lamb, pork and |
|
|
|
|
|
|||||
|
|
|
|
|
|
|
|
|
poultry. |
|
|
|
|
|
|
|
|
|
|
Convection Broil |
|
|
|
|
|
1 |
290°C |
|
Shortens broiling times for thicker cuts of meat, fish and |
|
|
|
|
|
|
2 |
230°C |
|
poultry. Utilize two-piece broiler pan and always broil with |
|
|
|
|
|
|
3 |
175°C |
|
oven door closed. |
|
|
|
|
|
|
|
|
|
|
Bake |
|
|
|
|
|
175°C |
75 – 290°C |
• |
Best for single-rack cooking, primarily baked foods. Use for |
|
|
|
|
|
|
|
|
|
standard recipes. |
|
|
|
|
|
|
|
|
|
|
Roast |
|
|
|
|
|
175°C |
75 – 290°C |
• |
Best for roasting less tender cuts of meat, such as chuck |
|
|
|
|
|
|
|
|
|
roasts and stew meat that should be covered. |
|
|
|
|
|
|
|
|
|
|
Broil |
|
|
|
|
|
1 |
290°C |
|
Best for broiling meats, fish and poultry pieces up to 25 mm |
|
|
|
|
|
|
2 |
230°C |
|
thick. Utilize two-piece broiler pan and always broil with |
|
|
|
|
|
|
3 |
175°C |
|
oven door closed. |
|
|
|
|
|
|
|
|
|
|
Bake Stone |
|
|
|
|
|
205°C |
75 – 290°C |
• |
Baking on a ceramic stone. Great for pizza and bread. Bake |
|
|
|
|
|
|
|
|
|
stone accessory required. Additional instructions included |
|
|
|
|
|
|
|
|
|
|
|
|
|
|
|
|
|
|
|
with accessory. |
|
|
|
|
|
|
|
|
|
|
Proof |
|
|
|
|
|
30°C |
30 – 45°C |
• |
Ideal for proofing, or rising bread dough. |
|
|
|
|
|
|
|
|
|
|
Dehydration |
|
|
|
|
|
60°C |
45 – 70°C |
|
Dry a variety of fruits, vegetables and meats. Acces- |
|
|
|
|
|
|
|
|
|
sory racks and door stop required. Additional instructions |
|
|
|
|
|
|
|
|
|
included with accessory. |
|
|
|
|
|
|
|
|
|
|
Self-Clean |
|
|
|
|
|
|
|
|
Oven heats to an extremely high temperature to allow food |
|
|
|
|
|
|
|
|
|
soil to burn off. Refer to page 6. |
|
|
|
|
|
|
|
|
|
|
Proof
Setting controls:
1Touch  .
.
2Oven temperature is preset to 30°C. Touch  to select preset temperature or use number pads to change temperature up to 45°C.
3Touch  .
.
Dehydration
Accessory kit required. Accessories are available through an authorized Wolf dealer.
Setting controls:
1Touch  .
.
2Oven temperature is preset to 60°C. Touch  to select preset temperature or use number pads to change temperature between 45°C and 70°C.
3Touch  .
.
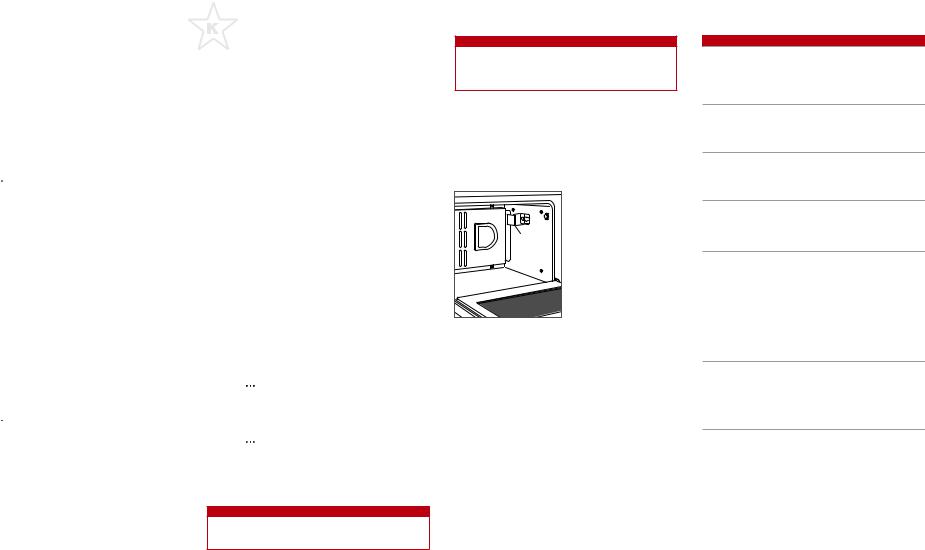
Temperature Probe
The temperature probe measures internal temperature of food while cooking. Only use the temperature probe
supplied by Wolf Appliance. It can be used with all cooking modes except broil and convection broil.
Setting controls:
1Touch desired cooking mode.
2Touch  to select preset temperature or use number pads to change temperature, then touch
  .
.
3Insert probe into thickest area of the food. When making bread, cook for approximately 10 minutes before inserting probe.
4When preheat is complete, use a pot holder to lift probe receptacle cover, then insert probe. Refer to the illustration below.
5Touch  . Use number pads to select temperature, then touch
  . The probe temperature appears in the display until set point is reached.
6An audible chime indicates internal temperature has reached probe set point. Remove, then reinsert probe to verify internal temperature.
 CAUTION
Probe and probe receptacle will be very hot. Handle with care.
Probe receptacle.
wolfappliance.com | 5
OVEN OPERATION
Auto Program
TIMED COOK
Timed cook automatically turns the oven off at a specified time. Oven will begin to heat immediately and will turn off at desired stop time. Clock must be set to the correct time for timed cook to function properly. Use in any cooking mode except broil, convection broil and bake stone.
Setting controls:
1Touch desired cooking mode.
2Touch  to select preset temperature or use number pads to change temperature.
3Touch  . Use number pads to set cook time in hours and minutes.
4Touch  .
.
DELAYED START
Delayed start automatically turns the oven on and off at specified times. Oven will remain idle until desired start time and will turn off at desired stop time. Clock must be set to the correct time for delayed start to function properly. Use in any cooking mode except broil, convection broil and bake stone.
Setting controls:
1Touch desired cooking mode.
2Touch  to select preset temperature or use number pads to change temperature. If
  is touched, the oven will begin to heat immediately, but will enter idle mode once stop time is set.
3Touch  . Use number pads to set cook time in hours and minutes.
4Use number pads to set stop time in hours and minutes.
5Touch  .
.
Sabbath
This appliance is certified by Star-K to meet strict religious regulations in conjunction with specific instructions found on www.star-k.org.
Sabbath overrides the automatic 12-hour shut off feature. Sabbath must be reset after a power outage.
Setting controls:
1Touch  , to turn oven light on or off.
2Touch  or
or  . Oven is preset at 175°C.
3Touch  to select preset temperature or use number pads to change temperature, then touch
  .
.
4Touch and hold  for 5 seconds. ‘SABBATH’ will appear on the control panel display indicating Sabbath mode has been initiated.
5To cancel, touch  .
.
Self-Clean
During self-clean, the oven is heated to an extremely high temperature to burn off food soil. Remove all oven racks and rack guides. They will discolor if left in during self-clean. Oven door will lock and remain locked until self-clean is complete and oven temperature has cooled below 150°C. Self-clean times include one hour for cool down.
Setting controls for 3-hour self-clean:
1Touch  .
.
2Touch  .
.
Setting controls for 4-hour self-clean:
1Touch  .
.
2Touch  .
.
3Use number pads to increase stop time by 1 hour.
4Touch  twice.
 CAUTION
During self-clean, exterior surfaces may get hotter than usual. Children should be kept away.
Oven Light
 WARNING
Ensure that the appliance is switched off before replacing the lamp to avoid the possibility of electric shock.
Allow oven to cool completely, then remove oven racks and rack guides. To remove the light cover, gently pry bottom edge with a flat screwdriver. Remove existing bulb and replace with a 20-watt halogen bulb. Refer to the illustration below.
LIGHT |
COVER |
Light bulb replacement.
Care Recommendations
CLEANING
Stainless Use a nonabrasive stainless steel cleaner and apply steel with a soft lint-free cloth. To bring out the natural
luster, lightly wipe surface with a water-dampened microfiber cloth followed by a dry polishing chamois. Always follow the grain of stainless steel.
Black Spray glass cleaner on a cloth to clean. Do not use glass harsh abrasive cleaners or sharp metal scrapers to
clean the oven door glass since they can scratch the surface, which may result in shattering of the glass.
Oven rack Remove and place on a flat surface near the sink. guides Clean with hot water and mild detergent or paste
of baking soda and water. Do not immerse in water. Towel dry.
Control Use spray degreaser to remove fingerprints and food panel soil. Spray on a cloth before wiping panel.
IMPORTANT NOTE: Do not spray cleaners directly on the control panel.
Oven Before utilizing self-clean feature, use a razor blade interior to gently lift baked on foods from oven cavity and
window. For stubborn stains, spray with a mild abrasive cleaner or spray degreaser and scrub with a no-scratch pad. Wash entire oven cavity with soap and water to remove all cleaning chemicals before entering self-clean mode. If residue is not cleaned from the cavity, etching of the porcelain may occur. Once self-clean cycle is complete, allow oven to cool completely and wipe out ash with a damp cloth.
Broiler pan To clean the upper rack, use mild detergent and a scouring pad. Rinse and dry. To clean the bottom pan, discard grease and wash with hot water and mild detergent. Rinse and dry. The stainless steel upper rack is dishwasher safe, however, do not place the porcelain-coated rack or pan in dishwasher.
6 | English

TROUBLESHOOTING
Troubleshooting
OPERATION
Oven does not operate.
•Verify power is on.
•Verify electrical power to unit and home circuit breaker is on.
•Oven will automatically turn off after 12 hours of continual use, except in dehydration or Sabbath mode.
Oven temperature issue.
• Contact Wolf factory certified service.
No response from control panel touch pads.
•Touch  to exit Sabbath mode.
•Turn circuit breaker off for 5 seconds, then turn back on.
‘SABBATH’ displayed on the control panel.
• Touch  to exit Sabbath mode.
Oven ‘pops’ or ‘bangs’ during preheat or cool down.
•Normal with new oven cavity expansion and contraction.
•Run self-clean cycle. If it persists, contact Wolf factory certified service.
SERVICE
•Maintain the quality built into your product by contacting Wolf factory certified service.
•When contacting service, you will need the model and serial number of your product. Both numbers are listed on the product rating plate. Refer to page 3 for rating plate location.
•For warranty purposes, you will also need the date of installation and name of your authorized Wolf dealer. This information should be recorded on page 2 of this guide.
Wolf Products Limited Warranty
INTERNATIONAL PRODUCTS
FOR RESIDENTIAL USE ONLY
FULL TWO YEAR WARRANTY
For two years from the date of original installation, your Wolf Appliance product warranty covers all parts and labor to repair or replace, under normal residential use, any part of the product that proves to be defective in materials or workmanship. All service provided by Wolf Appliance under the above warranty must be performed by Wolf factory certified service, unless otherwise specified by Wolf Appliance, Inc. Service will be provided during normal business hours.
LIMITED THIRD THROUGH FIFTH YEAR WARRANTY
For five years from the date of original installation, Wolf Appliance will repair or replace the following parts that prove to be defective in materials or workmanship: gas burners (excluding appearance), electric heating elements, blower motors (ventilation hoods), electronic control boards, magnetron tubes and induction generators. The part(s) will be repaired or replaced, free of charge, with the owner paying for all other costs including labor. All service provided by Wolf Appliance under the above warranty must be performed by Wolf factory certified service, unless otherwise specified by Wolf Appliance, Inc. Service will be provided during normal business hours.
Wolf, Wolf & Design, Wolf Gourmet, W & Design and the color red as applied to knobs are registered trademarks and service marks of Wolf Appliance, Inc. Sub-Zero, Sub-Zero & Design, Dual Refrigeration, Constant Care, The Living Kitchen, Great American Kitchens The Fine Art of Kitchen Design, and Ingredients are registered trademarks and service marks of Sub-Zero, Inc. (collectively, the “Company Marks.”) All other trademarks or registered trademarks are property of their respective owners in the United States and other countries.
wolfappliance.com | 7

HORNOS DE LA SERIE E
Índice
2Precauciones de seguridad
3Características de los hornos de la serie E
3 Funcionamiento del horno
6Recomendaciones de mantenimiento
7Localización y solución de problemas
7 Garantía Wolf
Atención al cliente
La información relativa al número de serie y el modelo se muestra en la placa de datos del producto. Consulte la página 3 para observar la ubicación de la placa de datos. Para cuestiones relacionadas con la garantía, también necesita saber la fecha de instalación y el nombre de
su distribuidor autorizado de Wolf. Guarde la siguiente información para tenerla como referencia en el futuro.
INFORMACIÓN SOBRE EL MANTENIMIENTO
Referencia del modelo
Número de serie
Fecha de instalación
Nombre del servicio certificado
Número de servicio certificado
Distribuidor autorizado
Número del distribuidor
Nota importante:
Para garantizar que este producto se instala y funciona de la forma más eficaz y segura posible, tenga en cuenta la información que se destaca en esta guía:
Cuando aparece NOTA IMPORTANTE, se resalta información que resulta especialmente importante.
PRECAUCIÓN indica una situación en la que se pueden sufrir heridas leves o provocar daños al producto si no se siguen las instrucciones.
AVISO indica el peligro de que se produzcan heridas graves o incluso la muerte si no se respetan las precauciones.
PRECAUCIONES DE SEGURIDAD
INSTRUCCIONES IMPORTANTES
PRECAUCIONES GENERALES DE SEGURIDAD
•Lea atentamente esta guía antes de utilizar este aparato para reducir el riesgo de incendio, descarga eléctrica o daños.
 AVISO
AVISO
Las zonas accesibles pueden calentarse durante su uso. Mantenga alejados a los niños pequeños.
•Este aparato debe ser instalado y revisado de manera correcta por un instalar cualificado o por una agencia de mantenimiento y conectado a tierra por un técnico cualificado.
•Limpie solo las piezas que se especifican en esta guía.
•No utilice nunca limpiadores para hornos. No utilice en el horno ni en sus alrededores ningún limpiador de horno comercial ni materiales para proteger el revestimiento en ninguna parte del horno.
•No utilice un limpiador de vapor.
•Las superficies interiores pueden calentarse lo suficiente para causarle quemaduras. Mientras esté utilizando el horno y después de utilizarlo, no toque ni deje que la ropa ni otros materiales inflamables toquen los elementos calefactores ni las superficies interiores del horno hasta que haya pasado un tiempo y se hayan enfriado lo suficiente.
 AVISO
AVISO
El aparato y sus zonas accesibles pueden calentarse durante su uso. Tenga cuidado de no tocar los elementos caloríficos en el interior del horno. Es posible que los elementos calefactores estén calientes aunque ya no estén rojos. Mantenga alejados a los niños menores de 8 años, salvo que estén bajo supervisión permanente.
•Utilice siempre elementos aislantes secos para retirar las cazuelas de este aparato. Si los elementos aislantes están húmedos o mojados pueden producirle quemaduras por vapor. No
utilice un paño de cocina o un paño acolchado en lugar de un elemento aislante.
•Tenga especial cuidado al abrir la puerta del horno. Deje que el aire caliente o el vapor salgan antes de mirar en el interior del horno o de alcanzar algún alimento.
•Asegúrese que la entrada de aire frío (situada encima de la puerta) y la rejilla extractora del horno (situada debajo de la puerta) no están nunca obstruidas.
•Coloque las rejillas en las ubicaciones que desee cuando el horno esté frío. En el caso de que tenga que colocar una rejilla cuando el horno todavía está caliente, asegúrese de que los elementos aislantes no toquen ningún elemento calefactor del horno.
 PRECAUCIÓN
Antes de utilizar el modo de limpieza automática, extraiga los derrames, la bandeja para asar, las rejillas y las guías de las rejillas y cualquier otro utensilio que tenga dentro del horno.
•No repare ni cambie ninguna pieza de este aparato a menos que esto se recomiende específicamente en los documentos que se proporcionan con este aparato.
•No utilice papel de aluminio para forrar ninguna parte de este aparato.
•No utilice nunca este aparato para calentar la habitación.
•Este aparato puede ser utilizado por niños de más de 8 años y personas con sus capacidades físicas, sensoriales o mentales reducidas, o con falta de experiencia y conocimientos, siempre que estén supervisados o les hayan enseñado cómo utilizar el aparato de forma segura y comprendan los peligros que supone. Los niños no deben jugar con el aparato. Los niños no pueden realizar las tareas de limpieza y mantenimiento sin supervisión.
•No utilice agua para apagar los incendios producidos por grasa. Baje la llama o utilice un agente químico seco o un extintor de espuma.
•No caliente recipientes con alimentos que estén cerrados, por ejemplo, envases de comida para bebés o latas. La formación de presión puede hacer que el recipiente explote y causar heridas personales.
•No almacene ni utilice gasolina ni otros vapores ni líquidos inflamables cerca de este o de otros aparatos.
•No almacene artículos que puedan gustar a los niños encima o detrás de este aparato, ya que podrían saltar sobre él para alcanzarlos y resultar heridos.
•No limpie la junta del horno ya que al frotar o mover la junta puede dañar el sellado hermético de la puerta.
•Lleve ropa adecuada. No lleve nunca prendas sueltas u holgadas mientras esté utilizando este aparato.
2 | Español

CARACTERÍSTICAS DE LOS HORNOS DE LA SERIE E
Características de los hornos de la serie E
CARACTERÍSTICA |
PÁG. |
|
1 |
Placa de datos del producto |
2 |
|
|
|
2 |
Bandejas de horno ajustables |
3 |
|
|
|
3 |
Pantalla y panel de control |
4 |
|
|
|
4 |
Ventiladores de convección |
5 |
|
|
|
5 |
Receptáculo y sensor de temperatura |
5 |
|
|
|
6 |
Luces halógenas |
6 |
|
|
|
3 |
6 |
4 |
1 |
5 |
2 |
Horno sencillo de la serie E.
FUNCIONAMIENTO DEL HORNO
Primeros pasos
Sabemos que está deseando empezar a cocinar, pero, antes de hacerlo, debe leer esta guía de uso y mantenimiento. Tanto si es un cocinero novato como si es un chef experto, le resultará útil familiarizarse con las prácticas de seguridad, las características, el funcionamiento y las recomendaciones de mantenimiento del horno de la serie E.
•Limpie el horno con agua caliente y detergente suave. Aclare y seque con un paño suave para eliminar cualquier residuo de aceite o grasa que haya quedado del proceso de fabricación. Consulte la sección Recomendaciones de mantenimiento en la página 6.
•Para garantizar los mejores resultados, consulte la sección Características especiales y modos de cocción de la página 5.
 PRECAUCIÓN
No coloque ningún utensilio de cocina sobre la superficie del horno, ni utilice papel de aluminio u otro material para forrar la superficie o las paredes del horno. Si no sigue esta advertencia, la porcelana interior del horno se dañará y la garantía quedará anulada.
Rejillas del horno
GUÍAS DE LA REJILLA DEL HORNO
Para insertar las guías de las rejillas en el horno, localice los tornillos de montaje en las paredes laterales del horno. Coloque las pestañas de montaje de las guías de la rejilla sobre los tornillos y deslícelas hasta que queden totalmente introducidos. Consulte la siguiente ilustración.
REJILLAS DEL HORNO
Para insertar una rejilla estándar en el horno, coloque el bloqueo anti-vuelco de la rejilla debajo de los rieles de las guías de rejilla laterales. Deslice la rejilla hacia atrás y levántela para pasarla por los topes de la rejilla. Siga
deslizando la rejilla hacia atrás hasta que esté complemente dentro del horno. Consulte la siguiente ilustración.
TORNILLO |
|
MOUNTING |
|
DE MONTAJE |
|
SCREW |
TOPE DE |
|
LARACKREJILLASTOP |
|
ANTIBLOQUEO-TIP |
|
ANTI- |
|
LOCK |
|
VUELCO |
MOUNTINGPESTAÑA |
|
DE MONTAJEB |
|
Guías de la rejilla del horno. |
Bloqueo anti-vuelvo de la rejilla |
|
del horno. |
La rejilla inferior del horno es completamente extensible y se mantiene con la puerta del horno. Con la rejilla en la posición más baja de la guía, deslícela en las guías de la
puerta para una mayor estabilidad y accesibilidad. Consulte la siguiente ilustración.
Para insertar una rejilla deslizante de fácil extracción total, coloque las dos pestañas traseras en la guía de la rejilla (una pestaña por arriba y otra por debajo). Consulte la siguiente ilustración. Incline ligeramente la rejilla y deslícela hacia atrás hasta que la muesca de la rejilla frontal encaje en la guía de la rejilla frontal.
|
PESTAÑAS |
|
REAR TABS |
|
TRASERAS |
|
MUESCANOTCH |
Rejilla inferior. |
Rejilla de extracción total. |
wolfappliance.com | 3

FUNCIONAMIENTO DEL HORNO
Funcionamiento del horno
PANEL DE CONTROL
El panel de control digital comprende mandos digitales para los modos de cocción y otras funciones. Observe la siguiente ilustración.
1Toque el modo de cocción deseado en el panel de control. En los hornos dobles, pulse  para seleccionar el horno.
2Pulse  para seleccionar la temperatura predefinida o utilice las teclas numéricas para cambiar la temperatura.
3Pulse  .
.
BLOQUEO DEL PANEL DE CONTROL
La función de bloqueo del panel de control evita que el horno se ponga en funcionamiento de forma inoportuna. Mantenga pulsado  durante tres segundos para bloquear y desbloquear el panel de control.
LUZ DEL HORNO
La luz del horno se enciende automáticamente cuando se abre la puerta, y se apaga al cerrarla. Para encender la luz con la puerta cerrada, pulse  en el panel de control.
MANDOS DEL PANEL DE CONTROL
Horneado
Horneado con ventilación
Asado
Asado con convección
Parrilla
Parrilla con convección
Piedra para hornear
Convección
Fermentación
Luz del horno
Superior/Inferior (solo hornos dobles)
Apagado del horno (solo hornos sencillos)
Apagado del horno superior
(solo hornos dobles)
Apagado del horno inferior
(solo hornos dobles)
Temporizador
Configuración del reloj
Cocción programada
Sensor de temperatura
Deshidratación |
Borrar |
Limpieza automática |
Introducir |
Bloquear |
|
|
1 |
2 |
3 |
4 |
5 |
|
6 |
7 |
8 |
9 |
0 |
Panel de control (se muestra el horno sencillo).
ANTES DE SU USO
Para garantizar que se ha eliminado todo el aceite residual del proceso de fabricación, cada horno debe someterse al siguiente procedimiento.
1Limpie el horno con agua caliente y detergente suave. Aclárelo y séquelo con un paño suave.
2Encienda la ventilación. Es normal que aparezca un poco de humo y olor.
3Pulse  (
(  para el horno inferior) y configure la temperatura a 290 °C durante una hora.
4Pulse  y deje que el horno se enfríe con la puerta cerrada.
PRECALENTAMIENTO
Durante el precalentamiento, el horno se calienta lo más rápido y uniformemente posible y no es ideal para cocinar. Se debe utilizar el precalentamiento en todos los modos de cocción salvo en los modos parrilla y parrilla con convección. Cuando haya finalizado el precalentamiento, un pitido indica que el horno ha alcanzado la temperatura establecida.
RELOJ
El reloj es visible en el panel de control durante todos los modos de cocción, salvo cuando el temporizador está en uso. Es muy importante que el reloj esté configurado a la hora correcta si se utiliza la función de cocción programada. El reloj debe restablecerse en caso de corte de alimentación.
Configuración del reloj:
1Pulse  en el panel de control.
2Pulse las teclas numéricas para configurar la hora del día actual.
3Pulse  , y luego 1 para AM o 2 para PM.
4Pulse  .
.
TEMPORIZADOR
Puede programar el temporizador para un máximo de 9 horas y 59 minutos. Cuando haya programado el temporizador, el cronómetro se iluminará en la pantalla del panel de control. Durante el último minuto, el reloj realizará la cuenta atrás en segundos. Cuando haya
finalizado, el horno emitirá un pitido y la hora parpadeará. El temporizador seguirá sonando cada 10 segundos hasta que pulse  . El temporizador es independiente del horno. Programar el temporizador no afecta a la hora de cocción o a la de parada. Para obtener más información sobre las funciones de programas automáticos, consulte la página 6.
Programar el temporizador:
1Pulse  en el panel de control.
2Pulse las teclas numéricas para configurar las horas y los minutos.
3Pulse  .
.
OPCIONES AMPLIADAS
La función de opciones ampliadas permiten al usuario seleccionar las preferencias de idioma, unidad de temperatura, intervalo de temperatura, reloj de 12 o 24 horas, brillo de retroiluminación, modo en espera encendido/apagado, y tono del pitido (timbre).
Configurar las opciones ampliadas:
1Para acceder al modo de opciones ampliadas, mantenga pulsado  durante 5 segundos.
2Pulse  para desplazarse por las opciones y siga las instrucciones de la pantalla del panel de control.
3Para salir, pulse  .
.
4 | Español
 Loading...