


TP-Link TD-W9980B, TD-W9970B, TD-W8980B, TD-W8970B, TD-W8961NB User Manual
...
TP-LINK TECHNOLOGIES CO., LTD.
Specifications are subject to change without notice. TP-LINK is a registered trademark of TP-LINK TECHNOLOGIES CO., LTD. Other brands and product names are trademarks or registered trademarks of their respective holders.
No part of the specifications may be reproduced in any form or by any means or used to make any derivative such as translation, transformation, or adaptation without permission from TP-LINK TECHNOLOGIES CO., LTD. Copyright © 2016 TP-LINK TECHNOLOGIES CO., LTD. All rights reserved.
www.tp-link.com
Quick Installation
Guide
• English |
• Azərbaycan dili |
• Čeština |
• Қазақша |
• Polski |
• Русский язык |
• Slovenčina |
• Srpski jezik |
• Українська мова |
|
|
|
|
|
|
Wireless DSL Modem Router
MADE IN CHINA |
|
|
|
|
|
|
|
|
|
|
|
|
|
|
|
|
7106505997 REV1.0.0 |
||||||||||||||||

CONTENTS
1 |
/ |
English |
5 |
/ |
Azərbaycan dili |
9 |
/ |
Čeština |
13 |
/ |
Қазақша |
17 |
/ |
Polski |
21 |
/ |
Русский язык |
25 |
/ |
Slovenčina |
29 |
/ |
Srpski jezik |
33 |
/ |
Українська мова |
English
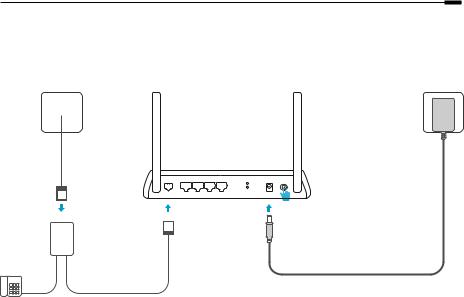
Connect the Hardware
If you don’t need the phone service, just directly connect the modem router to the phone jack with the provided phone cable, then follow steps 3 and 4 to complete the hardware connection.
Phone Jack |
Power Jack |
||
|
|
|
|
|
|
|
|
|
Cable Phone |
|
|
|
|
|
DSL LAN1 LAN2 LAN3 LAN4/WAN |
WIFI |
Power ON/OFF |
|
|
|
WPS/ |
|
|
|
|
RESET |
|
1 |
2 |
Modem Router |
|
3Turn on the modem router. |
|
|
|||
|
LINE |
|
|
|
Power Adapter
PHONE MODEM
DSL Splitter
|
|
|
Phone Cable |
Phone(Optional) |
|||
* Image may differ from actual product.
4Verify that the Power and DSL LEDs are on and stable before continuing with the configuration.
Note: The DSL LED takes about 1 to 2 minutes to stabilize.
1
English
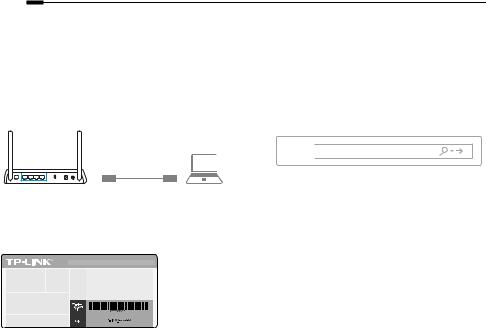
Configure via Web Browser
1 Connecting your computer to the modem router via a wired or wireless connection
Wired
Connect your computer to the LAN port using an Ethernet cable.
Ethernet Cable
Wireless
Connect wirelessly by using the SSID (network name) and Wireless Password printed on the product label at the bottom of the modem router.
2 Configuring the modem router via a web browser
A Launch a web browser and type in http:// tplinkmodem.net or 192.168.1.1. Use admin for both username and password, and then click
Login.
Note: If the login page does not appear, please refer to FAQ > Q1.


 http://tplinkmodem.net
B Go to Quick Start, click RUN WIZARD or NEXT or go to Quick Setup, and follow the step-by-step instructions to complete the initial configuration.
 Now you can enjoy your Internet.
For more advanced settings, refer to the User Guide on TP-LINK official website at www.tp-link.com.
2

English
FAQ (Frequently Asked Questions)
Q1. What can I do if the login page does not appear?
A1. If the computer is set to a static or fixed IP address, change it to obtain an IP address automatically from the modem router. A2. Verify http://tplinkmodem.net is correctly entered in the web browser and press Enter.
A3. Use another web browser and try again.
A4. Reboot your modem router and try again.
A5. Disable and enable the active network adapter.
Q2. What can I do if the DSL LED does not turn solid on?
A1. Check your cables and make sure they are all plugged in correctly, including the telephone lines and power adapter. A2. Restore your modem router to its factory default settings.
A3. Remove the DSL splitter, directly connect the modem router to the phone jack and then reconfigure the modem router by following the instructions in this Quick Installation Guide.
A4. Contact your ISP to verify if the DSL line is in good status.
A5. If you have tried all the suggestions above and the problem still exists, contact our Technical Support.
Q3. What can I do if I cannot access the Internet?
A1. Make sure the telephone and Ethernet cables are plugged in correctly.
A2. Try to log into the web management page of the modem router using the default address at http://tplinkmodem.net. If you can, try the following answers. If you cannot, change your computer to obtain an IP address automatically from the modem router.
A3. Consult your ISP and make sure all the VPI/VCI (or VLAN ID), Connection Type, account username and password are correct. If they are not, replace them with the correct settings and try again.
A4. Restore the modem router to its factory default settings and reconfigure the modem router by following the instructions in this Quick Installation Guide.
A5. Please contact our Technical Support if the problem still exists.
3

English
Q4. What can I do if I forget my password?
• Web Management page password:
With the modem router powered on, press and hold down the reset button of the modem router until there is an obvious change of LEDs, and then release the button. Use admin for both username and password, and then click Login.
• Wireless Network password:
A1. The default Wireless Password/PIN is printed on the product label of the modem router.
A2. If the default wireless password has been changed, log into the modem router’s web management page and go to wireless settings page to retrieve or reset your password.
Q5. How do I restore the modem router to its factory default settings?
A1. With the modem router powered on, press and hold down the reset button of the modem router until there is an obvious change of LEDs, and then release the button.
A2. Log in Web Management page of the modem router and go to the system management page to restore the modem router.
4
Azərbaycan dili
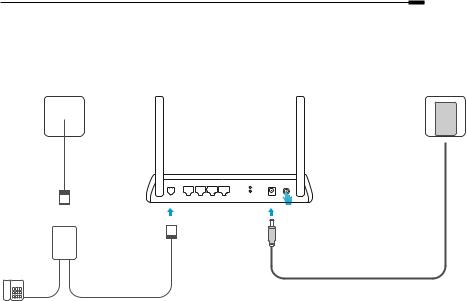
Avadanlığı Qoş
Əgər sizə telefon xidməti lazım deyilsə, sadəcə olaraq modem yönləndiricisini verilən telefon kabeli ilə birbaşa telefonun yuvasına qoşun, sonra avadanlıq qoşulmasını tamamlamaq üçün 3 və 4-cü addımları yerinə yetirin.
Telefon Yuvası |
Elektrik rozetkası |
||
|
|
|
|
|
|
|
|
Kabeli Telefon
1 
LINE
 Enerji adapteri
DSL |
LAN1 |
LAN2 |
LAN3 |
LAN4/WAN |
WIFI |
Power |
ON/OFF |
|
|
|
|
|
WPS/ |
|
|
|
|
|
|
|
RESET |
|
|
2 |
Modem Yönləndiricisi |
3Modem yönləndiricisini yandır. |
|
PHONE MODEM
DSL Bölüşdürücüsü
|
|
|
|
Telefon(İxtiyari) |
Telefon Kabeli |
||
4 Konfiqurasiyanı davam etdirməmişdən öncə enerji və DSL LED-lərinin yanılı və stabil olubolmadığını yoxlayın.
* Təsvir real məhsuldan fərqli ola bilər. |
Qeyd: DSL LED-i stabilləşdirmək 1-2 dəqiqə çəkir. |
5

Azərbaycan dili
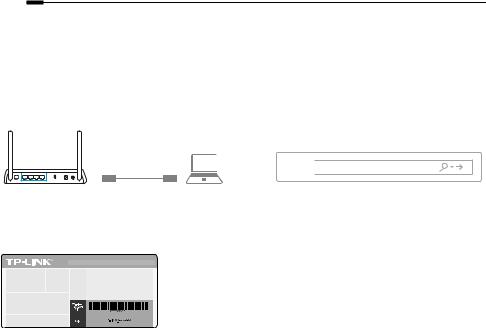
Veb-Brauzer vasitəsilə konfiqurasiya edin
1 Simli və ya simsiz bağlantı vasitəsilə kompüterinizin modem yönləndiricisinə qoşulması
Simli
Ethernet kabelindən istifadə etməklə, kompüterinizi LAN portuna qoşun.
Ethernet Kabeli
2 Veb-brauzer vasitəsilə modem yönləndiricisinin konfiqurasiya olunması
A Veb-brauzeri işə salın və http://tplinkmodem. net, yaxud 192.168.1.1 yazın. Həm istifadəçi adı, həm də şifrə üçün admin istifadə edin, sonra Login klikləyin.
Qeyd: Əgər giriş səhifəsi görünməzsə, FAQ > Q1-ə istinad edin.


 http://tplinkmodem.net
Simsiz
SSID (şəbəkənin adı) və modem yönləndiricisinin aşağısında məhsulun etiketində çap olunmuş Simsiz Şifrədən istifadə etməklə simsiz şəkildə qoşulun.
B Quick Start-a (Cəld Başlatma) keçin, RUN
WIZARD (USTADI İCRA ET) klikləyin və ya
NEXT (NÖVBƏTİ) klikləyin, yaxud Quick Setup
(Cəld Quraşdırma) seçiminə keçin və ilkin
konfiqurasiyanı tamamlamaq üçün addım-addım
göstərişlərə əməl edin.
 İndi internetinizdən həzz ala bilərsiniz.
Daha təkmil parametrlər üçün TP-LINK-in rəsmi veb-saytı olan www.tp-link.com səhifəsində İstifadəçi Təlimatına istinad edin.
6

Azərbaycan dili
FAQ (Frequently Asked Questions)
S1. Giriş səhifəsi görünmürsə, mən nə edə bilərəm?
C1. Əgər kompüter statik və ya sabit IP ünvanına təyin olunubsa, onu avtomatik olaraq IP ünvanını modem yönləndiricisindən əldə etməyə
dəyişdirin.
C2. http://tplinkmodem.net ünvanını veb-brauzerə düzgün daxil etdiyinizi yoxlayın və Enter basın.
C3. Başqa veb-brauzerdən istifadə edin və yenidən cəhd edin.
C4. Modem yönləndiricinizi yenidən yükləyin və yenidən cəhd edin.
C5. Aktiv şəbəkə adapterini qeyri-aktiv edin və aktivləşdirin.
S2. DSL LED tam yanmadıqda nə edə bilərəm?
C1. Kabellərinizi yoxlayın və onların hamısının, o cümlədən telefon xətləri və enerji adapterinin düzgün qoşulduğuna əmin olun.
C2. Modem yönləndiricinizi standart zavod parametrlərinə bərpa edin.
C3. DSL Bölüşdürücüsünü çıxarın, modem yönləndiricisini birbaşa telefon yuvasına qoşun, sonra Cəld Quraşdırma Təlimatında verilən
göstərişlərə əməl etməklə, modem yönləndiricisini yenidən konfiqurasiya edin.
C4. DSL xəttinin yaxşı vəziyyətdə olduğunu yoxlamaq üçün ISP-nizlə əlaqə saxlayın.
C5. Əgər yuxarıdakı bütün təklifləri sınaqdan keçirdinizsə və problem hələ də davam edirsə, Texniki Dəstəyimizlə əlaqə saxlayın.
S3. İnternetə daxil ola bilmirəmsə, nə edə bilərəm?
C1. Telefon və Ethernet kabellərinizin düzgün qoşulduğuna əmin olun.
C2. http://tplinkmodem.net veb-saytındakı standart ünvandan istifadə etməklə, modem yönləndiricisinin veb-idarəetmə səhifəsinə daxil
olmağa cəhd edin. Əgər bacarırsınızsa, aşağıdakı cavabları sınaqdan keçirin. Bacarmırsınızsa, kompüterinizi avtomatik olaraq modem
yönləndiricisindən IP ünvanını əldə etməyə dəyişdirin.
C3. ISP-nizlə məsləhətləşin və bütün VPI/VCI (və ya VLAN identifikatoru), Bağlantı Növü, hesab üzrə istifadəçi adı və şifrənin düzgün olduğuna
əmin olun. Əgər düzgün olmasalar, onları düzgün parametrlərlə əvəzləyərək yenidən cəhd edin.
C4. Modem yönləndiricisini standart zavod parametrlərinə bərpa edin və Cəld Quraşdırma Təlimatında verilən göstərişlərə əməl etməklə,
modem yönləndiricisini yenidən konfiqurasiya edin.
C5. Problem hələ də davam edərsə, Texniki Dəstəyimizlə əlaqə saxlayın.
7

Azərbaycan dili
S4. Şifrəmi unutsam nə edə bilərəm?
• Veb İdarəetmə səhifəsinin parolu:
Modem yönləndiricisini yandırın, LED-lərdə aşkar dəyişikliyi müşahidə etməyənə kimi modem yönləndiricisində reset (sıfırla) düyməsinə basıb saxlayın, sonra düyməni buraxın. Həm istifadəçi adı, həm də şifrə üçün admin (inzibatçı) istifadə edin, sonra Login (Giriş) klikləyin.
• Simsiz Şəbəkə şifrəsi:
C1. Standart Simsiz Şifrə/PIN modem yönləndiricisinin məhsul etiketinin üzərinə çap olunur.
C2. Əgər standart simsiz şifrə dəyişdirilibsə, modem yönləndiricisinin veb-idarəetmə səhifəsinə daxil olun və şifrəni əldə etmək və ya sıfırlamaq üçün simsiz parametrlər səhifəsinə keçin.
S5. Modem yönləndiricisini standart zavod parametrlərinə necə bərpa edə bilərəm?
C1. Modem yönləndiricisini yandırın, LED-lərdə aşkar dəyişikliyi müşahidə etməyənə kimi modem yönləndiricisində reset düyməsinə basıb saxlayın, sonra düyməni buraxın.
C2. Modem yönləndiricisinin Veb İdarəetmə səhifəsinə daxil olun və modem yönləndiricisini bərpa etmək üçün sistemin idarəolunması səhifəsinə keçin.
8
Čeština
Připojte hardware
V případě, že nepotřebujete telefonní služby, připojte modem router přímo do telefonní zdířky přibaleným telefonním kabelem. Poté pokračujte kroky 3 a 4 pro dokončení připojení hardwaru.
Telefonní zdířka
kabel Telefonní
1 
El. zásuvka
 Síťový adapter
DSL |
LAN1 |
LAN2 |
LAN3 |
LAN4/WAN |
WIFI |
Power |
ON/OFF |
|
|
|
|
|
WPS/ |
|
|
|
|
|
|
|
RESET |
|
|
2 |
Modem router |
3 Zapněte modem router. |
|
LINE
PHONE MODEM
DSL Splitter
Telefon (volitelný) |
Telefonní kabel |
|
*Obrázek se může lišit od skutečného produktu.
4 Ověřte, že LED “Zapnuto” a “DSL” trvale svítí a poté pokračuje s konfigurací.
Poznámka: Trvá asi 1 až 2 minuty než se DSL LED ustálí.
9
Čeština
Konfigurace přes Webový prohlížeč
1 Připojení vašeho počítače k modem routeru kabelem či bezdrátovým připojením
Připojení kabelem
Připojte svůj počítač do LAN portu použitím ethernetového kabelu.
Ethernetový kabel
Bezdrátové připojení
Připojte se bezdrátově použitím SSID (jméno sítě) a hesla bezdrátového připojení, které jsou uvedeny na štítku zespodu modem routeru.
2 Konfigurace modem routeru přes webový prohlížeč
A Spusťte webový prohlížeč a jděte na adresu http://tplinkmodem.net nebo 192.168.1.1. Použijte admin jako uživatelské jméno i heslo a
poté klikněte na Login.
Poznámka: V případě, že se přihlašovací stránka neobjeví, prostudujte FAQ > Q1.


 http://tplinkmodem.net
B Jděte na Quick Start (Rychlý start ), klikněte na RUN WIZARD (Spustit průvodce) nebo Next (Další) nebo jděte na Quick Setup (Rychlé nastavení) a postupujte přesně podle pokynů pro dokončení prvotní konfigurace.
 Nyní si můžete užít váš internet.
Pro pokročilé nastavení si prostudujte Uživatelský průvodce na oficiálních stránkách TP-LINK www.tp-link.com.
10
 Loading...