


Digital Wireless Headphones
with DAB Radio
as ue num ri ue sans l a e radio DAB Digital-Funkkopfhörer mit DAB-Radio
WHP5407

G Operating Instructions F Mode d‘emploi D Bedienungsanleitung I Istruzioni per l‘uso N Gebruiksaanwijzing P Instrukcja obsługi C Návod k použití Q Návod na použitie S Bruksanvisning
Pic. 1
Pic. 2 |
Pic. 3 |
Pic. 5 |
Pic. 4

Pic. 6 |
Pic. 7 |
Pic. 8 |
Pic. 9 |
MAX. |
Pic. 10 |
2 |

G Operating Instructions
Thank you for choosing a Thomson product.
Take your time and read the following instructions and information completely. Please keep these instructions in a safe place for future reference. If you sell the device, please pass these operating instructions on to the new owner.
1. Explanation of Warning Symbols and Notes
Warning
This symbol is used to indicate safety instructions or to draw your attention to specific hazards and risks.
 Note
Note
This symbol is used to indicate additional information or important notes.
2. Controls and displays
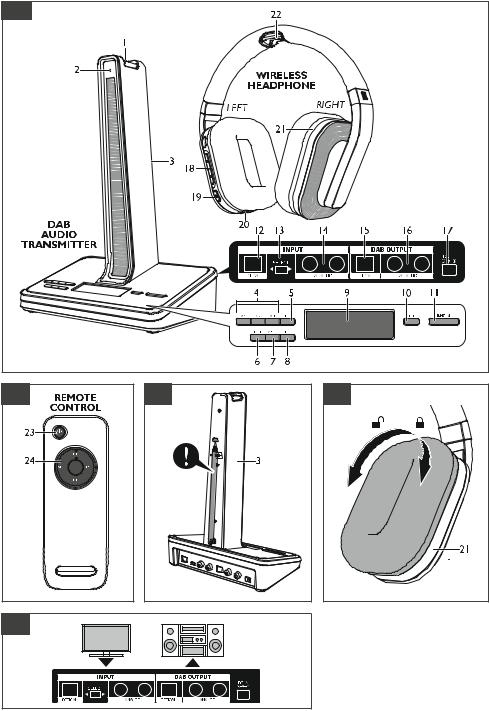
2.1 Transmitter/charging station (Fig. 1)
1.Charging cradle and charging contacts (protected against reverse polarity)
2.Charging LED indicator (CHARGE)
3.Headphone holder with integrated DAB+/FM antenna
Controls
4.Radio memory buttons M1–M3 (FM or DAB+)
5.Automatic/manual search + (TUNE +)
6.Button for additional information for the radio station (INFO)
7.Selection of up to 10 station presets on FM or DAB+ (M-SET)
8.Automatic/manual search - (TUNE -)
9.Multifunction LCD display
10.Input selection button for DAB+, FM, AUX-IN and status LED (INPUT)
11.On/off switch and status LED (POWER)
Rear connections
12.Optical audio input (digital)
13.Input selection switch: optical or analogue
14.RCA audio input (analogue)
15.DAB+/FM radio output (digital)
16.DAB+/FM radio output (analogue)
17.DC input socket (power supply unit)
2.2 Headphones/wireless receiver (Fig. 1)
18.Volume control +/-
19.Headphone on/off switch with status LED
20.Direct audio line-in (analogue, 3.5 mm stereo jack)
21.Right earpad as battery compartment cover (R)
22.Headphone charging contacts (protected against reverse polarity)
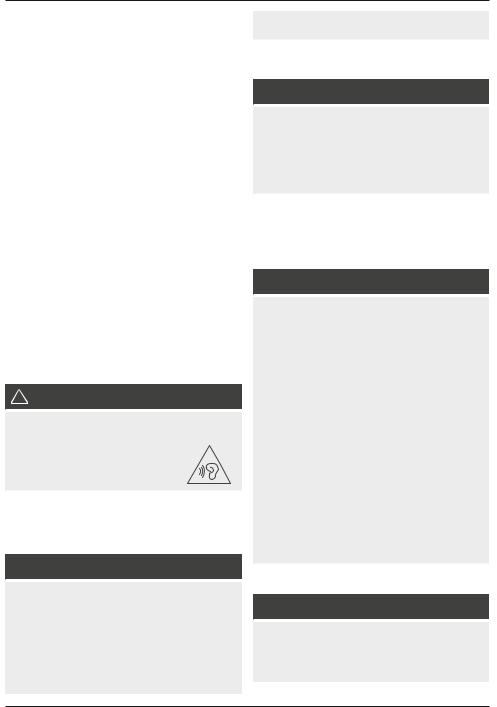
Remote control (Fig. 2)
23.Power button (on/off switch)
24.Control buttons on remote control:
•Automatic/manual search + (TUNE +)
•Automatic/manual search - (TUNE -)
•Mute (MUTE)
•Input selection button for DAB+, FM, AUX-IN (INPUT) Rear: Battery compartment cover for 2 x LR03 AAA batteries (not included)
3. Package contents
•These operating instructions
•1 WHP 5407 wireless headphones (transmitter + headphones)
25.2 x AAA NiMH batteries (exclusively for the headphones)
26.1 audio adapter 3.5 mm / 6.3 mm
27.1 optical fibre cable
28.1 audio adapter (3.5 mm jack socket – RCA plug)
29.1 audio adapter cable (3.5 mm jack plug – RCA plug)
30.1 audio connection cable (RCA plug – RCA plug)
31.1 audio connection cable (3.5 mm jack plug –
3.5 mm jack plug)
32.1 power supply unit (for the charging station)
4. Safety Notes
•Never open, damage or swallow batteries or allow them to enter the environment. They can contain toxic, environmentally unfriendly heavy metals.
•Do not tamper with or damage/heat/disassemble the batteries/rechargeable batteries.
•The product is intended for private, non-commercial use only.
•Use the product for its intended purpose only.
•Children should be supervised to ensure that they do not play with the device.
•Do not use the product in areas where the use of electronic devices is not permitted.
•Only connect the product to a socket that has been approved for the device. The socket must be installed close to the product and easily accessible.
•Disconnect the product from the network using the power
button – if this is not available, unplug the power cord from the socket.
•Lay all cables so that they do not pose a tripping hazard.
•Do not bend or crush the cable.
•Do not drop the product and do not expose it to any major shocks.
•Dispose of packaging material immediately according to locally applicable regulations.
•Do not modify the product in any way. Doing so voids the warranty.
•Do not use the product if the adapter, connection cable or power cable is damaged.
•Do not attempt to service or repair the product yourself. Leave any and all service work to qualified experts.
•Do not open the device or continue to operate it if it becomes damaged.
3

•Protect the product from dirt, moisture and overheating, and only use it in a dry environment.
•Only operate the product in ambient temperatures between 5°C and 40°C.
•Only use the product in environments where 2.4 GHz wireless technology is allowed.
Warning – pacemaker
•The body current that flows when using this product can affect the functioning of a pacemaker.
•This product generates magnetic fields. Persons with a pacemaker should consult a doctor before using the product, as the pacemakers proper function could be affected.
5.Introduction
These 2.4-GHz digital wireless headphones with DAB+ and FM receiver operate with the latest wireless technology and allow you to enjoy clean, crystal-clear music or TV sound in the entire home. Simply connect the transmitter to the desired audio source; DVD player, CD player, TV set, hi-fi system, iPod or smartphone. Furthermore, you are able to receive digital radio programmes directly on the headphones using the DAB+ standard and FM radio signals, or transmit these radio signals to a further source (for example, stereo system or active speakers).
6. Main functional features
•2.4-GHz digital wireless technology
•Automatic and digitally encoded channel selection for the wireless transmission
•Automatic switch-off ends the transmission if no signal is transmitted (or in charging mode).
•Range up to 10-15 metres (depending on building characteristics), up to 30 m with a clear line of sight
•Transmitter as a headphones stand with reverse polarity protection when charging
•Analogue or digital signal input and output selection
•Smart Volume Memory (storage of the last volume setting)
•Mute switch
•DAB+/FM radio with three direct favourites buttons on the transmitter
•LED display that shows the radio stations and additional information or source selection
•Remote control for controlling primary features
•Direct audio line-in (headphones in passive mode, connected directly to a smartphone/MP3 player, for example; for mobile use)
•Can also be used as wired headphones
7. Getting started
7.1 Connecting the transmitter
•Connect the power supply unit to a properly installed and easily accessible mains socket and to the DC input socket (17) on the transmitter.
•Connect one of the included audio cables (RCA or optical fibre cable) to the [ANALOG] (14) or [OPTICAL] (12) audio input on the rear of the transmitter and to the corresponding audio output on your playback device (TV or audio source).
•Set the [SELECT] input selector switch (13) to the input you are using (OPTICAL/ANALOG).
•If you want to use the radio signals (DAB+ or FM) on a further device (for example, stereo system or active speakers), you can forward these signals using the DAB OUTPUT (via RCA) (16) or optical fibre cable (15) as illustrated (Fig. 4). You may need additional connection cables for this purpose.
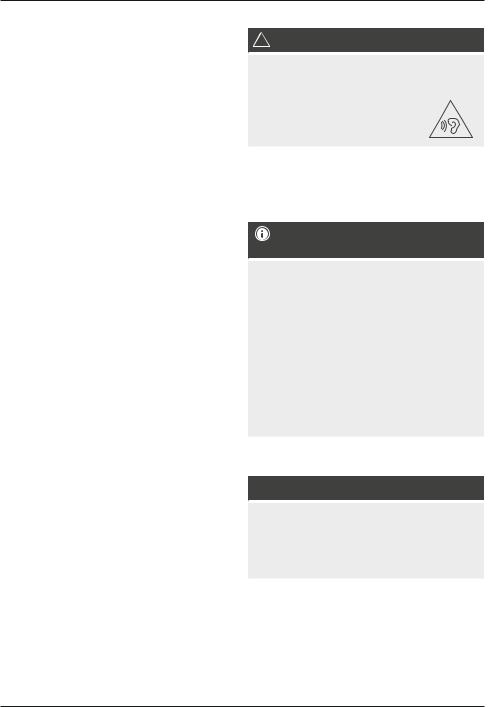
7.2 Inserting the batteries (headphones) (Fig. 5)
Warning
•When inserting the rechargeable batteries, always make sure that the polarity is correct (“+” and “-” markings). Failure to do so could result in the rechargeable batteries leaking or exploding.
•Do not allow batteries/rechargeable batteries to discharge completely.
•Do not tamper with or damage/heat/disassemble the batteries/rechargeable batteries.
•Do not short circuit the batteries/rechargeable batteries and keep them away from uncoated metal objects.
•The batteries and charging station included in the delivery go together and should always be used in combination.
 Note – Batteries
•Switch off your device before changing the batteries.
•When stored over a long period of time, batteries should be charged regularly (at least every three months).
•The batteries may be charged at any time; it is not necessary to discharge them completely before charging.
•Before using the device for the first time, you must insert the supplied batteries into the headphones and fully charge them (takes about 7 hours).
•Open the battery compartment cover by holding the rear side of the right earpiece (21) and carefully turning the right earpad anti-clockwise. (Fig. 5)
•Insert the two AAA batteries (supplied) into the battery compartment, observing correct polarity. Close the battery compartment properly by putting back the earpad and turning it clock-wise until you feel it snap into place. (Fig. 5)
7.3 Charging the headphones
•First switch off the headphones by pressing and holding the Power button (19) for about 2 seconds (Fig. 6). The red LED signal lights up.
•Switch on the transmitter using the POWER button (11) and wait until the display (9) switches to ‘Auxiliary Input’.
•Hang the headphones with the charging contacts (22) on the charging contacts (1) of the transmitter.
4
•Charging begins automatically; the Charge LED CHARGE
(2) on the transmitter turns green as soon as the charging contacts of the transmitter and headphones are connected. The device now switches automatically to standby mode.
•When charging is complete, the green Charge LED (2) goes out.
8.0Operation
8.1Receiving an external audio source
Switching on the transmitter
•Switch on the playback device (TV or audio component) that your transmitter is connected to, and initially set the volume to about 30–40% of the maximum volume to avoid damaging your hearing during setup.
•Press and hold the Power button (11) for one second to switch on the transmitter. The Power status LED (11) begins to light up blue. The INPUT status LED (10) begins to flash blue (Auxiliary Input display).
•The INPUT status LED (10) is constantly lit blue as soon as an audio signal is received.
•If no audio signal is received, the transmitter automatically switches to standby mode after about 5 minutes. The Power status LED (11) is lit red.
•Alternatively, you can later use the Power button (23) on the remote control. Note here that the transmitter must be in standby mode. The Power status LED (11) is lit red.
Switching on the headphones/receiver
 Warning – Volume
•Using this product limits your perception of ambient noise. For this reason, do not operate any vehicles or machines while using this product.
•Always keep the volume at a reasonable level. Loud volumes, even over short periods, can cause hearing loss.
•Switch on the headphones by pressing and holding the Power button (19) for about 2 seconds. The Power status LED (Fig. 6) lights up red, and then changes to green as soon
as there is a signal connection between the transmitter and headphones. If no audio signal is detected, the LED stays red.
 Note on pairing transmitter and receiver
•Should the LED stay red, you will need to pair the transmitter and receiver. To do so, switch the transmitter completely off using the Power button (11) and the Power button (19) of the headphones. No LED is lit on the transmitter or headphones. Now press the Power button (19) on the headphones and keep it pressed until the Power status LED flashes green (about 5 seconds). Press the Power button (11) on the transmitter within the next 15 seconds. An acoustic signal will sound to confirm successful pairing.
•After successful pairing, the playback device (for example, TV) should now be audible through the earpads.
•Adjust the headband and put the headphones on.
•Set the desired volume using the volume control (18) on the headphones.
 Note
Note
To get the best possible playback (and to avoid unwanted noise of the playback device), initially reduce the volume of the headphones (18) and set the volume of the playback device (for example, TV) to about 70–80%. Then adjust the volume (18) on the headphones to suit your needs. This is important for analogue input selection in particular (for example, headphone output of the TV).
•If the charge level of the headphone batteries is low, the Power status LED (Fig. 6) on the headphones will flash red. Five minutes before automatic switch-off, a warning tone will also sound: one tone per minute for four minutes and two tones in the last minute. The headphones then switch off automatically.
 Note
Note
•In the case of interference or poor reception, the headphone sound is muted and the LED is lit red.
•These headphones can also be used as standard wired headphones. For this purpose, connect the headphone output socket of your playback device to the 3.5 mm stereo jack socket on the headphones (20) using an analogue audio cable (package content #31). Please observe the technical specifications for the audio/headphone output in the operating instructions of your playback device; or, if anything is unclear, consult an expert.
•If you place the headphones onto the charging contacts
(1) during operation, the headphones switch off (Power status LED turns red) and the transmitter goes into standby mode (Power status LED (11) is lit red). At the same time, the wireless connection is interrupted and the headphones go into charging mode (CHARGE LED is lit green).
•As soon as an audio signal is detected again (and the headphones are removed from the charging contacts), the transmitter automatically switches back on and the Power status LED (11) is lit blue; the Power status LED on the headphones is lit green (Fig. 6).
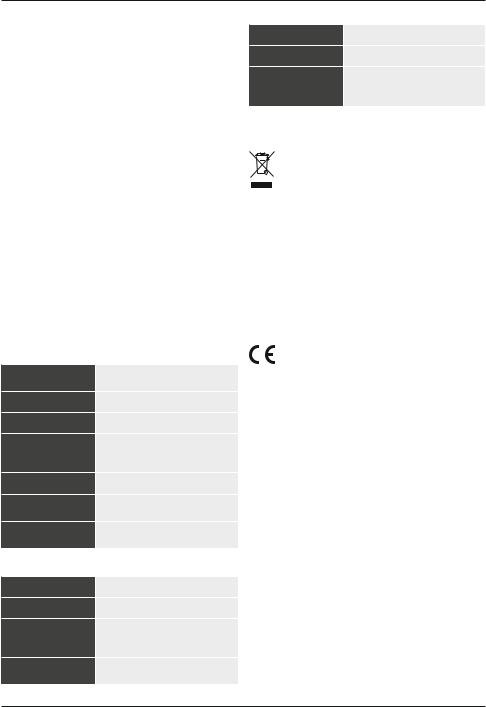
8.2 Receiving and playing DAB+ radio  Note – Optimum reception
This product has a telescopic antenna (Fig. 3) that enables DAB+ and FM reception.
Please note:
• Always pull the antenna out completely.
5

•We recommend you adjust the antenna vertically to ensure optimal reception.
•In many cases, the signal strength varies depending on the installation location. To improve reception, choose an installation location near a window.
•Press the INPUT button on the transmitter (10) until you are in DAB mode (alternatively the INPUT button (24) of the remote control).
•For a f rsti-time installation, an automatic station search takes place; alternatively, press the INFO button (6) to start the automatic station search (Scanning).
•Press and hold TUNE+ (5) or TUNE – (8) to view a list of available stations.
•Press TUNE + (5) or TUNE – (8) to select a station from the station list (alternatively the TUNE + or TUNE - button (24) on the remote control).
•Confirm your selection by pressing the Info button (6) or wait until the station is automatically adjusted.
•To program the quick-selection buttons M1 to M3, press and hold one of the favourites buttons (4) on the station you would like to store as a preset.
•Press the M Set button (7) to view or store your complete favourites list. For this purpose, first select stations you wish to store and press the M SET button (7). Use the TUNE +/- buttons to search for an empty station preset ‘Preset Store (Empty)’. The station is automatically stored in this preset.
•To get additional DAB+ station information, press the INFO button (6) repeatedly (for example, programme information, DAB+ frequency, signal information, transmission quality, time, date, signal strength of the transmitter, etc.).
Note: The signal strength display of the weakest DAB+ station may be helpful in adjusting the rod antenna or positioning the transmitting station.
8.3 Receiving and playing FM radio
•Press the Input button (10) repeatedly until you are in FM mode (alternatively the INPUT button (24) of the remote control).
•Press and hold TUNE + (5) or TUNE- (8) for the automatic station search to stop at the nearest station with a strong reception. Alternatively, you can manually set a transmission frequency by briefly pressing the TUNE + (5) or TUNE - (8) button. This is also possible using the TUNE+/- buttons (24) on the remote control.
•To store the desired stations, you can now store the transmission frequency.
•To program the quick-selection buttons M1 to M3, press and hold one of the favourites buttons (4) on the station you would like to store as a preset.
•Press the M Set button (7) to view or store your complete favourites list. For this purpose, first select stations you wish to store and press the M SET button (7). Use the TUNE +/- buttons to search for an empty station preset ‘Preset Store (Empty)’. The station is automatically stored in this preset. The preset number (for example, P4) is shown in the upperleft area of the LCD display (9).
•To get additional RDS station information, press the INFO button (6) repeatedly (for example, programme information, frequency, STEREO/MONO, time, date, etc.).
8.4 General/system settings
•Press and hold the transmitter’s POWER button (11) for one second to switch on the transmitter.
•Press the INPUT button (10) repeatedly until you are in
AUX-IN mode.
•Press and hold the INFO button (6) for about 2–3 seconds until ‘System’ appears in the LCD menu.
•Press TUNE + (5) or TUNE - (8) to select your setting. Press the INFO button (6) to confirm each of your entries. Use the INPUT button (10) to end your entries/changes.
•The following menu items are available:
Time |
(Date and time settings) |
Confirm your selection by pressing the Info button (6). |
|
Set the following information in the order listed: |
|
Set Time/Date |
|
Auto Update |
|
Set 12/24 hour |
|
Set date format |
|
Factory Reset |
(Resetting to factory settings) |
Select the Factory Reset menu item.
Confirm your selection by pressing the INFO button (6). Press Tune + (5) or Tune – (8) to choose between YES and NO. Confirm your selection by pressing the INFO button (6).
Software Upgrade
Software update only for authorised dealers
SW Version (display of the software version)
Select the SW Version menu item.
Confirm your selection by pressing the INFO button (6). The current software version is displayed.
8.5 Troubleshooting
8.5.1 No sound
•Make sure that the power supply unit is correctly connected to the wall socket and to the transmitter’s power socket.
•Check whether the headphones are on.
•The headphone charge level may be too low, in which case you need to fully charge the batteries.
•Make sure that the desired TV set or audio device is switched on and playing sound.
•The headphone volume may be too low.
•The audio signal may be too low. Increase the volume on your playback device.
•Make sure that the transmitter and receiver (headphones) are paired > Point 8.1.
6
8.5.2 Other sound interference (dropouts or noise)
•Make sure that the headphone volume is suitably set.
•The headphones may be too far from the transmitter.
•The audio signal may be too low. Increase the volume on your playback device.
•Noise: Make sure that the audio signal is not too low (noise floor of the playback device).
9. Care and Maintenance
Only clean this product with a slightly damp, lint-free cloth and do not use aggressive cleaning agents.
10. Warranty Disclaimer
Hama GmbH & Co. KG assumes no liability and provides no warranty for damage resulting from improper installation/ mounting, improper use of the product or from failure to observe the operating instructions and/or safety notes.
11. Service and Support
Please contact Hama Product Consulting if you have any questions about this product.
Hotline: +49 9091 502-115 (German/English) Further support information can be found here: www.hama.com
12. Technical Data
Headphones/transmitter
Operating voltage |
transmitter: 5 V, 550 mA, |
|
headphones: 2.4 V (2 x AAA NiMH) |
||
|
||
Distortion |
< 1% |
|
Signal-to-noise ratio |
80 dB |
|
|
up to 30 metres inside buildings |
|
Range |
(depending on the composition of |
|
|
intervening walls) |
|
Frequency range |
20 Hz – 20 kHz |
|
Max. emitted |
6.82 dBm |
|
transmitting power |
||
|
||
Frequency band/ |
2406 – 2472 MHz |
|
frequency bands |
||
|
||
Digital radio |
|
|
DAB frequency |
174–240 MHz |
|
Presets |
10 |
|
|
Dynamic Label Service (programme- |
|
DLS |
related text information of the radio |
|
|
station) |
|
Supported DAB |
MP2/AAC |
|
formats |
||
|
FM radio
Frequency |
87.5 – 108 MHz |
Presets |
10 |
|
Radio Data System (programme- |
RDS |
related additional information of |
|
the radio station) |
13. Recycling Information
Note on environmental protection:
After the implementation of the European Directive
2012/19/EU and 2006/66/EU in the national legal
system, the following applies: Electric and electronic devices as well as batteries must not be disposed of
with household waste. Consumers are obliged by law to return electrical and electronic devices as well as batteries at the end of their service lives to the public collecting points set up for this purpose or point of sale. Details to this are defined by the national law of the respective country. This symbol on the product, the instruction manual or the package indicates that a product is subject to these regulations. By recycling, reusing the materials or other forms of utilising old devices/Batteries, you are making an important contribution to protecting our environment.
14. Declaration of Conformity
Hereby, Hama GmbH & Co KG declares that the radio equipment type [00131989] is in compliance with Directive 2014/53/EU. The full text of the EU declaration
of conformity is available at the following internet address: www.hama.com -> 00131989 -> Downloads.
7

F Mode d‘emploi
Nous vous remercions d’avoir choisi un produit Thomson. Veuillez prendre le temps de lire l‘ensemble des remarques et
consignes suivantes. Veuillez conserver ce mode d‘emploi à portée de main afin de pouvoir le consulter en cas de besoin. Transmet- tez-le au nouveau propriétaire avec l’appareil le cas échéant.
1.Explication des symboles d‘avertissement et des remarques
Avertissement
Ce symbole est utilisé pour indiquer des consignes de sécurité ou pour attirer votre attention sur des dangers et risques particuliers.
 Remarque
Ce symbole est utilisé pour indiquer des informations supplémentaires ou des remarques importantes.
2. Éléments de commande et d’affichage
2.1 Émetteur / station de charge (fig. 1)
1.Support-chargeur et contacts de charge (avec protection contre l’inversion de polarité)
2.Témoin LED de charge (CHARGE)
3.Support de casque avec antenne DAB+/UKW intégrée
Éléments de commande
4.Touches mémoire radio M1-M3 (UKW ou DAB+)
5.Recherche automatique/manuelle + (TUNE +)
6.Touche pour informations supplémentaires concernant la station de radio (INFO)
7.Consultation de 10 stations en mémoire maxi sur UKW ou DAB+ (M-SET)
8.Recherche automatique/manuelle - (TUNE -)
9.Écran LCD multifonctions
10.Touche de sélection d’entrée pour DAB+, UKW, AUX-IN et LED d’état (INPUT)
11.Touche de mise sous / hors tension et LED d’état (POWER)
Branchements sur la face arrière
12.Entrée audio optique (numérique)
13.Sélecteur d’entrée : optique ou analogique
14.Entrée audio RCA (analogique)
15.Sortie radio DAB+/UKW (numérique)
16.Sortie radio DAB+/UKW (analogique)
17.Prise d’entrée CC (bloc secteur)
2.2 Casque / récepteur radio (fig. 1)
18.Réglage du volume +/-
19.Interrupteur du casque avec LED d’état
20.Entrée audio Line-In directe (analogique, jack stéréo 3,5 mm)
21.Oreillette droite faisant office de couvercle du compartiment à piles (R)
22.Contacts de charge du casque (avec protection contre l’inversion de polarité)
Télécommande (fig. 2)
23.Touche POWER (mise sous / hors tension)
24.Boutons de contrôle de la télécommande :
•Recherche automatique/manuelle + (TUNE +)
•Recherche automatique/manuelle - (TUNE -)
•Mise en sourdine (MUTE)
•Touche de sélection d’entrée pour DAB+, UKW, AUX-IN (INPUT)
Face arrière : Couvercle du compartiment à piles pour 2 piles LR03(AAA (non fournies)
3. Contenu de l’emballage
•Mode d’emploi
•1 casque radio WHP 5407 (émetteur + casque)
25.2 piles LR03/AAA NiMH (exclusivement pour le casque)
26.1 adaptateur audio 3,5 mm / 6,3 mm
27.1 câble fibre optique
28.1 adaptateur audio jack femelle 3,5 mm – connecteur RCA
29.1 câble adaptateur audio jack femelle 3,5 mm – connecteur RCA
30.1 câble de connexion audio RCA – RCA
31.1 câble de connexion audio jack mâle 3,5 mm – jack mâle 3,5 mm
32.1 bloc secteur (pour la station de charge)
4. Consignes de sécurité
•Ne tentez pas d‘ouvrir les piles ou les batteries, faites attention à ce que des petits enfants ne les avalent pas et ne les jetez pas avec les ordures domestiques. Elles sont susceptibles de contenir métaux lourds toxiques et nocifs pour l‘environnement.
•Ne modifiez pas et/ou ne déformez/chauffez/désassemblez pas les batteries/piles.
•Ce produit est destiné à une installation domestique non commerciale.
•Utilisez le produit exclusivement conformément à sa destination.
•Les enfants doivent être surveillés fin de garantir qu‘ils ne jouent pas avec le produit.
•N‘utilisez pas le produit dans les zones dans lesquelles l‘utilisation d‘appareils électroniques est interdite.
•Utilisez l‘appareil exclusivement branché à une prise de courant appropriée. La prise de courant doit être située à proximité du produit et doit être facilement accessible.
•Coupez le produit du secteur à l‘aide de l‘interrupteur - débranchez la prise de courant en cas d‘absence d‘interrupteur.
•Posez tous les câbles de telle sorte qu’ils ne présentent aucun risque de chute.
•Faites attention à ne pas plier ni coincer le câble.
•Protégez le produit des secousses violentes et évitez tout choc ou toute chute.
•Recyclez les matériaux d’emballage conformément aux prescriptions locales en vigueur.
8
•N’apportez aucune modification à l’appareil. Des modifications vous feraient perdre vos droits de garantie.
•N‘utilisez pas le produit lorsque l‘adaptateur, le câble de connexion ou le câble d‘alimentation sont endommagés.
•Ne tentez pas de réparer l’appareil vous-même ni d’effectuer des travaux d’entretien. Déléguez tous travaux d‘entretien à des techniciens qualifiés.
•Ne tentez pas d‘ouvrir le produit en cas de détérioration et cessez de l’utiliser.
•Protégez le produit de toute saleté, humidité, surchauffe et utilisez-le uniquement dans des locaux secs.
•Utilisez le produit uniquement à une température ambiante de 5°C à 40°C.
•Utilisez le produit uniquement dans un environnement dans lequel la technologie radio sans fil 2,4 GHz est autorisée.
Avertissement – stimulateurs cardiaques
•Les courants corporels circulant lors de l‘utilisation de ce produit sont susceptibles d‘influencer le fonctionnement d‘un stimulateur cardiaque.
•Ce produit génère des champs magnétiques. Avant d’utiliser ce produit, toute personne portant un stimulateur cardiaque doit se faire conseiller par un médecin car le fonctionnement du stimulateur cardiaque peut en être affecté.
5.Introduction
Ce casque numérique sans fil 2,4 GHz équipé d’un récepteur DAB+ et UKW fonctionne avec la technologie radio sans fil de dernière génération. Qu’il s’agisse de musique ou de son TV, il vous permet de profiter d’un son pur et cristallin dans toute
votre maison. Branchez simplement l’émetteur à la source audio souhaitée : lecteur DVD, lecteur CD, téléviseur, chaîne Hi-Fi, iPod ou smartphone. Vous pouvez également recevoir directement sur votre casque des stations de radio numérique via les signaux radio standard DAB+ et UKW ou transférer ces signaux radio à une autre source (chaîne stéréo, haut-parleurs actifs, etc.).
6. Caractéristiques des fonctions principales
•Technologie radio sans fil numérique 2,4 GHz
•Choix du canal codé automatique et numérique de la transmission radio
•La mise hors tension automatique arrête la transmission en cas de non-détection du signal (ou en mode de chargement).
•Portée jusqu’à 10-15 mètres (selon les conditions ambiantes), jusqu’à 30 mètres sans obstacle
•Émetteur en tant que support de casque avec protection contre les l’inversion de polarité lors du chargement
•Choix d’entrée et de sortie analogique ou numérique des signaux
•Smart Volume Memory (sauvegarde des volumes précédemment réglés)
•Mise en sourdine
•Radio DAB+/UKW avec trois touches de stations favorites directes pouvant être sauvegardées sur l’émetteur
•Écran LED d’affichage des stations de radio et d’informations supplémentaires ou de la sélection de la source
•Télécommande pour le contrôle des caractéristiques primaires
•Entrée directe audio Line-In (casque passif directement sur un smartphone/MP3 pour utilisation mobile)
•Peut également être utilisé en tant que casque audio filaire
7. Mise en service
7.1 Branchement de l’émetteur
•Branchez le bloc secteur à une prise de courant facile d’accès à la f chei d’entrée CC (17) de l’émetteur.
•Branchez l’un des câbles audio fournis (RCA ou f brei optique) aux entrées audio [ANALOG] (14) ou [OPTICAL] (12) situées au dos de l’émetteur ainsi qu’à la sortie audio correspondante de votre appareil de lecture (source TV ou audio).
•Réglez le sélecteur d’entrée [SELECT] (13) sur l’entrée utilisée (OPTICAL / ANALOG).
•Si vous souhaitez utiliser les signaux radio (DAB+ ou UKW) sur un appareil supplémentaire (chaîne stéréo, haut-parleurs actifs, etc.), vous pouvez transférer ces signaux par le biais de la sortie DAB-OUTPUT via RCA (16) ou câble à f brei optique (15) comme décrit dans le schéma (fig. 4). Vous aurez éventuellement besoin de câbles de raccordement supplémentaires pour cette connexion.
7.2 Insérer les piles rechargeables (casque) (fig. 5)
Avertissement
•Respectez impérativement la polarité des batteries (indications + et -) lors de leur insertion dans le boîtier. Risques d‘écoulement et d‘explosion des batteries si tel n‘est pas le cas.
•Ne déchargez pas totalement les batteries/piles.
•Ne modifiez pas et/ou ne déformez/chauffez/désassemblez pas les batteries/piles.
•Ne court-circuitez pas les batteries/piles et éloignez-les des objets métalliques.
•Les piles rechargeables et la station de charge sont prévues pour fonctionner ensemble et doivent être utilisées exclusivement dans la combinaison livrée.
 Remarque – concernant les piles
•Assurez-vous que votre appareil est bien hors tension avant de remplacer les piles.
•Rechargez régulièrement le produit (au moins une fois par trimestre) en cas de longue période d’entreposage.
•Vous pouvez recharger les piles à tout moment ; une décharge totale n’est pas nécessaire avant de les recharger à nouveau.
•Avant la première utilisation, vous devez insérer les piles fournies dans le casque et les charger entièrement (env. 7 h).
9
•Ouvrez le couvercle du compartiment à piles. Maintenez fermement le dos de l’écouteur droit (21) et tournez doucement le coussinet droit dans le sens inverse des aiguilles d’une montre. (fig. 5)
•Insérez les deux piles AAA/LR03 fournies dans le compartiment à piles en respectant la polarité. Fermez correctement le compartiment à piles en insérant l’oreillette et en la tournant dans le sens des aiguilles d’une montre jusqu’à ce qu’elle s’enclenche de manière audible. (fig. 5)
7.3 Charge du casque audio
•Pour charger le casque, veuillez tout d’abord le mettre sous tension en appuyant sur la touche POWER (19) pendant env. 2 secondes (fig. 6). Le témoin LED rouge s’allume.
•Mettez l’émetteur sous tension à l’aide de la touche POWER (11), puis patientez jusqu’à ce que l’écran (9) passe en mode “Auxilary Input” (entrée auxiliaire).
•Placez les contacts de charge (22) du casque sur les contacts de charge (1) de l’émetteur.
•La charge démarre automatiquement dès que les contacts de charge de l’émetteur et du casque sont connectés et la LED de charge CHARGE (2) de l’émetteur s’allume en vert.. L’appareil passe alors automatiquement en mode veille.
•La LED de charge verte (2) s’éteint une fois la charge terminée.
8.0Fonctionnement
8.1Réception d’une source audio externe
Mise sous tension de l’émetteur
•Mettez l’appareil de lecture (composant TV ou audio) auquel votre émetteur est connecté sous tension. Réglez tout d’abord le volume à env. 30-40 % du volume maximal afin d’éviter tout dommage auditif lors de l’installation.
•Appuyez sur la touche POWER (11) pendant une seconde afin de mettre l’émetteur sous tension. La LED d’état Power (11) s’allume en bleu. La LED d’état INPUT (10) (entrée) se met à clignoter en bleu (affichage Auxilary Input – entrée auxiliaire).
•La LED d’état INPUT (10) (entrée) cesse de clignoter et reste allumée en bleu dès qu’un signal audio est reçu.
•L’émetteur passe automatiquement en mode veille au bout d’env. 5 minutes dans le cas où aucun signal audio n’est reçu. La LED d’état Power (11) s’allume en rouge.
•Vous pouvez également utiliser ultérieurement la touche POWER (23) de la télécommande. Veuillez toutefois noter que, dans ce cas, l’émetteur doit se trouver en mode veille. La LED d’état Power (11) s’allume en rouge.
Mise sous tension du casque / du récepteur
 Avertissement – relatif au volume
•L‘utilisation du produit limite votre perception des bruits ambiants. N‘utilisez donc pas le produit lorsque vous conduisez un véhicule ou faites fonctionner une machine.
•Maintenez en permanence un niveau de volume raisonnable. Un volume excessif - même à courte durée - est susceptible d‘endommager votre ouïe.
•Mettez le casque sous tension en maintenant la touche POWER (19) enfoncée pendant environ 2 secondes. La LED d’état Power (fig. 6) s’allume en rouge, puis passe au vert dès qu’une connexion de signal est établie entre l’émetteur et le casque. La LED continue à briller en rouge dans le cas où aucun signal audio n’est détecté.
Remarque concernant le couplage / la synchronisation entre l’émetteur et le récepteur
•Une LED allumée en rouge en permanence signifie que l’émetteur et le récepteur doivent être synchronisés entre eux. Pour synchroniser les appareils, mettez l’émetteur hors tension à l’aide de la touche POWER (11) ainsi que le casque à l’aide de la touche POWER (19). Aucune LED n’est allumée sur l’émetteur ou le casque. Appuyez alors sur la touche POWER (19) du casque jusqu’à ce que la LED d’état de mise sous tension clignote en vert (env. 5 secondes). Appuyez, dans les 15 secondes, sur la touche POWER (11) de l’émetteur. Un signal acoustique retentit en cas de synchronisation conforme (couplage).
•Vous devriez entendre le son de l’appareil de lecture (téléviseur, etc.) uniquement sur le casque en cas de synchronisation conforme.
•Réglez l’arceau et mettez le casque.
•Réglez le volume souhaité à l’aide du bouton de réglage du volume (18) situé sur le casque.
 Remarque
Afin d’obtenir la meilleure lecture possible, baissez tout d’abord le volume du casque (18) puis réglez le volume de l’appareil de lecture (téléviseur, etc.) à environ 70-80 %. Ajustez ensuite le volume (18) du casque en fonction du volume souhaité. Ce réglage est important en cas d’entrée analogique (sortie casque du téléviseur, etc.).
•La LED Power (fig. 6) du casque clignote en rouge en cas de batterie du casque faible. Un signal sonore supplémentaire retentit cinq minutes avant la mise hors tension automatique : un signal sonore par minute pendant les quatre dernières minutes et deux signaux pendant la dernière minute. Le casque s’éteint ensuite automatiquement.
10

 Remarque
•Le casque se met en sourdine et la LED s’allume en rouge en cas de dysfonctionnement ou de mauvaise réception.
•Ce casque peut également être utilisé en tant que casque filaire traditionnel : vous devez alors connecter la fiche de sortie casque de votre appareil de lecture - avec un câble audio analogique (contenu de l’emballage #31) - à la fiche jack stéréo 3,5mm du casque (20). Respectez à cet effet les indications techniques relatives à la sortie audio / casque mentionnées dans le mode d’emploi de votre appareil de lecture ou demandez de l’aide à un spécialiste en cas de doutes.
•Le casque se met hors tension (la LED d’état Power s’allume en rouge) et l’émetteur passe en mode veille (la LED d’état Power (11) s’allume en rouge) si vous placez le casque sur les contacts de charge (1) pendant son fonctionnement. Simultanément, la connexion radio s’interrompt, le casque passe en mode de charge (CHARGE) et la LED d’état s’allume en vert.
•L’émetteur se réactive automatiquement, la LED d’état Power (11) s’allume en bleu et la LED d’état Power (fig. 6) du casque s’allume en vert dès qu’un signal audio est à nouveau détecté (et dès que le casque ne repose plus sur les contacts de charge).
8.2 Réception et lecture de radio DAB+
 Remarque concernant une réception optimale
Ce produit dispose d’une antenne télescopique (fig. 3) permettant la réception via DAB+ et UKW.
Veuillez noter :
•déployez toujours l’antenne entièrement.
•Nous recommandons de placer l’antenne à la verticale afin de garantir une réception optimale.
•L’intensité du signal varie dans de nombreux cas en fonction de l’emplacement de l’antenne. Un emplacement à proximité d’une fenêtre améliore souvent la réception.
•Appuyez sur la touche INPUT (entrée) de l’émetteur (10) jusqu’à activation du mode DAB - ou sur la touche INPUT (entrée) (24) de la télécommande.
•L’appareil effectue une recherche automatique de stations lors de la première installation. Vous pouvez également appuyer sur la touche INFO (6) afin de lancer une recherche automatique des stations (Scanning).
•Appuyez sur la touche TUNE+ (5) ou TUNE – (8) et maintenez-la enfoncée afin d’afficher une liste des stations disponibles.
•Appuyez sur la touche TUNE + (5) ou TUNE – (8) afin de sélectionner une station de la liste de stations (alternative : appuyez sur la touche TUNE + ou TUNE – (24) de la télécommande).
•Confirmez votre sélection en appuyant sur la touche Info (6) ou attendez jusqu’à ce que la station commute automatiquement.
•Pour affecter les touches de programmation de sélection rapide M1 à M3, maintenez l’une des touches de favoris enfoncée (4) pendant la lecture de la station que vous souhaitez affecter à cette touche.
•Appuyez sur la touche M SET (7) afin d’afficher ou sauvegarder votre liste entière de favoris. Sélectionnez au préalable les stations à enregistrer, puis appuyez sur la touche M SET (7). Recherchez un emplacement de sauvegarde vide à l’aide des touches TUNE +/- : “Preset Store (Empty)” (emplacement de préréglage (vide)). La station sera automatiquement sauvegardée à cet emplacement.
•Appuyez plusieurs fois sur la touche INFO (6) pour obtenir des informations supplémentaires DAB+ relatives à la station (informations de programme, fréquence DAB+, infos de signal, qualité de transmission, heure, date, intensité du signal de l’émetteur, etc.).
Remarque : l’affichage de l’intensité du signal d’un émetteur DAB+ faible peut être utile pour le positionnement de l’antenne courte ou pour le positionnement de la station émettrice.
8.3 Réception et lecture de radio UKW
•Appuyez plusieurs fois sur la touche INPUT (entrée) (10) jusqu’à activation du mode FM (réception UKW) - ou sur la touche INPUT (entrée) (24) de la télécommande.
•Appuyez sur la touche TUNE + (5) ou TUNE – (8) et main- tenez-la enfoncée pour que le balayage automatique détecte la prochaine station bénéficiant d’une bonne réception. Voua pouvez également régler manuellement une fréquence d’émission connue en appuyant brièvement les touches TUNE + (5) ou TUNE – (8). Ce réglage est également possible avec la touche TUNE+/- (24) de la télécommande.
•Vous pouvez alors sauvegarder la fréquence d’émission afin de sauvegarder la station souhaitée.
•Pour affecter les touches de programmation de sélection rapide M1 à M3, maintenez l’une des touches de favoris enfoncée (4) pendant la lecture de la station que vous souhaitez affecter à cette touche.
•Appuyez sur la touche M SET (7) afin d’afficher ou sauvegarder votre liste entière de favoris. Sélectionnez au préalable les stations que vous désirez sauvegarder, puis appuyez sur la touche M SET (7). Recherchez un emplacement de sauvegarde vide à l’aide des touches TUNE +/- : “Preset Store (Empty)” (emplacement de préréglage (vide)). La station sera automatiquement sauvegardée à cet emplacement. Le numéro de l’emplacement apparaît alors en haut à gauche de l’écran LCD (9) (P4, par exemple).
•Appuyez plusieurs fois sur la touche INFO (6) afin d’obtenir des informations RDS supplémentaires relatives à la station (informations de programme, fréquence, stéréo/mono, heure, date, etc.).
8.4 Paramètres généraux et paramètres système
•Appuyez sur la touche POWER (11) de l’émetteur pendant une seconde afin de le mettre sous tension.
•Appuyez plusieurs fois sur la touche INPUT (entrée) (10) jusqu’à affichage du mode AUX-IN.
•Appuyez sur la touche INFO (6) te maintenez-la enfoncée pendant env. 2-3 secondes jusqu’à ce que “System” apparaisse dans le menu LCD.
11

•Appuyez sur la touche TUNE + (5) ou TUNE – (8) afin de sélectionner votre réglage. Confirmez votre saisie à l’aide de la touche INFO (6). Terminez vos saisies / modifications en appuyant sur la touche INPUT (10).
•Les options de menu suivantes sont disponibles :
Heure (réglages de la date et de l’heure)
Confirmez votre sélection en appuyant sur la touche Info (6). Vous pouvez régler successivement les informations suivantes : Set Time/Date (réglage heure / date)
Auto Update (mise à jour automatique)
Set 12/24 hour (format horaire 12 ou 24 heures) Set date format (format d’affichage de la date)
Factory Reset (restauration des réglages d’usine)
Sélectionnez l’option de menu Factory Reset.
Confirmez votre sélection en appuyant sur la touche INFO (6). Appuyez sur la touche Tune + (5) ou Tune – (8) pour choisir entre YES (oui) et NO (non).
Confirmez votre sélection en appuyant sur la touche INFO (6).
Mise à jour du logiciel
Mise à jour du logiciel uniquement pour le commerce spécialisé habilité
Version SW (affichage de la version du logiciel)
Sélectionnez l’option de menu Version SW.
Confirmez votre sélection en appuyant sur la touche INFO (6). La version actuelle du logiciel s’affiche à l’écran.
8.5 Recherche des pannes
8.5.1 Aucun son
•Assurez-vous que le bloc secteur est correctement raccordé à la prise murale et à la f chei d’alimentation de l’émetteur.
•Vérifiez que le casque est bien sous tension.
•Le casque n’est peut-être pas assez chargé : dans ce cas, rechargez entièrement les batteries.
•Assurez-vous que le téléviseur ou l’appareil audio que vous souhaitez utiliser est bien sous tension et en mode de et transmission.
•Le volume du casque est peut-être trop faible.
•Le signal audio est éventuellement trop faible. Augmentez le volume sur votre appareil de lecture.
•Assurez-vous que l’émetteur et le récepteur (casque audio) sont bien synchronisés entre eux (couplage) : cf. point 8.1.
8.5.2 Autres dysfonctionnements du son (interruption ou bruit indésirable)
•Assurez-vous que le volume du casque est bien réglé.
•Le casque est peut-être trop éloigné de l’émetteur.
•Le signal audio est éventuellement trop faible. Augmentez le volume sur votre appareil de lecture.
•Bruits indésirables : assurez-vous que le signal audio n’est pas trop faible (bruit de fond de votre appareil de lecture).
9. Soins et entretien
Nettoyez la balance uniquement à l’aide d’un chiffon non fibreux légèrement humide ; évitez tout détergent agressif.
10. Exclusion de garantie
La société Hama GmbH & Co. KG décline toute responsabilité en cas de dommages provoqués par une installation, un montage ou une utilisation non conformes du produit ou encore provoqués par un non respect des consignes du mode d‘emploi et/ou des consignes de sécurité.
1^1. Service et assistance
En cas de question concernant le produit, veuillez vous adresser au service de conseil produits de Hama.
Ligne téléphonique directe : +49 9091 502-115 (allemand/ anglais)
Vous trouverez ici de plus amples informations concernant l‘assistance : www.hama.com
12. Caractéristiques techniques
Casque audio / émetteur
|
émetteur 5 V, 550 mA, casque |
|
Tension de service |
audio : 2,4 V (2 batteries LR03/ |
|
|
AAA NiMH) |
|
Distorsion |
< 1% |
|
Rapport bruit |
80 dB |
|
Portée |
30 mètres maxi à l’intérieur (selon |
|
la composition des murs) |
||
|
||
Plage de fréquence |
20 Hz – 20 kHz |
|
Puissance d’émis- |
6.82 dBm |
|
sion maxi émise |
||
|
||
Gamme(s) de |
2406 – 2472 MHz |
|
fréquences |
||
|
||
Radio numérique |
|
|
Fréquence DAB |
174–240 MHz |
|
Nombre de stations |
10 |
|
en mémoire |
||
|
||
|
Dynamic Label Service (texte |
|
DLS |
informatif relatif au programme de |
|
|
la station de radio) |
|
Formats DAB pris en |
MP2/AAC |
|
charge |
||
|
12

Radio UKW (FM)
Fréquence |
87,5 – 108 MHz |
|
Nombre de stations |
10 |
|
en mémoire |
||
|
||
|
Radio Data System (informations |
|
RDS |
supplémentaires relatives au |
|
|
programme de la station de radio) |
13. Consignes de recyclage
Remarques concernant la protection de l’environnement:
Conformément à la directive européenne 2012/19/EU
et 2006/66/CE, et afin d‘atteindre un certain nombre
d‘objectifs en matière de protection de l‘environnement, les règles suivantes doivent être
appliquées: Les appareils électriques et électroniques ainsi que les batteries ne doivent pas être éliminés avec les déchets ménagers. Le pictogramme “picto” présent sur le produit, son manuel d‘utilisation ou son emballage indique que le produit est soumis à cette réglementation. Le consommateur doit retourner le produit/la batterie usager aux points de collecte prévus à cet effet. Il peut aussi le remettre à un revendeur. En permettant enfin le recyclage des produits ainsi que les batteries, le consommateur contribuera à la protection de notre environnement. C‘est un acte écologique.
15. Déclaration de conformité
Le soussigné, Hama GmbH & Co KG, déclare que l‘équipement radioélectrique du type [00131989] est conforme à la directive 2014/53/UE. Le texte complet
de la déclaration UE de conformité est disponible à l‘adresse internet suivante:
www.hama.com -> 00131989 -> Downloads.
13

DBedienungsanleitung
Vielen Dank, dass Sie sich für ein Thomson Produkt entschieden haben!
Nehmen Sie sich Zeit und lesen Sie die folgenden Anweisungen und Hinweise zunächst ganz durch. Bewahren Sie diese Bedienungsanleitung anschließend an einem sicheren Ort auf, um bei Bedarf darin nachschlagen zu können. Sollten Sie das Gerät veräußern, geben Sie diese Bedienungsanleitung an den neuen Eigentümer weiter.
1. Erklärung von Warnsymbolen und Hinweisen
Warnung
Wird verwendet, um Sicherheitshinweise zu kennzeichnen oder um Aufmerksamkeit auf besondere Gefahren und Risiken zu lenken.
 Hinweis
Wird verwendet, um zusätzlich Informationen oder wichtige Hinweise zu kennzeichnen.
2. Bedienungselemente und Anzeigen
2.1 Sender/Ladestation (Pic. 1)
1.Ladeaufnahme und Ladekontakte (verpolsicher)
2.Ladeanzeige-LED (CHARGE)
3.Kopfhörerhalter mit integrierter DAB+/UKW-Antenne
Bedienelemente
4.Speichertasten Radio M1-M3 (UKW oder DAB+)
5.Automatischer/manueller Suchlauf + (TUNE +)
6.Taste für Zusatzinformationen zum Radiosender (INFO)
7.Abruf von max. 10 Senderspeicher auf UKW oder DAB+ (M-SET)
8.Automatischer/manueller Suchlauf - (TUNE -)
9.Multifunktions-LCD-Display
10.Eingangswahltaste für DAB+, UKW, AUX-IN und Status LED (INPUT)
11.Ein-/Ausschalttaste und Status LED (POWER)
Rückseitige Anschlüsse
12.Audio-Eingang Optisch (Digital)
13.Eingangswahlschalter: Optisch oder Analog
14.Audio-Eingang Cinch (Analog)
15.DAB+/UKW Radio Ausgang (Digital)
16.DAB+/UKW Radio Ausgang (Analog)
17.DC-Eingangsbuchse (Netzteil)
2.2 Kopfhörer/Funkempfänger (Pic. 1)
18.Lautstärkeregler +/-
19.Ein-/Ausschalter Kopfhörer mit Status LED
20.Direkter Audio-Line-In (Analog 3,5mm Stereoklinke)
21.Ohrmuschel Rechts als Batteriefachabdeckung (R)
22.Ladekontakte Kopfhörer (verpolsicher)
Fernbedienung (Pic.2)
23.Power-Taste (Ein-/Ausschalter)
24.Steuerknöpfe Fernbedienung:
•Automatischer/manueller Suchlauf + (TUNE +)
•Automatischer/manueller Suchlauf - (TUNE -)
•Stummschalten (MUTE)
•Eingangswahltaste für DAB+, UKW, AUX-IN (INPUT)
Rückseitig: Batteriefachdeckel für 2x AAA/ LR03 Batterien (nicht im Lieferumfang enthalten)
3. Verpackungsinhalt
•diese Bedienungsanleitung
•1 Funkkopfhörer WHP 5407 (Sender + Kopfhörer)
25.2 x AAA NiMH Akkus (ausschließlich für den Kopfhörer)
26.1 Audio Adapter 3,5mm/6,3mm
27.1 optisches Lichtleiterkabel
28.1 Audio-Adapter 3,5mm-Klinken-Kupplung – Cinch-Stecker
29.1 Audio-Adapterkabel 3,5mm-Klinken-Stecker – Cinch-Stecker
30.1 Audio-Verbindungskabel Cinch-Stecker – Cinch-Stecker
31.1 Audio-Verbindungskabel 3,5mm-Klinken-Stecker – 3,5mm-Klinken-Stecker
32.1 Netzteil (für die Ladestation)
4. Sicherheitshinweise
•Akkus und Batterien nie öffnen, beschädigen, verschlucken oder in die Umwelt gelangen lassen. Sie können giftige und umweltschädliche Schwermetalle enthalten.
•Verändern und/oder deformieren/erhitzen/zerlegen Sie Akkus/ Batterien nicht.
•Das Produkt ist für den privaten, nicht-gewerblichen Haushaltsgebrauch vorgesehen.
•Verwenden Sie das Produkt ausschließlich für den dazu vorgesehenen Zweck.
•Kinder sollten beaufsichtigt werden, um sicher zu stellen, dass sie nicht mit dem Produkt spielen.
•Benutzen Sie das Produkt nicht in Bereichen, in denen elektronische Geräte nicht erlaubt sind.
•Betreiben Sie das Produkt nur an einer dafür zugelassenen Steckdose. Die Netzsteckdose muss in der Nähe des Produktes angebracht und leicht zugänglich sein.
•Trennen Sie das Produkt mittels des Ein-/Ausschalters vom Netz – wenn dieser nicht vorhanden ist, ziehen Sie die Netzleitung aus der Steckdose.
•Verlegen Sie alle Kabel so, dass sie keine Stolpergefahr darstellen.
•Knicken und quetschen Sie das Kabel nicht.
•Lassen Sie das Produkt nicht fallen und setzen Sie es keinen heftigen Erschütterungen aus.
•Entsorgen Sie das Verpackungsmaterial sofort gemäß den örtlich gültigen Entsorgungsvorschriften.
•Nehmen Sie keine Veränderungen am Produkt vor. Dadurch verlieren sie jegliche Gewährleistungsansprüche.
•Verwenden Sie das Produkt nicht, wenn das Netzteil oder die Netzleitung beschädigt sind
•Versuchen Sie nicht, das Gerät selbst zu warten oder zu reparieren. Überlassen Sie jegliche Wartungsarbeit dem zuständigen Fachpersonal
14

•Öffnen Sie das Produkt nicht und betreiben Sie es bei Beschädigungen nicht weiter.
•Schützen Sie das Produkt vor Schmutz, Feuchtigkeit und Überhitzung und verwenden Sie es nur in trockenen Räumen.
•Betreiben Sie das Produkt nur bei einer Umgebungstemperatur von 5°C bis 40°C.
•Benutzen Sie das Produkt ausschließlich in Umgebungen, in denen die drahtlose 2,4 GHz-Funktechnologie gestattet ist.
Warnung - Herzschrittmacher
•Die bei der Nutzung dieses Produktes fließenden Körperströme können die Funktion eines Herzschrittmachers beeinträchtigen.
•Das Produkt erzeugt magnetische Felder. Personen mit Herzschrittmacher sollten vor Benutzung dieses Produktes einen Arzt zu Rate ziehen, da die Funktion des Herzschrittmachers beeinträchtigt werden könnte.
5.Einführung
Dieser 2,4 GHz Digital Wireless Kopfhörer mit DAB+ und UKW Empfänger arbeitet mit der neuesten Funktechnik und ermöglicht es Ihnen reinen, kristallklaren Musikoder
TV-Sound im ganzen Haus zu genießen. Hierzu verbinden Sie den Sender ganz einfach mit der gewünschten Audio-Quelle. DVD-Player, CD-Player, TV Gerät, Fernseher, HiFi-Anlage, iPod oder Smartphone. Weiterhin haben Sie die Möglichkeit digitale Radioprogramme über DAB+ Standard und UKW Radiosignale an dem Kopfhörer direkt zu empfangen bzw. diese Radiosignale an eine weitere Quelle zu übertragen (z.B. Stereoanlage oder aktive Lautsprecher).
6. Hauptfunktionsmerkmale
•2.4 GHz Digital Funktechnologie
•Automatische und digital codierte Kanalwahl der Funkübertragung
•Abschaltautomatik beendet die Übertragung, wenn kein Signal übermittelt wird (bzw. im Lademodus).
•Reichweite bis zu 10-15 m (je nach Umgebungsbedingungen), bis zu 30 m bei freier Sicht
•Sender als Kopfhörerständer mit Schutz gegen Verpolung beim Laden
•Analoge oder digitale Eingangs-und Ausgangswahl der Signale
•Smart Volume Memory (Speicherung der zuletzt eingestellten Lautstärke)
•Stummschaltung
•DAB+/UKW Radio mit drei direkten Favoritentasten am Sender speicherbar
•LED-Display für Anzeige der Radiosender und zusätzlicher Informationen bzw. Quellwahl
•Fernbedienung zu Steuerung von primären Eigenschaften
•Direkter Audio-Line-In (Kopfhörer passiv direkt an z.B. Smartphone/MP3 für mobile Nutzung)
•Auch als kabelgebundener Kopfhörer benutzbar
7. Inbetriebnahme
7.1 Sender anschließen
•Verbinden Sie das Netzteil mit einer ordnungsgemäß installierten und leicht zugänglichen Steckdose und der DCEingangsbuchse (17) des Senders.
•Verbinden Sie eines der beiliegenden Audiokabel (Cinch oder Optisches Lichtleiterkabel) mit den Audio-Eingängen
[ANALOG] (14) oder [OPTICAL] (12) auf der Rückseite des Senders und dem entsprechenden Audio-Ausgang an Ihrem Wiedergabegerät (TVoder Audioquelle).
•Stellen Sie den Eingangswahlschalter [SELECT] (13) auf den verwendeten Eingang (OPTICAL / ANALOG) ein.
•Wenn Sie die Radiosignale (DAB+ oder UKW) an ein weiteres Gerät nutzen wollen (z.B. Stereoanlage oder Aktive Lautsprecher) so haben Sie die Möglichkeit über den DAB-OUTPUT per Cinch (16) oder optischen Lichtleiterkabel (15) diese Signale weiter zu führen wie in Schema beschrieben (Pic. 4). Gegebenenfalls benötigen Sie hierzu noch weitere Anschlusskabel.
7.2 Akkus einlegen (Kopfhörer) (Pic. 5)
Warnung
•Beachten Sie unbedingt die korrekte Polarität (Beschriftung + und -) der Akkus und legen Sie diese entsprechend ein. Bei Nichtbeachtung besteht die Gefahr des Auslaufens oder einer Explosion der Akkus.
•Tiefentladen Sie Akkus/Batterien nicht.
•Verändern und/oder deformieren/erhitzen/zerlegen Sie Akkus/Batterien nicht.
•Schließen Sie Akkus/Batterien nicht kurz und halten Sie sie von blanken Metallgegenständen fern.
•Akkus und Ladestation sind aufeinander abgestimmt und dürfen nur in der ausgelieferten Kombination verwendet werden.
 Hinweis – Akkus
•Achten Sie darauf, dass Ihr Gerät beim Akku-/Batterie- wechsel ausgeschaltet ist.
•Laden Sie bei längerer Lagerung regelmäßig (mind. vierteljährig) nach.
•Akkus können jederzeit nachgeladen werden, eine vollständige Entladung vor dem Laden ist nicht notwendig.
•Vor der ersten Anwendung müssen Sie die mitgelieferten Akkus in den Kopfhörer einlegen und vollständig aufladen (ca. 7 h).
•Öffnen Sie die Batteriefachabdeckung. Dazu halten Sie Rückseite der rechten Hörmuschel (21) fest und drehen Sie das rechte Ohrpolster vorsichtig gegen den Uhrzeigersinn ab. (Pic. 5)
•Legen Sie die mitgelieferten zwei AAA-Akkus polrichtig in das Batteriefach ein. Schließen Sie das Batteriefach ordnungsgemäß durch Einsetzen und Drehen der Ohrmuschel im Uhrzeigersinn, bis diese spürbar einrastet. (Pic. 5)
15
 Loading...