


US
FR
ES
Instruction manual
Mode d'emploi
Manual de instrucciones
SCPH-70001
Before using this product, carefully read this manual and retain it for future reference.
Avant d'utiliser ce produit, lisez attentivement ce mode d'emploi et conservez-le pour pouvoir vous y reporter ulterieurement.
Antes de utilizar este producto, lea detenidamente este manual y consérvelo para consultarlo en el futuro.
2-599-984-11(1)

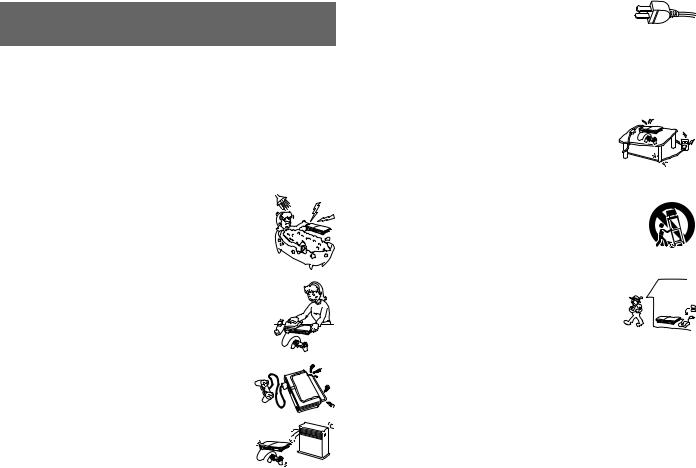
WARNINGS
The use of optical instruments with this product will increase eye hazard.
To prevent fire or shock hazard, do not expose the unit to rain or moisture.
To prevent fire or shock hazard, do not place a container filled with liquids on top of the console.
To avoid electrical shock, do not disassemble.
Refer servicing to qualified personnel only.
Caution
This graphical symbol with supplemental marking is located on the bottom surface of the PlayStation®2 console (when it is in a vertical position).
This symbol is intended to alert the user to the presence of uninsulated "dangerous voltage" within the product's enclosure that may be of sufficient magnitude to constitute a risk of electric shock to persons.
This symbol is intended to alert the user to the presence of important operating and maintenance (servicing) instructions in the literature accompanying the console.
This appliance is classified as a CLASS 1 LASER product.
Before operating your PlayStation®2 console
A very small percentage of individuals may experience epileptic seizures when exposed to certain light patterns or flashing lights. Exposure to certain patterns or backgrounds on a television screen or while playing video games, including games played on the PlayStation®2 console, may trigger an epileptic seizure in these individuals. Certain conditions may trigger previously undetected epileptic symptoms even in persons who have no history of prior seizures or epilepsy. If you, or anyone in your family, has an epileptic condition, consult your physician prior to playing. If you experience any of the following symptoms while playing a video game - dizziness, altered vision, eye or muscle twitches, loss of awareness, disorientation, any involuntary movement, or convulsions - IMMEDIATELY discontinue use and consult your physician before resuming play.
2 WARNINGS

Information
For customers in the USA
This equipment has been tested and found to comply with the limits for a Class B digital device, pursuant to Part 15 of the FCC rules. These limits are designed to provide reasonable protection against harmful interference in a residential installation. This equipment generates, uses, and can radiate radio frequency energy and, if not installed and used in accordance with the instructions, may cause harmful interference to radio communications. However, there is no guarantee that interference will not occur in a particular installation. If this equipment does cause harmful interference to radio or television reception, which can be determined by turning the equipment off and on, the user is encouraged to try to correct the interference by one or more of the following measures:
–Reorient or relocate the receiving antenna.
–Increase the separation between the equipment and receiver.
–Connect the equipment into an outlet on a circuit different from that to which the receiver is connected.
–Consult the dealer or an experienced radio/TV technician for help.
If you have questions about this product, call our technical support line at 1-800-345-7669, or write to:
Sony Computer Entertainment America
Consumer Services/Technical Support
PO Box 5888, San Mateo, CA 94402-0888 U.S.A.
|
Declaration of Conformity |
Trade Name : |
SONY |
Model No. : |
SCPH-70001 |
Responsible Party : Sony Electronics Inc. |
|
Address : |
16450 W. Bernardo Dr. San Diego, CA 92127 U.S.A. |
Telephone No. : |
858-942-2230 |
This device complies with Part 15 of the FCC Rules. Operation is subject to the following two conditions: (1) this device may not cause harmful interference, and (2) this device must accept any interference received, including interference that may cause undesired operation.
You are cautioned that any changes or modifications not expressly approved in this manual could void your authority to operate this equipment.
Owner's record
The model and serial numbers of the PlayStation®2 console are located on the bottom of the console (when placed in the horizontal position). Record the serial number in the space provided below. Refer to the number whenever you call for technical assistance at 1-800-345-7669.
Model No. |
|
|
SCPH-70001 |
|
|
Serial No. |
|
|
US |
||
PlayStation®2 console __________________________ |
||
Some PlayStation® format software titles may perform differently on the |
|
|
PlayStation®2 console than they do on the PlayStation® console, or may not perform |
|
|
properly on the PlayStation®2 console. For more information, visit our Web site at |
|
|
http://www.us.playstation.com or call SCEA Consumer Services at 1-800-345-7669. |
|
WARNINGS 3
Important safety instructions
For your protection, please read these safety instructions completely before operating the PlayStation®2 console, and keep this manual for future reference.
1)Read these instructions.
2)Keep these instructions.
3)Heed all warnings.
4)Follow all instructions.
5) Do not use this apparatus near water.
6) Clean only with dry cloth.
7) Do not block any ventilation openings. Install in accordance with the manufacturer's instructions.
8) Do not install near any heat sources such as radiators, heat registers, stoves, or other apparatus (including amplifiers) that produce heat.
9) Do not defeat the safety purpose of the polarized or grounding-type plug. A polarized plug has two blades with one wider than the other. A grounding type plug has two blades and a third grounding prong. The wide blade or the third prong are provided for your safety. If the provided plug does not fit into your outlet, consult an electrician for replacement of the obsolete outlet.
10) Protect the power cord from being walked on or pinched particularly at plugs, convenience receptacles, and the point where they exit from the apparatus.
11)Only use attachments/accessories specified by the manufacturer.
12)Use only with the cart, stand, tripod, bracket, or
table specified by the manufacturer, or sold with the apparatus. When a cart is used, use caution when moving the cart/apparatus combination to avoid injury from tip-over.
13) Unplug this apparatus during lightning storms or when unused for long periods of time.
14)Refer all servicing to qualified service personnel. Servicing is required when the apparatus has been damaged in any way, such as powersupply cord or plug is damaged, liquid has been spilled or objects have fallen into the apparatus, the apparatus has been exposed to rain or moisture, does not operate normally, or has been dropped.
4 Important safety instructions

Table of contents |
|
WARNINGS .................................................................................. |
2 |
Important safety instructions.......................................................... |
4 |
Precautions..................................................................................... |
6 |
Preparation |
|
Getting started................................................................................ |
9 |
Part names.................................................................................... |
10 |
Connecting to a TV...................................................................... |
11 |
Connecting digital audio equipment ............................................ |
13 |
Connecting the controller............................................................. |
13 |
Connecting the AC adaptor and AC power cord ......................... |
14 |
Turning the console on and off .................................................... |
15 |
Games |
|
Playing a game............................................................................. |
16 |
Using memory cards .................................................................... |
19 |
Audio CDs |
|
Playing an audio CD .................................................................... |
21 |
DVDs |
|
Watching a DVD.......................................................................... |
23 |
Using the playback modes ........................................................... |
27 |
Adjusting DVD player settings.................................................... |
29 |
Main menu |
|
Displaying the main menu............................................................ |
36 |
Using the Browser screen............................................................. |
36 |
Using the System Configuration menu......................................... |
37 |
Using the Version Information screen.......................................... |
40 |
Networking |
|
|
US |
Networking ................................................................................... |
43 |
Additional information |
|
Compatible software..................................................................... |
46 |
Accessories ................................................................................... |
47 |
LIMITED WARRANTY.............................................................. |
48 |
Specifications ............................................................................... |
49 |
Troubleshooting............................................................................ |
50 |
Table of contents |
5 |

Precautions
Safety
This product has been designed with the highest concern for safety. However, any electrical device, if used improperly, has the potential for causing fire, electrical shock or personal injury. To help ensure accident-free operation, follow these guidelines:
•Observe all warnings, precautions and instructions.
•Stop use and unplug the AC power cord from the electrical outlet immediately if the device functions in an abnormal manner or produces unusual sounds or smells.
•Never connect cables of types other than those specified in this manual to the network connector.
•Call SCEA Consumer Services at 1-800-345-7669 if the device does not operate properly.
Use and handling
•When operating the unit, play in a well-lit room and keep a safe distance from the TV screen.
•Avoid prolonged use of the console. To help prevent eye strain, take a break of about 15 minutes during every hour of play.
•Do not throw or drop the console or accessories, or expose them to strong physical shock.
•Do not place the console or accessories on surfaces that are unstable, tilted or subject to vibration.
•Do not expose the console or accessories to high temperatures, high humidity or direct sunlight (use in an environment where temperatures range from 5°C to 35°C/ 41°F to 95°F).
•Do not place the console or accessories in locations subject to sudden temperature change (for example, changes of 10°C/18°F per hour or more).
•Do not leave the console or accessories in a car with its windows closed (particularly in summer).
•Do not expose the console to dust, smoke or steam.
•Do not allow liquid or small particles to get into the console.
•Do not put any objects on the console.
•Do not touch or insert foreign objects into the connectors of the console or accessories.
6 Precautions
•Do not place the console close to magnetic fields produced by magnets or loudspeakers.
•Do not set the console other than in the vertical or horizontal position. When placing in the vertical position, use the vertical stand (for PlayStation®2) (sold separately) that is compatible with this console. Also, do not change the position while the console is turned on.
•Do not place any rubber or vinyl materials on the console exterior for an extended period of time.
AC adaptor and AC power cord use
•Do not touch the plug of the AC power cord with wet hands.
•Do not touch the console or connected accessories during an electrical storm.
•Do not touch the console or AC adaptor for extended periods of time while the console is turned on as extended contact may cause low-temperature burns.
•To help ensure safe operation, regularly inspect the AC adaptor and AC power cord. If damaged, stop use immediately and call SCEA Consumer Services at 1-800-345-7669 for assistance.
•Do not use a power cord other than the supplied AC adaptor and AC power cord.
•Check that there is no dust or lint on the power plug before inserting into an electrical outlet. If the plug becomes dirty, wipe it off with a dry cloth before connecting.
•Do not allow dust or foreign matter to build up around the ~AC IN connector. Before connecting or plugging in the AC power cord, check that there is no dust or foreign matter in or on the power plug or connecting end of the cord, the socket of the wall outlet or the ~AC IN connector on the console rear. Dust or other matter on the connectors can result in fire or electrical shock.
•Unplug the AC power cord from the electrical outlet before cleaning or moving the console, or when you do not intend to use the console for an extended period of time. When disconnecting, grasp the power cord by the plug and pull straight out of the electrical socket. Never pull by the cord and do not pull out at an angle.
•Do not connect the AC power cord to a voltage transformer or inverter.
Notes on safety when using the analog controller (DUALSHOCK®2)*
•Stop using the console immediately if you begin to feel tired or if you experience discomfort or pain in your hands or arms while operating the analog controller (DUALSHOCK®2). If the condition persists, consult a doctor.
•The analog controller (DUALSHOCK®2) is intended for use with the hands only. Do not bring it into contact with your head, face or the bones of any other part of the body.
•The vibration function of the analog controller (DUALSHOCK®2) can aggravate injuries. Do not use the vibration function if you have any ailment or injury to the bones, joints or muscles of your hands or arms. Note that some PlayStation®2 and PlayStation® format software titles set the vibration function to "On" by default. In most cases, the vibration function can be set to "Off" in the options menu of the software. If you have an ailment or an injury, do not play such titles using the analog controller (DUALSHOCK®2) unless you have set the vibration function to "Off".
•Avoid prolonged use of the analog controller (DUALSHOCK®2). Take a break at about 30-minute intervals.
* These notes also apply to the analog controller (DUALSHOCK®).
Network (except Local Area Networks)
•A broadband Internet connection is required to connect to a network.
•When you connect your PlayStation®2 console to a network, the Internet service provider may charge additional usage fees. In some cases, usage charges may be more than anticipated. For details, refer to the information provided in your service contract or contact your Internet service provider.
Do not connect network cables or telephone cords of the following types to the network connector:
•Network cables not appropriate for use with a 10Base-T/100Base-TX network
•Standard residential telephone lines
•Any ISDN (digital) compatible phone or data line
•PBX phone lines
•Other "unknown" types of telephone lines
Disc handling
•Do not touch the disc surface when handling a disc; hold it by the edges.
•Do not stick paper or tape onto discs and do not write on discs.
•Fingerprints, dust, dirt or scratches on the disc can distort the picture or reduce sound quality. Always handle carefully and make sure discs are clean before use.
•Do not leave discs near a heat source, in direct sunlight or in high humidity.
•Store discs in their cases when not in use.
•Clean discs using a soft cloth, lightly wiping from the center outwards.
Do not use solvents such as benzine, commercially available cleaners not intended |
US |
|
for CDs or anti-static spray intended for vinyl LPs. |
||
|
•Do not use irregularly shaped discs (for example, heartor star-shaped discs) or damaged, re-shaped or repaired discs.
Do not move the console with a disc inserted
Do not move or change the position of the console with a disc inserted. The vibration may result in scratching of the disc or the console.
Never disassemble the console or supplied accessories
Use the PlayStation®2 console and accessories according to the instructions in this manual. No authorization for the analysis or modification of the console, or the analysis and use of its circuit configurations, is provided. There are no userserviceable components inside the PlayStation®2 console. Disassembling the console will void the warranty. Additionally, there is a risk of exposure to laser radiation as well as to electrical shock hazards.
When connecting the console to a plasma or projection* TV
Do not leave a still image on the TV screen for an extended period of time, as this may leave a faint image permanently on the screen.
* Except LCD screen types.
Moisture condensation
If the console or disc is brought directly from a cold location to a warm one, moisture may condense on the lens inside the console or on the disc. Should this occur, the console may not operate properly. In this case, remove the disc and turn off and unplug the console. Do not put the disc back in until the moisture evaporates (this may take several hours). If the console still does not operate properly, call SCEA Consumer Services at 1-800-345-7669 for assistance.
Precautions 7

Cleaning
•For safety reasons, before cleaning the console or connected accessories, 1) turn off the console, 2) disconnect the power plug for the console from the electrical outlet, and 3) disconnect the network cable from the console.
•If the exterior of the console becomes dirty, soak a soft cloth in a mild detergent solution diluted with water, tightly squeeze the cloth to remove the excess liquid, wipe the affected area of the exterior, and finish by wiping with a dry cloth. Avoid wiping the front vents with a damp cloth.
•When dust accumulates in the console vents, remove the dust with a low-powered vacuum cleaner.
•Do not touch the lens located inside the disc cover. To help protect the lens from dust, keep the disc cover closed except when inserting or removing discs.
Differences with previous PlayStation®2 models
This version of the PlayStation®2 console may be different from previous models in compatibility with optional accessories and the method of operating game software. For full details contact SCEA Consumer Services at 1-800-345-7669 or visit our Web site at http://www.us.playstation.com
8 Precautions
Preparation
Getting started
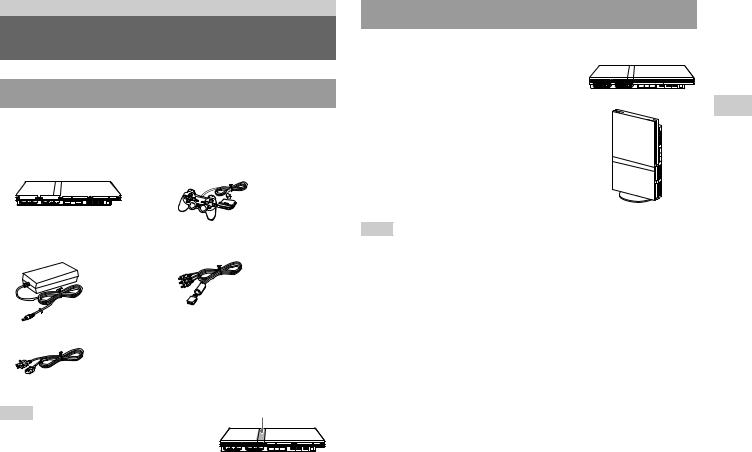
Checking the package contents
Check that you have all of the following items. If any items are missing, call SCEA Consumer Services at 1-800-345-7669 for assistance.
s PlayStation®2 console 1... |
s Analog controller |
||||||||
|
|
|
|
|
|
|
|
|
(DUALSHOCK®2)...1 |
|
|
|
|
|
|
|
|
|
|
|
|
|
|
|
|
|
|
|
|
|
|
|
|
|
|
|
|
|
|
s AC adaptor...1 |
s AV cable (integrated |
|
audio/video)...1 |
s AC power cord...1 |
s Online start-up disc...1 |
|
s Instruction manual...1 |
Note |
Protective tape |
|
|
You first need to remove the protective tape before |
|
using the console. |
|
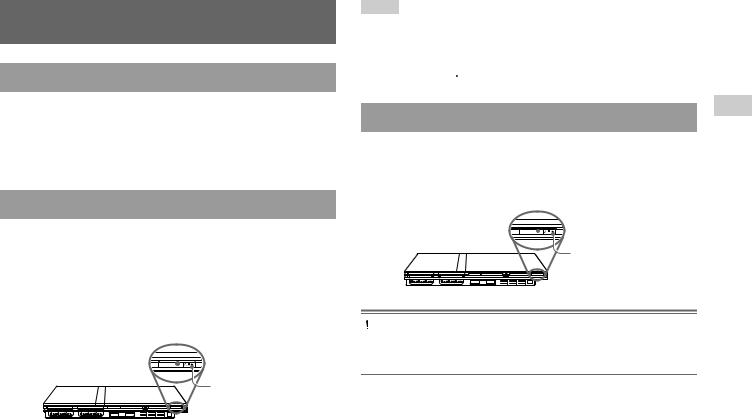
Positioning the console
You can place the console in either the horizontal or vertical position.
Horizontal position
Set the console horizontally.
Vertical position
When setting the console in the vertical position, use the SCPH-70110 U vertical stand (for PlayStation®2) (sold separately).
Note
Some vertical stands (for PlayStation®2) cannot be used with this model of the PlayStation®2 console (
 page 47). Choose the SCPH-70110 U when purchasing a vertical stand.
US
Preparation
Getting started |
9 |

Caution
Do not place the console in locations where it may be exposed to the following conditions:
•Places subject to excessive cigarette smoke or dust. Cigarette smoke residue or dust build-up on the internal components, such as the lens, may cause the console to malfunction.
•Places subject to extreme temperatures, in direct sunlight, near a heat source, or in a car with its windows closed (particularly in summer). These conditions may warp the exterior of the console or cause the console to malfunction.
•Places close to magnetic fields, such as those produced by magnets or loudspeakers.
•Places subject to vibration.
10 Part names
Part names
PlayStation®2 console front
Disc cover
A (open) button
MEMORY CARD slot 2
MEMORY CARD slot 1
]/1 (on/standby) indicator
]/1 (on/standby)/RESET button
" " product family logo*
RESET |
|
IR receiver |
Controller port 1 |
Front vent |
Controller port 2 |
USB connector |
*The " " product family logo can be rotated to match the horizontal or vertical positioning of the console.
Note
You can connect USB devices that are compatible with the PlayStation®2 console. Note, however, that not all USB-compatible products work with the PlayStation®2 console. Refer to the instructions supplied with the device to be connected for more information.
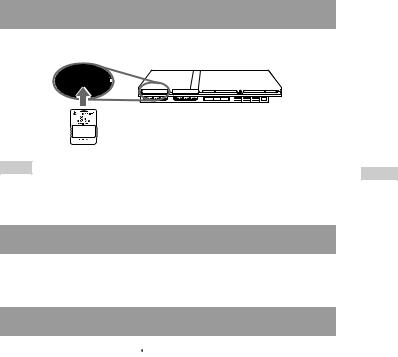
PlayStation®2 console rear
Rear vent
!DC IN 8.5V connector
NETWORK connector |
AV MULTI OUT connector |
DIGITAL OUT (OPTICAL) connector
Note
For part names of the analog controller (DUALSHOCK®2), see "Using the analog controller (DUALSHOCK®2)" (
 page 18).
Connecting to a TV
Before connecting
•Do not plug the AC power cord for the console into an electrical outlet until you have made all other connections.
•Check that the TV is turned off.
Connecting to a TV using the supplied AV cable
Connect the console to the TV as shown below.
Console rear
Audio and video inputs of the TV
VIDEO L-AUDIO-R
Yellow White |
Red |
To the AV MULTI |
|
Do not use when |
OUT connector |
|
connecting to a |
|
|
|
|
|
monaural TV. |
|
|
AV cable (integrated audio/video) |
|
US
Preparation
Connecting to a TV 11
Caution
If you display a still image on a plasma or projection* TV screen for an extended period of time, "ghosting" may occur. This is a characteristic of these types of TVs. Static, non-moving images, such as console setting menus, DVD menus or paused images, may leave a faint image permanently on the TV screen if left on for an extended time. Refer to the instructions supplied with your TV for details. * except those of LCD screen types
Note
When playing a DVD, connect the console to the TV directly. If the video signal from the console is coming through a VCR to the TV, copy protection on some DVDs may affect picture quality.
When using cables sold separately
Picture quality differs depending on the type of cable used. Use the information below to determine the best connection method.
If you use a cable sold separately, refer to the instructions supplied with the cable.
TV |
Cable type |
|
|
A TV with S VIDEO inputs |
S VIDEO cable (SCPH-10060 U) |
|
|
A TV without video inputs |
RFU adaptor (SCPH-10071) |
|
|
A TV with component video |
Component AV cable (for PlayStation®2) |
input connectors |
(SCPH-10100 U) |
|
|
Picture quality scale
High quality
xAV cable (supplied) x S VIDEO cable x Component AV cable x RFU adaptor
This scale is intended only as a reference. Depending on the product or condition of your TV, the picture quality may be different.
Notes
•To use progressive scan, you must have a TV and software that support progressive scan (480p) and you must connect using the appropriate type of cable*. You must also check that the console settings are correct. For details, see "Progressive" in "Setting TV display options" (
 page 31).
*The component AV cable (for PlayStation®2) (sold separately) is compatible with progressive scan.
•This product is compatible for use with component video inputs (Y CB/PB CR/PR), but cannot be used with inputs in HDTV format (Y PB PR). Refer to the instructions supplied with your TV for details.
•For TV connection methods not listed in this manual, contact SCEA Consumer Services at 1-800-345-7669.
12 Connecting to a TV
Connecting digital audio equipment
By using a commercially available optical digital cable to connect digital audio equipment, you can enjoy surround sound with the effect of being in a movie theater or a concert hall. When connecting the console to audio equipment with digital connectors, refer to the instructions supplied with the device to be connected.
Console rear
Connected device
DIGITAL IN
OPTICAL
Commercially available optical digital cable
Notes
•If you connect the console to audio equipment using an optical digital cable, it may affect the audio output of some PlayStation®2 format software with the result that no sound is produced. If this happens, use a cable such as the supplied AV cable (integrated audio/video) and connect it to the console's AV MULTI OUT connector. Do not use an optical digital cable.
•After connecting digital audio equipment, set "Digital Out (Optical)" to "On" in the System Configuration menu. For details, see "Digital Out (Optical)" ( page 38).
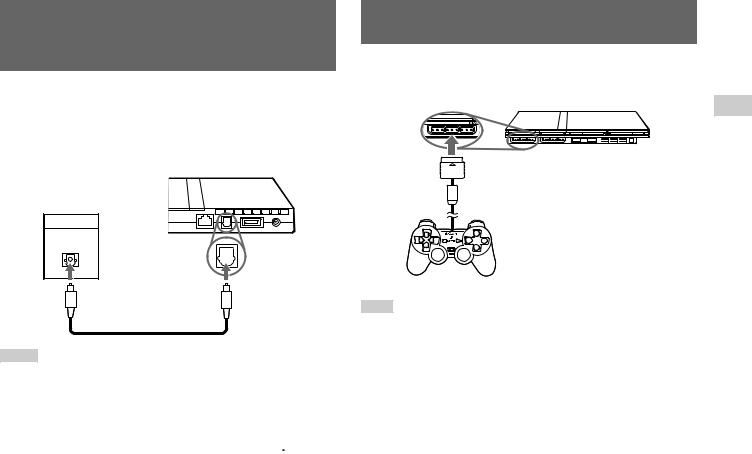
Connecting the controller
1 Insert the analog controller (DUALSHOCK®2) into a controller port of the console.
Console front |
US |
|
|
MEMORY CARD |
|
|
Preparation |
Analog controller (DUALSHOCK®2)
Note
Some software titles designate a specific controller port to be used. Refer to the instructions supplied with the software for details.
Connecting digital audio equipment 13
Connecting the AC adaptor and AC power cord
Warning
Do not plug the AC power cord for the console into an electrical outlet until you have made all other connections.
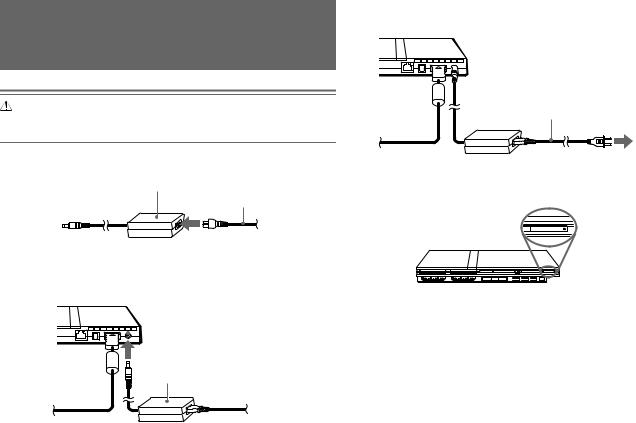
1 Connect the AC power cord to the AC adaptor.
AC adaptor
AC power cord
2 Plug the connector of the AC adaptor into the !DC IN 8.5V connector on the console rear.
Console rear
 !DC IN 8.5V connector
AC adaptor
3 Plug the AC power cord into the electrical outlet.
Console rear
AC power cord
To the electrical outlet
The =/1 (on/standby) indicator on the console front will light up in red to indicate that the console is in standby mode.
RESET 

 ]/1 indicator
Console front
14 Connecting the AC adaptor and AC power cord
Turning the console on and off
Before turning on the console
Do not turn on the console until you have finished these steps. Refer to the instructions supplied with your TV for details.
•Turn on the TV.
•Change your TV setting to display output from the line to which the console is connected.
Turning on the console
1 Check that the =/1 (on/standby) indicator on the console front is lit up in red.
2 Press the =/1 (on/standby)/RESET button on the console front.
The =/1 indicator on the console front will turn green and output from the console will be displayed on the TV.
 =/1/RESET button
RESET
Console front
=/1 indicator
Notes
•The first time you turn on the console after purchase, screens for setting "Language", "Time Zone" and "Daylight Savings Time (Summer Time)" will be displayed. Follow the on-screen instructions to complete the settings.
•If you connect the console to a wide screen TV, set "Screen Size" in the System Configuration menu ( page 38).
US
Turning off the console
1 |
Press and hold the =/1/RESET button on the console front for |
Preparation |
|
more than a second.
The =/1 indicator will turn red to indicate that the console has entered standby mode.
 =/1/RESET button
RESET
Console front
=/1 indicator
Warning
The power is not completely turned off when the console is in standby mode. If you do not plan to use the console for an extended period of time, unplug the AC power cord from the electrical outlet.
Turning the console on and off 15

Games
Playing a game
Place the disc in the console with the label side facing up.
Disc cover 
Place the disc so that all three tabs are above the disc's surface.
|
|
|
|
|
|
|
|
|
|
|
|
|
|
|
|
|
|
|
|
|
|
|
|
|
|
|
|
|
|
|
|
|
|
|
|
|
|
|
|
|
|
|
|
|
|
|
|
|
|
|
|
|
|
|
|
|
|
|
|
|
|
|
|
|
|
|
|
|
|
|
|
|
|
|
|
|
|
|
|
|
|
|
|
|
|
|
|
|
|
|
|
|
|
|
|
|
|
|
|
|
|
|
|
|
|
|
|
|
|
|
|
|
|
|
|
|
|
|
|
|
|
|
|
|
|
|
|
|
|
|
|
|
|
|
|
|
|
|
|
|
|
|
|
|
|
|
|
|
|
|
|
|
|
|
A (open) button |
|
=/1/RESET button |
|
|
|
|
|
|
|
|
|||||
|
|
|
|
|
|
|
|
|
|
|
|
|
|
|
|
|
|
|
Before playing a game
Check that the connections to the TV and audio equipment are correct and that the precautions have been met.
•"Precautions" ( page 6)
•"Connecting to a TV" ( page 11)
•"Connecting the controller" ( page 13)
•"Connecting the AC adaptor and AC power cord" ( page 14)
Note
To play online games, you first need to connect to and set up a network. See "Connecting to a network" ( page 43) for details.
16 Playing a game
Starting a game
1 Turn on the console ( page 15).
The main menu is displayed ( page 36).
2 Press the A (open) button on the console front.
The disc cover opens.
3 Place the disc in the console.
Set the disc in the disc holder with the label side facing up.
4 Close the disc cover.
Press down on the middle of the disc cover to close it. After the disc cover is closed, the game will start.
Notes
•You can also start a game from the Browser screen (
 page 36).
•If you turn on the console after inserting a disc, the game will start automatically.
To reset a game
Press the \/1 (on/standby)/RESET button on the console front. Do not accidentally press the @/1/RESET button while playing a game, as doing so will cause the game to reset.
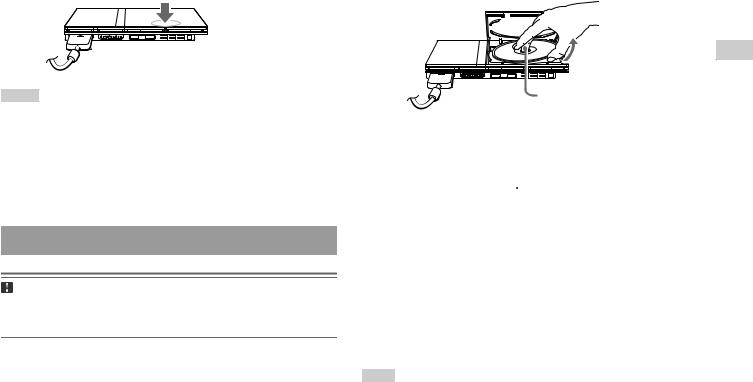
Ending a game
Caution
When removing a disc, check that the disc has stopped completely. Do not touch the disc if it is spinning, as doing so may cause injury, damage to the disc or console malfunction.
1 Press the A button on the console front.
2 Remove the disc.
Hold down the black center part of the disc holder, and then lift the disc by the edges.
Press the black center part of the disc holder.
3 Close the disc cover.
4 Press the =/1/RESET button.
The main menu is displayed ( page 36).
Changing game discs
1 Open the disc cover and remove the disc.
When removing a disc, hold down the black center part of the disc holder and then lift the disc by the edges.
2 Insert a new disc.
3 Close the disc cover and reset the console.
The new game will start.
Note
You do not need to turn off the console when changing games.
US
Games
Playing a game 17
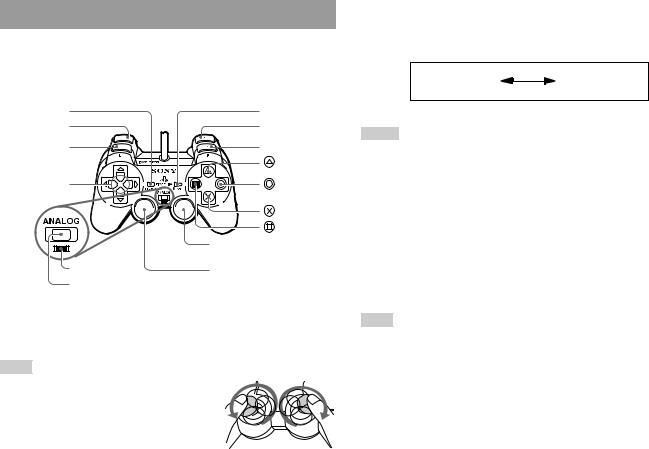
Using the analog controller (DUALSHOCK®2)
The analog controller (DUALSHOCK®2) is equipped with a pressuresensitive button function. It also has a vibration function.
Part names
SELECT button |
START button |
L2 button |
R2 button |
L1 button |
R1 button |
|
button |
Directional |
button |
buttons |
|
|
button |
|
button |
|
Right analog stick/ R3 button* |
Mode indicator |
Left analog stick/ L3 button* |
ANALOG mode button |
|
*The left and right analog sticks, or the L3 and R3 buttons, function only in analog mode (indicator: red).
*The L3 and R3 buttons function when the analog sticks are pressed.
Note
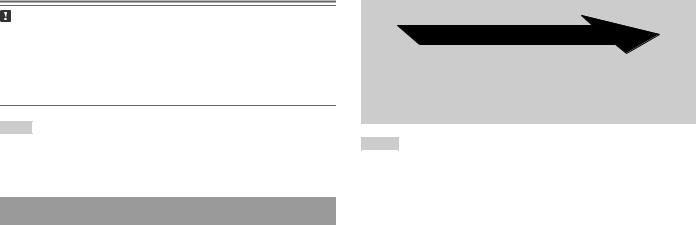
Before using the analog controller (DUALSHOCK®2), with the console turned on, rotate the left and right analog sticks once with your thumbs before starting a game. Do not twist the analog sticks, but rotate as if drawing a circle as shown in the diagram.
About mode switching
The ANALOG mode button can be used to switch between two modes. Switch to the appropriate mode for use. Note, however, that some software titles make this adjustment automatically.
Digital mode |
Analog mode |
(indicator: off) |
(indicator: red) |
Notes
•When using the analog controller in digital mode, the left and right analog sticks do not function. Also, the pressure-sensitive button function is turned off.
•Depending on the software, you may not be able to switch modes even if you press the ANALOG mode button.
When using in analog mode
•When playing a PlayStation®2 format software title, the left and right analog sticks/L3 and R3 buttons are active and all buttons except SELECT, START, L3 and R3 have pressure-sensitive button function.
•When playing a PlayStation® format software title, the left and right analog sticks are active.
Note
Depending on the software, the buttons for use in analog mode may be limited. Refer to the instructions supplied with the software for details.
18 Playing a game

About the vibration function
The vibration function can be set to ON or OFF in the software options menu.
Notes
•Before using the vibration function, read "Notes on safety when using the analog controller (DUALSHOCK®2)" (
 page 7).
•Depending on the software, the vibration function may be set to "On" automatically.
•When the analog controller (DUALSHOCK®2) is not being used, turn the console off or unplug the controller from the console. The vibration may cause the controller to unexpectedly move or fall.
About using the analog controller (DUALSHOCK®) (SCPH-110 U)
You can use the analog controller (DUALSHOCK®) (SCPH-110 U) with the PlayStation®2 console, but the functions of the buttons in analog mode may be different from those of the analog controller (DUALSHOCK®2). Only the left and right analog sticks can be used in analog mode.
Using memory cards
You can save and load game data using a memory card. You can also delete game data or copy game data from one memory card to another.
About memory card types
There are two types of memory cards. Select a memory card suitable for the software in use.
Memory card type |
Compatible software |
Amount of memory |
|
|
|
Memory card (8MB) |
PlayStation®2 format software |
Approx. 8 MB |
(for PlayStation®2) |
|
|
(SCPH-10020 U) |
|
|
|
|
|
Memory card |
PlayStation® format software |
15 memory blocks |
(SCPH-1020 U) |
|
(approx. 120 KB) |
|
|
|
Note
The memory card (8MB) (for PlayStation®2) uses "MagicGate", a technology that helps protect copyrighted content through data encryption and hardware authentication.


 is a term of copyright protection technology developed by Sony Corporation.


 does not guarantee compatibility with other products bearing the "MagicGate" trademark.
US
Games
Using memory cards 19
Inserting a memory card
Insert the memory card into a memory card slot on the console front.
Console front
MEMORY CARD
Note
Some software titles designate a specific memory card slot to use. Refer to the instructions supplied with the software for details.
Saving or loading game data
Depending on the software, the procedure for saving or loading may vary. Refer to the instructions supplied with the software for details.
Copying or deleting game data
1 At the Browser screen ( page 36), use the directional buttons to select the icon for the memory card you want to use for copying or deleting data and then press the
  button.
2 Select the icon for the data you want to copy or delete, and then press the  button.
3 Select "Copy" or "Delete", and then press the  button.
When copying game data, check that two memory cards are inserted in the console. If you have selected "Delete", skip to step 5.
4 Select the destination, and then press the  button.
5 Select "Yes", and then press the  button.
While copying or deleting data, do not remove the memory cards.
6 When copying or deleting is completed, press the  button.
Notes
•To view information about a game data item, select the icon for the data and then press the  button to check the details.
•Compatibility between software and memory cards:
–You cannot save or copy PlayStation®2 format software to a memory card (SCPH-1020 U).
–You cannot save PlayStation® format game data to a memory card (8MB) (for PlayStation®2). You can, however, copy PlayStation® format game data from a memory card (SCPH-1020 U) to a memory card (8MB) (for PlayStation®2) for storage purposes. Note that such game data cannot be loaded directly from a memory card (8MB) (for PlayStation®2).
20 Using memory cards
Audio CDs
Playing an audio CD
Playing a CD
1 Turn on the console and insert the disc (
 page 16).
Follow steps 1 to 4 of "Starting a game". The track numbers are displayed.
2 Using the directional buttons, select the track number you want to play and then press the  button.
Playback begins.
Notes
•If you turn on the console after inserting a disc, the track numbers are displayed automatically.
•You can also start playback from the Browser screen ( page 36).
Caution
To play an audio CD recorded in DTS format, you must connect a device with a DTS decoder to the DIGITAL OUT (OPTICAL) connector ( page 13). Note that an extremely loud noise may be emitted if the device does not have a DTS decoder or if it is connected to the AV MULTI OUT connector.
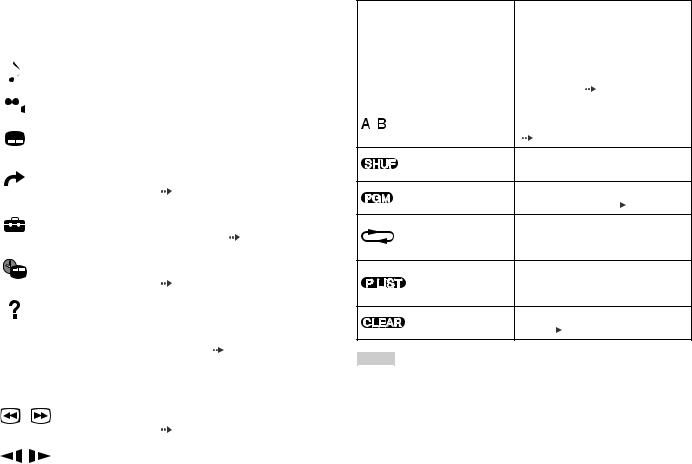
Operating the CD player during playback
Using the directional buttons, select the icon for the desired track and then press the  button.
Icon |
(button*) |
Function |
|
|
|
. |
(L1 button) |
Go to the beginning of the current or previous track |
|
|
|
m |
(L2 button) |
Fast reverse |
|
|
|
M |
(R2 button) |
Fast forward |
|
|
|
> |
(R1 button) |
Go to the beginning of the next track |
|
|
|
N |
(START button) |
Start playback |
|
|
|
X |
(START button) |
Pause playback |
|
|
|
x |
(SELECT button) |
Stop playback |
|
|
|
*You can operate directly by pressing the buttons of the analog controller (DUALSHOCK®2).
Note
You can also use the DVD remote control (for PlayStation®2) (sold separately).
US
CDs Audio
Playing an audio CD 21

Ending audio CD playback
1 Using the directional buttons, select x and then press the
 button.
Playback stops. Press the A (open) button on the console front to remove the disc.
Playing in various modes
You can set for "Play Mode" and "Repeat".
Play Mode |
Normal |
Plays tracks as recorded on the CD |
|
|
|
|
Program |
Plays tracks in a specified order |
|
|
|
|
Shuffle |
Plays tracks in a random order |
|
|
|
Repeat |
Off |
Does not play the CD repeatedly |
|
|
|
|
All |
Plays all tracks repeatedly |
|
|
|
|
1 |
Plays a track repeatedly |
|
|
|
1 At the Browser screen ( page 36), use the directional buttons to select the audio CD icon and then press the
  button.
The Play Options screen is displayed.
2 Select "Play Mode" or "Repeat", and then press the  button.
3 Select the desired setting, and then press the  button.
If you select "Program", the screen for specifying track order will be displayed. Select the tracks you want to play.
4 Press the  button.
The Browser screen is displayed.
5 Select the audio CD icon, and then press the  button.
The track numbers are displayed, and the setting option is shown in the lower left of the screen.
6 Select the desired track, and then press the  button.
Playback begins.
Notes
•You can also access the Play Options screen from the screen displaying the tracks
by selecting the Audio CD icon in the upper left corner of the screen and pressing the  button.
•You can set "Play Mode" and "Repeat" at the same time.
22 Playing an audio CD

DVDs
Watching a DVD
You can operate the DVD player using the following methods.
•Using the on-screen Control Panel
•Operating directly using the analog controller (DUALSHOCK®2)
•Using the DVD remote control (for PlayStation®2) (sold separately)
The following instructions assume use of the Control Panel to operate the DVD player. Some operations may be different depending on the method used.
Notes
•For details about the features available on a DVD, refer to the instructions supplied with the DVD.
•In rare instances, certain DVDs may not operate properly with the PlayStation®2 console. This is primarily due to variations in the manufacturing process or software encoding of the DVD-Video software. If you experience problems, try restarting your DVD. If problems persist, call the publisher of the DVD or contact SCEA Consumer Services at 1-800-345-7669 for more information.
Using the Control Panel
1 |
Start playback of the DVD ( page 25). |
|
2 |
Press the SELECT button. |
|
|
The Control Panel is displayed. If you press the SELECT button again, |
|
|
the display will change its position on the screen. |
US |
|
|
DVDs |
3 Using the directional buttons, select an icon and then press the  button.
Note
To turn off the Control Panel, press the SELECT button (once or twice), or press the  button.
Control Panel item list
You can access the following options in the Control Panel.
Icon |
Function |
Menu |
Displays the DVD-Video menu |
Top Menu |
Displays the DVD-Video menu |
Watching a DVD 23
Icon |
|
Function |
|
|
|||||
|
|
|
|
|
|
||||
O |
Return |
Returns to the previously selected screen |
|||||||
within the DVD's menu |
|||||||||
|
|
|
|
|
|||||
|
|
|
|
|
|
||||
|
|
|
|
Audio Options |
Displays and changes audio options on |
||||
|
|
|
|
||||||
|
|
|
|
DVDs with multiple audio tracks |
|||||
|
|
|
|
|
|||||
|
|
|
|
|
|
||||
|
|
|
|
Angle Options |
Displays and changes viewing angles on |
||||
|
|
|
|
DVDs recorded with multi-angle options |
|||||
|
|
|
|
||||||
|
|
|
|
|
|||||
|
|
|
|
|
|
||||
|
|
|
|
Subtitle Options |
Displays and changes subtitle options on |
||||
|
|
|
|
DVDs with subtitle options |
|||||
|
|
|
|
|
|||||
|
|
|
|
|
|
||||
|
|
|
|
|
Skips to the selected title, chapter or the |
||||
|
|
|
|
Go To |
specified time, and starts playback |
||||
|
|
|
|
|
( |
page 25) |
|
|
|
|
|
|
|
|
|
||||
|
|
|
|
|
Displays and changes options for |
||||
|
|
|
|
Setup |
language, picture quality, Parental Control |
||||
|
|
|
|
|
level, audio, etc. ( |
page 29) |
|||
|
|
|
|
|
|
||||
|
|
|
|
|
Displays the current title or chapter |
||||
|
|
|
|
Time Display |
number, the elapsed time, etc. |
||||
|
|
|
|
|
( |
page 26) |
|
|
|
|
|
|
|
|
|
||||
|
|
|
|
Help |
Displays the direct button functions of the |
||||
|
|
|
|
analog controller (DUALSHOCK®2) |
|||||
|
|
|
|
|
|||||
|
|
|
|
|
|
||||
0~9 |
Go to Chapter |
Used to enter the number of a chapter you |
|||||||
want to play ( |
page 25) |
||||||||
|
|
|
|
|
|||||
|
|
|
|
|
|
||||
./> |
Previous/Next |
Returns/skips to the beginning of the |
|||||||
current, previous or next chapter |
|||||||||
|
|
|
|
|
|||||
|
|
|
|
|
|
||||
|
|
|
|
|
Fast reverses/forwards playback on the |
||||
/ |
Search |
screen to help you find a particular scene |
|||||||
|
|
|
|
|
( |
page 26) |
|
|
|
|
|
|
|
|
|
||||
/ |
Slow |
Changes to playback/reverse playback in |
|||||||
slow-motion |
|
|
|||||||
|
|
|
|
|
|
|
|||
|
|
|
|
|
|
|
|
|
|
Icon |
|
Function |
|
|||
|
|
|
|
|
|
|
N |
Play |
Starts playback |
|
|||
|
|
|
|
|
|
|
X |
Pause |
Pauses playback |
|
|||
|
|
|
|
|
|
|
x |
Stop |
Stops playback ( |
page 25) |
|||
|
|
|
|
|
||
|
|
|
|
Specifies a scene for playback, and starts |
||
|
|
|
A-B Repeat |
playback of the scene that has been set |
||
|
|
|
||||
|
|
|
|
( |
page 28) |
|
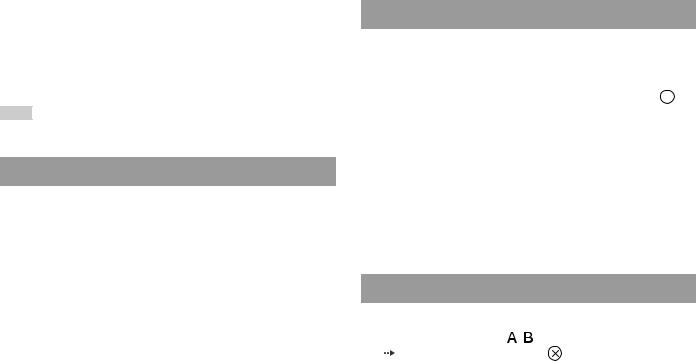
Shuffle Play
Begins playback of titles or chapters in a random order (
 page 28)
Program Play
Begins playback of titles or chapters in a programmed sequence ( page 27)
Selects repeated playback of all the titles Repeat Play on the disc, or one title or one chapter
(
 page 28)
For DVD-RW discs (VR mode), selects Original/Play List Original or Play List content to play
(
 page 27)
Clear
Clears selected numbers or playback modes ( page 29)
Notes
•You can use " " to check the options that can be accessed directly using the buttons of the analog controller. To access the options directly using the controller,
you must clear the Control Panel from the screen.
•Depending on the playback mode, some options may not be available or cannot be adjusted.
24 Watching a DVD

Playing a DVD
1 Turn on the console and insert a disc (
 page 16).
Follow steps 1 to 4 of "Starting a game". Playback begins.
Notes
•If you turn on the console after inserting a disc, playback will begin automatically.
•You can also start playback from the Browser screen (
 page 36).
Ending DVD playback x
1 During playback, select x in the Control Panel (
 page 23) and then press the
  button.
Playback stops. Press the A (open) button on the console front, and then remove the disc.
Playing a DVD from the last stopping point (Resume Play)
1 During playback, select x in the Control Panel ( page 23) and then press the
  button.
2 Select N, and then press the  button.
Playback begins from the point where you stopped the disc in step 1.
To clear Resume Play
After step 1, select x and then press the  button.
Selecting a specific scene for playback
Selecting a scene by chapter number
1 During playback, select the desired chapter number in the Control Panel ( page 23) and then press the
  button.
Playback of the selected chapter begins. If you want to play a chapter with a single digit number (i.e. 1-9), enter a leading zero. For example, enter as "01".
Selecting a scene by title number, chapter number or by specifying the time
1 During playback, select in the Control Panel (
 page 23) and then press the
  button.
2 Select an item, and then press the  button.
Title |
Specifies the title number |
|
|
Chapter |
Specifies the chapter number |
|
|
C XX:XX:XX |
Specifies the elapsed time for the chapter (or title) |
(or T XX:XX:XX) |
|
|
|
3 Select the numbers for the desired scene, and then press the
 button.
Playback of the selected chapter begins.
US
DVDs
Watching a DVD 25

Finding a particular point on a DVD (Search)
You can search either forwards or backwards to quickly locate a particular point on a DVD.
1 During playback, select  or
or  in the Control Panel (
 page 23) and then press and hold the
  button.
Search speed changes as shown below when you press either the up or down directional button while holding down the  button.
•Search 3
•Search 2
•Search 1
•Slow
2 Release the  button when you reach the point you are searching for.
Playback returns to normal speed.
Note
To use the analog controller for Search during playback, press and hold down the L2 or R2 button to begin searching. Use the directional buttons to change speeds. Release the L2 or R2 button when you reach the point you are searching for.
Displaying playback information 
You can display information such as the current title number or elapsed time.
1 During playback, select in the Control Panel (
 page 23) and then press the
  button.
The display changes as shown below each time you press the  button.
Title X |
Chapter X |
|
Title number and chapter number |
|
|
|
|
Title X |
Chapter X |
C XX:XX:XX |
Elapsed time of current chapter |
|
|
|
|
Title X |
Chapter X |
C - XX:XX:XX |
Remaining time of current chapter |
|
|
|
|
Title X |
Chapter X |
T XX:XX:XX |
Elapsed time of current title |
|
|
|
|
Title X |
Chapter X |
T - XX:XX:XX |
Remaining time of current title |
|
|
|
|
(Off) |
|
|
|
|
|
|
|
26 Watching a DVD

Selecting Original or Play List for DVD-RW playback 
When using a DVD-RW disc (VR mode), you can select the type of titles you want to play.
1 With playback stopped, select  in the Control Panel (
 page 23) and then press the
  button.
Original and Play List will be selected in turn each time you press the  button.
Original |
Plays content in the originally recorded sequence |
|
|
Play List |
Plays edited content. Play List is the default setting. |
|
|
Notes
•Slow-motion play in reverse is not available for DVD-RW discs (VR mode).
•You cannot use this function with Resume Play. Clear Resume Play ( page 25) before selecting this feature.
Using the playback modes
Using the various playback modes, you can play titles or chapters in the order you want or repeat playback of a specific scene. There are four playback modes:
•Program Play ( page 27)
•Shuffle Play ( page 28)
•Repeat Play ( page 28)
•A-B Repeat ( page 28)
The following instructions assume use of the Control Panel ( page 23) to operate the DVD player.
Notes
•You can play combinations of Program Play, Shuffle Play, and Repeat Play. Note, however, that some Shuffle Play or Repeat Play options may not be available depending on the combination.
•The PlayStation®2 console plays disc content as recorded in the DVD software.
Program Play 
You can create programs to play titles and chapters in any order.
1 During playback, select  in the Control Panel (
 page 23) and then press the
  button.
2 Select a program number, and then press the  button.
If no programs have been set, the only option will be "1. Title".
3 Select the title number, and then press the  button.
US
DVDs
Using the playback modes 27
4 Select the chapter number, and then press the  button.
To play all the chapters, select "All". Repeat steps 2 to 4 to set other titles or chapters.
5 Press the START button.
Program Play begins.
Note
The setting will not be cleared after Program Play finishes.
Shuffle Play
You can set this option for random playback of all titles or chapters recorded on a disc. Playback order will be different each time Shuffle Play is used.
1 Select  in the Control Panel (
 page 23), and then press the
  button.
The display changes as shown below each time you press the  button.
Title Shuffle |
Plays titles in random order |
|
|
Chapter Shuffle |
Plays chapters in random order |
|
|
Shuffle Off |
Clears Shuffle Play |
|
|
2 Select N, and then press the  button.
Repeat Play 
You can set this option to play titles or chapters repeatedly.
1 Select in the Control Panel (
 page 23), and then press the
 button.
The display changes as shown below each time you press the  button.
Disc Repeat |
Repeats playback of all titles |
|
|
Title Repeat |
Repeats playback of one title |
|
|
Chapter Repeat |
Repeats playback of one chapter |
|
|
Repeat Off |
Clears Repeat Play |
|
|
2 Select N, and then press the  button.
A-B Repeat 

You can set a specific scene to be played repeatedly.
1 During playback, select |
|
in the Control Panel |
|
|
|||
( page 23) and then press the |
button at the point you |
||
want to start repeated playback. |
|
||
The starting point (point A) is set.
2 Press the  button at the point you want to end repeated playback.
The ending point (point B) is set, and repeated playback of the section from A to B begins.
28 Using the playback modes

Clearing playback modes 
Clears playback modes to allow normal playback.
1 Select  in the Control Panel (
 page 23), and then press the
  button.
A message stating, "Play mode contents cleared", is displayed and the console returns to normal playback.
Note
If multiple playback modes have been set in a combination, all playback modes are cleared.
Adjusting DVD player settings
You can change the initial settings, adjust the picture and sound and set various other output options using the Setup display. You can also select a language for subtitles and menus, restrict playback by children and other options.
Notes
•Some DVDs do not support all settings. The PlayStation®2 console plays disc content as recorded in the DVD software. If the DVD does not support the features listed, you will not be able to change the settings.
•The following options are not available during playback or Resume Play ( page 25). Clear Resume Play before changing these settings.
–"Menu", "Audio" and "Subtitles" in Language Setup
–"TV Type" and "Progressive" in Screen Setup
–"Parental Control" in Custom Setup
–"DTS" and "Audio Track Auto Select Mode" in Audio Setup
You can change DVD player settings using the following procedure:
1 Select in the Control Panel (
 page 23), and then press the
 button.
The Setup icon bar is displayed.
2 Select the icon for the setting you want to change, and then press the  button.
The current setting for each item is displayed.
3 Select the desired item, and then press the  button.
The menu option becomes active and can be selected.
US
DVDs
Adjusting DVD player settings 29
4 Select the desired setting, and then press the  button.
The setting of the item is completed. For details, see the instructions for each item ( pages 30 to 35).
Notes
•The default setting for each menu item is underlined in the explanations below.
•To return to the Control Panel after making settings, press the SELECT button.
•Settings are saved when you do any of the following:
–Stop playback (including stopping Resume Play)
–Open the disc cover
Setting language options
In "Language Setup" you can choose the language for the DVD's menu, audio and subtitles. Note that if you select a language that is not recorded on the DVD, one of the recorded languages is selected automatically.
Menu |
Selects the language for the DVD's menu |
|
|
Audio |
Selects the language for the DVD's audio track |
|
|
Subtitles |
Selects the language for the DVD's subtitles |
|
|
Note
If you select "Audio Follow" for subtitles, the subtitle language will automatically be set to match the language selected for the DVD's audio track.
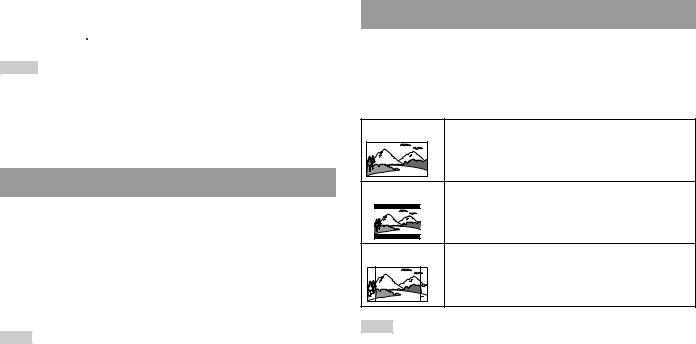
Setting TV display options
In the Screen Setup menu, you can set the screen size (aspect ratio) and other options that affect picture quality.
TV Type
You can set the aspect ratio to match the screen of the connected TV.
16:9 |
Select this option when using a wide screen TV or a standard |
|
TV with special 16:9/wide screen functionality. |
4:3 Letter Box |
Select this option when using a standard TV. This setting |
|
displays a wide picture with margins on the upper and lower |
|
portions of the screen. |
4:3 PAN SCAN |
Select this option when using a standard TV. This setting |
|
displays a picture adjusted to the height of the screen, cutting |
|
off portions at left and right that do not fit. |
Note
When you set "Progressive" to "On", "TV Type" is automatically set to "16:9".
30 Adjusting DVD player settings
 Loading...