


Sony Corporation Printed in Malaysia

3-860-245-11 (1)
Active
Super Woofer
Operating Instructions |
|
EN |
||
|
|
|||
|
|
|
|
|
Mode d’emploi |
|
|
F |
|
|
|
|
|
|
CCC |
|
|
|
C |
|
|
|
|
|
SA-W70ES/SA-W705/SA-W505
© 1997 by Sony Corporation

WARNING
To prevent fire or shock hazard, do not expose the unit to rain or moisture.
Do not install the appliance in a confined space, such as a bookcase or built-in cabinet.
For the customers in the U.S.A.
This symbol is intended to alert the user to the presence of uninsulated “dangerous voltage” within the product’s enclosure that may be of sufficient magnitude to constitute a risk of electric shock to persons.
This symbol is intended to alert the user to the presence of important operating and maintenance (servicing) instructions in the literature accompanying the appliance.
Owner’s Record
The model number and serial numbers are located at the rear. Record these numbers in the spaces provided below. Refer to these numbers whenever you call upon your Sony dealer regarding this product.
Model No. SA-W70ES/SA-W705/
SA-W505
Serial No.
CAUTION
You are cautioned that any changes or modifications not expressly approved in this manual could void your authority to operate this equipment.
CAUTION
Use of this appliance with some systems may present a shock or fire hazard. Do not use with any units which have the following marking located near output. WARNING: HAZARDOUS ENERGY!
Note to CATV system installer:
This reminder is provided to call CATV system installer’s attention to Article 820-40 of the NEC that provides guidelines for proper grounding and, in particular, specifies that the cable ground shall be connected to the grounding system of the building, as close to the point of cable entry as practical.
For detailed safety precautions, see the leaflet “IMPORTANT SAFEGUARDS” included with this manual in the vinly bag.
For the customers in Canada
CAUTION
TO PREVENT ELECTRIC SHOCK, DO NOT USE THIS POLARIZED AC PLUG WITH AN EXTENSION CORD, RECEPTACLE OR OTHER OUTLET UNLESS THE BLADES CAN BE FULLY INSERTED TO PREVENT BLAD EXPOSURE.
NOTICE FOR THE CUSTOMERS IN THE UNITED KINGDOM
A moulded plug complying with BS 1363 is fitted to this equipment for your safety and convenience.
Should the fuse in the plug supplied need to be replaced a 5 AMP fuse approved by ASTA or BSI to BS 1362, (i.e. marked with 2or @mark) must be used.
If the plug supplied with this equipment has a detachable fuse cover, be sure to attach the fuse cover after you change the fuse. Never use the plug without the fuse cover. If you should lose the fuse cover, please contact your nearest Sony service station.
IMPORTANT
If the plug supplied is not suitable for the socket outlets in your home, it should be cut off and an appropriate plug fitted in accordance with the following instructions.
The wires in this mains lead are coloured in accordance with the following code:
Blue: Neutral
Brown: Live
As the colours of the wires in the mains lead of this apparatus may not correspond with the coloured markings identifying the terminals in your plug, proceed as follows: The wire which is coloured blue must be connected to the terminal which is marked with the letter N or coloured black. The wire which is coloured brown must be connected to the terminal which is marked with the letter L or coloured red. Do not connect either wire to the earth terminal in the plug which is marked by the letter E or by the safety earth symbol Yor coloured green or green-and-yellow.
WARNING
To prevent shock hazard, do no insert the plug cut off from the mains lead into a socket outlet. This plug cannot be used and should be destroyed.
2EN

Welcome!
Thank you for purchasing the Sony Active Super Woofer. Before operating this woofer, please read this manual thoroughly and retain it for future reference.
TABLE OF CONTENTS
Getting Started
Unpacking 4
Installation 4
Hooking Up the System 5
Basic Operations
Listening to the Sound 8
Adjusting the Sound 9
Additional Information
Precautions 10
Troubleshooting 10
Specifications 11
EN
3EN

Getting Started
Unpacking
Check that you received the following items:
•Audio connecting cord (1)
•Speaker cord (2)
Installation
Since the human ear cannot detect the direction and position where the bass sound being reproduced by a woofer (below 150 Hz) comes from, you can install the woofer wherever you like in your room. To obtain a better bass reproduction, we recommend you to install the woofer on a solid floor where the resonance is unlikely to occur.
You can obtain a sufficient heavy bass reproduction from a single woofer. However if you use a couple of the woofers, you can obtain an even more effective heavy bass reproduction.
When connecting the optional speaker SS-T505
You can attach the speaker to this woofer by using the dedicated speaker stand WS-W505.
Notes
•Always install the woofer vertically, keeping a few centimeters from away the wall.
•Do not place an object on the woofer or sit on it.
•If the woofer is installed in the center of a room, the bass could be extreamely weakened. This is due to the influence of the standing wave of the room. If this happened, move the woofer away from the center of a room or eliminate the cause of the standing wave, by installing a bookshelf on the wall, etc.
4EN
Getting Started
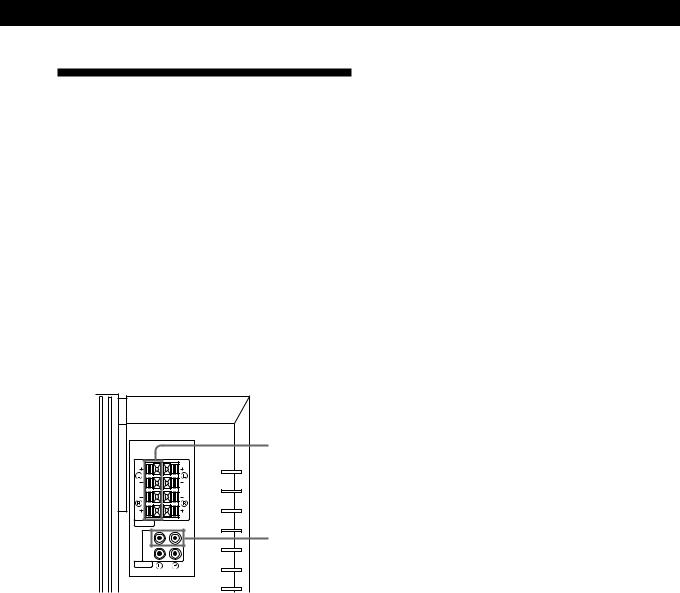
Hooking Up the System
Overview
Use the LINE IN jacks or the SPEAKER IN terminals of the woofer when you connect the amplifier.
•If your amplifier has one of the following types of output jacks, connect the L (left channel) of the LINE IN jack and the amplifier's jack using the supplied audio connecting cord.
—MONO OUT jack
—MIX OUT jack
—SUB WOOFER output jack(s)
—SUPER WOOFER output jack(s)
•If your amplifier does not have the above mentioned output jacks, connect the speaker terminals of the amplifier to the SPEAKER IN terminals instead.
IN |
OUT |
SPEAKER |
|
IN |
|
OUT |
|
LINE |
|
SPEAKER IN
LINE IN
Before you get started
•Turn off the power of the amplifier and the woofer before making any connection.
•Use the audio connecting cords that are supplied to the respective equipment. If there are not enough audio connecting cords to make the necessary connections, you need to purchase some optional audio connecting cords.
•Be sure to make connections firmly to avoid noise.
•Connect the AC power cord from the woofer to a wall outlet.
•You cannot connect the CENTER output jack for use with Dolby Pro Logic function to the woofer. Bass sound is not output with some Dolby Pro Logic modes.
(continued)
5EN

Getting Started
Connecting to an amplifier with a single set of speaker terminals
If your amplifier is equipped with a single set of speaker terminals, connect the woofer to the amplifier, and then connect the front speakers to the woofer.
What cords will I need?
Speaker cord (supplied) (1 for each speaker)
Twist the stripped ends of the cord about 2/3 inch (15 mm). Be sure to match the speaker cord to the appropriate terminal on the componentes: + to + and – to –. If the cords are reversed, the sound will be distorted and will lack bass. It is useful to decide that the speaker cord marked with a line is always the positive (+) and should be connected to the positive (+) terminal to avoid any improper connections.
Hookups
1Connect the woofer to the amplifier.
Connect the SPEAKER IN terminals of the woofer to the amplifier’s speaker terminals with the speaker cords. Be sure to connect both L and R channels.
ç: signal flow
Amplifier
SPEAKER
This woofer
IN |
OUT |
SPEAKER |
|
2Connect the front speakers to the woofer. Connect the speakers to the speaker terminals of
the woofer. |
|
This woofer |
|
IN |
OUT |
Front |
Front |
Speaker (R) |
Speaker (L) |
SPEAKER |
|
6EN
Connecting to an amplifier with double(A+B) sets of speaker terminals
If your amplifier has double(A+B) sets of speaker terminals, connect both the woofer and the front speakers to the amplifier.
What cords will I need?
Speaker cord (supplied) (1 for each speaker)
Twist the stripped ends of the cord about 2/3 inch (15 mm).
Hookups
1 Connect the front speakers to the amplifier. Connect the speakers to your amplifier’s speaker terminals (A).
|
Amplifier |
|
SPEAKER A |
Front |
Front |
Speaker (R) |
Speaker (L) |
2Connect the woofer to the amplifier.
Connect the SPEAKER IN terminals of the woofer to the amplifier’s speaker terminals (B) using speaker cords (supplied).
Amplifier
SPEAKER B
This woofer
IN |
OUT |
SPEAKER |
|
When using the double (A +B) sets of speakers, make sure that you select the “A +B” position with your amplifier.
Note
When you are using speaker terminal (A) only (front speaker only) or when the power of the amplifier is turned off, turn down the volume or turn off the power of the woofer otherwise, hum noise may be heard.
Connecting to an amplifier with a special jack for a super woofer
If your amplifier has a special jack for a super woofer (like a MONO OUT jack, MIX OUT jack, SUB WOOFER jack or SUPER WOOFER jack), connect the LINE IN jack of the woofer to one of those jacks.
What cords will I need?
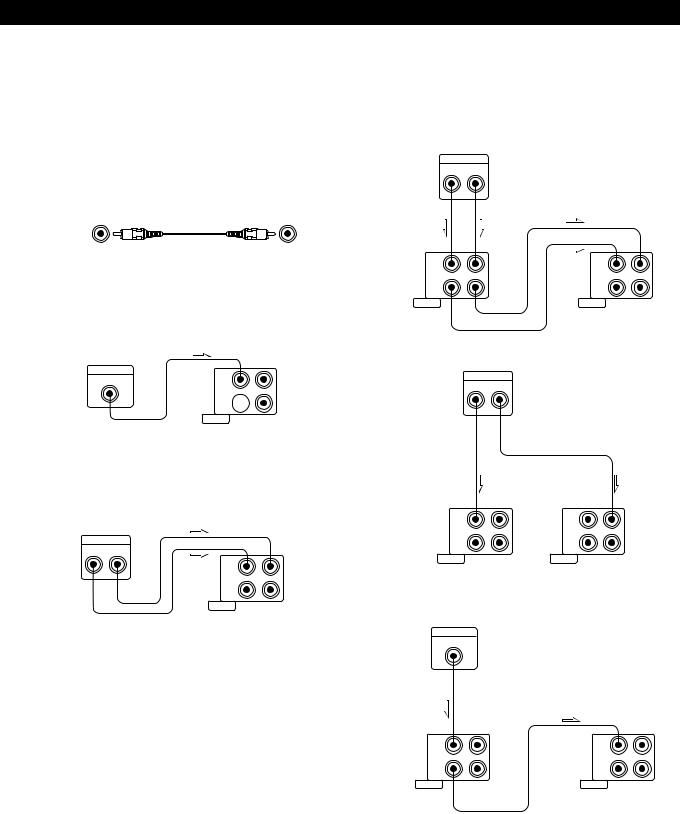
Audio connecting cord (supplied) (1)
Hookups
Connect the MONO OUT jack of your amplifier to the left LINE IN jack (L) of the woofer with the supplied audio connecting cord.
Amplifier |
This woofer |
MONO OUT |
|
|
IN |
OUT 
LINE L R
Connect the PRE OUT jacks (L/R) of your amplifier to the LINE IN jacks (L/R) of the woofer with the supplied audio connecting cord.
Amplifier
PRE OUT |
|
This woofer |
|
L |
R |
|
|
|
IN |
|
|
|
OUT |
|
|
|
LINE |
L |
R |
|
|
||
Note
If the output level of your amplifier is not large enough, the sound may not be loud enough. In this case, connect the speaker terminals of the amplifier directly to the SPEAKER IN terminals of the woofer.
Getting Started
When using this woofer for both left (L) and right (R) channels
If your amplifier has PRE OUT jacks, connect them to the woofer as shown in the following illustrations.
Amplifier
PRE OUT
L R
|
|
|
|
|
This |
This woofer |
|
|
|
|
woofer |
IN |
|
|
IN |
|
|
OUT |
|
|
OUT |
|
|
LINE |
L |
R |
LINE |
L |
R |
|
|
or
Amplifier
PRE OUT
L R
This woofer |
|
|
|
|
This woofer |
IN |
|
|
IN |
|
|
OUT |
|
|
OUT |
|
|
LINE |
L |
R |
LINE |
L |
R |
|
|
If your amplifier has a MONO OUT jack, connect it to the left LINE IN jack (L) of the woofer.
Amplifier
MONO OUT
This woofer |
|
|
|
This woofer |
|
IN |
|
|
IN |
|
|
OUT |
|
|
OUT |
|
|
LINE |
L |
R |
LINE |
L |
R |
|
|
||||
Note
Connect the MONO OUT jack, SUB WOOFER output jack, SUPER WOOFER output jack of the amplifier to the left input jack of the woofer. When connecting them to the right input jack of the woofer the sound will not come out.
Connecting the AC power cord
Connect the AC power cord from the woofer and from your amplifier to a wall outlet.
7EN
 Loading...