


4-235-007-11(4)
Super Audio CD
Player
Operating Instructions |
|
US |
|||
|
|
||||
|
|
|
|
|
|
Mode d’emploi |
|
|
|
FR |
|
|
|
|
|
||
|
|
|
|
|
|
|
|
|
|
|
|
SCD-XE670
© 2001 Sony Corporation
WARNING
To prevent fire or shock hazard, do not expose the unit to rain or moisture.
For the customers in the United States
This symbol is intended to alert the user to the presence of uninsulated “dangerous voltage” within the product’s enclosure that may be of sufficient magnitude to constitute a risk of electric shock to persons.
This symbol is intended to alert the user to the presence of important operating and maintenance (servicing) instructions in the literature accompanying the appliance.
WARNING
This equipment has been tested and found to comply with the limits for a Class B digital device, pursuant to Part 15 of the FCC Rules. These limits are designed to provide reasonable protection against harmful interference in a residential installation. This equipment generates, uses, and can radiate radio frequency energy and, if not installed and used in accordance with the instructions, may cause harmful interference to radio communications. However, there is no guarantee that interference will not occur in a particular installation. If this equipment does cause harmful interference to radio or television reception, which can be determined by turning the equipment off and on, the user is encouraged to try to correct the interference by one or more of the following measures:
–Reorient or relocate the receiving antenna.
–Increase the separation between the equipment and receiver.
–Connect the equipment into an outlet on a circuit different from that to which the receiver is connected.
–Consult the dealer or an experienced radio/TV technician for help.
CAUTION
You are cautioned that any changes or modification not expressly approved in this manual could void your authority to operate this equipment.
This label is located on the LEFT exterior.
The use of optical instruments with this product will increase eye hazard.
As the laser beam used in this CD player is harmful to eyes, do not attempt to disassemble the cabinet. Refer servicing to qualified personnel only.
Owner’s Record
The model and serial numbers are located at the rear of the unit.
Record the serial number in the space provided below. Refer to them whenever you call upon your Sony dealer regarding this product.
Model No. SCD-XE670
Serial No.
For the customers in Canada
This Class B digital apparatus complies with Canadian ICES-003.
CAUTION
TO PREVENT ELECTRIC SHOCK, DO NOT USE THIS POLARIZED AC PLUG WITH AN EXTENSION CORD, RECEPTACLE OR OTHER OUTLET UNLESS THE BLADES CAN BE FULLY INSERTED TO PREVENT BLADE EXPOSURE.
About This Manual
The instructions in this manual are for model SCDXE670.
Conventions
•Instructions in this manual describe the controls on the player.
You can also use the controls on the remote if they have the same or similar names as those on the player.
•The following icons are used in this manual:
ZIndicates that you can do the task using the remote.
zIndicates hints and tips for making the task easier.
2US

Features |
Table of Contents |
About the Super Audio CD
•Super Audio CD is a new high-quality audio disc standard where music is recorded in the DSD (Direct Stream Digital) format (conventional CDs are recorded in the PCM format). The DSD format, using a sampling frequency 64 times higher than that of a conventional CD, and with 1-bit quantization, achieves both a wide frequency range and a wide dynamic range across the audible frequency range, and so provides music reproduction extremely faithful to the original sound.
•The Super Audio CD has two types; a 2 channel stereo disc and a Multi-channel disc which holds up to 6 independent channels. The multi-channel characteristic of the Super Audio CD features a speaker allocation system basically similar to the 5.1 channel output of current AV systems.
Features of the player
This player is designed to play back 2-channel and multi-channel Super Audio CDs, and conventional CDs, and provides the following features:
•Mounted with a Discrete Dual Laser Optical Pickup, capable of reading a Super Audio CD or conventional CD depending on the exclusive wavelength.
•Quicker track access performance enabled by an advanced servo mechanism.
•A Multi-Channel Management function that allows you to adjust the multi-channel playback environment according to the allocation and size of your speakers.
•A Super Audio D/A Converter and Direct Digital Sync System, which allows higherquality sound reproduction.
Others
•A Super Audio CD can mark up to 255 track numbers. This feature applies to SCDXE670.
•The supplied remote is capable of controlling both the SCD-XE670 and a conventional Sony CD player.
Parts Identification
Front Panel ................................................ |
4 |
Rear Panel ................................................. |
4 |
Remote Control ......................................... |
5 |
Getting Started
Checking the supplied accessories ............ |
6 |
Inserting Batteries Into the Remote .......... |
6 |
Hooking Up the System ............................ |
6 |
Playing CDs
Compatible Disc Types ............................. |
9 |
|
|
Playing a Disc ......................................... |
10 |
|
|
Using the Display .................................... |
11 |
|
US |
.......................Locating a Specific Track |
14 |
|
|
Locating a Particular Point in a Track .... |
15 |
|
|
Playing Tracks Repeatedly ...................... |
16 |
|
|
Playing Tracks in Random Order (Shuffle |
|
|
|
Play) .................................................. |
17 |
|
|
Creating Your Own Program |
|
|
|
(Program Play) ................................. |
18 |
|
|
Listening to a Multi-channel Super Audio |
|
|
|
CD (Multi-channel management |
|
|
|
function) ........................................... |
19 |
|
|
|
|
|
|
Additional Information |
|
|
|
Precautions .............................................. |
23 |
|
|
Notes on Discs ........................................ |
24 |
|
|
Troubleshooting ...................................... |
25 |
|
|
Specifications .......................................... |
25 |
|
|
3US

Parts Identification
The items are arranged in alphabetical order.
Refer to the pages indicated in parentheses ( ) for details.
Front Panel
CHECK qg (18)
CLEAR qh (18) Disc tray 6 (10) Display w; (11)
MENU qj (10, 20) MULTI/2CH qk (9, 11) Multi-Channel indicator 7 PHONE LEVEL qf (25)
PHONES jack qd
PLAY MODE 2 (17, 18) POWER 1 (10)
Remote sensor ql (6) REPEAT 3 (16) SACD/CD 5 (9, 11) TIME/TEXT 4 (11)
BUTTON DESCRIPTIONS
lAMSLdial qs (10, 11, 14, 15, 19, 20)
AOPEN/CLOSE 8 (10, 18) H9 (10, 15, 16, 17, 18) X0 (11)
xqa (11, 16, 19) m/Mwa (15)
Rear Panel
ANALOG 2CH OUT L/R jacks 1 (8) ANALOG 5.1CH OUT jacks 2 (6) DIGITAL (CD) OUT OPTICAL jack 3 (8) Mains lead 4 (8)
4US
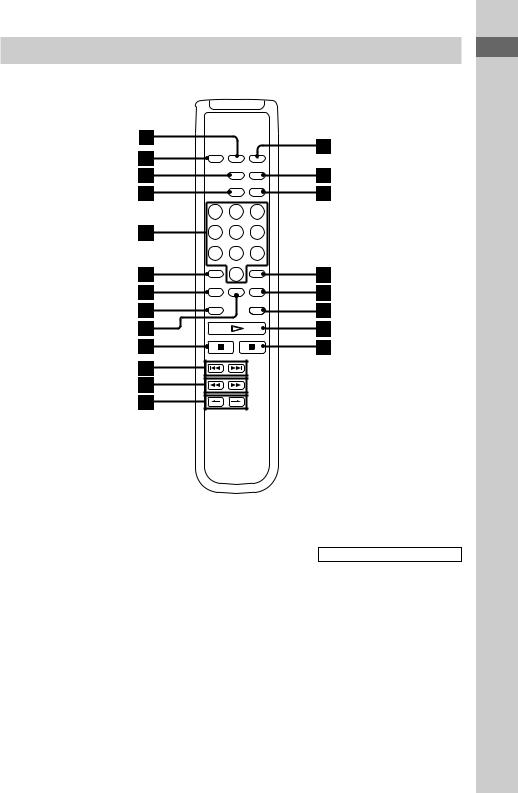
Remote Control
AyB 8 (16)
AMS ./>qa (14, 15, 17, 22)
CHECK 9 (18)
CLEAR qk (18) CONTINUE 2 (17, 18) DISPLAY MODE 3 (12) ENTER qj (22)
INDEX >/.qd (15)
LEVEL ADJ ql (22) MULTI/2CH qh (9, 11) Number buttons 5 (14, 18) PROGRAM qf (18) REPEAT 7 (16) SACD/CD qg (9, 11) SHUFFLE 1 (17) TIME/TEXT 4 (11)
Identification Parts
BUTTON DESCRIPTIONS
>10 6 (14, 18)
Hw; (10, 15, 16, 17, 18) X0 (11)
xwa (11, 16, 19) m/Mqs (15)
5US
Getting Started
Checking the supplied
accessories
This player comes with the following items:
•Audio connecting cord
phono jack × 2 (Red and White) yphono jack × 2 (Red and White) (2)
phono jack × 1 (Black) yphono jack × 1 (Black) (2)
•Remote commander RM-SX700 (1)
•Size AA (R6) batteries (2)
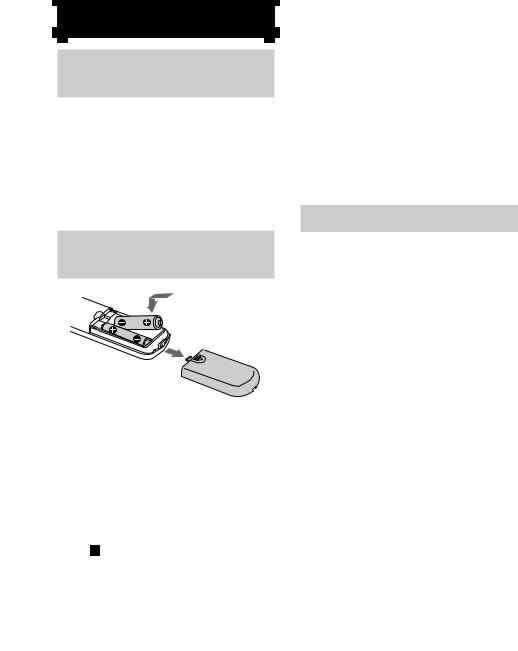
Inserting Batteries Into
the Remote
You can control the player using the supplied remote.
Insert two size AA (R6) batteries by matching the + and – on the batteries to the diagram inside the battery compartment.
Insert the negative (–) end first, then push in and down until the positive (+) end clicks into position.
When using the remote, point it at the remote sensor on the player.
z When to replace the batteries
Under normal conditions, the batteries should last for about six months. When the remote no longer operates the player, replace both batteries with new ones.
Notes
•Do not leave the remote in an extremely hot or a humid place.
•Do not drop any foreign object into the remote casing, particularly when replacing the batteries.
•Do not use a new battery with an old one.
•Do not expose the remote sensor to direct sunlight or lighting apparatus. Doing so may cause a malfunction.
•If you do not intend to use the remote for an extended period of time, remove the batteries to avoid possible damage from battery leakage and corrosion.
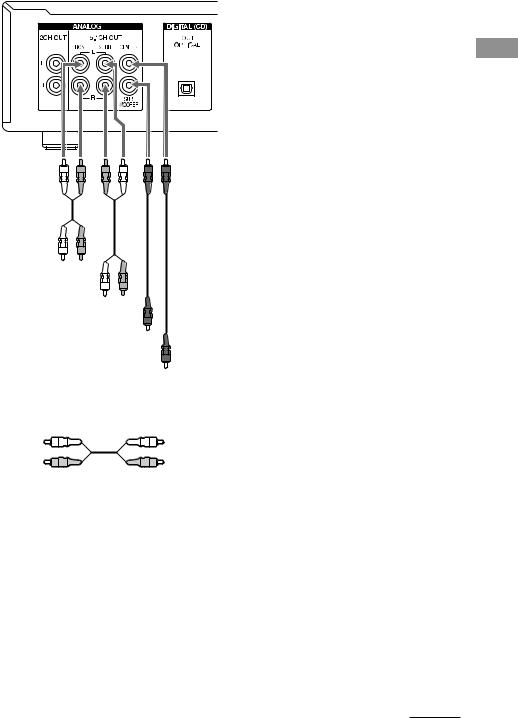
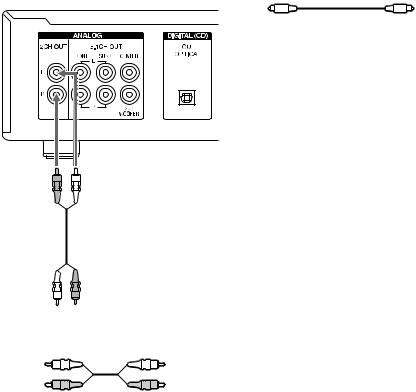
Hooking Up the System
Connect the Super Audio CD player to an audio component. Be sure to turn off the power of all components before making connections and connect securely to prevent noise.
When you have an amplifier equipped with the 5.1CH input jacks (multi-channel amplifier, AV amplifier, etc.) and connect the player and the amplifier via ANALOG 5.1CH OUT jacks, you can play a multi-channel Super Audio CD and enjoy the multi-channel playback.
For normal playback, connect the player and an amplifier via ANALOG 2CH OUT jacks.
Connecting via ANALOG 5.1CH OUT jacks
Use audio connecting cords for this connection. Connect the ANALOG 5.1CH OUT jacks (FRONT L/R, SURR L/R, CENTER, SUBWOOFER) to the corresponding jacks of your amplifier. For FRONT or SURR connection, use the connecting cords (Red and White jacks) and be sure to match the colorcoded pin to the appropriate jacks: white (left) to white and red (right) to red. For CENTER and SUB WOOFER connection, use the connecting cords (Black).
6US
Notes
• When you make the Multi-channel connection, connect the ANALOG 2CH OUT jacks also using another audio connecting cord so that you can play a CD (or SACD) when you set the input selector of your amplifier to CD (or SACD) input .
• During playback of a conventional CD or a 2CH Super Audio CD, the same signal that is output from the ANALOG 2CH OUT jacks is also output from the ANALOG 5.1CH FRONT L/R jacks.
• During playback of a Multi-channel Super Audio CD, the same signal that is output from the ANALOG 5.1CH FRONT L/R jacks is also output from the ANALOG 2CH OUT jacks. (The down mixed signal of the Multi-channel signal is not played back.)
• There are some types of Super Audio CD disc, such as 5CH, 4CH, and 3CH. When you play these disc, the signal does not output from all the jacks of the ANALOG 5.1CH OUT. For details of the playback, see the cover or instructions of the Super Audio CD disc.
To FRONT IN (L/R) jacks
To SURROUND or
REAR IN (L/R) jacks
To SUB WOOFER IN jack
To CENTER IN jack
FRONT or SURR connection
Audio connecting cords (Red and White) (supplied)
White (L) |
White (L) |
Red (R) |
Red (R) |
CENTER or SUB WOOFER connection
Audio connecting cords (Black) (supplied)
Black 
 Black
Black
Started Getting
continued
7US
Hooking Up the System (continued)
Connecting via ANALOG 2CH OUT jacks
Use an audio connecting cords for this connection. Connect the ANALOG 2CH OUT L/R jacks to the CD (SACD) input jacks of your amplifier. Be sure to match the colorcoded pin to the appropriate jacks: white (left) to white and red (right) to red.
To CD (SACD) IN (L/R) jacks
Audio connecting cords (Red and White) (not supplied*)
White (L) |
White (L) |
Red (R) |
Red (R) |
*If you do not make the ANALOG 5.1 CH connection (page 6), you can use the supplied audio connecting cable for the ANALOG 2CH connection.
Connecting via DIGITAL (CD) OUT OPTICAL connector
Use an optical digital cable for this connection. When connecting the optical digital cable to the DIGITAL (CD) OUT OPTICAL connector, take the cap off the connectors and push the cable plugs in until they click into place.
Be careful not to bend or twist the optical cable.
Optical digital cable (not supplied)
Note
Only the audio signals of conventional CDs can be output from the DIGITAL (CD) OUT OPTICAL connector. Those of the Super Audio CD cannot be output through the DIGITAL (CD) OUT OPTICAL connector.
Connecting the AC power cord
Connect the AC power cord to a wall outlet.
8US
Playing discs
Compatible Disc Types
You can play the following discs with this player.
Depending on the type of disc to be played, select the appropriate indicator by pressing SACD/CD or MULTI/2CH (pages 11).
Classification by the layer configuration
Super Audio CD (single layer disc)
This disc consists of a single HD (high density) layer.
When you play this disc, the player is set to the Super Audio CD playback mode automatically.
HD (Super Audio CD) layer
Super Audio CD (dual layer disc)
This disc consists of dual HD layers and is capable of extended play over long periods.
When you play this disc, the player is set to the Super Audio CD playback mode automatically.
Also, as the dual layer disc consists of dual HD layers on one side only, it is not necessary to turn the disc over.
HD (Super Audio CD) layer
HD (Super Audio CD) layer
Conventional CD
This disc is the standard format.
When you play this disc, the player is set to the Conventional CD playback mode automatically.
CD layer
Super Audio CD + CD (Hybrid disc)
This disc consists of an HD layer and a CD layer. Press SACD/CD to select the layer you want to listen to. Also, as the dual layers are on one side, it is not necessary to turn the disc over. You can play the CD layer using a conventional CD player.
CD layer
HD (Super Audio CD) layer
Classification by the channel configuration of the Super Audio CD
2 channel Super Audio CD
This disc consists of the 2 channel playback area.
When you play this disc, the player is set to the 2 channel playback mode automatically.
2 channel playback area
Multi-channel Super Audio CD
This disc consists of the multi-channel playback area.
When you play this disc, the player is set to the multi-channel playback mode automatically.
Multi-channel playback area
Started Getting
discs Playing
continued
9US
Compatible Disc Types (continued)
2 channel + Multi-channel Super Audio CD
This disc consists of the 2 channel playback area and the multi-channel playback area.
Press MULTI/2CH to select the playback area you want to listen to.
 2 channel playback area
 Multi-channel playback area
You can select the default playback area (2 channel playback or multi-channel playback area).
1 During stop mode, press MENU.
2 Turn lAMSLuntil “M/2CH SELECT” appears in the display.
3 Press lAMSL.
The current playback area appears.
4 Turn lAMSLto select desired playback area, then press lAMSL.
Incompatible Discs
This player cannot play the following discs. If you try to play them, the error message “TOC Error” or “No Disc” will appear or there will be no sound.
•CD-ROM
•DVD, etc.
Playing a Disc
The operations for normal play and the basic operations during play are explained below.
1 Turn on the amplifier. Turn down the volume level to the lowest.
2 Select the player position using the input selector on the amplifier.
3 Press POWER to turn on the player.
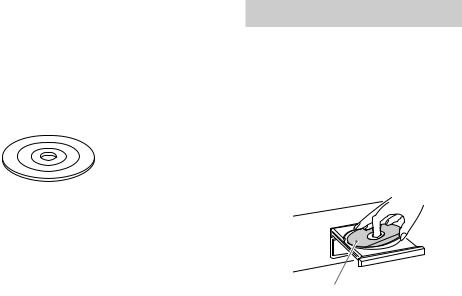
4 Press AOPEN/CLOSE to open the disc tray, and place a disc on the tray.
With the label side up
5 Press SACD/CD to select the SACD or CD.
Each time you press the button, the SACD or CD appears alternately in the display. Select the type of disc on the tray. For details, see page 9.
6 Press H.
Playback starts from the first track. If you want to start playing from a specific track, turn lAMSLto select the track number before pressing H.
7 Adjust the volume on the amplifier.
10US
Basic operations during play |
|
Using the Display |
|
To |
Press |
|
|
|
|
||
Stop play |
x |
|
|
Pause play |
X |
|
|
Resume play after |
Xor H |
pausing |
|
|
|
Locate a succeeding |
Turn lAMSL |
track |
clockwise |
Locate the beginning Turn lAMSL of the current track counterclockwise
or a preceding track
Eject the disc |
AOPEN/CLOSE |
|
|
The display window shows various information about the disc or track being played. This section describes the current disc information and information that appears for each play status.
Disc information when a disc is loaded
Depending on the disc that is currently loaded, the display shows as follows:
2 channel Super Audio CD
z If you turn on the player when a disc is |
|
|
2 |
CH |
|
|
S A C D |
|
|||
already loaded |
|
|
|
|
|
6 |
7 |
8 |
9 |
10 |
|
|
1 |
2 |
3 |
4 |
5 |
Playback starts automatically. If you connect a |
|
|
|
|
|
|
|
|
|
|
|
|
|
|
|
|
|
|
|
|
|
|
|
|
|
|
|
|
|
|
|
|
|
|
|
|
|
|
|
|
|
|
|
|
|
|
|
|
|
|
|
|
|
|
|
|
|
|
|
|
|
|
|
|
|
|
|
|
|
|
|
|
|
|
|
|
|
|
|
|
|
|
|
|
|
|
|
|
|
commercially available timer, you can set it to start |
Multi-channel Super Audio CD |
|
|
|
|
|
|
|
|
||||||||||||||||||||
playing the disc at any time you want. |
|
|
|
|
|
|
|
|
|||||||||||||||||||||
z To select a layer you want to listen to |
|
|
|
|
|
|
|
|
|
|
|
|
|
|
|
|
|
|
|
|
|
|
|
|
|
|
|
|
|
|
|
MULTI |
5.1CH |
|
|
MULTI |
5 |
CH |
|
|
|
MULTI |
|
CH |
|||||||||||||||
when playing a hybrid disc (page 9) |
|
|
|
S A C D |
|
|
|
or |
|
|
S A C D |
or |
|
|
S A C D |
||||||||||||||
|
|
|
|
|
|
|
|
|
|
|
|
|
|
|
|
|
|
|
|
|
|
|
|
||||||
|
1 |
|
2 |
3 |
4 |
5 |
|
1 |
|
2 |
3 |
4 |
|
5 |
|
1 |
|
2 |
3 |
4 |
|
5 |
|
||||||
After you stop play using x, press SACD/CD |
|
6 |
|
7 |
8 |
9 |
10 |
|
|
|
|
6 |
|
7 |
8 |
9 |
|
10 |
|
|
|
6 |
|
7 |
8 |
9 |
|
10 |
|
repeatedly to light either the “SACD” or “CD.” |
|
|
|
|
|
|
|
|
|
|
|
|
|
|
|
|
|
|
|
|
|
|
|
|
|
|
|
|
|
|
|
|
|
|
|
|
|
|
|
|
|
|
|
|
|
|
|
|
|
|
|
|
|
|
|
|
|
|
|
|
|
|
|
|
|
|
|
|
|
|
|
|
|
|
|
|
|
|
|
|
|
|
|
|
|
|
|
|
|
z To select a playback area you want to listen to when playing a 2 channel + Multi-channel Super Audio CD (page 10)
After you stop play using x, press MULTI/2CH repeatedly to light either the “MULTI CH” or “2 CH.”
Note
During |
During |
During |
playback a 5.1 |
playback a 5 |
playback |
channel Super |
channel Super |
other Super |
Audio CD |
Audio CD |
Audio CDs or |
|
|
during stop |
|
|
mode |
Conventional CD
During playback, increase the volume level |
|
|
|
C D |
|
|
|
gradually starting from the lowest level. The output |
|
|
|
|
|
|
|
|
1 |
2 |
3 |
4 |
5 |
|
|
from this unit may contain band width that are out of |
|
6 |
7 |
8 |
9 |
10 |
|
|
|
|
|
|
|
|
|
the normal listening range. This may cause damage |
|
|
|
|
|
|
|
|
|
|
|
|
|
|
|
to the speakers or ears. |
|
|
|
|
|
|
|
Displaying information while the player is stopped
Press TIME/TEXT.
The display shows the total number of tracks and total playing time.
Total number of tracks Total playing time
|
|
|
|
|
|
|
|
|
|
|
|
|
|
|
|
|
|
|
|
|
|
|
MULTI |
|
CH |
||||
|
|
|
|
|
|
|
|
|
S A C D |
|||||
|
TRACK |
|
MIN |
SEC |
|
|
|
|
|
|
|
|
||
|
|
1 |
|
2 |
3 |
4 |
|
5 |
|
|||||
1 0 |
|
4 5 . 2 8 |
|
6 |
|
7 |
8 |
9 |
|
10 |
|
|||
|
|
|
|
|
|
|
|
|
|
|||||
|
|
|
|
|
|
|
|
|
|
|
|
|
|
|
discs Playing
continued
11US

Using the Display (continued)
Displaying information while the player is playing
Press TIME/TEXT.
Each time you press the button, the current track number and its elapsed time or remaining time appears, or the total remaining time for the disc appears in the display.
When the player detects a Multi-channel Super Audio CD, the channel information appears before the default display appears.
Playing track number and elapsed playing time of the current track (default display)
|
|
|
|
MULTI |
5.1CH |
||||
|
|
|
|
|
S A C D |
|
|
||
TRACK INDEX |
MIN |
SEC |
|
|
|
|
|
|
|
1 |
|
2 |
3 |
4 |
5 |
|
|||
1 |
1 . 5 7 |
6 |
|
7 |
8 |
9 |
10 |
|
|
|
|
|
|
|
|
|
|||
|
|
|
|
|
|
|
|
|
|
Press TIME/TEXT
Playing track number and remaining time of the current track
|
|
|
|
MULTI |
5.1CH |
||||
|
|
|
|
|
S A C D |
|
|
||
TRACK |
MIN |
SEC |
|
|
|
|
|
|
|
1 |
|
2 |
3 |
4 |
5 |
|
|||
1 |
- 1 . 5 6 |
6 |
|
7 |
8 |
9 |
10 |
|
|
|
|
|
|
|
|
|
|||
|
|
|
|
|
|
|
|
|
|
Press TIME/TEXT
Total remaining time on the disc
|
|
|
MULTI |
5.1CH |
||||
|
|
|
|
S A C D |
|
|
||
MIN |
SEC |
|
|
|
|
|
|
|
1 |
|
2 |
3 |
4 |
5 |
|
||
- 4 3 . 3 2 |
6 |
|
7 |
8 |
9 |
10 |
|
|
|
|
|
|
|
|
|
||
|
|
|
|
|
|
|
|
|
Press TIME/TEXT
Channel information (appears only when the player detects a Multi-channel Super Audio CD)
|
|
MULTI |
5.1CH |
||||
|
|
|
S A C D |
|
|
||
TRACK |
|
|
|
|
|
|
|
1 |
|
2 |
3 |
4 |
5 |
|
|
[ M U L T I ] 5 . 1 C H |
6 |
|
7 |
8 |
9 |
10 |
|
|
|
|
|
|
|
|
|
|
|
|
|
|
|
|
|
Turning off the information in the display
Each time you press DISPLAY MODE on the remote while playing a disc, the display turns off and on alternately.
Even when the display is turned off, the display turns on if you pause or stop play. When you resume play, the display turns off again.
Before you start playing, when you press DISPLAY MODE to turn off the display, “Display Off” appears, and when you press the button to turn on the display, “Display On” appears.
Displaying the information of a TEXT disc
TEXT discs contain information, such as the disc name or artist name, as well as the audio signals. This player can display the disc name, artist name, and current track name as TEXT information.
When the player detects a TEXT disc, “TEXT” appears in the display. If your TEXT disc has several languages, “TEXT” and “MULTI” appear in the display. When you want to check the information in another language, see “Displaying the information of a TEXT disc in other languages” on page 14.
12US
Displaying the information of a TEXT disc in stop mode
Press TIME/TEXT.
Each time you press the button, the disc name or artist name appears in the display. When you select the artist name, “ART.” appears in the display.
• Before you start playing
Disc title
|
|
|
|
MULTI |
|
CH |
||||
|
|
TEXT |
|
|
S A C D |
|||||
|
|
|
|
|
|
|
|
|
|
|
DISC |
|
|
1 |
|
2 |
3 |
4 |
|
5 |
|
S O N Y H I T S |
|
6 |
|
7 |
8 |
9 |
|
10 |
|
|
|
|
|
|
|
|
|
|
|
||
|
|
|
|
|
|
|
|
|
|
|
|
Press TIME/TEXT |
|
|
|
|
|
|
|
|
|
Artist name |
|
|
|
|
|
|
|
|
|
|
|
|
|
|
|
|
|
||||
|
|
|
|
MULTI |
|
CH |
||||
|
|
TEXT |
|
|
S A C D |
|||||
|
|
|
|
|
|
|
|
|
|
|
ART. |
|
|
1 |
|
2 |
3 |
4 |
|
5 |
|
S O N Y B A N D |
|
6 |
|
7 |
8 |
9 |
|
10 |
|
|
|
|
|
|
|
|
|
|
|
||
|
|
|
|
|
|
|
|
|
|
|
|
Press TIME/TEXT |
|
|
|
|
|
|
|
|
|
Total number of tracks and total playing time |
|
|
|
|||||||
|
|
|
|
MULTI |
|
CH |
||||
|
|
TEXT |
|
|
S A C D |
|||||
|
|
|
|
|
|
|
|
|
|
|
TRACK |
MIN |
SEC |
1 |
|
2 |
3 |
4 |
|
5 |
|
1 0 |
4 5 . 2 8 |
6 |
|
7 |
8 |
9 |
|
10 |
|
|
|
|
|
|
|
|
|
|
|||
|
|
|
|
|
|
|
|
|
|
|
Press TIME/TEXT
Display information of a TEXT disc while playing a disc
The current track name appears. If the disc name has more than 15 characters, the first 14 characters will remain after the name scrolls by in the display.
When the player detects a Multi-channel Super Audio CD, the channel information appears before the playing time of the current track appears.
• While playing a disc
Track title
|
|
|
MULTI |
5.1CH |
|||
|
TEXT |
S A C D |
|
|
|||
|
|
|
|
|
|
||
TRACK |
|
1 |
2 |
3 |
4 |
5 |
|
H I T E C H B L U E S |
|
6 |
7 |
8 |
9 |
10 |
|
|
|
|
|
|
|
|
|
|
|
|
|
|
|
|
|
Press TIME/TEXT
Channel information (appears only when the player detects a Multi-channel Super Audio CD)
|
|
|
|
|
MULTI |
5.1CH |
|
|||
|
|
|
TEXT |
|
S A C D |
|
|
|
||
|
|
|
|
|
|
|
|
|
|
|
TRACK |
|
|
|
1 |
2 |
3 |
4 |
5 |
|
|
[ M U L T I ] 5 . 1 C H |
6 |
7 |
8 |
9 |
10 |
|
|
|||
|
|
|
|
|
|
|
||||
|
|
|
|
|
|
|
|
|
|
|
Playing time of the current track |
|
|
|
|
|
|
|
|||
|
|
|
|
|
|
|
|
|
|
|
|
|
|
|
|
MULTI |
5.1CH |
|
|||
|
|
|
TEXT |
|
S A C D |
|
|
|
||
|
|
|
|
|
|
|
|
|
|
|
TRACK |
INDEX |
MIN |
SEC |
1 |
2 |
3 |
4 |
5 |
|
|
1 |
1 |
1 . 5 6 |
6 |
7 |
8 |
9 |
10 |
|
|
|
|
|
|
|
|
|
|
||||
|
|
|
|
|
|
|
|
|
|
|
|
Press TIME/TEXT |
|
|
|
|
|
|
|
||
Remaining time on the current track |
|
|
|
|
|
|
|
|||
|
|
|
|
|
MULTI |
5.1CH |
|
|||
|
|
|
TEXT |
|
S A C D |
|
|
|
||
|
|
|
|
|
|
|
|
|
|
|
TRACK |
|
MIN |
SEC |
1 |
2 |
3 |
4 |
5 |
|
|
1 |
|
- 1 . 5 7 |
6 |
7 |
8 |
9 |
10 |
|
|
|
|
|
|
|
|
|
|
|
|||
|
|
|
|
|
|
|
|
|
|
|
|
Press TIME/TEXT |
|
|
|
|
|
|
|
||
Remaining time on the disc |
|
|
|
|
|
|
|
|
||
|
|
|
|
|
|
|
|
|
|
|
|
|
|
|
|
MULTI |
5.1CH |
|
|||
|
|
|
TEXT |
|
S A C D |
|
|
|
||
|
|
|
|
|
|
|
|
|
|
|
|
|
MIN |
SEC |
1 |
2 |
3 |
4 |
5 |
|
|
|
- 4 3 . 3 2 |
6 |
7 |
8 |
9 |
10 |
|
|
||
|
|
|
|
|
|
|
|
|||
|
|
|
|
|
|
|
|
|
|
|
|
|
|
Press TIME/TEXT |
|||||||
discs Playing
continued
13US

Using the Display (continued)
Notes
•The display may not show all the characters, depending on the disc.
•This player can display only the disc name, artist name, and track names from TEXT discs. Other information cannot be displayed.
Displaying the information of a TEXT disc in other languages
You can change the displayed language if the TEXT disc has multi language capacity. When the player detects such a TEXT disc, “TEXT” and “MULTI” appear in the display. Change the language according to the procedures below.
1 Press MENU in stop mode.
2 Turn lAMSLuntil “LANGUAGE” appears in the display.
3 Press lAMSL.
The current selected language (English, French, German, etc.) flashes.
If the player cannot display the language used in a TEXT disc, “Other Lang” appears in the display.
4 Turn lAMSLuntil the desired language appears in the display.
5 Press lAMSL.
After a few seconds, the information appears in the selected language.
Locating a Specific Track
During stop or play mode, you can locate any track to be played.
To locate |
You need to |
The next or |
Turn lAMSLclockwise |
succeeding |
until you find the track. When |
tracks |
using the remote, press > |
|
repeatedly until you find the |
|
track. |
|
|
The current |
Turn lAMSL |
or preceding |
counterclockwise until you find |
tracks |
the track. When using the remote, |
|
press .repeatedly until you |
|
find the track. |
|
|
A specific |
Turn lAMSLuntil you |
track directly |
find the track number you want. |
|
When using the remote, press |
|
.or >repeatedly until |
|
you find the track. |
|
|
Locating a track directly by entering the track number Z
Press the number button(s) to enter the track number.
z To enter a track number over 11
1 Press >10.
2 Enter the corresponding digits.
To enter 0, press 10/0 instead.
Examples:
•To play track number 30, press >10, then 3 and 10/0.
•To play track number 100, press >10 twice, then 1, and 10/0 twice.
14US

Locating a Particular
Point in a Track
You can locate a particular point in a track during play or play pause.
Locating a point while monitoring the sound (Search)
Press and hold m/Mduring play.
You will hear intermittent playback as the disc goes forward or reverses.
When you reach the desired point, release the button.
Locating a point by observing the time indication (HighSpeed Search)
Press and hold m/Mduring play pause.
You will not hear the playback sound.
z When “Over!!” appears in the display
The disc has reached its end. Press .or mto go back.
Note
Tracks that are only a few seconds long may be too short for monitoring. In this case, the player may not search correctly.
Locating a point using the index function (Index Search)
Z
Press INDEX.or INDEX>repeatedly in play or pause mode.
z What is an INDEX?
Some SACD or CD are provided with an index marking system which divides tracks or discs into smaller segments. This is especially useful when you want to locate a certain point within a long track (in classical music for example). The index search function works only when you use a commercially available indexed discs (usually indicated on the label).
Locating a point by setting the start time (Time Search)
1 Press ./>(or turn lAMSL) to select the desired track in stop mode.
2 Press and hold m/Mto set the time to start play while looking at the display.
You can set the time from the beginning of the desired a track when you press Mat first, and set the time from the end of the desired track backward’s when you press mat first.
|
|
|
|
MULTI |
5.1CH |
||||
|
|
|
|
|
S A C D |
|
|
||
TRACK |
MIN |
SEC |
|
|
|
|
|
|
|
1 |
|
2 |
3 |
4 |
5 |
|
|||
5 |
2 . 5 7 |
6 |
|
7 |
8 |
9 |
10 |
|
|
|
|
|
|
|
|
|
|||
|
|
|
|
|
|
|
|
|
|
3 Press H.
Play will start at the time search.
discs Playing
15US

Playing Tracks
Repeatedly
You can play an entire disc or portions thereof repeatedly. This function can be used with Shuffle Play to repeat all the tracks in random order (page 17), or with Program Play to repeat all the tracks in a program (page 18). You can also repeat a specific track or portion within a track.
Note
If you turn off the player or disconnect the mains lead, the player will store the last setting of repeat play (“Repeat All” or “Repeat 1”) and recall it the next time you turn on the player. However, the setting of the Repeat A-B Play will be cancelled if you turn off the player or disconnect the mains lead.
Repeating all the tracks on the disc (Repeat All Play)
Press REPEAT once, then press H.
“REPEAT” appears in the display and Repeat All Play starts.
The repeat play changes depending on the play mode you select.
When the play |
The player repeats |
mode is |
|
|
|
Normal play |
All the tracks in sequence |
(page 10) |
|
|
|
Shuffle Play |
All the tracks in random |
(page 17) |
order |
|
|
Program Play |
All the tracks in the program |
(page 18) |
in sequence |
|
|
To stop Repeat All Play
Press x.
To resume normal play
Press REPEAT repeatedly until “REPEAT” goes off.
Repeating the current track (Repeat 1 Play)
While the track you want to repeat is being played, press REPEAT repeatedly until “REPEAT 1” appears in the display.
Repeat 1 Play starts.
To stop Repeat 1 Play
Press x.
To resume normal play
Press REPEAT repeatedly until “REPEAT 1” goes off.
Repeating a specific portion within a track (Repeat A-B Play) Z
You can specify one portion within a track to be played repeatedly. Note that the portion that you specify must be within the boundaries of a single track.
1 While the player is playing, press AyB at the starting point (point A) of the portion to be played repeatedly.
“REPEAT” appears and “A” flashes in the display.
2 Continue playing the track (or press M) to locate the ending point (point B), then press AyB.
“REPEAT A-B” appears and Repeat A-B Play starts.
To stop Repeat A-B Play and resume normal play
Press REPEAT or x.
16US
 Loading...