


US
English
FR
Français
ES
Español
Internal Hard Disk Drive (40GB)
(for PlayStation®2)
Disque Dur Interne (40 Go)
(pour PlayStation®2)
Disco Duro Interno (40GB)
(para PlayStation®2)
Hardware installation guide
Thank you for purchasing the internal hard disk drive (for PlayStation®2). Before installing or using this product, carefully read this guide and retain it for future reference. Refer also to the instruction manuals for the PlayStation®2 console and the network adaptor (for PlayStation®2) (sold separately).
This guide provides hardware installation instructions only. For HDD usage instructions, refer to the instruction manual for the internal hard disk drive (40GB) (for PlayStation®2) and HDD utility disc (ver 1.10).
Guide d’installation du matériel
Nous vous remercions d’avoir fait l’acquisition du disque dur interne (pour PlayStation®2). Avant d’installer ou d’utiliser ce produit, lisez attentivement ce guide et conservez-le pour pouvoir vous y reporter ultérieurement. Reportez-vous aussi aux modes d’emploi de la console PlayStation®2 et de l’adaptateur réseau (pour PlayStation®2) (vendu séparément). Ce guide donne seulement les instructions d’installation du matériel.
Pour les instructions d’utilisation du HDD, reportez-vous au mode d’emploi du Disque Dur Interne (40 Go) (pour PlayStation®2) et Disque d’Utilitaires HDD (version 1.10).
Guía de instalación del hardware
Gracias por adquirir el disco duro interno (para PlayStation®2). Antes de instalar o utilizar este producto, lea detenidamente esta guía y consérvela para consultarla en el futuro. Consulte también los manuales de instrucciones de la consola PlayStation®2 y del adaptador de red (para PlayStation®2) (vendido por separado).
Esta guía solamente proporciona instrucciones de instalación de hardware. Para obtener instrucciones sobre el uso del HDD, consulte el manual de instrucciones del Disco Duro Interno (40GB) (para PlayStation®2) y Disco de Utilidad HDD (ver. 1.10).
SCPH-20401 U / 97266
HDD v. 1.0

WARNING
To prevent fire or shock hazard, do not expose the unit to rain or moisture.
To avoid electrical shock, do not disassemble. Refer servicing to qualified personnel only.
Information
For customers in the USA
This equipment has been tested and found to comply with the limits for a Class B digital device, pursuant to Part 15 of the FCC rules. These limits are designed to provide reasonable protection against harmful interference in a residential installation. This equipment generates, uses, and can radiate radio frequency energy and, if not installed and used in accordance with the instructions, may cause harmful interference to radio communications.
However, there is no guarantee that interference will not occur in a particular installation. If this equipment does cause harmful interference to radio or television reception, which can be determined by turning the equipment off and on, the user is encouraged to try to correct the interference by one or more of the following measures:
–Reorient or relocate the receiving antenna.
–Increase the separation between the equipment and receiver.
–Connect the equipment into an outlet on a circuit different from that to which the receiver is connected.
–Consult the dealer or an experienced radio/TV technician for help.
You are cautioned that any changes or modifications not expressly approved in this manual could void your authority to operate this equipment.
Owner’s record
The model and serial numbers are located on the top surface of the internal hard disk drive. Record the serial number in the space provided below. Refer to these numbers whenever you call for technical assistance at 1-800-345-7669.
Model No. SCPH-20401
Serial No. _______________________________
2

Table of contents |
|
|
US |
WARNING ........................................................ |
2 |
About this product ........................................... |
4 |
Precautions ...................................................... |
4 |
Part names ....................................................... |
6 |
Installing the HDD in a PlayStation®2 |
|
console .......................................................... |
7 |
Positioning a PlayStation®2 console with an HDD |
|
installed ................................................................ |
10 |
Removing the HDD from a PlayStation®2 |
|
console ........................................................ |
11 |
Troubleshooting ............................................. |
14 |
Specifications ................................................ |
15 |
LIMITED WARRANTY ...................................... |
16 |
3
About this product |
Precautions |
|
|
|
|
Compatible models
The internal hard disk drive (40GB) (for PlayStation®2) (referred to as “HDD” throughout this guide) is designed exclusively for use with the PlayStation®2 console.
Do not attempt to install the HDD in any other hardware, as doing so may damage not only the HDD but also the hardware to which you attempt installation. Also, do not connect a commercially available hard disk drive that is not specifically designed for the PlayStation®2 console to the network adaptor, as this may damage the console or the connected device.
A network adaptor (for PlayStation®2) (sold separately) is required to install the HDD in the PlayStation®2 console. The combination of the HDD and network adaptor is referred to as “HDD unit” throughout this guide.
Compatible software
This product is compatible with PlayStation®2 format software marked as compatible with the internal hard disk drive (for PlayStation®2).
Usage of the HDD may vary depending on the software in use. For details, refer to the appropriate software manual.
Once the HDD is installed, you may not be able to reset software by pressing the 1 (standby)/reset button on the PlayStation®2 console front. To help avoid losing game progress, try to save before attempting to reset a game.
Capacity
The storage capacity of the HDD is 40 gigabytes (GB). Note that available formatted capacity is reduced with pre-installed software. Also note that due to manufacturing variances, hard disk capacity may vary slightly. If you have any questions, call SCEA Consumer Services at 1-800-345-7669.
The amount of memory required for saving data varies depending on the software in use. For details, refer to the appropriate software manual.
Safety
This product has been designed with the highest concern for safety. However, any electrical device, if used improperly, has the potential for causing fire, electrical shock or personal injury. To help ensure accident-free operation, follow these guidelines:
•Observe all warnings, precautions and instructions.
•Stop use immediately if the device functions in an abnormal manner, or produces unusual sounds or smells.
•The HDD has an exposed metal casing. To help avoid injury, be careful when handling the HDD.
•If the device does not function properly, contact our technical support line at 1-800-345-7669 for assistance.
Use and handling
The HDD is a sensitive piece of equipment and should be handled with care at all times. To help prevent software or data loss or corruption, or damage to the HDD, carefully follow the precautions listed below.
•Do not drop the HDD or subject it to physical shock or vibration.
•Do not place the HDD on surfaces that are unstable, tilted or subject to vibration.
•Do not move or change the position of a console with an HDD installed while it is turned on.
•Do not turn off a console with an HDD installed without following the correct shutdown procedure. Refer to the instruction manual for the internal hard disk drive (40GB) (for PlayStation®2) and HDD utility disc (ver 1.10) for the procedure.
•Do not shut down the console while the HDD access indicator within the front vent of the console is blinking.
•Do not expose the HDD to high temperatures, high humidity or direct sunlight (use in an environment where temperatures range 5˚C – 35˚C/41˚F – 95˚F).
•Do not place the HDD in locations subject to sudden temperature change (for example, temperature changes of 10˚C/18˚F per hour or more).
•Do not use the console with the HDD installed in a dusty location.
•Do not allow liquid or small particles to get into the HDD.
•Do not place the HDD close to magnetic fields such as those produced by magnets or loudspeakers.
•Do not put heavy objects on the HDD.
•When handling the HDD, do not touch the black protective covering as doing so may damage the circuit board.
4

•Do not touch the metal parts or insert foreign objects into the connectors of the HDD.
•When you do not intend to use the unit for an extended period of time, disconnect the power plug for the console from the electrical outlet. This will help prevent damage to the HDD from lightning and power line surges. When disconnecting the power plug from an electrical outlet, pull it out by grasping the plug. Never pull the cord itself.
•Do not connect any peripheral to the HDD except the network adaptor (for PlayStation®2) (sold separately).
•Do not move the console for 30 seconds after shutdown, as this may damage the HDD.
•It is recommended that you regularly back up game save data to a memory card (8MB) (for PlayStation®2) or memory card.
If for any reason software or data loss or corruption occurs on the HDD, it is usually not possible to recover the software or data.
Sony Computer Entertainment Inc. and its subsidiaries and affiliates will not be held liable for any damages or injury in the case of software or data loss or corruption.
Moisture condensation
If brought directly from a cold location to a warm one, moisture may condense on the outside or inside of the HDD. Should this occur, the HDD may not operate properly. In this case, turn off the PlayStation®2 console by pressing the main power switch on the console rear and remove the power plug from the electrical socket. Do not turn on the console until the moisture evaporates (this could take several hours). If the console or HDD still does not operate properly, contact our technical support line at 1-800-345-7669 for assistance.
Cleaning
Never attempt to clean the HDD, as touching the circuit board or subjecting the HDD to physical shock or vibration, could damage the HDD.
For instructions on cleaning the PlayStation®2 console or network adaptor (for PlayStation®2) (sold separately), refer to the appropriate instruction manual.
US
Never disassemble the HDD
Use the HDD according to the instructions in this guide. No authorization for the analysis or modification of the HDD, or the analysis and use of its circuit configurations is provided herein.
5
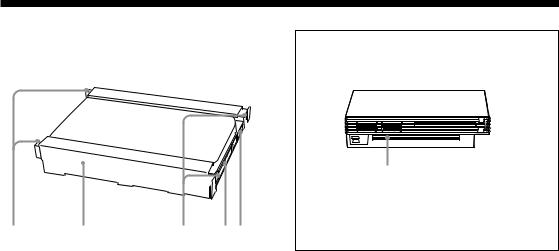
Part names
Internal hard disk drive (40GB) (for PlayStation®2)
1 |
2 |
3 |
45 |
1 LOCK tabs
Used to secure the HDD to the PlayStation®2 console.
2 HDD rails
3 UNLOCK tabs
Used to release the HDD from the PlayStation®2 console.
4 HDD data connector
Connects to the HDD data connector of the network adaptor (sold separately).
5 HDD power connector
Connects to the HDD power connector of the network adaptor.
PlayStation®2 console
Front
1
1 HDD access indicator
The HDD access indicator inside the front vent of the PlayStation®2 console blinks while saving or loading data to the HDD.
6

Installing the HDD in a PlayStation®2 console
US
Caution
•For safety reasons, do not connect the power plug for the PlayStation®2 console to an electrical outlet until installation is completed.
•The HDD has an exposed metal casing. To help avoid injury, be careful when handling the HDD.
•Do not hold the HDD unit by the network adaptor alone. Always grasp the HDD by the rails, taking care not to touch the black protective covering, or the circuit board beneath.
1 Remove the EXPANSION BAY cover or network adaptor (for PlayStation®2) (if installed) from the PlayStation®2 console rear.
To remove the expansion bay cover, use the indentation at the top of the cover as a finger grip to help pull it free from the console. Keep the cover in a safe place for future use.
To remove the network adaptor, refer to the instruction manual for the network adaptor.
PlayStation®2 console rear
EXPANSION BAY cover
2 Connect the network adaptor to the HDD.
Caution
Do not touch the black protective covering or the metal parts of the connectors, as doing so may damage the HDD.
1 Press in the two LOCK tabs of the HDD (see figure below).
2 Hold the HDD with the black surface facing down and the network adaptor with the HDD power and data connectors at the bottom and facing the HDD.
3 Fully insert the connectors of the network adaptor into the matching connectors of the HDD. Insert the connectors straight into each other to avoid bending the pins.
HDD power connector HDD power connector
LOCK tabs
HDD rail
HDD data connector
HDD data connector
Internal hard disk drive |
Network adaptor |
7
Installing the HDD in a PlayStation®2 console (continued)
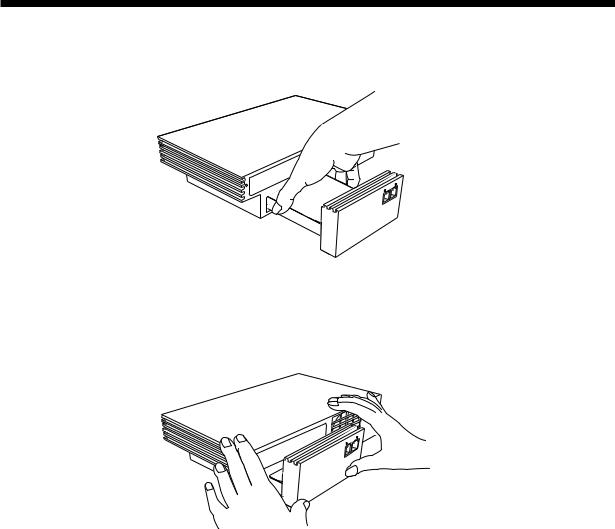
3 Insert the HDD unit straight into the expansion bay on the console rear.
1Hold the HDD as shown, and insert it into the console.
2Press lightly on the front of the network adaptor until the HDD is fully inserted in the expansion bay.
8
US
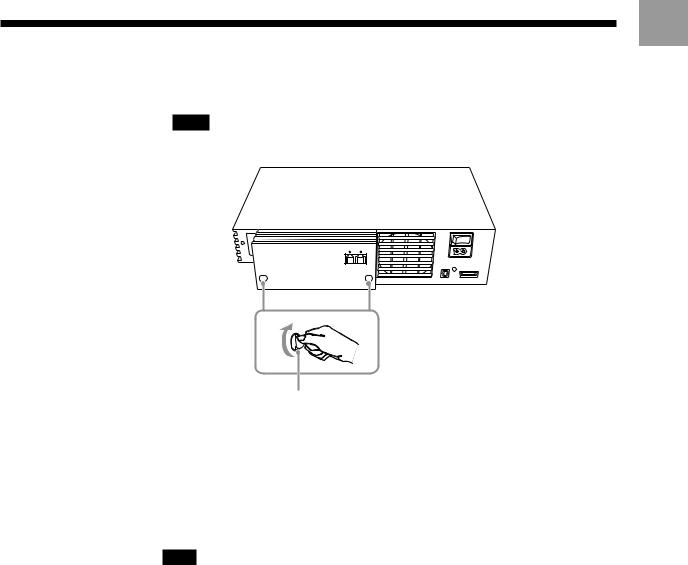
4 Fasten the HDD unit to the console.
Using a coin, turn the mounting screws of the network adaptor in a clockwise direction. Do not overtighten.
Notes
•Do not use a screwdriver to tighten the mounting screws.
•Do not fasten the mounting screws too tightly, as this may damage the screws or console.
5
6
7
PlayStation®2 console rear
Mounting screw
Insert the power plug for the console into an electrical outlet.
Turn on the console using the main power switch on the console rear.
Press the 1 (standby)/reset button on the console front, and wait for the main menu to appear.
The 1 indicator turns green.
Note
For detailed usage instructions for the HDD, refer to the instruction manual for the internal hard disk drive (40GB) (for PlayStation®2) and HDD utility disc (ver 1.10).
9
Installing the HDD in a PlayStation®2 console (continued)
Positioning a PlayStation®2 console with an HDD installed
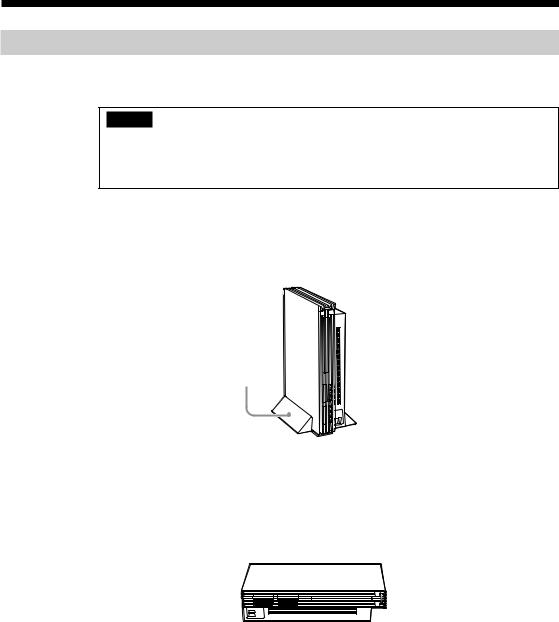
After installing the HDD in the PlayStation®2 console, you can set the console in either the vertical or horizontal position.
Caution
•Do not change the position of the console while it is in operation. Doing so may damage the HDD or cause the console to malfunction.
•Never move a console in such a way that the installed HDD will be exposed to physical shock or vibration. Doing so may damage the HDD.
When placing a PlayStation®2 console with an HDD unit installed in the vertical position, use the SCPH-10040 U vertical stand (for PlayStation®2) (sold separately).
For details, refer to the instructions supplied with the vertical stand.
Vertical position
PlayStation®2 console
Vertical stand (for PlayStation®2)
If a vertical stand (for PlayStation®2) is not available, set the console in the horizontal position as shown below. When positioning the console horizontally, you can use the SCPH-10110 U horizontal stand (for PlayStation®2) (sold separately).
Horizontal position
PlayStation®2 console
10
Removing the HDD from a PlayStation®2 console
US
Warning
For safety reasons, disconnect the power plug for the PlayStation®2 console from the electrical outlet before attempting to remove the HDD from the console.
Caution
To help avoid software or data loss or corruption, or damage to the HDD:
•Never turn off or unplug the PlayStation®2 console when the HDD access indicator is blinking.
PlayStation®2 console front
 HDD access indicator
•Always follow the correct shutdown procedure. For details, refer to the instruction manual for the internal hard disk drive (40GB) (for PlayStation®2) and HDD utility disc (ver 1.10).
•Do not move the PlayStation®2 console or the HDD for 30 seconds after shutdown.
•Do not touch the black protective covering or the metal parts of the connectors, as doing so
may damage the HDD.
The HDD or network adaptor may become hot to the touch during use. Use caution in handling these items during the HDD removal process.
11
Removing the HDD from a PlayStation®2 console (continued)
1 Check that the 1 (standby) indicator on the PlayStation®2 console front is lit up in red. Then, turn off the console using the main power switch on the console rear.
2
3
Disconnect the power plug for the console from the electrical outlet.
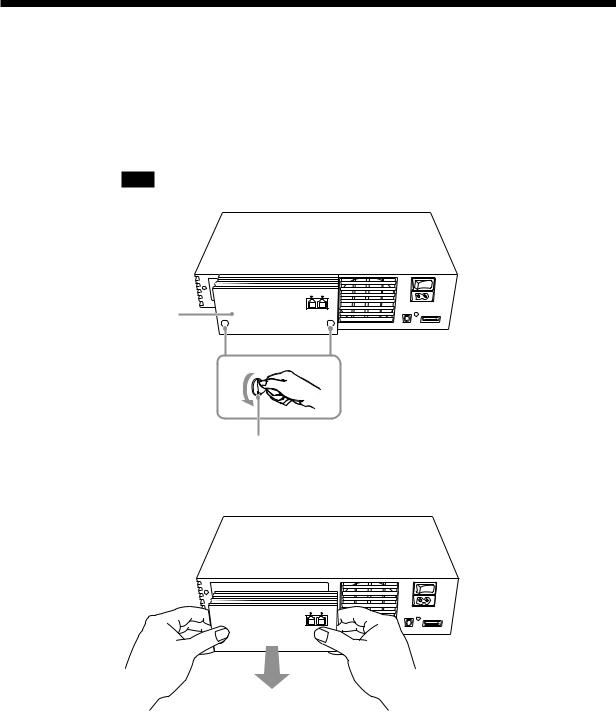
Loosen the mounting screws of the network adaptor.
Using a coin, turn the mounting screws in a counterclockwise direction.
Note
Do not use a screwdriver to loosen the mounting screws.
PlayStation®2 console rear
Network adaptor |
Mounting screw
4 Remove the network adaptor from the console and HDD.
Remove the network adaptor by pulling it away from the console. Note that the HDD remains in the console.
12
US
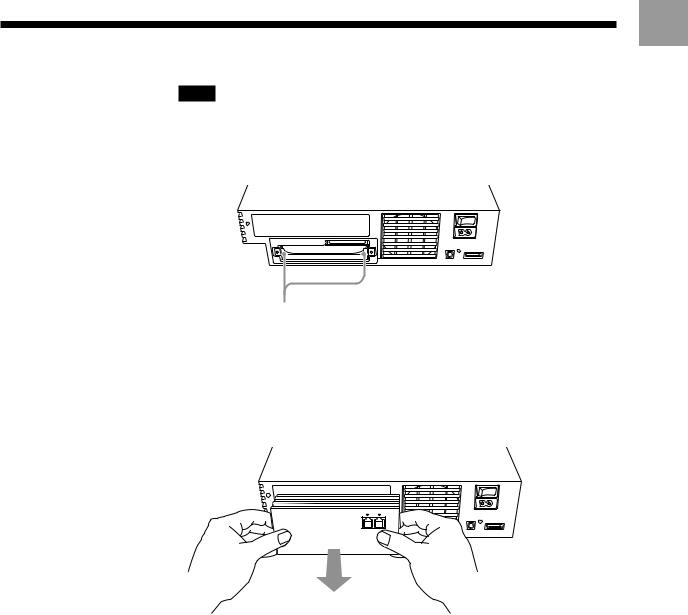
5 Remove the HDD from the console.
Notes
• To remove the HDD you will need to temporarily reattach the network adaptor.
• Do not hold the HDD unit by the network adaptor alone. Always grasp the HDD by the rails.
1 Press in the two UNLOCK tabs of the HDD to release it from the console.
UNLOCK tabs
2Fully insert the HDD power and data connectors of the network adaptor into the matching connectors of the HDD. Insert the connectors straight into each other to avoid bending the pins.
3Remove the network adaptor along with the connected HDD by pulling it out of the expansion bay.
6 Cover the expansion bay.
After removing the HDD, reattach the expansion bay cover or the network adaptor to help protect the expansion bus connector located within the expansion bay.
13
Troubleshooting
Please go through this section if you experience difficulty in operating the HDD.
If you experience any of the following difficulties, use this troubleshooting guide to help remedy the problem before requesting repair. Refer also to the troubleshooting section of the PlayStation®2 console instruction manual.
Should any problem persist, contact our technical support line at 1-800-345-7669 for assistance.
Data cannot be saved or loaded on the HDD.
–Check that the HDD is installed properly in the expansion bay on the PlayStation®2 console rear. (See page 7.)
–Check that the HDD is connected properly to the network adaptor (for PlayStation®2). (See page 7.)
–Check that the power plug for the PlayStation®2 console is inserted properly into the electrical outlet.
The HDD unit does not fit properly into the PlayStation®2 console.
–Check that the two LOCK tabs of the HDD are pressed in properly.
Remove the HDD unit from the PlayStation®2 console, and make sure that both LOCK tabs are pressed in properly. (For removal instructions, see page 11.) After checking the LOCK tabs, try installing the HDD unit again. (See page 7.)
Trouble with items other than the HDD
The instructions provided in this guide are for the installation of the HDD hardware only. If you experience difficulty with peripheral items or software included with this product or sold separately, refer to the appropriate instruction manual or contact our technical support line at 1-800-345-7669 for assistance.
14

Specifications
US
Dimensions (approx.)
122 × 27 × 154 mm (w/h/d) (4 3/4 × 1 × 6 in)
Weight (approx.)
0.7 kg (1 lb 9 oz)
Operating temperature
5°C – 35°C (41°F – 95°F)
Maximum data transfer speed
66 MB/sec
Capacity
40 GB unformatted (available capacity reduced with pre-installed software)
Inputs/Outputs
HDD data connector (1)
HDD power connector (1)
Design and specifications are subject to change without notice.
15

LIMITED WARRANTY
Sony Computer Entertainment America (SCEA) warrants to the original purchaser that this product (internal hard disk drive (40GB) (for PlayStation®2) and HDD utility disc) shall be free from defects in material and workmanship for a period of ninety (90) days from the date of purchase (the “Warranty Period”). If this product is determined to be defective during the Warranty Period, SCEA agrees to either repair or replace, at its option, the SCEA product. You must call 1-800-345-7669 to receive instructions to obtain repair/ replacement services.
THIS WARRANTY SHALL NOT APPLY IF THIS PRODUCT: (a) IS USED WITH PRODUCTS NOT SOLD OR LICENSED BY SCEA (INCLUDING, BUT NOT LIMITED TO, NON-LICENSED GAME ENHANCEMENT DEVICES, CONTROLLERS, ADAPTORS AND POWER SUPPLY DEVICES) OR OTHERWISE NOT COMPATIBLE WITH THIS PRODUCT; (b) IS USED FOR COMMERCIAL PURPOSES (INCLUDING RENTAL) OR IS MODIFIED OR TAMPERED WITH; (c) IS DAMAGED BY ACTS OF GOD, MISUSE, ABUSE, NEGLIGENCE, ACCIDENT, WEAR AND TEAR, UNREASONABLE USE, OR BY OTHER CAUSES UNRELATED TO DEFECTIVE MATERIALS OR WORKMANSHIP; (d) HAS HAD THE SERIAL NUMBER ALTERED, DEFACED OR REMOVED; OR (e) HAS HAD THE WARRANTY SEAL ON THE CONSOLE REMOVED. THIS WARRANTY DOES NOT COVER PRODUCTS SOLD AS IS OR WITH ALL FAULTS, OR CONSUMABLES (SUCH AS BATTERIES).
PROOF OF PURCHASE IN THE FORM OF A BILL OF SALE OR RECEIPTED INVOICE WHICH IS EVIDENCE THAT THE UNIT IS WITHIN THE WARRANTY PERIOD MUST BE PRESENTED TO OBTAIN WARRANTY SERVICE.
REPAIR OR REPLACEMENT AS PROVIDED UNDER THIS WARRANTY IS THE EXCLUSIVE REMEDY OF THE CONSUMER. ANY APPLICABLE IMPLIED WARRANTIES, INCLUDING WARRANTIES OF MERCHANTABILITY AND FITNESS FOR A PARTICULAR PURPOSE, ARE LIMITED IN DURATION TO THE DURATION OF THIS WARRANTY. IN NO EVENT SHALL SCEA BE LIABLE FOR CONSEQUENTIAL OR INCIDENTAL DAMAGES FOR BREACH OF ANY EXPRESS OR IMPLIED WARRANTY ON THIS PRODUCT. SOME STATES OR PROVINCES DO NOT ALLOW LIMITATION ON HOW LONG AN IMPLIED WARRANTY LASTS AND SOME STATES DO NOT ALLOW THE EXCLUSION OR LIMITATIONS OF CONSEQUENTIAL OR INCIDENTAL DAMAGES, SO THE ABOVE LIMITATIONS OR EXCLUSION MAY NOT APPLY TO YOU.
This warranty gives you specific legal rights, and you may also have other rights which vary from state to state or province to province. This warranty is valid only in the United States and Canada.
16
 Loading...