


Z1E/Z1P-HVR Recorder Camera Video HD Digital
2-514-607-12(1)
Digital HD Video
Camera Recorder
Operating Instructions
Before operating the unit, please read this manual thoroughly, and retain it for future reference.
HVR-Z1E/Z1P
© 2005 Sony Corporation

Read this first
WARNING
To prevent fire or shock hazard, do not expose the unit to rain or moisture.
To avoid electrical shock, do not open the cabinet. Refer servicing to qualified personnel only.
b Notice
If static electricity or electromagnetic causes data transfer to discontinue midway (fail), restart the application or disconnect and connect the i.LINK cable again.
FOR CUSTOMERS IN THE UNITED KINGDOM
HVR-Z1E only
NOTICE ON THE SUPPLIED AC ADAPTOR
A moulded plug complying with BS1363 is fitted to this equipment for your safety and convenience.
Should the fuse in the plug supplied need to be replaced, a fuse of the same rating as the supplied one and approved by ASTA or BSI to BS1362 (i.e., marked with  or
or  mark) must be used.
If the plug supplied with this equipment has a detachable fuse cover, be sure to attach the fuse cover after you change the fuse. Never use the plug without the fuse cover. If you should lose the fuse cover, please contact your nearest Sony service station.
FOR CUSTOMERS IN EUROPE
HVR-Z1E only
This product with the marking complies with both the EMC Directive (89/336/EEC) and the Low Voltage Directive (73/23/EEC) issued by the Commission of the European Community. Compliance with these directives implies conformity to the following European standards:
• EN60065 : Product Safety (Supplied AC Adaptor only)
• EN55103-1 : Electromagnetic Interference (Emission)
• EN55103-2 : Electromagnetic Susceptibility (Immunity)
This product is intended for use in the following Electromagnetic Environment(s):
E1 (residential), E2 (commercial and light industrial), E3 (urban outdoors) and E4 (controlled EMC environment ex. TV studio).
ATTENTION
The electromagnetic fields at the specific frequencies may influence the picture and sound of this camcorder.
This product has been tested and found compliant with the limits set out in the EMC Directive for using connection cables shorter than 1 meter (3.28 feet).
For the customers in the Nederland Voor de klanten in Nederland
Dit apparaat bevat een vast ingebouwde batterij die niet vervangen hoeft te worden tijdens de levensduur van het apparaat.
Raadpleeg uw leverancier indien de batterij toch vervangen moet worden.
De batterij mag alleen vervangen worden door vakbekwaam servicepersoneel.
Gooi de batterij niet weg maar lever deze in als klein chemisch afval (KCA).
Lever het apparaat aan het einde van de levensduur in voor recycling, de batterij zal dan op correcte wijze verwerkt worden.
2

Disposal of Waste Electrical and Electronic Equipment for business use (Applicable in the European Union and other European countries with separate collection systems)
This symbol on the product or on its packaging indicates that this product shall not be treated as household waste. Instead it shall be handed over to the applicable take-back scheme for the recycling of electrical and electronic equipment. By ensuring this product is disposed of correctly, you will help prevent potential negative consequences for the environment and human health, which could otherwise be caused by inappropriate waste handling of this product. The recycling of materials will help to conserve natural resources. For more detailed information about recycling of this product, please contact your local Sony office or visit Sony Europe’s web site for business customers:
http://www.sonybiz.net/environment
Notes on use
Your camcorder is capable of recording in HDV, DVCAM, and DV formats.
When recording in HDV/DV format, it is recommended to use mini DV cassettes. When recording in DVCAM format, it is recommended to use mini DVCAM cassettes.
The HDV standards
•Digital high-definition (HD) video signals are recorded and played back on a DV format cassette.
•HDV signals are compressed in MPEG2 format, which is adopted in BS (broadcast satellite) digital and terrestrial digital HDTV broadcastings and in Blu-ray disc recorders.
z Tip
•Your camcorder adopts the HDV1080i specification, which utilizes 1080 effective scanning lines, within the HDV standards, and records pictures at the image bit rate of about 25 Mbps. The i.LINK Interface is adopted as the digital interface enabling a digital connection with TVs and personal computers compatible with the HDV format.
Recording
•Before starting to record, test the recording function to make sure the picture and sound are recorded without any problems.
•Compensation for the contents of recordings cannot be provided, even if recording or playback is not possible due to a malfunction of the camcorder, storage media, etc.
•TV color systems differ depending on the country/ region. To view your recordings on a TV, you need a PAL system-based TV.
•Television programs, films, video tapes, and other materials may be copyrighted. Unauthorized recording of such materials may be contrary to the copyright laws.
The LCD panel, viewfinder, and lens
•The LCD screen and the viewfinder are manufactured using extremely high-precision technology, so over 99.99% of the pixels are operational for effective use.
However, there may be some tiny black points and/ or bright points (white, red, blue, or green in color) that appear constantly on the LCD screen and the viewfinder.
These points are normal results of the manufacturing process and do not affect the recording in any way.
•Exposing the LCD screen, the viewfinder, or the lens to direct sunlight for long periods of time may cause
,continued
3
malfunctions. Be careful when placing the camera near a window or outdoors.
•Do not aim at the sun. Doing so might cause your camcorder to malfunction. Take pictures of the sun only in low light conditions, such as at dusk.
Playing back HDV tapes on other devices
A tape recorded in the HDV format cannot be played back on a device that is not compatible with the HDV format.
Check the contents of tapes by playing them back on this camcorder prior to playing them back on other devices.
Connecting other devices
Before connecting your camcorder to other device such as a VCR or a computer with an i.LINK cable, be sure to insert the connector plug in the proper direction. If you insert the connector plug forcibly in the wrong direction, the terminal may be damaged, or this may cause a malfunction of your camcorder.
Using this manual
•The images of the LCD screen and the viewfinder used on this manual are captured using a digital still camera, and thus may appear different from what you see.
•The illustrations of the screen are those of when [50i/ 60i SEL] on the 
 (OTHERS) menu is set to 50i.
Using the camcorder
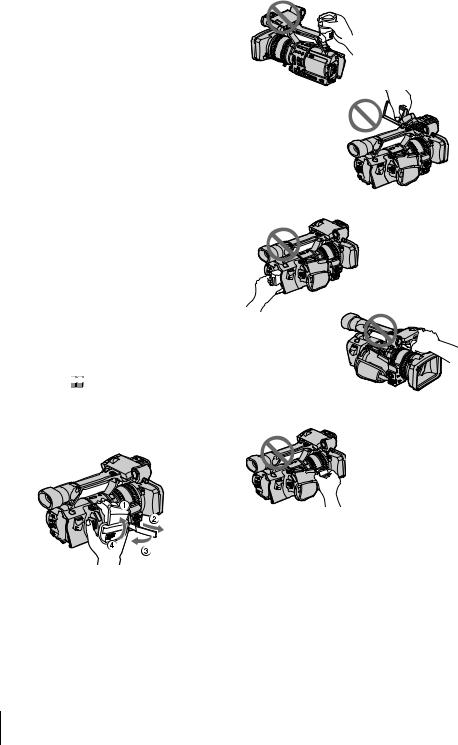
•To ensure a good grip, fasten the grip belt as shown in the following illustration.
•You can change the language to be used for screen display on your camcorder (p. 19).
• Do not hold the camcorder by the following parts.
Viewfinder
LCD panel
Battery pack
Microphone
Jack holder
4

Table of Contents |
|
Read this first ............................................................................................. |
2 |
Quick Start Guide |
|
Recording movies ...................................................................................... |
8 |
Getting started |
|
Step 1: Checking supplied items.............................................................. |
10 |
Step 2: Charging the battery pack............................................................ |
11 |
Using an outside power source ................................................................................. |
14 |
Step 3: Turning the power on................................................................... |
15 |
Step 4: Adjusting the LCD panel and viewfinder...................................... |
15 |
Adjusting the LCD panel ........................................................................................... |
15 |
Adjusting the viewfinder ............................................................................................ |
16 |
Step 5: Setting the date and time............................................................. |
17 |
Step 6: Inserting a cassette tape.............................................................. |
18 |
Step 7: Setting the screen language ........................................................ |
19 |
Recording |
|
Recording movies .................................................................................... |
21 |
Usable cassettes ....................................................................................................... |
23 |
Using zoom ............................................................................................................... |
23 |
Recording in mirror mode ......................................................................................... |
25 |
Displaying the recording setup information – Status check ...................................... |
25 |
Adjusting the exposure............................................................................. |
26 |
Adjusting the exposure for backlit subjects ............................................................... |
26 |
Recording the subject lit by strong light – SPOTLIGHT ............................................ |
27 |
Adjusting the white balance ...................................................................................... |
27 |
Recording using manual adjustments ...................................................... |
29 |
Adjusting the iris ........................................................................................................ |
29 |
Adjusting the gain ..................................................................................................... |
30 |
Adjusting the shutter speed ...................................................................................... |
31 |
Adjusting the volume of light – ND FILTER .............................................................. |
31 |
Displaying the zebra pattern to adjust the brightness ............................................... |
32 |
Adjusting the focus................................................................................... |
33 |
Adjusting the focus manually .................................................................................... |
33 |
Enhancing the outline to focus – PEAKING .............................................................. |
35 |
|
,continued |
5

Customizing the picture quality – PICTURE PROFILE ............................ |
35 |
Customizing the sound............................................................................. |
38 |
Adjusting the audio recording level – Microphone volume level ................................ |
38 |
Connecting external audio sources ........................................................................... |
39 |
Selecting the recording channel ................................................................................ |
40 |
Recording a picture using various features.............................................. |
41 |
Developing scenes smoothly – Shot transition .......................................................... |
41 |
Revising a specific color –Color Correction ............................................................... |
43 |
Fading in and out of a scene– FADER ...................................................................... |
45 |
Recording an index signal at the beginning of recording ........................................... |
45 |
Recording on a device connected via an i.LINK cable |
|
– External REC Control....................................................................... |
46 |
Reviewing the most recently recorded scenes – Rec Review ................. |
48 |
Playback |
|
Viewing movies ........................................................................................ |
49 |
Playing back in various modes .................................................................................. |
50 |
Various playback functions ...................................................................... |
51 |
Searching for the last scene of the most recent recording – END SEARCH ............. |
51 |
Displaying the screen indicators ................................................................................ |
51 |
Displaying the date/time and camera settings data – Data code .............................. |
52 |
Displaying the video information – Status check ....................................................... |
52 |
Playing the picture on a TV ...................................................................... |
53 |
Viewing the picture on a high definition TV ............................................................... |
53 |
Viewing the picture on a 16:9 TV or a 4:3 TV ............................................................ |
55 |
Locating a scene on a tape for playback.................................................. |
56 |
Searching for a scene by date of recording – Date search ....................................... |
56 |
Searching for a recording start point – Index search ................................................. |
57 |
6
Advanced operations |
|
|
Using the Menu |
|
|
Selecting menu items ......................... |
58 |
|
Using the |
(CAMERA SET) menu |
|
– STDYSHOT TYP/FRAME REC, |
|
|
etc. ............................................... |
|
59 |
Using the |
(AUDIO SET) menu – INT |
|
MIC SET/XLR SET, etc. ............... |
65 |
|
Using the |
(LCD/VF SET) menu |
|
– LCD COLOR, etc. ..................... |
69 |
|
Using the |
(IN/OUT REC) menu |
|
– REC FORMAT/DOWN CONVERT, |
||
etc. ............................................... |
|
71 |
Using the |
(TC/UB SET) menu |
|
– TC MAKE, etc. .......................... |
77 |
|
Using the |
(OTHERS) menu |
|
– CLOCK SET/WORLD TIME, |
|
|
etc. ............................................... |
|
79 |
Customizing Personal Menu .............. |
84 |
|
Assigning the functions ...................... |
87 |
|
Troubleshooting |
|
Troubleshooting ............................... |
107 |
Warning indicators and messages ... |
112 |
Additional Information |
|
Using your camcorder abroad .......... |
114 |
HDV format and recording/playback 115 |
|
Compatibility of the DVCAM and DV |
|
formats ....................................... |
117 |
About the “InfoLITHIUM” battery |
|
pack ............................................ |
118 |
About i.LINK ..................................... |
120 |
Maintenance and precautions .......... |
121 |
Specification ..................................... |
124 |
Quick Reference |
|
Identifying parts and controls ........... |
126 |
Index ................................................ |
134 |
Dubbing/Editing |
|
Dubbing to another tape .................... |
90 |
Recording pictures from a VCR |
|
or TV ............................................ |
94 |
Connecting to a computer .................. |
97 |
Dubbing sound to a recorded tape |
|
.......................................... |
99 |
Setting time values .......................... |
102 |
Connecting an analog VCR to the |
|
computer via your camcorder |
|
– Signal conversion |
|
function ....................................... |
105 |
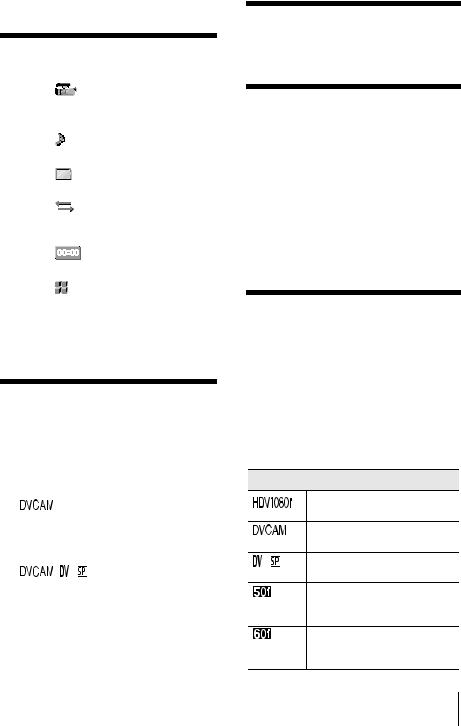
Note on the icons used in this manual
Features available for the HDV format only.
Features available for the
DVCAM format only.
Features available for the DV
SP format only.
Features available only when [50i/60i SEL] of the menu is set to [50i].
Features available only when [50i/60i SEL] of the menu is set to [60i].
7
Quick Start Guide
Recording movies
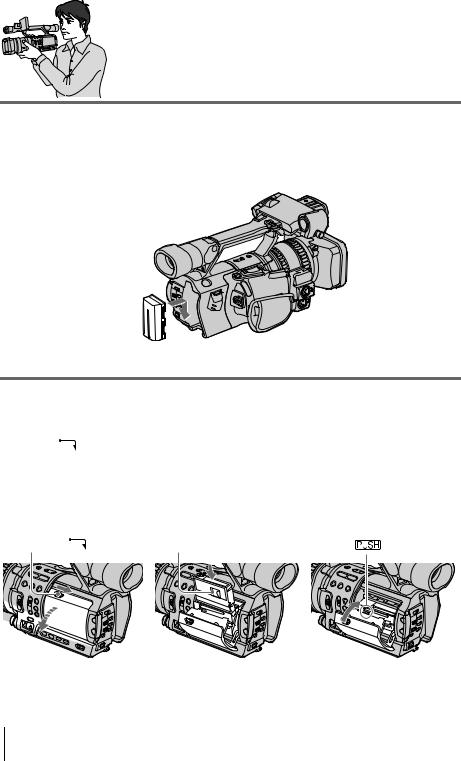
1 Attach the charged battery pack to the camcorder.
To charge the battery, see page 11.
Press the battery pack and slide it down.
Battery Pack 
2 Insert a cassette into the camcorder.
a Slide the OPEN/ |
b Insert the cassette with |
|
EJECT |
lever in |
its window-side facing |
the direction of the |
out, then push the center |
|
arrow to open the lid. |
of the back of the |
|
The cassette compartment |
cassette. |
|
comes out automatically. |
|
|
cPress  on the cassette compartment.
Close the cassette lid after the cassette compartment slides back in by itself.
OPEN/EJECT |
lever |
Window-side |
8 Quick Start Guide

3 Start recording while checking the subject on the LCD screen.
The date and time is not set up in the default setting. To set the date and time, see page 17. The pictures are recorded in the HDV format in the default setting. To record in the DVCAM or DV format, see page 21.
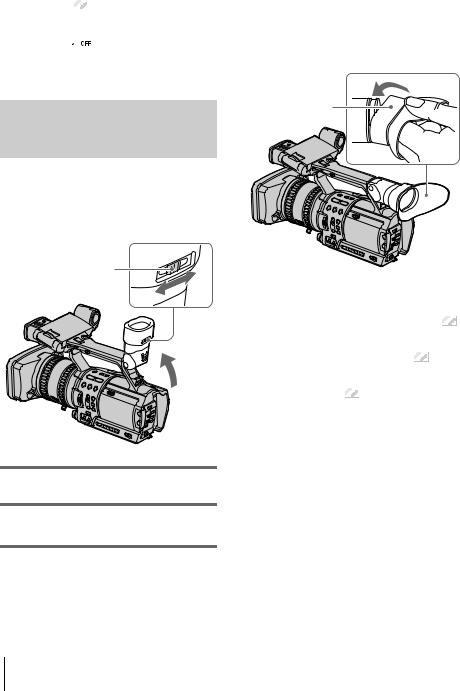
a Open the hood shutter.
b Open the LCD panel and adjust the angle.
c While pressing the green button, set the POWER switch to CAMERA.
d Press REC START/STOP.
Recording starts. To change to standby mode, press REC START/STOP again.
4 View the recorded picture on the LCD screen.
aWhile pressing the green button, set the POWER
switch to VCR.
b Press m (rewind).
c Press N (play) to start the playback.
To stop, press x (stop).
To turn off the power, set the POWER switch to OFF.
Guide Start Quick
Quick Start Guide 9
Getting started
Step 1: Checking supplied items
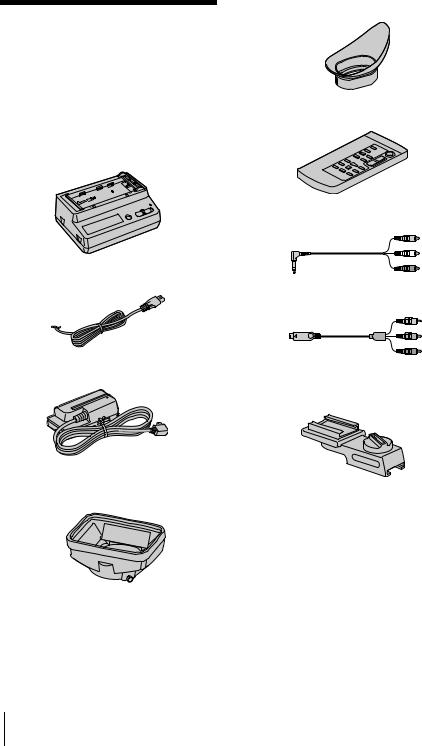
Make sure you have following items supplied with your camcorder.
The number in parentheses indicates the number of that item supplied.
AC Adaptor/charger (1)
Mains lead (1)
Connecting cord (DK-415) (1)
Lens hood (1)
This is attached to your camcorder.
b Note
•If you attach an optical filter (optional) or so, remove the lens hood.
Large eyecup (1)
To attach it to your camcorder, see page 16.
Wireless Remote Commander (1)
A/V connecting cable (1)
Component video cable (1)
Shoe adaptor (1)
To attach it to your camcorder, see page 131.
10 Getting started
Rechargeable battery pack NP-F570 (1)
R6 (size AA) batteries (2)
To insert the batteries in the Remote Commander, see page 132.
Cleaning cassette (1)
Shoulder strap (1)
To attach it to your camcorder, see page 127.
Operating Instructions (This manual) (1)
Step 2: Charging the battery pack
You can charge the battery by attaching the
“InfoLITHIUM” battery pack (L series) to the AC Adaptor/charger.
b Note
•You cannot use batteries other than the “InfoLITHIUM” battery pack (L series) (p. 118).
•Do not short-circuit the DC plug of the AC Adaptor/ charger with any metallic objects. This may cause a malfunction.
•Use a nearby wall socket when using the AC Adaptor/charger. Disconnect the AC Adaptor/ charger from the wall socket immediately if any malfunction occurs.
•Do not use the AC Adaptor/charger placed in a narrow space, such as between a wall and furniture.
To the wall socket
Power cord
Battery pack
Charge lamp
Mode switch
Display window
AC Adaptor/charger
1 Set the mode switch to CHARGE.
2 Connect the mains lead to the AC Adaptor/charger.
3 Connect the mains lead to the wall socket.
,continued
started Getting
Getting started 11

4 While pressing the battery back down, slide it in the direction of the arrow.
The charge lamp lights up and charging starts.
When the battery was successfully charged
The battery mark on the display window will light up in the shape of a full battery ( 
 ) that indicates that the battery has been sufficiently charged for use.
If you continue charging until the CHARGE lamp turns off and FULL appears on the display window, the battery has now been fully charged and can be used for a little longer period. Remove the battery pack from the AC Adaptor/ charger.
To attach the battery pack to the camcorder
Press the battery pack and slide it down.
To remove the battery pack
1 Set the POWER switch to OFF.
2Press BATT RELEASE and slide the battery pack up.
To check the remaining battery – Battery Info
You can check the battery’s current charge level and its current remaining recording time when the power is turned off. The remaining recording time in the selected recording format appears.
1Set the POWER switch to OFF.
2Open the LCD panel and adjust the angle.
3Press DISPLAY/BATT INFO.
The battery information appears for about 7 seconds.
Keep the button pressed to view it for about 20 seconds.
BATTERY INFO
BATTERY CHARGE LEVEL
0% |
50% |
100% |
REC TIME AVAILABLE
LCD SCREEN: 105 min
VIEWFINDER: 115 min
ABattery charge level: Displays approximate remaining amount of power left in the battery pack.
BPossible recording time using the LCD panel.
12 Getting started

CPossible recording time using the viewfinder.
Charging time
Approximate number of minutes required when you fully charge a fully discharged battery pack using the supplied AC Adaptor/charger at 25°C (77°F). (10 – 30°C (50 – 86°F) recommended.)
Battery pack |
Full charge |
|
|
(Practical charge) |
|
|
|
|
NP-F570 (supplied) |
145 |
(85) |
|
|
|
NP-F770 |
230 |
(170) |
|
|
|
NP-F970 |
310 |
(250) |
|
|
|
b Note
•NP-F330/F530/500/510/710 battery packs cannot be used with your camcorder.
Recording time
Approximate number of minutes available when you use a fully charged battery pack at 25°C (77°F).
Recording in the HDV format
Battery pack |
Continuous |
Typical |
|
recording |
recording |
|
time |
time |
|
|
|
NP-F570 |
105 |
55 |
(supplied) |
115 |
60 |
|
115 |
60 |
|
|
|
NP-F770 |
220 |
120 |
|
245 |
120 |
|
235 |
120 |
|
|
|
NP-F970 |
335 |
185 |
|
370 |
190 |
|
360 |
190 |
|
|
|
Recording in the DVCAM/DV SP format
Battery pack |
Continuous |
Typical |
|
recording |
recording |
|
time |
time |
|
|
|
NP-F570 |
110 |
60 |
(supplied) |
125 |
60 |
|
120 |
60 |
|
|
|
NP-F770 |
235 |
130 |
|
255 |
130 |
|
250 |
130 |
|
|
|
Battery pack |
Continuous |
Typical |
|
recording |
recording |
|
time |
time |
|
|
|
NP-F970 |
355 |
195 |
|
385 |
200 |
380200
•The top figures show an approximate number of minutes when the LCD BACKLIGHT switch is set to ON, and [VF POWER] is set to [OFF].
•The middle figures show an approximate number of minutes when the LCD BACKLIGHT switch is set to OFF, and [VF POWER] is set to [OFF].
•The bottom figures show an approximate number of minutes when recording with the viewfinder.
•“Typical recording time” means an approximate number of minutes that you can record using external microphones 1 and, and you repeatedly start/stop recording, move the POWER switch to change the power mode, and zoom. The actual battery life may be shorter.
z Tip
•You can also use NP-F550/F730/F750/F960 battery packs. After charging these battery packs, make a trial recording with them before an actual recording to see the recording time. The recording time varies depending on the environment where the camcorder is used. Press DISPLAY/BATT INFO to display the recording time on the screen.
Playing time
Approximate number of minutes available when you use a fully charged battery pack at 25°C (77°F).
HDV format pictures
Battery pack |
LCD panel |
LCD panel |
|
opened* |
closed |
|
|
|
NP-F570 |
155 |
175 |
(supplied) |
|
|
|
|
|
NP-F770 |
325 |
365 |
|
|
|
NP-F970 |
485 |
550 |
|
|
|
DVCAM/DV SP format pictures
Battery pack |
LCD panel |
LCD panel |
|
opened* |
closed |
|
|
|
NP-F570 |
175 |
200 |
(supplied) |
|
|
|
|
|
NP-F770 |
365 |
410 |
|
|
|
NP-F970 |
550 |
625 |
|
|
|
,continued
started Getting
Getting started 13

* With the LCD BACKLIGHT switch set to ON.
b Note
•Figures are those of 60 Hz. They may be slightly longer at 50 Hz.
•The recording and playback time will be shorter when you use your camcorder in low temperature.
•The battery life will be slightly shorter when you use both of the LCD panel and the viewfinder than when you use only the LCD panel.
•The battery information will not be correctly displayed when the battery pack is discharged.
Using an outside power source
You can use the AC Adaptor/charger as the power source when you do not want the battery to run out.
PRECAUTION
Even if your camcorder is turned off, AC power (house current) is still supplied to it while connected to the wall socket via the AC Adaptor/charger.
To the wall socket
Power cord 
AC Adaptor/ charger
Mode switch
1 Set the mode switch to VCR/ CAMERA.
No power will be supplied if the mode switch is set to CHARGE.
2 Attach the connecting cord (DK-415) to the camcorder.
Press the attaching part of the connecting cord (DK-415), and slide it down.
3 Connect the connecting cord (DK-415) to the AC Adaptor/charger.
4 Connect the mains lead to the AC Adaptor/charger.
5 Connect the mains lead to the wall socket.
Connecting cord (DK-415)
14 Getting started

Step 3: Turning the power on
You need to set the POWER switch to the respective power mode to record or play back pictures.
When using this camcorder for the first time, the [CLOCK SET] screen appears (p. 17).
While pressing the green button, set the POWER switch.
The power turns on.
Step 4: Adjusting the LCD panel and viewfinder
Adjusting the LCD panel
|
|
|
You can adjust the angle and brightness of |
Getting |
|
|
||
the LCD panel to meet various recording |
started |
|
situations. |
||
|
||
Even when there are obstructions between |
|
|
you and the subject, you can check the |
|
|
subject on the LCD screen during recording |
|
|
by adjusting the angle of the LCD panel. |
|
180 degrees
Up to about 100 degrees
• CAMERA: To record pictures.
• VCR: To play or edit pictures.
To turn off the power
Set the POWER switch to OFF.
Open the LCD panel 180 degrees, then rotate it to the desired position.
To adjust the brightness of the LCD screen
Adjust the brightness by pressing LCD BRIGHT – or +.
,continued
Getting started 15
z Tip
•If you rotate the LCD panel until it faces down, you can close and restore the LCD panel to the original position with the LCD screen facing out.
•If you are using the battery pack for power source,
you can select the brightness by setting [LCD BL LEVEL] on the  [LCD/VF SET] menu (p. 69).
•When you use your camcorder in bright conditions
using the battery pack, set the LCD BACKLIGHT switch to OFF (
 appears). This position saves battery power.
•Even if you change the brightness of the LCD panel, the brightness of recorded pictures is not affected.
Adjusting the viewfinder
You can view images using the viewfinder when you close the LCD panel. Use the viewfinder when the battery is running out, or when the screen is hard to see.
Viewfinder lens adjustment lever
When the picture in the viewfinder is hard to see
If you cannot see the picture in the viewfinder clearly under bright circumstances, use the supplied large eyecup.
To attach the large eyecup, stretch it a little and align it with the groove of the viewfinder, then slide it up to the end. You can attach the large eyecup facing either the right or left side.
Large eyecup (supplied)
z Tip
•To select the brightness of the viewfinder backlight when you are using the battery pack, select the (LCD/VF SET) menu, then [VF B.LIGHT] (p. 70).
•To display the picture on both the LCD panel and the viewfinder during recording, select the (LCD/ VF SET) menu, [VF POWER], then [ON] (p. 70).
•To display the picture in black and white on the viewfinder, select the  (LCD/VF SET) menu, [VF COLOR], then [OFF] (p. 70).
1 Lift up the viewfinder.
2 Adjust the viewfinder lens adjustment lever until the picture is clear.
16 Getting started

Step 5: Setting the date and time
Set the date and time when using this camcorder for the first time. If you do not set the date and time, the [CLOCK SET] screen appears every time you turn on your camcorder.
b Note
•If you do not use your camcorder for about 3 months, the built-in rechargeable battery gets discharged and the date and time settings may be cleared from the memory. In that case, charge the rechargeable battery (p. 123) and then set the date and time again.
POWER switch
1 Turn on your camcorder (p. 15).
2 Open the LCD panel and adjust the angle.
Proceed to step 6 when you set the clock for the first time.
3 Press MENU.
CAMERA SET
 WB PRESET
WB OUTDR LVL
GA I N SETUP
SHOT TRANS
COLOR CORRCT
STEADYSHOT
STDYSHOT TYP
[ MENU ] : END
4 Select the 
 (OTHERS) menu by turning the SEL/PUSH EXEC dial, then press the dial.

 OTHERS
 RETURN
ASS I GN BTN
CLOCK SET
WORLD T I ME
LANGUAGE
QU I CK REC
BEEP
REC LAMP
[ MENU ] : END
5 Select [CLOCK SET] by turning the SEL/PUSH EXEC dial, then press the dial.
120min |
|
|
|
CLOCK SET |
|
|
|
2005 Y |
1 M |
1 D |
0 : 00 |
[ MENU ] : CANCEL |
|
|
|
6 Set [Y] (year) by turning the SEL/ PUSH EXEC dial, then press the dial.
120min |
|
|
|
CLOCK SET |
|
|
|
2005 Y |
1 M |
1 D |
0 : 00 |
[ MENU ] : CANCEL |
|
|
|
You can set any year up to the year 2079.
,continued
started Getting
Getting started 17

7 Set [M] (month), [D] (day), hour and minute in the same way as was done in step 6, then press the dial.
Step 6: Inserting a cassette tape
For the information about the type of cassette you can use with your camcorder, and details on these cassettes (such as write-protection, etc.), see page 115.
b Note
•Do not force the cassette into the compartment. This may cause a malfunction of your camcorder.
1 Slide the OPEN/EJECT lever in the direction of the arrow and open the lid.
OPEN/EJECT lever Lid
The cassette compartment automatically comes out and opens up.
18 Getting started

2 Insert a cassette with its window-side facing out.
Window-side |
Push the center of the back |
of the cassette lightly. |
3 Press  on the cassette compartment.
The cassette compartment automatically slides back in.
Step 7: Setting the screen language
You can select the language to be used on the LCD screen.
started Getting
POWER switch
4 Close the lid.
To eject the cassette
1Slide the OPEN/EJECT lever in the direction of the arrow and open the lid.
The cassette compartment automatically comes out.
2Take out the cassette, then press  .
.
The cassette compartment automatically slides back in.
3Close the lid.
1 Turn on your camcorder.
2 Open the LCD panel and adjust the angle.
3 Press MENU.
4 Select the 
 (OTHERS) menu by turning the SEL/PUSH EXEC dial, then press the dial.
OTHERS |
STBY |
 RETURN
ASS I GN BTN
CLOCK SET
WORLD T I ME
LANGUAGE
QU I CK REC
BEEP
REC LAMP
[ MENU ] : END
,continued
Getting started 19

5 Select [LANGUAGE] by turning the SEL/PUSH EXEC dial, then press the dial.
6 Select the desired language by turning the SEL/PUSH EXEC dial, then press the dial.
7 Press MENU to hide the menu screen.
z Tip
•Your camcorder offers [ENG [SIMP]] (simplified English) for when you cannot find your native tongue among the options.
20 Getting started
Recording
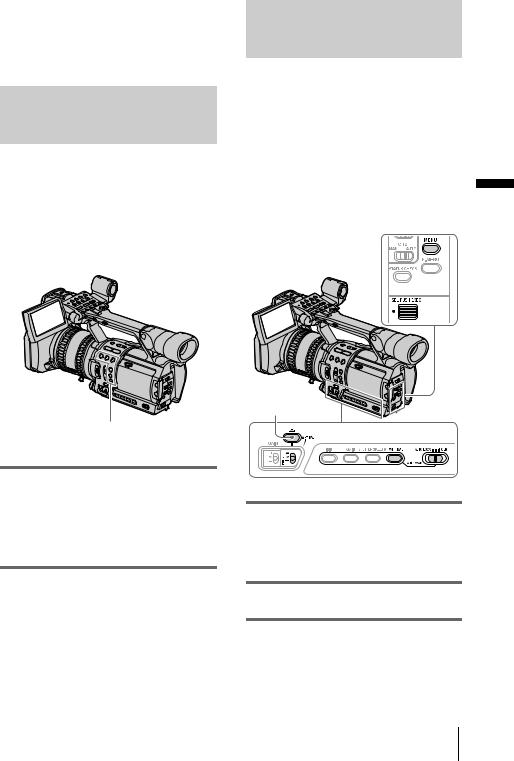
Recording movies
You can record movies in HDV, DVCAM, and DV formats, in addition to either 50i or 60i system.
Before recording, follow steps 1 to 7 in “Getting started” (p. 10 - p. 19).
Movies will be recorded along with stereo sound.
Camera recording lamp
Format lamps
POWER switch and
REC START/STOP
Camera recording lamp
1 Open the shutter of the lens hood.
2 Open the LCD panel and adjust the angle.
3 While pressing the green button, set the POWER switch to CAMERA.


 appears on the LCD screen. The HDV format lamp lights up and your
camcorder is set to recording standby after a while.
Your camcorder is set to record using the 1080/50i specification of the HDV format in the default setting.
To record using the 1080/60i specification (NTSC system), see “To record using the 1080/60i specification (NTSC system)” below.
To record in the DVCAM/DV format, see “To record in the DVCAM/DV format” below.
4 Press REC START/STOP.
Recording starts. [REC] appears on the LCD screen and the Camera recording lamps light up.
Press REC START/STOP again to stop recording.
To record using the 1080/60i specification (NTSC system)
Change the setting of [50i/60i SEL] on the 
 (OTHERS) menu (p. 83).
Recording in DVCAM/DV will be done also using the 60i (NTSC) system.
To record in the DVCAM/DV format
To record in the DVCAM format
On the  (IN/OUT REC) menu, set [REC FORMAT] to [DV], and [
 REC MODE] to [DVCAM] (p. 72).
When the menu screen is turned off, 


appears on the LCD screen, the DVCAM format lamp lights up, and your camcorder is set to recording standby.
Recording
Recording 21

To record in the DV format
On the  (IN/OUT REC) menu, set [REC FORMAT] to [DV], and [
 REC MODE] to [DV SP] (p. 72).
When the menu screen is turned off, 
appears on the LCD screen, the DVCAM format lamp lights up, and your camcorder is set to recording standby.
To turn the power off
Set the POWER switch to OFF.
To record from a low-angle
Use the REC START/STOP button on the handle after releasing the HOLD lever.
To view the picture during recording, face the LCD panel or the viewfinder upward, or face the LCD screen down, then close and restore the LCD panel to the original position with the LCD screen facing out.
HOLD lever
Indicators displayed during recording
The indicators will not be recorded on the tape. The camera settings data (p. 52) will not be displayed during recording.
60min |
REC 00:00:00:00 |
HDV1080i |
60min |
ND |
|
1 |
|
|
CH1 |
|
CH2 |
|
|
ARecording format (HDV1080i, DVCAM, or DV SP)
BRemaining battery
The indicated time may not be correct, depending on the environment where you are using your camcorder. When you open or close the LCD panel, it takes about
1 minute to display the correct remaining battery time.
C 50i/60i system indicator (p. 83)
DRecording status ([STBY] (standby) or [REC] (recording))
ETime code or user bits
The time code of this camcorder can be preset. You can reset or preset the time code even during recording (p. 102).
F Recording capacity of the tape (p. 81)
G Microphone volume level (p. 38)
HND filter
If [ND1] or [ND2] flashes on the screen, activate the ND filter (p. 31).
b Note
•Before changing the battery pack, set the POWER switch to OFF.
•When the camcorder is left in recording standby for more than about 3 minutes, your camcorder exits the recording standby mode (the drum stops rotating) to prevent tape wear and battery loss. Since the power does not turn off, you can restart recording by pressing REC START/STOP again. It takes some time to restart recording, but this not a malfunction. When recording in the HDV format, you can shorten the time until recording starts by setting [QUICK REC] on the
 (OTHERS) menu to [ON] (p. 79).
22 Recording

However, the transition from the last recorded scene may not be smooth.
•The following functions may not work correctly with a tape recorded in the HDV, DVCAM, and DV formats mixed:
–Date search
–Index search
z Tip
•You can record the color bars on a tape. If you record movies including the color bars, you can adjust the color while observing the color bars when you are viewing the pictures on a TV or monitor. To display the color bars, press BARS. Press BARS again to hide the color bars. There are 2 types of color bar.
You can select either one in [BARS TYPE] on the


 (CAMERA SET) menu (p. 63).
•To ensure smooth transition on a tape from the last recorded scene to the next, note the following.
–Do not remove the cassette. (The picture will start recording again without an obvious break even if you turn the power off).
–Do not record pictures in the HDV, DVCAM, and DV formats on the same tape.
–Do not record pictures in the system of 50i and 60i on the same tape.
•You can superimpose the time and date on the picture by setting [DATE REC] on the 
 (OTHERS) menu (p. 82). The time and date are always displayed on the screen during recording.
•The recording time, date, and the camera settings data are recorded automatically on the tape without being displayed on the screen. You can view this information during playback by pressing DATA CODE (p. 52).
•To display the time data, press TC/U-BIT (p. 104).
•To attach an external microphone (optional), see page (p. 39).
time will be 1/3 shorter than that indicated on the tape.
Using zoom
Zoom levers are mounted on the camera itself and on the handle.
Occasional use of the zoom is effective, but use it sparingly for the best results.
1 cm (approx. 1/2 inch)*
Recording
80 cm (approx. 2 5/8 feet)*
*The minimum distance required between your camcorder and the subject to get a sharp focus with that side of the lever.
Usable cassettes
When recording in HDV/DV format, it is recommended that you use mini DV cassettes.
When recording in DVCAM format, it is recommended that you use mini DVCAM cassettes.
b Note
•The transition from the last recorded scene to the next may not be smooth with the [DV SP] setting.
•You cannot record in the LP mode of the DV format.
•If you use a mini DV cassette when [ REC MODE] is set to [DVCAM], the possible recording
1 Set the ZOOM switch to LEVER/ REMOTE.
2 Press the power zoom lever slightly for a slower zoom. Press it further for a faster zoom.
To record a wider range of view
Press the W side of the power zoom lever. The subject appears farther away (Wide angle).
To record a closer view
Press the T side of the power zoom lever. The subject appears closer (Telephoto).
,continued
Recording 23

z Tip
•You can display the zoomed position with a number
or a bar display. Select [BAR] or [NUMBER] in [ZOOM DISPLAY] on the 
 (OTHERS) menu (p. 81). The zoom position is displayed with a bar display in the default setting.
Using the handle zoom
You can adjust the zoom speed with the handle zoom switch when using the handle zoom lever.
Handle zoom lever |
Handle zoom switch |
Zoom ring
Using the zoom ring
You can zoom at the desired speed. Fine adjustment is also possible.
1Set the ZOOM switch to RING.
2Rotate the zoom ring to zoom.
b Note
•Rotate the zoom ring at an appropriate speed. Zooming may not be able to catch up the rotating speed of the ring if it is rotated too fast.
•When you zoom using the Remote Commander, set the ZOOM switch to LEVER/REMOTE.
•Zoomed position and picture angle change when the ZOOM switch is switched from LEVER/REMOTE to RING.
•If you rotate the zoom ring fast, motor noise will become louder as the zoom motor rotates at high speeds. If the motor noise is so loud that can be recorded, use the zoom lever or the Remote Commander.
1Set the ZOOM switch to LEVER/ REMOTE.
2Set the handle zoom switch to H (high) or L (low).
You can set the zoom speed of H or L of the
handle zoom lever in [HANDLE ZOOM] on the 


 (CAMERA SET) menu. In the default setting, [H] is set to 6, and [L] is set to 3 (p. 63).
3Press the handle zoom lever to zoom in or out.
b Note
•You cannot adjust the zoom speed by pressing the handle zoom lever. Change the zoom speed by setting [HANDLE ZOOM] (p. 63).
•You cannot use the handle zoom lever when the handle zoom switch is set to OFF.
•You cannot change the zoom speed of the power zoom lever on the camera itself by switching the handle zoom switch.
24 Recording

Recording in mirror mode |
|
Displaying the recording setup |
|
|
information – Status check |
|
|
|
You can turn the LCD panel towards the subject so that you and your subject can share the image being recorded. You can also utilize this function when recording yourself, or to keep the attention of small children attracted to the camcorder while you record them.
Up to about 100 degrees
Open the LCD panel 180 degrees, then rotate it towards the subject until it clicks.
A mirror-image of the subject appears on the LCD screen, but the picture will be normal when recorded.
You can check the setup value of the following items in the standby mode or during recording.
•Audio setup such as microphone volume level (p. 38)
•Output setup ([COMPONENT], [i.LINK CONV], and [DOWN CONVERT] settings) (p. 74)
•Functions assigned to the ASSIGN buttons (p. 87)
•CAMERA setting
•Picture profile setup (p. 35)
1 Press STATUS CHECK.
2 Turn the SEL/PUSH EXEC dial to display the desired item.
Each time you turn the dial, the items appear in the following order: AUDIO t OUTPUT t ASSIGN t CAMERA t PICT. PROFILE
Recording
Recording 25

To turn off the display of the recording setup information
Press STATUS CHECK.
b Note
•Information of the picture profile setup does not appear when it is set to [OFF].
Adjusting the exposure
The exposure is adjusted automatically in the default setting.
If you want to record brighter or darker pictures than those of the auto exposure adjustment, use the manual adjustment function (p. 29), or customize the picture quality by using the PICTURE PROFILE function (p. 35).
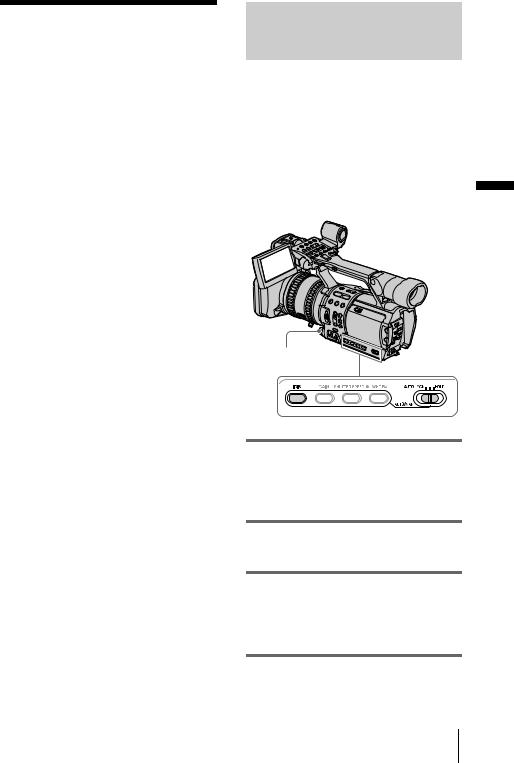
Adjusting the exposure for backlit subjects
When your subject has its back to the sun or other light, you can adjust the exposure to prevent the subject from becoming shadowed.
Assign the BACK LIGHT function to one of the ASSIGN buttons in advance. See page 87 for details on how to assign a function.
ASSIGN 1 – 6
Press the ASSIGN button assigned to the BACK LIGHT function.
. appears.
To cancel the back light function, press the button again.
26 Recording
b Note
•The back light function is canceled when you press the ASSIGN button assigned to SPOTLIGHT.
•You cannot use the back light function if 2 or more items out of iris, gain, and shutter speed are adjusted manually.
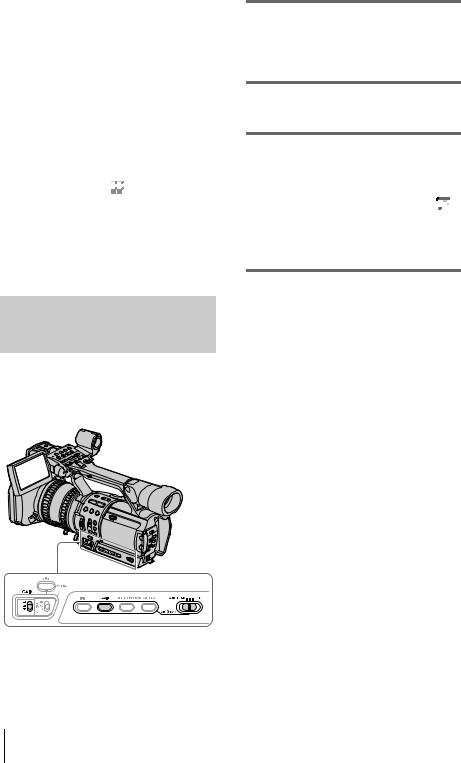
Recording the subject lit by strong light – SPOTLIGHT
When the subject is lit by strong light, such as in a theater, use the spotlight function to prevent people’s faces from appearing excessively white.
Assign the SPOTLIGHT function to one of the ASSIGN buttons in advance. See page 87 for details on how to assign a function.
ASSIGN 1 – 6
During recording or in the standby mode, press the ASSIGN button assigned to the SPOTLIGHT function.
 appears.
To cancel the spotlight function, press the button again.
b Note
•The spotlight function is canceled when you press the ASSIGN button assigned to BACK LIGHT.
•You cannot use the spotlight function if 2 or more items out of iris, gain, and shutter speed are adjusted manually.
Adjusting the white balance
You can adjust the white balance according |
|
|
to the light of the recording environment. |
|
|
The white balance adjustment data for 2 |
|
|
different recording conditions can be set up |
|
|
and memorized separately in memory A and |
|
|
B. During recording, you can recall the setup |
|
|
data from the memory with the WHT BAL |
|
|
(white balance) switch. The setup data will be |
|
|
retained for about 3 months as long as it is not |
Recording |
|
readjusted even if the power is disconnected. |
||
|
 (one-push)
WHT BAL
1 During recording or in the standby mode, set the AUTO LOCK switch to the center position to release the auto lock mode.
2 Press WHT BAL.
3 Set the WHT BAL switch to A or B.
,continued
Recording 27

4 Shoot a white subject such as a piece of paper filling the entire screen under the same lighting condition as that of the subject.
5 Press  (one-push) WHT BAL.
|
A or |
B flashes quickly. |
|
When the white balance is adjusted, |
A |
||
or |
B lights up and the adjustment data is |
||
memorized. |
|
|
|
|
|
|
|
To recall adjustment data from the memory
1During recording or in the standby mode, set the AUTO LOCK switch to the center position to release the auto lock mode.
2Set the WHT BAL switch to A or B.
3Press WHT BAL.
The white balance is set to the recalled adjustment.
b Note
•Avoid subjecting your camcorder to mechanical shock while  A or
A or  B is flashing.
•If  A or
A or  B does not change from flashing to lit steadily, your camcorder is unable to set up the white balance. In this case, use the preset or automatic white balance.
To use the preset white balance
Your camcorder has the preset white balance values for indoor recording and outdoor recording. In addition, you can adjust the color temperature ranging in ±7 steps from 5800K for outdoor recording (p. 59). A step is equivalent to about 500K.
1During recording or in the standby mode, set the AUTO LOCK switch to the center position to release the auto lock mode.
2Press MENU.
3Select the 

 (CAMERA SET) menu by turning the SEL/PUSH EXEC dial,
then press the dial.
4Select [WB PRESET] by turning the SEL/PUSH EXEC dial, then press the dial.
5Select the desired item by turning the SEL/PUSH EXEC dial, then press the dial.
Item |
Recording scene |
|
|
[OUTDOOR] |
• general night views, |
( ) |
neon signs, or fireworks |
|
• sunset, sunrise |
|
• under daylight |
|
fluorescent lamps |
[INDOOR] (n) • at party or in studios where lighting conditions change quickly
•under video lamps such as those in a studio, under sodium lamps, mercury lamps, or warm white fluorescent lamps
It is set to [OUTDOOR] in the default setting.
6Press MENU to hide the menu screen.
7Set the WHT BAL switch to PRESET.
8Press WHT BAL.
The white balance is set to the selected setting.
z Tip
•When [OUTDOOR] is selected, you can adjust the
white balance value for outdoor recording in [WB
OUTDR LVL] on the 

 (CAMERA SET) menu (p. 59). You can assign this function to one of the ASSIGN buttons (p. 87).
To restore the automatic white balance
Press WHT BAL, or set the AUTO LOCK switch to AUTO LOCK.
b Note
•If you set the AUTO LOCK switch to AUTO LOCK, other manually adjusted items (iris, gain, shutter speed) also become temporarily automatic.
28 Recording
Recording using manual adjustments
You can manually adjust the iris, gain, etc. according to the brightness of the recording scene or in order to obtain desired effects.
Adjust the iris, gain, shutter speed, and white balance after setting the AUTO LOCK switch to the center position to release the auto lock mode.
Depending on the position of the AUTO LOCK switch, you can hold or release the settings of these functions.
Position |
Purpose |
|
|
AUTO LOCK |
To adjust automatically. |
|
|
Center (to |
To adjust manually. |
release the auto |
|
lock mode) |
|
|
|
HOLD |
Select this position after adjusting |
|
the settings manually to retain |
|
them. |
|
|
See page 27 for details on how to adjust the white balance.
b Note
•If you want to set the exposure intentionally to other than a proper level, adjust the iris, gain, and shutter speed manually.
•If you adjust only one of either iris, shutter speed, or gain manually, you can record with iris priority, shutter speed priority, or gain priority, respectively.
z Tip
•To adjust the brightness of pictures, set all of the iris, gain, and shutter speed to the manual adjustment mode, then rotate the iris dial.
Adjusting the iris
You can manually adjust the light volume |
|
entering the lens. |
|
As the iris is opened (smaller aperture |
|
values), the light volume increases. The |
|
range of focus narrows and only the subject |
|
appears in sharp focus. |
|
As the iris is closed (larger aperture values), |
|
the light volume decreases and the range of |
|
focus widens. |
Recording |
|
IRIS dial
1 During recording or in the standby mode, set the AUTO LOCK switch to the center position to release the auto lock mode.
2 Press IRIS.
The current aperture value (F) appears.
3 Rotate the IRIS dial to a desired aperture value.
The aperture value (F) varies from F1.6 to F11, and Close, and the corresponding value appears.
Recording 29
To restore automatic adjustment
Press IRIS, or set the AUTO LOCK switch to AUTO LOCK.
b Note
•If you set the AUTO LOCK switch to AUTO LOCK, other manually adjusted items (gain, shutter speed, white balance) also become temporarily automatic.
•As you shift the zoom from W (wide) to T (telephoto), the aperture value varies from F1.6 to F2.8.
z Tip
•You can select the rotation direction of the iris dial with [IRIS DIAL] on the 
 (OTHERS) menu (p. 80).
•The iris has an important effect on the “depth of field,” that is, the focused range. An open iris makes the depth of field shallower (shorter focused range), and a closed iris makes the depth of field deeper (longer focused range). Use the iris effectively according to your purpose of recording.
Adjusting the gain
Adjust the gain manually when shooting blackish or dark objects if you do not want the AGC (auto gain control) to be activated.
1 During recording or in the standby mode, set the AUTO LOCK switch to the center position to release the auto lock mode.
2 Press GAIN.
The current gain value appears.
3 Set the GAIN switch to the desired position.
3 gain levels (H, M, L) are available. You can set the value for the respective
positions with [GAIN SETUP] on the 


 (CAMERA SET) menu (p. 59).
The default settings for each position are 18 dB (H), 9 dB (M) and 0 dB (L).
The larger the number, the greater the gain.
To restore automatic adjustment
Press GAIN, or set the AUTO LOCK switch to AUTO LOCK.
b Note
•If you set the AUTO LOCK switch to AUTO LOCK, other manually adjusted items (iris, shutter speed, white balance) also become temporarily automatic.
z Tip
•You can increase the gain level up to about 36 dB by using Hyper-gain (p. 88).
30 Recording
 Loading...