


For customers in Europe
Disposal of Old Electrical & Electronic Equipment (Applicable in the European Union and other European countries with separate collection systems)
This symbol on the product or on its packaging indicates that this product shall not be treated as household waste. Instead it shall be handed over
to the applicable collection point for the recycling of electrical and electronic equipment. By ensuring this product is disposed of correctly,
you will help prevent potentialnegative consequences for the environment and human health, which could otherwise be caused by inappropriate waste handling of this product. The recycling of materials will help to conserve natural resources. For more detailed information about recycling of this product, please contact your local Civic Office, your household waste disposal service or the shop where you purchased the product. Applicable accessories: Headphones
Disposal of waste batteries (applicable in the European Union and other European countries with separate collection systems)
This symbol on the battery or on the packaging indicates that the battery provided with this product shall not be treated as household waste.
By ensuring these batteries are disposed of correctly, you will help
prevent potentially negative consequences for
the environment and human health which could otherwise be caused by inappropriate waste handling of the battery. The recycling of the materials will help to conserve natural resources.
In case of products that for safety, performance or data integrity reasons require a permanent
connection with an incorporated battery, this battery should be replaced by qualified service staff only.
To ensure that the battery will be treated properly, hand over the product at end-of-life to the applicable collection point for the recycling of electrical and electronic equipment.
For all other batteries, please view the section on how to remove the battery from the product safely. Hand the battery over to the applicable collection point for the recycling of waste batteries.
For more detailed information about recycling of this product or battery, please contact your local Civic Office, your household waste disposal service or the shop where you purchased the product.
Notice for the customers in the countries applying EU Directives
The manufacturer of this product is Sony Corporation, 1-7-1 Konan, Minato-ku, Tokyo, Japan. The Authorized Representative for EMC and product safety is Sony Deutschland GmbH, Hedelfinger Strasse 61, 70327 Stuttgart, Germany. For any service or guarantee matters please refer to the addresses given in separate service or guarantee documents.
GB

Notice for Users
Program © 1999, 2000, 2001, 2002, 2003, 2004, 2005, 2006, 2007, 2008 Sony Corporation
Documentation ©2008 Sony Corporation
All rights reserved. This manual or the software described herein, in whole or in part, may not be reproduced, translated or reduced to any machine readable form without prior written approval from Sony Corporation.
IN NO EVENT SHALL SONY CORPORATION BE LIABLE FOR ANY INCIDENTAL, CONSEQUENTIAL OR SPECIAL DAMAGES, WHETHER BASED ON TORT, CONTRACT, OR OTHERWISE, ARISING OUT OF OR IN CONNECTION WITH THIS MANUAL, THE SOFTWARE OR OTHER INFORMATION CONTAINED HEREIN OR THE USE THEREOF.
Sony Corporation reserves the right to make any modification to this manual or the information contained herein at any time without notice.
The software described herein may also be governed by the terms of a separate user license agreement.
This software is for Windows and cannot be used for Macintosh.
The supplied connecting cable is for the IC recorder ICD-P630F. You cannot connect other IC recorders.
GB

Table of Contents |
|
Index to Parts and Controls..................... |
6 |
Getting Started |
|
Step 1: Installing the Batteries................ |
9 |
Replacing the batteries..................... |
10 |
Step 2: Setting the Clock........................... |
11 |
Basic Operations |
|
Recording Messages.................................... |
13 |
Selecting the Folder..................................... |
17 |
Starting Recording Automatically |
|
in Response to the Sound |
|
— Advanced VOR Function ................... |
17 |
Selecting the Microphone |
|
Sensitivity............................................................ |
18 |
Various Recording Modes |
|
Adding a Recording..................................... |
19 |
Using an adding recording............. |
19 |
Adding a recording to a |
|
previously recorded message....... |
20 |
Recording with an External |
|
Microphone or from Other |
|
Equipment.......................................................... |
21 |
Playback/Erasing |
|
Playing Back Messages............................... |
23 |
Playing back a message |
|
repeatedly |
|
— Repeat Play......................................... |
25 |
Playing back all messages |
|
in a folder continuously |
|
— Continuous Play.............................. |
25 |
Searching forward/backward |
|
during playback (Cue/Review)..... |
25 |
Locating quickly the point |
|
you wish to start playback |
|
(Easy Search)............................................ |
26 |
Playing Back a Message at a |
|
Desired Time with an Alarm.................... |
26 |
Erasing Messages........................................... |
30 |
Erasing messages one by one...... |
30 |
Erasing all messages in a folder.... |
31 |
GB

Editing Messages |
|
Dividing a Message....................................... |
32 |
Moving Messages to a |
|
Different Folder |
|
— Move Function.......................................... |
33 |
Listening to the Radio |
|
Listening to an FM Radio Station......... |
35 |
Switching the FM radio output |
|
between speaker and |
|
headphones............................................. |
36 |
Recording FM broadcasts................ |
36 |
Presetting FM Radio Stations.................. |
36 |
Presetting FM Radio Stations |
|
Automatically................................................... |
37 |
Listening to a Preset Radio Station..... |
38 |
Erasing Preset FM Radio Stations......... |
39 |
Switching the receiver |
|
sensitivity of the FM radio................ |
40 |
Utilizing the Menu Function |
|
Selecting the Display Mode.................... |
41 |
Turning off the Beep Sound.................... |
42 |
Changing the Recording Mode............ |
42 |
Playing Back All Messages in a |
|
Folder Continuously..................................... |
43 |
Turning off the Operation |
|
Indicator (LED)................................................. |
43 |
Using the IC Recorder with Your Computer
Using the Supplied Digital Voice |
|
Editor Software................................................ |
44 |
What you can do using the |
|
Digital Voice Editor software.......... |
44 |
System requirements.......................... |
45 |
Installing the software....................... |
46 |
Connecting the IC recorder |
|
to your computer.................................. |
49 |
Referring to the help files................. |
50 |
Troubleshooting |
|
Troubleshooting............................................. |
51 |
Additional Information |
|
Precautions........................................................ |
57 |
Specifications.................................................... |
58 |
GB
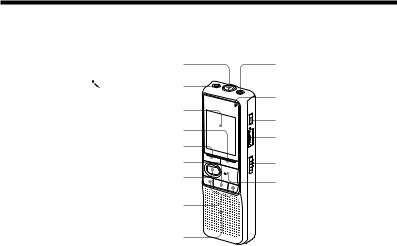
Index to Parts and Controls
Main unit
Built-in microphone |
(headphone) jack |
|
(microphone) jack |
Operation indicator |
|
Display window |
||
DIVIDE |
||
DISPLAY/MENU |
||
VOL (volume) control* |
||
FM• (headphone)/ (speaker) selector |
||
|
||
(stop) |
HOLD |
|
REC (record) |
PLAY/ENTER** |
|
|
||
– (review/fast backward)/ |
|
|
+ (cue/fast forward) |
|
|
Speaker |
|
|
|
* There is a tactile dot beside the control to show |
|
|
the direction to turn up the volume. |
|
|
** The button has a tactile dot. |
GB

Preventing Accidental Operation
— HOLD function
Slide the HOLD switch to ON. “HOLD” will flash three times, indicating that all the functions of the buttons are locked.
When the HOLD function is activated during stop, all the display will be turned off after “HOLD” flashes.
HOLD
To cancel the HOLD function
Slide the HOLD switch to OFF.
Note
When the HOLD function is activated during recording, cancel the HOLD function first to stop recording.
Tip
Even if the HOLD function is activated, you can stop the alarm playback. To stop the alarm or playback, press (stop).
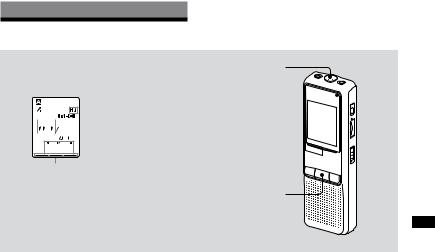
Rear
 USB connector
 Battery compartment
 Hook for handstrap (not supplied)
GB

Display window
Folder indication
Microphone sensitivity 


 Alarm indicator


Selected message |
number |
REC DATE (recorded date) |
indication |
REMAIN indicator |
FM radio sensitivity
Remaining memory indicator
Remaining battery indicator
Recording mode indication
REC (recording) indicator
FM indicator
Repeat play indicator
EASY-S (Easy Search) indicator
Number of messages in a folder/Menu indication/Counter/ Remaining time indication /Recording date indication/ Current time indication/ Messages
GB

Getting Started
Step 1: Installing the Batteries
1 Slide and lift the battery compartment lid.
2 Insert two LR03 (size AAA) alkaline batteries with correct polarity, and close the lid.
Make sure to insert both of the batteries from their – ends.
If the battery compartment lid is accidentally detached, attach it as illustrated.
Clock setting display appears when you |
Getting |
|
Started |
||
you replace the batteries with new ones. |
||
insert batteries for the first time, or when |
|
|
Please refer to Steps 2 to 3 in “Step 2: |
|
|
Setting the Clock” to set the date and time. |
|
GB

Replacing the batteries
The battery indicator in the display window shows the battery condition. When “ flashes, replace the batteries with new ones.
When “ flashes, the batteries are exhausted and the unit will stop operation.
Battery life* (With continuous use)
In the HQ mode
Recording: |
Approx. 11 hr. |
|
|
Playback**: |
Approx. 7.5 hr. |
|
|
FM recording: |
Approx. 5 hr. |
|
|
FM reception: |
Approx.13 hr. |
|
|
In the SP and LP modes |
|
|
|
Recording: |
Approx. 22 hr. |
|
|
Playback**: |
Approx.11 hr. |
|
|
FM recording: |
Approx.7 hr. |
|
|
FM reception: |
Approx.13 hr. |
(hr.: hours)
* Using Sony alkaline batteries LR03 (size AAA) **When playing back through the internal
speaker with the medium volume level
The battery life may shorten depending on the operation of the unit.
Notes
Do not use manganese batteries for this unit.
When you replace the batteries with new ones, the clock setting display appears. In this case, set the date and time again.
The recorded messages and alarm setting, however, will remain.
When replacing the batteries, be sure to replace both batteries with new ones.
Do not charge dry batteries.
When you are not going to use the unit for a long time, remove the batteries to prevent damage from battery leakage and corrosion.
The unit is accessing data while “ACCESS“ appears in the display window or the operation indicator flashes in orange. While accessing, do not remove the batteries. Doing so may damage the data.
10GB
Step 2: Setting the
Clock
DISPLAY/MENU
PLAY/ENTER
(stop)

– / +
Clock setting display appears when you insert batteries for the first time, or when you replace the batteries with new ones. In this case, proceed from step 2.
1 Display the clock setting display.
Press DISPLAY/MENU for more than 1 second until “MODE” appears in the display window.
The unit enters the menu mode.
Press – or + to display “SET DATE.”
Press PLAY/ENTER. The year digits will flash.
2 Set the date.
Press – or + to select the digits of the year.
Press PLAY/ENTER. The month digits will flash.
Set the month and day in sequence, then press PLAY/ENTER.
The hour digits will flash.
Tip
To set the date to Year 2008, display “08Y.”
Started Getting
11GB
3 Set the time.
Press – or + to select the digits of the hour.
Press PLAY/ENTER. The minute digits will flash.
Set the minute.
Press PLAY/ENTER at the time signal.
The display will return to “SET DATE.”
Press (stop) to exit from the menu mode.
If the unit is left unused for more than 3 seconds in the stop mode, the display will show the current time.
Tips
This unit does not have a power on/off switch. The display is shown at all times.
You can select the 12-hour display using the menu. To set the 12-hour display, select “12H” in the “HOUR” menu. In that case, “AM12:00” will appear in step 2- .
12GB
Basic Operations
Recording Messages
Display window
 Recording mode
 Current message

 number


 Counter display*
Remaining memory indicator
*The display selected with the DISPLAY/MENU button appears.
Built-in microphone
Operation indicator (lights in red during
recording.)
REC 

(stop)
You can record up to 99 messages in each of the four folders (A, B, C, and D). Since a newly recorded message
is automatically added behind the last recorded message, you can start
recording quickly without searching for the end of the last recording.
Note
Before making a long recording, be sure to insert new batteries and check the battery indicator.
1 Select the recording mode.
See “Changing the Recording Mode” on page 42.
2 Select the folder.
See “Selecting the Folder” on page 17.
Operations Basic
13GB

3 Start recording.
Press REC.
You do not need to keep pressingREC while recording.
Speak to the built-in microphone.
4 Stop recording.
Press (stop).
The unit stops at the beginning of the current recording.
If you do not change the folder after you stop recording, the next time you record you will record in the same folder.
Other operations
To |
Do this |
pause |
Press REC. |
recording* |
During recording pause, the |
|
operation indicator flashes in |
|
red and “PAUSE” flashes in the |
|
display window. |
|
|
release |
Press REC. |
pause and |
Recording resumes from that |
resume |
point. |
recording |
(To stop recording after |
|
pausing recording, press |
|
(stop).) |
|
|
To |
Do this |
listen to |
Press (stop) to stop |
the current |
recording, then press |
recording |
PLAY/ENTER. |
|
|
review the |
Press PLAY/ENTER during |
current |
recording. |
recording |
|
instantly |
|
|
|
search |
Hold down – during |
backward |
recording or recording pause. |
during |
Recording mode will be |
recording |
released, and reviewing of the |
(Review) |
current recording starts. If you |
|
release the button, playback |
|
starts from that point. |
|
|
select the |
You can select the |
microphone |
microphone sensitivity using |
sensitivity |
the menu. See “Selecting the |
|
Microphone Sensitivity.” |
|
H (high): To record at meeting |
|
or in a quiet and/or spacious |
|
place. |
|
L (low): To record for dictation |
|
or in a noisy place. |
*About one hour after you pause recording, recording pause is automatically released and the unit goes into the stop mode.
14GB

Note on recording
Noise may be recorded if an object, such as your finger, etc., accidentally rubs or scratches the unit during recording.
Maximum recording time
The maximum recording time of all the folders is as follows. You can record messages for the maximum recording time in a single folder.
HQ* |
59 hr. 45 min. |
|
|
SP** |
159 hr. 20 min. |
|
|
LP*** |
261 hr. 45 min. |
(hr.: hours/min.: minutes)
*HQ: High quality recording mode (monaural sound)
**SP: Standard play recording mode (monaural sound)
***LP: Long play recording mode (monaural sound)
Notes
To record in better sound quality, select the HQ mode. For switching the recording mode, see “Changing the Recording Mode” on page 42.
Before making a long recording, be sure to check the battery indicator.
The maximum recording time and the number of messages you can make vary depending on the conditions of use.
When you record messages in the mixture of HQ, SP and LP modes, the maximum recording time will be between those for the HQ and LP modes.
Due to the limitation of the IC recording system, this unit records in the minimum recording unit of approx. 2 seconds at most, therefore the following symptoms may occur:
When a message is shorter than the minimum recording unit, it is still counted as approx. 2 seconds at most so the remaining recording time will decrease by more than the actual length of the message.
When the message is longer than the minimum recording unit, the remaining recording time will decrease by more than the actual length of the message if it cannot be divided by the minimum recording unit without a remainder.
The sum of the number on the counter (elapsed recording time) and the remaining recording time may be less than the unit’s maximum recording time.
Operations Basic
15GB

Remaining memory indication
During recording, the remaining memory indicator decreases one by one.
The memory is nearly full.
Flashing
When the remaining time of recording reaches 5 minutes, the last one of the indication flashes.
If the remaining recording time display mode is selected, the remaining recording time display will also flash when the remaining time reaches 1 minute.
When the memory is full, recording automatically stops and “FULL” will flash in the display window with an alarm sound. To continue recording, first erase some of the messages.
Notes
If you press REC when the memory is full, “FULL” will flash with an alarm sound. Erase some of the messages before you start recording again.
If you press REC after you have recorded 99 messages, “FULL” will flash with an alarm sound. Select another folder or erase some of the messages.
16GB

Selecting the Folder
1 Press DISPLAY/MENU for more than
1 second until “MODE” appears in the display window.
2 Press – or + to select “FOLDER” and press PLAY/
ENTER.
3 Press – or + to select the folder you want and pressPLAY/ENTER.
Current folder 

4 Press (stop) to exit the menu mode.
Starting Recording
Automatically in Response to the Sound — Advanced VOR Function
When VOR (voice operated recording) is set to “ON” in the menu, recording starts when the recorder detects sound. (“VOR” is displayed in the display window.)
Recording stops when no sound is heard. (“VOR PAUSE” flashes in the display window.)
Note
VOR function is affected by the sound around you. Set the microphone sensitivity to “H (high)” or “L (low)” using the menu. If recording is not satisfactory after you have changed
the microphone sensitivity, or for important recording, set VOR to “OFF.”
Operations Basic
17GB

Selecting the
Microphone
Sensitivity
1 Press DISPLAY/MENU for more than
1 second until “MODE” appears in the display window.
2 Press – or + to select “SENS” and press PLAY/ENTER.
3 Press – or + to select
“H (high sensitivity)” or “L (low sensitivity)” and press PLAY/
ENTER.
4 Press (stop) to exit the menu mode.
18GB
 Loading...