


4-269-874-12(1)
Home Theatre System
Operating Instructions |
|
|
||
US |
||||
Mode d’emploi |
|
|
||
FR |
||||
Manual de instrucciones |
|
|
||
ES |
||||
HT-CT550W
©2011 Sony Corporation
Sony Corporation Printed in Malaysia

WARNING
To reduce the risk of fire or electric shock, do not expose this apparatus to rain or moisture.
The unit is not disconnected from the AC power source (mains) as long as it is connected to the wall outlet, even if the unit itself has been turned off.
To reduce the risk of fire, do not cover the ventilation opening of the apparatus with newspapers, tablecloths, curtains, etc.
Do not place the naked flame sources such as lighted candles on the apparatus.
To reduce the risk of fire or electric shock, do not expose this apparatus to dripping or splashing, and do not place objects filled with liquids, such as vases, on the apparatus.
As the main plug is used to disconnect the unit from the mains, connect the unit to an easily accessible AC outlet. Should you notice an abnormality in the unit, disconnect the main plug from the AC outlet immediately.
Do not install the appliance in a confined space, such as a bookcase or built-in cabinet.
Do not expose batteries or apparatus with batteryinstalled to excessive heat such as sunshine, fire or the like.
In door use only.
For the customers in the U.S.A
This symbol is intended to alert the user to the presence of uninsulated “dangerous voltage” within the product’s enclosure that
may be of sufficient magnitude to constitute a risk of electric shock to persons.
This symbol is intended to alert the user to the presence of important operating and maintenance (servicing) instructions in the
literature accompanying the appliance.
Owner’s Record
The model and serial numbers are located on the bottom of the receiver. Record the serial numbers in the spaces provided below. Refer to them whenever you call upon your Sony dealer regarding this product.
Model No. HT-CT550W
Serial No.
Important Safety Instructions
1)Read these instructions.
2)Keep these instructions.
3)Heed all warnings.
4)Follow all instructions.
5)Do not use this apparatus near water.
6)Clean only with dry cloth.
7)Do not block any ventilation openings. Install in accordance with the manufacturer’s instructions.
8)Do not install near any heat sources such as radiators, heat registers, stoves, or other apparatus (including amplifiers) that produce heat.
9)Do not defeat the safety purpose of the polarized or grounding-type plug. A polarized plug has two blades with one wider than the other. A grounding type plug has two blades and a third grounding prong. The wide blade or the third prong are provided for your safety. If the provided plug does not fit into your outlet, consult an electrician for replacement of the obsolete outlet.
10)Protect the power cord from being walked on or pinched particularly at plugs, convenience receptacles, and the point where they exit from the apparatus.
11)Only use attachments/accessories specified by the manufacturer.
12)Use only with the cart, stand, tripod, bracket, or table specified by the manufacturer, or sold with the apparatus. When a cart is used, use caution when moving the cart/apparatus combination to avoid injury from tip-over.
13)Unplug this apparatus during lightning storms or when unused for long periods of time.
2US
14)Refer all servicing to qualified service personnel. Servicing is required when the apparatus has been damaged in any way, such as power-supply cord or plug is damaged, liquid has been spilled or objects have fallen into the apparatus, the apparatus has been exposed to rain or moisture, does not operate normally, or has been dropped.
The following FCC statement applies only to the version of this model manufactured for sale in the U.S.A. Other versions may not comply with FCC technical regulations.
NOTE:
This equipment has been tested and found to comply with the limits for a Class B digital device, pursuant to Part 15 of the FCC Rules. These limits are designed to provide reasonable protection against harmful interference in a residential installation. This equipment generates, uses, and can radiate radio frequency energy and, if not installed and used in accordance with the instructions, may cause harmful interference to radio communications. However, there is no guarantee that interference will not occur in a particular installation. If this equipment does cause harmful interference to radio or television reception, which can be determined by turning the equipment off and on, the user is encouraged to try to correct the interference by one or more of the following measures:
–Reorient or relocate the receiving antenna.
–Increase the separation between the equipment and receiver.
–Connect the equipment into an outlet on a circuit different from that to which the receiver is connected.
–Consult the dealer or an experienced radio/TV technician for help.
CAUTION
You are cautioned that any changes or modifications not expressly approved in this manual could void your authority to operate this equipment.
For the receiver (STR-CT550WT)
The nameplate and the date of manufacture marking are located on the bottom exterior.
These following indications are located on the bottom exterior.
For the wireless transceiver (EZW-RT50)
This device complies with Part 15 of the FCC Rules. Operation is subject to the following two conditions:
(1)this device may not cause harmful interference, and
(2)this device must accept any interference received, including interference that may cause undesired operation.
This equipment must not be co-located or operated in conjunction with any other antenna or transmitter.
This equipment complies with FCC radiation exposure limits set forth for uncontrolled equipment and meets the FCC radio frequency (RF) Exposure Guidelines in Supplement C to OET65.
This equipment should be installed and operated with at least 20cm and more between the radiator and person's body (excluding extremities: hands, wrists, feet and ankles).
For the customers in the Canada
For the wireless transceiver (EZW-RT50)
This Class B digital apparatus complies with Canadian ICES-003.
Operation is subject to the following two conditions:
(1) this device may not cause interference, and (2) this device must accept any interference, including interference that may cause undesired operation of this device.
This equipment complies with IC radiation exposure limits set forth for uncontrolled equipment and meets the RSS-102 of the IC radio frequency (RF) Exposure rules.
This equipment should be installed and operated with at least 20cm and more between the radiator and person’s body (excluding extremities: hands, wrists, feet and ankles).
3US

Precautions
On safety
•Should any solid object or liquid fall into the system, unplug the system and have it checked by qualified personnel before operating it any further.
•Do not climb on the receiver or the subwoofer, as you may fall down and injure yourself, or system damage may result.
On power sources
•Before operating the system, check that the operating voltage is identical to your local power supply. The operating voltage is indicated on the nameplate at the rear of the receiver.
•If you are not going to use the system for a long time, be sure to disconnect the system from the wall outlet (mains). To disconnect the AC power cord (mains lead), grasp the plug itself; never pull the cord.
•One blade of the plug is wider than the other for the purpose of safety and will fit into the wall outlet (mains) only one way. If you are unable to insert the plug fully into the outlet, contact your dealer.
•AC power cord (mains lead) must be changed only at the qualified service shop.
On heat buildup
Although the system heats up during operation, this is not a malfunction. If you continuously use this system at a large volume, the system temperature of the back and bottom rises considerably. To avoid burning yourself, do not touch the system.
On placement
•Place the system in a location with adequate ventilation to prevent heat buildup and prolong the life of the system.
•Do not place the system near heat sources, or in a place subject to direct sunlight, excessive dust, or mechanical shock.
•Do not place anything at the rear of the receiver that might block the ventilation holes and cause malfunctions.
•Do not place the system near equipment such as a TV, VCR, or tape deck. (If the system is being used in combination with a TV, VCR, or tape deck, and is placed too close to that equipment, noise may result, and picture quality may suffer. This is especially likely when using an indoor antenna. Therefore, we recommend using an outdoor antenna.)
•Use caution when placing the system on surfaces that have been specially treated (with wax, oil, polish, etc.) as staining or discoloration of the surface may result.
•Take care to avoid any possible injury on the corners of the receiver or the subwoofer.
On operation
Before connecting other equipment, be sure to turn off and unplug the system.
If you encounter color irregularity on a nearby TV screen
The system is magnetically shielded to allow it to be installed near a TV set. However, color irregularities may still be observed on certain types of TV sets.
If color irregularity is observed...
Turn off the TV set, then turn it on again after 15 to 30 minutes.
If color irregularity is observed
again...
Place the system further away from the TV set.
On cleaning
Clean the system with a soft dry cloth. Do not use any type of abrasive pad, scouring powder or solvent such as alcohol or benzine.
If you have any question or problem concerning your system, please consult your nearest Sony dealer.
Copyrights
This system incorporates Dolby* Digital and the DTS** Digital Surround System.
*Manufactured under license from Dolby Laboratories.
Dolby, and the double-D symbol are trademarks of Dolby Laboratories.
**Manufactured under license under U.S. Patent #’s: 5,451,942; 5,956,674; 5,974,380; 5,978,762; 6,226,616; 6,487,535; 7,212,872; 7,333,929; 7,392,195; 7,272,567 & other U.S. and worldwide patents issued & pending. DTS, DTS-HD and the Symbol are registered trademarks, & DTS-HD Master Audio, and the DTS logos are trademarks of DTS, Inc. Product includes software. © DTS, Inc. All Rights Reserved.
This system incorporates High-Definition Multimedia Interface (HDMI™) technology.
4US
HDMI, the HDMI Logo, and High-Definition Multimedia Interface are trademarks or registered trademarks of HDMI Licensing LLC in the United States and other countries.
“BRAVIA” logo is a trademark of Sony Corporation.
“x.v.Colour (x.v.Color)” and “x.v.Colour (x.v.Color)” logo are trademarks of Sony Corporation.
“PlayStation®” is a registered trademark of Sony Computer Entertainment Inc.
5US

Table of contents |
|
Precautions............................................... |
4 |
Getting Started |
|
Unpacking................................................ |
7 |
Index to parts and controls....................... |
9 |
Positioning the system ........................... |
13 |
Installing the supplied wireless |
|
transceivers ...................................... |
15 |
Connecting the speaker .......................... |
15 |
Connecting the TV and player, etc. ....... |
16 |
Connecting other equipment .................. |
18 |
Connecting the FM wire antenna (aerial) |
|
......................................................... |
19 |
Connecting the AC power cord (mains |
|
lead) ................................................. |
20 |
Setting up the Wireless System.............. |
20 |
Preparing for “BRAVIA” Sync ............. |
20 |
Setting up the sound output of the |
|
connected equipment ....................... |
22 |
Playback Options |
|
What is “BRAVIA” Sync?..................... |
23 |
Using “BRAVIA” Sync features ........... |
23 |
Operating the system using the supplied |
|
remote control.................................. |
26 |
Tuner Functions |
|
Listening to the radio ............................. |
27 |
Programming radio stations ................... |
28 |
Listening to the preset radio stations ..... |
28 |
Naming preset stations........................... |
29 |
Viewing the station name or frequency on |
|
the front panel display ..................... |
30 |
Surround Function |
|
Enjoying the surround effect.................. |
31 |
Advanced Settings |
|
Controlling connected Sony equipment |
|
with the remote control.................... |
32 |
Changing the input button assignments of |
|
the remote control............................ |
35 |
Settings and adjustments using the |
|
amplifier menu................................. |
36 |
Additional Information |
|
Troubleshooting .................................... |
41 |
Specifications ........................................ |
44 |
Index...................................................... |
46 |
6US
Getting Started
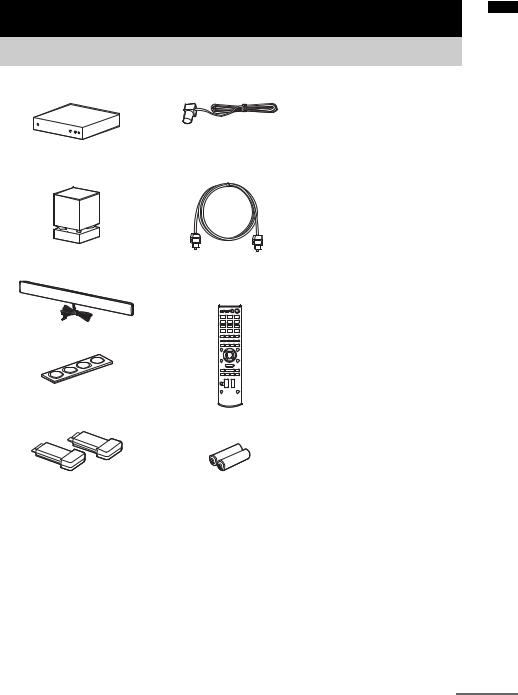
Unpacking
• Receiver (STR-CT550WT) (1) • FM wire antenna (aerial) (1) • Operating Instructions (1)
• Warranty (1)
•Subwoofer (SA-WCT550W)
(1)
•Speaker (SS-CT550W) (1)
•Speaker foot pads (4)
•Wireless transceivers (EZW-RT50) (2)
•Digital optical cord for a TV (2.5 m) (1)
•Remote control (RM-AAU113)
(1)
• R6 (size AA) batteries (2)
Started Getting
continued
7US

Inserting batteries into the remote control
Insert two R6 (size AA) batteries (supplied) by matching the 3 and # ends on the batteries to the diagram inside the battery compartment of the remote control. To use the remote control, point it at the remote control sensor  at the front of the receiver.
Notes
•Do not leave the remote control in an extremely hot or humid place.
•Do not use a new battery with an old one.
•Do not drop any foreign object into the remote control casing, particularly when replacing the batteries.
•Do not expose the remote control sensor to direct sunlight or lighting apparatus. Doing so may cause a malfunction.
•If you do not intend to use the remote control for an extended period of time, remove the batteries to avoid possible damage from battery leakage and corrosion.
8US
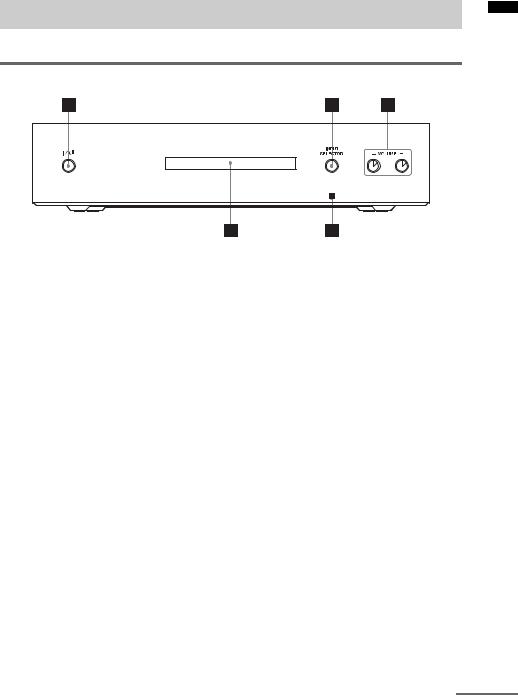
Index to parts and controls
For more information, see the pages indicated in parentheses.
Receiver
Started Getting
A ?/1 (on/standby)
BINPUT SELECTOR
Press to select the input source to play back. Every time you press the button, the input source changes cyclically as follows:
TV t BD/DVD t GAME t SAT/CATV t VIDEO t LINE IN t TUNER FM t TV……
C VOLUME +/–
D Front panel display (page 11)
E  (remote control sensor)
continued
9US
Subwoofer
A ?/1 (power button)
B SECURE LINK button (page 39)
CLINK/STANDBY indicator
You can check the status of wireless transmission between the receiver and the subwoofer.
•Turns green:
The system is turned on,wireless transmission is activated and sound signals are being received.
•Turns amber:
The system is turned on,wireless transmission is activated with the Secure Link function, and sound signals are being received.
•Flashes in green quickly:
The wireless transceiver is not inserted correctly into the wireless transceiver (EZW-RT50/EZW-RT20) slot.
•Flashes in green or amber slowly: Wireless transmission is not activated.
•Turns red:
The subwoofer is in standby mode (page 20).
•Turns off:
The subwoofer is turned off.
•Flashes in red:
The subwoofer’s protection is activated (page 43).
10US
Front panel display (on the receiver)
Started Getting
AAudio format indicators
Light up according to the audio format that is being input to the system.
LPCM: Linear PCM
 TrueHD: Dolby TrueHD
 D: Dolby Digital
 D+: Dolby Digital Plus DTS
DTS 96/24*
DTS-HD LBR: DTS-HD Low Bit Rate DTS-HD MSTR: DTS-HD Master Audio DTS-HD HI-RES: DTS-HD High Resolution Audio
*Lights up only when a DTS 96/24 signal is input while “2CH STEREO” is selected for the sound field. If you select a sound field other than “2CH STEREO,” it does not light up.
BNIGHT (page 38)
Lights up in NIGHT MODE.
C HDMI (page 16)
DCOAX/OPT
Lights up according to the jack you are using, the DIGITAL COAX or the DIGITAL OPT jack.
ETUNED (page 28)
Lights up when tuned in to an FM radio station.
FST (page 28)
Lights up when an FM stereo program is received.
GMessage display area
Displays volume, selected input source, etc.
HMUTING
Lights up when the sound is turned off.
Lights up when an HDMI signal is input or when an Audio Return Channel (ARC) signal is being input to the system while “TV” is selected as the input source.
continued
11US
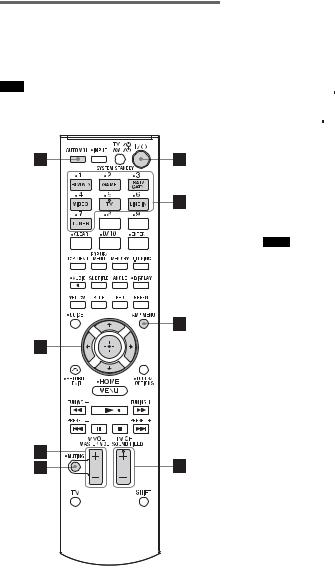
Remote control
This section describes subwoofer and speaker button operation. See page 32 for details on the button operation of connected equipment.
Note
•Point the remote control towards the remote control sensor ( ) of the receiver.
*The 5, N, AUDIO and SOUND FIELD + buttons have a tactile dot. Use it as a guide during operation.
A ?/1 (on/standby)
BInput buttons
Press one of the buttons to select the equipment you want to use.
C AMP MENU (page 36)
D SOUND FIELD +/– (page 31)
E MUTING
FMASTER VOL +/–
Press to adjust the volume.
GC, X, x, c or 
Press C, X, x or c to select the menu items. Then press  to enter the selection.
HAUTO VOL (volume)
Press to reduce fluctuations in the volume while playing back content or programs (ADVANCED AUTO VOLUME function). This function is useful, for example, when the sound of a commercial is louder than that of the TV programs.
Notes
•The AUTO VOL (volume) function is not appropriate for listening to CDs.
•The AUTO VOL (volume) function is activated only when Dolby Digital, DTS and Linear PCM are being input to the system. If you change to another input source, the sound may be louder than it was before.
12US

Positioning the system
The illustrations below are examples of how to install the speaker.
Note
•When you select a place for the receiver or the subwoofer, do not block the heat ventilation on the rear panel of the receiver or the subwoofer.
Installing the speaker to the TV
You can install the speaker on the following TV models (not supplied) by using the WS-CT550B40/46 speaker attachment bracket (not supplied):
XBR-46HX92s, KDL-46HX82s, KDL-46NX72s, KDL-46HX72s, KDL-40/46EX72s, KDL-40/46EX62s
*In the actual model names, the “s” indicates numbers and/or characters specific to each model.
As of April 2011.
• Installing the speaker on the TV stand
Installing the speaker and the TV separately
If you cannot install the speaker to the TV, you can install the speaker as shown below.
• Installing the speaker in a rack
Note
•To prevent speaker vibration or movement while listening, attach the supplied speaker foot pads to the bottom four corners of the speaker.
|
|
|
• Installing the speaker on a wall (page 14) |
• Hanging the speaker and TV on a wall |
|||
Started Getting
continued
13US

Installing the speaker on a wall
You can install the speaker on the wall.
Notes
•Use screws that are suitable for the wall material and strength. As a plaster board wall is especially fragile, attach the screws securely to a wall beam. Install the speaker on a vertical and flat reinforced area of the wall.
•Be sure to subcontract the installation to Sony dealers or licensed contractors and pay special attention to safety during the installation.
•Sony is not responsible for accidents or damage caused by improper installation, insufficient wall strength, improper screw installation or natural calamity, etc.
1 Prepare screws (not supplied) that are suitable for the holes on the back of the speaker. See the illustrations below.
4 mm (1/6 inches)
more than 25 mm (1 inch)
5 mm
(1/5 inches)
10 mm (2/5 inches)
Hole on the back of the speaker
2 Fasten the screws to the wall. The screws should protrude 6 to 7 mm (approx. 1/4 inches).
265 mm
(10 2/5 inches)
6 to 7 mm (approx. 1/4 inches)
3 Hang the speaker onto the screws.
Align the holes on the back of the speaker to the screws, then hang the speaker onto the two screws.
14US

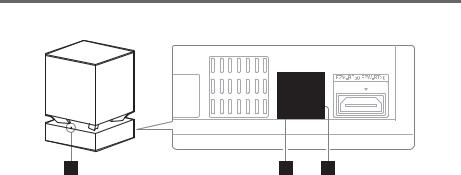
Installing the supplied wireless transceivers
Insert the two supplied wireless transceivers into the wireless transceiver (EZW-RT50/EZW-RT20) slot on the rear panel of both the receiver and the subwoofer.
Rear panel of the receiver |
Rear panel of the subwoofer |
Wireless transceiver
Wireless transceiver
Connecting the speaker
The connectors of the speaker cord are color-coded depending on the type of speaker. Connect the connectors of the speaker cord to match the color of the SPEAKERS jacks.
Rear of the Receiver
Red 


 White
White
Speaker cord
Speaker
Started Getting
15US
 Loading...