


FOR UNITED STATES CUSTOMERS.
NOT APPLICABLE IN CANADA, INCLUDING IN THE PROVINCE OF QUEBEC.
POUR LES CONSOMMATEURS AUX ÉTATS-UNIS.
NON APPLICABLE AU CANADA, Y COMPRIS LA PROVINCE DE QUÉBEC.
For the customers in the United States
The following FCC statement applies only to the version of this model manufactured for sale in the USA. Other versions may not comply with FCC technical regulations.
INFORMATION
This equipment has been tested and found to comply with the limits for a Class B digital device, pursuant to Part 15 of the FCC Rules. These limits are designed to provide reasonable protection against harmful interference in a residential installation. This equipment generates, uses and can radiate radio frequency energy and, if not installed and used in accordance with the instructions, may cause harmful interference to radio communications.
However, there is no guarantee that interference will not occur in a particular installation. If this equipment does cause harmful interference to radio or television reception, which can be determined by turning the equipment off and on, the user is encouraged to try to correct the interference by one or more of the following measures:
Reorient or relocate the receiving antenna.
Increase the separation between the equipment and receiver.
Connect the equipment into an outlet on a circuit different from that to which the receiver is connected. Consult the dealer or an experienced radio/TV technician for help.
You are cautioned that any changes or modifications not expressly approved in this manual could void your authority to operate this equipment.
If you have any questions about this product, you may call: Sony Customer Information Service Center 1-800- 222-7669 or http://www.sony.com/
Declaration of Conformity
Trade Name |
: |
SONY |
Model |
: |
ICD-PX720 |
Responsible Party |
: |
Sony Electronics Inc. |
Address |
: |
16530 Via Esprillo, San Diego, |
|
|
CA 92127 USA |
Telephone Number : |
858-942-2230 |
|
This device complies with part 15 of the FCC Rules. Operation is subject to the following two conditions: (1) this device may not cause harmful interference, and (2) this device must accept any interference received, including interference that may cause undesired operation.
Notice for the customers in Canade
This Class B digital apparatus complies with Canadian ICES-003.
GB

The recorded music is limited to private use only. Use of the music beyond this limit requires permission of the copyright holders.
Sony is not responsible for incomplete recording/downloading or damaged data due to problems of the IC recorder or computer.
Depending on the types of the text and characters, the text shown on the IC recorder may not be displayed properly on device. This is due to:
The capacity of the connected IC recorder.
The IC recorder is not functioning normally.
Content information is written in the language or the character that is not supported by the IC recorder.
Notice for users
Program © 1999, 2000, 2001, 2002, 2003, 2004, 2005, 2006, 2007, 2008, 2009 Sony Corporation Documentation ©2009 Sony Corporation
All rights reserved. This manual or the software described herein, in whole or in part, may not be reproduced, translated or reduced to any machine readable form without prior written approval from Sony Corporation.
IN NO EVENT SHALL SONY CORPORATION BE LIABLE FOR ANY INCIDENTAL, CONSEQUENTIAL OR SPECIAL DAMAGES, WHETHER BASED ON TORT, CONTRACT, OR OTHERWISE, ARISING OUT OF OR IN CONNECTION WITH THIS MANUAL, THE SOFTWARE OR OTHER INFORMATION CONTAINED HEREIN OR THE USE THEREOF.
Sony Corporation reserves the right to make any modification to this manual or the information contained herein at any time without notice.
The software described herein may also be governed by the terms of a separate user license agreement.
This software is for Windows and cannot be used for Macintosh.
The supplied connecting cable is for the IC recorder ICD-PX720. You cannot connect other IC recorders.
GB

Table of Contents |
|
Checking the Contents of |
|
the Package.......................................................... |
7 |
Index to Parts and Controls........................ |
8 |
Getting Started |
|
Step 1: Preparing a Power Source......... |
12 |
Inserting the batteries............................. |
12 |
When replacing the batteries............. |
13 |
Step 2: Setting the Clock............................ |
15 |
Continued directly from “Step 1: |
|
Preparing a Power Source”.................... |
16 |
Setting the clock using the menu... |
16 |
Turning the IC Recorder On or Off....... |
18 |
Turning the power off............................. |
18 |
Turning the power on ............................ |
18 |
Recording |
|
Recording Messages..................................... |
19 |
Selecting the Recording Mode.............. |
22 |
Selecting a Folder........................................... |
24 |
Setting the Microphone Sensitivity..... |
25 |
Starting to Record Automatically in |
|
Response to Sound – the VOR |
|
Function................................................................ |
27 |
Dividing a Message into Two During |
|
Recording............................................................. |
28 |
Recording with an External |
|
Microphone or from Other |
|
Equipment........................................................... |
30 |
Recording sound from a telephone |
|
or a cell phone............................................. |
31 |
Adding a Recording to a Previously |
|
Recorded Message......................................... |
32 |
Adding an Overwrite Recording during |
|
Playback................................................................ |
34 |
GB

Playback |
|
Playing Back Messages................................ |
36 |
Playing Back All Messages in a Folder |
|
Continuously – the Continuous |
|
Play........................................................................... |
39 |
Playing Back a Specified Section |
|
Repeatedly – A-B Repeat............................ |
41 |
Adjusting the Playback Speed – the |
|
DPC Function..................................................... |
42 |
Recording with Other Equipment........ |
43 |
Playing Back a Message at a Desired |
|
Time with an Alarm....................................... |
45 |
Editing Messages |
|
Erasing Messages............................................ |
49 |
Erasing messages one by one............ |
49 |
Erasing all messages in a folder......... |
51 |
Moving a Message to a Different |
|
Folder...................................................................... |
52 |
Dividing a Message into Two................... |
53 |
Preventing Accidental Operation – the |
|
HOLD Function................................................. |
55 |
Selecting the Display.................................... |
56 |
Utilizing the Menu Function
Making Settings for the Menu................ |
58 |
Utilizing Your Computer |
|
Using the Supplied Digital Voice Editor |
|
Software................................................................ |
66 |
What You Can Do Using the Digital |
|
Voice Editor Software............................... |
66 |
System requirements............................... |
68 |
Installing the software............................. |
69 |
Connecting the IC recorder to your |
|
computer......................................................... |
72 |
Referring to the help files...................... |
73 |
Disconnecting the IC recorder from |
|
your computer............................................. |
74 |
Troubleshooting |
|
Troubleshooting.............................................. |
75 |
Error messages............................................. |
82 |
System limitations...................................... |
84 |
GB

Additional Information
Using a USB AC Adaptor |
|
(not supplied).................................................... |
85 |
Disconnecting the IC recorder from |
|
the AC outlet................................................. |
86 |
Precautions......................................................... |
87 |
Specifications..................................................... |
88 |
Index....................................................................... |
90 |
GB
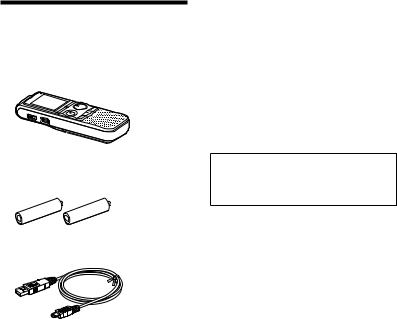
Checking the
Contents of the
Package
IC Recorder (1)
Remove the film on the display window before you use the IC recorder.
LR03 (size AAA) alkaline batteries (2)
USB connecting cable (1)
Application Software, Digital Voice Editor (CD-ROM)
Stereo headphones* (1) Carrying pouch* (1) Operating Instructions
*The stereo headphones, carrying pouch are supplied with some models in some regions only.
You are cautioned that any changes or modifications not expressly approved in this manual could void your authority to operate this equipment.
GB
Index to Parts and Controls
Refer to the pages indicated in parentheses for details.
Front
Built-in microphones (19)
Operation indicator (15, 19, 36, 64)Display window (9)
DIVIDE button (29, 54)
REC/PAUSE button (19, 21)
– (review/fast backward) button (36, 37, 58)
(stop) button (20, 37, 47, 59)Speaker
(microphone) jack (30)
(headphone) jack (21, 37, 44)ERASE button (50)
VOL (volume)+/– button (21, 37)DISPLAY/MENU button (57, 58) (repeat) A-B button (41)
PLAY/STOP•ENTER button (21, 36, 38, 58)
+ (cue/fast forward) button (36, 37, 58)
Opening for a handstrap
(A handstrap is not supplied.)
GB

Rear |
|
Display window |
||||||||
|
|
|
|
|
|
|
|
|
|
|
|
|
|
|
|
|
|
|
|
|
|
|
|
|
|
|
|
|
|
|
|
|
|
|
|
|
|
|
|
|
|
|
|
|
|
|
|
|
|
|
|
|
|
|
|
|
|
|
|
|
|
|
|
|
|
|
|
|
|
|
|
|
|
|
|
|
|
|
|
|
|
|
|
|
|
|
|
|
|
|
|
|
|
|
|
|
|
|
Battery compartment (12)HOLD switch (18, 56)
(USB) connector (72, 85)
Folder indicator
Displays the folder ( ,
,  ,
,  ,
,  , or
, or  ) you have selected.
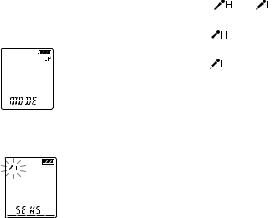
Microphone sensitivity
Displays the microphone sensitivity. 
 (high): To record at a meeting or
in a quiet/spacious place.

 (low): To record for dictation or in a noisy place.
Alarm indicator
Appears when the alarm is set for a message.
Repeat play indicator
Appears when a message is played back repeatedly.
GB
Selected message number
REC DATE (recorded date) indicator
The recording date is displayed with the REC DATE indicator.
REMAIN indicator
When the IC recorder is in the recording mode, the remaining recording time is displayed with the REMAIN indicator, or when the IC recorder is in the playback/stop mode, the remaining time of the
current message is displayed with the REMAIN indicator.
Remaining memory indicator
Displays the remaining memory and decreases one by one during recording.
Battery indicator
Displays the remaining battery power.
Recording mode indicator
Displays the recording mode set using the menu when the IC recorder is in the stop mode, and displays
the current recording mode when the IC recorder is in the playback or recording mode.
LP : Long play monaural recording mode
SP : Standard play monaural recording mode
HQ : High-quality monaural recording mode
SHQ : Super highquality monaural recording mode
 (recording) indicator
Appears while the IC recorder is recording.
VOR indicator
Appears when the VOR function is set to “ON” in the menu and flashes when the IC recorder pauses during recording with the VOR function.
Lock indicator
Appears when “LOCK” is set to “ON” in the menu.
10GB
EASY-S (Easy Search) indicator
Appears when the easy search function is set to “ON” in the menu.
DPC indicator
Appears when the DPC (Digital Pitch Control) function is set to “ON” in the menu.
Total number of messages in the folder/DPC setting
Elapsed time/ Remaining time/ Recorded or Recording date and time indication/Message
11GB

Getting Started
Step 1: Preparing a
Power Source
Remove the film on the display window before you use the IC recorder.
Inserting the batteries
1 Slide and lift the battery compartment lid.
2 Insert LR03 (size AAA) alkaline batteries with correct polarity, and close the lid.
If the battery compartment lid is accidentally detached, attach it as illustrated.
12GB
Tips
When replacing the batteries, messages recorded or alarm settings are not erased even when you remove the batteries.
When replacing the batteries, the clock continues moving for a certain period of time after you remove the batteries.
Notes
Do not use manganese batteries for this IC recorder.
When replacing the batteries, be sure to replace both batteries with new ones.
Do not charge dry batteries.
When you are not going to use the IC recorder for a long time, remove the batteries to prevent damage from battery leakage and corrosion.
Clock setting display appears and the year section flashes when you insert batteries for the first time, or when you insert batteries after the IC recorder has been without batteries for a certain
period of time. Please refer to “Continued directly from Step 1: Preparing a Power Source” on page 16 to set the date and time.
When replacing the batteries
The battery indicator on the display shows the battery condition.
Battery remain indication
 : Replace the old batteries with new ones.
 : “LO BATT“ appears and the IC recorder will stop operation.
Battery life*1
When using Sony LR03 (SG) (size AAA) alkaline batteries (with continuos use)
Recording |
SHQ*3 |
HQ*4 |
mode |
|
|
Recording |
Approx. 30 hr. Approx. 30 hr. |
|
Playback*2 |
Approx. 13 hr. Approx. 13 hr. |
|
through |
|
|
speaker |
|
|
Playback |
Approx. 32 hr. Approx. 32 hr. |
|
using the |
|
|
headphones |
|
|
Started Getting
13GB
Recording |
SP*5 |
LP*6 |
mode |
|
|
Recording |
Approx. 35 hr. Approx. 48 hr. |
|
Playback*2 |
Approx. 13 hr. Approx. 13 hr. |
|
through |
|
|
speaker |
|
|
Playback |
Approx. 32 hr. Approx. 32 hr. |
|
using the |
|
|
headphones |
|
|
(hr. : hours)
When using Sony NH-AAA rechargeable batteries (with continuos use)
Recording |
SHQ*3 |
HQ*4 |
mode |
|
|
Recording |
Approx. 20 hr. Approx. 20 hr. |
|
Playback*2 |
Approx. 10 hr. Approx. 10 hr. |
|
through |
|
|
speaker |
|
|
Playback |
Approx. 25 hr. Approx. 25 hr. |
|
using the |
|
|
headphones |
|
|
Recording |
SP*5 |
LP*6 |
mode |
|
|
Recording |
Approx. 25 hr. Approx. 35 hr. |
|
Playback*2 |
Approx. 10 hr. Approx. 10 hr. |
|
through |
|
|
speaker |
|
|
Playback |
Approx. 25 hr. Approx. 25 hr. |
|
using the |
|
|
headphones |
|
|
(hr. : hours)
*1 The battery life may shorten depending on how you operate the IC recorder.
*2 When playing back music through the internal speaker with the volume level set to 27
*3 SHQ : Super highquality monaural recording mode
*4 HQ : High-quality monaural recording mode
*5 SP : Standard play monaural recording mode
*6 LP : Long play monaural recording mode
14GB

Note while accessing
The IC recorder is accessing data when “ACCESS” appears in the display window or the operation indicator flashes in orange. While the IC recorder is accessing data, do not remove the batteries or connect or disconnect the USB AC adaptor (not supplied). Doing so may damage the data.
Note
If the IC recorder is required to process a large amount of data, the message may be displayed for an extended period of time. This is not a malfunction of the IC recorder.
Wait until the animation disappears before starting operation.
Step 2: Setting the
Clock
DISPLAY/ |
|
Getting |
MENU |
|
|
|
|
|
|
|
Started |
|
STOP• |
|
|
PLAY/ |
|
– , |
ENTER |
|
+ |
|
|
You need to set the clock to use the alarm function or record the date and time.
Clock setting display appears when you insert batteries for the first time, or when you insert batteries after the IC recorder has been without batteries for a certain period of time the year section flashes in the display window.
15GB

Continued directly from “Step 1: Preparing a Power Source”
1 Press – or + to set the year, month, day, hour, and minute in sequence, then press PLAY/
STOP•ENTER.
2 Press (stop) to return to the display of the stop mode.
Setting the clock using the menu
While the IC recorder is in the stop mode, you can set the clock using the menu.
1 Press and hold DISPLAY/MENU to enter the menu mode.
The menu mode will be displayed in the display window.
2 Press – or + to select “SET DATE,” then press PLAY/
STOP•ENTER.
16GB

3 Press – or + to select
“AUTO” or “MANUAL,” then pressPLAY/STOP•ENTER.
When you select “AUTO,” the clock is automatically adjusted using the clock in the computer connected to the IC recorder and on which the supplied Digital Voice Editor software is started. When you select “MANUAL,” the year section flashes. Proceed to the next steps.
4 Press – or + to set the year, month, day, hour, and minute in sequence, then press PLAY/
STOP•ENTER.
5 Press (stop) to return to the display of the stop mode.
Tips
Press DISPLAY/MENU to return to the previous operation.
You can set the time display for the clock to “12H (12-hour display)” or “24H (24-hour display)” in the “HOUR” menu. When “12H (12-hour display)” is set, “AM” or “PM” appears in the display window.
Note
If you do not press PLAY/STOP•ENTER within one minute of entering the clock setting data, the clock setting mode is cancelled and the window will return to the display of the stop mode.
Started Getting
17GB
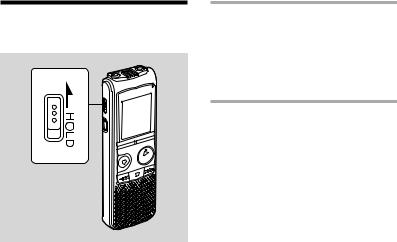
Turning the IC Recorder On or Off
When you are not using the IC recorder, you can prevent the batteries from getting weak quickly by turning the power off.
Turning the power off
Slide the HOLD switch in the direction of the arrow in the stop mode. “HOLD” flashes. The IC recorder turns off within a few seconds.
Turning the power on
Slide the HOLD switch in the opposite direction from that of the arrow. The IC recorder turnes on.
Tips
When you are not going to use the IC recorder for a long time, we recommend to turn off the IC recorder.
When 10 minutes have passed after you have turned on the IC recorder and leave it without doing anything, the display goes off automatically. (Press any button to show the display.)
18GB

Recording
Recording Messages
|
Built-in |
|
|
microphones |
|
|
Operation |
|
|
indicator |
|
REC/ |
|
|
PAUSE |
|
|
|
|
|
PLAY/ |
||
|
||
|
STOP• |
|
– , + |
ENTER |
|
|
Display window
 Recording mode
 Current message
number


 Counter display*
Remaining memory indicator
*The display selected using the DISPLAY/MENU button appears.
1 Select a folder.
Press and hold DISPLAY/MENU to enter the menu mode.
Press – or + to select “FOLDER,” then press PLAY/ STOP•ENTER.
Press – or + to select the folder you want , or ), then press PLAY/STOP•ENTER.
Press (stop) to exit the menu mode.
2 Start recording.
Press REC/PAUSE in the stop mode. The operation indicator lights in red. (When “LED” is set to “OFF” in the menu (page 64), the operation indicator does not light.)
You do not need to press and holdREC/PAUSE while recording.
The new message will be automatically recorded after the last recorded message.
Speak into the built-in microphones.
Recording
19GB
3 Press (stop) to stop recording.
The IC recorder stops at the beginning of the current recording.
If you do not change the folder after you stop recording, the next time you record you will record in the same folder.
Tips
Before you start recording, we recommend you make a trial recording first.
When you purchase the IC recorder, there are 5 folders already available, and you can record up to 99 messages in each folder.
While recording you can lock all the functions of all the buttons so that you can prevent inadvertent operations by sliding the HOLD switch in the direction of the arrow.
Notes
While the operation indicator is flashing in orange, do not remove the batteries or
connect or disconnect the USB AC adaptor. Doing so may damage the data.
Noise may be recorded if an object, such as your finger, etc., accidentally rubs or scratches the IC recorder during recording.
Before making a recording, be sure to check the battery indicator (page 13).
To avoid replacing batteries during a long recording session, use a USB AC adaptor (not supplied) (page 85).
The maximum recording time varies if you record messages in mixed recording mode.
20GB
To |
Do this |
pause |
Press REC/PAUSE. |
recording* |
During recording pause, the |
|
operation indicator flashes |
|
in red and “PAUSE“ flashes in |
|
the display window. |
|
|
release pause |
Press REC/PAUSE again. |
and resume |
Recording resumes |
recording |
from that point. (To stop |
|
recording after pausing |
|
recording, press (stop).) |
|
|
review the |
Press PLAY/STOP•ENTER. |
current |
Recording stops and |
recording |
playback starts from the |
instantly |
beginning of the message |
|
just recorded. |
|
|
review during |
Press and hold |
recording |
– during recording or |
|
recording pause. Recording |
|
stops and you can search |
|
backwards while listening |
|
to fast playback sound. |
|
After you release – , |
|
playback starts from that |
|
point. |
*One hour after you pause recording, recording pause is automatically released and the IC recorder enters the stop mode.
Monitoring the recording
Connect commercially available headphones to the (headphone) jack and monitor the recording. You can adjust the monitoring volume by pressing VOL + or –, but the recording level is fixed.
Remaining memory indication
During recording, the remaining memory indicator decreases one by one.
The memory is nearly full.
Flashing
When the remaining time of recording reaches 10 minutes, the last one of the indication flashes.
If the remaining recording time display mode is selected, the remaining recording time display will also flash when the remaining time reaches 1 minute. The display will be changed automatically to the remaining time display.
When the memory is full, recording automatically stops and and “FULL” will flash in the display window three times. To continue recording, first erase some of the messages.
Recording
21GB

Selecting the
Recording Mode
DISPLAY/ |
|
MENU |
|
|
|
|
PLAY/ |
– , |
STOP• |
ENTER |
|
+ |
|
You can select the recording mode in the menu when the IC recorder is stopped. The recording mode is set to “SHQ” when you purchase the IC recorder.
1 Press and hold DISPLAY/MENU to enter the menu mode.
The menu mode window will be displayed.
2 Press – or + to select “MODE,” then press PLAY/
STOP•ENTER.
3 Press – or + to select “LP,”
“SP,”“HQ,” or “SHQ,” then pressPLAY/STOP•ENTER.
22GB

LP : Long play monaural recording mode (11.025 kHz/8 kbps)
You can record for a longer time with monaural sound.
SP : Standard play monaural recording mode (44.1 kHz/48 kbps)
You can record with standard quality sound.
HQ : High-quality monaural recording mode (44.1 kHz/128 kbps)
You can record with monaural highquality sound.
SHQ : Super high-quality monaural recording mode (44.1 kHz/ 192 kbps)
You can record with monaural super high-quality sound.
4 Press (stop) to exit the menu mode.
To record with better sound quality, select the HQ or SHQ mode.
Note
You cannot set the recording mode while recording.
Maximum recording time
The maximum recording time of all the folders is as follows.
SHQ mode HQ mode SP mode
11 hr. 55 min. 17 hr. 55 min. 48 hr.
LP mode
288 hr. 10 min.
(hr. : hours/min. : minutes)
Recording
23GB

Selecting a Folder
DISPLAY/ |
|
MENU |
|
|
|
|
PLAY/ |
– , |
STOP• |
ENTER |
|
+ |
|
Five folders , or ) have been already made for you when you purchase the IC recorder. Select one of these folders in the menu.
1 Press and hold DISPLAY/MENU to enter the menu mode.
The menu mode window will be displayed.
2 Press – or + to select “FOLDER,” then press PLAY/
STOP•ENTER.
24GB

3 Press – or + to select the folder you want ( ,
,  ,
,  ,
,  , or
, or  ), then press PLAY/STOP•ENTER.
4 Press (stop) to exit the menu mode.
Setting the Microphone
Sensitivity
DISPLAY/ |
|
|
MENU |
|
|
|
|
Recording |
|
PLAY/ |
|
– , |
STOP• |
|
ENTER |
|
|
+ |
|
|
You can set the microphone sensitivity in the menu when the IC recorder is stopped or is recording.
The microphone sensitivity is set to ” when you purchase the IC recorder.
25GB
1 Press and hold DISPLAY/MENU to |
3 Press – or + to select |
||
enter the menu mode. |
“ ,” or “ ,” then press PLAY/ |
||
The menu mode window will be |
STOP•ENTER. |
||
|
|||
displayed. |
: To record at meetings or in a |
||
|
|
|
quiet and/or spacious place. |
|
|
|
: To record dictation, or record in a |
|
|
|
noisy place. |
|
|
|
4 Press (stop) to exit the menu |
|
|
|
mode. |
2 Press – or + to select “SENS,” then press PLAY/STOP•ENTER.
26GB

Starting to Record Automatically in Response to Sound
– the VOR Function
DISPLAY/ |
|
|
MENU |
|
|
REC/ |
|
|
PAUSE |
|
|
|
||
PLAY/ |
||
|
||
– , |
STOP• |
|
+ |
ENTER |
You can set the VOR (Voice Operated Recording) function to “ON,” to make the IC recorder start recording when the IC recorder detects sound, and pause when no sound is heard, eliminating recording during soundless periods.
The VOR function is set to “OFF” when you purchase the IC recorder.
1 Press and hold DISPLAY/MENU to enter the menu mode.
The menu mode window will be displayed.
2 Press – or + to select “VOR,” then press PLAY/STOP•ENTER.
Recording
3 Press – or + to select “ON,” then press PLAY/STOP•ENTER.
4 Press (stop) to exit the menu mode.
27GB

5 Press REC/PAUSE.
“ ” and “VOR” appear in the display window.
The recording starts when the IC recorder detects sound. The recording pauses when no sound is detected and “VOR” and “PAUSE”flash. When the IC recorder detects sound again, the recording starts again.
To cancel the VOR function
Set “VOR” to “OFF” in step 3.
Note
The VOR function is affected by the sound around you. Set “SENS” in the menu according to the recording conditions. If recording is not satisfactory after you have changed the microphone sensitivity, or for an important recording, set “VOR” to “OFF” in the menu.
Dividing a Message into Two During Recording
DIVIDE 


You can divide a message during recording so that the message is divided into two parts, and a new message number is added to the newer part of the divided message.
28GB

Press DIVIDE during recording.
“DIVIDE” flashes and the new message number is added at the point you pressed the button. The message
will be recorded as two messages, however recording continues without stopping.
Message 1 |
Message 2 |
Message 3 |
Message is divided.
Message 2 and Message 3 are recorded without stopping.
Tip
You can divide the currently recorded message during recording pause.
Notes
You need a certain amount of free space in the memory to divide a message. For more information, see “System Limitations” on page 84.
If 99 messages have been recorded in a folder, you cannot divide a message in that folder.
Once a message is divided, you cannot recombine the divided messages using the IC recorder. To combine the divided messages, use the supplied application software.
You cannot divide a message at the very beginning (0.5 seconds from the beginning) of the message.
When you divide a message into two, at the point of division, the end of the first message and the beginning of the second message may be interrupted.
If you divide messages too frequently while the IC recorder is recording them, the following phenomenon may occur: The operation indicator keeps flashing, and you cannot operate the IC recorder for a certain period. This is not a malfunction. Wait until the operation indicator goes off.
Recording
29GB
 Loading...