


3-290-149-11(1)
Memory Recording
Unit
Operating Instructions
Owner’s record
The model number and the serial number are located at the name plate on the left of the unit. Record the serial number in the space provided below. Refer to these numbers whenever you call upon your Sony dealer regarding this product.
Model No. HVRSerial No. ______________________
HVR-MRC1
2008 Sony Corporation

Table of contents |
|
Overview ........................................................ |
3 |
Names of parts ............................................... |
4 |
Memory Recording Unit / i.LINK Cradle ...................... |
4 |
LCD screen display ............................................................. |
5 |
Using in VIDEO mode .................................... |
6 |
Connecting this unit to a camcorder ................................ |
6 |
Inserting/removing optional memory media ................ |
6 |
Menu settings ...................................................................... |
6 |
Menu organization (VIDEO mode) ............... |
7 |
Recording images from the camcorder to this |
|
unit ................................................................. |
9 |
Recording images |
|
(POWER switch at the ON side) ....................................... |
9 |
Playback the image recorded on a |
|
CompactFlash in this unit ............................ |
12 |
Playback (POWER switch to ON) .................................. |
12 |
Useful functions in combination with HVR-Z7/S270 |
|
............................................................................................. |
13 |
Using in COMPUTER mode .......................... |
16 |
Connecting to a computer ............................................... |
16 |
Menu organization (COMPUTER mode) ..... |
17 |
Folder saving format ................................... |
18 |
Folder organization .......................................................... |
18 |
Notes regarding COMPUTER mode .............................. |
19 |
Power supply ............................................... |
20 |
Preparing the power supply ........................................... |
20 |
Trouble shooting .......................................... |
22 |
Power sources .................................................................... |
22 |
Recording ........................................................................... |
22 |
Connecting a computer .................................................... |
23 |
Warning indicators ...................................... |
24 |
Self-diagnosis display ...................................................... |
24 |
Caution message ............................................................... |
25 |
About i.LINK ................................................. |
26 |
Optional CompactFlash ............................... |
27 |
CompactFlash .................................................................... |
27 |
Specifications ............................................... |
28 |
Precautions ................................................... |
29 |
Getting the best performance from the |
|
battery pack ................................................. |
30 |
On trademarks
• “InfoLITHIUM” is a trademark of Sony Corporation.
• i.LINK and are trademarks of Sony Corporation.
•HDV and the HDV logo are trademarks of Sony Corporation and Victor Company of Japan, Ltd.
•Microsoft, Windows, Windows Vista and Windows Media are either registered trademarks or trademarks of Microsoft Corporation in the United States and/or other countries.
•Macintosh and Mac OS are registered trademarks of Apple Inc. in the U.S. and other countries.
•CompactFlash is the registered trademark of SanDisk Corporation.
All other product names mentioned herein may be the trademarks or registered trademarks of their respective companies. Furthermore, ™ and “®” are not mentioned in each case in this manual.
Notes on the License
ANY USE OF THIS PRODUCT OTHER THAN CONSUMER PERSONAL USE IN ANY MANNER THAT COMPLIES WITH THE MPEG-2 STANDARD FOR ENCODING VIDEO INFORMATION FOR PACKAGED MEDIA IS EXPRESSLY PROHIBITED WITHOUT A LICENSE UNDER APPLICABLE PATENTS IN THE MPEG-2 PATENT PORTFOLIO, WHICH LICENSE IS AVAILABLE FROM MPEG LA, L.L.C., 250 STEELE STREET, SUITE 300, DENVER, COLORADO 80206.
2

Overview
Integrated architecture to the camcorder
•The body is small and light with a weight of about 130 g and connects directly to a camcorder without a cable to provide camcorder mobility. Power is supplied from the camcorder so no additional battery is required; weight and size have thus been minimized. The power-saving design also enables longer recording time.
•The operational status such as operating mode, remaining CompactFlash capacity or recording format, etc. can be checked on the LCD screen of the camcorder. Not having to check the unit itself means you can concentrate more on what you are shooting.
•The camcorder used with this unit can output a record command without a tape inserted. This synchronizes the unit to the REC/STOP operation of the camcorder and so audio and video can be recorded on the CompactFlash unit only. A loop recording mode is also available which enables you to record repeatedly.
Supported models
•This unit can be connected to a camcorder via a special interface.
•Refer to the supplied “Guide to supported models and their functions” for details on supported models when connecting via an i.LINK terminal.
Recording on small, light and highly versatile CompactFlash
•CompactFlash used as recording media
•CompactFlash is less subject to strong vibration or high altitude and are highly resistant to impact such as being dropped. This enables recording in a wide range of environments.
•A highly versatile CompactFlash media (16GB) enables about 1 hour and 12 minutes of recording of an HDV/ DVCAM/DV stream.
•Connecting the unit to a computer via a commercial CompactFlash reader allows faster data transfer to the computer than when using a tape. The data transfer time depends on the specifications of the CompactFlash media and CompactFlash reader.
Can also connect to the HVRA-CR1 i.LINK cradle
•The unit can be connected to a computer or camcorder via the HVRA-CR1 i.LINK cradle.
•The unit operates with a battery or AC adaptor via the HVRA-CR1 i.LINK cradle, which enables you to record in a wide range of environments.
•This unit has two operating modes, VIDEO mode and COMPUTER mode. The mode is automatically selected depending on which device is connected. The unit independently outputs playback video to the i.LINK interface.
•VIDEO mode is for recording and playback an HDV/ DVCAM/DV stream via the i.LINK terminal of the camcorder.
•COMPUTER mode enables the unit to be recognized as an external drive when connected to a computer via an i.LINK terminal. This mode enables high-speed data transfer.
3

Names of parts
Memory Recording Unit / i.LINK Cradle
1 |
|
|
|
5 |
|
|
6 |
|
2 |
7 |
|
8 |
||
3 |
||
9 |
||
|
q; |
4 |
qa |
|
|
|
qs |
|
qd |
qg
 qf
qf
qj
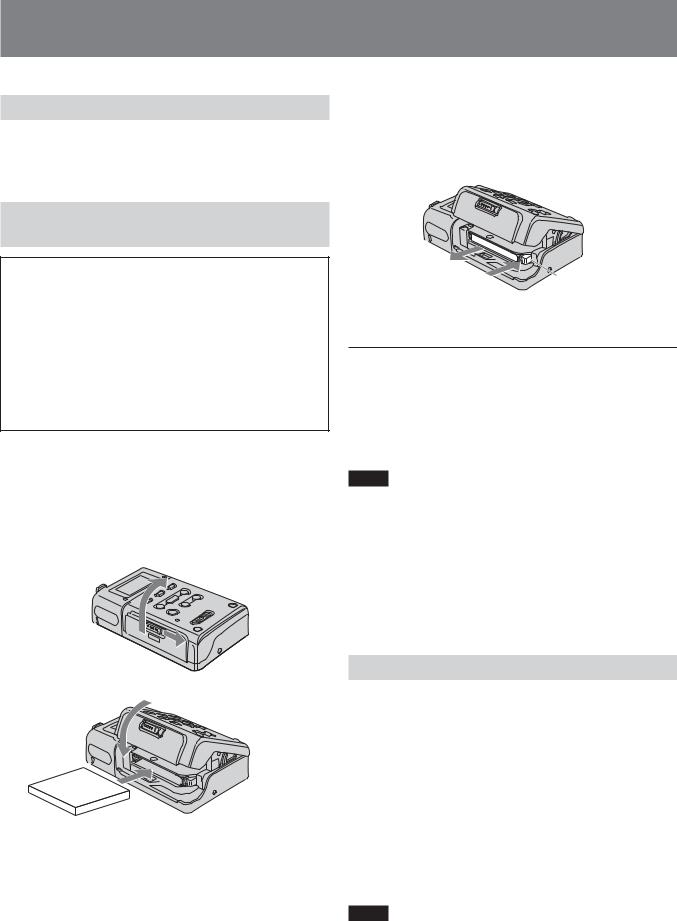
Attaching to the i.LINK cradle
Attach this unit to the i.LINK cradle by sliding the unit in the direction of the arrow.
qh
qk
1RELEASE button
Press this button to remove this unit.
2CAM LINK button
Press this button to switch to CAM LINK [ON] (FOLLOW/SYNCHRO) to record video in conjunction with the recording operation of the camcorder, or to CAM LINK [OFF] to record with this unit alone.
*Default setting is CAM LINK [ON].
3PREVIOUS/REW button
Press this button during standby to go back to the previous clip.
Press this button during playback to stop playback and restart playback from the beginning of the current clip. Keep this button pressed down during playback to play the current clip backwards at triple the normal speed.
When the menu screen is displayed on the LCD screen, press this button to move the cursor.
4CompactFlash slot door OPEN latch
Slide the button to open the CompactFlash slot door. If the CompactFlash door is opened while the CompactFlash is being accessed, such as when recording or during playback, operations will stop.
5 LCD screen
6MENU/LCD BACK LIGHT button
Press this button to display the menu screen on the LCD screen.
Press the MENU/LCD BACK LIGHT button long enough for the backlight of the LCD screen to come on or off.
7REPEAT button
Press this button to change the auto repeat mode.
Each time you press the button, the mode cycles through each of the following changes.
REPEAT1 (Repeatedly plays back the selected clip only)/ ALL REPEAT (Repeatedly plays back all clips)/OFF
8NEXT/FF button
Press this button during standby to go to the next clip. Press this button during playback to stop playback and restart playback from the beginning of the next clip.
Keep this button pressed down during playback to play the current clip forwards at triple the normal speed. When the menu screen is displayed on the LCD screen, press this button to move the cursor.
9PLAY/EXEC button
Press this button to play recorded files.
Press this button during playback to pause playback. When the menu screen is displayed on the LCD screen, press this button to execute the selected menu item.
q; REC button
Press two buttons together to start recording.
qa STOP button
Press this button to return to the VIDEO mode screen. Press this button to stop recording or playback.
When a menu is selected, press this button to cancel it.
qs POWER switch
Press this button to turn the power of this unit on or off. The VIDEO mode and COMPUTER mode switch automatically.
qd REC lamp/Access lamp
REC lamp/Access lamp comes on during recording in VIDEO mode.
REC lamp/Access lamp blinks while accessing the computer in COMPUTER mode.
qf  HDV/DV terminal
Connect to a camcorder or computer with an i.LINK cable.
qg CompactFlash slot door
qh Eject lever
Press this lever to eject the CompactFlash.
qj DC IN (DC power input) terminal
Connect the AC adaptor etc. to supply power to this unit.
qk Attachment screw hole
This unit enables mounting to the camcorder equipped a cold shoe or to directly mount to a tripod using the optional shoe adaptor.
Use a tripod with 5.5 mm or shorter screws.
4
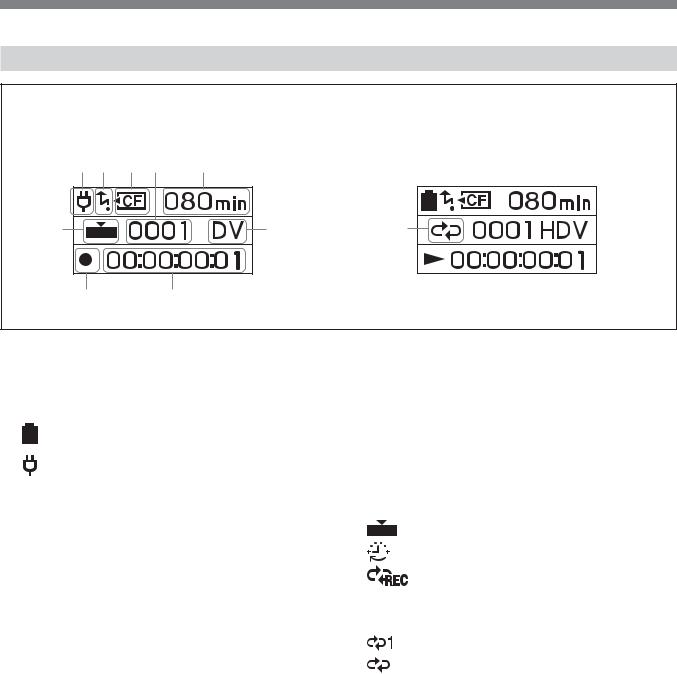
LCD screen display
VIDEO mode
During recording |
|
During playback |
1 2 3 4 |
5qa |
|
9 |
6 |
q; |
8 |
7 |
|
1Power supply display
This icon is not displayed when this unit is connected directly to the camcorder.
Displays the power supply icons when connected to a PC or camcorder using the i.LINK cradle.
Battery pack in use
Display the remaining battery capacity.
AC adapter connected
2CAM LINK mode display
When the CAM LINK is set to ON, this icon is on. When the CAM LINK is set to OFF, this icon is off.
3CompactFlash display
Remains on under normal conditions. Starts blinking in the following situations.
•When the remaining recording time is less than 5 minutes
•When the CompactFlash slot door is open
•When the clip number is 9999
4Clip number display
Displays the selected clip number or recording/playback clip number.
5Remaining CompactFlash capacity display
Displays the remaining recording time (in minutes).
6Format type display
Displays the recording/playback clip format.
7TC (time code) display
Displays the time code.
8Status display
Displays the status with an icon.
x Power is on and playback/recording is stopped z Recording
N Playback
u Pausing playback M Fast-forward m Rewind
9REC mode display
Displays REC mode setting in the menu. NORMAL Not displayed.
Cache recording mode
Interval recording mode
Loop recording mode
q; Repeat mode display
Displays the repeat status during playback.
REPEAT 1
REPEAT ALL
qa Loop recording display
Time display of 5 is the total time recorded by loop recording.
Displays [L] to the left of the time display.
5
Using in VIDEO mode
Connecting this unit to a camcorder
Refer to the operating instructions of the camcorder. Connecting the shoe connector of the unit enables the camcorder to supply power and a stream signal.
Inserting/removing optional
memory media
•Although this unit has been tested with CompactFlash, Sony does not guarantee its operation with all CompactFlash.
The operation of this unit with Sony CompactFlash has been checked.
•CompactFlash with 133x 2GB or more specifications are recommended for this unit. (A speed of less than 133x is not guaranteed; space less than 2GB is not guaranteed.)
•Always format a new CompactFlash with this unit before use.
•Do not remove the CompactFlash while the access lamp is blinking.
Inserting the CompactFlash
1Open the CompactFlash slot door while sliding the OPEN latch.
2Push the CompactFlash in the correct direction until it clicks into place.
3Close the CompactFlash slot door.
1
3
2
Removing the CompactFlash
1Open the CompactFlash slot door and push the eject lever 1 to remove the CompactFlash.
2Close the CompactFlash slot door.
1 1
CompactFlash capacity and available recording time
CompactFlash |
available recording time |
|
|
2GB |
Approx. 9 min. |
|
|
4GB |
Approx. 18 min. |
|
|
8GB |
Approx. 36 min. |
|
|
16GB |
Approx. 72 min. |
|
|
Notes
Do not repeatedly insert or remove the CompactFlash over a short amount of time. Doing so may cause mis-recognition of the CompactFlash and memory malfunction. If you open the CompactFlash slot door while the unit is recording or in playback, operations will stop. If that occurs, be sure that the status on the LCD screen changes to x (playback/recording is stopped) before removing the CompactFlash.
When ejecting the CompactFlash, forcefully pressing the eject lever and allowing the CompactFlash to be pointed downward when ejected will cause the CompactFlash to fall.
Menu settings
Check the individual settings and change them if necessary. For details, see page 7.
1Display the menu screen on the LCD screen by pressing the MENU button.
2Select the desired setting by pressing the PREVIOUS/ REW button or the NEXT/FF button and press the PLAY/EXEC button.
3Select the desired item by pressing the PREVIOUS/REW button or the NEXT/FF button and press the PLAY/ EXEC button.
4Return to the VIDEO mode screen by pressing the STOP button. Press the MENU button to close the menu screen.
Notes
You cannot record or play back movies while the menu screen is displayed on the LCD screen. Also, you cannot change to the menu screen on the LCD screen during recording or playback.
6

Menu organization (VIDEO mode)
root |
|
|
CLIP SELECT |
|
|
|
|
|
|
|
|
|
|
|||
|
|
|
|
|
|
|
|
|
|
|
|
|||||
|
|
|
DELETE |
|
|
CLIP |
|
|
|
|
|
|||||
|
|
|
|
|
|
|
|
|
|
|||||||
|
|
|
|
|
|
|
|
ALL |
|
|
|
|
|
|||
|
|
|
|
|
|
|
|
|
|
|
|
|
||||
|
|
|
|
|
|
|
|
FORMAT |
|
|
|
|
|
|||
|
|
|
|
|
|
|
|
|
|
|
|
|
||||
|
|
|
REC MODE |
|
|
|
NORMAL |
|
|
|
|
|
||||
|
|
|
|
|
|
|
|
|
|
|||||||
|
|
|
|
|
|
|
|
CACHE |
|
|
|
|
|
|||
|
|
|
|
|
|
|
|
|
|
|
|
|
||||
|
|
|
|
|
|
|
|
INTERVAL |
|
|
|
|
|
|||
|
|
|
|
|
|
|
|
|
|
|
|
|
||||
|
|
|
|
|
|
|
|
LOOP |
|
|
|
|
|
|||
|
|
|
|
|
|
|
|
|
|
|
|
|
||||
|
|
|
i.LINK MODE |
|
|
AUTO |
|
|
|
|
|
|||||
|
|
|
|
|
|
|
|
|
||||||||
|
|
|
|
|
|
|
|
HDV |
|
|
|
|
|
|||
|
|
|
|
|
|
|
|
|
|
|
|
|
||||
|
|
|
|
|
|
|
|
DV |
|
AUTO |
|
|
||||
|
|
|
|
|
|
|
|
|
|
|
||||||
|
|
|
SETTING |
|
|
TC FORMAT |
|
|
|
|
|
|||||
|
|
|
|
|
|
|
|
|
||||||||
|
|
|
|
|
|
|
|
|
|
|
|
|
NDF |
|
|
|
|
|
|
|
|
|
|
|
|
|
|
|
|
|
|
||
|
|
|
|
|
|
|
|
|
|
|
|
|
DF |
|
|
|
|
|
|
|
|
|
|
|
|
|
|
|
|
|
|
||
|
|
|
|
|
|
|
|
DV FILETYPE |
|
|
|
AVI |
|
|
||
|
|
|
|
|
|
|
|
|
|
|
|
|
||||
|
|
|
|
|
|
|
|
INTERVAL |
|
|
|
|
RAW DV |
|
0.5sec |
|
|
|
|
|
|
|
|
|
|
|
|
|
|
||||
|
|
|
|
|
|
|
|
|
|
|
REC TIME |
|
|
|||
|
|
|
|
|
|
|
|
|
|
|
|
|
||||
|
|
|
|
|
|
|
|
|
|
|
|
|
|
|
|
1sec |
|
|
|
|
|
|
|
|
|
|
|
|
|
|
|
|
|
|
|
|
|
|
|
|
|
|
|
|
|
|
|
|
|
1.5sec |
|
|
|
|
|
|
|
|
|
|
|
|
|
|
|
|
|
|
|
|
|
|
|
|
|
|
|
|
|
|
|
|
|
2sec |
|
|
|
|
|
|
|
|
|
|
|
|
|
|
|
|
|
|
|
|
|
|
|
|
|
|
|
|
|
|
INT.TIME |
|
|
30sec |
|
|
|
|
|
|
|
|
|
|
|
|
|
|
|
||
|
|
|
|
|
|
|
|
|
|
|
|
|
|
|
|
1min |
|
|
|
|
|
|
|
|
|
|
|
|
|
|
|
|
|
|
|
|
|
|
|
|
|
|
|
|
|
|
|
|
|
5min |
|
|
|
|
|
|
|
|
|
|
|
|
|
|
|
|
|
|
|
|
|
|
|
|
|
CAMLINK SEL |
|
|
FOLLOW |
|
10min |
|||
|
|
|
|
|
|
|
|
|
|
|
||||||
|
|
|
|
|
|
|
|
|
|
|
|
|||||
|
|
|
|
|
|
|
|
|
|
|
|
|||||
|
|
|
|
|
|
|
|
|
|
|
|
|
SYNCHRO |
|
|
|
|
|
|
|
|
|
|
|
|
|
|
|
|
|
|
||
|
|
|
|
|
|
|
|
SLEEP MODE |
|
|
OFF |
|
|
|||
|
|
|
|
|
|
|
|
|
|
|
|
|||||
|
|
|
|
|
|
|
|
|
|
|
|
|
1min |
|
|
|
|
|
|
|
|
|
|
|
|
|
|
|
|
|
|
||
|
|
|
ALL RESET |
|
CAMERA NO |
|
5min |
|
|
|||||||
|
|
|
|
|
|
|
||||||||||
|
|
|
|
|
|
|
|
|
||||||||
|
|
|
|
|
|
|
|
|
||||||||
|
|
|
|
* Boldface settings are default settings. |
||||||||||||
|
|
|
|
|||||||||||||
|
|
|
|
|
|
|
|
|||||||||
CLIP SELECT
You can select the clip number directly.
Press the PREVIOUS/REW (previous clip/rewind) or NEXT/ FF (next clip/fast-forward) button to select the number and press the PLAY/EXEC (playback/execute) button.
Select the digits one by one. The display returns to the menu after four digits are selected.
If there is no clip number, the previous clip number is selected.
DELETE
Deletes the recorded data or formats the CompactFlash.
• CLIP
Displays the three clip numbers from those displayed on the normal screen.
Selects and deletes clips.
• ALL
Deletes all the recorded clips.
• FORMAT
Formats the CompactFlash.
REC MODE
• NORMAL
Sets the normal recording mode.
• CACHE
Sets the cache recording mode.
• INTERVAL
Sets the interval recording mode. Only DVCAM/DV format is valid.
• LOOP
Sets the loop recording mode.
Notes
When inputting the stream signal from the i.LINK, INTERVAL and LOOP is valid.
i.LINK MODE
• AUTO ....... Automatically switches to the camcorder recording/playback format.
•HDV .......... Plays back HDV format only.
•DV ............. Plays back DVCAM (DV) format only.
If there is no clip, you cannot make a selection.
7

SETTING
TC FORMAT
Follows the DF/NDF of the time code from the camcorder connected to this unit.
•AUTO ....... Follows the time code format of the camcorder.
•NDF ........... Records the time code in NDF format.
•DF .............. Records the time code in DF format.
Notes
The default [AUTO] setting is NDF. If time code information from the camcorder is not obtained, this unit is set to the most recent recording setting.
DV FILE TYPE
Changes the DV recording format.
•AVI ............ Records video in AVI format.
•RAW DV ... Records video in DV format.
INTERVAL
• REC TIME
Selects the interval recording time.
You can select [0.5sec], [1sec], [1.5sec] or [2sec].
• INT.TIME
Selects the interval time between recordings.
You can select [30 sec], [1 min], [5 min], or [10 min].
CAM LINK SEL
When CAM LINK is set to [ON], select the type of camcorderlinked operation.
• FOLLOW ...... Uses this setting when connecting to a camcorder that has no “external REC control” function. The unit follows the camcorder operation.
• SYNCHRO ... Uses this setting when connecting to a camcorder that has an “external REC control” function. The unit operates simultaneously with the camcorder.
SLEEP MODE
Switches the sleep mode ON/OFF.
• OFF
Sleep mode is set to OFF.
• 1min
If the i.LINK cable is disconnected and no operation is done for more than one minute, this unit automatically switches to SLEEP status.
• 5min
If the i.LINK cable is disconnected and no operation is done for more than five minutes, this unit automatically switches to SLEEP status.
To return to normal status, reconnect the i.LINK cable to this unit or turn the POWER switch off and back on.
Notes
In SLEEP MODE, this unit is not completely switched off but continues to run using low power consumption.
CAMERA NO
You can assign a number to the data clip name when recording.
Use this mode to assign non-overlapping numbers to clip names recorded simultaneously on more than one camcorder, or to manage clip data by assigning numbers.
Press the PREVIOUS/REW (previous clip/rewind) or NEXT/ FF (next clip/fast-forward) button to select the number and press the PLAY/EXEC (playback/execute) button.
Select the digits one by one. The display returns to the menu after two digits are selected.
The factory default setting is [00].
ALL RESET
Restores all default settings.
8

Recording images from the camcorder to this unit
Images recorded by the camcorder can be recorded onto this unit.
Recording images
(POWER switch at the ON side)
The different methods of recording are as follows:
xRecording video simultaneously on this unit and a camcorder
xRecording on this unit during camcorder tape replacement
xRecording video from this unit
xOperating cache recording
xOperating interval recording
xOperating loop recording
Notes
•A 0 KB file may be created, but the file cannot be opened because it does not have video data. Do not delete the 0 KB file on your computer. If you do, this clip cannot be played back.
•When changing the tape, the audio may mute on some camcorder models. At the recorded part, only video is recorded.
•When HDV recording with this unit, if you start the tape recording with the camcorder, the i.LINK output stream is cut for about 0.5 seconds, so when that video is recorded onto this unit, it is the cut form. In this case, the file will be separated before and after changing the tape recording started.
•The file will be separated automatically every time the recording time of one clip over about 20 minutes but this clip is operated as a same clip.
•If the i.LINK cable is disconnected or the power of the connecting device turned off during recording, recording stops but the data recorded until that point is recorded.
•If the power of this unit is turned off by battery exhaustion or mistakenly sliding the POWER switch, the data recorded until the power off is detected is recorded on a CompactFlash in this unit.
•If the battery pack is removed or the jack of the AC adaptor disconnected during recording, the folder information at the moment the power goes off may not be written correctly.
•The interval recording operation of the camcorder is not timed, so operations are not guaranteed.
•Do not switch the audio mode of the camcorder while recording. Depending on the PC application, there may not be any audio.
xRecording video simultaneously on this unit and a camcorder
–Connecting to a camcorder with an “external REC control” function (SYNCHRO mode)
When connected to a camcorder that has an external REC control function, this unit can be controlled by the camcorder to record video data simultaneously to the camcorder recording on tape.
•Clips recorded by this unit include several frames after the recording stopping point on the tape.
Camcorder |
STANDBY |
|
REC |
STANDBY |
This unit |
|
REC |
|
STOP |
|
|
|||
|
|
|||
|
|
|
||
STANDBY |
|
REC |
STANDBY |
|
1Press the CAM LINK button of this unit and set it to ON.
2Set the [CAM LINK SEL] setting of this unit to [SYNCHRO].
3Set the [EXT REC CTRL] setting of the camcorder to [SYNCHRONOUS].
4Connect the camcorder to this unit via an i.LINK cable.
5Press the REC START/STOP button of the camcorder to start recording.
•The above Step 3 is for the HVR-Z7/S270 series. For details on another camcorder you want to connect to this unit, refer to the operating instructions supplied with that camcorder.
•For details on the types of camcorder that have an “external REC control” function and on motion detection, refer to the “Guide to supported models and their functions” supplied with this unit.
–Connecting to a camcorder without an “external REC control” function (FOLLOW mode)
When connected to a camcorder that has no external REC control function, this unit regularly checks the status of the camcorder and follows its recording operation.
Camcorder |
|
STANDBY |
|
|
R E C |
|
|
STANDBY |
|
|||||||||
|
|
|
|
|
|
|
|
|
|
|
|
|
|
|
|
|
|
|
|
|
|
|
|
|
|
|
|
|
|
|
|
|
|
|
|
|
|
|
|
|
|
|
|
|
|
|
|
|
|
|||||||
This unit |
|
|
STANDBY |
|
|
|
R E C |
|
|
|
STANDBY |
|
||||||
1Press the CAM LINK button of this unit and set it to ON.
2Set the [CAM LINK SEL] setting of this unit to [FOLLOW].
3Connect the camcorder to this unit via an i.LINK cable.
4Press the REC START/STOP button of the camcorder to start recording.
•This unit may lag up to two seconds behind the tape recording/stopping point of the camcorder.
•For details on camcorders that have been tested in FOLLOW mode, refer to “Guide to supported models and their functions” supplied with this unit.
9

xRecording on this unit during camcorder tape replacement
When connected to a camcorder that has an external REC control function, you can record video on this unit only while changing the tape of the camcorder.
|
|
|
|
5 minutes before end of tape |
|
||
Camcorder |
|
|
|
|
|
|
|
|
REC |
|
Changing the tape |
REC |
|
STANDBY |
|
This unit |
|
|
REC |
|
|
STOP |
|
|
|
|
|
||||
|
|
|
|||||
|
|
|
|
|
|
||
STANDBY |
|
REC |
|
|
STANDBY |
||
1Press the CAM LINK button of this unit and set it to ON.
2Set the [CAM LINK SEL] setting of this unit to [SYNCHRO].
3Set the [EXT REC CTRL] setting of the camcorder to [RELAY].
4Connect the camcorder to this unit via an i.LINK cable.
5Press the REC START/STOP button of the camcorder to start recording.
•When the remaining time of the tape is less than 5 minutes, the camcorder sends a command to this unit to start recording.
•The recording by this unit can be stopped from the camcorder after changing the tape or by pressing the STOP button of this unit.
•The noise of the tape change is recorded.
•The above Step 3 is for the HVR-Z7/S270 series. For details on another camcorder you want to connect to this unit, refer to the operating instructions supplied with that camcorder.
•For details on camcorders that have an “external REC control” function and on motion detection, refer to the “Guide to supported models and their functions” supplied with this unit.
Notes
•During RELAY recording, the cache recording cannot be operated.
xRecording video from this unit
You can use this unit to start or stop recording a video input signal from an i.LINK without linked operation to a device connected via i.LINK.
Camcorder |
STANDBY |
|
REC |
|
|
STANDBY |
|||
This unit |
|
|
|
|
|
|
|||
REC |
STANDBY |
REC |
STANDBY |
REC |
|
STANDBY |
|||
1Press the CAM LINK button of this unit and set it to OFF.
2Slide the REC button to start recording.
Cache recording mode
The most recent approximately maximum 14 seconds of video and audio captured by the camcorder are held in a buffer memory and automatically recorded when the recording button is pressed.
To set cache recording
Select [CACHE] from [REC MODE] on the menu screen.
Notes
•After cache recording, it may take about 30 seconds to write data of the cache part.
Interval recording mode
Records a series of videos at regular intervals. This function is useful to observe things like cloud
movements or daylight changes. Only DVCAM/DV format is valid.
Selecting an interval recording time
Select [SETTING] t [INTERVAL] t [REC TIME] on the menu screen to set the time.
You can select [0.5sec], [1sec], [1.5sec] or [2sec].
Setting the interval time
Select [SETTING] t [INTERVAL] t [INT TIME] on the menu screen to set the time.
You can select [30sec], [1min], [5min] or [10min].
Setting interval recording
Select [INTERVAL] from [REC MODE] on the menu screen.
LCD screen display in interval recording mode
Remains on during recording and blinks during standby
10
 Loading...