


 Loading...
Sound Bar
Operating Instructions
HT-X8500

WARNING
Do not install the Sound Bar in a confined space, such as a bookcase or built-in cabinet.
To reduce the risk of fire, do not cover the ventilation opening of the Sound Bar with newspapers, tablecloths, curtains, etc.
Do not expose the Sound Bar to naked flame sources (for example, lighted candles).
To reduce the risk of fire or electric shock, do not expose this Sound Bar to dripping or splashing, and do not place objects filled with liquids, such as vases, on the Sound Bar.
The AC adapter is not disconnected from the mains as long as it is connected to the AC outlet, even if the Sound Bar itself has been turned off.
As the main plug of AC power adapter is used to disconnect the AC power adapter from the mains, connect it to an easily accessible AC outlet. Should you notice an abnormality in it, disconnect it from the AC outlet immediately.
CAUTION
Risk of explosion if the battery is replaced by an incorrect type.
Do not expose batteries or appliances with battery-installed to excessive heat, such as sunshine and fire.
Indoor use only.
Recommended cables
Properly shielded and grounded cables and connectors must be used for connection to host computers and/or peripherals.
For the Sound Bar
The nameplate is located on the bottom of the Sound Bar.
For the AC adapter
Labels for AC adapter Model No. and Serial No. are located at the bottom of AC adapter.
For the customers in Europe
Notice for customers: the following information is only applicable to equipment sold in countries applying EU directives.
This product has been manufactured by or on behalf of Sony Corporation.
EU Importer: Sony Europe Limited. Inquiries to the EU Importer or related to product compliance in Europe should be sent to the manufacturer’s authorized representative, Sony Belgium, bijkantoor van Sony Europe Limited, Da Vincilaan 7-D1, 1935 Zaventem, Belgium.
Hereby, Sony Corporation declares that this equipment is in compliance with Directive 2014/53/EU.
The full text of the EU declaration of conformity is available at the following internet address: http:// www.compliance.sony.de/
This equipment has been tested and found to comply with the limits set out in the EMC regulation using a connection cable shorter than 3 meters.
2GB

Disposal of waste batteries and electrical and electronic equipment (applicable in the European Union
and other countries with separate collection systems)
This symbol on the product, the battery or on the packaging indicates that the product and the battery shall not be treated as household waste. On certain batteries this symbol might be used in combination with a chemical symbol. The chemical symbol for lead (Pb) is added if the battery contains more than 0.004% lead. By ensuring that these products and batteries are disposed of correctly, you will help to prevent potentially negative consequences for the environment and human health which could be caused by inappropriate waste handling. The recycling of the materials will help to conserve natural resources. In case of products that for safety, performance or data integrity reasons require a permanent connection with an incorporated battery, this battery should be replaced by qualified service staff only. To ensure that the battery and the electrical and electronic equipment will be treated properly, hand over these products at end-of-life to the appropriate collection point for the recycling of electrical and electronic equipment. For all other batteries, please view the section on how to remove the battery from the product safely. Hand the battery over to the appropriate collection point for the recycling of waste batteries. For more detailed information about recycling of this product or battery, please contact your local Civic Office, your household waste disposal service or the shop where you purchased the product or battery.
3GB

Table of Contents |
|
|
About These Operating |
|
|
Instructions |
............................. |
4 |
What’s in the Box .......................... |
5 |
|
What You Can Do with the Sound |
||
Bar ........................................... |
|
6 |
Guide to Parts and Controls .......... |
7 |
|
Connecting to a TV or AV |
|
|
Device |
|
|
Connecting to a |
|
|
|
Startup Guide |
|
TV or AV Device |
|
|
with the HDMI |
(separate |
|
|
document) |
|
Cable |
|
|
Connecting Sony TV with the |
|
|
BLUETOOTH Function |
|
|
Wirelessly ............................... |
|
13 |
Connecting a 4K TV and 4K |
|
|
Devices ................................... |
|
16 |
Connecting a TV Compatible with |
||
eARC ....................................... |
|
17 |
Mounting the Sound Bar on |
|
|
a Wall ..................................... |
|
18 |
When the TV Remote Control does |
||
not Work ................................ |
|
19 |
Listening to the Sound |
|
|
Listening to a TV and Other |
|
|
Devices .................................. |
|
20 |
Enjoying the Surround Sound ..... |
21 |
|
Adjusting the Sound .................... |
23 |
|
Listening to Music/Sound |
|
|
with the BLUETOOTH® |
|
|
Function |
|
|
Listening to Music from a Mobile |
|
|
Device .................................... |
|
25 |
Changing the Settings of the |
|
|
BLUETOOTH Function ............ |
27 |
|
Using the Various Functions
Using the Control for HDMI |
|
Function ................................ |
28 |
Using the “BRAVIA” Sync |
|
Function ................................ |
30 |
Saving Power Consumption ....... |
30 |
Troubleshooting |
|
Troubleshooting ........................... |
31 |
Resetting the Sound Bar ............. |
36 |
Additional Information |
|
Specifications ............................... |
37 |
Supported Input Audio |
|
Formats ................................. |
38 |
Supported HDMI Video |
|
Formats ................................. |
39 |
On BLUETOOTH |
|
Communication ..................... |
41 |
Precautions ................................. |
42 |
About These Operating
Instructions
•The instructions in these Operating Instructions describe the controls on the remote control.
•Some illustrations are presented as conceptual drawings, and may be different from the actual products.
•The default settings are underlined on each feature description.
Example: Vertical surround off
4GB
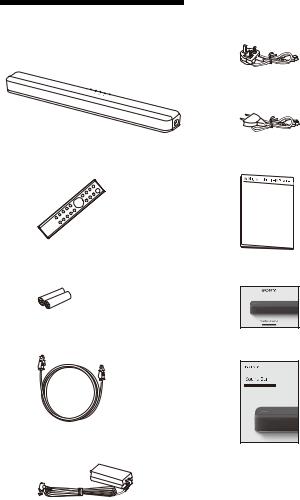
What’s in the Box
• Sound Bar (1)
• Remote control (1)
•R03 (size AAA) battery (2)
•Optical digital cable (1)
• AC adapter (1)
•AC power cord (mains lead) (1)
–U.K./Ireland models
–Other models
•WALL MOUNT TEMPLATE (1)
•Startup Guide
•Operating Instructions
5GB
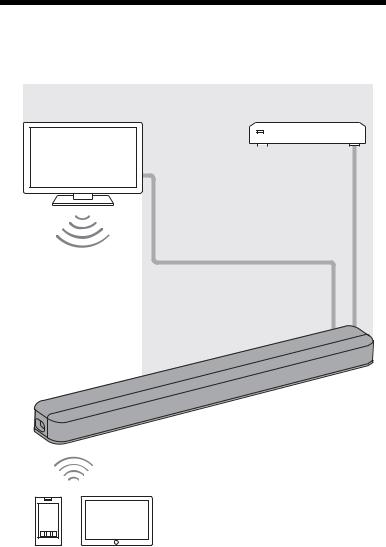
What You Can Do with the Sound Bar
The Sound Bar supports object-based audio formats such as Dolby Atmos and DTS:X as well as HDR video formats such as HDR10, HLG, and Dolby Vision.
“Listening to a TV and Other |
Blu-ray Disc™ player, cable |
|||||
Devices” (page 20) |
||||||
box, satellite box, etc. |
||||||
|
|
|
|
|
|
|
|
|
|
|
|
|
|
|
|
|
|
|
|
|
|
|
|
|
|
|
|
“Connecting Sony TV with the BLUETOOTH Function Wirelessly” (page 13)
Basic connection: Refer to “Startup Guide” (separate document).
Other connections: See “Connecting to a TV or AV Device” (page 13).
“Using the Control for HDMI Function” (page 28)
“Using the “BRAVIA” Sync Function” (page 30)
“Listening to Music from a Mobile Device” (page 25)
6GB

Guide to Parts and Controls
Details are omitted from the illustrations.
Sound Bar
Front
Remote control sensor
Point the remote control at the remote control sensor to operate the Sound Bar.
(power) button
Turns on the Sound Bar or sets it to standby mode.
 (input select) button (page 20)
BLUETOOTH button (page 25)
+/– (volume) buttons
7GB

Indicators
A lighting or flashing of the indicators on the Sound Bar indicates the following state.
Currently selected input
Indicators Status
Lights while TV input is selected.
Lights while HDMI input is selected.
Lights while BLUETOOTH input is selected.
|
|
|
|
|
|
|
|
Light while the Sound Bar is connected to the TV with the BLUETOOTH |
||
|
|
|
|
|
|
|
|
|||
|
|
|
|
|
|
|
|
function (TV input is selected). |
||
|
|
|
|
|
|
|
|
|
|
|
Sound format, surround effect |
|
|||||||||
|
|
|
|
|
|
|
|
|
|
|
|
|
Indicators/colors |
Status |
|
||||||
|
|
|
|
|
|
|
|
|
|
|
|
|
|
|
|
|
White |
Lights while the Dolby Atmos format is playing and the virtual |
|||
|
|
|
|
|
|
|||||
|
|
|
|
|
|
|||||
|
|
|
|
|
|
|
|
surround processing is activated. |
||
|
|
|
|
|
|
|
|
|
|
|
|
|
|
|
|
|
White |
Lights while the DTS:X format is playing. |
|||
|
|
|
|
|
|
|
|
|
|
|
|
|
|
|
|
|
Green |
Lights while the DTS format is playing and the sound effect setting is |
|||
|
|
|
|
|
|
|
|
set to “DTS Virtual:X” (page 22). |
||
|
|
|
|
|
|
|
|
|
|
|
|
|
|
|
|
|
Orange |
Lights while the DTS:X format is playing and the sound effect setting |
|||
|
|
|
|
|
|
|
|
is set to “DTS Virtual:X” (page 22). |
||
|
|
|
|
|
|
|
|
|
|
|
|
|
|
|
|
|
White |
Lights while the vertical surround function is set to on (page 21). |
|||
|
|
|
|
|
|
|||||
|
|
|
|
|
|
|||||
|
|
|
|
|
|
|
|
|
|
|
Volume |
|
|
|
|||||||
|
|
|
|
|
|
|
|
|
|
|
|
|
|
|
|
|
Indicators |
Status |
|||
|
|
|
|
|
|
|
|
|
|
|
|
|
|
|
|
|
|
|
|
|
Indicate the volume level by the flashing |
|
|
|
|
|
|
|
|
|
|
|
|
|
|
|
|
|
|
|
|
|
|
indicators when adjusting the volume by pressing +/–.
As the volume level is turned up, the flashing indicators increase (from left to right).
• Flash repeatedly while the sound is muted.
• Flash twice when the volume level is set to minimum.
Flash twice when the volume level is set to maximum.
8GB

Setting value for each function
The changed setting for each function is indicated as the status of the indicators. The following status indicates the on/off setting for each function.
For the status when the settings other than the on/off setting are changed, see the description for each function.
|
|
Indicators |
Status |
|
|
|
|
|
• Flash twice when the function is set to on |
|
|
|
|
|
|
|
|
|
|
|
|
|
|
(for the function other than the night/voice |
|
|
|
|
mode). |
|
|
|
|
• Light for 2 seconds when the function is set |
|
|
|
|
to on (for the night/voice mode). |
|
|
|
|
|
|
|
|
|
• Flash twice when the function is set to off |
|
|
|
|
|
|
|
|
|
|
|
|
|
|
(for the function other than the night/voice |
|
|
|
|
mode). |
|
|
|
|
• Light for 2 seconds when the function is set |
|
|
|
|
to off (for the night/voice mode). |
|
|
|
|
|
9GB

Rear
DC IN terminal |
“Supported Input Audio Formats” |
|
TV IN (OPT) jack |
(page 38). For specifications and |
|
notes on connections, see |
||
HDMI IN jack |
||
“Supported HDMI Video Formats” |
||
Peel the sticker when connecting |
(page 39). |
|
the device to the HDMI IN jack. |
IR repeater (page 19) |
|
For specifications and notes on |
||
Transmits the remote signal of the |
||
connections, see “Supported HDMI |
||
TV remote control to the TV. |
||
Video Formats” (page 39). |
||
|
HDMI OUT (TV eARC/ARC) jack
Connect a TV that has an HDMI input jack with an HDMI cable. The Sound Bar is compatible with eARC and ARC. ARC is the function
that sends TV sound to an AV device such as the Sound Bar from the TV’s HDMI jack. eARC is an extension of ARC and enables transmission of the object audio and multi-channel LPCM content that cannot be transmitted with ARC. For details of eARC, see “Connecting a TV Compatible with eARC” (page 17). For supported audio formats, see
10GB
Remote Control
Some buttons function differently depending on how long the button is pressed. The icons below indicate how long to press the button.
• : Press the button.
• : Press and hold the button for 5 seconds.
INPUT (page 20)
Selects the playback source. When you press INPUT once, the current input indicator flashes.
Press INPUT again to select the device you want.
Each time you press INPUT, the
input changes cyclically as follows. TV input HDMI input BLUETOOTH input
VERTICAL S.
 : Turns on/off the vertical surround function. (page 21)
  : Selects the sound effect setting. (page 22)
AUTO SOUND
 : Selects AUTO SOUND for the sound mode. (page 21)
 : Turns on/off the AAC codec function. (page 27)
VOICE
 : Turns on/off the voice mode. (page 23)
 : Turns on/off the Control for HDMI function. (page 28)
(volume) +*/–
Adjusts the volume.
BASS (page 23)
Adjusts the level of the bass tone.
INDICATORS
 : Turns on/off the indicators on the Sound Bar.
 : Turns on/off the auto standby function. (page 30)
GAME
 : Selects GAME for the sound mode. (page 21)
 : Selects the HDMI standby through setting. (page 29)
11GB
SPORTS
 : Selects SPORTS for the sound mode. (page 21)
 : Turns on/off the eARC function. (page 28)
A/V SYNC (page 24)
Adjusts the delay between the picture and sound.
(power)
Turns on the Sound Bar or sets it to standby mode.
CINEMA (page 21)
Selects CINEMA for the sound mode.
MUSIC (page 21)
Selects MUSIC for the sound mode.
NIGHT
 : Turns on/off the night mode. (page 23)
 : Turns on/off the BLUETOOTH standby mode. (page 27)
(muting)
Turns off the sound temporarily or turns on the sound.
AUDIO*
 : Selects the audio channel for Dolby Digital multiplex broadcast. (page 23)
 : Turns on/off the Audio DRC function. (page 23)
NEWS
 : Selects NEWS for the sound mode. (page 21)
 : Selects the HDMI signal format setting. (page 17)
STANDARD
 : Selects STANDARD for the sound mode. (page 21)
 : Turns on/off the IR repeater function. (page 19)
DTS DIALOG (page 24)
Adjusts the dialog volume while the DTS:X content is played back.
*The + and AUDIO buttons have a tactile dot. Use it as a guide during operation.
Tip
You can turn the indicators off by pressing INDICATORS.
Even if the indicators are turned off by pressing INDICATORS, when you operate the Sound Bar, the indicators in relation to the operation light or flash.
About the replacement of batteries for the remote control
When the Sound Bar does not respond by operating with the remote control, replace two batteries with new batteries.
Use R03 (size AAA) manganese batteries for replacement.
12GB

Connecting to a TV or AV Device
Connecting to a TV or AV Device with the HDMI Cable
To connect a 4K TV or 4K devices
See “Connecting a 4K TV and 4K
Devices” (page 16).
To connect a TV compatible with eARC
For the connection, refer to Startup Guide (separate document). For the settings, see “Connecting a TV Compatible with eARC” (page 17).
To connect to a TV other than the above, refer to Startup Guide (separate document).
Connecting Sony TV with the BLUETOOTH Function Wirelessly
When using Sony TV* with the BLUETOOTH function, you can listen to sound of the TV or device that is connected to the TV by connecting the Sound Bar and TV wirelessly.
*The TV needs to be compatible with A2DP (Advanced Audio Distribution Profile).
Blu-ray Disc player, cable box, satellite box, etc.
Connecting the Sound Bar
and TV Wirelessly
To connect the Sound Bar and TV wirelessly, you need to perform pairing of the Sound Bar and TV by using the BLUETOOTH function.
Pairing is the process required to mutually register the information on BLUETOOTH devices to be connected wirelessly in advance.
13GB

 INPUT
INPUT
BLUETOOTH button
1Insert batteries (supplied) into the remote control.
2Turn on the TV.
3Turn on the Sound Bar.
4Point the remote control at the remote control sensor on the Sound Bar, and press and hold the INPUT on the remote control and BLUETOOTH button on the Sound Bar simultaneously for 5 seconds.
The TV and BLUETOOTH indicators flash twice, the Sound Bar enters the pairing mode, then the BLUETOOTH indicator flashes quickly.
BLUETOOTH indicator
Remote control sensor
5On the TV, search the Sound Bar by performing the pairing operation.
The list of the BLUETOOTH devices that are searched appears on the TV screen.
For the operation method to pair the BLUETOOTH device to the TV, refer to the operating instructions of the TV.
6Pair the Sound Bar and TV by selecting “HT-X8500” from the list on the TV screen.
7Make sure that the TV and BLUETOOTH indicators on the Sound Bar light.
A connection between the Sound Bar and TV has been established.
8Select the program or input of the TV by using the TV remote control.
The sound of the displayed image on the TV screen is output from the Sound Bar.
9Adjust the volume of the Sound Bar by using the TV remote control.
When pressing the muting button on the TV remote control, the sound is muted temporarily.
Notes
•If the TV sound is not output from the Sound Bar, press INPUT on the remote control of the Sound Bar repeatedly to
14GB
Loading...