


s
GB Instructions for Use |
3 |
HB 131.10 B

I %
I ! ! |
! |
|
|
|
|
|
|
|
|
|
|
|
|
|
|
|
|
|
|
|
|
|
|
|
|
|||||||||||||
|
|
|
|
|
|
|
|
|
|
|
|
|
|
|
|
|
|
|
|
|
|
|
|
|
|
|
|
|
|
|
|
|
|
|
||||
B #% |
"&' ' #" |
|
|
|
|
|
|
|
|
|
|
|
|
|
|
|
|
|
|
|
|
|
|
|
|
|
|
|
|
|
|
|
|
|||||
|
|
|
|
|
|
|
|
|
|
|
|
|
|
|
|
|
|
|
|
|
|
|
|
|
||||||||||||||
'+ " #%! ' #" |
|
|
|
|
|
|
|
|
|
|
|
6 |
|
|
|
|
|
|
|
|
|
|
|
|||||||||||||||
|
|
|
|
|
|
|
|
|
|
|
|
|
|
|
|
|
|
|
|
|
|
|
|
|
|
|||||||||||||
"& #% ! |
|
|
|
|
|
|
|
|
|
|
|
|
|
6 |
|
|
|
|
|
|
|
|
|
|
||||||||||||||
|
|
|
|
|
|
|
|
|
|
|
|
|
|
|
|
|
|
|
|
|
|
|
|
|
||||||||||||||
" $ |
|
|
|
|
|
|
|
|
|
|
|
|
|
8 |
|
|
|
|
|
|
|
|
|
|||||||||||||||
|
|
|
|
|
|
|
|
|
|
|
|
|
|
|
|
|
|
|
|
|
|
|
|
|
|
|
|
|
|
|
|
|
|
|||||
#"'%# |
$" |
|
|
|
|
|
|
|
|
|
|
|
|
|
|
|
|
|
|
|
|
|
|
|
|
|
|
|
|
|
|
|
|
|||||
|
|
|
|
|
|
|
|
|
|
|
|
|
|
|
|
|
|
|
|
|
|
|
|
|
|
|
|
|
|
|
|
|
|
|
||||
(" ' #" |
& '#% |
|
|
|
|
|
|
|
|
|
|
|
|
|
|
|
|
|
|
|
|
|
|
|
|
|
|
|
|
|
|
|
|
|||||
|
|
|
|
|
|
|
|
|
|
|
|
|
|
|
|
|
|
|
|
|
|
|
|
|
|
|
|
|
|
|
||||||||
!$% '(% |
& '#% |
|
|
|
|
|
|
|
|
|
|
|
|
|
|
|
|
|
|
|
|
|
|
|
|
|
|
|
|
|||||||||
|
|
|
|
|
|
|
|
|
|
|
|
|
|
|
|
|
|
|
|
|
|
|
|
|
|
|
||||||||||||
#"'%# |
|
(''#"& " |
&$ + |
|
$" |
|
|
|
|
|
|
|
|
|
|
|
|
|
|
|
|
|
|
|
|
|
||||||||||||
|
|
|
|
|
|
|
|
|
|
|
|
|
|
|
|
|
|
|
|
|
|
|
|
|
|
|
|
|
||||||||||
+$& # ' " |
|
|
|
|
|
|
|
|
|
|
|
|
|
|
|
|
|
|
|
|
|
|
|
|
|
|
|
|||||||||||
|
|
|
|
|
|
|
|
|
|
|
|
|
|
|
|
|
|
|
|
|
|
|
|
|
|
|
||||||||||||
) " |
" |
& ) " |
&% & |
|
|
|
|
|
|
|
|
|
|
|
|
|
|
|
|
|
|
|
|
|
|
|||||||||||||
|
|
|
|
|
|
|
|
|
|
|
|
|
|
|
|
|
|
|
|
|
|
|
|
|
|
|
|
|
|
|
|
|
||||||
## " |
" |
|
|
|
|
|
|
|
|
|
|
|
|
|
|
|
|
|
|
|
|
|
|
|
|
|
|
|
|
|
|
|||||||
|
|
|
|
|
|
|
|
|
|
|
|
|
|
|
|
|
|
|
|
|
|
|
|
|||||||||||||||
" ! |
|
! |
|
! |
|
|
|
|
|
|
|
|
|
|
|
|
|
|
|
|
|
|
|
|||||||||||||||
|
|
|
|
|
|
|
|
|
|
|
|
|
|
|
|
|
|
|
|
|
|
|
|
|
|
|
|
|||||||||||
' " ($ ' #) " |
|
|
|
|
|
|
|
|
|
|
|
|
|
|
|
|
|
|
|
|
|
|
|
|
|
|
|
|||||||||||
|
|
|
|
|
|
|
|
|
|
|
|
|
|
|
|
|
|
|
|
|
|
|
|
|
|
|
|
|
||||||||||
% , " " |
' |
&% & |
|
|
|
|
|
|
|
|
|
|
|
|
|
|
|
|
|
|
|
|
|
|
|
|
|
|||||||||||
|
|
|
|
|
|
|
|
|
|
|
|
|
|
|
|
|
||||||||||||||||||||||
!! ! # |
|
|
|
|
|
|
|
|
|
|
|
|
|
|
|
|||||||||||||||||||||||
|
|
|
|
|
|
|
|
|
|
|
|
|
|
|
|
|
|
|
|
|
|
|
|
|
|
|
|
|||||||||||
* ' " |
# |
' |
#) " |
! "( + |
|
|
|
|
|
|
|
|
|
|
|
|
|
|
|
|
|
|
|
|
|
|
|
|||||||||||
|
|
|
|
|
|
|
|
|
|
|
|
|
|
|
|
|
|
|||||||||||||||||||||
' |
#) " |
& |
'# &* ' |
# |
('#! ' + |
|
|
|
|
|
|
|
|
|
|
|
||||||||||||||||||||||
|
|
|
|
|
|
|
|
|
|
|
|
|
||||||||||||||||||||||||||
' #) " & '# &* ' #" " |
# |
('#! ' + |
|
|
|
|
|
|
|
|
|
|||||||||||||||||||||||||||
|
|
|
|
|
|
|
|
|
|
|
|
|
|
|
|
|
|
|
|
|
|
|
|
|
|
|
|
|||||||||||
|
|
|
|
|
|
|
|
|
|
|
|
|
|
|
|
|
|
|
|
|
|
|
|
|
|
|
||||||||||||
|
|
|
|
|
|
|
|
|
|
|
|
|
|
|
|
|
|
|
|
|
|
|
|
|
|
|
|
|||||||||||
'' " $%# (% |
|
|
|
|
|
|
|
|
|
|
|
|
|
|
6 |
|
|
|
|
|
|
|
|
|
|
|
||||||||||||
|
|
|
|
|
|
|
|
|
|
|
|
|
|
|
|
|
|
|
|
|
|
|
|
|
|
|
|
|
||||||||||
|
|
|
|
|
|
|
|
|
|
|
|
|
|
|
|
7 |
|
|
|
|
|
|
|
|
|
|
|
|||||||||||
|
|
|
|
|
|
|
|
|
|
|
|
|
|
|
|
|
|
|
|
|
|
|
|
|
|
|
|
|
|
|
|
|
|
|
||||
'' " |
|
$%# (% |
|
|
|
|
|
|
|
|
|
|
|
|
|
|
|
|
|
|
|
7 |
|
|
|
|
|
|
|
|
|
|
|
|||||
|
|
|
|
|
|
|
|
|
|
|
|
|
|
|
|
|
|
|
|
|
|
|
|
|
|
|
|
|
|
|||||||||
|
|
!! |
|
|
|
|
|
|
|
|
|
|
|
|
|
|
|
|
8 |
|
|
|
|
|
|
|
|
|
||||||||||
|
|
|
|
|
|
|
|
|
|
|
|
|
|
|
|
|
|
|
|
|
|
|
|
|
|
|
|
|||||||||||
" " |
' |
& |
& '' " & |
|
|
|
|
|
|
|
|
|
|
|
|
|
|
|
|
|
|
|
|
|
|
|
||||||||||||
|
|
|
|
|
|
|
|
|
|
|
|
|
|
|
|
|
|
|
|
|
|
|
|
|||||||||||||||
|
|
|
|
|
|
|
|
|
|
|
|
|
|
|
|
|
|
|
|
|
|
|
||||||||||||||||
|
|
|
|
|
|
|
|
|
|
|
|
|
|
|
|
|
|
|
|
|
|
|
|
|
||||||||||||||
|
|
|
|
|
|
|
|
|
|
|
|
|
|
|
|
|
|
|
|
|
|
|
|
|||||||||||||||

Index
O) " x' % #%. . . . . . . . . . . . . . . . . .20. . . . . . . . .
O) " . . . . . . . . . . . . . . . . . . . . 21. . . . . . . . . .
Cl a" " ' %a l&. . . . . . . . . . . . . . . . 23. . . . . . . . .
al . . . . . . . . . . . . . . . . . . . . 23. . . . . . . . . .
A &% & . . . . . . . . . . . . . . . . . .23. . . . . . . . .
Troubleshooting 24
$la " ' #) " l . '. . . . . . . . . . . . . 24. . . . . . . .
After#sales service. . . . . . . . . . . . . . .25. . . . . . . . .
Packaging and old appliances. . . . . . . . . . 26. . . . .
Tables and tips. . . . . . . . . . . . . . . . 27. . . . . . . . .
Cak & a" $a&'% .& . . . . . . . . . . . . . . .27. . . . . . . .
Bak " ' $&. . . . . . |
. . . . . . . . . . |
. |
. |
.29. . . . . . . . . |
|
|
|
|
|
|
|
M a', $#(l'%+, &. . . |
. . . . . . . . . . |
. |
. |
. 30. . . . . . . . . |
|
|
|
|
|
|
|
$& #% %#a&' " a" |
% .ll ". . . . . . . . |
. |
. |
. . 32. . . . . . . |
|
|
|
|
|
|
|
D%+ " . . . . . . . . |
. . . . . . . . . . |
. |
. 32. . . . . . . . . . |
||
|
|
|
|
|
|
D %#&' " . . . . . . |
. . . . . . . . . . |
. |
. 33. . . . . . . . . . |
||
|
|
|
|
|
|
E" % + &a) " ' $.& . . |
. . . |
. . . |
. . . |
. . |
. |
. 33. . . . . . . . . |
||||
|
|
|
|
|
|
|
|
|
|
|
Acrylamide |
in |
food |
|
|
|
|
|
|
34 |
|
|
|
|
|
|
|
|
|
|
|
|
W a' a" |
+#( |
#?. . |
|
. . . . |
. . . |
. . . |
. |
. . |
. 35. . . . . . . . |
|
4

Important |
information |
|
|
|
|
||||
|
|
|
Read |
this instruction manual |
carefully. |
Only then will |
|||
|
|
|
you be able to operate your cooker safely and |
||||||
|
|
|
correctly.The manufacturer does not accept any re( |
||||||
|
|
|
sponsibility if the instruction manual is not followed. |
||||||
|
|
|
Please |
keep the instruction and installation manual i |
|||||
|
|
|
a safe |
place. Please pass on the instruction |
manua |
||||
|
|
|
the new owner if you sell the appliance. |
|
|||||
|
|
|
|
|
|
|
|
||
|
|
|
|
|
|
|
|
|
|
Before |
installation |
|
|
|
|
|
|
||
Transport |
damage |
|
Check |
the appliance after unpacking it. Do |
not |
||||
|
|
|
connect the appliance if it has been damaged in |
||||||
|
|
|
transport. |
|
|
|
|
||
Electrical |
connection |
|
The cooker may only be connected by an approve |
||||||
|
|
|
specialist. Losses resulting from damage caused by |
||||||
|
|
|
incorrect connection will invalidate warranty claims. |
||||||
|
|
|
Before using the appliance for the first time, you m |
||||||
|
|
|
ensure |
that the domestic electrical system is |
earthe |
||||
|
|
|
and meets all the current safety regulations. |
An aut |
|||||
|
|
|
rized electrician should install and connect your ap( |
||||||
|
|
|
pliance. |
|
|
|
|
||
|
|
|
Use of this appliance without an earth connection |
||||||
|
|
|
incorrectly installed can cause |
serious |
injuries |
(injurie |
|||
|
|
|
or |
electrocution), |
although this |
is very |
rare |
|
|
|
|
|
The |
manufacturer |
does not accept any responsibility |
||||
|
|
|
for any inappropriate use or for any injury caused |
||||||
|
|
|
incorrect electrical |
installation. |
|
|
|
||
5

Safety information
|
|
|
|
|
This appliance is intended for domestic |
use only. |
||||||||
|
|
|
|
|
Only |
use |
the |
cooker |
for food preparation. |
|
||||
Hot |
oven |
|
|
Open |
the |
oven |
door |
carefully. Hot steam may esca |
||||||
|
|
|
|
|
Never |
touch |
the |
internal surfaces of the oven or t |
||||||
|
|
|
|
|
|
|
|
|
|
|
|
|
|
|
|
|
|
|
|
heating elements. There is a risk of burning. |
|
||||||||
|
|
|
|
|
Children must be kept at a safe distance from the |
|||||||||
|
|
|
|
|
appliance. |
|
|
|
|
|
|
|||
|
|
|
|
|
Never store combustible items in the oven. Risk of |
|||||||||
|
|
|
|
|
Never |
clamp |
leads of |
electrical appliances in the h |
||||||
|
|
|
|
|
oven door. The insulation on the leads could melt. |
|||||||||
|
|
|
|
|
There is a risk of short&circuiting. |
|
|
|||||||
Repairs |
|
|
|
Incorrectly |
done |
repairs are dangerous. |
There is |
a |
||||||
|
|
|
|
|
of |
electrocution. |
|
|
|
|
||||
|
|
|
|
|
Repairs may only be carried out by after&sales serv |
|||||||||
|
|
|
|
|
technicians |
who |
have |
been fully trained |
by us. |
|
||||
|
|
|
|
|
In |
case of malfunction, disconnect the |
appliance |
fro |
||||||
|
|
|
|
|
the |
mains. |
|
|
|
|
|
|
||
|
|
|
|
|
Call the |
after&sales service. |
|
|
||||||
|
|
|
|
|
|
|
|
|
|
|
|
|
||
|
|
|
|
|
|
|
|
|
|
|
|
|
||
Reasons |
for |
|
|
|
|
|
|
|
|
|
|
|
||
damage |
|
|
|
|
|
|
|
|
|
|
|
|
||
Baking |
sheet or |
aluminium Do |
not |
place |
baking |
sheets on the oven floor. |
Do |
|||||||
foil |
on |
the |
oven |
floor |
line |
the |
oven |
floor with aluminium foil. |
|
|
||||
|
|
|
|
|
|
|
||||||||
This causes heat to accumulate. Baking and roastin times will no longer be correct and the enamel wil damaged.
Water in the oven Never pour water directly into a hot oven. This co damage the enamel.
Fruit juice |
When |
baking |
very moist fruit cakes, do not put |
to |
|
much |
on the |
baking sheet. Fruit juice dripping |
from |
|
the baking sheet leaves stains that cannot be |
|
||
|
removed. |
|
|
|
6

Cooling with the |
oven |
doorOnly leave the oven to cool with the door closed. |
||
open |
|
|
|
not allow anything to become trapped in the oven |
|
|
|
|
|
|
|
|
|
door. Even if you only leave the oven door open |
|
|
|
|
slightly, the fronts of adjacent units may become |
|
|
|
|
damaged over time. |
Very |
dirty |
oven |
seal |
If the oven seal is very dirty, the oven door will n |
|
|
|
|
longer close properly when the oven is in use. The |
|
|
|
|
fronts of adjacent units could be damaged. Keep th |
|
|
|
|
oven seal clean. |
Using |
the |
oven |
door |
as aDo not stand or sit on the oven door. |
seat |
|
|
|
|
7
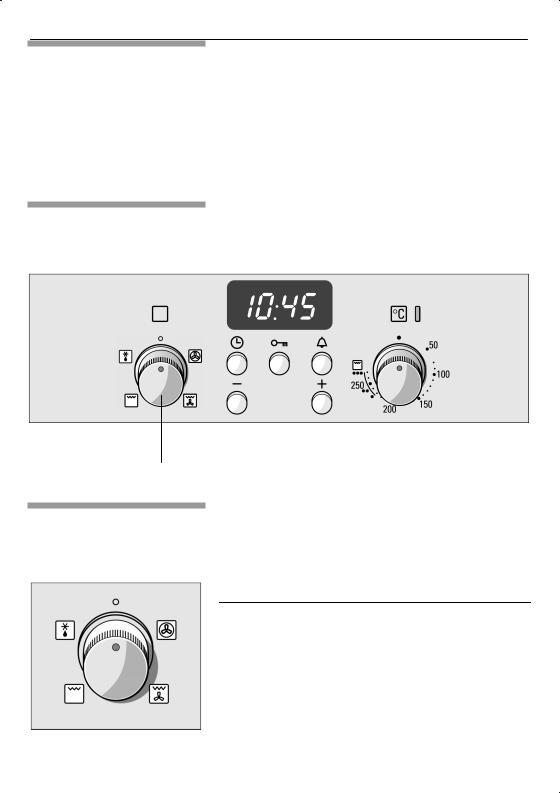
Your new cooker
Here you will learn more about your new oven Th control panel and its switches and indicators are explained here The heating modes and the accessories included with your oven will be explaine here
The control panel
Details vary according to the appliance model
|
|
|
|
|
|
|
|
|
|
|
|
|
|
Function |
|
Display |
panel and |
Temperature |
||
|
||||||
selector |
|
selector |
||||
|
control |
buttons |
||||
|
|
|
|
|||
Function selector
Set the type of heating for the oven using the fun selector
|
|
|
|
|
|
|
|
|
|
|
|
|
|
g ll g |
|
|
|
|
|
|
|
|
g ll |
|
|
|
|
|
|
|
|
f |
|
|
|
|
|
|
|
The oven light switches on when you select a function
8
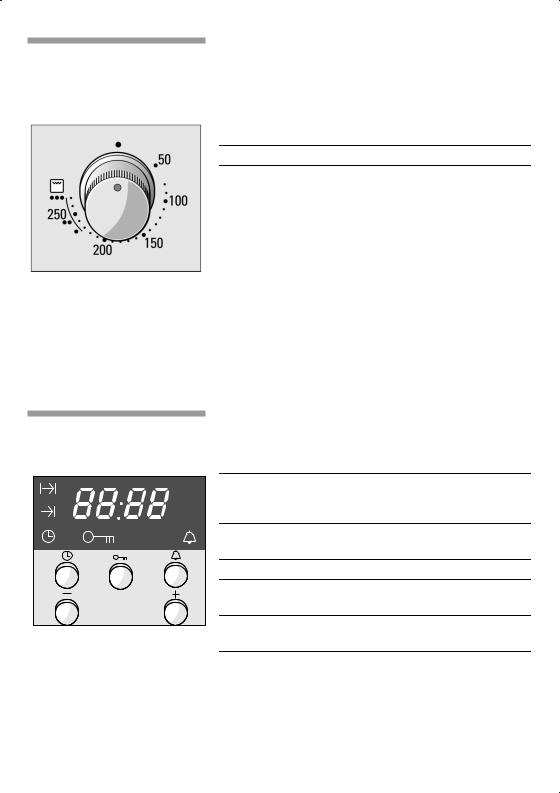
Temperature selector
Grill settings
Use the temperature selector to set the temperature or grill setting.
Temperature
50 * 270 Temperature range in C
Grill x |
|
|
|
|
|
|
Setting |
|
|
|
|
|
|
|
|
|
|
|
|
Low |
grill |
|
1 |
|
||
|
|
|
|
|
|
|
|
|
|
|
Medium |
grill |
2 |
|
|||
|
|
|
|
|
|
|
|
|
|
|
High |
grill |
|
3 |
|
||
|
|
|
|
|
|
|||
The indicator |
light |
by |
the |
temperature selector come |
||||
on while the oven is heating up. It goes out durin pauses in heating. The light does not come on for defrosting.
For radiant grillingx, set a grill setting using the temperature selector.
Control |
buttons |
and |
|
|
|
|
|
|
|
|
display |
panel |
|
|
|
|
|
|
|
|
|
|
|
Clock |
|
buttonj |
|
Use this |
button to set the |
time |
of |
|
|
|
h |
|
|
|
|
day, the cooking time? and |
|
|
|
|
|
min |
|
|
|
|
|
|
||
|
|
|
|
|
|
the completion time!. |
|
|
||
|
|
Key |
buttonp |
|
Use this button to switch the |
|
||||
|
|
|
|
|
|
|
childproof |
lock on and off. |
|
|
|
|
Timer |
|
buttona |
|
Use this |
button to set the timer. |
|
||
|
|
Minus |
button |
* |
|
Use this button to reduce the |
|
|||
|
|
|
|
|
|
|
values set. |
|
|
|
|
|
Plus |
|
button |
+ |
|
Use this button to increase the |
|
||
|
|
|
|
|
|
|
values set. |
|
|
|
|
|
The |
values |
set |
can |
be seen |
in the display |
panel. |
|
|
9

Types of heating
Different types of oven heating are available. You c therefore select the best method for cooking any d
3D |
hot |
air |
|
|
A fan in the rear |
panel distributes the heat from t |
|||
ring heating element evenly inside the oven. |
|
|||
Using 3D hot air, |
it is possible to bake cakes |
and |
||
on |
two shelves. It is best to use this type of heat |
|||
puff |
pastry. |
|
|
|
3D |
hot |
air is ideal |
for drying food. |
|
Hot |
air |
grilling |
|
|
This |
type of heating involves the grill element and |
|||
fan |
switching on and off alternately. During the |
pau |
||
in heating, the fan |
circulates the heat generated |
by |
||
the grill around the food. This ensures that pieces meat are crisped and brown on all sides. Large roasts, poultry and fish can also be cooked beautif without using the rotary spit or preheating the oven
Radiant |
grilling |
|
The entire area under the |
grill element becomes ho |
|
This is ideal if you wish to cook several steaks, |
||
sausages, |
fish or slices of |
toast. |
10
Defrosting |
|
A fan in the rear |
panel circulates the air in the ov |
around the frozen food. Frozen pieces of meat, |
|
poultry, bread and |
cakes defrost evenly. |
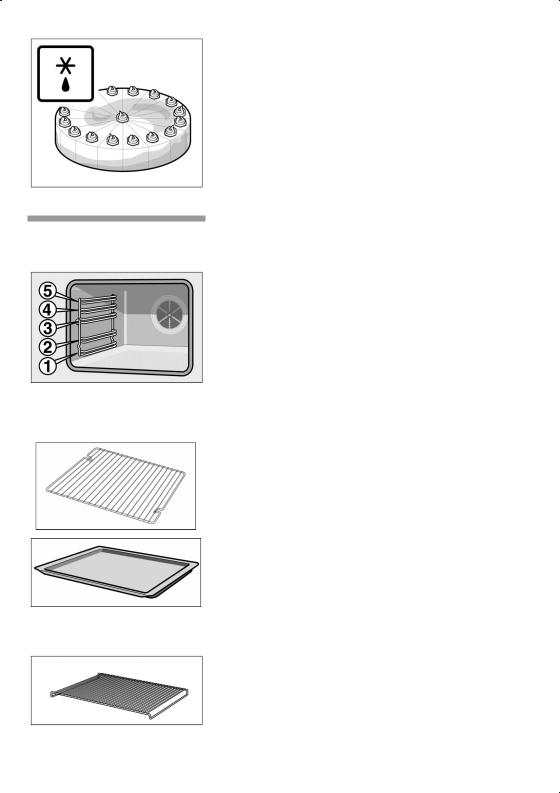
Oven and |
shelving |
|
|
|
|
|
|
accessories |
|
|
|
|
|
|
|
|
The shelf can be inserted at 5 different |
heights |
in |
||||
|
oven. |
|
|
|
|
|
|
|
You can remove the shelf two thirds of the way |
||||||
|
without it tipping. |
This makes it easier to |
take |
food |
|||
|
of the |
oven. |
|
|
|
|
|
Accessories |
Accessories may |
be purchased at a later |
date |
from |
|||
|
the after#sales service or from specialist shops. |
|
|||||
|
Wire |
rack |
|
|
|
|
|
|
For ovenware, cake tins, roasts, grilling and frozen |
||||||
|
meals. |
|
|
|
|
|
|
|
Enamel |
baking |
tray |
|
|
||
|
for moist |
cakes, |
pastries, frozen food and large |
roa |
|||
|
It can also be used to catch dripping fat when yo |
||||||
|
grilling directly on the wire grill. |
|
|
||||
|
Push |
the |
baking |
tray as far as possible |
into the o |
||
|
with the sloping edge facing towards the oven door |
||||||
|
Wire |
rack |
|
|
|
|
|
|
for grilling. Always |
place the wire grill in |
the baking |
||||
|
tray. Fat |
and meat |
juices are collected. |
|
|
||
11
Handle
for removing the baking tray.
Cooling fan
The |
oven is fitted with a cooling fan. It switches it |
on |
and off as necessary. The warm air escapes a |
the |
door. |
Before using for the first time
If thej symbol and zeros are flashing in display
This section |
will |
tell you everything you need to do |
before using |
the |
cooker for the first time. |
Heat the oven and clean the accessories. Read the safety instructions in the Important information" section.
Firstly, check to |
see |
ifjthesymbol and three zeros |
||
are flashing in the display. |
||||
three Set |
the time. |
|
|
|
the |
|
|
|
|
1 |
Press |
thej clock |
button. |
|
12:00 |
appears |
and |
thej clock symbol flashes. |
|
2 Set the time using the + or - button.
The time selected is adopted after a few seconds. cooker is now ready for use.
Heating up |
the oven |
|
|
|
Heat |
the |
empty oven with the door closed to rem |
|
the |
new |
oven smell. |
Method |
1 Set the function selectorT.to |
||
|
2 Use the temperature selector to set the |
||
|
temperature to 240 C. |
||
12
 Loading...