


Siemens - Electrogeräte GmbH
Carl-Wery-Straße 34
81739 München
en |
Operating instructions |
||
|
|
|
Gebrauchsanweisung |
de |
|||
|
|
|
Mode d’emploi |
fr |
|||
|
|
|
Avvertenze per l’uso |
it |
|||
|
|
|
Instrucciones de funcionamiento |
es |
|||
|
|
Gebruiksaanwijzing |
|
nl |
|
||
|
|
|
|
pt |
|
Manual de utilização |
|
|
|
|
|
tr |
|
|
Kullanma KIlavuzu |
Cod. 9000127932 G |
www.siemens-home.com |

Dear Customer,
We thank you and congratulate you on your choice.
This practical appliance, modern and functional, is manufactured using materials of the highest quality which are subjected to strict quality control throughout the entire manufacturing process. It is meticulously tested to ensure that it meets your demands for perfect cooking. This instructions book is divided into two sections for your convenience, one on use and the other on installation.
We strongly advise you to read through these simple instructions, so as to ensure that you get perfect results from the moment you first use this appliance. This book contains important information, not only on how to use the appliance, but also on maintenance and safety.
When our products are being transported, they must be provided with suitable protective packaging. However, we have reduced our packaging to the bare essentials, and the materials are all completely recyclable. You too can contribute to the conservation of
the environment by depositing the packaging in the nearest recycling container.
Used oil must not be poured down the sink as this has great environmental impact. Place it in a sealed container and take it to an appropriate collection point, or if this is not possible place it in the rubbish bin, (it will end up in a controlled dump, which is not the best option but here it will not contaminate ground water). Both you and your children will be grateful. Before disposing of a used appliance, disable it and then take it to a centre for recovering recyclable materials. Ask your local authorities for details of the centre nearest your home.
Packaging and old appliances
If th e sym b o lóa p p e a rs o n th e sp e cifica tio n s p la te , fo llo w th e se instructions:
Disposing in an environmentally, responsible manner
Unpack the appliance and dispose of the packaging in an environmentallyHresponsible manner.
óThis appliance is labelled in accordance with the European Directive 2002/96/EC concerning used electrical and electronic appliances (waste electrical and electronic equipment - WEEE).
The guideline determines the framework for the return and recycling of used appliances as applicable.
1

CONTENTS
Safety advice |
3 |
|
|
This is what your new cooking hob looks like |
5 |
|
|
Gas burners |
6 |
|
|
Recommended diameters of cookware |
7 |
|
|
Cooking recommendations |
8 |
|
|
Timer operation |
9 |
|
|
Programming |
10 |
|
|
Other functions |
11 |
|
|
The digital display |
13 |
|
|
Warnings |
14 |
|
|
When in use for cooking |
14 |
|
|
Cleaning and care |
15 |
|
|
Home troubleshooting |
16 |
|
|
Warranty conditions |
17 |
|
|
2

Safety advice
Read this user's manual carefully, to ensure that you use this appliance as effectively and safely as possible.
In accordance with current regulations, installation of the appliance and changing of gas type may only be carried out by an officially authorised technician.
Before installing your new cooking hob, check that the measurements are correct.
The following instructions are only valid in countries whose symbol appears on the appliance. To adapt
the appliance to conditions of use in your country, always follow the technical instructions.
It is of the utmost importance that the place in which the appliance is to be installed should have suitable, fully-functioning ventilation.
Make sure the appliance is not in a strong draught as this may blow out the burners.
This appliance leaves the factory with the set to the type of gas that is indicated on the specifications plate. If any change needs to be made, call our technical assistance service.
Do not make any adjustments to the interior of the appliance. If this should be necessary, call our technical assistance service.
Make sure you keep these instructions for use and assembly in a safe place, so that you can hand them on with the appliance if it ever changes owner.
If your hob has a glass panel, do not exert excessive force on it. If the glass on the cooking hob is unstuck, call the technical assistance service immediately, so that they can repair or replace it.
Never use a malfunctioning appliance.
The heating and cooking surfaces of the appliance become hot when they are in use, take all due precautions.
Always keep children well away.
3

Only use the appliance for preparing food; never use it as a heater.
Very hot fat or oil can easily catch fire, so food preparation using fat or oil, such as making chips, must be closely watched at all times.
Never pour water on burning fat or oil. DANGER! Cover the pan with a damp cloth to extinguish the fire and disconnect the cooking appliance.
In the event of malfunction, disconnect the gas and electricity supply to the appliance. Call our technical assistance service for repairs.
Do not place deformed receptacles that look unstable on hotplates and burners to prevent them from tipping over accidentally.
Should a key become stiff, do not force it. Phone our technical services department immediately, so that they can repair or replace it.
 Do not use steam clearing machines to clean the hotplate, as there is risk of electrocution.
 This appliance is not intended for use by persons (including children) with reduced physical, sensory or mental capabilities, or lack of experience and knowledge, unless they have been given supervision or instruction concerning use of the appliance by a person responsible for their safety.
 Never leave the appliance unattended during operation.
The diagrams contained in this instruction book are for orientation purposes only.
IF THESE INSTRUCTIONS ARE NOT
FOLLOWED, THE MANUFACTURER
ACCEPTS NO RESPONSIBILITY.
4
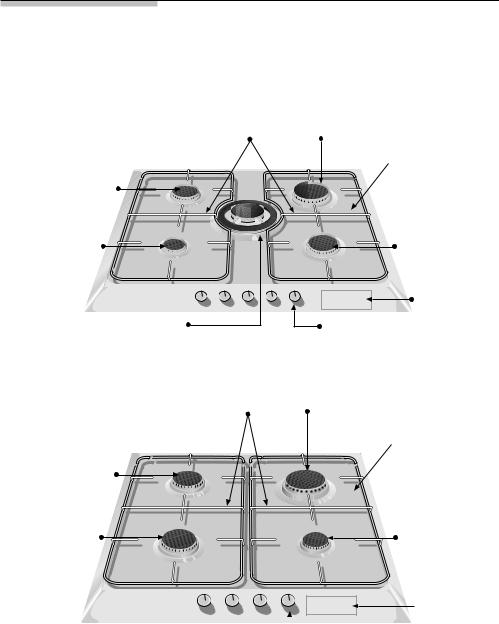
This is what your new cooking hob looks like
Pan supports |
Burner (up |
|
to 3 kW) |
||
|
 Grease splash
tray
Burner (up to 1,75 kW)
Burner (up |
Burner (up |
to 1 kW) |
to 1,75 kW) |
|
Timer |
Triple-flame burner |
Control knobs |
(up to 3,6 kW)
Burner (up
Pan supports to 3 kW)
 Grease splash tray
Burner (up to 1,75 kW)
Burner (up |
Burner (up |
to 1,75 kW) |
to 1 kW) |
 Timer
Timer

 Control knobs
5
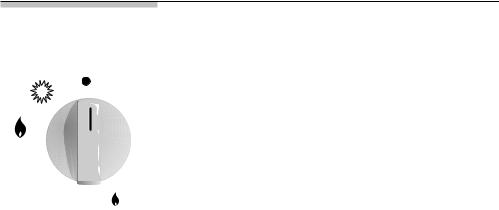
Gas burners
Fig. 1 |
There are indications to show which burner each control |
|
|
|
knob operates. Fig. 1. |
To light a burner, press the control of the selected burner and turn it to the left as far as possible, holding it on maximum for a few seconds until it lights, and then release it and adjust it to the right position. If it fails to light, repeat the operation.
If the cooking hob does not have any kind of automatic lighting, bring a flame (lighter, matches, etc.) up to
the burner.
If the plugs are dirty, the lighting will be faulty, so the utmost cleaning must be maintained at all times. Do this with a small brush, bearing in mind that the plug must not be receive violent knocks.
If your hob has burners with safety valves that prevent the gas from coming out if the burners are accidentally put out, light it in the same way, but keeping the control pressed until the lighting occurs, and then pressing for a few seconds with the flame already alight. If it fails to light, repeat the operation, this time holding for
10 seconds.The appliance switches off automatically after 6 hours of operation. Turn all the control knobs to the  position and then you can turn the appliance on again.
To turn it off, turn the control to the right to the position .
.
With the modern and functional cooking hob you have purchased, you can have progressive taps fitted which allow you to adjust the flame to the desired heat.
Depending on the model, your cooking hob may have a triple-flame burner, which is very practical if you wish to cook with receptacles such as paella pans or Chinese woks (to create all kinds of Asian dishes).
When you are using this gas appliance, it will make the kitchen hot and humid, and therefore you must ensure that the kitchen is well ventilated. Either keep the natural ventilation apertures open, or install an extractor hood. If you use your appliance for a long period of time, you may need extra ventilation - either open a window (though watch out for draughts) or turn up the power on the extractor hood, if possible.
An orange-coloured flame is normal and it is produced in the presence of dust in the atmosphere, spillages, etc.
6

Recommended diameter of cookware (in cm)
According to model:
BURNER |
MINIMUM Ø OF COOKWARE |
MAXIMUM Ø OF COOKWARE |
||||
|
|
|
|
|
|
|
Triple-flame burner |
22 cm |
|
|
|||
|
|
|
|
|
|
|
Rapid burner |
|
22 cm |
|
26 cm |
||
|
|
|
|
|
|
|
Semi-rapid burner |
12 cm |
|
20 cm |
|||
|
|
|
|
|
|
|
Auxiliary burner |
|
10 cm |
|
12 cm |
||
|
|
|
|
|
|
|
Additional pan supports
Fig. 2
Depending on which model you have purchased, your cooking hob may include a very useful extra cradle support for use on the triple-flame burner for receptacles with diameters of over 26 cm, barbecue griddles, earthenware cooking pots and all kinds of concave receptacles (such as Chinese woks). Fig. 2.
If you do not have this additional cradle support, the technical service for the make can supply you with one (code no. 363300).
Pan support for coffee pot: Depending on the model, your hob may come with an additional coffee pot support, exclusively for the auxiliary burner with pans whose diameter is less than 10 cm. If you do not have this, they can be obtained from our technical assistance service using code 184200.
The manufacturer declines all responsibility if these additional pan supports are not used or are used incorrectly.
7

This advice is for use as a guideline
Cooking guidelines
|
Very high |
High |
Medium |
|
Low |
||
|
|
|
|
||||
Triple flame |
|
Boiling, grilling, browning, |
Reheating and keeping things hot: |
||||
burner |
|
paellas and Asian food |
cooked and pre-cooked dishes. |
||||
|
|
(woks). |
|
|
|
|
|
|
|
|
|
|
|
|
|
Rapid |
|
Scallops, steaks, omelettes, |
Rice, white |
|
Steaming: fish |
||
|
|
||||||
burner |
|
frying. |
|
|
sauce and |
|
and vegetables. |
|
|
|
|
|
ragout. |
|
|
|
|
|
|
|
|||
Semi-rapid |
Steaming potatoes, fresh |
Reheating, keeping things hot and |
|||||
burner |
vegetables, stews and pasta. |
making tasty casseroles. |
|||||
|
|
|
|
|
|
|
|
Auxiliary |
|
Cooking: casseroles, rice |
Defrosting and |
|
Melting: butter, |
||
|
|
||||||
burner |
|
pudding and caramels. |
slow cooking: |
|
chocolate and |
||
|
|
|
|
|
vegetables, fruits |
|
jelly. |
|
|
|
|
|
and frozen |
|
|
|
|
|
|
|
products. |
|
|
|
|
|
|
|
|
|
|
|
|
|
|
|
|
|
|
8
Timer Function
< >
Kitchen timer
Setting procedure
The timer is an electronic clock to set a kitchen timer and two cooking timers for the burners.
The kitchen timer runs independently of all the other settings. This means that it can still be set when the hob is locked.
The cooking timers can be used to switch off the burners automatically.
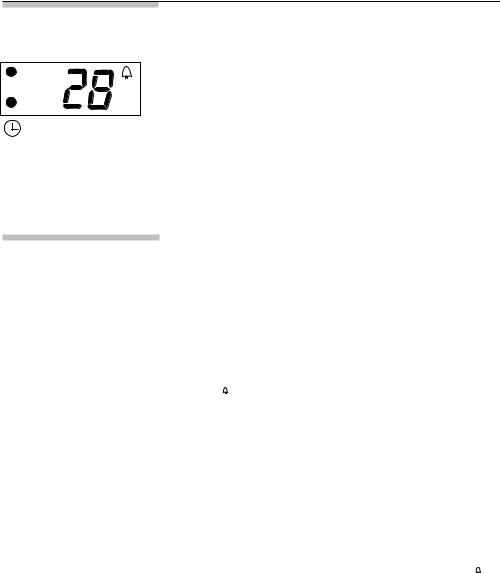
You can use the kitchen timer to set a time up to 99 minutes. It runs independently of all the other settings. THE KITCHEN TIMER DOES NOT SWITCH OFF ANY BURNER.
1. Touch the symbol W . The display will show the following image 00 .
When the cooking time has elapsed
Changing the time
2. Touch the symbol < or > within next 5 seconds to set the time
The time begins to count down after a few seconds. If more than one timer ( kitchen or cooking timer) is set, the timer with the shortest time is displayed.
A signal sounds for 30 seconds,00 is shown in the display.
Touch any symbol. The display goes out and the audible signal ceases.
Touch the symbol W and change the time using the symbol < or > within next 5 seconds.
The new time begins to count down after a few seconds.
9
Cancelling prematurely
Touch the symbol W and change the time to 00 using the symbol < or >.
The indicator disappears after a few seconds or if more than one timer is set, the timer with the shortest time is displayed.
Notes
The kitchen timer is no longer in operation after a power cut.
You can set a time up to 99 minutes.
Setting a burner to switch off automatically. The cooking timer.
Enter a specific duration for the desired burner. When the duration has elapsed, the burner switches off automatically.
The burner must be switched on.
< |
> |
1. Touch the symbol |
W |
|
|
.The display will show the |
following image 00 .
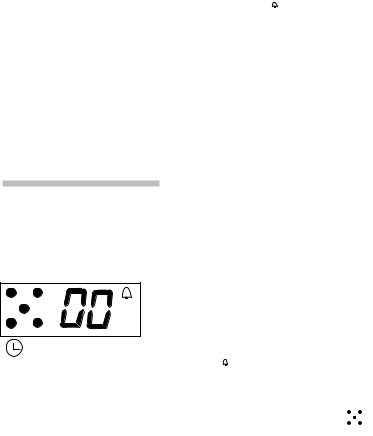
2. Touch once more the symbol W. The display will show during 1 second the layout of the appliance
00 .Now, touch the symbol W to select the desired burner.
3. Once the desired burner is selected, touch the symbol < or > within next 5 seconds to set the desired time.
You can set, in this way, any burner of the hob.
YOU CAN ONLY HAVE 2 COOKING TIMERS SET
AT THE SAME TIME.
The time begins to count down after a few seconds or when we select another burner.
If more than one timer is set, the timer with the shortest time is displayed.
10
When the duration
has elapsed
When the duration has elapsed, the burner switches off, a signal sounds for 30 seconds,00 is shown on the right of the display and on the left 

 the dots will rotate.
Touch any symbol. The display goes out and the audible signal ceases.
TURN THE CONTROL KNOB TO THE "0" POSITION
FOR THE BURNERS WHICH HAVE BEEN
SWITCHED OFF BY THE TIMER.
Changing the duration
Touch the symbol W , select the burner and change the time using the symbol < or > whithin next 5 seconds. The new time begins to count down after a few seconds.
Cancelling
prematurely
Touch the symbol W, select the burner and change
the time to 00 using the symbol < or >. The indicator disappears after a few seconds or if another timer is set, the timer with the shortest time is displayed.
Notes
The timer function is no longer active after a power cut. You can set duration up to 99 minutes.
If you would like to call up the remaining duration of the set times, touching the symbolW you will see them.
Other functions
Timer button lock
< >
Press and hold the 0 symbol for at least 4 seconds. A whistle will sound and the display will show the following message ˜–.Then the display will show the programme information again. If any symbol is touched when this function is being used, a whistle will sound and ˜– will appear on the display.
To deactivate the button lock, press the 0 symbol again for at least 4 seconds.
11

Protection against excess temperatures
< >
Protection against power supply failure
< >
Notes
Your hob has a protection system for the electronic of the timer.
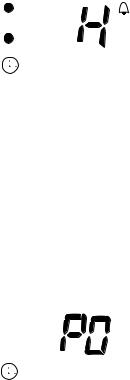
Where there is high temperature in the electronic of the timer, the message H and the information of the set times are alternatively displayed, and the burners will stay switched on. If the temperature drops down to an acceptable level, the H message disappears. If the temperature reaches the maximum allowed limit, the timer switches off all the burners of your appliance as
a safety action, the message H and the remaining
time of the set burners which have been switched off are alternatively displayed. The controls are blocked until the temperature drops down to an acceptable level. Wait a few minutes and use again your appliance.
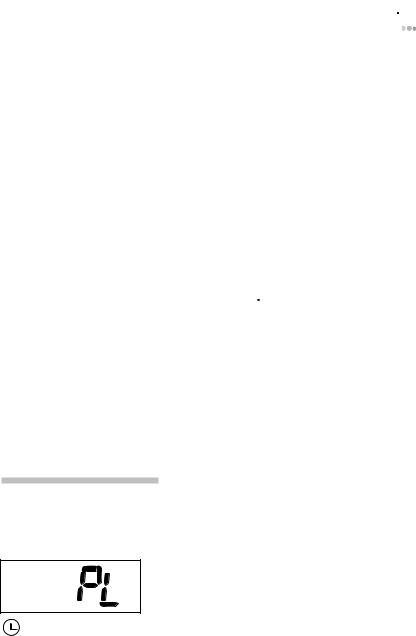
If there is a power cut, as a safety action, the set burners are switched off.
As soon as the electricity is restored, the message
P0 is displayed. In order to use again the timer, touch any of the symbols, the display will go out and your hob will be reeady to be set.
The message P0 is also displayed the first time the appliance is plugged in. In order to use again
the timer, touch any of the symbols, the display will go out and your hob will be ready to be set.
When water falls on any of the sensors, the system sends out an alarm.
The system will not work if it is handled with wet hands.
12
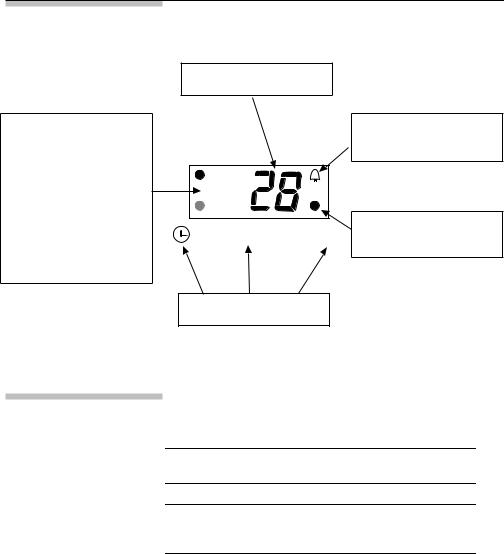
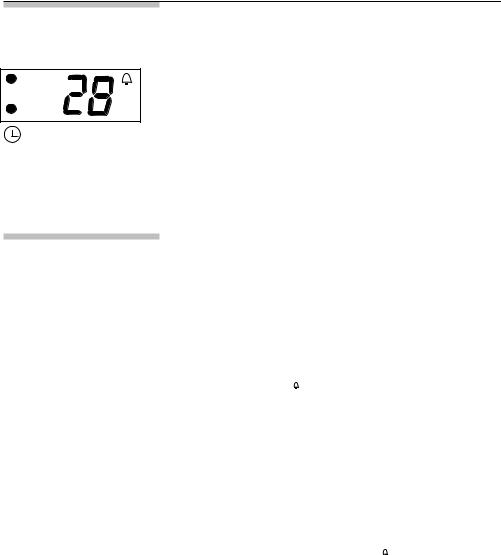
The digital display
Programmed burners indicators.
A bright dot shows the burner which the time displayed belongs to.
The dots dimmed mean that there are more burners set than the one with the information displayed.
The shortest time set with the timer is displayed.
This bell points out that the Kitchen Timer is set.
< |
> |
This dot points out that the |
Cooking Timer is set |
Symbols
Messages in the digital display
•Excess temperatures (See Protection against excess temperatures).
˜– Timer button lock (See Timer button lock).
˜‹ Connecting the appliance to the power supply/ Power failure (See Protection against power supply failure).
13

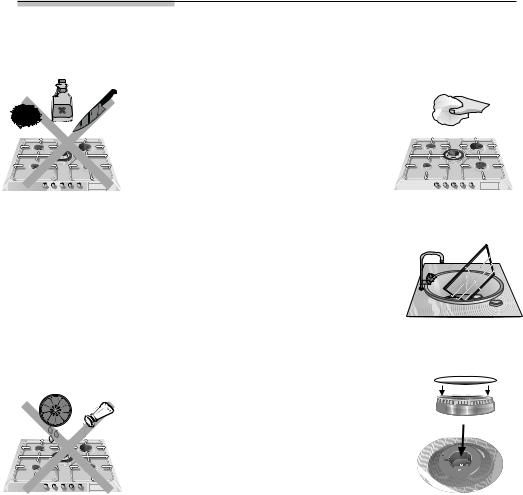
Warnings when in use for cooking
DON’T DO
Don't use small cookware on large burners. The flame must not touch the sides of
the cookware.
 Never cook without a lid or with the lid half off - you are wasting energy.
Never use cookware with uneven bottoms, they increase cooking time and energy consumption.
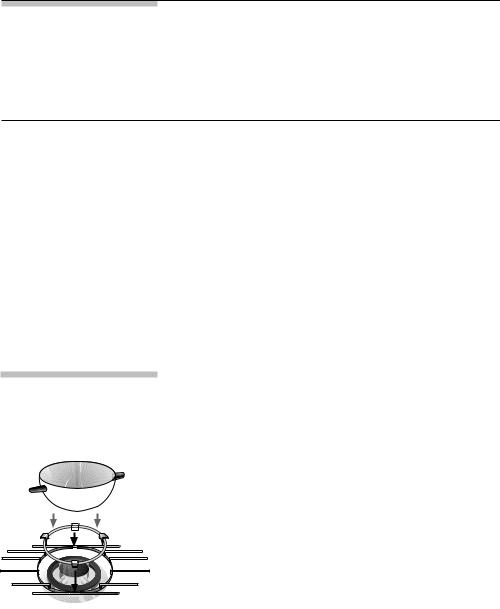
Do not place a receptacle on one side of a burner, as it could tip over. Do not use cookware with a large diameter on the burners near the controls, which when placed on the middle of the burner may touch the controls or be so close to them that they increase the temperature in this area and may
cause damage.
Do not place cookware directly on the burner.
Always use cookware that are suitable for each burner, so as to avoid wasting
gas and discolouring the cookware.
Always place lids on receptacles.
Only use pots, saucepans and frying pans with thick, flat bottoms.
Always place the cookware right over the burner, not to one side.
Place the cookware on top of the pan support.
|
|
|
|
|
|
|
|
|
|
|
|
|
|
Do not use excessive weight |
Handle cookware carefully |
|
|
|
|
|
|
|
|
|
|
|
|
|
|
||
|
|
|
|
|
|
|
|
|
|
|
|
|
|
||
|
|
|
|
|
|
|
|
|
|
|
|
|
|
||
|
|
|
|
|
|
|
|
|
|
|
|
|
|
||
|
|
|
|
|
|
|
|
|
|
|
|
|
|
||
|
|
|
|
|
|
|
|
|
|
|
|
|
|
||
|
|
|
|
|
|
|
|
|
|
|
|
|
|
||
|
|
|
|
|
|
|
|
|
|
|
|
|
|
||
|
|
|
|
|
|
|
|
|
|
|
|
|
|
||
|
|
|
|
|
|
|
|
|
|
|
|
|
|
||
|
|
|
|
|
|
|
|
|
|
|
|
|
|
and do not hit the hob with |
when they are on the hob. |
|
|
|
|
|
|
|
|
|
|
|
|
|
|
heavy objects. |
|
|
|
|
|
|
|
|
|
|
|
|
|
|
|
|
|
|
|
|
|
|
|
|
|
|
|
|
|
|
|
|
|
|
|
|
|
|
|
|
|
|
|
|
|
|
|
|
|
14
Cleaning and care

 DON’T DO
NEVER use abrasive products, sharp objects, steel scourers or knives, etc. for removing the remains of hardened food from the cooking hob, pan supports, burners or electric hot plates. If your cooking hob is fitted with a glass or aluminium panel, never use a knife, scraper or similar to clean the point where it joins the metal.
DO NOT use steam cleaning machines to clean the hob, this could damage it.
Avoid spilling acidic liquids (such as lemon juice or vinegar) on your cooking hob.
Try not to spill salt on the surface of the electrical hotplate.
Once the appliance has cooled down, clean it with a sponge, soap
and water.
Wipe away all spilled liquids as soon as spillage occurs to save unnecessary effort at a later stage.
To keep the burners and pan supports clean, you should clean them periodically by placing them in soapy water and brushing them with a non-metallic brush to ensure that the holes and grooves are perfectly clean, to provide a perfect flame. Always dry the burner covers and the pan supports if they have become wet.
After cleaning and drying the burners, make sure the burner covers are correctly placed on the burner's flame diffuser.
If prolonged use has worn away the surface of the electrical hot plates, sprinkle them with a few drops of oil or other maintenance products that are widely available.
The ring cover of the triple-flame burner and stainless steel parts such as hotplate rings, grease pans and the area around the burners may become discoloured over time. This is NORMAL because of the high temperatures. Each time the appliance is used these parts should be cleaned with a product that is suitable for stainless steel.
After washing the pan supports, dry them completely before cooking with them again. Drops of water or damp patches on the surfaces when you begin cooking may cause deterioration of the enamel.
If the pan supports on your cooking hob are fitted with rubber rests, take care when you clean them, as they might come off, leaving your pan support without protection, and it may scratch the cooking hob.
The stainless steel cleaner must not be used in the area around the controls. The (printed) symbols may be wiped off.
If your cooking hob has an aluminium panel under the controls, do not use a scourer to clean the panel, as regular use of this might rub out the indications (serigraphy).
15

Home troubleshooting
You don't always need to call the technical assistance service. Very often you can solve the problem on your own. The following table contains a few pieces of advice.
Important note:
Only authorised personnel from our Technical Services Department can carry out work on the gas and electrical supply systems.
What happens... |
Likely cause |
Solution |
|
|
|
|
|
... if the general electrical |
- Defective fuse. |
- Check the fuse in the main fuse |
|
system is malfunctioning? |
|
box and change it if it is damaged. |
|
|
- The automatic safety switch has |
- Check the main fuse box to see |
|
|
tripped or a fuse has blown. |
whether the automatic trip switch |
|
|
|
or a differential switch has tripped. |
|
|
|
|
|
... if the electric ignition does |
- There is waste from food or |
- Carefully clean the spaces |
|
not work and the burner |
cleaning products between the |
between the ignition sparker and |
|
activated display is flashing? |
ignition sparker and the burner. |
the burners. |
|
|
- The burners are wet. |
- Dry the burner covers carefully. |
|
|
- The burner covers are not |
- Make sure that the burner covers |
|
|
positioned correctly. |
are correctly positioned. |
|
|
|
|
|
... if the flames on the burners |
- The different parts of the burner |
- Place all the different |
|
are not uniform? |
have been improperly assembled. |
pieces correctly. |
|
|
- The grooves on the burner’s gas |
- Clean the grooves on |
|
|
outlets are dirty. |
the burner’s gas outlets. |
|
|
|
|
|
... if the gas flow does not |
- The gas main is turned off. |
- Open any intermediate taps. |
|
appear to be normal or no |
|
|
|
gas comes out? |
|
|
|
|
- If the gas is coming from |
- Replace the gas bottle with |
|
|
a gas bottle, it may be empty. |
a full one. |
|
|
|
|
|
... if there is a smell of gas in |
- A gas tap has been left on. |
- Check to see if any gas taps |
|
the kitchen area? |
|
are on. |
|
|
- There may be a leak between the |
- Check that the coupling is correct. |
|
|
coupling and the gas bottle. |
|
|
|
|
|
|
... the safety devices on the |
- The control knob was not held down |
- Once the burner is lit, hold |
|
different burners don't work? |
for long enough. |
the control knob down a few |
|
|
|
seconds longer. |
|
|
- The grooves on the burners' gas |
- Clean the grooves on |
|
|
outlets are dirty. |
the burner’s gas outlets. |
|
|
|
|
|
16

If you call the Technical Services Department, please be sure to indicate:
E - NR FD
This code can be found on the specifications plate of your appliance, located on the underside of your cooking hob.
Warranty conditions
The conditions of the guarantee which apply to this appliance are those that are set by our company's representatives in the country where it was bought.
If you so require, the salesman from whom you bought the appliance will always be able to provide you with more details on this subject. However, the warranty is only valid if it is submitted together with the purchase document.
We reserve the right to make any changes.
17

Sehr geehrter Kunde:
Wir danken Ihnen für Ihren Kauf und beglückwünschen Sie zu Ihrer Wahl. Dieses praktische, moderne und funktionelle Gerät wird aus hochwertigen Materialien hergestellt, die während des gesamten Produktionsprozesses einer strikten Qualitätskontrolle unterliegen und genauestens geprüft werden, um Ihre Anforderungen an einen perfekten Kochvorgang erfüllen zu können. Zur Vereinfachung ist diese Gebrauchsanweisung in zwei Abschnitte unterteilt, ein Abschnitt für die Benutzung des Geräts und der andere für die Installation.
Wir möchten Sie bitten, diese Anweisung aufmerksam durchzulesen und einzuhalten, um bereits ab der ersten Benutzung hervorragende Ergebnisse zu erzielen. Sie enthält wichtige Informationen, nicht nur für die Benutzung, sondern auch für die Pflege und Ihre Sicherheit.
Für den Transport benötigen unsere Produkte eine wirksame Schutzverpackung. Bei dieser Verpackung beschränken wir uns auf das unbedingt erforderliche Material, das gesamte Verpackungsmaterial ist voll recyclefähig. Auch Sie können einen Beitrag zum Umweltschutz leisten, indem Sie die Verpackung in einem in der Nähe Ihres Wohnorts zu diesem Zweck aufgestellten Container entsorgen.
Gebrauchtes Öl sollte nicht über den Abfluss entsorgt werden, da dies eine sehr hohe Umweltbelastung darstellt. Füllen Sie es in einen geschlossenen Behälter und geben Sie es an einer Sammelstelle ab. Sollte es in Ihrer Nähe keine Sammelstelle geben, entsorgen Sie den Behälter über Ihren Hausmüll (so gelangt er auf eine kontrollierte Deponie, was zwar nicht die optimale Lösung darstellt, aber eine Gewässerverschmutzung vermeidet). Die Umwelt und nachfolgende Generationen werden es Ihnen danken. Machen Sie ein nicht mehr benutztes Gerät vor der Entsorgung unbrauchbar. Bringen Sie anschließend zu einer Sammelstelle für recyclingfähige Wertstoffe. Ihre örtliche Verwaltung gibt Ihnen Auskunft über diese Sammelstellen.
Verpackung und Altgerät
Wenn das Typenschild Ihres Gerätes das Symbol óaufweist, befolgen Sie diese Anweisungen:
Umweltgerecht entsorgen Entsorgen Sie die Verpackung umweltgerecht.
óDieses Gerät ist entsprechend der europäischen Richtlinie 2002/96/EG über ElektroH und ElektronikH Altgeräte (waste electrical and electronic equipment H WEEE) gekennzeichnet.
Die Richtlinie gibt den Rahmen für eine EUHweit gültige Rücknahme und Verwertung der Altgeräte vor.
18

INHALT
Sicherheitshinweise |
20 |
|
|
Dies ist Ihr neues Kochfeld |
22 |
|
|
Gasbrenner |
23 |
|
|
Empfohlene Durchmesser von Kochgeschirr |
24 |
|
|
Empfehlungen zum Kochen |
25 |
|
|
Zeitschaltuhrfunktion |
26 |
|
|
Programmieren |
27 |
|
|
Andere Funktionen |
28 |
|
|
Die Digitalanzeige |
30 |
|
|
Hinweise zum Gebrauch |
31 |
|
|
Kochgeschirr |
31 |
|
|
Reinigung und Wartung |
32 |
|
|
Betriebsstörungen |
33 |
|
|
Garantiebedingungen |
34 |
|
|
19
Sicherheitshinweise
Lesen Sie diese Bedienungsanleitung sorgfältig durch, um mit diesem Gerät sicher und effektiv
zu kochen.
Gemäß der geltenden Richtlinien darf die Installation und die Änderung des Gasanschlusses nur durch einen offiziell autorisierten Techniker erfolgen.
Überprüfen Sie vor dem Einbau Ihres neuen Kochfeldes, ob die Maße stimmen.
Die nachfolgenden Anweisungen gelten nur für jene Länder, deren Symbol am Gerät aufgeführt ist. Zur Anpassung des Geräts an die Benutzungsbedingungen des jeweiligen Landes müssen die technischen Anweisungen beachtet werden.
Der Einbauort des Geräts muss über die vorschriftsmäßige Belüftung verfügen, die in perfektem Gebrauchszustand sein muss.
Setzen Sie das Gerät keinem starken Luftzug aus, da die Brenner erlöschen können.
Dieses Gerät ist im Lieferzustand auf die, auf dem Typenschild angegebene, Gasart eingestellt. Ist eine andere Einstellung erforderlich, wenden sie sich an den technischen Kundendienst.
Das Geräteinnere nicht manipulieren. Wenden Sie sich ggf. an unseren technischen Kundendienst.
Bewahren Sie die Bedienungsund Einbauanleitung gut auf, damit diese bei einem Besitzerwechsel zusammen mit dem Gerät übergeben werden können.
Sollte Ihr Kochfeld eine Glasplatte besitzen, setzen Sie nicht zu viel Kraft darüber ein. Sollte bei Ihrem Kochfeld das Glas beschädigt sein, rufen Sie sofort den technischen Kundendienst an, damit es repariert oder ersetzt werden kann.
Nehmen Sie ein beschädigtes Gerät nicht in Betrieb.
Die Oberflächen des Wärmeund Kochgerätes erwärmen sich während des Betriebes. Lassen Sie die erforderliche Vorsicht walten.
Halten Sie Kinder immer vom Gerät entfernt.
20

Verwenden Sie das Gerät grundsätzlich nur zur Zubereitung von Speisen, niemals als Heizung.
Überhitztes Fett oder Öl kann sich leicht entzünden. Aus diesem Grund muss die Zubereitung von Speisen mit Fett oder Ölen, z. B. Pommes Frites, überwacht werden.
Niemals Wasser auf brennendes Fett oder Öl schütten. GEFAHR! Den Topf oder die Pfanne zum Ersticken der Flamme abdecken, und die Kochstelle ausschalten.
Bei einer Störung die Gasund Stromzufuhr zum Gerät unterbrechen. Wenden Sie sich für eine Reparatur des Geräts an unseren Kundendienst.
Stellen Sie keine verformte und instabile Kochgeräte auf die Platten und Brenner, diese können umfallen.
Lässt sich eine Armatur nicht betätigen, darf keine Gewalt angewendet werden. Wenden Sie sich sofort an unseren Kundendienst, der das betroffene Element repariert oder ersetzt.
 Verwenden Sie keine Dampfreinigungsgeräte zur Reinigung des Kochfeldes, da Stromschlaggefahr besteht.
 Das Gerät ist nicht für die Benutzung durch Personen
(einschließlich Kinder) vorgesehen, die in ihrer körperlichen, sensorischen oder geistigen Leistungsfähigkeit beeinträchtigt sind oder denen es an Erfahrung oder Kenntnissen mangelt, es sei denn, sie stehen unter Beaufsichtigung oder wurden von einer für ihre Sicherheit verantwortlichen Person in der Benutzung des Gerätes unterrichtet.
 Lassen Sie das Gerät während des Betriebes nicht unbeaufsichtigt.
Die Darstellungen in dieser Gebrauchsanweisung können von Ihrem Gerät abweichen.
WERDEN DIESE BESTIMMUNGEN NICHT EINGEHALTEN, LEHNT DER HERSTELLER JEGLICHE GARANTIELEISTUNGEN AB.
21

Dies ist Ihr neues Kochfeld
Rost |
Brenner bis |
3 kW |
 Fettbehälter
Brenner bis 
 1,75 kW


Brenner bis |
Brenner bis |
|
1,75 kW |
||
1 kW |
||
|
||
|
Zeitschaltuhr |
|
Dreiflammenbrenner |
Bedienteile |
|
bis 3,6 kW |
|
Rost |
Brenner bis |
3 kW |
|
|
Fettbehälter |
Brenner bis |
|
1,75 kW |
|
Brenner bis |
Brenner bis |
1,75 kW |
1 kW |
|
Zeitschaltuhr |
|
Bedienteile |
22

Gasbrenner
Abb. 1 |
Neben jedem Schalter ist die Kochstelle markiert, die er |
|
|
|
regelt. Abb. 1. |
Um einen Brenner zu entzünden, drücken Sie den Schalter des Brenners hinein, drehen Sie ihn nach links bis zur maximalen Leistungsstufe, halten Sie ihn einige Sekunden lang gedrückt, bis er zündet, und lassen Sie ihn anschließend los, um dann die gewünschte Leistungsstufe einzustellen. Wenn der Brenner nicht zündet, wiederholen Sie diesen Vorgang.
Wenn Ihr Kochfeld nicht über eine automatische Zündung verfügt, benutzen Sie ein Feuerzeug, Streichhölzer oder Ähnliches, um den Brenner zu entzünden.
Wenn die Zünder verschmutzt sind, kann dies zu Zündproblemen führen, daher sollten Sie auf eine gründliche Reinigung der Zünder achten. Die Reinigung kann mit einer kleinen Bürste vorgenomen werden. Der Zünder sollte keinen starken Stößen ausgesetzt werden.
Wenn Ihr Kochfeld über Brenner mit Sicherheitsventilen verfügt, die bei einem versehentlichen Erlöschen der Brenner das Ausströmen von Gas verhindern, gehen Sie zum Zünden der Brenner genauso vor, aber halten Sie den Schalter auch nach dem Entzünden der Flamme für ein paar Sekunden gedrückt. Wenn die Flamme nicht gezündet wird, wiederholen Sie den Vorgang, aber halten Sie den Schalter ungefähr
10 Sekunden lang gedrückt. Nach einer Betriebsdauer von
6 Stunden schaltet sich das Gerät selbsttätig aus. Drehen Sie alle Bedienknebel auf  -Stellung, dann können Sie das Geräte wieder einschalten.
Zum Ausschalten den Schalter bis zur Position  nach rechts drehen.
Ihr modernes Kochfeld verfügt über stufenlos verstellbare
Ventile, so dass Sie die Einstellung genau abstimmen können.
Je nach Ausführung ist Ihr Kochfeld mit einem Dreiflammenbrenner ausgestattet, der besonders zum Kochen mit spanischen Paella-Pfannen, chinesischen Woks oder ähnlichem Kochgeschirr geeignet ist.
Die Benutzung des Gasgeräts erzeugt in dem Raum, in dem es betrieben wird, Wärme und Feuchtigkeit. Es muss daher eine gute Belüftung der Küche gewährleistet sein. Halten Sie Fenster oder andere Belüftungsöffnungen geöffnet, oder installieren Sie eine mechanische Belüftung (Abzugshaube). Bei einer kontinuierlichen Benutzung Ihres Geräts könnte eine zusätzliche Belüftung erforderlich werden, z. B. ein geöffnetes Fenster (ohne einen Luftzug zu verursachen), oder die Leistung der ggf. vorhandenen mechanischen Belüftung muss
erhöht werden.
Eine orangene Verfärbung der Flamme ist normal und kann bei Staub in der Umgebung oder bei übergelaufener Flüssigkeit oder Ähnlichem auftreten.
23
Empfohlener Durchmesser (cm) der Kochgeräte
Je nach Modell:
BRENNER |
MIND. Ø KOCHGERÄT |
MAX. Ø KOCHGERÄT |
|||
|
|
|
|
|
|
Dreiflammenbrenner |
|
22 cm |
|
||
|
|
|
|
|
|
Schnellbrenner |
|
22 cm |
26 cm |
||
|
|
|
|
|
|
Mittelschnellbrenner |
|
12 cm |
20 cm |
||
|
|
|
|
|
|
Sparbrenner |
|
10 cm |
12 cm |
||
|
|
|
|
|
|
Zusatzroste
Abb. 2
Je nach Modell kann Ihr Kochfeld mit einem unentbehrlichen Zusatzrost ausgestattet sein. Dieser Rost ist beim Dreiflammenbrenner für Gefäße mit einem Durchmesser von mehr als 26 cm, Fleischbräter, Tontöpfe und jede Art von konkaven Gefäßen (chinesischer Wok, etc...) geeignet, Abb. 2.
Sollte dieser nicht enthalten sein, ist dieser Zusatzrost beim Kundendienst des Herstellers unter der
Nr. 363300 erhältlich.
Rost für Kaffeekocher: Je nach Modell kann Ihr Kochfeld mit einem Rost für Kaffeekocher ausgerüstet sein. Dieses Zusatzgerät ist ausschließlich für den Zusatzbrenner für Kochgefäße mit weniger als 10 cm Durchmesser geeignet. Sollte dieser nicht enthalten sein, ist der Zusatzrost für Kaffeemaschinen beim Kundendienst des Herstellers unter der
Nr. 184200 erhältlich.
Der Hersteller haftet nicht, wenn einer dieser Zusatzroste nicht oder falsch verwendet wird.
24
Diese Empfehlungen sind rein informativ.
Empfehlungen zum Kochen
Sehr stark |
Stark |
Mittel |
Schwach |
|
|
|
|
Dreiflammenbrenner
Schnellbrenner
Mittelschnellbrenner
Sparbrenner
Sieden, kochen, braten, rösten, Spanische Paellas, asiatische Gerichte (Wok).
Schnitzel, Steak, Omelette,
Gebratenes.
Dampfkartoffeln, Frischgemüse,
Gemüsekonserven,
Nudelgerichte.
Kochen: Schmorgerichte,
Milchreis, Karamell.
Aufwärmen und warmhalten: vorbereitete Gerichte, Fertiggerichte.
Reis, Béchamel, |
|
Dampfkochen: |
|
||
Ragout. |
|
Fisch, Gemüse. |
|
|
|
|
|
|
Aufwärmen und warmhalten: Fertiggerichte und Kochen empfindlicher Gerichte.
Auftauen und |
Schmelzen: |
langsam Kochen: |
Butter, |
Hülsenfrüchte, |
Schokolade, |
Obst, |
Gelatine. |
Gefriergerichte. |
|
|
|
25
Zeitschaltuhrfunktion
|
|
Die elektronische Multifunktionsuhr verfügt über eine |
|
|
Ablaufuhrfunktion und zwei Kochuhren für die Brenner. |
|
|
Die Ablaufuhr kann unabhängig von anderen Funktionen |
< |
> |
verwendet werden. Das bedeutet, dass sie auch |
verwendet werden kann, wenn das Kochfeld nicht in |
||
|
|
Betrieb ist. |
|
|
Mit den Kochuhren können die Brenner automatisch |
|
|
abgeschaltet werden. |
Ablaufuhr
Sie können mit dieser Funktion einen Zeitraum von 99 Minuten programmieren. Die Uhr kann unabhängig von anderen Funktionen verwendet werden. DIE ABLAUFUHR SCHALTET KEINE BRENNER AB.
Programmierung
1. Berühren Sie einmal das Symbol W. Das folgende Bild 00 wird angezeigt.
2. Berühren Sie in den darauf folgenden 5 Sekunden das Symbol < oder >, um die gewünschte Zeit
zu programmieren.
Das Zurückzählen beginnt nach einigen wenigen
Sekunden. Auf der Anzeige erscheint die Zeit des
Programms, dass zuerst abläuft.
Bei Ablauf der
programmierten Zeit
30 Sekunden lang ertönt ein Akustiksignal, und auf der
Anzeige erscheint die entsprechende Meldung 00 . Wenn Sie ein beliebiges Symbol berühren, wird das Akustiksignal gestoppt und die Anzeige ausgeschaltet.
Programmzeit ändern
Berühren Sie das Symbol W und ändern Sie in den darauf folgenden 5 Sekunden mit Hilfe von < oder > die Zeit.
Das Zurückzählen der neu eingestellten Zeit beginnt nach einigen wenigen Sekunden.
26
Programm abbrechen
Berühren Sie das Symbol W und ändern Sie die Zeit mit Hilfe der 00 Symbole < oder >.
Die Anzeige erlischt nach ein paar Sekunden, oder es wird die Restzeit des nächsten Programms angezeigt.
Hinweis
Nach einer Unterbrechung der Stromzufuhr zählt die Ablaufuhr nicht weiter zurück.
Sie können eine Dauer von 99 Minuten einstellen.
Automatisches Abschalten |
||
eines Brenners |
|
|
programmieren. |
|
|
Koch-uhr |
|
Stellten Sie die Programmzeit für den gewünschten |
|
|
|
|
|
Brenner ein. Wenn die programmierte Zeit abgelaufen |
|
|
ist, wird der Brenner automatisch abgestellt. |
|
|
Der Brenner muss eingeschaltet sein. |
< |
> |
1. Berühren Sie einmal das Symbol W. Das folgende |
|
|
Bild 00 wird angezeigt. |
2. Berühren Sie das Symbol W ein zweites Mal. Die
Konfiguration des Kochfelds 00 wird eine Sekunde lang angezeigt. Berühren Sie anschließend das Symbol
W, um den gewünschten Brenner auszuwählen.
3. Berühren Sie in den 5 Sekunden nach der Auswahl des Brenners die Symbole < oder >, um die gewünschte Zeit einzustellen.
Sie können auf diese Weise jeden beliebigen Brenner programmieren. ES KÖNNEN ALLERDINGS NUR ZWEI BRENNER GLEICHZEITIG
PROGRAMMIERT WERDEN.
Das Programm beginnt nach einigen wenigen Sekunden oder nach der Auswahl eines anderen Brenners.
Auf der Anzeige erscheint die Zeit des Programms, dass zuerst abläuft.
27

Ablauf der
Programmzeit
Nach Ablauf der Programmzeit erlischt der Brenner, und 30 Sekunden lang ist ein akustisches Signal zu vernehmen. Auf der rechten Seite der Anzeige erscheint
00 , und auf der linken Seite drehen sich die Punkte 

 .
.
Wenn Sie beliebiges Symbol berühren, wird das Akustiksignal gestoppt und die Anzeige ausgeschaltet.
DREHEN SIE DEN SCHALTER DER DURCH DIE ZEITSCHALTUHR AUSGESCHALTETEN BRENNER AUF DIE POSITION 0.
Programmzeit ändern
Berühren Sie das Symbol W, wählen Sie den Brenner aus und ändern Sie in den darauf folgenden 5 Sekunden die Zeit mit Hilfe der Symbole < oder >.
Das Zurückzählen der neu eingestellten Zeit beginnt nach einigen wenigen Sekunden.
Programm abbrechen
Berühren Sie das Symbol W, wählen Sie den Brenner
aus, und ändern Sie die Zeit 00 mit Hilfe der Symbole < oder >. Die Anzeige erlischt nach ein paar Sekunden, oder es wird die Restzeit des nächsten Programms angezeigt.
Hinweise
Nach einer Unterbrechung der Stromzufuhr zählt die Ablaufuhr nicht weiter zurück.
Sie können eine Dauer von 99 Minuten einstellen.
Berühren Sie das Symbol W zur Überprüfung der Programmzeiten.
Andere
Funktionen
Tastensperre der Zeitschaltuhr
< >
Berühren Sie mindestens 4 Sekunden lang das Symbol 0. Es ertönt ein Signal und in der Anzeige erscheint folgende Meldung ˜–. Anschließend wird erneut die Information über die Programme angezeigt. Wird bei aktivierter Funktion irgendein Symbol gedrückt, ertönt ein Signal und ˜–erscheint im Display.
Um die Tastensperre aufzuheben, berühren Sie erneut für mindestens 4 Sekunden das Symbol 0.
28
Schutz vor Überhitzung
|
|
|
|
Das Kochfeld verfügt über ein System zum Schutz vor |
|
|
|
|
Überhitzung für die Zeitschaltuhr. Wenn zu hohe |
|
|
|
|
|
|
|
|
|
Temperaturen erreicht werden, wird die Meldung H sowie |
|
|
|
|
Informationen über die gerade betriebenen Programme |
|
|
|
|
angezeigt. Die Brenner bleiben in Betrieb. Wenn die |
|
|
< |
> |
Temperatur auf ein akzeptables Niveau sinkt, wird die |
|
|
|||
|
|
Meldung H nicht mehr angezeigt. Wenn die Temperaturen |
||
|
|
|
|
|
|
|
|
|
das erlaubte Maximum erreichen, schaltet die |
|
|
|
|
Zeitschaltuhr zum Schutz alle Brenner ab. Es werden |
|
|
|
|
abwechselnd die Meldung H und die Restzeiten der |
|
|
|
|
abgebrochenen Programme angezeigt. Die Schalter |
|
|
|
|
bleiben blockiert, bis die Temperatur auf ein akzeptables |
|
|
|
|
Niveau sinkt. Warten Sie ein paar Minuten, bevor Sie |
|
|
|
|
das Kochfeld erneut benutzen. |
Schutz vor Fehlern bei der Stromversorgung
|
|
|
|
|
Wenn während des Betriebes der Zeitschaltuhr ein Fehler |
|
|
|
|
|
in der Stromversorgung auftritt, werden alle mit der |
|
|
|
|
|
Zeitschaltuhr betriebenen Brenner abgeschaltet. Sobald |
|
|
|
|
|
die Stromversorgung wiederhergestellt ist, wird die |
|
|
|
< |
> |
folgende Meldung angezeigt P0. Um die Zeitschaltuhr |
|
|||||
|
|
|
|||
|
|
|
|
|
erneut verwenden zu können, berühren Sie eines der |
|
|
|
|
|
Symbole. Die Anzeige wird ausgeschaltet, und das |
|
|
|
|
|
Kochfeld ist programmierbereit. |
|
|
|
|
|
Die Meldung P0 wird auch angezeigt, wenn Sie das |
|
|
|
|
|
Kochfeld zum ersten Mal an das Stromnetz anschließen. |
|
|
|
|
|
Um die Zeitschaltuhr zu verwenden, berühren Sie eines |
|
|
|
|
|
der Symbole. Die Anzeige wird ausgeschaltet, und das |
|
|
|
|
|
Kochfeld ist programmierbereit. |
Hinweise
Wenn die Sensoren mit Wasser in Berührung kommen, ertönt ein Akustiksignal.
Das System kann nicht mit nassen Fingern bedient werden.
29
 Loading...