


HOME THEATER WITH DVD
MODEL
HT-CN400DVA HT-CN500DVA
OPERATION MANUAL
HTCN400_500DVA_A 92LCN400A0270 |
|
1 |
|
|
|
|
|
|
|
|
|
ENTER
1 |
2 |
3 |
4 |
5 |
6 |
7 |
8 |
9 |
0 |
>10 |
|
HTCN400_500DVA_A 92LCN400A0270
HT-CN400DVA Introduction
HT-CN500DVA
Instruction |
Special notes - |
Important |
- Introduction / |
|
|
Thank you for purchasing this SHARP product. To obtain the best performance from this product, please read this manual carefully. It will guide you in operating your SHARP product.
!HT-CN400DVA Home Theater with DVD consisting of HT-CN400DVA (main unit), CP-CN400AF (front speakers), CP-CN400AC (centre speaker), CP-CN400AR (surround speakers) and CP-CN400ASW (subwoofer).
!HT-CN500DVA Home Theater with DVD consisting of HT-CN500DVA (main unit), CP-CN500AF (front speakers), CP-CN500AC (centre speaker), CP-CN500AR (surround speakers) and CP-CN500ASW (subwoofer).
The illustrations of the main unit in this operation manual are for the model HTCN500DVA.
Special notes
WARNING
!When the ON/STAND-BY button is set at STAND-BY position, mains voltage is still present inside the unit. When the ON/STAND-BY button is set at STAND-BY position, the unit may be brought into operation by the remote control.
!This unit contains no user serviceable parts. Never remove covers unless qualified to do so. This unit contains dangerous voltages, always remove mains plug from the socket before any service operation and when not in use for a long period.
!To prevent fire or shock hazard, do not expose this appliance to dripping or splashing. No objects filled with liquids, such as vases, should be placed on the apparatus.
Manufactured under license from Digital Theater Systems, Inc. US Pat. No.5,451,942, 5,956,674, 5,974,380, 5,978,762 and other world-wide patents issued and pending. "DTS" and "DTS Digital Surround" are registered trademarks of Digital Theater Systems, Inc. Copyright 1996, 2000 Digital Theater Systems, Inc. All Rights Reserved.
Manufactured under license from Dolby Laboratories. "Dolby", "Pro Logic" and the double-D symbol are trademarks of Dolby Laboratories.
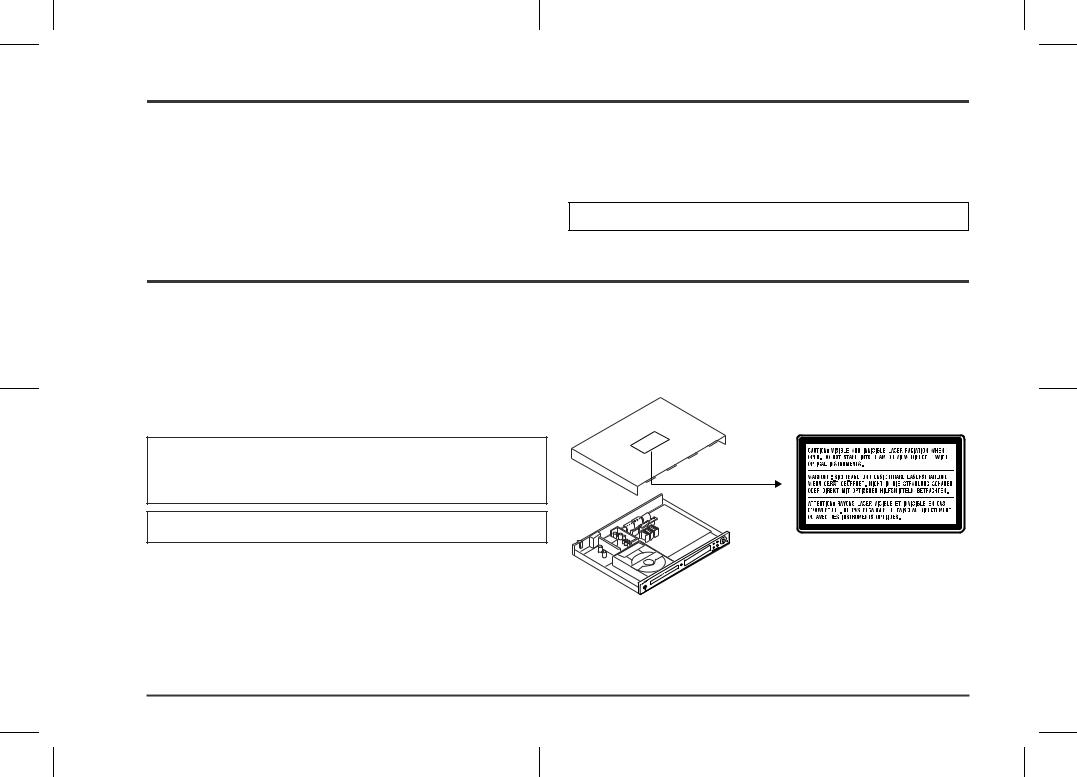
CAUTION
!This product is classified as a CLASS 1 LASER product.
!Use of controls, adjustments or performance of procedures other than those specified herein may result in hazardous radiation exposure.
As the laser beam used in this compact disc player is harmful to the eyes, do not attempt to disassemble the cabinet. Refer servicing to qualified personnel only.
Laser Diode Properties
Material: AlGaAs/AlGalnP Wavelength: 785 nm/650 nm Emission Duration: continuous Laser Output: max. 0.6 mW
2
03/10/24 HTCN400_500DVA_A1.fm |
92LCN400A0270 |

Contents
|
|
|
HTCN400_500DVA_A 92LCN400A0270 |
2 |
|
|
|
|
HT-CN400DVA
HT-CN500DVA
Page
" General Information
Types of playable discs . . . . . . . . . . . . . . . . . . . . . . . . . . . . . . . . . . . . . . . . . . . . . .4 Accessories . . . . . . . . . . . . . . . . . . . . . . . . . . . . . . . . . . . . . . . . . . . . . . . . . . . . . . .5 Precautions . . . . . . . . . . . . . . . . . . . . . . . . . . . . . . . . . . . . . . . . . . . . . . . . . . . . . . .6 Description of discs . . . . . . . . . . . . . . . . . . . . . . . . . . . . . . . . . . . . . . . . . . . . . . . .7 Controls and indicators . . . . . . . . . . . . . . . . . . . . . . . . . . . . . . . . . . . . . . . . . . 8 - 11
" System Connections
Speaker connection . . . . . . . . . . . . . . . . . . . . . . . . . . . . . . . . . . . . . . . . . . . . .12, 13 Aerial connection . . . . . . . . . . . . . . . . . . . . . . . . . . . . . . . . . . . . . . . . . . . . . . . . . .13 Connections to TV, VCR, etc. . . . . . . . . . . . . . . . . . . . . . . . . . . . . . . . . . . . . .14, 15
" Preparation for Use
System installation . . . . . . . . . . . . . . . . . . . . . . . . . . . . . . . . . . . . . . . . . . . . . . . .16 Battery installation . . . . . . . . . . . . . . . . . . . . . . . . . . . . . . . . . . . . . . . . . . . . . . . .17 Turning the power on . . . . . . . . . . . . . . . . . . . . . . . . . . . . . . . . . . . . . . . . . . . . . . .17 Changing the setup menu . . . . . . . . . . . . . . . . . . . . . . . . . . . . . . . . . . . . . . . 18 - 22 General control . . . . . . . . . . . . . . . . . . . . . . . . . . . . . . . . . . . . . . . . . . . . . . . . . . .23
" DVD Operation
DVD playback
Playback . . . . . . . . . . . . . . . . . . . . . . . . . . . . . . . . . . . . . . . . . . . . . . . . . . . . . .24, 25 To resume playback after stopping (resume play) . . . . . . . . . . . . . . . . . . . . . . .25 DVD mode operation indicators . . . . . . . . . . . . . . . . . . . . . . . . . . . . . . . . . . . . . .25
Basic operation
To locate the beginning of a chapter (track) (skip) . . . . . . . . . . . . . . . . . . . . . . .26 Fast forward/Fast reverse (search) . . . . . . . . . . . . . . . . . . . . . . . . . . . . . . . . . . . .26 To start playback from the desired point (direct play) . . . . . . . . . . . . . . . . . . . .27
Useful operation
Still picture/Frame advance . . . . . . . . . . . . . . . . . . . . . . . . . . . . . . . . . . . . . . . . .28 Slow-motion play . . . . . . . . . . . . . . . . . . . . . . . . . . . . . . . . . . . . . . . . . . . . . . . . . .28 To change the angle . . . . . . . . . . . . . . . . . . . . . . . . . . . . . . . . . . . . . . . . . . . . . . .29 To zoom images (zoom) . . . . . . . . . . . . . . . . . . . . . . . . . . . . . . . . . . . . . . . . . . . .29 To play repeatedly (repeat play) . . . . . . . . . . . . . . . . . . . . . . . . . . . . . . . . . . . . . .30 To play the contents between the specified points repeatedly (A-B repeat) . .31 To select a title from the top menu of the disc . . . . . . . . . . . . . . . . . . . . . . . . . .31 To select a subtitle or audio language from the disc menu . . . . . . . . . . . . . . . .31
Page
Various settings
To change the subtitle language . . . . . . . . . . . . . . . . . . . . . . . . . . . . . . . . . . . . .32 To change the audio language (audio output) . . . . . . . . . . . . . . . . . . . . . . . . . .32 To change the TV type . . . . . . . . . . . . . . . . . . . . . . . . . . . . . . . . . . . . . . . . . . . . . .33 To change the audio channel . . . . . . . . . . . . . . . . . . . . . . . . . . . . . . . . . . . . . . . .33 To change the display on TV screen . . . . . . . . . . . . . . . . . . . . . . . . . . . . . . . . . .33
" Video CD and Super Video CD Operation
Video CD and Super Video CD playback
Playback of a video CD (super video CD) with P.B.C. . . . . . . . . . . . . . . . . . . . .34 To play without activating the playback control function . . . . . . . . . . . . . . . . .35 To start playback from the desired point (direct play) . . . . . . . . . . . . . . . . . . . .35
" CD, CD-R and CD-RW Operation
CD operation
To play in the desired order (programmed play) . . . . . . . . . . . . . . . . . . . . . . . . .36
MP3 and JPEG disc operation
Playback on the MP3 menu screen . . . . . . . . . . . . . . . . . . . . . . . . . . . . . . . . .37, 38 Zoom function . . . . . . . . . . . . . . . . . . . . . . . . . . . . . . . . . . . . . . . . . . . . . . . . . . . .39 Rotating a picture . . . . . . . . . . . . . . . . . . . . . . . . . . . . . . . . . . . . . . . . . . . . . . . . .39
" Radio Operation
Listening to the radio . . . . . . . . . . . . . . . . . . . . . . . . . . . . . . . . . . . . . . . . . . .40, 41
" Advanced Features
Enjoying various sounds . . . . . . . . . . . . . . . . . . . . . . . . . . . . . . . . . . . . . . . .42, 43 Adjusting speaker delay time/speaker level . . . . . . . . . . . . . . . . . . . . . . . . .44, 45 Sleep operation . . . . . . . . . . . . . . . . . . . . . . . . . . . . . . . . . . . . . . . . . . . . . . . . . . .46
" References
Troubleshooting chart . . . . . . . . . . . . . . . . . . . . . . . . . . . . . . . . . . . . . . . . . . .47, 48 Error indicators and warnings . . . . . . . . . . . . . . . . . . . . . . . . . . . . . . . . . . . . . . .49 Maintenance . . . . . . . . . . . . . . . . . . . . . . . . . . . . . . . . . . . . . . . . . . . . . . . . . . . . . .49 Specifications . . . . . . . . . . . . . . . . . . . . . . . . . . . . . . . . . . . . . . . . . . . . . . . . .49, 50
WARRANTY . . . . . . . . . . . . . . . . . . . . . . . . . . . . . . . . . . . . . . . . End of the manual

 1
1
General Information |
- Contents - |
3
03/10/24 HTCN400_500DVA_A1.fm |
92LCN400A0270 |

HT-CN400DVA HT-CN500DVA
Information |
playable discs - |
General |
- Types of |
|
|
4
Types of playable discs
The DVD player can play back discs bearing any of the following marks:
|
Disc type |
Disc contents |
Disc size |
|
DVD Video Disc |
Audio and video |
12 cm (5") |
||
|
|
|
(movies) |
8 cm (3") |
|
|
|
|
|
|
|
|
|
|
|
|
|
|
|
|
|
|
|
|
Super Video CD |
Audio and video |
12 cm (5") |
||
|
|
|
(movies) |
8 cm (3") |
|
|
|
|
|
|
|
|
|
|
Video CD |
Audio and video |
12 cm (5") |
||
|
|
|
(movies) |
8 cm (3") |
|
|
|
|
|
|
|
|
|
|
|
|
|
|
|
|
|
|
|
|
Audio CD |
Audio |
12 cm (5") |
||
|
|
|
|
8 cm (3") |
|
|
|
|
|
CD-R/CD-RW (*1) |
Audio and picture |
12 cm (5") |
||
|
|
|
|
8 cm (3") |
Or CD-R/CD-RW recorded in MP3 format (*2), JPEG format (*3)
(*1): |
The CD-R/CD-RW may not be played back properly depending on the record- |
|
ing equipment or the disc. |
(*2): |
If the sampling frequency is 44.1 or 48.1 kHz and the fixed bit rate is 128 kbps |
|
or higher, MPEG 1 Audio Layer 3 (MP3) files can be played. However, some |
|
of them may not be played depending on their conditions or formats. |
(*3): |
JPEG or JPG picture discs also play on this unit. However, pictures may not |
|
be clear (depends on resolution and recording method). |
! For unplayable discs, see page 7.
Icons used in this operation manual
Some functions may not be available depending on discs. The following icons indicate the discs that can be used in the section.
... Indicates DVDs.
... Indicates Super video CDs.
... Indicates video CDs.
... Indicates audio CDs.
... Indicates CD-R/RW with MP3 recording.
... Indicates CD-R/RW with JPEG recording.
!Some operations may not be performed depending on discs even if they are described in this manual.
!During operation, "  " may be displayed on the screen. This means that the operations described in this manual are not possible.
Copyright Information:
!Unauthorised copying, broadcast, public display, transmission, public performance and rental (regardless of whether or not such activities are for profit) of disc contents are prohibited by law.
!This system is equipped with copy protection technology that causes substantial degradation of images when the contents of a disc are copied to a videotape.
!This system is protected by U. S. patents and other intellectual property rights, the copyright for which belongs to Macrovision Corporation. The use of Macrovision's copy protection technology in the system is authorised by Macrovision and is intended for home use only, unless otherwise authorised in writing by Macrovision. Reverse engineering or disassembly is prohibited.
03/10/24 HTCN400_500DVA_A1.fm |
92LCN400A0270 |
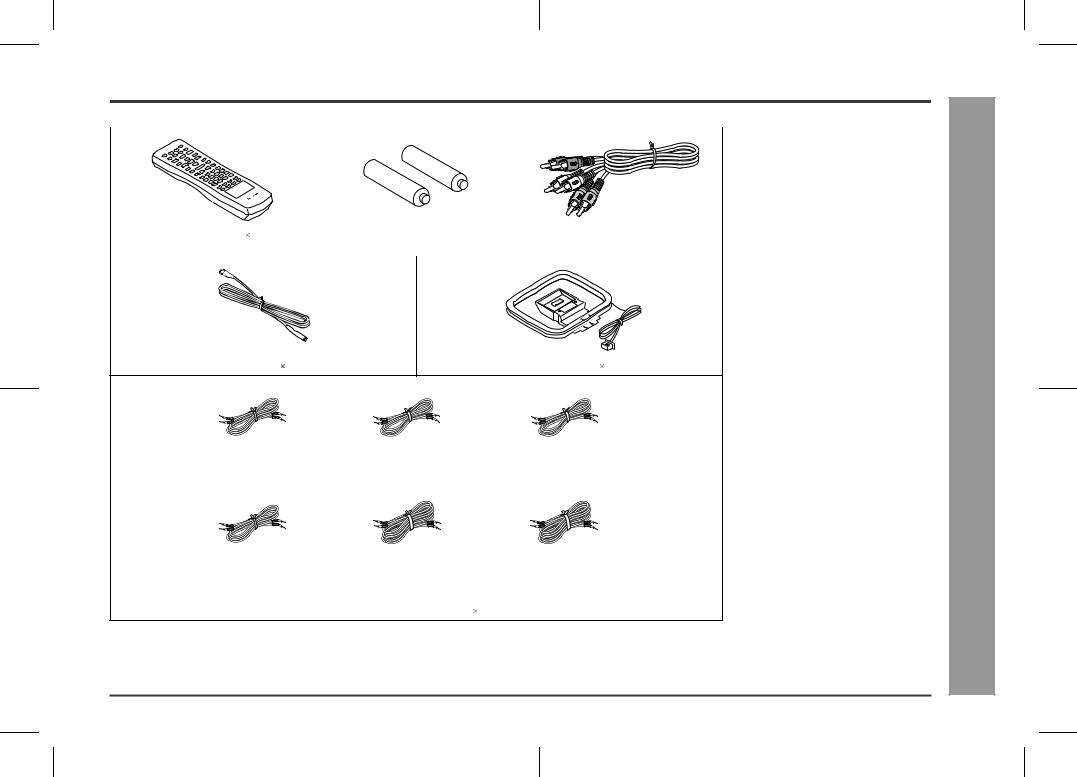
Accessories
Please confirm that the following accessories are included.
Remote control 1 |
"AA" size battery |
|
Audio/Video cable 1 |
|
(UM/SUM-3, R6, HP-7 or similar) |
2 |
|
|
|
|
|
FM aerial 1 |
AM loop aerial 1 |
White and Black |
Green and Black |
Red and Black |
(for left front speaker) |
(for centre speaker) |
(for right front speaker) |
approx. 5 m (16 feet) |
approx. 5 m (16 feet) |
approx. 5 m (16 feet) |
Purple and Black |
Blue and Black |
Grey and Black |
(for subwoofer) |
(for left surround speaker) |
(for right surround speaker) |
approx. 5 m (16 feet) |
approx. 15 m (49 feet) |
approx. 15 m (49 feet) |
|
Speaker connection lead |
6 |
Note:
Only the above accessories are included.
HT-CN400DVA
HT-CN500DVA

 1
1
General Information |
- Accessories - |
5
03/10/24 HTCN400_500DVA_A1.fm |
92LCN400A0270 |
HT-CN400DVA HT-CN500DVA
General Information - Precautions -
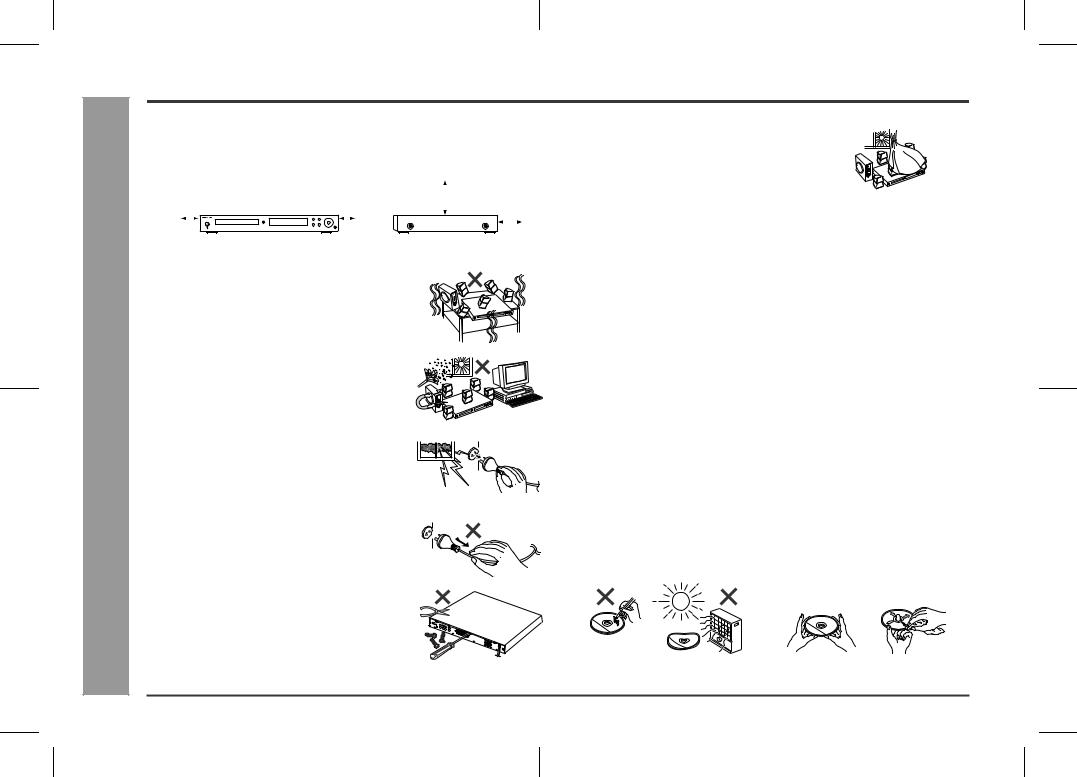
Precautions
" General
!Please ensure that the equipment is positioned in a well ventilated area and that there is at least 10 cm (4") of free space along the sides and back. There must also be a minimum of 15 cm (6") of free space on the top of the unit.
10 cm (4") |
10 cm (4") |
|
|
15 cm (6") |
|||||||||||
|
|||||||||||||||
|
|
|
|
|
|
|
|
|
|
|
|
|
|
|
|
|
|
|
|
|
|
|
|
|
|
|
|
|
|
|
|
|
|
|
|
|
|
|
|
|
|
|
|
|
|
|
|
|
|
|
|
|
|
|
|
|
|
|
|
|
|
|
|
|
|
|
|
|
|
|
|
|
|
|
|
|
|
|
|
10 cm (4")
! Use the unit on a firm, level surface free from vibration.
! Keep the unit away from direct sunlight, strong magnetic fields, excessive dust, humidity and electronic/ electrical equipment (home computers, facsimiles, etc.) which generates electrical noise.
!Do not place anything on top of the unit.
!Do not expose the unit to moisture, to temperatures higher than 60°C (140°F) or to extremely low temper-
atures.
! If the unit does not work properly, unplug and plug it in again. Then turn on the unit.
!In case of an electrical storm, unplug the unit for safety.
!Hold the AC power plug by the head when removing it
from the wall socket, as pulling the lead can damage internal wires.
!Do not remove the outer cover, as this may result in electric shock. Refer internal service to your lo-
cal SHARP service facility.
!The ventilation should not be impeded by covering the ventilation openings with items, such as newspapers,
tablecloths, curtains, etc.
!No naked flame sources, such as lighted candles, should be placed on the apparatus.
!Attention should be drawn to the environmental aspects of battery disposal.
!This unit should only be used within the range of 5°C - 35°C (41°F - 95°F).
Warning:
The voltage used must be the same as that specified by this unit. Using this product with a higher voltage other than that specified is dangerous and may result in a fire or other types of accident, causing damage. SHARP will not be held responsible for any damage resulting from the use of this unit with a voltage other than that specified.
" Volume control
The sound level at a given volume setting depends on speaker efficiency, location, and various other factors. It is advisable to avoid exposure to high volume levels. Do not turn the volume on to full at switch on and listen to music at moderate levels.
" Care of DVD/CD discs
DVD/CD discs are fairly resistant to damage, however mistracking can occur due to an accumulation of dirt on the disc surface. Follow the guidelines below for maximum enjoyment from your DVD/CD collection and player.
!Do not write on either side of the disc, particularly the non-label side from which signals are read. Do not mark this surface.
!Keep your discs away from direct sunlight, heat, and excessive moisture.
!Always hold the DVD/CDs by the edges. Fingerprints, dirt, or water on the DVD/ CDs can cause noise or mistracking. If a DVD/CD is dirty or does not play properly, clean it with a soft, dry cloth, wiping straight out from the centre, along the radius.
NO |
|
|
YES |
|
|
Correct |
|
|
|
|
|
|
|
|
|
|
|
|
|
6
03/10/24 HTCN400_500DVA_A1.fm |
92LCN400A0270 |

Description of discs
" Discs that cannot be played
! DVDs without the region number "4" or |
! CDG |
"ALL". |
! CDV |
! DVDs with SECAM system |
! Photo CD |
! DVD-ROM |
! CD-ROM |
! DVD-RAM |
! SACD |
! DVD-Audio |
! Discs recorded in special formats, etc. |
!The discs above cannot be played at all, or no sound is heard although images appear on the screen or vice versa.
!Incorrect operation may damage the speakers and can have an negative effect on your hearing when played at high volume settings.
!You cannot play illegally produced discs.
Notes:
!A disc with has scratches or fingerprints may not play properly. Refer to "Care of DVD/CD discs (page 6)" and clean the disc.
!Do not play the discs of special shapes (heart or octagon shaped) as they can be ejected whilst rotating and cause injury.
" Title, chapter and track
DVDs are divided into "titles" and "chapters". If the disc has more than one movie on it, each movie is a separate "title". "Chapters" are subdivisions of titles.
Title 1 |
Title 2 |
Chapter 1 Chapter 2 Chapter 3 |
Chapter 1 Chapter 2 |
Audio CDs consist of "tracks".
A "track" is each tune on an audio CD.
Track 1 Track 2 Track 3 Track 4 Track 5
Note:
Title, chapter, or track numbers may not be recorded on some discs.
" Icons used on DVD discs
Check the icons on the DVD case before playing your discs.
|
|
|
Display |
|
Description |
|
|
|
|
||
Region number (playable area number) |
DVD discs are programmed with region |
||||
|
|
|
|
|
numbers indicating countries in which |
4 |
1 4 6 |
ALL |
they can be played. This system can play |
||
discs with region number "4" or "ALL". |
|||||
|
|
|
|
||
Format recorded on the DVD |
To adopt the video format to the connect- |
||||
|
|
|
|
|
ed TVs ("wide-screen TV" or "4:3 size |
|
|
|
|
|
TV"). |
|
|
|
|
|
|
|
|
|
Recorded in 4:3. |
|
|
|
|
|
|
|
|
You can enjoy wide images on a wide-screen TV, and letterbox size images on the 4:3 size TV.
You can enjoy wide images on a wide-screen TV and 4:3 images with the side edges cut on the 4:3 size TV.
Type of subtitles recorded |
Recorded subtitle languages. |
|
2 |
Example: |
Language can be selected with the SUB- |
1: English |
TITLE button. |
|
|
|
|
|
2: French |
|
|
|
|
Number of camera angles |
Number of angles recorded on the DVD. |
|
|
|
Angles can be selected with the ANGLE |
2 |
|
button. |
|
|
|
|
|
|
Number of audio tracks and audio |
The number of audio tracks and audio re- |
|
recording systems |
cording systems are indicated. |
|
|
Example: |
! The audio recorded on the DVD can |
|
1: Original <English> |
be switched by using the LANGUAGE |
|
(DTS 5.1 Surround) |
button. |
|
2: English (Dolby Digital |
! The number of audio tracks and re- |
|
5.1 Surround) |
cording systems vary depending on |
|
|
the DVD. Check them in the DVD's |
|
|
manual. |
|
|
|
HT-CN400DVA
HT-CN500DVA

 1
1
General Information - Description of discs -
7
03/10/24 HTCN400_500DVA_A1.fm |
92LCN400A0270 |

HT-CN400DVA Controls and indicators
HT-CN500DVA
Information |
and indicators - |
General |
- Controls |
|
|
" Main unit (front panel)
1 |
2 |
3 |
4 |
5 |
6 |
12 |
|
|
|
|
|
|
13 |
11 |
7 |
8 |
9 |
10 |
12 |
|
(1) (2) (3) |
|
15 |
16 |
17 |
18 |
19 |
20 |
21 |
22 |
23 |
24 |
25 |
26 |
27 |
||||||||
|
|
|
|
|
|
|
|
|
|
|
|
|
|
|
|
|
|
|
|
|
|
|
|
14 |
L |
|
|
R |
L C |
R |
|
|
|
TITLE |
TRK |
PRESET |
CHP |
PROG |
SLEEP |
|
REPEAT 1 |
A - B |
|||||
C |
|
|
|
|
|||||||||||||||||||
|
|
|
|
|
|
|
|
|
|
|
|||||||||||||
|
|
|
|
|
|
|
|
|
|
|
|
DIGITAL |
|
|
|
|
|
|
|
|
|
|
KHz |
|
|
|
|
|
|
|
|
|
|
|
|
Pro Logic |
|
|
|
|
|
|
|
|
|
|
|
|
LS |
S RS |
LS |
S |
RS |
|
|
|
|
|
|
|
|
|
|
MHz |
|||||||
|
STEREO VCD MP3 |
|
|
|
|
|
|
|
|||||||||||||||
|
|
|
|
|
|
|
|
|
|
|
|
|
|
|
|
|
|
|
|
|
|
|
|
|
|
|
|
|
|
|
|
|
|
|
|
|
|
|
|
|
|
|
|
|
|
|
|
|
|
|
|
|
|
|
|
|
|
|
|
|
|
|
|
|
|
|
|
|
|
|
|
(4) (5) (6) |
28 |
29 |
30 |
31 |
|
Reference page |
|||
1. On/Stand-by Button . . . . . . . . . . . . |
. . . . . . . . . . . . . . . . . |
. . |
. . . . |
. . 17 |
2. Disc Tray . . . . . . . . . . . . . . . . . . . . . |
. . . . . . . . . . . . . . . . . |
. . . |
. . . |
. . 24 |
3. Disc Tray Open/Close Button . . . . |
. . . . . . . . . . . . . . . . . |
. . . |
. . . |
. . 24 |
4. Remote Sensor . . . . . . . . . . . . . . . . |
. . . . . . . . . . . . . . . . . |
. . . |
. . . |
. . 17 |
5. Play or Pause Button . . . . . . . . . . . |
. . . . . . . . . . . . . . . . . |
. . . |
. . |
24, 25 |
6. Stop Button . . . . . . . . . . . . . . . . . . . |
. . . . . . . . . . . . . . . . . |
. . . |
. . . |
. . 25 |
7. Power Stand-by Indicator . . . . . . . |
. . . . . . . . . . . . . . . . . |
. . . |
. . . |
. . 17 |
8. Function Button . . . . . . . . . . . . . . . |
. . . . . . . . . . . . . . . . . |
. . |
15, 24, 40 |
|
9. Speaker Level Mode Button . . . . . |
. . . . . . . . . . . . . . . . . |
. . . |
. . |
23, 45 |
10.Headphone Socket . . . . . . . . . . . . . |
. . . . . . . . . . . . . . . . . |
. . . |
. . . |
. . 23 |
11.Chapter (track) Skip Down or Tuning Down Button . . . |
. . . |
. . |
26, 40 |
|
12.Volume Up and Down or Speaker Level Adjust Buttons |
. . . . 23, 45 |
|||
13.Chapter (track) Skip Up or Tuning Up Button . . . . . . . . |
. . . |
. . |
26, 40 |
|
14.Speaker Indicators . . . . . . . . . . . . . |
. . . . . . . . . . . . . . . . . |
. . . |
. . . |
. . 43 |
(1) Left Front Speaker Indicator |
(4) Left Surround Speaker Indicator |
|||
(2) Centre Speaker Indicator |
(5) Subwoofer Indicator |
|
|
|
(3) Right Front Speaker Indicator |
(6) Right Surround Speaker Indicator |
|||
Reference page
15.Dolby Pro Logic Indicator . . . . . . . . . . . . . . . . . . . . . . . . . . . . . . . . .43 16.Dolby Digital Signal Indicator . . . . . . . . . . . . . . . . . . . . . . . . . . . . . .42 17.DVD Indicator . . . . . . . . . . . . . . . . . . . . . . . . . . . . . . . . . . . . . . . . . . .25 18.Pause Indicator . . . . . . . . . . . . . . . . . . . . . . . . . . . . . . . . . . . . . . . . .25 19.Play Indicator . . . . . . . . . . . . . . . . . . . . . . . . . . . . . . . . . . . . . . . . . . .25 20.Title Indicator . . . . . . . . . . . . . . . . . . . . . . . . . . . . . . . . . . . . . . . . . . .27 21.Track Indicator . . . . . . . . . . . . . . . . . . . . . . . . . . . . . . . . . . . . . . . . . .35 22.Tuner Preset Indicator . . . . . . . . . . . . . . . . . . . . . . . . . . . . . . . . . . . .41 23.Chapter Indicator . . . . . . . . . . . . . . . . . . . . . . . . . . . . . . . . . . . . . . . .27 24.Programme Indicator . . . . . . . . . . . . . . . . . . . . . . . . . . . . . . . . . . . . .36 25.Sleep Indicator . . . . . . . . . . . . . . . . . . . . . . . . . . . . . . . . . . . . . . . . . .46 26.Repeat Indicator . . . . . . . . . . . . . . . . . . . . . . . . . . . . . . . . . . . . . . . . .30 27.A - B Repeat Indicator . . . . . . . . . . . . . . . . . . . . . . . . . . . . . . . . . . . .31 28.DTS Signal Indicator . . . . . . . . . . . . . . . . . . . . . . . . . . . . . . . . . . . . .42 29.Stereo (2-ch) or FM Stereo Receiving Indicator . . . . . . . . . . . .40, 42 30.SVCD/VCD/CD Indicator . . . . . . . . . . . . . . . . . . . . . . . . . . . . . . . . . .25 31.MP3 or JPEG Indicator . . . . . . . . . . . . . . . . . . . . . . . . . . . . . . . . . . .25
8
03/10/24 HTCN400_500DVA_A1.fm |
92LCN400A0270 |

" Main unit (rear panel)
1 |
2 |
3 |
4 |
5 |
6 |
|
7 |
8 |
|||||||||||
|
|
|
|
|
|
|
|
|
|
|
|
|
|
|
|
|
|
|
|
|
|
|
|
|
|
|
|
|
|
|
|
|
|
|
|
|
|
|
|
|
|
|
|
|
|
|
|
|
|
|
|
|
|
|
|
|
|
|
|
|
|
|
|
|
|
|
|
|
|
|
|
|
|
|
|
|
|
|
|
|
|
|
|
|
|
|
|
|
|
|
|
|
|
|
|
|
|
|
|
|
|
|
|
|
|
|
|
|
|
|
|
|
|
|
|
|
|
|
|
|
|
|
|
|
|
|
|
|
|
|
|
|
|
|
|
|
|
|
|
|
|
|
|
|
|
|
|
|
|
|
|
|
|
|
|
|
|
|
|
9
 The rating label is located on the bottom of the unit.
|
Reference page |
1. FM 75 Ohms Aerial Socket . . . . . . . . . . . . . . . . . . . . . . |
. . . . . . . . . .13 |
2. AM Loop Aerial Socket . . . . . . . . . . . . . . . . . . . . . . . . . |
. . . . . . . . . .13 |
3. Audio Input Sockets 1/2 . . . . . . . . . . . . . . . . . . . . . . . . |
. . . . . . . . . .14 |
4. Audio Output Sockets . . . . . . . . . . . . . . . . . . . . . . . . . . |
. . . . . . .14, 15 |
5. Video Output Socket . . . . . . . . . . . . . . . . . . . . . . . . . . . |
. . . . . . . . . .14 |
6. Speaker Terminals . . . . . . . . . . . . . . . . . . . . . . . . . . . . . |
. . . . . . . . . .12 |
7. Cooling Fan . . . . . . . . . . . . . . . . . . . . . . . . . . . . . . . . . . |
. . . . . . . . . . .9 |
8. AC Power Lead . . . . . . . . . . . . . . . . . . . . . . . . . . . . . . . . |
. . . . . . . . . .15 |
9. S-video Output Socket . . . . . . . . . . . . . . . . . . . . . . . . . |
. . . . . . . . . .14 |
Cooling fan
This unit is fitted with a cooling fan at the rear for improved cooling. Do not cover the opening in this section with any obstacles.
Cooling fan
Caution:
!The unit will get warm whilst being used. Do not touch the warm areas of the unit for prolonged periods to avoid damage to you.
!This unit is equipped with a special function which protects the amplifier circuit from damages. When it is activated, the sound switch is turned off. In this case, unplug the unit and, after 15 minutes or more, plug it in again.
HT-CN400DVA
HT-CN500DVA

 1
1
Information |
and indicators - |
General |
- Controls |
9
03/10/24 HTCN400_500DVA_A1.fm |
92LCN400A0270 |

HT-CN400DVA HT-CN500DVA
Information |
and indicators - |
General |
- Controls |
|
|
Controls and indicators (continued)
2
3
4
5
6
7
8
9
10
11
12
13
14
15
16
17
18
1
OPEN/ |
|
|
ON/ |
CLOSE |
SET UP |
MUTE |
STAND-BY |
|
|
||
TITLE |
SUBTITLE LANGUAGE DISPLAY |
||
MENU/PBC |
|
ST/MO |
|
|
ENTER |
|
|
PROG |
|
|
SLEEP |
SLOW/MEMORY |
|
|
|
PRESET |
TUNING |
||
LISTENING MODE |
ADJ/VOL |
||
1 |
2 |
3 |
4 |
5 |
6 |
7 |
8 |
|
|
|
STEP |
9 |
0 |
>10 |
|
DIRECT RETURN REPEAT |
A-B |
||
ANGLE |
ZOOM |
AUDIO NTSC/PAL |
|
19
20
21
22
23
24
25
26
27
28
29
30
31
32
33
34
35
36
" Remote control
Reference page
1. Remote Control Transmitter . . . . . . . . . . . . . . . . . . . . . . . . . . . . . . .17 2. Set Up Menu Button . . . . . . . . . . . . . . . . . . . . . . . . . . . . . . . . . . . . . .18 3. Disc Tray Open/Close Button . . . . . . . . . . . . . . . . . . . . . . . . . . . . . .24 4. Subtitle Select Button . . . . . . . . . . . . . . . . . . . . . . . . . . . . . . . . . . . .32 5. Title Select Button . . . . . . . . . . . . . . . . . . . . . . . . . . . . . . . . . . . . . . .31 6. DVD/Tuner/Auxiliary Input Select Buttons . . . . . . . . . . . . . .15, 24, 40 7. Menu/Playback Control On/Off Button . . . . . . . . . . . . . . . . .31, 35, 37 8. Cursor Buttons . . . . . . . . . . . . . . . . . . . . . . . . . . . . . . . . . . . . . . . . . .18 9. Programme Button . . . . . . . . . . . . . . . . . . . . . . . . . . . . . . . . . . . . . .36 10.Slow-motion or Preset Memory Button . . . . . . . . . . . . . . . . . . .28, 41 11.Fast Reverse or Preset Down Button . . . . . . . . . . . . . . . . . . . . .26, 41 12.Fast Forward or Preset Up Button . . . . . . . . . . . . . . . . . . . . . . .26, 41 13.Surround/Stereo (2-ch) Listening Mode Button . . . . . . . . . . . . . . .42 14.Speaker Level Mode Button . . . . . . . . . . . . . . . . . . . . . . . . . . . .23, 45 15.Direct Button . . . . . . . . . . . . . . . . . . . . . . . . . . . . . . . . . . . . . . . . . . .27 16.Angle Select Button . . . . . . . . . . . . . . . . . . . . . . . . . . . . . . . . . . . . . .29 17.Return Button . . . . . . . . . . . . . . . . . . . . . . . . . . . . . . . . . . . . . . . . . . .34 18.Zoom Button . . . . . . . . . . . . . . . . . . . . . . . . . . . . . . . . . . . . . . . .29, 39 19.Mute Button . . . . . . . . . . . . . . . . . . . . . . . . . . . . . . . . . . . . . . . . . . . .23 20.On/Stand-by Button . . . . . . . . . . . . . . . . . . . . . . . . . . . . . . . . . . . . . .17 21.Language Select Button . . . . . . . . . . . . . . . . . . . . . . . . . . . . . . . . . .32 22.Display Button . . . . . . . . . . . . . . . . . . . . . . . . . . . . . . . . . . . . . . . . . .33 23.FM Stereo/Mono Select Button . . . . . . . . . . . . . . . . . . . . . . . . . . . . .40 24.Enter Button . . . . . . . . . . . . . . . . . . . . . . . . . . . . . . . . . . . . . . . . . . . .18 25.Sleep Button . . . . . . . . . . . . . . . . . . . . . . . . . . . . . . . . . . . . . . . . . . . .46 26.Play or Pause Button . . . . . . . . . . . . . . . . . . . . . . . . . . . . . . . . . .24, 25 27.Stop Button . . . . . . . . . . . . . . . . . . . . . . . . . . . . . . . . . . . . . . . . . . . .25 28.Chapter (track) Skip Up or Tuning Up Button . . . . . . . . . . . . . .26, 40 29.Chapter (track) Skip Down or Tuning Down Button . . . . . . . . .26, 40 30.Volume Up and Down or Speaker Level Adjust Buttons . . . . .23, 45 31.Direct Number Buttons . . . . . . . . . . . . . . . . . . . . . . . . . . . . . . . . . . .27 32.Frame Advance Button . . . . . . . . . . . . . . . . . . . . . . . . . . . . . . . . . . .28 33.A - B Repeat Button . . . . . . . . . . . . . . . . . . . . . . . . . . . . . . . . . . . . . .31 34.NTSC/PAL Select Button . . . . . . . . . . . . . . . . . . . . . . . . . . . . . . .18, 33 35.Repeat Play Button . . . . . . . . . . . . . . . . . . . . . . . . . . . . . . . . . . . . . .30 36.Audio Select Button . . . . . . . . . . . . . . . . . . . . . . . . . . . . . . . . . . . . . .33
10
03/10/24 HTCN400_500DVA_A1.fm |
92LCN400A0270 |
HTCN400_500DVA_A
" Front/centre/surround speakers
1 |
3 |
2 |
Reference page
1.Speaker
2.Bass Reflex Duct
3. Speaker Terminals . . . . . . . . . . . . . . . . . . . . . . . . . . . . . . . . . . . . . . .12
" Subwoofer
3
1 |
2 |
Speaker grilles are removable:
Make sure nothing comes into contact with the speaker diaphragms when you remove the speaker grilles.
" Speaker functions
Front speaker:
Reproduces left and right sound (stereo mode) or front surround sound.
Centre speaker:
Reproduces centre surround sound.
Surround speaker:
Reproduces rear surround sound.
Subwoofer:
Reproduces bass sound.
Notes:
!Do not allow any objects to fall into or to be placed in the bass reflex ducts.
!Front and centre speakers are magnetically shielded.
Reference page
1.Bass Reflex Duct
2.Woofer
3. Speaker Terminals . . . . . . . . . . . . . . . . . . . . . . . . . . . . . . . . . . . . . . .12
92LCN400A0270 3
HT-CN400DVA
HT-CN500DVA

 1
1
Information |
and indicators - |
General |
- Controls |
11
03/10/24 HTCN400_500DVA_A1.fm |
92LCN400A0270 |
HT-CN400DVA HT-CN500DVA
System Connections - Speaker connection -
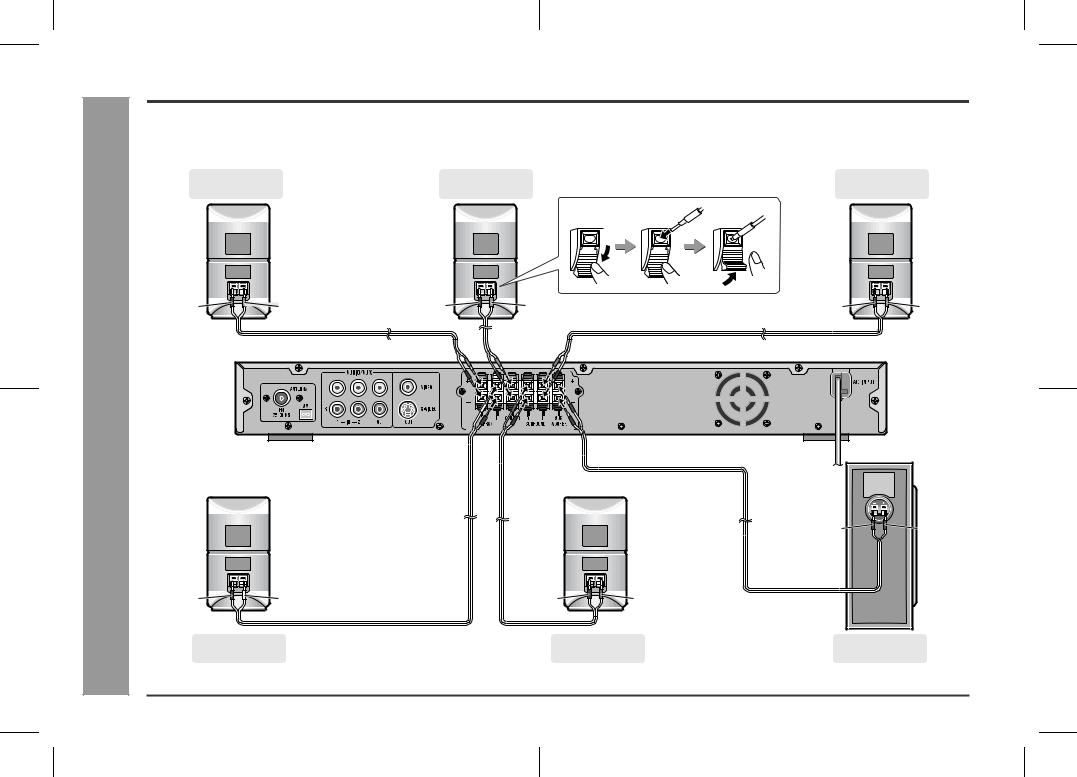
Speaker connection
Speaker terminals on the main unit and speakers, and speaker wires are distinguished by colours. Connect the speaker and the unit by matching the colours.
(For speaker installation, see page 16.)
Front speaker
Centre speaker
(right)
Surround speaker
(left)
Black |
Red |
Black |
Green |
Black |
Blue |
Black |
White |
Black |
Grey |
|
Front speaker |
|
Surround speaker |
|
(left) |
|
(right) |
Black |
Purple |
|
Subwoofer |
12
03/10/24 HTCN400_500DVA_A2.fm |
92LCN400A0270 |

! Connecting speaker wires
Make sure to leave the AC power lead disconnected when connecting the speakers.
To prevent accidental short circuits between  and
and  terminals, connect the speaker wires to the speakers first and then to the unit.
1 Connect the wires to the speakers. Black |
Red |
Black 
 Red
Red
2 Connect the other end to the main unit.
Red
Red
Black

Black
Caution:
"The supplied speaker for HT-CN400DVA is designed exclusively for HTCN400DVA. The speaker for HT-CN500DVA is exclusively for HT-CN500DVA. Do not connect speakers for HT-CN400DVA or HT-CN500DVA to other equipment. Also, do not connect other speakers to HT-CN400DVA or HTCN500DVA. It may cause malfunction.
"Do not mistake the  and
and  , and right and left terminals of the speaker wires. (The right speaker is placed on the right when you face the unit.)
"Do not let the bare speaker wires touch each other.
" Do not stand or sit on the speakers. You may be injured. " Do not short-circuit the speaker wires. If the power is
turned on, malfunction may occur.
" When disconnecting the speaker wires, unplug the AC power lead, and then disconnect the speaker wires from the main unit.
Incorrect
Aerial connection
Supplied FM aerial:
Connect the FM aerial wire to the FM 75 OHMS |
FM aerial |
AM loop |
socket and position the FM aerial wire in the di- |
|
aerial |
|
|
|
rection where the strongest signal can be re- |
|
|
ceived. |
|
|
Supplied AM loop aerial:
Connect the AM loop aerial to the AM socket. Position the AM loop aerial for optimum reception. Place the AM loop aerial on a shelf, etc., or attach it to a stand or a wall with screws (not supplied).
Note:
Placing the aerial on the unit or near the AC power lead may cause noise pickup. Place the aerial away from the unit for better reception.
Installing the AM loop aerial:
< Assembling > |
< Attaching to the wall > |
||
|
|
|
|
|
|
|
|
Wall |
Screws (not supplied) |
External FM aerial:
Use an external FM aerial if you require better reception. Consult your dealer.
External FM aerial
HT-CN400DVA
HT-CN500DVA

 2
2
System Connections - Speaker connection / Aerial connection -
13
03/10/24 HTCN400_500DVA_A2.fm |
92LCN400A0270 |

HT-CN400DVA HT-CN500DVA
System Connections - Connections to TV, VCR, etc. -
14
Connections to TV, VCR, etc.
|
! Connecting to a TV with an S-video input socket |
Caution: |
Turn off all other equipment before making connections.
! Connecting to a TV with a video input socket |
|
TV |
|
To S-video |
|
|
Video signal |
input socket |
|
|
|
|
S-video cable |
|
|
(commercially available) |
|
|
Audio signal |
To audio |
|
|
|
|
Audio cable (commercially available) |
input sockets |
|
|
|
|
! Audio connection to TV or VCR |
|
|
You can enjoy surround sound from TV or VCR by connecting them to the unit as |
|
|
shown. |
|
Audio/Video cable |
|
TV |
(supplied) |
Audio signal |
|
|
|
|
To video |
|
|
input socket |
Audio cable |
|
TV |
|
|
(commercially available) |
|
|
|
To audio |
|
Video signal |
|
output sockets |
Audio signal |
|
|
To audio |
|
To audio |
input sockets |
|
|
Audio signal |
output sockets |
|
|
VCR |
|
03/10/24 HTCN400_500DVA_A2.fm |
92LCN400A0270 |
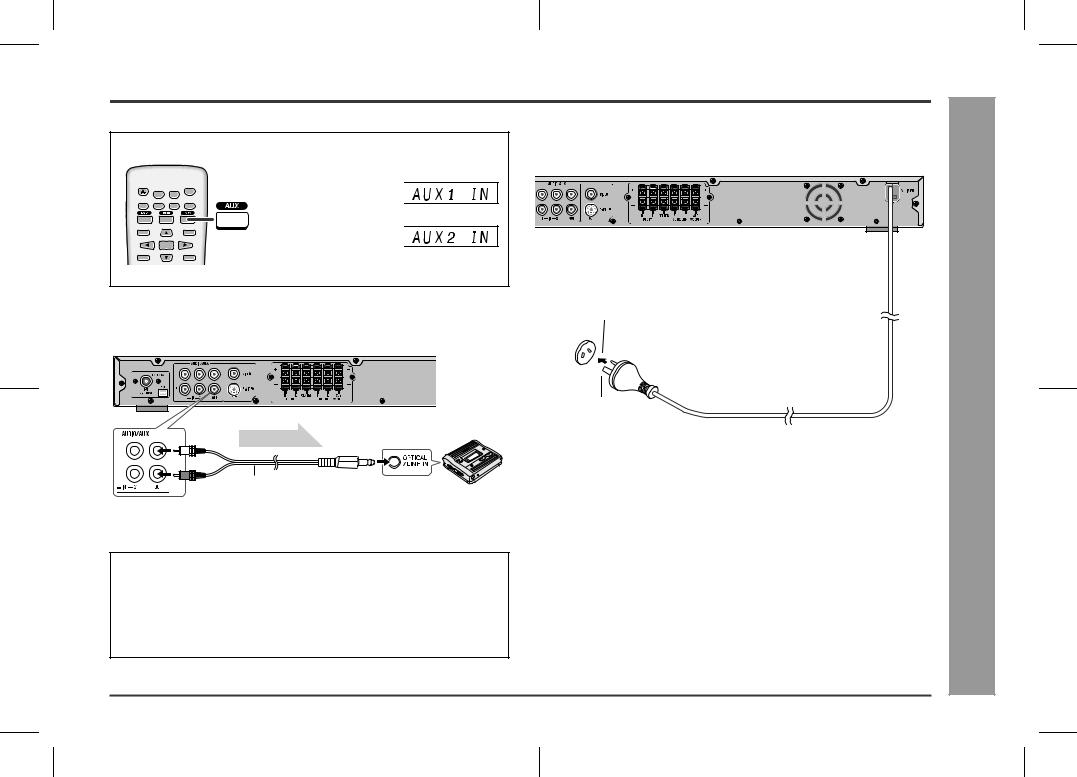
To listen to TV or VCR sound via the speakers of this unit:
Press the AUX button repeatedly to select the desired audio input.
OPEN/ |
ON/ |
CLOSE |
STAND-BY |
SET UP |
MUTE |
TITLE SUBTITLE LANGUAGE DISPLAY |
|
MENU/PBC |
ST/MO |
ENTER |
|
PROG |
SLEEP |
Unit display
" For the TV, select "AUX
1 IN". |
ESET CHP |
PROG |
SLEEP |
REPEAT 1 |
A - B |
|
|
|
|
KHz |
|
|
|
|
|
|
MHz |
" For the VCR, select |
|
|
|
|
KHz |
"AUX 2 IN". |
ESET CHP |
PROG |
SLEEP |
REPEAT 1 |
|
|
A - B |
||||
|
|
|
|
|
MHz |
"Alternatively, press the FUNCTION button on the main unit.
! Audio connection to other equipment
Audio signal |
To audio MD recorder |
input socket |
Audio cable (commercially available)
Notes:
"Change the TV input in accordance with the connected socket.
"Do not connect other equipment (VCR, etc.) between the TV and this unit. Pictures may be distorted.
"Refer to the operation manual of the equipment to be connected.
"Insert the plugs fully to avoid fuzzy pictures or noise.
! Connecting the AC power lead
After checking all the connections have been made correctly, plug the AC power lead of this unit into the wall socket.
Wall socket
(AC 220 - 240 V, 50/60 Hz)
Note:
Unplug the AC power lead from the wall socket if the unit will not be used for a prolonged period of time.
HT-CN400DVA
HT-CN500DVA

 2
2
System Connections - Connections to TV, VCR, etc. -
15
03/10/24 HTCN400_500DVA_A2.fm |
92LCN400A0270 |

HT-CN400DVA HT-CN500DVA
Preparation for Use - System installation -
16
System installation
! Placing the speaker system
The best surround effect will be achieved by placing each speaker at the same distance from the listening position.
It is recommended to arrange the speakers as shown below.
Front |
Centre |
speaker Front |
|
speaker (left) |
speaker (right) |
|
|
Subwoofer |
|
Surround |
Surround |
|
speaker (left) |
||
speaker (right) |
||
|
||
|
|
Note:
If speakers cannot be placed at equal distances, refer to "Speaker delay time setting" (see page 44).
Installation image:
Notes:
"Place the TV halfway between the front speakers.
"It is recommended that the centre speaker be placed near the television.
"Place the surround speakers at a position just above the height of your ears.
"The subwoofer vibrates whilst reproducing bass. Place it on a stable, sturdy surface.
"The bass sound from the subwoofer is non-directional, however, it is recommended to place it as close as left and right speakers.
Centre speaker
Same distance |
Same distance |
Front speaker (left) |
Front speaker (right) |
! Magnetically shielded speakers
The front and centre speakers may be placed beside or near the TV as they are magnetically shielded. However, discolouration may occur depending on the TV type.
If colour variation occurs...
Turn off the TV (with the power switch).
After 15 - 30 minutes, turn the TV on again.
If the colour variation is still present...
Move the speakers further away from the TV.
Refer to the manual of the TV for details.
Note:
The surround speakers and subwoofer are not magnetically shielded.
03/10/24 HTCN400_500DVA_A2.fm |
92LCN400A0270 |
 Loading...