


IQ-8920

Congratulations on purchasing the
IQ-8900/lQ-8920
unit.
Please read this operation manual thoroughly to
familiarize yourself with all the features of the unit and to
ensure years of reliable operation. You may also find it
useful to keep this operation manual on hand for
reference.
l
The only difference between the IQ-8900 and the
IQ-8920 is memory capacity.
l
Unless otherwise specified, the text and materials in
this manual apply to both models,
One of the models or certain accessories described in
this manual may not be available in your country when
you purchase this product.
Check with your local SHARP dealer concerning
availability.
All company and/or product names are trademarks and/or
registered trademarks of their respective manufacturers.
NOTICE
l SHARP
strongly recommends that separate permanent
written records be kept of all important data. Data may
be lost or altered in virtually any electronic memory
product under certain circumstances. Therefore,
SHARP assumes no responsibility for data lost or
otherwise rendered unusable whether as a result of
improper use, repairs, defects, battery replacement, use
after the specified battery life has expired, or any other
cause.
l
SHARP assumes no responsibility, directly or indirectly,
for financial losses or claims from third persons
resulting from the use of this product and any of its
functions, such as stolen credit card numbers, the loss
of or alteration of stored data, etc.
l
The information provided in this manual is subject to
change without notice.
1
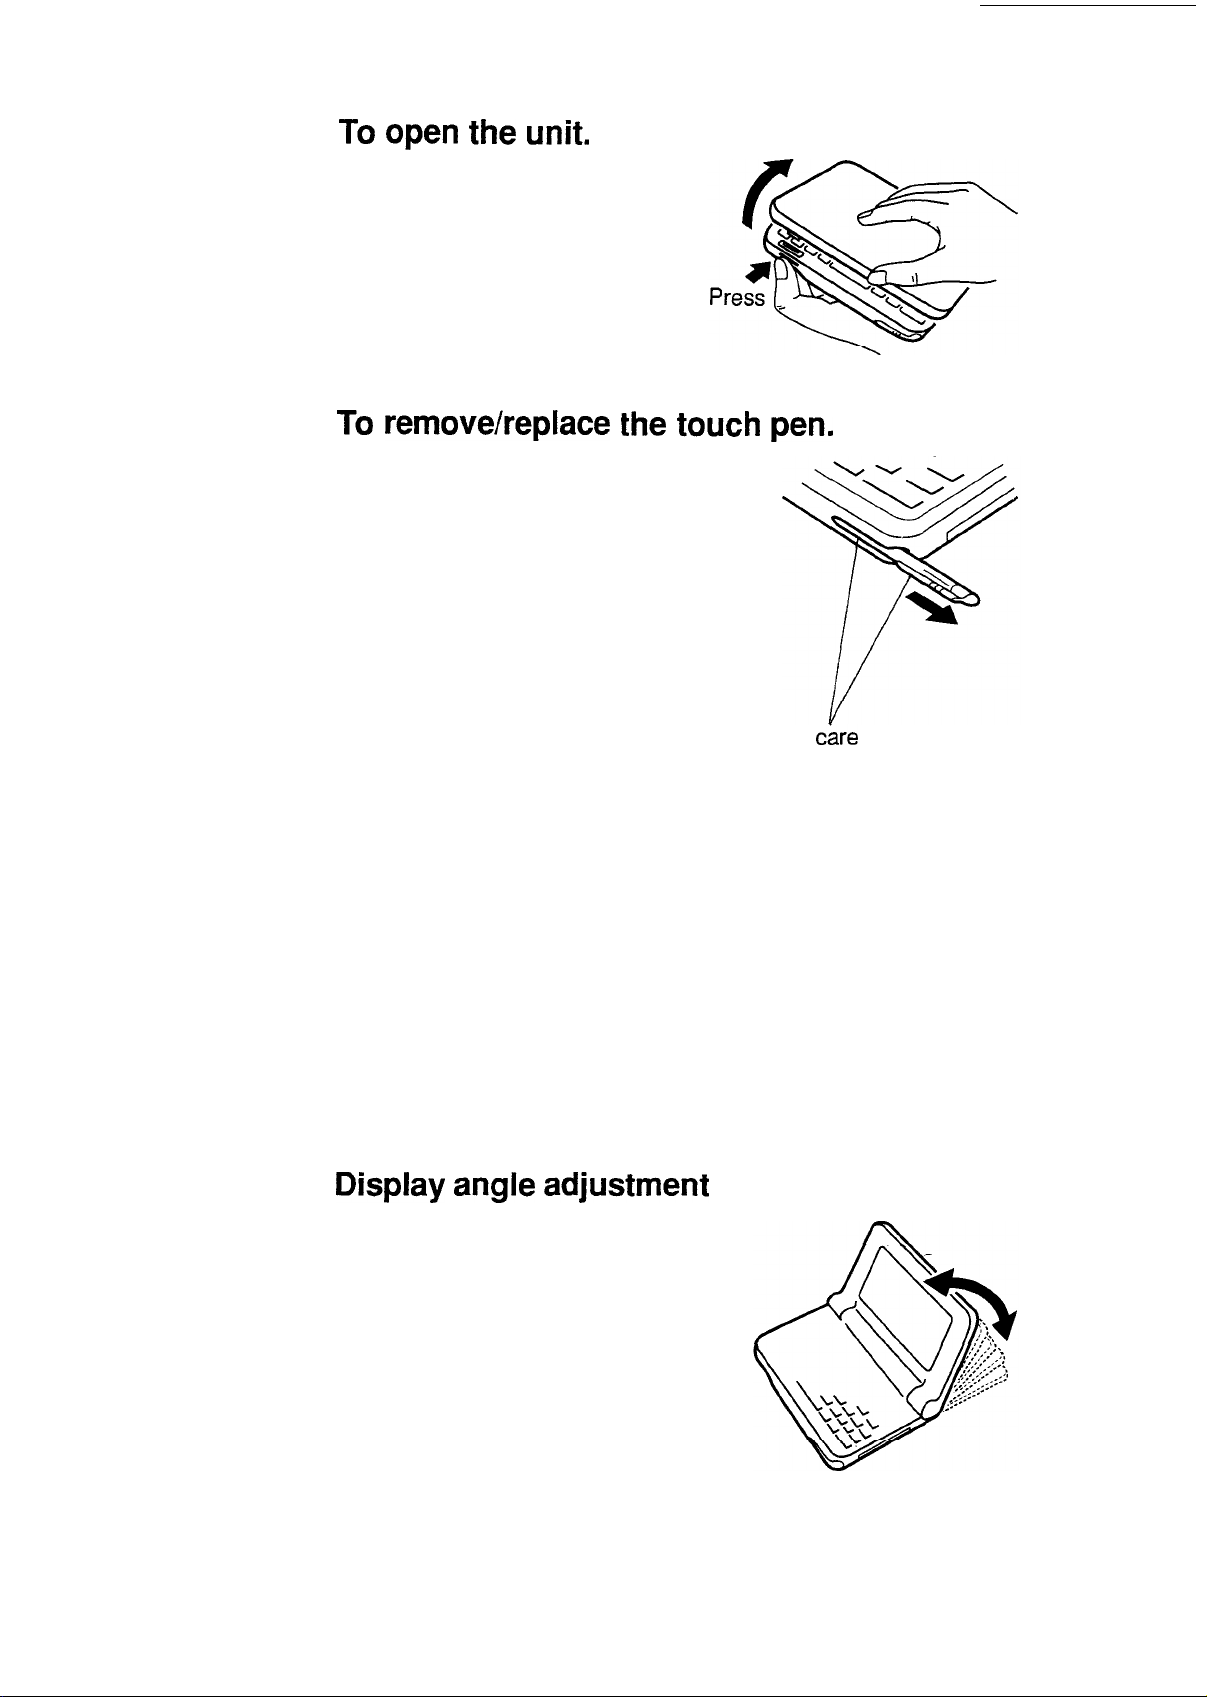
To
open the unit.
Open
Press the lock button and
open the unit.
To
remove/replace
the
touch
pen.
To remove the touch pen,
which is installed at the front
right of the unit, pull in the
direction indicated.
To replace the touch pen,
slowly push the pen point
back into place (push in the
opposite direction to that
indicated), then check the
pen is safely secured.
Take
c&-e
to ensure the
ridge grip on the touch
pen aligns correctly with
the mounting slot.
Caution:
Use only the attached touch pen to operate with the
display.
Do not use a pencil or any other sharp pointed object,
and always keep the point of the touch pen and the
display clean, to prevent scratching and damage to the
display.
Display
angle
adjustment
The display can be adjusted
to any angle to make reading
easy.
uick
Start
v
.
Important
things
to
do:
q
Please read through this Quick Start section even if you hate
to read operation manuals. The Quick Start section will get you
up and running with your unit in just a few minutes. Refer to
the rest of the manual for more details about a particular
operation.
q
Please read through the section for answers to commonly
asked questions. There is a good chance that any general
questions you have about your unit will be answered there.
13(
Press (2nd)
5
when you need help using a particular
application on the unit. The on-screen help is a quick
reference guide explaining various controls and their functions.
3
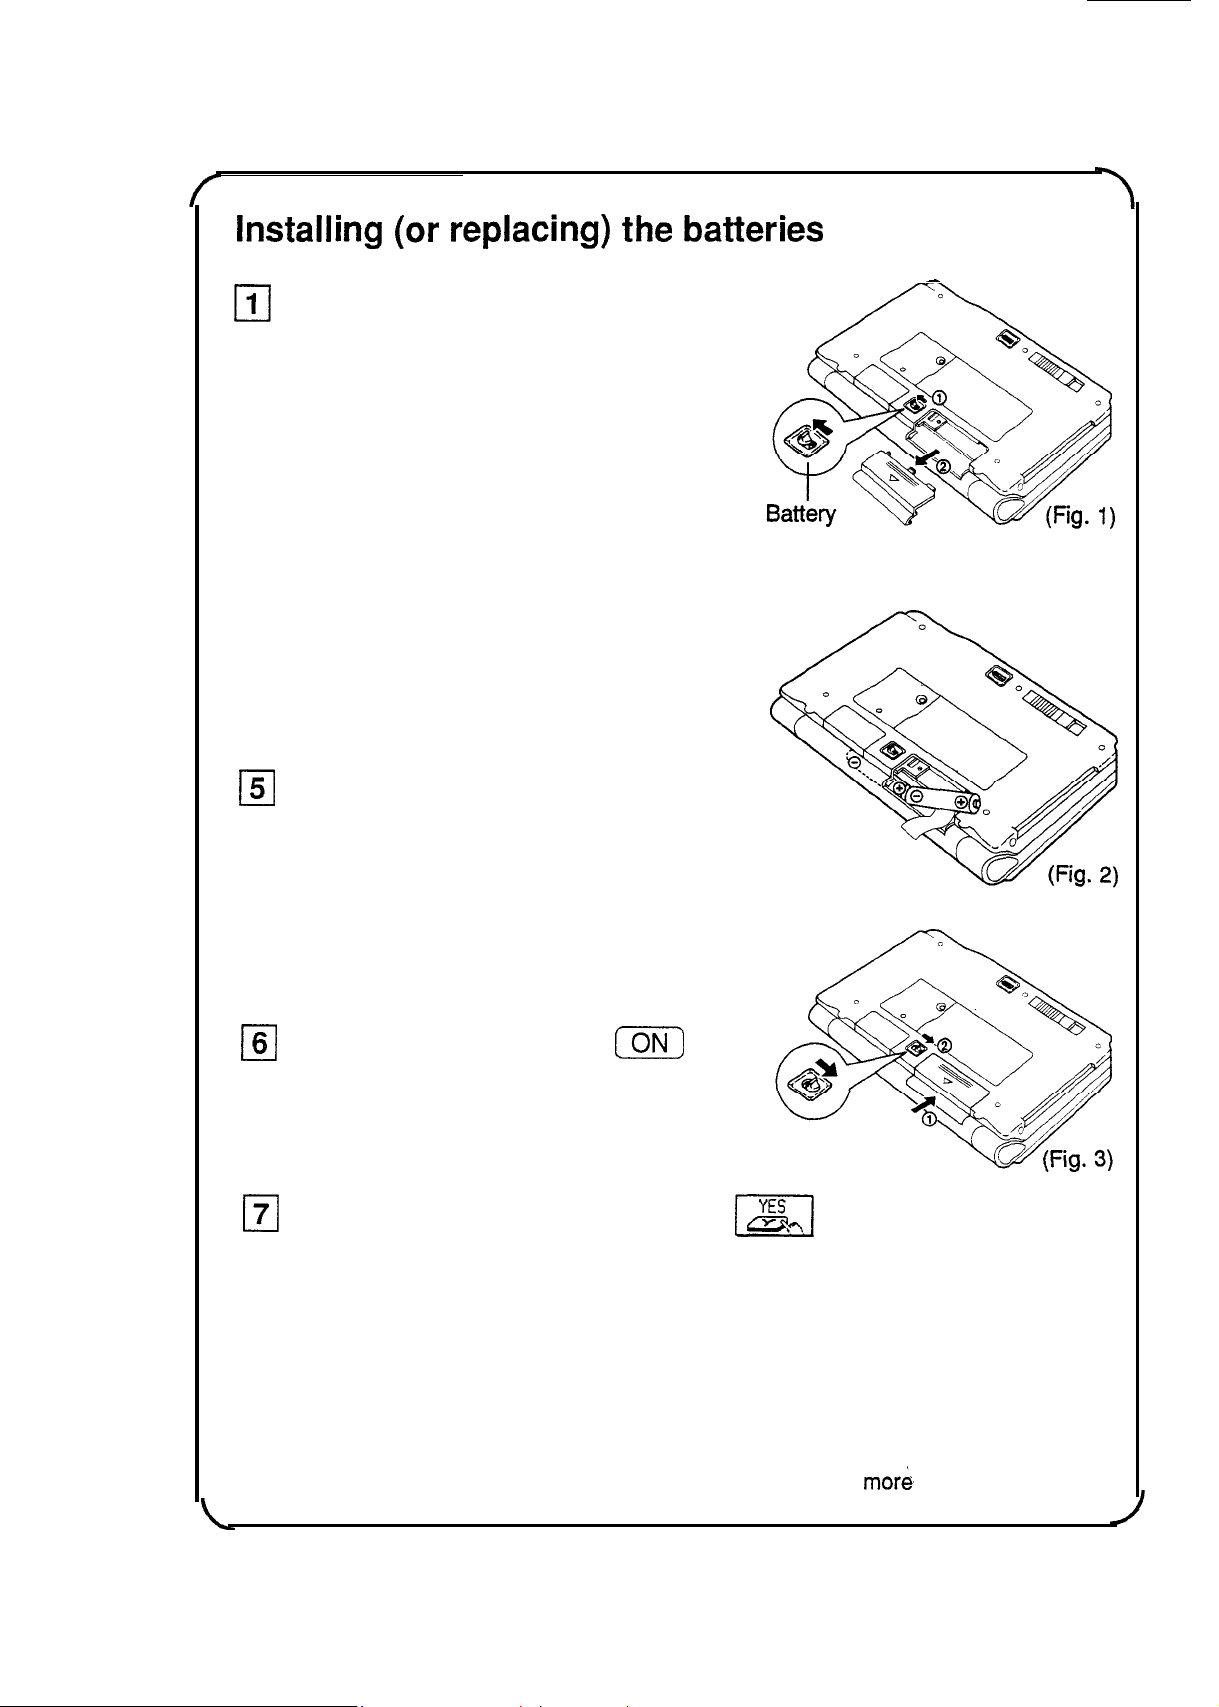
Installing
(or
replacing)
the
batteries
-
cl
1
q
2
cl
3
cl
4
0
5
0
6
0
7
Set the battery replacement switch
on the back of the unit to “REPLACE
BATTERIES” (exposing the red dot).
(Fig. 1)
Slide off the operation battery cover.
(Fig. 1)
replacement
Insert the two batteries atop the
ribbon tab, as shown. (Fig. 2)
switch
Replace the operation battery cover.
(Fig. 3)
Set the battery replacement switch to
“NORMAL OPERATION”. (Fig. 3)
If this is the first time you have
installed batteries in your unit,
proceed to the following steps.
While holding down the
[m]
key
on the keyboard, push the RESET
button on the back of the unit using
the touch pen or a similar object.
When a message appears, touch
m/
to initialize the unit,
completely clearing the memory.
On average, you can expect to get about two months of
battery life based on one hour a day of constant use. Actual
battery life will vary depending on individual use.
See “Getting the Unit Up and Running,” Chapter 1, for
mor&
details.
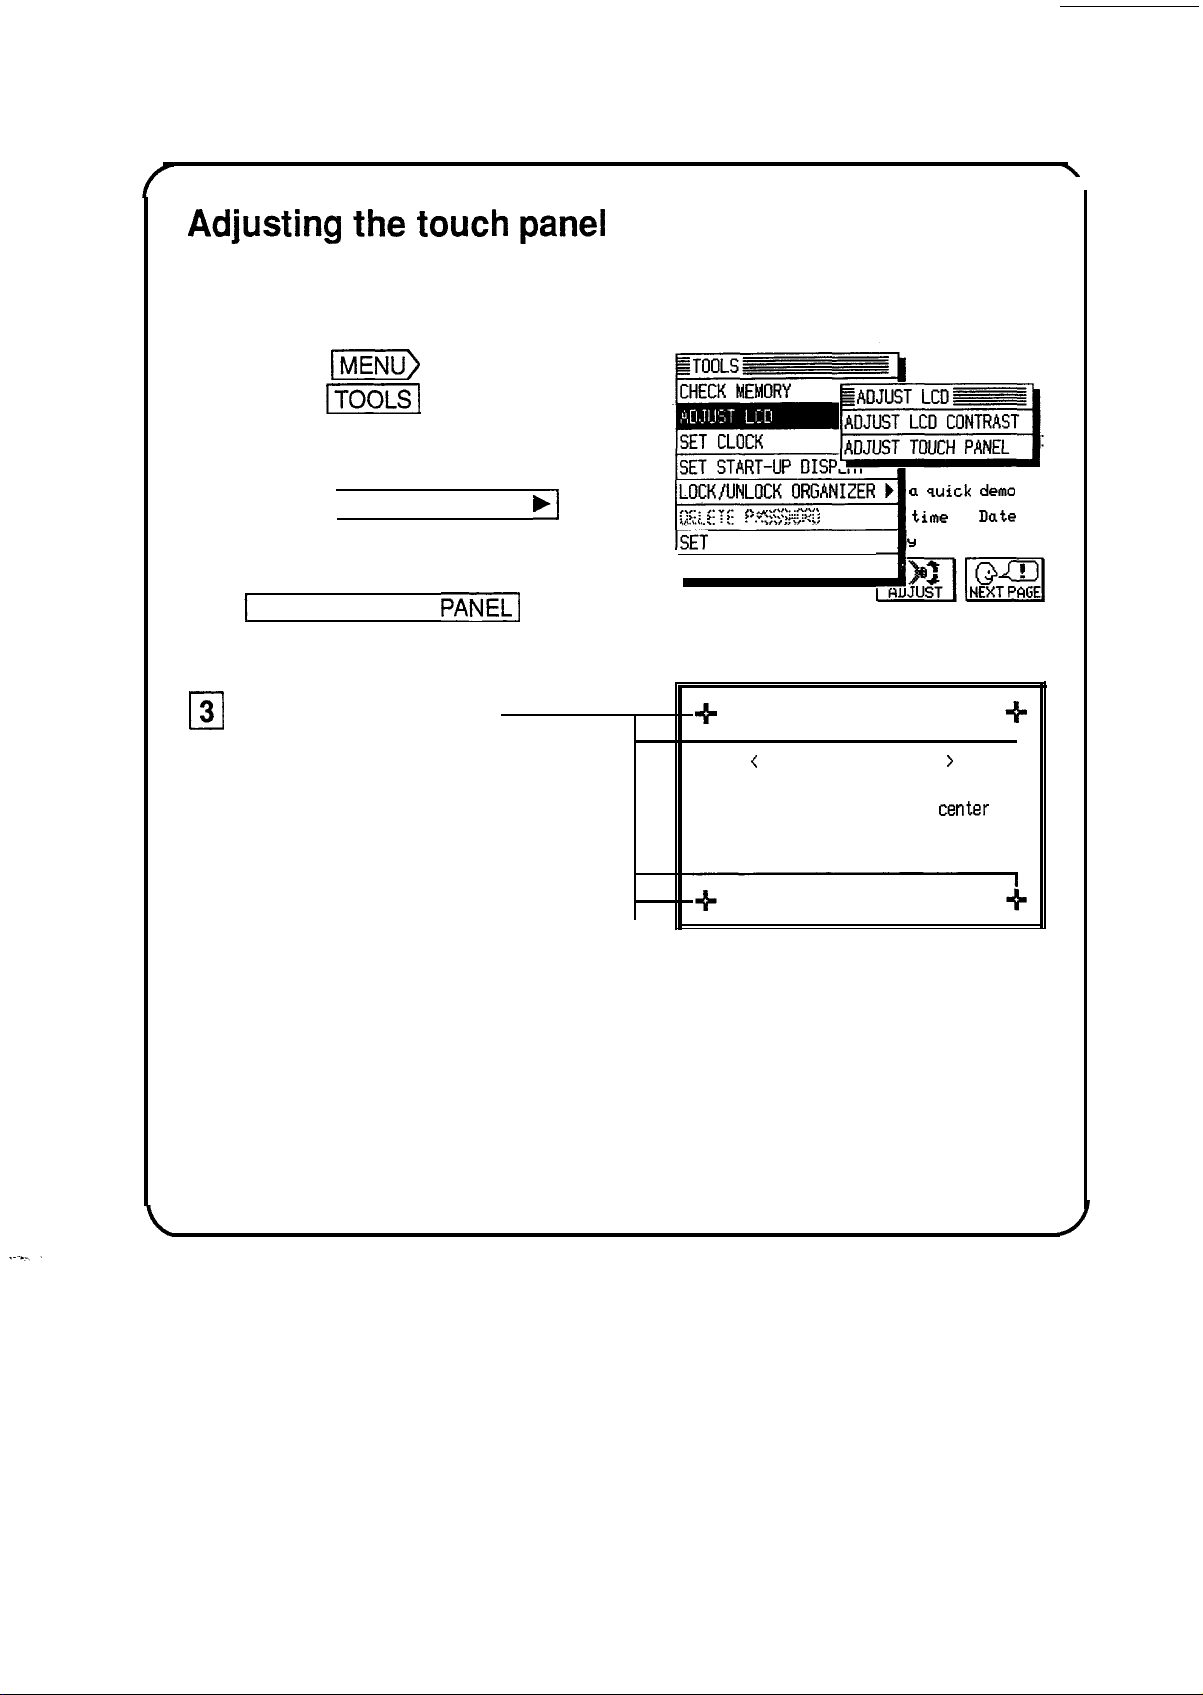
Adjusting
the
touch
panel
Before using the unit, you should adjust the touch panel to ensure
optimal response when touching or writing on the display.
q
1
cl
2
Press
m)
and then
touch
v]
to open the
TOOLS menu.
Touch [ADJUST LCD
.]
on the TOOLS menu and
then touch
1
ADJUST TOUCH
PANEL1
on
the submenu.
LOCK/UNLOCK
ORGANIZER
b
a
quick
demo
1-1
time
&
Date
,,..\...
:
. .
?'.".::::z+..>
,.
~
*.,.:.:<y:/;
ISET
DAILY ALARMS
IY
at the left
MORE TOOLS
,JrnI
0
3
Touch all four of the
?k
+
cross-points with the touch
<
ADJUST
TOUCH PANEL
>
pen.
Note: If the display is not
cleared from the screen,
verify that you have
touched each point.
(Points that have been
touched appear gray.)
Please
touch the exact
center
of
all
four
cross-points with the
organizer’s
pen.
See “Getting the Unit Up and Running,” Chapter 1, for more details.
5
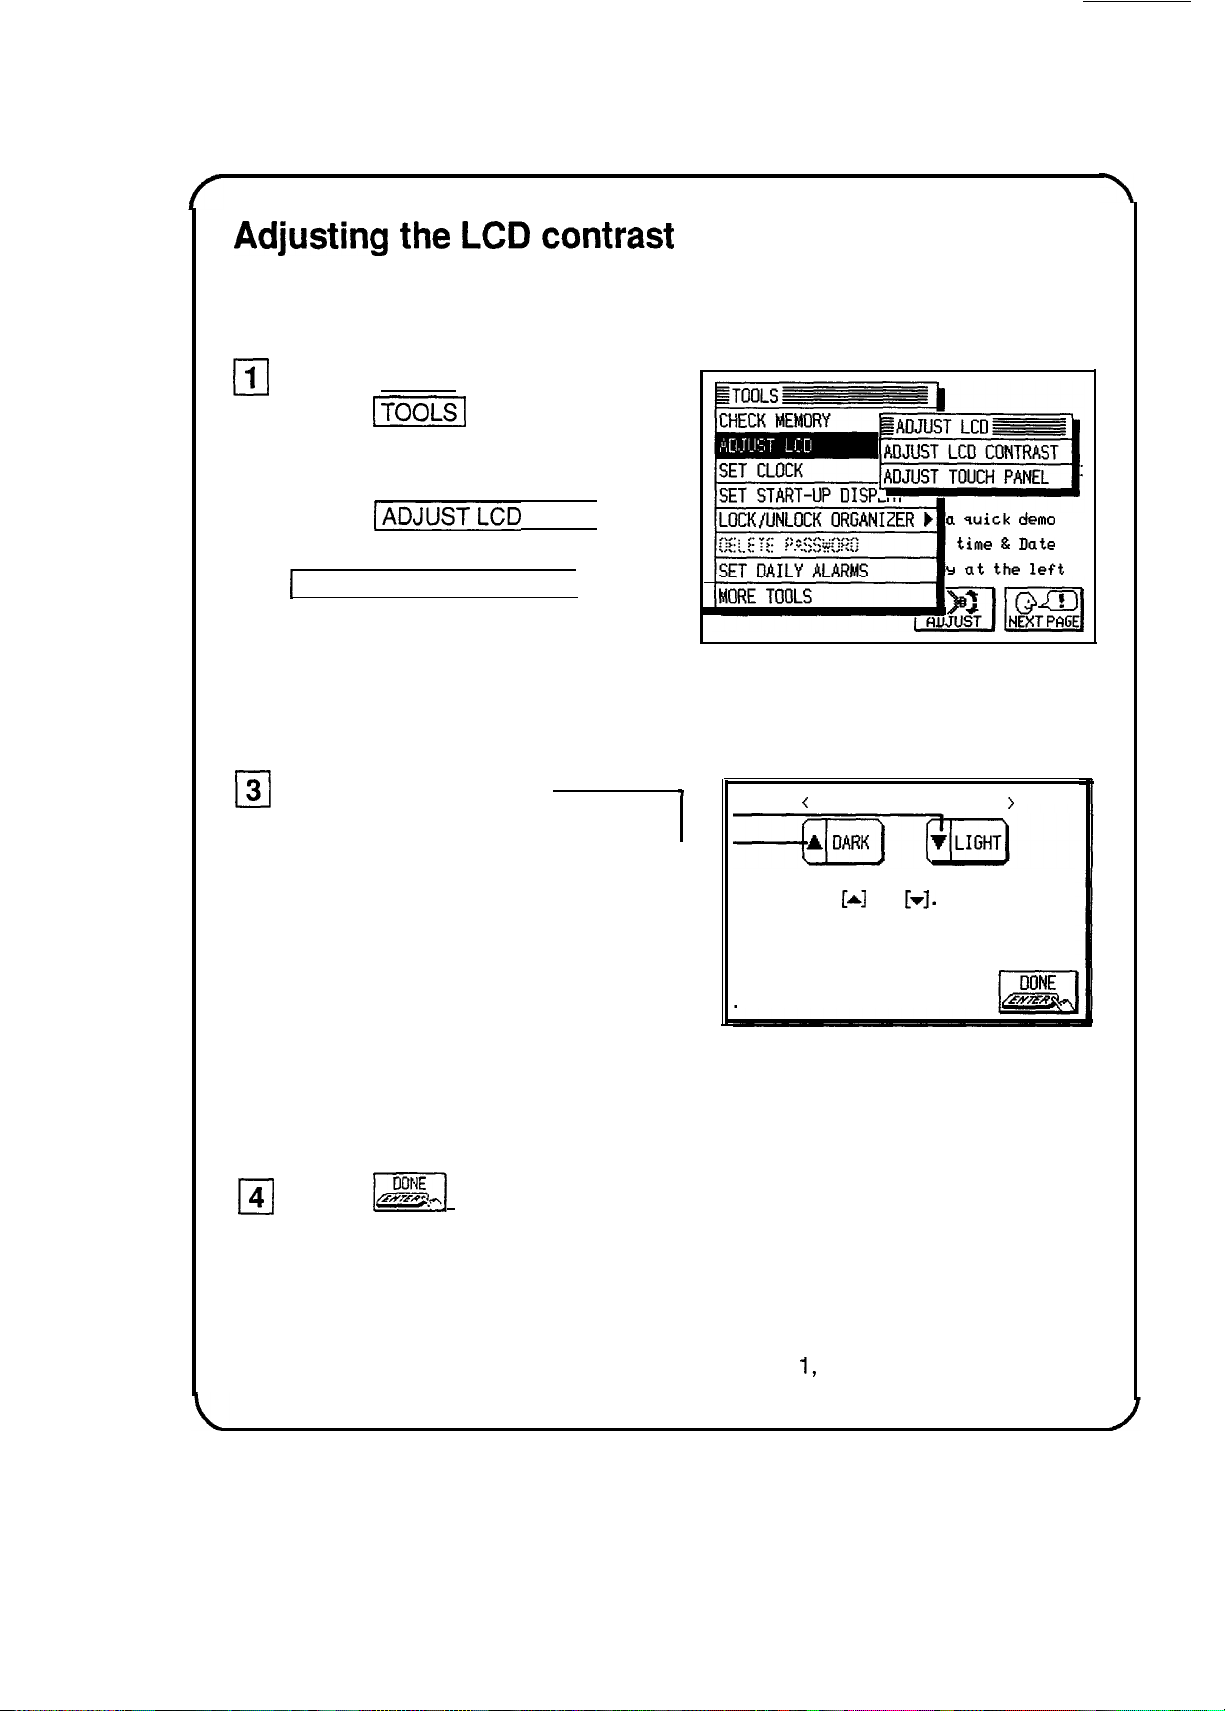
Adjusting
the
LCD
contrast
You may find it necessary to adjust the LCD contrast to suit certain
lighting conditions.
(II
Press (MENU) and then
touch
-1
to open the
TOOLS menu.
q
2 Touch IADJUSTLCD
ä
1
on the menu, then touch
1
ADJUST LCD CONTRAST]
on
the submenu.
Cl
3 Touch the buttons to
7
adjust the contrast to your
liking.
Note: If dark, horizontal
lines appear on the
display, then you have set
the contrast too dark.
Simply lighten it until the
lines disappear.
a
quick
demo
time
&
Date
Y
at
the
left
(
ADJUST
LCD CONTRAST
>
To adjust the LCD contrast,
Press
[A]
or
[T].
Note: You can get here
directly
when the unit
is
off by
holding
down
the [MENU] key and then
pressing the [ON] key.
14)
Touch
K]
when you are finished.
See “Getting the Unit Up and Running,” Chapter
1,
for more details,
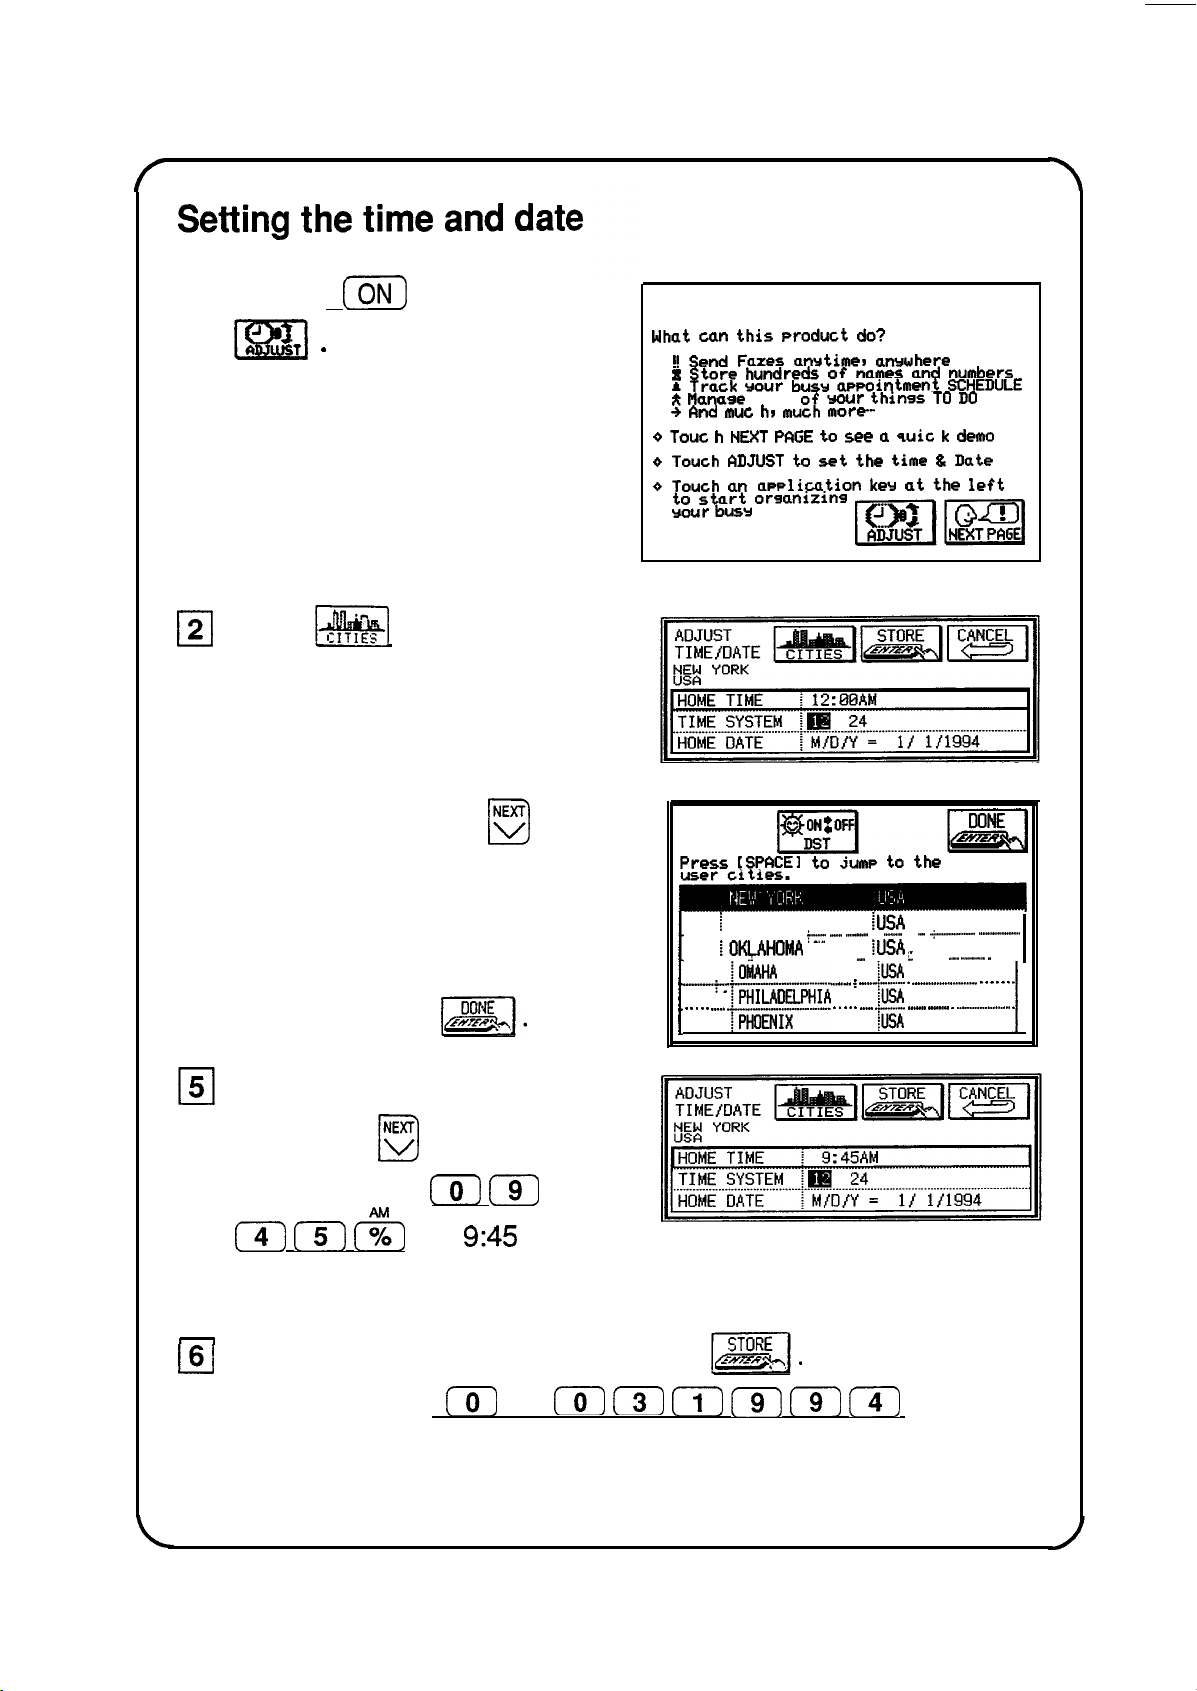
Setting
the
time
and
date
q
Press
[ON)
and touch
J
m
I)
us1
-
(If the demo has already
been disabled, select SET
CLOCK from the TOOLS
menu, then select
ADJUST TIME/DATE from
the submenu.)
Welcome!
What
can
this
product
do?
!!
Send
Faxes
anytime,
anywhere
I
Store
hundreds
of
names
and
numbers
fi
Track
your
busy
aPPointment
SCHEDULE
e
Manase
all
of
wour
things
TO
DO
+
And
muc
hr
much
more-
Q
Tout
h
NEXT
PAGE
to
see
a
quit
k
demo
Q
Touch
ADJUST
to
set
the
time
&
Date
Q
Touch
an
awlication
ker
at
the
left
to
start
orsanizins
your
busy
life
121
Touch
!$@&I
to set your
home city.
cl
3
Press the first letter of the
name of your home
country, then press
y
D
until you find a city in your
time zone.
CHANGE
HOME CITY
Press
[SpACEI
to
jump
to
the
cl
4
Touch the city to select it
and then touch
m].
t
1
NORFOLK
:USA
. . . . . . . . . . .
f...".."
.-.._
.._._-_."
.
..._._."
.
.._
..+"..."-
..-..,....-...........
iOKLAHO#A
CITY
tl!iiA
. . . . . . . . .
";
. . . . . . . . . . . . . .
"""
.
. . . . . . . . . . . . . . . . . . . .
i....
.
. . . . . . .
I._."
-....--..........
_
. . . .
.“..“....y”......“.”
-__......_..........-.
i
-....-...
“I
.
.._....._..........”
.
.
.
.
.
.
.
/
.
.
.
.
.
.._..
pL&!!?“!
.
.
.
.
.
.._
ii
..-..
““..”
.
..-.................
/
151
Type the correct time and
then press
@
twice.
(For example:
[o)
(3)
14)
(5)
(%]
for
9:45
AM.)
-
w
Type the correct date and then touch
I=].
(For example:
(-6-j
(5)
(0)
(3)
(?-)
[-%i-]
(9)
(7)
for May
3, 1994.)
See “Getting the Unit Up and Running,” Chapter 1, for more details.
7
r
7
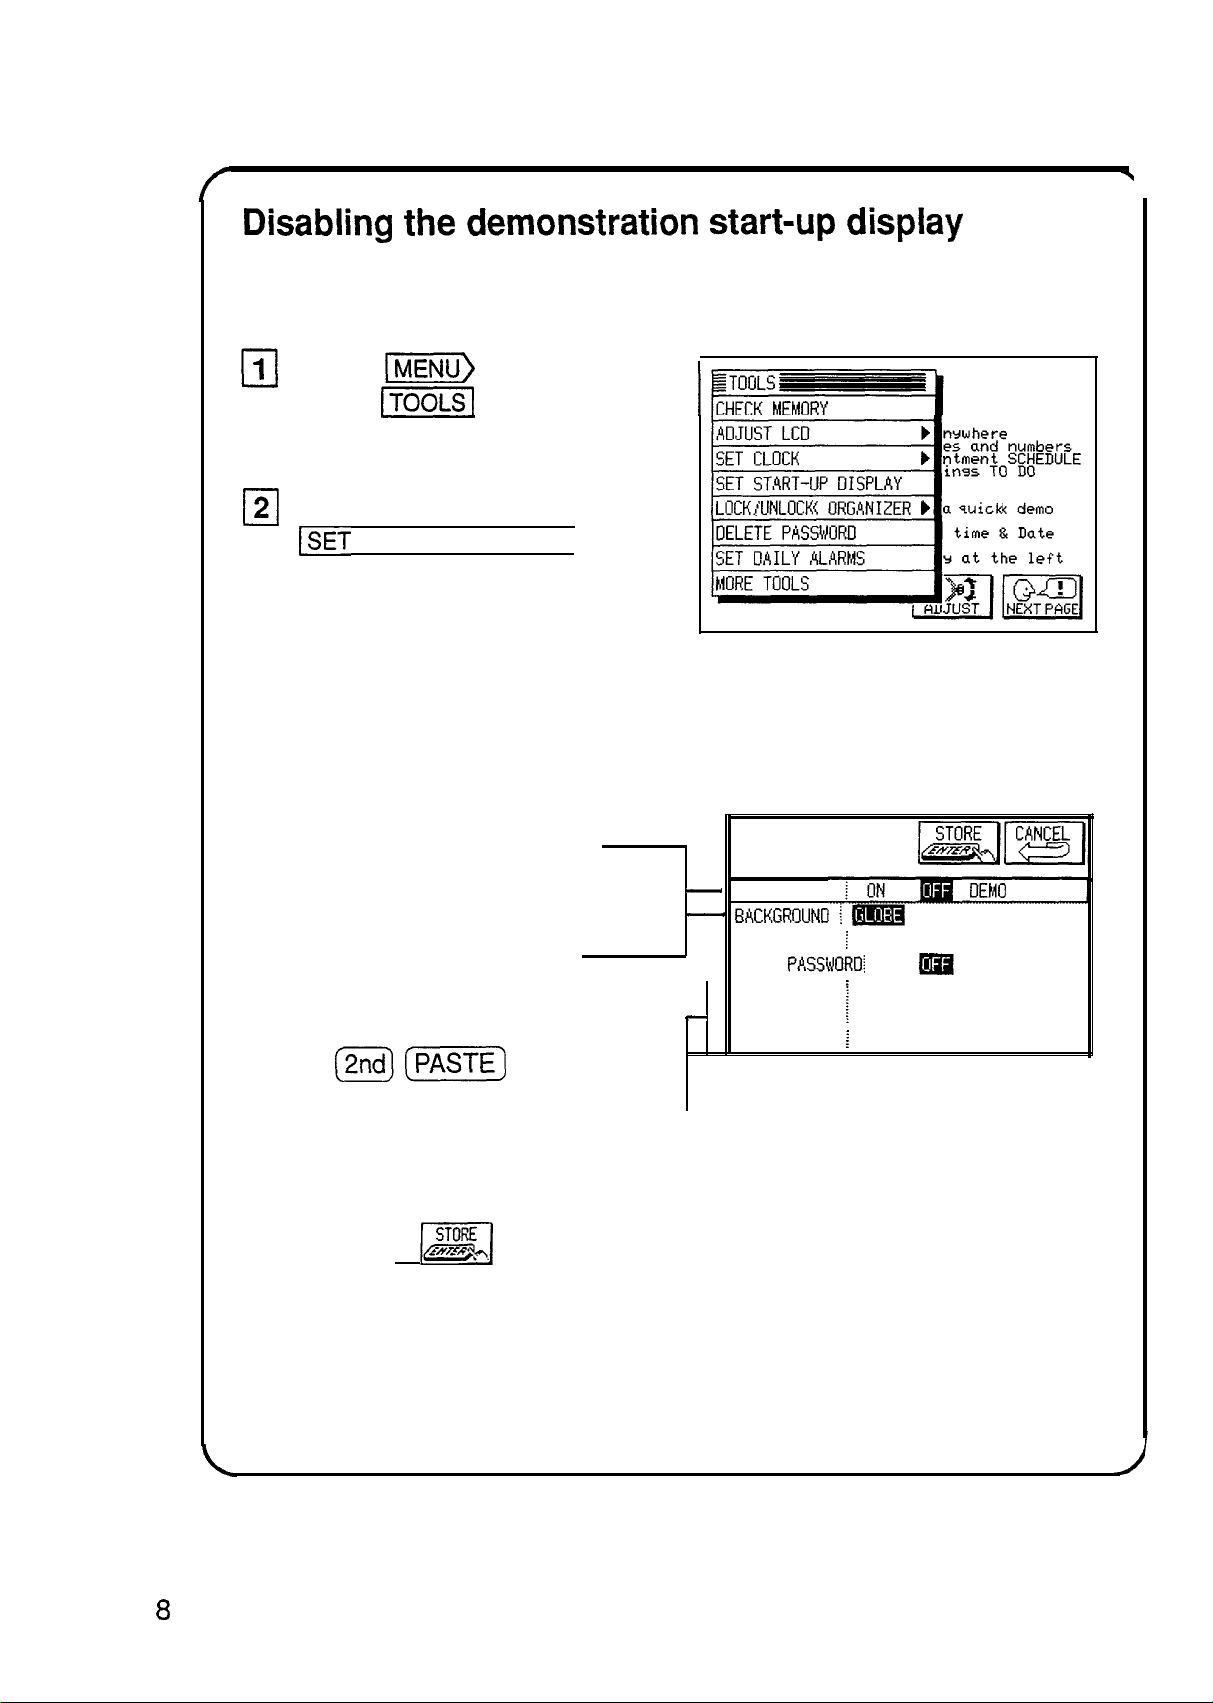
Disabling
the
demonstration
start-up
display
Your unit comes with a built-in demo which is turned on by default.
You will most likely want to shut this off at this time.
cl
1
cl
2
Press
Im)
and then
touch
v]
to open the
TOOLS menu.
Touch
~SET
START-UP DISPLAY].
q
3
Touch OFF in the box next
to START-UP to disable
the demo start-up display.
If you want your name, number
and address to be displayed on
start-up, touch ON instead of OFF.
GLOBE is the default start-up
display. To paste in a picture you
have copied from Scrapbook,
select USER’S and then
type
(2ndl[7%%%]
.
~~g:i$:E;~k;;,
LOCK!UNLOCK
ORGANIZER
b
a
quick
demo
SET
START-UP DISPLAY
-
START-UP
i
-
EACKGROUNO
i
m
USER'S PICTURE
. . . . . . . . . . . . . . . . . . . . . . . . . . . . . . . . . . . . . . . . . . . . . . . . . . . . . . . . . . . . . . . . . . . . . . . . . . . . . . . . . . . . . . . . . . . . . . . . . . . . . . . .
USER'S
I
[Paste picture here]
. . . . . . . . . . . . . . . . . . . . . . . . . . . . . . . . . . . . . . . . . . . . . . . . . . . . . . . . . . . . . . . . . . . . . . . . . . . . . . . . . . . . . . . . . . . . . . . . . . . . . . . . . .
ASK
PASSVORDI
ON
[9ili
. . . . . . . . . . . . . . . . . . . . . . . . . . . . . . . . . . . . . . . . . . . . . . . . . . . . . . . . . . . . . . . . . . . . . . . . . . . . . . . . . . . . . . . . . . . . . . . . . . . . . . . .
OWNER
:
. . . . . . . . . . . . . . . . . . . . . . . . . . . . . . . . . . . .
j
. . . . . . . . . . . . . . . . . . . . . . . . . . . . . . . . . . . . . . . . . . . . . . . . . . . . . . . . . . . . . . . . . . . . . . . . .
-
TEL NUMBER
i
. . . . . . . . . . . . . . . . . . . . . . . . . . . . . . . . . . . . . . . . . . . . . . . . . . . . . . . . . . . . . . . . . . . . . . . . . . . . . . . . . . . . . . . . . . . . . . . . . . . . . . . . . . . . . .
ADDRESS
i
Type in your name, number, and-
address here.
q
Touch
m]
to save all the changes.
See “Setting the Start-Up Display,” Chapter 9, for more details.
8
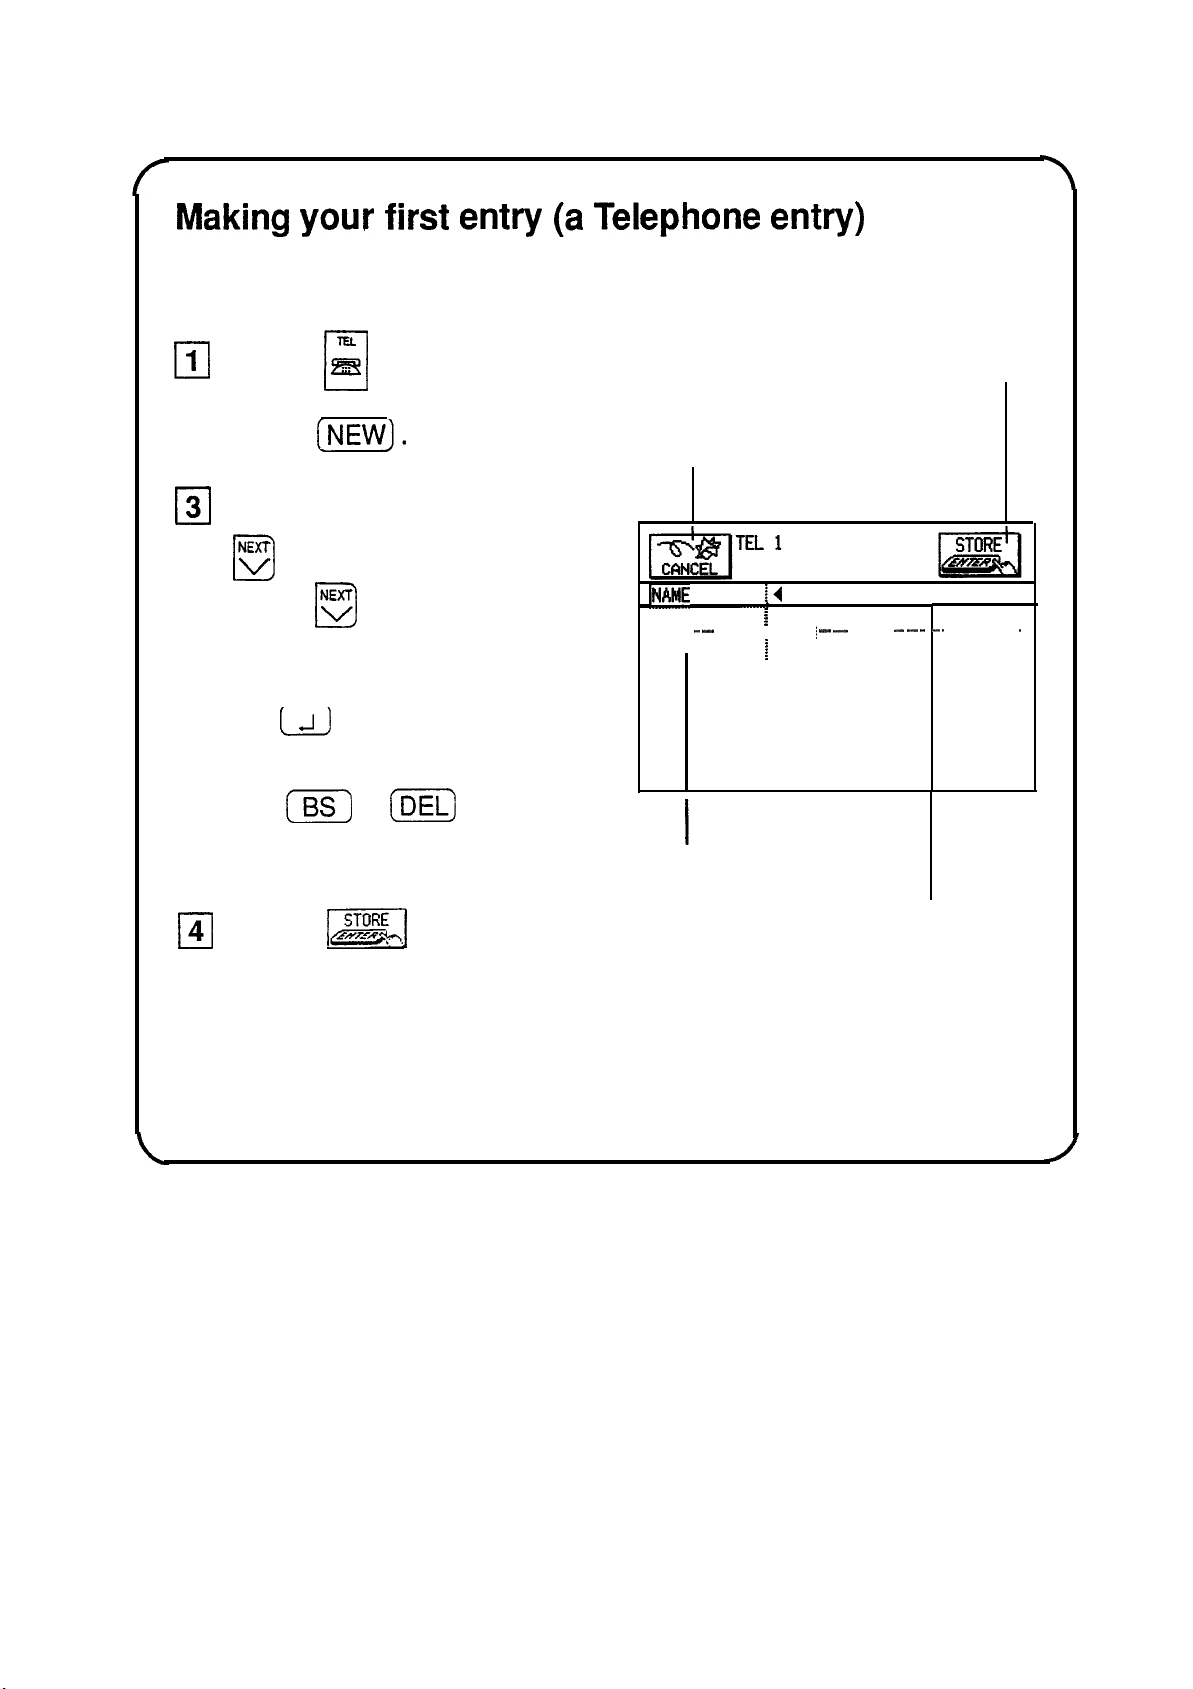
Making
your
first
entry
(a
Telephone
entry)
Note: The procedures described in the example below can be used
in many of this unit’s applications.
cl
1
cl
2
0
3
0
4
Press
j&
.
0
Press
(NEW).
Type in a name, press
D
‘G
, type in a number,
press
NC
, then type in
cl
an address.
Use
u
to move to the next
line within a field.
Use
(E)
or
(E)
and the
cursor keys to correct mistakes.
Touch
m]
when
you are finished.
Touch here to store the
entry into memory.
Touch here to cancel
the new entry.
FAME
:4
-
NUMBER
:
. . . . . .
.._._
"..".."
. . ..." . . . . . . . . .
i
_......"
.._......."
. . . . . .
"^".I
..1-1..
-
.--...
I
. . . . . . . . . . ..I..
I
ADDRESS
!
Simply touch a field name to
select the field for data entry.
The dark outlines around a
field indicates that it is selected.
See “Making a New Entry,” Chapter 2, for more details.
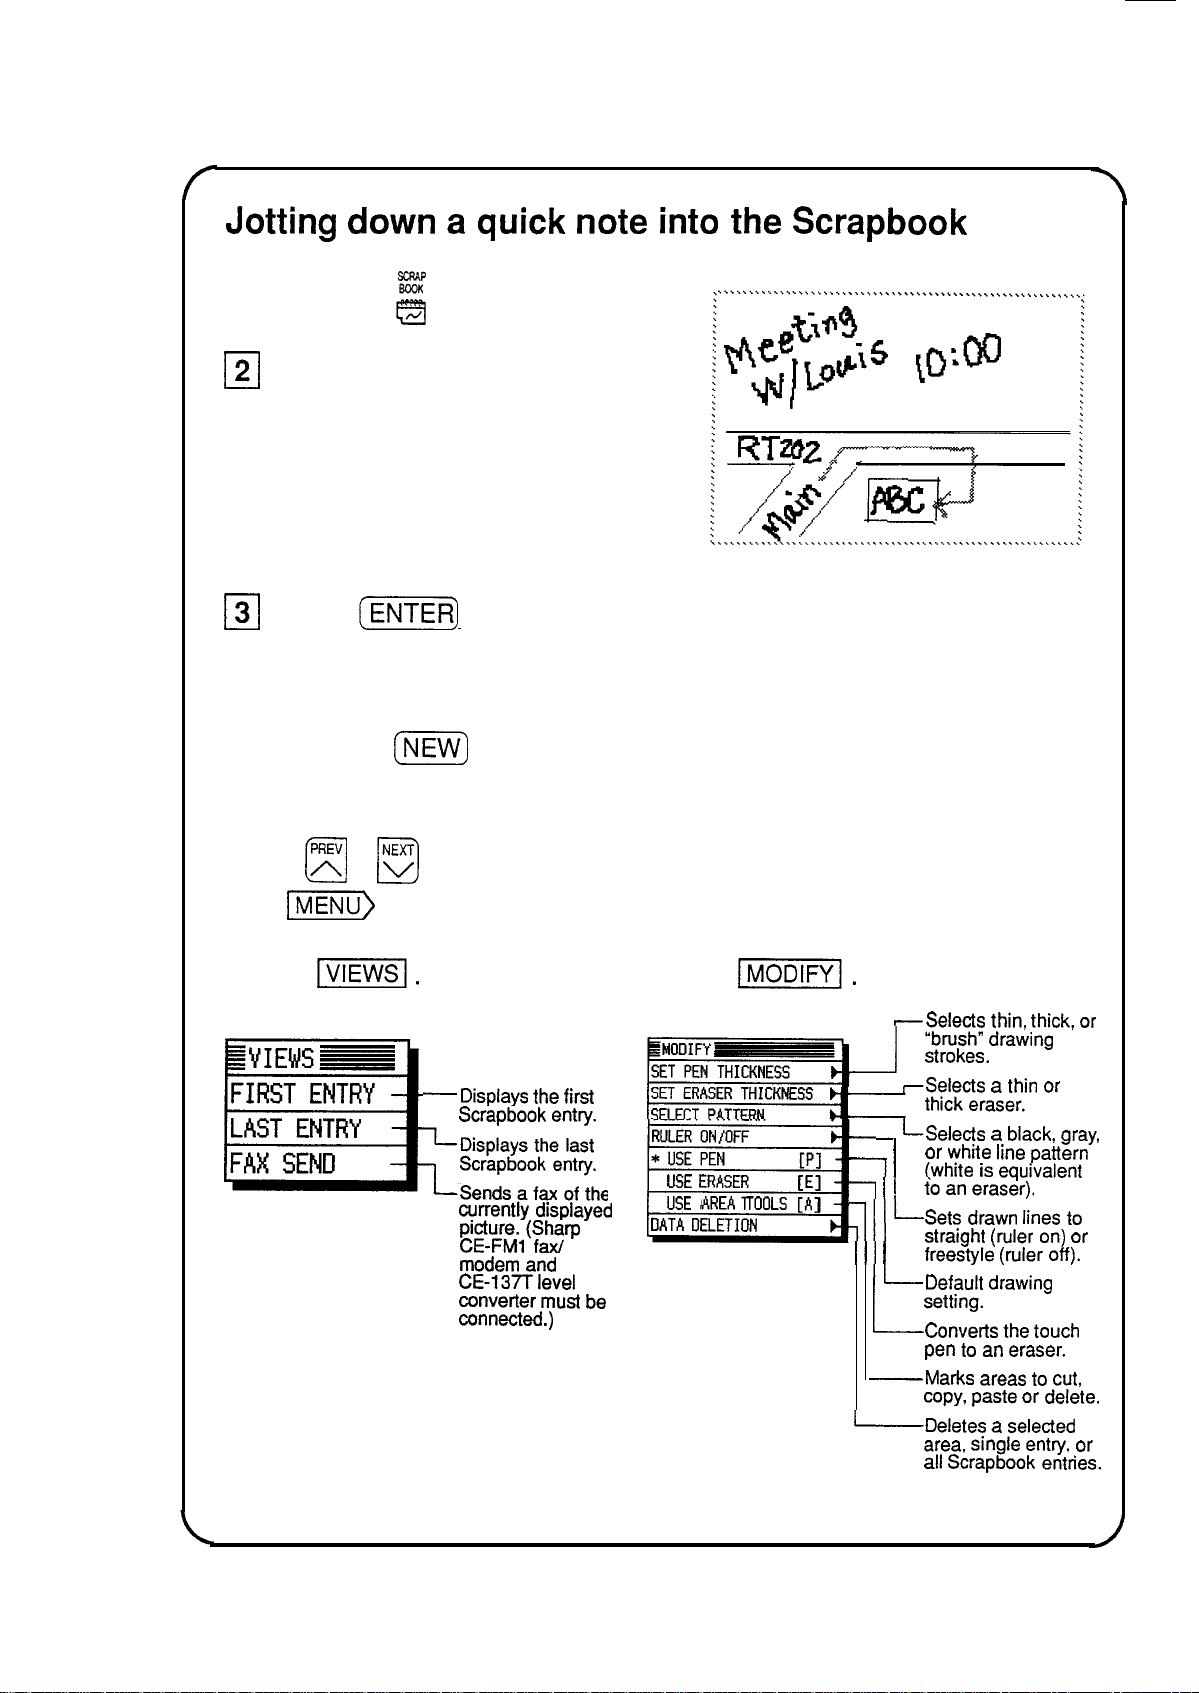
Jotting
down
a
quick
note
into
the
Scrapbook
q
Press
j!j
.
cl
121
Take the pen and write a
note on the display.
131
Press
(m)
when you
are finished drawing.
Now you can close the Scrapbook by pressing another application
key or press
(N)
to create other drawings.
Other Scrapbook Features
Use
a
,
u
t
o
view other scrapbook entries.
Use
IMENU)
to access other features.
Touch
I.
Touch
p-j.
-Selects
thin,
thick,
or
-J
“brush”
drawing
strokes.
-Displays
the
first
Scrapbook
entry.
currently
displayed
gg$$P
modem
and
CE-137T
level
converter
must
be
connected.)
-Selects
a
thin
or
_---_.
.__.
RULER
ON/OFF
*
USE
PEN
[PI
r
,a
’
USE
ERASER
[El
USE
AREA
TOOLS
[A]
I!
io
an
eraser).
DATA
DELETION
III
LSelects
a
black,
gray,
1
1
or
white
line
pattern
(white
is
equivalent
lW--
Sets
drawn
lines
to
Ill
I
straight
(ruler
on)
or
freestyle
(ruler
off).
L-
L
Default
drawing
setting.
Converts
the
touch
pen
to
an
eraser.
-Marks
areas
to
cut,
copy,
paste
or
delete.
-Deletes
a
selected
area,
single
entry,
or
all
Scrapbook
entries.
See “The Scrapbook Application,” Chapter 6, for more details.
10
--
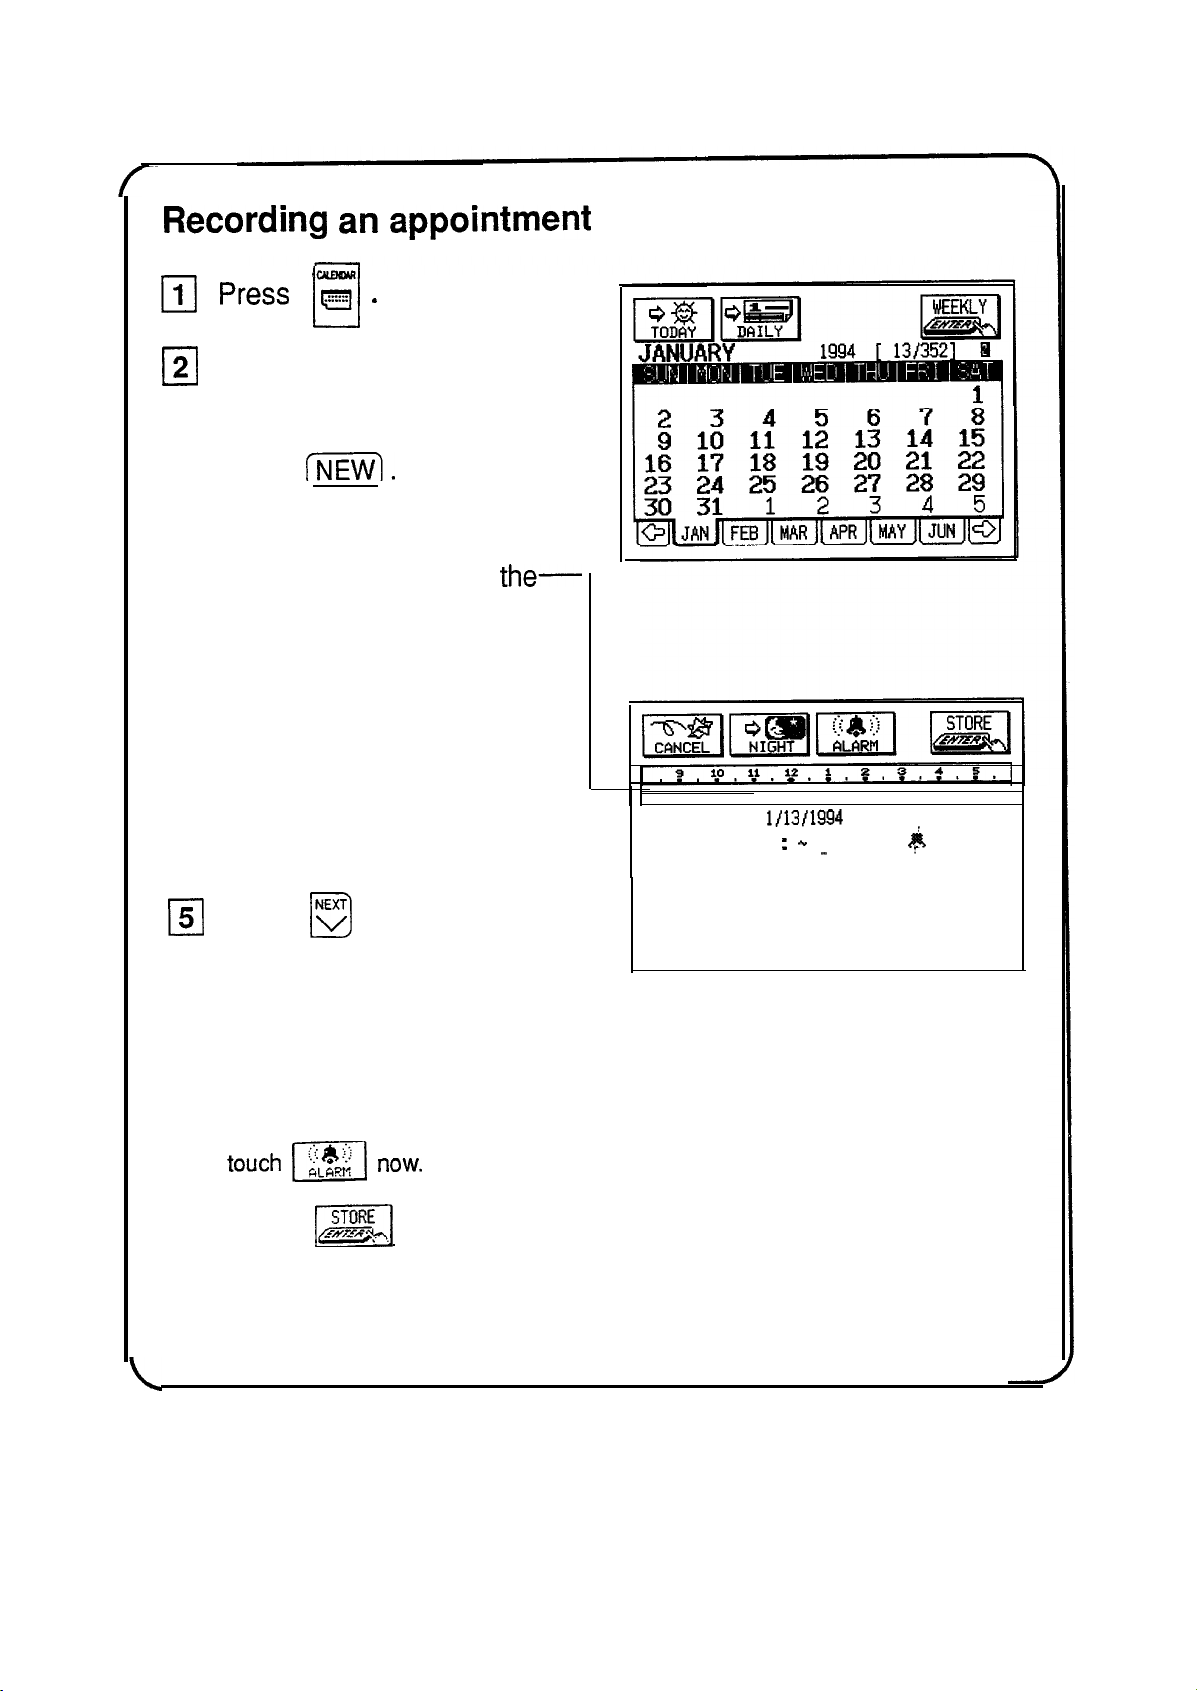
Recording
an
appointment
III
1
El
2
cl
3
q
4
0
5
El
6
press
g
.
u
Touch the day you wish to
make an appointment on.
Press
INEW).
Touch the time bar at
the-
time the appointment
begins, then touch it again
at the time the
appointment ends.
You can also use the keyboard to
enter the times if your
appointment does not fall on the
hour or half-hour.
Press
B
and
type in a description.
(Example: “Meeting with
Pat”)
If you want to set an alarm to
remind you of the appointment,
DATE: M/D/Y=
l/13/1994
. . . . . . . . . . . . . . . . . . . . . . . ..." . . . . . . . . . . . . . . .. . . . . . . . . . . . . . . . . . . . . . . . . . . . . . . . . . . . . . . . . . . . . .
y
. . . . . . . . . . . . . . . . . . . . . . . . . . . . .
TIME:
:
.+
:
h
:
. . . . . . . . . . . . . . . . . . . . . . . . . . . . . . . . . . . . . . . . . . . . . . . . . . . . . .
..-..
. . . . . . . . . . . . . . . . . . . . . . . . . . . .
t
. . . . . . . . . . . . . . . . . . . . . . . . . . . . . .
touch
1x1
now.
Touch
m]
to store the entry into memory.
See “The Schedule Application,” Chapter 3, for more details.
11
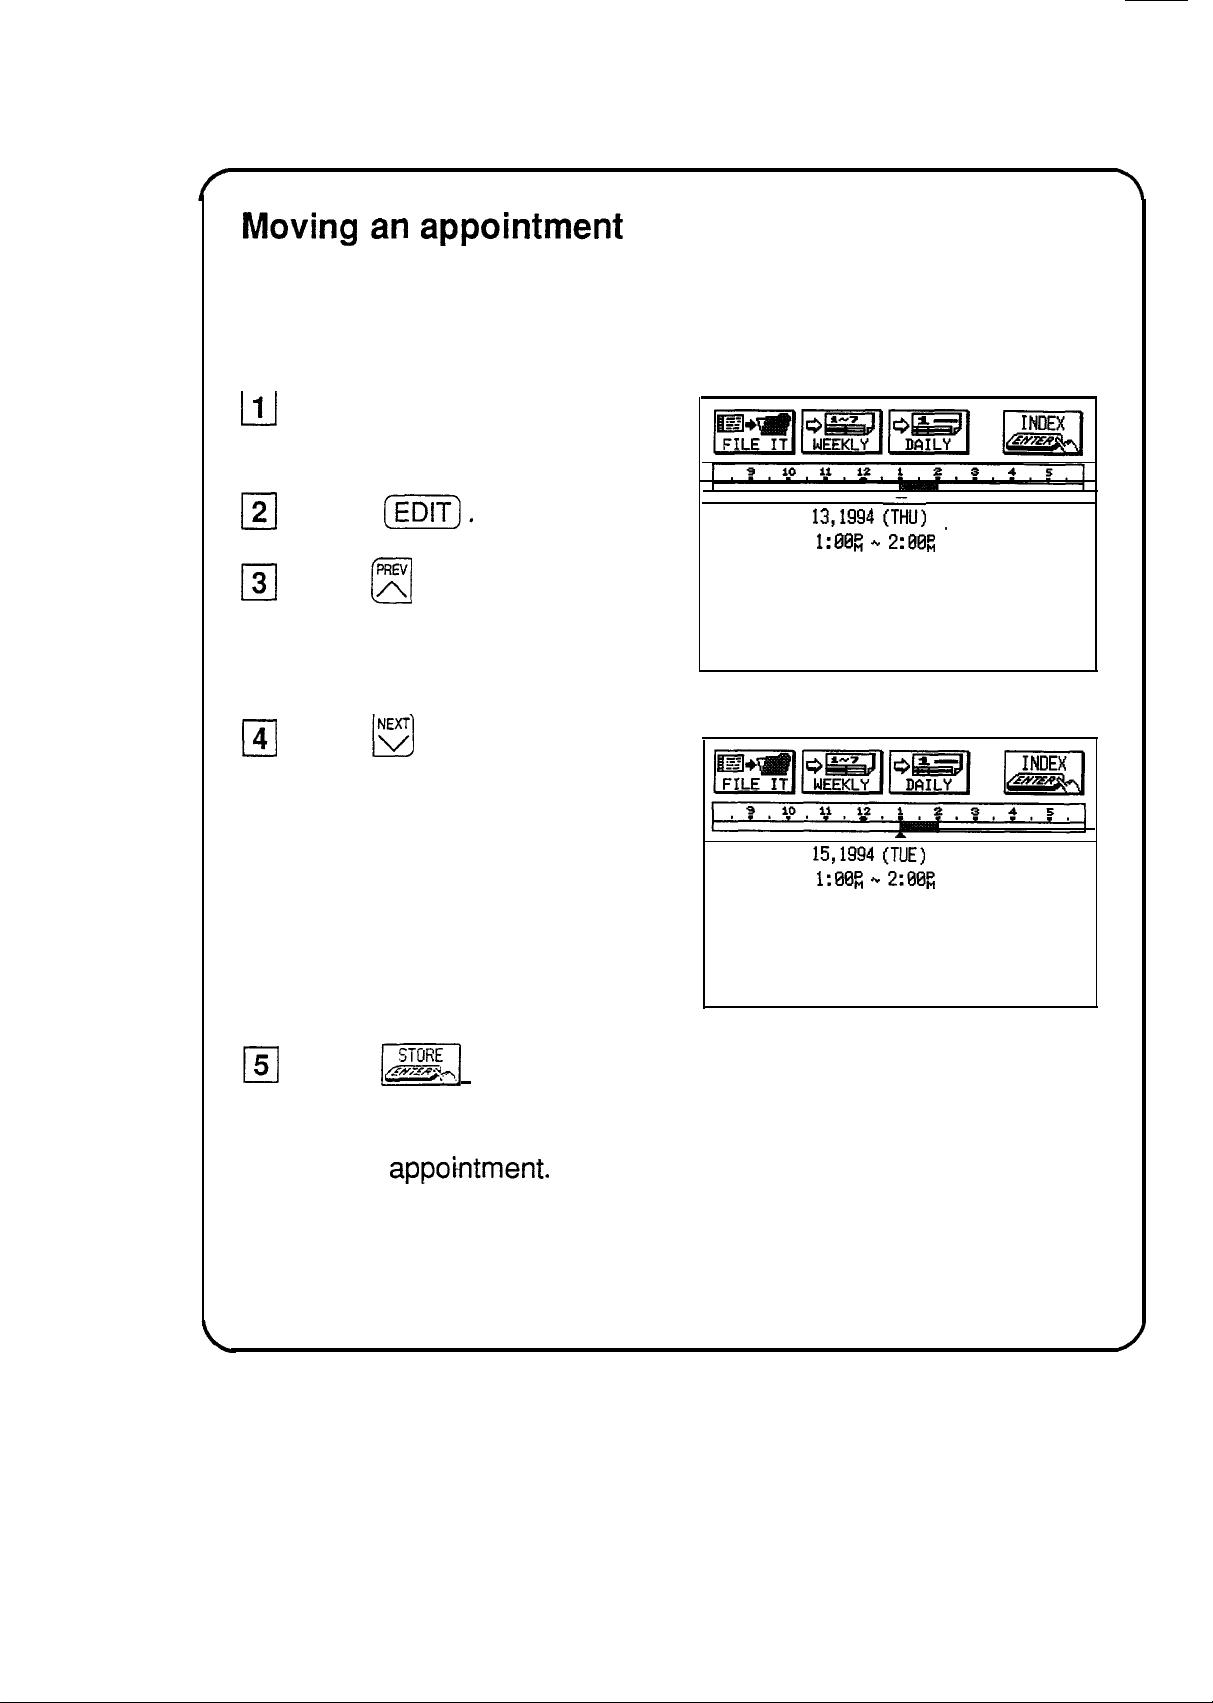
Moving
an
appointment
Appointment times and dates can frequently change. Rather
than
re-typing the information, you can easily change an appointment
stored in the unit.
111
Find the Schedule entry
you want to move.
121
Press
[EE).
131
Press
m
and type in the
new date (if the date has
been changed).
141
Press
B
to move to the
time field and touch the
time bar at the time the
appointment begins, then
touch it again at the time
the appointment ends (if
the time has been
changed).
DATE: JAN
13,1994
(TiU)
. . . . . . . . . . . . . . . . . . . . . . . . . . . . . . . . . . . . . . . . . . . . . . . . . . . . . . . . . . . . . . . . . . . . . . . . . .
_
. . . . . . . . . . . . . . . . . . . . . . . . . . . . . . . . . . . . . . . . . . .
TIME:
1:00;
.+
2:00g
. . . . . . . . . . . . . . . . . . . . . . . . . . . . . . . . . . . . . . . . . . . . . . . . . . . . . . . . . . . . . . . . . . . . . . . . . . . . . . . . . . . . . . . . . . . . . . . . . . . . . . . . . . . . . . . . . . . . . . .
Meeting with Pat
Note: You can also use the Cut and Paste functions to move an
appo’ktment.
See p. 207.
See “The Schedule Application,” Chapter 3, for more details.
DATE: MAR
15,1994
(TUE)
. . . . . . . . . . . . . . . . . . . . . . . . . . . . . . . . . . . . . . . . . . . . . . . . . . . . . . . . . . . . . . . . . . . . . . . . . . . . . . . . . . . . . . . . . . . . . . . . . . . . . . . . . . . . . . . . . . . . . . .
TIME:
1:00p,
‘*
2:00D,
. . . . . . . . . . . . . . . . . . . . . . . . . . . . . . . . . . . . . . . . . . . . . . . . . . . . . . . . . . . . . . . . . . . . . . . . . . . . . . . . . . . . . . . . . . . . . . . . . . . . . . . . . . . . . . . . . . . . . . .
Meeting with
Pat
151
Touch
mi
to save the changes.
12
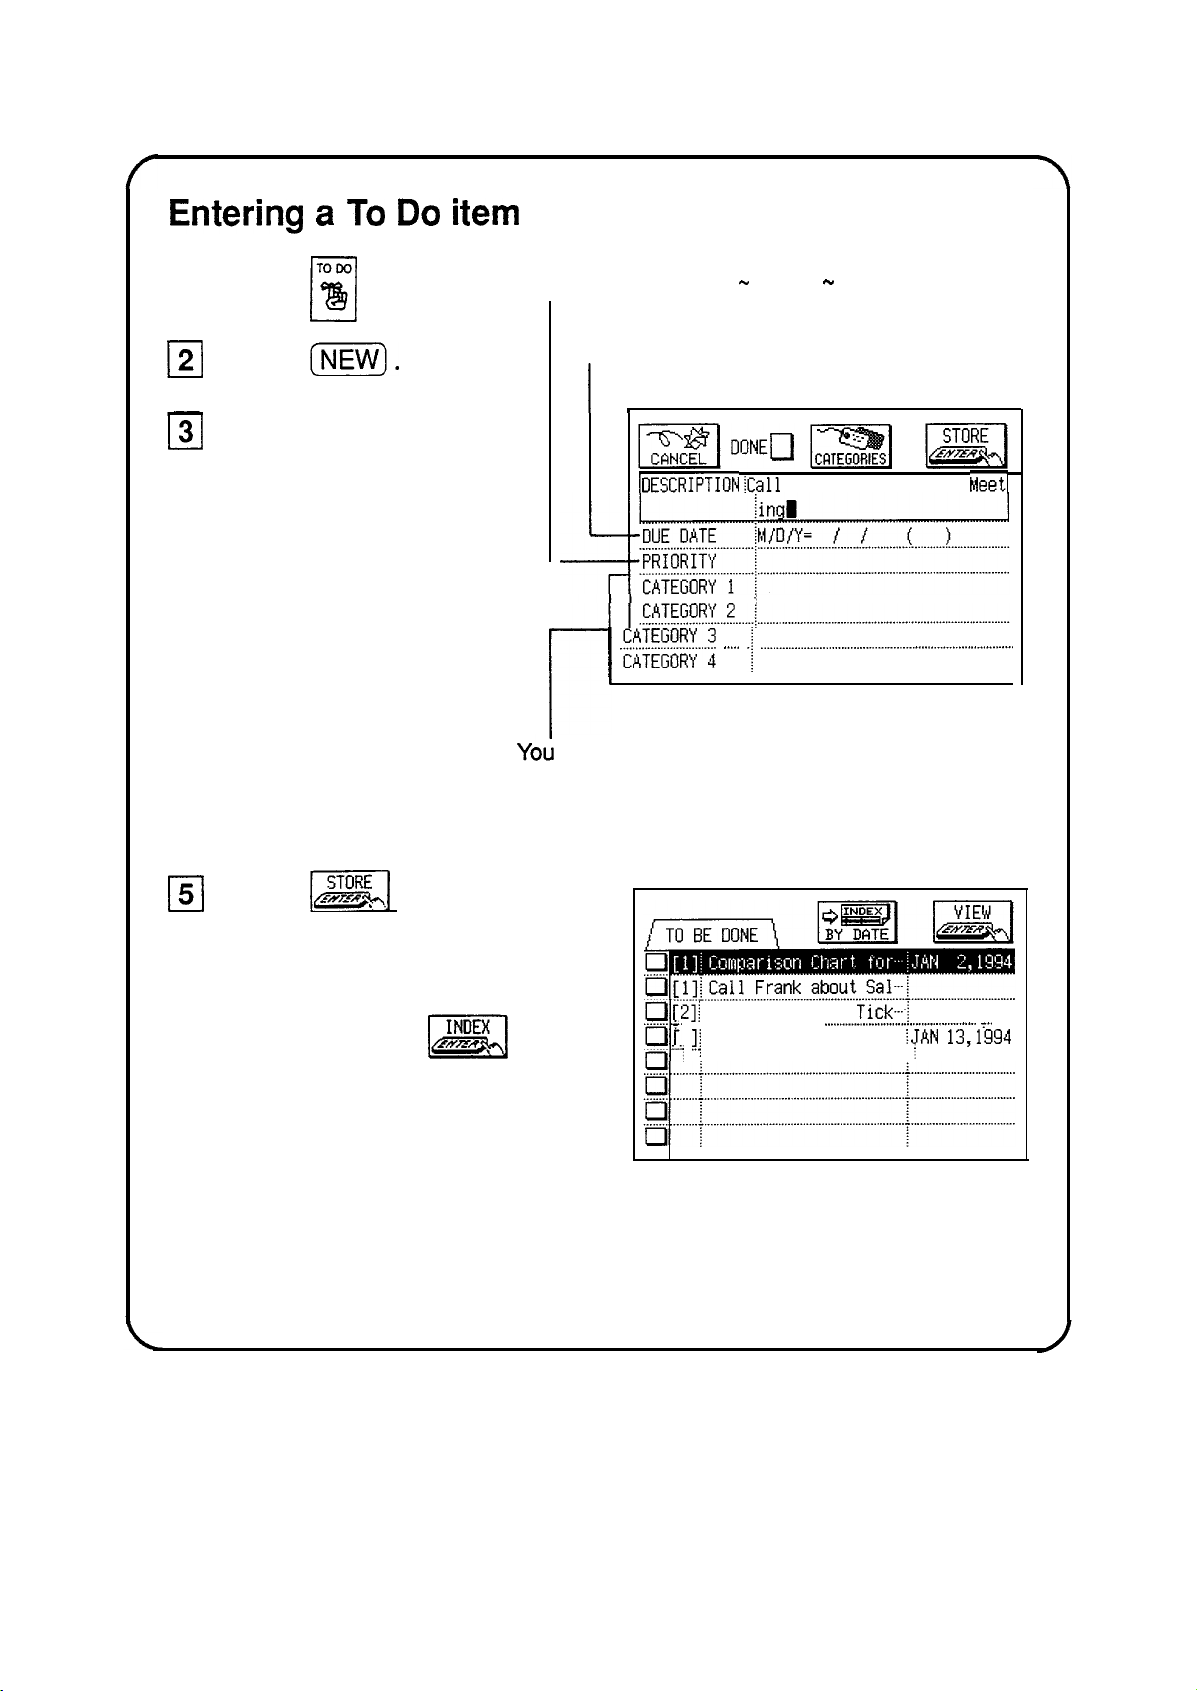
Entering
a
To
Do
item
q
Press
‘g
.
0
You can assign the task a priority using a
single character. (0
-
9 or A
-
Z).
12)
Press (KKK).
131
Type in a description.
q
4
If desired, type in any
other information.
p
1
p;;.,.;
,_,_,
1
_.__.____._._._._,_....,,....,.......................................,...........,
Yob
can assign up to 5 categories to a task, then
later use these to filter the item in a To Do list.
151
Touch
[=I
when you
are finished.
You can now press 2Ex to
Q
see a list of all your To Do
items or you can review them
in the Calendar views.
Type in a due date here if the To Do
item has one.
I
,
iDESCRIPTION
iCal
Frank about Sales
Meet1
. . . . . . . . . . . . . . . . . . . . . . . . . . . . . . . . . . .
..j
. . . . . . . . . . . . . . . . . . . . . . . . . . . . . . . . . . . . . . . . . . . . . . . . . . . . . . . . . . . . . . . . . . . . . . . . . . . .
[2]1
Pick up Theater
Tick-i
+
. . . . . . . . . . . . .
.._.___.............................................
y . .
]f
Finish report
fJAN
13,1994
........i
. . . . . . . . . . . . . . . . . . . . . . . . . . . . . . . . . . . . . . . . . . . . . . . . . . . .
i
. . . . . . . . . . . . . . . . . . . . . .
See “The To Do Application,” Chapter 3, for more details.
13
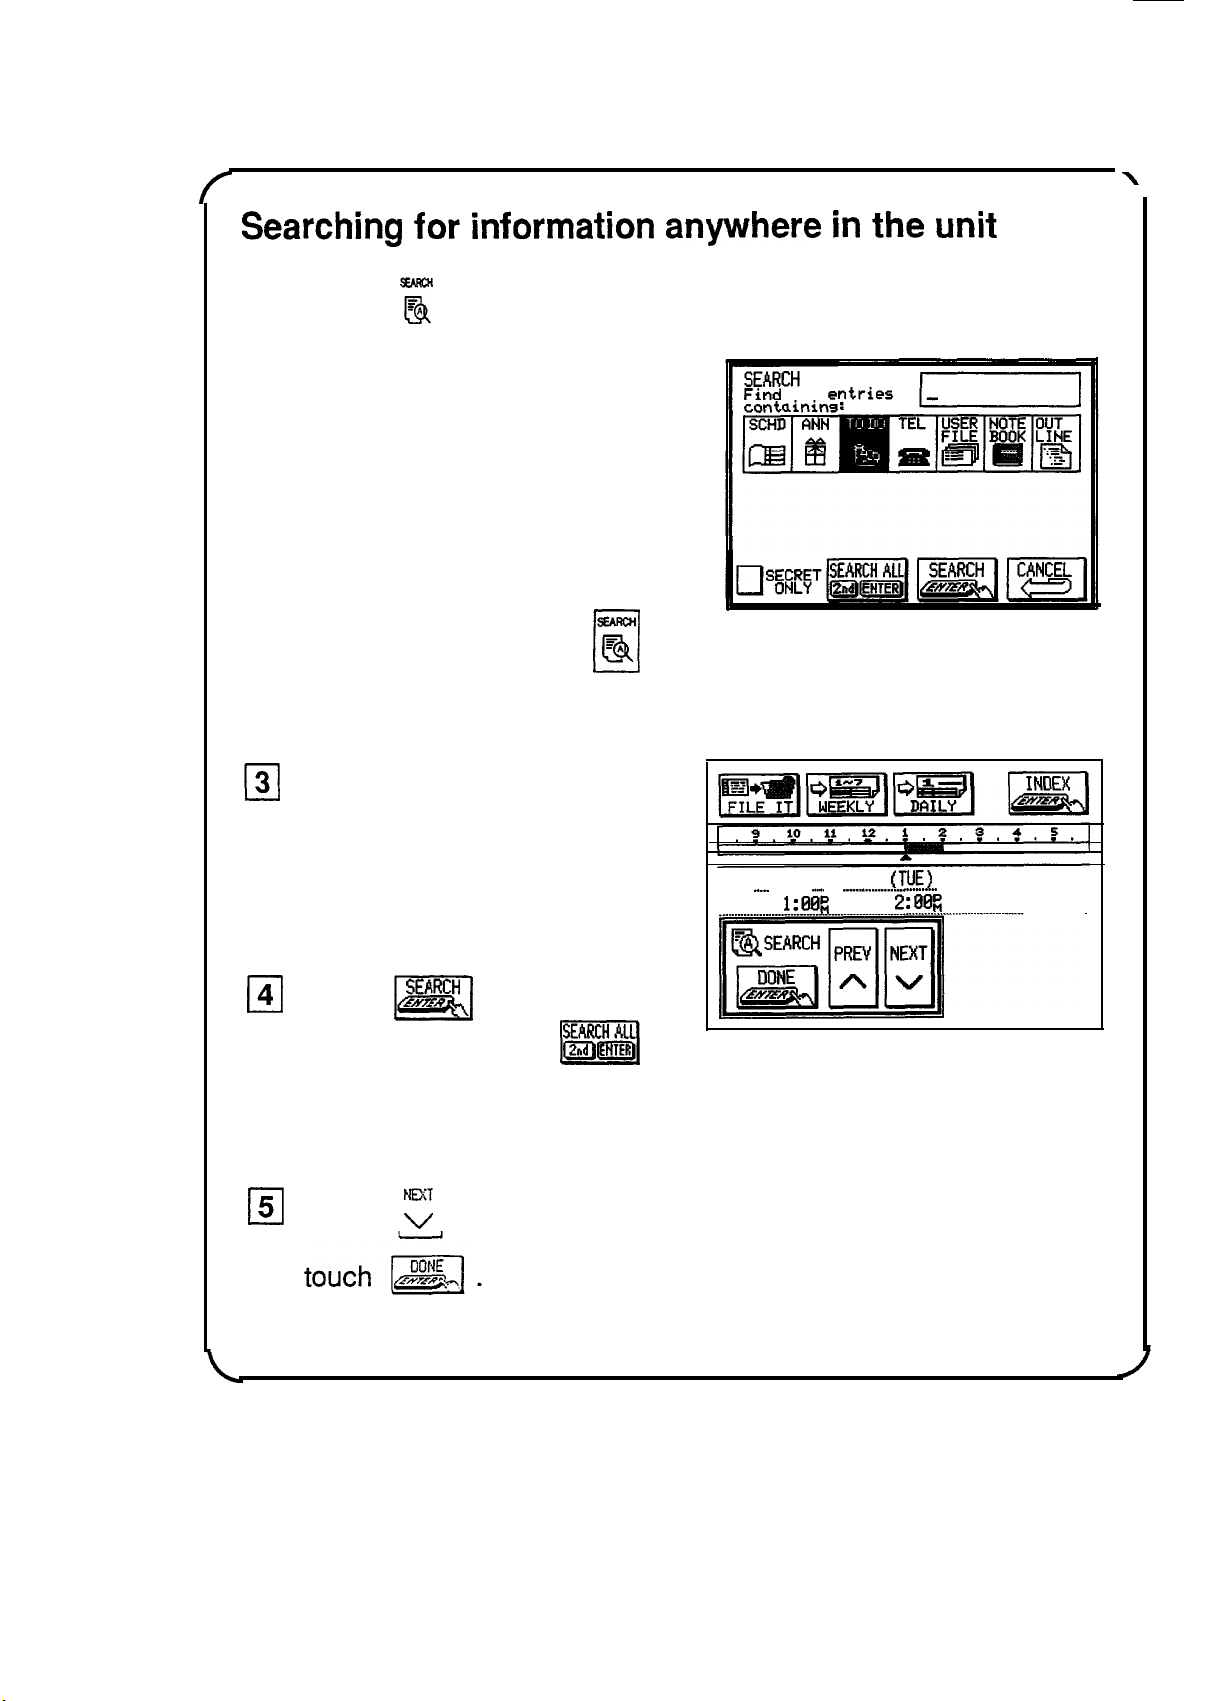
Searching
for
information
anywhere
in
the
unit
q
Press
E
.
cl
cl
2
Type in any word stored in
an entry that you want to
Find
all
entries
containins:
search for.
You can use up to 16 characters
(letters, numbers, symbols, etc.).
If you highlight a word in an entry
with the pen and then press
g
,
cl
that word will automatically
appear in the search word box.
131
Select the application you
want to search.
The application you were using
last will always be the default
application.
DATE: MAR 15 1994
(TUE)
...........
".^
..............
.._.
.
.
.
.._...............-.......-
..........................................
.......
TIME:
l:EIEi~
.
2:88::
............
.........
cl
4 Touch
m
,%.!$cH
to begin
searching (or touch
ml
to search in ail applica-
tions).
III
5 Touch
7
rl
until you find the entry you are looking for, then
See “General Operation,” Chapter 2, for more details.
14
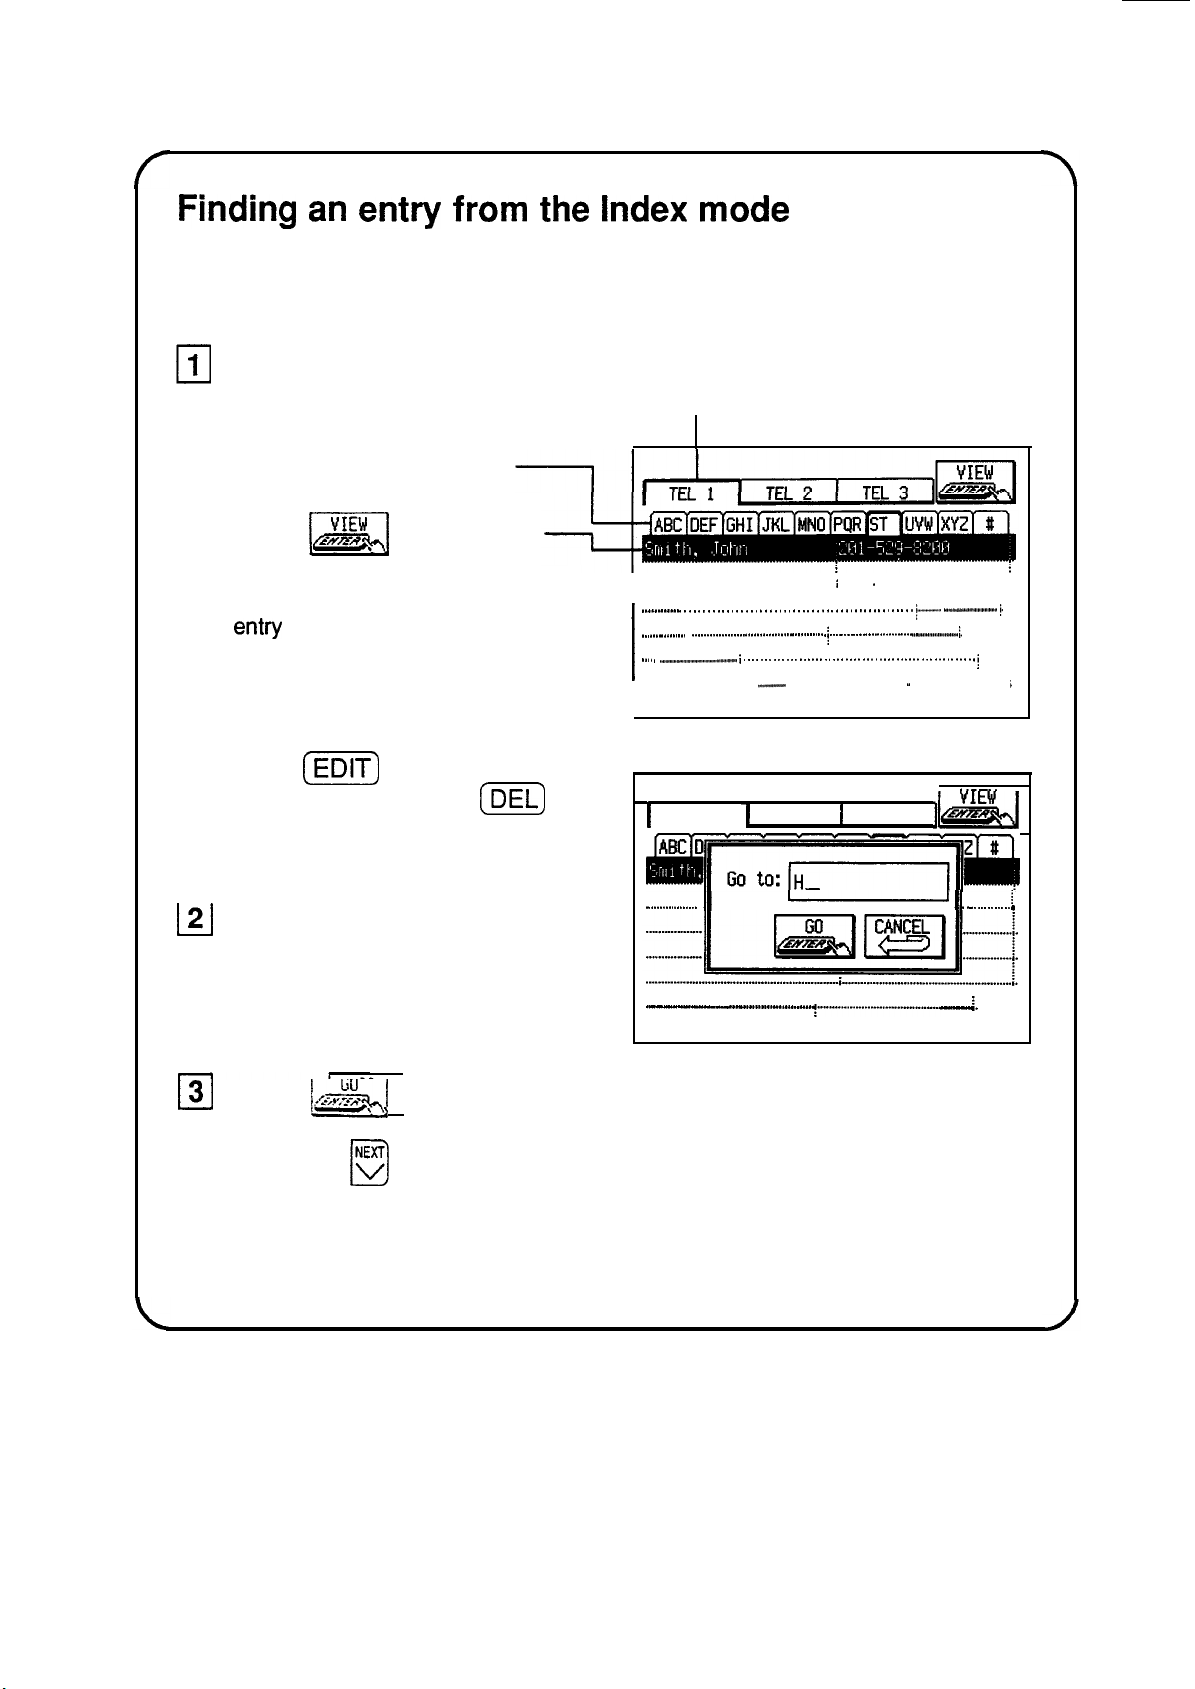
Finding
an
entry
from
the
Index
mode
The Index modes for Tel, User File, Outline and Notebook are very
similar.
0
1
Select an application and
Touch one of these tabs to select
go to the Index mode.
the file.
Touch these tabs to jump to
these alphabetical listings.
Touch
L;yE,w
Ia
with a desired
.
I
. . . . . . . . . . . . . . . . . . . . . . . . . . . . . . . . . . . . . . . . . . . . . . . . . . . . . . . . . . . . . .
i
. . . . . . . . . . .
I
. . . . . . . . . . . . . . . . . . . . . . . . . . . . . . . . . . . . . . . . . .
j
I
............
.
.
.
.
.
.
.
.
.
.
.
.
.
.
.
.
.
.
.
.
.
.
.
.
.
.
.
.
.
.
.
.
.
.
.
.
.
.
.
.
.
.
.
.
.
.
.
.
.
.
+
-....................................
i.
1
.
.
.
.
.
.
.
.
.
.
.
.
.
.
.
.
.
.
.
.
.
.
.
.
.
.
.
.
.
.
.
.
.
.
.
.
.
.
.
.
.
.
.
.
.
.
.
.
.
.
.
.
.
.
.
.
.
.
.
.
.
.
i
.
.
.
.
.
.
.
.
.
.
.
.
.
.
.
.
.
.
.
.
.
.
.
.
.
.
.
.
..-.......................
/.
name highlighted or touch a
name twice to view a particular
entry
in full.
.
.
.
.
.
I
,.......................................................
i
.
.
.
.
.
.
.
.
.
.
.
.
.
.
.
.
.
.
.
.
.
.
.
.
.
.
.
.
.
.
.
.
.
.
.
.
.
.
.
.
.
.
.
.
.
.
.
.
.
.
.
.
.
.
.
j
I
. . . . . . . . . . . . . . . . . . . . . . . . . . . .
..-.........................
. . . . . . . . . . . . . . . . . . . . . . . . . . . . .
I
. . . . . . . . . . . . . . . . . . . . . . . .
i.
Press
(m]
to edit the
selected entry, or press
(DEL)
to delete the selected entry.
121
Type the first few letters of
an entry to begin the Go
To search.
..--..
1
TEL 1
1
TEL 2
I
TEL 3
jr&i-/
llllidimru
.
.
.
.
.
.
.
.
.
.
.
.
.
.
.
.
.
.
II
-
II
.
.
.
.
.
.
.
.
.
.
.
.
.
.
.
i.
I
.
.
.
.
.
.
.
.
.
.
.
.
.
.
.
.
.
.
.
.
.
.
.
.
.
.
.
.
.
.
.
.
.
“”
-.........-.......-...
W”.”
.
.
.
.
.
.
.
.
.
.
.
.
.
j.
131
Touch
IL&&]
to jump to the entry that starts with these letters.
\
q
Press
B
until you see the entry you are looking for.
See “General Operation,” Chapter 2, for more details.
15
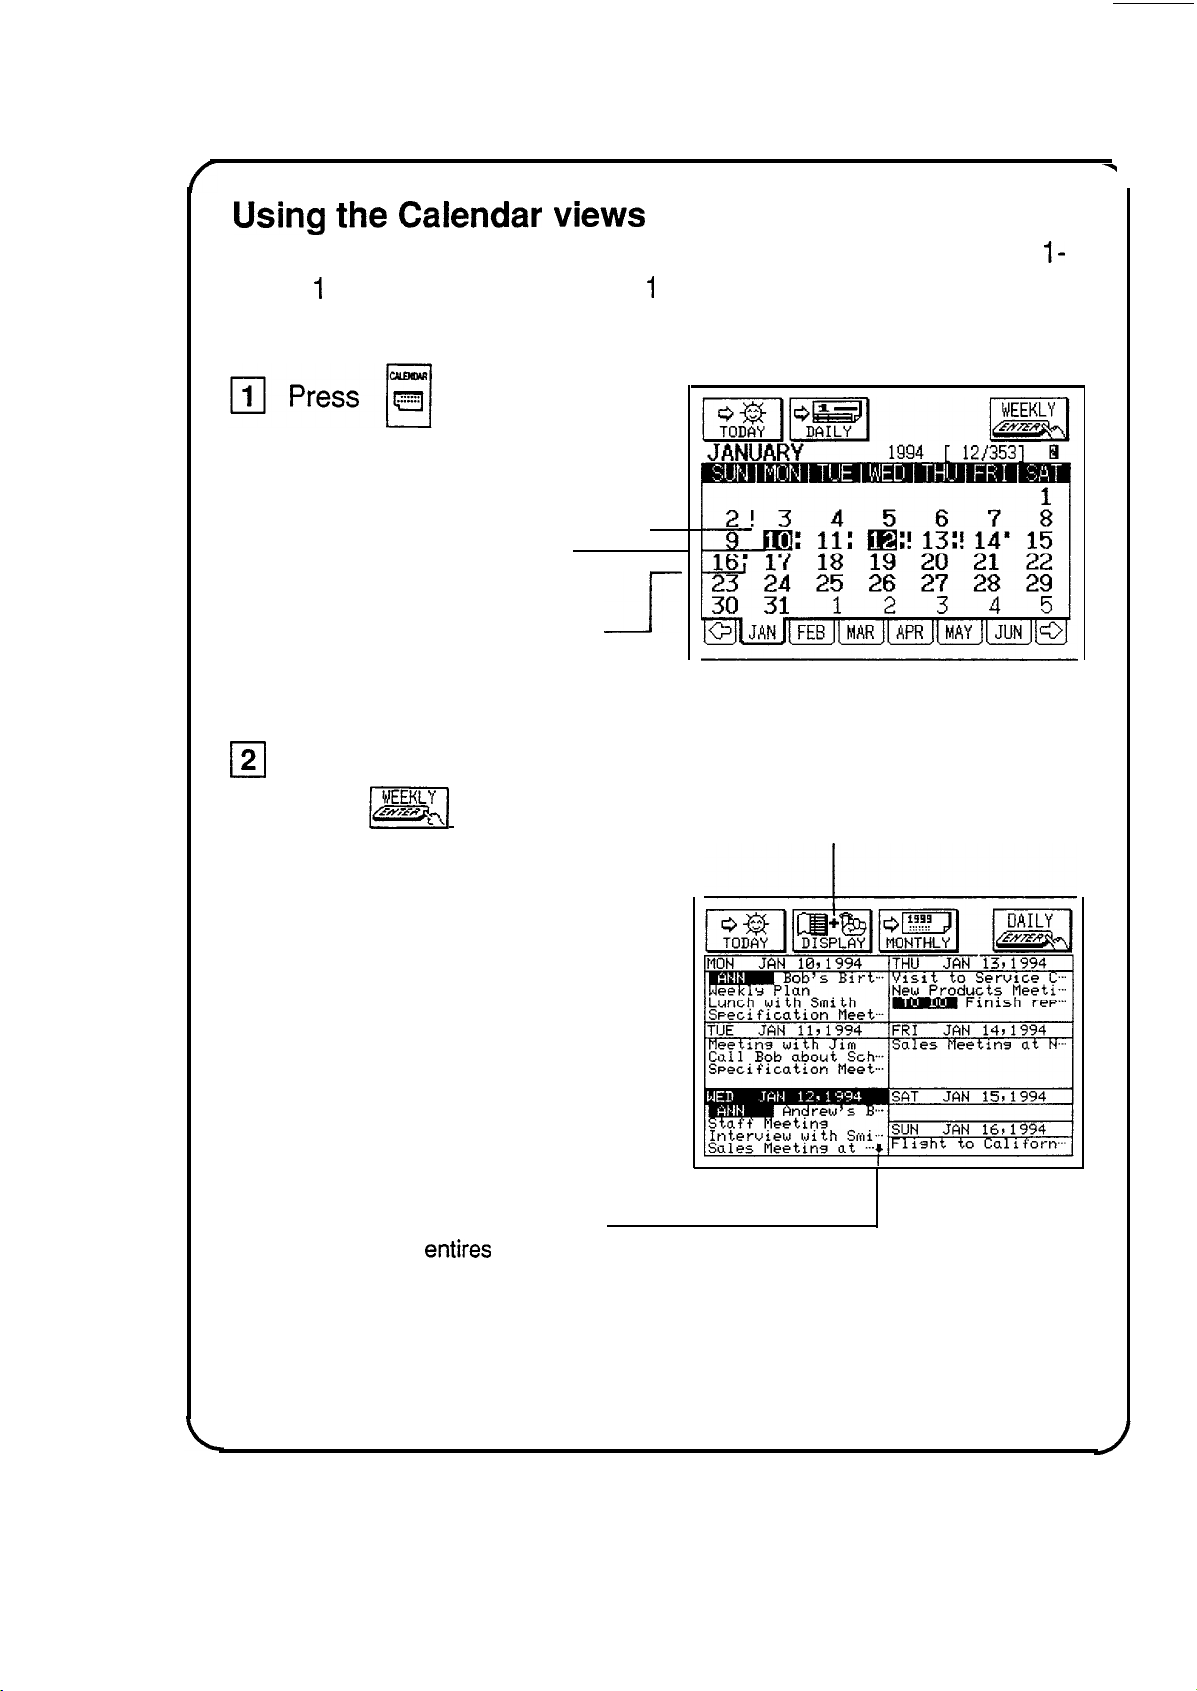
Using
the
Calendar
views
The Calendar consists of 5 different views: a 3-month, l-month,
l-
week,
1
-week (graphical), and a
1
-day view. These views allow
you to see information stored in Schedule, Ann and To Do.
to display the
1 -month view.
Exclamation points indicate
To Do items.
1
Reversed dates indicate
Anniversary events.
Dots indicate appointments.
0
2
Touch a date and then
touch
RI
to see more
details.
Touch to hide Schedule and Ann
information so that only To Do
information is visible. Touch again to
restore the hidden information.
This symbol indicates there
are more
entires
on this day.
See “The Calendar Application,” Chapter 3, for more details.
16
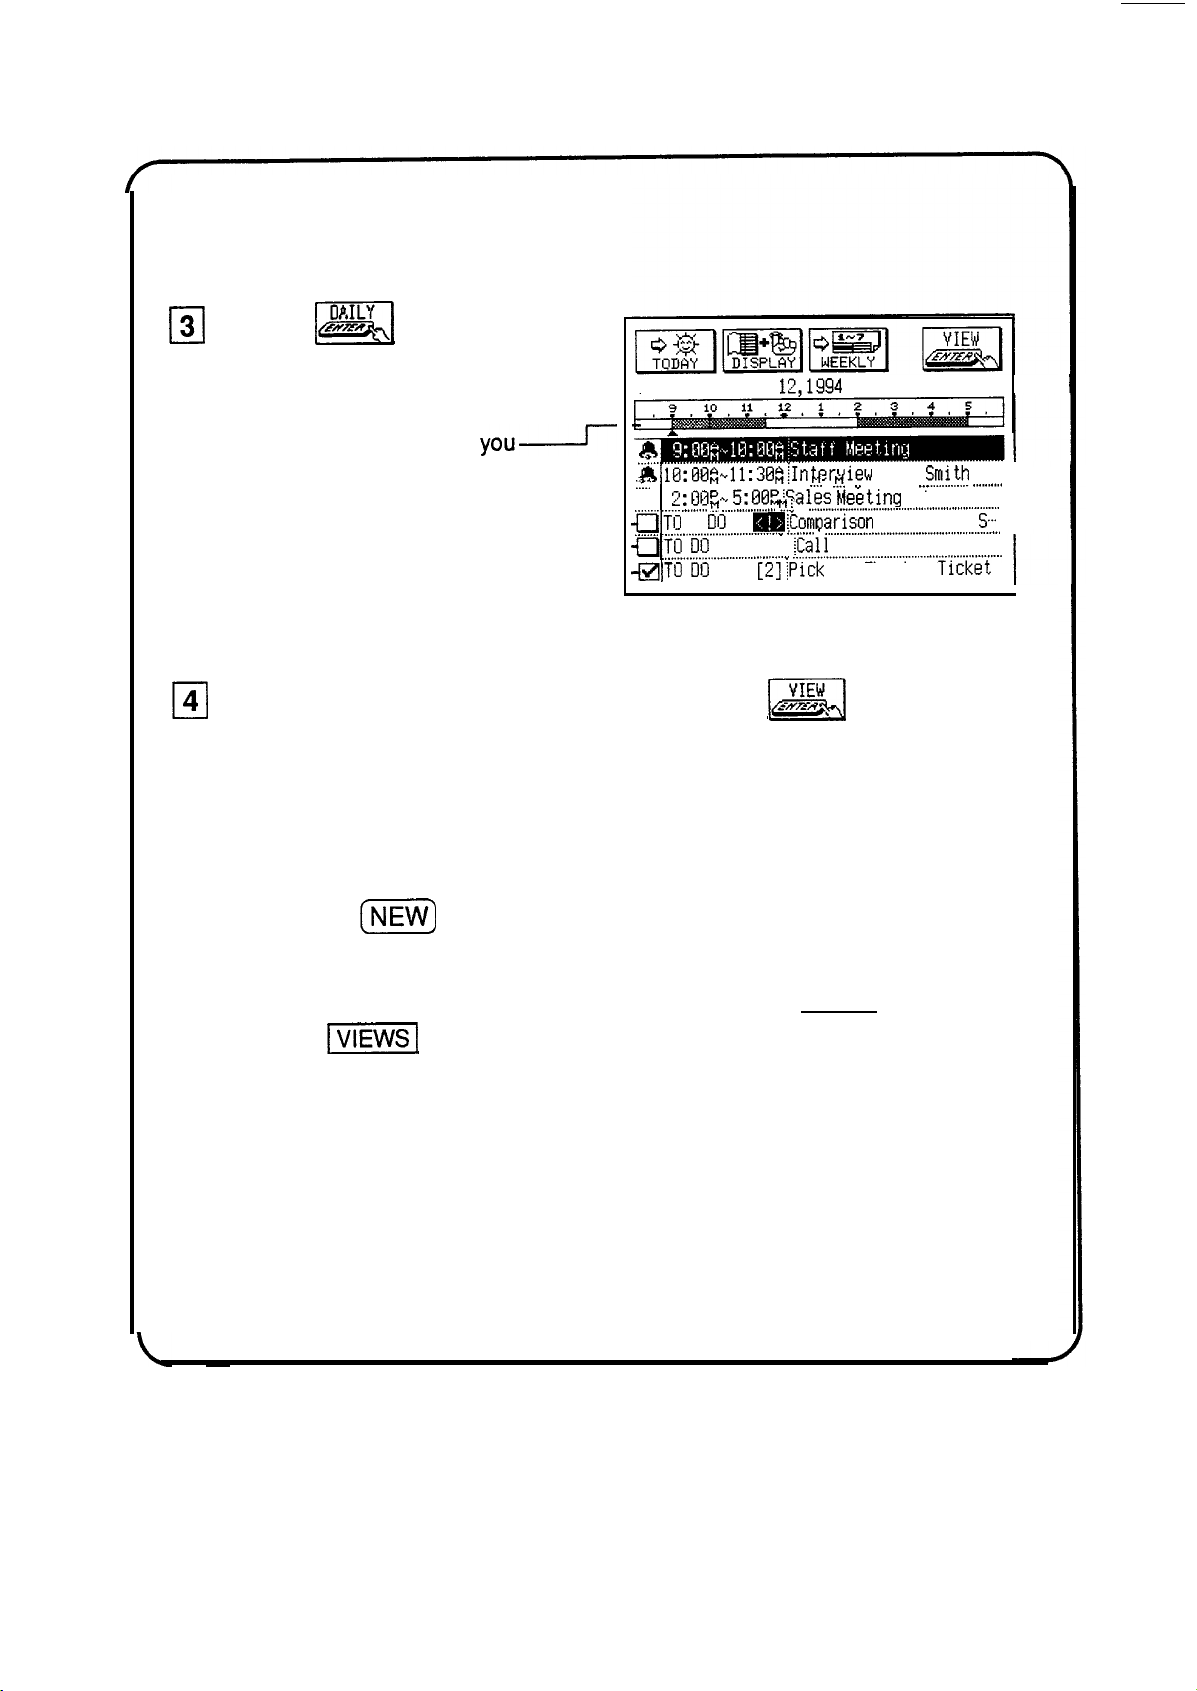
cl
3
0
4
Touch
mi
to see the
details of the selected date.
This time bar shows
you2
when you have appointments
and when you have free time.
You can mark To Do items off
as done by touching here.
-E
WEDNESDAY JAN l&1994
7 ITEMS
A.lB:BB~~l1:38*~Interview
.t..
with
$~JI
,_____,,,,
. __ __
rr
.!I
”
. .
..,.
2:013p-,
5:BBPiSales
hleetmg
at Royal-
,,,.....
___._._..,._...
M
___........_..__,,,
M;
.
.._...._.._._._____.................................................
Q’rll
no
m.
I
____.___
._._.,..._.__._._.__......,...........,”
._.......
Q
_.___________..__._.........................................
,
Xomoarison
Chart for
5.
I
QTO
DU
I
(1)
iCal
Frank about
Sales-
,..__.____._._..._._.........,.,..,....”
“..“.........,.,“““““““““““..........
-@TO
IIII
[2];Pick
up
Theater
Ticket
Touch an entry to select it and then touch
m
to go to that
entry’s application.
Note:
The Calendar application only displays information stored in Schedule,
Anniversary, and To Do. You cannot actually store information in the
Calendar application.
If you press
(NEW)
in any of these views, the unit will assume you want to
make a new Schedule entry on the currently selected date.
You can access any of these views directly by pressing (MENU) and then
touching
II
.
See “The Calendar Application,” Chapter 3, for more details.
17
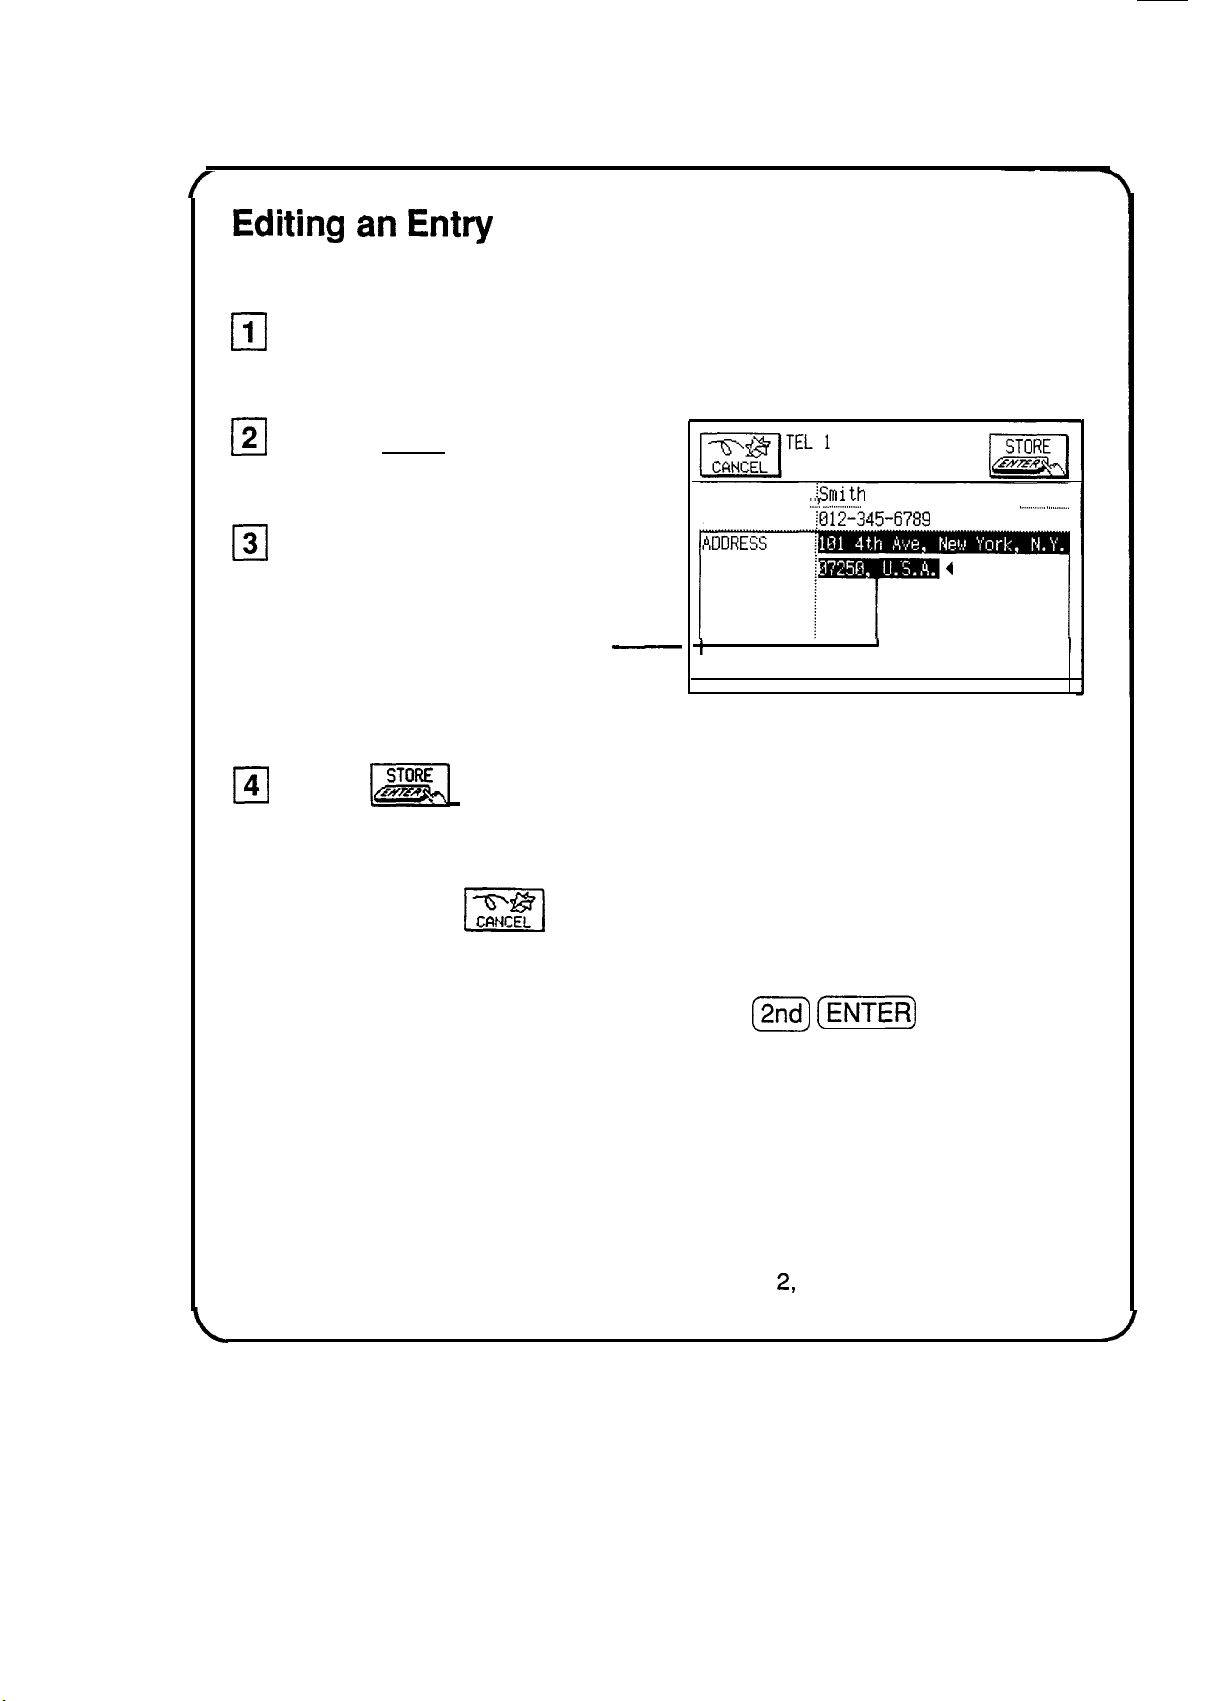
Editing
an
Entry
cl
1
Find an entry that you wish to change.
m
Press [EDIT).
131
Make any necessary
changes.
You can also drag the pen over
-
text to select it, then cut the text
and paste it elsewhere, or just
delete it.
NAME
iSmith
John
. . . . . . . . . . . . . .
..._!
_._...............
. . . . . . . . . . . . . . . . . . . .
,____._,.,,.
,,.__.__._.
NUMBER
$312-345-6789
t
I
I
141
Touch
[m
when you are finished.
If you make a mistake and want to restore the original entry,
simply touch
m]
instead.
If you want to save these changes as a new entry
(thus preserving the original) press
C2nd)
(m)
instead.
See “Editing an Existing Entry,“ Chapter
2,
for more details,
18
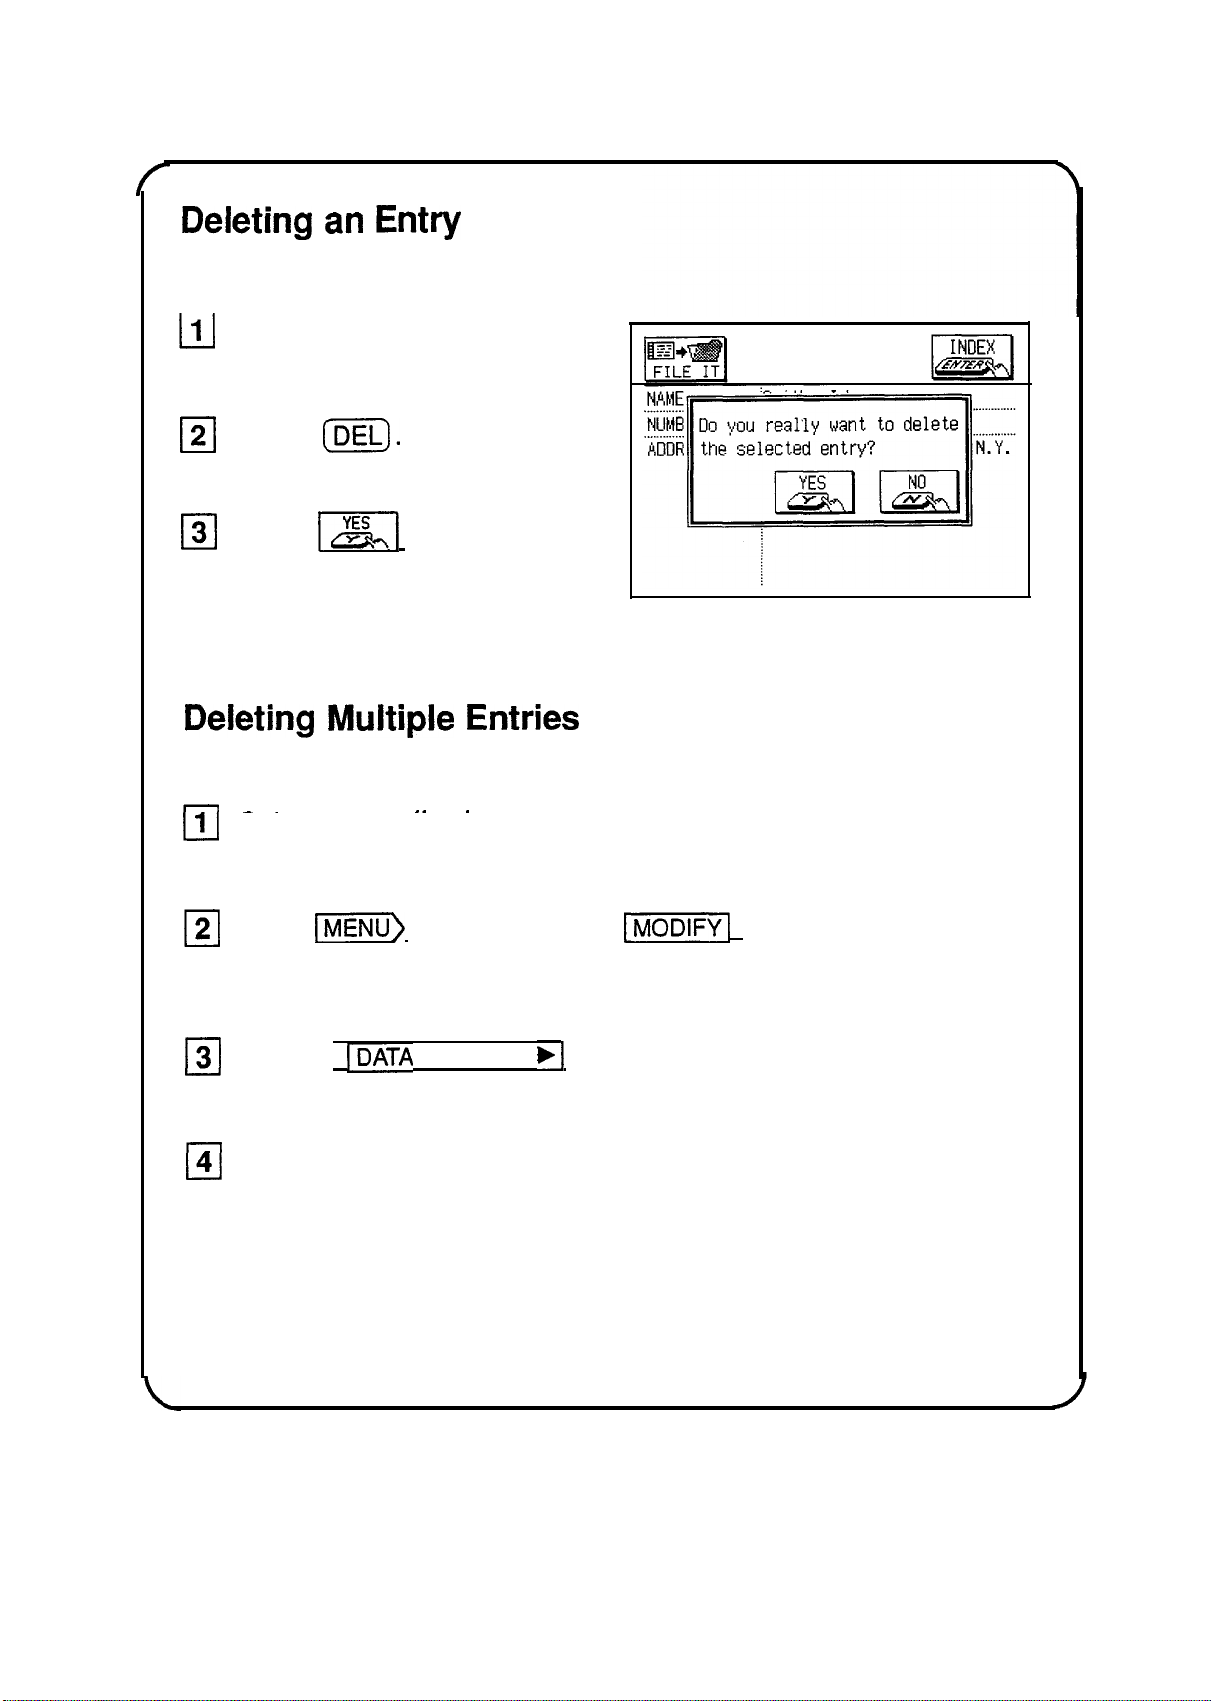
Deleting
an
Entry
111
Find an entry that you
wish to delete.
121
Press
[DEL).
TEL 1
131
Touch
[xl
to confirm
the deletion.
Deleting
Multiple
Entries
I
-.
__
.
111
Select an application that you want to delete data from.
121
Press
v)
and then touch
II
to open the MODIFY
menu.
cl
3 Touch
IDATA
DELETION
b/
.
0
4
Select which group of information you wish to delete.
(The selection will vary for each application.)
See “Deleting Entries from the Unit,” Chapter 2, for more details.
19
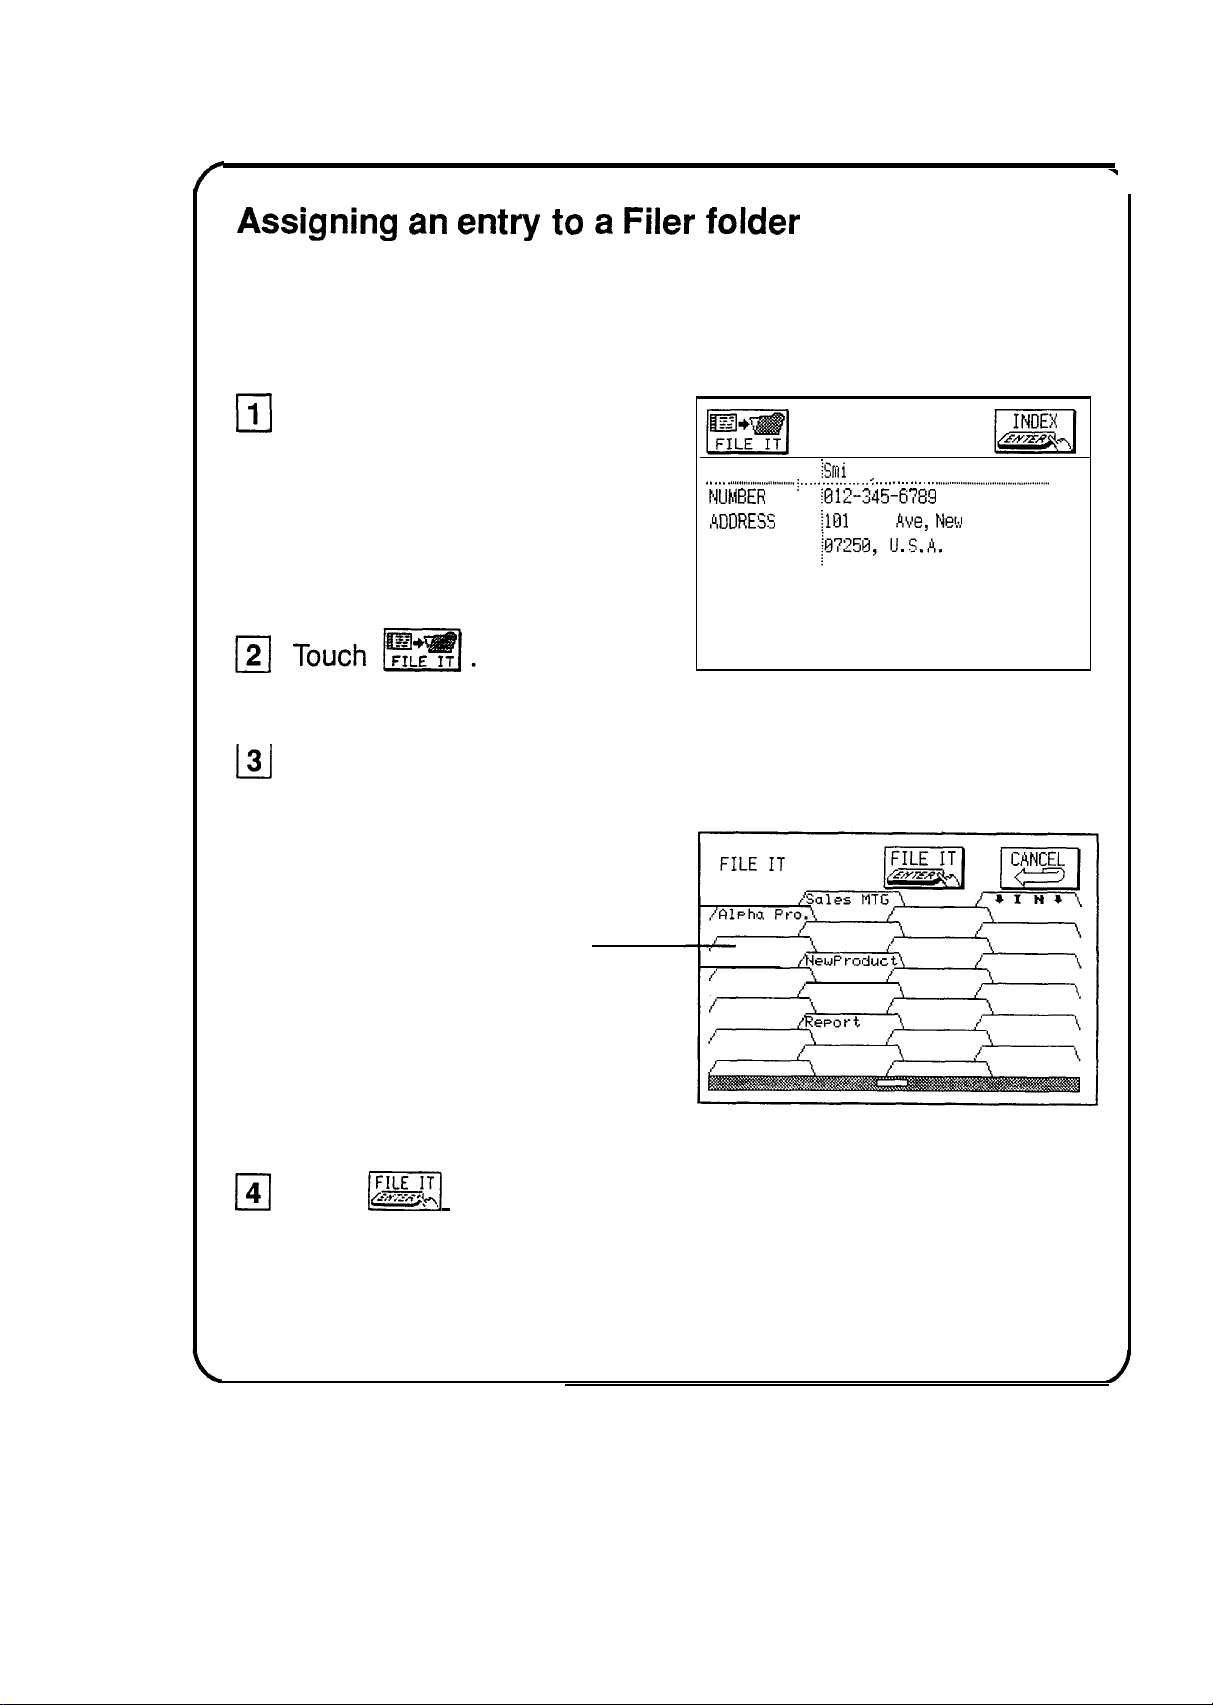
Assigning
an
entry
to
a
Filer
folder
Note: The entry will not be copied or moved to a folder. It is simply
“assigned” to the folder. Entries assigned to folders can be
worked with as usual.
Find the entry you wish to
assign to a folder. Be sure
to display the entry in the
VIEW mode (not the
INDEX).
131
Touch the folder(s) you
want to assign this entry to.
Touch once to select a folder.
Touch again to cancel a selection.
You can select multiple folders.
Note: You can assign entries to
an unnamed folder and name the
folder later.
TEL 1
NAME
:iSrni
th. John
.
.
.
.
.
..t...........................
j
.
.
.
.
.
.
.
.
.
.
.
.
.
.
.
.
.
.
.
.
.
.
.
.
.
.
.
.
.
.
.
.._.__.............................................
NUMBER
iB12-345~678!3
. . . . . . . . . . . . . . . . . . . . . . . . . . . . . . . . . . . . . . . . . . . . . . . . . . . . . . . . . . . . . . . . . . . . . . . . . . . . . . . . . . . . . . . . . . . . . . . . . . .
,ADORESS
$01
4th
Ave,
Net;!
York, N.Y.
m
Touch
m/
when you finish selecting the folder(s).
See “The Filer Application,” Chapter 7, for more details.
20
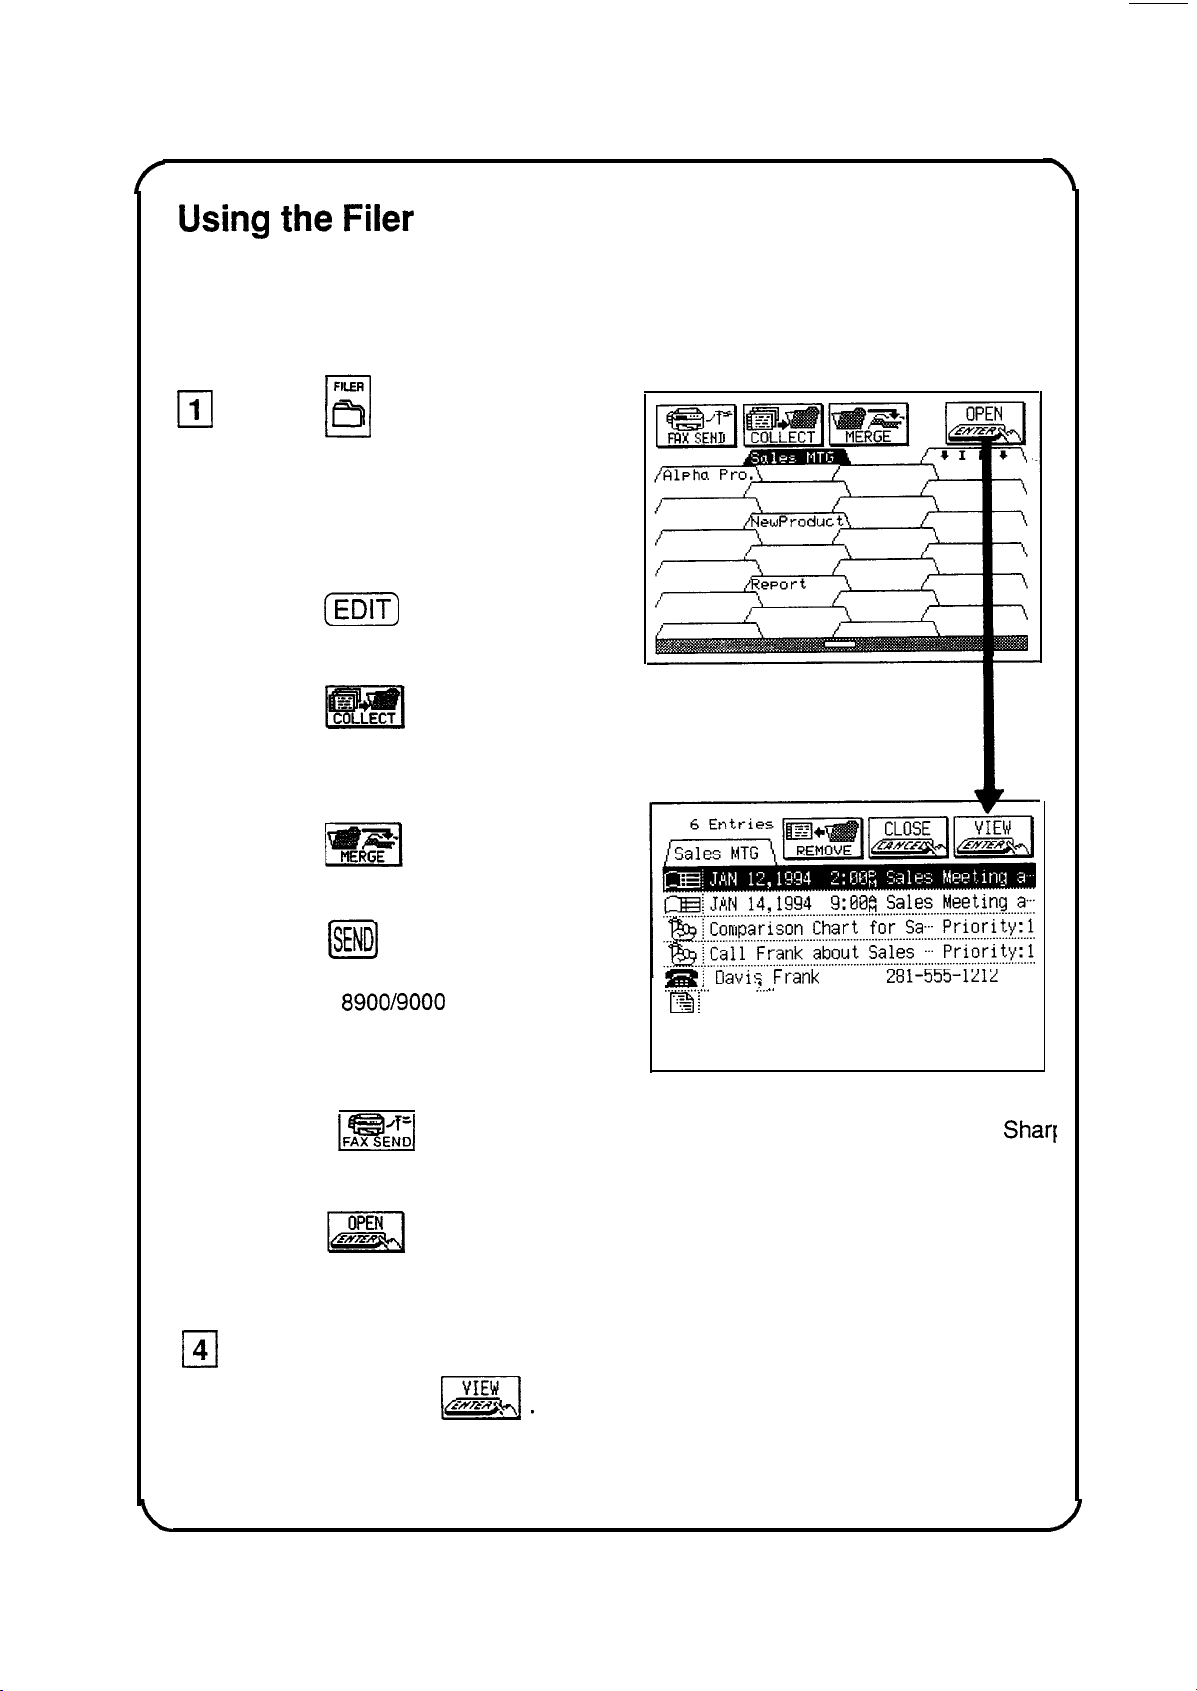
Using
the
Filer
The Filer allows you to group your entries into folders, which lets
you access and manage your information by subject matter instead
cl
1
cl
2
cl
3
0
4
of just by application.
FILER
Press
a
to access your
folders.
LJ
Touch a folder to select it.
Now you can:
Press
(iZiQ
to name (or rename)
the folder.
Touch
to have the unit
automatically assign a group of
entries to the selected folder based
on a search word.
Touch
to merge the
selected folder with another folder.
Press
ISEND]
to send a copy of all
the entries assigned to this folder to
another
8900/9000
Series unit (via
infrared transfer). All entries will
appear in the receiving unit’s “IN”
folder.
-
Bf
Davis
Ft-ank
...............
...............
.1__
..
....................................................................................
B
!
Sales Figure
.........................................................................................................................
.............
.
...........................................................................................................
Touch
IFRti:I
to fax a copy of all the entries in the selected folder (the
Sharf
CE-FM1 fax/modem and CE-137T level converter are required).
Touch
m
to view
all the entries assigned to the folder.
To go to the actual entry (VIEW mode), simply touch the entry
and then touch
ml.
See “The Filer Application,” Chapter 7, for more details.
21
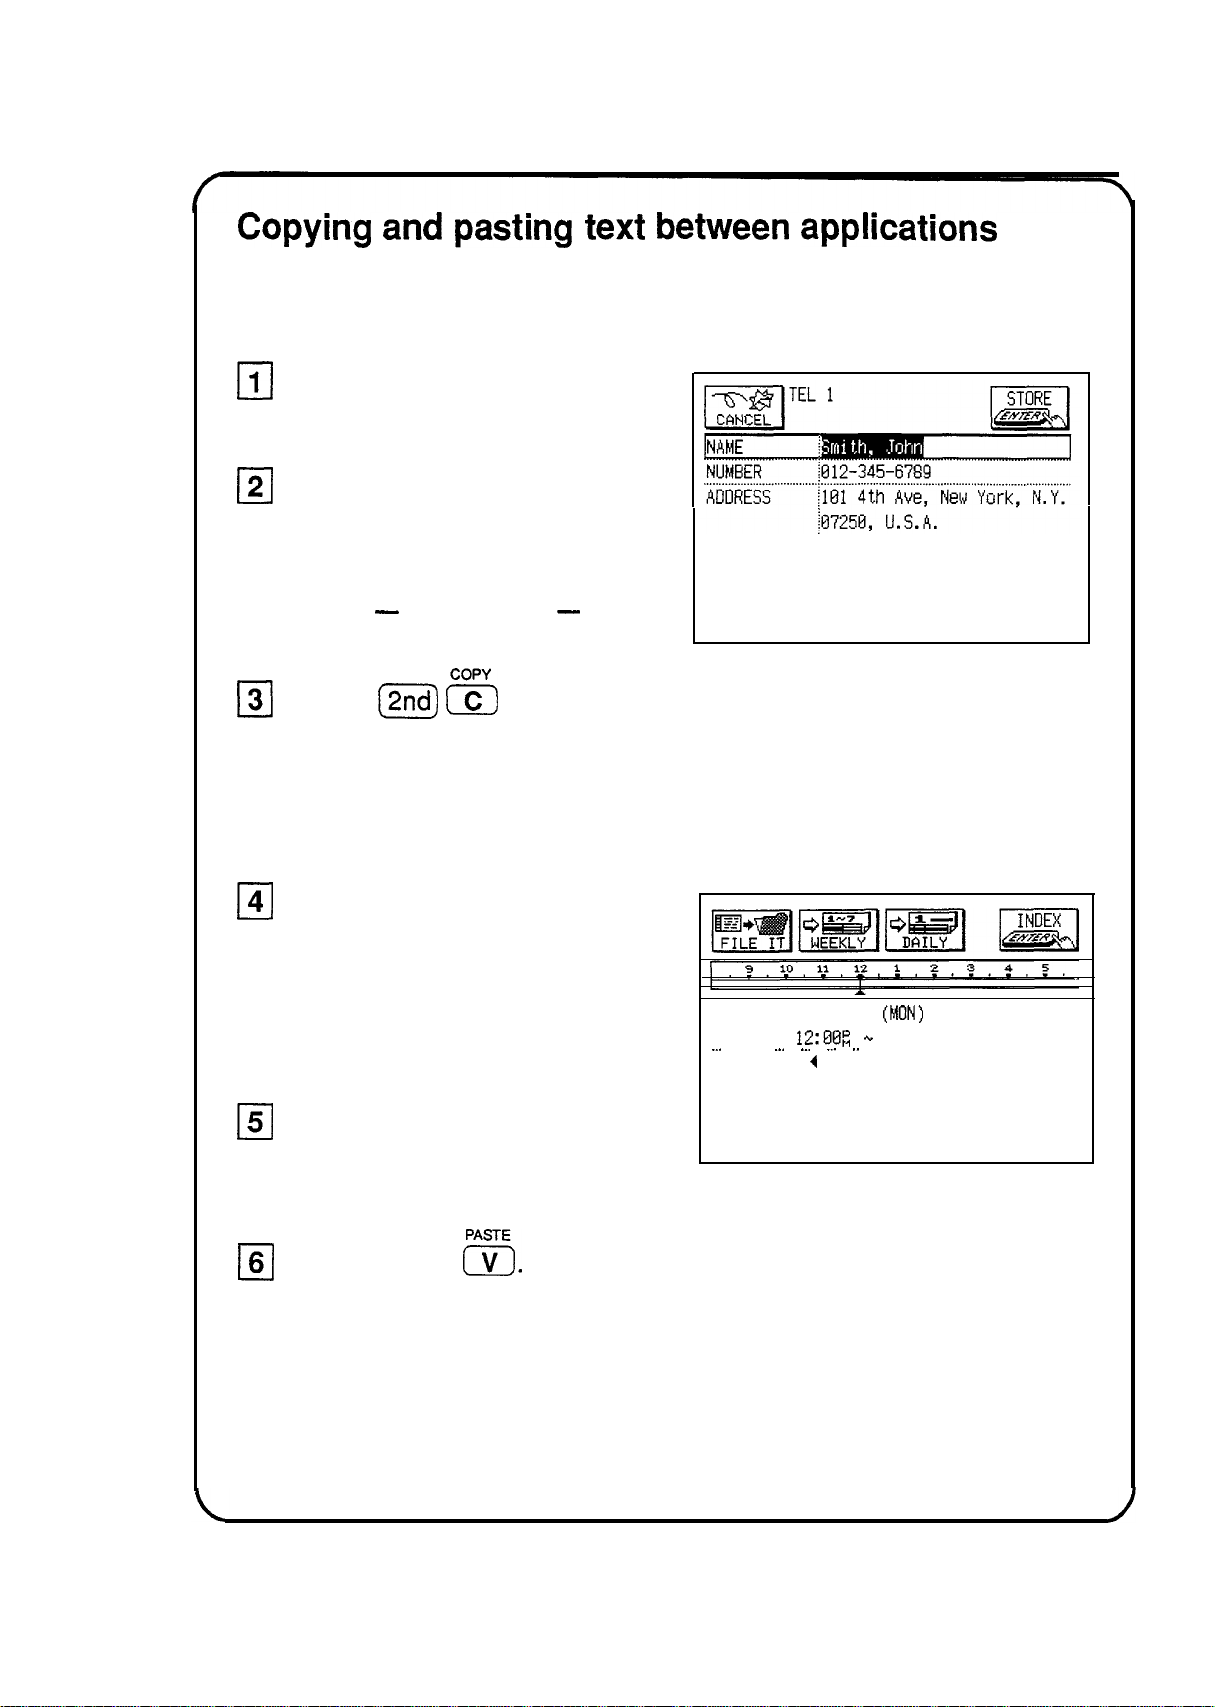
Copying
and
pasting
text
between
applications
You may find a need to copy text from one place to another in the
unit.
Go to the entry you
want to copy text from.
121
Drag the pen over a word
or sentence to select it.
The text will be displayed in
reverse
-
white on black
-
to
indicate it is selected.
131
Press
j2nd)
s
to copy
the text to the clipboard.
Anything currently on the clipboard
is replaced with the text you just
copied.
141
Go to the entry you want to
add the text to.
Be sure you are in the EDIT mode
when adding text to an entry.
151
Touch the desired place of
insertion.
16(
Press (2nd)
E.
DATE: FEB 14 1994
(MON)
. . . . . . . . . . . . . . . . . . . . . . . . . . . . . . . . . ...! . . . . . . . . . . . . . . . . . . . . . . . . . . . . . . . . . . . . . . . . . . . . . . . . . . . . . . . . . . . . . . . . . . . . . . . . . . . . . . . . . .
TIME:
12:E)BR
+.
:
__.
.
_..
._.
,_.
,.
. . . . . .
Lunch with
4
See “Copying or Moving a Block of Text,” Chapter 7, for more details.
22
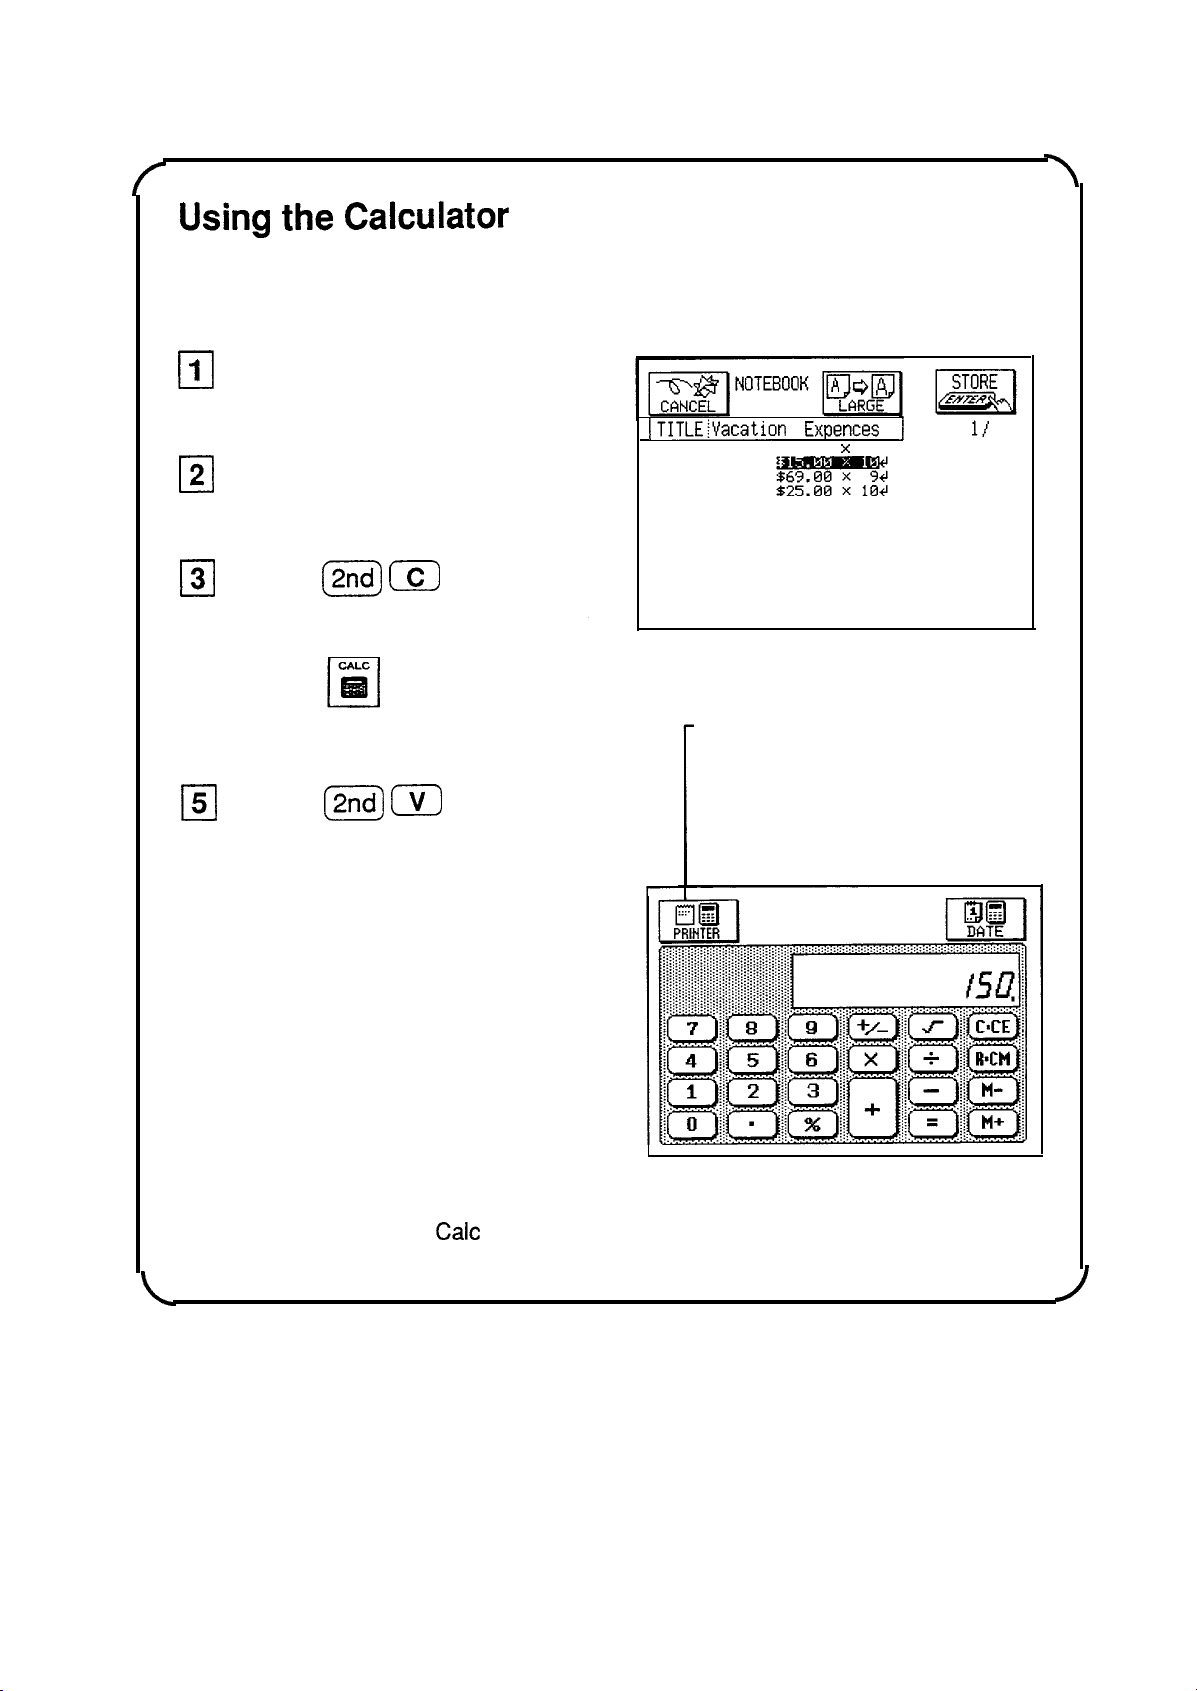
Using
the
Calculator
In addition to working like a standard calculator, the unit’s
Calculator can work with numbers stored in an entry.
El
1
cl
2
0
3
cl
4
El
5
cl
6
Find an entry that you have
stored numbers in.
Drag the pen over a
number to highlight it.
cow
Press
(2ndj
(cl
to copy
the number to the clipboard.
Press
to call
the Calculator.
PASTE
Press
(%J
WJ
to enter
the copied number to the
Calculator.
Perform any calculations
you desire by touching the
Calculator’s keypad.
ITITLE!Vacation
Expences
1
Car rental
$79.95
x
10
Gasoline
Hotel
Food
Total
PAGE
1,'
1
799.504
-Touch if you want to display
an electronic “print out” to
check calculations as you
work.
See “The
Calc
Application,” Chapter 6, for more details.
23
Answers
to
Commonly
Asked
Questions
Q:
A:
Q:
A:
My batteries only lasted for two months. Is there something wrong?
Will
I
lose data in memory when I change the batteries?
There is probably nothing wrong with your unit. Battery life will vary from
user to user. A number of factors will affect battery life, including how much
the unit is used. The battery life is rated at 70 hours of continuous use.
Assuming an average of one hour per day of continuous use, you would get
about 2 months of battery life. Two months indicates heavier usage.
When you change the main operating batteries, the back-up battery will
protect data in memory. Be sure to follow the directions carefully when
changing the batteries.
An optional battery case is available, which will extend the life of your
operating batteries.
I have a SHARP 8000* Series Organizer. How can
I
transfer my data
from it to this new unit?
The data format on your new unit is different to that on the 8000 Series
Organizer. You can get data from the 8000 Series (or 7000 Series) one
application at a time using one of the following methods:
l
If you have your 8000 Series data on a RAM card, do the following:
-
Insert the RAM card into the 8900 Series.*
-
Turn on the 8900 Series.
-
Go to an application (Tel, Schedule, etc.).
-
Press
[m)
and then touch
1
PERIPHERALS1 , select IMPORT
OTHER FORMAT, then select VIA RAM CARD.
-
Repeat the last two steps for each application you wish to import.
l
If you own one of the Sharp Organizer Link software packages for an
8000 Series Organizer (either for the IBM and compatibles or the
Macintosh) do the following:
-
Hook up the cable to the 8900 Series.
-
Turn on the 8900 Series.
-
Press (MENU) and then touch
IPERIPHERALS]
, select IMPORT
OTHER FORMAT, then select VIA PC LINK.
-
Now use the link software on the PC to send the Information to the
8900 Series.
* 8000 Series: IQ-8000, 08200, IQ-8400,
IQ-8100M,
IQ-8300M,
IQ-85OOM
8900 Series: IQ-8900, IQ-8920
9000 Series: IQ-9000, IQ-9200
24
l
You can purchase the CE-315L transfer cable. Then do the following:
-
Hook up the cable to the 8900 Series and the 8000 Series.
Organizer.
-
Turn
on the 8000 Series Organizer and press
(m)
(oPTloN)
(4j
.
-
Turn on the 8900 Series.
-
Go to an application (Tel, Schedule, etc.).
-
Press
[%%@I
and then touch
~PERlPtiERALS~
, select
IMPORT
OTHER FORMAT, then select VIA
DIRECT
CABLE.
.-
Repeat the last two steps for each application you wish to import.
Note:
Data can only be transferred from an 8000 or 7000 Series
Organizer to the
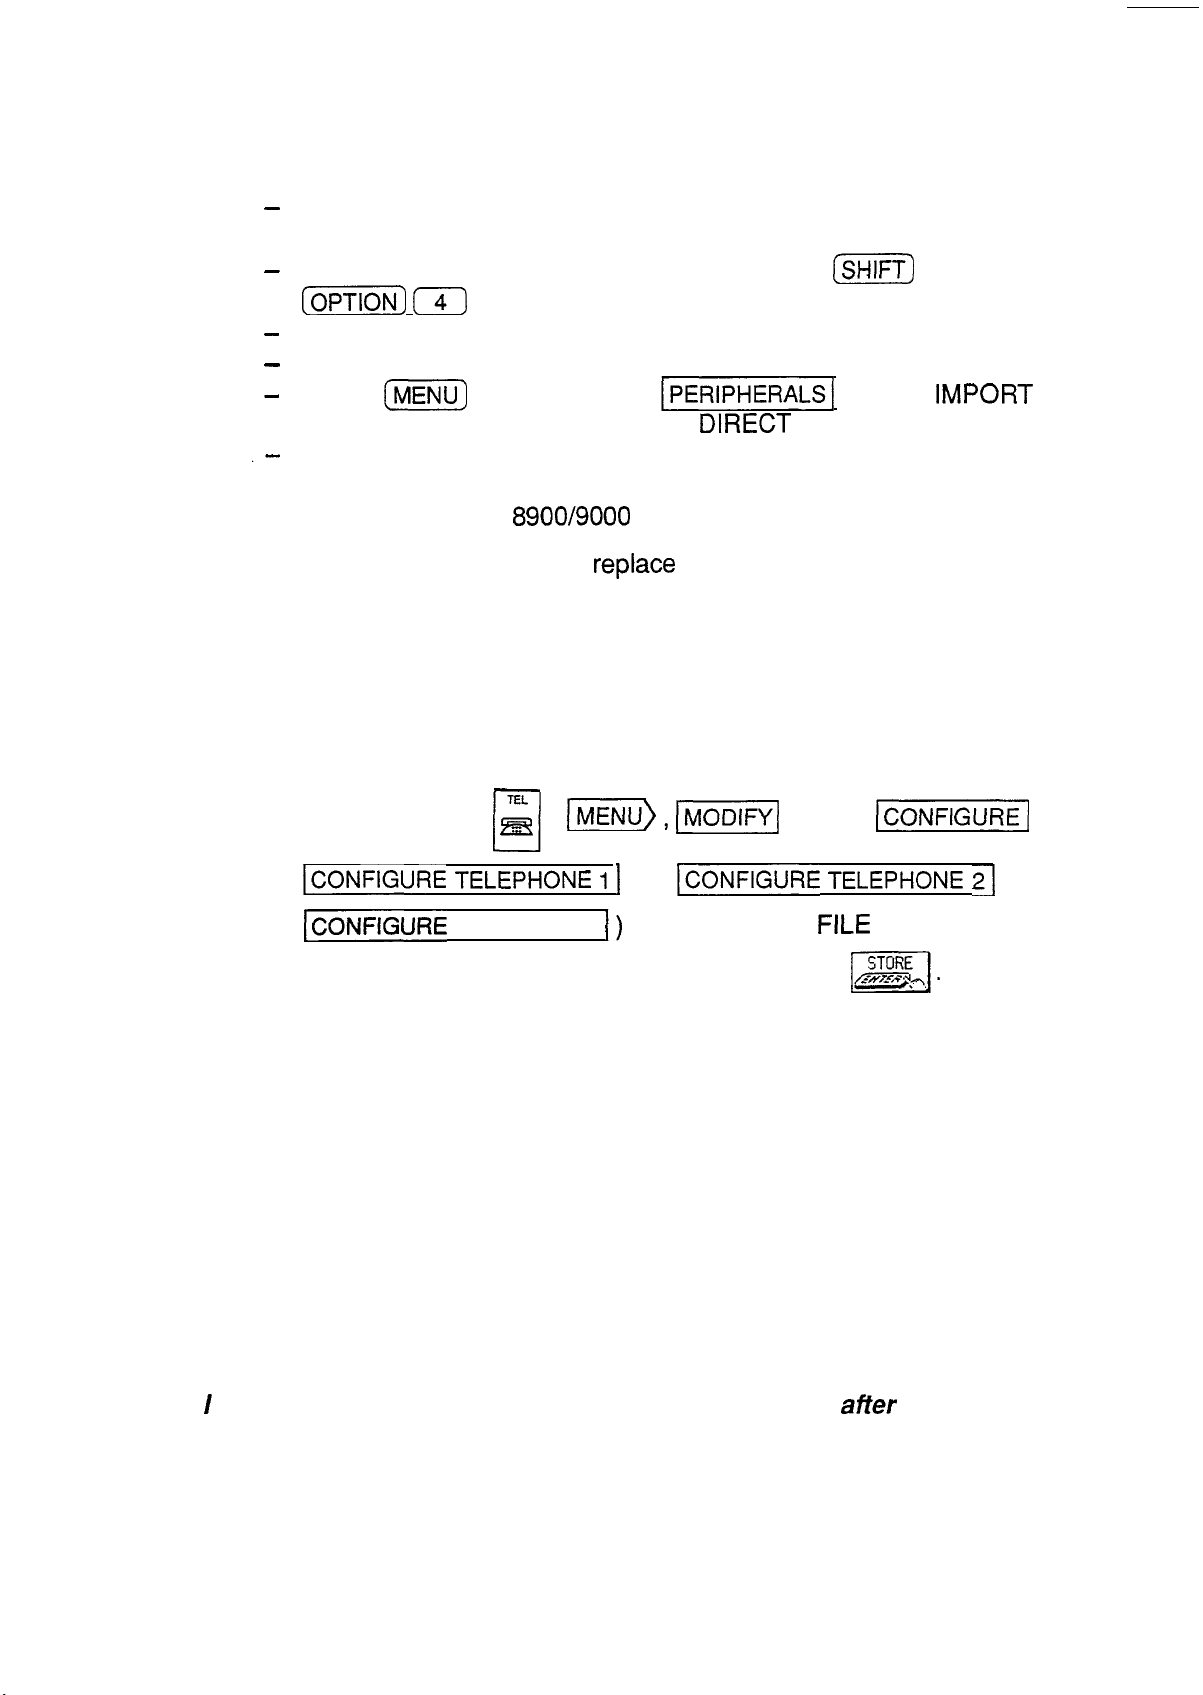
8900/9000
Series unit, and not vice versa.
The procedures above will not
replace
the existing data on the
Organizer but add to it.
Warning: If you have used free fields in Telephone on your 8000 Series
Organizer, you must set the number of fields in Telephone on the
8900 Series to be the same (8) BEFORE transferring the
information to the 8900 Series. Otherwise the data in the free fields
will not be transferred onto the 8900 Seires.
To do this touch
&
,
u
Ir\llENU),
(-1
touch
w(
~~ONFIGURE
TELEPHONE
i
1
(or
[CONFIGURE
TELEPHONE
21
or
ICONFIGURE
TELEPHONE 3
1)
and then select
FILE
NAME. Enter
the number of fields (at least 8) and then touch
m].
Now go
back and import the 8000 Series data. See p. 134,276 and 277.
Q:
I have an older model of the SHARP Organizer and imported the data
into this unit. But when I went to the Tel application in my new unit, ail
of my entries looked strange.
Some words were split in two and some
lines ended too early. The entries don’t look like this in the other
Organizer. What can I do?
A:
In certain applications, such as Tel, the number of characters allowed per
line is different from that of other Organizer models. This means that the
new line characters you entered in the older Organizer will not produce the
same formatting in this unit. You will need to edit the relevant entries and
reformat them by deleting old new line characters and entering new ones.
Q:
I
saw the message “There is not enough memory...” after trying to store
an entry. What does this mean?
A: You have filled your unit with information. Here are some things you should
try in order to free up some memory:
25
1.
Check your Scrapbook. These drawings take up more memory than
regular entries. Be sure to delete any notes or drawings that you no
longer need.
2. Check for old Schedule items. Delete those you no longer need. You can
delete
ali
Schedule entries for an entire month using the Calendar menu.
3.
Check for completed To Do items. You can delete all completed To Do
items using the Jo Do menu.
If you wish, you can purchase a memory expansion RAM card. You can use
these cards like floppy disks, keeping several to store your data by subject,
for example.
Q:
I want to print out my unit information. What do
/
need?
A:
Here are the things you will need:
1.
The SHARP
CE-IRI
wireless interface for printers.
2.
Any parallel PC printer that emulates one of the following printers:
Canon
BJ-1 Oe series
IBM
ProPrinter
series
Epson
FX series, LQ series
Hewlett-Packard
LaserJet series
Most printers, including portable ink-jet printers on the market today,
emulate at least one of these printers. Check with your local computer
dealer for more information about printers.
Cl:
How can
I
back up my data?
A:
It is important to always have a back-up of your important information. Here
are some ways of doing this:
l
You can print out a hard copy using the optional accessories. See
p.
222.
l
You can back up your entire unit using the IQ-783 256KB RAM card
(for the IQ-8900) or IQ-784 512 KB RAM card (for the IQ-8900 and the
IQ-8920). (if needed, you can just as easily restore your information
back to the unit.) See p. 238.
l
You can use PC or Macintosh link software either from SHARP or a
third party. You will also need one of the various PC-Link cables or the
CE-IR2 wireless interface for computers. Check with your local dealer
regarding features and availability of these products.
Q:
I can’t seem to turn my unit on. I changed the batteries but still nothing
happens. What should
1
do?
A:
Check the following before sending the unit in for service:
26

l
Check to see that the CARD LOCK switch is LOCKED and not in the
RELEASE position. You may have accidentally left it unlocked after
removing an IC card.
l
Check that the battery replacement switch on the back of the unit is in
the “NORMAL
OPERATION”
position. If the switch is in the “REPLACE
BATTERIES” position, the unit cannot be turned on.
l
Check or replace the operating batteries, even if you have just replaced
the batteries. It is possible that the batteries were not fresh when you
purchased them.
l
Press the RESET switch. If the unit has been dropped, for example, it
may have to be reset.
This
will not delete your data. If for any reason
data is missing after resetting the unit, it was lost before you pressed
the RESET switch. The RESET switch simply re-starts the unit.
If none of the procedures above works, you will need to send the unit to a
service center. Check the back page of this operation manual for the location
of your nearest service center and call for more information.
Q:
What happens if I am working on an entry and the auto power off
function shuts off the unit before I store the entry?
A:
You will not lose any information. The next time you turn the unit on, the
Resume feature returns you to exactly where you left off.
Q:
I would like to use the Filer feature but I am afraid of using up memory.
How does the Filer work? Does it make a copy of each entry?
A: No. When you assign an entry to a folder in the Filer, it does not use up any
extra memory. The unit doesn’t actually make a copy of the entry, it simply
“assigns” the entry to a folder. Entries are still stored in each individual
application (Tel, Notebook, etc.). The Filer is a great way to organize your
information and there is no reason not to use it.
Q:
I have an older model 8000 Series 256K Organizer that was about 99%
full. When I loaded all of the data into my new unit
(/Q-8920)
and
checked the memory, it read about 65% full. I expected it to read about
50% full. What happened?
A:
This unit uses memory differently to other SHARP Organizers, providing
many more features, formatting capabilities, etc., which require more
memory. Importing data from another type of unit will require more memory
on this unit. This amount will vary depending on the number and type of
records you import.
27

Q
:
What is the Outline application
?
Why would I want to use it instead of
Notebook?
A:
The Outline application allows you to group and categorize information using
a hierarchical structure. Everyone has a lot of small but important pieces of
information that have to be memorized or kept track of in a written record, for
example, important personal information: Social Security number, credit card
numbers, various ID numbers, account numbers, clothing sizes, etc. Using
the unit, you could make a number of Notebook entries for each piece of
information, but a better way to manage the information would be to make a
single Outline file called “Personal Information.” This file could then contain
a number of headings (such as Car info., Travel info., Health info., Financial
info., etc.), under which relevant pieces of information could be stored. This
makes it easier to access information and prevents your unit from becoming
cluttered with hundreds of individual entries.
Additional Outline files could also be made, including: favorite movie list,
project management file, To Do lists, price lists, product line-up and
specification file, business plans, product proposals, and meeting notes.
Many types of information can be more easily and efficiently managed in an
Outline structure.
Another use of the Outline application is document preparation. Many times
you might want to write a memo, letter, proposal, marketing plan, etc., but
find it difficult to write an entire document from scratch. The Outline
application allows you to capture your thoughts and ideas, then rearrange
and categorize them at any time. You can also copy an Outline file and
paste it into the Notebook application to finish the document there, adding
text to the major topics.
Q:
I want to send faxes from my IQ-8900 series unit, but what do I need
besides the unit itself?
A:
The IQ-8900 series unit has fax software built in, but you will also need the
PC fax/modem and the CE-137T level converter.
Not all PC fax/modems can be used with the IQ-8900 series unit. Contact
your nearest SHARP dealer for information about compatibility and
availability of the PC fax/modems. (If the CE-FM1 Fax/Modem is not
available for use in your country because of the specifications of the
telephone lines, ignore references to it in this manual.)
28
.,................,.,....
.
.
..-.
. .
.
.
. . . . . . . . .
:::::::.~;~.:~.:~::~~~.~~
.~:~::i~::::::~.~.:~~.:~::~~.~~:
~:~::::::::::::::~::::::::~.:~.::.:.:.:::::::::::
~.:~:.~~~.::::::?.~.~:~.~.~~~.~.~
I.:.:.:.:.:.:.:.::::::::.:.:.:.:.:.:.:
....:.~.~.~.~.~.
.:.:.:.:.:.:.::::.>:.:.:.,s.:.:.>:.:
.
.
.
.
..‘.........:...
. . . . . . . .
.
.
. . . . . . . .
:...:.:.:.:.:.:.:.:.:.:
.,:,:,
~:::::::::.~.:.:~.:::j:.j;.~<:$$$jjjj
:.:,:
i:.:.:.:.:.:.:.:.:. . . . . . . . . . . .
. .
.,.,.,...,...,
.:::::::::~~~~:~~:~
‘%%
.A........
n
.:
.
.
.
.
.
. .
.
.
.
__
::::::::::jjjj.:.::::::.:.:.:.:.:.:::j
:.:.:.:.:.:.
.:.:.:.:.:.:.:.:.:~>..:.:jj.:.:.:::
:.:~~~:~:
,:
::.:j
..A.
. .
.
.
.
..v.....
Y..
.>>>
.
.
.
.
. .
.
.
.
.
::::~::::~~~j~~.~.~:::::::?.~~:~..~:i
,:~~~::‘.:~~::~.~~.:~~.:...
:::::::::::::::::::::::~.~.~:~
‘.:2.:.:.:~.:.:.:.:.:
.
.
.
.
..~.~.
>:
.A
.
.
.
.
.
.
.
.
.
.
.
.
.
..A
:.:.:
.,.,....
:::::::~;~:~~~:~~,$~
.A.. .
.
0
C
ontents
Introduction
. . . . . . . . . . . . . . . .
..*............................................................................
1
Quick Start
. . . . . . . . . . . . . . . .
..*..............................................................................
3
Answers to Commonly Asked Questions
. . . . . . . ..*................*.......
24
Contents
.~..............,.,......,,............,..........................................................
29
What Your Unit Can Do
. . . . . . . . . . . . . . . .
..I.......................................................
37
About this Manual
. . . . . . . . . . . . . . . . . . . . . . . . . . . . . . .
..~......~................~...~....................
39
Conventions Used in this Manual
. . . . . . .
..~.................~................~......~.~...
41
Caring for the unit
. . . . . . . . .
..*......................................................~...............
42
Chapter 1 Getting Started
.....................................................................
45
Pat-t Names and Functions
.......................................................
46
Getting the Unit Up and Running
..............................................
48
Installing the batteries
..................................................
48
lnitializing
......................................................................
48
Setting the clock
..........................................................
49
Turning the unit on and off
..........................................
51
Calibrating the touch panel
..........................................
52
Setting the LCD contrast to suit various lighting
conditions
.....................................................................
52
Turning
off the
welcome
display.:. ...............................
53
Turning the key beep on and off
.................................
54
Getting to Know Your Unit
.........................................................
54
Touch buttons and the touch panel
.............................
55
Applications
..................................................................
55
Menu operation
............................................................
56
The keyboard
...............................................................
57
Display symbols
...........................................................
57
Built-in
help and
other messages..
..............................
58
29
 Loading...