


Home Appliances
K-61V28IM1-EU
K-61V28BM1-EU
Cooking
EN |
User Manual |
|
|
|
|
AL |
Manual i Përdorimit |
|
|
|
|
DK |
Brugermanual |
|
|
|
|
DE |
FBedienungsanleitung |
|
|
|
|
BG |
AИнструкции за Употреба |
|
|
|
|
CZ |
HNávod k Obsluze |
|
|

GB-Declaration of conformity
We declare that our products meet the applicable European Directives, Decisions and Regulations and the requirements listed in the standards referenced.
DE-Konformitätserklärung
Wir erklären, dass unsere Produkte die geltenden europäischen Richtlinien, Entscheidungen und Regularien sowie die in den referenzierten Standards gelisteten Anforderungen erfüllen.
FR-Déclaration de conformité
Nous déclarons que nos produits sont conformes aux Directives, Décisions et Règlementations européennes en vigueur et aux exigences visées dans les normes citées en référence.
ES-Declaración de conformidad
Declaramos que nuestros productos cumplen con las Directivas Europeas, Decisiones
y Regulaciones aplicables y los requisitos enumerados en dichas normativas.
PT-Declaração de conformidade
Declaramos que os nossos produtos cumprem as Diretivas Europeias, Decisões e Regulamentos aplicáveis e os requisitos enumerados nas referências normalizadas.
NL-Conformiteitsverklaring
We verklaren dat onze producten voldoen aan de van toepassing zijnde Europese richtlijnen, besluiten en voorschriften in de normen waarnaar wordt verwezen.
IT-Dichiarazione di conformità
Dichiariamo che i nostri prodotti sono conformi
a Direttive, Decisioni e Regolamenti europei e ai requisiti elencati negli standard di riferimento.
GR-Δήλωση συμμόρφωσης
Δηλώνουμε ότι τα προϊόντα μας πληρούν τις εφαρμόσιμες Ευρωπαϊκές Οδηγίες, Αποφάσεις και Κανονισμούς, καθώς και τις απαιτήσεις που περιέχονται στα πρότυπα όπου γίνεται αναφορά.
BG-Декларация за съответствие
Ние заявяваме, че нашите продукти отговарят на приложимите европейски директиви, решения и регламенти и на изискванията, посочени в гореописаните стандарти.
CZ-Prohlášení o shodě
Prohlašujeme, že naše výrobky splňují příslušné evropské směrnice, rozhodnutí, předpisy a požadavky uvedené ve zmiňovaných normách.
SK-Vyhlásenie o zhode
Vyhlasujeme, že naše produkty spĺňajú príslušné smernice, rozhodnutia, nariadenia a požiadavky vypísané v uvedených štandardoch.
EE-Vastavusdeklaratsioon
Deklareerime, et meie tooted vastavad kohaldatavatele Euroopa direktiividele, otsustele ja määrustele ning viidatud standardites sätestatud nõuetele.
SV-Försäkran om överensstämmelse
Vi försäkrar att våra produkter uppfyller gällande EU-direktiv, beslut och förordningar och de krav som anges i de standarder som refereras.
FI-Yhteensopivuuslauseke
Tuotteemme ovat yhteensopivia EU:n tuotedirektiivien, päätösten ja säädösten kanssa, sekä niissä listattujen standardien kanssa.
HR-Izjava o sukladnosti
Izjavljujemo da su naši proizvodu u skladu s primjenjivim Direktivama, Odlukama i Uredbama Europske unije te zahtjevima navedenima u
spomenutim standardima.
SR-Izjava o usklađenosti
Izjavljujemo da naši proizvodi zadovoljavaju primenljive evropske direktive, odluke i propise, kao i zahteve navedene u naznačenim standardima.
DA-Overensstemmelseserklæring
Vi erklærer, at vores produkter opfylder de gældende europæiske direktiver, beslutninger og forordninger, og de anførte standarder der henvises til.
NO-Samsvarserklæring
Vi erklærer at våre produkter oppfyller de gjeldende europeiske direktiver, beslutninger og forskrifter, og kravene i standardene som det henvises til.
UK-Декларація відповідності
Цим ми заявляємо, що наші продукти відповідають усім застосовним директивам, рішенням та нормам Європейського союзу. Вимоги зазначено в додаткових матеріалах щодо стандартів.
MK-Декларација за усогласеност
Изјавуваме дека нашите производи ги исполнуваат применливите европски директиви, решенија и одредби, како и побарувањата наведени во посочените стандарди.
RO-Declarație de conformitate
Noi declarăm că produsele noastre respectă Directivele Europene, Deciziile și Reglementările aplicabile și condițiile enumerate în standardele menționate.
HU-Megfelelőségi nyilatkozat
Ezúton igazoljuk, hogy termékeink megfelelnek az EU direktíváknak, jogszabályoknak, előírásoknak. Az előírások felsorolása a
referencia tartalmaknál.
SL-Izjava o skladnosti
Zagotavljamo, da so naši izdelki skladni z ustreznimi evropskimi direktivami, sklepi in predpisi ter zahtevami, ki so navedene v referenčnih standardih.
AL-Deklarata e konformitetit
Ne deklarojmë se produktet tona përmbushin Direktivat e aplikueshme evropiane, Vendimet dhe Rregulloret si dhe kërkesat e renditura në standardet e referuara.
LT-Atitikties deklaracija
Tvirtiname, kad mūsų produktai atitinka susijusiose Europos direktyvose, sprendimuose ir reglamentuose pateikiamų standartų keliamus reikalavimus.
LV-Atbilstības deklarācija
Mēs apliecinām, ka mūsu produkti atbilst attiecīgajām Eiropas direktīvām, lēmumiem un noteikumiem, kā arī prasībām, kas norādītas pieminētajos standartos.
PL-Deklaracja zgodności
Oświadczamy, że nasze produkty spełniają wymagania odpowiednich dyrektyw, decyzji i regulacji Unii Europejskiej oraz wymagania określone w wymienionych standardach.
Dear Customer,
Our goal is to offer you, high quality products that exceed your expectations. Your appliance is produced in modern facilities and is carefully, particularly tested for quality. This manual is prepared in order to help you use your appliance, which has been manufactured using the most recent technology with confidence and maximum efficienc . Before using your appliance, carefully read this guide which includes basic information to safe installation, maintenance and use. Please contact your nearest Authorized Service centre for the installation of your product.
EN - 1
Contents
Presentation and size of product Warnings
Preparation for installation and use Using the oven
Cleaning and maintenance of your product Service and Transport
EN - 2
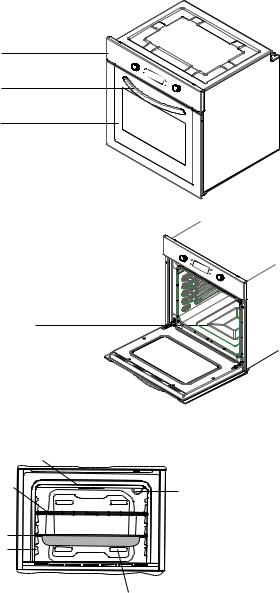
PRESENTATION AND SIZE OF PRODUCT
Control panel
Handle
Oven Door
Lower Heating Element (behind the plate)
Upper Heating Element (behind the plate)
Wire |
|
Grill |
Oven Light |
Tray
Racks
Air Outlet Shutters
EN - 3
SAFETY WARNINGS |
|
shall not play with the |
READ THESE INSTRUCTIONS CARE- |
|
|
|
appliance. Cleaning |
|
FULLY AND COMPLETELY BEFORE |
|
|
USINGYOURAPPLIANCE,ANDKEEP |
|
and user maintenan- |
IT INACONVENIENT PLACE FOR RE- |
|
ce shall not be made |
FERENCE WHEN NECESSARY. |
|
by children without |
|
|
|
THIS MANUAL IS PREPARED FOR |
supervision. |
|
MORE THAN ONE MODEL IN COM- |
• WARNING: The app- |
|
MON. YOUR APPLIANCE MAY NOT |
|
liance and its acces- |
HAVE SOME OF THE FEATURES |
sible parts become |
|
THAT ARE EXPLAINED IN THIS MA- |
|
|
NUAL. PAY ATTENTION TO THE EXP- |
|
hot during use. Care |
RESSIONS THAT HAVE FIGURES, |
||
WHILE YOUARE READING THE OPE - |
|
should be taken to |
RATING MANUAL. |
|
avoid touching hea- |
|
|
ting elements. Child- |
General Safety Warnings |
|
ren less than 8 years |
|
|
of age shall be kept |
• This appliance can |
|
away unless continu- |
be used by children |
|
ously supervised. |
aged from 8 years |
• WARNING: Danger |
|
and above and per- |
|
of fire: do not store |
sons with reduced |
|
items on the cooking |
physical, sensory or |
|
surfaces. |
mental capabilities |
• WARNING: If the |
|
or lack of experience |
|
surface is cracked, |
and knowledge if they |
|
switch off the applian- |
have been given su- |
|
ce to avoid the possi- |
pervision or instruc- |
|
bility of electric shock. |
tion concerning use |
• The appliance is not |
|
of the appliance in |
intended to be ope- |
|
a safe way and un- |
||
rated by means of an |
||
derstand the hazards |
||
external timer or se- |
||
involved. Children |
||
|
EN - 4
parate remote-control system.
•During use, the appliance becomes hot. Care should be taken to avoid touching heating elements inside the oven.
•During use, handles held for short periods in normal use can get hot.
•Do not use harsh abrasive cleaners or sharp metal scrapers to clean the oven door glass and other surface since they can scratch the surface, which may result in shattering of the glass or damage to the surface.
•Do not use steam cleaners for cleaning the appliance.
•WARNING: Ensure that the appliance is switched off before replacing the lamp to
avoid the possibility of electric shock.
•CAUTION: Accessible parts may be hot when the cooking or grilling is in use. Young children should be kept away.
•Your appliance is produced in ac-
cordance with all applicable local and international standards and regulations.
• Maintenance |
and |
repair |
work |
||
must be made only by authorized |
|||||
service |
technicians. |
Installation |
|||
and repair work that is carried out |
|||||
by unauthorized |
technicians may |
||||
endanger you. It is dangerous to |
|||||
alter or modify the specifications |
|||||
of the appliance in any way. |
|
||||
• Prior |
to |
installation, ensure |
that |
||
the |
local |
distribution |
conditions |
||
(nature of the gas and gas pressure or electricity voltage and frequency) and the requirements of the appliance are compatible. The requirements for this appliance are stated on the label.
•CAUTION: This appliance is designed only for cooking food and is intended for indoor domestic household use only and should not be used for any other purpose or in any other application, such as for non-domestic use or in a commercial environment or room heating.
•Do not try to lift or move the app-
EN - 5
liance by pulling the door handle. |
|
atmospheric effects. Do not expo- |
|||||||||||||
• All |
possible |
security |
measures |
se it to effects such as sun, rain, |
|||||||||||
have been taken to ensure your |
|
snow etc. |
|
|
|
|
|||||||||
safety. Since the glass may break, |
• |
The surrounding materials of the |
|||||||||||||
you should be careful while clea- |
|
appliance (cabinet) must be able |
|||||||||||||
ning to avoid scratching. Avoid hit- |
|
to withstand a temperature of min |
|||||||||||||
ting or knocking on the glass with |
|
100°C. |
|
|
|
|
|
||||||||
accessories. |
|
|
|
|
During usage |
|
|
|
|
||||||
• Ensure that the supply cord is not |
|
|
|
|
|||||||||||
• When you first run your oven a |
|||||||||||||||
wedged |
during |
the |
installation. |
certain |
smell |
will |
emanate |
from |
|||||||
If the supply cord is damaged, it |
|
the |
insulation |
materials |
and |
the |
|||||||||
must be replaced by the manufac- |
|
heater |
elements. |
For |
this |
rea- |
|||||||||
turer, its service agent or similarly |
|
||||||||||||||
|
son, |
before using |
your oven, |
run |
|||||||||||
qualified persons in order to pre- |
|
||||||||||||||
|
it empty at maximum temperature |
||||||||||||||
vent a hazard. |
|
|
|
|
|
||||||||||
|
|
|
|
|
for 45 minutes. At the same time |
||||||||||
• While the oven door is open, do |
|
||||||||||||||
|
you need to properly ventilate the |
||||||||||||||
not let children climb on the door |
|
environment in which the product |
|||||||||||||
or sit on it. |
|
|
|
|
|
is installed. |
|
|
|
|
|||||
Installation Warnings |
|
|
• |
During usage, the outer and inner |
|||||||||||
• Do not operate the appliance be- |
|
surfaces of the oven get hot. While |
|||||||||||||
fore it is fully installed. |
|
|
|
opening the oven door, step back |
|||||||||||
• The appliance must be |
installed |
|
to avoid the hot steam coming out |
||||||||||||
by |
an authorized |
technician and |
|
of the oven. There may be a risk |
|||||||||||
put into use. The producer is not |
|
of burns. |
|
|
|
|
|||||||||
• Do not put flammable or combus- |
|||||||||||||||
responsible for any damage that |
|||||||||||||||
might be caused by defective pla- |
|
tible materials, in or near the app- |
|||||||||||||
cement and installation by unaut- |
|
liance when it is operating. |
|
|
|||||||||||
horized people. |
|
|
|
|
• |
Always use oven gloves to remo- |
|||||||||
• When you unpack the appliance, |
|
ve and replace food in the oven. |
|
||||||||||||
make sure that it is not damaged |
• |
Do not leave the cooker while co- |
|||||||||||||
during transportation. In case of |
|
oking with solid or liquid oils. They |
|||||||||||||
any defect; do not use the appli- |
|
may catch fire on condition of ext- |
|||||||||||||
ance and contact a qualifi |
d servi- |
|
reme heating. Never pour water |
||||||||||||
ce agent immediately. As the ma- |
|
on to flames that are caused by |
|||||||||||||
terials used for packaging (nylon, |
|
oil. Cover the saucepan or frypan |
|||||||||||||
staplers, |
styrofoam...etc) |
maywith its cover in order to choke the |
|||||||||||||
cause harmful effects to children, |
|
flame that has occured in this case |
|||||||||||||
they should be collected and -re |
|
and turn the cooker off. |
|
|
|||||||||||
moved immediately. |
|
|
|
• |
If you will not use the appliance for |
||||||||||
• Protect |
your |
appliance |
against |
a long |
time, plug |
it off. Keep |
the |
||||||||
EN - 6
main control switch off. Also when |
PREPARATION FOR |
|
|
||||||||||
you |
do |
not |
use |
the |
appliance, |
|
|
|
|||||
keep the gas valve off. |
|
|
|
INSTALLATION AND USE |
|
||||||||
|
|
|
Manufactured with |
best |
quality |
parts |
|||||||
• Make sure the appliance control |
|||||||||||||
and materials, this modern, functional |
|||||||||||||
knobs are always in the “0” (stop) |
and practical oven will meet your ne- |
||||||||||||
position when it is not used. |
|
|
eds in all respects. Make sure to read |
||||||||||
• The trays incline when pulled out. |
the manual to obtain successful results |
||||||||||||
Be careful not to let hot liquid spill |
and not to experience any problems in |
||||||||||||
over. |
|
|
|
|
|
|
|
|
the future. The information given below |
||||
• When |
the door |
or |
drawer of thecontain rules that are necessary for cor - |
||||||||||
oven is open, do not leave any- |
rect positioning and service operations. |
||||||||||||
thing on it. You may |
unbalanceThey should be read without fail espe- |
||||||||||||
your appliance or break the cover. |
cially by the technician who will position |
||||||||||||
• Do not put heavy things or fla - |
the appliance. |
|
|
|
|||||||||
|
|
|
|
||||||||||
mable or ignitable goods (nylon, |
|
|
|
|
|||||||||
plastic bag, paper, cloth...etc) into |
CONTACT THE AUTHORIZED SER- |
||||||||||||
the drawer. This includes cookwa- |
VICE FOR INSTALLATION OF YOUR |
||||||||||||
re with plastic accessories (e.g.OVEN! |
|
|
|
||||||||||
handles). |
|
|
|
|
|
|
|
|
|
|
|||
• Do not hang towels, dishcloths or |
CHOOSING A PLACE FOR THE |
|
|||||||||||
clothes from the appliance or its |
OVEN |
|
|
|
|||||||||
handles. |
|
|
|
|
|
|
|
|
|
|
|
||
• During cleaning and maintenance |
––There are several points to pay atten- |
||||||||||||
• Always turn the appliance off befo - |
|||||||||||||
tion to when choosing a place for your |
|||||||||||||
re operations such as cleaning or |
|||||||||||||
oven. Make sure to take into account |
|||||||||||||
maintenance. You can |
do |
it |
after |
||||||||||
our recommendations below in order |
|||||||||||||
plugging |
the |
appliance |
off |
or |
tur- |
||||||||
to prevent any problems and dange- |
|||||||||||||
ning the main switches off. |
|
|
|||||||||||
|
|
rous situations, |
which |
might |
occur |
||||||||
• Do not remove the control knobs |
|||||||||||||
later! |
|
|
|
||||||||||
to clean the control panel. |
|
|
––When choosing a place for the oven, |
||||||||||
• |
|
|
|
|
|
|
|
|
|||||
|
|
|
|
|
|
|
|
attention should be paid that there are |
|||||
• TO MAINTAIN THE EFFICIENCY |
no flammable or combustible materi- |
||||||||||||
AND SAFETY OF YOUR APPLI- |
als in the close vicinity, such as curta- |
||||||||||||
ANCE, |
WE RECOMMEND YOU |
ins, oil, cloth etc. which quickly catch |
|||||||||||
ALWAYS USE |
ORIGINAL |
SPA- |
fire |
|
|
|
|||||||
RE PARTS AND TO CALL ONLY |
––Furnitures surrounding the oven must |
||||||||||||
OUR |
|
AUTHORIZED |
SERVICE be made of materials resistant to heat |
||||||||||
AGENTS IN CASE OF NEED. |
|
more than 50 C° of the room tempe- |
|||||||||||
rature.
EN - 7

Required changes to wall cabinets and |
|
|
2 x |
||
exhaust fans above the built-in combi- |
|
|
|||
|
|
|
|||
ned product as well as minimum he- |
|
|
|||
ights from the oven board are shown in |
|
|
|
||
Figure 1. Accordingly, the exhaust fan |
|
|
|
||
should be at a minimum height of 65 cm |
|
|
|
||
from the hob board. If there is no -ex |
|
|
|
||
haust fan the height should not be less |
Insert the oven into the cabinet by pus- |
||||
than 70 cm. |
|
|
hing it forward. Open the oven door and |
||
|
|
|
|||
|
|
|
insert 2 screws in the holes located on |
||
|
|
|
the oven frame. While the product fra- |
||
|
Minimum 65cm (with hood) Minimum 70cm (without hood) |
|
me touches the wooden surface of ca- |
||
Minimum 42 cm |
|
binet, tighten the screws. |
|||
Minimum 42 cm |
|
|
Worktop |
||
min. |
min. |
|
|||
|
HOB |
|
25 mm |
Built-in hob |
|
|
|
50 mm |
|||
|
|
|
|
|
|
|
|
|
|
|
Built-in oven |
INSTALLATION OF BUILT-IN OVEN
|
|
|
|
550 mm |
|
|
.560mm |
|
|
|
590mm |
max.580mm |
|
|
|
|
|
|
|
600mm . |
555mm |
mm |
mm |
|
. |
|
|||
|
|
min. |
|
|
min |
min |
|
595 |
|
|
576 |
|||
|
|
|
||
|
|
|
|
|
|
|
|
575 |
mm |
mm |
|
|
|
|
|
|
595 |
|
|
|
|
557mm |
550 mm |
||
|
|
min.560mm |
|
|
|
|
600mm |
590mm |
max.580mm |
|
|
|
|
min. |
mm |
|
|
mm |
||
|
|
|
|
|||
. . |
555mm |
|
|
|
|
|
min |
min |
|
576 |
|
|
595 |
|
|
|
|
|
||
min5mm |
|
|
|
|
|
|
. |
|
|
|
|
|
|
|
|
|
575 |
mm |
mm |
|
|
|
|
|
595 |
||
If the oven is installed under a hob, the distance between the worktop and the top panel of the oven must be minimum 50 mm and the distance between the
worktop and the top of control panel must be minimum 25 mm.
WIRING AND SAFETY OF BUILT_IN OVEN
The instructions given below must be followed without fail during wiring :
––The earthing cable must be connected via the screw with the earthing mark. Supply cable connection must be as shown in Figure 6. If there is no earthed outlet conforming to regulations in the installation environment, call the Authorized Service immediately.
––The earthed outlet must be in close vicinity of the appliance. Never use an extension cord.
––The supply cable should not contact
EN - 8

the product’s hot surface.
––In case of any damage to the supply cable, make sure to call the Authorized Service. The cable must be repla - ced by the Authorized Service.
––Wiring of the appliance must be performed by the Authorized Service. H05VV-F type supply cable must be used.
––Faulty wiring may damage the appli- |
|
|
|
|
|
|
|
|
|
||||||||
ance. Such a damage will not be co- |
|
|
|
|
|
|
|
|
|
||||||||
vered under the warranty. |
|
|
3.4. GENERAL WARNING AND |
|
|||||||||||||
––The appliance is designed to connect |
|
||||||||||||||||
PRECAUTIONS |
|
|
|
|
|||||||||||||
to 220-240V~ |
electricty |
is |
different |
|
|
|
|
|
|
|
|
||||||
than the value given above, call the |
Your |
appliance |
is produced |
in |
confor- |
||||||||||||
Authorized Service immediately. |
|
mity |
with |
the |
relevant |
safety |
instruc- |
||||||||||
––The Manucaturer |
Firm |
declares |
|||||||||||||||
tions |
relating to electrical appliances. |
||||||||||||||||
that its |
bears |
no |
responsibility |
||||||||||||||
Maintanance and repair works must be |
|||||||||||||||||
whatsover |
for |
any |
kind |
of |
da- |
||||||||||||
performed |
only |
by Authorized |
Service |
||||||||||||||
mage and |
loss |
arising from |
not |
||||||||||||||
technicians trained by the manufacturer |
|||||||||||||||||
complying |
with |
safety |
norms! |
||||||||||||||
firm. Installation and repair works, per- |
|||||||||||||||||
|
|
|
|
|
|
|
|
||||||||||
––Wiring of the appliance must be per- |
formed without observing the rules may |
||||||||||||||||
be dangerous. |
|
|
|
|
|
||||||||||||
formed |
by |
the |
|
Authorized |
Service.The outer surfaces is heated while your |
||||||||||||
The appliance is |
|
|
|
|
|
appliance |
is |
operating. |
The |
elements |
|||||||
––designed to connect to 220-240V~heating the |
inner surface of |
the |
oven |
||||||||||||||
electricity. If the mains electricity isand the steam |
out are |
extremely |
hot. |
||||||||||||||
different than the value given, call the |
These sections will continue to preser- |
||||||||||||||||
Authorized |
Service |
immediately. The |
ve their heat for certain while even if the |
||||||||||||||
appliance is designed for using with |
appliance is switched off. Never touch |
||||||||||||||||
plug ofor fixed connection to the ma- |
the hot surfaces. Keep children away. |
||||||||||||||||
ins. It is necessary that you install a |
In order to cook in your oven, the oven |
||||||||||||||||
double pole switch between the pro- |
function and temperature setting butt- |
||||||||||||||||
duct and the electricity supply (ma- |
|||||||||||||||||
tons need to be adjusted and the oven |
|||||||||||||||||
ins), with a minimum gap of 3 mm bet - |
timer, needs to be programmed. Other- |
||||||||||||||||
ween the switch contacts. (20A rated, |
wise, the oven will not operate. |
|
delay function type). |
||
|
EN - 9

Unplug your appliance when it is not in use.
Protect your appliance from atmosp-The heric effects. Do not leave it under the effects of the sun,rain, snow, dust etc.
Using the oven function control button
Oven Functions
* The functions of your oven may be different due to the model of your product.
 Oven Lamp:
Only the oven light will be turned on and it remains on in all the cooking function.
Static Cooking Function:
oven’s thermostat and warning
|
|
|
Defrost Function: |
|
|
|
|
|
||||
The oven’s warning lights will be turned |
This function is very good for obtaining |
|||||||||||
on, the fan starts operating. |
|
|
|
|||||||||
To use the defrost function, take your |
resultsinbakingpastry.Cookingiscarried |
|||||||||||
outbythelowerandupperheatingelement |
||||||||||||
frozen food and |
place |
it |
in |
the |
ovenwithin the oven and by the fan providing |
|||||||
on a |
shelf placed |
in |
the |
third slot from |
air circulation, which will give a slight grill |
|||||||
the |
bottom. |
It |
is |
recommended |
|
effect to the food. It is recommended to |
||||||
that |
|
|||||||||||
you |
can place an oven tray |
|
pre-heat the oven about 10 minutes. |
|||||||||
under |
|
|||||||||||
the |
defrosting food, to catch the |
-wa |
|
|
||||||||
ter |
accumulated |
due |
to |
melting |
ice. |
Grilling Function: |
||||||
This |
function |
will |
not |
cook |
or |
bake |
|
|||||
your food, it will only help to defrost it. |
Theoven’sthermostatandwarninglights |
|||||||||||
willbeturnedon,thegrillheatingelement will start operating. The function is used for grilling and toasting foods, use the upper shelves of oven. Lightly brush the wire grid with oil to stop foods sticking and place foods in the center of the grid.
Alwaysplaceatraybeneathtocatch any drips of oil or fat. It is recommended to pre-heat the oven about 10 minutes. Warning: When grilling, the oven door mustbeclosedandtheoventemperature should be adjusted to 1900C.
EN - 10

 Faster Grilling Function:
The oven’s thermostat and warning lightswillbeturnedon,thegrillandupper heatingelementswillstartoperating.The function is used for faster grilling and for covering a larger surface area, such as grilling meats, use the upper shelves of oven. Lightly brush the wire grid with oil to stop foods sticking and place foods in thecenterofthegrid.Alwaysplaceatray beneathtocatchanydripsofoilorfat.Itis recommendedtopre-heattheovenabout 10 minutes. Warning: When grilling, the oven door must be closed and the oven temperatureshouldbeadjustedto190 0C
 Double Grill and Fan Function:
The oven’s thermostat and warning lights will be turned on, the grill and upper heating elements and fan will start operating.
The function is used for faster grilling of thicker foods and for covering a larger surface area. Both the upper heating elementsandgrillwillbeenergisedalong with the fan to ensure even cooking.
Use the upper shelves of oven. Lightly brush the wire grid with oil to stop foods stickingandplacefoodsinthecenterofthe grid.Alwaysplaceatraybeneathtocatch any drips of oil or fat. It is recommended to pre-heat the oven about 10 minutes.
Warning: When grilling, the oven door mustbeclosedandtheoventemperature should be adjusted to 190C°.
 Pyrolytic Cleaning Function
Thisfunctionallowsyoutocleanthroughly the oven cavity.
 WARNING:
•Before activating pyrolytic cleaning function, remove any excessive spillage and make sure that the oven is empty. Do not leave anything inside the oven cavity (e.g. wire grids, shallow tray, deep tray etc. ) As this could heavily damage them.
•Before activating the pyrolytic cleaning function, remove the wire oven shelves and shelf supports (if available).
• Ensure that the oven door closed before activating the pyrolytic cleaning function.
•The oven door will be locked when the pyrolytic function started.
•When the pyrolytic cleaning function is on, it is advisable not to use a hob if it is fitted above the oven. This could cause overheatinganddamagetobothappliances.
•Duringthepyrolyticcleaningcycletheoven doorbecomeshot.Childrenshouldbekept away until it has cooled.
•At the end of pyrolytic cleaning process, the display shows the time of day.
Pyrolytic Cleaning
•The oven cavity is coated with a special emanel resistant to high temperatures.
EN - 11
•Duringthepyrolyticcleaningoperation,the
temperatureinsidetheovencanreachabout 475 ºC does burning food residuals. For your security, during the pyrolytic cleaning operation,theovendoorautomaticlylocks.
•Upon completion of the cleaning operation the oven door will be locked until the oven cavity has cooled down.
•Thecoolingfanoperatesuntiltheovenhas cooled down. After cooking, it is advisable to remove all the food residues with a wet sponge.
•It is advisable to wipe the oven over with aspongesoakedinwarmwateraftereach pyrolytic cleaning cycle is carried out.
•DuringthePyrolyticoperation,somesmell andfumewillbeemanatedduetodestruction of the food residual, it is normal. Oven cleaning fumes could be fatal to birds and disturbespeciallychildrensandpets,soall shouldbemovedintotheotherroomuntilit was finished. During the Pyrolytic operation, theroomwheretheoveninstalledmustbe ventilated sufficiently and the kitchen door should be closed to avoid passing smell and fume to other rooms..
ENERGY SAVING
Minimize the amount of liquid or fat to reduce cooking times.
Oven door should not be opened often during cooking period.
EN - 12
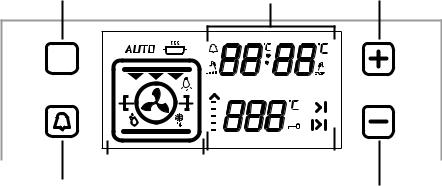
4.2. HOW TO USE THE VISIO TOUCH CONTROL UNIT
Mode Key
Mode Key
|
Time setting/Temperature |
|
settings for meat probe/ |
|
settings for meat probe/ |
Timerdisplay |
Key lack Key |
Key lock Key |
M |
|
|
|
|
|
|
|
|
|
|
|
|
|
|
|
|
|
|
Alarm Key |
|
|
|
|
|
|
|
|
Oven function |
|
|
|
|
|
|||
|
|
|
|
|
||||
Temperatureperaturedisplay |
Time setting Key |
|
||||||
|
display |
|
||||||
|
|
|
||||||
|
display |
|
|
|
|
|
||
Adjusting the Day Time:
When the built in oven installed firstly the time of day must be adjusted according to below instructions.
When oven installed firstl ,“0.00” will start to flash on the display. Touch “M“ sensor or “ - “ and “ + “ sensors to adjust the day time mode. “ : ” symbol will start to flash on the display. You can adjust it with “ - “ and “ + “ sensor.If Auto cooking mode is off, touch “ - “ and “ + “ sensors at the sametimetothedaytimemode.Youcan adjust it with “ - “ and “ + “ sensor.
You have to adjust the day time to use oven function.
ADJUSTING THE COOKER TIME:
Adjusting the Minute Minder:
Touch alarm sensor which shows “ ” symbol. “ ” will be flashing on the display. “0.00”willappearontheclockdigits.Adjust thedesiredtimeperiodforthewarningby usingTimerPlusandMinussensorwhile the symbol is flashing. Some time after thecompletionoftheadjustment, symbol will begin to light continuously. When the symbol begins to light continuously, the audiblewarningtimeadjustmentisdone. When the set time is up, the timer gives an audible warning and symbol begins to flash on the screen. Pressing “ - “or “+“ will stop the audible warning and the symbol disappears on the screen.
EN - 13
Adjusting the Cooking
Duration Time:
Thisfunctionisusedtocookinthedesired time range. The foods to be cooked are put into the oven. The oven is adjusted tothedesiredcookingfunction.Theoven temperature is adjusted to the desired degree depending on the dish to be cooked. Touch on the “M” sensor until you see Duration time symbol “ |>| ” on thetimerdisplayscreen.“ AUTO”appear onthedisplay.Adjustedthecookingperiod forthefoodyouwishtocook,byusingthe Timer Plus and minus sensor while the timer is in this position. Some time after the adjustment operation is completed, the day’s time will appear on the screen and the Duration time symbol will begin to continuously light on the screen.
At the completion of the set duration, the timer will stop the oven and give an audible warning. Also, “AUTO” will begin to flash on the screen. Touching any sensor of the control unit will end the audible warning. “AUTO” will go on to flash. Touch “ - “ and “ + “ symbols at the same time to finish AUTO” mode.
Adjusting the Cooking End Time:
Thisfunctionisusedtocookafteracertain period of time, within certain duration. The food to be cooked is put into the oven.Theovenisadjustedtothedesired cookingfunction.Theoventemperatureis adjustedtothedesireddegreedepending on the dish to be cooked.
Touch on the “M” sensor until you see Duration time symbol “ |>| ” on the timer display screen. “AUTO” appear on the
display. Adjusted the cooking period for the food you wish to cook, by using the Timer Plus and minus sensor while the timer is in this position.Then touch the “M” sensor until you see “ >| ” symbol. the day time will begin to flash, with the addition of the cooking period.Adjust the fi ishing time for the food by using the Timer Plus and minus sensor while the timer is in this position. Some time after the adjustment operation is completed, thedaytimewillappearonthescreenand the“>|”symbolwillbegintocontinuously light on the screen. The oven will start operating at the time calculated by deducting the cooking period from the set finishing time, and will stop at the set finishing time. The timer will give an audible warning and “AUTO” will begin to flash on the screen will begin to flash. Touching any button of the timer will end the audible warning. “AUTO” will go on to flash. Touch “ - “ and “ + “ symbols at the same time to finish AUTO” mode.
Digital Timer Sound Adjustment:
Touch “-“ sensor until you hear sound. timerwillgiveanaudiblesignalbeep.After thateachtime“-“sensoristouched,timer will give three different types of signal beep. Do not touch any further sensor andtimerwillsavethelastselectedsignal type.
Key Lock Function
The key lock function is used to prevent operating any functions of the control unit by mistake. Touch “+” sensor until you see key lock symbol on the display to activate key lock.Touch the “+” sensor to deactivate key lock.
EN - 14
While oven is operating, if control switches and touch buttons are not pushed or touched for 6 hours, oven turns off.
EN - 15
16 - EN
|
|
TURBO |
|
LOWER-UPPER |
|
LOWER-UPPER FAN |
|
GRILL |
|
||||
|
|
|
|
|
|
|
|
|
|
|
|
|
|
DISHES |
Thermostat |
Rack |
Cooking |
Thermostat |
Rack |
|
Cooking |
Thermostat |
Rack |
Cooking |
Thermostat |
Rack |
Cooking |
|
period |
|
period |
period |
period |
||||||||
|
pos. (°C) |
pos. |
pos. (°C) |
pos. |
|
pos. (°C) |
pos. |
pos. (min) |
pos. |
||||
|
(min) |
|
(min) |
(min) |
(min) |
||||||||
|
|
|
|
|
|
|
|
|
|
||||
|
|
|
|
|
|
|
|
|
|
|
|
|
|
Layered |
170-190 |
1-2-3 |
35-45 |
170-190 |
1-2 |
|
35-45 |
170-190 |
1-2 |
25-35 |
|
|
|
pastry |
|
|
|
|
|||||||||
|
|
|
|
|
|
|
|
|
|
|
|
|
|
|
|
|
|
|
|
|
|
|
|
|
|
|
|
Cake |
150-170 |
1-2-3 |
30-40 |
170 -190 |
1-2 |
|
30-40 |
150-170 |
1-2-3 |
25-35 |
|
|
|
|
|
|
|
|
|
|
|
|
|
|
|
|
|
Cookie |
150-170 |
1-2-3 |
25-35 |
170-190 |
1-2 |
|
30-40 |
150-170 |
1-2-3 |
25-35 |
|
|
|
|
|
|
|
|
|
|
|
|
|
|
|
|
|
Grilled |
|
|
|
|
|
|
|
|
|
|
200 |
4 |
10-15 |
meatballs |
|
|
|
|
|
|
|
|
|
|
|||
|
|
|
|
|
|
|
|
|
|
|
|
|
|
|
|
|
|
|
|
|
|
|
|
|
|
|
|
Watery food |
175-200 |
2 |
40-50 |
175-200 |
2 |
|
40-50 |
175-200 |
2 |
40-50 |
|
|
|
|
|
|
|
|
|
|
|
|
|
|
|
|
|
Chicken |
|
|
|
200 |
1-2 |
|
45-60 |
200 |
1-2 |
45-60 |
200 |
* |
50-60 |
|
|
|
|
|
|
|
|
|
|
|
|
|
|
Chop |
|
|
|
|
|
|
|
|
|
|
200 |
3-4 |
15-25 |
|
|
|
|
|
|
|
|
|
|
|
|
|
|
Beefstake |
|
|
|
|
|
|
|
|
|
|
200 |
4 |
15-25 |
|
|
|
|
|
|
|
|
|
|
|
|
|
|
Two-tray |
160-180 |
1-4 |
30-40 |
|
|
|
|
|
|
|
|
|
|
cake |
|
|
|
|
|
|
|
|
|
|
|||
|
|
|
|
|
|
|
|
|
|
|
|
|
|
|
|
|
|
|
|
|
|
|
|
|
|
|
|
Two-tray |
170-190 |
1-4 |
35-45 |
|
|
|
|
|
|
|
|
|
|
pastry |
|
|
|
|
|
|
|
|
|
|
|||
|
|
|
|
|
|
|
|
|
|
|
|
|
|
|
|
|
|
|
|
|
|
|
|
|
|
|
|
* Cook with roast chicken skewer... |
|
|
|
|
|
|
|
|
|
|
|
||
|
|
|
|
|
|
|
|
|
|
|
|
|
|
Accessories |
maged and cannot be used, request a |
The product is supplied with accesso- |
spare part from the nearest service |
ries. You can also use accessories you |
centre. |
purchase from other sources, but they |
Oven Cavity |
||||
must be heat and flame resistant. You |
|||||
|
|||||
can also use glass dishes, cake molds |
5. Rack |
||||
and oven trays that are appropriate for |
|||||
4. Rack |
|||||
use in oven. Follow manufacturer’s ins- |
3. Rack |
||||
2. Rack |
|||||
tructions when using other accessories. |
1. Rack |
||||
In case small size dishes are used, pla- |
|
||||
ce the dish onto the wire grid, as it will |
|
||||
completely be on the middle part of the |
Oven Accessories |
||||
grid. If the food to be cooked does not |
|||||
cover the oven tray |
completely, if |
the The accessories for your oven may be |
|||
food is taken from the deep freezer or |
different due to the model of your pro- |
||||
the tray is being used for the collection |
duct. |
||||
of food’s juices that flow during grilling, |
Wire grid |
||||
the form changes can be observed in |
|||||
the tray. This is due to the high tempe- |
|
||||
ratures that occur during cooking. The |
|
||||
tray will return to its old form when the |
|
||||
tray cools down after cooking. This is |
|
||||
a normal physical event that occurs |
|||||
during heat transfer. Do not place hot |
|
||||
glass trays and dishes into a cold envi- |
Wire grid is used to grill or to place diffe - |
||||
ronment straight from the oven to avoid |
rent cookwares on. |
||||
breakingthetrayordish.Donotputonto |
|
|
|||
cold and wet surfaces. Place on a dry |
WARNING- Fit the grid correctly into |
||||
kitchen cloth and allow to cool slowly. |
any corresponding rack in the oven ca- |
||||
When using |
the grill |
in your oven; |
we vity and push it to the back. |
||
recommend |
(where |
appropriate) |
you |
|
|
use the grid that was supplied with the |
|
||||
product. When using the wire grid; put |
|
||||
a tray onto one of the lower shelves to |
|
||||
enable oil to be collected. Water may be |
|
||||
added to the tray to assist cleaning. As |
|
||||
explained in the corresponding clauses, |
|
||||
never attempt to use the gas operated |
|
||||
grill burner |
without |
the grill protection Shallow Tray |
|||
lid. If your oven has a gas operated grill burner, but the grill heat shield is missing, or if it is da
EN - 17
it to the back.
Deep Tray
Deep tray is used to cook stews.To locate the tray correctly in the cavity, put it to any rack and push it to the back.
Removal of wire shelf
Pull the wire shelf as shown in the picture. After releasing it from clips, lift it up.
1 |
2 |
|
EN - 18
CLEANING AND |
the inner frame do not require cleaning. |
MAINTENANCE OF YOUR |
However; depending on usage, it is re- |
OVEN |
commended that you replace them after |
|
a certain period of time. |
CLEANING |
MAINTENANCE |
|
|
Before starting to clean your oven, be |
Replacing the Oven Light |
sure that all control buttons are off and |
|
your appliance is cooled off. Unplug the |
|
appliance. |
The change of oven lamp must be done |
|
by authorized technician. The rating of |
Do not use cleaning materials conta- |
the bulb should be 230V, 25Watt, Type |
ining particles that might scratch theE14,T300 before changing the lamp,the |
|
enamelled and |
oven should be plugged off and it sho- |
painted parts of your oven. Use cream |
uld be cool. |
cleaners or liquid cleaners, which do not |
|
contain particles. As they might ahrm The lamp design is specific for the use |
|
the surfaces, do not use caustic cre- |
in household cooking appliances and it |
ams, abrasive cleaning powders, rough |
is not suitable for household room illu- |
wire wool or hard tools. In the event the |
mination. |
excess liquids spilling over your oven |
|
should burn, it may cause a damage to |
|
the enamel. Immediately clean up the split liquids. Do not use steam cleaners for cleaning the oven.
Cleaning the interior of the oven
Make sure to unplug the oven before starting to clean it. You will obtain best results if you clean the oven interior while the oven is slightly warm. Wipe your oven with a soft piece of cloth dampened with soap water after each use. Then wipe it again, this time with a wetted cloth, and wipe it dry. A complete cleaning using dry and powder type cleaners. For product with catalytic enamel frames, the rear and side walls of
EN - 19
SERVICE AND |
carriers to the cooking panels. |
|
|||||
TRANSPORT |
Place a paper between the upper cover |
||||||
|
and cooking panel, cover the upper co- |
||||||
REQUIREMENTS BEFORE |
ver, than tape |
to |
the |
side surfaces of |
|||
oven. |
|
|
|
|
|
||
CONTAINING TO SERVICE |
|
|
|
|
|
||
|
|
|
|
|
|
||
If the oven does not operate : |
Tape |
carboard |
or |
paper onto |
the front |
||
cover on interior glass of oven as it will |
|||||||
The oven may be plugged off, there has |
|||||||
be suitable to the trays, for the wire grill |
|||||||
been a black out. On models fitted with |
|||||||
and trays in your oven not damage to |
|||||||
a timer, time may not be regulated. |
|||||||
the oven’s cover during transport. Also |
|||||||
If the oven does not heat : |
|||||||
tape the oven’s covers to the side walls. |
|||||||
The heat may be not adjusted with |
|
|
|
|
|
||
oven’s heater control switch. |
If does not have the original case : |
||||||
If the interior lighting lamp does not light |
|||||||
|
|
|
|
|
|
||
: |
Take |
measure |
for |
external |
surfaces |
||
|
|||||||
The electricitiy must be controlled. |
It(glass and paintes surfaces) of oven |
||||||
must be controlled whether the lamps |
against possible blows. |
|
|
||||
are defective. If they are defective, you |
|
|
|
|
|
|
|
can change them as following the gu- |
|
|
|
|
|
|
|
ide. |
|
|
|
|
|
|
|
Cooking (if lower-upper part does not cook equally) :
Control the shelf locations, cooking period and heat values according to the manual.
Except these, if you still have any problem with your product, please call to the “Authorized Service”.
INFORMATION RELATED TO
TRANSPORT
If you need any transport :
Keep the original case of product and carry it with its original case when need to be carried. Follow the transport signs
on case. Tape the cooker on upper parts, hats and heads and saucepan
EN - 20
I nderuar klient,
Qëllimiynëështët’Juofrojmëproduktetëcilësisësëlartëqëitejkalojnëpritshmëritë
Tuaja. Pajisja juaj është prodhuar në fabrika moderne dhe me shumë kujdes, e testuar veçanërisht për cilësinë. Ky udhëzues është përgatitur në mënyrë që t'ju ndihmojë të përdorni pajisjen tuaj, e cila është prodhuar duke përdorur teknologjinë
më të fundit me besueshmëri dhe efikasitet maksimal. Para se të përdorni pajisjen tuaj, lexoni me kujdes këtë udhëzues i cili përfshin informacione bazë për instalimin e sigurtë, mirëmbajtjen dhe përdorimin. Ju lutemi të kontaktoni qendrën më të afërt të autorizuar për instalimin e produktit tuaj.
AL - 1
Përmbajtja
Prezantimi dhe madhësia e produktit Paralajmërime
Përgatitja për instalim dhe përdorim Përdorimi i furrës
Pastrimi dhe mirëmbajtja e produktit tuaj Shërbimi dhe Transporti
AL - 2

PREZANTIMI DHE MADHËSIA E PRODUKTIT
Paneli i kontrollit
Doreza
Dera e furrës
Element me ngrohje më të ulët (prapa pllakës)
Element me ngrohje më të lartë (prapa pllakës)
rrjetë grile
Drita e furrës
tabaka
mbajtëse
Grila me ventilim
AL - 3
PARALAJMËRIMET E SIGURISË |
dhe kuptojnë rreziqet |
||||
LEXONI |
ME |
KUJDES |
|
DHE |
|
PLOTËSISHT KËTO UDHËZIME PARA |
e përfshira. Fëmijët |
||||
PËRDORIMIT |
TË |
PAJISJES |
TUAJ nuk duhet të luajnë |
||
DHE RUAJENI ATË NË NJË VEND TË |
me pajisjen. Pastrimi |
||||
PËRSHTATSHËM PËR REFERENCË |
|||||
KUR TË JETË E NEVOJSHME. |
|
dhe mirëmbajtja nuk |
|||
|
|
|
|
|
duhet të bëhet nga |
KY UDHËZUES ËSHTË PËRGATITUR |
fëmijët pa mbikëqyrje. |
||||
PËR MË SHUMË SE NJË MODEL TË |
• KUJDES: Pajisja |
||||
PËRBASHKËT. PAJISJA JUAJ MUND |
|
||||
TË MOS |
KETË |
NJË |
NGA DISA |
KA- dhe pjesët e saj të |
|
RAKTERISTIKAT QË JANË SHPJE- |
arritshme nxehen |
||||
GUAR NË KËTË UDHËZUES. KUSH- |
gjatë përdorimit. Du- |
||||
TOJUNI |
RËNDËSI PARAQITJES |
NË |
|||
VLERA, |
KUR |
JENI |
DUKE LEXUAR het patur kujdes për |
||
KËTË UDHËZUES. |
|
|
të shmangur prek- |
||
|
|
|
|
|
jen e elementëve të |
Paralajmërime të përgjithshme |
|
nxehtë. Fëmijët më |
|||
për sigurinë |
|
|
|
pak se 8 vjeç, do të |
|
|
|
|
|
|
|
• Kjo pajisje mund të |
|
mbahen larg vetëm |
|||
|
nëse mbikëqyren |
||||
përdoret nga fëmijë |
|
||||
|
vazhdimisht. |
||||
të moshës 8 vjeç |
|
||||
|
• KUJDES: Rreziku |
||||
e sipër dhe persona |
|
||||
|
i zjarrit: mos ruani |
||||
me aftësi të kufiz - |
|
||||
|
a tikuj në sipërfaqet |
||||
ara fizike, ndjesore |
|
||||
|
e gatimit. |
||||
ose mendore apo |
|
||||
|
• KUJDES: Nëse |
||||
me mungesa të |
|
||||
përvojës dhe njo- |
|
sipërfaqja është pla- |
|||
hurive në qoftë se |
|
saritur, fikeni paji - |
|||
ata kanë mbikëqyrje |
|
jen për të shmangur |
|||
ose udhëzohen për |
|
mundësinë e goditjes |
|||
përdorimin e pajisjes |
|
elektrike. |
|||
në mënyrë të sigurtë |
|
• Pajisja nuk është |
|||
AL - 4
ndërtuar për tu vënë në punë me anë të një ore me zile të jashtme apo me anë të një sistemi të veçantëtelekomandë.
•Gjatë përdorimit pajisja nxehet. Tregoni kujdes për të shmangur prekjen e elementëve të
nxehtë brenda furrës.
•Gjatë përdorimit, dorezat që përdoren për një kohë të shkurtër mund të nxehen.
•Mos përdorni pastrues gërryes ose skraper të mprehtë metalik për të pastruar xhamin e derës së furrës dhe sipërfaqe të tjera pasi ato mund të gërvishtin sipërfaqen, e cila mund të rezultojë
në krisjen e xhamit apo dëmtimin e sipërfaqes.
•Mos përdorni pastrues me avull për pastrimin e pajisjes.
•KUJDES: Sigurohuni që pajisja është e fikur para se të
zëvendësoni llambën për të shmangur mundësinë e goditjes elektrike.
•VINI RE: Pjesët e aksesueshme mund
të nxehen, kur janë në përdorim vatrat për gatim apo skara. Fëmijët e vegjël duhet të mbahen larg.
•Pajisja juaj është prodhuar në
përputhje me të gjitha standardet e aplikueshme dhe rregulloret vendore dhe ndërkombëtare.
•Mirëmbajtja dhe puna riparuese duhet të bëhet vetëm nga teknikë të shërbimit të autorizuar. Instalimi dhe puna riparuese që kryhet nga teknikë të paautorizuar mund t'ju rrezikojë. Është e rrezikshme të ndryshoni apo modifikoni specifi-
kimet e pajisjes në çdolloj mënyre. |
|
||
• Para |
instalimit, |
sigurohuni |
që |
kushtet |
lokale të |
shpërndarjes |
|
(natyra e gazit dhe presioni i gazit |
|
||
ose tensionit të energjisë elektri- |
|
||
ke dhe |
frekuenca) |
dhe kërkesat |
|
e pajisjes përputhen. Kërkesat për këtë pajisje janë të deklaruara në
AL - 5
etiketë. |
|
|
|
|
|
|
|
rohuni që ajo nuk është dëmtuar |
||||||||||
• VINI RE: Kjo pajisje është projek- |
|
gjatë transportit. Në rast të ndonjë |
||||||||||||||||
tuar vetëm për gatim dhe është |
|
defekti;mosepërdornipajisjendhe |
|
|||||||||||||||
menduar |
vetëm |
për |
përdorimkontaktoni |
menjëherë |
një |
agjent |
||||||||||||
shtëpiak të brendshëm dhe nuk |
|
të |
kualifikua |
të |
shërbimit. Duke |
|||||||||||||
duhettëpërdoretpërndonjëqëllim |
|
qenë se materialet e përdorura për |
||||||||||||||||
tjetër,osenëndonjëkërkesëtjetër, |
|
paketim (najloni, staplers, poliste- |
||||||||||||||||
të tilla si për përdorim jo-shtëpiak |
|
roli ... etj) mund të kenë efekte të |
||||||||||||||||
apo në një mjedis komercial apo |
|
dëmshme për fëmijët, ato duhet të |
||||||||||||||||
për ngrohje ambienti. |
|
|
|
|
mblidhen dhe të hiqen menjëherë. |
|||||||||||||
• Mos u mundoni ta hiqni apo lëvizni |
• Mbroni |
pajisjen |
tuaj |
ndaj |
efekte- |
|||||||||||||
pajisjen duke e tërhequr nga dore- |
|
ve atmosferike. Mos e ekspozoni |
||||||||||||||||
za e derës. |
|
|
|
|
|
|
atë nën efekte të tilla si dielli, shiu, |
|||||||||||
• Janë |
marrë |
të |
gjitha |
masatbora etj . |
|
|
|
|
|
|
|
|||||||
e mundshme të sigurisë për të ga- |
• Materialet |
përreth pajisjes (kabi- |
||||||||||||||||
rantuar sigurinë tuaj. Duke qenë |
|
net) duhet të jenë në gjendje të |
||||||||||||||||
se xhami mund të thyhet, ju duhet |
|
përballojnë |
|
një |
temperaturë |
prej |
||||||||||||
të jeni të kujdesshëm gjatë past- |
|
min 100 °C. |
|
|
|
|
|
|
|
|||||||||
rimi për të shmangur gërvishtjet. |
Gjatë përdorimit |
|
|
|
|
|
||||||||||||
Shmangni |
goditjet |
apo |
trokitjet |
|
|
|
|
|
|
|
|
|
|
|
||||
mbi xham me aksesorët. |
|
|
• Kur ju do përdorni furrën tuaj për |
|||||||||||||||
|
|
|
herëtëparënjëerëepakëndshme |
|||||||||||||||
• Sigurohuni |
që |
kordoni |
furnizu- do të burojë nga materialet izolu- |
|||||||||||||||
es nuk ka ngecur diku gjatë ins- |
|
ese dhe elementet ngrohës. Për |
||||||||||||||||
talimit. |
Nëse |
kablloja |
furnizues |
këtë |
arsye, |
para |
se |
të |
përdorni |
|||||||||
është e dëmtuar, ajo duhet |
tëfurrën tuaj, lëreni të punojë bosh |
|||||||||||||||||
zëvendësohet |
nga |
|
prodhuesi,në |
temperaturë |
|
maksimale |
për |
|||||||||||
agjenti i saj i shërbimit apo nga |
45 minuta. Në të njëjtën kohë ju |
|||||||||||||||||
persona të kualifikuar në mënyrë |
|
duhet të duhet të ajrosni ambien- |
||||||||||||||||
të ngjashme për të parandaluar |
|
tin në të cilin produkti është i ins- |
||||||||||||||||
ndonjë rrezik. |
|
|
|
|
|
taluar. |
|
|
|
|
|
|
|
|
|
|||
• Kur dera e furrës është e hapur, |
• Gjatë përdorimit, sipërfaqet e jash- |
|||||||||||||||||
mos lejoni fëmijët të ngjiten apo të |
|
tme dhe të brendshme të furrës |
||||||||||||||||
ulen tek dera. |
|
|
|
|
|
nxehen. Kur hapni derën e furrës, |
||||||||||||
Paralajmërime mbi instalimin |
|
|
ikni mbrapa për të shmangur avul- |
|||||||||||||||
• Mos e përdorni pajisjen |
para se |
|
lin e nxehtë që del nga furra. Kjo |
|||||||||||||||
ajo të instalohet plotësisht. |
|
|
|
mund të përbëjë rrezik për djegie. |
||||||||||||||
• Pajisja duhet të instalohet nga një |
• Mos vendosni materiale të ndezs- |
|||||||||||||||||
teknik i autorizuar dhe të vihet në |
|
hme ose të djegshme, në ose në |
||||||||||||||||
përdorim. |
Prodhuesi |
nuk |
është |
afërsi |
|
të |
pajisjes |
kur ajo |
është |
|||||||||
përgjegjës për çdo dëm që mund |
|
duke punuar. |
|
|
|
|
|
|
||||||||||
të shkaktohet nga vendosja e ga- |
• Gjithmonë |
|
përdorni |
doreza |
-fur |
|||||||||||||
buar dhe instalimi nga persona të |
|
re për të hequr dhe zëvendësuar |
||||||||||||||||
paautorizuar. |
|
|
|
|
|
ushqimin në furrë. |
|
|
|
|
||||||||
• Kur ju |
shpaketoni pajisjen, |
sigu- |
• Mos |
e |
lini |
pa |
|
mbikëqyrje |
tenx- |
|||||||||
AL - 6
heren |
ndërsa |
gatuani |
me |
vajra |
DHE |
SIGURINË |
E |
PAJISJES |
|||||||||
të ngurtë apo të lëngshëm. Ato |
TUAJ |
NE JU REKOMANDOJMË |
|||||||||||||||
mund |
të |
marrin |
zjarr |
në |
kushtet |
|
QË GJITHMONË TË PËRDORNI |
||||||||||
e ngrohjes |
ekstreme. |
Asnjëherë |
|
PJESËORIGJINALE |
DHE |
NË |
|||||||||||
mos derdh ujë mbi flakët që janë |
|
RAST NEVOJE TË KONTAKTONI |
|||||||||||||||
shkaktuar |
nga |
vaji. Mbuloni |
tiga- |
|
|||||||||||||
|
VETËMAGJENTIN EAUTORIZU- |
|
|||||||||||||||
nin ose fritezën me kapakun e vet |
|
|
|||||||||||||||
|
AR TË SHËRBIMIT. |
|
|
|
|||||||||||||
në mënyrë që të mbyten flakët që |
|
|
|
|
|||||||||||||
|
|
|
|
|
|
|
|||||||||||
janë |
shkaktuar |
në |
këtë rast |
dhe PËRGATITJA PËR INSTALIM |
|
||||||||||||
fikni sobën. |
|
|
|
|
|
|
|
DHE PËRDORIM |
|
|
|
|
|||||
|
|
|
|
|
përdorniE prodhuar me pjesë dhe materiale të |
||||||||||||
• Në qoftë se |
ju |
nuk |
do |
të |
|||||||||||||
pajisjen për një kohë të gjatë, hiqeni |
cilësisë më të mirë , kjo furrë moderne, |
||||||||||||||||
funksionale dhe praktike do të plotësojë |
|||||||||||||||||
nga priza. Fikeni edhe çelësin krye- |
|||||||||||||||||
nevojat |
tuaja në të gjitha |
aspektet. Si- |
|||||||||||||||
sor. Gjithashtu, kur ju nuk e përdorni |
|||||||||||||||||
gurohuni që të lexoni udhëzuesin për të |
|||||||||||||||||
pajisjen, mbyllni valvolën e gazit. |
|
||||||||||||||||
|
patur rezultate të suksesshme dhe për |
||||||||||||||||
|
|
|
|
|
|
|
|
|
|
||||||||
• Sigurohuni |
që |
çelësat |
e |
kontrol- të mos patur ndonjë problem në të ard- |
|||||||||||||
lit të pajisjes janë gjithmonë në |
|
|
|
|
|
|
|||||||||||
pozicionin |
"0" (stop) |
kur |
ajo |
nuk |
hmen. Informacioni i dhënë më poshtë |
||||||||||||
përdoret. |
|
|
|
|
|
|
|
|
përmban rregulla që janë të nevojshme |
||||||||
• Tavat anojini kur i tërhiqni për tipër pozicionimin e saktë |
dhe |
veprimet |
|||||||||||||||
nxjerrë. Jini të kujdesshëm për të |
e shërbimit. Ato duhet të lexohen pa u |
||||||||||||||||
mos derdhur lëngun e nxehtë. |
|
anashkaluar sidomos nga tekniku, i cili |
|||||||||||||||
|
do ta pozicionojë pajisjen. |
|
|
|
|||||||||||||
• Kur dera ose |
skara e furrës është |
|
|
|
|||||||||||||
|
|
|
|
|
|
|
|||||||||||
hapur, mos lini asgjë mbi të. Ju |
|
|
|
|
|
|
|||||||||||
mund |
të çekuilibroni |
pajisjen |
tuaj |
KONTAKTONI SERVISIN E AUTORIZU- |
|||||||||||||
ose të thyeni kapakun. |
|
|
|
AR PËR INSTALIMIN E FURRËS TUAJ! |
|||||||||||||
• Mos vini gjëra të rënda a[p mallra |
ZGJIDH NJË VEND PËR FURRËN |
||||||||||||||||
të ndezshëm apo që marrin flakë |
|||||||||||||||||
lehtë (najloni, qese plastike, letër, |
––Ka disa pika që kërkojnë vëmendje |
||||||||||||||||
rroba ... etj) në skarë. Kjo përfshin |
|
kur zgjidhni një vend për furrën tuaj. |
|||||||||||||||
edhe enët e gatimit me aksesorë |
|
Sigurohuni të merrni parasysh reko- |
|||||||||||||||
plastik (p.sh. dorezat). |
|
|
|
|
mandimet tona si |
më |
poshtë për |
të |
|||||||||
• Mos varni peshqirë, peceta për |
parandaluar ndonjë |
problem |
dhe |
-si |
|||||||||||||
pjata apo veshje të pajisjes apo |
|
tuata të rrezikshme, të cilat mund të |
|||||||||||||||
dorezat e saj. |
|
|
|
|
|
|
|
|
ndodhin më vonë! |
|
|
|
|
||||
• Gjatë pastrimit dhe mirëmbajtjes |
––Kur zgjidhni një vend për furrën, duhet |
|
|||||||||||||||
• Gjithmonë |
fikeni |
pajisjen |
para |
|
t'i kushtohet vëmendje që nuk ka ma- |
||||||||||||
veprimeve të tilla si pastrimi apo |
|
teriale të ndezshme ose të djegshme |
|||||||||||||||
mirëmbajtja. Ju mund ti bëni këto |
|
në afërsi të ngushtë, të tilla si perde, |
|||||||||||||||
pas fikjes së pajisjes apo duke fi- |
|
vaj, rroba etj e cila marrin zjarr shpejt. |
|||||||||||||||
kur çelësin kryesor. |
|
|
|
|
––Mobiljet përreth furrës duhet të jenë |
||||||||||||
• Mos hiqni çelësat e kontrollit për të |
|
nga materiale rezistente ndaj ngroh- |
|||||||||||||||
pastruar panelin e kontrollit. |
|
|
|
jes më shumë se 50 C ° nga tempera - |
|||||||||||||
• PËR TË RUAJTUR EFIKASITETN |
|
tura e dhomës. |
|
|
|
|
|||||||||||
|
|
|
|
|
|
|
|||||||||||
AL - 7
 Loading...