


 Loading...
SOFTWARE
SETUP GUIDE
DIGITAL MULTIFUNCTIONAL SYSTEM
• INTRODUCTION |
Page |
1 |
|
• CONTENTS |
5 |
•INSTALLING THE SOFTWARE (THAT ACCOMPANIES
THE MACHINE) |
7 |
• INSTALLING THE SOFTWARE |
20 |
(FOR OPTIONS) |
|
• TROUBLESHOOTING AND |
39 |
USEFUL INFORMATION |

Warranty
While every effort has been made to make this document as accurate and helpful as possible, SHARP Corporation makes no warranty of any kind with regard to its content. All information included herein is subject to change without notice. SHARP is not responsible for any loss or damages, direct or indirect, arising from or related to the use of this operation manual.
© Copyright SHARP Corporation 2004. All rights reserved. Reproduction, adaptation or translation without prior written permission is prohibited, except as allowed under copyright laws.
Note
•This manual assumes that the personnel who are installing this product and the users of the product have a working knowledge of Windows and Macintosh computers.
•For information on the operating system, please refer to your operating system manual or the online Help function.
•Some of the windows that appear in this manual may vary depending on your computer type and settings.
•In some regions the "Key operator's guide" cited in this manual is a separate manual, and in other regions the "Key operator's guide" is included in the "Operation manual (for general information and copier)".
•The dual function board mentioned in this manual can be installed as an option on some models and is installed standard on other models. For more information, see "3. PERIPHERAL DEVICES AND SUPPLIES" of the "Operation manual (for general information and copier)".
Trademark Acknowledgments
•Sharpdesk is a trademark of Sharp Corporation.
•Microsoft®, Windows®, Windows® 95, Windows® 98, Windows® Me, Windows NT® 4.0, Windows® 2000, Windows® XP, Windows® Server 2003 and Internet Explorer® are registered trademarks or trademarks of Microsoft Corporation in the U.S.A. and other countries.
•IBM, PC/AT, and PowerPC are trademarks of International Business Machines Corporation.
•Macintosh, Power Macintosh, Mac OS, LaserWriter, and AppleTalk are registered trademarks of Apple Computer, Inc.
•PostScript® is a registered trademark of Adobe Systems Incorporated.
•Acrobat® Reader Copyright© 1987-2002 Adobe Systems Incorporated. All rights reserved.
Adobe, the Adobe logo, Acrobat, and the Acrobat logo are trademarks of Adobe Systems Incorporated.
•NetWare is a registered trademark of Novell, Inc.
•Agfa and the Agfa Rhombus are registered trademarks of Agfa-Gevaert A.G.
•All other trademarks and copyrights are the property of their respective owners.
The display screens, messages, and key names shown in the manual may differ from those on the actual machine due to product improvements and modifications.

INTRODUCTION
Thank you for purchasing this product. This manual explains how to install the printer driver and utilities that are required for the printer and scanner functions.
The optional network expansion kit (AR-NB3) enables the machine to be used as a network scanner and network printer. The optional PS3 expansion kit (AR-PK1/N) enables the machine to be used as a PostScript compatible printer. When the machine is used as a PostScript printer, printing is possible in both a Windows and a Macintosh environment. Note that printing in a Macintosh environment is only possible via a network connection. (Parallel and USB ports cannot be used in a Macintosh environment.)
Where "AR-XXXX" appears in this manual, please substitute the name of your model for "XXXX". For the name Note of the model that you are using, see "DIFFERENCES BETWEEN MODELS" in the "Operation manual (for
general information and copier)".
Software setup guide (this manual)
Explains the procedures for installing the software in the "Software" CD-ROMs that accompany the machine and the optional network expansion kit (AR-NB3).
To use the machine as a printer or scanner, see this manual and the online manuals.
Using the standard printer function and scanner function
•Operation manual (for printer and scanner)
This is an online manual that can be found in the "Software CD-ROM (1)" that accompanies the machine.
This manual contains information necessary for using the machine as a printer and scanner, including printing by means of the standard printer driver, printing by means of the SPLC printer driver that can be used when the dual function board is installed, scanning using Button Manager, troubleshooting, and key operator programs for the printer and network functions.
Using the network printer function
•Operation manual (for network printer)
This is an online manual that can be found in the "Software CD-ROM (1)" that accompanies the network expansion kit. This manual contains information necessary for using the machine as a printer, including printing condition settings, printing using the PCL5e and PCL6 printer drivers, and the PS printer driver, troubleshooting, and key operator programs for the printer and network functions.
Using the network scanner function
•Operation manual (for network scanner)
This is an online manual that can be found in the "Software CD-ROM (1)" that accompanies the network expansion kit.
Read this manual for information on using Scan to FTP, Scan to E-mail, and other network scanner functions.
The following help files are installed when the software on the "Software CD-ROM (1)" that accompanies the network expansion kit is installed:
•Printer Status Monitor Help file
•Printer Administration Utility Help file
Online manual contained in the "Network Utilities CD-ROM"
• Print Server Card Online Manual
SOFTWARE LICENSE
The SOFTWARE LICENSE will appear when you install the software from the CD-ROM. By using all or any portion of the software on the CD-ROM or in the machine, you are agreeing to be bound by the terms of the SOFTWARE LICENSE.
The explanations in this manual are based on American English and the North American version of the software. Software for other countries and regions may vary slightly from the North American version.
1
ABOUT THE CD-ROMS
This product includes CD-ROMs that are provided standard with the machine and CD-ROMs that are provided with the optional network expansion kit (AR-NB3).
For Windows
■CD-ROM provided standard with the machine
There are two CD-ROMs that are provided with the machine.
"Software CD-ROM (1)"
• MFP driver (Printer driver / Scanner driver)
• Button Manager
"Software CD-ROM (2)"
• Sharpdesk (Desktop Document
Management Software)
• Internet Explorer 6.0 SP1
Software CD-ROM (1)
This CD-ROM contains a wizard-type installer for installation of the utilities below and the online manual "Operation Manual (for printer and scanner)".
For the procedure for installing the software, see page 7 of this manual.
MFP Driver
•Printer driver
The printer driver enables you to use the printer function of the machine.
There are two types of printer drivers for the machine: a standard printer driver and a printer driver* that is used when the dual function board is installed.
*When the dual function board is installed, "(EB)" appears in the name of the installed printer driver. Furthermore, the printer driver for the dual function board enables a faster printing speed.
•Scanner driver
The scanner driver allows you to use the scanning function of the machine with TWAIN-compliant and WIA-compliant applications.
Button Manager
Button Manager is a software utility that allows you to use the [SCAN] key on the machine to scan a document.
Acrobat Reader 5.0
This program is used to view the online manuals on your computer screen.
Sharpdesk
Sharpdesk is an integrated software environment that makes it easy to manage document and image files and launch applications.
Online Manual
This is a manual in PDF format that is viewed using Adobe Acrobat Reader. To view the online manual "Operation Manual (for printer and scanner)" on the CD-ROM, specify the following path. (Note that "R" represents the letter of your CD-ROM drive.)
R:\Manual\EnglishA*\AR_161_162_163.pdf
* "English A" in North America. "English" in Europe.
The scanning feature can only be used with computers that are running Windows 98/Me/2000/XP and are Note connected to the machine by a USB cable. If you are running Windows 95/NT 4.0 or are connected by a parallel
cable, only printing is available.
Software CD-ROM (2)
This CD-ROM contains a minimal version of Internet Explorer 6.0 SP1. For the installation procedure, double-click "Readme.txt" in the root folder of the "Software CD-ROM (2)" to view the Readme file.
2
■CD-ROMS in the network expansion kit (AR-NB3)
The optional network expansion kit includes the following four CD-ROMs:
1."Software CD-ROM (1)" included in the network expansion kit
•PCL5e and PCL6 drivers, and PS driver
•Printer Status Monitor
•Printer Administration Utility
•NICManager
•Macintosh PPD File
2."Network Utilities" CD-ROM
This CD-ROM contains utilities for using the machine as a network printer and an online manual.
3."Sharpdesk" CD-ROM
•Sharpdesk (Desktop Document Management Software)
•Network Scanner Tool
•SHARP TWAIN AR/DM (TWAIN driver)
•OmniPage Pro Trial (ScanSoft, inc.)
4."Software CD-ROM (2)"
•Internet Explorer 6.0 SP1
1. "Software CD-ROM (1)" included in the network expansion kit
This CD-ROM contains a wizard-type installer for installation of the following utilities, and online manuals. For the procedure for installing the software, see page 20 of this manual.
Printer driver
Contains the PCL5e and PCL6 printer drivers, and the PS printer driver that are needed to use this product.
Printer Status Monitor*1
When using the printer in a network environment, this provides messages and displays that allow you to monitor the status of the printer.
Printer Administration Utility*1
When using the printer in a network environment, this administration utility makes it possible to configure printer settings and monitor the printer from a computer. (This utility is for use by system administrators.)
NICManager
Use this program to configure and check the IP address when the machine is connected to a network.
Acrobat Reader 5.0
This program is used to view the online manuals on your computer screen.
To install Acrobat Reader, see page 42 of this manual.
Online Manuals
Manuals in PDF format that are viewed using Adobe Acrobat Reader. To view the online manuals on the CD-ROM, specify the following paths. (Note that "R" represents the letter of your CD-ROM drive.)
•For network printer: R:\Manual\EnglishA*2\OnlineManual\AR_NB3_Prn.pdf
•For network scanner: R:\Manual\EnglishA*2\OnlineManual\AR_NB3_Scn.pdf
*1 In order to use the Printer Status Monitor and Printer Administration Utility, the machine must be connected to a network.
*2 "English A" in North America. "English" in Europe.
2. "Network Utilities" CD-ROM
This CD-ROM contains an online manual and utilities for using the machine as a network printer.
Please read before using (Readme):
This contains information on the contents of the "Network Utilities" CD-ROM, how to use the utilities, how to view the online manual, and limitations.
Print Server Card Quick Setup:
This is a wizard-type utility for Windows 95, Windows 98, Windows Me, Windows NT 4.0, Windows 2000, Windows XP, and Windows Server 2003 that allows you to conveniently configure the print server.
Print Server Card Standard Setup:
This installs and launches "NICManager", which enables administration and configuration of advanced print server settings.
Online Manual:
This manual in PDF format explains how to use the "Network Utilities" CD-ROM.
3

3. "Sharpdesk" CD-ROM
Sharpdesk is an integrated software environment that makes it easy to manage document and image files, and launch applications.
For information on the "Sharpdesk" CD-ROM and how to install Sharpdesk, see the "Sharpdesk installation guide" that accompanies the machine.
Sharpdesk (Desktop Document Management Software)
Sharpdesk is used to manage images scanned from the machine and files created in various software programs.
Network Scanner Tool
This is a utility that helps you use Scan to Desktop. The utility allows you to configure settings to receive scanned images from the machine to your computer. You can have Sharpdesk launch automatically when your computer receives a scanned image from the machine.
SHARP TWAIN AR/DM
This is used to acquire black and white images from a TWAIN interface into TWAIN-compliant software applications.
OmniPage Pro Trial (ScanSoft, inc.)
This is used to scan text printed on paper and convert the image data into text data by means of OCR (Optical Character Recognition).
4. "Software CD-ROM (2)"
This CD-ROM contains a minimal version of Internet Explorer 6.0 SP1. For the installation procedure, double-click "Readme.txt" in the root folder of the "Software CD-ROM (2)" to view the Readme file.
Using the machine in a macintosh environment
To use the machine as a printer for the Macintosh, the PS3 expansion kit (AR-PK1/N) must be installed.
Install the PPD file needed to use the machine as a printer from the "Software CD-ROM (1)" that accompanies the network expansion kit (AR-NB3).
1. "Software CD-ROM (1)" that accompanies the network expansion kit
This CD-ROM contains the software that is needed to use the machine in a Macintosh environment and the online manuals "Operation Manual (for network printer)" and "Operation Manual (for network scanner)".
To open the online manual "Operation Manual (for network printer)", double-click the [AR-NB3 Printer Manual] folder, the [EnglishA]* folder, and then the [Printer Manual] icon.
To open the online manual "Operation Manual (for network scanner)", double-click the [AR-NB3 Scanner Manual] folder, the [EnglishA]* folder, and then the [Scanner Manual] icon.
For the procedure for installing the software, see page 32 of this manual.
*"English A" in North America. "English" in Europe.
PPD file
This file contains printer information necessary for printing.
Acrobat Reader 4.05
This program is used to view the online manuals on your computer screen.
To install Acrobat Reader, see page 42 of this manual.
The PPD file on the "Software CD-ROM (1)" that accompanies the network expansion kit cannot be used when
Note |
the machine is connected to your computer with a USB or parallel cable. |
|
2. "Network Utilities" CD-ROM that accompanies the network expansion kit
This CD-ROM contains utilities required when using the machine as a printer in a Macintosh environment.
PSC Setup Utility
This is a utility that lets you configure the machine's network settings from a Macintosh.
Online Manual
This manual in PDF format explains how to use the "Network Utilities" CD-ROM.
4

CONTENTS |
|
|
INTRODUCTION ........................................................................................................................................ |
1 |
|
● SOFTWARE LICENSE ..................................................................................................................................... |
1 |
|
● ABOUT THE CD-ROMS ................................................................................................................................... |
2 |
|
1 |
INSTALLING THE SOFTWARE (THAT ACCOMPANIES THE MACHINE) |
|
BEFORE INSTALLATION ......................................................................................................................... |
7 |
|
● HARDWARE AND SOFTWARE REQUIREMENTS ......................................................................................... |
7 |
|
● INSTALLATION ENVIRONMENT AND USEABLE SOFTWARE ..................................................................... |
7 |
|
INSTALLING THE SOFTWARE ................................................................................................................ |
7 |
|
● INSTALLATION USING THE INSTALLER ....................................................................................................... |
7 |
|
● INSTALLATION METHOD 1............................................................................................................................. |
8 |
|
● INSTALLATION METHOD 2........................................................................................................................... |
10 |
|
● INSTALLATION METHOD 3........................................................................................................................... |
12 |
|
● INSTALLATION METHOD 4........................................................................................................................... |
14 |
|
● USING THE MACHINE AS A SHARED PRINTER VIA A SERVER............................................................... |
16 |
|
SETTING UP BUTTON MANAGER ........................................................................................................ |
18 |
|
● WINDOWS XP ................................................................................................................................................ |
18 |
|
● WINDOWS 98/ME/2000 ................................................................................................................................. |
19 |
|
2 |
INSTALLING THE SOFTWARE (FOR OPTIONS) |
|
INSTALLATION FOR A NETWORK CONNECTION .............................................................................. |
20 |
|
SETUP IN A WINDOWS ENVIRONMENT |
|
|
HARDWARE AND SOFTWARE REQUIREMENTS................................................................................ |
21 |
|
SETTING THE IP ADDRESS OF THE MACHINE................................................................................... |
21 |
|
INSTALLING THE SOFTWARE .............................................................................................................. |
24 |
|
● INSTALLING THE PRINTER DRIVER (STANDARD INSTALLATION).......................................................... |
24 |
|
● CUSTOM INSTALLATION.............................................................................................................................. |
26 |
|
● USING THE MACHINE AS A SHARED PRINTER VIA A SERVER............................................................... |
28 |
|
● INSTALLING THE PS DISPLAY FONTS........................................................................................................ |
30 |
|
USING THE PPD FILE............................................................................................................................. |
31 |
|
● Installing the resident font information (only when the PPD file is installed in Windows 95/98/Me) .............................. |
31 |
|
5

SETUP IN A MACINTOSH ENVIRONMENT |
|
HARDWARE AND SOFTWARE REQUIREMENTS ................................................................................ |
32 |
APPLETALK SETTINGS ......................................................................................................................... |
32 |
INSTALLING THE PPD FILE................................................................................................................... |
32 |
● INSTALLATION IN MAC OS X ....................................................................................................................... |
32 |
● INSTALLATION IN MAC OS 8.6 TO 9.2.2...................................................................................................... |
34 |
● INSTALLING THE SCREEN FONTS (MAC OS 8.6 - 9.2.2) ........................................................................... |
34 |
CONFIGURING THE PRINTER DRIVER ................................................................................................ |
35 |
● MAC OS X V10.2 TO 10.3.4 ........................................................................................................................... |
35 |
● MAC OS X v10.1.5.......................................................................................................................................... |
37 |
● MAC OS 8.6 TO 9.2.2..................................................................................................................................... |
38 |
3 TROUBLESHOOTING AND USEFUL INFORMATION |
|
TROUBLESHOOTING ............................................................................................................................. |
39 |
CONFIGURING THE PRINTER DRIVER ................................................................................................ |
42 |
INSTALLING ACROBAT READER......................................................................................................... |
42 |
CHECKING THE IP ADDRESS ............................................................................................................... |
43 |
HARDWARE AND SOFTWARE REQUIREMENTS ................................................................................ |
43 |
CONNECTING TO A COMPUTER .......................................................................................................... |
44 |
6

|
1 |
INSTALLING THE SOFTWARE (THAT |
||
|
ACCOMPANIES THE MACHINE) |
|||
|
|
|
|
|
|
|
|
|
|
BEFORE INSTALLATION
HARDWARE AND SOFTWARE REQUIREMENTS
Before installing the software, see "HARDWARE AND SOFTWARE REQUIREMENTS" on page 43 to make sure your computer meets the hardware and software requirements.
INSTALLATION ENVIRONMENT AND USEABLE SOFTWARE
The software that can be installed varies depending on your operating system version and type of connection to the machine.
|
MFP Driver |
Button |
Sharpdesk |
||
|
Printer driver |
Scanner driver |
Manager |
||
|
|
||||
Windows 98/Me/2000/XP |
|
Available |
Available |
Available |
|
USB 2.0 connection*1 |
|
||||
Available*2,3 |
|
|
|
||
Windows 95/98/Me/NT 4.0/2000/XP |
Not Available |
Not Available |
Available*4 |
||
|
|||||
Parallel connection |
|
||||
|
|
|
|
||
|
|
|
|
|
|
*1 Windows 98/Me does not support USB 2.0. A USB 2.0 connection can be used in Windows 98/Me, however, the performance will be the same as USB 1.1. The print speed based on USB 2.0 specifications can only be attained if your computer is running Windows 2000/XP, you are using a cable that supports USB 2.0, and the cable is connected to a USB 2.0 port on your computer. If the connection is made through a hub, the hub must support USB 2.0.
USB 2.0 (Hi-Speed) can be used when the dual function board is installed.
*2 When the machine is connected using a parallel cable, the Print Status Window can only be used when the parallel port is set to ECP mode. *3 The printer driver that is installed varies depending on the type of connection between the machine and your computer.
*4 Sharpdesk can be installed when using a parallel cable, however, the machine's scanner function cannot be used. Windows 95 and Windows NT 4.0 are not supported.
INSTALLING THE SOFTWARE
Note |
• |
The scanner feature only works when using a USB cable. |
• |
If an error message appears, follow the instructions on the screen to solve the problem. After the problem is solved, |
|
|
|
continue the installation procedure. Depending on the problem, you may have to exit the installer. In this case, click |
|
|
the [Cancel] button to quit the installer and then reinstall the software from the beginning after solving the problem. |
•When installing Sharpdesk, if Internet Explorer 5.5 or later is not installed on your computer, see the Internet Explorer installation procedure in the Readme file (Readme.txt) in the root folder of the "Software CD-ROM (2)". If you are only going to install Sharpdesk after installing Internet Explorer (for example, when the other components have already been installed), perform a custom installation (follow steps 2 through 7 in "INSTALLATION METHOD 2" and then install only Sharpdesk in steps 11 and 12).
INSTALLATION USING THE INSTALLER
The software programs installed and the steps for installation vary depending on the version of Windows you are running and the type of connection to your computer. Refer to the following table for the appropriate procedure for your environment.
|
Windows XP |
Windows |
Windows 95/NT 4.0 |
|
|
2000/98/Me |
|||
|
|
|
||
USB cable connection* (standard installation) |
INSTALLATION METHOD 1 (pages 8 to 9) |
|
||
|
|
|
|
|
|
INSTALLATION |
INSTALLATION |
|
|
USB cable connection* (custom installation) |
METHOD 3 (pages |
|
||
METHOD 2 (pages |
|
|||
|
12 to 13) |
|
||
|
10 to 11) |
|
||
|
|
|
||
Parallel cable connection (custom installation) |
INSTALLATION METHOD 4 (pages 14 to 15) |
|||
|
||||
|
|
|
|
|
* Windows 95 and Windows NT 4.0 are not supported.
7
INSTALLING THE SOFTWARE (THAT ACCOMPANIES THE MACHINE)
INSTALLATION METHOD 1
Use this procedure to install the software in the following environments:
1.The printer is connected by USB cable.
2.Windows version: Windows 98/Windows Me/Windows 2000*/Windows XP*
The following procedure uses Windows XP as an example. Follow the same steps to install the software on other operating systems.
Note |
* To install the software, you must have administrator's rights. |
Standard installation (only when using a USB cable)
The procedure for a standard installation of the software is explained below.
The standard installation procedure is normally used when the machine is connected by a USB cable and you wish to install all the software components.
If the machine is used as a shared printer via a server or is connected by a parallel cable and you only wish to
Note |
install certain components, select "Custom installation". (Pages 10 to 17) |
|
1 Make sure that the USB cable is not connected to the machine.
If the cable is connected, a Plug and Play window will appear. If this happens, click the [Cancel] button to close the window and disconnect the cable.
 Note The cable will be connected in step 9.
2 Insert the "Software CD-ROM (1)" that accompanies the machine into your computer's CD-ROM drive.
3 Click the [start] button, click [My Computer] (  ), and then double-click the [CD-ROM] icon (
  ).
).
In Windows 98/Me/2000, double-click [My Computer], and then double-click the [CD-ROM] icon.
4 Double-click the [Setup] icon (  ).
).
If the language selection screen appears Note after you double click the [Setup] icon,
select the language that you wish to use and click the [Next] button. (Normally the correct language is selected automatically.)
5 The "SOFTWARE LICENSE" window will appear. Make sure that you understand the contents of the license agreement and then click the [Yes] button.
6 Read the message in the "Welcome" window and then click the [Next] button.
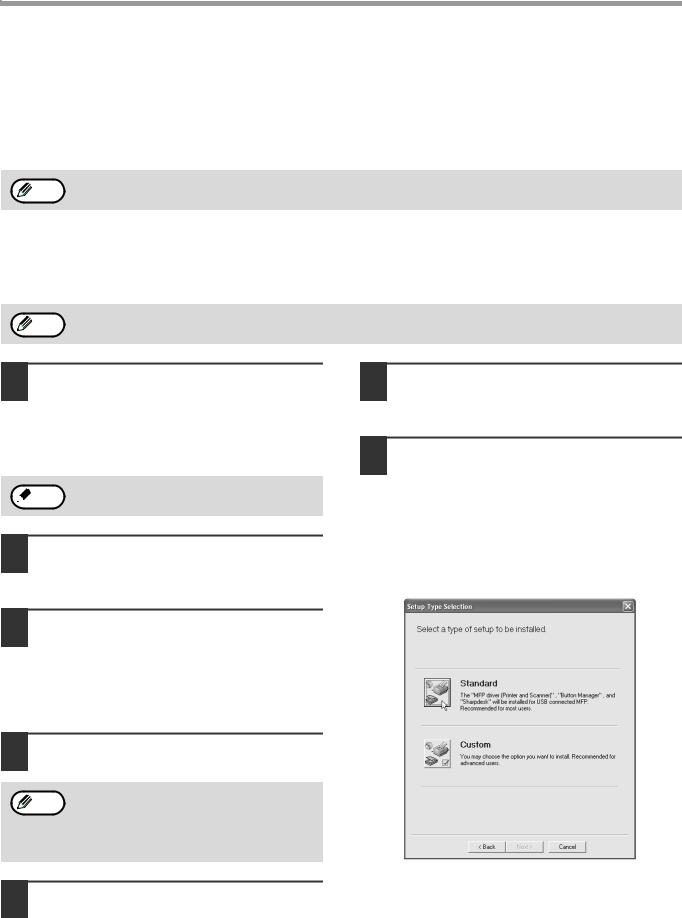
7 Click the [Standard] button.
After the "Integrated Installer is preparing..." message appears, the software components below will be automatically installed. Follow the on-screen instructions.
•MFP Driver
•Button Manager
•Sharpdesk
8
INSTALLING THE SOFTWARE (THAT ACCOMPANIES THE MACHINE)
8 When the "Finish" screen appears, click the [Close] button.
When "Now connect the MFP interface cable to the PC." appears, click the [OK] button.
Caution |
If you are using Windows 2000/XP
If a warning message regarding the Windows logo test or digital signature appears, be sure to click the [Continue Anyway] or [Yes] button.
After the installation, a message prompting |
1 |
Note you to restart your computer may appear. If |
|
this message appears, click the [Yes] button to restart your computer.
9 Connect the machine to your computer with the USB cable. (Page 44)
Make sure that the machine is powered on. The machine is found and a plug and play window appears. Follow the on-screen instructions.
Caution |
•If the following message appears on your computer screen, close it.
A window regarding "HI-SPEED USB Device" will then appear. Close the window.
This message appears when the machine's USB 2.0 mode is not set to "Hi-Speed". For information on switching the USB 2.0 mode, see the "Key operator's guide".
•If you are using Windows 2000/XP
If a warning message regarding the Windows logo test or digital signature appears, be sure to click the [Continue Anyway] or [Yes] button.
If the dual function board is installed, the Note "AR-XXXX (EB)" printer driver and scanner
driver will be installed.
This completes the installation.
•After installing the MFP Driver, see "CONFIGURING THE PRINTER DRIVER" (page 42) to configure the printer driver settings.
•After installing Button Manager, see "SETTING UP BUTTON MANAGER" (page 18) to set up Button Manager.
9

INSTALLING THE SOFTWARE (THAT ACCOMPANIES THE MACHINE)
INSTALLATION METHOD 2
Use this procedure to install the software in the following environments:
1.The printer is connected by USB cable or parallel cable.
2.Windows version: Windows XP
Note |
To install this software, you must have administrator's rights. |
Custom installation
Installation methods 2 through 4 are for custom installations of the software. If the machine is used as a shared printer via a server or is connected by a parallel cable and you only wish to install required software components, select "Custom installation".
1 Make sure that the USB or parallel cable is not connected to the machine and your computer.
If the cable is connected, a Plug and Play window will appear. If this happens, click the [Cancel] button to close the window and disconnect the cable.
 Note The cable will be connected in step 14.
2 Insert the "Software CD-ROM (1)" that accompanies the machine into your computer's CD-ROM drive.
3 Click the [start] button, click [My Computer] (  ), and then double-click the [CD-ROM] icon (
  ).
).
4 Double-click the [Setup] icon (  ).
).
If the language selection screen appears Note after you double click the [Setup] icon,
select the language that you wish to use and click the [Next] button. (Normally the correct language is selected automatically.)
5 The "SOFTWARE LICENSE" window will appear. Make sure that you understand the contents of the license agreement and then click the [Yes] button.
6 Read the message in the "Welcome" window and then click the [Next] button.
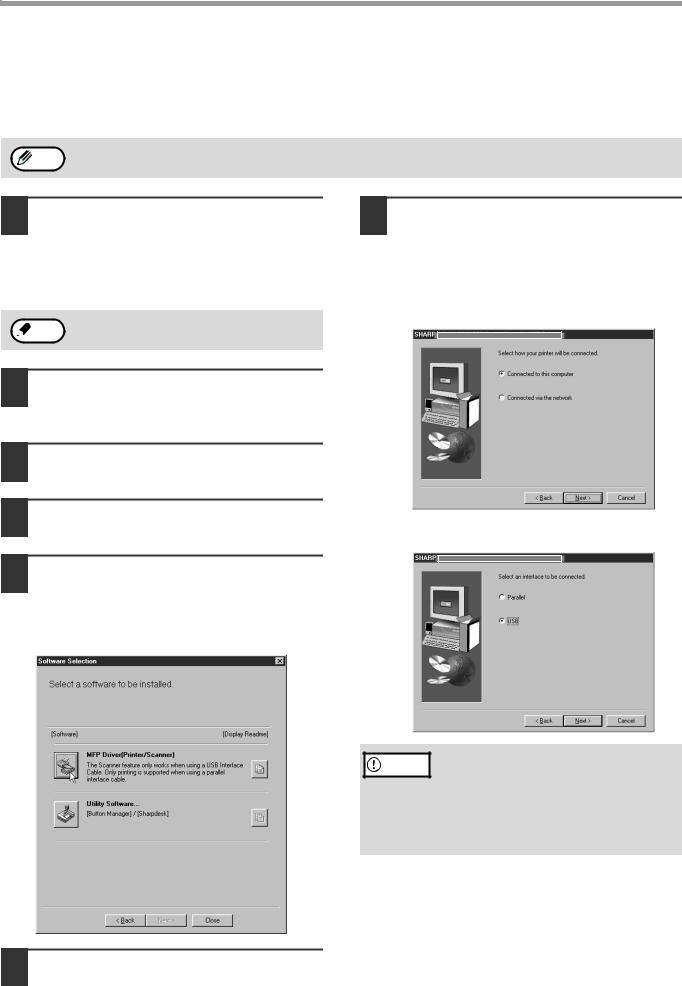
7 Click the [Custom] button.
8 If you wish to install the MFP driver, click the [MFP Driver (Printer/Scanner)] button.
To view information on the software, click the [Display Readme] button.
9 Click the [Next] button.
10
INSTALLING THE SOFTWARE (THAT ACCOMPANIES THE MACHINE)
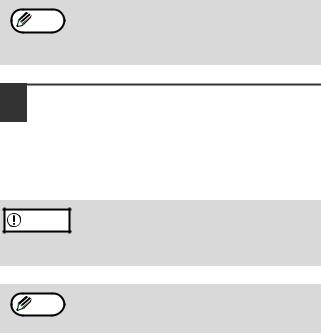
10 The files required for installation of the MFP driver are copied (if "MFP Driver" was selected in Step 8).
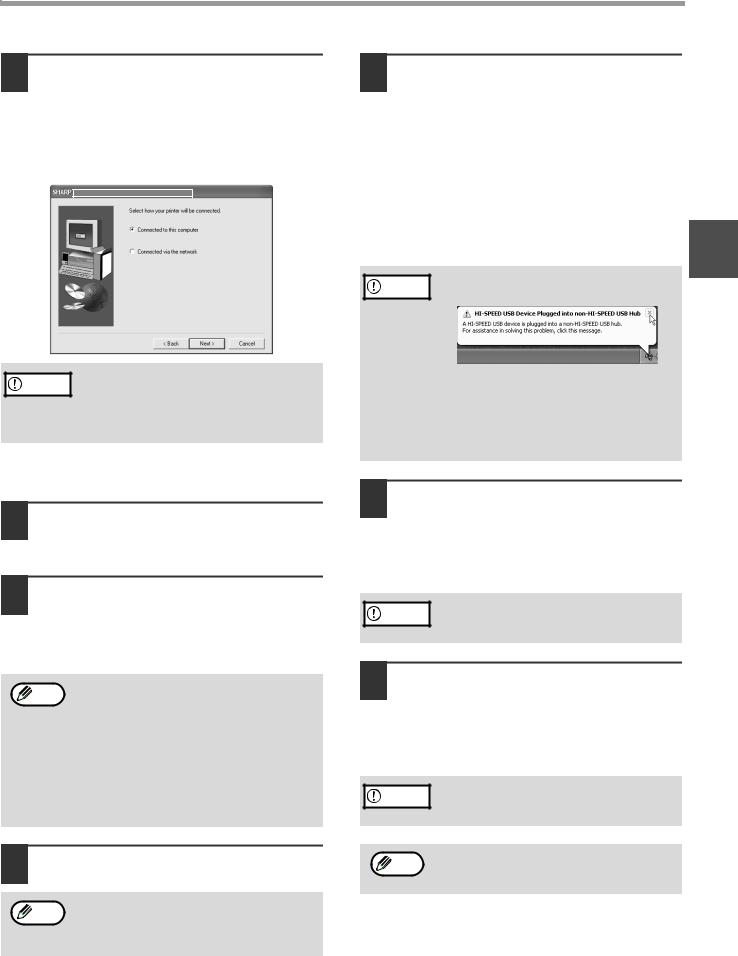
Follow the on-screen instructions. When you are asked how the printer is
connected, select [Connected to this computer] and click the [Next] button.
Caution |
If a warning message regarding the |
Windows logo test appears while the MFP |
|
|
driver files are being copied (the warning |
|
message may appear several times), be |
|
sure to click the [Continue Anyway] button. |
When "The installation of the SHARP software is complete" appears, click the [OK] button.
11 If you wish to install Button Manager or Sharpdesk, click the [Utility Software] button in step 8.
12 Click the [Button Manager] or [Sharpdesk] button.
To view information on the software, click the [Display Readme] button.
Follow the on-screen instructions.
• If you are using a parallel cable, do not Note select "Button Manager". This feature is
not supported when a parallel cable is used.
•When a message appears prompting you to connect the USB cable, click the [OK] button. For the software that can be installed, see "INSTALLATION ENVIRONMENT AND USEABLE SOFTWARE" (page 7).
13 Click the [Close] button.
After the installation, a message prompting Note you to restart your computer may appear. In
this case, click the [Yes] button to restart your computer.
14 Connect the machine to your computer with the interface cable. (Page 44)
•If you are using a USB cable, make sure the machine power is turned on and then connect the cable.
•If you are using a parallel cable, turn off both the machine power and the computer power and then connect the cable. Turn the machine power on first and then turn on your computer. The machine
is found and a plug and play window appears. If |
1 |
you are using a parallel cable, go to step 16. |
Caution |
If the following message appears on |
|
your computer screen, close it. |
||
|
•A window regarding "HI-SPEED USB Device" will then appear. Close the window.
•This message appears when the machine's USB mode is not set to "Hi-Speed" mode. For information on switching the USB 2.0 mode, see the "Key operator's guide".
15 Installation of the scanner driver begins. (only when using a USB cable).
"SHARP AR-XXXX" will appear in the "Found New Hardware Wizard" dialog box. Select [Install the software automatically (Recommended)], click the [Next] button, and follow the on-screen instructions.
Caution |
If a warning window appears regarding the |
"Windows logo test", be sure to click the |
|
|
[Continue Anyway] button. |
16 Installation of the printer driver begins.
"SHARP AR-XXXX" will appear in the "Found New Hardware Wizard" dialog box. Select [Install the software automatically (Recommended)], click the [Next] button, and follow the on-screen instructions.
Caution |
If a warning window appears regarding the |
"Windows logo test", be sure to click the |
|
|
[Continue Anyway] button. |
If the dual function board is installed, the Note "AR-XXXX (EB)" printer driver and scanner
driver will be installed.
This completes the installation.
•If you installed the MFP Driver, see "CONFIGURING THE PRINTER DRIVER" (page 42) to configure the printer driver settings.
•If you installed Button Manager, see "SETTING UP BUTTON MANAGER" (page 18) to set up Button Manager.
11
INSTALLING THE SOFTWARE (THAT ACCOMPANIES THE MACHINE)
INSTALLATION METHOD 3
Use this procedure to install the software in the following environments:
1.The printer is connected by USB cable.
2.Windows version: Windows 98/Windows Me/Windows 2000*
Note |
* To install this software, you must have administrator's rights. |
1 Make sure that the USB cable is not connected to the machine.
If the cable is connected, a Plug and Play window will appear. If this happens, click the [Cancel] button to close the window and disconnect the cable.
 Note The cable will be connected in step 11.
2 Insert the "Software CD-ROM (1)" that accompanies the machine into your computer's CD-ROM drive.
3 Double-click [My Computer] and then double-click the [CD-ROM] icon.
4 Follow steps 4 through 7 in "INSTALLATION METHOD 2".
5 If you wish to install the MFP driver, click the [MFP Driver (Printer/Scanner)] button.
To view information on the software, click the [Display Readme] button.
7 The files required for installation of the MFP driver are copied (if "MFP Driver" was selected in Step 5).
Follow the on-screen instructions.
When you are asked how the printer is connected, select [Connected to this computer] and click the [Next] button.
When the interface selection screen appears, select [USB].
Caution |
If you are using Windows 2000
If you are using Windows 2000 and a warning message regarding the digital signature appears while the MFP driver files are being copied (the warning message may appear several times), be sure to click the [Continue Anyway] button.
When "The MFP driver installation is complete." appears, click the [OK] button.
6 Click the [Next] button.
12
INSTALLING THE SOFTWARE (THAT ACCOMPANIES THE MACHINE)
|
|
|
|
|
|
|
8 |
If you wish to install Button Manager |
|
||
|
|
or Sharpdesk, click the [Utility |
|
||
|
|
Software] button in step 5. |
|
||
|
|
If you do not wish to install either, go to step 10. |
|
||
|
|
|
|
|
|
|
9 |
Click the [Button Manager] or |
|
||
|
|
[Sharpdesk] button. |
|
||
|
|
• To view information on the software, click the |
|
||
|
|
[Display Readme] button. |
|
||
|
|
• Follow the on-screen instructions. |
1 |
||
|
|
|
|
|
|
|
10 |
Click the [Close] button. |
|||
|
|
|
|
|
|
After the installation, a message prompting Note you to restart your computer may appear. In
this case, click the [Yes] button to restart your computer.
11 Connect the machine to your computer with the USB cable. (Page 44)
Make sure that the machine is powered on. The machine is found and a plug and play window appears. Follow the on-screen instructions.
Caution |
If you are using Windows 2000
If a warning message regarding the digital signature appears, be sure to click the [Yes] button.
If the dual function board is installed, the Note "AR-XXXX (EB)" printer driver and scanner
driver will be installed.
This completes the installation.
•If you installed the MFP Driver, see "CONFIGURING THE PRINTER DRIVER" (page 42) to configure the printer driver settings.
•If you installed Button Manager, see "SETTING UP BUTTON MANAGER" (page 18) to set up Button Manager.
13
Loading...