


 Loading...
LCD Color TV Wall-Mount Bracket
Téléviseur couleur LCD et le support de montage au mur
Wandhalter für LCD-Farbfernsehgerät
Ménsula de montaje el TV color de cristal líquido en la pared
AN-65AG2
OPERATION MANUAL MODE D’EMPLOI BEDIENUNGSANLEITUNG MANUAL DE MANEJO
AN-65AG2) AQUOS
CAUTION This product (SHARP, AN-65AG2) is only to be used for the SHARP LCD TV as follows.Using the bracket for another product could cause an accident.
|
ENGLISH |
FRANÇAIS |
DEUSTCH |
ESPAÑOL |
|
|
|
|
|
|
|
|
|
|
For Japan |
Pour le |
Für Japan |
Para Japón |
|
LC-65XS1 |
Japon |
|
|||||
|
|
|
|
|
|
|
|
|
|
|
|
|
|
|
For U.S.A |
Pour I' |
Für USA |
Para EE.UU |
|
LC-65XS1U |
Etats-Unis |
|
|||||
|
|
|
|
|
|
|
|
For Europe |
Pour I' |
Für Europa |
Para Europe |
|
LC-65XS1E/LC-65XS1RU |
Europe |
|
|||||
|
|
|
|
|
|
|
|
For |
Pour I' |
Für |
Para |
|
LC-65XS1X |
Australia |
Australie |
Australien |
Austalia |
|
||
|
|
|
||||
|
For |
Pour I' |
Für |
Para |
|
LC-65XS1M |
Singapore |
Singapour |
Singapur |
Singapur |
|
||
|
|
|
||||
|
For |
Pour I' |
Für |
Para |
|
LCD-65XS1A |
China |
Chine |
China |
China |
|
||
|
|
|
ESPAÑOL DEUTSCH FRANÇAIS ENGLISH

|
|
.............................................. |
1 |
........................................................................................ |
2 |
................................................................................................ |
3 |
............................................................. |
4 |
.......................................... |
5 |
.............................................. |
6 |
■
お読みください。お読みになったあとは、いつでも取り出せる場所に必ず大切に保管してください。


4 4 4 4 4 4 4


■
■ ■ ■
■
■

● ●
● ●
1

|
|
|
|
|
|
||
|
|
|
|||||
|
|
||||||
|
|
||||||
|
|
||||||
|
|
||||||
|
|
||||||
|
|
|
|||||
|
|
|
|||||
|
2 |
||||||
|
|
||||||
|
|
||||||
|
|
||||||
|
|
|
|
|
|||
|
|
|
|
|
|
|
|
|
|
|
|
|
|
|
|
( 2mm) |
|
|
( 1.6mm) |
|
( 2mm) |
||
|
|
|
|
|
|
|
|
|
|
|
5 |
|
|
||
|
|
|
|
||||
|
|
|
|
|
|||
|
|
|
|
2 6 |
|
|
|
( 1.6mm) |
|
|
|
|
|
|
|
19 4 |
|
|
|
|
|
|
|
3 |
|
|
|
|
|
|
|
|
|
|
|
|
|
|
|
|
|
|
|
|
|
|
|
|
|
|
|
|
|
||
|
|
|
|
|
|
||
|
|
|
|
|
|
|
|
|
|
|
|
|
|
|
|
|
|
|
|
|
|
|
|
|
|
|
|
|
|
|
|
|
|
|
|
|
|
|
|
( 2mm) |
|
|
|
|
|
|
|
|
|
|
|
|
|
||
|
|
|
|
|
|
|
|
|
|
|
|
|
|
|
|
1.5 |
|
|
|
|
|
|
|
|
|
|
|
|
|||
4.6 |
|
|
|
|
|
|
mm |
|
|
|
|
|
|
|
|
2 |
|
|
|
|
|
|
|

|
|
|
|
|
|
|
|
|
|
A…2 |
|
B |
|
|
|||||
|
|
|
…1 |
|
…2 |
|
…2 |
…2 |
|
|
|
|
|
|
|
|
|
|
|
|
|
|
|
|
|
|
|
|
|
|
|
|
|
|
|
|
|
…2 |
|
|
|
A B |
|
|
|
||||
|
|
|
|
|
|||||
|
|
|
|
||||||
|
|
|
|
|
|
|
|
|
|
|
M5 |
|
M8 |
|
M6 |
|
M4 |
|
|
6mm |
14mm |
10mm |
6mm |
|
|
||||
2 |
|
4 |
6 |
4 |
|
|
|||
M5 5mm |
|
|
|
|
|
||||
|
|
|
|
|
|
|
|||
|
● 20 |
|
|
|
|
||||
|
|
|
|
||||||
|
|
● 5 ● |
|
||||||
|
|
● ● |
|
||||||
●
kg
|
|
|
|
|
|
|
|
|
|||||
|
LC-65XS1 |
|
59.5 |
|
5.0 |
64.5 |
|
LC-65XS1U |
|
59.5 |
|
5.0 |
64.5 |
|
LC-65XS1E |
|
59.5 |
|
5.0 |
64.5 |
|
LC-65XS1RU |
|
59.5 |
|
5.0 |
64.5 |
LC-65XS1X |
|
59.5 |
|
5.0 |
64.5 |
|
|
|
|
||||
|
LC-65XS1M |
|
59.5 |
|
5.0 |
64.5 |
|
LCD-65XS1A |
|
59.5 |
|
5.0 |
64.5 |
3
1 A B
A B M6 10mm 6
2
5


B

A…LC-65XS1
3 6mm 24mm6mm 18
で、○ 20
4

4
4 M4 6mm 4
A
A
LC-65XS1 |
a |
b |
1 2 2
5

2
M8 14mm 4
|
|
|
|
|
|
|
|
|
|
|
M8 14mm |
|
|
|
|
|
|
|
|
|
|
|
|
|
|
|
|
|
LC-65XS1 |
b |
|
|
|
|
|
2


A 4M5 6mm 2
|
|
|
M5,6mm×2 |
引いて、フックの引っかかりがある ことを必ず確認してください。

6


Contents
To Ensure Safe and Correct Use..................................... |
E-1 |
Outside Dimension Drawing............................................ |
E-2 |
Package Contents ........................................................... |
E-3 |
Attaching the Based Brackets to the Wall ....................... |
E-4 |
Attaching the Brackets to the LCD Color TV ................... |
E-5 |
Installing the LCD Color TV on the Wall .......................... |
E-6 |
• Thank you for purchasing a SHARP product.
Before using the product, please be sure to read this operation manual carefully. In particular, be sure to read the section “To Ensure Safe and Correct Use.” After reading the manual, keep it in a convenient location where it can be accessed at any time.
To Ensure Safe and Correct Use
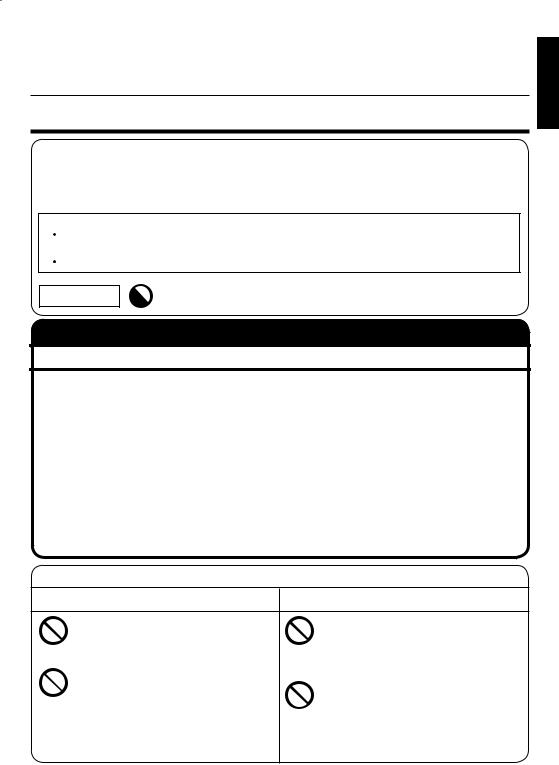
This operation manual and the product use various displays and labels to ensure safe use. Ignoring these displays and labels and incorrectly using the product could have results as classified below. Please read the following warning symbol information before reading the rest of this section, and be sure to strictly observe all instructions.
 Warning: Not following these instructions could result in death or serious injury.
  Caution: Not following these instructions could result in injury or property damage.
Meaning of symbol |
The symbol |
means something that should not be done. |
|
|
|
Special Precautions for Safety
 Warning
•Follow the instructions in this manual regarding the installation method and installation orientation. Not following these instructions could results in injury or damage from falling parts.
•Accurate work is required for the installation work, so please have it done by the dealer or qualified contractor.
•During installation, be careful not to pinch your fingers in the fixture, etc.
•Make sure the installation wall is sufficiently strong to support the weight of the TV. (Attach the fixtures to the reinforcing material in the walls.)
•Do not apply any other loads to the installation fixtures. Doing so could cause the TV to fall causing injury and damage.
•Do not modify or change the installation parts. Doing so could cause the TV to fall causing injury and damage.
ENGLISH
Caution |
|
|
|
Install in a location with low humidity and little dust |
|
Install in a well-ventilated area |
|
|
|
|
|
• Do not install the LCD color TV in a |
|
• Do not plug the air passage holes in the |
|
location with high humidity and much |
|
LCD color TV cabinet. Plugging the air |
|
dust. Doing so could result in fire or |
|
passage holes could trap heat inside |
|
electric shock. |
|
the cabinet, causing a fire. |
|
• Do not place the LCD color TV where it |
|
• Do not use the cabinet as follows. |
|
will come into contact with oily smoke |
|
Do not place the cabinet in a place with |
|
or steam, such as near a cooking range |
|
poor air circulation, such as in a closet |
|
or humidifier. Doing so could result in |
|
or bookcase. Do not place a drop cloth, |
|
fire or electric shock. |
|
etc., on the installed LCD color TV. |
|
|
|
E-1 |
|
|
|
||
Please strictly observe the following. |
To the contractor |
|
|
• To ensure the safety of the customer, conduct |
|
Special skill is required to install the LCD color |
||
the design so that the strength of the installation |
||
TV, so please have it installed by a contractor |
||
location is sufficiently strong to support the |
||
specializing in such installation. The customer |
weight of the LCD color TV and the wall-mount |
|
should not attempt to install the TV. Sharp shall |
bracket. |
|
not be responsible for improper installation or |
• Be sure to use two or more people to conduct |
|
any accidents, damage, or injury resulting from |
the work. |
|
improper installation. |
• The wall installation screws for the based |
|
|
brackets are not included with the fixtures. Select |
|
|
off-the-shelf screws that match the wall. |
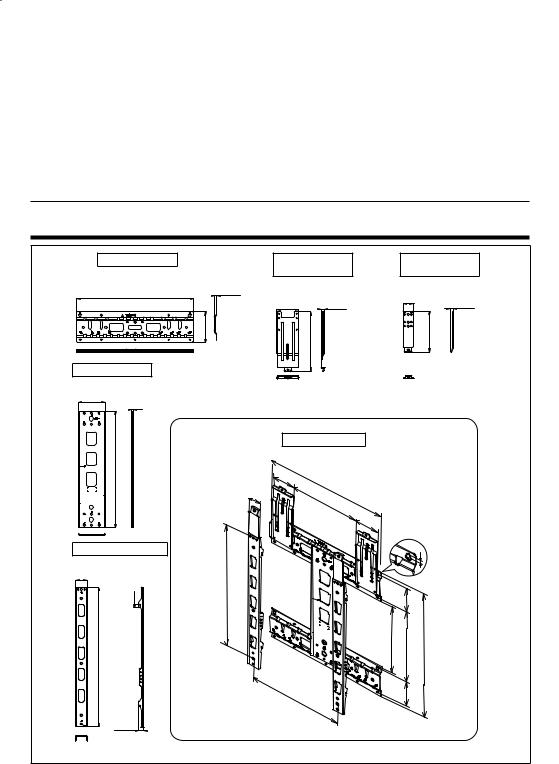
Outside Dimension Drawing
Based bracket A |
Mounting brackets |
|
|
Mounting brackets |
||
(Plate thickness 2 mm) |
|
(for wall) |
|
|
|
(for TV) |
|
(Plate thickness 1.6 mm) |
|
(Plate thickness 2 mm) |
|||
520 |
10.5 |
|
|
|
46 |
|
|
|
|
|
14.6 |
||
|
98 |
12.5 |
|
|
||
|
|
|
|
|||
137 |
|
262.6 |
|
|
|
181.2 |
Based bracket B |
|
|
|
|
|
|
(Plate thickness 1.6 mm) |
|
|
|
|
|
|
119.4 |
|
|
|
|
|
|
5.3 |
|
|
|
|
|
|
|
Assembly Diagram |
|
|
|
|
|
520 |
95 |
|
|
|
|
|
|
520 |
|
|
|
|
|
|
52 |
|
|
|
|
|
|
300 |
|
|
|
|
|
|
|
|
|
|
|
|
|
|
|
95 |
|
|
|
TV installation fixtures |
|
|
|
|
|
8 |
(Plate thickness 2 mm) |
|
|
|
|
|
|
52 |
600 |
|
|
|
|
|
15 |
|
|
|
|
|
|
|
|
|
110 |
|
|
|
621.5 |
|
|
313 |
340 |
|
587 |
|
400 |
|
110 |
|
|
|
24.6 |
|
|
|
|
|
|
|
|
|
|
|
|
Units: mm |
E-2 |
|
|
|
|
|
|
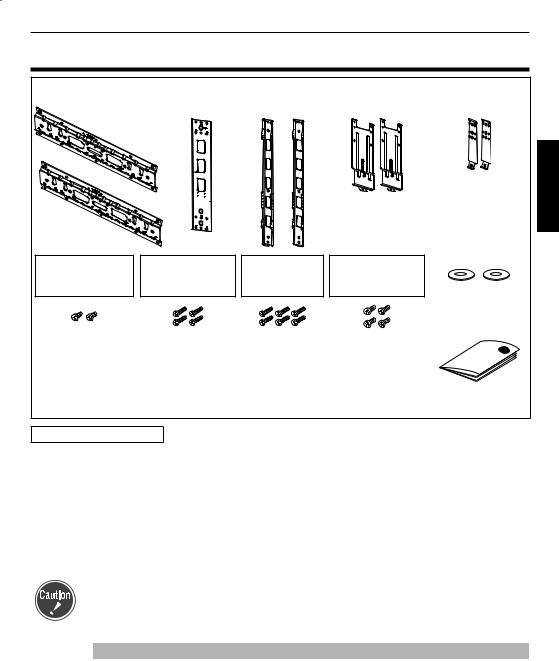
Package Contents
Based bracket A (x2) |
Based bracket B |
TV installation |
Mounting brackets |
Mounting brackets |
|
(x1) |
fixtures (x2) |
(for wall) (x2) |
(for TV) (x2) |
|
|
|
Washer (E) |
|
|
|
|
(for TV installation |
|
|
|
|
fixtures) (x2) |
|
For holding the |
|
For based |
For attaching |
|
For TV installation |
brackets A and |
mounting brackets |
||
wall-mount bracket |
||||
|
B assembly |
(for wall) |
||
|
|
|||
|
|
|
Operation manual |
|
|
|
|
(This manual) |
|
Screws (A) M5 |
Screws (B) M8 |
Screws (C) M6 |
Screws (D) M4 |
|
Length: 6 mm |
Length: 14 mm |
Length: 10 mm |
Length: 6 mm |
|
(2 screws) |
(4 screws) |
(6 screws) |
(4 screws) |
*The screw notation M5 means that the diameter of the thread is 5 mm. *Please also store the screws that are not used.
Please use the following ● Wall installation screws (off-the-shelf screws, x20)
When installing the TV, be sure to consult with the dealer or qualified contractor.
●A plumb bob (or a washer on a string) ● A pin, such as a thumbtack
●Cushion, soft cloths, etc. ● Tools (Phillips head screw driver)
Installation location |
● LCD color TVs have a viewing angle (range in which the image can |
|
be viewed correctly). The best viewing position is from directly in front |
|
of the screen. Determine the TV installation location after taking into |
|
consideration the viewing posture, line of sight, and the visual and aural |
|
ranges. |
ENGLISH
•Sharp shall bear no responsibility for damages, etc., caused by the LCD color TV falling due to insufficient installation strength or improper installation.
Weight Table (Unit: kg. All values approximate.)
Destination market |
Model |
TV (without stand) |
Brackets |
Total |
|
Japan |
LC-65XS1 |
59.5 |
5.0 |
64.5 |
|
|
LC-65XS1U |
59.5 |
5.0 |
64.5 |
|
|
LC-65XS1E |
59.5 |
5.0 |
64.5 |
|
Except for Japan |
LC-65XS1RU |
59.5 |
5.0 |
64.5 |
|
LC-65XS1X |
59.5 |
5.0 |
64.5 |
||
|
|||||
|
LC-65XS1M |
59.5 |
5.0 |
64.5 |
|
|
LCD-65XS1A |
59.5 |
5.0 |
64.5 |
E-3

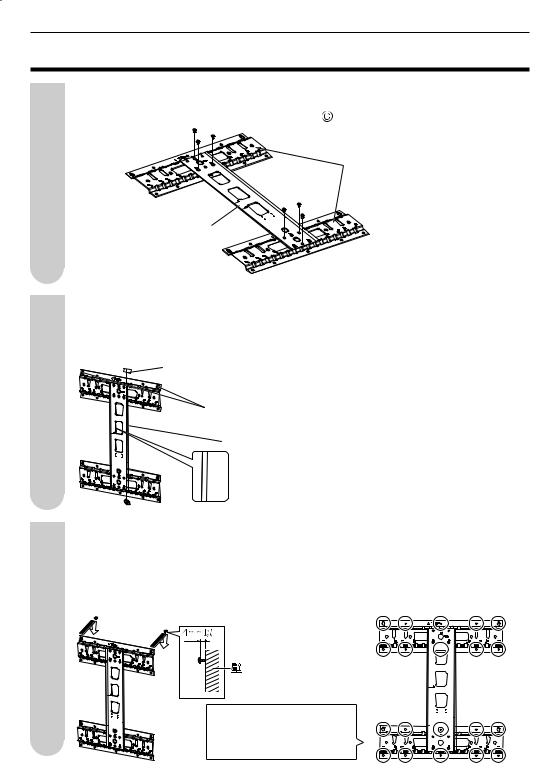
Attaching the Based Brackets to the Wall
1
2
3
Assembling based brackets A and B
Assemble based brackets A and B as shown below, and use the 6 included screws (C) (M6, 10 mm) to fasten them together.
Based bracket A
Based bracket B
Determining a mounting location for the based brackets
Use the plumb bob (or washer on a string) prepared earlier to check that the based brackets are positioned vertically. Confirm vertical orientation using the vertical reference line on based bracket B, and use a pencil to mark the position of the two screw holes.
 Adhesive tape
-shaped screw holes
Mark the wall using a pencil.
The edge of based bracket B is used as a reference line for determining horizontal and vertical orientation.
The letters and lines indicate the position of the center line of the screen for the LCD color TVs. Use them as guidelines for installation height.
A:LC-65XS1/LC-65XS1U/LC-65XS1E/ LC-65XS1RU/ LC-65XS1X/LC-65XS1M/LCD-65XS1A
Temporarily attaching the screws
Remove the based brackets from the wall, and temporarily attach off-the-shelf screws (M6, 2 screws) in the screw hole locations marked on the wall. When doing so, ensure that the heads of the screws are at least 4 mm away from the wall to allow enough space for the based brackets to be attached. Hang the based brackets over the screws, and tighten the screws firmly after confirming that based brackets are not leaning to either side.
Use off-the-shelf screws (M6, 18 screws) to attach the remaining screw holes to the wall.
4 mm or more
Wall
After checking vertical orientation with the plumb bob (or washer on a string) used in the previous step, attach the circled screw holes using off-the-shelf screws (x 20).
E-4

Attaching the Based Brackets to the Wall (Continued)
4 |
Attaching the mounting brackets (for wall) to the based brackets |
Align the 4 attachment bracket screw holes on the based brackets and the mounting brackets |
(for wall) and attach them together using 4 screws (D) (M4, 6 mm). Bracket mounting positions differ according to LCD color TV model. (See table below.)
ENGLISH
Stamps on based bracket A
|
Stamp |
Stamp on |
|
mounting |
|
Model |
on based |
|
|
bracket A |
bracket |
|
(for wall) |
|
LC-65XS1 |
a |
b |
LC-65XS1U |
a |
b |
LC-65XS1E |
a |
b |
LC-65XS1RU |
a |
b |
LC-65XS1X |
a |
b |
LC-65XS1M |
a |
b |
LCD-65XS1A |
a |
b |
Stamps on mounting bracket (for wall)
Attaching the Brackets to the LCD Color TV
1 |
Remove the caps and the terminal cover from the back of the LCD color TV |
Place the LCD color TV on a blanket or other thick, soft cloth, and remove the 2 caps |
indicated, 2 screws, and the terminal cover from the back. (Store the caps and screws in a safe place after removing them.)
Caps
Terminal cover
Screws |
E-5 |
|
Loading...