


 Loading...
INSTALLGUIDE
HG43NJ678U HG50NJ678U
HG55NJ678U HG65NJ678U
Thank you for purchasing this Samsung product.
To receive more complete service, please register your product at www.samsung.com
Model |
Serial No. |

Before Reading This Install Guide
This TV B2B (Business to Business) model is designed forhotels orthe otherhospitality businesses, supports a variety of special functions, and lets you limit some user(guest) controls.
Figures and illustrations in this Install Guide are provided forreference only and may differfrom the actual product appearance. Product design and specifications may change without notice.
Operational Modes
This TV has two modes: Interactive and Standalone mode.
•• Interactive mode: In this mode, the TV communicates with and is fully orpartially controlled by a connected Set Back Box (SBB) orSet Top Box (STB) provided by a hospitality System Integration (SI) vendor. When the TV is initially plugged in, it sends a command that attempts to identify the SSB orSTB connected to it. If the TV identifies the SBB orSTB and the SBB orSTB identifies the TV, the TV gives full control to the SBB orSTB.
•• Standalone mode: In this mode, the TVworks alone without an external SBB orthe STB.
The TV has a Hotel Option menu that lets you easily set its various hospitality functions. Please see page 23. The menu also lets you activate orde-activate some TV and hospitality functions so you can create youroptimal hospitality configuration.
Still image warning
Avoid displaying still images (such as jpeg picture files) orstill image elements (such as TV channel logos, panorama or4:3formatimages,stockornewsbarsorcrawls)onthescreen.Displayingstillpicturescontinuallycancause uneven screen wear, which will affect image quality. To reduce the chance that this effect will occur, please follow the recommendations below:
•• Avoid displaying the same TV channel forlong periods.
•• Always try to display a full screen image.
•• Reduce brightness and contrast to help prevent the occurrence of after-images.
•• Use all TV features designed to reduce image retention and screen burn-in.
English - 2

Warning! Important Safety Instructions
Please read the Safety Instructions before using yourTV.
|
CAUTION |
|
|
|
|
|
|
|
Class II product: This symbol indicates that a |
|
|
|
|
|
|
|
|
|
safety connection to electrical earth (ground) is |
RISK OF ELECTRIC SHOCK. DO NOTOPEN. |
|
|
|
|
|
|
|
||
|
|
|
|
|
|
|
not required. |
||
|
|
|
|
|
|
|
|
|
|
CAUTION:TOREDUCETHERISKOFELECTRICSHOCK,DO |
|
|
|
|
|
|
|
|
|
NOTREMOVECOVER(ORBACK).THEREARENOUSER |
|
|
|
|
|
|
|
AC voltage: Rated voltage marked with this |
|
SERVICEABLEPARTSINSIDE.REFERALLSERVICINGTO |
|
|
|
|
|
|
|
symbol is AC voltage. |
|
QUALIFIEDPERSONNEL. |
|
|
|
|
|
|
|
|
|
|
|
|
|
|
|
|
|
|
|
|
This symbol indicates that high voltage is |
|
|
|
|
|
|
|
DCvoltage:Ratedvoltagemarkedwiththis |
|
present inside. It is dangerous to make any kind |
|
|
|
|
|
|
|
|
|
|
|
|
|
|
|
|
symbolisDCvoltage. |
|
|
of contact with any internal part of this product. |
|
|
|
|
|
|
|
|
|
|
|
|
|
|
|
|
|
|
|
|
|
|
|
|
|
|
|
|
|
This symbol indicates that this product has |
|
|
|
|
|
|
|
Caution. Consult instructions foruse: This |
|
included important literature concerning |
|
|
|
|
|
|
|
symbol instructs the userto consult the install |
|
operation and maintenance. |
|
|
|
|
|
|
|
guide forfurthersafety related information. |
|
|
|
|
|
|
|
|
|
|
•• The slots and openings in the cabinet and in the back orbottom are provided fornecessaryventilation. To ensure reliable operation of this apparatus and to protect it from overheating, these slots and openings must neverbe blocked orcovered.
––Donotplacethisapparatusinaconfinedspace,suchasabookcaseorbuilt-incabinet,unlessproper ventilation is provided.
––Donotplacethisapparatusnearoroveraradiatororheatregister,orwhereitisexposedtodirectsunlight.
––Donotplacevessels(vasesetc.)containingwateronthisapparatus,asthiscanresultinafireorelectricshock.
•• Donotexposethisapparatustorainorplaceitnearwater(nearabathtub,washbowl,kitchensink,orlaundrytub, in a wet basement, orneara swimming pool, etc.). If this apparatus accidentally gets wet, unplug it and contact an authorized dealerimmediately.
•• This apparatus uses batteries. In yourcommunity, there might be environmental regulations that require you to dispose of these batteries properly. Please contact yourlocal authorities fordisposal orrecycling information.
•• Donotoverloadwalloutlets,extensioncords,oradaptorsbeyondtheircapacity,sincethiscanresultinfireor electric shock.
•• Power-supply cords should be placed so that they are not likely to be walked on orpinched by items placed upon oragainst them. Pay particularattention to cords at the plug end, at wall outlets, and at the point where they exit from the appliance.
•• To protect this apparatus from a lightning storm, orwhen left unattended and unused forlong periods of time, unplug it from the wall outlet and disconnect the antenna orcable system. This will prevent damage to the set due to lightning and powerline surges.
English - 3

•• BeforeconnectingtheACpowercordtotheDCadaptoroutlet,makesurethatthevoltagedesignationoftheDC adaptorcorresponds to the local electrical supply.
•• Neverinsert anything metallic into the open parts of this apparatus. This may cause a dangerof electric shock.
•• To avoid electric shock, nevertouch the inside of this apparatus. Only a qualified technician should open this apparatus.
•• Be sure to plug in the powercord until it is firmly seated. When unplugging the powercord from a wall outlet, alwayspullonthepowercord'splug.Neverunplugitbypullingonthepowercord.Donottouchthepowercord with wet hands.
•• If this apparatus does not operate normally - in particular, if there are any unusual sounds orsmells coming from it - unplug it immediately and contact an authorized dealerorservice center.
•• Be sure to pull the powerplug out of the outlet if the TV is to remain unused orif you are to leave the house foran extended period of time (especiallywhen children, elderly, ordisabled people will be left alone in the house).
––Accumulated dust can cause an electric shock, an electric leakage, ora fire by causing the powercord to generate sparks and heat orby causing the insulation to deteriorate.
•• Be sure to contact an authorized Samsung service centerforinformation if you intend to install yourTV in a location with heavy dust, high orlow temperatures, high humidity, chemical substances, orwhere it will operate 24 hours a day such as in an airport, a train station, etc. Failure to do so may lead to serious damage to yourTV.
•• Use only a properly grounded plug and wall outlet.
–– An improperground may cause electric shock orequipment damage. (Class l Equipment only.)
•• To turn off this apparatus completely, disconnect it from the wall outlet. To ensure you can unplug this apparatus quickly if necessary, make sure that the wall outlet and powerplug are readily accessible.
•• Store the accessories (batteries, etc.) in a location safely out of the reach of children.
•• Donotdroporstriketheproduct.Iftheproductisdamaged,disconnectthepowercordandcontactaSamsung service center.
•• Tocleanthisapparatus,unplugthepowercordfromthewalloutletandwipetheproductwithasoft,drycloth.Do not use any chemicals such as wax, benzene, alcohol, thinners, insecticide, airfresheners, lubricants, ordetergents. These chemicals can damage the appearance of the TV orerase the printing on the product.
•• Donotexposethisapparatustodrippingorsplashing.
•• Donotdisposeofbatteriesinafire.
•• Donotshort-circuit,disassemble,oroverheatthebatteries.
•• There is dangerof an explosion if you replace the batteries used in the remote with the wrong type of battery. Replace onlywith the same orequivalent type.
•• WARNING-TOPREVENTTHESPREADOFFIRE,KEEPCANDLESANDOTHERITEMSWITHOPEN FLAMESAWAYFROMTHISPRODUCTATALLTIMES.
•• Use care when touching the TV afterit has been on forsome time. Some parts can be warm to the touch.
English - 4
|
Contents |
|
|
Before Reading This Install Guide ---------------------------------------------------------------------------- |
2 |
|
Warning! Important Safety Instructions ---------------------------------------------------------------------------- |
3 |
01 |
Package Content |
|
02 |
TV Installation |
|
|
Assembling the swivel ---------------------------------------------------------------------------- |
8 |
|
InstallingtheLEDTVStand ---------------------------------------------------------------------------- |
9 |
|
Installing the wall mount kit ---------------------------------------------------------------------------- |
11 |
|
Securing the TV to the Wall ---------------------------------------------------------------------------- |
11 |
|
WallMountKitSpecifications(VESA) ---------------------------------------------------------------------------- |
12 |
|
Providing properventilation foryourTV ---------------------------------------------------------------------------- |
13 |
03 |
The Remote Control |
|
|
About the Buttons on the Remote Control ---------------------------------------------------------------------------- |
14 |
|
Installing batteries into the remote control ---------------------------------------------------------------------------- |
15 |
04 |
Using the TV Controller |
|
05 |
The Connection Panel |
|
06 |
Connections |
|
|
Connecting the TV to a SBB orSTB ---------------------------------------------------------------------------- |
19 |
|
Connecting the TV to the game controller ---------------------------------------------------------------------------- |
19 |
|
ListofHospitalitySIVendorsandCompatibleDataCables |
|
|
Supplied with the TV ---------------------------------------------------------------------------- |
20 |
|
Connecting the RJP (Remote Jack Pack) ---------------------------------------------------------------------------- |
21 |
07 |
Setting the Hotel Option Menus |
|
|
HotelOptionmenuitems ---------------------------------------------------------------------------- |
24 |
|
Welcome Message ---------------------------------------------------------------------------- |
31 |
|
HotelLogo ---------------------------------------------------------------------------- |
31 |
|
USB Cloning ---------------------------------------------------------------------------- |
32 |
|
SettingsClonedintheHotelMenu ---------------------------------------------------------------------------- |
34 |
|
Setting Auto Initialize ---------------------------------------------------------------------------- |
36 |
|
Updating the TV’s Software ---------------------------------------------------------------------------- |
38 |
English - 5
08 |
Using a Multi Code Remocon |
|
09 |
Setting the Soundbar |
|
|
SamsungSoundbar(AirTrack)andHospitalityTVsin2018---------------------------------------------------------------------------- |
40 |
10 |
Editing Channels |
|
|
Channel Bank Editor(Smoovie TV Only) ---------------------------------------------------------------------------- |
41 |
|
Using Channel Editor ---------------------------------------------------------------------------- |
42 |
11Anti-theft Kensington Lock
12Specifications and OtherInformation
Specifications ---------------------------------------------------------------------------- |
46 |
Environmental Considerations ---------------------------------------------------------------------------- |
47 |
Decreasingpowerconsumption ---------------------------------------------------------------------------- |
47 |
SupportedResolutionsforUHDInputSignals ---------------------------------------------------------------------------- |
48 |
DisplayResolution ---------------------------------------------------------------------------- |
48 |
Dimensions ---------------------------------------------------------------------------- |
50 |
Licenses ---------------------------------------------------------------------------- |
54 |
Important Warranty Information Regarding Television |
|
Format Viewing ---------------------------------------------------------------------------- |
55 |
SAMSUNGELECTRONICSNORTHAMERICANLIMITED |
|
WARRANTYSTATEMENT ---------------------------------------------------------------------------- |
56 |
English - 6
01 Package Content
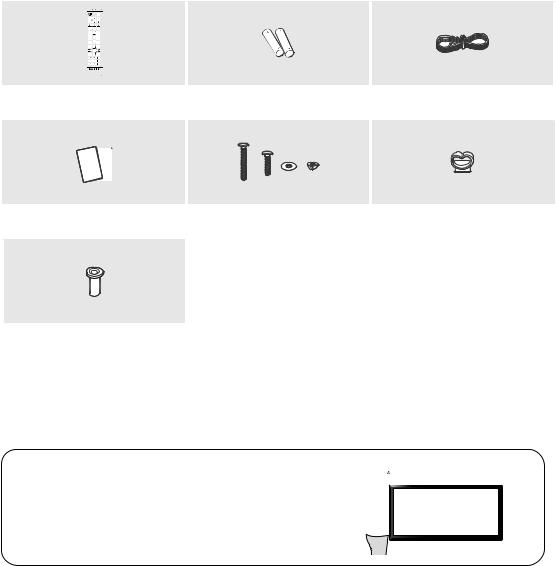
Make sure the following items are included with yourTV. If any items are missing, contact yourdealer.
Remote Control |
Batteries (AAA x 2) |
PowerCord |
|||
(AA59-00817A) |
|||||
|
|
||||
|
|
|
|
|
|
|
|
|
|
|
|
Safety Guide / Quick Setup Guide / |
HotelMountKit |
Cable Guide |
|
Regulatory Guide |
|||
|
|
x 4
Wall Mount Adaptor
•• The items’ colors and shapes mayvary depending on the models.
•• Cables not included can be purchased separately.
•• Check forany accessories hidden behind orin the packing materials when opening the box.
The screen can be damaged from direct pressure when handled |
|
incorrectly. As shown in the figure, make sure to grip the edges |
Do Not Touch |
of the screen when you lift the TV. |
This Screen! |
|
English - 7
02 TV Installation
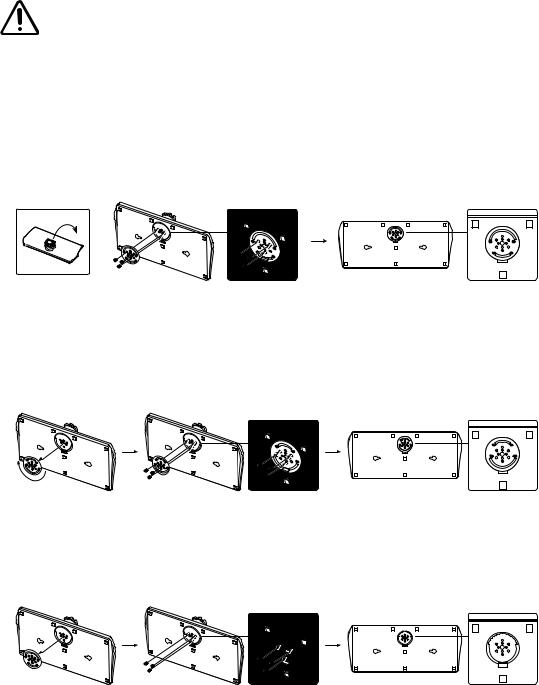
Assembling the swivel
WARNING: If you configure the TV to swivel, you must attach it securely to the floor, a desk, a dressertop, etc. as described in the installation instructions.
TheLEDTVshaveswivelstands.YoucanconfigurethesestandssothattheTVsswivel20degreesleftandright,60 degreesleftandright,or90degreesleftandrightusingtheBRACKETHOLDERSWIVEL.
*The product ships with its stand's swivel angle set to 20°.
*20° swivel
To configure the TV so that it swivels 20° left and right, insert the prong on the bottom of the stand through the curved holeintheBracketHolderSwivelmarked20°.Then,fixtheBracketHolderSwiveltothestandusingthethreesupplied screws as shown below.
60° swivel
To configure the TV so that it swivels 60° left and right, insert the prong on the bottom of the stand through the curved holeintheBracketHolderSwivelmarked60°.Then,fixtheBracketHolderSwiveltothestandusingthethreesupplied screws as shown below.
90° swivel
ToconfiguretheTVsothatitswivels90°leftandright,removetheBracketHolderSwivel,andthenscrewthethree supplied screws into the stand as shown below.
English - 8

Installing the LED TV Stand
Assembling the Stand and Components
When installing the stand, use the provided components and parts.
A |
B |
|
C |
BN96-32380B x 4 (M4 x L14) |
|
|
|
||
|
|
|
D |
BN96-36261A x 4 (M4 x L14) |
|
(43″-55″) |
(65″) |
E |
BN96-47100A x 4 (M4 x L14, SECURITY) |
Stand x1 |
Guide Stand x1 |
|
Screws |
|
1 43″-55″ |
65″ |
x 4 |
x 4 |
(M4 x L14) |
(M4 x L14) |
2 |
3 |


 x 4 (M4 x L14) or


 x 4 (M4 x L14, SECURITY)
•• Place a soft cloth overthe table to protect the TV, and then place the TV so that its screen faces down toward the table surface.
•• Insert the Stand Guide into the slot on the bottom of the TV.
•• Slide and assemble it to the end line in the direction of arrow.
Tight the bottom screw first, and upperscrew last.
•• Progress the assembly of screw in the manual’s order.
English - 9
4 |
43″ |
|
|
|
|
|
|
|
50″-65″ |
|
|
|
|
|||
|
|
|
|
|
|
|
|
|
|
|
|
|
|
|
|
|
|
|
|
|
|
|
|
|
|
|
|
|
|
|
|
|
|
|
|
|
|
|
|
|
|
|
|
|
|
|
|
|
|
|
|
|
|
|
|
|
|
|
|
|
|
|
|
|
|
|
|
|
|
|
|
|
|
|
|
|
|
|
|
|
|
|
|
|
|
|
|
|
|
|
|
|
|
|
|
|
|
|
|
|
|
NOTE
•• Make sure to distinguish between the front and back of each component when assembling them.
•• Make sure that at least two persons lift and move the TV.
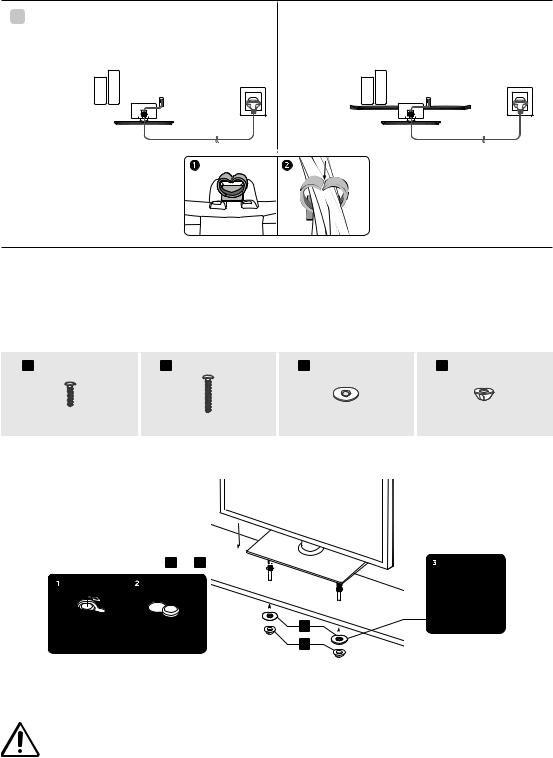
Assembling the Hotel Mount Kit
A |
B |
C |
D |
Short Bolt x 2 |
LongBoltx2 |
Washerx 2 |
Nut x 2 |
|
|
|
|
A or B

C
D
[[ Affix the stand to a flat surface such as a dressertop, desk top, or entertainment centeras shown.
WARNING: To prevent injury, you must attach this TV securely to the floor, a table, a dressertop, etc. with theHotelMountKitasdescribedintheseinstructions.
English -10
Installing the wall mount kit
YoucanmounttheTVonthewallusingawallmountkit(soldseparately).
|
Wall mount Adapter |
|
Wall mount |
TV |
|
bracket |
||
|
C
Wall mount Adapter
Wall mount |
TV |
|
bracket |
||
|
C
•• The Product shape may differdepending on the model.
The wall mount kit (sold separately) allows you to mount the TV on a wall.
Fordetailed information on installing the wall mount, see the instructions provided with the wall mount. Contact a technician forassistance when installing the wall mount bracket. Samsung Electronics is not responsible forany damage to the product orinjury to yourself orothers if you select to install the TV on yourown.
Securing the TVto the Wall
Caution: Pulling, pushing, orclimbing on the TV may cause the TV to fall. In particular, ensure yourchildren do not hang on ordestabilize the TV. This action may cause the TV to tip over, causing serious injuries or death. Follow all safety precautions provided in the Safety Flyerincluded with yourTV. Foradded stability and safety, you can purchase and install the anti-fall device.
To Prevent the TVfrom Falling
•• TVHolderKitsaresoldseparately.TopurchaseaTVHolderKit,contactSamsungCustomerCare.
1.Insert the screws into the wall brackets and firmly fasten them to the wall. Make sure the screws are firmly fixed to the wall.
––We strongly recommend you drive the screws into a stud.
2.Insert the screws into the wall brackets and firmly fasten the screws to the top VESA screw holes on theback of the TV.
3.Connect the brackets on the TV and the brackets on the wall with a strong string orcable, and then tie the string or cable tighrly to the brackets.
––Verify all connections are properly secured. Periodically check the connections forany sign of fatigue orfailure. If you have any doubt about the security of yourconnections, contact a professional installer.
––Install the TV close to the wall so that it does not fall.
––Connect the string orcable so that the brackets on the wall are at the same height orlowerthan the brackets on the TV. Untie the string orcable before moving the TV.
English -11

Wall Mount Kit Specifications (VESA)
Install yourwall mount on a solid wall perpendicularto the floor. If you are attaching the wall mount to building materials otherthan plasterboard, contact yournearest dealer. If installed on a ceiling orslanted wall, the TV may fall and cause severe personal injury.
•• The wall mount kit is not supplied, but sold separately.
•• NOTE
––Standard dimensions forwall mount kits are shown in the table below.
––Samsung wall mount kits contain a detailed installation manual. All parts necessary forassembly are provided.
––DonotusescrewsthatdonotcomplywiththeVESAstandardscrewspecifications.
––DonotusescrewsthatarelongerthanthestandarddimensionordonotcomplywiththeVESAstandardscrew specifications. Screws that are too long may cause damage to the inside of the TV set.
––Forwall mounts that do not complywith the VESA standard screw specifications, the length of the screws may differdepending on the wall mount specifications.
––Donotfastenthescrewstoofirmly.Thismaydamagetheproductorcausetheproducttofall,leadingto personal injury. Samsung is not liable forthese kinds of accidents.
––Samsung is not liable forproduct damage orpersonal injurywhen a non-VESA ornon-specified wall mount is used orthe consumerfails to follow the product installation instructions.
––DonotmounttheTVatmorethana15degreetilt.
––Always have two people mount the TV onto a wall.
TV size in inches |
VESA screw hole specs |
C (mm) |
Standard |
Quantity |
|
(A * B) in millimeters |
Screw |
||||
|
|
|
|||
43-55 |
200 x 200 |
|
|
|
|
|
|
43-45 |
M8 |
4 |
|
65 |
400 x 400 |
|
|
|
Do not install yourwall mount kit while yourTV is turned on. This may result in personal injuryfrom electric shock.
English -12

Providing properventilation foryourTV
When you install yourTV, maintain a distance of at least 4 inches (10 cm) between the TV and otherobjects (walls, cabinet sides, etc.) to ensure properventilation. Failing to maintain properventilation may result in a fire ora problem with the product caused by an increase in its internal temperature.
When you install yourTVwith a stand ora wall mount, we strongly recommend you use parts provided by Samsung Electronics only. Using parts provided by anothermanufacturermay cause difficulties with the product orresult in injury caused by the product falling.
|
Installation with a stand |
Installation with a wall mount |
|
|
10 cm |
|
10 cm |
10 cm |
10 cm |
10 cm |
10 cm |
|
|
|
10 cm |
English -13
03 The Remote Control
About the Buttons on the Remote Control
•• The images, buttons, and functions of the remote control may differdepending on the model.
•• The remote control has Braille points on the Power, Channel, Volume, and Select buttons and can be used by visually impaired persons.
Turns the TV on and off.
Gives direct access to channels.
Selects additional digital channels being broadcast by the same digital station. Forexample, to select channel ‘54-3’, press ‘54’, then press ‘-’ and ‘3’.
Adjusts the volume.
DisplaystheHomeScreen.
Displaysthemainon-screenmenu. 


Displaysandselectstheavailable video sources.
Returns to the previous channel.
Turns the sound on and off.
Changes channels.
 LaunchestheChannel List.
LaunchestheAPPS. (Not available)
Quickly select frequently used functions. (Not available)
E(Select)
Press this button to select orrun a focused item.
Returns to the previous menu.
SLEEP
Sets the Sleep Timer.
X
Turnsthe3Dfunctiononoroff.(Not available)
CC
When pressed the button, the
Accessibility Shortcuts menu appears.
 DisplaysinformationontheTV
screen.
Moves the cursor, selects the onscreen menu items, and changes the values seen on the TV's menu.
Exits the menu.
Use these buttons according to the directions on the TV screen.
 : Enterthe houryourwant the TV to turn on.
Use these buttons with a specific feature, according to the directions on the TV's screen.
English -14

Installing batteries into the remote control
Match the polarity of the batteries to the symbols in the battery compartment.
•• Use the remote control within 23 feet of the TV.
•• Bright light may affect the performance of the remote control. Avoid using nearbright fluorescent lights orneon signs.
•• The colorand shape of the remote mayvary depending on the model.
English -15
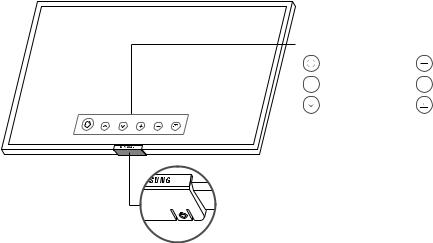
04 Using the TV Controller
YoucanturnontheTVwiththeTV Controller button at the bottom of the TV, and then use the Control menu. The Control menu appears when the TV Controller is pressed while the TV is On. Formore information about its usage, refer to the figure below.
•• The screen may dim if the protective film on the SAMSUNG logo orthe bottom of the TV is not detached. Please remove the protective film.
Control menu |
|
: PowerOff |
: Volume Up |
: Channel Up |
: VolumeDown |
: ChannelDown |
: Source |
TV Controller/ Remote control sensor
 Press: Move
 Press & Hold: Select
The TV Controller is located on the bottom of the TV.
English -16
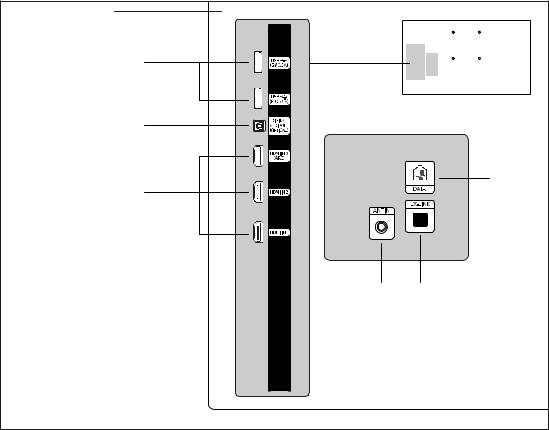
05 The Connection Panel
TV RearPanel |
|
|
|
|
|
|
|
|
|
|
|
•• Wheneveryou connect an external device to yourTV, make sure that poweron the TV and the device is turned off.
USB (5V 0.5A), USB (HDD 5V1A)
––Connectorforsoftware upgrades and Media Play, etc.
––Service connection.
DIGITALAUDIO OUT(OPTICAL)
ConnectstoaDigitalAudiocomponent.
HDMI IN1, 2, 3 (ARC)
ConnectstotheHDMIportofadevicewithanHDMIoutput.
––NoseparatesoundconnectionisneededforanHDMItoHDMIconnection.HDMIconnectionscarrybothaudio and video.
––ItisrecommendedthattheexternaldeviceoftheHDMI1.3or1.4versionwillbeusedwiththisTV.Ifyoumeet thecompatibleproblemlikenosoundortheabnormalscreenoretcwiththedeviceoftheHDMI1.2version, contact to the Samsung customercare center.
English -17
ANTIN
––To view television channels correctly, the TV must receive a signal from one of the following sources:
––An outdoorantenna / A cable television system
––TouseBLAN,besuretosettheBLAN Power to ON in the Hotel Option menu.
EX-LINK
Connect this port to the port on the optional RJP (Remote Jack Pack). This will allowyou to connect external devices(Camcoder,PC,DVDplayersetc.)easily.
DATA
––UsedtoconnecttheLodgenetgamecontrollerintheLodgenetsystemorsupportdatacommunication between the TV and the external SBB orSTB.
––Connects using RJ-12 TV type plugs.
––Formore information about the data cables, referto page 20.
English -18
Loading...