

Saeco 740821408, 740820310, 740819410, 740819210, 10000032 Operating Instructions Manual
...
Ideas with Passion
FOR HOUSEHOLD USE ONLY
Leggere attentamente queste istruzioni d’uso prima di utilizzare
la macchina
ISTRUZIONI PER L’USO
Read these operating instructions carefully before using the
machine
OPERATING INSTRUCTIONS
Bedienungsanleitung ist vor dem ersten Gebrauch der Maschine
aufmerksam zu lesen
BEDIENUNGSANLEITUNG
Lire attentivement ce mode d’emploi avant d’utiliser la machine
MODE D’EMPLOI
Diese Leer atentamente estas instrucciones de uso antes de
utilizar la máquina
INSTRUCCIONES DE USO
Ler atentamente estas instruções de uso antes de utilizar a
máquina
INSTRUÇÕES PARA USO
Lees deze INSTRUCTIES aandachtig door, alvorens het apparaat
te gebruiken
GEBRUIKSAANWIJZING
ITALIANOENGLISHDEUTSCHFRANÇAISESPAÑOLPORTUGUÊSNEDERLAND

2
PRECAUZIONI IMPORTANTI
Durante l’utilizzo di elettrodomestici, è consigliabile prendere alcune precauzioni per
limitare il rischio di incendi, scosse elettriche e/o incidenti.
1 Leggere attentamente tutte le istruzioni ed informazioni riportate in questo
manuale e in qualsiasi altro opuscolo contenuto nell’imballo prima di avviare od
utilizzare la macchina espresso.
2 Non toccare superfici calde.
3 Non immergere cavo, spine o il corpo della macchina in acqua o altro liquido per
evitare incendi, scosse elettriche o incidenti.
4 Fare particolare attenzione durante l’utilizzo della macchina espresso in presenza
di bambini.
5 Togliere la spina dalla presa se la macchina non viene utilizzata o durante la
pulizia. Farla raffreddare prima di inserire o rimuovere pezzi e prima di procedere
alla sua pulizia.
6 Non utilizzare la macchina con cavo o spina danneggiati o in caso di guasti o rotture.
Far controllare o riparare l’apparecchio presso il centro di assistenza più vicino.
7 L’utilizzo di accessori non consigliati dal produttore possono causare danni a cose
e persone.
8 Non utilizzare la macchina espresso all’aperto.
9 Evitare che il cavo penda dal tavolo o che tocchi superfici calde.
10 Tenere la macchina espresso lontano da fonti di calore.
11 Controllare che la macchina espresso sia in posizione “Spento” prima di inserire la
spina nella presa. Per spegnerla, posizionarla su “Spento” e rimuovere quindi la
spina dalla presa.
12 Utilizzare la macchina unicamente per uso domestico.
13 Fare estrema attenzione durante l’utilizzo del vapore.
CONSERVARE QUESTE ISTRUZIONI
AVVERTENZA
La macchina espresso è stata studiata unicamente per uso domestico. Qualsiasi
intrevento di assistenza, fatta eccezione per le operazioni di pulizia e di normale
manutenzione, dovrà essere prestato da un centro di assistenza autorizzato. Non
immergere la macchina in acqua. Qualsiasi riparazione dovrà essere effettuata
unicamente dal centro di assistenza autorizzato.
1 Controllare che il voltaggio indicato sulla targhetta corrisponda al vostro.
2 Non utilizzate mai acqua tiepida o calda per riempire il serbatoio dell’acqua.
Utilizzate unicamente acqua fredda.
3 Non toccate con le mani le parti calde della macchina ed il cavo di alimentazione
durante il funzionamento.
4 Non pulire mai con detersivi corrosivi o utensili che graffiano. É sufficiente un
panno morbido inumidito con acqua.
5 Per evitare la formazione di calcare, si può utilizzare acqua minerale naturale.
ISTRUZIONI SUL CAVO ELETTRICO
A Viene fornito un cavo elettrico abbastanza corto per evitare che si attorcigli o che vi
inciampiate.
B Si possono utilizzare, con molta attenzione, delle prolunghe omologate.
C Qualora venga utilizzata una prolunga, verificare:
1 che il voltaggio riportato sulla prolunga sia perlomeno, uguale al voltaggio
elettrico dell’elettrodomestico;
2 che sia munito di una spina a tre pin con messa a terra (qualora il cavo
dell’elettrodomestico sia di questo tipo);
3 che il cavo non penda dal tavolo per evitare di inciamparvi.

ITALIANO
3
GENERALITÀ
La macchina da caffè è indicata per la preparazione di caffè espresso impiegando
caffè in grani ed è dotata di un dispositivo per l’erogazione del vapore e dell’acqua
calda.
Il corpo della macchina, dall’elegante design, è stato progettato per uso domesti
-
co e non è indicato per un funzionamento continuo di tipo professionale.
Attenzione. Non si assumono responsabilità per eventuali danni in caso di:
• impiego errato e non conforme agli scopi previsti;
• riparazioni non eseguite presso i centri d’assistenza autorizzati;
• manomissione del cavo d’alimentazione;
• manomissione di qualsiasi componente della macchina;
• impiego di pezzi di ricambio ed accessori non originali.
In questi casi viene a decadere la garanzia.
PER FACILITARE LA LETTURA
Il triangolo d’avvertimento indica tutte le istruzioni importanti per la
sicurezza dell’utente. Attenersi scrupolosamente a tali indicazioni
per evitare ferimenti gravi!
IMPIEGO DI QUESTE ISTRUZIONI PER L’USO
Conservare queste istruzioni per l’uso in un luogo sicuro ed allegarle alla macchina per caffè qualora un’altra persona dovesse utilizzarla. Per ulteriori informazioni
o nel caso di problemi, non trattati del tutto o soltanto insufficientemente nelle
presenti istruzioni, rivolgetevi ai Centri di Assistenza Autorizzati.
DATI TECNICI
• Tensione nominale Vedi targhetta posta sull’apparecchio
• Potenza nominale Vedi targhetta posta sull’apparecchio
• Materiale corpo Metallo
• Dimensioni (l x a x p) (mm) 285 x 375 x 400
• Peso (Kg) 9
• Lunghezza cavo (mm) 1200
• Pannello comandi Frontale
• Serbatoio acqua (lt.) 2 - Estraibile
• Alimentazione Vedi targhetta posta sull’apparecchio
• Pressione pompa (bar) 15
• Caldaia Acciaio Inox
• Capacità contenitore caffè (gr) 300 di caffè in grani
• Macine In ceramica
• Quantità caffè macinato 8 g
• Rapacità cassetto raccoglifondi 13
• Dispositivi di sicurezza Valvola di sicurezza pressione caldaia
termostato di sicurezza.
Con riserva di modifiche di costruzione ed esecuzione dovute al progresso tec
nologico.
Macchina conforme alla Direttiva Europea 89/336/CEE (Decreto legislativo 476
del 04/12/92), relativa all’eliminazione dei disturbi radiotelevisivi.
4
IN CASO D’EMERGENZA
Estrarre immediatamente la spina dalla presa di rete.
UTILIZZARE ESCLUSIVAMENTE L’APPARECCHIO
- In luogo chiuso.
- Per la preparazione di caffè, acqua calda, per montare il latte o per riscaldare
bevande utilizzando vapore.
- Per l’impiego domestico.
- Da adulti in condizioni psico-fisiche non alterate.
NON UTILIZZARE MAI L’APPARECCHIO
per scopi diversi da quelli sopra indicati, al fine di evitare pericoli.
Non introdurre nei contenitori sostanze diverse da quelle indicate nel manuale
istruzioni.
Durante il normale riempimento di ogni contenitore, è obbligatorio chiudere tutti i
contenitori vicini.
Riempire il serbatoio acqua soltanto con acqua fresca potabile: acqua calda e/o
altri liquidi possono danneggiare la macchina.
Non utilizzare acqua addizionata con anidride carbonica. La regolazione del maci
nacaffè deve essere eseguita solo quando quest’ultimo è in funzione.
Nel macinacaffè è vietato introdurre le dita e qualsiasi materiale che non sia caffè
in grani. Prima di intervenire all’interno del macinacaffè disinserire la macchina
con l’interruttore generale e togliere la spina dalla presa di corrente.
ALLACCIAMENTO ALLA RETE
Allacciare la macchina per caffè soltanto ad una presa di corrente adeguata. La
tensione deve corrispondere a quella indicata sulla targhetta posta sull’apparec
chio.
INSTALLAZIONE
- Scegliere un piano d’appoggio ben livellato. Non collocare su superfici incande-
scenti!
- Porre a 10 cm di distanza da pareti e piastre di cottura.
- Non tenere a temperature inferiori a 0 °C, pericolo di danni da congelamento.
- La presa di corrente deve essere raggiungibile in ogni momento.
- Il cavo di alimentazione non deve essere danneggiato, legato con morsetti,
posto su superfici incandescenti, ecc.
- Non lasciar pendere il cavo d’alimentazione. (Att.: Pericolo d’inciampare o di far
cadere l’apparecchio a terra.)
- Non portare o tirare la macchina per caffè tenendola per il cavo d’alimentazione.
PERICOLI
- L’apparecchio non deve essere utilizzato da bambini e persone non informate
circa il suo funzionamento.
- L’apparecchio è pericoloso per i bambini. Se incustodito, disattivarlo.
- Non lasciare i materiali utilizzati per imballare la macchina alla portata dei bambini.
- Non dirigere contro se stessi e/o altri il getto di vapore surriscaldato e/o d’acqua
calda: pericolo di scottature.
- Non inserire oggetti attraverso le aperture dell’apparecchio (Pericolo! Corrente
elettrica!).
- Non toccare la spina con le mani e piedi bagnati non estrarre dalla presa tirando
il cavo.
- Attenzione pericolo di ustioni al contatto con l’acqua calda, il vapore e il beccuc
-
cio per l’acqua calda/il vapore.
GUASTI
- Non utilizzare l’apparecchio in caso di guasto accertato o sospetto, ad es. dopo
una caduta.
- Eventuali riparazioni devono essere effettuate dal servizio assistenza autorizzato.
- Non utilizzare un apparecchio con cavo di alimentazione difettoso. Se il cavo
d’alimentazione è danneggiato, deve essere cambiato dal produttore o dal suo
servizio assistenza clienti. (Pericolo! Corrente elettrica!).
- Spegnere l’apparecchio prima di aprire lo sportello di servizio. Pericolo di ustioni!
PULIZIA / DECALCIFICAZIONE
- Prima della pulizia, estrarre la spina di rete e lasciare raffreddare l‘apparecchio.
- Impedire che l’apparecchio venga a contatto con schizzi d’acqua o immerso in
acqua.
- Non asciugare le parti della macchina in forni convenzionali e/o a microonde.
PARTI DI RICAMBIO
Per ragioni di sicurezza, utilizzare solo parti di ricambio e accessori originali.
SMALTIMENTO
- L’imballaggio può essere riciclato.
- Apparecchio: Estrarre la spina di rete, recidere il cavo di allacciamento dell’ap
-
parecchio.
- Consegnare l’apparecchio e il cavo di allacciamento al servizio di assistenza o
al centro di smaltimento pubblico.
NORME DI SICUREZZA
ITALIANO
5
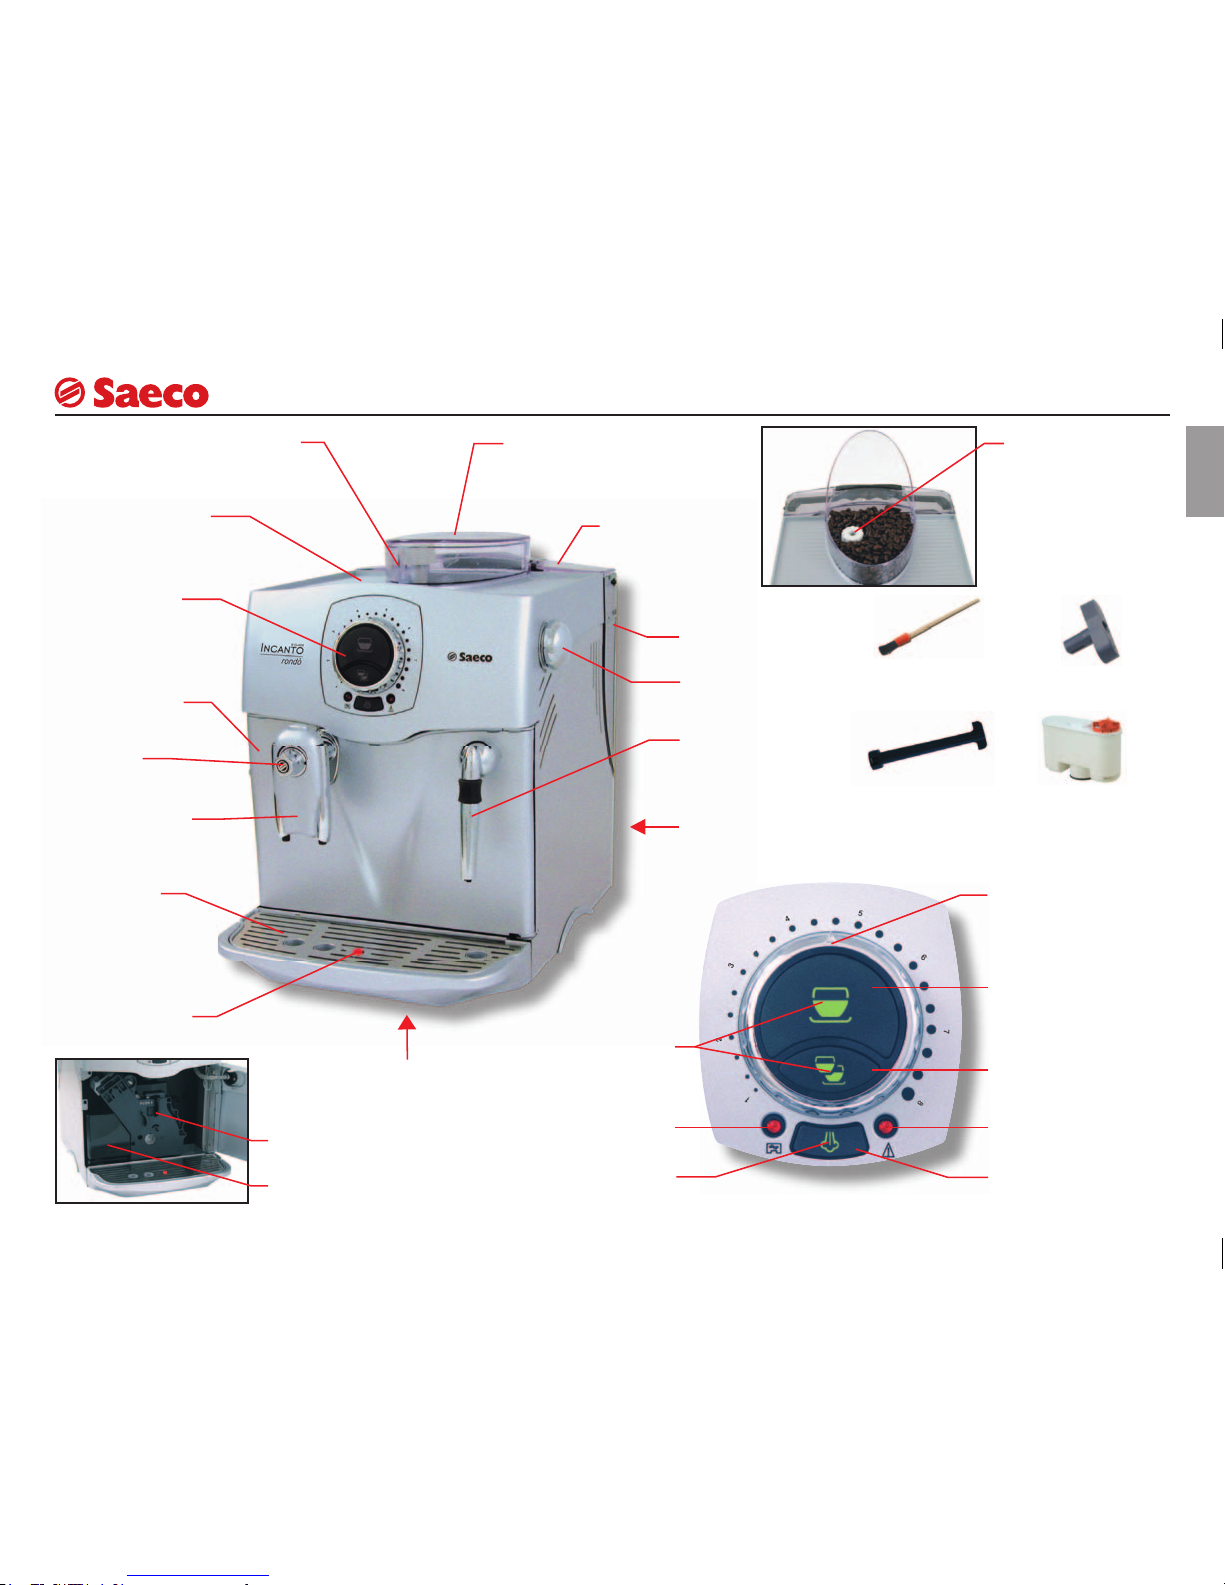
Cassetto raccogli fondi
Vasca raccogli
gocce + griglia
Interruttore generale
(ON/OFF)
Erogatore caffè
regolabile in altezza
e profondità
Tubo acqua
calda/vapore
Pannello comandi
Pomello rubinetto
erogazione vapore
Piastra appoggia tazze
Serbatoio acqua
Coperchio serbatoio
acqua
Contenitore caffè in grani
Coperchio contenitore caffè in grani
Pomello regolazione
macinatura
Gruppo erogatore
caffè
Pennello per
la pulizia
Chiave gruppo caffè
Sportello di servizio
Spia sostituzione fi ltro
“Aqua Prima” Vedi pag.13
Pulsante erogazione singolo caffè
Pulsante selezione vapore
Reset allarme fi ltro “Aqua
Prima”
Spia funzione vapore
Spia allarmi
Pomello regolazione quantità di caffè in tazza
SBS
Indicatore vaschetta
piena
Pulsante erogazione due
caffè
Spie pronto
temperatura caffè
Applicatore fi ltro
a cartuccia
Filtro a cartuccia
“Aqua Prima”
Base girevole

6
INSTALLAZIONE / CARICAMENTO CIRCUITO
Premere l’interruttore sulla
posizione “I” per accendere la macchina.
La macchina si sta
riscaldando; le spie lampeggiano.
Nota: Prima di procedere alla prima messa in funzione, in caso di prolungata inattività, se il serbatoio
acqua è stato vuotato completamente è obbligatorio
caricare il circuito della macchina.
Inoltre il circuito
va caricato ogni qual volta la spia rimane accesa in
modo fi sso:
Inserire un contenitore
sotto al tubo vapore .
Aprire il rubinetto per
iniziare il caricamento del
circuito.
Attendere che dall’ugello
fuoriesca acqua in modo
regolare.
Chiudere il rubinetto per
terminare il caricamento
del circuito.
Riempire il contenitore con
caffè in grani.
Verifi care che tutti i componenti siano posizionati
correttamente.
Inserire la spina in una presa di corrente adeguata.
Togliere il contenitore.
Vedi targhetta dati
Verifi care il datario sul fi ltro “Aqua Prima”; se il fi ltro
è scaduto sostituirlo con uno nuovo.
Si può installare il fi ltro
“Aqua Prima” (vedi pag.13).
Riempire il serbatoio con
acqua fresca potabile.
Quando le spie si accendono
in modo fi sso, la macchina è
pronta per l’uso.
A pag.14 sono riportati i messaggi che la macchina fornisce all’utente
durante il funzionamento.
Avvertenze importanti per l’utilizzo del fi ltro “Aqua prima” sono riportate
a pag.14.
SBS
ITALIANO
7
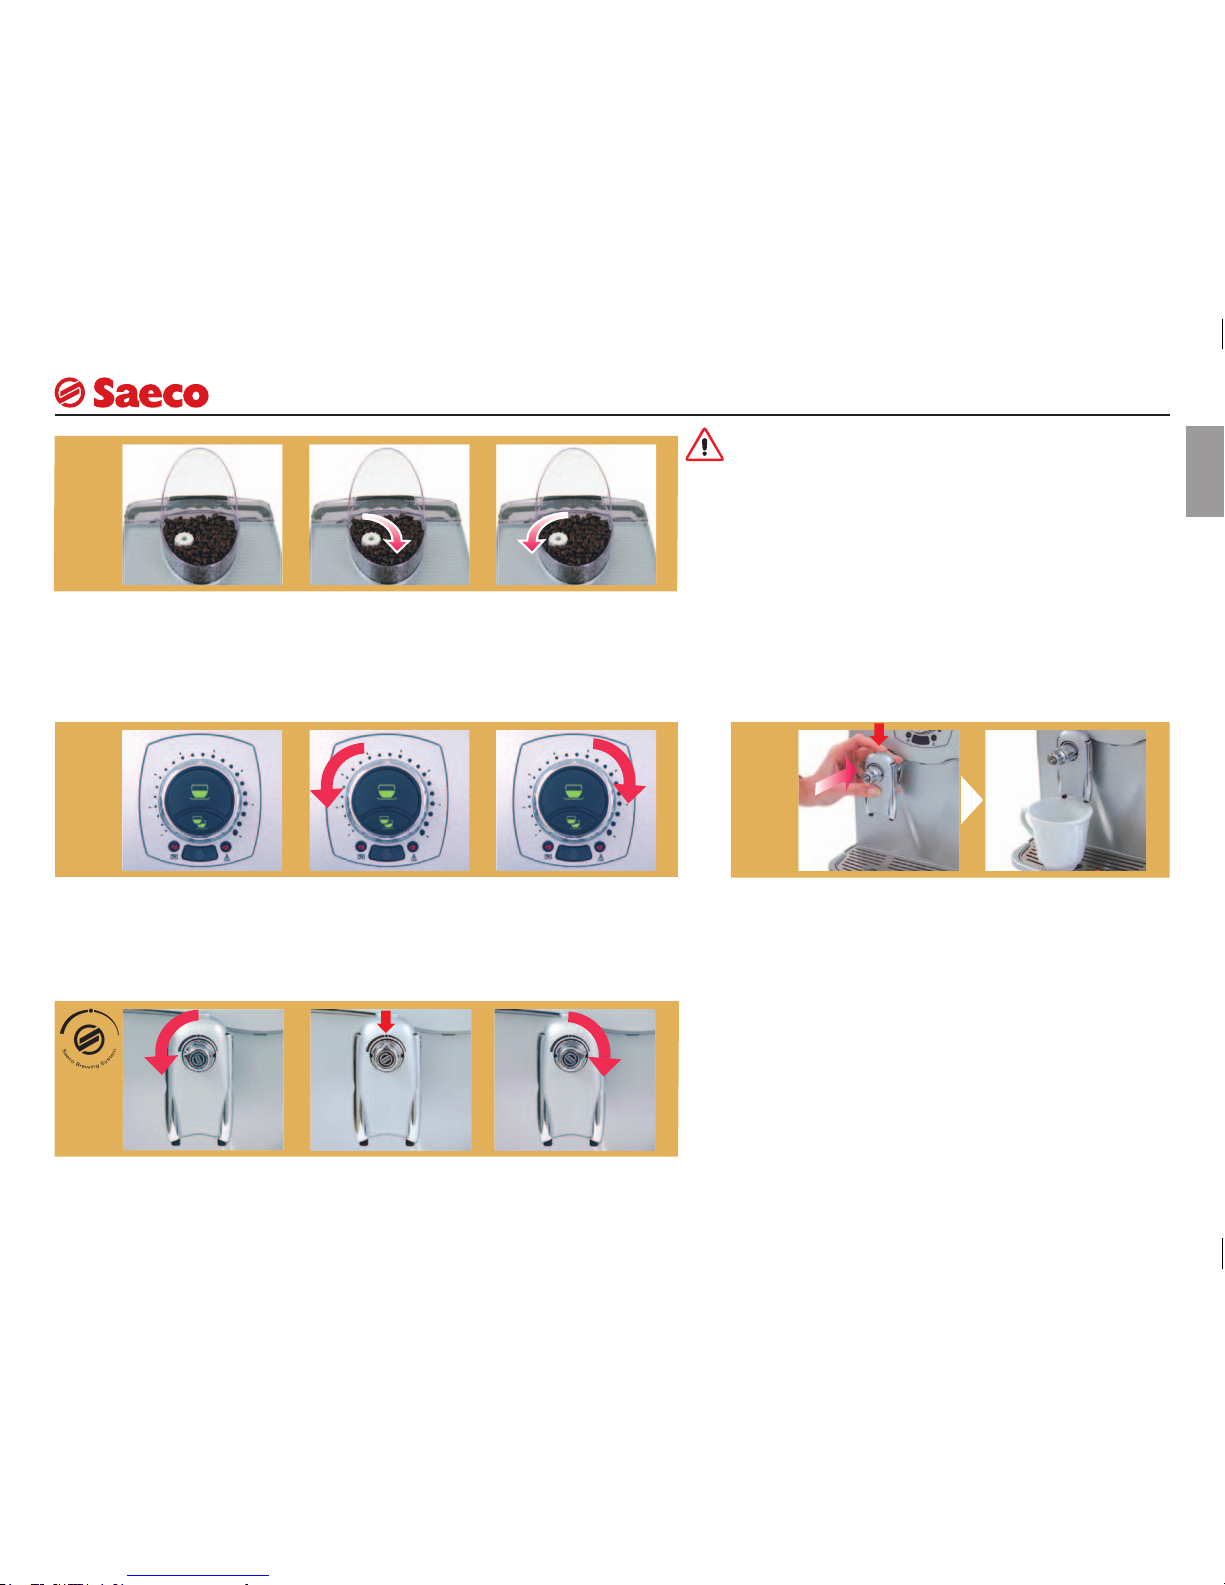
REGOLAZIONI
Il grado di macinatura può essere
regolato con il pomello.
Il caffè esce troppo lentamente. Premere e ruotare.
Il caffè esce troppo velocemente. Premere e ruotare.
La regolazione deve essere eseguita solo quando il macinacaffè
è in funzione.
Usare miscele di caffè in grani per macchine espresso. Se non si ottiene il
risultato desiderato utilizzare miscele di caffè differenti. Conservare il caffè
al fresco, in un contenitore chiuso ermeticamente.
La variazione si ottiene dopo aver erogato 1 - 2 caffè.
Se regolate la macinatura su un valore troppo fi ne (pomello completamente in senso antiorario) e la manopola SBS sulla posizione “ristretto” (verso
destra), l’erogazione del caffè può risultare troppo scarsa o assente.
Per adattare la quantità di caffè erogato alle dimensioni delle tazze.
Caffè corto.
CAFFÈ IN TAZZA - La regolazione deve essere eseguita prima di erogare il caffè.
Questa regolazione ha un effetto immediato sull’erogazione selezionata.
REGOLAZIONE
MACINATURA
CAFFÈ IN TAZZA
Caffè lungo.
Solo per macchine provviste di SBS - Per regolare la corposità del caffè erogato. La regolazione
può essere eseguita anche durante l’erogazione del caffè. Questa regolazione ha un effetto immediato sull’erogazione selezionata.
Per utilizzare tazze di grandi dimensioni, premere il
pulsante e spingere fi no a battuta l’erogatore.
TAZZE GRANDI
TAZZE GRANDI
Per riposizionare l’erogatore, tirarlo fi no al suo incastro.
Caffè espresso. Caffè ristretto.Caffè Creme.
8
EROGAZIONE CAFFÈ - ACQUA CALDA
ACQUA CALDA
Aprire il rubinetto per iniziare l’erogare dell’acqua.
Quando è stata raggiunta la
quantità desiderata chiudere
il rubinetto.
Attendere. Prelevare il contenitore.Posizionare un contenitore
sotto al tubo vapore.
Attenzione: acqua calda e vapore possono provocare ustioni! Dirigere il tubo vapore sulla vasca raccogli gocce.
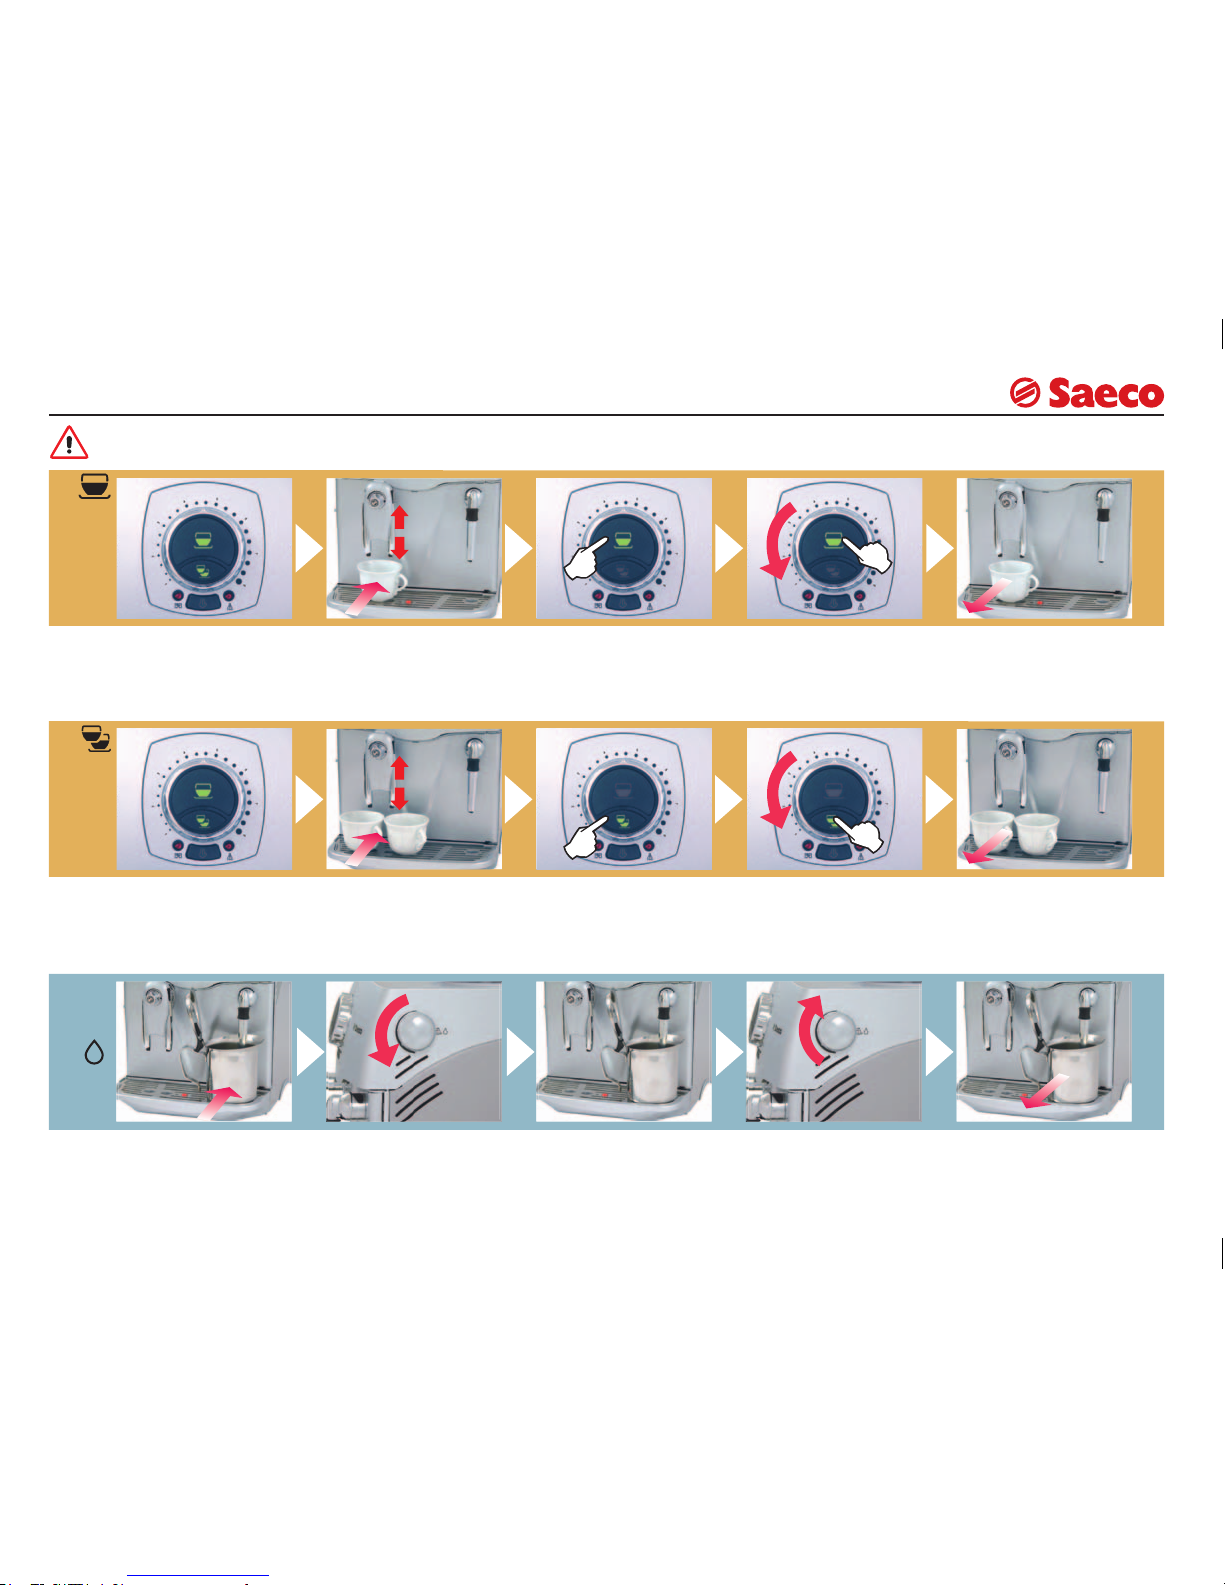
CAFFÈ IN GRANI
1 CAFFÈ
Verifi care che la macchina
sia pronta.
Posizionare la tazza da
caffè calda sotto l’erogatore.
Premere il tasto per erogare 1 caffè.
Per interrompere prima l’erogazione premere il tasto o
ruotare la ghiera.
Quando la macchina termina la preparazione, prelevare la tazza.
Verifi care che la macchina
sia pronta.
Posizionare le tazze da caffè calde sotto l’erogatore.
Premere il tasto per erogare 2 caffè.
Quando la macchina termina
la preparazione, prelevare le
tazze.
CAFFÈ IN GRANI
2 CAFFÈ
Per interrompere prima l’erogazione premere il tasto o
ruotare la ghiera. Se si interrompe l’erogazione del 1° caffè, il 2° non sarà erogato.
ITALIANO
9
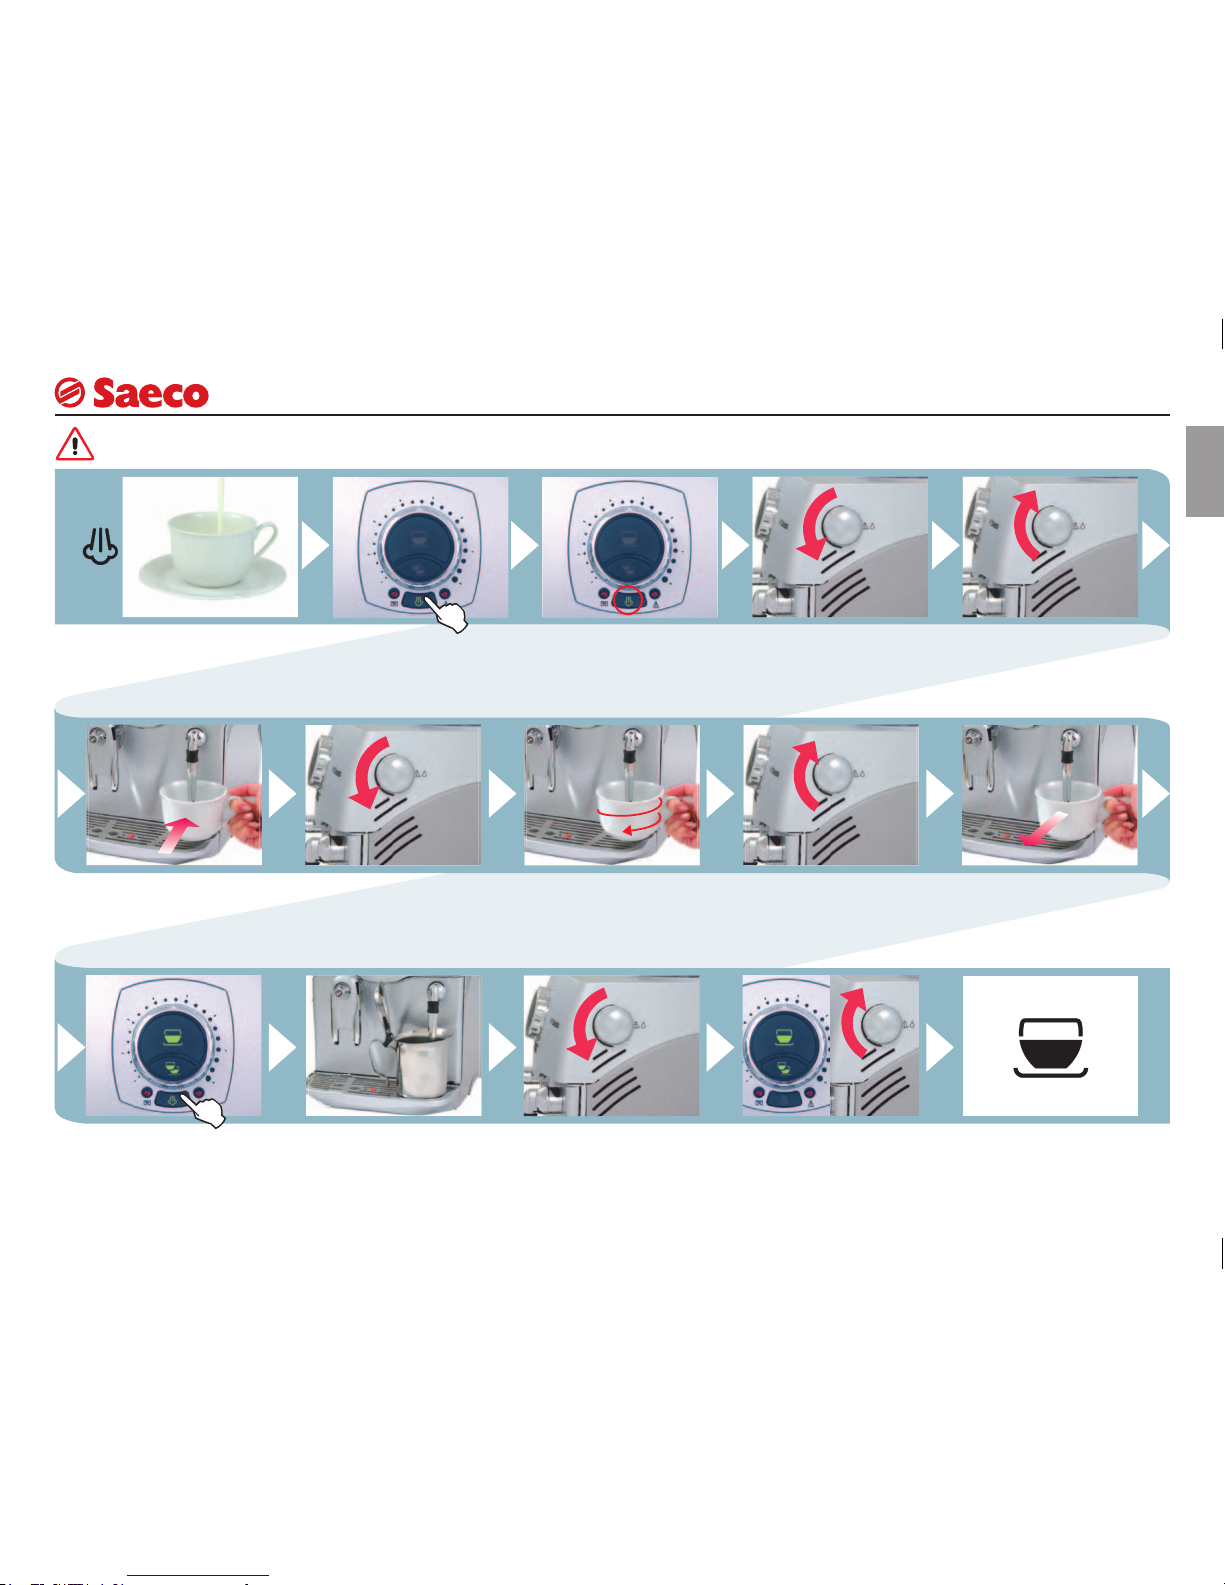
CAPPUCCINO
CAPPUCCINO
Riempire la tazza con 1/3
di latte freddo.
Premere il pulsante per
selezionare la funzione.
La spia lampeggia.
Quando la spia si accende
in modo fi sso, la macchina
è pronta per l’erogazione
del vapore.
Aprire il rubinetto per erogare vapore.
Muovere con movimenti
circolari la tazza per uniformare il riscaldamento.
Finito di montare il latte,
chiudere il rubinetto.
Posizionare la tazza con il
latte sotto al tubo vapore.
Erogare il caffè nella tazza
per ottenere un ottimo
cappuccino.
Aprire il rubinetto per scaricare l’acqua residua.
Quando esce solo vapore
chiudere il rubinetto.
Prelevare la tazza.
Premere il pulsante per ripristinare il normale funzionamento.
Le spie lampeggiano.
Aprire il rubinetto ed erogare acqua.
Posizionare un contenitore
sotto al tubo vapore.
Quando le spie sono accese
in modo fi sso, chiudere il rubinetto e rimuovere il contenitore.
Attenzione: acqua calda e vapore possono provocare ustioni! Dirigere il tubo vapore sulla vasca raccogli gocce.
10
Attenzione: acqua calda e vapore possono provocare ustioni! Dirigere il tubo vapore sulla vasca raccogli gocce.
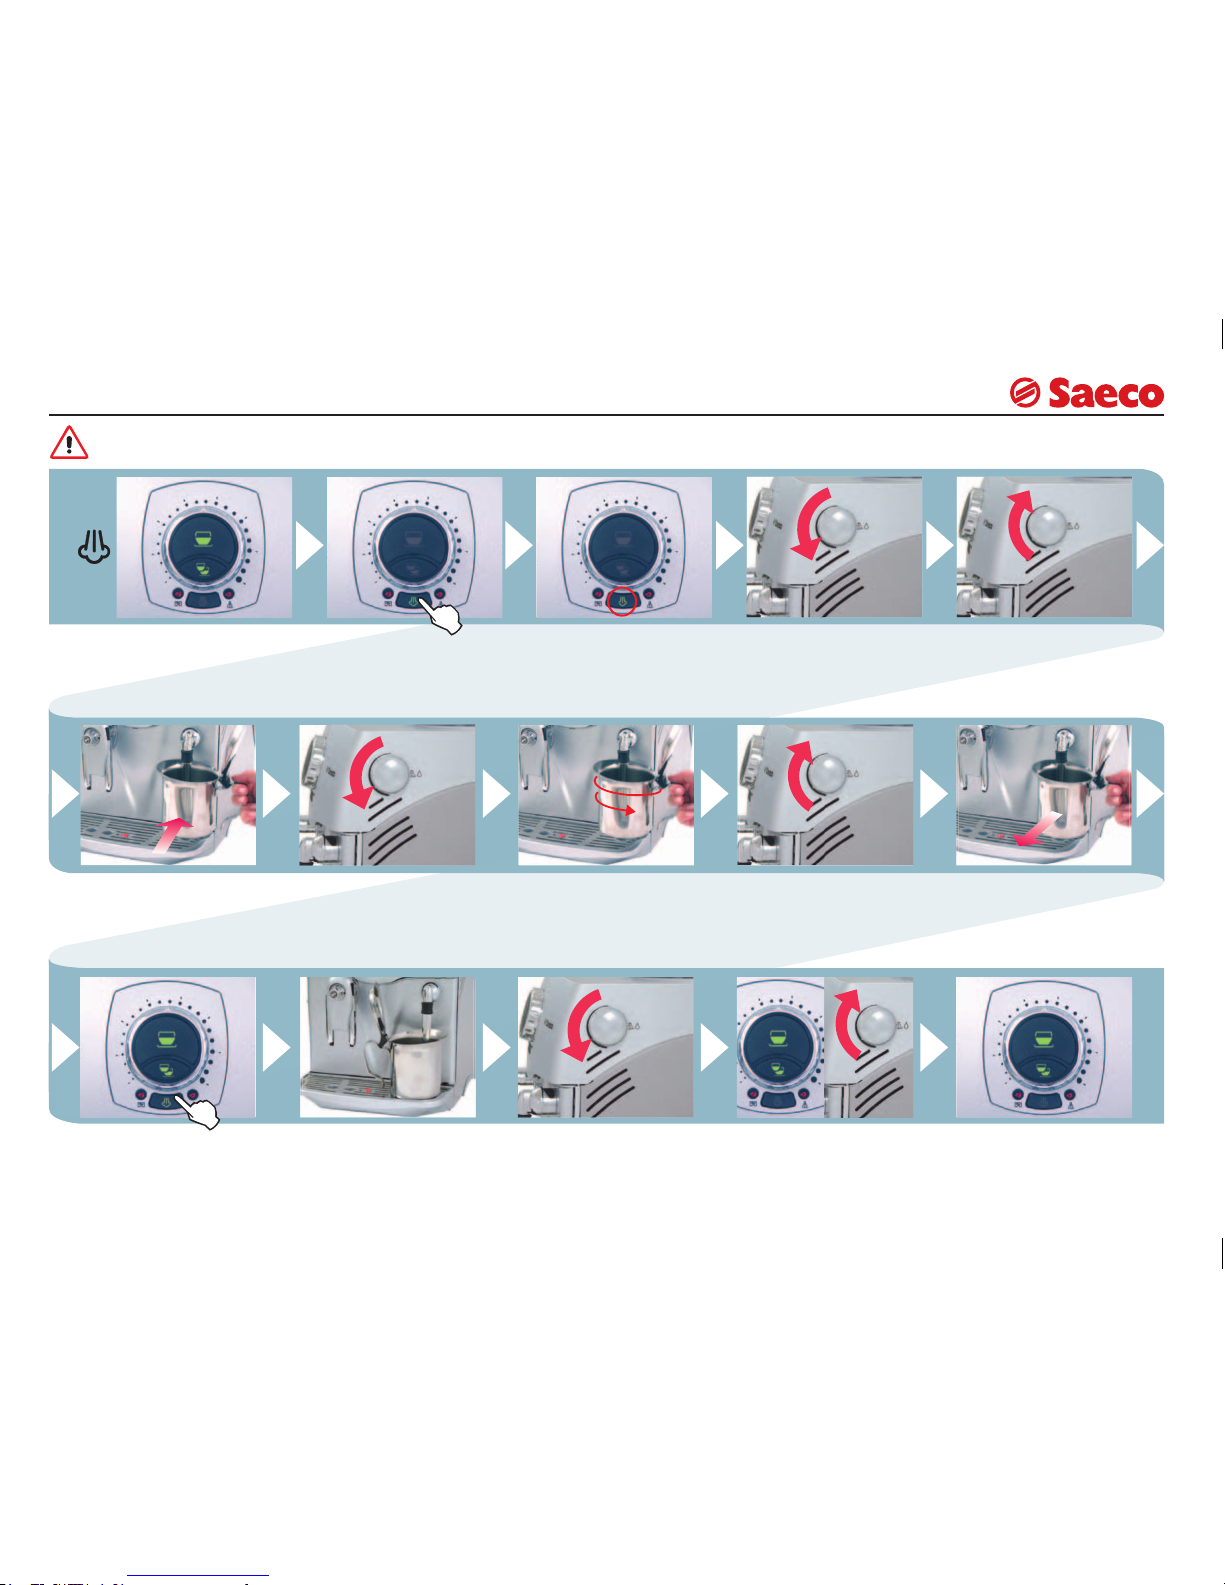
VAPORE
Controllare lo stato della
macchina.
Premere il pulsante per
selezionare la funzione.
La spia lampeggia.
Quando la spia si accende
in modo fi sso, la macchina
è pronta per l’erogazione
del vapore.
Aprire il rubinetto per erogare vapore.
Muovere con movimenti
circolari il contenitore per uniformare il riscaldamento.
Finita la preparazione,
chiudere il rubinetto.
Prelevare il contenitore e
posizionarlo sotto il tubo
acqua calda/vapore
Aprire il rubinetto per scaricare l’acqua residua.
Quando esce solo vapore
chiudere il rubinetto.
Prelevare il contenitore.
Premere il pulsante per ripristinare il normale funzionamento.
Le spie lampeggiano.
Aprire il rubinetto ed erogare acqua.
Posizionare un contenitore
sotto al tubo vapore.
Quando le spie sono accese in modo fi sso, chiudere
il rubinetto e rimuovere il
contenitore.
VAPORE
La macchina è pronta per
erogare caffè o acqua
calda.
A
B
ITALIANO
11
Si raccomanda il decalcifi cante Saeco. La decalcifi cazione è necessaria ogni 2 mesi; nel
caso l’acqua sia molto dura decalcifi care la macchina con maggiore frequenza. La macchina deve essere accesa e gestisce automaticamente la distribuzione del decalcifi cante
DECALCIFICAZIONE
Attenzione! Non utilizzare in nessun caso l’aceto come decalcifi cante.
Si può utilizzare un prodotto decalcifi cante per macchine da caffè di tipo non
tossico e/o nocivo, comunemente reperibile in commercio.
Dopo 2 mesi d’utilizzo decalcifi care la macchina.
Rimuovere il fi ltro, vedi
pag.13.
Spegnere la macchina. Mettere un recipiente gran-
de sotto il tubo vapore.
Dopo circa 30 secondi
chiudere il rubinetto.
Aprire il rubinetto ed eseguire il risciacquo.
Sciacquare e riempire il
serbatoio con acqua fresca
potabile.
Se il ciclo di decalcifi cazione
viene interrotto si deve procedere
al risciaquo della vasca dell’acqua e dei
circuiti interni della macchina. Percorso
di tipo “B”.
Dopo aver eseguito la decalcifi cazione ricaricare il circuito della macchina. Reinserire
il fi ltro a cartuccia nel serbatoio acqua.
Riempire il serbatoio con la
soluzione decalcifi cante.
Aprire il rubinetto.
Inizia il processo di decalcifi cazione.
Se il recipiente si riempe,
vuotarlo.
Accendere la macchina.
Erogare la soluzione decalcifi cante nel recipiente.
Spegnere la macchina e
rimuovere il recipiente.
Dopo 10 minuti seguire
il percorso (A) o (B).
Se nel serbatoio
c’è della soluzione
decalcifi cante.
Verifi ca
Se il serbatoio è
vuoto
Mettere un recipiente grande sotto il tubo vapore.
Quando l’acqua è fi nita,
chiudere il rubinetto. Rimuovere il contenitore.
Accendere la macchina.

12
PULIZIA E MANUTENZIONE
Non asciugare la macchina e/o i suoi componenti utilizzando un forno a
microonde e/o un forno convenzionale.
Non immergere la macchina nell’acqua e non inserire i componenti nella
lavastoviglie.
PULIZIA
GENERICA
Spegnere la macchina.
Scollegare la spina.
Lavare il serbatoio.
Lavare il fi ltro che si trova
all’interno.
Estrarre la vasca raccogli
gocce, svuotarla e lavarla.
Smontare l’erogatore e
lavarlo con acqua.
Estrarre e vuotare il cassetto raccogli fondi e lavarlo.
Estrarre e pulire il pannarello.
Premere sul tasto PUSH
per estrarre il gruppo.
Lavare il gruppo, asciugarlo e rimontarlo. Non
premere sul tasto “PUSH”.
Riposizionare tutti i componenti nella macchina.
Chiudere lo sportello.
Aprire lo sportello frontale. Rimuovere il cassetto
raccogli gocce e il cassetto
raccogli fondi.
GRUPPO
EROGATORE
Rimontare il fi ltro pulito.
La pulizia della macchina, dei
suoi componenti e del gruppo erogatore deve essere eseguita
almeno una volta alla settimana.
Svitare, con l’apposita
chiave, il fi ltro superiore e
lavarlo.

ITALIANO
13
Prelevare il fi ltro dall’imballo
Regolare il datario sul
mese corrente.
Il riferimento deve essere
posizionato in corrispondenza della scanalatura.
Premere fi no in fondo. Ruotare l’applicatore in
senso antiorario ed estrarlo dal serbatoio.
Inserire il fi ltro nel serbatoio vuoto.
Adesso potete utilizzare la
vostra macchina da caffè.
Inserire e ruotare l’applicatore in senso orario per
fi ssarlo al fi ltro.
Verifi care dove si trova la
tacca di riferimento e posizionamento del fi ltro.
Riempire il serbatoio con
acqua fresca potabile.
Aprire il rubinetto ed erogare acqua.
Posizionare un contenitore
sotto al tubo vapore e accendere la macchina.
Vuotare ad intervalli l’intero
contenuto del serbatoio
dell’acqua.
INSTALLAZIONE
Quando il serbatoio è vuoto
riempirlo nuovamente con
acqua fresca potabile.
Il fi ltro deve essere sostituito quando viene segnalato dalla macchina
vedi pagina 14.
Prima d’eseguire la decalcifi cazione il fi ltro deve essere rimosso dal
serbatoio.
FILTRO A CARTUCCIA “AQUA PRIMA”
È possibile utilizzare la
macchina senza fi ltro,
Saeco ne consiglia l’utilizzo. Nel caso non venga utilizzato il fi ltro decalcifi care
la macchina con maggiore
frequenza.
Premere il pulsante. Quando la spia lampeggia rilasciare il pulsante.

14
Tramite il pannello comandi, la macchina guida l’utente al suo corretto utilizzo.
Riempire il contenitore caffè in grani con caffè
in grani e riavviare il ciclo d’erogazione caffè.
Riempire il serbatoio dell’acqua con acqua
fresca potabile e caricare il circuito.
Caricare il circuito.
Vuotare cassetto raccogli fondi.
Nota importante: il cassetto raccogli fondi deve essere vuotato solo quando la
macchina è accesa. Il cassetto deve essere estratto per almeno 5 secondi. Lo
svuotamento del cassetto a macchina spenta non permette l’erogazione del
caffè alla riaccensione della stessa.
Inserire correttamente il gruppo erogatore.
Inserire correttamente la vasca raccogli goc-
ce ed il cassetto raccogli fondi .
Chiudere lo sportello anteriore.
Sostituire il filtro acqua presente nel ser
batoio.
Dopo aver sostituito il filtro nel serbatoio,
azzerare l’allarme premendo per 5 secondi il
pulsante fino allo spegnimento del led.
Temperatura caldaia troppo alta, caricare il
circuito. Erogare acqua.
Lampeggiante
Fisso
SEGNALAZIONI PANNELLO COMANDI - NOTE FILTRO AQUA PRIMA
Lampeggiante
INFORMAZIONI AGGIUNTIVE PER IL CORRETTO UTILIZZO DEL FILTRO
“AQUA PRIMA”
Per utilizzare correttamente il filtro “Aqua prima” vi elenchiamo alcune avvertenze
da prendere in considerazione:
1. Conservare il filtro “Aqua prima” in un ambiente fresco al riparo dal sole; la
temperatura dell’ambiente deve essere compresa tra +5°C e +40°C;
2. Utilizzare il filtro in ambienti la cui temperatura non superi i 60°C.
3. Consigliamo di lavare il filtro “Aqua prima” dopo 3 giorni d’inutilizzo della macchina da caffè;
4. È necessario sostituire il filtro dopo 20 giorni d’inutilizzo della macchina da
caffè;
5. Nel caso si voglia conservare un filtro già aperto, chiuderlo ermeticamente in
un sacchetto di nylon e riporlo nel frigorifero; è vietato conservarlo nel freezer
in quanto si alterano le proprietà del filtro.
6. Prima d’utilizzare il filtro lasciarlo immerso nel serbatoio dell’acqua per 30
minuti.
7. Non conservare il filtro all’aperto una volta estratto dalla confezione.
8. Il filtro deve essere sostituito dopo 90 giorni dall’apertura dell’imballo o dopo
aver trattato 60 litri di acqua potabile.
Lampeggiante

ITALIANO
15
PROBLEMI CAUSE RIMEDI
La macchina non si accende.
La macchina non è collegata alla rete elettrica.
Attivare l’interruttore generale.
Controllare la spina e la connessione.
Il caffè non è abbastanza
caldo.
Le tazzine sono fredde. Scaldare le tazzine.
La macchina non eroga
caffè.
Ghiera posizionata su un
valore troppo basso.
Ruotare in senso orario la ghiera su un valore più elevato.
Nessuna erogazione di
acqua calda o vapore.
Beccuccio del tubo
otturato.
Pulire il beccuccio con un ago.
Per questa operazio-
ne il pomello deve
essere chiuso la macchina
deve essere spenta.
La macchina emette un
rumore dal tubo vapore.
La macchina impiega molto tempo per scaldarsi.
L’apparecchio ha molto
calcare.
Decalcifi care l’apparecchio.
Il gruppo non può essere
estratto.
Il gruppo si è arrestato in
una posizione errata.
Chiudere lo sportello ed accendere la macchina; il gruppo
erogatore esegue un ciclo di
ripristino.
PROBLEMI - CAUSE - RIMEDI
PROBLEMI CAUSE RIMEDI
Erogazione troppo scarsa
o assente
Macinatura troppo fi ne
e manopola SBS ruotata
verso destra.
Regolare la macinatura su un
valore più grosso (ruotare il
pomello in senso orario).
Ruotare la manopola SBS
verso sinistra.

IMPORTANT SAFEGUARDS
When using electrical appliances, basic safety precautions should always be
followed to reduce the risk of fire, electric shock, and/or injury to persons, including
the following:
1 Read all instructions and information in this instruction book and any other
literature included in this carton referring to this product before operating or using
this appliance.
2 Do not touch hot surfaces. Use handles or knobs.
3 To protect against fire, electric shock and personal injury do not immerse cord,
plugs or appliance in water or other liquid.
4 Close supervision is necessary when any appliance is used by or near children.
5 Unplug from outlet when not in use and before cleaning. Allow to cool before
putting on or taking off parts, and before cleaning the appliance.
6 Do not operate any appliance with a damaged cord or plug or after the appliance
malfunctions or has been damaged in any way. Return appliance to the nearest
authorized service centre for examination, repair or adjustment.
7 The use of accessory attachments not recommended by the appliance manufacturer
may result in fire, electric shock or personal injury.
8 Do not use outdoors.
9 Do not let cord hang over edge of table or counter, or touch hot surfaces.
10 Do not place on or near a hot gas or electric burner, or in a heated oven.
11 Always turn appliance “OFF”, then plug cord into the wall outlet. To disconnect,
turn switch to “OFF”, then remove plug from wall outlet.
12 Do not use appliance for other then intended household use.
13 Use extreme caution when using hot steam.
SAVE THESE INSTRUCTIONS
CAUTION
This appliance is for household use. Any servicing, other than cleaning and user
maintenance, should be performed by an authorized service centre. Do not immerse
base in water. To reduce the risk of fire or electric shock, do not disassemble the base.
There are no user serviceable parts inside. Repair should be done by authorized service
personnel only.
1 Check voltage to be sure that the voltage indicated on the nameplate agrees with
your voltage.
2 Never use warm or hot water to fill the water tank. Use cold water only.
3 Keep your hands and the cord away from hot parts of the appliance during
operation.
4 Never clean with scouring powders or hard implements. Simply use a soft cloth
dampened with water.
5 To avoid your coffee maker scaling up, use purified or bottled water.
INSTRUCTIONS FOR THE POWER SUPPLY CORD
A A short power-supply cord is provided to reduce risks of getting tangled up or
tripping over a longer cord.
B Longer extension cords are available and may be used if care is exercised in their use.
C If a long extension cord is used:
1 the marked electrical rating of the extension cord should be at least as great as
the electrical rating of the appliance.
2 if the appliance is of the grounded type, the extension cord should be a
grounding type
3 the cable does not hang from the table to avoid the risk of getting caught up in it.
16

ENGLISH
GENERAL INFORMATION
The coffee machine is suitable to make espresso coffee using coffee beans and is
equipped with a device for the distribution of steam and hot water.
This elegantly styled machine is designed for household use only. It is not suitable
for continuous professional-type use.
Warning. The manufacturer shall accept no liability for damage or injury
caused by:
• improper use or use for other than the intended purposes;
• repairs carried out by anyone other than an authorised service centre;
• tampering with the power cord;
• tampering with any machine component;
• use of spare parts and accessories other than those supplied by the
manufacturer.
The warranty will be invalidated in such cases.
TO FACILITATE INTERPRETATION
A warning triangle draws attention to the instructions that are important for user safety. Please carefully abide by these instructions to
avoid serious injury!
HOW TO USE THESE OPERATING INSTRUCTIONS
Keep these operating instructions in a safe place and make them available to
anyone else who should use the coffee machine. For further information or an
explanation of problems not completely or sufficiently addressed in these instruc
-
tions, contact an authorised service centre.
TECHNICAL SPECIFICATIONS
• Voltage rating See rating plate on appliance
• Power rating See rating plate on appliance
• Casing material Metal
• Size (w x h x d) (mm) 285 x 375 x 400
• Weight (Kg)
9
• Cord length (mm) 1200
• Control panel Front
• Water tank (lit.)
2 - Extractible
• Power supply See rating plate on appliance
• Pump pressure (bars) 15
• Boiler Stainless steel
• Coffee container capacity (g.) 300 of coffee beans
• Grinders Ceramic
• Quantity of ground coffee 8 g
• Dreg drawer capacity 13
• Safety devices Boiler pressure safety valve
safety thermostat
Subject to engineering and manufacturing changes as warranted by technological
developments.
Machine in conformity with European Directive 89/336/EEC (Italian Legislative
Decree 476 of 04/12/92) concerning electromagnetic compatibility.
17

IN THE EVENT OF AN EMERGENCY
Immediately unplug the appliance.
THE APPLIANCE MAY ONLY BE USED
- In a closed place.
- To prepare coffee, dispense hot water, froth milk or heat beverages using
steam.
- For household use.
- By adults in full possession of their physical and mental capacities.
NEVER USE THE APPLIANCE
for purposes other than those indicated above to avoid hazards.
Never place any substances in the containers other than those specified in the
instruction manual. When you fill a container, make sure all nearby containers
are closed.
Fill the water tank only with fresh drinking water: hot water and/or other liquids
may damage the machine. Do not use carbonated water. The coffee grinder may
be adjusted only while it is running. Do not introduce your fingers or any material
other than coffee beans into the coffee grinder. Before attempting to access the
inside of the coffee grinder, switch OFF the machine and remove the plug from
the electric socket.
MAINS CONNECTION
Connect the coffee machine to a suitable electric socket. The voltage must match
the voltage specified on the appliance rating plate.
INSTALLATION
- Choose a perfectly level supporting surface. Do not place on a hot surface!
- Maintain a distance of 10 cm from walls and electric or gas burners.
- Do not keep at temperatures below 0 °C; the appliance may be damaged by
freezing.
- The electric socket must be accessible at all times.
- The power cord must not be damaged, secured with clamps, placed on very hot
surfaces etc.
- Do not let the power cord hang loosely (Warning: danger of tripping or of
causing the appliance to fall).
- Do not use the power cord to carry or pull the coffee machine.
HAZARDS
- The appliance must not be used by children or by individuals unacquainted with
the operating instructions.
- The appliance is dangerous for children. If left unattended it must be
switched off.
- Do not leave the materials used to pack the appliance within children’s reach.
- Do not direct a jet of hot steam and/or hot water toward yourself or others:
danger of scalding.
- Do not introduce any objects through the openings in the appliance (Electrical
hazard!).
- Do not touch the plug when your hands or feet are wet. Do not unplug the
appliance by yanking at the power cord.
- Warning: contact with hot water, steam or and hot water/steam nozzle may
cause burns.
FAULTS
- Do not use the appliance if it malfunctions or you suspect damage, e.g.
after a fall.
- Repairs must be performed by an authorised service centre.
- Do not use an appliance with a defective power cord.
Should the power cord
be damaged, it must be replaced by the manufacturer or his customer service
department. (Electrical hazard!).
- Switch off the appliance before opening the service door. Danger of burns!
CLEANING / DESCALING
- Before cleaning the appliance, unplug it and allow it to cool down.
- Avoid exposing the appliance to splashes of water. Do not immerge it in water.
- Do not dry machine components in a conventional or microwave oven.
SPARE PARTS
To guarantee safety, you should use only original spare parts and accessories.
DISPOSAL
- The packing materials can be recycled.
- Appliance: unplug the appliance and cut the power cord.
- Deliver the appliance and power cord to a service centre or public waste
disposal facility.
SAFETY RULES
18

ENGLISH
Dregs drawer
Drip tray + grill
ON/OFF switch
Height and depth
adjustable brew unit
Hot water/ steam tube
Control panel
Steam knob
Cup plate
Water tank
Water tank lid
Coffee bean container
Coffee bean container lid
Grind adjustment knob
Brew group
Cleaning brush Brew group key
Service door
Selector button for 1 coffee
Steam button
“Aqua Prima” fi lter alarm
reset
Steam indicator light
Knob to adjust the quantity
of coffee in the cup
SBS
Tray full indicator
Selector button for 2 coffees
Coffee temperature
ready indicator lights
“Aqua Prima” fi lter replacement light – see page 27
Alarm indicator light
Cartridge fi lter
applicator
“Aqua Prima”
cartridge fi lter
19
Swivel base

INSTALLATION / CIRCUIT LOADING
The machine is warming
up; lights are fl ashing.
Note: You must load the circuit before starting up the
machine for the fi rst time, if it has been inoperative for a
lengthy period or if the water tank has been completely
emptied. The circuit must be also loaded each time
the light is steadily lit:
Turn the knob counterclockwise to start loading the
circuit.
Turn the knob clockwise
to terminate the circuitloading process.
Fill the tank with fresh drinking water.
Move the ON/OFF switch
to “I” to turn on the
machine.
Fill the coffee bean container
with coffee beans.
Check that all components
are correctly placed.
Insert the plug into a suitable electric socket.
Place a container beneath
the steam tube.
Wait until a steady stream
of water fl ows out from the
nozzle.
Remove the container.
See rating plate
When lights remain steadily
lit, the machine is ready
for use.
Check the dater on “Aqua Prima” fi lter; if fi lter is past its
date, replace it with a new one.
The “Aqua Prima” fi lter can
be installed (see pg.27).
20
The messages displayed by the machine during operation are shown
on pg.28.
Important warning for using the “Aqua Prima Filter” can be found at
page 28.

SBS
ENGLISH
ADJUSTMENTS
Adjustment may be made only while the coffee grinder is
operating.
Use coffee bean blends for espresso coffee makers. If you do not obtain
the desired result, try using different coffee blends. Store coffee in a cool
place, in a hermetically sealed container.
You will note a change after dispensing 1 - 2 coffees.
If you set the grinder on too fi ne a grind (knob turned all the way
anticlockwise) and the SBS control on “strong” (toward the right), coffee
may fl ow out in a slow trickle or not at all.
COFFEE IN CUPS - You must adjust the dose before dispensing coffee.
This adjustment will have an immediate effect on the coffee brewed.
The fi neness of the grind may be
adjusted using the knob.
Coffee fl ows out too slowly.
Press and turn.
Coffee fl ows out too fast.
Press and turn.
COFFEE GRINDER
ADJUSTMENT
COFFEE IN CUPS
To adapt the quantity of coffee
brewed to the dimensions of cups.
Short coffee Weak black coffee
For machines provided with SBS only. - To adjust the strength and consistency of brewed coffee.
The adjustment can also be made while brewing the coffe. This adjustment will have an immediate
effect on the coffee brewed.
BIG CUPS
BIG CUPS
To place the brew unit again in its position, pull it until it fi ts in.
To use big cups, press the button and push the brew
unit until the end.
21
Espresso coffee
Strong black coffeeCafé crème

COFFEE DISPENSING / HOT WATER
Make sure that the machine is ready.
COFFEE BEANS
2 COFFEES
COFFEE BEANS
1 COFFEE
Make sure that the machine is ready.
Warning! Hot water and steam may cause burns! Direct the steam tube toward the drip tray.
Place a container beneath
the steam tube.
Turn the knob counterclockwise to start dispensing
water.
Wait. When you reach the
desired amount, close the
knob.
Remove the container.
HOT WATER
Position a warm coffee cup
beneath the brew unit.
Press the button to brew
1 coffee.
When the machine stops
making the coffee, remove
the cup.
Position the warm coffee
cups beneath the brew
unit.
Press the button to brew 2
coffees.
When the machine stops
making the coffee, remove
the cups.
To stop brewing sooner,
press the button or turn the
knob.
22
To stop brewing sooner, press
the button or turn the knob.
Should the distribution of the
1
st
coffee be interrupted, the 2
nd
coffee will not be distributed.

ENGLISH
CAPPUCCINO
Warning! Hot water and steam may cause burns! Direct the steam tube toward the drip tray.
Fill a cup to 1/3 with cold
milk.
Press the button to select
the function.
The light is fl ashing.
When the light is steadily
lit, the machine is ready to
release steam.
Open the knob to release
steam.
Move the cup in a circular
fashion to heat the milk
evenly.
After frothing the milk,
close the knob.
Position the cup containing
milk beneath the steam
tube.
Dispense coffee into the
cup to prepare a delicious
cappuccino.
Remove the cup.
Press the button to restore the
machine to normal operation.
Lights are fl ashing.
Open the knob and dispense hot water.
Place a container beneath
the steam tube.
When lights remain steadily
lit, close the knob and
remove the lid.
Open the knob to discharge
any residual water.
When only steam comes
out, close the knob.
CAPPUCCINO
23

Warning! Hot water and steam may cause burns! Direct the steam tube toward the drip tray.
STEAM
Check the machine status. Press the button to select
the function.
The light is fl ashing.
When the light is steadily
lit, the machine is ready to
release steam.
Open the knob to release
steam.
Move the container in a
circular fashion to heat
evenly.
After you have fi nished,
close the knob.
Take and place the
container beneath the hot
water/steam tube.
Open the knob to discharge
any residual water.
When only steam comes
out, close the knob.
Remove the container.
Press the button to restore the
machine to normal operation.
Lights are fl ashing.
Open the knob and dispense hot water.
Place a container beneath
the steam tube.
When lights remain steadily
lit, close the knob and
remove the lid.
STEAM
The machine is ready to
brew coffee or dispense
hot water.
24

A
B
ENGLISH
Descaling is necessary every 2 months; should water be very hard, descale the
machine more frequently. The machine must be on; it automatically controls the
distribution of the descaling solution.
DESCALING
Warning! Never use vinegar as a descaling agent. You can use any
commercially available non-toxic, non-harmful descaling product for coffee
machines. We recommend using a Saeco descaling agent.
The machine must be
descaled every 2 months.
Remove the fi lter, see
page 27.
Switch off the machine. Place a large receptacle
beneath the steam
tube.
After about 30 seconds
close the knob.
Open the knob to rinse.
Rinse out the tank and fi ll it
with fresh drinking water.
If the descaling cycle is interrupted,
the water tank and internal machine
circuits must be rinsed. Type “B” routing.
After descaling the machine, reload the
machine circuit. Install the cartridge fi lter
again in the water tank.
Fill the water tank with the
descaling solution.
Open the knob.
The descaling process
starts.
If the receptacle fi lls,
empty it.
Switch on the machine.
Dispense the descaling
solution into the receptacle.
Switch off the machine and
remove the receptacle.
After 10 minutes, follow
instructions (A) or (B)
Whether there is
descaling solution
in the tank.
Check
Whether the tank is
empty.
Place a large receptacle
beneath the steam tube.
When no water is left, turn
the knob to close the valve.
Remove the container.
Switch on the machine.
25

CLEANING AND MAINTENANCE
Do not dry the machine and/or its components in a microwave and/or
conventional oven.
Do not immerge the machine in water and do not place any of its
components in a dishwasher.
BASIC
CLEANING
Turn the machine off.
Unplug the machine.
Wash the water tank.
Wash the fi lter inside it.
Remove the drip tray, empty it out and wash it.
Remove the brew unit and
wash it with water.
Remove the dregs drawer,
empty it out and wash it.
Remove the “pannarello”
and clean it.
Press the PUSH button to
release the brew group.
Wash the unit, dry it and
fi t it back in place. Do not
press the “PUSH” button.
Set all machine components
back in position.
Close the door.
Open the front door. Remove the drip tray and
the dregs drawer.
BREW GROUP
Fit the fi lter back in place
when clean.
Clean the machine, its components, and the brew group
once a week at least.
26
Unscrew the upper fi lter
by the special wrench, and
wash it.

ENGLISH
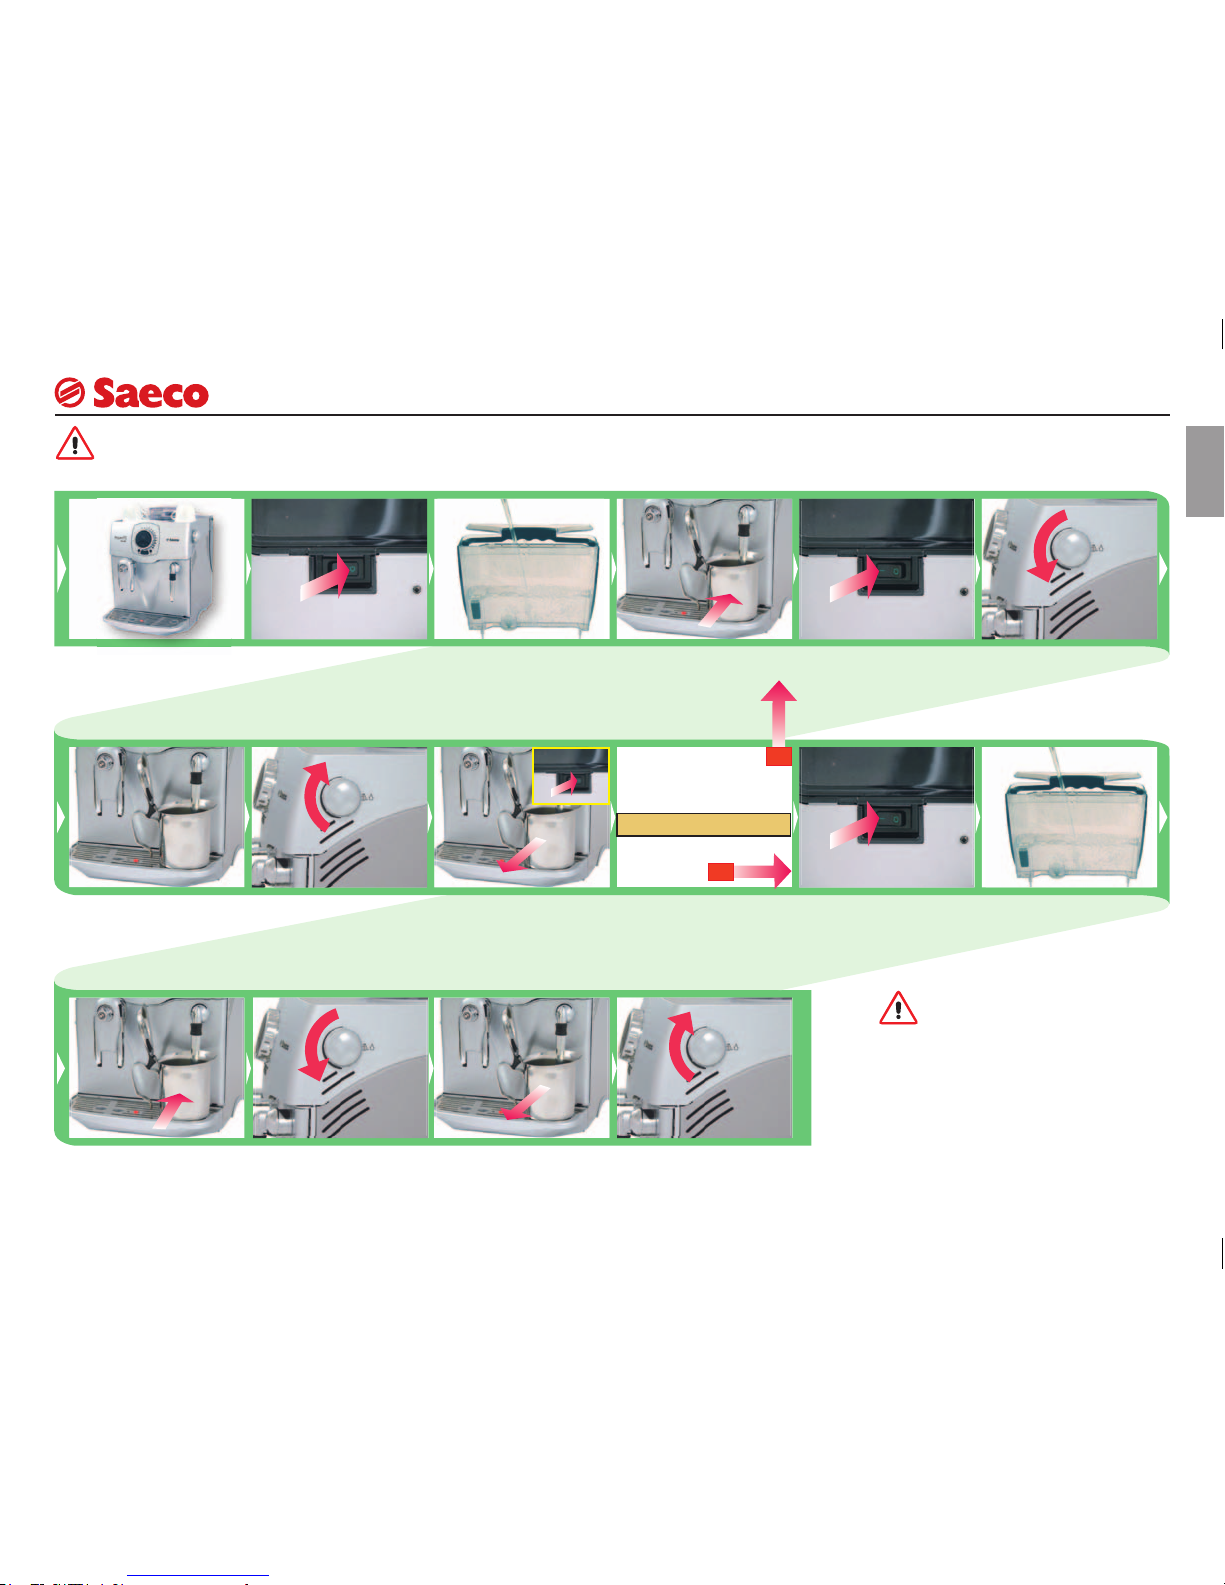
Remove the fi lter from the
packing container.
Adjust the dater to the
current month.
The reference must be
positioned in correspondence with the groove.
Press until the end limit. Turn the applicator coun-
ter-clockwise and remove
it from the tank.
Put the fi lter into the empty
tank.
You can now use your
coffee machine.
Check where the fi lter
positioning and reference
mark is.
Fill the tank with fresh
drinkable water.
Open the knob and dispense water.
Position a container beneath the steam tube and
turn the machine on.
Empty the water tank out at
intervals.
INSTALLATION
When the tank is empty, fi ll
it again with fresh drinkable
water.
The fi lter must be replaced when signalled by the machine, see page 28. Before descaling, remove the fi lter from the tank.
“AQUA PRIMA” CARTRIDGE FILTER
It is possible to use the
machine without fi lter,
Saeco suggests its
use. If fi lter is not used,
the machine must be
descaled more frequently.
Insert the applicator and
turn it clockwise to secure
it to the fi lter.
Press the button. When
the light fl ashes, release
the button.
27

Flashing
Steadily lit
CONTROL PANEL MESSAGES - NOTES ON THE AQUA PRIMA CARTRIDGE FILTER
Flashing
The control panel display guides users and helps them to use the machine correctly.
Fill the coffee bean container with coffee
beans and start the coffee brewing cycle.
Fill the water tank with fresh drinking water
and load the circuits.
Load the circuit.
Empty the dregs drawer.
Important note: the dregs drawer may be emptied only when the machine
is on. The drawer must be removed for at least 5 seconds. If you empty the
drawer with the machine off, you will not be able to dispense coffee the next
time you switch the machine on.
Fit the brew group properly in place.
Fit the drip tray and dregs drawer properly
in place.
Close the front door.
Replace the water filter in the tank.
After replacing the filter in the tank, reset the
alarm by pressing the button for 5 seconds
until the light goes off.
Too high boiler temperature, load the circuit.
Let water flow out.
28
ADDITIONAL INFORMATION FOR CORRECTLY USING
THE “AQUA PRIMA” FILTER.
Please follow these simple instructions to correctly use the “Aqua prima” filter:
1. Keep the “Aqua prima” filter cool and away from sunlight; the room temperatu
-
re should be between +5°C and +40°C;
2. Do not use the filter in temperatures over 60°C.
3. If the coffee machine is not used for 3 days, we recommend washing the
“Aqua prima” filter;
4 If the coffee machine is not used for more than 20 days, it is advisable to
replace the filter.
5. To store an already opened filter, seal it in a nylon bag and keep in the fridge;
do not store it in the freezer to avoid damaging the filter properties.
6. Before using the filter, leave it to soak in the water tank for 30 minutes.
7. Once it is taken out of its pack, do not keep the filter in the open air.
8. The filter must be replaced 90 days after opening the packing or after treating
60 litres of drinking water.
Flashing

ENGLISH
PROBLEMS CAUSES REMEDIES
The machine does not
turn on.
The machine is not
connected to the power
supply.
Move the main switch to ON.
Check the plug and the
connection
The coffee is not hot
enough.
The cups are cold. Warm up the cups.
The machine does not
brew coffee.
Knob positioned on too
low a setting
Turn the knob clockwise to a
higher setting.
No hot water or steam is
dispensed.
The tube nozzle is clogged.
Clean the nozzle opening with
a needle.
During this operation,
the knob must be
closed and the machine
must be off.
A noise can be heard
coming from the steam
tube of the machine.
The machine takes a long
time to warm up.
Excessive scale has
built up.
Descale the machine.
The brew unit cannot be
removed.
The unit has stopped in
the wrong position.
Close the door and switch on
the machine; the brew unit will
move back into position.
PROBLEMS - CAUSES - REMEDIES
29
PROBLEMS CAUSES REMEDIES
Coffee fl ows out in slow
trickle or not at all.
Excessively fi ne grind
and SBS control turned
to the right.
Adjust to a coarser grind (turn
the knob clockwise).
Turn the SBS control toward
the left.

WICHTIGE VORSICHTSMASSNAHMEN
Bei der Verwendung von Elektrogeräten empfiehlt es sich, sich an einige Vorsichtsmaßnahmen
zu halten, um die Gefahr von Brand, elektrischen Schlägen und Unfällen einzuschränken.
1 Alle in diesem oder jedem anderen in der Verpackung enthaltenen Heft
angegebenen Anweisungen und Informationen aufmerksam durchlesen, ehe die
Espressomaschine eingeschaltet oder benutzt wird.
2 Keine heißen Flächen berühren.
3 Netzkabel, Stecker oder den Maschinenkörper nicht in Wasser oder andere
Flüssigkeit tauchen, um Brand, elektrische Schläge und Unfälle zu vermeiden.
4 Im Beisein von Kindern die Espressomaschine mit besonderer Vorsicht handhaben.
5 Den Stecker aus der Steckdose ziehen, sobald die Maschine nicht mehr benutzt
wird oder gereinigt wird. Bevor Teile entnommen oder eingesetzt werden sowie vor
der Reinigung die Maschine abkühlen lassen.
6 Keine kaputten oder defekten Geräte oder Geräte mit beschädigtem Netzkabel
oder –stecker verwenden. Das schadhafte Gerät beim nächsten Händler oder
Kundendienst prüfen, reparieren oder neu einstellen lassen.
7 Die Verwendung nicht vom Hersteller empfohlenen Zubehörs kann Brand,
elektrische Schläge und Unfälle verursachen.
8 Die Espressomaschine nicht im Freien verwenden.
9 Das Kabel darf nicht vom Tisch herunterhängen oder heiße Flächen berühren.
10 Die Espressomaschine nicht in der Nähe von heißen Küchenherden oder Backöfen
verwenden.
11 Prüfen, ob die Maschine sich in Stellung „0” befindet, bevor man den Stecker einsteckt.
Zum Ausschalten auf „0” stellen, dann den Stecker aus der Steckdose ziehen.
12 Die Maschine nur im Haushalt verwenden.
13 Bei Verwendung von heißem Dampf mit äußerster Vorsicht verfahren.
DIESE ANWEISUNGEN GUT AUFBEWAHREN
HINWEISE
Diese Espressomaschine wurde ausschließlich für den Haushalt entwickelt. Sämtliche
Eingriffe mit Ausnahme der Reinigung oder normalen Wartung dürfen ausschließlich durch
den autorisierten Kundendienst vorgenommen werden. Das Gerät nicht in Wasser tauchen.
Reparaturen dürfen nur durch Fachpersonal des autorisierten Kundendienstes erfolgen.
1 Sicherstellen, dass die auf dem Datenschild des Geräts angegebene Spannung mit
der Ihres Netzanschlusses übereinstimmt.
2 Nie lauwarmes oder heißes Wasser in den Wasserbehälter füllen. Ausschließlich
kaltes Wasser verwenden.
3 Während des Betriebs nie die heißen Teile oder das Netzkabel der Maschine berühren.
4 Keine Schleif- oder Scheuermittel zum Reinigen verwenden. Es genügt ein weicher
Lappen mit Wasser.
5 Zur Vermeidung von Kalkablagerungen kohlensäurefreies Mineralwasser verwenden.
BETRIEBSANLEITUNGEN ZUM NETZKABEL
A Das mitgelieferte Netzkabel ist relativ kurz, damit es sich nicht verdrehen kann
oder Sie darüber stolpern.
B Längere Netzkabel können verwendet werden, doch sollte man dabei mit grösste
Vorsicht vorgehen.
C Sollte ein längeres Netzkabel verwendet werden, folgendes überprüfen:
1 dass die auf der Verlängerungsschnur vermerkte Spannung mindestens der des
Elektrogerätes entspricht;
2 dass es einen Stecker mit drei Stiften (Erdung) hat, falls das Netzkabel des
Elektrogerätes ebenfalls drei hat;
3 Das Netzkabel darf nicht am Tisch herunterhängen; Sie könnten darüber
stolpern.
30

DEUTSCH
ALLGEMEINES
Diese Kaffeemaschine ist für die Zubereitung von Espressokaffee mit ganzen
Kaffeebohnen konzipiert und verfügt über eine Dampf- und Heißwasserdüse.
Die Maschine mit elegantem Design ist ausschließlich für den privaten und nicht
den professionellen Dauerbetrieb bestimmt.
Achtung. In den folgenden Fällen wird jede Verantwortung seitens des
Herstellers verweigert:
• Unsachgemäßer und nicht vom Hersteller vorgesehener Einsatz der Maschine;
• Reparaturen, die nicht von den autorisierten Servicestellen durchgeführt
wurden;
• Änderungen am Netzkabel;
• Änderungen an irgendwelchen Bauteilen der Maschine;
• Benutzung von nicht originalen Ersatz- und Zubehörteilen.
In all diesen Fällen erlischt die Garantie.
BENUTZUNGSHINWEISE
Alle für die Sicherheit des Benutzers wichtigen Hinweise sind mit einem Warndreieck gekennzeichnet. Diese Hinweise sind strengstens
zu beachten, um schwere Verletzungen zu vermeiden!
GEBRAUCH DIESER BEDIENUNGSANLEITUNG
Bewahren Sie diese Bedienungsanleitung an einem sicheren Platz auf und legen
Sie sie der Maschine immer bei, wenn sie von anderen Personen benutzt wird.
Für weitere Fragen oder bei Problemen, die nicht ganz oder im Detail in der vor
liegenden Bedienungsanleitung beschrieben sind, wenden Sie sich bitte an die
zuständigen Servicestellen.
TECHNISCHE DATEN
• Nennspannung Siehe Typenschild auf der Maschine
• Nennleistung Siehe Typenschild auf der Maschine
• Material Gehäuse Metall
• Abmessungen (L x H x T) (mm) 285 x 375 x 400
• Gewicht (kg) 9
• Kabellänge (mm) 1200
• Bedienfeld Frontal
• Wassertank (l) 2 - Abnehmbar
• Stromversorgung Siehe Typenschild auf der Maschine
• Pumpenleistung (bar) 15
• Durchlauferhitzer Edelstahl
• Fassungsvermögen Kaffeebehälter (g) 300 g Kaffeebohnen
• Mahlwerk Porzellan
• Kaffeepulvermenge 8 g
• Inhalt Kaffeesatzschublade 13
• Sicherheitsvorrichtungen Sicherheitsventil Heizelement
Überhitzungsschutz.
Technische Änderungen der Konstruktion und Ausführung sind aufgrund von
Weiterentwicklungen der Maschine vorbehalten.
Die Maschine entspricht der europäischen Richtlinie 89/336/CEE (Gesetze
-
sdekret 476 vom 04.12.92), über die Funkentstörung.
31

IM NOTFALL
Sofort Netzstecker aus der Steckdose ziehen.
SACHGEMÄSSE VERWENDUNG DER MASCHINE
- In geschlossenen Räumen.
- Zur Zubereitung von Kaffee, Heißwasser, Milchschaum oder zum Aufwärmen
von Getränken mit Dampf.
- Für den Hausgebrauch.
- Von Erwachsenen in guter körperlicher und geistiger Verfassung.
UNSACHGEMÄSSE VERWENDUNG DER MASCHINE
Nicht für andere Zwecke als die vorgenannten verwenden. Keine anderen Stoffe
als die in der Bedienungsanleitung aufgeführten in die Behälter geben.
Beim normalen Füllen der Behälter müssen alle in der Nähe befindlichen Behälter
geschlossen werden.
Ausschließlich frisches Trinkwasser in den Wassertank einfüllen: Heißwasser
und/oder andere Flüssigkeiten können die Maschine beschädigen. Kein
kohlensäurehaltiges Wasser verwenden. Die Kaffeemühle darf nur eingestellt
werden, wenn sie in Betrieb steht. Nicht mit den Fingern in die Kaffeemühle
eingreifen und keine anderen Stoffe als Bohnenkaffee einfüllen. Bevor in die
Kaffeemühle eingegriffen wird, die Maschine mit dem Hauptschalter ausschalten
und den Netzstecker aus der Steckdose ziehen.
NETZANSCHLUSS
Die Espressomaschine nur an eine Steckdose mit der richtigen Spannung
anschließen. Die Spannung muss mit derjenigen übereinstimmen, die auf dem
Typenschild angegeben ist.
INSTALLATION
- Eine gut ausgerichtete Stellfläche wählen. Die Maschine nicht in die Nähe von
heißen Flächen stellen!
- Einen Abstand von 10 cm von Wänden und Kochplatten einhalten.
- Nicht bei Temperaturen unter 0°C aufbewahren, Gefahr von Frostschäden.
- Das Netzkabel darf nicht beschädigt, mit Klemmen zusammengebunden
werden, heiße Flächen berühren, usw.
- Das Netzkabel nicht herunterhängen lassen (Vorsicht: Stolpern, Herunterfallen
der Maschine).
- Die Espressomaschine nie am Netzkabel anheben oder ziehen.
GEFAHREN
- Die Maschine darf nicht von Kindern und Personen bedient werden, die deren
Betriebsweise nicht kennen.
- Die Maschine kann eine Gefahr für Kinder darstellen. Wenn sie unbewacht ist,
Maschine ausschalten.
- Kein Verpackungsmaterial in der Reichweite von Kindern aufbewahren.
- Den Dampf- bzw. Heißwasserstrahl niemals auf sich selbst oder andere richten:
Verbrennungsgefahr.
- Nicht mit Gegenständen in die Öffnungen der Maschine eingreifen (Gefahr! Strom!).
- Den Stecker nicht am Kabel aus der Steckdose ziehen und den Stecker nicht
mit nassen Händen berühren.
- Verbrennungsgefahr bei Kontakt mit Heißwasser, Dampf und der Heißwasser/
Dampfdüse.
STÖRUNGEN
- Die Maschine bei Störungen oder dem Verdacht auf Störungen (z.B. nach
einem Sturz der Maschine) nicht verwenden.
- Eventuelle Reparaturen müssen von autorisierten Servicestellen ausgeführt werden.
- Die Maschine niemals benutzen, wenn das Netzkabel defekt ist. Wenn das
Netzkabel beschädigt ist, muss es vom Hersteller oder von seinem Kundendienst ersetzt werden. (Gefahr! Strom!).
- Die Maschine ausschalten, bevor die Servicetür geöffnet wird.
(Verbrennungsgefahr!!)
REINIGUNG/ENTKALKEN
- Vor der Reinigung den Netzstecker ziehen und die Maschine abkühlen lassen.
- Die Maschine darf nicht mit Wasser bespritzt oder in Wasser eingetaucht werden.
- Die Maschinenbestandteile nicht in Back- und/oder Mikrowellenöfen trocknen.
ERSATZTEILE
Aus Sicherheitsgründen sind ausschließlich Original-Ersatzteile und -Zubehör zu
verwenden.
ENTSORGUNG
- Die Verpackung kann wiederverwendet werden.
- Maschine: Netzstecker ziehen, Anschlusskabel der Maschine abschneiden.
- Maschine und Anschlusskabel der Servicestelle oder der öffentlichen
Entsorgungsstelle übergeben.
SICHERHEITSVORSCHRIFTEN
32

DEUTSCH
Kaffeesatzbehälter
Abtropfschale
und Abtropfgitter
Hauptschalter
(EIN/AUS)
Heißwasser/ Dampfdüse
Bedienfeld
Dampfdrehknopf
Platte zum Abstellen
der Tassen
Wassertank
Wassertankdeckel
Kaffeebohnenbehälter Deckel Kaffeebohnenbehälter
Drehknopf zur Einstellung
der Mahlstufe
Brühgruppe
Reinigungspinsel
Schlüssel für
Brühgruppe
Servicetür
Taste Zubereitung ein
Kaffee
Wählschalter Dampf
Alarmrücksetzung Filter
“Aqua Prima”.
Anzeigelampe Dampffunktion
Einstellknopf Kaffeemenge
in der Tasse
SBS
Anzeige Schale voll
Anzeigelampe Kaffee-
temperatur erreicht
Filterwarnlampe „Aqua
Prima“ siehe Seite 41
Alarmlampe
Höhen- und
tiefenverstellbarer
Kaffeeauslauf
Taste Zubereitung zwei
Kaffees
Applikator
Filtereinsatz
Filtereinsatz
„Aqua Prima“
33
Drehbasis

INSTALLATION / ENTLÜFTEN
Maschine heizt auf, die
Kontrolllampen blinken.
Hinweis: Vor der ersten Inbetriebnahme, nach
längerem Stillstand mit komplettem Entleeren muss
der Wasserkreislauf der Maschine wieder aufgefüllt
werden. Außerdem muss der Wasserkreislauf immer
dann aufgefüllt werden, wenn die Kontrolllampe
konstant leuchtet:
Dampfdrehknopf zum
Starten des Kreislauf-Auffüllvorgangs öffnen.
Dampfdrehknopf zum
Beenden des Auffüllvorgangs schließen.
Tank mit frischem Trinkwasser füllen.
Zum Einschalten der Maschine Schalter auf „I“
stellen.
Einen Behälter unter die
Dampfdüse stellen.
Warten, bis das Wasser
regelmäßig aus der Düse
austritt.
Behälter mit Kaffeebohnen
füllen.
Überprüfen, dass alle
Bestandteile richtig eingesetzt sind.
Netzstecker in eine
geeignete Steckdose einstecken.
Behälter wegnehmen.
Siehe Typenschild
Wenn die Lampen konstant
leuchten, ist die Maschine
betriebsbereit.
Datumsanzeige auf dem Filter “Aqua Prima”
kontrollieren. Wenn die Frist abgelaufen ist, mit
einem neuen ersetzen.
Es kann ein Filter „Aqua
Prima“ installiert werden
(siehe S.41).
34
Auf S.42 sind die Meldungen aufgelistet, die die Maschine dem Benutzer
während des Betriebs anzeigt.
Wichtige Hinweise für den Gebrauch des Filters "Aqua Prima" sind auf
der Seite 42 zu fi nden.

SBS
DEUTSCH
EINSTELLUNGEN
KAFFEEMENGE IN DER TASSE - Die Einstellung muss vor der Kaffeezubereitung erfolgen.
Diese Einstellung wirkt sich sofort auf die ausgewählte Kaffeezubereitung aus.
Die Mahlstufe kann mit dem
Drehknopf eingestellt werden.
Der Kaffee tritt zu langsam
aus. Drücken und drehen.
Der Kaffee tritt zu schnell
aus. Drücken und drehen.
EINSTELLUNG DER
KAFFEEMÜHLE
KAFFEEMENGE
IN DER TASSE
Die Einstellung darf nur bei laufender Kaffeemühle vorgenommen werden.
Bohnenkaffeemischungen für Espressomaschinen verwenden. Wird das
gewünschte Ergebnis nicht erzielt, andere Kaffee-mischungen verwenden.
Den Kaffee an einem kühlen Ort hermetisch verschlossen aufbewahren.
Die Veränderung der Mahlstufe wird erst nach dem Zubereiten von 1 bis 2
Tassen Kaffee feststellbar.
Wenn die Mahlung zu fein eingestellt ist (Drehknopf ganz im Uhrzeigersinn
gedreht) und der SBS-Drehknopf auf “Ristretto” (rechts) steht, ist es
möglich, dass nur wenig oder kein Kaffee ausläuft.
Zum Anpassen der ausgege-benen
Kaffeemenge an die Tassengröße.
Kleiner Kaffee. Großer Kaffee.
Nur für Maschinen mit SBS. - Einstellung der Kaffeestärke. Die Einstellung kann auch während
der Kaffeezubereitung erfolgen. Diese Einstellung wirkt sich sofort auf die ausgewählte
Kaffeezubereitung aus.
GROSSE
T
ASSEN
GROSSE TASSEN
Zum Zurückstellen den Kaffeeauslauf ziehen bis er einrastet.
Für den Gebrauch von großen Tassen den Knopf
drücken und den Kaffeeauslauf bis zum Anschlag
schieben.
35
Kaffee crème RistrettoEspresso

AUSGABE DES KAFFEES / HEISSWASSER
Prüfen, ob die Maschine
betriebsbereit ist.
HEISSWASSER
Prüfen, ob die Maschine
betriebsbereit ist.
Einen Behälter unter die
Dampfdüse stellen.
Drehknopf öffnen, das
Heißwasser wird ausgegeben.
Warten. Wenn die gewünschte
Menge erreicht ist, Drehknopf schließen.
Behälter wegnehmen.
Achtung! Heißes Wasser und Dampf können Verbrühungen hervorrufen! Das Dampfrohr auf die Abtropfschale richten.
BOHNENKAFFEE
1 KAFFEE
BOHNENKAFFEE
2 KAFFEES
Die Tasse unter den
Kaffeeauslauf stellen.
Die Taste zur Zubereitung
von 1 Kaffee drücken.
Wenn die Maschine den
Kaffee zubereitet hat, die
Tasse wegnehmen.
Die Tassen unter den
Kaffeeauslauf stellen.
Die Taste zur Zubereitung
von 2 Kaffees drücken.
Wenn die Maschine den
Kaffee zubereitet hat, die
Tassen wegnehmen.
Zur Unterbrechung der
ersten Ausgabe die Taste
drücken oder Einstellknopf
drehen.
36
Zur Unterbrechung der ersten
Ausgabe die Taste drücken oder
Einstellknopf drehen. Wenn die Ausgabe des 1. Kaffees unterbrochen
wird, wird der 2. nicht ausgegeben.

DEUTSCH
CAPPUCCINO
CAPPUCCINO
Achtung! Heißes Wasser und Dampf können Verbrühungen hervorrufen! Das Dampfrohr auf die Abtropfschale richten.
1/3 der Tasse mit kalter
Milch füllen.
Zur Anwahl der Funktion
die Taste drücken. Die
Kontrolllampe blinkt.
Wenn die Kontrolllampe
konstant leuchtet, ist die
Maschine zur Dampfabgabe bereit.
Dampfdrehknopf drehen. Tasse für ein gleichmäßiges
Aufwärmen mit Drehbewegungen bewegen.
Nach dem Aufschäumen
der Milch den Drehknopf
zudrehen.
Tasse mit Milch unter die
Dampfdüse stellen.
Für einen ausgezeichneten
Cappuccino den Kaffee in
diese Tasse zubereiten.
Drehknopf zum Ablassen
des restlichen Wassers
öffnen.
Sobald nur noch Dampf
austritt, den Drehknopf
zudrehen.
Tasse wegnehmen.
Die Taste zur Wiederherstellung
des normalen Betriebs drücken:
Die Lampen blinken.
Drehknopf für die Heißwasserausgebe öffnen.
Einen Behälter unter die
Dampfdüse stellen.
Wenn die Lampen
konstant leuchten, den
Hahn schließen.
37

Achtung! Heißes Wasser und Dampf können Verbrühungen hervorrufen! Das Dampfrohr auf die Abtropfschale richten.
DAMPF
Den Maschinenzustand
prüfen.
Zur Anwahl der Funktion
die Taste drücken. Die
Kontrolllampe blinkt.
Wenn die Kontrolllampe
konstant leuchtet, ist die
Maschine zur Dampfabgabe bereit.
Dampfdrehknopf drehen. Behälter für ein gleich-
mäßiges Aufwärmen mit
Drehbewegungen bewegen.
Nach der Dampfausgabe
den Drehknopf zudrehen.
Den Behälter nehmen und
unter die Heißwasser/Dampfdüse stellen.
Drehknopf zum Ablassen
des restlichen Wassers
öffnen.
Sobald nur noch Dampf
austritt, den Drehknopf
zudrehen.
Behälter wegnehmen.
Drehknopf für die Heißwasserausgebe öffnen.
Einen Behälter unter die
Dampfdüse stellen.
DAMPF
Die Taste zur Wiederherstellung
des normalen Betriebs drücken:
Die Lampen blinken.
Wenn die Lampen
konstant leuchten, den
Hahn schließen.
Die Maschine ist zur
Ausgabe von Kaffee oder
Heißwasser bereit.
38

A
B
DEUTSCH
Die Maschine muss alle 2 Monate entkalkt werden, falls das Wasser sehr hart ist,
muss dies häufi ger geschehen. Die Maschine muss dazu eingeschaltet sein, das
Entkalkungsmittel wird automatisch verteilt.
ENTKALKEN
Achtung! Auf keinen Fall Essig zum Entkalken verwenden. Es muss ein
handelsübliches, unschädliches und ungiftiges Entkalkungsmittel für Kaffee-
maschinen verwendet werden. Wir empfehlen das Saeco-Entkalkungsmittel.
Nach 2 Monaten Gebrauch die Maschine
entkalken. Filter entfernen,
siehe Seite.41
Maschine ausschalten. Grossen Behälter unter die
Dampfdüse stellen.
Nach ca. 30 Sekunden
Drehknopf schließen.
Drehknopf öffnen und
spülen.
Tank spülen und mit frischem Trinkwasser füllen.
Wird der Entkalkungszyklus unter-
brochen, müssen der Tank und die
Kreisläufe in der Maschine gespült werden.
Weg des Typs „B“.
Nach dem Entkalkungszyklus die Maschinenkreislauf wieder auffüllen. Den
Filtereinsatz in den Wassertank einsetzen.
Tank mir der Entkalkungslösung füllen.
Drehknopf öffnen.
Der Entkalkungszyklus
beginnt.
Wenn der Behälter
voll ist, entleeren.
Maschine einschalten.
Entkalkungslösung ausgeben.
Maschine ausschalten und
Behälter wegnehmen.
Nach 10 Minuten den Weg
(A) oder (B) befolgen.
Wenn im Behälter
Entkalkungslösung
vorhanden ist.
Kontrolle
Wenn der Behälter
leer ist.
Grossen Behälter unter
die Dampfdüse stellen.
Wenn kein Wasser mehr vorhanden ist, Drehknopf schließen.
Behälter wegnehmen.
Maschine einschalten.
39

REINIGUNG UND WARTUNG
Die Maschine und/oder die Bauteile nicht in Back- und/oder
Mikrowellenöfen trocknen.
Die Maschine nicht ins Wasser tauchen oder die Bauteile im
Geschirrspüler waschen.
ALLGEMEINE
REINIGUNG
Die Maschine ausschalten.
Netzstecker ziehen.
Tank reinigen.
Sieb im Tank reinigen.
Abtropfschale herausnehmen, entleeren und reinigen.
Auslauf abmontieren und
mit Wasser waschen.
Kaffeesatzbehälter herausnehmen, entleeren und
reinigen.
“Pannarello” herausnehmen
und reinigen.
Zum Herausnehmen
der Gruppe Taste PUSH
drücken.
Gruppe reinigen, trocknen
lassen und wieder montieren.
Taste PUSH nicht drücken.
Alle Teile wieder in die
Maschine einsetzen.
Tür schließen.
Fronttür öffnen. Abtropfschale und Kaffee-
satzbehälter herausnehmen.
BRÜHGRUPPE
Den sauberen Filter wieder
montieren.
Die Reinigung der Maschine,
ihrer Komponenten und der
Brühgruppe muss mindestens ein
Mal wöchentlich erfolgen.
40
Mit dem zugehörigen
Schlüssel den oberen
Filter aufschrauben und
waschen.

DEUTSCH
Filter auspacken Das Datum auf den
laufenden Monat einstellen.
Der Bezugspunkt muss mit
der Nute übereinstimmen.
Bis zum Anschlag drücken. Applikator im Gegenuhr-
zeigersinn drehen und aus
dem Tank herausnehmen.
Filter in den leeren Tank
einsetzen.
Jetzt ist Ihre Kaffeemaschine gebrauchsbereit.
Die Bezugs- und Einsetzraste
des Filters suchen.
Tank mit frischem Trinkwasser füllen.
Hahn öffnen und Wasser
ausgeben.
Einen Behälter unter die
Dampfdüse stellen und die
Maschine einschalten.
In Intervallen den ganzen
Tankinhalt entleeren.
INSTALLATION
Wenn der Tank leer
ist, wieder mit frischem
Trinkwasser auffüllen.
Der Filter muss ersetzt werden, wenn dies die Maschine meldet, siehe
Seite 42.
Zum Entkalken muss der Filter aus dem Tank entfernt werden.
FILTEREINSATZ „AQUA PRIMA“
Die Maschine kann
auch ohne Filter benutzt
werden, Saeco empfi ehlt
aber den Gebrauch. Falls
sie trotzdem ohne Filter
betrieben wird, muss die
Maschine öfters entkalkt
werden
Applikator einsetzen und
zur Befestigung am Filter
im Uhrzeigersinn drehen.
Taste drücken. Wenn die
Kontrolllampe blinkt, Taste
los lassen.
41

BEDIENFELD-ANZEIGEN - ANMERKUNGEN FILTEREINSATZ “AQUA PRIMA”.
blinkt
konstant
Mit dem Display leitet die Maschine den Benutzer zur richtigen Anwendung an.
Kaffeebohnenbehälter mit Kaffeebohnen füllen und
den Kaffeezubereitungszyklus wieder starten.
Wassertank mit frischem Trinkwasser füllen und
den Kreislauf auffüllen.
Kreislauf auffüllen.
Kaffeesatzbehälter leeren.
Wichtiger Hinweis: Der Kaffeesatzbehälter darf nur bei eingeschalteter Maschine
entleert werden. Der Behälter muss mindestens 5 Sekunden lang herausgenommen
werden. Wird der Kaffeesatzbehälter bei ausgeschalteter Maschine entleert, ist die
Kaffeezubereitung beim nächsten Einschalten gesperrt.
Brühgruppe richtig einsetzen.
Abtropfschale und Kaffeesatzbehälter richtig
einsetzen.
Fronttür schließen.
Wasserfilter im Tank ersetzen.
Nach dem Ersetzen des Filters im Tank den Alarm
durch Drucken während 5 Sek. der Taste bis die
Lampe ablöscht, zurücksetzen.
Die Temperatur des Heizelements ist zu hoch,
Kreislauf auffüllen. Wasser ausgeben.
42
blinkt
ZUSÄTZLICHE INFORMATIONEN ZUR BENUTZUNG DES FILTERS
„AQUA PRIMA“
Wir geben Ihnen hier einige Hinweise zur korrekten Benutzung des Filters „Aqua
prima“, die Sie beachten sollten:
1. Den Filter „Aqua prima“ an einem kühlen und vor Sonnenlicht geschützten Ort
aufbewahren; die Raumtemperatur muss zwischen +5°C und +40°C liegen.
2. Den Filter in Räumen benutzen, deren Temperatur 60°C nicht überschreitet.
3. Wir empfehlen, den Filter „Aqua prima“ zu waschen, wenn die Kaffeemaschine 3 Tage nicht benutzt wurde.
4 Wenn die Kaffeemaschine 20 Tage nicht benutzt wurde, ist es empfehlen
-
swert, den Filter auszuwechseln.
5. Wenn man einen bereits geöffneten Filter aufbewahren möchte, ihn luftdicht in
einem Nylonbeutel verschließen und in den Kühlschrank stellen; es ist verboten, ihn in der Tiefkühltruhe aufzubewahren, weil sich dabei die Eigenschaften
des Filters ändern.
6. Den Filter vor Benutzung 30 Minuten im Wasserbehälter eingetaucht lassen.
7. Wenn die Verpackung einmal geöffnet ist, den Filter nicht offen aufbewahren.
8. Der Filter muss nach 90 Tagen ab Öffnung der Verpackung oder nach Behan
-
dlung von 60 Litern Trinkwasser ausgewechselt werden.
blinkt

DEUTSCH
STÖRUNGEN URSACHEN BEHEBUNG
Die Maschine schaltet
nicht ein.
Die Maschine ist
nicht am Stromnetz
angeschlossen.
Hauptschalter einschalten.
Stecker und Anschluss
kontrollieren.
Der Kaffe ist nicht heiß
genug.
Die Tassen sind kalt. Tassen vorwärmen.
Die Maschine gibt keinen
Kaffee aus.
Drehknopf auf einen zu
niedrigen Wert gestellt
Drehknopf im Uhrzeigersinn auf
einen höheren Wert stellen.
Kein Heißwasser oder
Dampf
Die Düse ist verstopft. Die Düse mit einer Nadel reinigen.
Zur Durchführung dieses
Arbeitsorgangs sollte der
Drehknopf geschlossen und die
Maschine ausgeschaltet sein.
Aus dem Dampfrohr ist ein
Geräusch zu hören.
Das Aufheizen der
Maschine dauert lange.
Die Maschine ist stark
verkalkt
Die Maschine entkalken.
Die Brühgruppe kann
nicht herau-sgenommen
werden.
Die Brühgruppe hat in
einer falschen Stellung
gestoppt.
Die Tür schließen und die
Maschine einschalten.
Die Brühgruppe führt eine
Rückstellung durch.
STÖRUNGEN - URSACHEN - BEHEBUNG
43
STÖRUNGEN URSACHEN BEHEBUNG
Zu wenig oder keine
Kaffeeausgabe
Drehknopf nach rechts
gedreht.
Mahlung zu fein oder
SBS.
Mahlung auf einen höheren
Wert einstellen (Drehknopf im
Uhrzeigersinn drehen).
SBS-Drehknopf nach links
drehen.

IMPORTANT
Lors de l’utilisation d’appareils électriques, il est important de prendre les précautions
suivantes, afin d’éviter les décharges électriques, les courts circuits et les accidents corporels.
1 Lire toutes les instructions et les indications données dans cette brochure, ainsi que toute
autre information que contient l’emballage, avant de mettre la machine en marche.
2 Ne pas toucher les surfaces chaudes de la machine. Utiliser les poignées ou
boutons.
3 Ne pas plonger le fil électrique, la prise ou l’appareil lui-même dans l’eau ou tout
autre liquide.
4 Faire très attention lorsque l’appareil est utilisé par ou près des enfants.
5 Débrancher l’appareil lorsqu’il n’est pas en service et laissez-le refroidir avant de
retirer les accessoires pour le nettoyage ou de les mettre en place.
6 Ne pas utiliser l’appareil avec un cordon ou une prise en mauvais état ou après
que l’appareil ait été endommagé de quelque manière que ce soit. Confiez
votre appareil au service après-vente autorisé le plus proche pour examen ou
réparation.
7 L’utilisation d’accessoires non recommandés par le fabricant de l’appareil pourrait
poser des problèmes.
8 Ne pas utiliser à l’extérieur.
9 Ne pas laisser le cordon pendre de la table ou de la surface de travail, ni toucher
des surfaces chaudes.
10 Ne pas poser sur une cuisinière ou dans un four chaud.
11 Mettre toujours l’appareil en position «éteint» avant de le débrancher. Mettre aussi
tous les interrupteurs à «éteint» avant de le débrancher.
12 Usage domestique seulement.
13 Faire très attention en utilisant la vapeur.
GARDER CES ISTRUCTIONS
PRÉCAUTIONS
Machine est réservée à un usage domestique. Tout entretien, en dehors du nettoyage et de
l’entretien usuel par l’usager, doit être fait par un centre de service autorisé. Ne pas plonger
la base dans l’eau. Pour éviter les courts-circuits et les décharges électriques, ne pas démonter
la base. Elle ne contient aucune pièce qui demande un entretien de la part de l’usager. Toute
réparation doit être effectuée par le personnel d’un service après-vente autorisé.
1 Vérifier si le voltage correspond bien aux spécifications apparaissant sur la plaque
des données techniques.
2 Ne jamais mettre de l’eau tiède ou chaude dans le réservoir; mais toujours de l’eau
froide.
3 Ne pas toucher les surfaces chaudes de l’appareil pendant le fonctionnement et en
écarter le cordon électrique.
4 Ne jamais nettoyer avec des poudres à récurer ou des instruments durs.
5 Utiliser de l’eau purifiée ou en bouteille pour éviter la formation de tartre.
INSTRUCTIONS SUR LE CORDON
ELECTRIQUE
A Votre appareil est muni d’un cordon électrique court afin d’éviter qu’il ne s’emmêle
ou qu’on ne s’y accroche.
B On peut utiliser une rallonge électrique en prenant certaines précautions.
C Si on utilise une rallonge, vérifier:
1 que sa tension est au moins égale à celle de l’appareil
2 qu’elle est munie d’une prise à trois fiches, avec mise à la terre, si c’est le cas
pour le cordon de l’appareil
3 que le câble ne pende pas de la table afin d’éviter de trébucher.
44

FRANÇAIS
INFORMATIONS GENERALES
La machine à café est indiquée pour la préparation de café espresso à partir de
café en grains; elle est équipée avec un dispositif pour la distribution de vapeur
et d’eau chaude.
Le corps de la machine, à l’élégant design, a été conçu pour un usage domestique
et n’est donc pas indiqué pour un fonctionnement continu de type professionnel.
Attention. Aucune responsabilité n’est assumée pour les éventuels dommages
résultant de :
• emploi erroné et non conforme aux buts prévus ;
• réparations effectuées en dehors des centres de service autorisés ;
• manipulation frauduleuse du cordon d’alimentation ;
• manipulation frauduleuse de tout composant de la machine ;
• emploi de pièces de rechange et d’accessoires non originaux.
Dans les cas cités, la garantie sera annulée.
POUR FACILITER LA LECTURE
Le triangle d’avertissement indique toutes les instructions importantes pour la sécurité de l’utilisateur. Suivre scrupuleusement ces
indications pour éviter les risques de blessures graves.
UTILISATION DU MODE D’EMPLOI
Conserver cette brochure dans un endroit sûr et la joindre à la machine si une
autre personne devait l’utiliser. Pour d’ultérieurs renseignements ou en cas de
problèmes non traités ou insuffisamment traités dans la présente brochure, veuil
-
lez vous adresser aux centres de services autorisés.
DONNÉES TECHNIQUES
• Tension nominale Voir plaque située sur l’appareil
• Puissance nominale Voir plaque située sur l’appareil
• Matériau du corps de la machine Métal
• Dimensions (l x h x p) (mm) 285 x 375 x 400
• Poids (kg) 9
• Longueur du cordon (mm) 1200
• Tableau de commande Frontal
• Réservoir d’eau (l) 2 - Amovible
• Alimentation Voir plaque située sur l’appareil
• Pression pompe (bars) 15
• Chaudière Acier inox
• Capacité du récipient à café (g) 300 g de café en grains
• Moulins En porcelaine
• Quantité de café moulu 8 g
• Capacité du bac à marcs 13
• Dispositifs de sécurité Valve de sécurité pression chaudière;
thermostat de sécurité.
Sous réserve de modifications de construction et d’exécution dues au progrès
technologique.
Machine conforme à la Directive Européenne 89/336/CEE (Décret législatif 476
du 04/12/92), relative à l’élimination des perturbations radiotechniques.
45

EN CAS D’URGENCE
Détacher immédiatement la fiche d’alimentation de la prise.
L’APPAREIL DOIT ÊTRE UTILISÉ EXCLUSIVEMENT
- Dans un lieu fermé ;
- Pour la préparation du café, de l’eau chaude, pour monter le lait ou pour
réchauffer des boissons en utilisant la vapeur ;
- Pour un emploi domestique ;
- Par des adultes en bonnes conditions psychologiques et physiques.
NE JAMAIS UTILISER L’APPAREIL
Dans des buts différents de ceux indiqués ci-dessus afin d’éviter les accidents. Ne
pas introduire dans les bacs et récipients des produits différents de ceux indiqués
dans le mode d’emploi.
Pendant le remplissage normal d’un récipient, il faut fermer obligatoirement tous
les récipients voisins. Remplir le réservoir d’eau avec de l’eau potable fraîche
uniquement : l’eau chaude et/ou d’autres liquides pourraient endommager la
machine. Ne pas utiliser de l’eau avec de l’anhydride carbonique. Régler le
moulin à café uniquement lorsque ce dernier est activé. Il est interdit de mettre
les doigts dans le moulin à café ou tout matériau autre que du café en grains.
Avant d’intervenir à l’intérieur du moulin à café mettre la machine hors tension et
détacher la prise de courant.
BRANCHEMENT AU RÉSEAU ÉLECTRIQUE
Brancher la machine à une prise de courant adéquate. La tension doit
correspondre à celle indiquée sur la plaque de la machine.
INSTALLATION
- Choisir un plan d’appui bien nivelé. Ne pas poser la machine sur des surfaces
brûlantes !
- Placer la machine à 10 cm de distance des murs et des plaques de cuisson.
- Ne pas laisser la machine à une température inférieure à 0°C : le gel risque de
l’endommager.
- La prise de courant doit pouvoir être atteinte à tout moment.
- Le cordon d’alimentation ne doit pas être endommagé, attaché avec un serrefils, posé sur des surfaces chaudes, etc.
- Ne pas laisser pendre le cordon (afin d’éviter de trébucher ou de faire tomber la
machine)
- Ne pas porter ni tirer la machine en la tenant par le cordon d’alimentation.
DANGERS
- La machine à café ne doit pas être utilisée par des enfants ou des personnes
ne sachant pas l’utiliser.
- L’appareil est dangereux pour les enfants. Si la machine est sans surveillance,
il faut la désactiver.
- Ne laissez pas les matériaux employés pour emballer la machine à la portée des enfants
- Ne pas diriger contre soi-même et/ou quelqu’un d’autre le jet de vapeur
surchauffé et/ou d’eau chaude : danger de brûlures.
- Ne pas insérer d’objets à travers les ouvertures de l’appareil. (Danger ! Courant électrique)
- Ne pas toucher la fiche avec les mains ou les pieds mouillés, ne pas tirer pour
la détacher.
- Attention ! Dangers de brûlures au contact de l’eau chaude, de la vapeur et du
bec de la buse de l’eau chaude/vapeur.
PANNES
- Ne jamais utiliser la machine si elle est en panne ou si vous soupçonner une
panne, par exemple après une chute.
- Seuls les centres de service autorisés peuvent effectuer des interventions et
réparations.
- Ne pas utiliser une machine dont le cordon d’alimentation est défectueux. Si le
cordon d’alimentation est endommagé, il doit être remplacé par le producteur
ou son service assistance clients. (Danger ! Courant électrique !).
- Désactiver la machine avant d’ouvrir le volet de service. Danger de brûlures !
NETTOYAGE / DÉTARTRAGE
- Avant le nettoyage, débrancher le cordon électrique de la prise de courant et
attendre que la machine refroidisse.
- Eviter que la machine entre en contact avec des éclaboussures d’eau ou ne soit
plongée dans l’eau !
- Ne pas sécher des parties de la machine dans un four traditionnel ou un four à
micro-ondes.
PIÈCE DE RECHANGE
Pour des raisons de sécurité, n’utilisez que des pièces de rechange et des
accessoires originaux.
MISE AU REBUT
- L’emballage peut être recyclé.
- Machine : débrancher la fiche d’alimentation du réseau, couper le cordon
d’alimentation de l’appareil.
- Livrer la machine et le cordon au centre de service ou au centre de tri public.
MESURES DE SÉCURITÉ
46

FRANÇAIS
Tiroir à marcs
Cuvette d’égout-
toir + grille
Interrupteur général
(ON/OFF)
Buse vapeur /
eau chaude
Tableau de
commande
Pommeau robinet
vapeur
Plaque à tasses
Réservoir d’eau
Couvercle du
réservoir d’eau
Récipient à café en grains
Couvercle récipient à café en grains
Pommeau réglage
mouture
Groupe café
Pinceau pour
le nettoyage
Clé de groupe café
Volet de service
Bouton pour faire un café
Bouton de sélection vapeur
Rétablissement alarme fi ltre
“Aqua Prima”.
Voyant fonction vapeur
Pommeau de réglage
quantité café en tasse
SBS
Indicateur bac plein
Voyants température
café prête
Voyant remplacement fi ltre
“Aqua Prima” – Voir page 55
Voyant alarmes
Diffuseur de café
réglable en hauteur
et en profondeur
Bouton pour faire deux
cafés
Applicateur fi ltre à
cartouche
Filtre à cartouche
“Aqua Prima”
47
Base tournante

INSTALLATION / CHARGEMENT CIRCUIT
La machine se réchauffe;
les voyants clignotent.
Remarque : Avant de passer à la première mise en
service, en cas d’inactivité prolongée, si le réservoir
d’eau a été complètement vidé, il faut charger le
circuit de la machine. Il faut également charger le
circuit chaque fois que le voyant reste constamment
allumé:
Ouvrir le robinet pour commencer le chargement du
circuit.
Fermer le robinet pour
interrompre le chargement
du circuit.
Remplir le réservoir d’eau
avec de l’eau fraîche
potable.
Presser l’interrupteur sur la
position "I" pour activer la
machine.
Introduire un récipient sous
la buse vapeur.
Attendre que l’eau sorte de
façon régulière du bec.
Remplir le récipient avec
du café en grains.
Contrôler que tous les
composants sont placés
correctement.
Introduire la fi che dans
une prise de courant appropriée.
Retirer le récipient.
Voir plaquette
signalétique
Lorsque les voyants sont
allumés fi xement, la machine
est prête à l’usage
Vérifi er le dateur sur le fi ltre “Aqua Prima”; si le fi ltre
a passé la date d’échéance, il faut le remplacer avec
un fi ltre nouveau.
Il est possible d’installer
le fi ltre “Aqua Prima” (voir
page 55).
48
Nous reportons page 56 les messages d’alarme destinés à l’utilisateur
de la machine.
Des notices importantes pour l’usage du fi ltre "Aqua Prima" sont
indiquées à la page 56.

SBS
FRANÇAIS
REGLAGES
CAFE EN TASSE - Effectuer le réglage avant de faire le café.
Ce réglage a un effet immédiat sur le café sélectionné.
REGLAGE
MOUTURE
CAFE EN TASSE
Le degré de mouture peut être réglé
à l’aide du pommeau.
Le café sort trop lentement. Presser et tourner.
Le café sort trop rapidement. Presser et tourner.
Le réglage ne peut être effectué que lorsque le moulin à café
est en service.
Utiliser des mélanges de café en grains pour machines espresso. Si le
résultat n’est pas satisfaisant, utiliser des mélanges de café différents.
Conserver le café dans un endroit frais, dans un récipient fermé
hermétiquement. On remarque la différence après 1-2 cafés.
Si vous sélectionnez une mouture trop fi ne (bouton complètement dans
le sens contraire des aiguilles d’une montre) et le bouton SBS est sur la
position «Café serré» (droite), le café peut couler lentement ou pas du tout.
Pour adapter la quantité de café
diffusé aux dimensions des tasses.
Café petit. Grand café.
Seulement pour machines dotées de SBS. - Pour régler le corps du café. Le réglage peut s’éffectuer
également pendant la préparation du café. Ce réglage a un effet immédiat sur le café sélectionné.
TASSES GRANDES
TASSES GRANDES
Pour remettre le diffuseur en position, il faut le tirer jusqu’à son
encastrement.
Pour utiliser des tasses de grandes dimensions, presser
le bouton et pousser le diffuseur jusqu’au bout.
49
Café espresso. Café serré.Café crème.

DISTRIBUTION CAFE / EAU CHAUDE
Vérifi er si la machine est
prête.
EAU CHAUDE
Vérifi er si la machine est
prête.
Attention ! l’eau chaude et la vapeur peuvent causer des brûlures ! diriger la buse vapeur vers la cuvette d’égouttoir.
Placer un récipient sous la
buse vapeur.
Ouvrir le robinet pour que
l’eau commence à sortir.
Attendre. Lorsqu’on a la quantité
désirée, fermer le robinet.
Retirer le récipient.
CAFE EN GRAINS
1 CAFÉ
CAFE EN GRAINS
2 CAFÉS
Placer la tasse à café
chaude sous le diffuseur.
Presser le bouton pour
préparer 1 café.
Lorsque la machine a
terminé, retirer la tasse.
Placer les tasses à café
chaudes sous le diffuseur.
Presser le bouton pour
préparer 2 cafés.
Lorsque la machine a
terminé, retirer les tasses
Pour interrompre le café
avant la fi n, presser le bouton ou tourner le pommeau.
50
Pour interrompre le café avant la
fi n, presser le bouton ou tourner
le pommeau. Si la distribution du
1er café est interrompue, le 2
ème
café n’est pas distribué.

FRANÇAIS
CAPPUCCINO
CAPPUCCINO
Attention ! l’eau chaude et la vapeur peuvent causer des brûlures ! diriger la buse vapeur vers la cuvette d’égouttoir.
Remplir la tasse avec 1/3
de lait froid.
Presser le bouton pour
sélectionner la fonction. Le
voyant clignote.
Lorsque le voyant est allumé
fi xement, la machine est
prête à diffuser la vapeur.
Ouvrir le robinet de la
vapeur.
Appliquer des mouvements
circulaires à la tasse pour
la réchauffer de façon
uniforme.
Lorsque le lait est prêt,
fermer le robinet.
Placer la tasse avec le lait
sous la buse vapeur.
Faire couler le café dans
la tasse pour obtenir un
excellent cappuccino.
Ouvrir le robinet pour
évacuer l’eau résiduelle.
Lorsque de la vapeur sort,
fermer le robinet.
Retirer la tasse.
Presser le bouton pour
rétablir le fonctionnement
normal.
Les voyants clignotent.
Ouvrir le robinet pour avoir
de l’eau.
Placer un récipient sous la
buse vapeur.
Lorsque les voyants sont
allumés fi xement, fermer le
robinet et retirer le récipient.
51

VAPEUR
Contrôler l’état de la
machine.
Presser le bouton pour
sélectionner la fonction. Le
voyant clignote.
Lorsque le voyant est allumé
fi xement, la machine est prête à diffuser la vapeur.
Ouvrir le robinet de la
vapeur.
Appliquer des mouvements
circulaires au récipient pour
le réchauffer.
Une fois l’opération terminée, fermer le robinet
Prendre et mettre le récipient sous la buse eau
chaude/vapeur.
Ouvrir le robinet pour évacuer l’eau résiduelle.
Lorsque de la vapeur sort,
fermer le robinet.
Retirer le récipient.
Ouvrir le robinet pour avoir
de l’eau.
Placer un récipient sous la
buse vapeur.
VAPEUR
Presser le bouton pour
rétablir le fonctionnement
normal.
Les voyants clignotent.
Lorsque les voyants sont
allumés fi xement, fermer le
robinet et retirer le récipient.
Attention ! l’eau chaude et la vapeur peuvent causer des brûlures ! diriger la buse vapeur vers la cuvette d’égouttoir.
La machine est prête à
faire du café ou de l’eau
chaude.
52

A
B
FRANÇAIS
détartrage Saeco. Le détartrage est nécessaire tous les 2 mois; en cas d’eau
particulièrement dure, il faut
détartrer la machine plus fréquemment. La machine doit
être activée et elle gère la distribution du produit de détartrage automatiquement.
DETARTRAGE
Attention ! N’utilisez en aucun cas du vinaigre comme produit de détartrage.
Vous pouvez utiliser un produit de détartrage pour machine à café de type non
toxique et/ou nocif, disponible dans le commerce. Nous recommandons le produit
de
Après 2 mois d’emploi, détartrer l’appareil.
Retirer le fi ltre, voir
page 55.
Eteindre la machine. Placer un grand récipient
sous la buse vapeur.
Après environ 30 secondes, fermer le robinet.
Ouvrir le robinet et effectuer le rinçage.
Rincer et remplir le réservoir avec de l’eau fraîche
potable.
Si le cycle de détartrage est interrompu, rincer le bac de l’eau et les
circuits internes de la machine.
Parcours
de type «B».
Après avoir effectué le détartrage, recharger le circuit de la machine. Remettre le
fi ltre à cartouche dans le réservoir d’eau.
Remplir le réservoir avec
le produit de détartrage.
Ouvrir le robinet. Le
processus de détartrage
commence.
Si le récipient est plein,
le vider.
Allumer la machine.
Introduire le produit de
détartrage dans le récipient.
Eteindre la machine et
retirer le récipient.
Après 10 minutes, suivre
le parcours (A) ou (B).
S’il y a du produit
de détartrage dans
le réservoir.
Vérifi er
Si le réservoir est
vide
Placer un grand récipient
sous la buse vapeur.
Lorsqu’il n’y a plus d’eau,
fermer le robinet. Retirer le
récipient.
Allumer la machine.
53

NETTOYAGE ET ENTRETIEN
Ne pas sécher la machine et/ou ses parties dans un four à micro-ondes
et/ou un four traditionnel.
Ne pas plonger la machine dans l’eau et ne pas introduire ses éléments
dans le lave-vaisselle.
NETTOYAGE
GENERAL
Eteindre la machine.
Débrancher la fi che.
Laver le réservoir.
Laver le fi ltre qui se trouve
à l’intérieur.
Retirer la cuvette d’égouttoir, la vider et la laver.
Démonter le diffuseur et le
laver avec de l’eau.
Retirer et vider le tiroir à
marcs et le laver.
Sortir et nettoyer le “pannarello”
Presser sur la touche PUSH
pour retirer le groupe.
Laver le groupe, l’essuyer et
le remonter. Ne pas presser
la touche « PUSH ».
Repositionner tous les éléments dans la machine.
Fermer le volet de service.
Ouvrir le volet frontal. Retirer la cuvette d’égout-
toir et le tiroir à marcs.
GROUPE
CAFÉ
Remonter le fi ltre après
l’avoir nettoyé.
Faire le nettoyage de la
machine, de ses parties et
du groupe café au moins une fois par
semaine.
54
Dévisser le fi ltre supérieur
à l’aide de la clé spéciale
et le laver.

FRANÇAIS
Prendre le fi ltre dans l’emballage.
Régler le dateur sur le
mois courant.
Le repère doit être placé
en correspondance avec
la rainure.
Presser complètement. Tourner l’applicateur dans le
sens contraire aux aiguilles
d’une montre et le retirer du
réservoir.
Introduire le fi ltre dans le
réservoir vide.
Vous pouvez maintenant
utiliser votre machine à
café.
Trouver la marque de
repère et positionnement
du fi ltre.
Remplir le réservoir avec de
l’eau fraîche potable.
Ouvrir le robinet et faire
sortir l’eau.
Placer un récipient sour la
buse vapeur et allumer la
machine.
Vidanger par intervalles le
contenu du réservoir d’eau.
INSTALLATION
Lorsque le réservoir est vide,
le remplir de nouveau avec
de l’eau fraîche potable.
Le fi ltre doit être remplacé quand la machine le signale, voir page 56. Avant d’effectuer le détartrage, le fi ltre doit être retiré du réservoir.
FILTRE À CARTOUCHE “AQUA PRIMA”
Il est possible d’utiliser la
machine sans fi ltre, Saeco
en conseille l’emploi. Si le
fi ltre n’est pas utilisé, il faut
détartrer la machine plus
fréquemment.
Monter et tourner l’applicateur dans le sens des
aiguilles d’une montre pour
le fi xer au fi ltre.
Presser le bouton. Quand
le témoin lumineux clignote,
relâcher le bouton.
55

Clignotant
Fixe
COMM. AFFICHAGE - NOTES CONCERNANT LE FILTRE « AQUA PRIMA »
Clignotant
Pour un emploi correct, la machine guide l’utilisateur au moyen du tableau de commande.
Remplir le récipient à café en grains avec du
café en grains et relancer le cycle de production
du café.
Remplir le réservoir d’eau avec de l’eau fraîche et
potable; charger le circuit.
Charger le circuit.
Vider le tiroir du café résiduel.
Remarque importante : le tiroir à marcs doit être vidé uniquement lorsque la machine
est activée. Le tiroir doit être retiré pendant au moins 5 secondes. Si le tiroir est vidé
lorsque la machine est désactivée, cela empêchera la production de café à l’activation.
Introduire correctement le groupe café.
Introduire correctement la cuvette d’égouttoir et le
tiroir à marcs.
Fermer le volet frontal.
Remplacer le filtre d’eau dans le réservoir.
Après avoir remplacé le filtre dans le réservoir,
annuler l’alarme pressant pour 5 secondes le
bouton jusqu’à l’extinction du voyant lumineux.
Température chaudière trop élevée, charger le
circuit. Faire sortir l’eau.
56
INFORMATIONS COMPLÉMENTAIRES POUR UN USAGE CORRECT DU
FILTRE «AQUA PRIMA»
Pour utiliser correctement le filtre «Aqua prima», nous vous prions d’observer les
consignes suivantes :
1. Conservez le filtre «Aqua prima» dans un local frais, à l’abri du soleil ; la température du local doit être comprise entre +5°C et +40°C;
2. Utilisez le filtre dans un environnement où la température ne dépasse pas
60°C.
3. Lavez le filtre «Aqua prima» si vous laissez la machine à café inutilisée pen
-
dant trois jours ;
4 Il est conseillé de remplacer le filtre si vous laissez la machine à café inutilisée
plus de 20 jours ;
5. Si vous souhaitez conserver un filtre ouvert, fermez-le hermétiquement dans
un sac en plastique et rangez-le au frigo ; il est interdit de le conserver au
surgélateur car les propriétés du filtre s’altéreraient.
6. Avant d’utiliser le filtre, laissez-le dans le réservoir d’eau pendant 30 minutes.
7. Ne conservez pas le filtre au contact de l’air après l’avoir déballé.
8. Le filtre doit être remplacé 90 jours après l’ouverture de l’emballage ou après
avoir traité 60 litres d’eau potable.
Clignotant

FRANÇAIS
PROBLEME CAUSE REMEDE
La machine ne se met pas
en marche
La machine n’est pas
branchée au réseau
électrique.
Activer l’interrupteur général.
Contrôler la fi che et le branchement.
Le café n’est pas assez
chaud.
Les tasses sont froides Réchauffer les tasses.
La machine ne parvient
pas à faire de café.
Le pommeau est placé
sur une valeur trop
basse
Tourner le pommeau dans le
sens horaire sur une valeur
plus élevée.
L’eau chaude ou la vapeur
n’arrive pas.
Bec de la buse bouché. Nettoyer le bec à l’aide d’une
aiguille.
Pour cette opération,
le pommeau doit être
fermé et la machine doit être
désactivée.
La machine émet un bruit
qui vient du tube vapeur .
La machine se réchauffe
très lentement.
Il y a du calcaire dans
l’appareil.
Détartrer l’appareil.
Impossible de retirer le
groupe
Le groupe s’est arrêté
dans une position incorrecte.
Fermer le volet de service et
activer la machine. Le groupe
diffuseur effectue un cycle de
rétablissement.
PROBLEME - CAUSE - REMEDE
57
PROBLEME CAUSE REMEDE
Le café coule lente-ment
ou pas du tout.
La mouture est trop fi ne.
Le bouton SBS est tourné
vers la droite.
Sélectionner une mouture plus
grosse (tourner le bouton dans
le sens des aiguilles d’une
montre).
Tourner le bouton SBS vers la
gauche.

PRECAUCIONES IMPORTANTES
Durante el uso de electrodomésticos, se aconseja tomar algunas precauciones para
evitar el riesgo de sacudidas eléctricas o incendios.
1 Leer atentamente todas las instrucciones e informaciones descritas en este manual
y en cualquier otro folleto que venga dentro del embalaje antes de poner en
marcha o utilizar la máquina espresso.
2 No tocar superficies calientes.
3 No sumergir el cable, los enchufes o el cuerpo de la máquina en agua o en
cualquier otro líquido para evitar incendios, sacudidas eléctricas o accidentes.
4 Poner particular atención durante el uso de la máquina espresso en presencia de
niños.
5 Desenchufar la máquina cuando no se esté utilizando o mientras que se está
limpiando. Enfriarla antes de introducir o quitar piezas y antes de empezar a
limpiarla.
6 No utilizar la máquina si el cable o el enchufe están dañados o en caso de averías
o roturas. Haga que controlen o reparen el electrodoméstico en el centro de
asistencia más cercano.
7 El uso de accesorios no aconsejados por el fabricante podrá causar daños a cosas
y personas.
8 No utilizar la máquina espresso en espacios abiertos.
9 Evitar que el cable cuelgue de la mesa o que toque superficies calientes.
10 Mantener la máquina espresso lejos de fuentes de calor.
11 Controlar que la máquina espresso esté en posición “Apagado” antes de enchufarla.
Para apagarla, ponerla en “Apagado” y, a continuación, desenchufarla.
12 Utilizar la máquina únicamente para uso doméstico.
13 Extremar el cuidado durante la utilización de vapor.
CONSERVAR ESTAS INSTRUCCIONES
ADVERTENCIA
La máquina espresso ha sido estudiada únicamente para uso doméstico. Cualquier
intervención de asistencia, excepto para las operaciones de limpieza y de
mantenimiento normal, deberá ser efectuada por un centro de asistencia autorizado.
No sumergir la máquina en agua. Cualquier reparación deberá ser efectuada
únicamente por el centro de asistencia autorizado.
1 Controlar que el voltaje indicado en la chapa corresponda con el suyo.
2 Nunca utilice agua tibia o caliente para rellenar el recipiente de agua. Utilice
únicamente agua fría.
3 No toque con las manos las partes calientes de la máquina ni el cable de
alimentación durante el funcionamiento.
4 Nunca limpie con detergentes agresivos o utensilios que rayen. Es suficiente un
paño suave humedecido con agua.
5 Para evitar la formación de cal, se puede utilizar agua mineral natural.
INSTRUCCIONES ACERCA DEL CABLE
ELÉCTRICO
A Se suministra un cable eléctrico corto para evitar que se enrosque o que se enrede.
B También es posible utilizar extensiones pero se aconceja utilizar con mucha atención.
C En caso de que se utilicen una extensión,verificar.:
1 Que el voltaje anotado en la extensión sea por lo menos igual al voltaje
eléctrico del electrodoméstico.;
2 Que esté dotado de un enchufe de tres pin con colocación a tierra (en caso de
que el cable del electrodoméstico sea de este tipo);
3 que el cable no cuelgue de la mesa para evitar tropezar con él.
58

ESPAÑOL
GENERALIDADES
La máquina de café es indicada para la preparación de café exprés con empleo
de café en granos y está equipada con un dispositivo para el suministro de vapor
y de agua caliente.
El cuerpo de la máquina, de elegante diseño, ha sido proyectado para uso domé
-
stico y no está previsto para funcionamiento continuo de tipo profesional.
Atención. Se declina toda responsabilidad por posibles daños que deriven de:
• empleo erróneo y no conforme con los objetivos previstos;
• reparaciones no efectuadas en los centros de asistencia autorizados;
• alteración del cable de alimentación;
• alteración de cualquier componente de la máquina;
• empleo de piezas de recambio y accesorios no originales.
En estos casos la garantía otorgada perderá su validez.
PARA FACILITAR LA LECTURA
El triángulo de advertencia indica todas las instrucciones importantes para la seguridad del usuario. ¡Deberán respetarse escrupulosamente tales indicaciones a fin de evitar lesiones graves!
EMPLEO DE ESTAS INSTRUCCIONES DE USO
Consérvense estas instrucciones de uso en un lugar seguro y adjúntense a la
máquina de café en caso de que otra persona deba utilizarla. Para mayores informaciones o en caso de problemas que en las presentes instrucciones no sean
tratados o lo sean sólo parcialmente, sírvase dirigirse a un Centro de Asistencia
Autorizado.
DATOS TÉCNICOS
• Tensión nominal Véase placa presente en la máquina
• Potencia nominal Véase placa presente en la máquina
• Material del cuerpo Metal
• Dimensiones (a x h x p) (mm) 285 x 375 x 400
• Peso (kg) 9
• Longitud del cable (mm) 1200
• Panel de mandos Frontal
• Depósito agua (l) 2 - Extraíble
• Alimentación Véase placa presente en la máquina
• Presión bomba (bares) 15
• Caldera Acero inox
• Capacidad contenedor café (g) 300 de café en granos
• Molinillos En cerámica
• Cantidad de café molido 8 g
• Capacidad recipiente receptor de posos 13
• Dispositivos de seguridad Válvula de seguridad presión caldera
Termostato de seguridad
.
Con reserva de modificaciones de fabricación y ejecución a causa de desarrollo
tecnológico.
Máquina conforme con lo establecido por la Directiva Europea 89/336/CEE (Decreto
legislativo 476 del 04/12/92) sobre eliminación de las interferencias radiotelevisivas.
59

EN CASO DE EMERGENCIA
Extraer inmediatamente el enchufe de la toma de red.
UTILIZAR EXCLUSIVAMENTE LA MÁQUINA:
- En lugar cerrado.
- Para la preparación de café, agua caliente, para montar la leche o para calentar
bebidas mediante vapor.
- Para uso doméstico.
- De parte de adultos en condiciones psico-físicas no alteradas.
NON UTILIZAR NUNCA LA MÁQUINA:
para usos diferentes de aquéllos antedichos, a fin de evitar peligros.
No introducir en los contenedores sustancias diferentes de aquéllas indicadas
en el manual de instrucciones. Durante el llenado normal de cada contenedor es
obligatorio cerrar todos los contenedores contiguos. Llenar el depósito de agua
sólo con agua potable fresca: agua caliente y/u otros líquidos pueden dañar la
máquina. No utilizar agua con anhídrido carbónico. La regulación del moledor
de café debe efectuarse sólo con el mismo en funcionamiento. Está prohibido
introducir en el moledor de café los dedos y cualquier material que no sea café en
granos. Antes de intervenir en el interior del moledor de café desactivar la máqui
-
na mediante el interruptor general y retirar el enchufe de la toma de corriente.
ENCLACE LA RED
Conectar la máquina para café sólo a una toma de corriente adecuada. La tensión debe corresponder a aquélla indicada en la placa presente en la máquina.
INSTALACIÓN
- Elegir una superficie plana y nivelada. ¡No colocar sobre superficies
incandescentes!
- Colocar como mínimo a 10 cm de distancia de paredes y placas de cocción.
- No mantener a temperaturas inferiores a 0 °C; peligro de daños por
congelación.
- La toma de corriente debe poder alcanzarse en todo momento.
- El cable de alimentación no debe sufrir daños, ser fijado con mordazas,
colocado sobre superficies incandescentes, etc.
- No dejar que el cable de alimentación cuelgue (peligro de tropezar o hacer caer
la máquina al suelo).
- No trasladar ni tirar la máquina para café teniéndola por el cable de
alimentación.
PELIGROS
- La máquina no debe ser utilizada por niños ni personas no capacitadas acerca
de su funcionamiento.
- La máquina es peligrosa para los niños. Si queda sin vigilancia, desactivarla.
- No dejar los materiales utilizados para embalar la máquina al alcance de los niños.
- No dirigir contra sí mismo ni contra otras personas el chorro de vapor ni agua
caliente: peligro de sufrir quemaduras.
- No introducir objetos a través de las aberturas de la máquina (¡Peligro!
¡Corriente eléctrica!).
- No tocar el enchufe con las manos o los pies mojados ni extraerlo de la toma
tirando del cable.
- Atención, peligro de quemaduras al contacto con el agua caliente, el vapor y la
boquilla para el agua caliente/vapor.
AVERÍAS
- No utilizar la máquina en caso de sospecha o constatación de avería, por ej.
después de una caída.
- Posibles reparaciones deben ser efectuadas por el servicio de asistencia autorizado.
- No utilizar la máquina con cable de alimentación dañado. Si el cable de alimentación está dañado, debe ser sustituido por el productor o su servicio asistencia
clientes. (¡Peligro! ¡Corriente eléctrica!).
- Apagar la máquina antes de abrir la portezuela de servicio. ¡Peligro de
quemaduras!
LIMPIEZA/DESCALCIFICACIÓN
- Antes de efectuar la limpieza extraer el enchufe de la toma y esperar que la
máquina se enfríe.
- Impedir que la máquina entre en contacto con chorros de agua o sea sumergida
en el agua.
- No secar las partes de la máquina en hornos convencionales ni microondas.
PIEZAS DE RECAMBIO
Por razones de seguridad es indispensable utilizar sólo piezas de recambio y
accesorios originales.
DESGUACE
- El embalaje puede ser reciclado.
- Máquina: extraer el enchufe de la red y cortar el cable de alimentación.
- Entregar la máquina y el cable de alimentación al servicio de asistencia o al
centro de desguace público.
NORMAS DE SEGURIDAD
60

ESPAÑOL
Cajón receptor de posos
Cubeta receptora
de gotas + rejilla
Interruptor general
(ON/OFF)
Tubo de agua
caliente/vapor
Panel de mandos
Pomo grifo
suministro vapor
Placa de apoyo para
tacitas
Depósito agua
Tapa del depósito agua
Contenedor de café en granos
Tapa del contenedor café en granos
Pomo regulación
molienda
Conjunto suministrador de café
Pincel para
limpieza
Llave conjunto café
Portezuela de
servicio
Botón suministro de un
café
Botón de selección vapor
Reset alarma fi ltro “Aqua
Prima”.
Testigo función vapor
Pomo regulación cantidad
café en taza.
SBS
Indicador de cubeta
llena
Testigos temperatura
café lista
Testigo sustitución fi ltro “Aqua
Prima” , véase pag. 69
Testigo alarmas
Suministrador de café
de altura y profundidad
regulables
Botón para suministrar dos
cafés
Aplicador fi ltro de
cartucho
Filtro de cartucho
“Aqua Prima”
61
Base giratoria

INSTALACIÓN / CARGA CIRCUITO
La máquina se está calentando; los testigos centellean.
Nota. Antes de efectuar la primera puesta en
funcionamiento y en caso de prolongada inactividad,
si el depósito agua ha sido vaciado por completo, es
obligatorio cargar el circuito de la máquina. Se debe
también cargar el circuito cada vez que el testigo
permanece encendido con luz fi ja:
Abrir el grifo para comenzar a cargar el circuito.
Cerrar el grifo para terminar de cargar el circuito.
Al encenderse los testigos
con luz fi ja, la máquina esta
lista para el uso.
Llenar el depósito con
agua potable fresca.
Disponer el interruptor en
posición “I” para encender
la máquina.
Colocar un contenedor debajo del tubo vapor.
Esperar que por la boquilla
salga agua de manera
regular.
Llenar el contenedor con
café en granos
Controlar que todos los
componentes sean posicionados correctamente.
Introducir el enchufe en
una toma de corriente adecuada.
Retirar el contenedor.
Ver tarjeta datos
Controlar el fechador en el fi ltro “Aqua Prima”; si el
fi ltro ha pasado la fecha de vencimiento, debe ser
sustituido con otro nuevo.
Es posible instalar el
filtro “Aqua Prima” (véase
pág. 69).
62
En pág. 70 se exponen los mensajes que la máquina muestra al usuario
durante su funcionamiento.
Importantes advertencias para el uso del fi ltro
“Aqua Prima” se
encuentran a pág. 70.

SBS
ESPAÑOL
REGULACIONES
La regulación debe ser efectuada sólo con el moledor de café
en funcionamiento.
Usar mezclas de café en granos para máquinas exprés. Si no se obtiene
el resultado previsto se podrán utilizar otras mezclas de café. Conservar el
café en lugar fresco, en contenedor herméticamente cerrado.
La variación se obtiene sólo después de preparar 1 ó 2 cafés.
En caso de disponer un valor demasiado fi no de molienda (pomo en fi nal
de carrera en sentido antihorario) con mando SBS en posición “pequeño”
(hacia la derecha), el suministro del café puede ser insufi ciente o puede no
verifi carse en absoluto.
CAFÉ EN TAZA - La regulación debe efectuarse antes de preparar el café.
Esta regulación produce efecto inmediato en la preparación seleccionada.
El grado de molienda puede ser
regulado con el pomo.
El café sale demasiado
lentamente.
Presionar y girar.
El café sale demasiado
velozmente.
Presionar y girar.
REGULACION
MOLIENDA
CAFÉ EN TAZA
Para adaptar la cantidad de café suministrado a las dimensiones de las tazas.
Café corto. Café largo.
Sólo para máquinas equipadas con SBS. - Para regular el cuerpo del café suministrado. Se puede
efectuar la regulación también durante el suministro del café. Esta regulación produce efecto
inmediato en la preparación seleccionada.
TAZAS GRANDES
TAZAS GRANDES
Para reposicionar el suminstrador, hay que sacarlo hasta su encaje.
Para utilizar tazas de grandes dimensiones, presionar
el botón y empujar el suminstrador completamente.
63
Café exprés. Café pequeño.Café crème.

SUMINISTRO CAFE / AGUA CALIENTE
Atención: ¡Agua caliente y vapor pueden causar quemaduras! Dirigir el tubo vapor hacia la cubeta receptora de gotas.
Colocar la tacita caliente
debajo del suministrador.
Presionar el botón para el
suministro de 1 café.
Cuando la máquina ha
terminado la preparaón,
retirar la tacita.
Presionar el botón para el
suministro de 2 cafés.
Cuando la máquina ha
terminado la preparaón,
retirar las tacitas.
CAFÉ EN GRANOS
1 CAFÉ
AGUA CALIENTE
Abrir el grifo para comenzar el suministro de agua.
Una vez alcanzada la
cantidad prevista cerrar
el grifo.
Esperar Retirar el contenedor. Posicionar un contenedor
debajo del tubo vapor.
Verifi car que la máquina
esté lista.
Verifi car que la máquina
esté lista.
CAFÉ EN GRANOS
2 CAFÉS
Para interrumpir anticipadamente el suministro presionar el botón o girar la
virola.
64
Colocar las tacitas calientes
debajo del suministrador.
Para interrumpir anticipadamente el suministro presionar el botón
o girar el pomo. Si se interrumpe
la distribución del 1° café, el 2°
café no sera distribuido.

ESPAÑOL
CAPUCHINO
CAPUCHINO
Atención: ¡Agua caliente y vapor pueden causar quemaduras! Dirigir el tubo vapor hacia la cubeta receptora de gotas.
Llenar la taza con 1/3 de
leche fría.
Presionar el botón para
seleccionar la función.
El testigo centellea.
Cuando el testigo permanece encendido con luz fi ja,
la máquina está lista para
suministrar el vapor.
Abrir el grifo para suministrar vapor.
Mover la taza con movimientos circulares para uniformar el calentamiento.
Una vez montada la leche,
cerrar el grifo.
Posicionar la taza con
la leche debajo del tubo
vapor.
Verter el café en la taza
para obtener un óptimo
capuchino.
Abrir el grifo para descargar el agua residual.
Cuando empieza a salir
sólo vapor cerrar el grifo.
Retirar la taza.
Presionar el botón para
restablecer el funcionamiento normal. Los testigos centellean.
Abrir el grifo y suministrar
agua.
Posicionar un contenedor
debajo del tubo vapor.
Al encenderse los testigos
con luz fi ja, cerrar el grifo y
retirar el contenedor.
65

Atención: ¡Agua caliente y vapor pueden causar quemaduras! Dirigir el tubo vapor hacia la cubeta receptora de gotas.
Controlar el estado de la
máquina.
Presionar el botón para
seleccionar la función.
El testigo centellea.
Cuando el testigo permanece encendido con luz fi ja,
la máquina está lista para
suministrar el vapor.
Abrir el grifo para suministrar vapor.
Mover circularmente el contenedor para uniformar el calentamiento.
Una vez concluida la preparación, cerrar el grifo.
Tomar y colocar el contenedor debajo del tubo
agua caliente/vapor.
Abrir el grifo para descargar el agua residual.
Cuando empieza a salir
sólo vapor cerrar el grifo.
Retirar el contenedor.
Abrir el grifo y suministrar
agua.
Posicionar un contenedor
debajo del tubo de vapor.
Presionar el botón para
restablecer el funcionamiento normal. Los testigos centellean.
Al encenderse los testigos
con luz fi ja, cerrar el grifo y
retirar el contenedor.
VAPOR
VAPOR
La máquina está lista para
suministrar café o agua
caliente.
66

A
B
ESPAÑOL
La descalcifi cación es necesaria cada 2 meses; en caso de agua particularmente dura,
hay que descalcifi car la máquina más frecuentemente. Para este fi n la máquina, que
debe estar encendida, gestiona automáticamente la distribución del descalcifi cador.
DESCALCIFICACIÓN
¡Atención! No utilizar por ningún motivo el vinagre como descalcifi cador.
Se podrá utilizar un producto descalcifi cador para máquina de café de tipo no
tóxico ni nocivo, disponible en comercio. Se recomienda el descalcifi cador Saeco.
Después de 2 meses de
empleo, descalcificar la
máquina.
Extraer el filtro, véase
pág. 69.
Apagar la máquina. Poner un recipiente grande
debajo del tubo vapor.
Después de unos 30 segundos cerrar el grifo.
Abrir el grifo y efectuar
el enjuague.
Enjuagar y llenar el depósito con agua potable fresca.
En caso de interrumpirse el ciclo
de descalcifi cación se deberá
efectuar el enjuague de la cuba del agua
y de los circuitos internos de la máquina.
Trayecto de tipo “B”.
Una vez efectuada la descalcifi cación cargar nuevamente el circuito de la máquina.
Reinstalar el fi ltro de cartucho en el
depósito de agua.
Llenar el depósito con la
solución descalcifi cadora.
Abrir el grifo.
Comenzar el proceso de
descalcifi cación.
Si el recipiente se llena,
vaciarlo.
Encender la máquina.
Verter la solución descalcifi cadora en el recipiente.
Apagar la máquina y
retirar el recipiente.
Al pasar 10 minutos, seguir
las instrucciones (A) o (B).
Si en el depósito
hay solución descalcifi cadora.
Verifi car
Si el depósito está
vacío.
Poner un recipiente grande
debajo del tubo vapor.
Una vez terminada el agua,
cerrar el grifo. Retirar el
contenedor.
Encender la máquina.
67

LIMPIEZA Y MANTENIMIENTO
No secar la máquina o sus componentes utilizando un horno, ni
microondas ni convencional.
No sumergir la máquina en el agua ni lavar sus componentes en
lavavajillas.
LIMPIEZA
GENÉRICA
Apagar la máquina.
Desconectar el enchufe.
Lavar el depósito.
Lavar el fi ltro que se encuentra en su interior.
Extraer la cubeta receptora
de gotas, vaciarla y lavarla.
Desmontar el suministrador
y limpiarlo con agua.
Extraer y vaciar el cajón
receptor de posos y lavarlo.
Extraer y limpiar el pannarello.
Presionar el botón PUSH
para extraer el conjunto.
Lavar el conjunto, secarlo
y reinstalarlo. No presionar
el botón “PUSH”.
Reinstalar todos los componentes en la máquina.
Cerrar la portezuela.
Abrir la portezuela frontal. Retirar la cubeta receptora
de gotas y el cajón receptor
de posos.
CONJUNTO
SUMINISTRADOR
Reinstalar el fi ltro limpiado.
Limpiar la máquina, sus
componentes y el conjunto
suministrador por lo menos una vez
por semana.
68
Destornillar el fi ltro superior por medio de la llave,
y lavarlo.

ESPAÑOL
Retirar del embalaje del
fi ltro.
Ajustar el fechador al mes
corriente.
Posicionar la referencia
en correspondencia con
la ranura.
Presionar completamente. Rodear el aplicador en
el sentido contrario a las
agujas del reloj y extraerlo
del depósito.
Introducir el fi ltro en el
depósito vacío.
Ahora se puede utilizar la
máquina de café.
Verifi car la posición de la
muesca de referencia y
posicionamiento del fi ltro.
Llenar el depósito con agua
potable fresca.
Abrir el grifo para hacer
salir el agua.
Colocar un contenedor
debajo del tubo vapor y
encender la máquina.
Vaciar, con intervalos, todo
el contenido del depósito
de agua.
INSTALACIÓN
Cuando el depósito se ha
vaciado, llenarlo de nuevo
con agua potable fresca.
El fi ltro se debe sustituir cuando la máquina lo indica, véase página 70. Antes de efectuar la descalcifi cación, extraer el fi ltro del depósito.
FILTRO DE CARTUCHO “AQUA PRIMA”
Se puede emplear la
máquina sin fi ltro, Saeco
aconseja su empleo. Si
el fi ltro no es utilizado,
hay que descalcifi car
la máquinas más
frecuentemente.
Activar y girar el aplicador
en sentido de las agujas
del reloj para fi jarlo al
fi ltro.
Presionar el botón y soltarlo
al comenzar a centellear el
testigo.
69

Centelleante
Fija
SEÑALES EN EL PANEL DE MANDOS - NOTAS RELATIVAS AL FILTRO “AQUA PRIMA”
Centelleante
Para un empleo correcto, la máquina guia al utilizador por medio del panel de mandos.
Llenar el contenedor de café en granos con café
en granos y reactivar el ciclo de suministro café.
Llenar el depósito del agua con agua potable
fresca y cargar el circuito.
Cargar el circuito.
Vaciar cajón receptor de posos.
Nota importante. El cajón receptor de posos deberá vaciarse sólo con máquina
encendida y permanecer extraído por al menos cinco segundos. Atención por
que el vaciado del cajón con la máquina apagada impedirá el suministro de café
al reencenderla.
Introducir correctamente el conjunto suministrador.
Montar correctamente la cubeta receptora de
gotas y el cajón receptor de posos.
Cerrar la portezuela anterior.
Sustituir el filtro de agua en el depósito.
Después de haber sustituido el filtro en
el depósito, anular el estado de alarma
presionando el botón por 5 segundos hasta el
apagamiento del testigo.
Temperatura caldera demasiado alta; cargar el
circuito. Hacer salir el agua.
70
INFORMACIONES ADICIONALES PARA UN USO CORRECTO DEL FILTRO
“AQUA PRIMA”
Para utilizar correctamente el filtro “Aqua prima” señalamos a continuación algu
-
nas advertencias que deben tenerse presentes:
1. Conservar el filtro “Aqua prima” en un ambiente fresco protegido contra el sol;
la temperatura ambiente deberá estar comprendida entre +5 °C y +40 °C.
2. Utilizar el filtro en ambientes con temperaturas no superiores a 60 °C.
3. Aconsejamos lavar el filtro “Aqua prima” después de tres días de inactividad
de la máquina de café.
4 Se aconseja sustituir el filtro después de 20 días de inactividad de la máquina
de café.
5. Para conservar un filtro que ya ha sido abierto, cerrarlo herméticamente
dentro de una bolsa de nylon e introducirlo en el refrigerador; está prohibido
conservarlo en el congelador ya que se alteran las propiedades del filtro.
6. Antes de utilizar el filtro sumergirlo en el depósito del agua durante 30 minu
-
tos.
7. No conservar el filtro al aire libre una vez extraído del envase.
8. El filtro debe ser sustituido después de 90 días a contar de la apertura del
envase o después de haber tratado 60 litros de agua potable.
Centelleante

ESPAÑOL
PROBLEMAS CAUSAS REMEDIOS
La máquina no se
enciende.
La máquina no está
conectada a la red
eléctrica.
Disponer el interruptor ge-neral
en ON.
Controlar el enchufe y la
conexión.
El café no está sufi cientemente caliente.
Las tacitas están frías. Calentar las tacitas.
La máquina no suministra
café.
Virola posicionada sobre
valor demasiado bajo
Girar la virola en sentido
horario para alcanzar un valor
más elevado.
Ningún suministro de agua
caliente o vapor.
Boquilla del tubo obstruida.
Limpiar la boquilla con una
aguja.
Durante esta opera-
ción el pomo tiene que
estar cerrado y la máquina
desactivada.
La máquina emite un ruido
del tubo vapor.
La máquina demora mucho
en calentarse.
La máquina tiene mucha
materia calcárea incrustada.
Descalcifi car la máquina.
El conjunto no puede ser
extraído.
El conjunto ha sido
montado en una posición
errónea.
Cerrar la portezuela y encender la máquina; el conjunto
suministrador efectúa un ciclo
de reactivación.
PROBLEMAS - CAUSAS - REMEDIOS
71
PROBLEMAS CAUSAS REMEDIOS
Suministro insufi ciente o
ausente
Molienda demasiado fi na
y mando SBS girado
hacia la derecha.
Regular a fi n de obtener una
molienda más gruesa (girar el
pomo en sentido horario).
Girar el mando SBS hacia la
izquierda.

PRECAUÇÕES IMPORTANTES
Quando se usam electrdomésticos é aconselhável tomar algumas precauções para
limitar o risco de incêndios, choques eléctricos e/ou acidentes.
1 Ler atentamente todas a instruções e informações apresentadas neste manual e
em qualquer outro folheto contido nas embalagens, antes de preparar ou utilizar
a máquina expresso.
2 Não tocar nas superfícies quentes.
3 Não mergulhar o fio, a ficha ou o corpo da máquina em água ou outro líquido,
para evitar incêndios, choques eléctricos ou acidentes.
4 Ter particular cuidado ao utilizar a máquina expresso na presença de crianças.
5 Retirar a ficha da tomada quando a máquina não estiver a ser utilizada, ou
durante a sua limpeza. Deixar a máquina arrefecer antes de inserir ou retirar peças
e antes de proceder à sua limpeza.
6 Não utilizar a máquina com o fio ou a ficha danificados, nem em caso de avarias ou
roturas. Mandar verificar ou reparar o aparelho no centro de assistência mais próximo.
7 A utilização de acessórios não aconselhados pelo fabricante pode provocar danos
a coisas e pessoas.
8 Não utilizar a máquina expresso ao ar livre.
9 Evitar que o fio fique pendurado da mesa ou esteja em contacto com superfícies quentes.
10 Manter a máquina expresso longe de fontes de calor.
11 Verificar se a máquina expresso está na posição “Off” antes de inserir a ficha na
tomada. Para a desligar, colocá-la no “Off” e retirar depois a ficha da tomada.
12 Utilizar a máquina unicamente para uso doméstico.
13 Ter muito cuidado durante a utilização do vapor.
GUARDAR AS PRESENTES
INSTRUÇÕES DE USO
CUIDADOS
A máquina expresso foi concebida unicamente para uso doméstico: Qualquer
intervenção de assistência, com excepção das operações de limpeza e de manutanção
normal deverá ser prestada por um centro de assistência autorizado. Não mergulhar
a máquina em água. Qualquer reparação deverá ser efctuada unicamente por pessoal
do centro de assistência autorizado.
1 Verificar se a voltagem indicada na placa técnica corresponde à sua.
2 Nunca utilizar água tépida ou quente para encher o reservatório de água. Utilizar
unicamente água fria.
3 Não tocar com as mãos nas partes quentes da máquina, nem no fio de alimentação
durante o seu funcionamento.
4 Nunca limpar com detergentes corrosivos, nem com utensílios duros. É suficiente
um pano macio humidecido com água.
5 Para evitar a formação de calcário, pode-se utilizar água mineral natural.
INSTRUÇOS SOBRE O CABO ELETRICO
A O cabo eletrico fornecido é curto para facilitar o uso e para impedir que prenda-se
em outros objetos.
B Podem ser utilizados prolongamentos mas prestando muito cuidado.
C Se utilizar um prolongamento controlar:
1 que a voltagem do prolongamento seja igual à do eletrodomestico.
2 que seja dotado de uma tomada com tres pin com ponto de terra (seja o cabo
do eletrodomestico deste tipo);
3 que o cabo não pendure da mesa para não tropecar.
72

PORTUGUÊS
GENERALIDADES
A máquina de café é indicada para a preparação de café expresso, utilizando
café em grãos e possui um dispositivo para o fornecimento de vapor e de água
quente.
O corpo da máquina, com design elegante, foi projetado para o uso doméstico e
não é indicado para um funcionamento contínuo de tipo profissional.
Atenção. Não se assumem responsabilidades por eventuais danos no caso de:
• utilização errada e não conforme as finalidades previstas;
• reparações não feitas nos centros de assistência autorizados;
• alteração do cavo de alimentação;
• alteração de qualquer componente da máquina;
• utilização de peças de reposição e de acessórios não originais.
Nesses casos a garantia perde a sua validade.
PARA FACILITAR A LEITURA
O triângulo de advertência indica todas as instruções importantes
para a segurança do usuário. Seguir cuidadosamente essas indicações para evitar ferimentos graves!
USO DESTAS INSTRUÇÕES PARA O USO
Conservar estas instruções para o uso em local seguro e anexá-las à máquina
de café caso uma outra pessoa deva utilizá-la. Para ulteriores informações ou
no caso de problemas não tratados totalmente ou de maneira insuficiente nas
presentes instruções contatar os Centros de Assistência Autorizados.
DADOS TÉCNICOS
• Tensão nominal Ver etiqueta colocada no aparelho
• Potência nominal Ver etiqueta colocada no aparelho
• Material do corpo Metal
• Dimensões (l x h x p) (mm) 285 x 375 x 400
• Peso (kg) 9
• Comprimento do cabo (mm) 1200
• Painel de comandos Frontal
• Depósito de água (l) 2 - Extraível
• Alimentação Ver etiqueta colocada no aparelho
• Pressão da bomba (bar) 15
• Caldeira Aço inoxidavél
• Capacidade do recipiente de café (g) 300 de café em grãos
• Moedores De cerâmica
• Quantidade de café moído 8 g
• Cap. da gaveta recolhedora de fundos 13
• Dispositivos de segurança Válvula de segurança da pressão da
caldeira - termostato de segurança.
O fabricante reserva-se o direito de realizar modificações na fabricação e exe
cução seguindo o progresso tecnológico.
Máquina conforme a Diretiva Européia 89/336/CEE (Decreto legislativo 476 de
04/12/92) relativa à eliminação dos distúrbios radiotelevisivos.
73

EM CASO DE EMERGÊNCIA
Retirar imediatamente o plugue da tomada.
O APARELHO DEVE SER UTILIZADO EXCLUSIVAMENTE
- Em local fechado.
- Para a preparação de café, água quente, para espumar o leite ou para aquecer
bebidas utilizando o vapor.
- Para o uso doméstico.
- Por adultos em condições psicofísicas não alteradas.
NUNCA UTILIZAR O APARELHO
Para finalidades diferentes das indicadas acima, para evitar perigos. Não
introduzir nos recipientes substâncias diversas daquelas indicadas no manual
de instruções.
Durante o enchimento normal de cada recipiente é obrigatório fechar todos os
recipientes próximos. Encher o depósito de água somente com água fria potável:
água quente e/ou outros líquidos podem danificar a máquina. Não utilizar água
com anidride carbônica. A regulagem do moedor de café deve ser feita somente
quando este estiver funcionando. No moedor de café é proibido introduzir os
dedos ou qualquer material que não seja café em grãos. Antes de realizar
intervenções dentro do moedor de café desligar o interruptor geral da máquina e
tirar o plugue da tomada.
LIGAÇÃO À REDE ELÉTRICA
Ligar a máquina de café somente a uma tomada com corrente adequada. A
tensão deve corresponder àquela indicada na etiqueta colocada no aparelho.
INSTALAÇÃO
- Escolher um plano de apoio bem nivelado. Não colocar o aparelho sobre
superfícies quentes!
- Colocá-lo a 10 cm de distância da parede e de chapas para cozimento.
- Não mantê-lo em temperaturas inferiores a 0ºC, pois apresenta perigo de
danos por congelamento.
- A tomada de corrente deve ser facilmente acessível a qualquer instante.
- O cabo de alimentação não deve estar danificado, amarrado com presilhas,
colocado sobre superfícies quentes, etc.
- Não deixar o cabo de alimentação pendurado (Atenção: é perigoso enroscar-se
ou derrubar o aparelho no chão).
- Não carregar ou puxar a máquina de café segurando-a pelo cabo de alimentação.
PERIGOS
- O aparelho não deve ser usado por crianças e pessoas não informadas em
relação ao seu funcionamento.
- O aparelho é perigoso para crianças. Se não estiver sob vigilância, desativá-lo.
- Não deixar os materiais utilizados para embalar a máquina ao alcance das
crianças.
- Não direcionar para si e/ou para outros o jato de vapor aquecido e/ou a água
quente: perigo de queimaduras.
- Não introduzir objetos nas aberturas do aparelho (Perigo! Corrente elétrica!).
- Não tocar o plugue com as mãos e os pés molhados; não tirá-lo da tomada
puxando o cabo.
- Atenção: perigo de queimaduras no contato com a água quente, com o vapor e
com o bico para água quente/vapor.
DEFEITOS
- Não utilizar o aparelho em caso de defeito ou suspeita de defeito como, por
exemplo, depois de uma queda.
- Eventuais reparações devem ser feitas pelo serviço de assistência autorizado.
- Não utilizar um aparelho com cabo de alimentação defeituoso. Se o cabo de
alimentação estiver danificado, deve ser substituído na fábrica ou num dos
serviços de assistência aos clientes. (Perigo! Corrente elétrica!).
- Desligar o aparelho antes de abrir a portinhola de serviço. Perigo de queimaduras!
LIMPEZA / DESCALCIFICAÇÃO
- Antes de limpar, tirar o plugue da tomada e deixar o aparelho esfriar.
- Impedir que o aparelho tenha contato com espirros de água ou que seja
mergulhado na água.
- Não enxugar as peças da máquina em fornos convencionais e/ou no
microondas.
PEÇAS DE REPOSIÇÃO
Por razões de segurança, utilizar somente peças de reposição e acessórios
originais.
ELIMINAÇÃO
- A embalagem pode ser reciclada.
- Aparelho: tirar o plugue da tomada, cortar o cabo de alimentação do aparelho.
- Entregar o aparelho e o cabo de alimentação ao serviço de assistência ou ao
centro de eliminação público.
NORMAS DE SEGURANÇA
74

PORTUGUÊS
Gaveta recolhedora
de fundos
Recipiente reco-
lhegotas + grade
Interruptor geral
(ON/OFF)
Tubo água
quente/vapor
Painel de
comandos
Botão de fornecimento de vapor
Chapa de apoio para
xícaras
Depósito de água
Tampa do depósito
de água
Recipiente de café em grãos
Tampa do recipiente de café em grãos
Botão de regulagem da
moagem
Grupo fornecedor
de café
Pincel para
limpeza
Chave do grupo
fornecedor de café
Porta de serviço
Botão de fornecimento de
café simples
Botão de seleção do vapor
Reset alarme fi ltro “Aqua
Prima”.
Luz de sinalização da função vapor
Botão de regulagem da
quantidade de café na
xícara
SBS
Indicador de recipiente
cheio
Luzes de sinalização de
temperatura pronta para café
Luz de sinalização de
alarmes
Luz de sinalização para substituição
do fi ltro “Aqua Prima” (ver pág.83)
Fornecedor de café
com altura e profun-
didade ajustáveis
Botão de fornecimento de
dois cafés
Aplicador do fi ltro
com cartucho
Filtro com cartucho
“Aqua Prima”
75
Base giratória

INSTALAÇÃO / CARREGAMENTO DO CIRCUITO
A máquina está se aquecendo; as luzes de sinalização piscam.
Nota: Antes de colocar a máquina para funcionar pela
primeira vez, em caso de inatividade prolongada, se
o depósito de água foi esvaziado completamente, é
obrigatório carregar o circuito da máquina. Além
disto o circuito deve ser carregado sempre que a luz
de sinalização permanecer acesa de modo fi xo:
Abrir a torneira para iniciar o carregamento do circuito.
Fechar a torneira para
terminar o carregamento
do circuito.
Quando as luzes de sinalização se acenderem de
modo fi xo, a máquina está
pronta para o uso.
Encher o depósito com
água fria potável.
Pressionar o interruptor
na posição “I” para ligar a
máquina.
Colocar um recipiente
abaixo do tubo de vapor.
Esperar que saia água de
modo regular do bocal.
Encher o recipiente com
grãos de café.
Certifi car-se de que todos os
componentes estejam posicionados corretamente.
Colocar o plugue numa
tomada de corrente adequada.
Retirar o recipiente.
Vide etiqueta dados
Verifi car a data no fi ltro “Aqua Prima”; se o fi ltro
estiver vencido, substituí-lo por um novo.
Pode-se instalar o fi ltro
“Aqua Prima” (ver pág.83).
76
Na pág.84 são apresentadas as mensagens que a máquina transmite ao
usuário durante o funcionamento.
Advertências importantes para o uso do fi ltro
“Aqua Prima” são apre-
sentadas na pág.84.

SBS
PORTUGUÊS
REGULAGENS
CAFÉ EM XÍCARA - A regulagem deve ser feita antes de fornecer o café.
Esta regulagem tem um efeito imediato no fornecimento selecionado.
O grau de moagem do café pode ser
regulado com o botão.
O café sai muito lentamente.
Pressionar e rodar.
O café sai muito rapidamente.
Pressionar e rodar.
A regulagem deve ser feita somente quando o moedor de café
estiver funcionando.
Usar misturas de café em grãos para máquinas expresso. Se não se obtiver
o resultado desejado, utilizar misturas de café diferentes. Conservar o café
em local fresco, dentro de um recipiente hermeticamente fechado.
A variação pode ser notada depois do fornecimento de 1 a 2 cafés.
Se a moagem for regulada num valor fi no demais (botão completamente
rodado no sentido anti-horário) e o botão SBS na posição “pequeno” (para a
direita), o fornecimento do café pode ser escasso ou ausente.
REGULAGEM
MOAGEM
CAFÉ EM XÍCARA
Para adaptar a quantidade de café
fornecido ao ta-manho das xícaras.
Café curto Café grande
Somente para máquinas com SBS - Para regular a consistência do café fornecido. A regulação
pode ser feita também durante o fornecimento do café. Esta regulagem tem um efeito imediato no
fornecimento selecionado.
XÍCARAS
GRANDES
XÍCARAS GRANDES
Para reposicionar o fornecedor, puxá-lo até que se encaixe.
Para utilizar xícaras grandes, pressionar o botão e
empurrar o fornecedor até o encaixe.
77
Café expresso. Café pequeno.Café com creme.

FORNECIMENTO CAFÉ / ÁGUA QUENTE
Certifi car-se de que a máquina esteja pronta.
ÁGUA QUENTE
Certifi car-se de que a máquina esteja pronta.
Posicionar um recipiente
abaixo do tubo de vapor.
Abrir a torneira para iniciar o
fornecimento de água.
Esperar. Quando for atingida a
quantidade desejada, fechar a torneira.
Retirar o recipiente.
Atenção: a água quente e o vapor podem provocar queimaduras! Direcionar o tubo de vapor sobre o recipiente recolhe-gotas.
Posicionar a xícara de
café aquecida abaixo do
fornecedor.
Pressionar a tecla para
fornecer 1 café.
Quando a máquina terminar a preparação, retirar
a xícara.
Posicionar as xícaras de
café aquecidas abaixo do
fornecedor.
Pressionar a tecla para
fornecer 2 cafés.
Quando a máquina terminar a preparação, retirar
as xícaras.
CAFÉ EM GRÃOS
1 CAFÈ
CAFÉ EM GRÃOS
2 CAFÈS
Para interromper antes o
fornecimento pressionar a
tecla ou rodar a virola.
78
Para interromper antes o fornecimento pressionar a tecla ou
rodar a virola. Se o fornecimento
do 1° café for interrompido, o 2°
não será fornecido.

PORTUGUÊS
CAPPUCCINO
CAPPUCCINO
Atenção: a água quente e o vapor podem provocar queimaduras! Direcionar o tubo de vapor sobre o recipiente recolhe-gotas.
Encher a xícara com 1/3
de leite frio.
Pressionar o botão para
selecionar a função. A luz
de sinalização pisca.
Quando a luz de sinalização
acender-se de modo fi xo a
máquina está pronta para o
fornecimento do vapor.
Abrir a torneira para fornecer vapor.
Mover a xícara com movimentos circulares para uniformizar o aquecimento.
Ao terminar de fazer a
espuma, fechar a torneira.
Colocar a xícara com o
leite abaixo do tubo de
vapor.
Fornecer o café na xícara
para obter um ótimo cappuccino.
Abrir o botão (torneira)
para descarregar a água
residual.
Quando sair somente vapor, fechar a torneira.
Retirar a xícara.
Pressionar o botão para
restabelecer o funcionamento normal. As luzes de sinalização piscam.
Abrir a torneira e fornecer
água.
Posicionar um recipiente
abaixo do tubo de vapor.
Quando as luzes de sinalização se acenderem de
modo fi xo, fechar a torneira
e retirar o recipiente.
79

Atenção: a água quente e o vapor podem provocar queimaduras! Direcionar o tubo de vapor sobre o recipiente recolhe-gotas.
VAPOR
Verifi car o estado da
máquina.
Pressionar o botão para
selecionar a função. A luz
de sinalização pisca.
Quando a luz de sinalização
acender-se de modo fi xo a
máquina está pronta para o
fornecimento do vapor.
Abrir a torneira para fornecer vapor.
Mover o recipiente com movimentos circulares para uniformizar o aquecimento.
Ao terminar a preparação,
fechar a torneira.
Retirar o recipiente e
colocá-lo abaixo do tubo
de água quente /vapor.
Abrir o botão (torneira)
para descarregar a água
residual.
Quando sair somente vapor, fechar a torneira.
Retirar o recipiente.
Pressionar o botão para restabelecer o funcionamento
normal. As luzes de sinalização piscam.
Abrir a torneira e fornecer
água.
Posicionar um recipiente
abaixo do tubo de vapor.
Quando as luzes de sinalização se acenderem de
modo fi xo, fechar a torneira
e retirar o recipiente.
VAPOR
A máquina está pronta
para fornecer café ou água
quente.
80

A
B
PORTUGUÊS
prodzuto para descalcifi cação da Saeco. A descalcifi cação é necessária a cada 2 meses;
se a água for muito dura, descalcifi car a máquina com mais frequência. A máquina deve
estar ligada e gerencia automaticamente a distribuição do descalcifi cante.
DESCALCIFICAÇÃO
Atenção! Nunca utilizar o vinagre como descalcifi cante. Pode-se utilizar um
produto para descalcifi cação próprio para máquinas de café do tipo não tóxico
e/ou nocivo, que pode ser encontrado normalmente no comércio. Recomenda-se o
Após 2 meses de uso,
realizar a descalcifi cação
da máquina.
Retirar o fi ltro
(ver pág.83).
Desligar a máquina. Colocar um recipiente
grande abaixo do tubo
de vapor.
Após aproximadamente
30 segundos fechar a
torneira.
Abrir a torneira e fazer o
enxágue.
Enxaguar e encher o
depósito com água fria
potável.
Se o ciclo de descalcifi cação for
interrompido, deve-se enxaguar o
recipiente da água e dos circuitos internos
da máquina. Percurso de tipo “B”.
Depois de ter feito a descalcifi cação, recarregar o circuito da máquina. Recolocar o
fi ltro com cartucho no depósito de água.
Encher o depósito com a
solução para descalcifi cação.
Abrir a torneira.
Começa o processo de
descalcifi cação.
Se o recipiente se encher,
esvazie-o.
Ligar a máquina.
Fornecer a solução descalcifi cante no recipiente.
Desligar a máquina e retirar o recipiente.
Depois de 10 minutos seguir o percurso (A) ou (B)
Colocar um recipiente
grande abaixo do tubo
de vapor.
Quando a água terminar,
fechar a torneira. Retirar o
recipiente.
Ligar a máquina.
Se no depósito
existe solução descalcifi cante.
Verifi car
Se o depósito está
vazio.
81

LIMPEZA E MANUTENÇÃO
Não enxugar a máquina e/ou os seus componentes utilizando um forno
microondas e/ou um forno convencional.
Não mergulhar a máquina na água e não colocar os seus componentes
na máquina de lavar louças.
LIMPEZA
GERAL
Apagar a máquina.
Desligar o plugue da tomada.
Lavar o depósito.
Lavar o fi ltro que se encontra dentro dele.
Retirar o recipiente recolhegotas, esvaziá-lo e lavá-lo.
Desmontar o fornecedor e
lavá-lo com água.
Retirar e esvaziar a gaveta
recolhedora de fundos e
lavá-la.
Extrair e limpar o pannarello.
Pressionar a tecla PUSH
para retirar o grupo.
Lavar o grupo, enxugá-lo e
montá-lo novamente. Não
pressionar a tecla “PUSH”.
Recolocar todos os componentes na máquina. Fechar
a porta.
Abrir a portinhola da frente. Remover o recipiente re-
colhe-gotas e a gaveta recolhedora de fundos.
GRUPO
FORNECEDOR
Montar novamente o fi ltro
limpo.
A limpeza da máquina, dos
seus componentes e do grupo fornecedor deve ser feita pelo
menos uma vez por semana.
82
Desparafusar o fi ltro superior usando a chave adequada e lavá-lo.

PORTUGUÊS
Retirar o fi ltro da embalagem.
Regular o datador no mês
atual.
A referência deve ser colocada de modo que corresponda ao entalhe.
Pressionar até o encaixe. Rodar o aplicador em sen-
tido anti-horário e extrai-lo
do depósito.
Colocar o fi ltro no depósito
vazio.
Agora você pode usar a
sua máquina de café.
Verifi car onde se encontra
o entalhe de referência e
posicionamento do fi ltro.
Encher o depósito com
água fria potável.
Abrir a torneira e fornecer
água.
Posicionar um recipiente
abaixo do tubo de vapor e
ligar a máquina.
Esvaziar o depósito de água
em intervalos.
INSTALAÇÃO
Quando o depósito estiver
vazio, enchê-lo novamente
com água fria potável.
O fi ltro deve ser substituído quando for sinalizado pela máquina
(ver página 84).
Antes de realizar a descalcifi cação, deve-se retirar o fi ltro do depósito.
FILTRO COM CARTUCHO “AQUA PRIMA”
É possível utilizar a
máquina sem fi ltro, mas
a Saeco recomenda o
seu uso. Caso não seja
usado o fi ltro, realizar a
descalcifi cação da máquina
com maior frequência.
Inserir e rodar o aplicador
no sentido horário para
fi xá-lo ao fi ltro.
Pressionar o botão. Quando
a luz de sinalização piscar,
soltar o botão.
83

Intermitente
Fixa
SINALIZAÇÕES DO PAINEL DE COMANDOS - NOTAS SOBRE O FILTRO “AQUA PRIMA”
Intermitente
Através do painel de comandos, a máquina guia o usuário a utilizá-la corretamente.
Encher o recipiente com café em grãos e
reiniciar o ciclo de fornecimento do café.
Encher o depósito de água com água fria potável
e carregar o circuito.
Carregar o circuito.
Esvaziar a gaveta recolhedora de fundos.
Nota importante: a gaveta recolhedora de fundos deve ser esvaziada somente
quando a máquina estiver ligada. A gaveta deve ser retirada por pelo menos 5
segundos. O esvaziamento da gaveta com a máquina desligada impossibilita o
fornecimento do café quando ela for ligada novamente.
Colocar corretamente o grupo fornecedor.
Colocar o recipiente recolhe-gotas e a gaveta
recolhedora de fundos corretamente.
Fechar a portinhola da frente.
Substituir o filtro de água presente no depósito.
Depois de ter substituído o filtro no depósito,
zerar o alarme, pressionando o botão e mantêlo pressionado 5 segundos até que o led se
apague.
Temperatura da caldeira alta demais, carregar o
circuito. Fornecer água.
84
INFORMAÇÕES ADICIONAIS PARA O USO CORRETO DO FILTRO
“AQUA PRIMA”
Para utilizar corretamente o filtro “Aqua prima” indicamos alguns cuidados que
devem ser levados em consideração:
1. Conservar o filtro “Aqua prima” num ambiente fresco protegido contra o sol; a
temperatura do ambiente deve estar compreendida entre +5°C e +40°C;
2. Utilizar o filtro em ambientes com temperaturas que não ultrapassem os
60°C.
3. Recomendamos lavar o filtro “Aqua prima” após 3 dias de inutilização da
máquina de café;
4 Recomenda-se substituir o filtro após 20 dias de inutilização da máquina de
café;
5. Caso se deseje conservar um filtro já aberto, fechá-lo hermeticamente num
saco de nylon e colocá-lo na geladeira; é proibido conservá-lo no freezer, pois
as propriedades do filtro podem se alterar.
6. Antes de utilizar o filtro, deixá-lo imerso no reservatório de água por 30 minutos.
7. Não conservar o filtro ao aberto depois que ele tiver sido extraído da embalagem.
8. O filtro deve ser substituído 90 dias após a abertura da embalagem ou depois
de ter tratado 60 litros de água potável.
Intermitente

PORTUGUÊS
PROBLEMAS CAUSAS SOLUÇÕES
A máquina não liga A máquina não está
ligada à rede elétrica.
Ativar o interruptor geral.
Verifi car o plugue e a conexão.
O café não está sufi cientemente quente.
As xícaras estão frias. Aquecer as xícaras.
A máquina não fornece
café.
Virola posicionada num
valor baixo demais.
Rodar a virola em sentido
horário, colocando-a num valor
mais alto.
Nenhum fornecimento de
água quente ou vapor.
Bico do tubo obstruído. Limpar o bico com uma agulha.
Para esta operação,
o botão deve ser
fechado e a máquina deve
ser apagada.
A máquina emite um ruído
no tubo de vapor.
A máquina leva muito
tempo para se aquecer.
O aparelho tem muito
calcário.
Descalcifi car o aparelho.
O grupo não pode ser
retirado.
O grupo parou na
posição errada.
Fechar a portinhola e ligar a
máquina; o grupo fornecedor
executa um ciclo de reinício.
PROBLEMAS - CAUSAS - SOLUÇÕES
85
PROBLEMAS CAUSAS SOLUÇÕES
Fornecimento muito
escasso ou ausente
Moagem fi na demais
e botão SBS rodado para
a direita.
Regular a moagem num
valor maior (rodar o botão em
sentido horário).
Rodar o botão SBS para a
esquerda.

BELANGRIJKE VOORZORGSMAATREGELEN
Bij het gebruik van elektrische huishoudelijke apparaten is het raadzaam enkele
voorzorgsmaatregelen in acht te nemen, om brandgevaar, elektrische schokken en/of dergelijke
ongelukken zoveel mogelijk te voorkomen.
1 Aandachtig alle aanwijzingen en informatie in deze gebruiksaanwijzing en andere folders lezen,
die zich in de verpakking mochten bevinden, voordat het espresso apparaat wordt gebruikt.
2 De hete oppervlakken niet aanraken.
3 Geen kabels, stekkers of het apparaat zelf in water of andere vloeistoffen onderdompelen
om brandgevaar, elektrische schokken of ongelukken te vermijden.
4 Extra goed opletten indien het apparaat gebruikt wordt met kinderen in de buurt.
5 De stekker uit het stopcontact trekken als het apparaat niet gebruikt of gereinigd wordt.
Wachten totdat het apparaat afgekoeld is voordat de onderdelen verwijderd worden of
aangebracht, ook in geval van reiniging.
6 Het apparaat niet gebruiken als de kabel of stekker beschadigd zijn ofwel in geval van
schade of breuk. Het apparaat laten controleren of repareren bij het dichtstbijzijnde
servicecentrum.
7 Door het gebruik van niet door de producent aangeraden onderdelen kan er schade aan
dingen of letsel aan personen worden aangericht.
8 Het espresso apparaat nooit in de open lucht gebruiken.
9 De kabel niet van de tafel laten hangen en niet met hete oppervlakken in aanraking laten
komen.
10 Het espresso apparaat uit de buurt van warmtebronnen houden.
11 Controleren dat het espresso apparaat altijd in de stand “0” (uit) staat, voordat de stekker
in het stopcontact wordt gestoken. Indien men het apparaat uitschakelen wil,de machine
uitzetten en dan de stekker uit het stopcontact trekken.
12 Het apparaat mag alleen voor huishoudelijk gebruik gebruikt worden.
13 Uiterst goed opletten tijdens het gebruik van de stoom.
GELIEVE DEZE GEBRUIKSAAN-WIJZINGEN
TE BEWAREN
WAARSCHUWING
Het espresso apparaat is alleen maar voor huishoudelijk gebruik geschikt. Al de
servicewerkzaamheden of reparaties, behalve de reiniging en het normale onderhoud
moeten door een bevoegd Servicecentrum uitgevoerd worden.
Het apparaat niet in water onderdompelen.
Elke reparatie dient door een bevoegd Servicecentrum te worden uitgevoerd.
1 Controleren dat de aangetoonde spanning op het plaatje overeenkomt met de
spanning van het stopcontact.
2 Nooit lauw of warm water gebruiken, om het waterreservoir te vullen. Alleen maar
koud water gebruiken.
3 De warme onderdelen van het apparaat en de voedingskabel tijdens de werking
niet met de handen aanraken.
4 Nooit reinigen met schuurmiddelen of scherp gereedschap. Een met water
bevochtigde zachte doek is voldoende.
5 Gebruik mineraalwater zonder koolzuur, om de vorming van kalkaanslag te vermijden.
AANWIJZINGEN OVER DE
ELEKTRICITEITSKABEL
A Er wordt een nogal kort elektriciteitssnoer geleverd om te voorkomen dat het in
elkaar draait of dat u erover kunt struikelen.
B Er kan een verlengsnoer gebruikt worden.
C Als u een verlengsnoer gebruikt, controleer dan:
1 of de spanning die op het verlengsnoer vermeld is minstens gelijk is aan de
spanning van het apparaat;
2 of er een stekker aan zit met drie pinnen met aarde (als het snoer van het
apparaat van dit type is);
3 of het snoer niet van de tafel hangt zodat u er niet over kunt struikelen.
86

NEDERLAND
ALGEMEEN
Het koffiezetapparaat is bestemd voor de bereiding van espressokoffie met gebruik van koffiebonen, en beschikt over een systeem voor de afgifte van stoom
en heet water.
Het sierlijk ontworpen apparaat is bedoeld voor huishoudelijk gebruik en niet voor
een continu, professioneel gebruik.
Let op. Men stelt zich niet aansprakelijk voor schade die het gevolg is van:
• Foutief gebruik en gebruik dat niet overeenstemt met het beoogde
gebruiksdoel;
• Reparaties die niet uitgevoerd zijn door de bevoegde assistentiediensten;
• Onklaar gemaakte voedingskabel;
• Onklaar maken van ongeacht welk onderdeel van het apparaat;
• Gebruik van niet originele vervangingsonderdelen en accessoires.
In deze gevallen vervalt de garantie.
TER VEREENVOUDIGING VAN HET LEZEN
De waarschuwingsdriehoek duidt op alle instructies die van belang
zijn voor de veiligheid van de gebruiker. Houdt u zich strikt aan deze
aanwijzingen om ernstig letsel te voorkomen!
GEBRUIK VAN DEZE GEBRUIKSAANWIJZING
Bewaar deze gebruiksaanwijzing op een veilige plek en voeg ze bij het koffiezetapparaat wanneer iemand anders het apparaat gebruikt. Voor meer informatie, of
bij problemen die niet volledig of onvoldoende in deze gebruiksaanwijzing behan
-
deld worden, dient u zich te wenden tot de bevoegde assistentiedienst.
TECHNISCHE GEGEVENS
• Nominale spanning Zie plaatje op het apparaat
• Nominaal vermogen Zie plaatje op het apparaat
• Materiaal behuizing Metaal
• Afmetingen (l x h x d) (mm) 285 x 375 x 400
• Gewicht (kg) 9
• Lengte kabel (mm) 1200
• Bedieningspaneel Frontaal
• Waterreservoir (liter) 2 - Uittrekbaar
• Voeding Zie plaatje op het apparaat
• Druk pomp (bar) 15
• Ketel Roestvrij staal
• Inhoud koffiehouder (gr.) 300 gr. koffiebonen
• Molens Van keramiek
• Hoeveelheid gemalen koffie 8 g
• Inhoud van koffiediklade 13
• Veiligheidsvoorzieningen Veiligheidsklep druk ketel
Veiligheidsthermostaat.
Onder voorbehoud van wijzigingen aan constructie en uitvoering ten gevolge van
de technologische vooruitgang.
Apparaat conform de Europese Richtlijn 89/336/EEG (wettelijk decreet 476 van
04/12/92) met betrekking tot de eliminatie van radio- en televisiestoringen.
87

IN GEVAL VAN NOOD
Trek onmiddellijk de stekker uit het stopcontact.
HET APPARAAT UITSLUITEND
- in een gesloten ruimte gebruiken
- voor de bereiding van koffie, heet water, voor het kloppen van melk of voor de
opwarming met stoom van dranken gebruiken.
- voor huishoudelijk gebruik aanwenden.
- door volwassenen in goede lichamelijke en geestelijke gezondheid laten gebruiken.
GEBRUIK HET APPARAAT NOOIT
voor andere dan de beschreven doeleinden, om gevaarlijke situaties te
voorkomen. Doe nooit andere substanties in de houders dan de substanties
die aangegeven worden in de gebruiksaanwijzing. Tijdens de normale vulling
van een houder bent u verplicht de houders die zich in de nabijheid bevinden
te sluiten. Vul het waterreservoir alleen met vers drinkwater: heet water en/of
andere vloeistoffen kunnen het apparaat beschadigen. Gebruik geen water
met toevoeging van kooldioxide. De afstelling van de koffiemolen mag alleen
plaatsvinden wanneer de koffiemolen in werking is. Steek uw vingers, of materiaal
dat geen koffiebonen is, niet in de koffiemolen. Voordat u werkzaamheden verricht
aan het interne gedeelte van de koffiemolen, dient u het apparaat af te sluiten met
de hoofdschakelaar en de stekker uit het stopcontact te trekken.
AANSLUITING OP HET NET
Sluit het koffiezetapparaat alleen aan op een geschikt stopcontact. De spanning
dient overeen te komen met de spanning die op het plaatje van het apparaat staat.
INSTALLATIE
- Kies een goed genivelleerde ondergrond. Plaats het apparaat niet op hete
oppervlakken!
- Plaats het apparaat op 10 cm van muren en kookplaten.
- Bewaar het apparaat niet bij een temperatuur van minder dan 0°C. Gevaar op
schade door bevriezing.
- Het stopcontact moet op ieder gewenst moment toegankelijk zijn.
- De voedingskabel mag niet beschadigd zijn, vastgezet zijn met klemmetjes, op
een heet oppervlak rusten, enz.
- Laat de voedingskabel niet los afhangen (Let op: er kan over gestruikeld
worden of het kan het op de grond vallen van het apparaat veroorzaken).
- Niet aan de voedingskabel trekken of het koffiezetapparaat met behulp van de
voedingskabel dragen.
GEVAREN
- Het apparaat mag niet door kinderen gebruikt worden of door personen die niet
op de hoogte zijn van de werking.
- Het apparaat is gevaarlijk voor kinderen. Schakel het uit indien het onbeheerd
achtergelaten wordt.
- Laat het verpakkingsmateriaal van het apparaat niet binnen handbereik van
kinderen.
- Richt de hete stoomstraal en/of de heetwaterstraal niet op uzelf en/of op
anderen: gevaar op brandwonden.
- Steek geen voorwerpen in de openingen van het apparaat (Gevaar! Elektrische
stroom!)
- Raak de stekker niet met natte handen of natte voeten aan en trek de stekker
niet uit het stopcontact door aan de kabel te trekken.
- Let op: gevaar op brandwonden bij aanraking met heet water, stoom of het
mondstuk voor heetwater/stoom.
DEFECTEN
- Gebruik het apparaat niet indien het defect is of een defect vermoed wordt,
bijvoorbeeld na een val.
- Eventuele reparaties dienen uitgevoerd te worden door een bevoegde
assistentiedienst.
- Gebruik het apparaat niet met een defecte voedingskabel. Als de voedingska
bel beschadigd is, moet deze door de fabrikant of zijn klantenservice vervangen
worden. (Gevaar! Elektrische stroom!)
- Schakel het apparaat uit voordat u het deurtje open maakt. Gevaar op brandwonden!
REINIGING / ONTKALKING
- Voordat u met de reiniging begint, trekt u de stekker uit het stopcontact en laat
u het apparaat afkoelen.
- Zorg ervoor dat u geen water op het apparaat spettert en dompel het apparaat
niet in water.
- Droog de onderdelen van het apparaat niet een in oven en/of in een magnetron.
VERVANGINGSONDERDELEN
Om veiligheidsredenen dient u alleen originele vervangingsonderdelen en
accessoires te gebruiken.
VUILVERWERKING
- De verpakking kan gerecycled worden.
- Apparaat: trek de stekker uit het stopcontact en snij de voedingskabel van het
apparaat door.
- Lever het apparaat en de aansluitkabel in bij de assistentiedienst of bij een
openbaar centrum voor de vuilverwerking.
VEILIGHEIDSVOORSCHRIFTEN
88

NEDERLAND
Koffi ediklade
Druppelbak +
rooster
Hoofdschakelaar
(ON/OFF)
Heetwater/stoompijpje
Bedieningspaneel
Knop voor stoom-afgifte
Plaat voor verwarming
kopjes
Waterreservoir
Deksel waterreservoir
Koffi ebonenhouder
Deksel koffi ebonenhouder
Knop instelling
maalgraad
Koffi eafgiftegroep
Kwastje voor
reiniging
Sleutel koffi egroep
Deurtje
Knop afgifte één kopje
koffi e
Knop selectie stoom
Reset alarm “Aqua Prima”
fi lter.
Controlelampje stoomfunctie
Regelknop hoeveelheid
koffi e in kopje
SBS
Indicator bak vol
Controlelampje
temperatuur koffi e gereed
Controlelampje vervanging fi lter
“Aqua Prima”, zie pag.97
Controlelampje alarmen
In hoogte en
diepte verstelbare
koffi eafgiftegroep
Knop afgifte twee kopjes
koffi e
Applicator
fi lterpatroon
“Aqua Prima”
fi lterpatroon
89
Draaibare basis

INSTALLATIE / VULLEN CIRCUIT
Het apparaat is aan het
opwarmen; de controlelampjes knipperen.
Opmerking: Voordat u het apparaat in werking
stelt na een periode van lange onbruik, en het
waterreservoir geheel leeg is, bent u verplicht het
circuit van het apparaat te vullen. Het circuit moet
bovendien telkens gevuld worden wanneer het
controlelampje permanent brandt:
Open de kraan om de
vulling van het circuit te
starten.
Sluit de kraan om de
vulling van het circuit te
stoppen.
Wanneer de controlelampjes
permanent gaan branden is het
apparaat klaar voor gebruik.
Vul het reservoir met vers
drinkwater.
Druk de schakelaar in
stand “I” om het apparaat
in te schakelen.
Plaats een bak onder het
stoompijpje.
Wacht tot op regelmatige
wijze water uit het mondstuk
naar buiten komt.
Vul de houder met koffi ebonen.
Controleer of alle componenten op correcte wijze
geplaatst zijn
Steek de stekker in een
geschikt stopcontact.
Haal de bak weg.
Zie het plaatje
Controleer de datumaanduiding op het “Aqua Prima”
fi lter. Vervang het fi lter indien de datum vervallen is.
Het “Aqua Prima” fi lter kan
geïnstalleerd worden (zie
pag.97).
90
Op pag.98 staan berichten voor de gebruiker die het apparaat toont
tijdens de werking.
Belangrijke aanwijzingen over het gebruik van het “Aqua prima” fi lter
staan op pag.98.

SBS
NEDERLAND
INSTELLINGEN
De instelling mag alleen plaatsvinden wanneer de koffi emolen
in werking is.
Gebruik melanges van koffi ebonen voor espressoapparaten. Indien u niet
het gewenste resultaat bereikt, gebruikt u dan verschillende koffi emelanges.
Bewaar de koffi e op een koele plek in een hermetisch gesloten houder.
De wijziging van de maalgraad wordt na 1-2 kopjes koffi e merkbaar.
Indien de maling te fi jn ingesteld is (knop geheel tegen de wijzers van
de klok in) en de SBS-knop staat op “sterk” (naar rechts), dan kan de
koffi eafgifte te weinig of afwezig blijken te zijn.
KOFFIE IN KOPJE - De instelling dient plaats te vinden voordat de koffi eafgifte plaatsvindt
Deze instelling is onmiddellijk van invloed op de geselecteerde koffi eafgifte.
De maalgraad kan met de knop
geregeld worden.
De koffi e komt te langzaam
naar buiten.
Indrukken en draaien.
De koffi e komt te snel
naar buiten.
Indrukken en draaien.
INSTELLING
MAALGRAAD
KOFFIE IN KOPJE
Om de hoeveelheid afgegeven koffi e aan
te passen aan de grootte van het kopje.
Kleine koffi e. Grote koffi e
Alleen voor apparaten met SBS - Voor de instelling van de consistentie van de afgegeven koffi e. De
instelling kan ook uitgevoerd worden tijdens de koffi eafgifte. Deze instelling is onmiddellijk van invloed
op de geselecteerde koffi eafgifte.
GROTE KOPPEN
GROTE KOPPEN
Om de afgiftegroep opnieuw op zijn plaats te brengen trekt u eraan
tot de groep weer vastzit.
Om grote koppen te gebruiken drukt u op de knop en
drukt u de afgiftegroep tot het einde toe aan.
91
Espressokoffi e. Sterke koffi e.Koffi e met room.

KOFFIEAGIFTE / HEET WATER
Controleer of het apparaat
gereed is.
HEET WATER
Controleer of het apparaat
gereed is.
Let op: heet water en stoom kunnen brandwonden veroorzaken! Richt het stoompijpje op de druppelbak.
Plaats het warme koffi ekopje onder de afgiftegroep.
Druk op de toets voor de
afgifte van 1 kopje koffi e.
Wanneer het apparaat
klaar is met de bereiding
neemt u het kopje weg.
Plaats de warme koffi e-kopjes
onder de afgiftegroep.
Druk op de toets voor de
afgifte van 2 kopjes koffi e.
Wanneer het apparaat
klaar is met de bereiding
neemt u de kopjes weg.
KOFFIEBONEN
1 KOFFIE
KOFFIEBONEN
2 KOFFIE
Open de kraan voor de
waterafgifte
Wanneer de gewenste
hoeveelheid bereikt is,
sluit u de kraan
Even wachten Neem de kan wegPlaats een kan onder het
stoompijpje
Om de afgifte eerder te
stoppen drukt u op de toets
of draait u aan de ringmoer.
92
Om de afgifte eerder te stoppen
drukt u op de toets of draait u aan de
ringmoer. Als de afgifte van de eerste koffi e onderbroken wordt, wordt
de tweede koffi e niet afgegeven.

NEDERLAND
CAPPUCCINO
CAPPUCCINO
Let op: heet water en stoom kunnen brandwonden veroorzaken! Richt het stoompijpje op de druppelbak.
Vul het kopje voor 1/3 met
koude melk.
Druk op de knop om de
functie te kiezen.
Het controlelampje knippert.
Wanneer het controlelampje permanent brandt,
is het apparaat gereed
voor de stoomafgifte.
Draai de knop open voor
de afgifte van stoom.
Maak ronde bewegingen
met het kopje voor een
gelijkmatige verwarming.
Sluit de kraan wanneer de
melk geklopt is.
Zet het kopje met melk
onder het stoompijpje.
Laat de koffi e in het kopje
lopen voor een uitstekende
cappuccino.
Draai de knop open om
het resterende water af te
voeren.
Sluit de kraan wanneer
alleen stoom naar buiten
komt.
Neem het kopje weg.
Druk op de knop om de
normale werking te hervatten. De controlelampjes
knipperen.
Open de kraan voor de
waterafgifte.
Plaats een kan onder het
stoompijpje.
Wanneer de controlelampjes
permanent gaan branden
sluit u de kraan en neemt u
de kan weg.
93

STOOM
Controleer de staat van het
apparaat.
Druk op de knop om de
functie te kiezen.
Het controlelampje knippert.
Wanneer het controlelampje permanent brandt,
is het apparaat gereed
voor de stoomafgifte.
Draai de knop open voor
de afgifte van stoom.
Maak ronde bewegingen met
de kan voor een gelijkmatige
verwarming.
Sluit de kraan wanneer de
bereiding klaar is.
Neem de kan weg en
plaats het onder het pijpje
voor heet water/stoom.
Draai de knop open om
het resterende water af te
voeren.
Sluit de kraan wanneer
alleen stoom naar buiten
komt.
Neem de kan weg.
Open de kraan voor de
waterafgifte.
Plaats een kan onder het
stoompijpje.
STOOM
Druk op de knop om de
normale werking te hervatten. De controlelampjes
knipperen.
Wanneer de controlelampjes
permanent gaan branden
sluit u de kraan en neemt u
de kan weg.
Let op: heet water en stoom kunnen brandwonden veroorzaken! Richt het stoompijpje op de druppelbak.
Het apparaat is gereed
voor de afgifte van koffi e of
heet water.
94

A
B
NEDERLAND
Het is om de 2 maanden nodig een ontkalking uit te voeren; indien het water zeer hard is
moet het apparaat vaker ontkalkt worden. Het apparaat dient ingeschakeld te zijn; het zorgt
automatisch voor de verspreiding van het ontkalkingsproduct.
ONTKALKING
Let op! Gebruik in geen geval azijn als ontkalkingsproduct. U kunt een
ontkalkingsproduct voor koffi ezetapparaten gebruiken, dat niet toxisch en/of
schadelijk is, en normaal in de handel verkrijgbaar is. Het wordt aangeraden het
ontkalkingsproduct van Saeco te gebruiken.
Na 2 maanden gebruik
moet het apparaat ontkalkt
worden. Verwijder het fi lter,
zie pag.97.
Schakel het apparaat uit. Zet een grote kan onder
het stoompijpje.
Sluit de kraan na ongeveer 30 seconden.
Open de kraan voor het
naspoelen.
Het reservoir spoelen en
met vers drinkwater vullen.
Indien de ontkalkingscyclus onder-
broken wordt, dient u verder te gaan
met het naspoelen van het waterreservoir
en van de interne circuits van het apparaat.
Traject type “B”.
Na de ontkalking dient u het circuit van
het apparaat opnieuw te vullen. Plaats het
fi lterpatroon in het waterreservoir.
Vul het reservoir met de
ontkalkingsoplossing.
Open de kraan. Het ontkalkingsproces begint.
Als de kan volloopt dan
dient u hem te legen.
Schakel het apparaat in.
Laat de ontkalkingsoplossing in de kan lopen.
Schakel het apparaat uit
en neem de kan weg.
Na 10 minuten volgt u
traject (A) of (B)
Als de ontkalkingsoplossing in het reservoir aanwezig is
Controleer
Als het reservoir
leeg is
Zet een grote kan onder
het stoompijpje.
Wanneer het water op is
sluit u de kraan. Neem de
kan weg.
Schakel het apparaat in.
95

REINIGING EN ONDERHOUD
Het apparaat en/of de onderdelen van het apparaat niet drogen in een
magnetron en/of een oven.
Het apparaat niet in water dompelen en de onderdelen van het apparaat
niet in de vaatwasmachine reinigen.
ALGEMENE
REINIGING
Het apparaat uitschakelen.
Trek de stekker uit het
stopcontact.
Was het reservoir.
Was het fi lter dat zich in
het reservoir bevindt.
Trek de druppelbak naar
buiten. De bak legen en
wassen.
Demonteer de afgiftegroep
en reinig het met water.
Trek de koffi ediklade naar
buiten. De lade legen en
wassen.
Trek de pannarello naar
buiten en reinig hem.
Druk op de toets PUSH om
de groep te verwijderen.
Was en droog de groep.
De groep opnieuw
monteren. Niet op de toets
“PUSH” drukken.
Plaats alle componenten
van het apparaat terug.
Sluit het deurtje.
Open het voordeurtje. Verwijder de druppelbak
en de koffi ediklade.
AFGIFTEGROEP
Monteer het schone fi lter.
De reiniging van het appa-
raat, de onderdelen en de
afgiftegroep moet minstens één keer
per week plaatsvinden.
96
Schroef de bovenfi lter los
met de speciale sleutel en
was hem af.

NEDERLAND
Haal het fi lter uit de verpakking
Zet de datumaanduiding
op de huidige maand.
Het referentieteken dient
zich op de hoogte van de
gleuf te bevinden.
Tot het einde aandrukken. Draai de applicator tegen
de wijzers van de klok in en
haal het uit het reservoir.
Plaats het fi lter in het lege
reservoir.
Nu kunt u uw koffi ezetapparaat gebruiken.
Kijk na waar zich het
referentieteken voor de
plaatsing van het fi lter
bevindt.
Vul het reservoir met vers
drinkwater.
Open de kraan en laat
water naar buiten komen.
Plaats een kan onder het
stoompijpje en schakel het
apparaat in.
Leeg met tussenpozen de
volledige inhoud van het
waterreservoir.
INSTALLATIE
Wanneer het reservoir leeg
is, vult u het opnieuw met
vers drinkwater.
Het fi lter moet vervangen worden wanneer dit door het apparaat
aangegeven wordt, zie pagina 98.
Voordat u de ontkalking uitvoert, moet het fi lter uit het reservoir
verwijderd worden.
“AQUA PRIMA” FILTERPATROON
Het is mogelijk om het
apparaat zonder fi lter te
gebruiken, maar Saeco
beveelt het gebruik ervan
aan. Indien u het fi lter niet
gebruikt dient u het apparaat
vaker te ontkalken.
Plaats en draai de applicator
met de wijzers van de klok
mee om deze aan het fi lter
te bevestigen.
Druk op de knop. Laat
de knop los wanneer het
controlelampje knippert.
97

Knippert
Brandt
MELDINGEN OP HET BEDIENINGSPANEEL- OPMERKINGEN OVER HET “AQUA PRIMA” FILTERPATROON.
Knippert
Via het display begeleidt het apparaat de gebruiker bij het correcte gebruik.
Vul de koffiebonenhouder met koffiebonen en start
opnieuw de cyclus van koffieafgifte.
Vul het waterreservoir met vers drinkwater en vul
het circuit.
Vul het circuit.
Leeg de koffiediklade.
Belangrijke opmerking: de koffiediklade dient alleen geleegd te worden terwijl
het apparaat ingeschakeld is. De lade dient minstens 5 seconden naar buiten
getrokken te worden. Het legen van de lade bij uitgeschakeld apparaat verhindert
de koffieafgifte wanneer het apparaat opnieuw ingeschakeld wordt.
Plaats de afgiftegroep op de juiste wijze.
Plaats de druppelbak en de koffiediklade op de
juiste wijze.
Sluit het voordeurtje.
Vervang het waterfilter dat zich in het reservoir
bevindt.
Nadat u het filter in het reservoir vervangen heeft
zet u het alarm uit door 5 seconden op de knop te
drukken, tot de led uit gaat.
Te hoge temperatuur ketel, vul het circuit. Laat
water naar buiten komen.
98
BIJKOMENDE INFORMATIE VOOR HET CORRECTE GEBRUIK VAN HET
“AQUA PRIMA” FILTER.
Om het “Aqua prima” filter op correcte wijze te gebruiken moet rekening gehou
-
den worden met enkele aanwijzingen:
1. Bewaar het “Aqua prima” filter in een koele omgeving die bescherming biedt
tegen zonlicht;de omgevingstemperatuur moet tussen +5°C e +40°C zijn;
2. Gebruik het filter in een omgeving waar de temperatuur niet boven de 60°C
komt.
3. Er wordt geadviseerd het “Aqua prima” filter te wassen nadat het koffiezetap
-
paraat 3 dagen niet gebruikt is;
4. Het wordt aangeraden het filter te vervangen na 20 dagen onbruik van het
koffiezetapparaat;
5. Mocht u het reeds geopende filter willen bewaren, sluit u het dan hermetisch af
in een nylon zakje en plaats het in de koelkast; het is verboden het filter in de
vriezer te bewaren omdat de eigenschappen van het filter daardoor gewijzigd
worden.
6. Voordat u het filter gebruikt laat u het 30 minuten in het waterreservoir gedompeld.
7. Bewaar het filter niet in de open lucht nadat u het eenmaal uit de verpakking
gehaald heeft.
8. Het filter moet 90 dagen na opening van de verpakking vervangen worden, of
nadat 60 liter drinkwater behandeld is.
Knippert

NEDERLAND
PROBLEMEN OORZAKEN OPLOSSINGEN
Het apparaat wordt niet
ingeschakeld.
Het apparaat is niet
op het elektriciteitsnet
aangesloten.
Activeer de hoofdschakelaar.
Controleer de stekker en de
verbinding.
De koffi e is niet voldoende
warm.
De kopjes zijn koud. Verwarm de kopjes.
Het apparaat geeft geen
koffi e af.
Ringmoer op een te lage
waarde gezet
Draai de ringmoer met de
wijzers van de klok mee naar
een hogere waarde.
Er komt geen heet water of
stoom naar buiten.
Mondstuk van het pijpje
verstopt.
Reinig het mondstuk met een
naald.
Voor deze handeling
dient de knop dichtgedraaid te zijn en het
apparaat uitgeschakeld.
Het stoompijpje van het
apparaat laat een geluid
horen.
Het apparaat doet erg lang
over het opwarmen.
Het apparaat heeft veel
kalkaanslag.
Ontkalk het apparaat.
De groep kan niet naar
buiten getrokken worden.
De groep is in een foute
positie tot stilstand gekomen.
Sluit het deurtje en schakel het
apparaat in. De af-giftegroep
verricht nu een resetcyclus.
PROBLEMEN - OORZAKEN - OPLOSSINGEN
99
PROBLEMEN OORZAKEN OPLOSSINGEN
Afgifte te weinig of
afwezig.
Maling te fi jn
en SBS-knop naar rechts
gedraaid.
Zorg voor een grovere
instelling van de maling (draai
de knop tegen de wijzers van
de klok in).
Draai de SBS-knop naar links.

Saeco International Group S.p.A. - Via Panigali, 39
40041 Gaggio Montano - Bologna - Italy
Tel. +39 0534.771.111 - Fax. +39 0534.31025
http://www.saeco.com
Cod. 1.6.589.64.00 Rev.03 del 15-12-04
TYPE SUP021YO
 Loading...