


MANUALE D'INSTALLAZIONE ED USO
INSTALLATION AND USEGE MANUAL
INSTALLATIONS - UND BEDIENUNGSANLEITUNG
MANUEL D'INSTALLATION ET D’UTILISATION
MANUAL DE INSTALACIÓN Y DE USO
MANUAL DE INSTALAÇÃO E USO
INSTALLATIE-EN GEBRUIKSAANWIJZINGEN
MOD. TYPES
TUAREG 8 M |
2 CON 013 M |
TUAREG 8 E |
2 CON 013 E |
TUAREG 8 EH |
|
1 |
ON |
TIME |
ON/OFF |
|
|
|
|
2 |
OFF |
|
& |
3 |
MODE |
TIMER |
4 |
TEMP. |
E |
|
|
|
|
CO L |
|
|
|
ENTER |
MODE |
$ |
zz |
|
CLIMATIZZATORE D'AMBIENTE TRASFERIBILE MONOBLOCCO ENBLOC TRANSFERABLE CLIMATE CONTROL SYSTEM VERSETZBARE EINTEILIGE KLIMAANLAGE
CLIMATISEUR AMOVIBLE MONOBLOC
CLIMATIZADOR DE AMBIENTE TRANSFERIBLE MONOBLOQUE
CLIMATIZADOR MÓVEL MONOBLOCO
VERPLAATSBAAR MONOBLOK KLIMAATREGELINGSTOESTEL
NEDERLANDS PORTUGUES ESPAÑOL FRANÇAIS DEUTSCH ENGLISH ITALIANO
2 |
CONGRATULAZIONI - CONGRATULATIONS - HERZLICHEN GLÜCKWUNSCH FÉLICITATIONS - FELICIDADES - FELICITATIES - GEFELICITEERD
Congratulazioni !
Ci congratuliamo con Voi per l'acquisto di questo climatizzatore di qualità superiore, e Vi ringraziamo per la fiducia accordataci.
Prima di mettere in funzione l'apparecchio Vi consigliamo di leggere attentamente il manuale in dotazione che Vi spiega come installarlo, utilizzarlo e mantenerlo in perfetta efficienza.
Se avete altre domande, rivolgeteVi al rivenditore o direttamente alla nostra Sede. Saremo lieti di darVi tutti i chiarimenti desiderati.
Congratulations!
We’d like to congratulate you for purchasing this superior quality climate control system, and thank you for placing your trust in us.
We recommend that you read the manual provided before starting your equipment, as it will explain how to install, use and maintain it in perfect working order.
If you have any further questions, contact your dealer or our office directly. We will be happy to provide you with any clarification you need.
Herzlichen Glückwunsch!
Wir gratulieren Ihnen zum Kauf dieser Klimaanlage erstklassiger Qualität und danken Ihnen für das in uns gesetzte Vertrauen.
Lesen Sie die mitgelieferte Bedienungsanleitung vor Inbetriebnahme der Klimaanlage sorgfältig durch. Sie erfahren hier, wie die Anlage installiert, betrieben und einwandfrei instandgehalten wird.
Sollten Sie weitere Fragen haben, wenden Sie sich an Ihren Fachhändler oder direkt an uns. Wir stehen Ihnen gerne zur Verfügung, um Ihnen jegliche Erläuterung
zu geben.
Félicitations!
Nous vous félicitons d’avoir choisi notre produit, un climatiseur de qualité supérieure et nous vous remercions de la confiance que vous nous avez accordée.
Avant de mettre en marche l’appareil, nous vous conseillons de lire attentivement cette notice qui vous explique comment l’installer, l’utiliser et le conserver en parfait état.
Si vous avez des questions, adressez-vous à notre revendeur ou directement à notre maison de construction.
Nous serons heureux de vous donner tous les éclaircissements souhaités.
¡Felicitades!
Nos congratulamos con ustedes por la compra de este climatizador de calidad superior, y les agradecemos la confianza que nos han otorgado.
Antes de poner en marcha el aparato, lean atentamente el manual que lo acompaña, el cual explica cómo instalarlo, utilizarlo y mantenerlo en perfectas condiciones de funcionamiento.
Si tienen alguna consulta, diríjanse al vendedor, o directamente a nuestra Empresa. Tendremos mucho gusto en facilitarles todas las aclaraciones que deseen.
Parabéns!
Os nossos parabéns por ter comprado este climatizador de qualidade superior e um agradecimento pela confiança demonstrada.
Antes de pôr o aparelho a funcionar aconselhamos a leitura atenta do manual de instruções que indica a modalidade eficiente de instalação, uso e manutenção.
No caso de dúvidas, dirija-se ao revendedor ou directamente à nossa Sede. Teremos imenso prazer em fornecer-lhe todos os esclarecimentos necessários.
Gefeliciteerd!
Wij feliciteren u met de aankoop van dit klimaatregelingstoestel van superieure kwaliteit, en wij danken u voor het vertrouwen dat u in ons stelt.
Alvorens het apparaat in werking te stellen raden wij u aan beide bijgeleverde handleiding, die u uitleggen hoe het apparaat te installeren, te gebruiken en te onderhouden met een perfecte werking, aandachtig te lezen.
Mocht u vragen hebben, gelieve u te wenden tot de verkoper of rechtstreeks tot de Hoofdzetel. Wij zullen u met plezier alle gevraagde verduidelijkingen doorgeven.

3 |
A |
3 |
|
|
|
10 |
|
|
|
|
6 |
|
|
|||
|
|
|
|
|
|
||
|
4 |
5 |
|
13 |
|
|
|
|
|
|
|
|
|
|
|
|
1 |
|
|
|
|
|
|
|
11 |
|
9 |
|
|
|
|
|
|
|
|
|
|
|
|
|
|
14 |
12 |
|
|
|
|
|
|
|
|
|
|
||
|
|
|
2 |
|
|
|
|
|
|
8 |
|
|
|
|
|
|
|
15 |
|
|
7 |
|
|
B |
C |
|
|
D |
|
|
|
E |
|
|
|
|
|
|
|
|
|
|
|
ON |
|
|
|
& |
|
|
|
|
|
OG |
|
|
|
|
|
|
|
||
F |
|
|
|
|
|
|
|
|
|
1 |
ON |
TIME |
|
|
|
ON/OFF |
|
|
|
|
|
|
|
|
|
2 |
OFF |
|
|
|
|
& |
|
3 |
MODE |
TIMER |
|
|
|
|
4 |
TEMP. |
|
E |
|
L |
|
|
|
|
|
|
A |
||
|
|
|
|
|
C |
|
|
|
|
|
|
|
|
O LO GIC |
|
|
|
|
|
ENTER |
|
|
|
MODE |
|
|
zz |
|
|
|
|
|
$ |
z |
|
|
|
|
|
|
|
|
|
|
|
||
4 |
CARATTERISTICHE TECNICHE - LIMITI DI FUNZIONAMENTO IN RAFFREDDAMENTO
Il triangolo di avvertimento indica tutte le prescrizioni importanti per la sicurezza dell’utente.
Nella pagina 3 di copertina sono riportate le illustrazioni relative al funzionamento. Tenere questa pagina aperta durante la consultazione del presente manuale. I riferimenti ad illustrazioni, parti dell’apparecchio o elementi di comando, ecc. sono indicati da numeri o lettere.
Per ulteriori informazioni o nel caso di problemi, rivolgersi al Vostro rivenditore o al Centro Assistenza Autorizzato.
Conservare queste istruzioni per l’uso in un luogo sicuro ed allegarle al climatizzatore qualora un’altra persona dovesse utilizzarlo.
INDICE
CARATTERISTICHE TECNICHE ............................................ |
4 |
LIMITI DI FUNZIONAMENTO IN RAFFREDDAMENTO .......... |
4 |
USO PREVISTO DEL CLIMATIZZATORE ............................. |
5 |
NORME DI SICUREZZA ........................................................ |
5 |
INSTALLAZIONE E TRASPORTO ........................................ |
6 |
MESSA FUORI SERVIZIO ..................................................... |
6 |
DESCRIZIONE GENERALE DEI COMPONENTI .................... |
7 |
CARATTERISTICHE ESCLUSIVE DEI CLIMATIZZATORI |
|
"SAECO® " ............................................................................ |
7 |
USO DEL CLIMATIZZATORE (MODELLO M) ....................... |
8 |
INFORMAZIONI AGGIUNTIVE ............................................... |
9 |
USO DEL CLIMATIZZATORE (MODELLI E - EH) ............... |
10 |
TELECOMANDO OPZIONALE (MODELLI E-EH) ............... |
10 |
MODELLI E - EH ................................................................. |
11 |
USO SEMPLIFICATO .......................................................... |
11 |
MODI INTELLIGENTI ........................................................... |
11 |
MANUTENZIONE E CONSIGLI ........................................... |
16 |
SVUOTAMENTO VASCHETTA CONDENSA ...................... |
16 |
DIAGNOSTICA ................................................................... |
17 |
TABELLA CAUSE E RIMEDI .............................................. |
17 |
CARATTERISTICHE TECNICHE
|
8 M |
|
8 E |
8 EH |
opzionale |
|
|
|
|
|
|
Caratteristiche elettriche |
|
vedi targhetta dati |
|
||
|
|
|
|||
|
|
|
|
|
|
Potenza frigorifera (W) [Btu] |
|
2.350 [8.000] |
|
|
|
|
|
|
|
|
|
Potenza riscaldamento 230V 50Hz (W) |
- |
|
- |
2.000 |
= |
|
|
|
|
|
|
Potenza riscaldamento 120V 60Hz (W) |
- |
|
- |
1.385 |
(°°) |
|
|
|
|
|
|
Consumo di energia in raffreddamento |
|
vedi targhetta dati |
|
||
|
|
serie |
|||
|
|
|
|
|
|
Consumo di energia in riscaldamento |
|
vedi targhetta dati |
|
||
|
|
|
|||
|
|
|
|
|
|
Quantità fluido refrigerante R407c (ecologico) |
|
vedi targhetta dati |
|
= di |
|
|
|
|
|
|
|
Aria trattata (m3/h) min/max |
|
260/360 |
|
||
|
|
|
|
|
(°) |
Capacità di deumidificazione (l/h) |
|
0,85 |
|
||
|
|
disponibile |
|||
|
|
|
|
|
|
Numero di velocità del ventilatore |
2 |
|
3 |
3 |
|
|
|
||||
|
|
|
|
|
|
Dimensioni (mm) (largh. x alt. x prof.) |
|
|
466 x 855 x 406 |
|
|
|
|
|
|
|
|
Peso (kg) |
|
35 |
|
|
|
|
|
|
|
|
|
Timer programmatore |
° |
|
° |
° |
non |
|
|
|
|
|
|
Filtro aria |
° |
|
° |
° |
|
|
= |
||||
|
|
|
|
|
|
Ionizzatore |
- |
|
° |
° |
|
|
(-) |
||||
|
|
|
|
|
|
Protettore compressore |
° |
|
° |
° |
legenda: |
|
|
|
|
|
|
Protettore resistenza |
- |
|
- |
° |
|
|
|
||||
|
|
|
|
|
|
Oscillazione automatica deflettore |
- |
|
° |
° |
|
|
|
|
|
|
|
Telecomando |
- |
|
°° |
°° |
|
|
|
|
|
|
|
LIMITI DI FUNZIONAMENTO IN RAFFREDDAMENTO
|
Condizioni nominali |
Condizioni massime |
Condizioni minime |
|
|||
|
|
|
|
|
|
|
|
|
Temperatura |
35°C B.S. |
Temperatura |
40°C B.S. |
Temperatura |
21°C B.S. |
|
|
esterna |
24°C B.U. |
esterna |
25°C B.U. |
esterna |
15°C B.U. |
|
|
|
|
|
|
|
|
|
|
Temperatura |
27°C B.S. |
Temperatura |
30°C B.S. |
Temperatura |
18°C B.S. |
|
|
interna |
19°C B.U. |
interna |
21°C B.U. |
interna |
14°C B.U. |
|
|
|
|
|
|
|
|
|
|
|
|
|
|
|
|
|
|
|
|
|
|
|
|
|
USO PREVISTO DEL CLIMATIZZATORE - NORME DI SICUREZZA |
5 |
|
USO PREVISTO DEL CLIMATIZZATORE
G |
H |
I |
L |
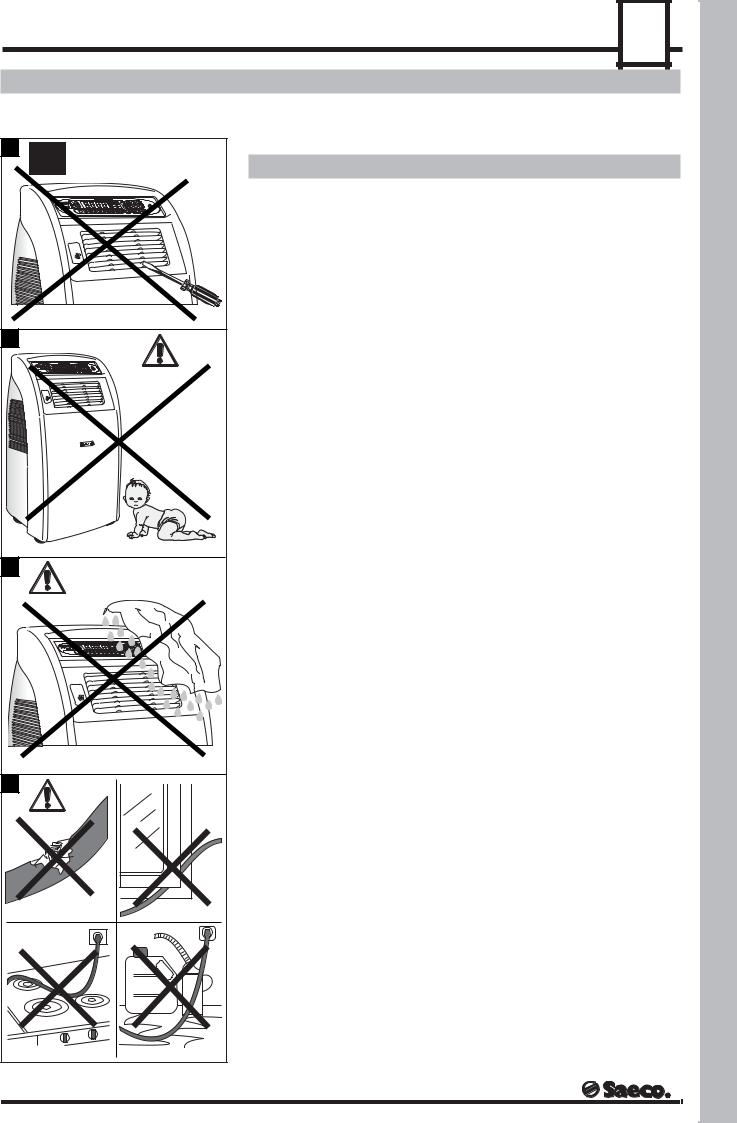
• Questo climatizzatore è stato progettato per creare condizioni climatiche ideali nel Vostro ambiente. Usatelo soltanto per questo scopo specifico e come descritto in questo manuale.
NORME DI SICUREZZA
•Il collegamento alla rete elettrica deve essere eseguito in conformità alle norme di sicurezza riguardanti l’installazione degli elettrodomestici vigenti nel paese di utilizzazione.
•La presa, nella quale viene collegato il climatizzatore, deve essere:
-conforme al tipo di spina installata nel medesimo;
-dimensionata per sopportare la corrente massima assorbita;
-collegata ad un efficiente impianto di messa a terra.
• Il cavo di alimentazione (Fig.L), non deve:
-entrare in contatto con qualsiasi tipo di liquido: pericolo di scosse elettriche e/o incendio;
-essere schiacciato e/o entrare in contatto con superfici taglienti;
-essere utilizzato per spostare il climatizzatore;
-essere utilizzato se risulta danneggiato;
-essere manipolato con le mani umide o bagnate;
-essere avvolto in una matassa quando il climatizzatore è in funzione;
-entrare in contatto con superfici calde.
•Il cavo di alimentazione può essere sostituito solo da un Centro Assistenza Autorizzato.
•È vietato:
-Inserire oggetti all’interno delle griglie di uscita o di ingresso dell’aria (Fig.G);
-Utilizzare il climatizzatore all’interno di armadi, mobili e/o in spazi ristretti tra questi;
-Riparare, smontare e /o modificare personalmente il climatizzatore;
-Ostruire le griglie di uscita e/o di ingresso dell’aria;
-Installare il climatizzatore con modalità differenti da quelle descritte;
-Utilizzare il climatizzatore in prossimità di sostanze infiammabili e/o esplosive;
-Far funzionare il climatizzatore senza i filtri;
-Usare la spina come mezzo per arrestare o avviare il climatizzatore: usare sempre l'interruttore ON/OFF del climatizzatore.
•Non lasciare giocare i bambini nelle vicinanze del climatizzatore (Fig.H).
•Prima di pulire il climatizzatore accertarsi che la spina sia scollegata dalla presa di corrente; non lavare il climatizzatore con acqua, benzina, solventi di qualsiasi natura (Fig.I).
•Evitare di usare il climatizzatore per applicazioni specialistiche come la conservazione di alimenti, opere d’arte, dati scientifici, ecc..
•In caso di incendio utilizzare estintori ad anidride carbonica (CO2). Non utilizzare acqua od estintori a polvere.
ITALIANO

6 |
SPOSTAMENTO DEL CLIMATIZZATORE - MESSA FUORI SERVIZIO
INSTALLAZIONE E TRASPORTO
• |
Durante la movimentazione e/o il trasporto, l'imballo deve essere sollevato manual- |
|
M |
||
|
mente da due addetti e mantenuto in posizione verticale evitando di inclinarlo (Fig.M). |
|
|
||
• |
Peso complessivo imballo = circa 40 Kg. |
|
|
|
|
• |
Dimensioni dell'imballo (mm) = 590 x 550 x H 970 |
|
|
|
|
• |
Prima di ogni spostamento del climatizzatore vuotare la vaschetta di raccolta con- |
|
|
||
|
densa (vedi paragrafo "Svuotamento vaschetta condensa acqua" pag.16). |
|
|
||
• Evitare inutili curve al tubo flessibile, ma distenderlo solo per la distanza necessaria (Fig.N). |
|
|
|||
• |
Inserire il tubo flessibile nell'apposita sede (12) (Fig.A). |
|
|
|
|
• Bloccare il convogliatore uscita aria (1) nella finestra (Fig.O) utilizzando la ventosa (Fig.P). |
|
|
|||
Nota: Non bloccare il convogliatore uscita aria con tapparelle o serrande. |
|
ALTO |
|||
• |
Evitare che tende e/o ostacoli vari impediscano i corretti flussi dell'aria. |
|
|
||
• |
Rispettare le distanze d'installazione (Fig.B). |
|
|
|
|
|
Istruzioni montaggio flangia (14) (Fig.A) e tappo (15) (Fig.A) |
|
N |
||
|
|
|
|||
Nota: Attrezzi e materiale per l'installazione non sono forniti in dotazione. |
|
|
|||
|
Montaggio flangia a muro (Fig.Q) |
|
|
|
|
Per questo tipo di installazione assicurarsi che la parete abbia le caratteristiche adegua- |
|
|
|||
te ed eseguire quanto descritto: |
|
|
|
|
|
• |
Eseguire foro diametro 120 mm passante (Fig.Q1). |
|
|
|
|
• |
Applicare la flangia e tracciare sul muro la posizione dei 2 fori di fissaggio, interasse |
|
|
||
|
153 mm (Fig.Q2). |
|
|
|
|
• |
Inserire n°2 tasselli di forma, dimensioni e tipo appropriati (Fig.Q3). |
|
|
||
• |
Fissare la flangia con n°2 viti in funzione dei tasselli montati precedentemente (Fig.Q4). |
|
O |
||
|
Montaggio flangia su vetro |
|
|
|
|
• |
Eseguire un foro diametro 120 mm passante. |
|
|
|
|
• |
Applicare la flangia al vetro utilizzando un sigillante opportuno. |
|
|
||
Nota: si consiglia di fare effettuare questa operazione a personale specializzato. |
|
|
|||
Nel caso la flangia venga applicata a finestre ove siano installati i vetri doppi c’è la |
|
|
|||
possibilità che il potere isolante di questi ultimi venga ridotto. |
|
|
|
||
|
Montaggio tappo per flangia (Fig.Q) |
|
|
1 |
|
|
|
|
|
||
• |
Inserimento: applicare a pressione il tappo. |
|
|
|
P |
|
|
|
|
||
• |
Estrazione: utilizzare un piccolo cacciavite inserendo l’estremità sotto i 3 punti in |
|
|
||
|
rilievo presenti sul tappo e fare una leggera pressione (Fig.Q5). |
|
|
||
|
MESSA FUORI SERVIZIO |
|
|
|
|
Rendere subito inutilizzabile l'apparecchio non più in uso. Staccare la spina di alimenta- |
|
|
|||
zione dalla presa di corrente e tagliare il cavo di alimentazione. Il climatizzatore fuori uso |
|
|
|||
deve essere consegnato ad un centro di raccolta autorizzato per lo smaltimento dello |
|
|
|||
stesso in base alle normative vigenti nel paese di utilizzazione. |
|
|
|
||
|
|
|
|
|
Q |
|
120mm |
|
(153) |
|
|
|
Ø |
|
|
|
|
|
Q1 |
Q2 |
Q3 |
Q4 |
Q5 |

DESCRIZIONE GENERALE DEI COMPONENTI - CARATTERISTICHE ESCLUSIVE DEI CLIMATIZZATORI "SAECO® " |
7 |
||||
|
|||||
|
DESCRIZIONE GENERALE DEI COMPONENTI |
|
|||
|
|
FIGURA A |
ITALIANO |
||
1 |
Convogliatore uscita aria |
9 |
Filtri estraibili lavabili (n° 2) |
||
|
|||||
2 |
Tappo drenaggio condensa |
10 |
Timer (quando previsto) |
|
|
3 |
Pannello comandi |
11 |
Cassetto portaessenze per sistema "Aria in fiore®" |
4 |
Alette orientabili uscita aria |
12 |
Raccordo per tubo flessibile |
5 |
Tubo flessibile |
13 |
Interruttore pompa svuotamento condensa |
6 |
Interruttore generale |
14 |
Flangia per fissaggio tubo flessibile |
7 |
Ruote piroettanti |
15 |
Tappo per flangia |
8 |
Cavo d'alimentazione |
|
|
CARATTERISTICHE ESCLUSIVE DEI CLIMATIZZATORI "SAECO® "
SISTEMA "ARIA IN FIORE® "
Tutti i climatizzatori SAECO® , sono dotati dell'esclusivo sistema "ARIA IN FIORE®" che permette di profumare piacevolmente l'ambiente nella fragranza preferita, semplicemente inserendo le tavolette in dotazione nell'apposito cassetto porta essenze:
•Estrarre la tavoletta dalla confezione.
•Aprire il cassetto porta essenze (11) (Fig.A) situato sulla parte frontale della macchina premendo sulla parte superiore.
•Inserire la tavoletta profumata nel cassetto e richiudere (Fig.D).
•Durante il funzionamento del ventilatore la fragranza viene diffusa nell'ambiente.
La durata della tavoletta è di circa 24 ore di funzionamento. Si consiglia di impiegare una tavoletta per volta.
Utilizzare esclusivamente i prodotti originali SAECO® reperibili nei punti vendita autorizzati.
SISTEMA OSCILLAZIONE AUTOMATICA ALETTE DEL DIFFUSORE ARIA
Tutti i climatizzatori SAECO® della serie E-EH, sono dotati del sistema di oscillazione automatica delle alette del diffusore aria. Tale sistema consente una distribuzione perfettamente omogenea, dell'aria climatizzata, nell'ambiente.
Il corretto utilizzo del sistema, è descritto nel capitolo USO DEL CLIMATIZZATORE.
MASSIMA SICUREZZA D'IMPIEGO
Le parti elettroniche, di tutti i climatizzatori SAECO® , sono alimentati in bassa tensione di sicurezza.
8 |
USO DEL CLIMATIZZATORE (MODELLO M)
USO DEL CLIMATIZZATORE (MODELLO M)
LEGENDA COMANDI E SEGNALAZIONI - FIG.A - E
COMANDO |
DENOMINAZIONE |
Manopola regolazione temperatura
Spia accensione
Pulsante/spia Modo "Freddo"
Pulsante/spia selezione massima velocità flusso aria
Spia termostato
Spia allarme
COMANDO |
DENOMINAZIONE |
|
|
|
|
|
|
|
|
|
|
|
|
|
|
|
|
|
|
|
|
|
|
|
|
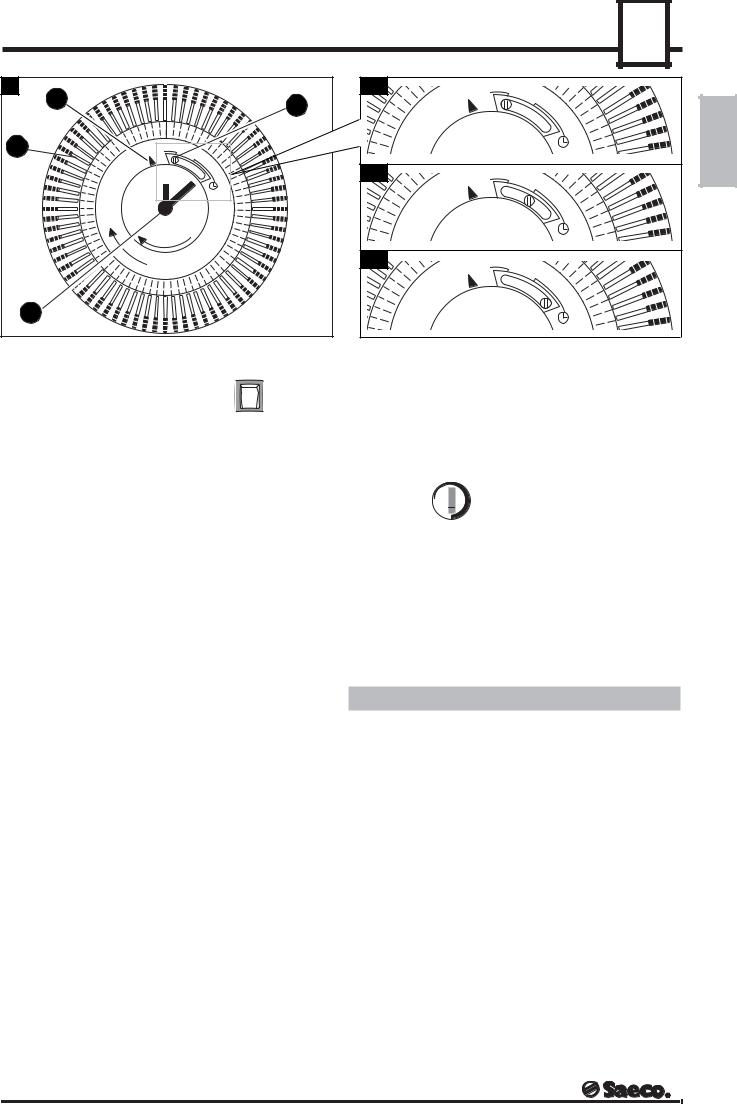
Timer (quando previsto) |
|
|
|
|
|
|
|
|
|
|
|
|
|
|
|
|
|
|
|
|
|
|
|
|
|
|
|
|
|
|
|
|
|
|
|
1Interruttore generale
Pulsante comando Pompa drenaggio
Accensione generale
Premere 1 . La spia si illumina.
Ventilazione
• All’accensione, il ventilatore interno si porta alla minima velocità del flusso di aria in uscita.
• Premendo il pulsante |
si varia la velocità di uscita del- |
l'aria.
Modo freddo
• Ruotare la manopola |
fino all’accensione della |
spia  .
.
• Per disattivare il modo "FREDDO" agire nuovamente sul
pulsante |
e l’unità passa al modo "VENTILAZIONE". |
Regolazione della temperatura
• Agire sulla manopola  per ottenere la temperatura ambiente desiderata.
• Con spia |
accesa e in modo |
la macchina è abi- |
litata al raffreddamento. |
|
|
• L’accensione della spia  indica che la temperatura impostata non è stata raggiunta.
• Premere il pulsante |
. |
• Trascorso un tempo di ritardo l’unità inizia il raffreddamento dell’ambiente. Il raffreddamento continua fino allo
spegnimento della spia  .
.
USO DEL CLIMATIZZATORE (MODELLO M) - INFORMAZIONI AGGIUNTIVE |
|
|
|
9 |
||||||||||||||||||||||||||||||||||||||||||||
|
|
|
|
|||||||||||||||||||||||||||||||||||||||||||||
R |
|
|
|
|
|
|
|
|
|
|
|
|
|
|
|
|
|
|
|
|
|
|
|
|
|
|
|
|
|
|
|
|
|
|
|
|
|
|
|
|
|
|
|
R1 |
|
|
|
|
|
|
|
|
|
|
|
|
|
|
|
|
|
|
|
|
|
|
|
|
|
|
|
|
|
|
|
|
|
|
|
|
|
|
|
|
|
|
|
|
|
|
|
|
|
|
|
|
|
4 |
|
|
|
|
|
|
|
|
|
|
|
|
|
|
|
|
|
|
|
|
|
|
|
|
|
|
|
|
|
|
|
|
|
|
|
|
|
|
|
|
|
|
3 |
|
|
|
|
|
|
|
|
|
|
|
|
|
|
|
|
|
|
|
|
|
|
|
|
|
|
|
|
|
|
|
|
|
|
|
|
|
|
|
|
|
|
|
|
|
|
|
|
|
|
|
|
ITALIANO |
|
|
|
|
|
|
|
|
|
|
|
|
|
|
|
|
|
|
|
|
|
|
|
|
|
|
|
|
|
|
|
|
|
|
|
|
|
|
|
|
|
|
|
|
|
|
|
|
||
|
|
|
|
|
|
|
|
|
|
|
|
|
|
|
|
|
|
|
|
|
|
|
|
|
|
|
|
|
|
|
|
|
|
|
|
|
|
|
|
|
|
|
|
|
|
|
||
|
|
|
|
|
|
|
|
|
|
|
|
|
|
|
|
|
|
|
|
|
|
|
|
|
|
|
|
|
|
|
|
|
|
|
|
|
|
|
|
|
|
|
|
|
|
|
|
|
|
|
|
|
|
|
|
|
|
|
|
|
|
|
|
|
|
|
|
|
|
|
|
|
|
|
|
|
|
|
|
|
|
|
|
|
|
|
|
|
|
|
|
|
|
||||
|
|
|
|
|
|
|
|
|
|
|
|
|
|
|
|
|
|
|
|
|
|
|
|
|
|
|
|
|
|
|
|
|
|
|
|
|
|
|
|
|
|
|
|
|
|
|
||
|
|
|
|
|
|
|
|
|
|
|
|
|
|
|
|
|
|
|
|
|
|
|
|
|
|
|
|
|
|
|
|
|
|
|
|
|
|
|
|
|
|
|
|
|
|
|
|
|
|
|
|
|
|
|
|
|
|
|
|
|
|
|
|
|
|
|
|
|
|
|
|
|
|
|
|
|
|
|
|
|
|
|
|
|
|
|
|
|
|
|
|
|
|
|
|
||
|
|
|
|
|
|
|
|
|
|
|
|
|
|
|
|
|
|
|
|
|
|
|
|
|
|
|
|
|
|
|
|
|
|
|
|
|
|
|
|
|
|
|
|
|
|
|
||
|
|
|
|
|
|
|
|
|
|
|
|
|
|
|
|
|
|
|
|
|
|
|
|
|
|
|
|
|
|
|
|
|
|
|
|
|
|
|
|
|
|
|
|
|
|
|
||
|
|
|
|
|
|
|
|
|
|
|
|
|
|
|
|
|
|
|
|
|
|
|
|
|
|
|
|
|
|
|
|
|
|
|
|
|
|
|
|
|
|
|
|
|
|
|
||
2 |
|
|
|
|
|
|
|
|
|
|
|
|
|
|
|
|
|
|
|
|
|
|
|
|
|
|
|
|
|
|
|
|
|
|
|
|
|
|
|
|
|
|
|
|
|
|||
|
|
|
|
|
|
|
|
|
|
|
|
|
|
|
|
|
|
|
|
|
|
|
|
|
|
|
|
|
|
|
|
|
|
|
|
|
|
|
|
|
|
|
|
|
|
|||
|
|
|
|
|
|
|
|
|
|
|
|
|
|
|
|
|
|
|
|
|
|
|
|
|
|
|
|
|
|
|
|
|
|
|
|
|
|
|
|
|
|
|
|
|
|
|||
|
|
|
|
|
|
|
|
|
|
|
|
|
|
|
|
|
|
|
|
|
|
|
|
|
|
|
|
|
|
|
|
|
|
|
|
|
|
|
|
|
|
|
|
|
|
|
||
|
|
|
|
|
|
|
|
|
|
|
|
|
|
|
|
|
|
|
|
|
|
|
|
|
|
|
|
|
|
|
|
|
|
|
|
|
|
|
|
|
|
|
|
|
|
|||
|
|
|
|
|
|
|
|
|
|
|
|
|
|
|
|
|
|
|
|
|
|
|
|
|
|
|
|
|
|
|
|
|
|
|
|
|
|
|
|
|
|
|
|
|
|
|
|
|
|
|
|
|
|
|
|
|
|
|
|
|
|
|
|
|
|
|
|
|
|
|
|
|
|
|
|
|
|
|
|
|
|
|
|
|
|
|
|
|
|
|
|
|
|
|
|
|
|
|
|
|
|
|
|
|
|
|
|
|
|
|
|
|
|
|
|
|
|
|
|
|
|
|
|
|
|
|
|
|
|
|
|
|
|
|
|
|
|
|
|
|
|
|
|
|
|
|
|
|
|
|
|
|
|
|
|
|
|
|
|
|
|
|
|
|
|
|
|
|
|
|
|
|
|
|
|
|
|
|
|
|
|
|
|
|
|
|
|
|
|
|
|
|
|||
|
|
|
|
|
|
|
|
|
|
|
|
|
|
|
|
|
|
|
|
|
|
|
|
|
|
|
|
|
|
|
|
|
|
|
|
|
|
|
|
|
|
|
|
|
||||
|
|
|
|
|
|
|
|
|
|
|
|
|
|
|
|
|
|
|
|
|
|
|
|
|
|
|
|
|
|
|
|
|
|
|
|
|
|
|
|
|
|
|
|
|
|
|
||
|
|
|
|
|
|
|
|
|
|
|
|
|
|
|
|
|
|
|
|
|
|
|
|
|
|
|
|
|
|
|
|
|
|
|
|
|
|
|
|
|
|
|
|
|||||
|
|
|
|
|
|
|
|
|
|
|
|
|
|
|
|
|
|
|
|
|
|
|
|
|
|
|
|
|
|
|
|
|
|
|
|
|
|
|
|
|
|
|
|
|
||||
|
|
|
|
|
|
|
|
|
|
|
|
|
|
|
|
|
|
|
|
|
|
|
|
|
|
|
|
|
|
|
|
|
|
|
|
|
|
|
|
|
|
|
|
|
|
|
||
|
|
|
|
|
|
|
|
|
|
|
|
|
|
|
|
|
|
|
|
|
|
|
|
|
|
|
|
|
|
|
|
|
|
|
|
|
|
|
|
|
|
|
|
|
|
|||
|
|
|
|
|
|
|
|
|
|
|
|
|
|
|
|
|
|
|
|
|
|
|
|
|
|
|
|
|
|
|
|
|
|
|
|
|
|
|
|
|
|
|
|
|
|
|
||
|
|
|
|
|
|
|
|
|
|
|
|
|
|
|
|
|
|
|
|
|
|
|
|
|
|
|
|
|
|
|
|
|
|
|
|
|
|
|
|
|
|
|
|
|
|
|
||
|
|
|
|
|
|
|
|
|
|
|
|
|
|
|
|
|
|
|
|
|
|
|
|
|
|
|
|
|
|
|
|
|
|
|
|
|
|
|
|
|
|
|
|
|
|
|
|
|
|
|
|
|
|
|
|
|
|
|
|
|
|
|
|
|
|
|
|
|
|
|
|
|
|
|
|
|
|
|
|
|
|
|
|
|
|
|
|
|
|
|
|
|
|
|
|
||
|
|
|
|
|
|
|
|
|
|
|
|
|
|
|
|
|
|
|
|
|
|
|
|
|
|
|
|
|
|
|
|
|
|
|
|
|
|
|
|
|
|
|
|
|
|
|
|
|
|
|
|
|
|
|
|
|
|
|
|
|
|
|
|
|
|
|
|
|
|
|
|
|
|
|
|
|
|
|
|
|
|
|
|
|
|
|
|
|
|
|
|
|
|
|
|
|
|
|
|
|
|
|
|
|
|
|
|
|
|
|
|
|
|
|
|
|
|
|
|
|
|
|
|
|
|
|
|
|
|
|
|
|
|
|
|
|
|
|
|
|
|
|
|
|
|
|
|
|
|
|
|
|
|
|
|
|
|
|
|
|
|
|
|
|
|
|
|
|
|
|
|
|
|
|
|
|
|
|
|
|
|
|
|
|
|
|
|
|
|
|
R2 |
|
|
|
|
|
|
|
|
|
|
|
|
|
|
|
|
|
|
|
|
|
|
|
|
|
|
|
|
|
|
|
|
|
|
|
|
|
|
|
|
|
|
|
|
|
|
|
|
|
||||
|
|
|
|
|
|
|
|
|
|
|
|
|
|
|
|
|
|
|
|
|
|
|
|
|
|
|
|
|
|
|
|
|
|
|
|
|
|
|
|
|
|
|
||||||
|
|
|
|
|
|
|
|
|
|
|
|
|
|
|
|
|
|
|
|
|
|
|
|
|
|
|
|
|
|
|
|
|
|
|
|
|
|
|
|
|
|
|
|
|
||||
|
|
|
|
|
|
|
|
|
|
|
|
|
|
|
|
|
|
|
|
|
|
|
|
|
|
|
|
|
|
|
|
|
|
|
|
|
|
|
|
|
|
|
|
|
|
|
|
|
|
|
|
|
|
|
|
|
|
|
|
|
|
|
|
|
|
|
|
|
|
|
|
|
|
|
|
|
|
|
|
|
|
|
|
|
|
|
|
|
|
|
|
|
|||||
|
|
|
|
|
|
|
|
|
|
|
|
|
|
|
|
|
|
|
|
|
|
|
|
|
|
|
|
|
|
|
|
|
|
|
|
|
|
|
|
|
|
|
|
|
||||
|
|
|
|
|
|
|
|
|
|
|
|
|
|
|
|
|
|
|
|
|
|
|
|
|
|
|
|
|
|
|
|
|
|
|
|
|
|
|
|
|
|
|
|
|
|
|
||
|
|
|
|
|
|
|
|
|
|
|
|
|
|
|
|
|
|
|
|
|
|
|
|
|
|
|
|
|
|
|
|
|
|
|
|
|
|
|
|
|
|
|
|
|
|
|
|
|
|
|
|
|
|
|
|
|
|
|
|
|
|
|
|
|
|
|
|
|
|
|
|
|
|
|
|
|
|
|
|
|
|
|
|
|
|
|
|
|
|
|
|
|
|
|
|
|
|
|
|
|
|
|
|
|
|
|
|
|
|
|
|
|
|
|
|
|
|
|
|
|
|
|
|
|
|
|
|
|
|
|
|
|
|
|
|
|
|
|
|
|
|
|
|
|
||
|
|
|
|
|
|
|
|
|
|
|
|
|
|
|
|
|
|
|
|
|
|
|
|
|
|
|
|
|
|
|
|
|
|
|
|
|
|
|
|
|
|
|
|
|
|
|
|
|
|
|
|
|
|
|
|
|
|
|
|
|
|
|
|
|
|
|
|
|
|
|
|
|
|
|
|
|
|
|
|
|
|
|
|
|
|
|
|
|
|
|
|
|
|
|
|
|
|
|
|
|
|
|
|
|
|
|
|
|
|
|
|
|
|
|
|
|
|
|
|
|
|
|
|
|
|
|
|
|
|
|
|
|
|
|
|
|
|
|
|
|
|
|
|
|
|
|
|
|
|
|
|
|
|
|
|
|
|
|
|
|
|
|
|
|
|
|
|
|
|
|
|
|
|
|
|
|
|
|
|
|
|
|
|
|
|
|
|
|
|
|
|
|
|
|
|
|
|
|
|
|
|
|
|
|
|
|
|
|
|
|
|
|
|
|
|
|
|
|
|
|
|
|
|
|
|
|
|
|
|
|
|
|
|
|
|
|
|
|
|
|
|
|
|
|
|
|
|
|
|
|
|
|
|
|
|
|
|
|
|
|
|
|
|
|
|
|
|
|
|
|
|
|
|
|
|
|
|
|
|
|
|
|
|
|
|
|
|
|
|
|
|
|
|
|
|
|
|
|
|
|
|
|
|
|
|
|
|
|
|
|
|
|
|
|
|
|
|
|
|
|
|
|
|
|
|
|
|
|
|
|
|
|
|
|
|
|
|
|
|
|
|
|
|
|
|
|
|
|
|
|
|
|
|
|
|
|
|
|
|
|
|
|
|
|
|
|
|
|
|
|
|
|
|
|
|
|
|
|
|
|
|
|
|
|
|
|
|
|
|
|
|
|
|
|
|
|
|
|
|
|
|
|
|
|
|
|
|
|
|
|
|
|
|
|
|
|
|
|
|
|
|
|
|
|
|
|
|
|
|
|
|
|
|
|
|
|
|
|
|
|
|
|
|
|
|
|
|
|
|
|
|
|
|
|
|
|
|
|
|
|
|
|
|
|
|
|
|
|
|
|
|
|
|
|
|
|
|
|
|
|
|
|
|
|
|
|
|
|
|
|
|
|
|
|
|
|
|
|
|
|
|
|
|
|
|
|
|
|
|
|
|
|
|
|
|
|
|
|
|
|
|
|
|
|
|
|
|
|
|
|
|
|
|
|
|
|
|
|
|
|
|
|
|
|
|
|
|
|
|
|
|
|
|
|
|
|
|
|
|
|
|
|
|
|
|
|
|
|
|
|
|
|
|
|
|
|
|
|
|
|
|
|
|
|
|
|
|
|
|
|
|
|
|
|
|
|
|
|
|
|
|
|
|
|
|
|
|
|
|
|
|
|
|
|
|
|
|
|
|
|
|
|
|
|
|
|
|
|
|
|
|
|
|
|
|
|
|
|
|
|
|
|
|
|
|
|
|
|
|
|
|
|
|
|
|
|
|
|
|
|
|
|
|
|
|
|
|
|
|
|
|
|
|
|
|
|
|
|
|
|
|
|
|
|
|
|
|
|
|
|
|
|
|
|
|
|
|
|
|
|
|
|
|
|
|
|
|
|
|
|
|
|
|
|
|
|
|
|
|
|
|
|
|
|
|
|
|
|
|
|
|
|
|
|
|
|
|
|
|
|
|
|
|
|
|
|
|
|
|
|
|
|
|
|
|
|
|
|
|
|
|
|
|
|
|
|
|
|
|
|
|
|
|
|
|
|
|
|
|
|
|
|
|
|
|
|
|
|
|
|
|
|
|
|
|
|
|
|
|
|
|
|
|
|
|
|
|
|
|
|
|
|
|
|
|
|
|
|
|
|
|
|
|
|
|
|
|
|
|
|
|
|
|
|
|
|
|
|
|
|
|
|
|
|
|
|
|
|
|
|
|
|
|
|
|
|
|
|
|
|
|
|
|
|
|
|
|
|
|
|
|
|
|
||||||||
|
|
|
|
|
|
|
|
|
|
|
|
|
|
|
|
|
|
|
|
|
|
|
|
|
|
|
|
|
|
|
|
|
|
|
|
|
|
|
||||||||||
|
|
|
|
|
|
|
|
|
|
|
|
|
|
|
|
|
|
|
|
|
|
|
|
|
|
|
|
|
|
|
|
|
|
|
|
|
|
|
||||||||||
|
|
|
|
|
|
|
|
|
|
|
|
|
|
|
|
|
|
|
|
|
|
|
|
|
|
|
|
|
|
|
|
|
|
|
|
|
|
|||||||||||
|
|
|
|
|
|
|
|
|
|
|
|
|
|
|
|
|
|
|
|
|
|
|
|
|
|
|
|
|
|
|
|
|
|
|
|
|
||||||||||||
|
|
|
|
|
|
|
|
|
|
|
|
|
|
|
|
|
|
|
|
|
|
|
|
|
|
|
|
|
|
|
|
|
|
|
|
|
|
|||||||||||
|
|
|
|
|
|
|
|
|
|
|
|
|
|
|
|
|
|
|
|
|
|
|
|
|
|
|
|
|
|
|
|
|
|
|
|
|
||||||||||||
|
|
|
|
|
|
|
|
|
|
|
|
|
|
|
|
|
|
|
|
|
|
|
|
|
|
|
|
|
|
|
|
|
|
|
|
|
|
|||||||||||
|
|
|
|
|
|
|
|
|
|
|
|
|
|
|
|
|
|
|
|
|
|
|
|
|
|
|
|
|
|
|
|
|
|
|
|
|
|
|
|
|
|
|
|
|||||
|
|
|
|
|
|
|
|
|
|
|
|
|
|
|
|
|
|
|
|
|
|
|
|
|
|
|
|
|
|
|
|
|
|
|
|
|
|
|
|
|
|
|
|
|
|
|
|
|
|
|
|
|
|
|
|
|
|
|
|
|
|
|
|
|
|
|
|
|
|
|
|
|
|
|
|
|
|
|
|
|
|
|
|
|
|
|
|
|
|
|
|
|
|
|
|
|
|
|
|
|
|
|
|
|
|
|
|
|
|
|
|
|
|
|
|
|
|
|
|
|
|
|
|
|
|
|
|
|
|
|
|
|
|
|
|
|
|
|
|
|
|
|
|
|
|
|
|
|
|
|
|
|
|
|
|
|
|
|
|
|
|
|
|
|
|
|
|
|
|
|
|
|
|
|
|
|
|
|
|
|
|
|
|
|
|
|
|
|
|
|
|
|
|
|
|
|
|
|
|
|
|
|
|
|
|
|
|
|
|
|
|
|
|
|
|
|
|
|
|
|
|
|
|
|
|
|
|
|
|
|
|
|
|
|
|
|
|
|
|
|
|
|
|
|
|
|
|
|
|
|
|
|
|
|
|
|
|
|
|
|
|
|
|
|
|
|
|
|
|
|
|
|
|
|
|
|
|
|
|
|
|
|
|
|
|
|
|
|
|
|
|
|
|
|
|
|
|
|
|
|
|
|
|
|
|
|
|
|
|
|
|
|
|
|
|
|
|
|
|
|
|
|
|
|
|
|
|
|
|
|
|
|
|
|
|
|
|
|
|
|
|
|
|
|
|
|
|
|
|
|
|
|
|
|
|
|
|
|
|
|
|
|
|
|
|
|
|
|
|
|
|
|
|
|
|
|
|
|
|
|
|
|
|
|
|
|
|
|
|
|
|
|
|
|
|
|
|
|
|
|
|
|
|
|
|
|
|
|
|
|
|
|
|
|
|
|
|
|
|
|
|
|
|
|
|
|
|
|
|
|
|
|
|
|
|
|
|
|
|
|
|
|
|
|
|
|
|
|
|
|
|
|
|
|
|
|
|
|
|
|
|
|
|
|
|
|
|
|
|
|
|
|
|
|
|
|
|
|
|
|
|
|
|
|
|
|
|
|
|
|
|
|
|
|
|
|
|
|
|
|
|
|
|
|
|
|
|
|
|
|
|
|
|
|
|
|
|
|
|
|
|
|
|
|
|
|
|
|
|
|
|
|
|
|
|
|
|
|
|
|
|
|
|
|
|
|
|
|
|
|
|
|
|
|
|
|
|
|
|
|
|
|
|
|
|
|
|
|
|
|
|
|
|
|
|
|
|
|
|
|
|
|
|
|
|
|
|
|
|
|
|
|
|
|
|
|
|
|
|
|
|
|
|
|
|
|
|
|
|
|
|
|
|
|
|
|
|
|
|
|
|
|
|
|
|
|
|
|
|
|
|
|
|
|
|
|
|
|
|
|
|
|
|
|
|
|
|
|
|
|
|
|
|
|
|
|
|
|
|
|
|
|
|
|
|
|
|
|
|
|
|
|
|
|
|
|
|
|
|
|
|
|
|
|
|
|
|
|
|
|
|
|
|
|
|
|
|
|
|
|
|
|
|
|
|
|
|
|
|
|
|
|
|
|
|
|
|
|
|
|
|
|
|
|
|
|
|
|
|
|
|
|
|
|
|
|
|
|
|
|
|
|
|
|
|
|
|
|
|
|
|
|
|
|
|
|
|
|
|
|
|
|
|
|
|
|
|
|
|
|
|
|
|
|
|
|
|
|
|
|
|
|
|
|
|
|
|
|
|
|
|
|
|
|
|
|
|
|
|
|
|
|
|
|
|
|
|
|
|
|
|
|
|
|
|
|
|
|
|
|
|
|
|
|
|
|
|
|
|
|
|
|
|
|
|
|
|
|
|
|
|
|
|
|
|
|
|
|
|
|
|
|
|
|
|
|
|
|
|
|
|
|
|
|
|
|
|
|
|
|
|
|
|
|
|
|
|
|
|
|
|
|
|
|
|
|
|
|
|
|
|
|
|
|
|
|
|
|
|
|
|
|
|
|
|
|
|
|
|
|
|
|
|
|
|
|
|
|
|
|
|
|
|
|
|
|
|
|
|
|
|
|
|
|
|
|
|
|
|
|
|
|
|
|
|
|
|
|
|
|
|
|
|
|
|
|
|
|
|
|
|
|
|
|
|
|
|
|
|
|
|
|
|
|
|
|
|
||
|
|
|
|
|
|
|
|
|
|
|
|
|
|
|
|
|
|
|
|
|
|
|
|
|
|
|
|
|
|
|
|
|
|
|
|
|
|
|
|
|
|
|
|
|
|
|
||
|
|
|
|
|
|
|
|
|
|
|
|
|
|
|
|
|
|
|
|
|
|
|
|
|
|
|
|
|
|
|
|
|
|
|
|
|
|
|
|
|
|
|
|
|
|
|
|
|
|
|
|
|
|
|
|
|
|
|
|
|
|
|
|
|
|
|
|
|
|
|
|
|
|
|
|
|
|
|
|
|
|
|
|
|
|
|
|
|
|
|
|
|
|
|
|
||
|
|
|
|
|
|
|
|
|
|
|
|
|
|
|
|
|
|
|
|
|
|
|
|
|
|
|
|
|
|
|
|
|
|
|
|
|
|
|
|
|
|
|
|
|
|
|
||
|
|
|
|
|
|
|
|
|
|
|
|
|
|
|
|
|
|
|
|
|
|
|
|
|
|
|
|
|
|
|
|
|
|
|
|
|
|
|
|
|
|
|
|
|
|
|||
|
|
|
|
|
|
|
|
|
|
|
|
|
|
|
|
|
|
|
|
|
|
|
|
|
|
|
|
|
|
|
|
|
|
|
|
|
|
|
|
|
|
|
|
|
|
|||
|
|
|
|
|
|
|
|
|
|
|
|
|
|
|
|
|
|
|
|
|
|
|
|
|
|
|
|
|
|
|
|
|
|
|
|
|
|
|
|
|
|
|
|
|
||||
|
|
|
|
|
|
|
|
|
|
|
|
|
|
|
|
|
|
|
|
|
|
|
|
|
|
|
|
|
|
|
|
|
|
|
|
|
|
|
|
|
|
|
|
|||||
|
|
|
|
|
|
|
|
|
|
|
|
|
|
|
|
|
|
|
|
|
|
|
|
|
|
|
|
|
|
|
|
|
|
|
|
|
|
|
|
|
|
|
||||||
|
|
|
|
|
|
|
|
|
|
|
|
|
|
|
|
|
|
|
|
|
|
|
|
|
|
|
|
|
|
|
|
|
|
|
|
|
|
|
|
|
|
|
|
|||||
|
|
|
|
|
|
|
|
|
|
|
|
|
|
|
|
|
|
|
|
|
|
|
|
|
|
|
|
|
|
|
|
|
|
|
|
|
|
|
R3 |
|
|
|
|
|||||
|
|
|
|
|
|
|
|
|
|
|
|
|
|
|
|
|
|
|
|
|
|
|
|
|
|
|
|
|
|
|
|
|
|
|
|
|
|
|
|
|
|
|
|
|||||
|
|
|
|
|
|
|
|
|
|
|
|
|
|
|
|
|
|
|
|
|
|
|
|
|
|
|
|
|
|
|
|
|
|
|
|
|
|
|
|
|
|
|
|
|||||
|
|
|
|
|
|
|
|
|
|
|
|
|
|
|
|
|
|
|
|
|
|
|
|
|
|
|
|
|
|
|
|
|
|
|
|
|
|
|
|
|
|
|||||||
|
|
|
|
|
|
|
|
|
|
|
|
|
|
|
|
|
|
|
|
|
|
|
|
|
|
|
|
|
|
|
|
|
|
|
|
|
|
|
|
|
|
|
|
|
|
|||
|
|
|
|
|
|
|
|
|
|
|
|
|
|
|
|
|
|
|
|
|
|
|
|
|
|
|
|
|
|
|
|
|
|
|
|
|
|
|
|
|
|
|
|
|
|
|||
|
|
|
|
|
|
|
|
|
|
|
|
|
|
|
|
|
|
|
|
|
|
|
|
|
|
|
|
|
|
|
|
|
|
|
|
|
|
|
|
|
|
|
|
|
|
|
||
|
|
|
|
|
|
|
|
|
|
|
|
|
|
|
|
|
|
|
|
|
|
|
|
|
|
|
|
|
|
|
|
|
|
|
|
|
|
|
|
|
|
|
|
|
|
|
||
|
|
|
|
|
|
|
|
|
|
|
|
|
|
|
|
|
|
|
|
|
|
|
|
|
|
|
|
|
|
|
|
|
|
|
|
|
|
|
|
|
|
|
|
|
|
|
|
|
|
|
|
|
|
|
|
|
|
|
|
|
|
|
|
|
|
|
|
|
|
|
|
|
|
|
|
|
|
|
|
|
|
|
|
|
|
|
|
|
|
|
|
|
|
|
|||
|
|
|
|
|
|
|
|
|
|
|
|
|
|
|
|
|
|
|
|
|
|
|
|
|
|
|
|
|
|
|
|
|
|
|
|
|
|
|
|
|
|
|
|
|
|
|||
|
|
|
|
|
|
|
|
|
|
|
|
|
|
|
|
|
|
|
|
|
|
|
|
|
|
|
|
|
|
|
|
|
|
|
|
|
|
|
|
|
|
|
|
|
|
|
||
|
|
|
|
|
|
|
|
|
|
|
|
|
|
|
|
|
|
|
|
|
|
|
|
|
|
|
|
|
|
|
|
|
|
|
|
|
|
|
|
|
|
|
|
|
|
|||
|
|
|
|
|
|
|
|
|
|
|
|
|
|
|
|
|
|
|
|
|
|
|
|
|
|
|
|
|
|
|
|
|
|
|
|
|
|
|
|
|
|
|
|
|
|
|
||
|
|
|
|
|
|
|
|
|
|
|
|
|
|
|
|
|
|
|
|
|
|
|
|
|
|
|
|
|
|
|
|
|
|
|
|
|
|
|
|
|
|
|
|
|
|
|||
|
|
|
|
|
|
|
|
|
|
|
|
|
|
|
|
|
|
|
|
|
|
|
|
|
|
|
|
|
|
|
|
|
|
|
|
|
|
|
|
|
|
|
|
|
|
|
||
|
|
|
|
|
|
|
|
|
|
|
|
|
|
|
|
|
|
|
|
|
|
|
|
|
|
|
|
|
|
|
|
|
|
|
|
|
|
|
|
|
|
|
|
|
|
|
|
|
|
|
|
|
|
|
|
|
|
|
|
|
|
|
|
|
|
|
|
|
|
|
|
|
|
|
|
|
|
|
|
|
|
|
|
|
|
|
|
|
|
|
|
|
|
|
|
|
|
|
|
|
|
|
|
|
|
|
|
|
|
|
|
|
|
|
|
|
|
|
|
|
|
|
|
|
|
|
|
|
|
|
|
|
|
|
|
|
|
|
|
|
|
|
|
|
|
|
|
|
|
|
|
|
|
|
|
|
|
|
|
|
|
|
|
|
|
|
|
|
|
|
|
|
|
|
|
|
|
|
|
|
|
|
|
|
|
|
|
|
|
|
|
|
|
||
|
|
|
|
|
|
|
|
|
|
|
|
|
|
|
|
|
|
|
|
|
|
|
|
|
|
|
|
|
|
|
|
|
|
|
|
|
|
|
|
|
|
|
|
|
|
|
|
|
|
|
|
|
|
|
|
|
|
|
|
|
|
|
|
|
|
|
|
|
|
|
|
|
|
|
|
|
|
|
|
|
|
|
|
|
|
|
|
|
|
|
|
|
|
|
|
|
|
|
|
|
|
|
|
|
|
|
|
|
|
|
|
|
|
|
|
|
|
|
|
|
|
|
|
|
|
|
|
|
|
|
|
|
|
|
|
|
|
|
|
|
|
|
|
|||
|
|
|
|
|
|
|
|
|
|
|
|
|
|
|
|
|
|
|
|
|
|
|
|
|
|
|
|
|
|
|
|
|
|
|
|
|
|
|
|
|
|
|
|
|
|
|
||
|
|
|
|
|
|
|
|
|
|
|
|
|
|
|
|
|
|
|
|
|
|
|
|
|
|
|
|
|
|
|
|
|
|
|
|
|
|
|
|
|
|
|
|
|
||||
|
|
|
|
|
|
|
|
|
|
|
|
|
|
|
|
|
|
|
|
|
|
|
|
|
|
|
|
|
|
|
|
|
|
|
|
|
|
|
|
|
|
|
|
|
|
|
||
|
|
|
|
|
|
|
|
|
|
|
|
|
|
|
|
|
|
|
|
|
|
|
|
|
|
|
|
|
|
|
|
|
|
|
|
|
|
|
|
|
|
|
|
|
|
|
||
|
|
|
|
|
|
|
|
|
|
|
|
|
|
|
|
|
|
|
|
|
|
|
|
|
|
|
|
|
|
|
|
|
|
|
|
|
|
|
|
|
|
|
|
|
|
|
|
|
|
|
|
|
|
|
|
|
|
|
|
|
|
|
|
|
|
|
|
|
|
|
|
|
|
|
|
|
|
|
|
|
|
|
|
|
|
|
|
|
|
|
|
|
|
|
|
||
|
|
|
|
|
|
|
|
|
|
|
|
|
|
|
|
|
|
|
|
|
|
|
|
|
|
|
|
|
|
|
|
|
|
|
|
|
|
|
|
|
|
|
|
|
|
|
|
|
|
|
|
|
|
|
|
|
|
|
|
|
|
|
|
|
|
|
|
|
|
|
|
|
|
|
|
|
|
|
|
|
|
|
|
|
|
|
|
|
|
|
|
|
|
|
|
||
|
|
|
|
|
|
|
|
|
|
|
|
|
|
|
|
|
|
|
|
|
|
|
|
|
|
|
|
|
|
|
|
|
|
|
|
|
|
|
|
|
|
|
|
|
|
|||
|
|
|
|
|
|
|
|
|
|
|
|
|
|
|
|
|
|
|
|
|
|
|
|
|
|
|
|
|
|
|
|
|
|
|
|
|
|
|
|
|
|
|
|
|
|
|
|
|
|
|
|
|
|
|
|
|
|
|
|
|
|
|
|
|
|
|
|
|
|
|
|
|
|
|
|
|
|
|
|
|
|
|
|
|
|
|
|
|
|
|
|
|
|
|
|
|
|
|
|
|
|
|
|
|
|
|
|
|
|
|
|
|
|
|
|
|
|
|
|
|
|
|
|
|
|
|
|
|
|
|
|
|
|
|
|
|
|
|
|
|
|
|
|
|
|
|
|
|
|
|
|
|
|
|
|
|
|
|
|
|
|
|
|
|
|
|
|
|
|
|
|
|
|
|
|
|
|
|
|
|
|
|
|
|
|
|
|
|
|
|
|
|
|
|
|
1 |
|
|
|
|
|
|
|
|
|
|
|
|
|
|
|
|
|
|
|
|
|
|
|
|
|
|
|
|
|
|
|
|
|
|
|
|
|
|
|
|
|
|
|
|
|
|
|
|
|
|
|
|
|
|
|
|
|
|
|
|
|
|
|
|
|
|
|
|
|
|
|
|
|
|
|
|
|
|
|
|
|
|
|
|
|
|
|
|
|
|
|
|
|
|
|
|
|
|
|
|
|
|
|
|
|
|
|
|
|
|
|
|
|
|
|
|
|
|
|
|
|
|
|
|
|
|
|
|
|
|
|
|
|
|
|
|
|
|
|
|
|
|
|
|
|
|
|
|
|
|
|
|
|
|
|
|
|
|
|
|
|
|
|
|
|
|
|
|
|
|
|
|
|
|
|
|
|
|
|
|
|
|
|
|
|
|
|
|
|
|
|
|
|
|
|
|
|
|
|
|
|
|
|
|
|
|
|
|
|
|
|
|
|
|
|
|
|
|
|
|
|
|
|
|
|
|
|
|
|
|
|
|
|
|
|
|
|
|
|
|
|
|
|
|
|
|
|
|
|
|
|
|
|
|
|
|
|
|
|
|
|
|
|
|
|
|
|
|
|
|
|
|
|
|
|
|
|
|
|
|
|
|
|
|
|
|
|
|
|
|
|
|
|
|
|
|
|
|
|
|
|
|
|
|
|
|
|
|
|
|
|
|
|
|
|
|
|
|
|
|
|
|
|
|
|
|
|
|
|
|
|
|
|
|
|
|
|
|
|
|
|
|
|
|
|
|
|
|
|
|
|
|
|
|
|
|
|
|
|
|
|
|
|
|
|
|
|
|
|
|
|
|
|
|
|
|
|
|
|
|
|
|
|
|
|
|
|
|
|
|
|
|
|
|
|
|
|
|
|
|
|
|
|
|
|
|
|
|
|
|
|
|
|
|
|
|
|
|
|
|
|
|
|
|
|
|
|
|
|
|
|
|
|
|
|
|
|
|
|
|
|
|
|
|
|
|
|
|
|
|
|
|
|
|
|
|
|
|
|
|
|
|
|
|
|
|
|
|
|
|
|
|
|
|
|
|
|
|
|
|
|
|
|
|
|
|
|
|
|
|
|
|
|
|
|
|
|
|
|
|
|
|
|
|
|
|
|
|
|
|
|
|
|
|
|
|
|
|
|
|
|
|
|
|
|
|
|
|
|
|
|
|
|
|
|
|
|
|
|
|
|
|
|
|
|
|
|
|
|
|
|
|
|
|
|
|
|
|
|
|
|
|
|
|
|
|
|
|
|
|
|
|
|
|
|
|
|
|
|
|
|
|
|
|
|
|
|
|
|
|
|
|
|
|
|
|
|
|
|
|
|
|
|
|
|
|
|
|
|
|
|
|
|
|
|
|
|
|
|
|
|
|
|
|
|
|
|
|
|
|
|
|
|
|
|
|
|
|
|
|
|
|
|
|
|
|
|
|
|
|
|
|
|
|
|
|
|
|
|
|
|
|
|
|
|
|
|
|
|
|
|
|
|
|
|
|
|
|
|
|
|
|
|
|
|
Uso del Timer (quando previsto) - Fig.R |
|
Suggerimenti |
|
|
||||||||||||||||||||||||||||||||||||||||||||
Per l’utilizzo del timer l'interruttore generale |
1 |
deve essere |
|
|
|||
|
|
||
acceso Pos."I". |
|
|
Impostazione ore e minuti
Nota: Non ruotare manualmente l'orologio con il selettore
(3) (Fig.R) sulla posizione (Orologio) (Fig.R2) in quanto si potrebbero danneggiare i componenti elettronici.
Per impostare l'orario del Timer procedere come segue:
•Posizionare il selettore (3) (Fig.R) sulla posizione "0" (Fig.R3);
•Ruotare la lancetta dei minuti (1) (Fig.R) in senso orario fino ad impostare l’ora corrente (l'ora impostata viene indicata dalla freccia (4) (Fig.R).
Impostazione intervalli di accensione e spegnimento
• Portare i cavalieri (2) (Fig.R) nella posizione desiderata:
- |
Cavalieri abbassati |
= |
intervallo di accensione |
- |
Cavalieri sollevati |
= |
intervallo di spegnimento |
•Selezionare sul pannello frontale le modalità di funzionamento:
-MODO FREDDO oppure MODO VENTILAZIONE
-Velocità alta o bassa
-Posizione della manopola
•Portare il selettore (3) (Fig.R) in posizione "orologio"  (Fig.R2).
Esclusione dei programmi del timer (climatizzatore sempre acceso)
•Portando il selettore (3) in posizione "I" (Fig.R1) il climatizzatore rimane sempre acceso.
•In qualunque momento il timer può essere riattivato portando il selettore in posizione "orologio"  (Fig.R2).
•Portando il selettore (3) in posizione "0" (Fig.R3) il climatizzatore è acceso ma non funzionante.
•Con temperature ambiente non elevate e/o di notte, selezionare la minima velocità così da non abbassare eccessivamente la temperatura ambiente, ed ottenere un sensibile risparmio energetico.
•In condizioni climatiche di elevate temperature ambiente si consiglia di ruotare al massimo, in senso orario, la
manopola  . Raggiunta la temperatura desiderata
ruotare la manopola in senso antiorario fino allo spegnimento della spia  .
.
Orientamento flusso aria
• Agire manualmente sulle alette del diffusore aria (4)
(Fig.A).
Per una migliore diffusione dell'aria, si consiglia di orientare le alette verso l'alto.
INFORMAZIONI AGGIUNTIVE
•Per MANUTENZIONE E CONSIGLI si rimanda a pagina 16.
•Per SVUOTAMENTO VASCHETTA CONDENSA si rimanda a pagina 16.
•Per DIAGNOSTICA e TABELLA CAUSE E RIMEDI si rimanda a pagina 17.
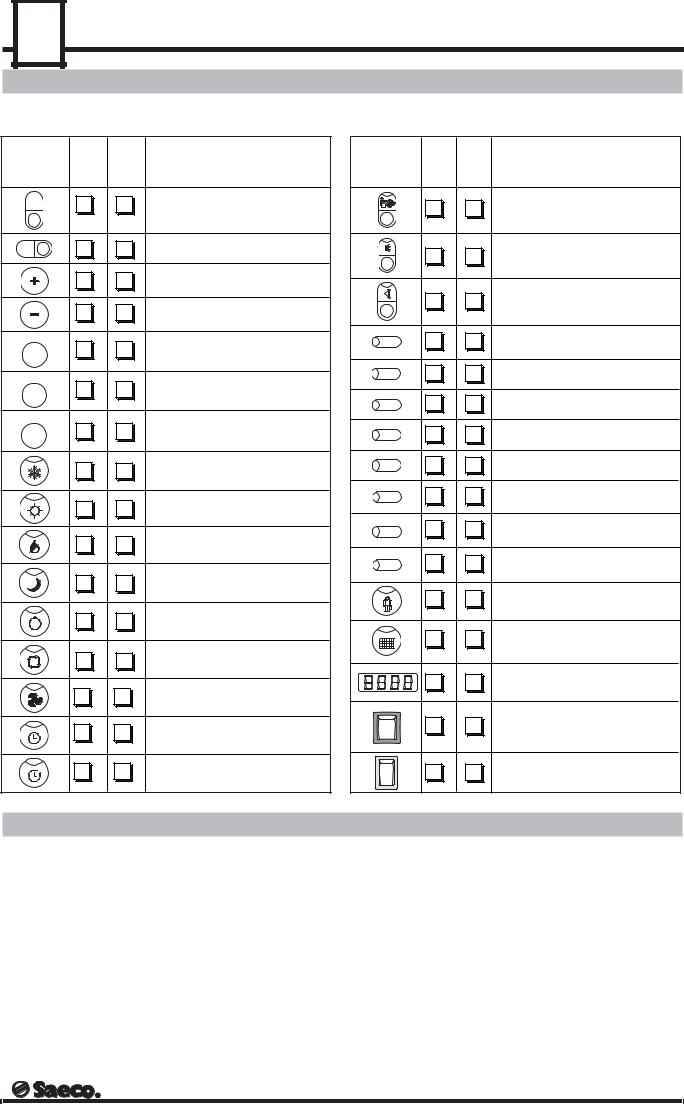
10 |
USO DEL CLIMATIZZATORE - TELECOMANDO OPZIONALE (MODELLI E - EH)
USO DEL CLIMATIZZATORE (MODELLI E - EH)
LEGENDA COMANDI E SEGNALAZIONI - Fig.A - F
COMANDO |
TUAREG 8E |
TUAREG EH8 |
DENOMINAZIONE |
COMANDO |
TUAREG 8E |
TUAREG EH8 |
|
|
|
|
|||
|
2 2 Pulsante "On/Off" |
|
2 2 |
|||
MODE |
2 2 Selettore modo di funzionamento |
|
2 2 |
|||
|
2 |
2 Pulsante di incremento |
|
|||
|
|
2 2 |
||||
|
2 |
2 Pulsante di decremento |
|
|||
|
|
|
|
|||
|
2 2 Pulsante imposta Timer |
|
2 2 |
|
|||
|
|
2 2 |
|
|
2 2 Pulsante imposta ora e minuti |
|
|
|
|
2 2 |
|
|
|
|
|
ENTER |
2 2 Pulsante Enter |
|
2 2 |
|
2 2 Spia Modo Freddo |
|
2 2 |
|
2 Spia Modo Riscaldamento |
|
2 2 |
|
|
2 2 |
|
|
2 2 Spia Modo Deumidificazione |
|
|
|
|
2 2 |
|
|
2 2 Spia Modo Notturno |
|
|
|
|
2 2 |
|
|
2 2 Spia Modo Economy |
|
|
|
|
2 2 |
|
|
2 2 Spia Modo Automatico |
|
|
|
|
2 2 |
|
|
2 2 Spia Modo Ventilazione |
|
|
|
|
|
|
|
2 2 Spia Modo Timer |
1 |
2 2 |
zzz |
2 2 Spia Modo Timer "sleep" |
|
2 2 |
DENOMINAZIONE
Pulsante variazione velocità ventilatore interno
Comando Ventola manuale
Pulsante/spia Ionizzatore
Pulsante/spia start/stop oscillazione alette
Spia Programma 1
Spia Programma 2
Spia Programma 3
Spia Programma 4
Spia inizio Programma Timer
Spia fine Programma Timer
Spia Modo Programma Timer
Spia Temperatura Timer
Allarme richiesta Assistenza Tecnica
Segnalazione pulizia filtro
Display
Interruttore Generale
Pulsante comando Pompa drenaggio
TELECOMANDO OPZIONALE (MODELLI E-EH)
I modelli E-EH sono predisposti per l'utilizzo del telecomando a raggi infrarossi, che permette di impostare o modificare il funzionamento del climatizzatore a distanza.
Precauzioni
Per il buon funzionamento del telecomando evitare le seguenti condizioni:
•Esposizione diretta ai raggi del sole
•Dietro a tendaggi od altri ostacoli
•Ad una distanza superiore a 5 metri dal climatizzatore
•In luoghi eccessivamente caldi o troppo freddi
•Dove può essere soggetto a interferenze elettriche o magnetiche.
Inserimento delle batterie
•Togliere il coperchio posto sul retro del telecomando
•Inserire 2 batterie da 1,5 V-DC tipo AAA rispettando la polarità indicata sul telecomando.
Utilizzo
Per poter utilizzare il telecomando, il condizionatore deve essere alimentato e con l'interruttore generale in posizione "I". Indirizzare il telecomando con la testina del trasmettitore verso il display posto sulla mascherina comandi del climatizzatore e premere i pulsanti interessati. Per l'impostazione dei dati si rimanda al capitolo "USO DEL CLIMATIZZATORE" in quanto nel telecomando sono riportati i tasti aventi le medesime caratteristiche di funzionamento dei comandi posti sulla mascherina del climatizzatore.
USO DEL CLIMATIZZATORE (MODELLI E - EH)
11 |
MODELLI E - EH
I modelli E eseguono il raffreddamento e la deumidificazione dell'ambiente. I modelli EH oltre alle funzioni di raffreddamento e deumidificazione effettuano il riscaldamento dell'ambiente. Nelle successive sezioni di questo manuale saranno indicate le funzioni specifiche per ogni modello.
MODI INTELLIGENTI |
ITALIANO |
|
I modi di funzionamento sono stati studiati per ottenere le con- |
||
|
||
dizioni ambientali richieste nel modo più rapido ed economi- |
|
|
co. Per l’utente è sufficiente selezionare il modo e la tempera- |
|
|
tura, quindi il climatizzatore in modo automatico ed intelligente |
|
|
selezionerà le più idonee velocità e temperature. |
|
Accensione generale
Modo ventilazione
• Premere 1 , l’unità si pone nella condizione di riposo
• Durante l’uso normale si consiglia di effettuare l’accensio-
|
|
ne o lo spegnimento attraverso il pulsante |
, consenten- |
do così all’unità di rimanere alimentata attraverso la rete.
• Lo spegnimento della macchina mediante il pulsante
1
comporta la perdita delle impostazioni dell'ora; le
impostazioni dei Timer (vedi Modo Timer) saranno conservate in memoria.
Nel modo ventilazione è attivo solo il ventilatore dell’unità interna. Pertanto vengono eseguiti il ricircolo, la filtrazione e la depurazione dell' aria senza variazione di temperatura ed umidità.
La selezione della velocità può avvenire in modo automatico o manuale.
All'attivazione del "MODO VENTILAZIONE" l'apparecchio si predispone in ventilazione automatica.
La spia |
spenta indica che la selezione delle velocità del |
ventilatore è eseguita automaticamente.
Impostazione Ora
•Premere il pulsante  , si visualizza l'ora corrente.
•Premere i pulsanti  e
e 

 per modificare l'ora.
ENTER
•Premere  per convalidare la modifica e passare ai minuti.
•Premere i pulsanti  e
e 

 per modificare i minuti.
|
ENTER |
• Premere |
per convalidare la modifica ed uscire dal- |
la modalità "IMPOSTAZIONE ORA".
USO SEMPLIFICATO
• Ad unità alimentata premere il tasto o MODE , il display
visualizza la temperatura impostata precedentemente.
• Premendo ripetutamente il tasto MODE |
si seleziona il |
modo di funzionamento desiderato secondo quanto indicato nella "LEGENDA COMANDI E SEGNALAZIONI"
•Premere  o
o  per impostare la temperatura che verrà visualizzata sul display.
•L'attivazione del modo di funzionamento, è segnalata dal- l'accensione fissa della spia relativa al "MODO" selezionato.
|
|
• Per spegnere l’unità premere il tasto |
. |
Tutte le funzioni sono disabilitate ed il display indica l'ora impostata. Se non è stata impostata alcuna ora il display visualizzerà 00:00 lampeggiante.
Ventilazione automatica
L'apparecchio controlla la differenza tra la temperatura ambiente e quella impostata dall'utilizzatore e quindi sceglie la velocità più idonea secondo la seguente logica di funzionamento:
maggiore differenza di temperatura - massima velocità; minore differenza di temperatura - minima velocità.
Ventilazione manuale
Premendo il pulsante |
vengono selezionate le tre velocità |
oppure il modo automatico.
Modo freddo
Il modo freddo consente di raffreddare rapidamente l’ambiente e ridurre l’umidità dell’aria in modo da ottenere le più confortevoli condizioni ambientali.
La selezione della velocità può avvenire in modo automatico o manuale.
All'attivazione del "MODO FREDDO" l'apparecchio si predispone in raffreddamento automatico.
La spia |
spenta indica che la selezione delle velocità del |
ventilatore è eseguita automaticamente.
Raffreddamento automatico
L'apparecchio controlla la differenza tra la temperatura ambiente e quella impostata dall'utilizzatore e quindi sceglie la velocità più idonea secondo la seguente logica di funzionamento :
maggiore differenza di temperatura - massima velocità; minore differenza di temperatura - minima velocità. Raggiunta la temperatutra desiderata il climatizzatore funziona alla minima velocità in modo da garantire la massima silenziosità.

12 |
USO DEL CLIMATIZZATORE (MODELLI E - EH)
Raffreddamento manuale
Modo automatico
Premendo il pulsante vengono selezionate le tre velocità È consigliato per gli ambienti dove si soggiorna per lungo
oppure il modo automatico. |
tempo. Il climatizzatore seleziona, in "MODO AUTOMATICO" le |
|
modalità di trattamento dell'aria: |
||
|
Modo economy |
|
Consente in particolari condizioni il mantenimento della temperatura impostata con il minimo consumo energetico.
•Durante la prima ora di funzionamento il raffreddamento viene eseguito alla minima velocità.
•Dopo la prima ora di funzionamento il raffreddamento è attivo per tre minuti e disattivato per sette.
Modo notturno
Consente di ottenere le condizioni climatiche desiderate ed elevato confort acustico con una attenzione particolare al consumo energetico.
Pertanto il ventilatore è sempre alla minima velocità e viene corretta la temperatura impostata per seguire l’andamento della temperatura ambiente durante le ore notturne.
•Se la temperatura ambiente è ± 1°C della temperatura impostata viene abilitata la sola ventilazione.
•Se la temperatura ambiente è maggiore di oltre 1°C rispetto alla temperatura impostata, viene attivato il minimo raffreddamento.
•Dopo un’ora di funzionamento la temperatura impostata viene aumentata di 1°C.
•Dopo 2 ore di funzionamento la temperatura impostata viene aumentata di 2 °C.
Sequenza delle operazioni
• Selezionare il modo di funzionamento ventilazione me-
diante il tasto MODE |
. |
• Selezionare la temperatura desiderata mediante i tasti
 e
e 
• Selezionare il modo di funzionamento notturno mediante
il tasto MODE |
. |
Modo deumidificazione
Consente di deumidificare l’aria pur mantenendo controllata la temperatura ambiente.
Questo modo di funzionamento esegue cicli di deumidificazione di durata determinata dalla differenza tra la temperatura ambiente e la temperatura selezionata.
Durante il ciclo di funzionamento il ventilatore interno funziona sempre alla minima velocità.
L’eliminazione dell’umidità dell’aria consente di ottenere delle ottimali condizioni di benessere.
Infatti durante i periodi estivi è consigliato soggiornare in ambienti con temperature comprese tra 24-26°C ed umidità relativa di circa il 45÷50%.
-Raffreddamento
-Ventilazione
•Se la temperatura ambiente è ± 1°C rispetto alla temperatura impostata, viene abilitata la sola ventilazione.
•Se la temperatura ambiente è maggiore di oltre 1°C rispetto alla temperatura impostata, viene attivato il raffreddamento.
•L'apparecchio controlla la differenza tra la temperatura ambiente e quella impostata dall'utilizzatore, quindi sceglie la velocità più idonea secondo la seguente logica di funzionamento :
maggiore differenza di temperatura - massima velocità; minore differenza di temperatura - minima velocità.
Modo Riscaldamento (modello EH)
Esegue il riscaldamento dell’ambiente mediante una resistenza elettrica:
• Se la temperatura ambiente è inferiore di 1°C rispetto alla temperatura impostata, viene attivato il "MODO RISCALDAMENTO".
Modo timer
Selezionando questo modo di funzionamento la macchina esegue automaticamente fino a 4 diversi programmi (Timer) precedentemente impostati dall’utente.
Per fare funzionare detta modalità nella macchina occorre che l’orario impostato nella stessa sia corretto, vedi paragrafo “Impostazione ora”.
Di seguito verranno identificate le sezioni per:
a)impostare i Timer;
b)modificare le impostazioni dei Timer;
c)escludere le impostazioni dei Timer;
d)uscire dall’impostazione dei Timer.
a) Impostare i Timer
Per ogni programma (Timer) occorre impostare l’ora d’inizio e di fine ciclo, la modalità e la temperatura di funzionamento.
Al fine di evitare errori nell’impostazione occorre tenere presente le seguenti indicazioni:
• è indispensabile che gli intervalli di funzionamento, dei Timer impostati, non si sovrappongano fra di loro; in caso di sovrapposizione verrà eseguito solo il Timer che ha orario di inizio più basso.
Es.: Timer |
1 |
ora |
d’inizio |
17,00 |
ora di fine 19,00 |
Timer |
2 |
ora |
d’inizio |
18,00 |
ora di fine 22,00 |
|
|
|
|
|
|
Con questa impostazione verrà eseguito solo il Timer 1 in quanto l’orario di inizio del Timer 2 è sovrapposto all’intervallo di funzionamento del Timer 1.
USO DEL CLIMATIZZATORE (MODELLI E - EH) |
|
|
|
13 |
|
|
||
|
|
|
|
|
|
|||
• In ogni Timer l’impostazione dell’ora di inizio deve essere |
|
|
|
|
|
|
||
minore dell’impostazione dell’ora di fine; in caso contra- |
|
L’impostazione di Timer 1 è terminata; premere |
per |
|
||||
rio il Timer non verrà eseguito. |
|
|
memorizzare i dati selezionati, rimane acceso il led rela- |
ITALIANO |
||||
|
|
|
|
|||||
Es.: Timer 1 |
ora d’inizio 17,00 |
ora di fine 19,00 (SI) |
|
tivo. |
|
|
|
|
|
|
|
|
|
||||
Timer 2 |
ora d’inizio 22,00 |
ora di fine 02,00 (NO) |
Se si desidera uscire dall’impostazione dei Timer eseguire le |
|||||
|
|
|
||||||
Il Timer 2 non verrà eseguito. |
|
istruzioni della sezione relativa; se si desidera procedere |
|
|||||
|
all’impostazione del Timer 2 procedere come segue: |
|
|
|||||
Se si desidera far funzionare la macchina in modo timer, nel |
|
|
||||||
|
|
|
|
|
|
|||
periodo serale e notturno, occorre impostare 2 Timer: |
1 |
Premere il pulsante |
|
|
|
|||
|
|
|
fino all’accensione del led |
; |
|
|||
Es.: Timer 1 |
ora d’inizio 19,00 |
ora di fine 23,30 |
|
|
ENTER |
|
|
|
Timer 2 ora d’inizio 00,00 |
ora di fine 07,00 |
|
|
|
|
|
||
2 |
Premere |
per confermare che si desidera imposta- |
|
|||||
|
|
|
|
|||||
Tale procedura si rende necessaria in quanto non viene gestito il passaggio tra un giorno e quello successivo.
Suggerimenti
•È consigliato impostare i Timer in modo che vengano eseguiti nell’ordine desiderato; questo permetterà una gestione più razionale degli intervalli di funzionamento.
•Si consiglia di trascrivere su un foglio le impostazioni che si effettuano nei Timer; tale procedura ridurrà il rischio di sovrapposizioni delle impostazioni e vi permetterà una migliore gestione della Vostra macchina.
Impostazione Timer
Di seguito verranno descritte le operazioni per impostare il Timer 1:
|
ON/OFF |
1 Spegnere l’apparecchio mediante il pulsante |
; il display |
visualizzerà l’ora attuale.
2 Premere una volta il pulsante  per selezionare il Timer 1;
il led relativo si illumina. Il display non visualizza più nessuna informazione.
ENTER
3 Premere  per confermare che si desidera impostare il
Timer1. Si accende la spia |
|
. |
4 Utilizzare i pulsanti  e
e  per impostare l’ora di inizio ciclo; questa è visualizzata sul display.
|
ENTER |
5 Premere |
per confermare il dato. Si accende la spia . |
6 Utilizzare i pulsanti  e
e  per impostare l’ora di fine ciclo; questa è visualizzata sul display.
|
|
ENTER |
|
|
7 |
Premere |
per confermare il dato. Si accende la spia |
. |
|
8 |
Premere il pulsante MODE |
fino a selezionare il modo di |
||
|
funzionamento desiderato; il Led relativo si illumina. |
|
||
ENTER
9Premere  per confermare la selezione. Si accende la spia .
10Utilizzare i pulsanti  e
e  per impostare la tempera-
tura desiderata; questa è visualizzata sul display.
ENTER
11 Premere  per confermare il dato.
re il Timer 2. Si accende la spia |
|
; |
3Per impostare questo Timer eseguire le istruzioni dal punto 4 al punto al punto 10 che sono state illustrate per l’impostazione del Timer 1;
ENTER
4 Premere  per confermare il dato. L’impostazione di
Timer 2 è terminata; premere  per memorizzare i dati selezionati, rimane acceso il led relativo.
Se si desidera uscire dall’impostazione dei Timer eseguire le istruzioni della sezione relativa; se si desidera procedere all’impostazione del Timer 3 procedere come segue:
|
|
|
|
|
|
|
1 |
Premere il pulsante |
fino all’accensione del led |
; |
|||
|
|
ENTER |
|
|
|
|
2 |
Premere |
per confermare che si desidera imposta- |
||||
|
re il Timer 3. Si accende la spia |
|
; |
|
||
3Per impostare questo Timer eseguire le istruzioni dal punto 4 al punto al punto 10 che sono state illustrate per l’impostazione del Timer 1;
ENTER
4 Premere  per confermare il dato. L’impostazione di
Timer 3 è terminata; premere  per memorizzare i dati selezionati, rimane acceso il led relativo.
Se si desidera uscire dall’impostazione dei Timer eseguire le istruzioni della sezione relativa; se si desidera procedere all’impostazione del Timer 4 procedere come segue:
|
|
|
|
|
|
|
1 |
Premere il pulsante |
fino all’accensione del led |
; |
|||
|
|
ENTER |
|
|
|
|
2 |
Premere |
per confermare che si desidera imposta- |
||||
|
re il Timer 4. Si accende la spia |
|
; |
|
||
|
|
|
|
|
|
|
3Per impostare questo Timer eseguire le istruzioni dal punto 4 al punto al punto 10 che sono state illustrate per l’impostazione del Timer 1;
ENTER
4 Premere  per confermare il dato. L’impostazione di
Timer 4 è terminata; premere  per memorizzare i dati selezionati, rimane acceso il led relativo.
Per uscire dall’impostazione dei Timer eseguire le istruzioni della sezione relativa.
14 |
USO DEL CLIMATIZZATORE (MODELLI E - EH)
b) Modificare le impostazioni dei Timer
Questa sezione ha la funzione di descrivere le operazioni da eseguire per modificare le impostazioni dei Timer.
Per eseguire queste modifiche procedere come segue:
|
ON/OFF |
1 Spegnere l’apparecchio mediante il pulsante |
; il display |
visualizzerà l’ora attuale.
2 Premere il pulsante  per selezionare il Timer che si
desidera modificare; il led relativo si illumina. Il display non visualizza più nessuna informazione.
ENTER
3 Premere  per confermare che si desidera modifica-
re il Timer selezionato. Si accende la spia |
|
. |
4 Utilizzare i pulsanti  o
o  per modificare l’ora di inizio ciclo; questa è visualizzata sul display.
ENTER
5Premere  per confermare il dato. Si accende la spia
.
6Utilizzare i pulsanti  o
o  per modificare l’ora di
fine ciclo; questa è visualizzata sul display.
ENTER
7Premere  per confermare il dato. Si accende la spia
.
ENTER
3Premere  per confermare che si desidera escludere il Timer selezionato. Si accende la spia “ ”.
4Utilizzare i pulsanti  o
o  per impostare l’ora di
inizio ciclo su 00:00 ; questa è visualizzata sul display.
ENTER
5Premere  per confermare il dato. Si accende la spia
.
6Utilizzare i pulsanti  o
o  per impostare l’ora di
fine ciclo su 00:00; questa è visualizzata sul display.
ENTER
7 Premere  per confermare il dato. Si accende la spia
. |
|
|
ENTER |
8 Premere |
. Si accende la spia . |
ENTER
9 Premere  .
.
10 Premere  ; il Timer selezionato è stato disattivato.
Se si desidera uscire dall’esclusione dei Timer eseguire le istruzioni della sezione relativa; se si desidera procedere al- l’esclusione di un ulteriore Timer eseguire le istruzioni appena descritte dal punto 2.
8 Premere il pulsante MODE |
fino a modificare il modo de- |
siderato; il Led relativo s’illumina.
ENTER
9Premere  per confermare la selezione. Si accende la spia .
10Utilizzare i pulsanti  o
o  per modificare la tempe-
ratura desiderata; questa è visualizzata sul display.
ENTER
Premere  per confermare il dato. L’impostazione del Ti-
mer selezionato è terminata; premere  per memorizzare i
d) Uscire dall’impostazione dei Timer
Questa sezione ha la funzione di descrivere le operazioni da eseguire per uscire dalla modalità di impostazione, modifica ed esclusione dei Timer.
È possibile eseguire due procedure per uscire:
1Premere il tasto  fino a quando non verrà visualizzata l’ora impostata nella macchina; tutti i dati verranno memorizzati.
2Se nel display viene visualizzato un qualsiasi dato (Ora di inizio, modalità di funzionamento ecc.) premere una volta
|
ON/OFF |
il pulsante |
. |
dati selezionati, rimane acceso il led relativo.
Se si desidera uscire dall’impostazione dei Timer eseguire le istruzioni della sezione relativa; se si desidera procedere alla modifica di un ulteriore Timer eseguire le istruzioni appena descritte dal punto 2.
c) Escludere le impostazioni dei Timer
Questa sezione ha la funzione di descrivere le operazioni da eseguire per escludere le impostazioni dei Timer che si sono attivati. Per escludere i Timer procedere come segue:
|
ON/OFF |
1 Spegnere l’apparecchio mediante il pulsante |
; il display |
visualizzerà l’ora attuale.
2Premere il pulsante  per selezionare il Timer che si desidera escludere; il led relativo si illumina. Il display non visualizza più nessuna informazione.
Importante: l’uscita dal MODO TIMER con questo pulsante fa si che non vengano memorizzati i dati del Timer selezionato; i Timer già impostati rimarranno memorizzati.
In tutti i casi, la macchina si pone in stato d’attesa e saranno attivati i parametri immessi ed attivi in quel momento.
Esempio di utilizzo dei quattro programmi
Programma |
ON |
OFF |
Modo |
Temp. |
|
(°C) |
|||||
|
|
|
|
||
|
|
|
|
|
|
1 |
7.00 |
8.30 |
Deumidificazione |
25 |
|
|
|
|
|
|
|
2 |
11.00 |
14.00 |
Freddo |
24 |
|
|
|
|
|
|
|
3 |
18.00 |
22.00 |
Freddo |
24 |
|
|
|
|
|
|
|
4 |
0.30 |
5.00 |
Notturno |
28 |
|
|
|
|
|
|

USO DEL CLIMATIZZATORE (MODELLI E - EH)
Modo Timer Sleep |
zz |
|
z |
Consente di spegnere automaticamente il climatizzatore dopo un tempo impostabile dall' utilizzatore.
• |
Premere il pulsante MODE |
e selezionare il modo |
zz |
, |
||
z |
||||||
• |
Il display visualizza il tempo (preimpostato 15 minuti), |
|
||||
• |
Premendo i pulsanti |
e |
si può modificare il |
|||
|
tempo di spegnimento da "00" a "120" minuti, |
|
|
|||
• |
Eseguita l'impostazione il climatizzatore torna al modo di |
|||||
|
funzionamento precedente ed il led |
zz |
rimane acce- |
|||
|
z |
|||||
|
so. |
|
|
|
|
|
• |
Per disattivare la funzione premere il pulsante MODE |
|
, |
|||
oppure impostare il tempo "00".
Griglia orientabile di uscita aria
Per garantire l'ideale distribuzione dell'aria trattata nell'ambiente, è stato introdotto l'esclusivo sistema di oscillazione delle alette della griglia frontale.
• Premendo il pulsante |
si attiva l'oscillazione delle |
alette.
• Premendo ancora il pulsante le alette si arrestano nella posizione desiderata.
Ionizzatore
Il climatizzatore SAECO® è dotato di un dispositivo per la generazione di ioni negativi così da ottenere una migliore qualità dell'aria. È particolarmente indicato in ambienti chiusi e fumosi.
• Premendo il pulsante |
si attiva il dispositivo ionizzatore. |
• Premendo ancora il pulsante si disinserisce il dispositivo.
15 |
ITALIANO |

16 |
MANUTENZIONE E CONSIGLI - SVUOTAMENTO VASCHETTA CONDENSA
MANUTENZIONE E CONSIGLI
•Prima di procedere alle operazioni seguenti spegnere il climatizzatore e togliere la spina dalla presa.
•Non immergere l'apparecchio in acqua o altri liquidi.
•Asciugare a mano l'apparecchio.
•Non versare liquidi all'interno dell'apparecchio .
•Procedere con particolare attenzione in quanto alcune superfici possono essere taglienti.
Spia pulizia filtro (modelli E - EH)
• L'accensione della spia  nel pannello comandi, se-
gnala che il filtro è sporco.
• Dopo la pulizia del filtro accendere la macchina con il
tasto |
1 |
mantenendo premuti contemporaneamente i |
||
|
||||
|
|
|
||
|
ON/OFF |
ENTER |
|
|
tasti |
e |
; tale procedura spegne la spia |
. |
|
A fine stagione
Pulizia
Le zone di circolazione dell'aria del climatizzatore devono essere mantenute pulite e libere da ostruzioni.
Parti esterne in plastica
Pulire il climatizzatore con un panno umido ed asciugare.
Pulizia dei filtri aria
•Spegnere l'interruttore generale posto sul retro del climatizzatore.
•Togliere la spina dalla presa.
•Eliminare l'acqua di condensa, togliendo il tappo di drenaggio (2) (Fig.S).
•Pulire i filtri e farli asciugare bene prima di reinserirli.
•Rimuovere la tavoletta profumata dal cassetto porta essenze.
•Coprire l'apparecchio per proteggerlo dalla polvere.
La macchina prevede n°2 filtri posti lateralmente, per la loro pulizia procedere nel modo seguente:
•periodicamente, e comunque non meno di una volta ogni 15 gg, procedere alla pulizia del filtro lavabile (9) (Fig.A).
•Afferrare la linguetta di presa posta sul filtro, quindi estrarlo dalla sede.
•Lavare con acqua tiepida (temperatura inferiore a 40°C) e risciacquare più volte (ad esempio con il doccino della vasca da bagno).
•Prima di riposizionarlo asciugarlo con cura.
S
2
 non in dotazione
SVUOTAMENTO VASCHETTA CONDENSA
In particolari condizioni ambientali, al di fuori dei normali limiti di funzionamento, la macchina può produrre una quantità di condensa maggiore di quanta non ne riesca ad espellere automaticamente; in questo caso il livello d’acqua nella vasca raccogli condensa, raggiunge il massimo livello e l’apparecchio si ferma segnalando che la vasca è piena.
Per riattivare la macchina procedere come segue:
•Procurarsi un contenitore di capienza adeguata per l’operazione che si sta compiendo (Circa 2 Litri).
•Estrarre il tubo (2) dall’alloggiamento nel quale è bloccato. (Fig.T)
•Mantenendo fermo il tubo con una mano estrarre il tappo (1) dallo stesso (Fig.U).
•Inserire il tubo nel contenitore; assicurarsi che non abbia possibilità di uscire durante la fase di drenaggio dell’acqua
•Premere e mantenere premuto il pulsante (13) (Fig.V) fino a quando non uscirà più acqua dal tubo di drenaggio.
•Mantenendo fermo il tubo (2) reinserire il tappo (1) precedentemente estratto.
•Riposizionare il tubo (2) nell’alloggiamento previsto.
Eseguite le operazioni sopra descritte la macchina riparte automaticamente.
T |
U |
V |
2

 13 1
13 1 


DIAGNOSTICA - TABELLA CAUSE E RIMEDI
17 |
DIAGNOSTICA
Segnalazione anomalie (modello M)
La spia segnala che è stato raggiunto il livello massimo della vaschetta raccogli condensa; procedere allo svuotamento come descritto nel paragrafo SVUOTAMENTO VASCHETTA CONDENSA.
La spia segnala che è intervenuto il circuito di sicu- |
ITALIANO |
Segnalazione anomalie (modelli E - EH) |
|
rezza della logica di controllo. Consultare la TABELLA |
|
CAUSA E RIMEDI per ulteriori informazioni. |
|
Suggerimenti: Se il display visualizza un codice di errore si consiglia di trascriverlo e consultare la TABELLA CAUSE E RIMEDI.
TABELLA CAUSE E RIMEDI
DIFETTI |
CAUSE |
RIMEDI |
|
|
|
|
|
|
|
|
|
Il climatizzatore è completamente |
Alimentazione interrotta o spina non |
|
|
|
|
fermo. |
inserita correttamente nella presa di |
Ripristinare l'alimentazione. |
|
|
|
(spia "ON" spenta - modello M), |
|
|
|
||
corrente. |
|
|
|
|
|
(display e spie spente - |
|
|
|
|
|
|
|
|
|
|
|
modelli E - EH) |
|
|
|
|
|
|
E' intervenuto l'interruttore automa- |
Chiamare il Vostro elettricista di fiducia. |
|
|
|
|
tico o il fusibile di linea. |
|
|
|
|
|
|
|
|
|
|
|
|
|
|
|
|
|
Tensione di linea troppo bassa. |
Chiamare il Vostro elettricista di fiducia. |
|
|
|
|
|
|
|
|
|
Climatizzatore alimentato ma non |
Timer in posizione "O". |
Portare il selettore (3) (Fig.R) in posizione "I" o " |
|
". |
|
|
|
||||
funzionante (modello M). |
|
|
|||
|
|
|
|
|
|
|
|
|
|
||
Accensione della spia di allarme. |
È stato raggiunto il livello massimo |
Vuotare la vaschetta di raccolta condensa come indicato nel paragrafo SVUOTAMENTO |
|||
(modello M) |
della vaschetta raccolta condensa |
VASCHETTA CONDENSA. |
|
|
|
|
|
|
|
||
Accensione della spia di allarme |
Malfunzionamento microprocessore |
Spegnere la macchina con l'interruttore generale, attendere qualche minuto e riaccende- |
|||
con visualizzazione errori sul |
(il display visualizza E02). |
re la macchina. Se il messaggio di errore torna ad essere visualizzato rivolgersi ad un |
|||
display (mod. E-EH). |
|
Centro Assistenza Autorizzato. |
|
|
|
Malfunzionamento sonde (il display |
|
|
|
||
|
|
|
|
|
|
|
visualizza E03 o E04 o E05 o |
|
|
|
|
|
- $ ) . |
|
|
|
|
|
|
|
|
|
|
|
Malfunzionamento circuito frigorife- |
|
|
|
|
|
ro (il display visualizza E08). |
|
|
|
|
|
|
|
|
||
|
È stato raggiunto il livello massimo |
Vuotare la vaschetta di raccolta condensa come indicato nel paragrafo SVUOTAMENTO |
|||
|
della vaschetta raccolta condensa |
VASCHETTA CONDENSA. |
|
|
|
|
(il display visualizza E09) |
|
|
|
|
|
|
|
|
|
|
Il climatizzatore non raffredda |
I filtri sono sporchi. |
Pulire i filtri. |
|
|
|
|
|
|
|
|
|
|
Porte o finestre aperte. |
Chiudere le porte o le finestre. |
|
|
|
|
|
|
|
|
|
|
Temperatura selezionata troppo ele- |
Diminuire la temperatura selezionata. |
|
|
|
|
vata. |
|
|
|
|
|
|
|
|
|
|
|
|
|
|
|
|
Per la risoluzione dei malfunzionamenti che non sono stati riportati nella tabella e/o se i rimedi consigliati non risolvono il difetto, è necessario rivolgersi ad un Centro Assistenza Autorizzato.
18 |
TECHNICAL SPECIFICATIONS - OPERATING LIMITS DURING COOLING
The warning triangle marks all important user safety rules.
You will find the illustrations mentioned in the text on the front cover page 3. Keep it open while you read these instructions. Numbers or letters are used to refer to illustrations, parts of the equipment or controls, etc.
For further information or in case of problems, contact your dealer or the Authorised Technical Service.
Keep these instructions in a safe place, and together with the climate control system if another person is to use it.
TABLE OF CONTENTS
TECHNICAL SPECIFICATIONS .......................................... |
18 |
OPERATING LIMITS DURING COOLING ........................... |
18 |
SUGGESTED USES FOR YOUR CLIMATE ........................ |
19 |
SAFETY RULES ................................................................. |
19 |
INSTALLATION AND HANDLING ....................................... |
20 |
HANDLING OF APPLIANCES THAT ARE OUT OF ORDER 20 |
|
GENERAL COMPONENT DESCRIPTION .......................... |
21 |
EXCLUSIVE FEATURES OF “SAECO® ” CLIMATE |
|
CONTROL UNITS .............................................................. |
21 |
USING THE CLIMATE CONTROL UNIT (MODEL M) ......... |
22 |
ADDITIONAL INFORMATION ............................................. |
23 |
USING THE CLIMATE CONTROL UNIT (E-EH MODELS) .. 24 |
|
OPTIONAL REMOTE CONTROL (E-EH MODELS) ............ |
24 |
E-EH MODELS ................................................................... |
25 |
SIMPLIFIED USE ............................................................... |
25 |
INTELLIGENT MODES ....................................................... |
25 |
MAINTENANCE AND HELPFUL HINTS ............................. |
30 |
EMPTYING THE CONDENSATION TRAY ........................... |
30 |
DIAGNOSTICS ................................................................... |
31 |
ERRORS AND SOLUTIONS TABLE .................................. |
31 |
TECHNICAL SPECIFICATIONS
|
8 M |
8 E |
8 EH |
|
|
Electrical features |
|
see rating plate |
|
optional |
|
|
|
|
|
||
Heating capacity 230V 50Hz (W) |
- |
- |
2,000 |
||
Refrigerating capacity (W) [Btu] |
|
2,350 [8,000] |
|
|
|
|
|
|
|
= |
|
Heating capacity 120V 60Hz (W) |
- |
- |
1,385 |
||
(°°) |
|||||
Energy consumption during cooling |
|
see rating plate |
|
||
|
|
|
|||
|
|
|
|
standard |
|
Air treated (m3/h) min/max |
|
260/360 |
|
||
Energy consumption during heating |
|
see rating plate |
|
|
|
Quantity of refrigerating fluid R407c (ecological) |
|
see rating plate |
|
|
|
|
|
|
|
= |
|
Dehumidifying capacity (l/h) |
|
0,85 |
|
||
|
|
(°) |
|||
|
|
|
|
||
Number of fan speeds |
2 |
3 |
3 |
available |
|
Dimensions (mm)(width x height x depth) |
|
466 x 855 x 406 |
|
||
|
|
|
|||
|
|
|
|
|
|
Weight (kg) |
|
35 |
|
|
|
|
|
|
|
|
|
Programming timer |
° |
° |
° |
not |
|
|
|
|
|
||
Air filter |
° |
° |
° |
||
= |
|||||
|
|
|
|
||
Ionizer |
- |
° |
° |
||
(-) |
|||||
|
|
|
|
||
Compressor protector |
° |
° |
° |
|
|
|
|
|
|
Legend: |
|
Resistor protector |
- |
- |
° |
||
|
|||||
|
|
|
|
|
|
Automatically oscillating deflector |
- |
° |
° |
|
|
|
|
|
|
|
|
Remote control |
- |
°° |
°° |
|
|
|
|
|
|
|
OPERATING LIMITS DURING COOLING
|
Nominal Conditions |
Maximum conditions |
Minumum conditions |
|
|||
|
|
|
|
|
|
|
|
|
Outdoor |
35°C B.S. |
Outdoor |
40°C B.S. |
Outdoor |
21°C B.S. |
|
|
temperature |
24°C B.U. |
temperature |
25°C B.U. |
temperature |
15°C B.U. |
|
|
|
|
|
|
|
|
|
|
Indoor |
27°C B.S. |
Indoor |
30°C B.S. |
Indoor |
18°C B.S. |
|
|
temperature |
19°C B.U. |
temperature |
21°C B.U. |
temperature |
14°C B.U. |
|
|
|
|
|
|
|
|
|
|
|
|
|
|
|
|
|
|
|
|
|
|
|
|
|
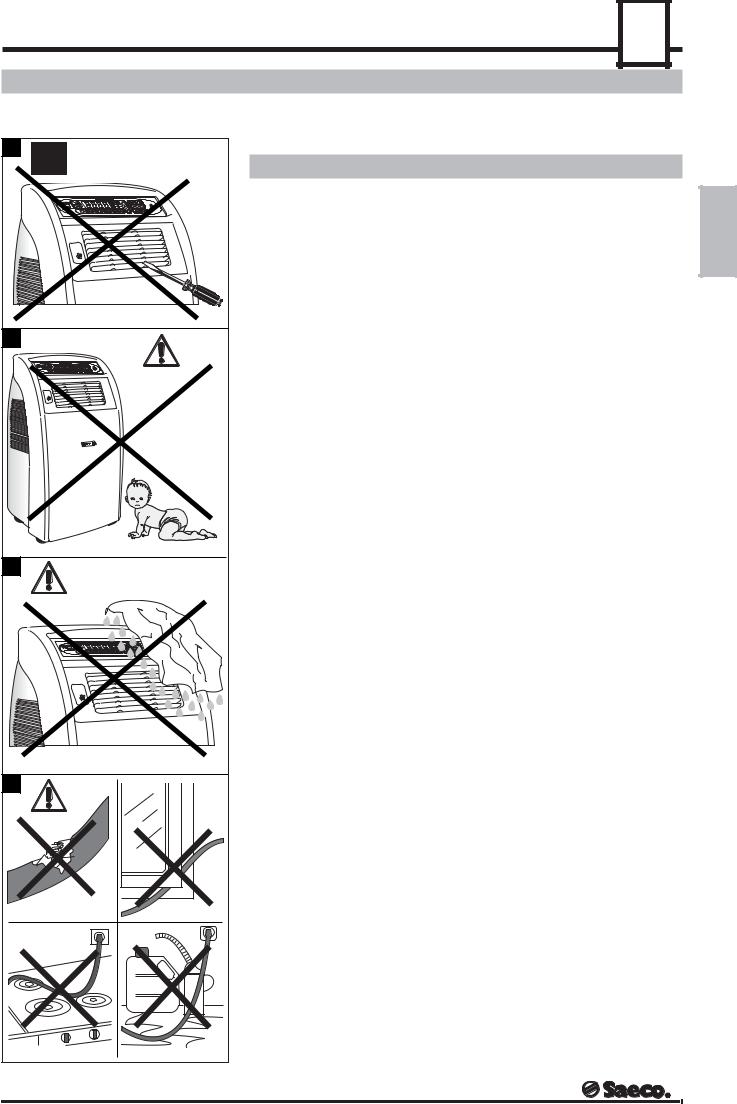
SUGGESTED USED FOR YOUR CLIMATE - SAFETY RULES
SUGGESTED USES FOR YOUR CLIMATE
19 |
G |
H |
I |
L |
• This climate control unit has been designed to create the ideal climate in your room. Use it only for this specific purpose and according to the instructions in this manual.
SAFETY RULES
• |
The connection to the mains electricity supply must comply with current |
|
|
|
safety regulations in your country for the installation of home appliances. |
ENGLISH |
|
• |
You must connect the climate control system to a socket that: |
||
- corresponds to the plug fitted on the unit; |
|||
|
|||
- |
is of suitable dimensions for the maximum current absorbed; |
|
|
- |
is connected to an efficient earthing system. |
|
|
• The power cable (Fig.L) must not:
-come into contact with liquid of any kind: danger of electric shock and/ or fire;
-be squeezed and/or come into contact with sharp surfaces;
-be used to drag the climate control system;
-be used if damaged;
-be handled with damp or wet hands;
-be left in a tangled coil when the climate control system is working;
-come into contact with hot surfaces.
•The power cable may be replaced exclusively by an Authorized Service Center.
•It is strictly forbidden to:
-Place objects inside the air outlet or inlet grids (Fig.G);
-Use the climate control system inside closets, cabinets and/or cramped spaces between furniture;
-Repair, disassemble and/or modify the climate control system yourself;
-Block the air outlet and/or inlet grids;
-Install the air-conditioner in any manner other than that described;
-Use the climate control system in proximity to inflammable and/or explosive substances;
-Operate the climate control system without filters;
-Turn the climate control system on or off by using the plug: always use the ON/OFF switch.
•Do not allow children to play near the climate control system (Fig.H).
•Before cleaning the climate control system, make sure that it is unplugged; do not wash the climate control system with water, gasoline or solvents of any kind (Fig. I).
•The climate control system is unsuitable for specialized purposes such as preserving food, works of art, scientific data etc.
•In the event of fire, use carbon dioxide (CO2) extinguishers. Do not use water or powder extinguishers.
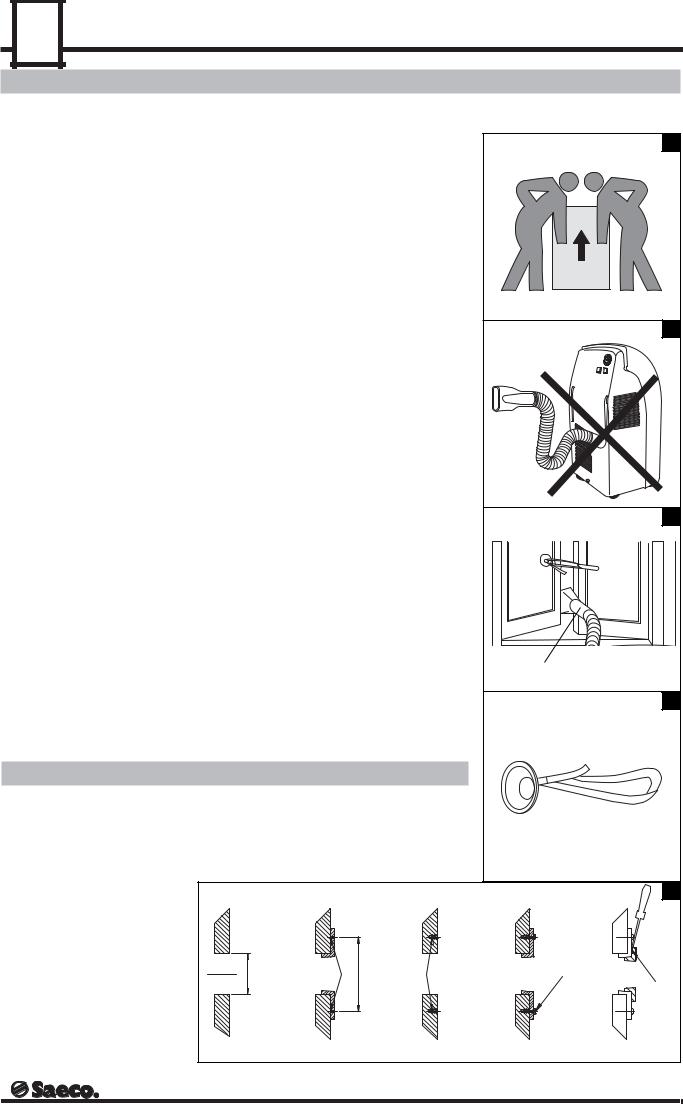
20 |
INSTALLATION AND HANDLING - HANDLING OF APPLIANCES THAT ARE OUT OF ORDER
INSTALLATION AND HANDLING
• |
During conveyance and/or transport, the packing container must be manually lifted |
|
M |
||
|
by two persons and held in an upright position, without being tilted (Fig.M). |
|
|
||
• |
Packing overall weight = Approx. 40 Kg. |
|
|
|
|
• |
Packing dimensions (mm) = 590 x 550 x H 970 |
|
|
|
|
• |
Always empty the condensation collection tray before moving the climate control |
|
|
||
|
system (see the relative section) (Pag. 30) |
|
|
|
|
• |
Avoid bending the flexible hose. Stretch it only as much as needed (Fig.N). |
|
|
||
• |
Introduce the flexible hose in its place (12) (Fig.A). |
|
|
|
|
• |
Block the air outlet duct (1) in the window (Fig.O) using the suction cup (Fig.P). |
|
|
||
Note: Do not block the air outlet duct between shutters or gates. |
|
UP |
|||
• |
Remove curtains and/or any obstacle interfering with smooth air flow. |
|
|
||
• |
Keep the right distances (Fig.B). |
|
|
|
|
|
|
|
|
|
N |
|
Flange assembly instructions (14)(Fig.A) and cap (15) (Fig.A) |
|
|
||
Note: installation tools and materials are not provided. |
|
|
|
|
|
|
Wall-mounted flange assembly (Fig.Q) |
|
|
||
Make sure that the wall is suitable for this type of installation and carry out the following |
|
|
|||
operations: |
|
|
|
|
|
• |
Drill a through hole of 120 mm in diameter (Fig.Q1). |
|
|
|
|
• |
Fit the flange and mark the position of the 2 securing holes on the wall - centre line |
|
|
||
|
153 mm (Fig.Q2). |
|
|
|
O |
• |
Insert no. 2 appropriately shaped and sized dowels (Fig.Q3). |
|
|||
• Secure the flange with no.2 screws according to the dowels fitted previously (Fig.Q4). |
|
|
|||
|
Flange assembly on the window |
|
|
|
|
• |
Drill a through hole of 120 mm in diameter. |
|
|
|
|
• |
Fit the flange to the window using an appropriate sealer. |
|
|
|
|
Note: it is advisable for a skilled person to carry out this operation. If the flange is |
|
|
|||
fitted to double-glazed windows, the sealing capacity of these may be reduced. |
|
|
|||
|
Flange cap fitting (Fig.Q) |
|
|
1 |
|
|
|
|
|
|
|
• |
Fitting: push the tap on |
|
|
|
P |
• |
Removal: insert the end of a small screwdriver beneath the 3 wedged points on the |
|
|
||
|
cap and push gently (Fig.Q5). |
|
|
|
|
|
HANDLING OF APPLIANCES THAT ARE OUT OF ORDER |
|
|
||
Make the appliance that is out of order unfit for further use. Unplug the appliance from |
|
|
|||
the power socket and cut the power cord. Climate control systems to be discarded must |
|
|
|||
be taken to an authorized waste disposal facility in accordance with current regulations |
|
|
|||
in your country. |
|
|
|
|
|
|
|
|
|
|
Q |
|
120mm |
|
(153) |
|
|
|
Ø |
|
|
|
|
|
Q1 |
Q2 |
Q3 |
Q4 |
Q5 |
GENERAL COMPONENT DESCRIPTION - EXCLUSIVE FEATURES OF “SAECO® ” CLIMATE CONTROL UNITS
GENERAL COMPONENT DESCRIPTION
21 |
|
|
FIGURE A |
|
||
1 |
Air outlet conveyor |
9 |
No.2 washable removable filters |
|
|
2 |
Condensation drainage cap |
10 |
Timer (where included) |
ENGLISH |
|
3 |
Control panel |
11 |
Fragrance tray for the “Air in bloom®” system |
||
|
|||||
4 |
Adjustable air outlet fins |
12 |
Connection for the flexible hose |
5 |
Flexible hose |
13 |
Water condensation drain pump switch |
6 |
Main switch |
14 |
Flange for fixing the flexible hose |
7 |
Spin wheels |
15 |
Cap for flange |
8 |
Power cord |
|
|
EXCLUSIVE FEATURES OF “SAECO® ” CLIMATE CONTROL UNITS
“AIR IN BLOOM® ” SYSTEM
All SAECO® climate control units have the exclusive “AIR IN BLOOM®” system, to scent any room with your favorite fragrance simply by inserting the tablets provided into the special fragrance tray:
•Remove the tablet from the package.
•Open the fragrance tray (11) (Fig.A) on the front of the machine by pressing down on the top.
•Insert the scented tablet into the tray and close (Fig.D)
•The fragrance will waft pleasantly through the room while the fan is running.
The tablets last for approximately 24 hours. We recommend using only one tablet at a time.
Use only original SAECO® products, available through authorized dealers.
AUTOMATIC AIR DIFFUSER FIN OSCILLATION SYSTEM
All SAECO® climate control units in the E-EH line have an automatic oscillation system for the air diffuser fins. This system allows a perfectly even distribution of climate-controlled air throughout the room.
See the chapter USING THE CLIMATE CONTROL UNIT for correct operating instructions.
MAXIMUM SAFETY
The electronic parts of all SAECO® climate control units are powered at a safe, low voltage.
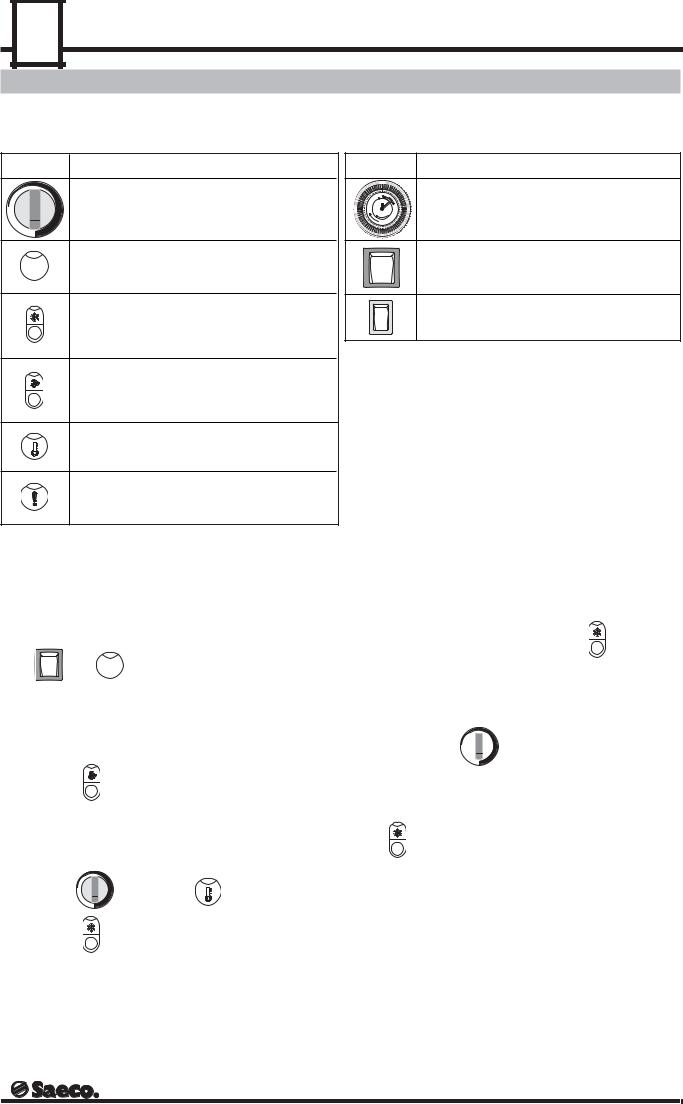
22 |
USING THE CLIMATE CONTROL UNIT (MODEL M)
USING THE CLIMATE CONTROL UNIT (MODEL M)
LEGEND OF CONTROLS AND INDICATORS – FIG.A-E
CONTROL |
NAME |
Temperature setting knob
On lamp
“Cool” mode button/lamp
Maximum air flow selection button/lamp
Thermostat lamp
Warning lamp
CONTROL |
NAME |
|
|
|
|
|
|
|
|
|
|
|
|
|
|
|
|
|
|
|
|
|
|
|
|
Timer (where included) |
|
|
|
|
|
|
|
|
|
|
|
|
|
|
|
|
|
|
|
|
|
|
|
|
|
|
|
|
|
|
|
|
|
|
|
1Main switch
Drainage pump control button
|
|
Switching the unit on |
|
|
|
|
• |
To deactivate “COOL” mode, press the |
button again. |
Press |
1 |
. The lamp will light. |
The unit will switch to “FAN” mode. |
|
|
|
Fan
• When switched on, the internal fan will begin running at the minimum air outlet speed.
• Press the |
button to adjust the air output speed. |
Cool mode
• |
Turn the |
knob until the |
lamp lights. |
• |
Press the |
button. |
|
• After a brief delay, the unit will begin cooling the room. Cooling continues until the  lamp switches off.
Temperature adjustment
•Adjust the knob  to obtain the desired room temperature.
•The machine is set to cool when the  lamp is lit and
in mode.
• When the  LED lights up it means that the set temperature has not been reached.
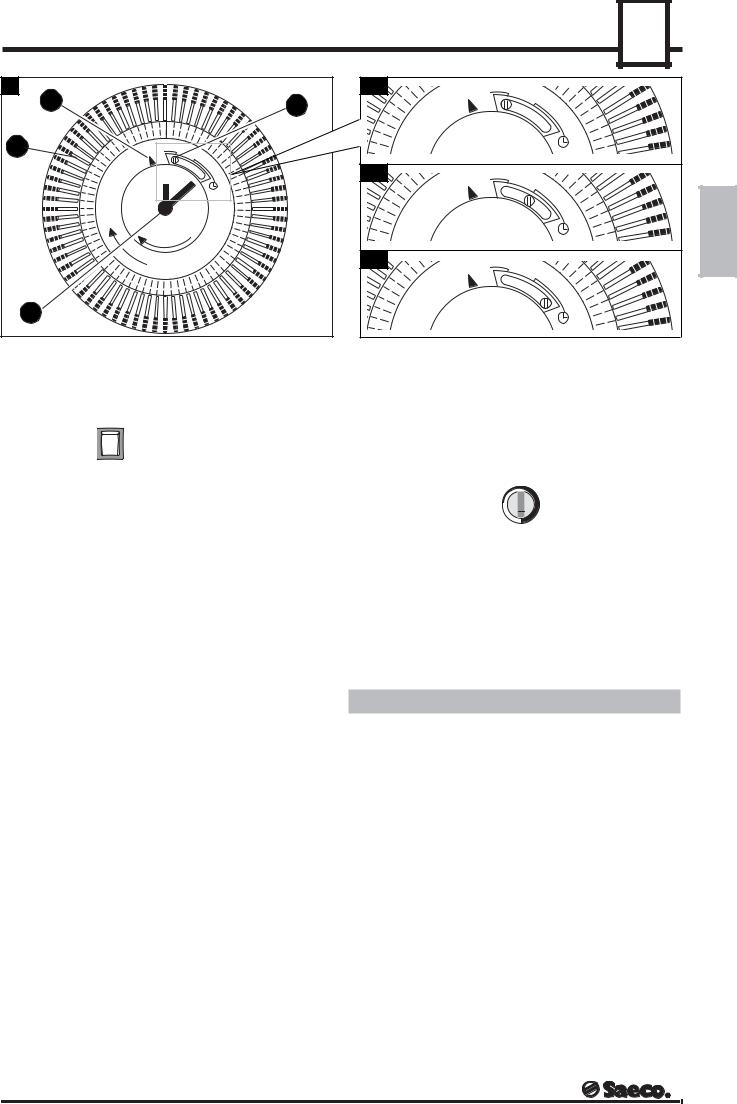
USING THE CLIMATE CONTROL UNIT (MODEL M) - ADDITIONAL INFORMATION |
23 |
|
R |
|
|
|
|
|
|
|
|
|
|
|
|
|
|
|
|
|
|
|
|
|
|
|
|
|
|
|
|
|
|
|
|
|
|
|
|
|
|
|
|
|
|
|
|
R1 |
|
|
|
|
|
|
|
|
|
|
|
|
|
|
|
|
|
|
|
|
|
|
|
|
|
|
|
|
|
|
|
|
|
|
|
|
|
|
|
|
|
|
|
|
|
|
|
|
|
|||
|
|
|
|
|
|
|
|
|
|
|
|
|
|
|
|
|
|
|
|
|
|
|
|
|
|
|
|
|
|
|
|
|
|
|
|
|
|
|
|
|
|
|
|
|
|
|
||
4 |
|
|
|
|
|
|
|
|
|
|
|
|
|
|
|
|
|
|
|
|
|
|
|
|
|
|
|
|
|
|
|
|
|
|
|
|
|
|
|
|
|
|
|
|
3 |
|
|
|
|
|
|
|
|
|
|
|
|
|
|
|
|
|
|
|
|
|
|
|
|
|
|
|
|
|
|
|
|
|
|
|
|
|
|
|
|
|
|
|
|
|
|
|
|
|
|
|
|
|
|
|
|
|
|
|
|
|
|
|
|
|
|
|
|
|
|
|
|
|
|
|
|
|
|
|
|
|
|
|
|
|
|
|
|
|
|
|
|
|
|
|
|
|
|
|
|
|
|
|
|
|
|
|
|
|
|
|
|
|
|
|
|
|
|
|
|
|
|
|
|
|
|
|
|
|
|
|
|
|
|
|
|
|
|
|
|
|
|
|
|
|
|
|
|||
|
|
|
|
|
|
|
|
|
|
|
|
|
|
|
|
|
|
|
|
|
|
|
|
|
|
|
|
|
|
|
|
|
|
|
|
|
|
|
|
|
|
|
|
|
|
|||
|
|
|
|
|
|
|
|
|
|
|
|
|
|
|
|
|
|
|
|
|
|
|
|
|
|
|
|
|
|
|
|
|
|
|
|
|
|
|
|
|
|
|
|
|
|
|
|
|
|
|
|
|
|
|
|
|
|
|
|
|
|
|
|
|
|
|
|
|
|
|
|
|
|
|
|
|
|
|
|
|
|
|
|
|
|
|
|
|
|
|
|
|
|
|
|
||
|
|
|
|
|
|
|
|
|
|
|
|
|
|
|
|
|
|
|
|
|
|
|
|
|
|
|
|
|
|
|
|
|
|
|
|
|
|
|
|
|
|
|
|
|
|
|
|
|
|
|
|
|
|
|
|
|
|
|
|
|
|
|
|
|
|
|
|
|
|
|
|
|
|
|
|
|
|
|
|
|
|
|
|
|
|
|
|
|
|
|
|
|
|
|
|
||
|
|
|
|
|
|
|
|
|
|
|
|
|
|
|
|
|
|
|
|
|
|
|
|
|
|
|
|
|
|
|
|
|
|
|
|
|
|
|
|
|
|
|
|
|
|
|
||
|
|
|
|
|
|
|
|
|
|
|
|
|
|
|
|
|
|
|
|
|
|
|
|
|
|
|
|
|
|
|
|
|
|
|
|
|
|
|
|
|
|
|
|
|
|
|
||
|
|
|
|
|
|
|
|
|
|
|
|
|
|
|
|
|
|
|
|
|
|
|
|
|
|
|
|
|
|
|
|
|
|
|
|
|
|
|
|
|
|
|
|
|
|
|
||
2 |
|
|
|
|
|
|
|
|
|
|
|
|
|
|
|
|
|
|
|
|
|
|
|
|
|
|
|
|
|
|
|
|
|
|
|
|
|
|
|
|
|
|
|
|
|
|||
|
|
|
|
|
|
|
|
|
|
|
|
|
|
|
|
|
|
|
|
|
|
|
|
|
|
|
|
|
|
|
|
|
|
|
|
|
|
|
|
|
|
|
|
|
|
|||
|
|
|
|
|
|
|
|
|
|
|
|
|
|
|
|
|
|
|
|
|
|
|
|
|
|
|
|
|
|
|
|
|
|
|
|
|
|
|
|
|
|
|
|
|
|
|||
|
|
|
|
|
|
|
|
|
|
|
|
|
|
|
|
|
|
|
|
|
|
|
|
|
|
|
|
|
|
|
|
|
|
|
|
|
|
|
|
|
|
|
|
|
|
|
||
|
|
|
|
|
|
|
|
|
|
|
|
|
|
|
|
|
|
|
|
|
|
|
|
|
|
|
|
|
|
|
|
|
|
|
|
|
|
|
|
|
|
|
|
|
|
|||
|
|
|
|
|
|
|
|
|
|
|
|
|
|
|
|
|
|
|
|
|
|
|
|
|
|
|
|
|
|
|
|
|
|
|
|
|
|
|
|
|
|
|
|
|
|
|
|
|
|
|
|
|
|
|
|
|
|
|
|
|
|
|
|
|
|
|
|
|
|
|
|
|
|
|
|
|
|
|
|
|
|
|
|
|
|
|
|
|
|
|
|
|
|
|
|
||
|
|
|
|
|
|
|
|
|
|
|
|
|
|
|
|
|
|
|
|
|
|
|
|
|
|
|
|
|
|
|
|
|
|
|
|
|
|
|
|
|
|
|
|
|
|
|
|
|
|
|
|
|
|
|
|
|
|
|
|
|
|
|
|
|
|
|
|
|
|
|
|
|
|
|
|
|
|
|
|
|
|
|
|
|
|
|
|
|
|
|
|
|
|
|
|||
|
|
|
|
|
|
|
|
|
|
|
|
|
|
|
|
|
|
|
|
|
|
|
|
|
|
|
|
|
|
|
|
|
|
|
|
|
|
|
|
|
|
|
|
|
|
|
||
|
|
|
|
|
|
|
|
|
|
|
|
|
|
|
|
|
|
|
|
|
|
|
|
|
|
|
|
|
|
|
|
|
|
|
|
|
|
|
|
|
|
|
|
|
||||
|
|
|
|
|
|
|
|
|
|
|
|
|
|
|
|
|
|
|
|
|
|
|
|
|
|
|
|
|
|
|
|
|
|
|
|
|
|
|
|
|
|
|
|
|
||||
|
|
|
|
|
|
|
|
|
|
|
|
|
|
|
|
|
|
|
|
|
|
|
|
|
|
|
|
|
|
|
|
|
|
|
|
|
|
|
|
|
|
|
|
|||||
|
|
|
|
|
|
|
|
|
|
|
|
|
|
|
|
|
|
|
|
|
|
|
|
|
|
|
|
|
|
|
|
|
|
|
|
|
|
|
|
|
|
|
|
|||||
|
|
|
|
|
|
|
|
|
|
|
|
|
|
|
|
|
|
|
|
|
|
|
|
|
|
|
|
|
|
|
|
|
|
|
|
|
|
|
|
|
|
|
|
|
|
|||
|
|
|
|
|
|
|
|
|
|
|
|
|
|
|
|
|
|
|
|
|
|
|
|
|
|
|
|
|
|
|
|
|
|
|
|
|
|
|
|
|
|
|
|
|||||
|
|
|
|
|
|
|
|
|
|
|
|
|
|
|
|
|
|
|
|
|
|
|
|
|
|
|
|
|
|
|
|
|
|
|
|
|
|
|
|
|
|
|
|
|||||
|
|
|
|
|
|
|
|
|
|
|
|
|
|
|
|
|
|
|
|
|
|
|
|
|
|
|
|
|
|
|
|
|
|
|
|
|
|
|
|
|
|
|
|
|||||
|
|
|
|
|
|
|
|
|
|
|
|
|
|
|
|
|
|
|
|
|
|
|
|
|
|
|
|
|
|
|
|
|
|
|
|
|
|
|
|
|
|
|
|
|
|
|
|
|
|
|
|
|
|
|
|
|
|
|
|
|
|
|
|
|
|
|
|
|
|
|
|
|
|
|
|
|
|
|
|
|
|
|
|
|
|
|
|
|
|
|
|
|
|
|
|
|
|
|
|
|
|
|
|
|
|
|
|
|
|
|
|
|
|
|
|
|
|
|
|
|
|
|
|
|
|
|
|
|
|
|
|
|
|
|
|
|
|
|
|
|
|
|
|
|
|
|
|
|
|
|
|
|
|
|
|
|
|
|
|
|
|
|
|
|
|
|
|
|
|
|
|
|
|
|
|
|
|
|
|
|
|
|
|
|
|
|
|
|
|
|
|
|
|
|
|
|
|
|
|
|
|
|
|
|
|
|
|
|
|
|
|
|
|
|
|
|
|
|
|
|
|
|
|
|
|
|
|
|
|
|
|
|
|
|
|
|
|
|
|
|
|
|
|
|
|
|
|
|
|
|
|
|
|
|
|
|
|
|
|
|
|
|
|
|
|
|
|
|
|
|
|
|
|
|
|
|
|
|
|
|
|
|
|
|
|
|
|
|
|
|
|
|
|
|
|
|
|
|
|
|
|
|
|
|
|
|
|
|
|
|
|
|
|
|
|
|
|
|
|
|
|
|
|
|
|
|
|
|
|
|
|
|
|
|
|
R2 |
|
|
|
|||
|
|
|
|
|
|
|
|
|
|
|
|
|
|
|
|
|
|
|
|
|
|
|
|
|
|
|
|
|
|
|
|
|
|
|
|
|
|
|
|
|
|
|
|
|
||||
|
|
|
|
|
|
|
|
|
|
|
|
|
|
|
|
|
|
|
|
|
|
|
|
|
|
|
|
|
|
|
|
|
|
|
|
|
|
|
|
|
|
|
|
|
|
|||
|
|
|
|
|
|
|
|
|
|
|
|
|
|
|
|
|
|
|
|
|
|
|
|
|
|
|
|
|
|
|
|
|
|
|
|
|
|
|
|
|
|
|
||||||
|
|
|
|
|
|
|
|
|
|
|
|
|
|
|
|
|
|
|
|
|
|
|
|
|
|
|
|
|
|
|
|
|
|
|
|
|
|
|
|
|
|
|
|
|||||
|
|
|
|
|
|
|
|
|
|
|
|
|
|
|
|
|
|
|
|
|
|
|
|
|
|
|
|
|
|
|
|
|
|
|
|
|
|
|
|
|
|
|
|
|
||||
|
|
|
|
|
|
|
|
|
|
|
|
|
|
|
|
|
|
|
|
|
|
|
|
|
|
|
|
|
|
|
|
|
|
|
|
|
|
|
|
|
|
|
|
|
|
|||
|
|
|
|
|
|
|
|
|
|
|
|
|
|
|
|
|
|
|
|
|
|
|
|
|
|
|
|
|
|
|
|
|
|
|
|
|
|
|
|
|
|
|
|
|
|
|
|
|
|
|
|
|
|
|
|
|
|
|
|
|
|
|
|
|
|
|
|
|
|
|
|
|
|
|
|
|
|
|
|
|
|
|
|
|
|
|
|
|
|
|
|
|
|
|
|
|
|
|
|
|
|
|
|
|
|
|
|
|
|
|
|
|
|
|
|
|
|
|
|
|
|
|
|
|
|
|
|
|
|
|
|
|
|
|
|
|
|
|
|
|
|
|
|
|
|
|
|
|
|
|
|
|
|
|
|
|
|
|
|
|
|
|
|
|
|
|
|
|
|
|
|
|
|
|
|
|
|
|
|
|
|
|
|
|
|
|
|
|
|
|
|
|
|
|
|
|
|
|
|
|
|
|
|
|
|
|
|
|
|
|
|
|
|
|
|
|
|
|
|
|
|
|
|
|
|
|
|
|
|
|
|
|
|
|
|
|
|
|
|
|
|
|
|
|
|
|
|
|
|
|
|
|
|
|
|
|
|
|
|
|
|
|
|
|
|
|
|
|
|
|
|
|
|
|
|
|
|
|
|
|
|
|
|
|
|
|
|
|
|
|
|
|
|
|
|
|
|
|
|
|
|
|
|
|
|
|
|
|
|
|
|
|
|
|
|
|
|
|
|
|
|
|
|
|
|
|
|
|
|
|
|
|
|
|
|
|
|
|
|
|
|
|
|
|
|
|
|
|
|
|
|
|
|
|
|
|
|
|
|
|
|
|
|
|
|
|
|
|
|
|
|
|
|
|
|
|
|
|
|
|
|
|
|
|
|
|
|
|
|
||
|
|
|
|
|
|
|
|
|
|
|
|
|
|
|
|
|
|
|
|
|
|
|
|
|
|
|
|
|
|
|
|
|
|
|
|
|
|
|
|
|
|
|
|
|
|
|||
|
|
|
|
|
|
|
|
|
|
|
|
|
|
|
|
|
|
|
|
|
|
|
|
|
|
|
|
|
|
|
|
|
|
|
|
|
|
|
|
|
|
|
|
|
|
|||
|
|
|
|
|
|
|
|
|
|
|
|
|
|
|
|
|
|
|
|
|
|
|
|
|
|
|
|
|
|
|
|
|
|
|
|
|
|
|
|
|
|
|
|
|
|
|
|
|
|
|
|
|
|
|
|
|
|
|
|
|
|
|
|
|
|
|
|
|
|
|
|
|
|
|
|
|
|
|
|
|
|
|
|
|
|
|
|
|
|
|
|
|
|
|
|
|
|
|
|
|
|
|
|
|
|
|
|
|
|
|
|
|
|
|
|
|
|
|
|
|
|
|
|
|
|
|
|
|
|
|
|
|
|
|
|
|
|
|
|
|
|
|
|
|
|
|
|
|
|
|
|
|
|
|
|
|
|
|
|
|
|
|
|
|
|
|
|
|
|
|
|
|
|
|
|
|
|
|
|
|
|
|
|
|
|
|
|
|
|
|
|
|
|
|
|
|
|
|
|
|
|
|
|
|
|
|
|
|
|
|
|
|
|
|
|
|
|
|
|
|
|
|
|
|
|
|
|
|
|
|
|
|
|
|
|
|
|
|
|
|
|
|
|
|
|
|
|
|
|
|
|
|
|
|
|
|
|
|
|
|
|
|
|
|
|
|
|
|
|
|
|
|
|
|
|
|
|
|
|
|
|
|
|
|
|
|
|
|
|
|
|
|
|
|
|
|
|
|
|
|
|
|
|
|
|
|
|
|
|
|
|
|
|
|
|
|
|
|
|
|
|
|
|
|
|
|
|
|
|
|
|
|
|
|
|
|
|
|
|
|
|
|
|
|
|
|
|
|
|
|
|
|
|
|
|
|
|
|
|
|
|
|
|
|
|
|
|
|
|
|
|
|
|
|
|
|
|
|
|
|
|
|
|
|
|
|
|
|
|
|
|
|
|
|
|
|
|
|
|
|
|
|
|
|
|
|
|
|
|
|
|
|
|
|
|
|
|
|
|
|
|
|
|
|
|
|
|
|
|
|
|
|
|
|
|
|
|
|
|
|
|
|
|
|
|
|
|
|
|
|
|
|
|
|
|
|
|
|
|
|
|
|
|
|
|
|
|
|
|
|
|
|
|
|
|
|
|
|
|
|
|
|
|
|
|
|
|
|
|
|
|
|
|
|
|
|
|
|
|
|
|
|
|
|
|
|
|
|
|
|
|
|
|
|
|
|
|
|
|
|
|
|
|
|
|
|
|
|
|
|
|
|
|
|
|
|
|
|
|
|
|
|
|
|
|
|
|
|
|
|
|
|
|
|
|
|
|
|
|
|
|
|
|
|
|
|
|
|
|
|
|
|
|
|
|
|
|
|
|
|
|
|
|
|
|
|
|
|
|
|
|
|
|
|
|
|
|
|
|
|
|
|
|
|
|
|
|
|
|
|
|
|
|
|
|
|
|
|
|
|
|
|
|
|
|
|
|
|
|
|
|
|
|
|
|
|
|
|
|
|
|
|
|
|
|
|
|
|
|
|
|
|
|
|
|
|
|
|
|
|
|
|
|
|
|
|
|
|
|
|
|
|
|
|
|
|
|
|
|
|
|
|
|
|
ENGLISH |
|
|
|
|
|
|
|
|
|
|
|
|
|
|
|
|
|
|
|
|
|
|
|
|
|
|
|
|
|
|
|
|
|
|
|
|
|
|
|
|
|||||||||
|
|
|
|
|
|
|
|
|
|
|
|
|
|
|
|
|
|
|
|
|
|
|
|
|
|
|
|
|
|
|
|
|
|
|
|
|
|
|||||||||||
|
|
|
|
|
|
|
|
|
|
|
|
|
|
|
|
|
|
|
|
|
|
|
|
|
|
|
|
|
|
|
|
|
|
|
|
|
|
|||||||||||
|
|
|
|
|
|
|
|
|
|
|
|
|
|
|
|
|
|
|
|
|
|
|
|
|
|
|
|
|
|
|
|
|
|
|
|
|
||||||||||||
|
|
|
|
|
|
|
|
|
|
|
|
|
|
|
|
|
|
|
|
|
|
|
|
|
|
|
|
|
|
|
|
|
|
|
|
|||||||||||||
|
|
|
|
|
|
|
|
|
|
|
|
|
|
|
|
|
|
|
|
|
|
|
|
|
|
|
|
|
|
|
|
|
|
|
|
|||||||||||||
|
|
|
|
|
|
|
|
|
|
|
|
|
|
|
|
|
|
|
|
|
|
|
|
|
|
|
|
|
|
|
|
|
|
|
|
|
||||||||||||
|
|
|
|
|
|
|
|
|
|
|
|
|
|
|
|
|
|
|
|
|
|
|
|
|
|
|
|
|
|
|
|
|
|
|
|
|
||||||||||||
|
|
|
|
|
|
|
|
|
|
|
|
|
|
|
|
|
|
|
|
|
|
|
|
|
|
|
|
|
|
|
|
|
|
|
|
|
||||||||||||
|
|
|
|
|
|
|
|
|
|
|
|
|
|
|
|
|
|
|
|
|
|
|
|
|
|
|
|
|
|
|
|
|
|
|
|
|
|
|
|
|
|
|
||||||
|
|
|
|
|
|
|
|
|
|
|
|
|
|
|
|
|
|
|
|
|
|
|
|
|
|
|
|
|
|
|
|
|
|
|
|
|
|
|
|
|
|
|
|
|
|
|
|
|
|
|
|
|
|
|
|
|
|
|
|
|
|
|
|
|
|
|
|
|
|
|
|
|
|
|
|
|
|
|
|
|
|
|
|
|
|
|
|
|
|
|
|
|
|
|
|
||
|
|
|
|
|
|
|
|
|
|
|
|
|
|
|
|
|
|
|
|
|
|
|
|
|
|
|
|
|
|
|
|
|
|
|
|
|
|
|
|
|
|
|
|
|
|
|
|
|
|
|
|
|
|
|
|
|
|
|
|
|
|
|
|
|
|
|
|
|
|
|
|
|
|
|
|
|
|
|
|
|
|
|
|
|
|
|
|
|
|
|
|
|
|
|
|
||
|
|
|
|
|
|
|
|
|
|
|
|
|
|
|
|
|
|
|
|
|
|
|
|
|
|
|
|
|
|
|
|
|
|
|
|
|
|
|
|
|
|
|
|
|
|
|
|
|
|
|
|
|
|
|
|
|
|
|
|
|
|
|
|
|
|
|
|
|
|
|
|
|
|
|
|
|
|
|
|
|
|
|
|
|
|
|
|
|
|
|
|
|
|
|
|
||
|
|
|
|
|
|
|
|
|
|
|
|
|
|
|
|
|
|
|
|
|
|
|
|
|
|
|
|
|
|
|
|
|
|
|
|
|
|
|
|
|
|
|
|
|
|
|
||
|
|
|
|
|
|
|
|
|
|
|
|
|
|
|
|
|
|
|
|
|
|
|
|
|
|
|
|
|
|
|
|
|
|
|
|
|
|
|
|
|
|
|
|
|
|
|||
|
|
|
|
|
|
|
|
|
|
|
|
|
|
|
|
|
|
|
|
|
|
|
|
|
|
|
|
|
|
|
|
|
|
|
|
|
|
|
|
|
|
|
|
|
|
|
||
|
|
|
|
|
|
|
|
|
|
|
|
|
|
|
|
|
|
|
|
|
|
|
|
|
|
|
|
|
|
|
|
|
|
|
|
|
|
|
|
|
|
|
|
|
|
|
||
|
|
|
|
|
|
|
|
|
|
|
|
|
|
|
|
|
|
|
|
|
|
|
|
|
|
|
|
|
|
|
|
|
|
|
|
|
|
|
|
|
|
|
|
|
|
|
|
|
|
|
|
|
|
|
|
|
|
|
|
|
|
|
|
|
|
|
|
|
|
|
|
|
|
|
|
|
|
|
|
|
|
|
|
|
|
|
|
|
|
|
|
|
|
|
|
|
|
|
|
|
|
|
|
|
|
|
|
|
|
|
|
|
|
|
|
|
|
|
|
|
|
|
|
|
|
|
|
|
|
|
|
|
|
|
|
|
|
|
|
|
|
|
|
|||
|
|
|
|
|
|
|
|
|
|
|
|
|
|
|
|
|
|
|
|
|
|
|
|
|
|
|
|
|
|
|
|
|
|
|
|
|
|
|
|
|
|
|
|
|
|
|
||
|
|
|
|
|
|
|
|
|
|
|
|
|
|
|
|
|
|
|
|
|
|
|
|
|
|
|
|
|
|
|
|
|
|
|
|
|
|
|
|
|
|
|
|
|
|
|
|
|
|
|
|
|
|
|
|
|
|
|
|
|
|
|
|
|
|
|
|
|
|
|
|
|
|
|
|
|
|
|
|
|
|
|
|
|
|
|
|
|
|
|
|
|
|
||||
|
|
|
|
|
|
|
|
|
|
|
|
|
|
|
|
|
|
|
|
|
|
|
|
|
|
|
|
|
|
|
|
|
|
|
|
|
|
|
|
|
|
|
|
|
|
|
||
|
|
|
|
|
|
|
|
|
|
|
|
|
|
|
|
|
|
|
|
|
|
|
|
|
|
|
|
|
|
|
|
|
|
|
|
|
|
|
|
|
|
|
|
|
|
|
|
|
|
|
|
|
|
|
|
|
|
|
|
|
|
|
|
|
|
|
|
|
|
|
|
|
|
|
|
|
|
|
|
|
|
|
|
|
|
|
|
|
|
|
|
|
|
|
|
||
|
|
|
|
|
|
|
|
|
|
|
|
|
|
|
|
|
|
|
|
|
|
|
|
|
|
|
|
|
|
|
|
|
|
|
|
|
|
|
|
|
|
|
|
|
|
|||
|
|
|
|
|
|
|
|
|
|
|
|
|
|
|
|
|
|
|
|
|
|
|
|
|
|
|
|
|
|
|
|
|
|
|
|
|
|
|
|
|
|
|
|
|
|
|
||
|
|
|
|
|
|
|
|
|
|
|
|
|
|
|
|
|
|
|
|
|
|
|
|
|
|
|
|
|
|
|
|
|
|
|
|
|
|
|
|
|
|
|
|
|
|
|||
|
|
|
|
|
|
|
|
|
|
|
|
|
|
|
|
|
|
|
|
|
|
|
|
|
|
|
|
|
|
|
|
|
|
|
|
|
|
|
|
|
|
|
|
|
|
|||
|
|
|
|
|
|
|
|
|
|
|
|
|
|
|
|
|
|
|
|
|
|
|
|
|
|
|
|
|
|
|
|
|
|
|
|
|
|
|
|
|
|
|
|
|
||||
|
|
|
|
|
|
|
|
|
|
|
|
|
|
|
|
|
|
|
|
|
|
|
|
|
|
|
|
|
|
|
|
|
|
|
|
|
|
|
|
|
|
|
|
|
||||
|
|
|
|
|
|
|
|
|
|
|
|
|
|
|
|
|
|
|
|
|
|
|
|
|
|
|
|
|
|
|
|
|
|
|
|
|
|
|
|
|
|
|
|
|||||
|
|
|
|
|
|
|
|
|
|
|
|
|
|
|
|
|
|
|
|
|
|
|
|
|
|
|
|
|
|
|
|
|
|
|
|
|
|
|
|
|
|
|
||||||
|
|
|
|
|
|
|
|
|
|
|
|
|
|
|
|
|
|
|
|
|
|
|
|
|
|
|
|
|
|
|
|
|
|
|
|
|
|
|
|
|
|
|||||||
|
|
|
|
|
|
|
|
|
|
|
|
|
|
|
|
|
|
|
|
|
|
|
|
|
|
|
|
|
|
|
|
|
|
|
|
|
|
|
R3 |
|
|
|||||||
|
|
|
|
|
|
|
|
|
|
|
|
|
|
|
|
|
|
|
|
|
|
|
|
|
|
|
|
|
|
|
|
|
|
|
|
|
|
|
|
|
||||||||
|
|
|
|
|
|
|
|
|
|
|
|
|
|
|
|
|
|
|
|
|
|
|
|
|
|
|
|
|
|
|
|
|
|
|
|
|
|
|
|
|
|
|||||||
|
|
|
|
|
|
|
|
|
|
|
|
|
|
|
|
|
|
|
|
|
|
|
|
|
|
|
|
|
|
|
|
|
|
|
|
|
|
|
|
|
|
|
||||||
|
|
|
|
|
|
|
|
|
|
|
|
|
|
|
|
|
|
|
|
|
|
|
|
|
|
|
|
|
|
|
|
|
|
|
|
|
|
|
|
|
|
|
|
|||||
|
|
|
|
|
|
|
|
|
|
|
|
|
|
|
|
|
|
|
|
|
|
|
|
|
|
|
|
|
|
|
|
|
|
|
|
|
|
|
|
|
|
|
|
|
||||
|
|
|
|
|
|
|
|
|
|
|
|
|
|
|
|
|
|
|
|
|
|
|
|
|
|
|
|
|
|
|
|
|
|
|
|
|
|
|
|
|
|
|
|
|
||||
|
|
|
|
|
|
|
|
|
|
|
|
|
|
|
|
|
|
|
|
|
|
|
|
|
|
|
|
|
|
|
|
|
|
|
|
|
|
|
|
|
|
|
|
|
|
|
||
|
|
|
|
|
|
|
|
|
|
|
|
|
|
|
|
|
|
|
|
|
|
|
|
|
|
|
|
|
|
|
|
|
|
|
|
|
|
|
|
|
|
|
|
|
|
|||
|
|
|
|
|
|
|
|
|
|
|
|
|
|
|
|
|
|
|
|
|
|
|
|
|
|
|
|
|
|
|
|
|
|
|
|
|
|
|
|
|
|
|
|
|
|
|
||
|
|
|
|
|
|
|
|
|
|
|
|
|
|
|
|
|
|
|
|
|
|
|
|
|
|
|
|
|
|
|
|
|
|
|
|
|
|
|
|
|
|
|
|
|
||||
|
|
|
|
|
|
|
|
|
|
|
|
|
|
|
|
|
|
|
|
|
|
|
|
|
|
|
|
|
|
|
|
|
|
|
|
|
|
|
|
|
|
|
|
|
||||
|
|
|
|
|
|
|
|
|
|
|
|
|
|
|
|
|
|
|
|
|
|
|
|
|
|
|
|
|
|
|
|
|
|
|
|
|
|
|
|
|
|
|
|
|
|
|||
|
|
|
|
|
|
|
|
|
|
|
|
|
|
|
|
|
|
|
|
|
|
|
|
|
|
|
|
|
|
|
|
|
|
|
|
|
|
|
|
|
|
|
|
|
||||
|
|
|
|
|
|
|
|
|
|
|
|
|
|
|
|
|
|
|
|
|
|
|
|
|
|
|
|
|
|
|
|
|
|
|
|
|
|
|
|
|
|
|
|
|
||||
|
|
|
|
|
|
|
|
|
|
|
|
|
|
|
|
|
|
|
|
|
|
|
|
|
|
|
|
|
|
|
|
|
|
|
|
|
|
|
|
|
|
|
||||||
|
|
|
|
|
|
|
|
|
|
|
|
|
|
|
|
|
|
|
|
|
|
|
|
|
|
|
|
|
|
|
|
|
|
|
|
|
|
|
|
|
|
|
|
|
||||
|
|
|
|
|
|
|
|
|
|
|
|
|
|
|
|
|
|
|
|
|
|
|
|
|
|
|
|
|
|
|
|
|
|
|
|
|
|
|
|
|
|
|
|
|
|
|||
|
|
|
|
|
|
|
|
|
|
|
|
|
|
|
|
|
|
|
|
|
|
|
|
|
|
|
|
|
|
|
|
|
|
|
|
|
|
|
|
|
|
|
|
|
|
|
||
|
|
|
|
|
|
|
|
|
|
|
|
|
|
|
|
|
|
|
|
|
|
|
|
|
|
|
|
|
|
|
|
|
|
|
|
|
|
|
|
|
|
|
|
|
|
|
||
|
|
|
|
|
|
|
|
|
|
|
|
|
|
|
|
|
|
|
|
|
|
|
|
|
|
|
|
|
|
|
|
|
|
|
|
|
|
|
|
|
|
|
|
|
|
|
||
|
|
|
|
|
|
|
|
|
|
|
|
|
|
|
|
|
|
|
|
|
|
|
|
|
|
|
|
|
|
|
|
|
|
|
|
|
|
|
|
|
|
|
|
|
|
|||
|
|
|
|
|
|
|
|
|
|
|
|
|
|
|
|
|
|
|
|
|
|
|
|
|
|
|
|
|
|
|
|
|
|
|
|
|
|
|
|
|
|
|
|
|
|
|
||
|
|
|
|
|
|
|
|
|
|
|
|
|
|
|
|
|
|
|
|
|
|
|
|
|
|
|
|
|
|
|
|
|
|
|
|
|
|
|
|
|
|
|
|
|
|
|
||
|
|
|
|
|
|
|
|
|
|
|
|
|
|
|
|
|
|
|
|
|
|
|
|
|
|
|
|
|
|
|
|
|
|
|
|
|
|
|
|
|
|
|
|
|
||||
|
|
|
|
|
|
|
|
|
|
|
|
|
|
|
|
|
|
|
|
|
|
|
|
|
|
|
|
|
|
|
|
|
|
|
|
|
|
|
|
|
|
|
|
|
|
|||
|
|
|
|
|
|
|
|
|
|
|
|
|
|
|
|
|
|
|
|
|
|
|
|
|
|
|
|
|
|
|
|
|
|
|
|
|
|
|
|
|
|
|
|
|||||
|
|
|
|
|
|
|
|
|
|
|
|
|
|
|
|
|
|
|
|
|
|
|
|
|
|
|
|
|
|
|
|
|
|
|
|
|
|
|
|
|
|
|
|
|
|
|
||
|
|
|
|
|
|
|
|
|
|
|
|
|
|
|
|
|
|
|
|
|
|
|
|
|
|
|
|
|
|
|
|
|
|
|
|
|
|
|
|
|
|
|
|
|
|
|
||
|
|
|
|
|
|
|
|
|
|
|
|
|
|
|
|
|
|
|
|
|
|
|
|
|
|
|
|
|
|
|
|
|
|
|
|
|
|
|
|
|
|
|
|
|
|
|
|
|
|
|
|
|
|
|
|
|
|
|
|
|
|
|
|
|
|
|
|
|
|
|
|
|
|
|
|
|
|
|
|
|
|
|
|
|
|
|
|
|
|
|
|
|
|
|
|
||
|
|
|
|
|
|
|
|
|
|
|
|
|
|
|
|
|
|
|
|
|
|
|
|
|
|
|
|
|
|
|
|
|
|
|
|
|
|
|
|
|
|
|
|
|
|
|
|
|
|
|
|
|
|
|
|
|
|
|
|
|
|
|
|
|
|
|
|
|
|
|
|
|
|
|
|
|
|
|
|
|
|
|
|
|
|
|
|
|
|
|
|
|
|
|
|
||
|
|
|
|
|
|
|
|
|
|
|
|
|
|
|
|
|
|
|
|
|
|
|
|
|
|
|
|
|
|
|
|
|
|
|
|
|
|
|
|
|
|
|
|
|
||||
|
|
|
|
|
|
|
|
|
|
|
|
|
|
|
|
|
|
|
|
|
|
|
|
|
|
|
|
|
|
|
|
|
|
|
|
|
|
|
|
|
|
|
|
|
|
|
|
|
|
|
|
|
|
|
|
|
|
|
|
|
|
|
|
|
|
|
|
|
|
|
|
|
|
|
|
|
|
|
|
|
|
|
|
|
|
|
|
|
|
|
|
|
|
|
|
|
|
|
|
|
|
|
|
|
|
|
|
|
|
|
|
|
|
|
|
|
|
|
|
|
|
|
|
|
|
|
|
|
|
|
|
|
|
|
|
|
|
|
|
|
|
|
|
|
|
|
|
|
|
|
|
|
|
|
|
|
|
|
|
|
|
|
|
|
|
|
|
|
|
|
|
|
|
|
|
|
|
|
|
|
|
|
|
|
|
|
|
|
|
|
|
|
|
|
|
1 |
|
|
|
|
|
|
|
|
|
|
|
|
|
|
|
|
|
|
|
|
|
|
|
|
|
|
|
|
|
|
|
|
|
|
|
|
|
|
|
|
|
|
|
|
|
|
|
|
|
|
|
|
|
|
|
|
|
|
|
|
|
|
|
|
|
|
|
|
|
|
|
|
|
|
|
|
|
|
|
|
|
|
|
|
|
|
|
|
|
|
|
|
|
|
|
|
|
|
|
|
|
|
|
|
|
|
|
|
|
|
|
|
|
|
|
|
|
|
|
|
|
|
|
|
|
|
|
|
|
|
|
|
|
|
|
|
|
|
|
|
|
|
|
|
|
|
|
|
|
|
|
|
|
|
|
|
|
|
|
|
|
|
|
|
|
|
|
|
|
|
|
|
|
|
|
|
|
|
|
|
|
|
|
|
|
|
|
|
|
|
|
|
|
|
|
|
|
|
|
|
|
|
|
|
|
|
|
|
|
|
|
|
|
|
|
|
|
|
|
|
|
|
|
|
|
|
|
|
|
|
|
|
|
|
|
|
|
|
|
|
|
|
|
|
|
|
|
|
|
|
|
|
|
|
|
|
|
|
|
|
|
|
|
|
|
|
|
|
|
|
|
|
|
|
|
|
|
|
|
|
|
|
|
|
|
|
|
|
|
|
|
||
|
|
|
|
|
|
|
|
|
|
|
|
|
|
|
|
|
|
|
|
|
|
|
|
|
|
|
|
|
|
|
|
|
|
|
|
|
|
|
|
|
|
|
|
|
|
|
||
|
|
|
|
|
|
|
|
|
|
|
|
|
|
|
|
|
|
|
|
|
|
|
|
|
|
|
|
|
|
|
|
|
|
|
|
|
|
|
|
|
|
|
|
|
|
|
||
|
|
|
|
|
|
|
|
|
|
|
|
|
|
|
|
|
|
|
|
|
|
|
|
|
|
|
|
|
|
|
|
|
|
|
|
|
|
|
|
|
|
|
|
|
|
|
|
|
|
|
|
|
|
|
|
|
|
|
|
|
|
|
|
|
|
|
|
|
|
|
|
|
|
|
|
|
|
|
|
|
|
|
|
|
|
|
|
|
|
|
|
|
|
|
|
|
|
|
|
|
|
|
|
|
|
|
|
|
|
|
|
|
|
|
|
|
|
|
|
|
|
|
|
|
|
|
|
|
|
|
|
|
|
|
|
|
|
|
|
|
|
|
|
|
|
|
|
|
|
|
|
|
|
|
|
|
|
|
|
|
|
|
|
|
|
|
|
|
|
|
|
|
|
|
|
|
|
|
|
|
|
|
|
|
|
|
|
|
|
|
|
|
|
|
|
|
|
|
|
|
|
|
|
|
|
|
|
|
|
|
|
|
|
|
|
|
|
|
|
|
|
|
|
|
|
|
|
|
|
|
|
|
|
|
|
|
|
|
|
|
|
|
|
|
|
|
|
|
|
|
|
|
|
|
|
|
|
|
|
|
|
|
|
|
|
|
|
|
|
|
|
|
|
|
|
|
|
|
|
|
|
|
|
|
|
|
|
|
|
|
|
|
|
Using the timer (where included) – Fig.R
The main switch |
1 |
must be on in order to use the timer |
|
|
|||
|
|
||
(Pos. “I”). |
|
|
Setting the time in hours and minutes
Note: Do not manually turn the clock with the selector switch
(3) (Fig.R) in position (Clock) (Fig.R2) as the electronic components may damage.
Proceed as follows to set the Timer time:
Helpful hints
•When the ambient temperature is not high, or at night, select the minimum speed to avoid cooling the room excessively and to achieve considerable energy savings.
•When the ambient temperature is very high, we
recommend turning the |
knob clockwise. Once the |
desired temperature has been reached, turn the knob counter-clockwise until the  lamp switches off.
•Position the selector switch (3) (Fig.R) in position “0”
(Fig.R3);
•Turn the minutes hand (1) (Fig.R) clockwise until the present time is set (the time set is indicated by the arrow
(4) (Fig.R).
Setting the on-off intervals
•Set the tabs as desired. (2) (Fig.R):
-Tabs down = on interval
-Tabs up = off interval
•Select the operating mode on the front panel:
-Cool or Fan mode
-High or low speed
-Knob position
•Set the selector (3) (Fig.R) switch to “clock”  (Fig.R2).
Cutting out the timer programs (climate control unit always on)
•The climate control unit will remain on at all times if the selector switch (3) is set to “I”. (Fig.R1).
•The timer may be activated at any time by setting the selector switch to “clock”  (Fig.R2).
Directing the air flow
• Adjust the air diffuser fins manually. (4) (Fig.A).
We recommend aiming the fins upward for improved air diffusion.
ADDITIONAL INFORMATION
•For MAINTENANCE AND HELPFUL HINTS, see page 30.
•To DRAIN THE WATER CONDENSATION TANK, refer to page 30.
•For TROUBLESHOOTING and ERRORS AND SOLUTIONS TABLE, see page 31.
• The climate control unit will remain on but not running if the selector switch (3) is set to “0”. (Fig.R3)

24 |
USING THE CLIMATE CONTROL UNIT - OPTIONAL REMOTE CONTROL (E-EH MODELS)
USING THE CLIMATE CONTROL UNIT (E-EH MODELS)
LEGEND OF CONTROLS AND INDICATORS – FIG.A - F
CONTROL |
TUAREG 8E |
TUAREG EH8 |
NAME |
CONTROL |
TUAREG 8E |
TUAREG EH8 |
NAME |
|
|
|
|
||||
|
2 2 ON/OFF button |
|
2 |
|
Internal fan speed adjustment |
||
|
|
2 button |
|||||
|
|
|
|
|
|
|
Manual fan control |
MODE |
2 2 Operating mode selector switch |
|
2 2 Ionizer button/lamp |
||||
|
2 2 Increase button |
|
2 2 lamp |
||||
|
2 2 Decrease button |
|
|
|
Start/stop fin oscillation button/ |
||
|
|
|
|
|
|||
|
2 |
2 Timer setting button |
|
2 2 Program 1 lamp |
|||
|
|||||||
|
2 2 Time setting button |
|
2 2 Program 2 lamp |
|
|
2 2 Program 3 lamp |
|
ENTER |
|
|
|
2 2 Enter button |
|
2 2 Program 4 lamp |
|
|
2 2 Cool mode lamp |
|
2 2 Timer Program Start lamp |
|
2 Heat pump mode lamp |
|
2 2 Timer Program End lamp |
|
|
2 2 Timer Program Mode lamp |
|
|
2 2 Dehumidifier mode lamp |
|
|
|
|
2 2 Timer Temperature lamp |
|
|
2 2 Nighttime mode lamp |
|
|
|
|
2 2 Technical Service needed alarm |
|
|
2 2 Economy mode lamp |
|
|
|
|
2 2 Cleaning filter indicator |
|
|
2 2 Automatic mode lamp |
|
|
|
|
2 2 Display |
|
|
2 2 Fan mode lamp |
|
|
|
|
|
|
|
2 2 Timer mode lamp |
1 |
2 2 Main switch |
zzz |
2 2 Timer “sleep” mode lamp |
|
2 2 Drainage pump control button |
OPTIONAL REMOTE CONTROL (E-EH MODELS)
E-EH models can be used with an infrared ray remote control, thus allowing the operator to preset or change the system operation from a certain distance.
Precautionary measures
In order for the remote control to work properly, avoid:
•Direct exposure to sunlight;
•placing it behind curtains or other obstacles;
•placing it at more than 5 meters from the climate control system;
•placing it in unsuitable areas, either too hot or too cold;
•placing it in areas subject to electrical or magnetic interferences.
Introducing batteries
•Remove the cover in the back of the remote control;
•introduce 2 batteries, 1.5V-DC, AAA type, and follow the polarity indication on the remote control.
Use
In order to use the remote control, the climate control system must be switched on and the main switch must be in “I” position. Direct the transmitter head of remote control towards the display located on the system control unit, then press the buttons required. For data setting, refer to chapter “USE OF THE CLIMATE CONTROL UNIT”; the remote control keys and controls on the system display have the same functions.
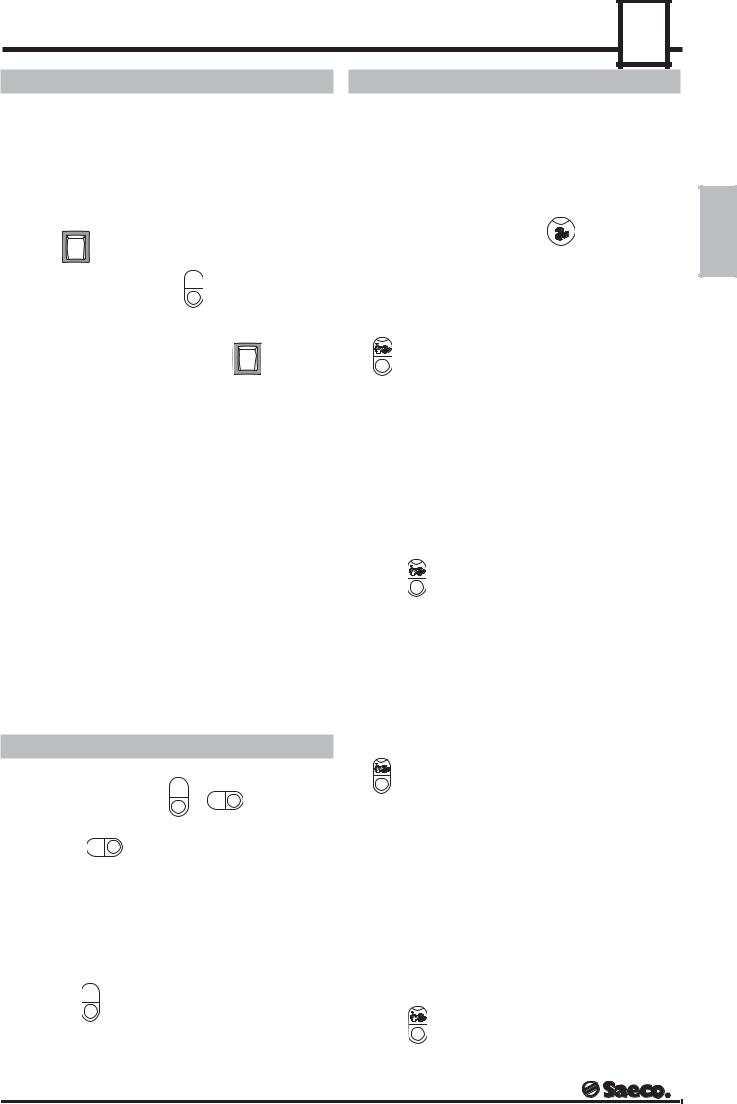
USING THE CLIMATE CONTROL UNIT (E-EH MODELS)
E-EH MODELS |
INTELLIGENT MODES |
25 |
E models cool and dehumidify the room. EH models also include heating in addition to cooling and dehumidifying functions.
The remaining sections of this manual refer to the specific functions of each model.
Switching the unit on
• |
Press 1 . The unit will set to stand-by mode. |
|
|
|
|
|
|
|
• |
During normal use, press the |
button to switch the unit |
on and off, while allowing the unit to be powered through the mains.
The operating modes have been developed to achieve the |
|
|
desired ambient conditions as rapidly and economically as |
|
|
possible. The user need simply select the mode and tempe- |
|
|
rature, and the climate control unit will select the most |
|
|
appropriate speeds and temperatures automatically and |
|
|
“intelligently”. |
ENGLISH |
|
Fan Mode |
||
|
||
Only the indoor unit fan operates in fan mode. This means that |
|
|
air is circulated, filtered and purified without changing its tem- |
|
|
perature and humidity. The speed may be selected |
|
|
automatically or manually. When fan mode is activated, the unit |
|
|
sets itself to automatic fan mode. |
|
• If the machine is turned off using the |
1 |
push button, |
|
|
|||
|
|
the time settings are lost; the Timer settings (see Timer Mode) will be stored in the memory.
The |
lamp shuts off to indicate that the fan speed is selected |
automatically.
Automatic fan
Setting the time
•Press the  button to display the current time, in hours.
•Press the  and
and  buttons to change the
hours.
ENTER
•Press  to confirm the change and move on to minutes.
•Press the  and
and  buttons to change the
minutes.
ENTER
• Press  to confirm the change and exit the "TIME SETTING" mode.
SIMPLIFIED USE
The unit checks the difference between the ambient temperature and the user temperature, and selects the most appropriate speed based on the following operating logic:
greater temperature difference = maximum speed; smaller temperature difference = minimum speed.
Manual fan
Press the |
key to select the three speeds or automatic |
mode.
Cool Mode 
Cool Mode cools the ambient rapidly and reduces the air humidity to achieve the most comfortable ambient conditions. The speed may be selected automatically or manually.
When cool mode is activated, the unit sets itself to automatic cooling.
|
|
|
|
|
• |
With the unit on, press the |
or MODE |
key. The display |
|
|
shows the previously set temperature. |
|
||
• |
Press the MODE |
key repeatedly to select the desired |
||
operating mode as indicated in the LEGEND OF CONTROLS AND INDICATORS
• Press  or
or  to set the temperature, which will
appear on the display.
• The lamp corresponding to the selected mode will light steadily to indicate which operating mode is activated.
|
|
• Press the |
key to shut off the unit. |
All functions are disable and the display shows the set time. If no time has been set, the display will flash
0 0 : 0 0 .
The |
lamp shuts off to indicate that the fan speed is selected |
automatically.
Automatic cooling
The unit checks the difference between the ambient temperature and the user temperature, and selects the most appropriate speed based on the following operating logic:
greater temperature difference = maximum speed; smaller temperature difference = minimum speed.
Once the desired temperature is reached, the climate control unit runs at minimum speed for greater noiselessness.
Manual cooling
Press the |
key to select the three speeds or automatic |
mode.
26 |
USING THE CLIMATE CONTROL UNIT (E-EH MODELS)
Economy Mode
This enables the set temperature to be maintained with the lowest possible energy consumption in particular surrounding conditions.
• Cooling takes place at minimum speed during the first hour of operation.
•If the ambient temperature is more than 1 °C above the set temperature, cooling is activated.
•The unit checks the difference between the ambient temperature and the temperature selected by the user, then selects the most appropriate speed according to the following operating logic:
greater temperature difference = maximum speed; smaller temperature difference = minimum speed.
• Cooling is activated for three minutes and deactivated for seven minutes after the first hour of operation.
Nighttime Mode 
Achieves the desired climate conditions and high acoustic comfort, with special attention to energy consumption. The fan is always at minimum speed, and the set temperature is corrected to follow the ambient temperature pattern overnight.
•If the ambient temperature is ± 1 °C of the set temperature, only the fan is enabled.
•If the ambient temperature is more than 1 °C above the set temperature, minimum cooling is activated.
•After one hour of operation, the set temperature is increased by 1 °C.
•After 2 hours of operation, the set temperature is increased by 2 °C.
Operation sequence
• Press MODE |
key to select the fan operating mode. |
• Select the desired temperature using the  and keys.
• Press MODE |
key to select the night operating mode. |
Dehumidifier Mode 
This mode dehumidifies the air while controlling the ambient temperature. This operating mode performs dehumidifying cycles, the duration of which depends on the difference between the ambient temperature and the selected temperature. The internal fan always runs at minimum speed during the operating cycle.
Eliminating humidity from the air provides maximum well-being. During the summer, it is recommended that rooms be kept at a temperature between 24-26 °C and at a relative humidity of approximately 45-50%.
Automatic Mode 


This is recommended for rooms occupied for long periods. The climate control unit automatically selects the air treatment mode:
-Cooling
-Fan
•If the ambient temperature is ± 1 °C of the set temperature, only the fan is enabled.
Heating Mode (Model EH) 
This mode heats the environment by means of a resistance:
• If the temperature of the environment is 1° C less than the set temperature, the “HEATING MODE” is activated.
Timer Mode 
By selecting this operational mode the machine automatically executes up to 4 different programs (Timers) that have been previously set by the user.
The time set on the machine must be correct in order to run this operational mode, see the “Time setting” section.
Below is the identification of the sections to:
a)set the Timers;
b)modify the Timer settings;
c)disable the Timer settings;
d)exit from the Timer setting mode.
a) How to set the Timer;
The starting and ending time of the cycle, the operating mode and the temperature must be set for each program (Timer).
The indications provided below must be observed in order to avoid errors in setting the Timers:
• the operating intervals of the set Timers must not be overlapped; if this should occur however, only the Timer with the earliest starting time will run.
Es.:Timer 1 |
starting |
time |
17.00 |
ending |
time |
19.00 |
Timer 2 |
starting |
time |
18.00 |
ending |
time |
22.00 |
|
|
|
|
|
|
|
If the setting is as above, only Timer 1 will run as the starting time of Timer 2 overlaps the operating interval of Timer 1.
• In each Timer, the starting time set must be earlier than the ending time set; if this should not be the case, the Timer will not run.
Es.: Timer 1 |
starting time 17.00 |
ending time 19.00 (YES) |
Timer 2 |
starting time 22.00 |
ending time 02.00 (NO) |
Timer 2 will not run.
If the machine is to run in the timer mode in the evening or overnight, Timer 2 must be set as follows:
Es.: Timer 1 |
starting time 19.00 |
ending time |
23.30 |
Timer 2 |
starting time 00.00 |
ending time |
07.00 |
|
|
|
|
This procedure is required as the machine does not control the switch-over from one day to another.
USING THE CLIMATE CONTROL UNIT (E-EH MODELS)
27 |
Some helpful Hints
•It is advisable to set the Timers so that they run in the desired order; this will allow a more rational control of the operating intervals.
•It is advisable to write the Timer settings on a piece of paper to reduce the risk of overlapping the settings and to allow you to better control your machine.
How to set the Timers
Below are the setting operations required to set Timer 1:
|
ON/OFF |
1 Switch the machine off using the |
push button; the |
display will show the present time.
2 Press the  push button once to select Timer 1; the
corresponding LED lights up. The display will no longer show any information.
3 Press |
ENTER |
|
to confirm that Timer 1 is to be set. The |
|
|
LED lights up. |
|
|
4 Use the  and
and  push buttons to set the cycle
starting time; this will then appear on the display.
5 Press |
ENTER |
|
LED lights up. |
to confirm the entry. The |
|
6 Use the  and
and  push buttons to set the cycle
ending time; this will then appear on the display.
|
ENTER |
|
|
7 |
Press |
to confirm the entry. The LED lights up. |
|
8 |
Press the |
MODE |
push button until the desired operating |
mode is selected; the corresponding LED will light up.
|
ENTER |
9 Press |
to confirm the selection. The LED lights up. |
10 Use the  and
and  push buttons to set the desired
temperature; this will then appear on the display.
ENTER
11 Press  to confirm the entry. Timer 1 has now been
set; press  to save the parameters selected and the corresponding LED remains lit.
If you wish to exit from the Timer setting mode, follow the instructions of the relative section; If, on the other hand, Timer 2 is to be set, proceed as follows:
|
|
|
|
1 Press the |
push button until LED |
lights up; |
|
ENTER |
|
|
|
2 Press |
to confirm that Timer 2 is to be set. The |
|
|
|
|
|
|
LED lights up;
3 To set this Timer, follow the instructions from point 4 to point 10 that have been illustrated to set Timer 1;
ENTER
4 Press  to confirm the entry. Timer 2 has now been
set; press  to save the parameters selected and the corresponding LED remains lit.
If you wish to exit from the Timer setting mode, follow the |
|
||||
instructions provided in the relative section; If Timer 3 is to be |
ENGLISH |
||||
|
|
|
|
|
|
set, proceed as follows: |
|
|
|
||
1 |
Press the |
push button until LED |
lights up; |
|
|
2 |
ENTER |
|
|
|
|
Press |
to confirm that Timer 3 is to be set. The |
|
|
||
LED lights up;
3 To set this Timer, follow the instructions from point 4 to point 10 that have been illustrated to set Timer 1;
ENTER
4 Press  to confirm the entries. Timer 3 has now been
set; press  to save the parameters selected and the corresponding LED remains lit.
If you wish to exit from the Timer setting mode, follow the instructions provided in the relative section; If Timer 4 is to be set, proceed as follows:
|
|
|
|
|
1 |
Press the |
push button until |
; lights up; |
|
2 |
ENTER |
|
|
|
Press |
to confirm that Timer 4 is to be set. The |
|
||
LED lights up;
3 To set this Timer, follow the instructions from point 4 to point 10 that have been illustrated to set Timer 1;
ENTER
4 Press  to confirm the entries.
Timer 4 has now been set; press  to save the
parameters selected and the corresponding LED remains lit.
Follow the instructions provided in the relative section to exit from the Timer setting mode.
b) How to modify the Timer settings
This section describes the operations to be carried out in order to modify the Timer settings.
Proceed as follows to modify the settings:
|
ON/OFF |
1 Turn the machine off using the |
push button; the display |
will show the present time.
2 Press the  push button to select the Timer to be
modified; the corresponding LED will light up. The display will no longer show any information.

28 |
USING THE CLIMATE CONTROL UNIT (E-EH MODELS)
ENTER
3 Press  to confirm that the Timer selected is to be
modified. The |
|
LED lights up. |
4 Use the  or
or  push buttons to modify the cycle
starting time; this will then appear on the display.
ENTER |
to confirm the modification. The |
|
LED |
5 Press |
|
||
lights up. |
|
|
|
6 Use the  or
or  push buttons to modify the cycle
ending time; this will then appear on the display.
|
ENTER |
|
|
|
7 Press |
to confirm the modification. The |
LED |
||
|
lights up. |
|
|
|
8 |
Press the |
MODE |
push button until the mode desired is |
|
|
modified; the corresponding LED will light up. |
|
||
|
ENTER |
|
|
|
9 |
Press |
to confirm the selection. The |
LED lights |
|
up.
10 Use the  or
or  push buttons to modify the
desired temperature; this will then appear on the display.
ENTER
6 Use the 
 push buttons to set the cycle ending time at 00:00; this will appear on the display.
|
|
ENTER |
7 |
Press |
to confirm the entry. The LED lights up. |
|
|
ENTER |
8 |
Press |
. The LED lights up. |
ENTER
9 Press  .
.
10 Press  ; the Timer selected has now been disabled.
If you wish to exit from the Timer disabling mode, follow the instructions provided in the relative section; if, on the other hand, you wish to disable the other Timers, follow the instructions provided above from point 2.
d) How to exit from the Timer setting mode
This section describes the operations to be carried out in order to exit from the Timer setting, modification and disabling modes.
Two exit procedures may be carried out:
1 Press the  key until the time set on the machine is
Press |
to confirm the entry. The Timer selected has now |
displayed; all the parameters will be saved. |
||
|
|
|
2 If any kind of parameter is displayed (starting time, operating |
|
been set; press |
to save the parameters selected and the |
|
|
|
|
|
|
|
ON/OFF |
relative LED remains lit. |
mode etc.) press the |
push button once. |
||
If you wish to exit from the Timer setting mode, follow the instructions provided in the relative section; if, on the other hand, you wish to modify the other Timers, follow the instructions described above from point 2.
c) Disabling the Timer settings
This section describes the operations to be carried out in order to disable the Timer settings presently in use.
Proceed as follows to disable the Timers:
|
ON/OFF |
1 Turn the machine off using the |
push button; the display |
will show the present time.
2 Press the  push button to select the Timer to be
disabled; the corresponding LED lights up. The display no longer shows any information.
ENTER
3 Press  to confirm that the Timer selected is to be
disabled. The |
|
LED lights up. |
4 Use the  or
or  push buttons to set the cycle starting time at 00:00 ; this will appear on the display.
5 Press |
ENTER |
|
LED lights up. |
to confirm the entry. The |
|
Important: If the TIMER MODE is exited using this push button, the parameters of the Timer selected will not be saved; the Timers that have already been set will remain in the memory.
In all events, the machine enters the stand-by status and the parameters entered and in use at the time will be activated.
Example of using the four programs
Program |
ON |
OFF |
M o d e |
|
Temp. |
|
(°C) |
||||
|
|
|
|
|
|
|
|
|
|
|
|
1 |
7.00 |
8.30 |
Dehumidifying |
25 |
|
|
|
|
|
|
|
2 |
11.00 |
14.00 |
Cool |
|
24 |
|
|
|
|
|
|
3 |
18.00 |
22.00 |
Cool |
|
24 |
|
|
|
|
|
|
4 |
0.30 |
5.00 |
Nighttime |
28 |
|
|
|
|
|
|
|
|
Timer sleep Mode |
zz |
|
||
|
z |
|
|||
This automatically shuts off the climate control unit after a time interval set by the user.
• |
Press the MODE |
button and select |
zz |
mode. |
|
z |
|||||
• |
The display shows the time interval (preset to 15 minutes). |
||||
• |
Press the |
and |
buttons to change the shut-off |
||
|
time from “ 00” to “ 120” minutes. |
|
|
||
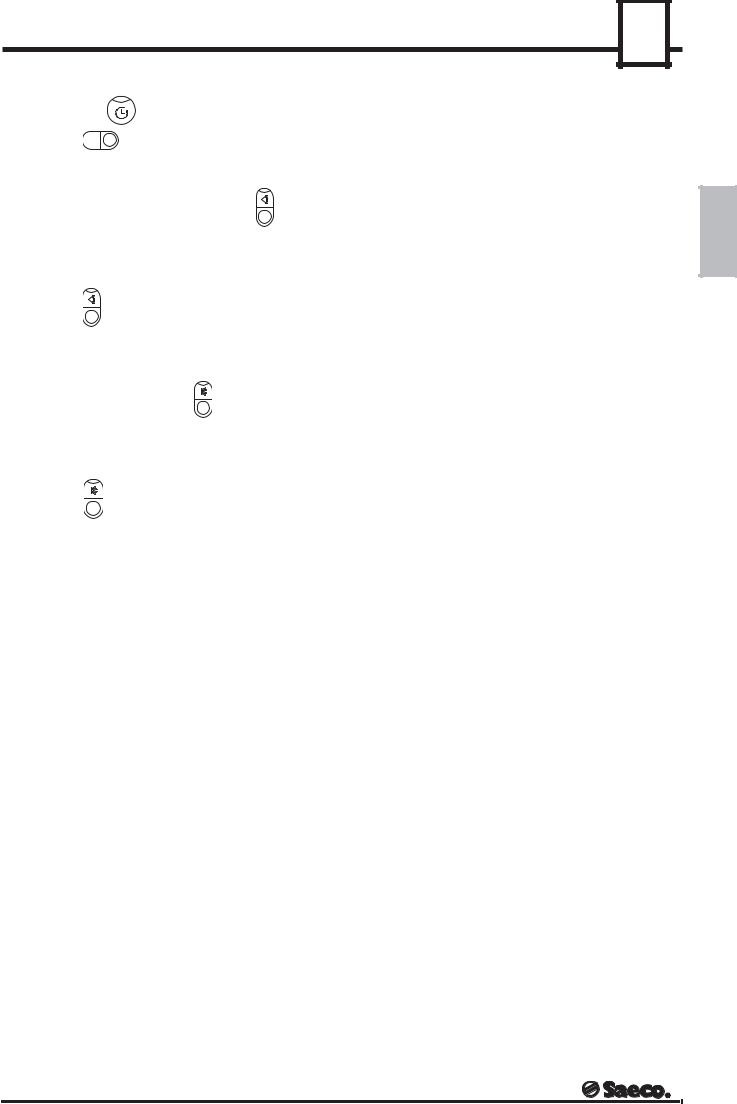
USING THE CLIMATE CONTROL UNIT (E-EH MODELS)
• After setting, the unit returns to the previous operating
mode and the |
zz |
LED remains lit. |
z |
||
• Press the MODE |
button to deactivate the function, or set |
|
the time interval to “00”.
Adjustable air outlet grid
To ensure the ideal distribution of treated air throughout the system, we have introduced an exclusive front grid fin oscillation system.
• Press the |
button to activate fin oscillation. |
• Press the button again to stop the fins in their current position.
Ionizer
The SAECO® climate control unit is equipped with a negative ion generating device to improve air quality. This is especially useful in closed, smoky rooms.
• Press the |
button to activate the ionizer device. |
• Press the button again to shut off the device.
29 |
ENGLISH |
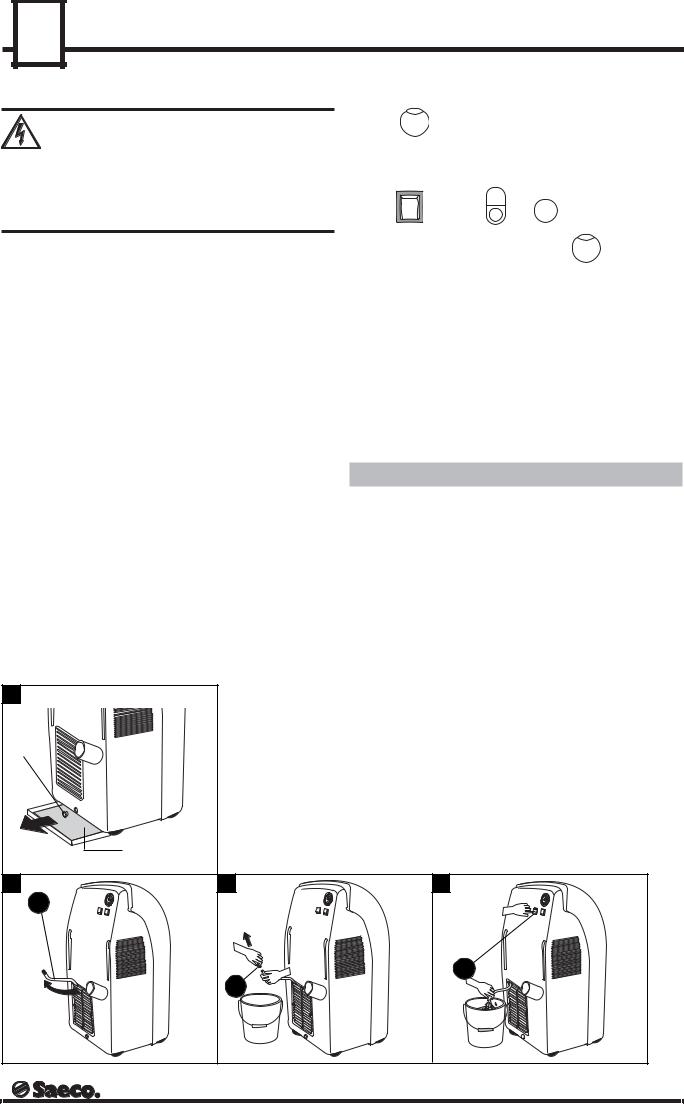
30 |
MAINTENANCE AND HELPFUL HINTS - EMPTYING THE CONDENSATION TRAY
MAINTENANCE AND HELPFUL HINTS |
Filter cleaning lamp (E-EH models) |
|
|
•Shut off and unplug the climate control unit before proceeding with the steps below.
•Do not immerse the unit in water or other liquids.
•Hand-dry the unit.
•Do not pour liquids into the unit.
•Take special precautions to avoid the sharp cutting edges of some parts.
•The 

 lamp on the control panel lights to indicate that the filter is dirty.
•After having cleaned the filter, turn the machine on using
|
ON/OFF |
ENTER |
the 1 holding the |
and |
keys down at the same |
|
|
|
Cleaning
The air circulation areas in the climate control unit must be kept clean and free of obstruction.
External plastic parts
Clean the climate control unit with a damp cloth, and dry.
Cleaning the washable filters
The unit is equipped with no.2 filters placed on the unit sides. To clean these filters, proceed as follows:
•Clean the washable filter (9) (Fig.A) periodically, and in any case at least once every two weeks.
•Grasp the holding tabs on the filter, and remove it.Washing the filter.
•Wash with warm water (temperature below 40 °C) and rinse several times (for example, using the shower head of the bath).
•Dry thoroughly before replacing it in the unit.
S
2
not supplied
time; this procedure will shut-off the 

 LED.
LED.
At the end of the season
•Turn off the main switch on the back of the climate control unit.
•Unplug the unit.
•Eliminate the condensation water by removing the drainage cap. (2) (Fig.S).
•Clean the filters and allow them to dry completely before fitting them back in place.
•Remove the scented tablet from the essence drawer.
•Cover the unit to protect it from dust.
EMPTYING THE CONDENSATION TRAY
In particular surrounding conditions beyond the normal operating thresholds, the machine may produce a greater amount of condensation than that of which it is capable of expelling automatically; if this is so, the water level inside the condensation tray reaches the maximum level and the machine stops and advises the user that the tray is full.
Proceed as follows to start the machine:
•Use a suitably sized container for the operation to be carried out (roughly 2 Litres)
•Remove the hose (2) from the position in which it is fixed. (Fig.T)
•Hold the hose still with one hand and remove its cap (1) (Fig.U).
•Insert the hose in the container, making sure that it may not slip out while water is being drained.
•Hold down the push button (13) (Fig.V) until all the water has been drained.
•Hold the hose still (2) and re-insert the cap (1) that was removed earlier.
•Re-position the hose (2) in the established position.
Once the aforesaid operations have been completed, the machine will re-start automatically.
T |
U |
V |
2
13
1
 Loading...