


ISTRUZIONI PER L'USO
OPERATING INSTRUCTIONS
MODE D’EMPLOI
BEDIENUNGSANLEITUNG INSTRUÇÕES PARA O USO
INSTRUCCIONES PARA EL USO
GEBRUIKSAANWIJZING
Instrukcje obsługi
R
C US
leggere attentamente queste istruzioni d'uso prima di utilizzare la macchina. READ THESE OPERATING INSTRUCTIONS CAREFULLY BEFORE USING THE MACHINE.
LIRE ATTENTIVEMENT CES INSTRUCTIONS AVANT D’UTILISER LA MACHINE.
DIESE BEDIENUNGSANLEITUNG IST VOR DEM ERSTEN GEBRAUCH DER MASCHINE AUFMERKSAM ZU LESEN. LER ATENTAMENTE ESTAS INSTRUÇÕES PARA O USO ANTES DE USAR A MÁQUINA.
LÉANSE ATENTAMENTE LAS SIGUIENTES INSTRUCCIONES DE USO ANTES DE UTILIZAR LA MÁQUINA.
LEES DEZE INSTRUCTIES AANDACHTIG DOOR VOORDAT U HET APPARAAT IN GEBRUIK NEEMT.
Przeczytać uważnie niniejsze instrukcje obsługi przed użytkowaniem urządzenia.
FOR HOUSEHOLD USE ONLY
USAGE DOMESTIQUE SEULEMENT
Ideas with Passion
1 |
2 |
3 |
4 |
5 |
|
6 |
7 |
8 |
9 |
|
|
|
|
|
|
11 |
|
10 |
|
|
|
12 |
|
|
|
|
|
|
|
|
|
14 |
|
13 |
|
17 |
|
15 |
|
|
|
|
|
|
|
|
in |
|
|
|
|
|
cm |
|
|
|
|
|
16 |
|
|
|
|
|
40 |
|
|
|
20 cm |
|
|
|
|
|
8 in |
|
20 cm |
|
|
|
|
|
|
|
|
16 |
|
20 cm |
8 in |
|
|
|
8 in |
|
|
|
|
|
|
|
|
|
|
|
Fig.A - Abb.A - Afb.A - Rys.A |
||
• • |
|
|
|
|
|
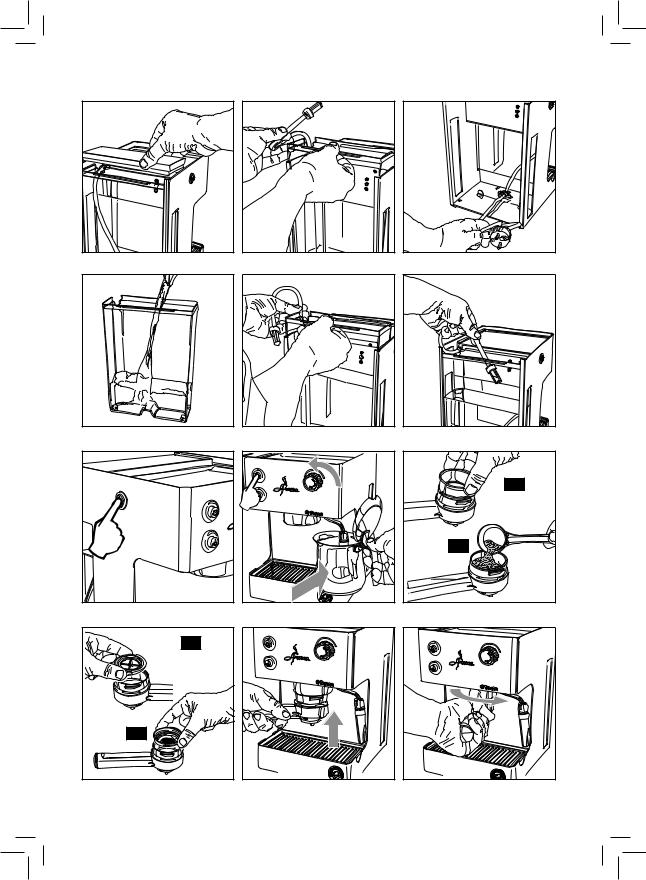
Fig.1 - Abb.1 - Afb.1 - Rys.1 |
Fig.4 - Abb.4 - Afb.4 - Rys.4 |
Fig.7 - Abb.7 - Afb.7 - Rys.7 |
A |
B
Fig.10 - Abb.10 - Afb.10 - Rys.10
Fig.2 - Abb.2 - Afb.2 - Rys.2 |
Fig.5 - Abb.5 - Afb.5 - Rys.5 |
Fig.8 - Abb.8 - Afb.8 - Rys.8 |
Fig.11 - Abb.11 - Afb.11 - Rys.11
Fig.3 - Abb.3 - Afb.3 - Rys.3 |
Fig.6 - Abb.6 - Afb.6 - Rys.6 |
A |
B |
Fig.9 - Abb.9 - Afb.9 - Rys.9 |
Fig.12 - Abb.12 - Afb.12 - Rys.11 |
• • |

Fig.13 - Abb.13 - Afb.13 - Rys.13 |
Fig.16 - Abb.16 - Afb.16 - Rys.16 |
Fig.19 - Abb.19 - Afb.19 - Rys.19 |
Fig.22 - Abb.22 - Afb.22 - Rys.22 |
• • |
Fig.14 - Abb.14 - Afb.14 - Rys.14 |
Fig.17 - Abb.17 - Afb.17 - Rys.17 |
Fig.20 - Abb.20 - Afb.20 - Rys.20 |
Fig.23 - Abb.23 - Afb.23 - Rys.23 |
Fig.15 - Abb.15 - Afb.15 - Rys.15 |
Fig.18 - Abb.18 |
- Afb.18 - Rys.18 |
Fig.21 - Abb.21 |
- Afb.21 - Rys.21 |
Fig.24 - Abb.24 - Afb.24 - Rys.24 |
1 Generalità
La macchina per caffè è indicata per la preparazione di 1 o 2 tazze di caffè espresso ed è dotata di un tubo
orientabile per l’erogazione del vapore e dell’acqua calda. I comandi sulla parte frontale dell’apparecchio sono contrassegnati con simboli di facile interpretazione.
La macchina è stata progettata per uso domestico e non è indicata per un funzionamento continuo di tipo professionale.
Attenzione. Non si assumono responsabilità per eventuali danni in caso di:
•Impiego errato e non conforme agli scopi previsti;
•Riparazioni non eseguite presso centri d’assistenza autorizzati;
•Manomissione del cavo d'alimentazione;
•Manomissione di qualsiasi componente della macchina;
•Impiego di pezzi di ricambio e accessori non originali;
•Mancata decalcificazione e stoccaggio in locali al di sotto di 0°C.
In questi casi viene a decadere la garanzia.
1.1Per facilitare la lettura
Il triangolo d’avvertimento indica tutte le istruzioni importanti per la sicurezza dell’utente. Attenersi
scrupolosamente a tali indicazioni per evitare ferimenti gravi!
Il riferimento ad illustrazioni, parti dell’apparecchio o elementi di comando, ecc. è indicato da numeri o lettere; in questo caso si rimanda all’illustrazione.
Questo simbolo evidenzia le informazioni da tenere in maggiore considerazione, per un mi-
gliore utilizzo della macchina.
1.2Impiego di queste istruzioni per l’uso
Conservare queste istruzioni per l’uso in un luogo sicuro e allegarle alla macchina per caffè qualora un’altra persona dovesse utilizzarla.
Per ulteriori informazioni o nel caso di problemi, rivolgetevi ai centri assistenza autorizzati.
|
2 |
Dati tecnici |
|
|
|
Italiano |
|||
|
Il costruttore si riserva il diritto di modificare le caratteri- |
|
||
|
stiche tecniche del prodotto. |
|
||
|
|
|
||
|
|
|
|
|
|
Tensione nominale - Potenza nominale - Alimentazione |
|
|
|
|
|
Vedi targhetta posta sull’apparecchio |
|
|
|
|
|
|
|
|
Materiale corpo |
|
|
|
|
|
Metallo |
|
|
|
Dimensioni (l x a x p) (mm) |
|
|
|
|
|
210 x 300 x 255 |
|
|
|
Peso |
7,5 kg |
|
|
|
|
|
|
|
|
Lunghezza cavo |
|
|
|
|
|
1,2 m |
|
|
|
Pannello di comando |
|
|
|
|
|
Sulla parte frontale |
|
|
|
Portafiltro |
|
|
|
|
|
Pressurizzato meccanico |
|
|
|
Pannarello |
|
|
|
|
|
Speciale per cappuccini |
|
|
|
Serbatoio acqua |
|
|
|
|
|
2 litri - Estraibile |
|
|
|
Pressione pompa |
|
|
|
|
|
15 bar |
|
|
|
Caldaia |
Inox |
|
|
|
|
|
|
|
|
Dispositivi di sicurezza |
|
|
|
|
|
Termostato a riarmo manuale |
|
|
|
|
Termofusibile |
|
|
|
|
|
|
|
3 |
Norme di sicurezza |
|
|
|
Mai mettere a contatto dell’acqua le parti sotto corrente: pericolo di cortocircuito! Il vapore surriscaldato e l’acqua calda possono provocare scottature! Mai dirigere il getto di vapore o dell’acqua calda verso parti del corpo, toccare con precauzione il beccuccio vapore / acqua calda: pericolo di scottature!
Destinazione d’uso
La macchina per caffè è prevista esclusivamente per l’impiego domestico. È vietato apportare modifiche tecniche e ogni impiego illecito, a causa dei rischi che essi comportano! L’apparecchio non è destinato ad essere utilizzato da persone (compresi i bambini) con ridotte capacità fisiche, mentali o sensoriali o con esperienza e/o competenze insufficienti, a meno che non siano sotto la supervisione di una persona responsabile della loro sicurezza o non vengano da essa istruite sull’uso dell’apparecchio.
• •

Alimentazione di corrente
Collegare la macchina per caffè soltanto ad una presa di corrente adeguata. La tensione deve corrispondere a quella indicata sulla targhetta dell’apparecchio.
Cavo d’alimentazione
Mai usare la macchina per caffè se il cavo d’alimentazione è difettoso. Se il cavo d’alimentazione è danneggiato, deve essere cambiato dal produttore o dal suo servizio assistenza clienti. Non far passare il cavo d’alimentazione per angoli e su spigoli vivi, sopra oggetti molto caldi e proteggerlo dall’olio.
Non portare o tirare la macchina per caffè tenendola per il cavo. Non estrarre la spina tirandola per il cavo oppure toccarla con le mani bagnate.
Evitare che il cavo d’alimentazione cada liberamente da tavoli o scaffali.
Protezione d’altre persone
Tenere i bambini sotto supervisione, per evitare che giochino con l’apparecchio.
I bambini non si rendono conto del pericolo connesso agli elettrodomestici.
Non lasciare alla portata dei bambini i materiali utilizzati per imballare la macchina.
Pericolo d’ustioni
Evitare di dirigere contro se stessi e/o altri il getto di vapore surriscaldato e/o d’acqua calda. Usare sempre le apposite maniglie o manopole.
Non disinserire (togliere) mai il portafiltro “Crema” durante l’erogazione del caffè. Durante la fase di riscaldamento dal gruppo erogazione caffè possono uscire gocce d’acqua calda.
Ubicazione
Sistemare la macchina per caffè in un posto sicuro, dove nessuno può rovesciarla o venirne ferito.
Acqua calda o vapore surriscaldato potrebbero fuoriuscire: pericolo di scottature!
Non tenere la macchina a temperatura inferiore a 0°C; c'è il pericolo che il gelo possa danneggiare la macchina. Non usare la macchina per caffè all’aperto.
Non posare la macchina su superfici molto calde e nelle vicinanze di fiamme libere per evitare che la carcassa fonda o comunque si danneggi.
Pulizia
Prima di pulire la macchina, è indispensabile disinserire tutti i tasti e poi staccare la spina dalla presa di corrente. Inoltre, aspettare che la macchina si raffreddi. Mai immergere la macchina nell’acqua!
È severamente vietato cercare d’intervenire all’interno della macchina.
Non utilizzare, per scopi alimentari, l’acqua rimasta nel serbatoio per alcuni giorni, lavare il serbatoio e riempirlo con acqua fresca potabile.
Spazio per l’uso e la manutenzione
Per il corretto e buon funzionamento della macchina per
caffè si consiglia quanto segue:
•Scegliere un piano d’appoggio ben livellato;
•Scegliere un ambiente sufficientemente illuminato, igienico e con presa di corrente facilmente accessibile;
•Prevedere una distanza minima dalle pareti della macchina come indicato in figura (Fig.A).
Custodia della macchina
Quando la macchina rimane inutilizzata per un periodo prolungato, disinserire la macchina e staccare la spina dalla presa. Custodirla in luogo asciutto e non accessibile ai bambini. Proteggerla dalla polvere e dallo sporco.
Riparazioni / Manutenzione
Nel caso di guasti, difetti o sospetto di difetto dopo una caduta, staccare subito la spina dalla presa. Mai mettere in funzione una macchina difettosa. Soltanto i Centri di Assistenza Autorizzati possono effettuare interventi e riparazioni. Nel caso di interventi non eseguiti a regola d’arte, si declina ogni responsabilità per eventuali danni.
Antincendio
In caso di incendio utilizzare estintori ad anidride carbonica (CO2). Non utilizzare acqua o estintori a polvere.
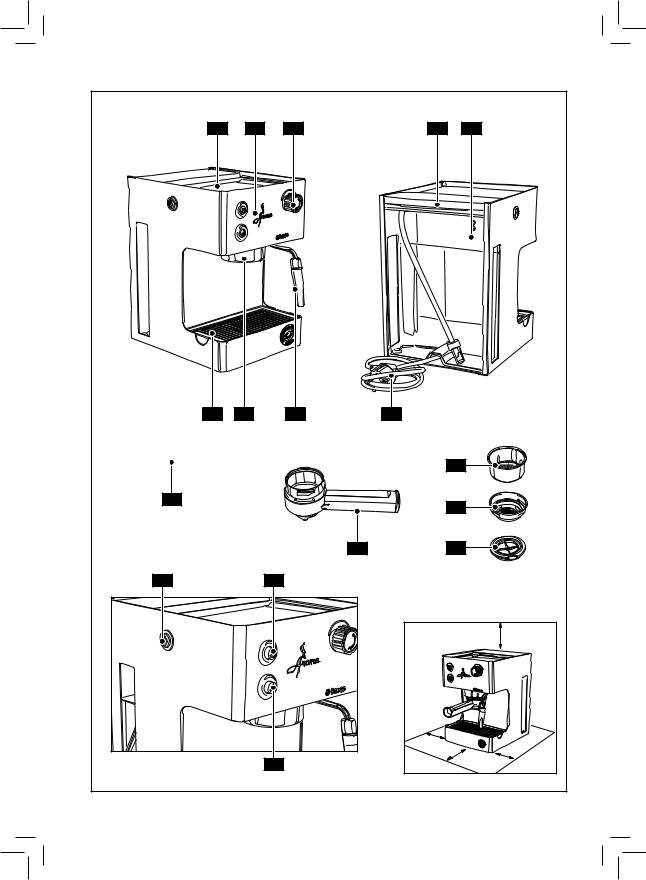
Legenda componenti macchina (Pag.4)
1Piano appoggia tazze
2Pannello comandi
3Pomello acqua calda / vapore
4Coperchio serbatoio acqua
5Serbatoio acqua
6Vasca recupero acqua + griglia
7Gruppo erogatore caffè
8Tubo vapore (pannarello)
9Cavo alimentazione
10Misurino per caffè macinato
11Filtro per caffè macinato
(unico per l'erogazione di 1 o 2 caffè)
12Filtro per caffè in cialde
13Adattatore per filtro caffè in cialde
14Portafiltro “Crema”
15Interruttore luminoso erogazione caffè
16Interruttore luminoso erogazione vapore
17Interruttore ON/OFF
4 installazione
Per la propria sicurezza e quella di terzi attenersi scrupolosamente alle “Norme di sicurezza” riportate nel cap. 3.
4.1Imballaggio
L’imballaggio originale è stato progettato e realizzato per proteggere la macchina durante la spedizione. Si consiglia di conservarlo per un eventuale trasporto futuro.
• •

4.2Avvertenze d'installazione
Prima di installare la macchina, attenersi alle seguenti prescrizioni di sicurezza:
•sistemare la macchina in un luogo sicuro;
•accertarsi che i bambini non abbiano la possibilità di giocare con la macchina;
•evitarechelamacchinavengacollocatasusuperficimolto calde o vicino a fiamme libere.
La macchina per caffè è ora pronta per essere collegata alla rete elettrica.
Nota: si consigli di lavare i componenti prima del loro primo utilizzo e/o dopo un periodo
d'inutilizzo.
4.3Collegamento della macchina
La corrente elettrica può essere pericolosa! Di  conseguenza, attenersi sempre scrupolosamente alle norme di sicurezza. Non usare mai cavi difettosi! I cavi e le spine difettosi devono essere sostituiti imme-
diatamente da Centri di Assistenza Autorizzati.
La tensione dell’apparecchio è stata impostata in fabbrica. Verificare che la tensione della rete corrisponda alle indicazioni riportate sulla targhetta d’identificazione posta sul fondo dell’apparecchio.
•Verificare che l’interruttore ON/OFF (17) non sia premuto prima di collegare la macchina alla rete elettrica.
•Il cavo elettrico è posizionato all'interno della macchina; seguire le indicazioni riportate nel par.4.4 per sollevare il serbatoio dell'acqua.
(Fig.3) - Posizionare in modo corretto il cavo elettrico in modo che non interferisca con il serbatoio dell'acqua.
•Inserire la spina in una presa di corrente a parete di tensione adeguata.
4.4Serbatoio acqua
•(Fig.1) - Rimuovere il coperchio del serbatoio dell'acqua
(4).
•(Fig.2) - Sollevare il tubo d'aspirazione ed estrarre il serbatoio dell’acqua (5); fare attenzione a non danneggiare il tubo d'aspirazione dell’acqua.
•(Fig.4) - Sciacquare il serbatoio e riempirlo con acqua fresca potabile evitando di immetterne una quantità eccessiva.
•(Fig.5) - Sollevare il tubo d'aspirazione e reinserire il serbatoio nella sua sede.
•(Fig.6) - Riposizionare correttamente il tubo sfilato in precedenza; riposizionare il coperchio sul serbatoio.
Immettere nel serbatoio sempre e soltanto acqua  fresca potabile non gassata. Acqua calda nonché altri liquidi possono danneggiare il serbatoio. Non mettere in funzione la macchina senza acqua: accertarsi che
ve ne sia a sufficienza all’interno del serbatoio.
4.5Caricamento del circuito
Prima di ogni messa in funzione, dopo che la macchina non è stata usata per molto tempo e dopo aver esaurito l’acqua, il circuito della macchina deve essere ricaricato.
•(Fig.7) - Premere l’interruttore ON/OFF (17).
•(Fig.8) - Inserire un contenitore sotto al tubo vapore. Aprire il pomello (3) “acqua calda/vapore” ruotandolo in senso antiorario e premere l'interruttore (15).
•Attendere che dal tubo vapore (pannarello) fuoriesca un getto regolare d'acqua.
•Premerel'interruttore(15)echiudereilpomello(3)“acqua calda/vapore” ruotandolo in senso orario. Rimuovere il contenitore.
La macchina ora è pronta per l’erogazione del caffè e del vapore; si rimanda ai capitoli relativi per i dettagli di funzionamento.
5 Erogazione del caffè
Attenzione! Durante l’erogazione del caffè è vietatodisinserireilportafiltro“Crema”ruotandolo
manualmente in senso orario. Pericolo d’ustioni.
•Durante questa operazione, la spia dell'interruttore caffè
(15)"pronto macchina" può accendersi e spegnersi; tale funzionamento deve essere considerato normale e non un’anomalia.
•Assicurarsi, prima dell’uso, che il pomello (3) acqua calda/vapore sia chiuso e che il serbatoio acqua della macchina contenga una quantità d'acqua sufficiente.
•(Fig.7) - Premere l’interruttore ON/OFF (17).
•Attendere che la spia dell'interruttore caffè (15) "pronto macchina" si accenda, ora la macchina è pronta per l’erogazione del caffè.
5.1Con caffè macinato
•(Fig.9-A) - Inserire il filtro (11) nel portafiltro “Crema”
•(Fig.11) - Inserire dal basso il portafiltro nel gruppo erogazione (7).
•(Fig.12) - Ruotareilportafiltrodasinistraversodestrafino al suo bloccaggio. Lasciare la presa dal manico del portafiltro “Crema”, il manico ruota leggermente verso sinistra.
Questo movimento garantisce il perfetto funzionamento del portafiltro .
•(Fig.14) - Preriscaldare il portafiltro “Crema” premendo l’interruttore caffè (15) l’acqua comincerà ad uscire dal portafiltro“Crema”(questaoperazionesirendenecessaria solo per il primo caffè).
•Dopo aver fatto scorrere 50cc di acqua premere nuovamente l’interruttore caffè (15) per fermare l’erogazione d'acqua calda.
•(Fig.16) - Togliere il portafiltro dalla macchina ruotandolo da destra verso sinistra e vuotare l’acqua residua. Con lo speciale portafiltro (14) di cui è dotata la macchina, non
Italiano
• •

occorre cambiare filtro per ottenere uno o due caffè.
•(Fig.9-B) - Versare 1 o 2 misurini rasi di caffè macinato nel filtro per ottenere uno o due caffè; pulire il bordo del portafiltro dai residui di caffè.
•(Fig.11) - Inserire dal basso il portafiltro (14) nel gruppo erogazione (7)
•(Fig.12) - Ruotareilportafiltrodasinistraversodestrafino al suo bloccaggio.
•(Fig.13) - Prelevare 1 o 2 tazzine preriscaldate e posizionarle sotto al portafiltro “Crema”; verificare che siano correttamente sistemate sotto ai fori di uscita caffè.
•(Fig.14) - Premere il tasto caffè (15).
•Raggiunta la quantità di caffè desiderata, premere nuovamente il tasto caffè (15) per fermare l’erogazione del caffè e prelevare le tazzine con il caffè (Fig.15).
•(Fig.16) - Al termine dell’erogazione attendere qualche secondo,estrarreilportafiltro“Crema”evuotarlodaifondi residui.
Nota di pulizia: mantenere pulito il filtro del portafiltro “Crema” estraendolo dalla propria
sede e lavandolo con acqua potabile (Fig.17).
5.2Con caffè in cialde
•(Fig.9-A) - Togliere il filtro per caffè macinato (11) dal portafiltro "Crema" (14) tirandolo verso l'alto.
•(Fig.10) - Inserire l'adattatore per cialde (13), con la parte bombatarivoltaversoilbasso,nelportafiltro“Crema”(14); successivamente inserire anche il filtro (12).
•(Fig.11) - Inserire dal basso il portafiltro “Crema” nel gruppo erogazione (7).
•(Fig.12) -Ruotareilportafiltrodasinistraversodestrafino al suo bloccaggio.
•Lasciare la presa dal manico del portafiltro “Crema”. Un sistema automatico riporta ora leggermente il manico verso sinistra.
Questo movimento garantisce il perfetto funzionamento del portafiltro “Crema”.
•(Fig.14) - Preriscaldare il portafiltro “Crema” premendo l’interruttore caffè (15) l’acqua comincerà ad uscire dal portafiltro“Crema”(questaoperazionesirendenecessaria solo per il primo caffè).
•Dopo aver fatto scorrere 50cc di acqua premere nuovamente l’interruttore caffè (15) per fermare l’erogazione di acqua calda.
•(Fig.16) - Togliere il portafiltro “Crema” dalla macchina ruotandolo da destra verso sinistra e vuotare l’acqua residua.
•Inserire la cialda nel portafiltro; assicurarsi che la carta della cialda non fuoriesca dal portafiltro.
•(Fig.11) - Inserire dal basso il portafiltro “Crema” nel gruppo erogazione (7).
•(Fig.12) -Ruotareilportafiltrodasinistraversodestrafino al suo bloccaggio.
•Prelevare 1 tazzina preriscaldata e posizionarla sotto al portafiltro;verificarechesiacorrettamentesistematasotto ai fori d'uscita caffè.
•(Fig.14) - Premere il tasto caffè (15).
•Quando è stato raggiunta la quantità di caffè desiderata, premere nuovamente il tasto caffè (15) per fermare l’erogazione del caffè e prelevare la tazzina con il caffè.
•(Fig.16) - Al termine dell’erogazione attendere qualche secondo, estrarre il portafiltro e smaltire la cialda utilizzata.
Nota di pulizia: mantenere pulito il filtro del portafiltro “Crema” estraendolo dalla propria
sede e lavandolo con acqua potabile (Fig.17).
6 Scelta del tipo di caffè - Consigli
In linea di massima si possono utilizzare tutti i tipi di caffè esistenti in commercio. Tuttavia, il caffè è un prodotto naturale ed il suo gusto cambia in funzione dell’origine e della miscela; è preferibile quindi provarne vari tipi, al fine di trovare quello che meglio si addice ai gusti personali. Per migliori risultati si consiglia comunque di utilizzare miscele espressamente preparate per macchine espresso. Il caffè dovrebbe sempre fuoriuscire regolarmente dal portafiltro “Crema” senza gocciolare.
La velocità di fuoriuscita del caffè può essere modificata cambiando leggermente la dose del caffè nel filtro e/o utilizzando caffè con un grado di macinatura differente.
PRIMA DI ESEGUIRE QUALSIASI OPERAZIONE RELATIVA ALL’EROGAZIONE DEL VAPORE O DELL’ACQUA CALDA VERIFICARE CHE IL TUBO
VAPORE (PANNARELLO) SIA ORIENTATO SOPRA LA VASCA RECUPERO ACQUA.
7 acqua calda
Pericolo di scottature! All’inizio dell’erogazione possonoverificarsibrevispruzzidiacquacalda.
Il tubo d’erogazione può raggiungere temperature elevate: evitare di toccarlo direttamente con le mani.
•(Fig.7) - Premere l’interruttore ON/OFF (17).
•Attendere che la spia dell'interruttore caffè (15) "pronto macchina" si accenda, ora la macchina è pronta.
•Durante questa operazione, la spia dell'interruttore caffè
(15)"pronto macchina" può accendersi e spegnersi; tale funzionamento deve essere considerato normale e non un’anomalia.
•(Fig.8) - Sistemare un contenitore o un bicchiere da tè sotto al tubo vapore (pannarello). Aprire il rubinetto (3) ruotandolo in senso antiorario e premere l'interruttore
•Quando è stata prelevata la quantità desiderata di acqua calda, premere l'interruttore (15) e chiudere il rubinetto (3) rotandolo in senso orario.
•Prelevare il contenitore con l'acqua calda.
• •

8 vapore / cappuccino
Pericolo di scottature! All’inizio dell’erogazione possonoverificarsibrevispruzzidiacquacalda.
Il tubo d’erogazione può raggiungere temperature elevate: evitare di toccarlo direttamente con le mani.
•(Fig.7) - Premere l’interruttore ON/OFF (17).
•Attendere che la spia dell'interruttore caffè (15) "pronto macchina" si accenda.
•(Fig.19) - Premere l’interruttore vapore (16) . Si spegne la spia dell'interruttore caffè (15).
•Attendere che la spia dell'interruttore vapore (16) si accenda; a questo punto la macchina è pronta per l’erogazione del vapore.
•Durante questa operazione, la spia dell'interruttore vapore (16) può accendersi e spegnersi; tale funzionamento deve essere considerato normale e non un’anomalia.
•(Fig.18) - Inserire un contenitore sotto al tubo vapore e aprire il pomello (3) per qualche istante, in modo da far uscire l’acqua residua dal tubo vapore (pannarello); in breve tempo comincerà ad uscire solo vapore.
•Chiudere il pomello (3) e togliere il contenitore.
•Riempire con latte freddo 1/3 del contenitore che si desidera utilizzare per preparare il cappuccino.
Per garantire un miglior risultato utilizzare latte freddo
•(Fig.20) - Immergere il tubo vapore nel latte e aprire il pomello (3) ruotandolo in senso antiorario; far ruotare lentamente il recipiente contenente il latte, dal basso verso l’alto per rendere uniforme il riscaldamento.
•Al termine, chiudere il rubinetto (3); prelevare la tazza con il latte montato.
•(Fig.19) - Premere nuovamente l’interruttore vapore (16).
•Procedere con il caricamento del circuito descritto nel par.4.5 per rendere operativa la macchina.
Nota: la macchina è operativa quando la spia dell'interruttore (15) "pronto macchina" è accesa
in modo fisso.
Nota bene: se non si riesce ad erogare un cappuccino come descritto, si deve ricaricare il circuito come descritto nel par. 4.5 e successivamente
ripetere le operazioni.
Lo stesso sistema può essere utilizzato per il riscaldamento di altre bevande.
•Pulire, dopo questa operazione il tubo vapore con un panno umido.
9 Pulizia
La manutenzione e la pulizia possono essere effettuate soltanto quando la macchina è fredda e scollegata dalla rete elettrica.
•Non immergere la macchina nell’acqua e non inserire i componenti nella lavastoviglie.
•Non utilizzare alcol etilico, solventi e/o agenti chimici aggressivi.
•Si consiglia di pulire quotidianamente il serbatoio del- l’acqua e di riempirlo con acqua fresca.
•(Fig.21-22) - Giornalmente, dopo aver riscaldato il latte, smontare la parte esterna del pannarello e lavarla con acqua potabile fresca.
•(Fig.23) - Settimanalmente si deve pulire il tubo vapore. Per eseguire questa operazione, si deve:
-rimuovere la parte esterna del pannarello (per la regolare pulizia);
-allentare la ghiera (senza toglierla);
-sfilare la parte superiore del pannarello dal tubo vapore;
-lavare la parte superiore del pannarello con acqua fresca potabile;
-lavare il tubo vapore con un panno umido e rimuovere eventuali residui di latte;
-riposizionare la parte superiore nel tubo vapore (assicurarsi che sia completamente inserito);
-serrare la ghiera precedentemente allentata. Rimontare la parte esterna del pannarello.
•(Fig.24) - Giornalmente vuotare e lavare la vasca raccogli gocce.
•Per la pulizia dell’apparecchio utilizzare un panno morbido inumidito d'acqua.
•(Fig.17) - Per la pulizia del portafiltro “Crema” procedere come segue:
-estrarre il filtro, lavarlo con cura con acqua calda.
-estrarre l'adattatore (se presente), lavarlo con cura con acqua calda.
-lavare l’interno del portafiltro “Crema”.
•Non asciugare la macchina e/o i suoi componenti utilizzando un forno a microonde e/o un forno convenzionale.
10 Decalcificazione
La formazione di calcare avviene con l’uso dell’apparecchio; la decalcificazione è necessaria ogni 3-4 mesi di utilizzo della macchina e/o quando si osserva una riduzione della portata dell’acqua.
Qualora si voglia eseguirla personalmente, si può utilizzare un prodotto decalcificante per macchine da caffè di tipo non tossico e/o nocivo,
comunemente reperibile in commercio. Si consiglia d'utilizzare il decalcificante Saeco.
Attenzione! Non utilizzare in nessun caso l’aceto come decalcificante.
Italiano
• •
•(Fig.2) - Togliere e vuotare il serbatoio dell’acqua.
•(Fig.4) - Miscelare il decalcificante con acqua come specificato sulla confezione del prodotto decalcificante e riempire il serbatoio dell’acqua; inserire il serbatoio nella macchina.
•(Fig.7) - Accendere la macchina premendo l’interruttore ON/OFF (17).
•(Fig.8) - Inserire un contenitore sotto al tubo vapore.
•Aprire il pomello (3) e premere l'interruttore (15) per prelevare ad intervalli (una tazza per volta) tutto il decalcificante; per fermare l’erogazione premere l'interruttore
(15)e chiudere il pomello (3).
•(Fig.7) - Durante i singoli intervalli si deve lasciare agire il decalcificantepercirca10-15minuti,scollegandolamac- china per mezzo dell’interruttore ON/OFF (17). Vuotare il contenitore.
•(Fig.2; Fig.4) - Terminata la soluzione decalcificante, estrarre il serbatoio dell’acqua, sciacquarlo e riempirlo con acqua fresca potabile.
•(Fig.5; Fig.6) - Reinserire il serbatoio nella machina.
•(Fig.8) - Aprire il pomello (3) e premere l'interruttore
(15)per vuotare 2/3 dell’acqua; per fermare l’erogazione premere l'interruttore (15) e chiudere il pomello vapore
(3)in senso orario.
•Lasciare riscaldare la macchina e vuotare il rimanente contenuto del serbatoio dell’acqua agendo come mostrato in precedenza.
Qualora si utilizzi un prodotto diverso da quello consigliato si raccomanda di rispettare comunque le istruzioni della casa produttrice riportate
sulla confezione del prodotto decalcificante.
11 Smaltimento
INFORMAZIONE AGLI UTENTI: ai sensi dell’art. 13 del Decreto Legislativo 25 luglio 2005, n. 151"Attuazione delle Direttive 2002/95/CE, 2002/96/CE e 2003/108/CE, relative alla riduzione dell'uso di sostanze pericolose nelle apparecchiature elettriche ed elettroniche, nonché allo smaltimento dei rifiuti"
Il simbolo  del cassonetto barrato riportato sull’apparecchiatura o sulla sua confezione indica che il prodotto alla fine della propria vita utile deve essere raccolto separatamente dagli altri rifiuti.
L’utente dovrà, pertanto, conferire l’apparecchiatura giunta a fine vita agli idonei centri di raccolta differenziata dei rifiuti elettronici ed elettrotecnici, oppure riconsegnarla al rivenditore al momento dell’acquisto di una nuova apparecchiatura di tipo equivalente, in ragione di uno a uno. L’adeguata raccolta differenziata per l’avvio successivo dell’apparecchiatura dismessa al riciclaggio, al trattamento e allo smaltimento ambientalmente compatibile contribuisce ad evitare possibili effetti negativi sull’ambiente
e sulla salute e favorisce il reimpiego e/o riciclo dei materiali di cui è composta l’apparecchiatura.
Lo smaltimento abusivo del prodotto da parte dell’utente comporta l’applicazione delle sanzioni amministrative previste dalla normativa vigente.
• 10 •
Guasto |
Cause possibili |
Rimedio |
|
|
|
Italiano |
|||
|
|
|
|
|
La pompa è molto rumorosa. |
Macchina non collegata alla rete |
Rabboccare con acqua.(par.4.4). |
|
|
Manca acqua nel serbatoio. |
|
|||
La macchina non si accende. |
elettrica. |
Collegare la macchina alla rete elettrica. |
|
|
|
|
|
|
|
|
|
|
|
|
|
La spia dell'interruttore (15) "pronto |
Attendere che la spia dell'interruttore (15) |
|
|
|
macchina" era spenta quando è stato |
|
|
|
|
si accenda. |
|
|
|
Il caffè é troppo freddo. |
premuto l’interruttore. |
|
|
|
|
|
|
||
|
|
|
|
|
Portafiltro non inserito per il preriscalda- |
Preriscaldare il portafiltro. |
|
|
|
|
|
|
||
|
mento (cap. 5). |
|
|
|
|
Tazzine fredde. |
Preriscadare le tazzine con acqua calda. |
|
|
|
|
|
|
|
|
Latte non adatto: latte in polvere, latte |
Utilizzare latte intero. |
|
|
Non si forma la schiuma del |
magro. |
|
|
|
|
|
|
||
latte. |
|
|
|
|
Pannarello sporco. |
Pulire il pannarello come descritto nel |
|
|
|
|
|
|
||
Non si riesce a preparare un |
Cap.9. |
|
|
|
|
|
|
||
cappuccino. |
Non è più presente vapore nella |
Ricaricare il circuito (par. 4.5) e ripetere le |
|
|
|
caldaia. |
operazioni descritte nel Cap.8. |
|
|
|
Troppo poco caffè nel portafiltro. |
Aggiungere il caffè (cap. 5). |
|
|
Il caffè sgorga troppo veloce- |
|
|
|
|
Macinatura troppo grossa. |
Usare una miscela diversa (cap.6). |
|
|
|
mente, non si forma la crema. |
|
|
|
|
Caffè vecchio o non adatto. |
Usare una miscela diversa (cap.6). |
|
|
|
|
|
|
||
|
|
|
|
|
|
Cialda vecchia o non adatta. |
Cambiare la cialda utilizzata. |
|
|
|
|
|
|
|
|
Mancanza di acqua. |
Rabboccare con acqua (par.4.4). |
|
|
|
|
|
|
|
|
Macinatura troppo fine. |
Usare una miscela diversa (cap.6). |
|
|
|
|
|
|
|
|
Caffè premuto nel portafiltro. |
Smuovere il caffè macinato. |
|
|
|
|
|
|
|
Il caffè non sgorga o sgorga |
Troppo caffè nel portafiltro. |
Ridurre la quantità di caffè nel portafiltro. |
|
|
solo a gocce. |
Pomello (3) aperto. |
Chiudere il pomello (3). |
|
|
|
|
|
|
|
|
Macchina calcificata. |
Decalcificare la macchina (cap.10). |
|
|
|
|
|
|
|
|
Filtro nel portafiltro otturato. |
Pulire il filtro (cap.9). |
|
|
|
|
|
|
|
|
Cialda non adatta. |
Cambiare il tipo di cialda. |
|
|
|
|
|
|
|
|
Portafiltro inserito male nel gruppo |
Inserire correttamente il portafiltro (cap.5). |
|
|
|
erogazione caffè. |
|
|
|
|
|
|
|
|
|
Bordo superiore del portafiltro sporco. |
Pulire il bordo del portafiltro. |
|
|
Il caffè sgorga dai bordi. |
|
|
|
|
Cialda inserita in modo errato. |
Inserire correttamente la cialda facendo in |
|
|
|
|
modo che non esca dal portafiltro. |
|
|
|
|
|
|
|
|
|
|
|
|
|
|
Troppo caffè nel portafiltro. |
Ridurre la quantità di caffè utilizzando il |
|
|
|
misurino. |
|
|
|
|
|
|
|
Per i guasti non contemplati dalla suddetta tabella o in caso che i rimedi suggeriti non li risolvano, rivolgersi ad un centro assistenza.
• 11 •
DICHIARAZIONE DI CONFORMITA' CE
EC 2006/95, EC 2004/108,
EC 1992/31, EC 1993/68
Noi :
Saeco International Group
Via Torretta , 240
40041 GAGGIO MONTANO (BO)
dichiariamo sotto la nostra responsabilità che il prodotto :
MACCHINA PER CAFFE' SINGOLA
TIPO : SIN 15XN
al quale si riferisce questa dichiarazione è conforme alle seguenti norme :
•Sicurezza di elettrodomestici e apparecchi elettrici - Requisiti generali EN 60335-1 (2002) + A1(2004) + A2(2006) + A11(2004) + A12 (2006)
•Sicurezza di elettrodomestici e apparecchi elettrici - Parte 2-15
Requisiti specifici per apparecchi per riscaldare liquidi
EN 60 335-2-15 (2002) + A1(2005)
•Sicurezza apparecchi per uso domestico e similare. Campi elettromagnetici Metodi per la valutazione e le misure
EN 50366 (2003) + A1 (2006).
•Limiti e metodi di misurazione dei disturbi radio caratteristici di apparecchi con motore elettrico e termici per uso domestico e simili scopi, strumenti elettrici e simili apparecchiature elettriche - EN 55014-1 (2000) + A1 (2001) + A2 (2002)
•Compatibilità elettromagnetica (EMC)
Parte 3^ Limiti - Sezione 2 : Limiti per le emissioni di corrente armonica (corrente in ingresso dell'apparecchiatura ≤ 16A per fase) - EN 61000-3-2 (2000)
•Compatibilità elettromagnetica (EMC)
Parte 3^ Limiti - Sezione 3 : Limitazione delle fluttuazioni e dei picchi di tensione nei sistemi di alimentazione a bassa tensione per apparecchiature con corrente nominale ≤ 16A.
EN 61000-3-3 (1995) + A1(2001)
•Requisiti di immunità per elettrodomestici, strumenti e apparecchi similari. Norma per famiglia di prodotti EN 55014-2 (1997) + A1 (2001)
secondo le disposizioni delle direttive : CE 73/23, CE 89/336, CE 92/31, CE 93/68.
Gaggio Montano 05/07/2006
R&D
Ing. Andrea Castellani
• 12 •

IMPORTANT SAFEGUARDS
When using electrical appliances, basic safety precautions should always be followed, including the following:
1. |
Read all instructions. |
English |
|
2. |
Do not touch hot surfaces. Use handles or knobs. |
||
|
|||
3. |
To protect against fire, electric shock and injury to persons do not immerse cord, plugs, |
|
|
|
or appliance in water or other liquid. |
|
|
4. |
Close supervision is necessary when the appliance is used by or near children. |
|
|
5. |
Unplug from outlet when not in use and before cleaning. Allow to cool before putting |
|
|
|
on or taking off parts, and before cleaning the appliance. |
|
|
6. |
Do not operate any appliance with a damaged cord or plug or after the appliance |
|
|
|
malfunctions, or has been damaged in any manner. Return appliance to the nearest |
|
|
|
authorized service facility for examination, repair or adjustment. |
|
|
7. |
The use of accessory attachments not recommended by the appliance manufacturer |
|
|
|
may result in fire, electric shock or injury to persons. |
|
|
8. |
Do not use outdoors. |
|
|
9. |
Do not let cord hang over edge of table or counter, or touch hot surfaces. |
|
|
10. |
Do not place on or near a hot gas or electric burner, or in a heated oven. |
|
|
11. |
Always attach plug to appliance first, then plug cord into wall outlet. To disconnect, turn |
|
|
|
any control to “off”, then remove plug from wall outlet. |
|
|
12. |
Do not use appliance for other than intended use. |
|
|
13. |
Save these instructions. |
|
SAVE THESE INSTRUCTIONS
• 13 •

Instructions for the power supply cord
AA short power-supply cord is provided to reduce risks of tangling or tripping over a longer cord.
BLonger extension cords are available and may be used if care is exercised in their use.
CIf a long extension cord is used:
1the marked electrical rating of the extension cord should be at least as great as the electrical rating of the appliance.
2if the appliance is of the grounded type, the extension cord should be a grounding type
3the cord should not hang from the table to avoid the risk of tangling or tripping.
• 14 •
1 GENERAL INFORMATION
This coffee machine is made for brewing 1 or 2 cups of espresso coffee and features a swivel steam and hot water spout. The controls on the front of the machine are labeled with easy-to-read symbols.
The machine has been designed for domestic use only and is not suitable for professional continuous use.
Warning. No liability is assumed for any damage caused by:
•Incorrect use not in accordance with the intended purposes;
•Repairing not carried out by authorized service centers;
•Tampering with the power cord;
•Tampering with any parts of the machine;
•The use of non-original spare parts and accessories;
•Failure to descale the machine and storage at temperatures below 0°C/32°F.
In these cases, the warranty is not valid.
1.1To facilitate reading
A warning triangle draws attention to all the instructions that are important for user’s safety. Please carefully fol-
low these instructions to avoid serious injury!
The reference to illustrations, parts of the appliance or controls, etc. is indicated by numbers or letters; in this case please refer to the illustration.
This symbol is used to highlight the information that is particularly important for ensuring opti-
mal use of the machine.
1.2How to use these operating instructions
Keep these operating instructions in a safe place and make them available to anyone else who may use the coffee machine.
For further information or in case of problems, please refer to an authorized service center.
|
2 |
TECHNICAL DATA |
|
|
The manufacturer reserves the right to make changes to |
|
|
|
the technical specifications of the product. |
|
|
|
|
|
|
|
Nominal Voltage - Power rating - Power supply |
|
|
|
|
See label on the appliance |
|
|
Housing |
|
|
|
Weight |
Metal |
English |
Size (w x h x d)
210 x 300 x 255 (mm) / 9 x 12 x 11 in
7.5 kg / 16.5 lbs
Cord length
1.2 m / 47 in
Control panel
Front
Portafilter
Pressurized portafilter
Pannarello
Plastic
Water tank (Removable)
2 liters / 68 oz.
Pump pressure
15 bar
Boiler
Stainless steel
Safety devices
Manual reset thermostat Thermofuse
3 SAFETY REGULATIONS
Never place live parts in contact with water: Danger of short circuit! Steam and hot water may cause scalding! Do not direct the steam or hot water jet toward parts of the body; handle the steam/hot water spout with care: Danger of scalding!
Intended use
The coffee machine is intended for domestic use only. Do not make any technical changes or use the machine for unlawful purposes since this would create serious hazards! The appliance is not for use by persons (included children) with reduced physical, mental or sensory abilities or with scarce experience and/or competences, unless they are under supervision of a person in charge of their safety or they are informed by him/her on the use of the appliance.
• 15 •

Power supply
Only connect the coffee machine to a suitable socket. The voltage must correspond to the indication on the machine’s label.
Power cord
Never use the coffee machine if the power cord is defective. If damaged, the power cord must be replaced by the manufacturer or its customer service department. Do not pass the cord around corners, over sharp edges or over hot objects and keep it away from oil.
Do not use the power cord to carry or pull the coffee machine. Do not pull out the plug by pulling on the power cord or touch it with wet hands.
Do not let the power cord hang freely from tables or shelves.
Protecting others
Prevent children from playing with the appliance. Children are not aware of the risks linked to electrical appliances. Do not leave the coffee machine packaging within the reach of children.
Danger of burns
Never direct the jet of hot steam and/or hot water towards yourself or others. Always use the handles or knobs provided.
Do not disconnect (remove) the Portafilter during coffee brewing. Hot water drops may spill out of the coffee brew unit during the warming phase.
Location
Place the coffee machine in a safe place, where no one may overturn it or be injured.
Hot water or steam may spill out: Danger of scalding! Do not keep the machine at a temperature below 0°C/32°F; freezing may damage the machine.
Do not use the coffee machine outdoors.
Do not place the machine on hot surfaces and close to open flames to prevent its housing from melting or being damaged.
Machine Cleaning
Before cleaning the machine, deselect all buttons, then remove the plug from the socket.
Then wait for the machine to cool down. Never immerse the machine in water!
It is strictly forbidden to tamper with the inside of the machine. Any water left in the tank for several days should not be consumed. Wash the tank and fill it with fresh drinking water.
Space for Operation and Maintenance
To ensure that the coffee machine works properly and efficiently, the following conditions are recommended:
•Choose a level surface;
•Selectalocationthatissufficientlywell-lit,cleanandnear an easily reachable socket;
•Allow for a minimum distance from the sides of the machine as shown in Fig. A.
Storing the Machine
If the machine is to remain out of use for a long time, turn it off and unplug it from the socket. Store it in a dry place out of reach of children. Shelter it from dust and dirt.
Servicing / Maintenance
In case of failure, faults or a suspected fault after dropping, immediately remove the plug from the socket. Never attempt to operate a faulty machine. Servicing and repairing may only be carried out by authorized service centers. All liability for damages caused by service work not carried out in a professional manner is declined.
Fire Safety
In case of fire, use Carbon Dioxide extinguishers (CO2). Do not use water or dry-powder extinguishers.
Key to machine components (Page 4)
1Cup stacking surface
2Control panel
3Hot water/steam knob
4Water tank cover
5Water tank
6Drip tray & grill
7Coffee Brew Unit
8Steam spout (Pannarello)
9Power cord
10Ground coffee measuring scoop
11Ground coffee filter
(for 1 or 2 coffees)
12Pod filter
13Pod filter adapter
14Portafilter
15Brew button
16Steam button
17ON/OFF button
4 INSTALLATION
For your own and for other people's safety, carefully follow the "Safety Regulations" in section 3.
4.1Packaging
The original packaging has been designed to protect the machine during transport. We recommend keeping the packaging for future transport.
4.2Installation Instructions
Before installing the machine, read the following safety instructions carefully:
•Place the machine in a safe place;
•Make sure children cannot play with the machine;
•Do not place the machine on hot surfaces or near open flames.
• 16 •
The coffee machine is now ready to be connected to the power supply.
Note: It is recommended that machine parts be washed before their first use and/or after they
have not been used for a period of time.
4.3Machine Connection
Electric power can be dangerous! It is therefore essential to follow the safety regulations carefully. Never use faulty cords! Faulty cords and plugs
must be immediately replaced by authorized service centers.
Appliance voltage has been pre-set by the manufacturer. Check that the power voltage matches the indications on the identification plate located on the bottom of the appliance.
•Check that the ON/OFF button (17) is not pressed before connecting the machine to the power supply.
•The power cord is located inside the machine. Follow the instructions in section 4.4 to lift the water tank.
(Fig.3) - Place the power cord correctly, so that it does not interfere with the water tank.
•Fit the plug into a wall socket with suitable power voltage.
4.4Water Tank
•(Fig.1) - Remove the cover from the water tank (4).
•(Fig.2) - Lift the suction pipe and remove the water tank (5); make sure not to damage the water suction pipe.
•(Fig.4) - Rinse the tank and fill it with fresh drinking water taking care not to overfill.
•(Fig.5) - Lift the suction pipe and fit the tank back into its housing.
•(Fig.6) - Correctly replace the water suction pipe into the tank; and place the cover back onto the tank.
Only use fresh, non-sparkling drinking water to fill the tank. Warm or hot water, or any other liquid, may damage the tank. Do not turn on the machine with empty water tank: always make sure there is enough
water in the tank.
4.5Priming the Water Circuit
Before starting up the machine, after long storage and when the water has been used up, be sure the machine’s water circuit has been primed.
•(Fig.7) - Press the ON/OFF button (17).
•(Fig.8) - Place a container below the steam spout. Open the hot water/steam knob (3) by turning it counterclockwise and press the brew button (15).
•Waituntilasteadyjetofwaterflowsoutofthesteamspout
(Pannarello).
•Push the brew button (15) and close the hot water/steam knob (3) by turning it clockwise. Remove the container.
The machine is now ready to brew coffee and dispense steam. Please see related sections for operating details.
5 COFFEE BREWING
Warning! Do not remove the Portafilter by manually turning it clockwise, during the coffee
brewing. Danger of burns.
•During this operation, the brew button (15) may flash on and off; this is to be considered as standard operation and not a fault.
•Before using the machine, make sure that the hot water/ steam knob (3) is closed and that there is enough water in the tank.
•(Fig.7) - Press the ON/OFF button (17).
•Wait until the brew button light (15) turns on. The machine is now ready for coffee brewing.
5.1Using ground coffee
•(Fig. 9-A) - Insert the ground coffee filter (11) into the Portafilter (14).
•(Fig. 11) - Insert the Portafilter in the brew unit from the bottom (7).
•(Fig.12) -Turn the Portafilter from left to right until it locks in place. Release the grip from the Portafilter.The handle slightly turns to the left. This movement guarantees the perfect operation of the Portafilter.
•(Fig.14) - Preheat the Portafilter by pressing the brew button (15). Water will pour out of the Portafilter (this operation is only necessary for the first coffee).
•After a few ounces of water have flowed out, press the brew button (15) again to stop hot water dispensing.
•(Fig.16) - Remove the Portafilter from the machine by turning it to the left and pour out any water left. As the machine is fitted with the special Portafilter (14), there is no need to change the filter to make one or two coffees.
•(Fig.9-B) - Add 1 or 2 level measuring scoops of ground coffee to the filter for one or two coffees; clean any coffee residues from the edge of the Portafilter.
•(Fig.11) - Insert the Portafilter (14) in the brew unit from the bottom (7).
•(Fig.12) -Turn the Portafilter from left to right until it locks in place.
•(Fig.13) - Take 1 or 2 preheated cups and place them under the Portafilter; check that they are correctly placed under the coffee dispensing holes.
•(Fig. 14) - Press the brew button (15).
•When the desired quantity of coffee has been reached, press the brew button again (15) to stop the coffee brewing and remove the cups of coffee (Fig.15).
•(Fig.16) - Wait a few seconds after brewing, then remove the Portafilter and empty the remaining coffee grounds.
English
• 17 •

Noteforcleaning:KeepthefilterofthePortafilter clean, by removing and washing it with drinking
water after each use (Fig. 17).
5.2Using Coffee Pods
•(Fig.9-A) - Remove the ground coffee filter (11) from the Portafilter (14) by pulling it out.
•(Fig.10) - Insert the coffee pod adapter (13) - with the curved part facing down - into the Portafilter (14); then insert the pod filter (12).
•(Fig.11) - Insert the Portafilter into the brew unit from the bottom (7).
•(Fig.12) -Turn the Portafilter from left to right until it locks in place.
•Release the grip from the Portafilter. The handle automatically turns slightly towards the left.
This movement assures the perfect operation of the
Portafilter.
•(Fig.14) - Preheat the Portafilter by pressing the brew button (15). Water will pour out of the Portafilter (this operation is only necessary for the first coffee).
•After a few ounces of water have flowed out, press the coffee button (15) again to stop hot water dispensing.
•(Fig.16) - Remove the Portafilter from the machine by turning it from right to left and emptying out the remaining water.
•InsertthepodinthePortafilter;make surethe paper from the pod does not hang over the edge of the Portafilter.
•(Fig.11) - Insert the Portafilter into the brew unit from the bottom (7).
•(Fig.12) -Turn the Portafilter from left to right until it locks in place.
•Take 1 preheated cup and place it under the Portafilter; check that it is correctly placed under the coffee dispensing holes.
•(Fig. 14) - Press the brew button (15).
•When the desired quantity of coffee has been reached, press the coffee button (15) again to stop coffee brewing and remove the cup of coffee.
•(Fig.16) - Wait a few seconds after brewing, then remove the Portafilter and dispose of the used pod.
Noteforcleaning:KeepthefilterofthePortafilter clean by removing it and washing with drinking
water after each use (Fig. 17).
6 TIPS FOR CHOOSING COFFEE
As a general rule any type of coffee available on the market can be used. However, coffee is a natural product and its flavor changes according to its origin and blend.
Therefore it is a good idea to try different types, in order to find the most suited to your personal taste.
For best results, we recommend using blends which are made especially for espresso coffee machines. Coffee should always be dispensed by the Portafilter without a
"dripping" effect.
The speed of coffee dispensing can be modified by slightly changing the amount of coffee in the filter and/or using a different coffee grind.
BEFORE USING THE HOT WATER/STEAM FUNCTION, MAKE SURE THAT THE STEAM SPOUT (PANNARELLO) IS POSITIONED OVER THE
DRIP TRAY.
7 HOT WATER
Danger of scalding! At the beginning, short spurts of hot water may come out. The brewing spout can reach high temperatures: do not touch it with
bare hands.
•(Fig.7) - Press the ON/OFF button (17).
•Wait until the brew button light (15) turns on. The machine is now ready.
•During this operation, the brew button (15) may flash on and off; this is to be considered as standard operation and not a fault.
•(Fig.8) - Place a container or a glass under the steam spout (Pannarello). Open the knob (3) by turning it counter-clockwise and press the button (15).
•When the desired quantity of hot water has been dispensed, press the button (15) and close the knob (3) by turning it clockwise.
•Remove the container with hot water.
8 STEAM / CAPPUCCINO
Danger of scalding! At the beginning, short spurts of hot water may come out. The brewing spout can reach high temperatures: do not touch it with
bare hands.
•(Fig.7) - Press the ON/OFF button (17).
•Wait until the brew button (15) turns on.
•(Fig.19) - Press the steam button (16). The brew button light goes off (15).
•Wait until the steam button light (16) turns on. The machine is now ready for steam dispensing.
•Duringthisoperation,thesteambutton(16)lightmayflash on and off. This is to be considered as standard operation and not a fault.
•(Fig.18) - Insert a container below the steam spout and open the knob (3) for a few seconds, so that residual water flowsoutofthesteamspout(Pannarello).Waituntilthere is a steady jet of steam.
•Close the knob (3) and remove the container.
•Fill a container 1/3 with cold milk.


 Use cold milk to get a better froth.
•(Fig.20) - Immerse the steam spout in the milk and open the knob (3) by turning it counter-clockwise. Turn the
• 18 •

milk container with slow upward movements so that it is warmed evenly.
•Once the container is filled with milk froth, close the knob
(3), remove the cup with the frothed milk.
•(Fig.19) - Press the steam button (16) again.
•Proceed with circuit priming as described in section 4.5 to make the machine ready for use.
Note: The machine is ready when the machine ready light (15) is permanently on.
Note: If it is not possible to dispense steam as described, prime the circuit as explained in sec-
tion 4.5 and then repeat the steps.
The same process can be used to heat other beverages.
•After this operation, clean the steam spout with a wet cloth.
9 CLEANING
Maintenance and cleaning may only be carried out when the machine has cooled down and has been disconnected from the power supply.
•Do not immerse the machine in water or place any of its parts in a dishwasher.
•Do not use alcohol, solvents and/or aggressive chemical agents.
•We recommend cleaning the water tank and filling it up with fresh water daily.
•(Fig.21-22) - Every day, after heating the milk, remove the external part of the Pannarello and wash it with fresh drinking water.
•(Fig.23) - The steam spout should be cleaned weekly. In order to do this, you need to:
-Remove the external part of the Pannarello (for standard cleaning);
-Loosen the ring nut (without removing it);
-Remove the upper part of the Pannarello from the steam spout;
-Wash the upper part of the Pannarello with fresh drinking water;
-Wash the steam spout with a wet cloth and remove any milk residue;
-Replace the upper part of the steam spout (make sure it is completely inserted);
-Tighten the previously loosened ring nut.
-Reassemble the external part of the Pannarello.
•(Fig.24) - Empty and clean the drip tray daily.
•Use a damp cloth to clean the appliance.
•(Fig.17) - To clean the Portafilter proceed as follows:
-Remove the filter, wash it thoroughly with hot water.
-Remove the adapter (if fitted), wash it thoroughly with hot water.
-Wash the internal part of the Portafilter.
•Do not dry the machine and/or its components using a
microwave and/or conventional oven.
10 DESCALING CYCLE
The formation of limescale inside the appliance is inevitable. It is necessary to descale the machine every 3-4 months of use and/or when you notice a reduction in water flow.
mercially available). We recommend using Saeco |
English |
|
|
You can use a non-toxic and/or non-harmful |
|
|
descaling product for coffee machines (com- |
|
descaling solution. |
|
|
 Warning! Do not use vinegar as a descaler.
•(Fig.2) - Remove and empty the water tank. Remove the
Portafilter from the machine.
•(Fig.4) - Mix the descaling solution with water as instructed on the descaling product box and fill the water tank. Fit the tank into the machine.
•(Fig.7) - Turn on the machine by pressing the ON/OFF button (17).
•(Fig.8) - Place a container below the steam spout.
•Open the knob (3) and press the button (15) to dispense water at intervals (one cup at a time). Press the button (15) and close the knob (3) to stop dispensing.
•(Fig.7) - During each interval allow the descaling solution to settle for about 10-15 minutes by turning the machine off. Empty the container.
•(Fig.2; Fig.4) - Repeat this process, untill the descaling solution is finished, remove the water tank, rinse it and fill it with fresh drinking water.
•(Fig.5; Fig.6) - Reinsert the tank in the machine.
•(Fig.8) - Open the knob (3) and press the button (15) to dispense 2/3 of the water. Press the button (15) and close the steam knob (3) clockwise to stop dispensing.
•Let the machine warm up and empty the water tank as described above.
If you are using a product other than the recommended one it is important to always follow the manufacturer’s instructions shown on the
descaling box.
11 DISPOSAL
•Put unused appliances out of service.
•Disconnect the plug from the socket and cut the electrical cord.
•At the end of its life, take the appliance to a suitable waste collection site.
This product complies with EU Directive 2002/96/EC.
The symbol |
on the product or on its packaging |
• 19 •

indicates that this product may not be treated as household waste. Instead it shall be handed over to the applicable collection point for the recycling of electrical and electronic equipment.
By ensuring this product is disposed of correctly, you will help prevent potential negative consequences for the
environment and human health, which could otherwise be caused by inappropriate waste handling of this product. For more detailed information about recycling of this product, please contact your local city office, your household waste disposal service or the shop where you purchased the product.
Problem |
Possible cause |
Solution |
|
|
|
|
|
The machine does not turn on. |
Machine not connected to the power |
Connect the machine to the power supply. |
|
supply. |
|||
The pump is very noisy. |
Water tank empty. |
Refill with water. (section 4.4). |
|
|
|
|
|
|
The machine ready light (15) was off |
Wait until the machine ready light (15) |
|
|
when the button was pressed. |
turns on. |
|
The coffee is too cold. |
|
|
|
The Portafilter was not preheated |
Preheat the Portafilter. |
||
|
|||
|
(section 5). |
||
|
|
||
|
Cold cups. |
Preheat the cups with hot water. |
Milk does not froth.
It is not possible to prepare a cappuccino.
The milk is not suitable: powdered milk, |
Use whole milk. |
|
low-fat milk. |
|
|
The Pannarello is dirty. |
Clean the Pannarello as described in |
|
section 9. |
||
|
||
No steam in the boiler. |
Prime the circuit (section 4.5) and repeat |
|
the operations described in section 8. |
||
|
|
Not enough coffee in the Portafilter. |
Add coffee (section 5). |
|
The coffee is dispensed too |
Coffee grinds are too coarse. |
Use a different blend (section 6). |
|
fast, the crema does not form. |
|
|
|
The pod is old or not suitable. |
Use a different blend (section 6). |
||
|
Old or not suitable pod. |
Change the pod. |
|
|
No water. |
Refill with water. (section 4.4). |
|
|
The grind is too fine. |
Use a different blend (section 6). |
|
|
Coffee has been tamped or pressed in |
Shake the ground coffee. |
|
|
the Portafilter. |
||
Coffee is not dispensed or |
|
||
Too much coffee in the Portafilter. |
Reduce the quantity of coffee in the |
||
dispensed only in drips. |
Portafilter. |
||
|
|||
|
Knob (3) is open. |
Close the knob (3). |
|
|
The machine has limescale buid-up |
Descale the machine (section 10). |
|
|
The filter in the Portafilter is clogged. |
Clean the filter (section 9). |
|
|
The pod is not suitable. |
Change type of pod. |
|
|
|
|
|
|
The Portafilter is incorrectly inserted in |
Insert the Portafilter correctly (section 5). |
|
|
the brew unit. |
|
|
Coffee drips from the edges. |
Upper edge of the Portafilter is dirty. |
Clean the rim of the Portafilter. |
|
|
|
||
|
Pod inserted incorrectly |
Insert the pod correctly. Make sure it doesn’t |
|
|
hang over the edge of the Portafilter. |
||
|
|
||
|
Too much coffee in the portafilter. |
Reduce the quantity of coffee using the |
|
|
measuring scoop. |
||
|
|
Please contact an authorized service center for any problems not covered in the above table or when the suggested solutions do not solve the problem. Saeco USA Customer Service (1-800-933-7876).
• 20 •
EC DECLARATION OF CONFORMITY
EC 2006/95, EC 2004/118,
EC 1992/31, EC 1993/68
We :
Saeco International Group
Via Torretta , 240
40041 GAGGIO MONTANO (BO)
declare under our responsibility that the product :
COFFEE MAKER
TYpe : SIN 15XN
to which this declaration relates is in conformity with the following standards or other normative documents :
•Safety of household and electrical appliances - General requirements EN 60335-1(2002 ) + A1(2004) + A2(2006) + A11(2004) + A12(2006)
•Safety of household and electrical appliances - Part 2-15 Particular requirements for appliances for heating liquids EN 60335-2-15(2002) + A1(2005)
•Household and similar electrical appliances - Electromagnetic fields - methods for evaluation and measurement
EN 50366 (2003) + A1 (2006).
•Electromagnetic compatibility (EMC) - Requirements for household appliances , electric tools and similar apparatus - Part 1 Emission EN 55014-1 (2000) + A1 (2001) + A2 (2002).
•Electromagnetic compatibility (EMC)
Part. 3^ Limits - Section 2 : Limits for harmonic current emissions (equipment input current ≤ 16A for phase) -
EN 61000-3-2 (2000)
•Electromagnetic compatibility (EMC)
Part 3^ : Limits - Section 3 : Limitation of voltage changes , voltage fluctuations and flicker in public low - voltage supply systems , for equipment with rated current ≤ 16 A for phase and not subject to conditional connection
EN 61000-3-3 (1995) + A1 (2001)
•Electromagnetic compatibility - Requirements for household appliances , electric tools and similar apparatus - Part 2. Immunity - Product family standard EN 55014-2 (1997) + A1 (2001)
following the provisions of the Directives : EC 73/23, EC 89/336, EC 92/31, EC 93/68.
English
Gaggio Montano 05/07/2006
R&D
Ing. Andrea Castellani
• 21 •
1 ALLGEMEINES
Die Kaffeemaschine eignet sich für die Zubereitung von 1 oder 2 Tassen Espresso und ist mit einem drehbaren Rohr für die Dampfund die Heißwasserausgabe ausgestattet. Die Bedienelemente auf der Vorderseite des Geräts sind mit einfach verständlichen Symbolen gekennzeichnet.
Die Maschine wurde für den Einsatz im Haushalt entwickelt und eignet sich daher nicht für den Dauerbetrieb im gewerblichen Einsatz.
Achtung. In folgenden Fällen wird für eventuelle Schäden keine Haftung übernommen:
•Falsche und nicht den vorgesehenen Verwendungszwecken entsprechende Verwendung;
•Reparaturen, die nicht in autorisierten Kundendienststellen durchgeführt wurden;
•Veränderungen am Netzkabel;
•Veränderungen an beliebigen Bestandteilen der Maschine;
•Verwendung von anderen als originalen Ersatzund Zubehörteilen;
•Fehlende Entkalkung und Lagerung in Räumen bei Temperaturen unter 0°C.
In diesen Fällen erlischt die Garantie.
1.1Hinweise zur einfacheren Lektüre
Das Warndreieck weist auf alle wichtigen Anweisungen für die Sicherheit des Benutzers hin. Diese Hinweise
sind strikt zu beachten, um schwere Verletzungen zu vermeiden!
Der Bezug auf Abbildungen, Teile des Geräts oder Bedienelemente usw. erfolgt über Zahlen oder Buchstaben. In diesem Falle wird auf die Abbildung verwiesen.
Mit diesem Symbol werden Informationen gekennzeichnet, auf die besonders geachtet werden muss, um den Betrieb der Maschine zu optimie-
ren.
1.2Gebrauch dieser Bedienungsanleitung
Bewahren Sie diese Bedienungsanleitung an einem sicheren Ort auf und legen Sie sie der Maschine immer bei, wenn diese von anderen Personen benutzt wird. Für weitere Informationen oder bei Problemen wenden Sie sich bitte an die autorisierten Kundendienststellen.
2 TECHNISCHE DATEN
Der Hersteller behält sich das Recht vor, technische Änderungen am Produkt vorzunehmen.
Nennspannung - Nennleistung - Stromversorgung Siehe Typenschild auf dem Gerät
Material des Gerätekörpers Metall
Abmessungen (L x H x T) (mm)
210 x 300 x 255
Gewicht
7,5 kg
Kabellänge
1,2 m
Bedienfeld
Auf der Vorderseite
Filterhalter
Mechanisch druckverdichtet
Pannarello
Spezialzubehör für Cappuccinos
Wassertank
2 Liter - herausnehmbar
Pumpendruck
15 bar
Durchlauferhitzer
Rostfreier Edelstahl Sicherheitsvorrichtungen
Thermostat mit manueller Rücksetzung Thermosicherung
3 SICHERHEITSVORSCHRIFTEN
Die unter Strom stehenden Teile dürfen keinesfalls mit Wasser in Berührung kommen: Kurzschlussgefahr! Der heiße Dampf und das heiße Wasser können Verbrennungen verursachen! Den Dampfoder Heißwasserstrahl keinesfalls auf Körperteile richten. Die Düse für die Dampf-/Heißwasserausgabe vorsichtig berühren: Verbrennungsgefahr!
Sachgemäßer Gebrauch
Die Kaffeemaschine ist ausschließlich für den Betrieb in Haushalten vorgesehen. Technische Änderungen und unsachgemäßer Gebrauch sind wegen der damit verbundenen Risiken verboten! Die Maschine ist nicht
dazu bestimmt, von Personen (einschließlich Kindern) mit eingeschränkten körperlichen oder geistigen Fähigkeiten oder einer Beeinträchtigung der Sinnesorgane bzw. von Personen ohne ausreichender Erfahrung oder Kompe-
• 22 •
 Loading...