


Heavy Duty 7-Day Digital Timer
OWNER’S MANUAL — Please read before using this equipment.
Your RadioShack Heavy Duty 7-Day Digital Timer gives you an easy way to program a lamp, TV, stereo, or other appliance to operate automatically in a set or random pattern.
Its features include:
Up to 98 ON/OFF Weekly Settings — let you program one appliance to turn on and off up to 14 times a day, every day of the week.
Random Switch Setting — turns the appliance on for five minutes to an hour (in a random pattern) four to 12 times a day to avoid a predictable “timer-controlled” look.
Manual Override — lets you turn the automatic timer on and off when you desire.
Various Length Settings — let you program the timer to operate only on a particular day of the week, every day, only weekdays, only weekends, or every day but Sunday.
Highly Accurate — the timer is accurate to the minute, providing you with precise timing in any setting.
WARNING: To reduce the risk of fire or shock hazard, do not expose this product to rain or moisture.
CAUTION |
! |
RISK OF ELECTRIC SHOCK. |
|
DO NOT OPEN. |
CAUTION: TO REDUCE THE RISK OF ELECTRIC SHOCK, DO NOT REMOVE COVER OR BACK. NO USER-SERVICE- ABLE PARTS INSIDE. REFER SERVICING TO QUALIFIED PERSONNEL.
This symbol is intended to alert you to the presence of uninsulated dangerous voltage within the product’s enclosure that might be of sufficient magnitude to constitute a risk of electric shock. Do not open the product’s case.
This symbol is intended to inform you that important operating and ! maintenance instructions are included in the literature accom-
panying this product.
Your Heavy Duty 7-Day Digital Timer is listed to UL standards and meets all applicable FCC requirements.
Warning: Do not use the timer to turn off power for maintenance (repairs, removing broken bulbs, etc.). Always turn power off at the service panel by removing a fuse or circuit breaker before doing any circuit repairs.
INSTALLING THE BACKUP BATTERIES
Your timer requires two L1154 button-cell batteries (supplied) for power. For the best performance and longest life, we recommend RadioShack alkaline batteries.
©2001 RadioShack Corporation. All Rights Reserved. RadioShack and RadioShack.com are trademarks
used by RadioShack Corporation.
The batteries retain the program during power outages. After removing the batteries, you have 15 seconds to insert new batteries without losing any programs.
Warning: Keep button-cell batteries away from children. Swallowing a button-cell battery can be fatal.
Cautions:
•Use only fresh batteries of the required size and recommended type.
•Do not mix old and new batteries, or different types of batteries.
Follow these steps to install batteries.
1.Unplug the timer.
2.Use a small, flat screwdriver to remove the battery carrier.
3.Place both batteries in the compartment as indicated by the polarity symbols (+ and –) marked inside.
4.Align the notch on the battery carrier with the indention in the holder, then slide the carrier into place.
5.Plug the timer into an outlet.
When the display dims or is weak or unreadable when the timer is unplugged from an outlet, replace the batteries. When you replace the batteries, follow Steps 1–5. If the display goes blank, use a straightened paper clip to press RESET.
Warning: Dispose of old batteries promptly and properly. Do not burn or bury them.
Caution: If you do not plan to use the timer for an extended period of time, remove the batteries. Batteries can leak chemicals that can destroy electronic parts.
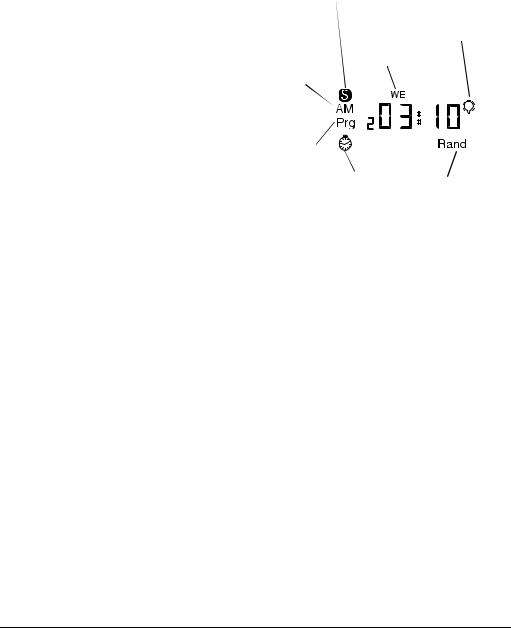
A QUICK LOOK AT THE DISPLAY
Daylight Savings Symbol — appears when it is Daylight Savings time. Hold down DS to turn the symbol off.
AM/PM |
Day — shows the |
Setting — |
|
indicates |
current day of the |
the time |
week. |
of day. |
|
On/Off Symbol — indicates the timer is on or an on time is being programmed. A light bulb with an X on it indicates the timer is off or an off time is being programmed.
Program |
|
|
|
|
Symbol — |
|
|
|
|
|
|
|
||
the number |
|
|
|
|
to the right |
Countdown Timer |
Mode Indicator — |
||
of this indi- |
||||
Clock — appears |
||||
shows which |
||||
cates which |
||||
when the timer is |
||||
program is |
mode the timer is |
|||
in countdown |
||||
currently in. |
||||
running. |
||||
mode. |
||||
|
|
|||
|
|
|
||
SETTING THE CLOCK
Before you program the clock, the timer must be set to On, Auto, or Off. The appliance can be on or off.
Note: If it is Daylight Savings time, hold down DS for a couple of seconds until the Daylight Savings symbol appears. If it is not Daylight Savings time and the Daylight Savings symbol is on, hold down DS for a couple of seconds until the symbol turns off. The Daylight Savings symbol (6) appears or disappears and the time switches one hour in the appropriate direction.
1.Push and hold TIME SET. The blinking colon stops blinking and appears steadily.
2.While holding TIME SET:
Repeatedly press DAY to change the day of week.
Repeatedly press HOUR to change the hour and AM/PM.
2
 Loading...