


HD7872, HD7870
User manual Brugervejledning Benutzerhandbuch Mode d’emploi Gebruiksaanwijzing Brukerhåndbok
For more support go to:
www.philips.com/senseo-twist/support


Table of contents
1 |
Introduction |
5 |
|
|
|
2 |
General description |
5 |
|
|
|
3 |
Important |
6 |
|
|
|
4 |
Flushing the machine before |
6 |
|
first use |
|
|
|
|
5 |
Brewing SENSEO® coffee |
9 |
|
|
|
6 |
Cleaning |
13 |
|
|
|
7 |
Descaling |
14 |
|
|
|
8 |
Frost-free storage |
17 |
|
|
|
9 |
Ordering accessories |
17 |
|
|
|
10 |
Environment |
17 |
|
|
|
11 |
Guarantee and service |
17 |
|
|
|
12 |
Troubleshooting |
18 |
1 Introduction
Congratulations on your purchase and welcome to Philips!To fully benefit from the support that Philips offers, register your product at www.philips.com/welcome.
1.1 SENSEO® coffee system
Make your coffee moments truly special with SENSEO®.This unique system combines the easy-to-use Philips SENSEO® coffee machine with the specially developed Douwe Egberts SENSEO® coffee pods, giving you a full, smooth coffee with a delicious foam layer. Douwe Egberts coffee in convenient SENSEO® coffee pods and Philips’ unique new SENSEO® brewing system are perfectly matched to ensure that the best
taste and aroma are extracted from the coffee. Discover all SENSEO® coffee blends at www.senseo.com.
To ensure a smooth and full coffee taste, you should keep the following things in mind:
Fresh coffee pods
Use the SENSEO® coffee pods that have been specially developed by Douwe Egberts for your SENSEO® coffee machine for a full, round taste.
Douwe Egberts SENSEO® coffee pods stay fresh longer if you store them in an airtight storage container.
Fresh water
Use fresh water every day. If you have not used the coffee machine for one day, you have to flush it with fresh water before you use it again
(see chapter ‘Brewing SENSEO® coffee, section ‘Flushing the machine after a day of non-use’).
2General description (Fig. 1)
1Coffee collector
2Lid lever
3Lid with brewing chamber
4Sealing ring
5Water distribution disc
62-cup pod holder qq
71-cup pod holder q
8Coffee spout cover
9Coffee spout
10Spout release buttons
11Removable drip tray
12Cup tray
13Touch panel
14On/off button
15Personal coffee memory symbol (HD7872 only)
16Regular coffee symbol
17Selection button
18Strong coffee symbol
19CALC light
201-cup button q
212-cup button qq
22Water reservoir
23Water reservoir lid
English
5
3 Important
Read this user manual carefully before you use the machine and save it for future reference.
Danger
•• Never immerse the machine in water or any other liquid.
Warning
•• Check if the voltage indicated on the bottom of the machine corresponds to the local mains voltage before you connect the machine.
•• This machine is not intended for use by persons (including children) with reduced physical, sensory or mental capabilities, or lack of experience and knowledge, unless they have been given supervision or instruction concerning use of the machine by a person responsible for their safety.
•• Children should be supervised to ensure that they do not play with the machine.
•• Do not use the machine if the plug, the mains cord or the machine itself is damaged.
•• If the mains cord is damaged, you must have it replaced by Philips, a service centre authorised by Philips or similarly qualified persons in order to avoid a hazard.
Caution
•• After unpacking the machine, never put your SENSEO® machine on its side. Always keep it in upright position, also during transport.
•• Always return the machine to a service centre authorised by Philips for examination or repair. Do not attempt to repair the machine yourself, otherwise your guarantee becomes invalid.
•• Do not use the machine in combination with a transformer, as this could cause hazardous situations.
•• Always put the machine on a flat and stable surface.
•• Do not use the machine at altitudes higher than 2200 metres above sea level.
•• Never pour milk, coffee, hot water or carbonated water into the water reservoir.
•• Never flush the machine or let it brew coffee when the spout is not in place.
•• This machine is intended for normal household use only. It is not intended for use in environments such as staff kitchens of shops, offices, farms or other work environments. Nor is it intended to be used
by clients in hotels, motels, bed and breakfasts and other residential environments.
3.1 Compliance with standards
This machine complies with all standards regarding electromagnetic fields (EMF). If handled properly and according to the instructions in this user manual, the machine is safe to use based on scientific evidence available today.
The energy consumption of this machine in off mode is less than 1 watt.This means that this machine complies with European Directive 2009/125/EC, which sets the ecological design requirements for energy-using products.
4Flushing the machine before first use
It is important that you flush your SENSEO® coffee machine before first use.After the flushing cycle (which only takes approx. 2 minutes), the machine is ready for brewing SENSEO® coffee.
CCaution:
Never interrupt the flushing cycle halfway. If you do, the boiler does not fill itself properly.
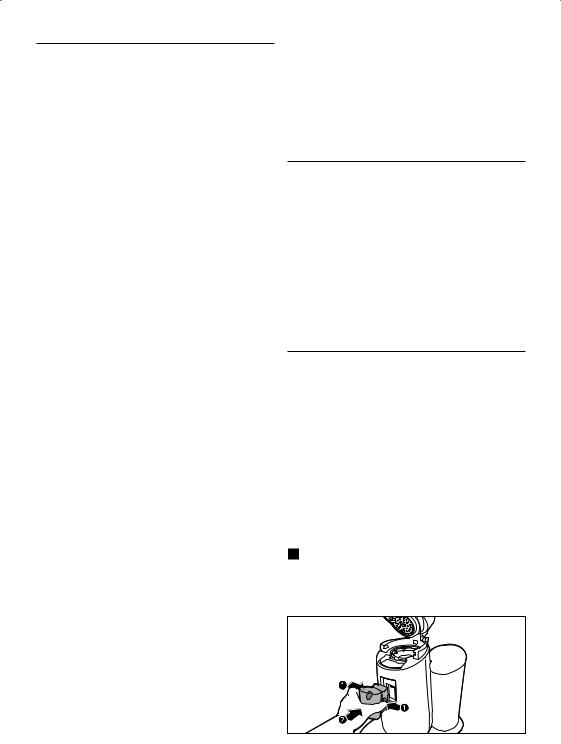
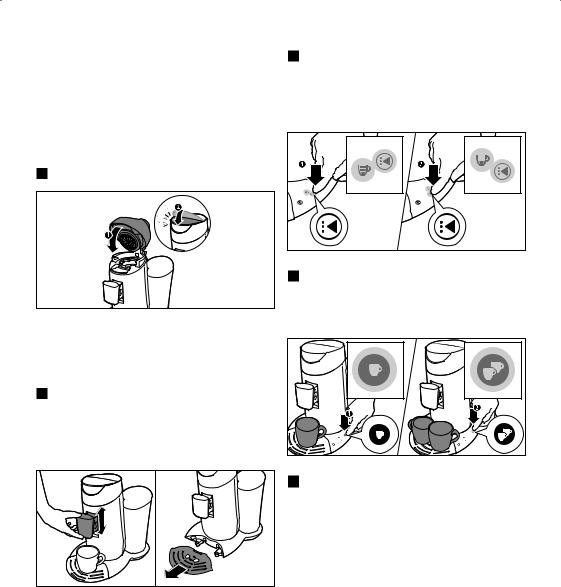
1Attach the spout to the machine. Grab the two ridges of the inner part of the spout and squeeze them lightly (1). Place the spout on the machine and release the two ridges (2).
6

CCaution: |
5 Tilt the water reservoir and place the bottom |
Never flush the machine or let it brew coffee |
back onto the machine (1).Then press the top |
when the spout is not in place. |
of the water reservoir towards the machine (2). |
2 Tilt the top of the water reservoir backwards |
|
(1) and lift the water reservoir off the |
|
machine (2). |
|
ENGLISH
6 Remove the drip tray.
3 Fill the water reservoir to the top with cold tap water.
4Place the lid on the water reservoir before you put the water reservoir back onto the machine.
7Place a bowl with a capacity of at least 1.5 litres under the coffee spout.
 1.5L
1.5L
8Make sure a pod holder, without pod or pods, is in place.
7
9 |
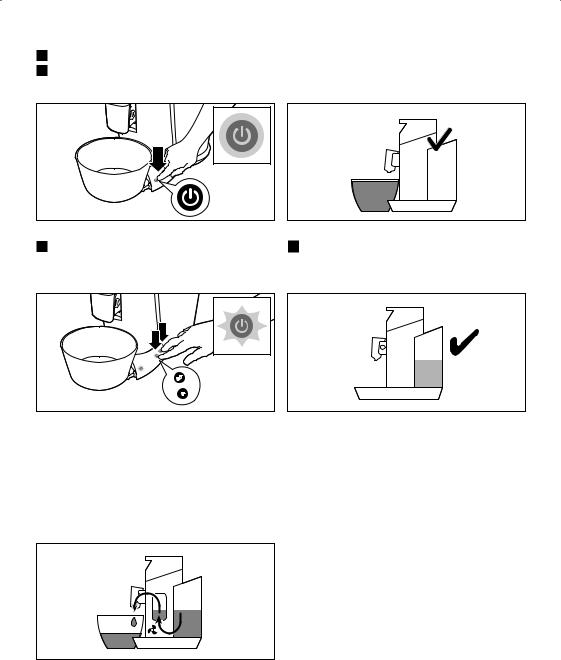
Put the plug in an earthed wall socket. |
•• When all the water in the water reservoir |
10 |
Press the on/off button 3.The button lights up |
has been used up, the flushing cycle is |
|
to indicate that you have to flush the machine. |
finished and the machine switches off. |
11 To start flushing, press the 1-cup button q |
12 Fill the water reservoir with fresh tap water, |
and the 2-cup button qq briefly at the same |
put the lid on it and place it back onto the |
time. |
machine. |
•• The on/off button starts flashing to indicate that the flushing cycle has started.
•• During the flushing cycle,the boiler fills itself with water from the water reservoir and cold water comes out of the coffee spout.During the flushing cycle,the machine produces more noise than during a regular brewing cycle.
Your SENSEO® machine is now ready for use so that you can brew your first cup of delicious coffee.
8
5 Brewing SENSEO®
coffee
While the SENSEO® coffee machine is heating up, you can select the coffee strength you prefer and the number of cups you want to brew.The machine then brews the cup or cups immediately after it has heated up.
1Make sure that the water reservoir is filled with fresh cold tap water beyond the MIN level and that the lid is on the water reservoir.
ETip:
Use fresh water every day.
2Put the plug in an earthed wall socket.
3Press the on/off button 3.The on/off button flashes slowly while the water heats up.
DNote:
If the on/off button flashes rapidly, the water reservoir does not contain enough water for brewing one cup of coffee.
4 Pull the lid lever upwards to open the lid. |
|
The lid opens automatically. |
sh |
|
Engli |
5If you want to make one cup of SENSEO® coffee, place the 1-cup pod holder q in the machine (1). If you want to make two cups, put the 2-cup pod holder qq in the machine
(2). Make sure the pod holder is clean.
6Place 1 coffee pod in the 1-cup pod holder q (1) or place 2 coffee pods in the 2-cup pod holder qq (2). Place the pod or pods properly in the centre of the pod holder, with the convex side pointing downwards. Press the pod or pods lightly into the pod holder.
9
DNote: |
9 Press the selection button to select the |
Make sure the coffee in the pod or pods is |
desired coffee strength. Select the cup symbol |
evenly distributed. |
with three bars for a regular cup of coffee |
|
(125ml) (1). Select the cup symbol with one |
CCaution: |
bar for a strong cup of coffee (60ml) (2). |
Never put normal ground coffee or use torn |
|
pods in the SENSEO® machine, as this causes |
|
it to become blocked. |
|
7 Close the lid (1) and lock the lever (2). |
|
BWarning:
Make sure the lid is closed properly and the lid lever is locked before you start brewing coffee.
8Place one cup or two cups under the spout openings.You can adjust the height of the coffee spout by sliding it upwards or
downwards.You can also remove the drip tray to be able to place higher cups.
DNote
The cups you use should have a capacity of at least 150ml when you brew regular coffee or 100ml when you brew strong coffee. Do not use cups that are too large, as they cause the coffee to get cold more quickly.
10When you have selected the desired coffee strength, press the 1-cup button q for one cup (1) or press the 2-cup button qq for two cups (2).
11When the water has heated up and the on/ off button lights up continuously, the machine starts brewing coffee.
ETip:
You can interrupt the brewing cycle at any time.To do this, press the same cup button (1- cup button or 2-cup button) that you pressed to start brewing coffee. However, if you do this, the machine does not complete the interrupted brewing cycle if you switch it on again or press the same cup button again.
DNote:
Do not remove the water reservoir during a brewing cycle.
10
12 |
When the coffee is ready, remove the used |
2 To enter the programming mode, first select |
|
coffee pod or pods. Simply lift the pod holder |
the personal coffee memory symbol (star |
|
out of the machine and empty it. |
symbol) with the selection button (1). Keep |
|
|
the selection button pressed for 2 seconds |
|
CCaution: |
until the star symbol starts flashing (2) and |
|
There may still be some hot water/coffee on |
you hear a beep.Then release the selection |
|
the coffee pod or pods. |
button. |
13 |
After use, press the on/off button 3 to switch |
|
|
off the machine. |
|
English
DNote:
If you do not use the machine, it switches off automatically after 15 minutes to save energy.
3Press the 1-cup button to make the coffee flow into the cup (1).When the cup contains the amount of coffee you prefer, press the 1-cup button again (2).Your preferred amount of coffee has been set.
5.1Personal coffee memory (HD7872 only)
You can program the machine to brew the amount of coffee you prefer (up to 145ml). Simply experiment and find out what you like best.We advise you to brew at least 60ml for optimal taste and temperature.
While programming, you can only use the 1-cup button.When you have completed the programming process, you will be able to brew one or two cups with the programmed amount of coffee.
DNote:
It is not possible to program your personal coffee memory while the machine is heating up.Wait until the on/off button lights up continuously.
1Place 1 coffee pod in the 1-cup pod holder and place 1 cup under the spout openings.
From now on, your SENSEO® machine brews one or two cups with this amount of coffee when you select the personal coffee memory symbol with the selection button.
DNote:
If you want to change the set amount of coffee, simply perform steps 1-3 again.
11

5.2Flushing the machine after a day of non-use
If you have not used the coffee machine for one day, flush it to make sure that the boiler is filled with fresh water.
To flush the machine, brew two cups of hot water in the following way:
1Fill the water reservoir with cold tap water beyond the MIN level (1). Put the lid on it (2) and put it the water reservoir back onto the machine.
2Put the 1-cup pod holder q or the 2-cup pod holder qq in the machine without pods.
5Press the on/off button 3.The on/off button flashes slowly while the water heats up.
6Make sure that the coffee strength you have selected is regular coffee (cup symbol with three bars).
7Press the 2-cup button qq to brew two cups of hot water.
8
9
3Close the lid and lock the lever.
4Put two cups or a large mug under the coffee spout to collect the water.
When the water has heated up, the on/off button lights up continuously and the coffee machine starts operating.
Throw away the water in the cups. Now the machine is ready for use again.
12

6 Cleaning
Regular cleaning of your SENSEO® is important to ensure that the SENSEO® coffee always tastes optimally and to optimise the lifetime of the coffee machine.
BWarning:
Never immerse the SENSEO® coffee machine in water.
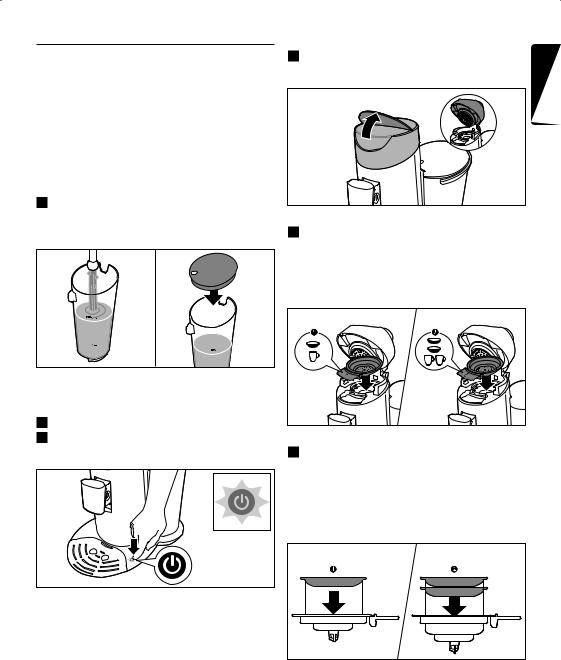
1Always unplug the machine before you clean it.
2Clean the outside of the machine with a moist cloth.
3Remove the coffee collector.
4To remove the coffee spout, press the release buttons (1) and pull the coffee spout off the machine (2).
|
To disassemble the coffee spout, grab the |
|
|
5 |
|
||
|
two ridges of the inner part of the spout and |
SH |
|
|
squeeze them lightly (1). Move the inner part |
LI |
|
|
downwards to remove it from the outer part |
ENG |
|
|
of the spout (2). |
|
|
|
|
|
|
|
|
|
|
6Clean the water reservoir and its lid, the coffee spout, the coffee collector, the drip tray, the cup tray and the pod holders in hot water or in the dishwasher.
CCaution:
Be careful not to damage the valve in the bottom of the water reservoir if you use a washing-up brush to clean the water reservoir.
DNote:
Check if the sieve in the centre of the pod holder is clogged. If this is the case, unclog the sieve by rinsing the pod holder under the tap. If necessary, use a washing-up brush to clean the sieve
13

7Clean the water distribution disc and the rubber sealing ring with a moist cloth.
CCaution:
Do not remove the rubber sealing ring and be careful not to damage the tab on the water distribution disc.
8Clean the water inlet on the machine with a moist cloth.
7 Descaling
Scale builds up inside the machine during use. It is essential to descale the SENSEO® coffee machine when the CALC light goes on. Use SENSEO® Descaler (HD7012, HD7011, HD7006) only.
When to descale
•• Descale the SENSEO® coffee machine as described below when the CALC light goes on (after you have brewed approx. 400 cups of SENSEO® coffee).
Why to descale
Your reasons to descale:
•• It prolongs the life of your SENSEO® coffee machine
•• It ensures maximum cup volume
•• It ensures maximum coffee temperature
•• The machine produces less sound during brewing
•• It prevents malfunctioning
If the descaling procedure is not performed correctly, scale residue remains behind in the machine.This causes scale to build up more quickly and may cause permanent and irreparable damage to the machine.
Use the correct descaling agent
Use SENSEO® Descaler (HD7012, HD7011, HD7006) only. It has been developed to ensure better machine performance and operation. Each descaling mixture can be used only once. For more information about this descaler,
visit our website www.philips.com.
BWarning:
Never use a descaling agent based on mineral acids such as sulphuric acid, hydrochloric acid, sulphamic acid and acetic acid (e.g. vinegar).These descaling agents may damage your SENSEO® coffee machine.
|
|
|
7.1 Descaling procedure |
|
The descaling procedure consists of a descaling |
|
cycle and two flushing cycles. Do not interrupt the |
|
descaling cycle and do not switch off the machine |
14 |
before you have performed the two flushing cycles. |

|
Mix 50 grams of citric acid with 1 litre of |
|
Place the 1-cup pod holder q with a used |
|||
1 |
4 |
|||||
|
water in a measuring jug. Stir until the powder |
|
coffee pod in it in the coffee machine. Close |
|||
|
has dissolved. Fill the water reservoir with the |
|
the lid and make sure it is properly locked. |
|||
|
descaling mixture. |
|
|
|||
|
|
|
|
|
|
|
|
|
|
|
|
|
|
|
|
|
|
|
|
|
|
|
|
|
|
|
|
|
|
|
|
|
|
|
|
|
|
|
|
|
|
ENGLISH
|
DNote: |
2 Tilt the water reservoir and place the bottom |
Always put a used coffee pod in the pod |
back onto the machine (1).Then press the top |
holder when you descale the machine.This |
of the water reservoir towards the machine (2). |
pod serves as a ‘filter’ to prevent the sieve or |
|
hole in the pod holder from getting clogged |
|
with scale residue. |
|
BWarning: |
|
Make sure the lid is closed properly and |
|
the lid lever is locked before you start |
|
descaling. |
|
5 Remove the drip tray. |
3 Press the on/off button 3.The on/off button |
|
flashes slowly while the water heats up.The |
|
machine is ready for descaling when the on/ |
|
off button lights up continuously. |
|
6 Put a bowl with a capacity of at least 1.5 litres under the spout to collect the descaling mixture.
 1.5L
1.5L
15

7 When the on/off button lights up continuously, |
DNotes: |
press the 1-cup button q and the 2-cup |
Do not refill the water reservoir with used |
button qq at the same time for 3 seconds |
hot water or the used descaling mixture. |
until you hear a beep. Release the buttons |
2 Tilt the water reservoir and place the bottom |
as soon as their lights as well as the selected |
back onto the machine (1).Then press the top |
strength go out.This means that the descaling |
of the water reservoir towards the machine (2). |
procedure has been activated correctly. |
|
•The CALC light and the on/off button start flashing to indicate that the descaling cycle is in progress.
•During the descaling cycle, the water comes out of the machine in intervals.
•When all the water in the water reservoir has been used up, the descaling cycle is finished.The on/off button starts to flash rapidly.
DNote:
If you press the 1-cup and 2-cup button longer than 3 seconds, the machine does not start the descaling cycle. If this happens, press the 1-cup button and the 2-cup button at the same time for 3 seconds again.
7.2 Flushing after descaling
1Rinse the water reservoir under the tap and then fill it to the top with fresh tap water.
3Place the 1-cup pod holder q with a used coffee pod in it in the coffee machine. Close the lid and make sure it is properly locked.
4Put a bowl with a capacity of at least 1.5 litres under the spout to collect the water.
 1.5L
1.5L
16

5Press the 1-cup button q and the 2-cup button qq at the same time for 3 seconds until you hear a beep to start the flushing cycle.
6Remove the used pod and clean the pod holder after the flushing cycle to prevent the sieve in the centre from getting clogged.
7Repeat steps 1 to 6 once more to ensure a clean machine.
8After the descaling cycle and the flushing cycles, the CALC light goes out and the machine switches off automatically.
8 Frost-free storage
After you have flushed the machine for the first time (see chapter ‘Flushing the machine before first use’), it may only be used and stored in a frost-free place to prevent damage.
9 Ordering accessories
To purchase accessories for this machine, please visit our online shop at www.shop.philips.com/service.
If the online shop is not available in your country, go to your Philips dealer or a Philips service centre. If you have any difficulties obtaining accessories for your machine, please contact the Philips Consumer Care Centre in your country.
You find its contact details in the worldwide guarantee leaflet.
10 Environment
•• Do not throw away the machine with the normal household waste at the end of its life, but hand it in at an official collection point for recycling. By doing this, you help to preserve the environment.
11 Guarantee and
service
If you need service or information or if you have a problem, please visit the Philips website at
www.philips.com/support or contact the Philips
Consumer Care Centre in your country.You find its phone number in the worldwide guarantee leaflet. If there is no Consumer Care Centre in your country, go to your local Philips dealer.
The purchase of the Philips SENSEO® coffee machine does not exhaust any of the rights of Sara Lee/Douwe Egberts or Philips under any of their patents nor does it confer upon the purchaser a licence under these patents. Always return the machine to a service centre authorised by Philips for examination or repair. Do not attempt to repair the machine yourself, otherwise your guarantee becomes invalid.
English
17

12 Troubleshooting
12.1 SENSEO® coffee machine
This chapter summarises the most common problems you could encounter with the machine.
If you are unable to solve the problem with the information below, visit www.philips.com/support for a list of frequently asked questions or contact the Consumer Care Centre in your country.
Problem |
Solution |
|
|
My cup overflowed |
You probably tried to brew a cup of coffee without flushing the machine |
when I used the |
first. Before you start brewing coffee, you have to flush the machine. |
machine for the first |
When you switch on the machine again, the on/off button either lights up |
time. |
continuously or flashes slowly or rapidly. |
|
If the on/off button lights up continuously, you have to carry out the flushing |
|
procedure (see chapter ‘Flushing the machine before first use’). |
|
If the on/off button flashes slowly or rapidly, you do NOT have to carry |
|
out the flushing procedure. If the on/off button flashes slowly, the water |
|
is heating up. If it flashes rapidly, there is not enough water in the water |
|
reservoir or the water reservoir is not placed on the machine properly. |
Water continued to |
If water continued to flow from the spout until the water reservoir was |
flow from the spout |
empty, the machine was performing the flushing cycle. Before you start |
when I used the |
brewing coffee, you have to flush the machine.When you switch on the |
machine for the first |
machine again, the on/off button either lights up continuously or flashes |
time. |
slowly or rapidly. |
|
If the on/off button lights up continuously, you have to carry out the flushing |
|
procedure (see chapter ‘Flushing the machine before first use’). |
|
If the on/off button flashes slowly or rapidly, you do NOT have to carry |
|
out the flushing procedure. If the on/off button flashes slowly, the water |
|
is heating up. If it flashes rapidly, there is not enough water in the water |
|
reservoir or the water reservoir is not placed on the machine properly. |
The on/off button |
You have used the SENSEO® coffee machine at an altitude higher than 2200 |
flashes slowly. |
metres above sea level.This has caused the water in the machine to start |
|
boiling before it has reached the required temperature, which prevents the |
|
machine from functioning properly. Switch off the machine and no longer |
|
use it at altitudes higher than 2200 metres above sea level. |
The CALC light |
You have pressed the 1-cup button and the 2-cup button at the same time. |
flashes. |
This started the descaling cycle. If you did not intend to start the descaling |
|
cycle, simply press the on/off button to switch off the machine. If you did |
|
intend to start the descaling cycle, do not interrupt this cycle but let the |
|
appliance operate until the water reservoir is empty. |
18
Problem |
Solution |
|
|
The CALC light does |
The CALC light does not go out if the descaling procedure has not been |
not go out after |
performed correctly.To perform the descaling procedure correctly: |
descaling. |
|
|
1. Make sure that you do not interrupt the descaling cycle or switch off or |
|
unplug the machine during the descaling cycle. During the descaling cycle, |
|
hot water comes out of the coffee spout at intervals and the machine stops |
|
descaling 3 to 4 times to let the descaling mixture act and to heat up again. |
|
2. Make sure that you start the descaling cycle by pressing the 1-cup |
|
button and the 2-cup button at the same time. See chapter ‘Descaling’ for a |
|
complete description of the descaling procedure. |
|
3. Make sure that you use three full water reservoirs to complete the |
|
descaling procedure: one reservoir filled with descaling mixture and two |
|
reservoirs filled with fresh water. |
The on/off button |
Make sure that there is enough water in the water reservoir and that the |
continues to flash |
water reservoir is placed properly. |
rapidly. |
|
|
Make sure that the ambient temperature is not lower than 5°C. If it is, the |
|
machine does not function properly. |
Water leaks from the |
If you notice coffee or water leaking from your SENSEO® machine, try to |
coffee machine. |
establish where the leakage occurs.This is important, as the location of the |
|
leakage determines the solution. |
|
1. If the leakage occurs near the lid or the spout, make sure that: |
|
1a.The sieve in the centre of the pod holder is not clogged. If it is, unclog |
|
the sieve by holding the pod holder under a running tap. |
|
1b.The coffee pod has been put properly in the centre of the pod holder. |
|
1c.The sealing ring has not got stuck under the edge of the water |
|
distribution disc (see figure 1 at the beginning of this user manual). |
|
1d.The spout and the coffee collector have been placed correctly. |
|
2. If the leakage occurs near the bottom of the water reservoir or under the |
|
machine, make sure that: |
|
2a.There is not too much water in the water reservoir. |
|
2b.You do not place the water reservoir onto the machine too roughly. |
|
If you place the water reservoir too roughly, water may splash out of the |
|
water reservoir. |
|
2c.The water reservoir is not damaged or broken. Normally, water should |
|
not start to drip from the water outlet in the bottom of the water reservoir |
|
within 30 seconds after filling. |
English
19

Problem |
Solution |
|
|
I cannot open the lid. |
A vacuum may have temporarily formed under the lid. Switch off the |
|
machine. Pull up the lever and wait 24 hours before you open the lid.You |
|
may need to use quite some force. |
|
Make sure that you do not move the SENSEO® machine. Moving the |
|
machine, placing it outdoors or in a cool or cold environment does not |
|
accelerate the unlocking of the lid. |
|
For this not to happen again, always make sure that the pod holders are |
|
clean and that the sieve in the centre of the pod holders is not clogged. |
The coffee machine |
Perhaps the sieve in the centre of the pod holder is clogged. If this is the |
produces less coffee |
case, unclog the sieve by rinsing the pod holder under a running tap. Use a |
than before. |
washing-up brush to clean the sieve, if necessary. |
|
Descale the machine (see chapter ‘Descaling’). |
I cannot close the lid properly.
Check if a used coffee pod is sticking to the water distribution disc. If this is the case, remove the used pod.
Check if you used the correct pod holder. Use 2 pods in combination with the deeper 2-cup pod holder qq.
The SENSEO® coffee |
Make sure that you have selected the coffee strength that you prefer.You |
is not strong enough. |
can choose between regular and strong coffee.You can also increase or |
|
decrease the coffee strength by setting your preferred amount of coffee |
|
with the personal coffee memory function (HD7872 only). |
|
Make sure that you have used the correct number of pods and have |
|
pressed the right button. Use 2 pods in combination with the 2-cup pod |
|
holder qq and the 2-cup button qq. |
|
Make sure that you have placed the coffee pod or pods properly in the |
|
centre of the pod holder, to prevent water from escaping along the edge |
|
of the pod or pods.When you use two coffee pods on top of each other, |
|
make sure that the convex sides of both pods point downwards and press |
|
the pods lightly into the pod holder. |
|
Make sure that you have not used the same coffee pod twice by accident. |
|
Make sure that the coffee in the pod is evenly distributed. |
|
If you prefer a more robust flavour, SENSEO® coffee pods with a stronger |
|
blend are available. |
20
Problem |
Solution |
|
|
The coffee is not hot |
If you have used the machine for quite some time and the temperature of |
enough. |
the coffee decreases, we advise you to descale the machine. See chapter |
|
‘Descaling’. Descale your SENSEO® coffee machine regularly. |
|
Do not use cups that are too large, as they cause the coffee to get cold |
|
more quickly. Make sure that the cups have a capacity of at least 150ml. |
|
Use thin-walled cups.Thin-walled cups absorb less heat from the coffee than |
|
thick-walled cups. |
|
Make sure the size of the cup matches the amount of coffee. Do not brew |
|
a small amount of coffee in a large cup. |
|
If you drink coffee with fresh milk, preheat the milk in the cup in a |
|
microwave. |
|
You can preheat the coffee machine by first brewing a cup of coffee without |
|
placing a coffee pod in the pod holder. In this way you also heat up your |
|
coffee cup. |
The touch panel does |
If there is water on the touch panel, the buttons do not work. Make sure |
not work. |
that the touch panel is dry and also make sure your hands are dry when |
|
you use the touch panel. |
|
Make sure that you press the selection button and not the symbols to the |
|
left of the selection button. |
I accidentally activate |
This happens because the touch panel is very sensitive and the buttons |
the touch panel when |
only require a light touch to be activated.There is no problem when this |
I clean it. |
happens, the machine will not start brewing coffee. |
|
Unplug the machine before you clean it. |
HD7872 only:The |
Please read section ‘Personal coffee memory’ in chapter ‘Brewing SENSEO® |
personal coffee |
coffee’ and try to set the amount of coffee you prefer again. |
memory button does |
|
not produce the |
|
amount of coffee I |
|
prefer. |
|
English
21

Indholdsfortegnelse
1 |
Introduktion |
22 |
|
|
|
2 |
Generel beskrivelse |
22 |
|
|
|
3 |
Vigtigt |
23 |
|
|
|
4 |
Gennemskylning af maskinen |
23 |
|
før brug første gang |
|
|
|
|
5 |
Brygning af SENSEO®-kaffe |
26 |
|
|
|
6 |
Rengøring |
29 |
|
|
|
7 |
Afkalkning |
31 |
|
|
|
8 |
Frostfri opbevaring |
34 |
|
|
|
9 |
Bestilling af tilbehør |
34 |
|
|
|
10 |
Miljøhensyn |
34 |
|
|
|
11 |
Reklamationsret og service |
34 |
|
|
|
12 |
Fejlfinding |
35 |
1 Introduktion
Tillykke med dit køb og velkommen til Philips! For at få fuldt udbytte af den support, Philips tilbyder, skal du registrere dit produkt på www.philips.com/welcome.
1.1 SENSEO®-kaffesystem
Få en helt særlig kaffeoplevelse med SENSEO®. Dette enestående system kombinerer Philips’ brugervenlige SENSEO®-kaffemaskine med de specialudviklede Merrild SENSEO®-kaffepuder, der giver en fyldig, rund smag med et lækkert skumlag. Merrild-kaffen i de praktiske SENSEO®-kaffepuder og Philips’ nye unikke SENSEO®-bryggesystem passer perfekt sammen og sikrer, at den bedste smag og aroma trækkes ud af
kaffen. Se alle SENSEO®-kaffeblandingerne på www.senseo.com.
For at være sikker på at få den fyldige og runde smag skal du huske følgende:
Friske kaffepuder
Benyt SENSEO®-kaffepuderne, der er specielt udviklet af Merrild til din SENSEO®-kaffemaskine, og som giver en fyldig og rund smag. Merrild SENSEO®-kaffepuderne holder sig friske længere, hvis de opbevares i en lufttæt beholder.
Frisk vand
Brug frisk vand hver dag. Hvis du ikke har brugt kaffemaskinen i én dag, skal du skylle den igennem med frisk vand, før du bruger den igen (se kapitlet “Brygning af SENSEO®-kaffe”, afsnit
“Gennemskylning af maskinen efter en dag, hvor den ikke er blevet brugt”).
2Generel beskrivelse
(fig.1)
1Tragt
2Udløser til låg
3Låg med bryggekammer
4Tætningsring
5Vandtilførselsplade
62-kops-pudeholder qq
71-kops-pudeholder q
8Dæksel til kaffeudløb
9Kaffeudløb
10Udløserknapper til udløb
11Aftagelig drypbakke
12Koprist
13Touch-panel
14On/off-knap
15Symbol til hukommelse for individuelt kaffevalg (kun HD7872)
16Almindelig kaffe-symbol
17Funktionsknap
18Symbol for stærk kaffe
19CALC-indikator
201-kops-knap q
212-kops-knap qq
22Vandtank
23Låg til vandtank
22

3 Vigtigt
Læs denne brugervejledning omhyggeligt igennem, inden maskinen tages i brug, og gem den til eventuel senere brug.
Fare
•• Kom aldrig maskinen ned i vand eller anden væske.
Advarsel
•• Før maskinen tages i brug, skal du kontrollere, om spændingsangivelsen i bunden af maskinen svarer til den lokale netspænding.
•• Denne maskine er ikke beregnet til at blive brugt af personer (herunder børn) med nedsatte fysiske og mentale evner, nedsat følesans eller manglende erfaring og viden, medmindre de er blevet vejledt
eller instrueret i maskinens anvendelse af en person, der er ansvarlig for deres sikkerhed.
•• Hold maskinen uden for børns rækkevidde for at sikre, at de ikke kan komme til at lege med den.
•• Brug aldrig maskinen, hvis stik, netledning eller selve maskinen er beskadiget.
•• Hvis netledningen beskadiges, må den kun udskiftes af Philips, et autoriseret
Philips-serviceværksted eller en tilsvarende kvalificeret fagmand for at undgå enhver risiko.
Forsigtig
•• Læg aldrig SENSEO®-kaffemaskinen på siden, når den er pakket ud. Den skal altid opbevares i lodret position, også under transport.
•• Reparation og eftersyn af maskinen skal altid foretages på et autoriseret Philipsserviceværksted. Forsøg ikke selv at reparere maskinen, da garantien i så fald bortfalder.
•• Brug ikke maskinen i kombination med en transformer, da dette kan resultere i en farlig situation.
•• Stil altid maskinen på et fladt og stabilt underlag.
•• Brug ikke maskinen steder, der ligger højere end 2.200 meter over havets overflade.
•• Hæld aldrig mælk, kaffe, varmt eller destilleret vand i vandtanken.
•• Gennemskyl aldrig maskinen, og lad den heller aldrig brygge kaffe, når udløbet ikke er på plads.
•• Denne maskine er kun beregnet til normal anvendelse i hjemmet. Den er ikke beregnet til brug i miljøer som personalekøkkener i butikker, på kontorer, på gårde eller andre arbejdspladser. Den er heller ikke beregnet til brug af gæster på hoteller, moteller, bed and breakfasts eller i andre værelser til udlejning.
3.1 Overholdelse af standarder
Denne maskine overholder alle standarder for elektromagnetiske felter (EMF).Ved korrekt anvendelse i overensstemmelse med instruktionerne i denne brugervejledning
er maskinen sikker at anvende ifølge den videnskabelige viden, der er tilgængelig i dag. Energiforbruget for denne maskine i slukket tilstand er mindre end 1 watt. Det betyder, at maskinen overholder EU-direktivet 2009/125/ EC, der angiver de økologiske designkrav for energiforbrugende produkter.
4Gennemskylning af maskinen før brug første gang
Det er vigtigt, at du gennemskyller din SENSEO®- kaffemaskine før brug første gang. Efter skyllecyklussen (som kun tager ca. 2 minutter) er maskinen klar til at brygge SENSEO®-kaffe.
CForsigtig:
Afbryd aldrig skylningsprocessen midt i forløbet, da vandkogeren i så fald ikke fyldes ordentligt.
Dansk
23

1 Sæt udløbet på maskinen.Tag fat i de to riller |
4 Placer låget på vandtanken, før du sætter den |
på den inderste del af udløbet, og tryk let på |
tilbage på maskinen. |
dem (1). Placer udløbet på maskinen, og slip |
|
de to riller (2). |
|
CForsigtig:
Gennemskyl aldrig maskinen, og lad den heller aldrig brygge kaffe, når udløbet ikke er på plads.
2Vip toppen af vandtanken bagover (1), og løft den af maskinen (2).
5Vip vandtanken, og sæt bunden tilbage på plads på maskinen (1).Tryk derefter toppen af vandtanken ind mod maskinen (2).
6 Fjern drypbakken.
3 Fyld vandtanken op med koldt vand fra hanen.
24

7 Placer en skål med en kapacitet på mindst 1,5 |
11 Tryk kort på 1-kops-knappen q og |
liter på kaffeudløbet. |
2-kops-knappen qq samtidig for at starte |
|
gennemskylningen. |
 1.5L
1.5L
DANSK
8Sørg for, at pudeholderen, uden pude eller puder, er på plads.
9Sæt stikket i en stikkontakt med jordforbindelse.
10Tryk på on/off-knappen 3. Knappen lyser op for at indikere, at du skal gennemskylle maskinen.
•On/off-knappen begynder at blinke for at indikere, at gennemskylningsprocessen er startet.
•Under gennemskylningsprocessen fyldes vandkogeren automatisk med vand fra vandtanken, og der kommer koldt vand ud af kaffeudløbet. Under
gennemskylningsprocessen støjer maskinen mere end under en almindelig bryggeproces.
•Når alt vandet i vandtanken er blevet brugt, er gennemskylningsprocessen færdig, og maskinen slukkes.
25

12 Fyld vandtanken med frisk vand fra hanen, sæt |
3 Tryk på on/off-knappen 3. On/off-knappen |
låget på, og sæt den tilbage på maskinen. |
blinker langsomt, mens vandet varmes op. |
Din SENSEO®-maskine er nu klar til brug, så du kan brygge din første kop velsmagende kaffe.
5Brygning af SENSEO®-kaffe
Mens SENSEO®-kaffemaskinen varmer op, kan du vælge den kaffestyrke, du foretrækker, og det antal kopper, du gerne vil brygge. Så brygger maskinen koppen eller kopperne straks efter, den er varmet op.
1Kontroller, at vandtanken er fyldt med friskt, koldt vand fra hanen mindst til MIN-
markeringen, og at låget er sat på vandtanken.
ETip:
Brug friskt vand hver dag.
2Sæt stikket i en stikkontakt med jordforbindelse.
DBemærk:
Hvis on/off-knappen blinker hurtigt, indeholder vandtanken ikke nok vand til at brygge en kop kaffe.
4Træk låget opad for at åbne det. Låget åbnes automatisk.
5Hvis du vil lave en kop SENSEO®-kaffe, skal du placere 1-kops-pudeholderenq i maskinen
(1). Hvis du vil lave to kopper, skal du lægge 2-kops-pudeholderen qq i maskinen (2). Kontroller, at pudeholderen er ren.
26

6 Placer 1 kaffepude i 1-kops-pudeholderen |
8 Stil en eller to kopper under |
|
|
q (1), eller placer 2 kaffepuder i 2-kops- |
udløbsåbningerne. Du kan justere højden på |
|
pudeholderen qq (2). Placer puden eller |
kaffeudløbene ved at skubbe dem op eller |
|
puderne helt i centrum af pudeholderen |
ned. Du kan også fjerne drypbakken for at |
|
med den buede side nedad.Tryk puden eller |
kunne benytte højere kopper. |
|
puderne let ned i pudeholderen. |
|
|
|
Dansk |
|
|
DBemærk |
|
DBemærk: |
De kopper, du bruger, skal kunne rumme mindst |
|
Kontroller, at kaffen i puden eller puderne er |
150 ml, når du brygger almindelig kaffe, eller |
|
jævnt fordelt. |
100 ml, når du brygger stærk kaffe. Brug ikke for |
|
|
store kopper, da kaffen så bliver hurtigere kold. |
|
CForsigtig: |
9 Tryk på funktionsknappen for at vælge den |
|
Kom aldrig almindelig formalet kaffe eller |
ønskede kaffestyrke.Vælg kopsymbolet med |
|
beskadigede kaffepuder i SENSEO®-maskinen, |
tre søjler for en almindelig kop kaffe (125 ml) |
|
da den vil stoppe til. |
(1).Vælg kopsymbolet med én søjle for en |
7 |
Luk låget (1), og tryk låseklemmen ned (2). |
stærk kop kaffe (60 ml) (2). |
BAdvarsel:
Sørg for, at låget er lukket korrekt, og lågudløseren sidder fast, før du starter brygningen.
10Når du har valgt den ønskede kaffestyrke, skal du trykke på 1-kops-knappen q for én kop (1) eller på 2-kops-knappen qq for to kopper (2).
27 |

11Når vandet er varmet op, og on/off-knappen lyser konstant, begynder maskinen at brygge kaffe.
ETip:
Du kan afbryde bryggeprocessen på et hvilket som helst tidspunkt. Du skal bare trykke på den samme kop-knap (1-kops-knap eller 2-kops-knap), som du trykkede på for at starte bryggeprocessen. Hvis du gør det, fuldfører maskinen dog ikke den afbrudte bryggeproces, hvis du tænder den igen eller trykker på den samme knap igen.
DBemærk:
Fjern ikke vandtanken under brygningen.
12Når kaffen er klar, skal du fjerne den eller de brugte kaffepuder(r). Du skal blot løfte
pudeholderen ud af maskinen og tømme den.
CForsigtig:
Der kan stadig være lidt varmt vand eller kaffe i kaffepuden/-puderne.
13Efter brug skal du trykke på on/off-knappen for at slukke maskinen 3.
5.1Hukommelse for individuelt kaffevalg (kun HD7872)
Du kan programmere maskinen til at brygge den mængde kaffe, du foretrækker (op til 145 ml). Du kan eksperimentere og finde ud af, hvad du bedst kan lide.Vi anbefaler, at du brygger mindst 60 ml for at få den optimale smag og temperatur.
Når du programmerer, skal du kun bruge 1-kops- knappen. Når du er færdig med at programmere, kan du brygge en eller to kopper med den programmerede mængde kaffe.
DBemærk:
Det er ikke muligt at programmere din hukommelse til individuelt kaffevalg, mens maskinen varmer op.Vent, indtil on/off-knappen lyser konstant.
1Placer 1 kaffepude i 1-kops pudeholderen, og placer 1 kop under udløbsåbningerne.
2For at aktivere programmeringstilstanden skal du først vælge symbolet til hukommelse for individuelt kaffevalg (stjernesymbolet) med funktionsknappen (1). Hold funktionsknappen inde i 2 sekunder, indtil stjernesymbolet begynder at blinke (2), og der lyder et bip. Slip derefter knappen.
|
|
|
|
|
|
|
|
|
|
|
|
|
|
|
|
|
|
|
|
|
|
|
|
|
|
|
|
|
|
|
|
|
|
|
|
DBemærk: |
|
|
|
|
|
|
|
|
Hvis du ikke bruger maskinen, slukkes der |
|
Tryk på 1-kops-knappen, så begynder kaffen |
||||||
3 |
||||||||
automatisk for den efter 15 minutter for at |
|
at løbe ned i koppen (1). Når der er så meget |
||||||
spare energi. |
|
kaffe i koppen, som du ønsker, skal du trykke |
||||||
|
|
|
på 1-kops-knappen igen (2). Dermed har du |
|||||
|
|
|
indstillet den mængde kaffe, du foretrækker. |
|||||
|
|
|
|
|
|
|
|
|
|
|
|
|
|
|
|
|
|
28

Fra nu af brygger SENSEO®-maskinen denne mængde kaffe, når du vælger symbolet til hukommelse for individuelt kaffevalg med funktionsknappen.
DBemærk:
Hvis du ønsker at ændre på indstillingen for mængden af kaffe, skal du blot udføre trin 1-3 igen.
5.2Gennemskylning af maskinen efter en dag, hvor den ikke er blevet brugt
Hvis du ikke har brugt kaffemaskinen en dag, skal du gennemskylle den for at være sikker på, at vandkogeren fyldes med frisk vand.
For at gennemskylle af maskinen skal du brygge to kopper kogende vand som følger:
1Fyld vandtanken med koldt vand fra hanen mindst til MIN-markeringen (1). Sæt låget på (2), og sæt vandtanken tilbage på maskinen.
4Sæt to kopper eller et stort krus under kaffeudløbet for at opsamle vandet.
5Tryk på on/off-knappen 3. On/off-knappen blinker langsomt, mens vandet varmes op.
Dansk
6 Kontroller, at den valgte kaffestyrke er almindelig kaffe (kopsymbol med tre søjler).
7 Tryk på 2-kops-knappen qq for at brygge to kopper varmt vand.
2 Sæt 1-kops-pudeholderen q eller 2-kops- pudeholderen qq i maskinen uden puder.
8
9
3 Luk låget og tryk låseklemmen ned.
Når vandet er varmet op, lyser on/off-knappen konstant, og maskinen begynder at brygge kaffe.
Smid vandet i kopperne væk. Nu er maskinen klar til brug igen.
29

6 Rengøring
Regelmæssig rengøring af din SENSEO® er vigtig for at sikre, at SENSEO®-kaffen altid smager optimalt. Desuden forlænger det kaffemaskinens levetid.
BAdvarsel:
SENSEO®-kaffemaskinen må aldrig kommes ned
ivand.
1Tag altid stikket ud af stikkontakten, inden maskinen rengøres.
2Maskinen rengøres udvendigt med en fugtig klud.
3Fjern tragten.
5For at skille kaffeudløbet ad skal du tage fat i de to riller på indersiden af udløbet og trykke let på dem (1). Før den indre del nedad for at skille den fra den ydre del af udløbet (2).
6Rengør vandtanken og det tilhørende låg, kaffeudløbet, tragten, drypbakken, kopristen og pudeholderne i varmt vand eller i opvaskemaskinen.
4For at fjerne kaffeudløbet skal du trykke på udløserknapperne (1) og trække kaffeudløbet af maskinen (2).
CForsigtig:
Pas på, at du ikke kommer til at beskadige ventilen i bunden af vandtanken, hvis du bruger en opvaskebørste til at rengøre vandtanken.
DBemærk:
Kontroller, om sien i midten af pudeholderen er tilstoppet. Er dette tilfældet, fjernes tilstoppelsen ved at skylle pudeholderen under vandhanen. Brug om nødvendigt
en opvaskebørste til at rense sien.
30
 Loading...