


HD7858, HD7857, HD7856, HD7855
User manual


Table of contents |
|
|
1 Introduction |
|
|
|
|
|
Congratulations on your purchase and welcome |
1 |
Introduction |
3 |
|
to Philips!To fully benefit from the support that |
1.1 |
SENSEO® coffee system |
3 |
|
Philips offers, register your product at |
|
|
|
|
www.philips.com/welcome. |
2 |
General description |
4 |
|
|
1.1 SENSEO® coffee system |
||||
3 |
Important |
4 |
|
Make your coffee moments truly special with |
3.1 |
Compliance with standards |
5 |
|
SENSEO®.This unique system combines the |
|
|
|
|
easy-to-use Philips SENSEO® coffee machine |
4 |
Flushing the machine before |
5 |
|
with the specially developed D.E Master Blenders |
|
first use |
|
SENSEO® coffee pods, giving you a full, smooth |
|
|
|
|
|
coffee with a delicious foam layer. |
5 |
Brewing black SENSEO® coffee |
7 |
|
D.E Master Blenders coffee in convenient |
|
|
|
|
SENSEO® coffee pods and Philips’ unique new |
6 |
Brewing a coffee speciality with |
8 |
|
SENSEO® brewing system are perfectly matched |
|
fresh milk |
|
to ensure that the best taste and aroma are |
|
|
|
|
|
extracted from the coffee. Discover all SENSEO® |
7 |
Adjusting the coffee volume |
11 |
|
coffee blends at www.senseo.com. |
7.1 |
Adjusting the coffee volume to your |
|
|
To ensure a smooth and full coffee taste, you |
|
personal taste |
11 |
|
should keep the following things in mind: |
|
|
|
|
Fresh coffee pods |
8 |
Cleaning |
11 |
|
Use the SENSEO® coffee pods that have been |
8.1 |
Cleaning the milk spout |
12 |
|
specially developed by D.E Master Blenders for |
8.2 |
Cleaning the coffee spout and |
|
|
your SENSEO® coffee machine for a full, round |
|
the machine |
14 |
|
taste. D.E Master Blenders SENSEO® coffee |
|
|
|
|
pods stay fresh longer if you store them in an |
9 |
Descaling |
15 |
|
airtight storage container. |
9.1 |
Descaling procedure |
15 |
|
Fresh water |
|
|
|
|
Use fresh water every day. If you have not used |
10 |
Ordering accessories |
17 |
|
the coffee machine for one day, you have to flush |
|
|
|
|
it with fresh water before you use it again. |
11 |
Environment |
17 |
|
|
|
|
|
|
|
12 |
Guarantee and support |
17 |
|
|
|
|
|
|
|
13 |
Troubleshooting |
18 |
|
|
13.1 |
SENSEO® coffee machine |
18 |
|
|
ENGLISH
3

2 General description
11-cup pod holder q
22-cup pod holder qq
3Coffee collector
4Coffee spout
5Milk spout
6Milk tube
7Cup tray
8Removable drip tray
9Water reservoir
10Touch panel with recipe buttons
11CALC button
12Café Latte button
13Latte Macchiato button
14Cappuccino button
15Cup indicators
16On/off button
17Regular coffee button
18Strong coffee button
19Milk only button
3 Important
Read this user manual carefully before you use the machine and save it for future reference.
Danger
•• Never immerse the machine in water or any other liquid.
Warning
•• Check if the voltage indicated on the bottom of the machine corresponds to the local mains voltage before you connect the machine.
•• This machine can be used by children aged from 8 years and above and by persons with reduced physical, sensory or mental capabilities or lack of experience and knowledge if they have been given supervision or instruction concerning use of the machine in a safe way and if they understand the hazards involved.
•• Cleaning and user maintenance shall not be made by children unless they are older than
8 and supervised.
•• Keep the machine and its cord out of the reach of children aged less than 8 years.
•• Children should be supervised to ensure that they do not play with the machine.
•• Do not use the machine if the plug, the mains cord or the machine itself is damaged.
•• If the mains cord is damaged, you must have it replaced by Philips, a service centre authorised
by Philips or similarly qualified persons in order to avoid a hazard.
Caution
•• Always return the machine to a service centre authorised by
Philips for examination or repair. Do not attempt to repair the machine yourself, otherwise your guarantee becomes invalid.
•• Do not use the machine in combination with a transformer, as this could cause hazardous situations.
4

•• Always put the machine on a flat and stable surface. Keep it in upright position, also during transport.
•• Do not place the machine on a hotplate, directly next to a hot oven or similar source of heat.
•• Do not keep the machine at temperatures below 0°.Water left in the heating system may freeze and cause damage.
•• Never pour milk, coffee, hot water or carbonated water into the water reservoir.
•• Never put normal ground coffee or use torn pods in the machine, as this causes it to become blocked.
•• Never flush the machine or let it brew coffee when the spout is not in place.
•• This machine is intended for normal household use only. It is not intended for use in environments such as staff
kitchens of shops, offices, farms or other work environments. Nor is it intended to be used by clients in hotels, motels, bed and breakfasts and other residential environments.
3.1 Compliance with standards
This Philips machine complies with all applicable standards and regulations regarding exposure to electromagnetic fields.
The energy consumption of this machine in off mode is less than 0,5 watt.This means that this machine complies with European Directive 2009/125/EC, which sets the ecological design requirements for energy-using products.
4 Flushing the machine before first use
It is important that you flush your SENSEO® coffee machine before first use.After the flushing cycle, the machine is ready for brewing SENSEO® coffee.
CCaution:
Never interrupt the flushing cycle halfway.If you do,the boiler does not fill itself properly.
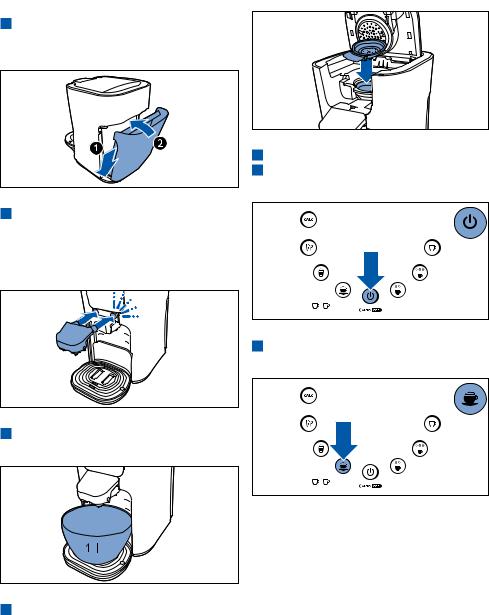
1Tilt the water reservoir backwards (1) and lift the water reservoir off the machine (2).
2 Fill the water reservoir.
ENGLISH
5
3Tilt the water reservoir and place the bottom back onto the machine (1).Then press the top of the water reservoir towards the machine (2).
4Slide the milk spout onto the machine. Make sure you attach the milk spout by sliding it over the guiding rails on the coffee spout.You hear a click sound when the spout is attached properly.
7Put the plug in an earthed wall socket.
8Press the on/off button.The button lights up to indicate that you have to flush the machine.
5Place a bowl with a capacity of at least 1 litre under the coffee spout.
6Make sure a pod holder, without pod or pods, is in place.
9To start flushing, press any of the recipe buttons.
•• During the flushing cycle,the boiler fills itself with water from the water reservoir and cold water comes out of the coffee spout. During the flushing cycle,the machine produces more noise than during a regular brewing cycle.
6

•• When all the water in the water reservoir has been used up,the flushing cycle is finished and the machine switches off.You may notice some steam coming from the machine,this is normal.
|
Press the on/off button.The on/off button |
|
3 |
|
|
|
flashes slowly while the water heats up. |
SH |
|
|
ENGLI |
|
|
|
|
|
|
DNote:
If the on/off button flashes rapidly, the water reservoir does not contain enough water for brewing one cup of coffee.
4 Pull the lid lever upwards to open the lid.
10 |
Fill the water reservoir with fresh tap water |
|
|
and place it back onto the machine. |
|
|
|
5 If you want to make one cup of SENSEO® |
5 |
Brewing black |
coffee, place the 1-cup pod holder q in the |
machine (1). If you want to make two cups, |
||
|
SENSEO® coffee |
put the 2-cup pod holder qq in the machine |
|
(2). Make sure the pod holder is clean. |
|
1 |
Make sure that the water reservoir is filled |
|
|
with fresh cold tap water. |
|
ETip:
Use fresh water every day.
2 Put the plug in an earthed wall socket.
7
 Loading...