


 Loading...
Register your product and get support at
www.philips.com/welcome
HDTP 8530
HDTP 8540
User manual

Congratulations!
This High Definition Digital Television Receiver (DTR) is an innovative product from the latest generation of Philips digital TV recorders, dedicated to Digital Terrestrial Television. Equipped with a silent hard disk drive, it allows easy reception and recording of digital programmes, including those broadcasted in High Definition.
Once you have connected your recorder and performed the initial installation, you will be able to watch and enjoy all the FREEVIEW channels available in your geographical area. Thanks to its embedded ’over the air’ upgrade feature, you can update your recorder with new features or services when they become available.
The Philips recorder follows a continuous development strategy. Therefore, we reserve the right to make changes and improvements to the product described in this user manual without any prior notice.
CE Marking:
The CE marking certifies that the product complies with the essential requirements of the Directive1999/5/EC concerning radio equipment and telecommunication equipment, and of Directives 2006/95/EC concerning safety, 2004/108/EC concerning electromagnetic compatibility and ErP 2009/125/EC concerning ecodesign requirements, defined by the European Parliament and Council to minimize electromagnetic interferences, ensure the safety of users and their equipment and protect their health, and minimize the impact of products on the environment.
The CE declaration of conformity can be viewed in the support section of the Philips site www.philips.com,
The FREEVIEW and FREEVIEW+HD words and logos are trademarks of DTV Services Ltd and are used under licence.
HDMI, HDMI logo and High-Definition Multimedia Interface are trademarks or registered trademarks of HDMI Licensing LLC. Manufactured under license from Dolby Laboratories. Dolby and the double-D symbol are registered trademarks of Dolby Laboratories Inc.
Telephone number for your local store is on your till receipt. Should your Store be unable to help, please check the following Websites for
Digital Television Terrestrial signal coverage: http://www.dtg.org.uk/consumer/freeview.html http://www.freeview.co.uk http://www.bbc.co.uk/digital
Note
•In order to receive digital signal of good quality you may need an antenna upgrade.
2

Contents
1 |
Safety recommendations |
4 |
|
Where to put your recorder? |
4 |
|
Warnings and safety instructions |
4 |
|
Batteries |
5 |
|
Interference |
5 |
|
Hard disk |
5 |
|
USB Storage devices |
5 |
|
Cleaning the recorder |
5 |
|
|
|
2 What‘s in the box |
6 |
|
|
Front panel of the recorder |
7 |
|
Rear panel of the recorder |
7 |
|
Overview of the remote control |
8 |
|
|
|
3 |
Connecting your devices |
10 |
|
Connection to the terrestrial antenna |
10 |
|
Connection to the TV set |
10 |
|
Connection to a VCR/DVD recorder |
11 |
|
Connection to a Home cinema system |
11 |
|
Connection to a hi-fi unit |
11 |
|
Connection to your Ethernet network |
11 |
|
|
|
4 |
Before starting |
12 |
|
Basics of the menu system |
12 |
|
Menu tree |
13 |
|
|
|
5 Running your first installation |
14 |
|
|
Video Settings |
14 |
|
Parental Control |
14 |
|
Channel Search |
14 |
|
Selecting your region |
15 |
|
|
|
6 Your recorder’s main commands |
16 |
|
|
Selecting a TV channel |
16 |
|
Adjusting the audio volume |
17 |
|
Using the Picture in Picture (PIP) feature |
17 |
|
Changing the favourites list |
17 |
|
Temporarily selecting audio languages, subtitles and audio |
|
|
description |
18 |
|
Activating and Using Audio description |
18 |
|
Teletext and interactive services |
18 |
|
TV/AUX Switch |
18 |
|
TV Guide |
18 |
|
Live mode/Deferred mode |
19 |
|
Recording programmes |
19 |
|
|
|
7 |
Video Recordings |
20 |
|
Immediate recording (Live or Deferred programme) |
20 |
|
Recording programmes from the Recording Schedule |
|
|
menu |
20 |
|
Recording programmes from the TV Guide |
21 |
|
Recording List |
22 |
|
Managing the Recording list |
22 |
|
|
|
8 |
Multimedia Player |
24 |
|
Accessing the Media Player |
24 |
|
Navigating in the Media Player |
24 |
|
Viewing photo files |
25 |
|
Playing audio files |
25 |
|
Viewing your own video files |
25 |
|
Importing/Exporting multimedia files |
25 |
|
|
|
9 Adjusting the installation parameters |
26 |
|
|
Channel Search |
26 |
|
Channel Management |
27 |
|
Technical Settings |
28 |
|
Information and Support |
30 |
|
|
|
10 |
Environment |
31 |
|
Meaning of logos present on the product or its packaging |
31 |
|
Product recycling and disposal |
31 |
|
European Directive on Waste Electrical and Electronic |
|
|
Equipment (WEEE) |
31 |
|
Directive on the Restriction of use of certain hazardous |
|
|
substances in electronic equipment (RoHS) |
31 |
|
Electrical consumption of the recorder |
31 |
|
|
|
11 |
Troubleshooting |
32 |
|
FAQ |
32 |
|
Using the recorder |
32 |
|
Updating the software |
33 |
|
|
|
12 |
Customer Support |
34 |
|
|
|
13 |
Specifications |
35 |
|
|
|
14 |
Guarantee Terms |
37 |
3

1 Safety recommendations
Use of the recorder is subject to safety measures designed to protect users and their environment.
Where to put your recorder?
In order to guarantee the correct operation of your recorder, you must:
•place it indoors to protect it from lightning, rain, and direct sunlight,
•place it in a dry and well ventilated area,
•keep it away from heat sources such as radiators, candles, lamps, etc.
•protect it from dampness, place it on a flat surface from where it will not fall and is out of the reach of children,
•avoid violent shocks. Choose a stable, horizontal surface on which the recorder will not be exposed to intense vibrations.
•do not place anything on top of your recorder (as it would restrict ventilation): the ventilation slots located on the casing prevent your recorder from overheating. If you place the recorder in a compartment or other closed space, leave a space of at least 10 cm on each side and 20 cm on the front and back of the recorder,
•connect it directly to the mains with the provided cords, the socket must be near the recorder and easy to access. The use of an extension cable (with multi-points) is not recommended.
Warnings and safety instructions
NEVER OPEN THE RECORDER OR THE POWER SUPPLY UNIT! YOU RISK GETTING AN ELECTRIC SHOCK.
• Use only the power supply unit supplied with the recorder to connect it to the mains. Other practice may be dangerous.
• As a precaution, in case of danger, the power supply unit acts as a disconnecting mechanism for the 230V power supply. That is why it is imperative that you connect the recorder to a power outlet located nearby and easily accessible.
•Connect the recorder to the mains in accordance with the indications mentioned on the identification label affixed on the recorder (voltage, current, frequency of electricity network).
•The identification label is located under the recorder or on the rear panel.
•You must imperatively connect the power supply unit to the recorder before connecting the power supply unit to the power socket. Ensure the power cord is correctly connected to the mains power socket and to the recorder. Otherwise, there is a risk of fire and you risk getting an electric shock when touching the recorder.
•You must imperatively use the recorder in an environment that complies with the following requirements:
•temperature: between 0°C [32°F] and 40°C [104°F].
•ambient humidity: between 20% and 90%.
•altitude: below 2000 m [6562 ft].
•To avoid short-circuits (fire or electrocution hazard), do not expose your recorder to dampness. Do not place any object containing liquid (vase for example) on the appliance.
The recorder must not be splashed with liquid. If liquid is spilled onto the recorder, unplug it immediately from the mains and consult your supplier.
•Take care not to allow liquids or metal objects to enter the recorder through the ventilation slots.
•Avoid reconnecting the recorder after it has been subjected to large changes in temperature.
•The recorder must be disconnected from mains supply (from the power outlet or rear panel) before any modification of connection between TV, VCR or antenna.
•In the event of a storm, it is advisable to unplug the antenna. Even if the recorder and the television set are disconnected from the power supply, lightning can still damage them.
•If you hear unusual noise coming from the mains power socket or from the power cord or adapter, disconnect immediately the power cord from the mains power socket in accordance with all the precautions of use, you risk getting an electric shock, and contact your retailer.
•Never connect the recorder to a mains power socket which is loose, shows signs of wear or damage, you risk getting an electric shock.
•Never touch the power cord with wet hands. You risk getting an electric shock.
•When connecting or disconnecting the power cord, always take hold of the plug without pulling on the cord. A damaged cord presents a potential risk of fire or electric shock. Never pull the power cord when disconnecting from the mains power socket.
•Never place objects on the power cord, and never pull on it or fold it. This may cause a risk of fire or electric shock. Ensure that the recorder never lies on the power cord or any other cables.
•Never place objects on the power adapter, never step on it or roll over it with a rolling device. You risk damaging the power adapter and creating a risk of fire or electric shock.
•Ensure the recorder is placed on a flat and stable surface, placing it incorrectly may lead to the power cord being disconnected. This may cause a risk of fire or electric shock.
4

•Always connect the power adapter cord to the recorder first, then connect the power cord to the power adapter, and finally connect the power cord to the mains power socket. By not observing the order indicated, you risk getting an electric shock.
•Ensure the power cord is correctly connected to the power adapter, and that it is firmly inserted in its slot. It is important that you push the connector into its slot. There is a risk of fire or electric shock in case of incorrect connection.
•Always keep the power cord and power supply unit out of the reach of children or domestic animals.
•Only personnel approved by the manufacturer can repair the recorder. Failure to comply with these safety precautions will invalidate the guarantee.
•Have a specialised installer perform all connections if you want to use cables that are not provided with the recorder.
Batteries
Batteries are easily swallowed by young children. Do not allow young children to play with the remote control.
Always keep batteries away from excessive heat sources such as direct sunlight, fire or similar sources.
To avoid damaging the remote control, only use identical batteries or batteries of an equivalent type. The batteries provided are not rechargeable.
Interference
Do not place the recorder near appliances that may cause electromagnetic interferences (for example, loudspeakers, modems, routers or cordless phones). This could affect recorder operation and distort the picture or sound.
Hard disk
This unit contains a hard disk drive. Please wait for the unit to go into standby mode before unplugging and moving it.
Never cut off the electrical supply while the disk is reading or writing, you may lose data and/or damage the hard disk.
USB Storage devices
Please wait until the recorder or the multimedia file application exits the multimedia list manager (multimedia file application) or is in standby mode before disconnecting your storage devices. Otherwise, you risk losing data or damage your storage device.
When connecting a USB peripheral device, respect the way of insertion and never use force. You may damage your peripheral device and/or the appliance.
Cleaning the recorder
The outer casing of the recorder can be cleaned with a soft and dry cloth. Do not use any type of abrasive pad, scouring powder or solvents, such as alcohol or turpentine, as they could damage the surface of the recorder.
5
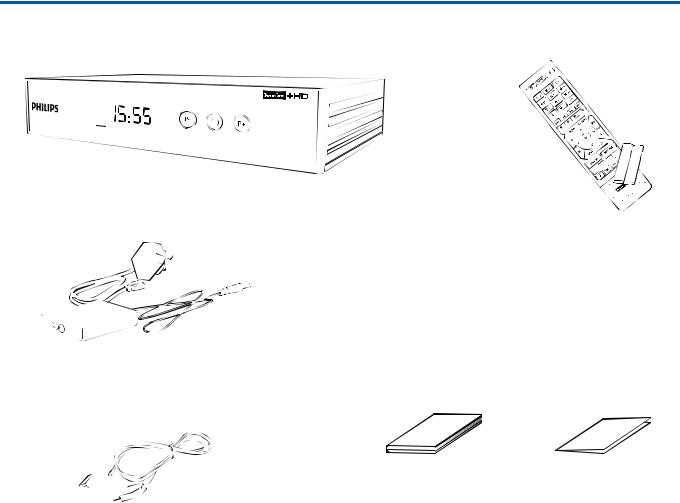
2 What‘s in the box
Your new equipment includes:
High Definition Digital
Television Recorder (DTR)
Remote control with 2 batteries (AAA)
Power supply unit (power adapter and power cord)
This user manual |
Quick start guide |
HDMI® lead for connection to a High Definition TV set
6

Front panel of the recorder
1 |
2 |
3 |
4 |
5 |
6 |
a USB port
bLED
•Green: Operating
•Red: Standby
cDigital display
•Shows the current time when the recorder is in standby.
•Shows the programme number when the recorder is on.
•Shows hard disk activity (recording in progress, programme playback,...)
d
•Change channel (Down)
e
•Put the recorder in standby mode/Wake up the recorder from standby mode (press and let go)
f
•Change channel (Up)
Rear panel of the recorder
Manufactured under license from Dolby Laboratories. L
Dolby and the double-D symbol are trademarks of
Dolby Laboratories.
ETHERNET |
IN |
OUT |
|
||
R |
|
|
HiFi |
DIG. |
ANTENNA |
AUDIO |
||
|
TV/AUX |
|
7 8 9 10 11 12 13 14
g Power supply unit connector h Ethernet port
i HDMI Digital video audio connector
j Analogue audio connectors (to hi-fi unit) k Digital audio connector (S/PDIF)
lSCART connector (to TV or VCR/ DVD)
mAntenna input
nAntenna output (Loopthrough only)
7

Overview of the remote control
1 


 24
24
23
d
•Launch immediate recording, Schedule a recording from the TV Guide
eMENU
•Access menus
f

•Increase or decrease the audio volume
|
|
1 ,.;@ |
|
2 abc |
3 def |
|
||||||||||||||||
2 |
|
|
|
|
4 ghi |
5 jkl |
6mno |
|
||||||||||||||
|
|
|
|
|
||||||||||||||||||
|
|
|
|
|
7 pqrs |
8 tuv |
9wxyz |
|
||||||||||||||
3 |
|
|
|
|
|
|
|
|
0 |
|
|
PIP |
|
|
22 |
|||||||
|
|
|
|
|
|
|
|
|
|
|
||||||||||||
|
|
|
|
|
|
|
|
|
|
|
||||||||||||
4 |
|
|
|
|
|
|
|
|
|
|
|
|
|
|
|
|
|
|
|
|
|
21 |
|
|
|
|
|
|
|
|
|
|
|
|
|
|
|
|
|
|
|
|
|
||
|
|
|
|
|
|
|
|
|
|
|
|
|
|
|
|
|
|
|
|
|
20 |
|
|
|
|
|
|
|
|
|
|
|
|
|
|
|
|
|
|
|
|
|
|
||
5 |
|
|
|
|
|
|
MENU |
|
TV GUIDE |
|
|
|
19 |
|||||||||
|
|
|
|
|
|
|
|
|
|
|||||||||||||
6 |
|
|
V+ |
|
|
|
P+ |
18 |
||||||||||||||
7 |
|
|
|
|
|
|
|
|
OK |
|
|
|
|
|
|
|
|
|
|
17 |
||
|
|
|
|
|
|
|
|
|
|
|
|
|
|
|
|
|
|
|||||
|
|
|
|
|
|
|
|
|
|
|
|
|||||||||||
|
|
|
V- |
|
|
|
P- |
|||||||||||||||
g


•Move in a page, a menu, the PIP window…
h
•Go back to the previous channel, screen or mode
iLIBRARY
•Access your recording library
•
jOn-screen options (MHEG, Teletext pages and menu)
k
•Access to Media Player
l
•Display Teletext pages when available
m
•This key only becomes active when Audio Description is activated in your User Preferences. When activated it will
allow you to set Audio Description where available on your current programme (see section Audio settings, page 28).
8 |
|
BACK |
EXIT |
|
16 |
n |
|
|
|
|
• |
Select subtitles and audio tracks |
|||||
|
|
|
|
|||||
9 |
LIBRARY |
SETTINGS |
15 |
o SETTINGS |
||||
• |
Access recorder settings |
|||||||
10 |
|
|
|
|
|
|||
|
|
|
|
|
p |
|
||
11 |
MP |
TEXT |
AD |
SUB |
14 |
• Exit from current screen or setting |
||
q |
|
|||||||
12 |
|
|
|
|
13 |
|
||
|
|
|
|
• |
Display the channel list, confirm a selection |
|||
|
|
|
|
|
|
r |
|
|
|
|
|
|
|
|
• Change channel in the main screen and in PIP mode |
||
|
|
|
|
|
|
s |
|
|
|
|
|
|
|
|
• Display the TV Guide |
||
a
•Put the recorder in standby mode/Wake up the recorder from standby mode.
b0 to 9
•Access channels and various on-screen options.
c
•Display programme information and options.
t


•Stop / Play / Pause
u


•Skip backward / Rewind / Fast forward / Skip forward
vPIP
•Activate PIP feature
w
•Toggle between TV and AUX modes on the SCART output
x
•Turn the sound off/on
8

Batteries
The remote control needs two batteries (AAA) to operate. The drawing in the battery compartment indicates how to install them. The batteries provided are not rechargeable.
9

3 Connecting your devices
Before installing your recorder:
•Please check that the delivery is complete (see What‘s in the box, page 6).
•Please ensure that the appliances to be connected together (recorder, TV set, VCR/DVD…) are unplugged before making any connections.
•Please ensure that Digital Terrestrial Television (DTT) is available in your area.
Connection to the terrestrial antenna
Very often to get the best reception, you may simply need to adjust your antenna. Alternatively, you can connect an indoor antenna to your system. For more information, please contact your specialised distributor.
Standard outdoor antenna
Preferably use an outside roof antenna that is designed to receive UHF channels (21 to 69). However:
•if your building is equipped with an old antenna model, digital channels may be difficult or even impossible to receive. The problem can only be resolved by changing the antenna.
•if your building is equipped with a common antenna which contains selective filters devised for analogue channels, reception will most probably not work correctly. In this case, you will have to contact the administrator of the building.
•some antennas directed towards an analogue TV transmitter must be re-adjusted towards a digital TV transmitter. If you encounter reception problems, you can also try placing the antenna at different heights.
Indoor antenna
In ideal reception conditions, this type of antenna is sufficient. Here, however, are some useful tips:
•use an antenna designed to receive channels 21 to 69.
•install the antenna close to the window and direct it towards the digital TV transmitter.
•if possible, use an antenna with an amplifier. The recorder can
provide remote power supply to your indoor antenna (see
Setting the power parameters, page 29).
Connection to the antenna
1Plug the antenna cable (not supplied) into the ANTENNA IN input connector on your recorder.
2You can connect the RF output connector of your recorder to the antenna input of the television set or VCR/DVD recorder (cable not supplied).
Connection to the TV set
Connection to a High-Definition television set using an HDMI lead
1To take advantage of High Definition picture quality, you must connect the HDMI connector of your recorder to the HDMI connector on your television set (cable supplied).
2To connect other devices to the recorder (VCR/DVD, Home cinema...), refer to the following sections.
3Connect the power adapter to the power cable. Then, connect the power cable into the 12 V connector on the recorder.
4Plug the power cord into the wall socket.
4
3 2 


1
Connection to a Standard-Definition television set
1You must connect the television set to your recorder using a SCART connector (not supplied).
2To connect other devices to the recorder (Home cinema...), refer to the following sections.
3Connect the power adapter to the power cable. Then, connect the power cable into the 12V connector on the recorder.
4Plug the power cord into the wall socket.
4
3 2 


1
10

Connection to a VCR/DVD recorder
See the diagram below to connect your recorder to a VCR/DVD recorder.


 EXT
EXT
TV
Note
•When you connect VCR/DVR recorder to the scart connector, select Recorder mode in the Scart Output field of the video settings (see section Picture settings, page 29).
Connection to a Home cinema system
Some programmes are broadcast with a high quality multichannel digital sound. The connection of your recorder to a Home cinema system will give you a cinematic surround sound experience when watching these programmes.
This can easily be done by connecting with a coaxial cable (not supplied) the DIGITAL AUDIO output of your recorder to the digital audio coaxial input of your Home cinema amplifier
Dolby® Digital Plus is one of the latest innovations of Dolby Laboratories in high quality digital audio. Compatible with Dolby Digital systems, it addresses the expectations of most demanding viewers, and is scalable to the diverse world of content delivery, such as, for instance, High Definition TV broadcast.
Note
•For more information, please visit the following website: http://www.dolby.com/consumer/setup/index.html
Connection to a hi-fi unit
To make the most of the quality sound and listen to radio channels with the TV turned off, just connect the right and left audio outputs of the recorder to the auxiliary input of your hi-fi system (cable not supplied).
Connection to your Ethernet network
To fully benefit from interactive services directly from your recorder, you must connect your recorder to the Internet through your broadband router.
1Connect one end of a RJ45 Ethernet cable (not supplied) to the ETHERNET port of your recorder.
2Connect the other end of the Ethernet cable to a free Ethernet port on your broadband router.
1
2
11

4 Before starting
Basics of the menu system
How to access the main menu?
Press the MENU key.
How to access a feature?
You can access some features using the remote control as well as the main menu.
When both possibilities are available, the corresponding procedures are proposed.
How to navigate through the various screens and set parameters?
Use the remote keys:
• |
to navigate in the menus and submenus, |
• or
or  to enter a menu,
• |
or |
to access the previous menu, |
• to exit the screens.
Menus presentation
For ease of understanding, accessing a menu is described in this
manual as follows:
MENU > Menu > Submenu
For example, when you read "Go to MENU > Configuration > Technical Settings", you should perform the following actions on
your remote control:
1 Press the MENU key to access the main menu.
2Press the  or
or  key to select Configuration.
3Press the  key to select Technical Settings, then enter the menu with the
  .
.
Controls presentation
The controls displayed on the screen are indicated as follows:
This control on the
screen...
is indicated as follows in your manual
"Press the  [Save] key":
• for the corresponding key of
your remote control,
•[Save] for the name of the control on the screen, introduced between brackets.
12
Loading...