


 Loading...
HD4918


1

English 6
20
32
HD4918

English
Introduction
The induction cooker works on the basis of an electromagnet that creates a powerful, high-frequency electromagnetic field.When cookware consisting of magnetic material (e.g. iron) is placed on the induction cooker, the electromagnetic field transfers energy to the bottom of the cookware, which causes the cookware and the food inside it to become hot.The amount of heat generated in the cookware is controlled by varying the strength of the electromagnetic field.When the strength of the
electromagnetic field is changed, the temperature of the cookware changes instantly.
Advantages of the induction cooker:
-Safe: the induction cooker does not make use of an open flame or fire. It also has a number of safety features, which allow you to enjoy cooking with your family whenever you want.
-Fast: in induction cooking, the cookware serves as the heat source.
This results in much faster and more even heat transfer, shortening the cooking time by more than 1/3 compared to conventional cooking.
-Versatile: the induction cooker has 8 preset cooking modes, each with its own optimal heating pattern.These modes allow you to prepare a great variety of nutritious meals.
-Very user friendly: the simple and interactive control panel and display allow you to easily adjust the settings at the touch of a button.
-Comfortable: the induction cooking process is smoke-free and produces less grease. Moreover, the cooker and the surrounding area stay cool.This allows you to cook in a cool and comfortable environment.
-Portable: the induction cooker has a compact design and the cooking plate stays cool.This means the appliance is always safe to use and allows you to cook anywhere in your home.
General description (Fig. 1)
ACeramic cooking plate
BBody
CCooking zone
DControl panel
EDisplay
FAir outlet
GAir inlet
HMains cord
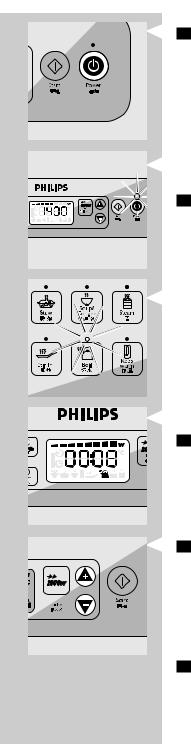
Control panel
1Preset cooking modes with indicator lights
2Hr:Min button (cooking time)
3Timer button
4Display
5Turbo button
6+/- buttons (for setting cooking time, power level and cooking temperature)
7Start button
8Power on/off button
Display
1 Power (W)/temperature (°C) symbol

English
2Power level
3Error symbol
4Cooking time
5Timer indicator
6Preset cooking mode symbols
7Cooking time/power level/cooking temperature indication
Important
Read this user manual carefully before you use the appliance and save it for future reference.
Danger
-Never immerse the appliance in water or rinse it under the tap.
Warning
-Check if the voltage indicated on the appliance corresponds to the local mains voltage before you connect the appliance.
-Only connect the appliance to an earthed wall socket.Always make sure the plug is inserted firmly into the socket.
-Do not use the appliance if the plug, the mains cord or the appliance itself is damaged.
-If the mains cord is damaged, you must have it replaced by Philips, a service centre authorised by Philips or similarly qualified persons in order to avoid a hazard.
-This appliance is not intended for use by persons (including children) with reduced physical, sensory or mental capabilities, or lack of experience and knowledge, unless they have been given supervision or instruction concerning use of the appliance by a person responsible for their safety.
-Children should be supervised to ensure that they do not play with the appliance.
-Keep the mains cord out of the reach of children. Do not let the mains cord hang over the edge of the table or worktop on which the appliance stands.
-Make sure the cooking plate is clean and dry before you switch on the appliance.
-Do not cover the air vent while the induction cooker is operating.
-Do not plug in the appliance or operate the control panel with wet hands.
-Do not touch the cooking plate after cooking, as it retains heat from the cookware.
-Metallic objects such as knives, forks, spoons and lids should not be placed on the cooking plate since they can get hot.
-Do not cover any part of the cooking plate with aluminium to prevent the risk of electric shock, short circuiting or fire.
-If the surface of the cooking plate is cracked, switch off the appliance and do not use it anymore to prevent the risk of electric shock, short circuiting or fire.
Caution
-Never use any accessories or parts from other manufacturers or that
Philips does not specifically recommend. If you use such accessories or parts, your guarantee becomes invalid.

English
-Do not expose the induction cooker to high temperatures, hot gas, steam or damp heat. Do not place the induction cooker on or near an operating or still hot stove or cooker.
-Always switch off the appliance before you unplug it.
-Always unplug the appliance and let it cool down before you clean it.
-This appliance is intended for household use only. If the appliance is used improperly or for professional or semi-professional purposes or if it is not used according to the instructions in the user manual, the guarantee becomes invalid and Philips will not accept liability for any damage caused.
-Place the induction cooker on a stable, horizontal and level surface and make sure there is at least 10cm free space around it to prevent overheating.
-Do not place anything between the cookware and the cooking plate.
-The maximum weight that can be put on the induction cooker is 7kg.
-Beware of hot steam that comes out of the cookware during cooking or when you remove the lid.
-Do not lift and move the induction cooker while it is operating.
-Never put empty cookware on the switched-on induction cooker, as this could cause the cookware to become distorted or the heating coil to become damaged.
-Do not store flammable materials and liquids near or on the induction cooker.
-Avoid hard contact between the cookware or other objects and the ceramic cooking plate.
-Always place the cookware on the cooking zone during cooking.
-Never connect this appliance to a timer switch or remote control system in order to avoid a hazardous situation.
-Do not use cookware with a bottom diameter of more than 16cm to deep-fry food, as this causes the appliance to malfunction.
Automatic shut-off
The appliance is equipped with automatic shut-off. It switches off automatically in two situations:
-In the Quick start (manual) mode and the Hot pot mode, the appliance switches off automatically if you do not press any button for
60 minutes.
-If there is no cookware or unsuitable cookware on the cooking plate when you press the start button or if you remove cookware from the cooking plate during cooking, the cooker beeps continuously, the display freezes and shows a flashing‘!’.The cooker automatically
switches off after 1 minute unless you put the cookware back onto the cooking plate within this minute.
Electromagnetic fields (EMF)
This Philips appliance complies with all standards regarding electromagnetic fields (EMF). If handled properly and according to the instructions in this user manual, the appliance is safe to use based on scientific evidence available today.

English
Before first use
Remove all packaging material from the induction cooker.
Preparing for use
1Place the appliance on a dry, stable and level surface.
2Make sure there is at least 10cm free space around the appliance to prevent overheating.
3Always place the cookware on the cooking zone during cooking.
4Make sure you use cookware of the correct type and size (see the tables below).
Recommended types and sizes of cookware
Suitable cookware for the induction cooker
Material |
Cookware with a bottom made of iron or magnetic stainless |
|
steel |
Shape |
Cookware with a flat bottom |
Size |
Cookware with a bottom diameter of 12-22cm, depending on |
|
the cooking mode (see tips below) |
Weight |
Cookware with a weight of up to 7kg (including contents) |
Cookware NOT suitable for the |
|
induction cooker |
|
Material |
Cookware with a bottom made of non-iron metal, |
|
ceramic, glass, aluminium and copper |
Shape |
Cookware with a concave or convex bottom |
Size |
Cookware with a bottom diameter of less than 11cm |
Weight |
Cookware with a weight over 7kg (including contents) |
Tip:When you cook in the Quick start (manual) mode or Hot Pot mode, you can use cookware with a bottom diameter of 12-25cm.
Tip:To deep-fry food, we advise you to use cookware with a bottom diameter of 12-16cm.
Using the appliance
Only use cookware that is suitable for induction cooking (see chapter ‘Preparing for use’).

10 English
Note: Always place and use the appliance on a dry, stable and level surface.
The tables below shows the default settings in the different cooking modes and to what extent these default settings can be adjusted.
Default and adjustable settings
Mode |
Default |
Power (watt)/ |
Adjustable |
Timer |
Display indications |
|
cooking |
temperature |
cooking |
|
|
|
time |
(°C) range |
time |
|
|
Quick |
5 |
400-2000W |
5-60 |
- |
Power level and power |
start (manual) |
|
|
|
|
bar |
cooking |
|
|
|
|
|
|
|
|
|
|
Remaining cooking time |
|
|
|
|
|
and power bar (if cooking |
|
|
|
|
|
time is set) |
Hot pot |
- |
400-2000W |
- |
- |
Power level and power |
|
|
|
|
|
bar |
Stew |
60 |
400-1400W |
30-180 |
up to |
Remaining cooking time |
|
|
|
|
12hrs |
and power bar |
Soup/Congee |
60 |
400-1400W |
30-180 |
up to |
Remaining cooking time |
|
|
|
|
12hrs |
and power bar |
Steam-Lo |
15 |
2000W |
10-40 |
up to |
Remaining cooking time |
|
|
|
|
12hrs |
and power bar |
Steam-Hi |
20 |
2000W |
10-60 |
up to |
Remaining cooking time |
|
|
|
|
12hrs |
and power bar |
Stir fry |
30 |
80-240°C |
5-60 |
- |
Temperature and power |
|
|
|
|
|
bar |
Boil |
9 |
2000W |
5-30 |
- |
Remaining cooking time |
|
|
|
|
|
and power bar |
Keep warm |
30 |
80°C |
15-180 |
- |
Remaining cooking time |
Turbo |
- |
2000W |
- |
- |
- |
Note:In the Stew and Soup/Congee modes,the appliance first brings the food to the boil and then switches to a lower power level.You can only adjust the power level after the boiling stage.
Note:The Steam modes allows you to steam various types of food, such as steamed rolls, egg, pork ribs or chicken.The Steam-Lo mode is suitable for steaming a small amount of food, like eggs or buns.The Steam-Hi mode is suitable for steaming a large amount of food, like ribs or chicken.
Note:The Boil mode allows you to boil water or food in a fast way.The
English 11
suggested boiling time for 1 litre is 3-5 minutes, for 2 litres 6-10 minutes and for 3 litres 9-14 minutes.
|
Low |
|
|
|
Mid |
|
|
High |
|
|
|
|
|
|
|
|
|
Wattage |
400 |
800 |
1000 |
1200 |
1400 |
1600 |
1800 |
2000 |
(W) |
|
|
|
|
|
|
|
|
Temperature |
80 |
120 |
140 |
160 |
180 |
200 |
220 |
240 |
(°C) |
|
|
|
|
|
|
|
|
Quick start cooking (manual mode)
1 Put the mains plug in the wall socket.
,The appliance produces a 2-second beep.
, The display shows ‘----’.
2 Place the cookware on the cooking zone.
3 Press the Power on/off button once to switch on the appliance.
, The power-on light goes on and the display shows the power bar and the default setting of 1400W.
4 If you want to adjust the power level, press the + and - buttons.
Note:You can also adjust the power level during cooking.
5 If you want to adjust the cooking time:

12 English
- Press the Hr:Min button.
- Adjust the time with the + and - buttons.
Note:When you press the + and - buttons briefly,the time increases or decreases by 1 minute.When you press the buttons longer, the time increases or decreases by 5 minutes.
Note:You can also adjust the cooking time during cooking.
6 Press the Start button to start cooking.
If you do have not set a cooking time and/or power level, the appliance starts cooking at the default settings (a cooking time of 5 minutes and a power level of 1400W).
, The appliance starts cooking.
,During cooking, the fan switches on to keep the appliance cool. When you switch off the appliance, the fan remains on for approx. 1 minute and then switches off automatically.
, During cooking, the display shows the power bar and power level.
, If you have set a cooking time, the display shows the remaining cooking time.
, When the cooking time has elapsed, the appliance beeps a few times. The appliance automatically switches off and the power-on light goes out.
Note: If you want to stop cooking, press the Power on/off button.The appliance then switches off.
7 Unplug the appliance after cooking.
Using the preset cooking modes
You can choose between 8 preset cooking modes.
English 13
Put the mains plug in the wall socket and press the Power on/off button to switch on the appliance.
The power-on light goes on and the display shows the power bar and the default power level (1400W).
2 Press the button of the preset mode you want to use.
Note:Before you press the Start button to confirm the selected mode,you can still switch to any other preset mode. If you want to switch to a different preset mode after you have pressed the start button, you have to switch off the appliance by pressing the Power on/off button.Then press the Power on/off button again to switch the appliance back on and select the desired preset mode.
The indicator light above the button goes on.
The corresponding mode symbol appears on the display.
3If you want to start cooking at the default setting of the selected preset mode, continue with step 6.
See the default settings and cooking time table above for the default settings in the different cooking modes.
If you want to adjust the power level or cooking temperature, press the + and - buttons.
Certain settings cannot be adjusted. See the table above for information about the settings that can or cannot be adjusted in the preset modes. If the power level is adjustable,‘W’ is shown on the display and the power level flashes. If the temperature is adjustable,‘C’ appears on the display.
Note:You can also adjust the power level or cooking temperature during cooking.
5 If you want to adjust the cooking time:

14 English
Press the Hr:Min button.
Adjust the time with the + and - buttons.
Note:When you press the + and - buttons briefly,the time increases or decreases by 1 minute.When you press the buttons longer, the time increases or decreases by 5 minutes.
Note:You can also adjust the cooking time during cooking.
Press the Start button.
The induction cooker automatically starts operating according to the selected mode.
,During cooking, the fan switches on to keep the appliance cool.
When you switch off the appliance, the fan remains on for approx. 1 minute and then switches off automatically.
The display shows the remaining cooking time.
When the cooking time has elapsed, the appliance beeps a few times. The appliance automatically switches off and the power-on light goes out.
Note: If you want to stop cooking, press the Power on/off button.The appliance then switches off.
Using the timer
You can use the Timer button to set the time at which you want the appliance to start cooking at a preset cooking mode.
For example: if it is 14:00 hours and you want the appliance to start cooking at 18:00 hours, set the timer to 4.00 (4 hours) and press the Start button.After 4 hours, at 18:00 hours, the appliance automatically starts cooking.
You can use the timer function for the Stew, Soup/Congee, Steam-Lo and
Steam-Hi modes.
You can set a start time of 5 minutes to 12 hours.
1 Follow steps 1 to 5 of section ‘Using the preset cooking modes’.
Loading...