


4
EXTERIOR
Panoramic sunroof
This roof provides incomparable visibility and light in the passenger compartment.
 105
105
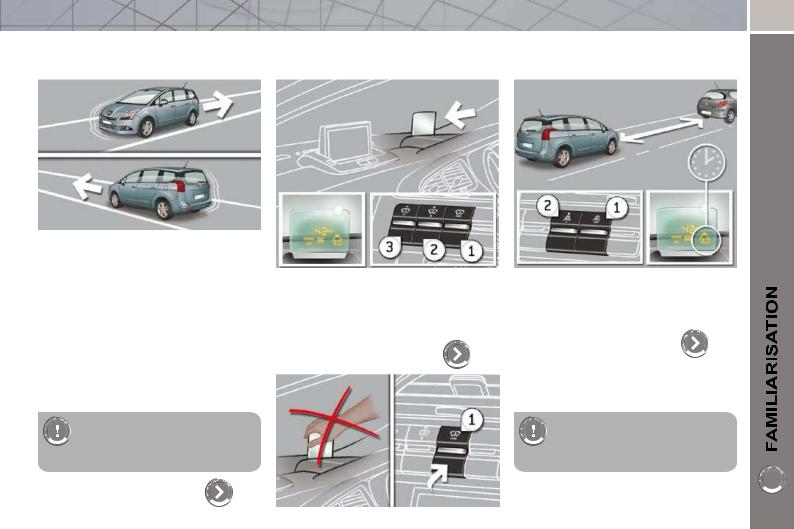
Welcome lighting
This additional exterior and interior lighting, controlled remotely, makes your approach to the vehicle easier when the light is poor.
 90
90
Directional lighting
This lighting automatically provides additional visibility when cornering.
 92
92

5
EXTERIOR
When washing your vehicle in a car wash:
- remove the aerial,
Parking space sensor
- fold back the mirrors.
This system measures the size of the parking space available between two vehicles or obstacles.
 162
162
Temporary puncture repair kit
This kit is a complete system, consisting of a compressor and an integrated sealant product, for the temporary repair of a tyre.
 172
172
Visual and audible front and/or rear parking sensors
This system warns you if an obstacle is detected behind or in front of the vehicle in reverse or forward gear.
 160
160

6
OPENING
Remote control key |
Welcome lighting |
Fuel tank |
A. Unfolding/Folding the key. |
When the light is poor, detected by a sen- |
1. Opening the fuel fi ller fl ap. |
|||
|
sor, the remote switching on of the dipped |
2. Opening and hooking the fuel fi ller |
|||
Normal locking |
beam headlamps and sidelamps makes |
cap. |
|
|
|
your approach to the vehicle easier. |
|
|
|||
(press once; fi xed lighting of |
|
|
|
||
This function can be programmed via |
|
|
|
||
the direction indicators). |
The type of fuel to be used is indicated |
||||
the confi guration menu. |
|||||
|
|||||
|
|
on the inner face of the fuel fi ller fl ap. |
|||
or |
|
Capacity of |
the |
tank: approximately |
|
|
60 litres. |
|
|
||
|
90 |
|
|
||
Deadlocking the vehicle |
|
|
|
||
|
|
|
|
||
(press twice in succession; |
|
|
|
86 |
|
fi xed lighting of the direction |
|
|
|
||
|
|
|
|
||
indicators). |
|
|
|
|
|
|
|
On |
Diesel |
vehicles, the fuel |
|
Complete or selective unlock- |
|
fi ller neck incorporates a mis- |
|||
ing of the vehicle |
|
fuel |
prevention device which |
||
(rapid fl ashing of the direction |
|
prevents fi lling with petrol. |
|||
|
|
|
|
||
indicators). |
|
|
|
|
|
73 |
|
This equipment will become available |
|||
|
during the year. |
|
|||

OPENING
Boot |
Panoramic sunroof |
1. |
Unlocking the vehicle. |
1. |
Opening the blind. |
|
2. |
Closing the blind. |
|||
2. |
Opening the boot. |
|||
|
|
|||
|
84 |
|
105 |
8
INTERIOR
Head-up display |
Electric parking brake |
|
This combines the functions of auto- |
||
This system projects certain information |
||
matic application on switching off the |
||
into the fi eld of vision of the driver: speed, |
||
engine and automatic release on accel- |
||
cruise control/speed limiter and Distance |
eration. |
|
alert. |
||
Manual application/release is possible. |
||
|
||
144 |
|
|
|
136 |
Audio and communication systems
This equipment benefi ts from the latest technology: MP3 compatible Peugeot Connect Sound, Peugeot Connect USB, Bluetooth, Peugeot Connect Navigation or Peugeot Connect Media with 16/9 retractable colour screen, JBL audio system, auxiliary sockets.
|
|
|
|
Dual-zone digital air conditioning |
|
Peugeot Connect |
217 |
Peugeot |
240, |
This system allows different levels of |
|
300 |
comfort to be set for the driver and front |
||||
Media |
|
Connect USB |
|||
|
|
passenger. It then controls these levels |
|||
|
|
|
245, |
||
Peugeot Connect |
261 |
Bluetooth |
automatically according to the ambient |
||
281, |
conditions. |
||||
Navigation |
|
|
303 |
|
|
Peugeot |
293 |
PEUGEOTAssistance |
213 |
59 |
|
|
Connect Sound
9
INSTRUMENTS AND CONTROLS
1. Audio and telematics system steering mounted control stalk.
2. Steering lock and ignition.
3. Wipers/screenwash/trip computer control stalk.
4. Instrument panel.
5. Driver’s airbag. Horn.
6. Gear lever.
7. Electric parking brake.
8. 12 V accessories socket.
9. Centre console.
10. Panoramic sunroof control.
11. Handbook storage compartment.
12. Manual headlamp adjustment.
Instrument panel navigator associated with the Peugeot Connect Media.
13. Alarm button.
Parking sensors button.
Dynamic stability control button (ESP/ASR).
14. Door mirror controls. Electric window controls. Child lock.
15. Front door window demist/defrost vent.
16. Windscreen demist/defrost vent.

10
INSTRUMENTS AND CONTROLS
1. Steering wheel adjustment.
2. Cruise control/speed limiter switches.
3. Lighting and direction indicator control stalk.
4. Central adjustable air vents.
5. Head-up display.
6. Multifunction screen.
7. Passenger’s airbag.
8. Side adjustable air vent.
9. Glove box - Audio/video sockets - Passenger’s airbag deactivation.
10. Bonnet release.
11. 12 V accessories socket.
12. Heating/air conditioning controls.
13. Audio and telematics system.
14. Buttons:
- head-up display,
- hazard warning lamps, - Distance alert,
- central locking.

11
SITTING COMFORTABLY
Driver's seat
Forwards-backwards |
Height |
Seat back angle |
Manual adjustment
62
Electric adjustment
63

12
SITTING COMFORTABLY |
Steering wheel adjustment |
Centre console |
Front seats
Head restraint height and angle
1. Releasing the adjustment mechanism. |
This has a large storage area (with re- |
|
2. Adjustment of height and reach. |
cesses for 2 bottles, ...) for the front |
|
passengers and, according to version, |
||
3. Locking the adjustment mechanism. |
||
a multimedia system for the rear pas- |
||
|
sengers. |
|
Lumbar |
|
|
As a safety precaution, these operations |
101, |
|
must only be carried out when stationary. |
104 |
|
72 |
|
 64
64

13
SITTING COMFORTABLY |
Rear view mirror |
Front seat belts |
Door mirrors
|
Manual model |
||
|
1. |
Selection of the "day" position of the 1. Fastening the buckle. |
|
Adjustment |
|
mirror. |
|
2. Adjustment of the mirror. |
|||
|
|||
A. Selection of the mirror to be adjusted. |
|
|
|
B. Adjustment of the position of the |
|
72 |
|
mirror in the four directions. |
|
|
|
71 |
|
|
|
Also...
2. Height adjustment.
C. Folding/
Unfolding.
128
Automatic day/night model 1. Adjustment of the mirror.
 72
72
14
SEEING CLEARLY
Lighting |
Direction indicators |
Wipers |
Ring A |
Raise or lower the lighting stalk passing |
Stalk A: windscreen wipers |
|
|
the point of resistance; the corresponding |
|
|
Lighting off. |
direction indicators will fl ash for as long as |
Switching on "AUTO" |
|
Automatic illumination of |
the stalk remains in this position. |
Press the stalk down and release it. |
|
|
|||
|
|
||
headlamps. |
|
|
|
Sidelamps. |
"Motorway" function |
Switching off "AUTO" |
|
Dipped/main beam headlamps. |
Press the lighting stalk up or down once, |
Push the stalk up and return it to |
|
without passing the point of resistance; |
position "0". |
||
|
|||
|
the corresponding direction indicators |
|
|
88 |
will fl ash three times. |
93 |
|
|
This function can be used at any speed, |
||
|
|
||
Ring B |
but it is particularly useful when chang- |
|
|
|
ing lane on high-speed roads. |
|
|
Rear foglamp. |
|
Ring B: rear wiper |
|
|
|
||
|
|
Park. |
|
or |
124 |
Intermittent wipe. |
|
Front and rear foglamps. |
|
Wash-wipe. |
|
|
|
||
89 |
|
94 |
|
|
|

VENTILATION
Recommended interior settings
|
Heating or Manual Air Conditioning |
|
|||
I require... |
Air flow |
Air recirculation/ |
|
|
|
Air distribution |
Temperature |
Manual A/C |
|||
Intake of outside air |
|||||
|
|
|
|
||
HOT |
COLD |
DEMISTING |
DEFROSTING |
Digital air conditioning: we recommend use of the fully automatic mode by pressing the "AUTO" button.

16
MONITORING |
|
Switch panels |
Instrument panel |
Warning lamps |
Lower |
Lighting of the indicator lamp indicates the status of the corresponding function.
|
|
|
|
A. Parking space sensors. |
162 |
|
|
|
|
|
B. Interior protection alarm. |
78 |
|
|
|
|
|
C. Visual and audible |
160 |
|
|
|
|
|
|
parking sensors. |
|
|
|
|
|
D. ESP OFF. |
126 |
|
|
|
|
|
E. Child lock. |
123 |
|
A. With the ignition on, the needle 1. |
With the ignition on, the orange and |
Central |
|
|||
should indicate the level of fuel re- |
|
|
red warning lamps come on. |
|
||
|
|
|
|
|
||
maining. |
2. |
With the engine running, these |
|
|
|
|
B. With the engine running, its associ- |
|
|
|
|||
|
|
warning lamps should go off. |
|
|
|
|
ated low level warning lamp should |
If warning lamps remain on, refer to the |
|
|
|
||
go off. |
|
|
|
|||
page concerned. |
|
|
|
|||
C. With the ignition on, the oil level in- |
|
|
|
|||
|
|
|
|
|
|
|
dicator should display "OIL OK" for |
|
|
|
|
|
|
a few seconds. |
|
|
26 |
F. |
Head-up display. |
144 |
If the levels are not correct, top up the |
|
|
|
|||
levels which are low. |
|
|
|
|
|
|
24 |
|
|
|
G. Hazard warning lamps. |
124 |
|
|
|
|
|
|
|
|
|
|
|
|
H. Distance alert. |
146 |
|
|
|
|
|
I. |
Central locking. |
74 |
|
|
|
|
|||
17
PASSENGER SAFETY |
|
|
Passenger's front airbag |
|
Child lock |
|
||
|
front airbag |
(locking of the rear doors) |
1. Insert the key. |
A. Front and/or rear seat belts not fas- |
Lighting of the indicator lamp indicates |
2. Select the position: |
tened/unfastened warning lamp. |
the status of the corresponding function. |
B. Front left seat belt warning lamp. |
|
|
"OFF" (deactivation), with "rear fac- |
|
|
ing" child seat, |
C. Front right seat belt warning lamp. |
123 |
"ON" (activation), with front passen- |
D. Rear right seat belt warning lamp. |
|
ger or "forwards facing" child seat. |
E. Rear centre seat belt warning lamp. |
|
3. Remove the key keeping the switch |
|
|
F. Rear left seat belt warning lamp. |
|
|
in the new position. |
|
|
G. Passenger's front airbag deactivated |
|
|
|
|
|
|
warning lamp. |
|
|
H. Passenger's front airbag activated |
|
133 |
warning lamp. |
|
|
129 |
|
7 seat version (3rd row)
I. Rear right seat belt warning lamp.
J. Rear left seat belt warning lamp.

18
ARRANGING YOUR SEATS |
7 SEAT VERSION |
Folding the seats in the |
Putting the seats back in place Access to the 3rd row seats |
2nd row |
|
Raise the seat back and push it rearwards until it locks.
Pull the strap A upwards fi rmly to re- Rigid panel |
Close the aircraft style tables on the |
lease the seat and continue to pull |
2nd row seats if they are open. |
until the seat is fully folded. |
Hold the control D up, the seat is |
|
released and the seat base rises to |
|
the seat back. |
|
Push the seat back forwards, hold- |
From the boot |
ing the control D forwards. |
Pull the strap B to release the seat |
|
and push the seat back forwards |
|
gently. |
|
67 |
68 |
After folding the seats, slide the catch C.
 68
68

19
ARRANGING YOUR SEATS (7 SEAT VERSION)
Changing from 5 to 7 seats
Place the rigid panels of the 2nd row seats upright and lock them then fold the concertina boards rearwards.
Remove the load space cover and store it in its housing.
Pull the strap E and guide the seat |
Lower the head restraints and place |
until the assembly locks. |
the concertina board in the vertical |
Fold the concertina boards forwards. |
position behind the seat. |
|
While pulling the strap F, push the |
|
seat back forwards gently. |
|
Remove the load space screen from |
69, |
its storage compartment and position |
108 |
it behind the 2nd row seats. |
|
69, |
|
108 |
20
DRIVING SAFELY
Electric parking brake
Manual application/release |
|
Automatic application/release |
|
|
|
Before getting out of the |
|||||
The parking brake |
can |
be |
applied |
Press the accelerator, press and and re- |
|
|
|
vehicle, |
check that the |
||
|
|||||||||||
|
|
|
braking |
warning lamp |
|||||||
manually by pulling the control lever A. |
lease the clutch (manual gearbox), the |
|
|
|
|||||||
|
|
|
(red!) and the warning |
||||||||
When the ignition |
is on, |
the |
parking |
parking brake is released automatically |
|
|
|
||||
lamp P, located in the control lever A |
|||||||||||
and progressively on acceleration. |
|||||||||||
brake can be released manually by |
|||||||||||
are on fi xed (not fl ashing). |
|||||||||||
With the vehicle stationary, when the |
|||||||||||
pressing the brake pedal and pulling |
|
|
|
|
|
||||||
then releasing the control lever A. |
engine is switched off, the parking |
|
|
|
|
|
|||||
|
|
|
|
brake is applied automatically. |
|
|
|
|
|
||
|
|
|
|
|
If this warning lamp is on in |
|
|
|
|
|
|
|
|
|
|
|
|
|
|
|
|
||
|
|
|
|
|
the instrument panel, the auto- |
|
|
If you are towing a trailer or a |
|||
|
|
|
|
|
matic application/release is de- |
|
|
||||
|
|
|
|
|
|
|
caravan or if the gradient is like- |
||||
|
|
|
|
|
activated, in this case use the |
|
|
||||
|
|
|
|
|
|
|
ly to change (transport by ship, |
||||
|
|
|
|
|
manual application/release. |
|
|
||||
|
|
|
|
|
|
|
lorry, towing, ...), apply the park- |
||||
|
|
|
|
|
|
|
|
||||
|
|
|
|
|
|
ing brake manually to maximum force |
|||||
|
|
|
|
|
When the door is opened with |
(long pull on control lever A) to immo- |
|||||
|
|
|
|
|
the engine running an audible |
bilise the vehicle. |
|
||||
signal is heard, apply the parking brake manually.
Do not leave a child alone in the ve- |
|
hicle with the ignition on, they could |
|
release the parking brake. |
136 |
|
21
DRIVING SAFELY
Hill start assist |
Head-up display |
Distance alert |
Your vehicle is equipped with a system |
|
|
|
|
|
which keeps it immobile for a short time |
|
|
|
|
|
(approximately 2 seconds) to assist you |
|
|
|
|
|
when starting on a hill, the time required |
1. |
Head-up display on/off. |
1. |
Distance alert on/off. |
|
for you to move your foot from the brake |
|||||
2. |
Brightness adjustment. |
2. |
Alert value increase/decrease. |
||
pedal to the accelerator pedal. |
|||||
This system only operates: |
3. |
Display height adjustment. |
|
|
|
- when the vehicle has been com- |
|
|
|
|
|
pletely stopped with your foot on the |
|
|
|
146 |
|
brake pedal, |
|
|
144 |
||
|
|
|
|||
- on certain gradients, |
|
|
|
||
|
|
|
|
||
- when the driver's door is closed. |
|
|
|
|
|
Do not get out of the vehicle |
|
|
|
The adjustments must be |
|
during the hill start assist tem- |
|
|
|
made with the engine running |
|
porary holding phase. |
|
|
|
and the vehicle stationary. |
|
141 |
|
|
|
|
22
DRIVING SAFELY
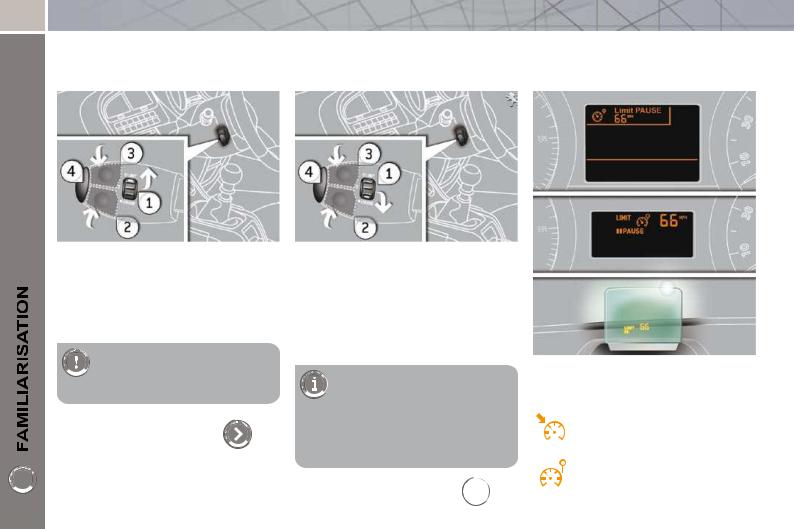
Speed limiter "LIMIT" |
Cruise control "CRUISE" |
Display in the instrument panel |
1. |
Limiter mode Selection/Off. |
1. |
Cruise control mode Selection/Off. |
|
|
|
2. |
Decrease the programmed value. |
2. |
Programme a speed/Decrease the |
|
|
|
3. |
Increase the programmed value. |
|
programmed value. |
|
|
|
3. Programme a speed/Increase the |
|
|
|
|||
4. |
Speed limiter On/Off. |
|
|
|
||
|
programmed value. |
|
|
|
||
|
|
|
|
|
|
|
|
|
4. |
Cruise control Off/Resume. |
|
|
|
|
The values must be set with |
|
|
|
|
|
|
the engine running. |
|
|
The cruise control or speed limiter mode |
||
|
|
|
In order to be programmed or |
|||
|
|
|
appears on the instrument panel when |
|||
|
|
|
activated, the vehicle speed |
it is selected. |
||
|
|
|
must be higher than 25 mph |
|
|
|
|
|
(40 km/h), with at least fourth gear en- |
|
|
|
|
|
|
gaged on the manual gearbox (second |
|
|
Cruise control |
|
|
148 |
gear for the 6-speed electronic gear |
|
|
||
|
|
|
||||
|
control gearbox or automatic gearbox). |
|
|
|
||
|
|
|
|
|
||
Speed limiter
 150
150

23
DRIVING SAFELY |
|
6-speed electronic gear control gearbox |
Automatic gearbox |
|
"Tiptronic - Porsche system" |
This 6-speed electronic gear control gearbox offers a choice between the comfort of fully automatic operation or the pleasure of manual gear changing.
This six-speed gearbox offers a choice between the comfort of fully automatic operation or the pleasure of manual gear changing.
1. |
Gear lever. |
3. |
Steering mounted "-" paddle. |
1. |
Gear lever. |
|
2. |
Button "S" (sport). |
|||||
2. |
Button "S" (sport). |
4. |
Steering mounted "+" paddle. |
|||
3. Button "" (snow). |
||||||
|
|
|
|
|||
|
|
Moving off |
Moving off |
|||
|
|
Select position N and press the |
Select position P or N and press the |
|||
|
|
|
brake pedal fi rmly while starting the |
|
brake pedal fi rmly while starting the |
|
|
|
|
engine. |
|
engine. |
|
|
|
Engage fi rst gear (position A or M) |
Select position R, D or M. |
|||
|
|
|
or reverse (position R) using the |
Take your foot off the brake pedal, |
||
gear lever 1. |
then accelerate. |
|
Take your foot off the brake pedal |
||
|
||
then accelerate. |
|
|
|
157 |
|
153 |
|
24
INSTRUMENT PANELS
Panel grouping together the vehicle operation indication dials and warning lamps.
Dials
1. Rev counter.
Indicates the engine speed (x 1 000 rpm).
2. Coolant temperature.
Indicates the temperature of the engine coolant (° Celsius).
3. Fuel level.
Indicates the quantity of fuel remaining in the tank.
4. Speedometer.
Indicates the current speed of the moving vehicle (mph or km/h).
5. Screen.
6. Display zero reset or service indicator re-display button.
Resets the selected function to zero (trip distance recorder or service indicator) or displays the service indicator again.
7. Instrument panel lighting dimmer.
Adjusts the brightness of the lighting of the instruments and controls, if the vehicle lighting is on.
For more information, refer to the paragraph relating to the button or function and its associated display.

25
Screen(s) |
C. Service indicator. |
|
(miles or km) or, |
|
Engine oil level indicator. |
|
or |
|
distance recorder. |
|
(miles or km) |
|
D. 6-speed electronic gear control |
|
or automatic gearbox. |
|
E. Warning messages and function |
|
status messages, trip computer, |
|
GPS navigation information, menus |
|
(with Peugeot Connect Media). |
|
Instrument panel navigator associated |
Controls |
||
|
with the Peugeot Connect Media |
|||
|
There are four buttons to control the large |
|||
|
|
|
|
|
|
|
|
|
16/9 screen in the instrument panel: |
|
|
|
|
1. access the main menu, confi rm the |
|
|
|
|
selection, |
|
|
|
|
2. move up through the menu, |
|
|
|
|
3. move down through the menu, |
|
|
|
|
4. return to the previous display, exit |
|
|
|
|
from the menu. |
A. Speed limiter |
|
|
|
|
or |
This group of buttons permits: |
|
|
|
Cruise control. |
|
|
||
- |
when stationary, confi guration of the |
|
||
(mph or km/h) |
|
|||
B. Trip distance recorder. |
|
vehicle's equipment and the |
screen |
|
|
settings (languages, units...), |
|
|
|
(miles or km) |
|
|
|
|
- |
while driving, scrolling of the |
active |
|
|
|
|
|||
functions (trip computer, navigation...).
The main menu and its associated functions can only be accessed when stationary, via
buttons 1 to 4.
A message appears on the screen, above a certain speed threshold, indicating that the main menu cannot be displayed.
The trip computer displays can only be accessed while driving, via buttons 2 and 3 (refer to the "Trip computer" paragraph).
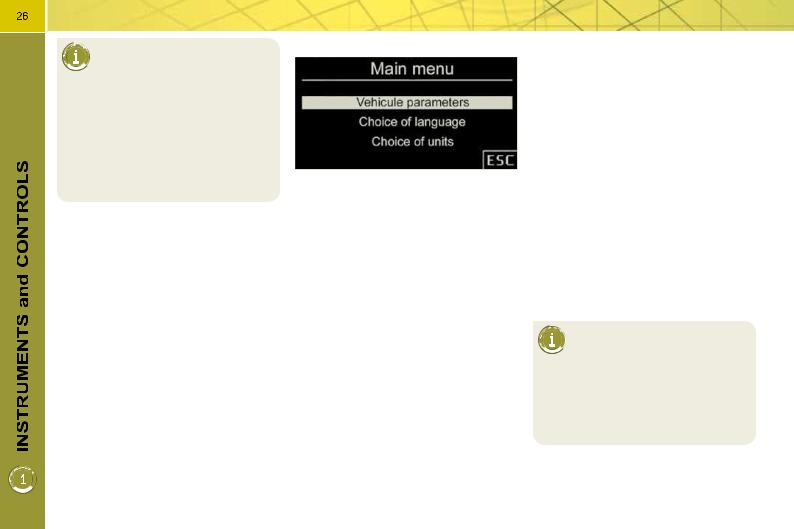
Main menu
Press button 1 for access to the main menu and select one of the following functions:
-"Vehicle parameters",
-"Choice of language",
-"Choice of units".
Press button 2 or 3 to move in the screen.
Press button 1 again to confi rm the selection.
* According to country.
Vehicle parameters
This menu allows you to activate or deactivate certain driving and comfort equipment (according to country):
-wiper linked with reverse gear (refer to the "Visibility" section),
-selective unlocking (refer to the "Access" section),
-guide-me-home and welcome lighting (refer to the "Visibility" section),
-interior mood lighting (refer to the "Visibility" section),
-daytime running lamps (refer to the "Visibility" section),
-directional headlamps (refer to the "Visibility" section),
-automatic or manual parking brake (refer to the "Driving" section).
Choice of language
This menu allows you to select the display language: Deutsch, English, Espanol, Français, Italiano, Nederlands, Portugues, Türkçe*.
Choice of units
This menu allows you to select the units: temperature (°Celsius or °Fahrenheit) and fuel consumption (l/100 km, mpg or km/l).
Indicator and warning lamps
Visual indicators informing the driver that a system is in operation (operation or deactivation indicator lamps) or of the occurrence of a fault (warning lamp).
When the ignition is switched on
Certain warning lamps come on for a few seconds when the vehicle's ignition is switched on.
When the engine is started, these same warning lamps should switch off.
If they remain on, before moving off, refer to the information on the warning lamp concerned.
Associated warnings
The switching on of certain warning lamps may be accompanied by an audible signal and a message on the multifunction screen.
The warning lamps may come
on continuously (fi xed) or fl ash.
Certain warning lamps may come on in two different modes. Only by relating the type of lighting to the operating status of the vehicle can it be ascertained whether the situation is normal or whether a fault has occurred.

The main menu and its associated functions can only be accessed when stationary, via
buttons 1 to 4.
A message appears on the screen, above a certain speed threshold, indicating that the main menu cannot be displayed.
The trip computer displays can only be accessed while driving, via buttons 2 and 3 (refer to the "Trip computer" paragraph).
Main menu
Press button 1 for access to the main menu and select one of the following functions:
-"Vehicle parameters",
-"Choice of language",
-"Choice of units".
Press button 2 or 3 to move in the screen.
Press button 1 again to confi rm the selection.
* According to country.
Vehicle parameters
This menu allows you to activate or deactivate certain driving and comfort equipment (according to country):
-wiper linked with reverse gear (refer to the "Visibility" section),
-selective unlocking (refer to the "Access" section),
-guide-me-home and welcome lighting (refer to the "Visibility" section),
-interior mood lighting (refer to the "Visibility" section),
-daytime running lamps (refer to the "Visibility" section),
-directional headlamps (refer to the "Visibility" section),
-automatic or manual parking brake (refer to the "Driving" section).
Choice of language
This menu allows you to select the display language: Deutsch, English, Espanol, Français, Italiano, Nederlands, Portugues, Türkçe*.
Choice of units
This menu allows you to select the units: temperature (°Celsius or °Fahrenheit) and fuel consumption (l/100 km, mpg or km/l).
Indicator and warning lamps
Visual indicators informing the driver that a system is in operation (operation or deactivation indicator lamps) or of the occurrence of a fault (warning lamp).
When the ignition is switched on
Certain warning lamps come on for a few seconds when the vehicle's ignition is switched on.
When the engine is started, these same warning lamps should switch off.
If they remain on, before moving off, refer to the information on the warning lamp concerned.
Associated warnings
The switching on of certain warning lamps may be accompanied by an audible signal and a message on the multifunction screen.
The warning lamps may come
on continuously (fi xed) or fl ash.
Certain warning lamps may come on in two different modes. Only by relating the type of lighting to the operating status of the vehicle can it be ascertained whether the situation is normal or whether a fault has occurred.

27
Operation indicator lamps
If one of the following indicator lamps comes on, this confirms that the corresponding system has come into operation.
Warning lamp |
is on |
Cause |
Action/Observations |
|
Left-hand |
fl ashing |
The lighting stalk is pushed |
|
|
direction |
|
|||
with buzzer. |
down. |
|
||
indicator |
|
|||
|
|
|
||
Right-hand |
fl ashing |
|
|
|
direction |
The lighting stalk is pushed up. |
|
||
with buzzer. |
|
|||
indicator |
|
|
|
|
Sidelamps |
fi xed. |
The lighting stalk is in |
|
|
the "Sidelamps" position. |
|
|||
|
|
|
||
Dipped beam |
fi xed. |
The lighting stalk is in the |
|
|
"Dipped beam headlamps" |
|
|||
headlamps |
|
|||
|
position. |
|
||
|
|
|
||
Main beam |
fi xed. |
The lighting stalk is pulled |
Pull the stalk to return to dipped beam |
|
headlamps |
towards you. |
headlamps. |
||
|
||||
Front |
fi xed. |
The front foglamps are |
Turn the ring on the stalk rearwards twice |
|
foglamps |
switched on. |
to switch off the front foglamps. |
||
|
||||
Rear |
fi xed. |
The rear foglamps are |
Turn the ring on the stalk rearwards to switch off |
|
foglamps |
switched on. |
the rear foglamps. |
||
|
28
|
Warning lamp |
is on |
Cause |
Action/Observations |
|
|
|
|
Wait until the warning lamp has switched off |
|
Diesel engine |
fi xed. |
The ignition switch is at the |
before starting. |
|
pre-heating |
2nd position (ignition on). |
The duration for which the warning lamp is on is |
|
|
|
|||
|
|
|
|
determined by the climatic conditions. |
|
|
|
|
Release the electric parking brake to switch off |
|
|
|
|
the warning lamp: with your foot on the brake |
|
Electric |
fi xed. |
The electric parking brake is |
pedal, pull the electric brake control. |
|
||||
|
|
|||
|
parking brake |
applied. |
Observe the safety recommendations. |
|
|
|
|||
|
|
|
|
For further information about the electric parking |
|
|
|
|
brake, refer to the "Driving" section. |
|
Deactivation |
|
The "automatic application" |
|
|
of the |
|
|
|
|
|
(on switching off the engine) |
Activate the function (according to country) via |
|
|
automatic |
|
||
|
fi xed. |
and "automatic release" |
the vehicle confi guration menu or contact a |
|
|
functions of |
|||
|
|
functions are deactivated or |
PEUGEOT dealer. |
|
|
the electric |
|
||
|
|
faulty. |
|
|
|
parking brake |
|
|
|
|
|
|
|
|
|
|
|
|
Press the brake pedal to start the engine with |
|
|
|
|
the 6-speed electronic gear control gearbox |
|
|
|
The brake pedal must be |
(lever in position N) or automatic gearbox |
|
|
fi xed. |
(lever in position P). |
|
|
|
pressed. |
||
|
|
|
If you wish to release the parking brake without |
|
|
|
|
|
|
|
Foot on the |
|
|
pressing the brake pedal, this warning lamp will |
|
|
|
remain on. |
|
|
brake pedal |
|
|
|
|
|
|
In the case of an electronic |
|
|
|
fl ashing. |
gear control gearbox, if you |
Use the brake pedal and/or the electric parking |
|
|
hold the vehicle on an incline |
||
|
|
brake. |
||
|
|
|
using the accelerator for too |
|
|
|
|
|
|
|
|
|
long, the clutch overheats. |
|
|
|
fi xed. |
The parking space sensors |
Press the corresponding button to deactivate it. |
|
Parking space |
function is active. |
||
|
|
|
||
|
sensors |
fl ashing. |
The system is measuring the space. |
|
|
|
|

29
Deactivation indicator lamps
If one of the following indicator lamps comes on, this confi rms that the corresponding system has been switched off intentionally.
This is may be accompanied by an audible signal and a message on the multifunction screen.
Warning lamp |
is on |
Cause |
Action/Observations |
|
|
|
The control, located in the |
Set the control to the ON position to activate the |
|
|
|
glove box, is set to the OFF |
||
|
|
passenger's front airbag. In this case, do not fi t |
||
Passenger's |
|
position. |
||
fi xed. |
The passenger's front airbag |
a child seat in the rear-facing position. |
||
airbag system |
The passenger's airbag system is put into |
|||
|
is deactivated. |
|||
|
|
service automatically when the vehicle is started |
||
|
|
In this case you can install a |
||
|
|
(ON position). |
||
|
|
"rear facing" child seat. |
||
|
|
|
||
|
|
The button, located at the |
|
|
|
|
bottom right of the dashboard, |
Press the button to activate the ESP/ASR. |
|
|
|
is pressed. Its indicator lamp |
Its indicator lamp switches off. |
|
ESP/ASR |
fi xed. |
is on. |
The ESP/ASR system is activated automatically |
|
The ESP/ASR is deactivated. |
||||
when the vehicle is started. |
||||
|
|
|||
|
|
ESP: electronic stability |
If it has been deactivated, the system is reactivated |
|
|
|
programme. |
automatically from approximately 30 mph (50 km/h). |
|
|
|
ASR: anti-skid regulation. |
|
30
Warning lamps
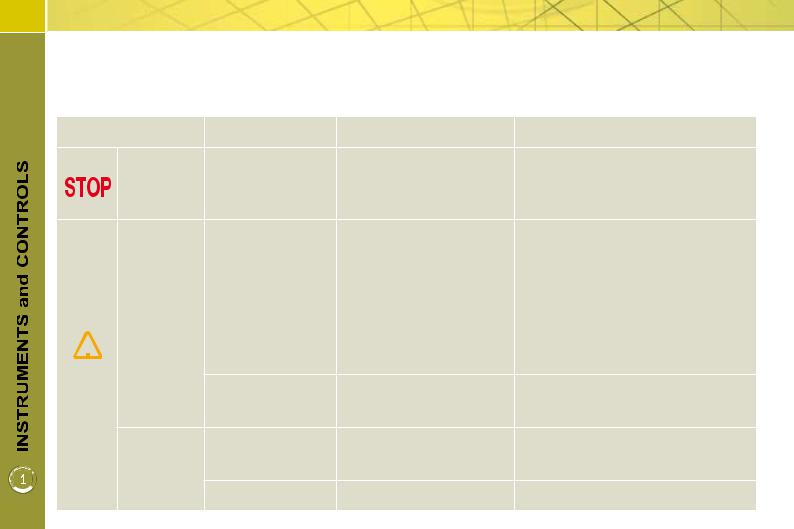
When the engine is running or the vehicle is being driven, the switching on of one of the following warning lamps indicates a fault which requires action on the part of the driver.
Any fault resulting in the switching on of a warning lamp must be investigated further by reading the associated message on the multifunction screen.
If you encounter any problems, do not hesitate to contact a PEUGEOT dealer.
Warning lamp |
is on |
Cause |
|
Action/Observations |
|
|
fi xed, alone or associated |
Illumination of this warning |
Stop as soon as it is safe to do so as |
||
|
lamp is associated with a |
||||
|
|
|
|||
|
with another warning |
serious braking system, |
there is a risk that the engine will cut out |
||
STOP |
lamp, accompanied by |
while driving. |
|||
power steering, engine |
|||||
|
an audible signal and a |
Park, switch off the ignition and call a |
|||
|
lubrication or cooling system |
||||
|
message on the screen. |
PEUGEOT dealer. |
|||
|
fault or a punctured tyre. |
||||
|
|
|
|
||
|
|
|
Identify the fault by reading the message |
||
|
|
|
shown in the screen, such as, for example: |
||
|
|
|
- the closing of the doors, boot or bonnet, |
||
|
|
|
- the engine oil level, |
||
|
|
A minor fault has occurred |
- |
the screenwash level, |
|
|
temporarily. |
for which there is no specifi c |
- the remote control battery, |
||
|
|
warning lamp. |
- |
the tyre pressures, |
|
Service |
|
|
|||
|
|
- saturation of the particle emission |
|||
|
|
|
|
fi lter (Diesel). |
|
|
|
|
|
||
|
|
|
For any other faults, contact a |
||
|
|
|
|||
|
|
|
PEUGEOT dealer. |
||
|
fi xed. |
A major fault has occurred |
Identify the fault by reading the message |
||
|
for which there is no specifi c |
shown on the screen and contact a |
|||
|
|
warning lamp. |
PEUGEOT dealer. |
||
|
fi xed, associated |
This indicates the start of |
As soon as traffi c conditions allow, |
||
(PEF: |
temporarily with a |
regenerate the fi lter by driving at a |
|||
saturation of the particle |
|||||
message on the risk of |
speed of at least 35 mph (60 km/h) until |
||||
particle |
emissions fi lter. |
||||
emissions |
blockage of the PEF. |
|
the service warning lamp goes off. |
||
filter, Diesel) |
fi xed. |
This indicates the low level in |
Have the level topped up by a |
||
|
|||||
|
the Diesel additive reservoir. |
PEUGEOT dealer as soon as possible. |
|||
|
|
||||
31
|
Warning lamp |
is on |
Cause |
Action/Observations |
|
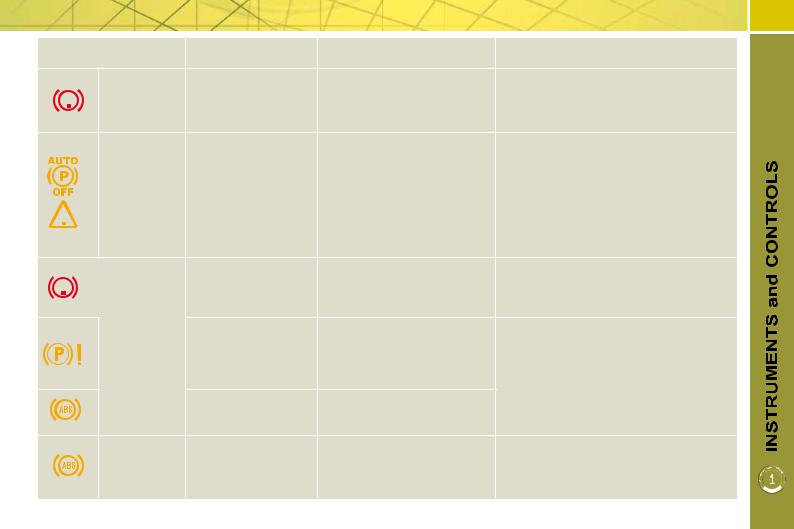
Electric |
|
The application or release |
You must stop as soon as it is safe to do so. |
|
fl ashing. |
Park on level ground, switch off the |
||
|
parking |
of the electric parking brake |
||
|
ignition and contact a PEUGEOT dealer |
|||
|
brake |
|
was interrupted. |
|
|
|
or a qualifi ed workshop. |
||
|
|
|
|
|
|
|
|
|
Automatic application/release is no |
|
|
|
|
longer possible. |
|
|
|
|
Contact a PEUGEOT dealer or a |
|
Electric |
|
The electric parking brake |
qualifi ed workshop without delay. |
|
fi xed. |
The parking brake can be released |
||
|
+ parking brake |
|||
|
has a fault. |
|||
|
fault |
|
manually using the emergency release |
|
|
|
|
procedure. |
|
|
|
|
|
|
|
|
|
|
For more information on the electric |
|
|
|
|
parking brake, refer to the "Driving" |
|
|
|
|
section. |
|
|
|
The braking system |
Top up with brake fl uid recommended by |
|
|
|
PEUGEOT. |
|
|
|
fi xed. |
fl uid level has dropped |
|
|
|
|
signifi cantly. |
If the problem persists, have the system |
|
|
|
|
checked by a PEUGEOT dealer. |
|
|
fi xed, associated with |
|
Stop as soon as it is safe to do so. |
|
Braking |
the electric parking |
The braking system has a |
|
|
brake fault warning |
Park, switch off the ignition and contact |
||
|
+ |
fault. |
||
|
|
lamp, if the parking |
a PEUGEOT dealer. |
|
|
|
|
||
|
|
brake is released. |
|
|
|
|
fi xed, associated |
The electronic brake force |
|
|
+ |
with the ABS warning |
distribution (EBFD) system |
Have it checked by a PEUGEOT dealer. |
|
|
lamp. |
has a fault. |
|
|
Anti-lock |
|
|
The vehicle retains conventional braking. |
|
Braking |
fi xed. |
The anti-lock braking system |
|
|
Drive carefully at reduced speed and |
|||
|
System |
has a fault. |
||
|
|
contact a PEUGEOT dealer without delay. |
||
|
(ABS) |
|
|
|
|
|
|
|

32
Warning lamp |
is on |
Cause |
Action/Observations |
|
|
|
fl ashing. |
The ESP/ASR regulation is |
The system optimises traction and |
|
|
improves the directional stability of |
||
|
Dynamic |
active. |
||
|
|
the vehicle. |
||
|
|
|
||
|
stability |
|
|
|
|
control |
|
Unless it has been |
|
|
(ESP/ASR) |
fi xed. |
deactivated with the indicator |
Have it checked by a PEUGEOT dealer. |
|
|
|||
|
|
|
lamp on the button on, the |
|
|
|
|
ESP/ASR system is faulty. |
|
|
|
|
|
This lamp should switch off when the |
|
|
fi xed. |
The emission control system |
engine is started. |
|
Engine |
has a fault. |
If it does not switch off, contact a |
|
|
|
|||
|
autodiagnosis |
|
|
PEUGEOT dealer urgently. |
|
system |
|
|
Risk of destruction of the catalytic convertor. |
|
|
fl ashing. |
The engine management |
|
|
|
system has a fault. |
Have it checked by a PEUGEOT dealer. |
|
|
|
|
||
|
|
|
|
Refuel as soon as possible to avoid |
|
|
|
|
running out of fuel. |
|
|
|
When it fi rst comes on there |
This warning lamp will come on every |
|
Low fuel |
fi xed with the needle |
remains approximately 6 litres |
time the ignition is switched on, until a |
|
of fuel in the tank. |
suffi cient addition of fuel is made. |
||
|
level |
in the red zone. |
||
|
At this point, you begin to |
Fuel tank capacity: approximately 60 litres. |
||
|
|
|
||
|
|
|
use the fuel reserve. |
Never continue to drive until you run |
|
|
|
|
|
|
|
|
|
out of fuel, as this could damage the |
|
|
|
|
emission control and injection systems. |
|
|
|
|
Stop as soon as it is safe to do so. |
|
Maximum |
fi xed with the needle |
The temperature of the |
Wait until the engine has cooled down |
|
coolant |
before topping up the level, if necessary. |
||
|
in the red zone. |
cooling system is too high. |
||
|
temperature |
If the problem persists, contact a |
||
|
|
|
||
|
|
|
|
|
|
|
|
|
PEUGEOT dealer. |
|
Engine oil |
fi xed. |
There is a fault with the |
Stop as soon it is safe to do so. |
|
Park, switch off the ignition and contact |
|||
|
pressure |
engine lubrication system. |
||
|
|
a PEUGEOT dealer. |
||
|
|
|
|
|
 Loading...