

Page 1
10
YOUR PARTNER AT A GLANCE
22-12-2003
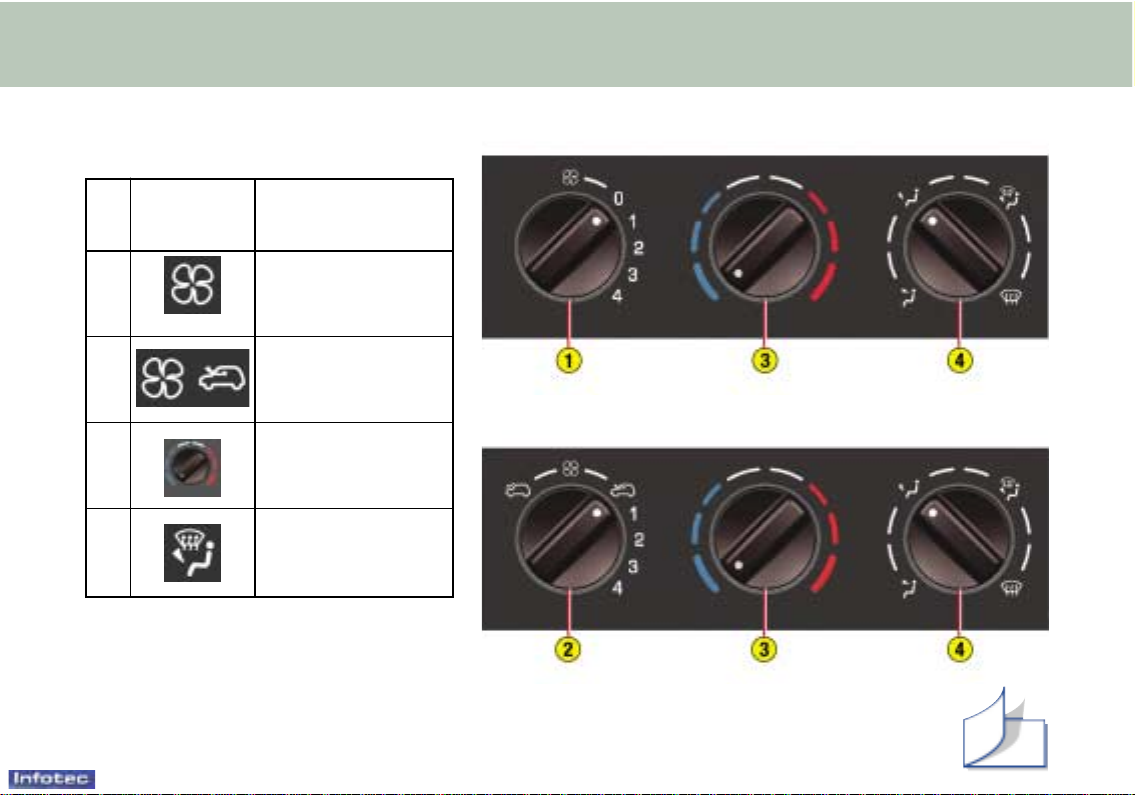
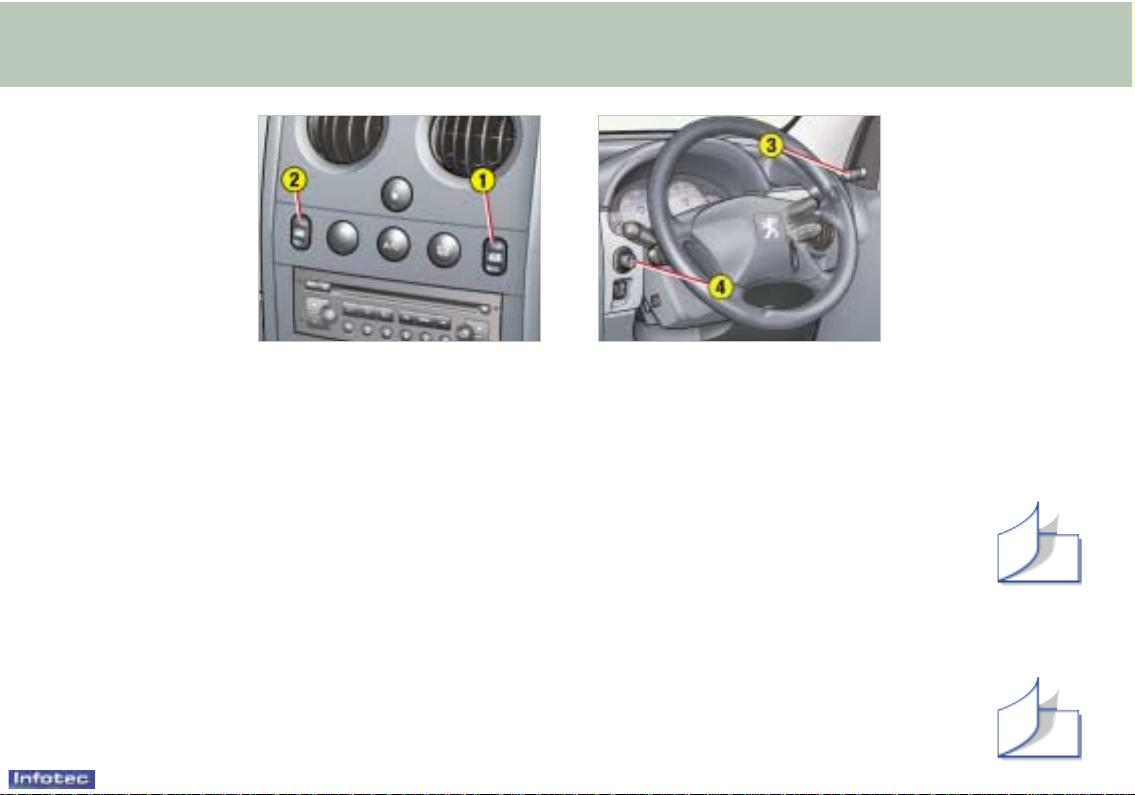
HEATING
N° Symbol Function
Air flow adjustment.1
Air flow adjustment
and air intake control.
2
3
Air distribution
adjustment.
4
Temperature
adjustment.
48
Page 2
PRACTICAL INFORMATION
100
22-12-2003
BATTERY
To charge the battery using a battery charger:
– Disconnect the battery,
– Follow the instructions for use given by the battery charger manufacturer,
– Reconnect starting with the negative (–) terminal,
– Check that the terminals and connectors are clean. If they are covered with
sulphate (white or greenish deposit), disconnect them and clean them.
To start the vehicle from another battery:
– Connect the red cable to the positive (+) terminals of the two batteries,
– Connect one end of the green or black cable to the negative (–) terminal of the
slave battery,
– Connect the other end of the green or black cable to an earth point on the
broken down vehicle as far as possible from the battery.
Operate the starter, let the engine run.
Wait for the engine to return to idle, then disconnect the cables.
– Never disconnect a terminal when the engine is running.
– Never charge a battery without first disconnecting the terminals.
– After every reconnection of the battery, switch on the ignition and
wait 1 minute before starting to allow the electronic systems to be
initialised. If slight difficulties are experienced after this, please
contact a PEUGEOT dealer.
A flat battery will prevent
the engine from starting.
It is advisable to disconnect the battery if the vehicle is not to be used
for a period of more than one month.
ECONOMY MODE FUNCTION
After the engine has stopped, with
the key in the accessories position,
certain functions (windscreen wiper,
electric windows, courtesy lights,
audio equipment etc.) can only be
used for thirty minutes, to prevent
discharging the battery.
Once the thirty minutes are over, the
message "Eco mode active"
appears on the multifunction display
and the active functions are put on
standby.
Page 3
PRACTICAL INFORMATION
101
22-12-2003
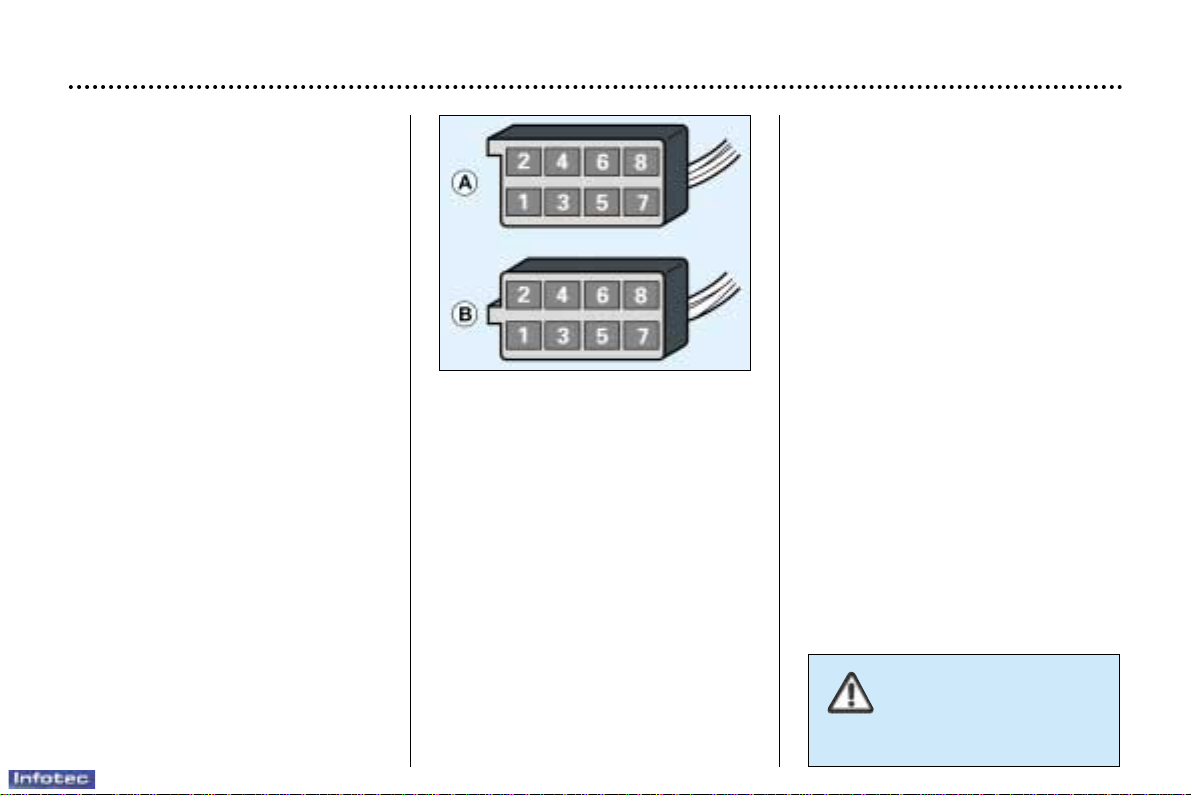
FITTING AUDIO EQUIPMENT
Y our vehicle is equipped with certain
factory-fitted audio equipment:
– roof aerial,
– coaxial aerial cable,
– basic interference suppression,
– supply to front speakers,
– two 8-way connectors.
Making the connections
A1 :–
A2 :–
A3 :–
A4 :–
A5 :–
A6 :(+ve) Accessories
A7 :(+ve) Permanent
A8 :(–ve) Earth
B1 :(+) –
B2 :(–) –
B3 :(+) Front right speaker
B4 :(–) Front right speaker
B5 :(+) Front left speaker
B6 :(–) Front left speaker
B7 :(+) –
B8 :(–) –
FITTING SPEAKERS
The factory-fitted equipment allows
the fitting of 165 mm diameter
speakers in the front doors.
Contact a PEUGEOT
dealer before fitting audio
equipment or speakers in
your vehicle.
Page 4
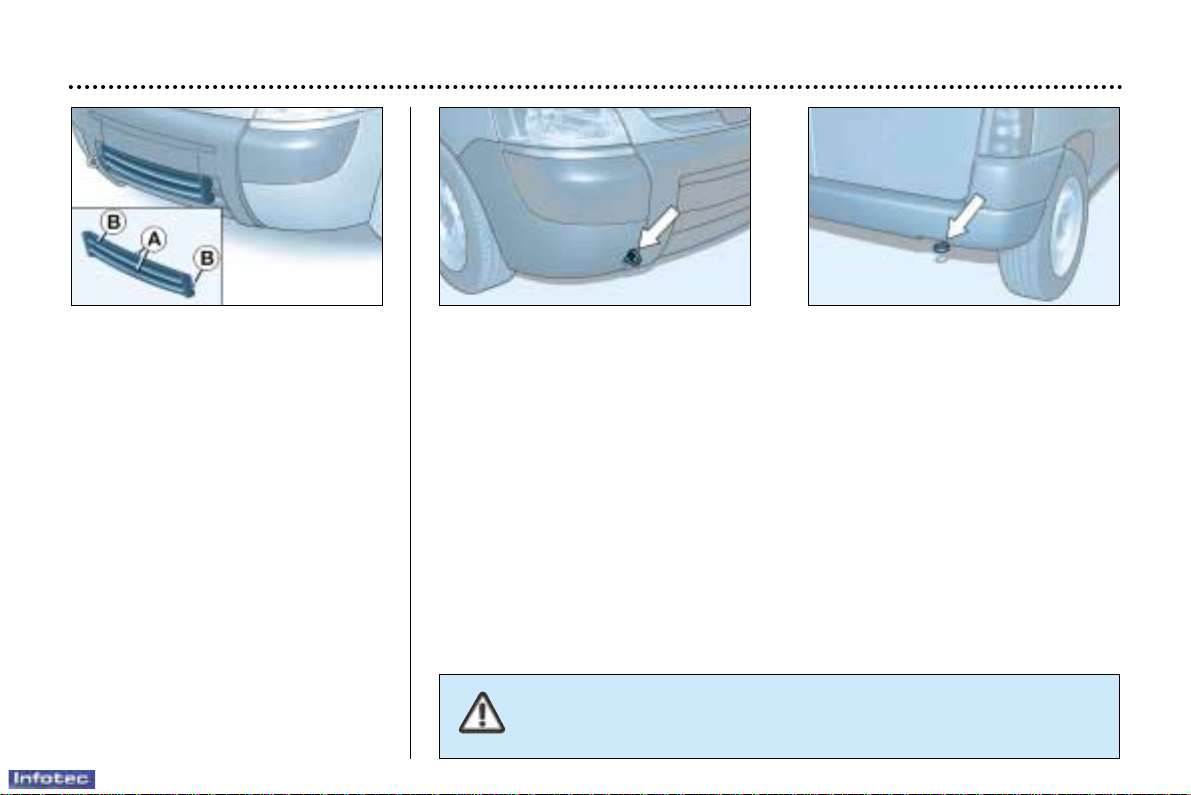
SNOW SCREEN*
The snow screen is installed on the
lower part of the front bumper to prevent the accumulation of snow at the
radiator cooling fan.
When the snow has cleared, do
not forget to remove the snow
screen.
FITTING
☞ Offer up the snow screen facing
its centring pin A on the front
bumper.
☞ Put it in place by pressing at
each clip B located in the four
corners.
REMOVAL
☞ Pass a screwdriver into the hole
located near each of the clips.
☞ Use the screwdriver as a lever to
unclip the four clips B in turn.
* According to destination.
PRACTICAL INFORMATION
102
TOWING YOUR VEHICLE
Without lifting (four wheels on the ground)
You must always use a tow bar.
From the front or the rear
Attach the tow bar to the towing eye.
By lifting (two wheels only on the ground)
It is preferable to lift the vehicle by the wheels.
Never use the radiator crossmember.
22-12-2003
Page 5

PRACTICAL INFORMATION
103
22-12-2003
TOWING A TRAILER,
CARAVAN, BOAT etc.
Only use original PEUGEOT tow
bars that have been tested and
approved from the design stage of
your vehicle.
The tow bar must be fitted by a
PEUGEOT dealer.
Your vehicle is basically designed for
transporting people and luggage but it
may also be used for towing a trailer.
Driving with a trailer subjects the
towing vehicle to more significant
stress and its driver must be particularly careful.
Air density decreases with altitude,
thus reducing engine performance.
Above 1 000 metres, the maximum
towing load must be reduced by 10 %
and so on for every 1 000 metres of
altitude.
Driving advice
Distribution of loads: Distribute the
load in the trailer so that the heaviest
items are as close as possible to the
axle and the nose weight approaches
the maximum permitted without
exceeding it.
Cooling: Towing a trailer on a slope
increases the temperature of the
coolant.
As the fan is electrically controlled,
its cooling capacity is not dependent
on the engine speed.
On the contrary, use a high gear to
lower the engine speed, and reduce
your speed.
The maximum towing load on a long
slope depends on the gradient and
the outside temperature.
In all cases, pay attention to the
coolant temperature.
If the warning light comes on, stop
the vehicle and switch off the engine
as soon as possible.
Tyres: Check the tyre pressures of
the towing vehicle and of the trailer,
observing the recommended pressures.
Braking: Towing increases the braking
distance.
Lights: Check the electrical signalling on the trailer.
Side wind: Take into acount the
increased sensitivity to side wind.
Page 6
PRACTICAL INFORMATION
104
22-12-2003
ACCESSORIES FOR YOUR PARTNER
For your PEUGEOT only use accessories and original parts approved by the manufacturer.
These accessories and parts are all adapted to your PEUGEOT, after being tested and approved for reliability and
safety, which PEUGEOT cannot guarantee for other products.
A wide choice of original accessories, approved by PEUGEOT, is available through the dealer network. They all carry
the PEUGEOT guarantee.
– Safety : Separation grille, window protectors, anti-theft alarm, wheel locks, parking assistance,
signalling triangle, first aid kit, fog lamps, safety jacket...
– Comfort : Rear and side windows, audio-telephone console, covers compatible with side air bags,
mats, luggage net, door deflectors...
– Loading : Roof bars, thermoformed interior protectors, wooden interior fittings, loading roller...
– Communication : Audio systems, audio-telephone, speakers, CD changer, navigation system...
– Customising : Alloy wheels, door sills, mud flaps, ...
– Leisure : Tow bar, roof bars, snow chains, tailgate bicycle carrier...
– Children : Booster seats and child seats...
– Maintenance products : Screenwash, interior and exterior maintenance and cleaning products...
Before installing any electrical accessory on your vehicle, contact a PEUGEOT dealer.
Page 7
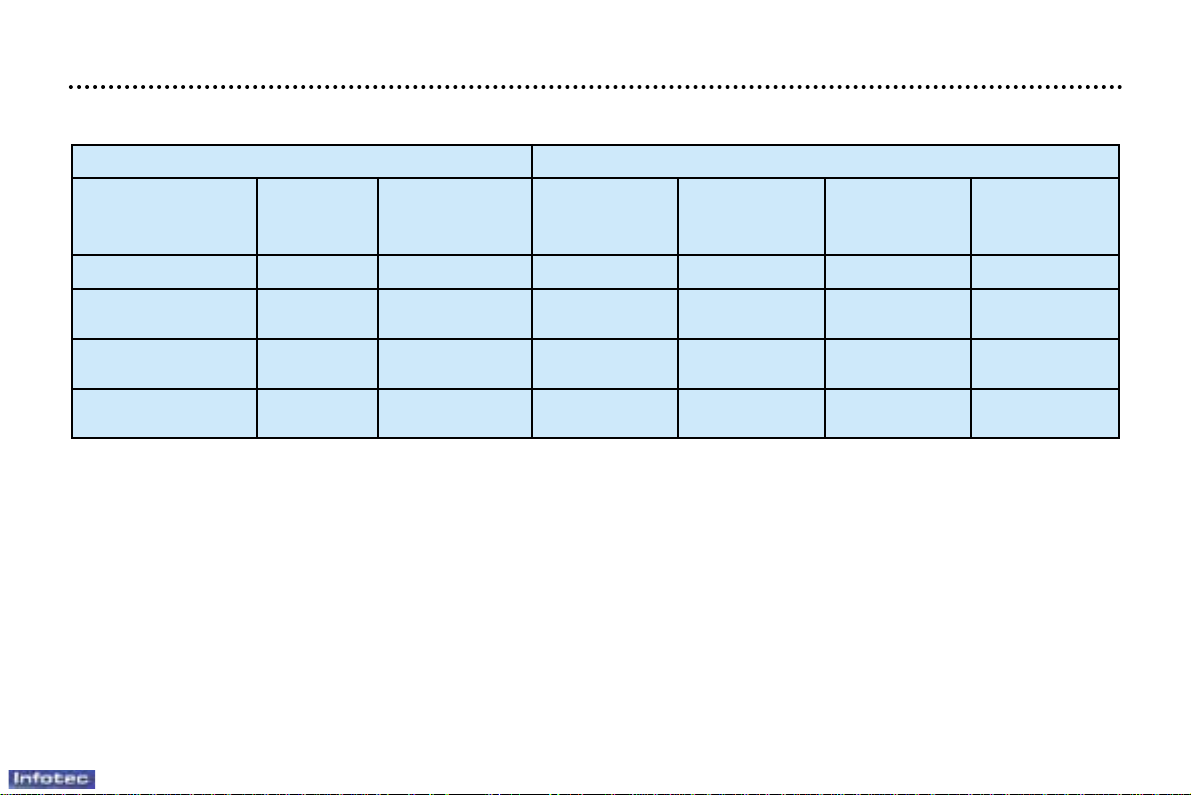
CONSUMPTION
Fuel consumption values correct at time of printing.
In accordance with directive 99/100 in M.P.G. (litres/100 km)
Engine Gearbox Model Urban driving Inter- Mixed Emission of
codes urban CO
2
by weight
(g/km)
1.1 litre Manual GBHFXB ––––
1.4 litre Manual GBKFWB 29.1 (9.7) 45.6 (6.2) 37.6 (7.5) 175
GCKFWB
1.9 litre Diesel Manual GBWJYB/K 32.1 (8.8) 49.6 (5.7) 40.9 (6.9) 181
GCWJYB PLC
2 litre Turbo HDI Manual GBRHYB 39.2 (7.2) 57.6 (4.9) 49.6 (5.7) 152
GCRHYB
TECHNICAL DATA
107
22-12-2003
Page 8
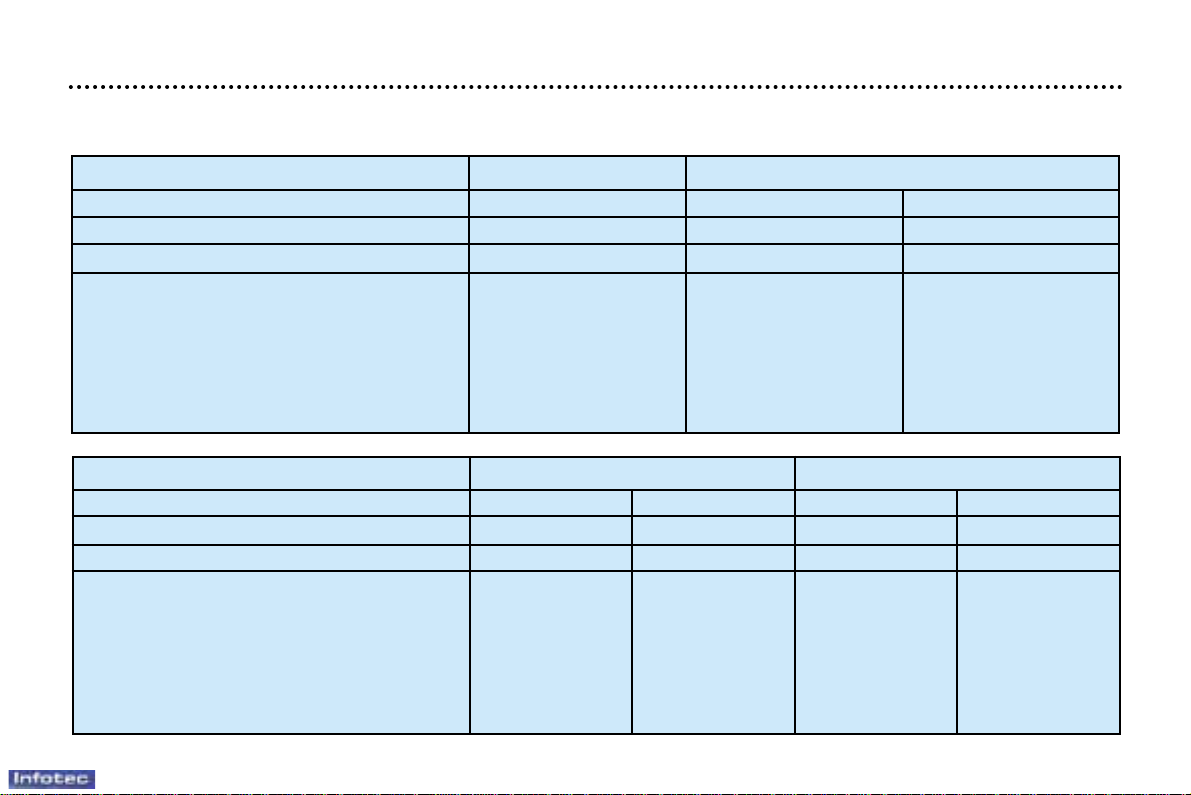
TECHNICAL DATA
Engine 1.1 litre 1.4 litre
Model 600 kg 600 kg 800 kg
Gearbox Manual Manual Manual
Model codes GBHFXB GBKFWB GCKFWB
• Kerb weight 1 108 1 108 1 110
• Gross vehicle
weight (GVW) 1 690 1 690 1 890
• Gross train weight (GTW)* 2 440 2 590 2 790
• Unbraked trailer 500 500 500
• Braked trailer (within GTW) 750 900 900
• Recommended nose weight – – –
WEIGHTS AND TOWING LOADS (IN KG)
* In the case of a towing vehicle, the speed is limited to 60 mph (100 km/h).
Engine 1.9 litre D 2 litre Turbo HDI
Model 600 kg 800 kg 600 kg 800 kg
Gearbox Manual Manual Manual Manual
Model codes GBWJYB/K GCWJYB PLC GBRHYB GCRHYB
• Kerb weight 1 163 1 225 1 211 1 211
• Gross vehicle
weight (GVW) 1 755 1 955 1 790 1 990
• Gross train weight (GTW)* 2 855 3 055 2 890 3 090
• Unbraked trailer 500 500 500 –
• Braked trailer (within GTW) 1 100 1 100 1 100 –
• Recommended nose weight – – – –
22-12-2003
108
Page 9
11
22-12-2003
AIR CONDITIONING
50
YOUR PARTNER AT A GLANCE
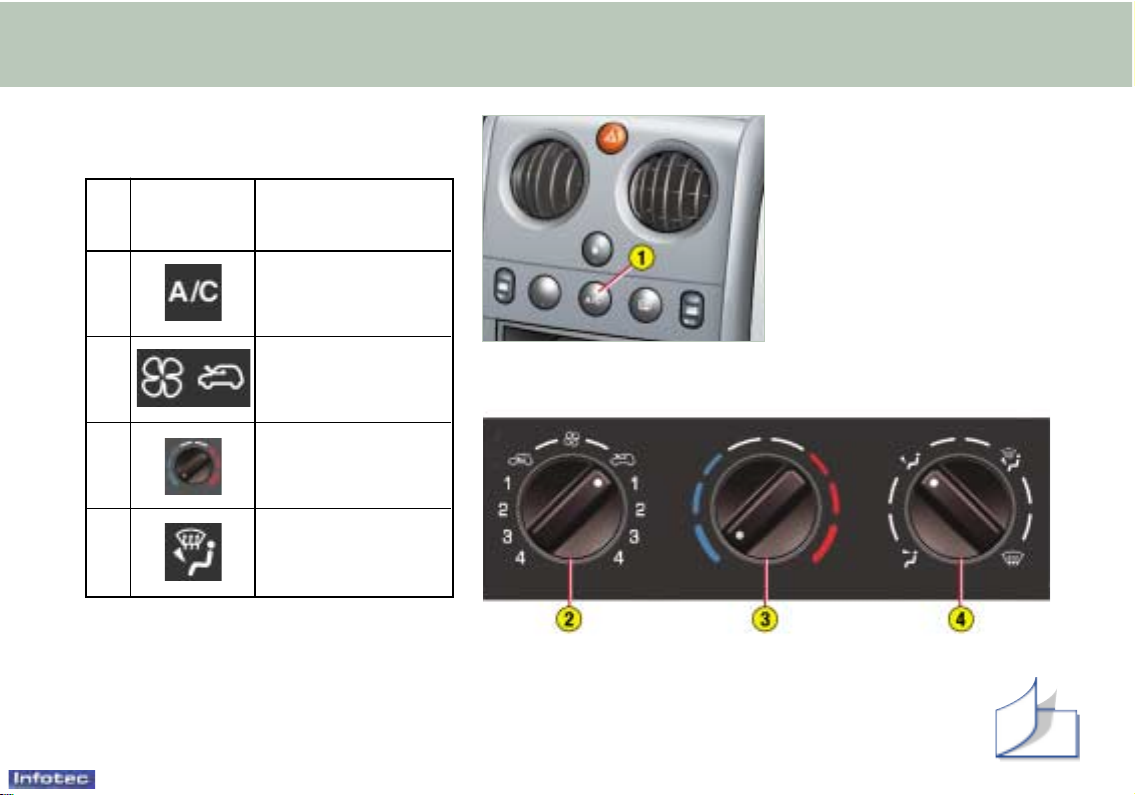
N° Symbol Function
Air conditioning
control.
1
Air flow adjustment
and air intake control.
2
3
Air distribution
adjustment.
4
Temperature
adjustment.
Page 10
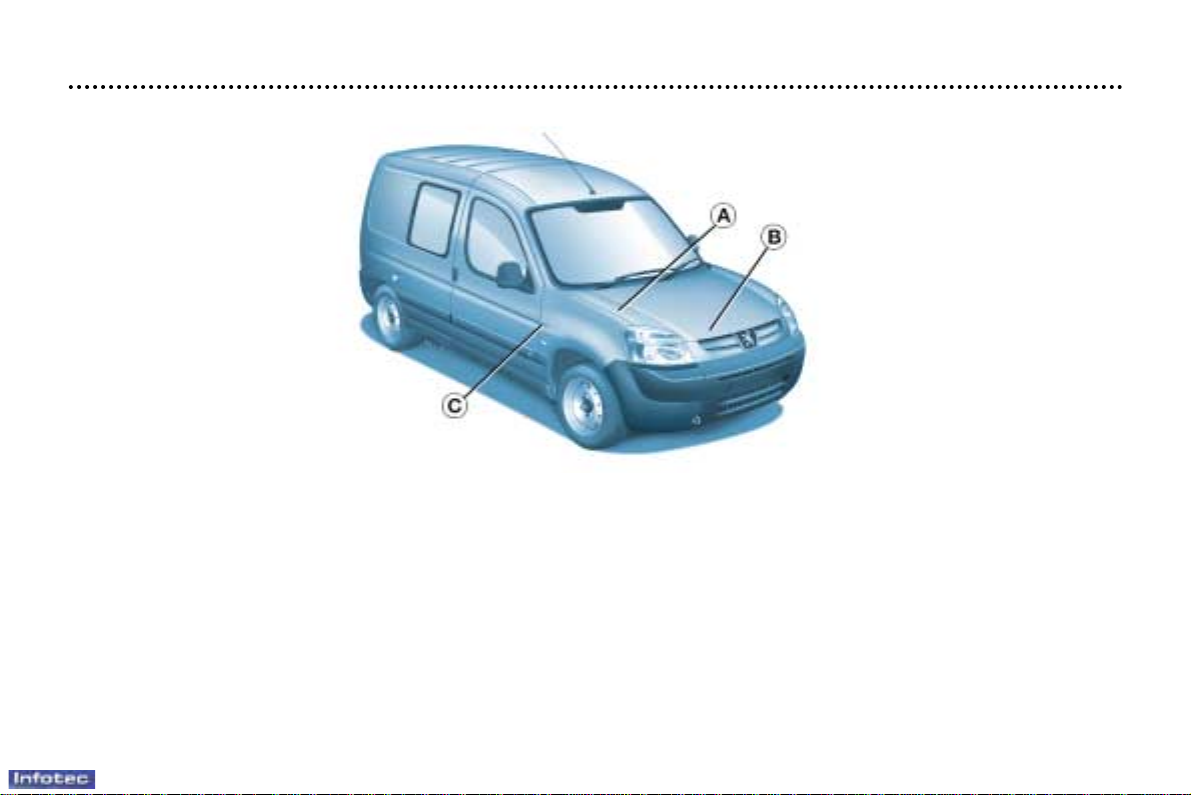
THE IDENTIFICATION FEATURES OF YOUR PARTNER
A. Manufacturer's plate (under the bonnet, on the front right wing).
B. Serial number on the bodywork (under the bonnet, on the right-hand crossmember).
C. Tyres and paint colour reference.
The label C on the driver's door pillar, near the hinges, gives:
– the wheel and tyre sizes,
– the tyre pressures: (tyre pressure checks must be carried out cold, at least every month),
– the paint colour reference.
TECHNICAL DATA
111
22-12-2003
Page 11
SPECIAL FEATURES
112
22-12-2003
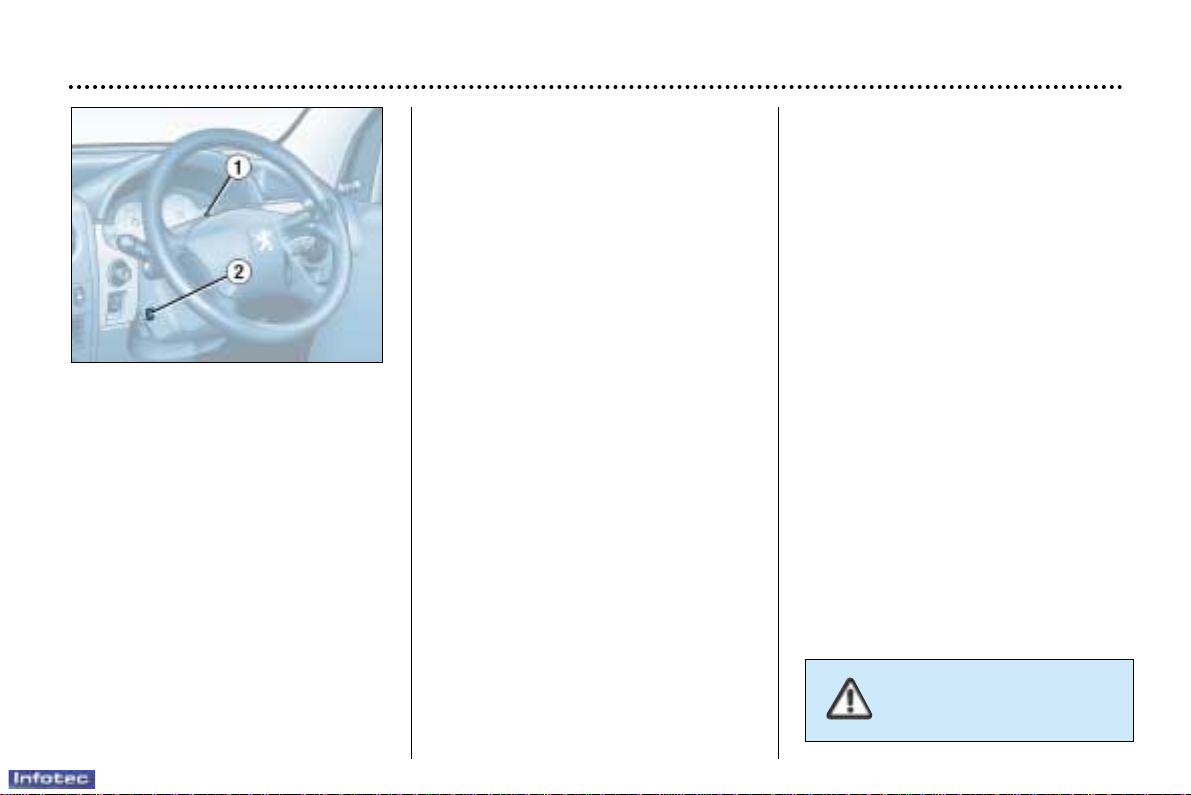
THE ALARM SYSTEM*
The alarm offers two types of
protection:
• exterior protection: the alarm
sounds if a door, the boot or the
bonnet is opened;
• interior protection: the alarm
sounds if there is a variation in the
volume inside the vehicle
(breaking of a window or movement inside the vehicle).
Setting the alarm
Switch the ignition off and get out of
the vehicle.
Activate the alarm within five minutes
following your exit from the vehicle,
by locking using the remote control
key (the red indicator light on the
switch 1, which can be seen from the
outside, flashes once a second).
When the alarm is triggered, the
siren sounds and the direction
indicators flash for thirty seconds.
After it has been triggered, the alarm
becomes operational again.
Note: if you wish to lock your vehicle
without setting the alarm, lock it
using the lock.
Warning key in the door
If, on setting the alarm, a door, the
boot or the bonnet are not closed
correctly, the siren sounds for a
moment.
Close the vehicle correctly to set the
alarm.
If the interior protection alarm is
triggered ten times in succession, it
is disarmed automatically. It must be
set again in order for it to operate
correctly.
Disarming the alarm
Unlock the vehicle using the remote
control key (the red indicator light on
the switch 1 goes out).
Note: if the warning light flashes, it
is a sign that the alarm has been
triggered in your absence.
To stop it, switch on the ignition.
* According to destination.
Note: when the alarm is set, but the
remote control no longer works:
☞ unlock the doors using the key
and open the door; the alarm is
triggered;
☞ switch the ignition on within ten
seconds; the alarm is disarmed.
To set the alarm with exterior
protection only.
If, while you are away from the vehicle,
you wish to leave a window partially
open or a pet inside the vehicle, you
need to select exterior protection only:
• Switch off the ignition.
• Press the button 2 until the light 1
comes on continuously.
• Get out of the vehicle.
• Press the locking button of the
remote control.
• The doors lock.
• The red light on the switch flashes
once a second.
Malfunction
When the ignition is switched on,
fixed lighting of the red indicator light,
located in the centre of the fascia,
indicates a siren connection fault.
Contact a PEUGEOT dealer to have
the system checked.
Do not make any modifications to the alarm system.
Page 12
12
22-12-2003
YOUR PARTNER AT A GLANCE
Page 13

22-12-2003
13
79
YOUR PARTNER AT A GLANCE
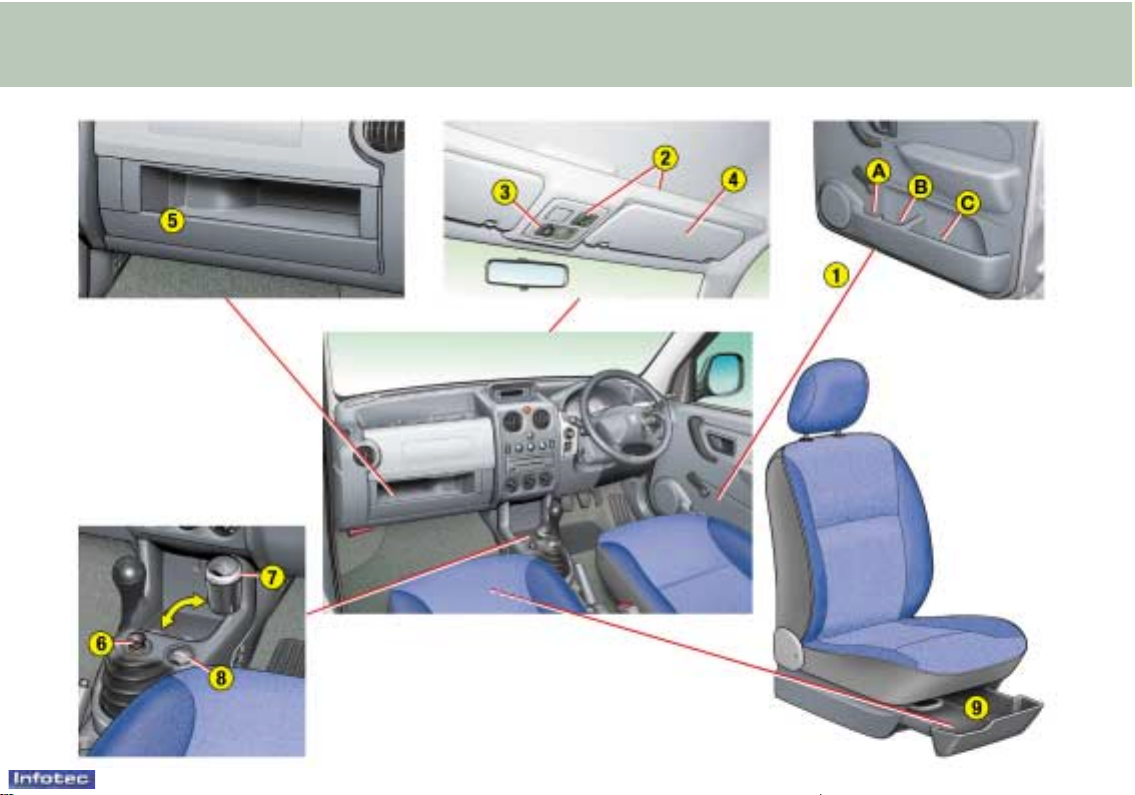
FRONT FITTINGS
1. STORAGE COMPARTMENTS IN THE DOORS
A. Bottle holder.
B. Can holder.
C. Storage compartment.
2. OVERHEAD STORAGE WITH MAP READING LIGHT
3. COURTESY LIGHT
4. SUN VISORS
5. GLOVE BOX
To open the glove box with lid, lift the handle (version with air conditioning).
6. LIGHTER
7. REMOV ABLE ASHTRAY
Lift the lid to open the ashtray.
To empty it, after opening, remove it by pulling upwards.
8. 12 V ACCESSORIES SOCKET
This is located at the bottom of the centre console.
It permits the connection of a telephone charger, a baby's bottle warmer, ...
9. STORAGE DRAWER
To open it, lift it slightly and pull it forwards.
Page 14
14
YOUR PARTNER AT A GLANCE
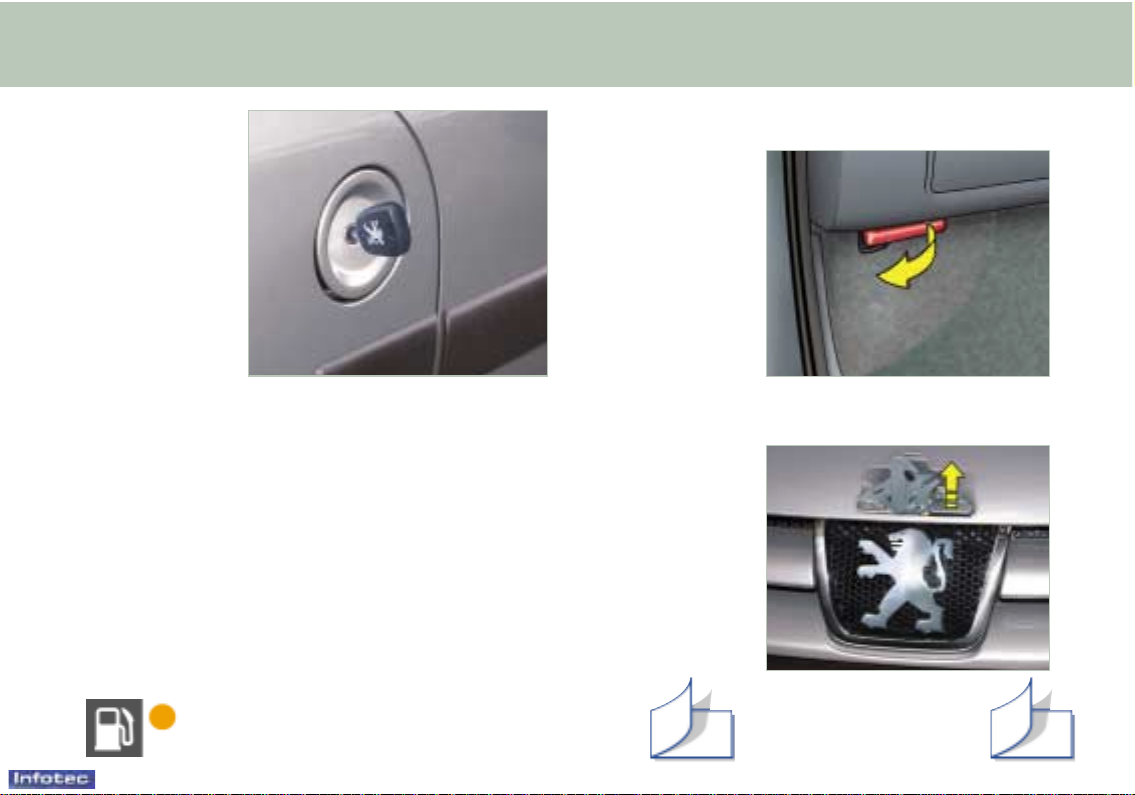
OPENING THE BONNET
Inside the vehicle: Pull the con-
trol on the left-hand side, under
the fascia panel.
Outside the vehicle:
Lift the control, raise the
bonnet and secure the
strut to keep the bonnet
open.
FILLING WITH FUEL
This operation must be carried out with the engine switched off.
☞ Insert the key then turn it to the left.
☞ Remove the cap.
An indication shows which type of fuel to use.
When you fill your tank, do not continue after the third cut-off of the pump.
This could cause a malfunction.
The capacity of the tank is approximately 55 litres for petrol engines
and 60 litres for Diesel engines.
Note: the right-hand sliding side door cannot be opened while the fuel
tank cap is removed.
Low fuel level warning light
From the time this light comes on, you have enough
fuel left to cover approximately 30 miles (50 km).
70 69
22-12-2003
Page 15

PEUGEOT SERVICING
Your vehicle benefits from extended service intervals.
• For petrol engines: every 20,000 miles (30 000 km) or every two years.
• For direct injection diesel engines: every 12,000 miles (20 000 km) or every two years.
• For indirect injection diesel engines: every 10,000 miles (15 000 km) or every two years.
Your service indicator informs you when a service is due; the point at which a service is due is calculated from the last indicator zero reset (see corresponding section).
This point is determined by two parameters:
– the distance travelled,
– the time elapsed since the last service.
Note: the distance remaining may be weighted by the time factor, depending on the driver's style of driving.
The extension of the service intervals means that the engine oil level must be checked regularly: topping up of the
oil between oil changes is normal.
This is why the PEUGEOT network is offering you an intermediate service between regular services.
The date of this visit is not shown by the service indicator. It is to be carried out at least every 10,000 miles
(15 000 km) for petrol engines; every 6,000 miles (10 000 km) for direct injection diesel engines and every
5,000 miles (7 500 km) for indirect injection diesel engines.
A PEUGEOT dealer will carry out a quick check and top up the levels if necessary (oil, coolant, windscreen wash
up to 2 litres).
If the oil level is too low there is a risk of serious damage to the engine: check the engine oil level at least every
2,000 to 3,000 miles (3 000 to 5 000 km), depending on the conditions of use.
This extended servicing has been made possible by modifications to our vehicles and to the lubricants:
THUS IT IS ESSENTIAL TO USE ONLY LUBRICANTS WHICH ARE SUITED TO YOUR ENGINE AND RECOMMENDED
BY THE MANUFACTURER (see "Lubricants" pages).
PEUGEOT SERVICING
18
22-12-2003
Page 16

PEUGEOT SERVICING
19
22-12-2003
SPECIAL FEATURES
Some of your vehicle's vital components have specific servicing schedules.
The brake fluid must be replaced every 36,000/40,000 miles (60 000 km) or every 2 years.
The passenger compartment filter must be checked at each visit to the PEUGEOT dealer (intermediate visits and regular
services).
The timing belt: consult your PEUGEOT dealer.
Arduous conditions of use
If the vehicle is used in certain particularly arduous conditions:
• Continuous door-to-door use.
• Town use (e.g. taxi).
• Repeated short journeys, with the engine cold in low temperatures.
Or in long stays in the following conditions:
• Hot countries with temperatures often above 30 °C.
• Cold countries with temperatures often below minus 15 °C.
• Countries with a dusty atmosphere.
• Countries whose lubricants or fuels do not conform to our recommendations.
It is necessary to follow an "Arduous Conditions" servicing schedule, which includes special operations and shorter
service intervals:
• Every 12,000 miles (20 000 km) or every year for petrol engine vehicles.
• Every 10,000 miles (15 000 km) or every year for Direct Injection Diesel engine vehicles.
• Every 6,000 miles (10 000 km) or every year for Indirect Injection Diesel engine vehicles.
Page 17

PEUGEOT SERVICING
19
22-12-2003
SPECIAL FEATURES
Some of your vehicle's vital components have specific servicing schedules.
The brake fluid must be replaced every 36,000/40,000 miles (60 000 km) or every 2 years.
The passenger compartment filter must be checked at each visit to the PEUGEOT dealer (intermediate visits and regular
services).
The timing belt: consult your PEUGEOT dealer.
Arduous conditions of use
If the vehicle is used in certain particularly arduous conditions:
• Continuous door-to-door use.
• Town use (e.g. taxi).
• Repeated short journeys, with the engine cold in low temperatures.
Or in long stays in the following conditions:
• Hot countries with temperatures often above 30 °C.
• Cold countries with temperatures often below minus 15 °C.
• Countries with a dusty atmosphere.
• Countries whose lubricants or fuels do not conform to our recommendations.
It is necessary to follow an "Arduous Conditions" servicing schedule, which includes special operations and shorter
service intervals:
• Every 12,000 miles (20 000 km) or every year for petrol engine vehicles.
• Every 10,000 miles (15 000 km) or every year for Direct Injection Diesel engine vehicles.
• Every 6,000 miles (10 000 km) or every year for Indirect Injection Diesel engine vehicles.
Page 18
2
YOUR PARTNER AT A GLANCE
22-12-2003
Page 19

3
YOUR PARTNER AT A GLANCE
22-12-2003
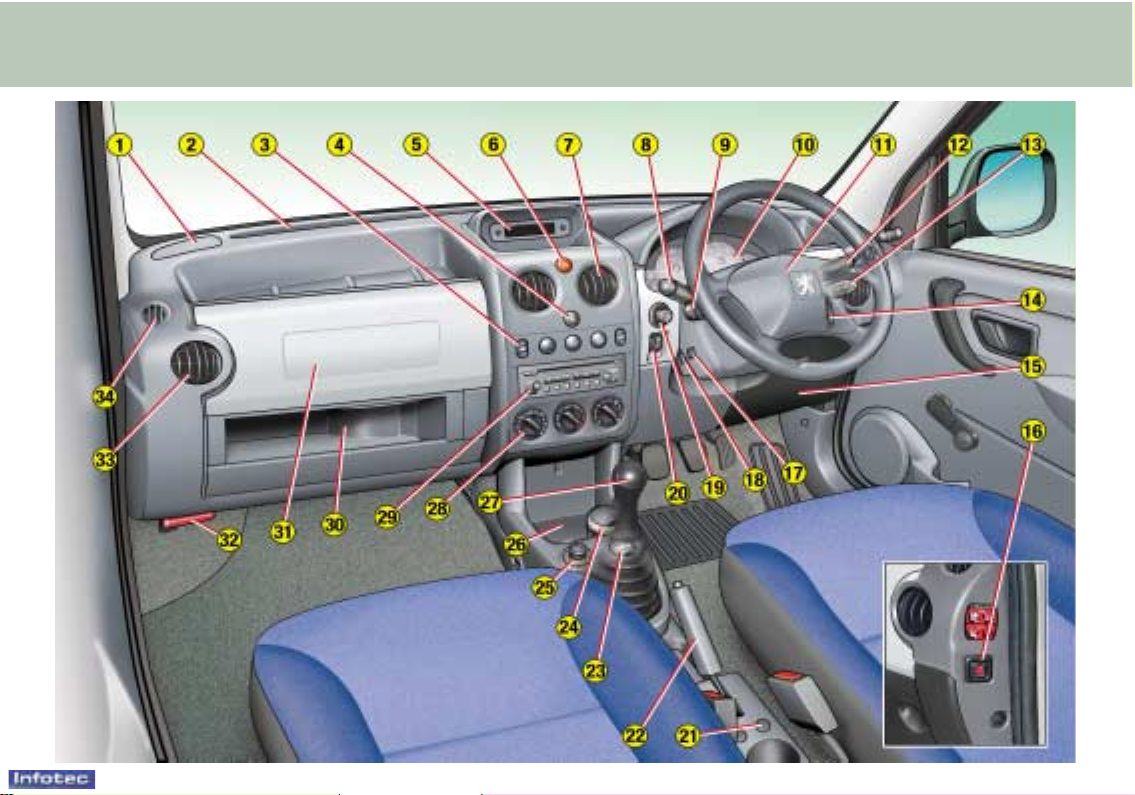
1- Speaker (tweeter).
2- Windscreen demisting
vents.
3- Controls:
– Electric windows.
– Demisting of rear door
windows or tailgate.
– Air conditioning.
4- Central locking button.
5- Multifunction display or
clock.
6- Hazard lights button.
7- Central adjustable
heating/ventilation vents.
8- Lights and direction
indicators stalk.
9- Cruise control.
10 - Instrument panel.
11 - Driver's air bag.
Horn.
12 - Windscreen wash-wipe
stalk.
13 - Audio equipment steering
wheel control.
14 - Steering lock and ignition.
15 - Fuse box.
16 - Passenger air bag
disarming control*.
17 - Alarm.
18 - Steering wheel adjustment
control.
19 - Passenger's electric mirror
control.
20 - Headlamp height
adjustment.
21 - Heated seats control.
22 - Handbrake.
23 - 12 V accessories socket.
24 - Removable ashtray.
25 - Lighter.
26 - Storage.
27 - Gear lever.
28 - Heating/air conditioning
controls.
29 - Audio RB3 or RD3.
30 - Lower glove box.
31 - Upper glove box or
passenger air bag.
32 - Bonnet release.
33 - Side adjustable heating/
ventilation vents.
34 - Side window
de-icing/demisting vents.
* According to destination.
Page 20
TYPES OF SERVICE
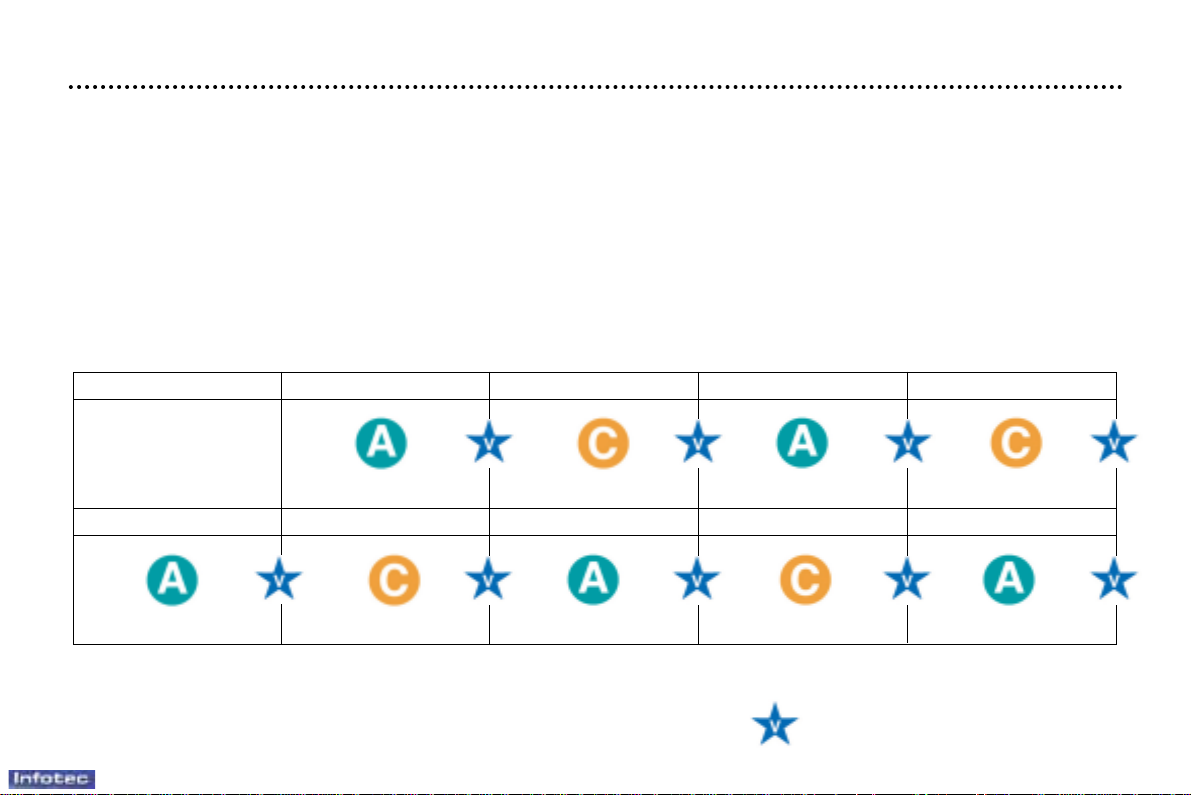
Each vehicle has its own servicing cycle, based upon the engine type.
This cycle consists of alternating two types of service, Aand C, intermediate visits and a few additional operations depending on your vehicle; these correspond to key stages in the life of your vehicle.
When the first service is carried out and at each subsequent service, your dealer will advise you of the type and
content of the next service due.
PEUGEOT SERVICING
22
22-12-2003
THE MAINTENANCE CYCLE FOR YOUR PARTNER PETROL
Service every 20,000 miles (30,000 km) or 2 years.
1st service at
6,000 miles (10,000 km)
or 6 months*.
This is necessary
in order to benefit
from the warranty.
* Whichever comes first.
Intermediate top-up visit included in
the Fixed Services.
MILES (KM) 20,000 (30,000) 40,000 (60,000) 60,000 (90,000) 80,000 (120,000)
100,000 (150,000) 120,000 (180,000) 140,000 (210,000) 160,000 (240,000) 180,000 (270,000)
These services are carried out with synthetic based oil; Fuel Economy oil or
synthetic oil may also be used.
Arduous conditions of use (see corresponding section).
Page 21
PEUGEOT SERVICING
23
22-12-2003
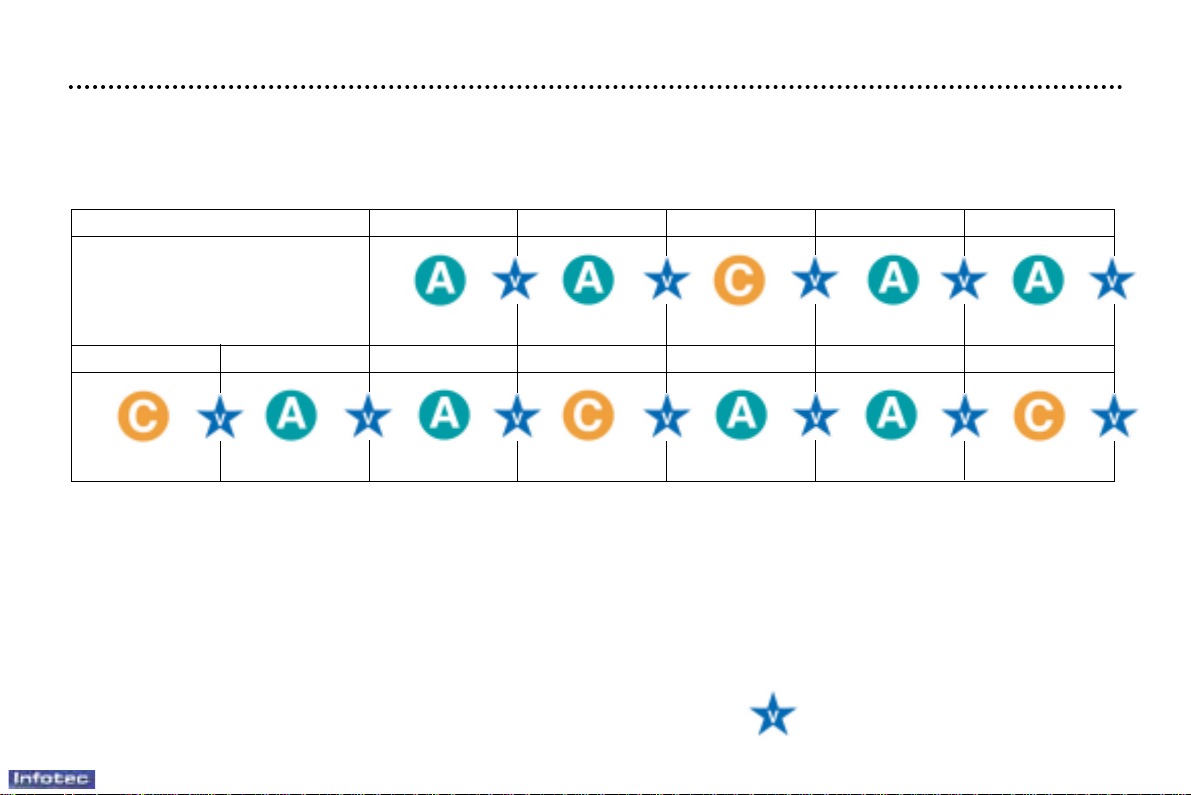
Intermediate top-up visit included in
the Fixed Services.
THE MAINTENANCE CYCLE FOR YOUR PARTNER TURBO DIESEL HDI
Service every 12,000 miles (20,000 km) or 2 years.
1st Service at
6,000 miles (10,000 km)
or 6 months*.
This is necessary in order to
benefit from the warranty.
These services are carried out with synthetic based oil; Fuel Economy oil or synthetic oil may also be used.
Arduous conditions of use (see corresponding section).
* Whichever comes first.
MILES (KM) 12,000 (20,000) 24,000 (40,000) 36,000 (60,000) 48,000 (80,000) 60,000 (100,000)
72,000 (120,000) 84,000 (140,000) 96,000 (160,000) 108,000 (180,000) 120,000 (200,000) 132,000 (220,000) 144,000 (240,000)
Page 22
PEUGEOT SERVICING
24
22-12-2003
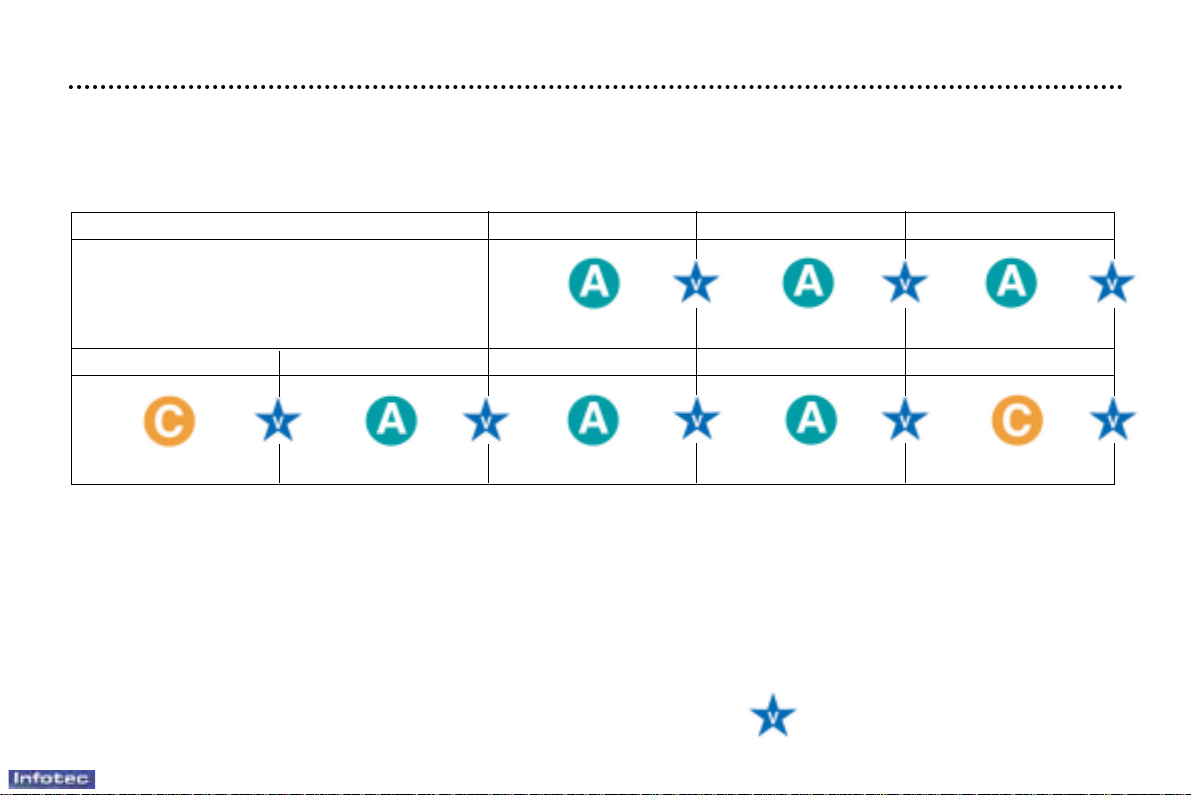
Intermediate top-up visit included in
the Fixed Services.
THE MAINTENANCE CYCLE FOR YOUR PARTNER INDIRECT INJECTION DIESEL
Service every 10,000 miles (15,000 km) or 2 years.
1st Service at 6,000 miles
(10,000 km) or 6 months*.
This is necessary in order to benefit
from the warranty.
These fixed services are carried out with synthetic based oil; Fuel Economy oil or synthetic oil may also be used.
Arduous conditions of use (see corresponding section).
* Whichever comes first.
MILES (KM)
10,000/90,000 (15,000/135,000) 20,000/100,000 (30,000/150,000) 30,000/110,000 (45,000/165,000)
40,000/120,000 (60,000/180,000) 50,000/130,000 (75,000/195 000) 60,000/140,000 (90,000/210,000) 70,000/150,000 (105,000/225,000) 80,000/160,000 (120,000/240,00)
Page 23
PEUGEOT SERVICING
25
22-12-2003
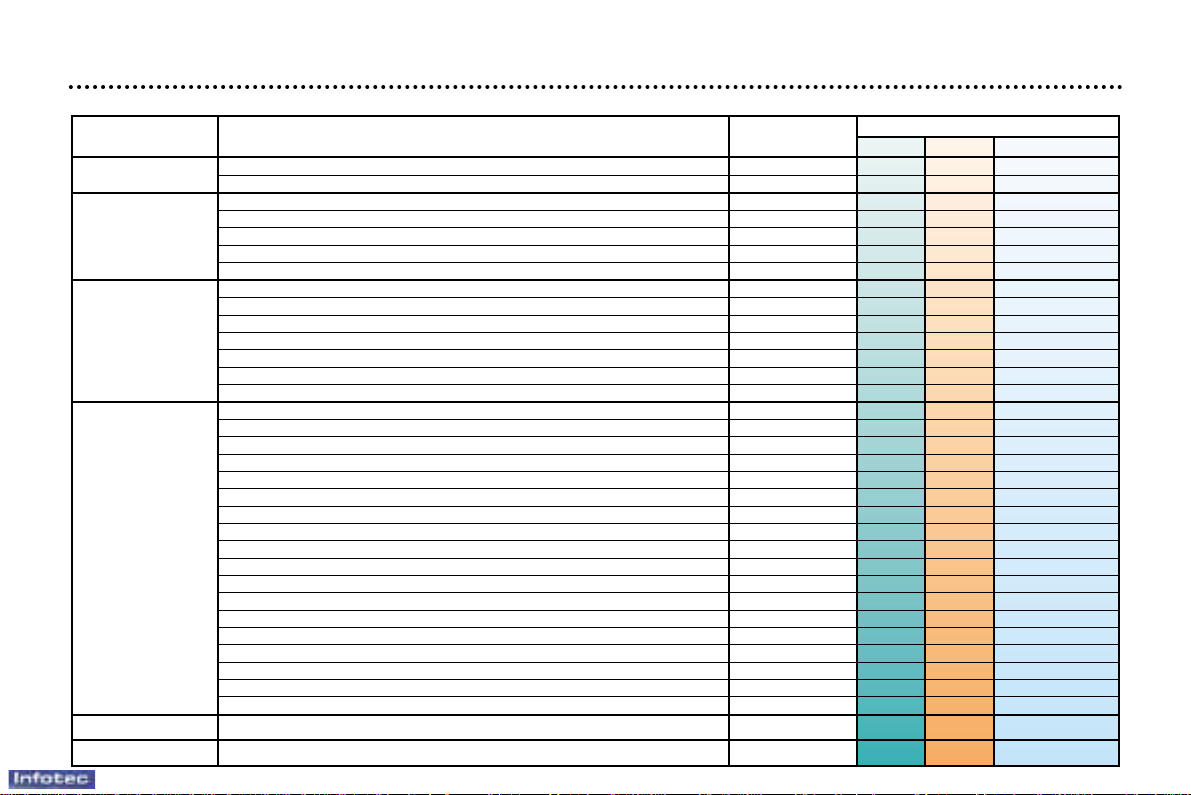
A AND C SERVICE LEVELS AND THE INTERMEDIATE VISIT
Level
Operations Description of operation 1st service
A C Intermediate
DRAIN/REFILL
– Engine oil
– Bleed fuel filter (diesel)
– Oil filter
– Petrol filter (according to engine)
REPLACE
– Diesel filter or element (according to engine)
– Air filter element
– Spark plugs (petrol)
– Engine oil (check + top-up)
– Manual gearbox oil (check + top-up)
– Battery (check + top-up) if cap is removable
LEVEL
– Screen wash (check + top-up)
– Coolant (check + top-up)
– Brake fluid (check + top-up)
– Power steering fluid (check + top up according to specification)
– Operation of lights and indicators
– Condition of glass, headlamp and light lenses and mirrors
– Horn
– Windscreen washer jets
– Condition of wiper blades
– Condition and tension of the ancillary drive belts
– Handbrake
– Condition of hydraulic circuits (hoses and covers)
CHECK
– Condition of rubber boots and gaiters
– Brake pads
– Play in hubs, link rods, ball joints, flexible mountings
– Shock absorbers
– Rear drum brake lining wear
– Condition and pressure of tyres (including spare wheel)
– Emission control check as per current legislation (petrol)
– Smoke opacity (diesel)
– Passenger compartment filter (according to specification)
– Visual check of the whole vehicle
SERVICE*
– Courtesy vehicle
ROAD TEST
: All driving conditions.
: Arduous conditions. * According to destination.
Page 24
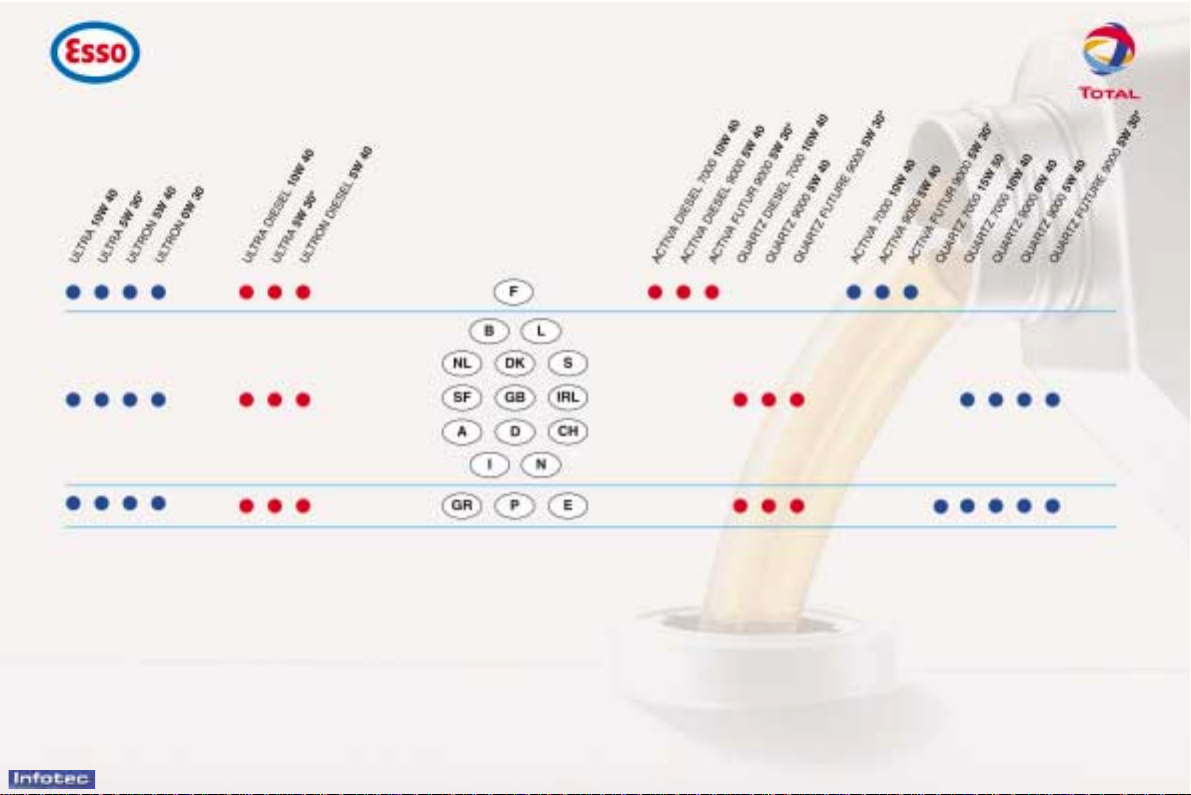
(1) Minimum quality standard: Petrol engines: ACEAA3 and API SH/SJ; Diesel engines: ACEA B3 and API CF/CD.
ACEA = Association des Constructeurs Européens Automobiles (Association of European Automobile Manufacturers) -
API = American Petroleum Institute.
If oil is used which does not conform to the ACEAA3-B3 standards, this requires the "Arduous Conditions"
servicing schedule to be followed, which involves shorter intervals between services.
* This Fuel Economy oil can only be used in engines designed for its use.
TRADE NAMES OF RECOMMENDED ENGINE LUBRICANTS IN EUROPE
(1)
PETROL DIESEL DIESEL PETROL
26
22-12-2003
Page 25
27
PEUGEOT SERVICING
22-12-2003
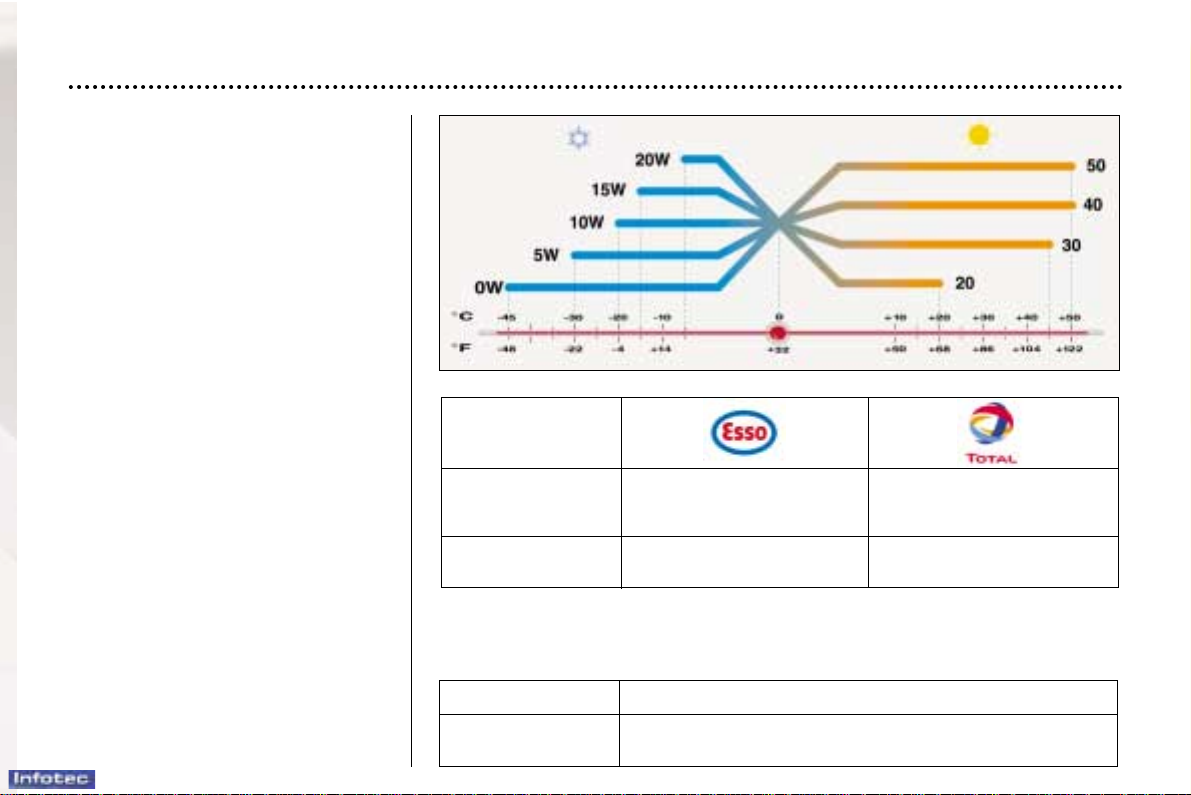
Recommendations for
recommended lubricants
The oils which appear in the table
opposite are suitable for most
purposes.
The diagram opposite states the
optimum range of viscosity depending on the temperatures at which
the oils are to be used.
It is also possible to use "superior
quality" synthetic oils.
In the absence of semi-synthetic or
synthetic oils, oils of ACEA A1/A2
and API SH/SJ/SL quality (for petrol
engines), or ACEA B1/B2 and API
CD/CF quality (for diesel engines)
may be used by following the
"Arduous Conditions" servicing
schedule which specifies shorter
intervals.
Do not hesitate to ask for advice
from a PEUGEOT dealer to maintain
driving pleasure and to minimise the
maintenance cost of your vehicle.
For countries outside Europe, please
contact a local PEUGEOT dealer.
ONLY ONLY
Manual Gearbox ESSO GEAR OILBV
TOT ALTRANSMISSION BV
75W80 PR 9736.41 75W80 PR 9730.A2
Power steering ESSO ATF D TOT ALFluide AT42
PR 9730.94 PR 9730.A3
Other recommended products
Brake fluid PEUGEOT DOT4
Coolant
PROCOR TM 108/GLYSANTIN G33 or REVKOGEL 2000
ONLY protection to –35 ºC
Page 26
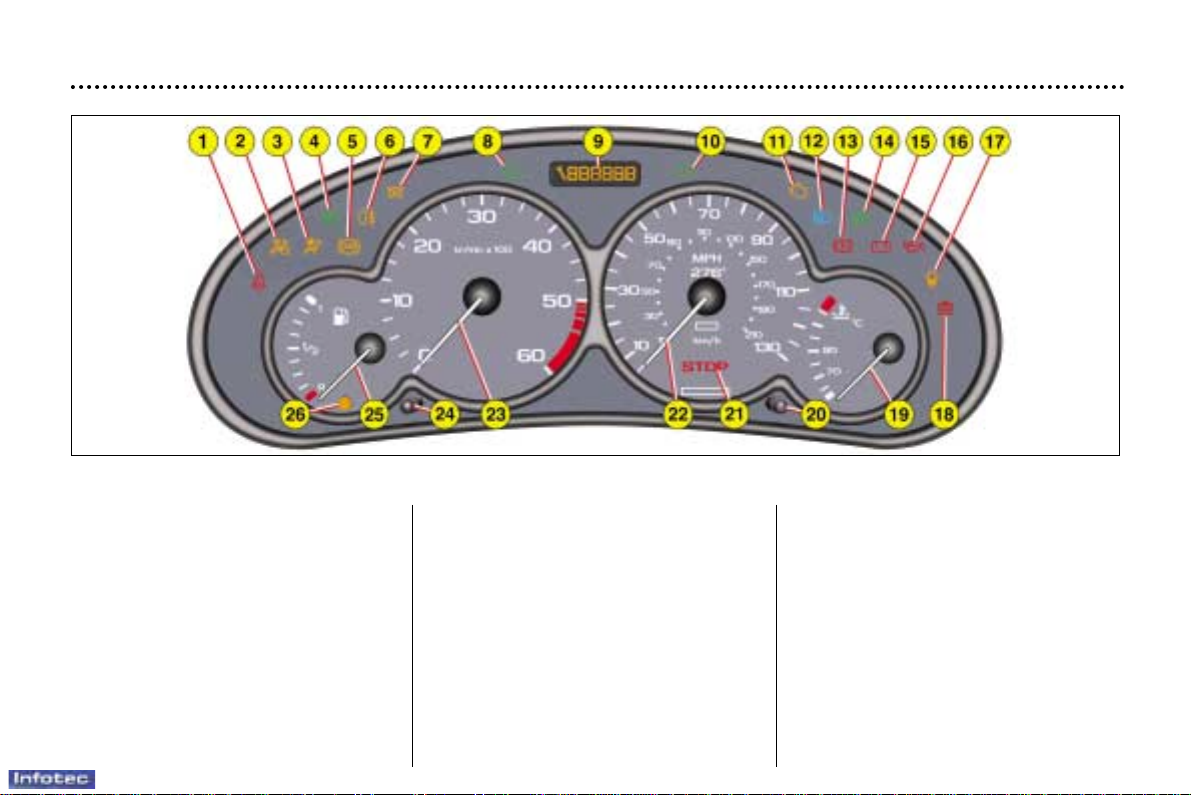
INSTRUMENTS AND CONTROLS
28
22-12-2003
1. Seat belt not fastened warning
light*
2. Passenger air bag disarming
warning light*
3. Front and side air bags warning
light
4. Front fog lamps indicator light
5. Anti-lock braking system (ABS)
warning light
6. Rear fog lamp indicator light
7. Diesel pre-heat warning light
8. Left hand direction indicator
9. Total distance recorder, service
indicator and engine oil level
indicator
10.Right hand direction indicator
11. Engine diagnostics warning light
12.Main beam headlamps indicator
light
13.Handbrake, low brake fluid level
and electronic brake force
distribution warning light
14.Dipped beam headlamps
indicator light
15.Battery charge warning light
16.Engine oil pressure and
temperature warning light
17.Water in diesel filter warning light
18.Low coolant level warning light
19.Coolant temperature indicator
20.Total distance recorder button
21.Central (STOP) warning light
22.Speedometer
23.Rev counter
24.Lighting rheostat button
25.Fuel level indicator
26.Low fuel level warning light
* According to destination.
INSTRUMENT PANEL: PETROL-DIESEL MANUAL GEARBOX
Page 27
INSTRUMENTS AND CONTROLS
31
22-12-2003
Instrument panel display
After switching on the ignition, three functions are shown in succession:
– service indicator (see corresponding section),
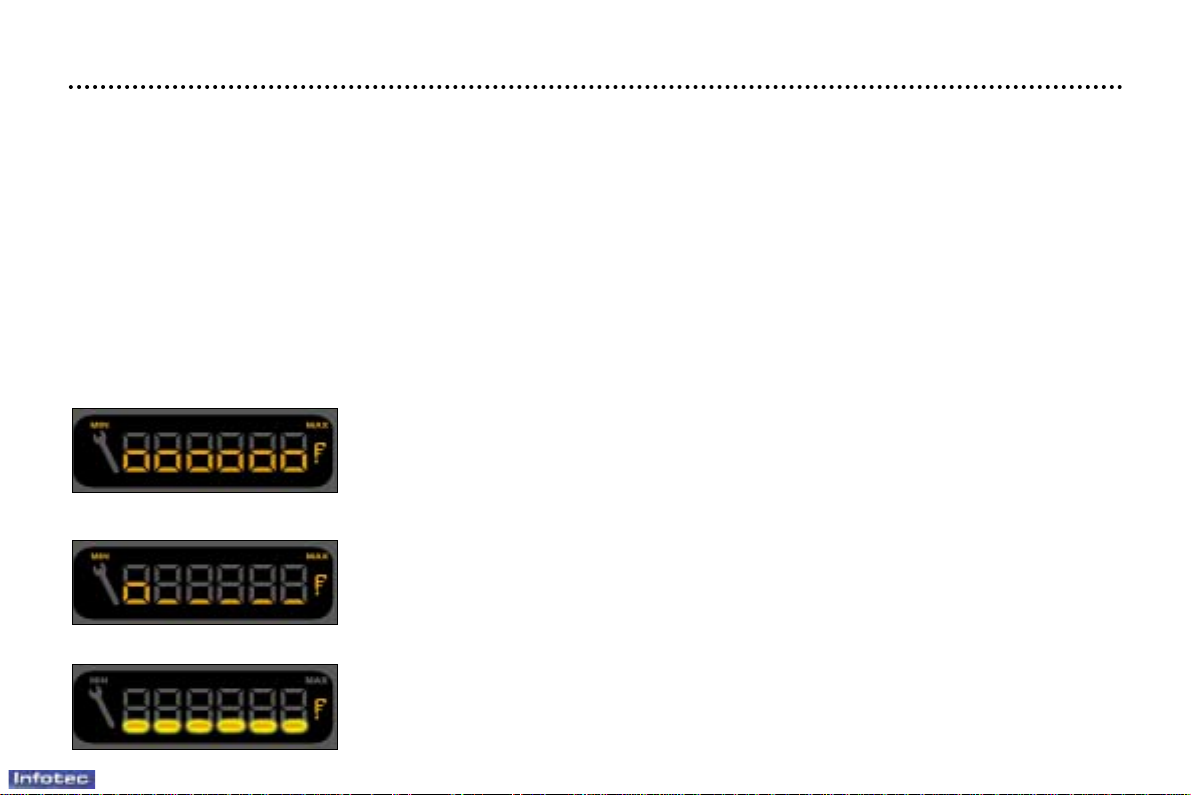
– engine oil level indicator (Diesel),
– total distance recorder/total and trip distances.
Note: the total and trip distances are displayed for 30 seconds when the ignition is switched off, on opening the driver's door ,
as well as on locking and unlocking the vehicle.
Engine oil level (Diesel)
When the ignition is switched on, the engine oil level is indicated for approximately 10 seconds, after the servicing
information.
Maximum
Note: a surplus of oil can cause damage to the engine.
Minimum
Check the level with the dipstick and top it up. The level indicated is only correct if the vehicle has been on stable, level ground, with the engine stopped, for 10 minutes.
Oil level gauge fault
The 6 segments flash to indicate a fault in the oil level gauge.
There is a risk the engine will be damaged.
Consult a PEUGEOT dealer.
Page 28
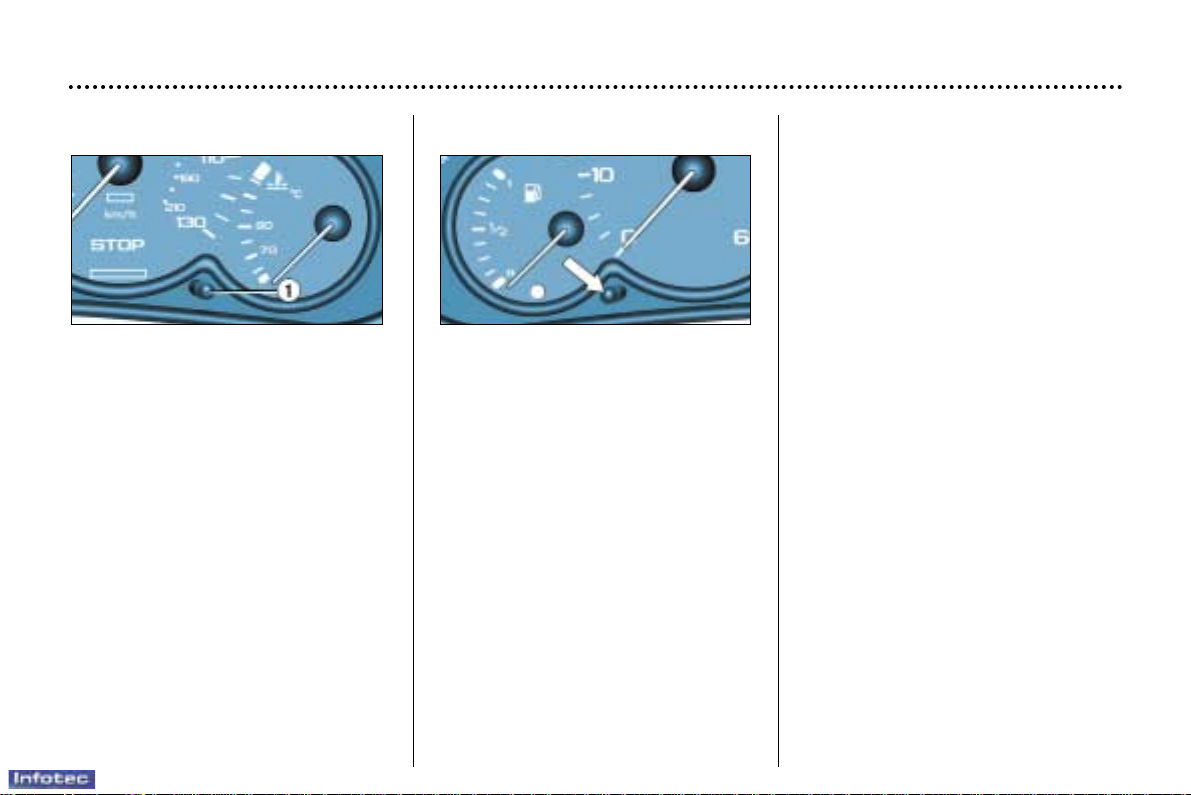
Lighting rheostat
With the lights on, press the button
to vary the intensity of the lighting of
the instruments and controls. When
the lighting reaches the minimum
(or maximum) setting, release the
button then press it again to
increase (or reduce) the brightness.
As soon as the lighting is of the
required brightness, release the
button.
Total distance recorder
Briefly pressing button 1 alternates
between the total and trip distance
displays.
To reset the trip recorder to zero,
when it is displayed press the button
for more than 3 seconds.
INSTRUMENTS AND CONTROLS
32
22-12-2003
Page 29
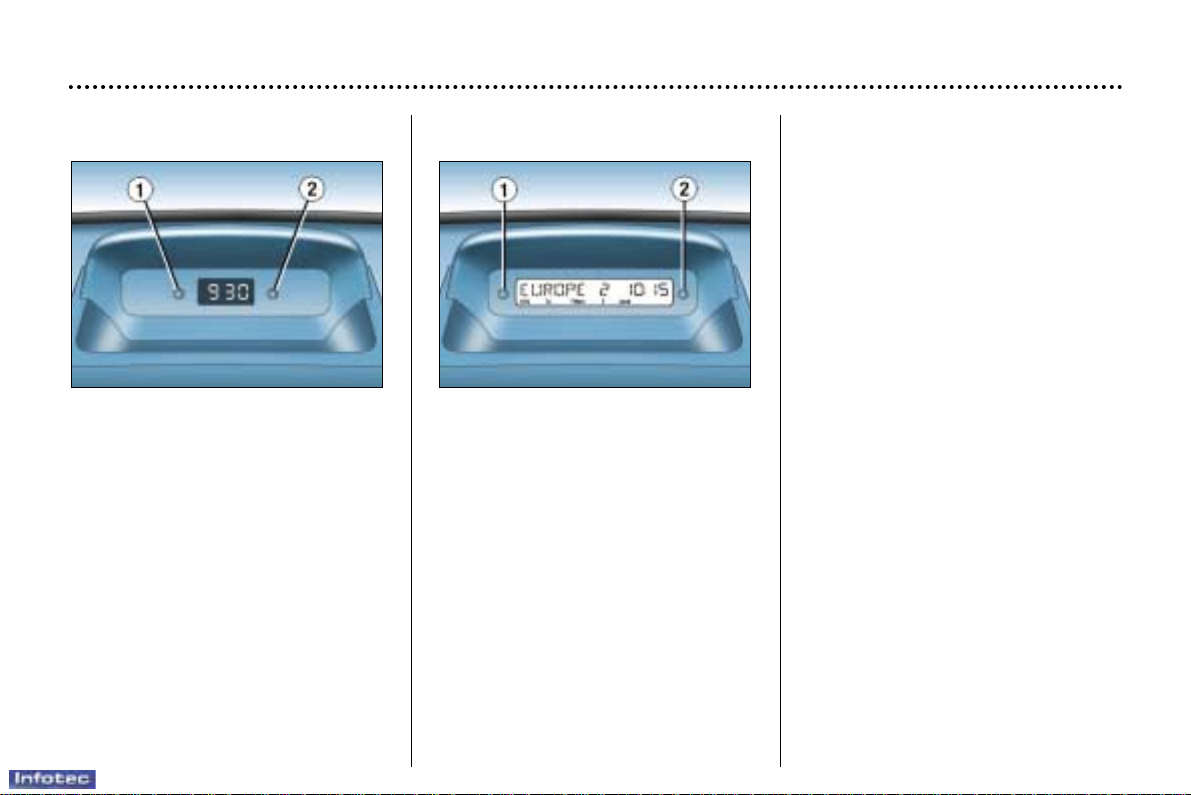
MULTIFUNCTION DISPLAY
This displays the following information:
– the time,
– the date,
– the audio system displays,
– a door check (e.g.: ''left front door
open''),
– warning messages (e.g.: ''remote
control battery flat'') or information
messages (e.g.: ''eco mode
active''), displayed temporarily.
CLOCK
Button 1: hour adjustment
Button 2: minute adjustment
Press and hold the button for rapid
advance.
YOUR PARTNER IN DETAIL
33
22-12-2003
Adjusting the parameters
Press and hold button 1 for two seconds to access the settings; the data
flashes, indicating it is ready to be
modified.
Then, each press of button 1 scrolls
through the various data in the following order:
– language of information displayed,
– hours (12 then 24 hour mode),
– minutes,
– year,
– month,
– day.
Pressing button 2 alters the value of
the parameter selected. Press and
hold for rapid advance (return to start
after the last possible value).
After 7 seconds with no action, the
main display returns; the modified
data are now recorded.
Page 30
4
THE KEYS
The keys allow you to switch on
the ignition and operate the passenger air bag disarming switch,
as well as to independently operate the locks on the doors and
the fuel filler cap.
Central locking
From the front doors, the keys
allow you to lock and unlock the
doors and tailgate.
If one of the doors or the tailgate
is open, it is impossible to operate the central locking.
The remote control performs the
same functions at a distance.
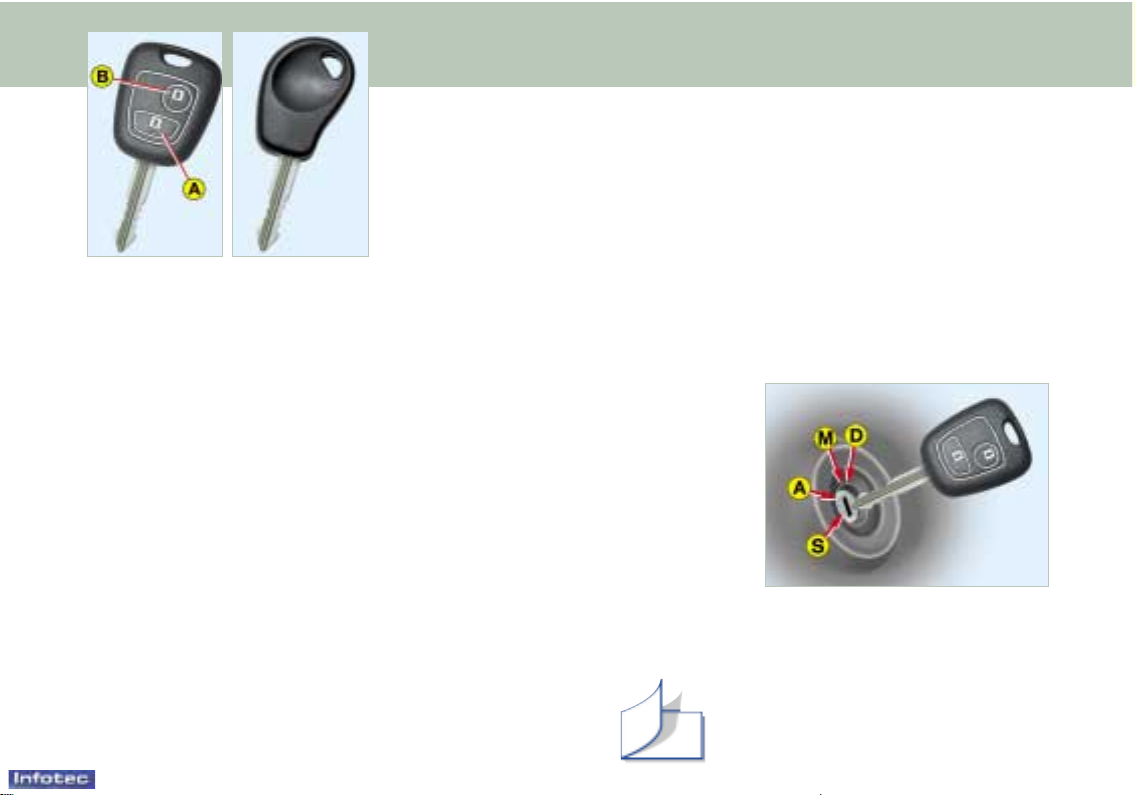
The remote control key
Locking
Press button A to lock the vehicle.
This is confirmed by fixed lighting
of the direction indicators for
approximately two seconds.
Vehicles fitted with
deadlocking
Deadlocking renders the exterior
and interior door controls inoperative.
Pressing button A deadlocks
the vehicle.
This is confirmed by fixed lighting
of the direction indicators for
approximately two seconds.
Pressing button A again within
five seconds following deadlocking, changes the deadlocking to
simple locking.
This is confirmed by fixed lighting
of the direction indicators for
approximately two seconds.
Unlocking
Press button B to unlock the
vehicle.
This is confirmed by rapid flashing of the direction indicators.
Locating the vehicle
To locate your vehicle, previously
locked, in a car park:
☞ press button A,
the courtesy lights
come on and the
direction indicators flash for a few
seconds.
STARTING
STOP position (S):
The ignition is off.
Accessories position (A): The
ignition is off but the accessories
can be used.
On position (M):
The ignition is on.
Starting position (D):
Operates the starter.
61
YOUR PARTNER AT A GLANCE
22-12-2003
Page 31
YOUR PARTNER IN DETAIL
46
22-12-2003
Page 32
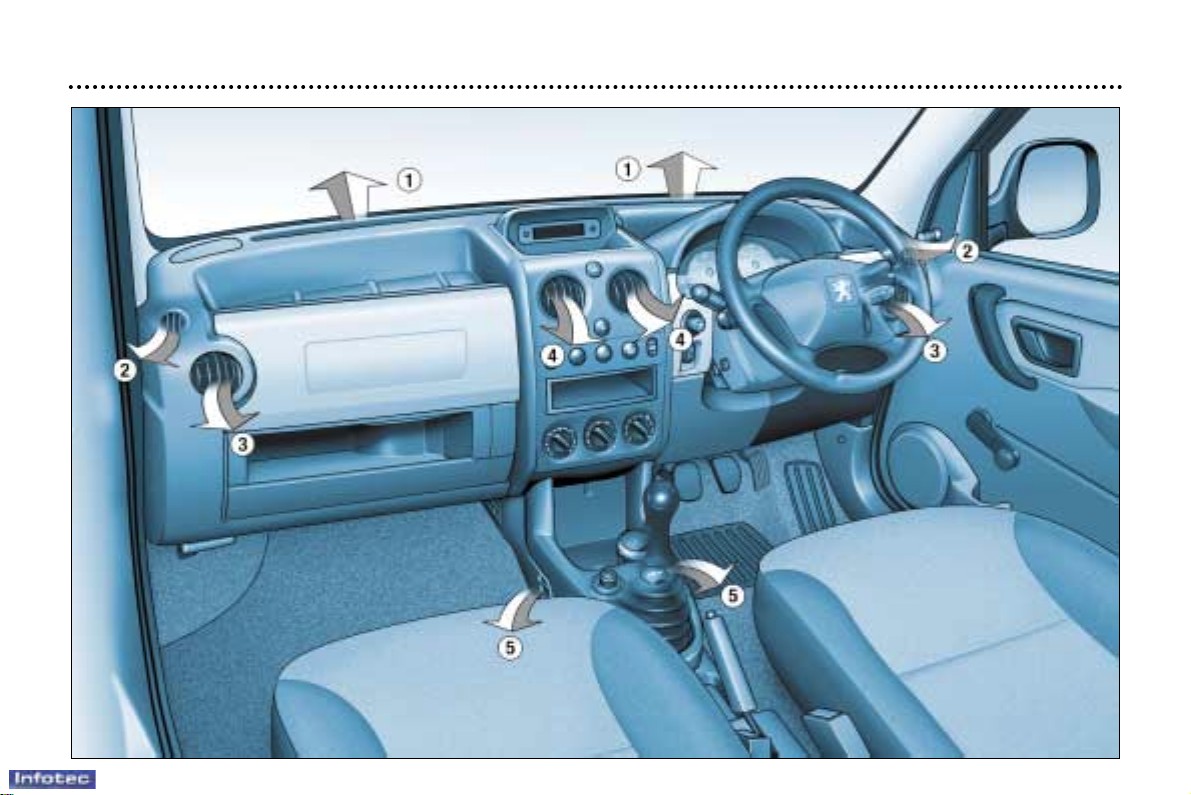
VENTILATION
1. Windscreen de-icing or demisting vents.
2. Front window de-icing or demisting vents.
3. Side vents.
4. Centre vents.
5. Air outlets to front footwells.
Advice on operation
– Select the air distribution most suited to your requirements and the climatic conditions.
– Gradually adjust the temperature setting for your comfort.
– Position the air control in the ''Outside Air'' position.
– For perfectly even air distribution, take care not to obstruct the exterior air intake grille and the vents. Check that the
passenger compartment filter is in good condition.
YOUR PARTNER IN DETAIL
47
22-12-2003
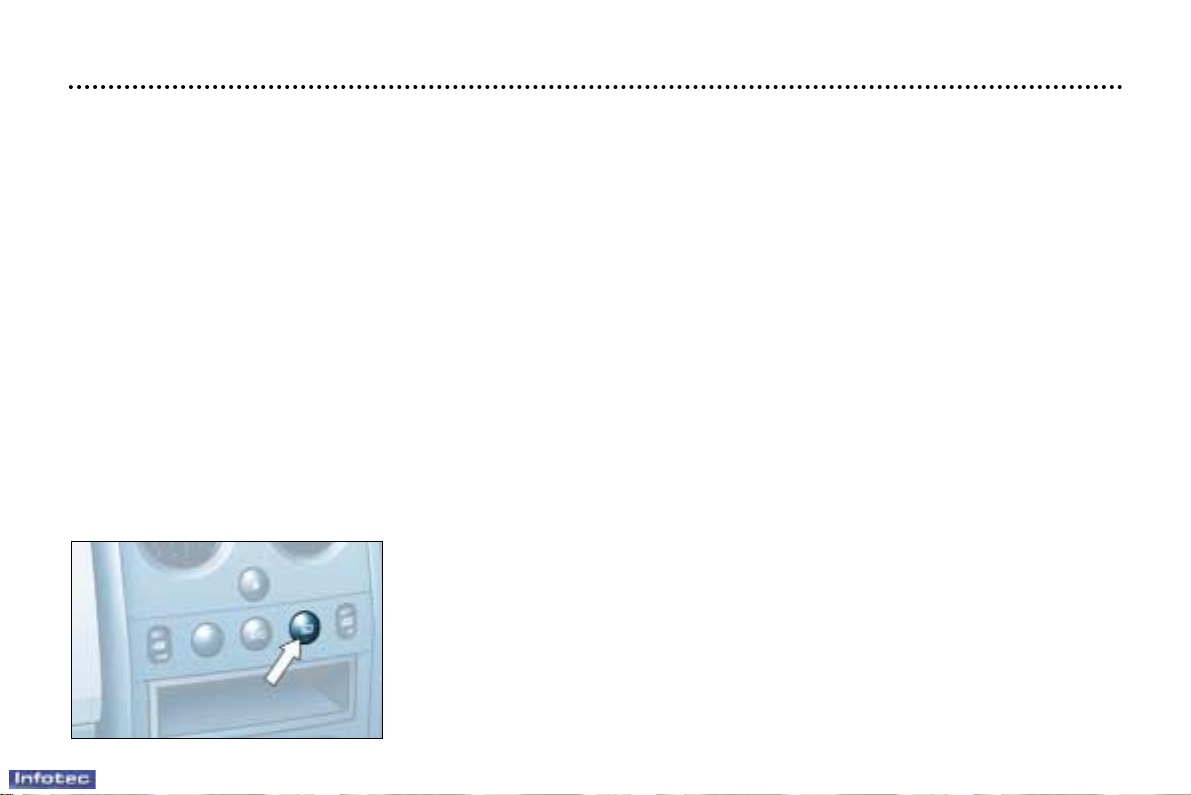
De-icing the rear screen and mirrors
With the engine running, pressing the control de-ices the rear screen and mirrors.
It switches off automatically after approximately twelve minutes.
Pressing the control again switches the de-icing system on again for twleve minutes.
It is possible to stop operation of the de-icing by pressing the control before the
twelve minutes have elapsed.
Page 33
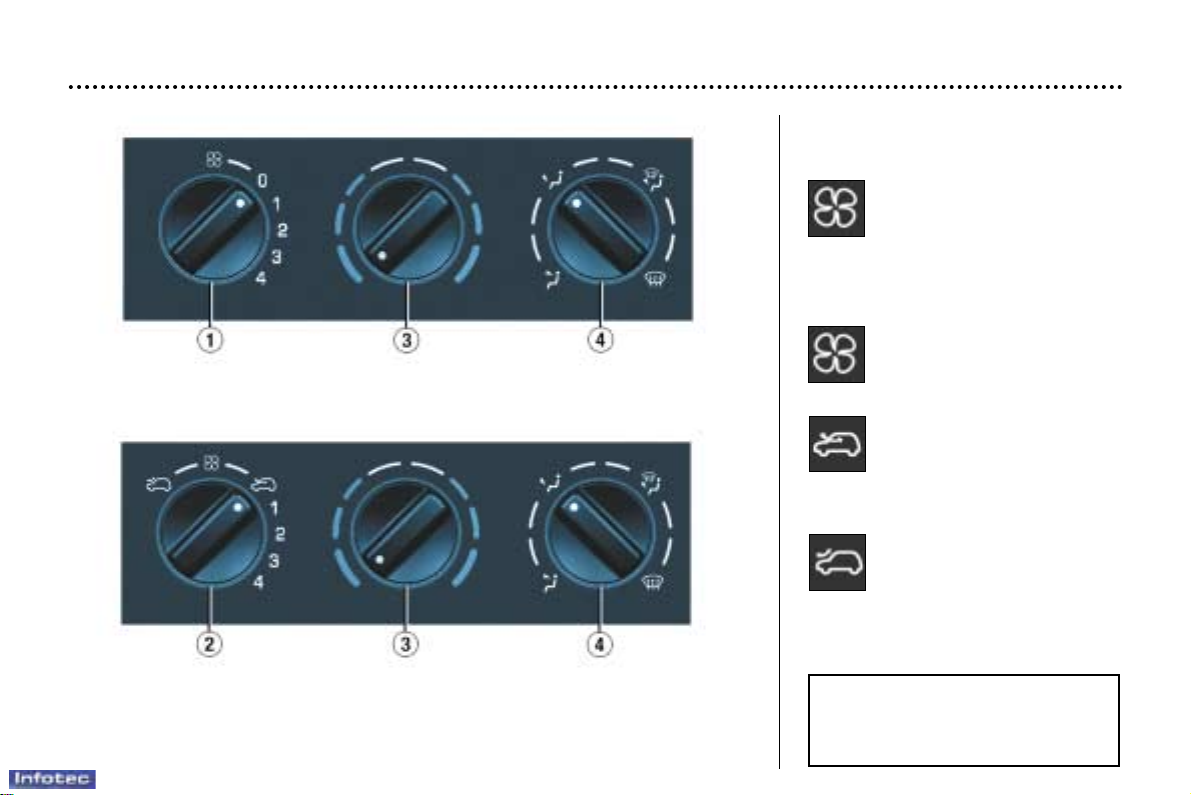
22-12-2003
2. Air flow adjustment and air
intake control
Turn the control from position 1 to position 4 to obtain
an air flow sufficient to
ensure your comfort.
Intake of exterior air.
This is the normal operating position.
Passenger compartment
isolation.
This position prevents exterior
odours and smoke entering the
passenger compartment.
As soon as possible, position the
control in the exterior air intake
position to prevent misting of the
windows.
HEATING
1. Air flow adjustment
Turn the control from position 1 to position 4 to obtain
an air flow sufficient to
ensure your comfort.
YOUR PARTNER IN DETAIL
48
Page 34
22-12-2003
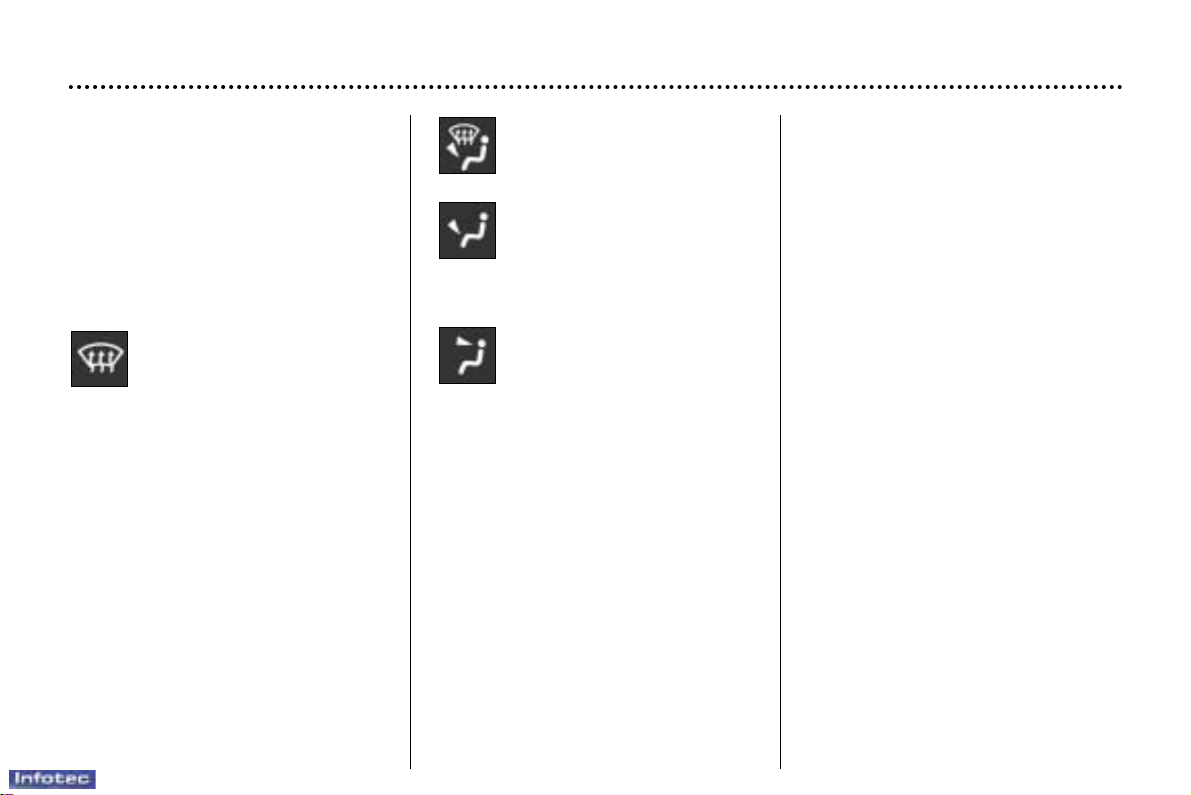
Windscreen, side windows
and footwells.
Footwells.
These settings are recommended
for cold climates.
Centre and side vents.
This setting is recommended for
high temperatures.
4. Air distribution adjustment
Windscreen and side windows (de-icing/demisting).
To quickly de-ice or demist the
windscreen and side windows:
– position the air intake control in the
''Outside Air" position,
– turn the temperature and air flow
controls to maximum,
– close the centre vents.
YOUR PARTNER IN DETAIL
49
3. Temperature adjustment
To be adjusted to your requirements.
From blue (exterior temperature) to
red (hot).
Page 35
5
YOUR PARTNER AT A GLANCE
STEERING WHEEL
STALKS
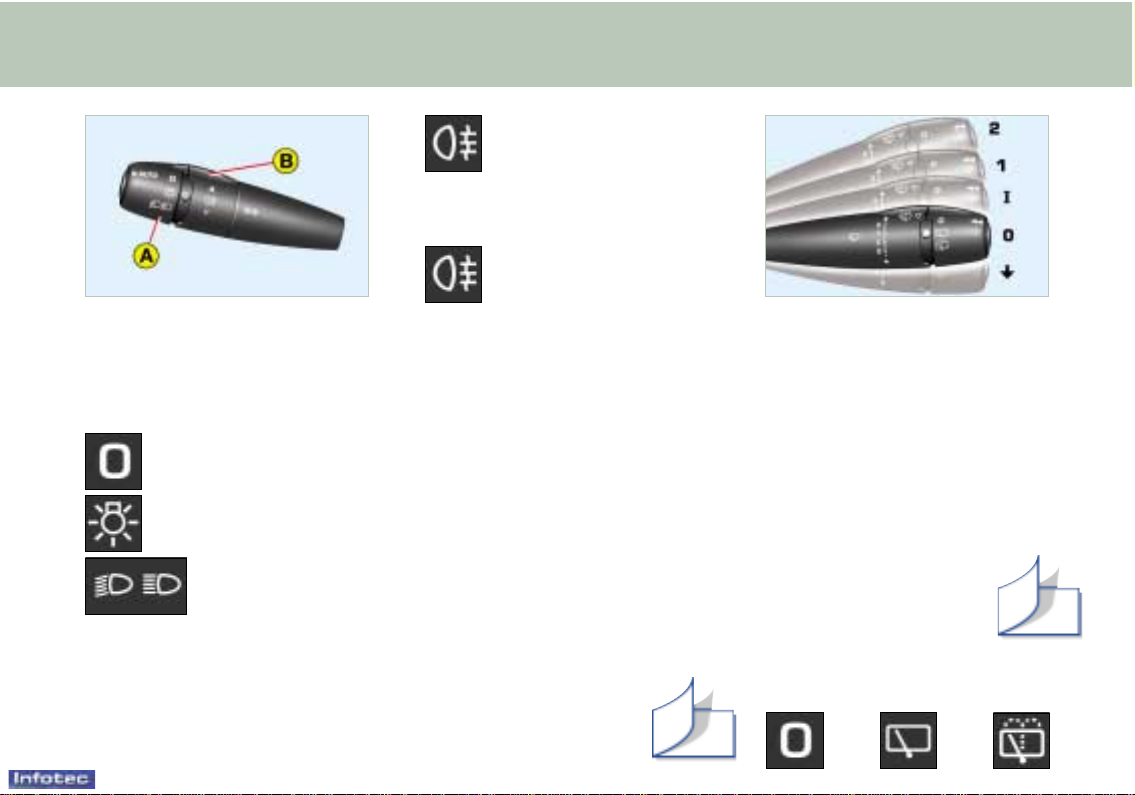
LIGHTING
Front and rear lights (ring A)
Lights off
Side lights
Dipped
headlamps/Main
beam headlamps
Vehicles fitted with
a rear fog lamp
(ring B)
Turn the ring forwards.
Vehicles fitted with
front fog lamps and a
rear fog lamp (ring B)
Front fog lamps (1st turn of the
ring forwards).
Front fog lamps and rear fog lamp
(2nd turn of the ring forwards).
T o switch off: turn the ring rearwards.
71
WINDSCREEN WIPERS
Front
2 Rapid wipe
(heavy rain).
1 Normal wipe
(moderate rain).
I Intermittent wipe.
0 Off.
Single wipe.
Windscreen wash-wipe:
pull the stalk towards you.
Rear
Off Intermittent Wash-
wipe wipe
72
22-12-2003
Page 36
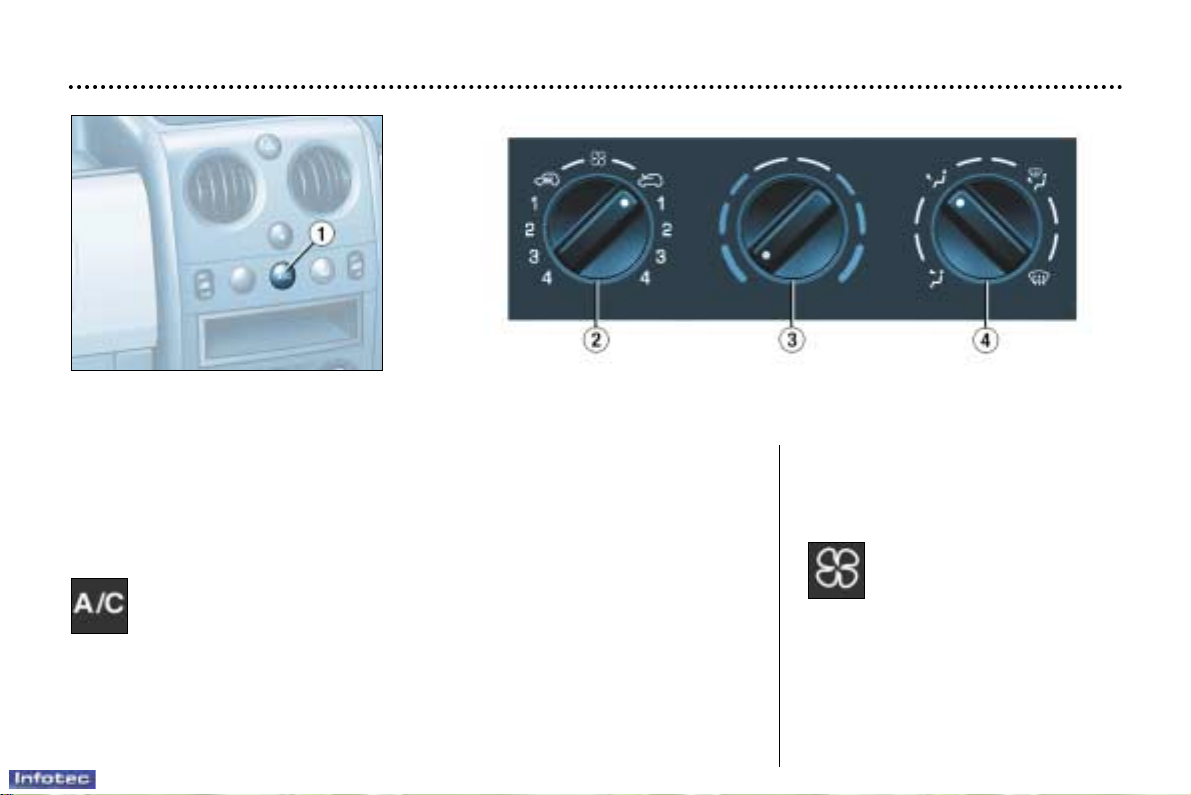
1. Air conditioning
The air conditioning is designed to operate in all seasons. In summer, it enables
the temperature to be lowered and in winter, above 0 °C, it increases the effectiveness of the demisting.
Press the switch to activate the air conditioning. The indicator light comes on.
2. Air flow adjustment and air
intake control
Turn the control from position 1 to position 4 to obtain
an air flow sufficient to
ensure your comfort.
YOUR PARTNER IN DETAIL
50
22-12-2003
AIR CONDITIONING
The air conditioning does not operate while the air flow adjustment control
is in the minimum position.
Note: It is quite normal that the condensation created by the air conditioning
results in a flow of water under the vehicle when it is stationary.
Page 37
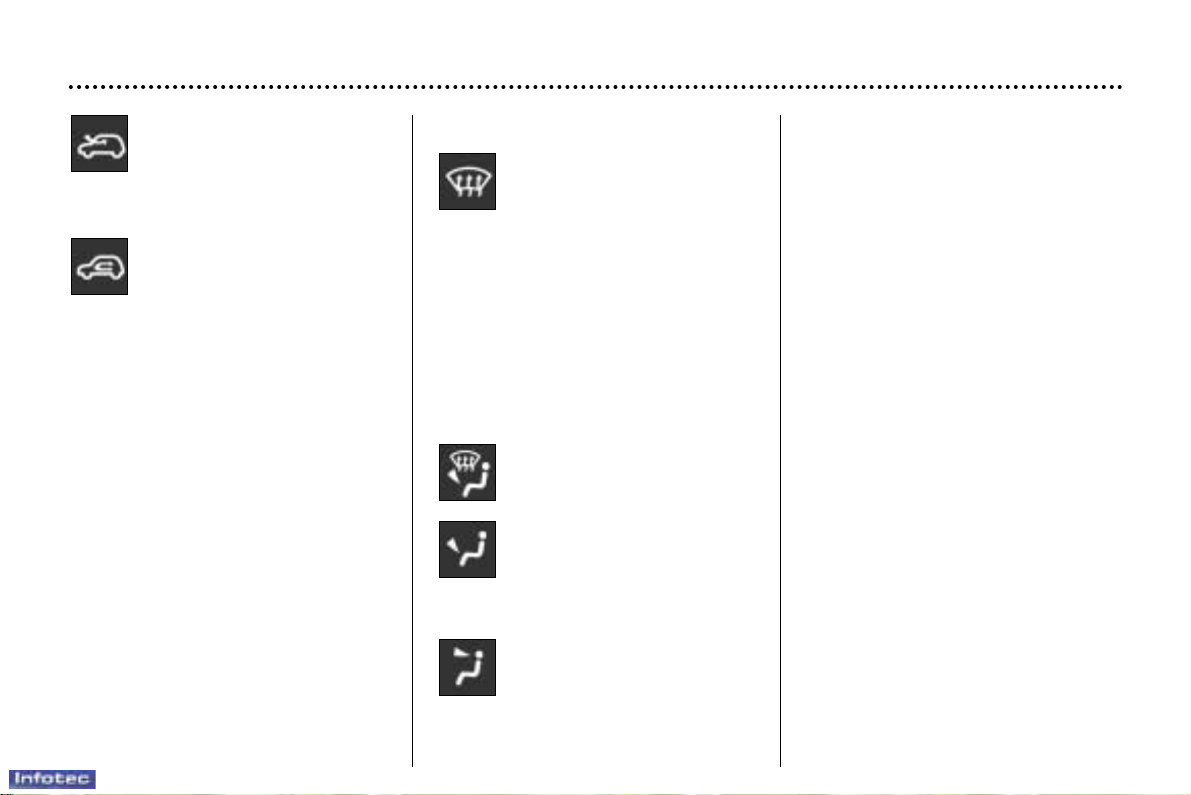
4. Air distribution adjustment
Windscreen and side windows (de-icing/demisting).
T o quickly de-ice or demist the windscreen and side windows:
– turn the temperature and air flow
controls to maximum,
– close the centre vents,
– position the air intake control in
the "Outside Air" position,
– start the air conditioning.
Windscreen, side windows
and footwells.
Footwells.
These settings are recommended
for cold climates.
Centre and side vents.
This setting is recommended for
high temperatures.
Intake of exterior air.
This is the normal operating position.
Recirculation of interior air.
This position prevents exterior
odours and smoke entering the passenger compartment.
Used simultaneously with the air
conditioning, recirculation enables
both heating and cooling performance to be improved.
Used without the air conditioning,
recirculation may result in misting of
the windows.
As soon as possible, position the
control in the exterior air intake position.
YOUR PARTNER IN DETAIL
51
22-12-2003
3. Temperature adjustment
To be adjusted to your requirements.
From blue (cold when the air condi-
tioning is on) to red (hot).
Important precaution
Operate the air conditioning system
for 5 to 10 minutes, once or twice a
month, to keep it in perfect working
order.
If the system does not produce cold air,
do not use it and contact a PEUGEOT
dealer.
Note: to optimise the operation of
the air conditioning, leave the vents
open.
Page 38
YOUR PARTNER IN DETAIL
52
22-12-2003
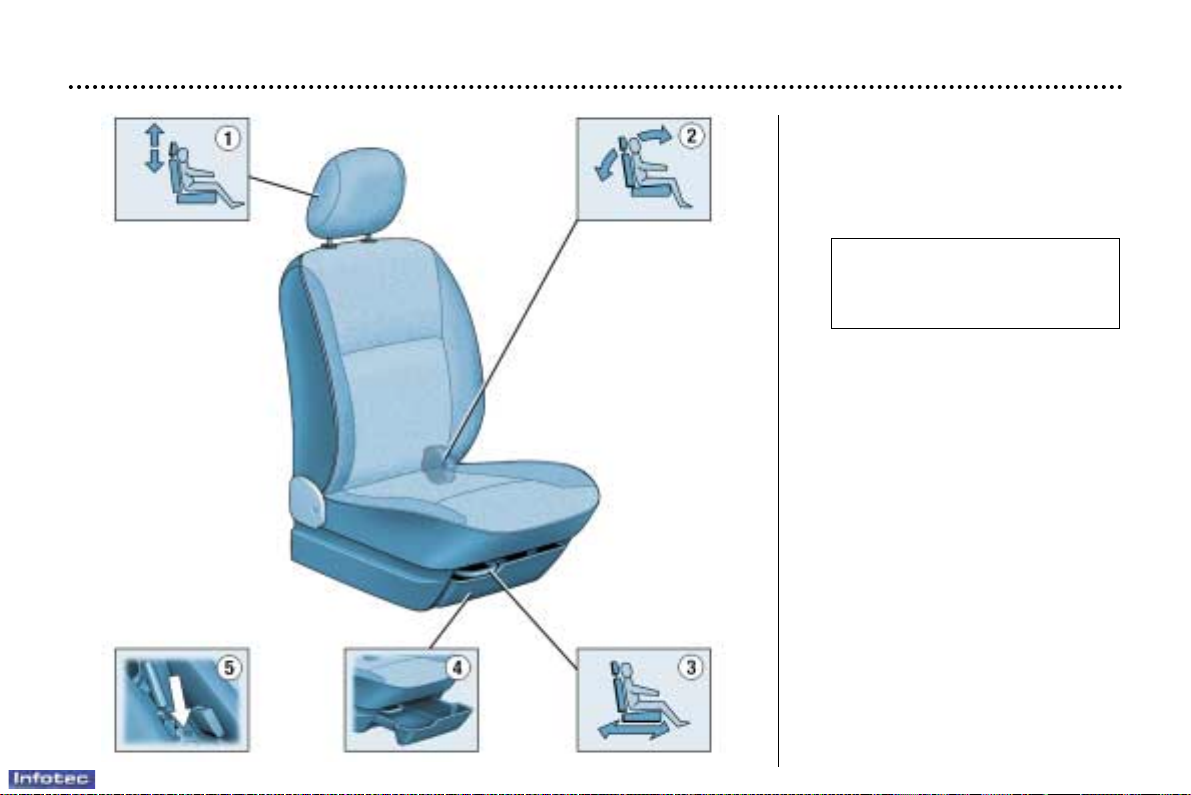
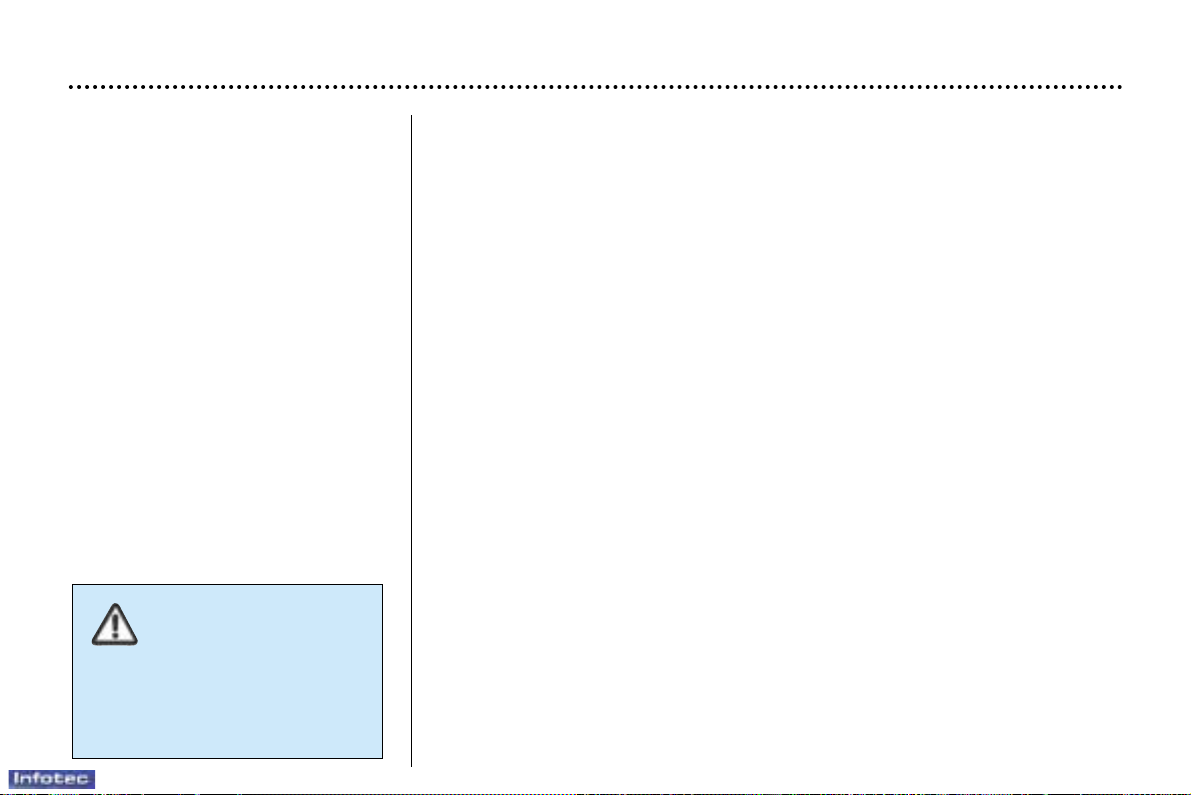
To remove the head restraint,
place it in the top position, press
the tabs and pull it upwards.
To put it back in position, locate
the stems of the restraint in the
holes, taking care to keep them
in line with the seat back.
2- Seat back angle adjustment
Turn the knob.
3- Forwards-backwards
adjustment (driver)
Lift the control and slide the seat
forwards or backwards.
SEATS
1- Head restraint height
adjustment
To raise or lower the restraint,
slide it.
The adjustment is correct
when the upper edge of the
head restraint is level with
the top of the head.
Page 39
YOUR PARTNER IN DETAIL
53
22-12-2003
Never drive with the
head restraints removed;
they must be in place
and correctly adjusted.
Do not place heavy
objects in the drawers.
4- Storage drawer (version with
passenger air bag)
There is a storage drawer under
the driver's or passenger seat.
To open it, lift it and pull.
5- Heated seats switch
Press the switch. The temperature is controlled automatically.
Pressing the switch again stops
operation.
Note: the command for activation
of heating of the seat(s) remains
memorised for two minutes after
the ignition has been switched off.
Page 40
YOUR PARTNER IN DETAIL
54
22-12-2003
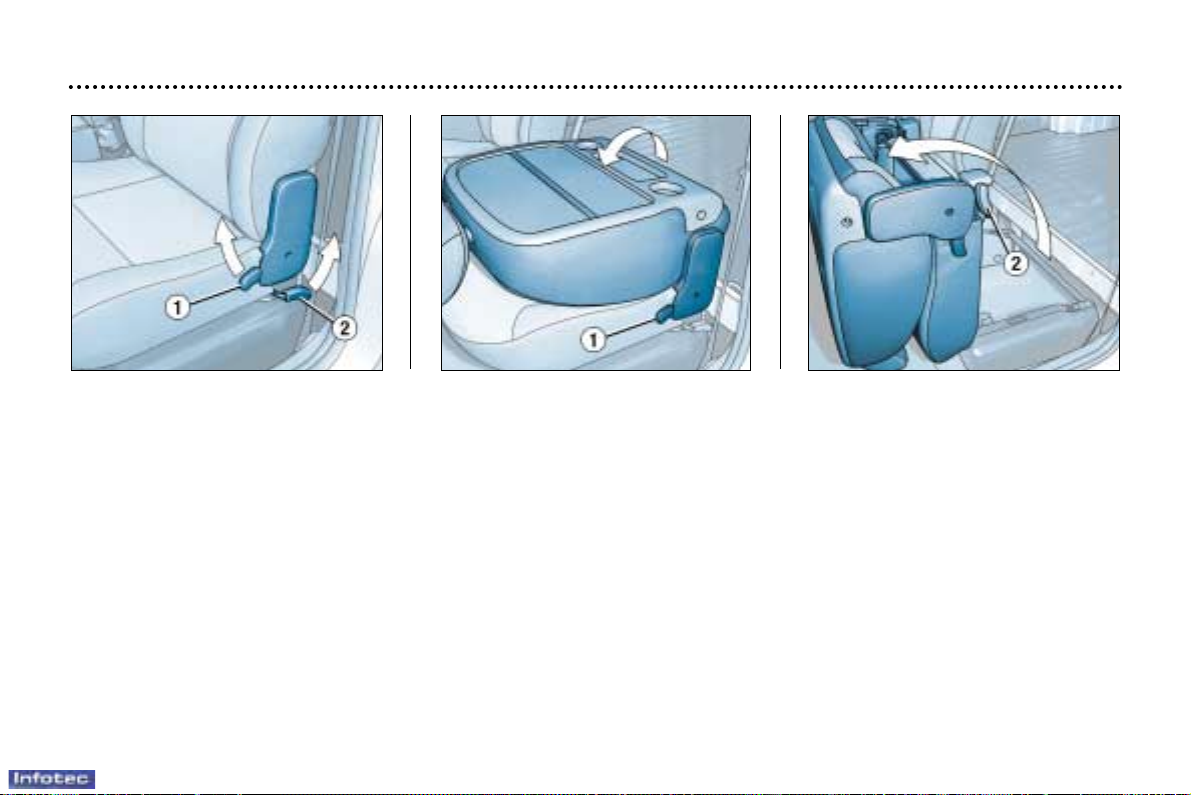
MULTIFUNCTION PASSENGER SEAT*
To fold the seat back:
Pull the control 1 upwards and tilt the seat back.
This provides a flat surface, recesses for drinks and a strap for retaining documents.
To fold the seat fully:
Pull the control 2 upwards and tilt the whole seat.
It is not necessary to remove the head restraint.
This provides access to a box which enables you to store objects so that they cannot be seen from outside the vehicle or
to wedge long objects passed through the roof flap.
If your vehicle is not fitted with a load blocking partition, it can accommodate long objects (up to 2.10 m).
These must be placed on the front edge of the instrument panel and secured using the rear bar of the boot or using the lashing
rings.
* According to destination.
Page 41
YOUR PARTNER IN DETAIL
55
22-12-2003
LASHING RINGS
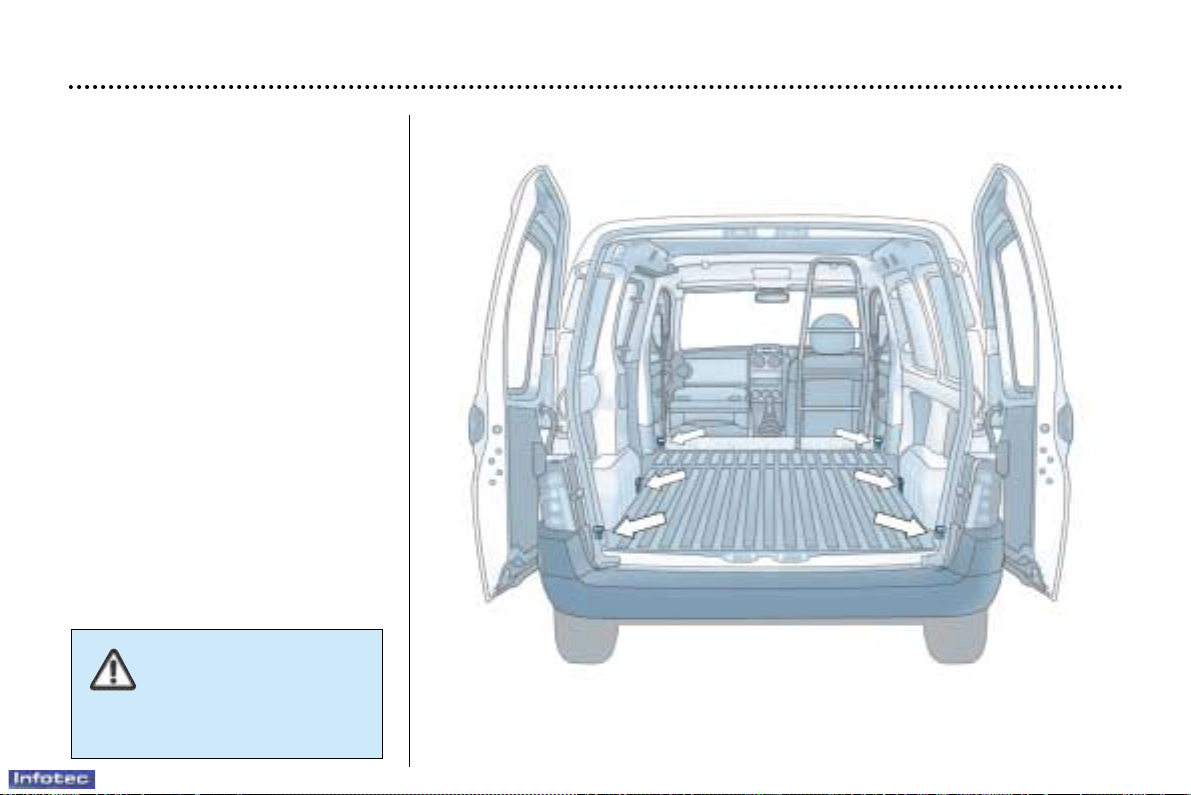
Use the 6 lashing rings on the luggage compartment floor to secure
your loads.
You can use suitable load retainers
(half-height partitions, grille, etc.)
supplied by your PEUGEOT dealer.
For greater safety,
always ensure that the
loads transported are
stowed securely.
Page 42

YOUR PARTNER IN DETAIL
56
22-12-2003
GENERAL POINTS RELATING TO CHILD SEATS
Although one of PEUGEOT's main criteria when designing your vehicle, the
safety of your children also depends on you.
For maximum safety, please follow these precautions:
– Since 1992, all children under the age of 10 must travel in approved child
seats* suited to their weight, on seats fitted with a seat belt.
– A child weighing less than 9 kg must travel in the rearwards facing
position both in the front and in the rear. PEUGEOT recommends that
children should travel in the "rearwards facing" position up to the age of
two.
– Statistically, the safest seats in your vehicle for the transportation of
children are the rear seats.
PEUGEOT recommends that children travel in the rear even when a
"rearwards facing" child seat is used.
– If a child is travelling on a booster seat, check that the lap section of the seat
belt passes over the child's thighs correctly. The chest section of the seat
belt must be positioned on the child's shoulder without touching the neck.
PEUGEOT recommends that you use a booster seat with a back, fitted with a
seat belt guide at shoulder level.
– Remember to fasten the seat belt or the child seat harness keeping the slack
in relation to the child's body to a minimum, even for short journeys.
* According to current legislation in the country.
** Consult the relevant administration in your country for information regarding
the rules for transporting children on the front passenger seat.
Rules for transporting children
on the front passenger seat**
Children under the age of 10 must
not travel in the forwards facing
position, unless the rear seats are
already occupied by other children
or the rear seats cannot be used
(absent or folded). In this case,
adjust the front passenger seat to
the intermediate position and leave
the passenger air bag armed.
The transportation of children in the
rearwards facing position is permitted. In this position, it is essential to
disarm the passenger air bag.
Otherwise, the child would risk being
killed or seriously injured if the air
bag were to inflate.
Page 43
YOUR PARTNER IN DETAIL
57
CHILD SEATS RECOMMENDED BY PEUGEOT
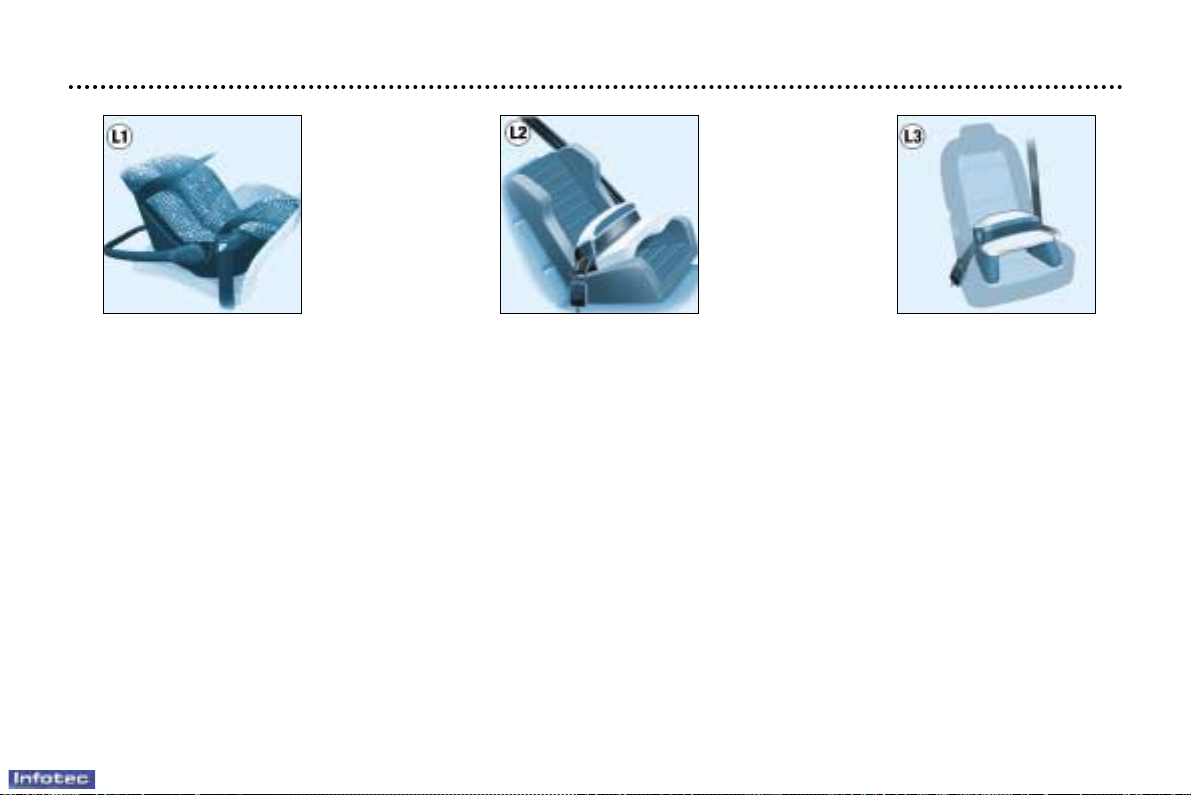
PEUGEOT offers a complete range of child seats which are secured using the seat belt:
Group 0+: from birth to 13 kg
L1 - "Britax Babysure": installed in the rear-facing position in the front and in the rear using a three-point seat belt.
In the front, it is compulsory to disarm the passenger air bag and the vehicle's seat must be adjusted to the intermediate
longitudinal position.
Group 1: from 9 to 18 kg
L2 - "Römer Prince": installed in the rear using a two or three-point seat belt.
For the safety of your child, it is imperative that the restraining cushion is used.
Group 2: from 15 to 25 kg
L3 - "Römer Vario'': installed in the rear using a two or three-point seat belt.
22-12-2003
Page 44
YOUR PARTNER IN DETAIL
58
22-12-2003
Groups 2 and 3: from 15 to 36 kg
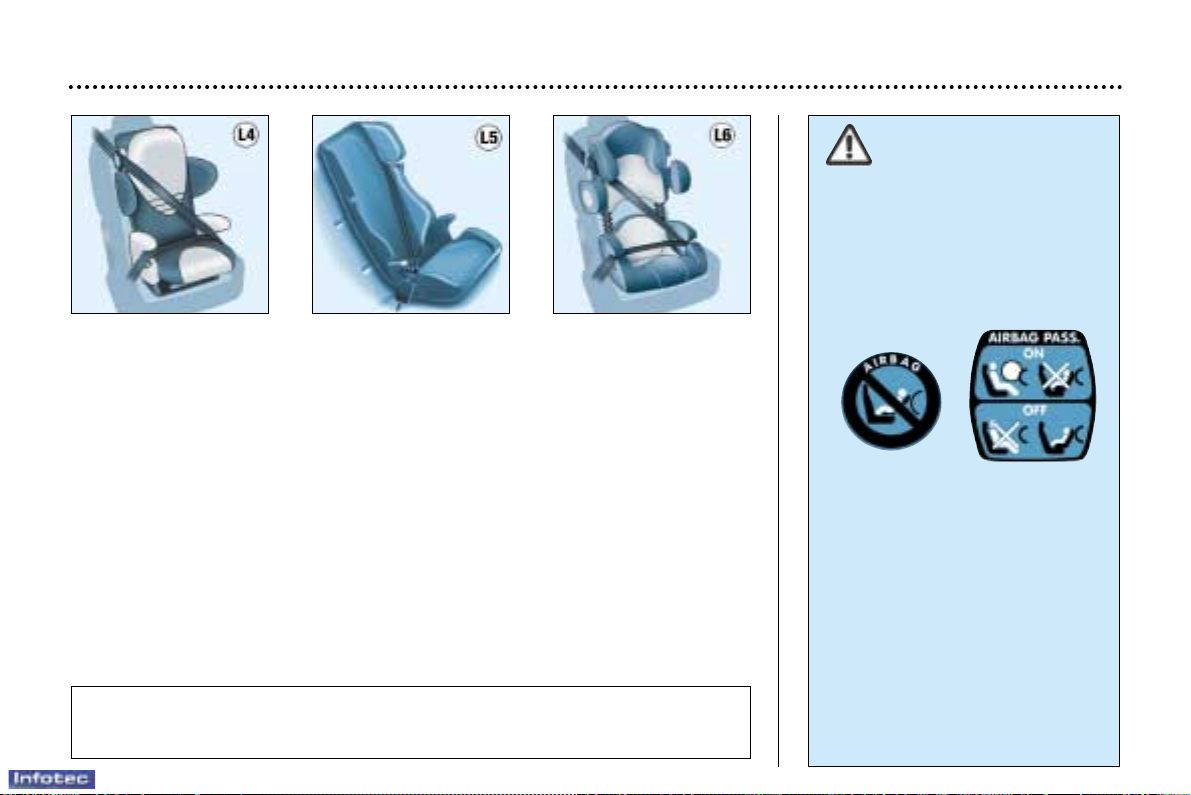
L4 - "Recaro Start'': installed in the rear using a three-point seat belt.
The height and width at the shoulders and length of the seat cushion must
be adjusted according to the age and build of your child.
L5 - "Klippan Optima": installed in the rear using a three-point seat belt.
From the age of 6 years (approximately 22 kg), the booster is used on its own.
Groups 1, 2 and 3: from 9 to 36 kg
L6 - "Kiddy Life": installed in the rear using a three-point seat belt.
The height and width at the shoulders and the length of the seat cushion
must be adjusted according to the age and build of your child.
For the safety of young children (from 9 to 18 kg), PEUGEOT recommends
use of the restraining cushion.
Never leave one or more
children alone and unsupervised in a vehicle.
Never leave a child or an
animal in a vehicle which is
exposed to the sun and has the
windows closed.
To protect your young children
from the sun, fit blinds on the rear
windows.
Never leave the keys within
reach of children inside the vehicle.
Observe strictly the recommendations for assembling and
securing the child seat as shown
in the child seat instructions.
T o prevent the doors from opening
accidentally, use the child lock*.
Also, do not open the rear windows
more than a third*.
* According to model.
Disarm the passenger air bag when installing a "rearwards facing" child
seat on the front passenger seat. Otherwise, the child would risk being
killed or seriously injured were the air bag to inflate.
Page 45
YOUR PARTNER IN DETAIL
59
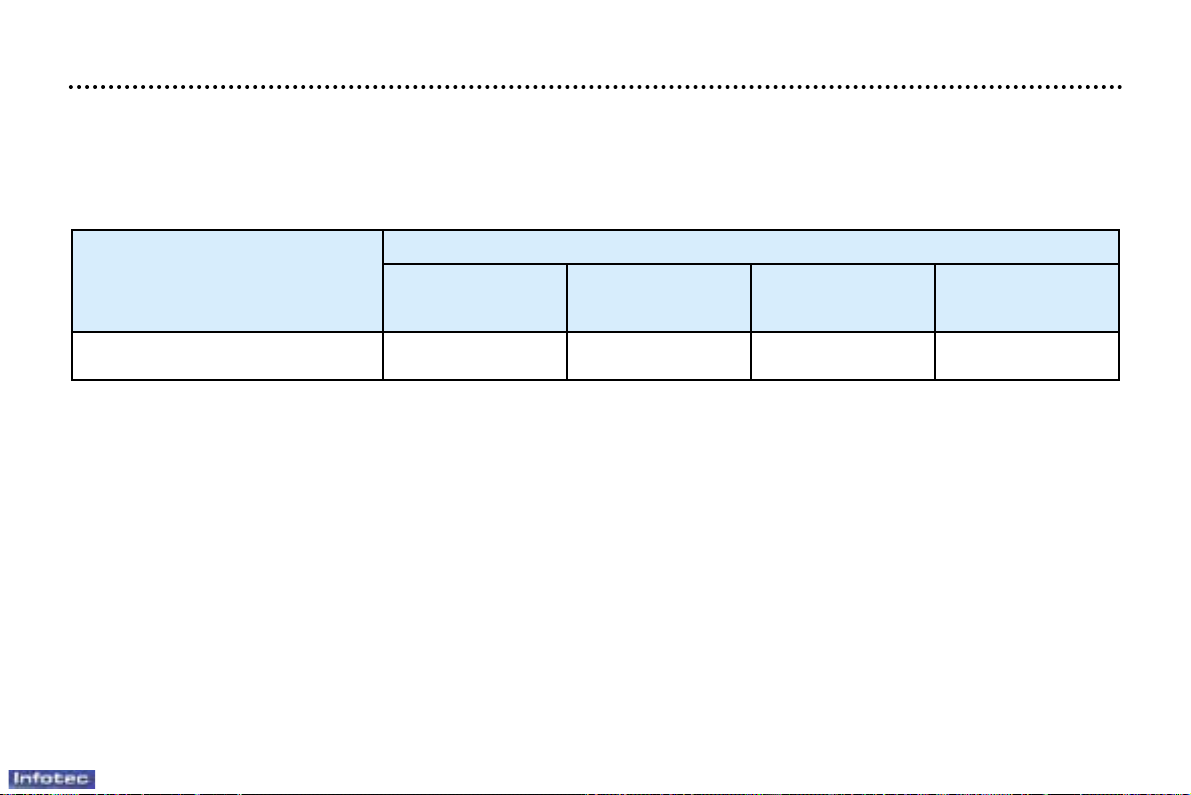
SUMMARY TABLE FOR THE INSTALLATION OF CHILD SEATS
In accordance with European regulations (Directive 2000/3), the table below indicates the options for the installation of child
seats secured using the seat belt and universally approved (child seats which can be installed in all vehicles using a seat
belt), in accordance with the weight of the child and the seat in the vehicle:
U : seat suitable for the installation of a child seat secured using the seat belt and "universally" approved. "Rear facing" and
"forward facing" child seats.
(a) Group 0: from birth to 10 kg.
(b) The rules for transporting children on the front passenger seat are specific to each country . Consult the legislation in force
in your country.
Weight of the child and indicative age
Seat
Weight below 13 kg Weight from 9 to 18 kg Weight from 15 to 25 kg Weight from 22 to 36 kg
(groups 0 (a) and 0+) (group 1) (group 2) (group 3)
From birth to From From From
1 year approx. 1 to 3 years approx. 3 to 6 years approx. 6 to 10 years approx.
Front passenger seat (b) UUUU
22-12-2003
Page 46
6
YOUR PARTNER AT A GLANCE
22-12-2003
SEATS
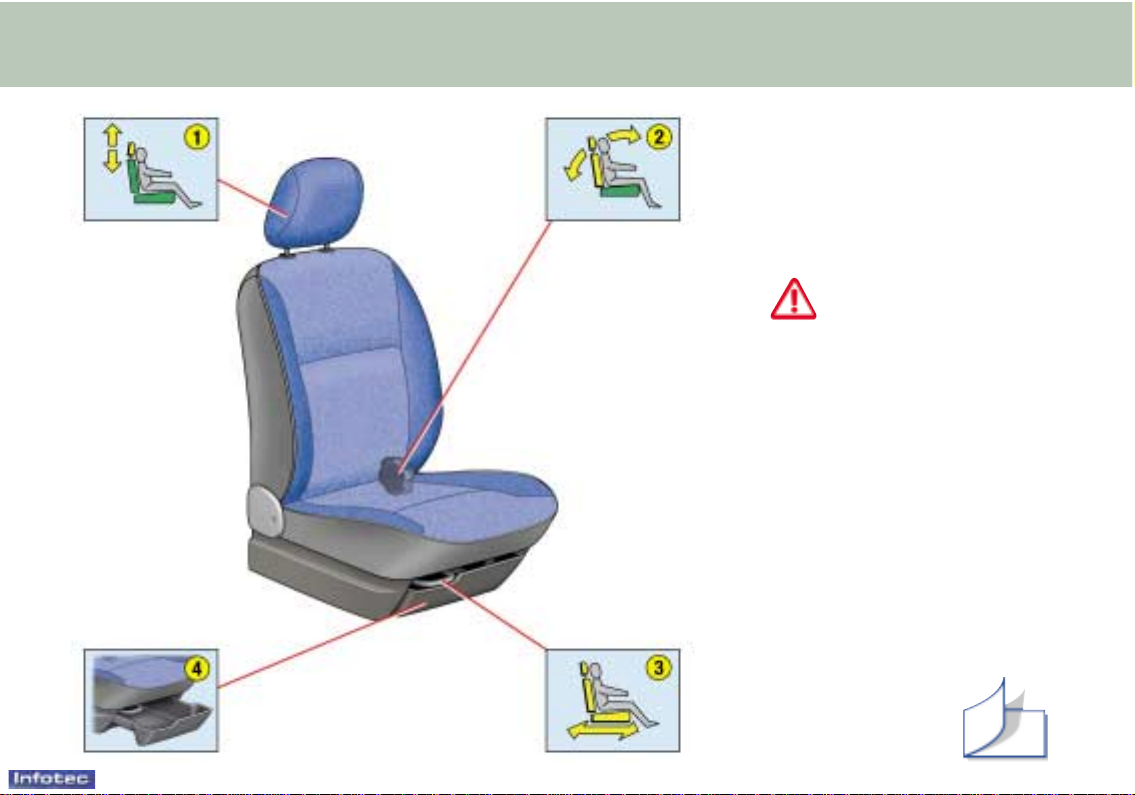
Driver and passenger seats
1 - Head restraint height
adjustment.
Never travel with the
head restraints removed.
2 - Seat back angle adjustment.
3 - Forwards-backwards adjustment.
4 - Storage drawer (passenger or
driver).
52
Page 47
YOUR PARTNER IN DETAIL
60
22-12-2003
SEAT BELTS
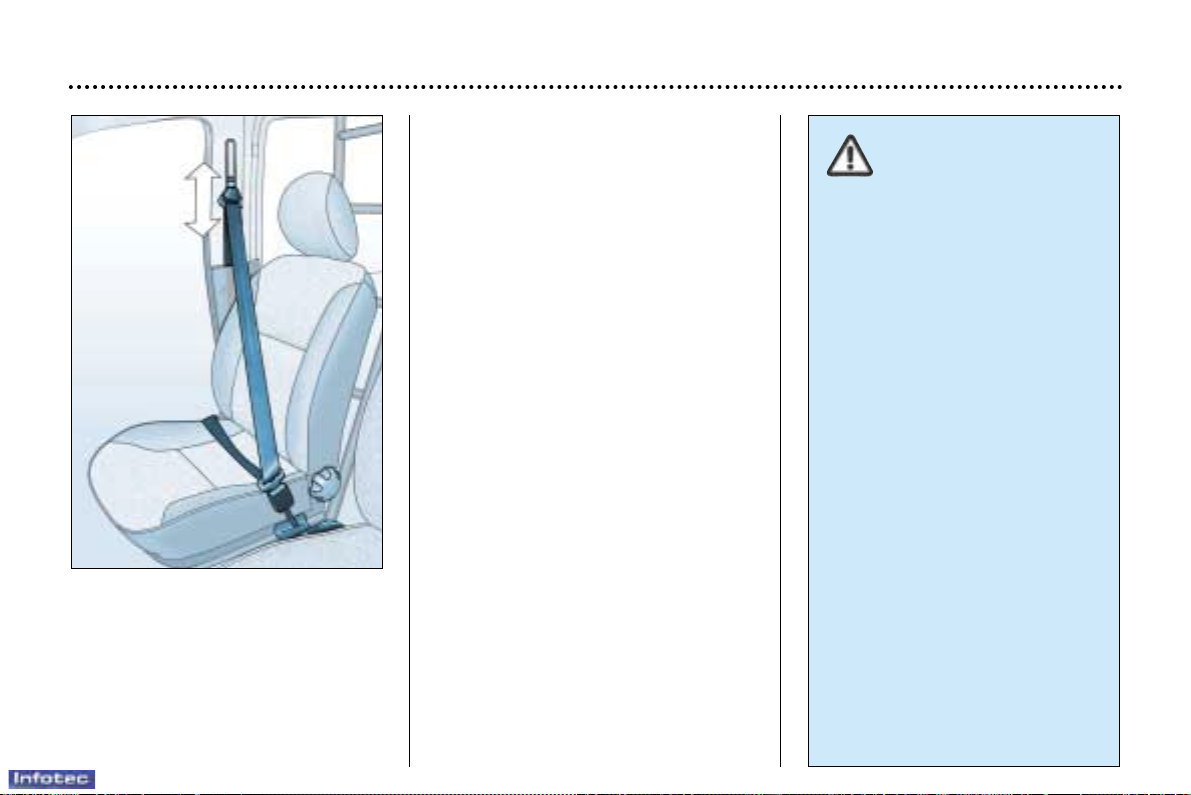
Seat belt height adjustment
To lower or raise: slide the control
downwards or upwards.
Fastening the seat belts
Pull the strap, then insert the end into
the buckle.
Seat belts with pre-tensioner
Safety in the event of front impacts
has been improved by the introduction of seat belts with pre-tensioner.
Depending on the seriousness of the
impact, the pre-tensioning system
instantly tightens the seat belts and
pulls them against the bodies of the
occupants.
The pre-tensioning seat belts are
active when the ignition is on.
To be effective, a seat
belt must be tightened
as close to the body as
possible.
Depending on the nature and
seriousness of the impact, the
pre-tensioning system may be
triggered before and independently of the air bags.
In all cases, the air bag warning
light on the instrument panel
comes on.
Following an impact, have the
system checked by a PEUGEOT
dealer.
Page 48
YOUR PARTNER IN DETAIL
61
THE KEYS
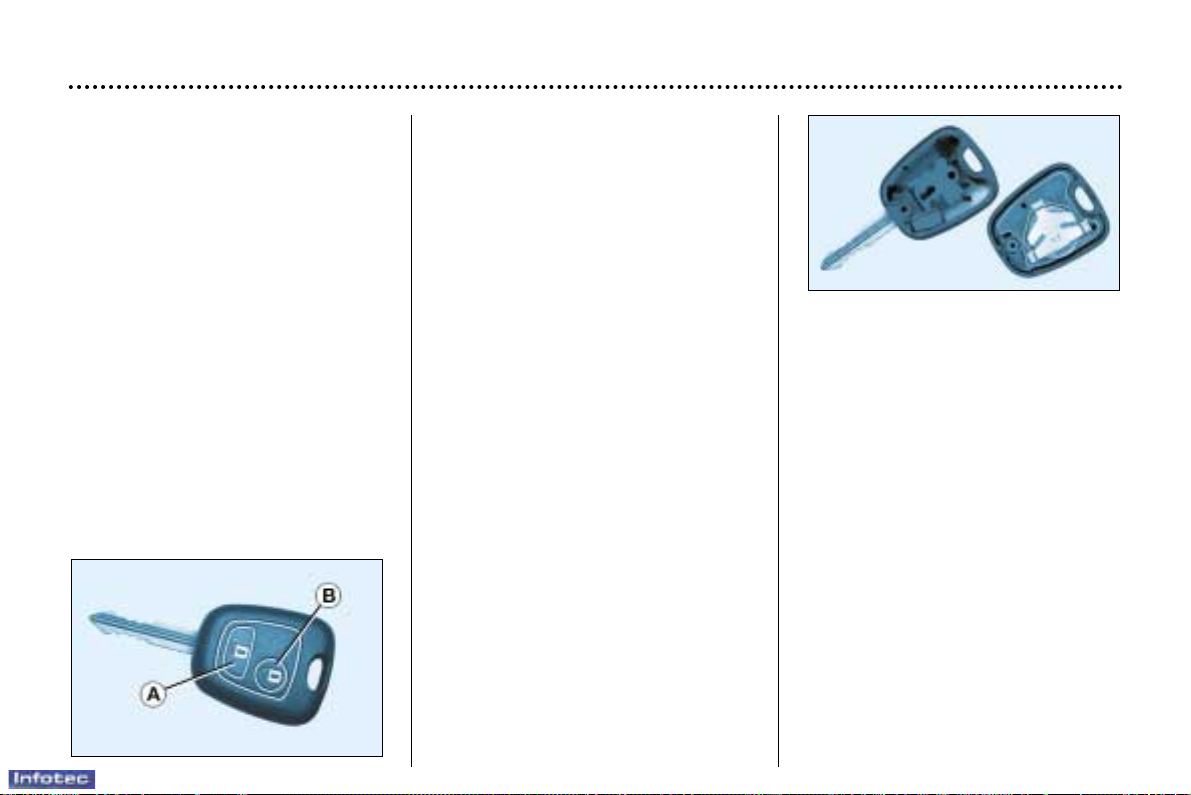
The keys allow you to switch on the
ignition and operate the passenger
air bag disarming switch as well as to
independently operate the locks on
the doors and the fuel filler cap.
Central locking
From the front doors, the keys allow
you to lock, deadlock and unlock the
doors and tailgate.
If one of the doors or the tailgate is
open, the central locking does not
work.
The remote control performs the
same functions at a distance.
Locating your vehicle
To locate your vehicle, if you have
locked it, in a car park:
☞ press button A, the courtesy
lights come on and the direction
indicators flash for a few seconds.
The remote control
Locking
Press button A to lock the vehicle.
This is confirmed by fixed lighting of
the direction indicators for approximately two seconds.
Deadlocking
Deadlocking renders the interior and
exterior door controls inoperative.
Pressingbutton Adeadlocks the vehicle
This is confirmed by fixed lighting of
the direction indicators for approximately two seconds.
Pressing button A again within five
seconds following deadlocking switches from deadlocking to simple locking.
This is confirmed by fixed lighting of
the direction indicators for approximately two seconds.
Unlocking
Press button B to unlock the vehicle.
This is confirmed by rapid flashing of
the direction indicators.
Note: if the vehicle is locked and
unlocking is activated inadvertently,
unless the doors are opened within
30 seconds, the vehicle will lock
automatically.
Changing the battery of the
remote control
The "battery flat" information is provided by an audible signal accompanied by the message "Remote con-
trol battery flat" on the screen.
To change the battery, unclip the
casing using a coin at the ring
(CR 2016/3 volt battery).
If the remote control does not work
after the battery has been changed,
re- programme the remote control.
Programming the remote
control
☞ Switch off the ignition.
☞ Switch the ignition on again.
☞ Press button A immediately for a
few seconds.
☞ Switch off the ignition and remove
the remote control key from the
ignition lock. The remote control is
now working again.
22-12-2003
Page 49
YOUR PARTNER IN DETAIL
62
Confidential card
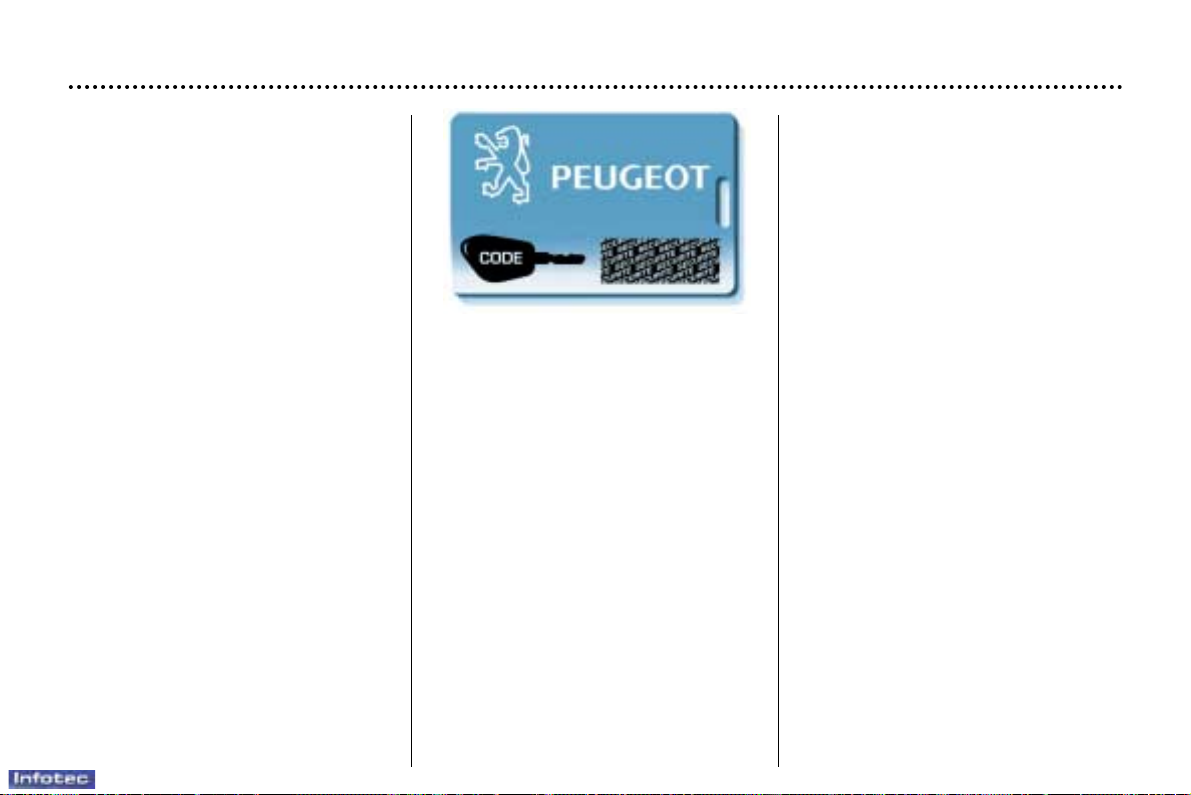
The confidential card contains the
identification code necessary for any
work carried out by a PEUGEOT
dealer on the electronic immobiliser
system. This code is hidden by a
film, which should be removed only if
necessary.
Keep your card in a safe place,
never inside the vehicle.
Key in ignition
A buzzer sounds on opening the
driver's door, if the key has been left
in the ignition.
ELECTRONIC ENGINE
IMMOBILISER
This locks the engine control system
as soon as the ignition has been
switched off and therefore prevents
starting of the vehicle by anyone
who does not have the key.
The ignition key has an electronic
chip which has a special code.
When the ignition is switched on, the
code must be recognised for starting
to be possible.
If the system does not function
correctly, the central locking button
indicator light, situated in the centre
of the fascia, flashes rapidly when
the ignition is switched on (2nd
notch), accompanied by an audible
signal.
In this case your vehicle will not
start.
Contact a PEUGEOT dealer as
soon as possible.
22-12-2003
Page 50
YOUR PARTNER IN DETAIL
63
Make a careful note of the number on each key. The key number is coded on the label attached to the key.
If the keys are lost, your PEUGEOT dealer can rapidly supply you with new keys.
The high frequency remote control is a sensitive system; do not operate it while it is in your pocket as there is a
possibility that it may unlock your vehicle, without you being aware of it.
The remote control does not operate when the key is in the ignition, even when the ignition is switched off, except for
reprogramming.
Do not operate the deadlocking function if there is anyone inside the vehicle.
Driving with the doors locked may make access to the passenger compartment by the emergency services more difficult
in an emergency.
As a safety precaution (with children on board), remove the ignition key when you leave the vehicle, even for a short time.
Do not repeatedly press the button of your remote control out of range of your vehicle.
You run the risk of stopping it from working and the remote control would have to be reprogrammed.
When purchasing a second-hand vehicle:
– ensure that you are given the confidential card;
– have the key codes memorised by a PEUGEOT dealer, to ensure that the keys in your possession are the only ones
which can start the vehicle.
Do not make any modifications to the electronic engine immobiliser system.
22-12-2003
Page 51
YOUR PARTNER IN DETAIL
62
Confidential card
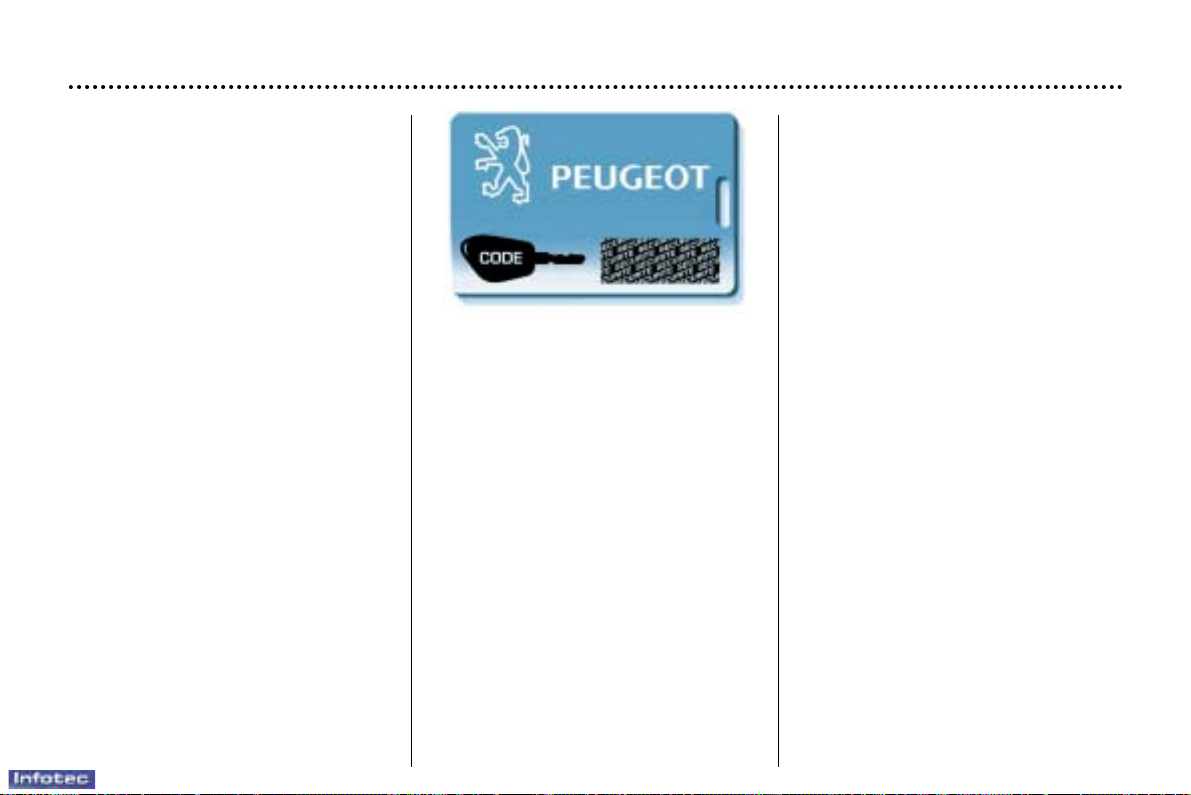
The confidential card contains the
identification code necessary for any
work carried out by a PEUGEOT
dealer on the electronic immobiliser
system. This code is hidden by a
film, which should be removed only if
necessary.
Keep your card in a safe place,
never inside the vehicle.
Key in ignition
A buzzer sounds on opening the
driver's door, if the key has been left
in the ignition.
ELECTRONIC ENGINE
IMMOBILISER
This locks the engine control system
as soon as the ignition has been
switched off and therefore prevents
starting of the vehicle by anyone
who does not have the key.
The ignition key has an electronic
chip which has a special code.
When the ignition is switched on, the
code must be recognised for starting
to be possible.
If the system does not function
correctly, the central locking button
indicator light, situated in the centre
of the fascia, flashes rapidly when
the ignition is switched on (2nd
notch), accompanied by an audible
signal.
In this case your vehicle will not
start.
Contact a PEUGEOT dealer as
soon as possible.
22-12-2003
Page 52
YOUR PARTNER IN DETAIL
63
Make a careful note of the number on each key. The key number is coded on the label attached to the key.
If the keys are lost, your PEUGEOT dealer can rapidly supply you with new keys.
The high frequency remote control is a sensitive system; do not operate it while it is in your pocket as there is a
possibility that it may unlock your vehicle, without you being aware of it.
The remote control does not operate when the key is in the ignition, even when the ignition is switched off, except for
reprogramming.
Do not operate the deadlocking function if there is anyone inside the vehicle.
Driving with the doors locked may make access to the passenger compartment by the emergency services more difficult
in an emergency.
As a safety precaution (with children on board), remove the ignition key when you leave the vehicle, even for a short time.
Do not repeatedly press the button of your remote control out of range of your vehicle.
You run the risk of stopping it from working and the remote control would have to be reprogrammed.
When purchasing a second-hand vehicle:
– ensure that you are given the confidential card;
– have the key codes memorised by a PEUGEOT dealer, to ensure that the keys in your possession are the only ones
which can start the vehicle.
Do not make any modifications to the electronic engine immobiliser system.
22-12-2003
Page 53
22-12-2003
YOUR PARTNER IN DETAIL
64
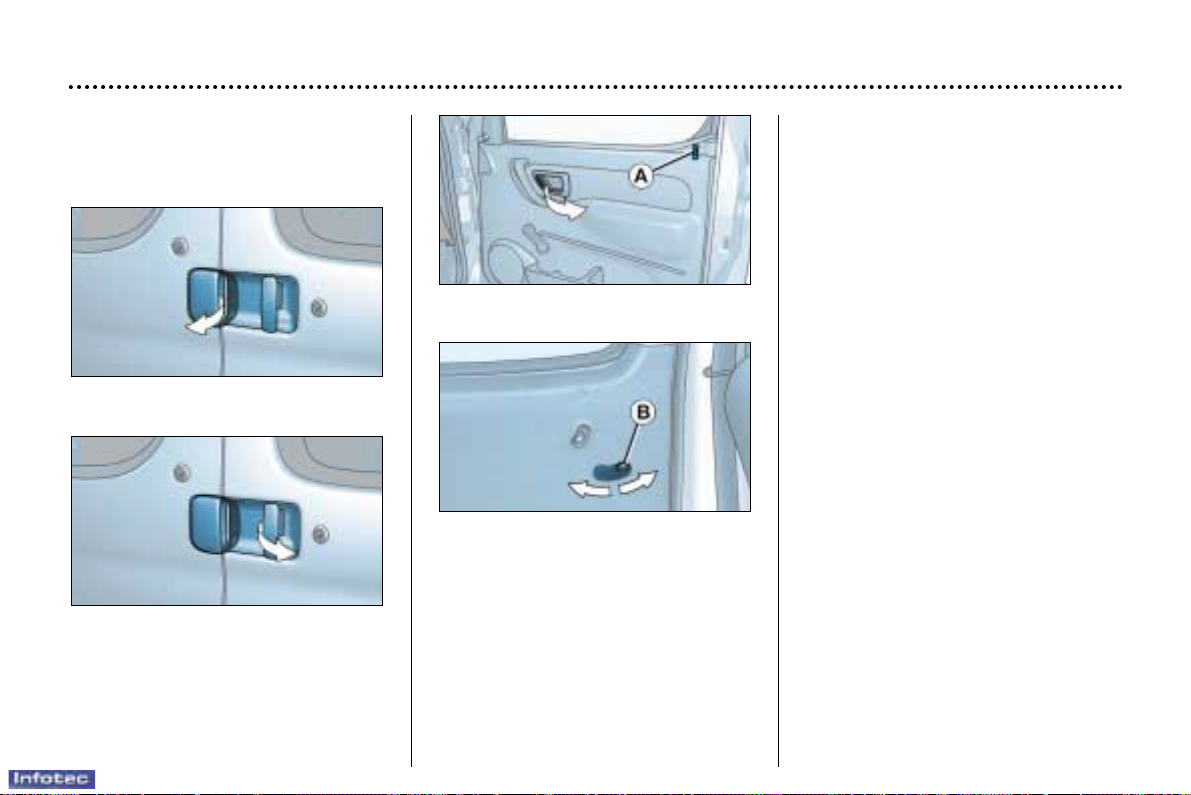
FRONT DOORS AND SLIDING
SIDE DOORS
Front doors
Side doors
Opening the doors from outside
Locking/Unlocking from
the inside
Front doors
To lock, lower button A.
The closing control of one of the front
doors permits complete locking of
the vehicle.
To unlock and open, lift button A and
pull the handle towards you.
The driver's door opening control
permits complete unlocking of the
vehicle.
Sliding side doors
The side door opening/closing control
only controls the door concerned.
T o close, push the control Bforwards
and slide the door.
To open, pull the control B rearwards
and slide the door.
Note: if the fuel tank cap is removed,
the right-hand side door cannot be
opened.
Side doors
Opening the doors from inside
The driver's door opening control
permits complete unlocking of the
vehicle.
Front doors
Page 54
YOUR PARTNER IN DETAIL
65
22-12-2003
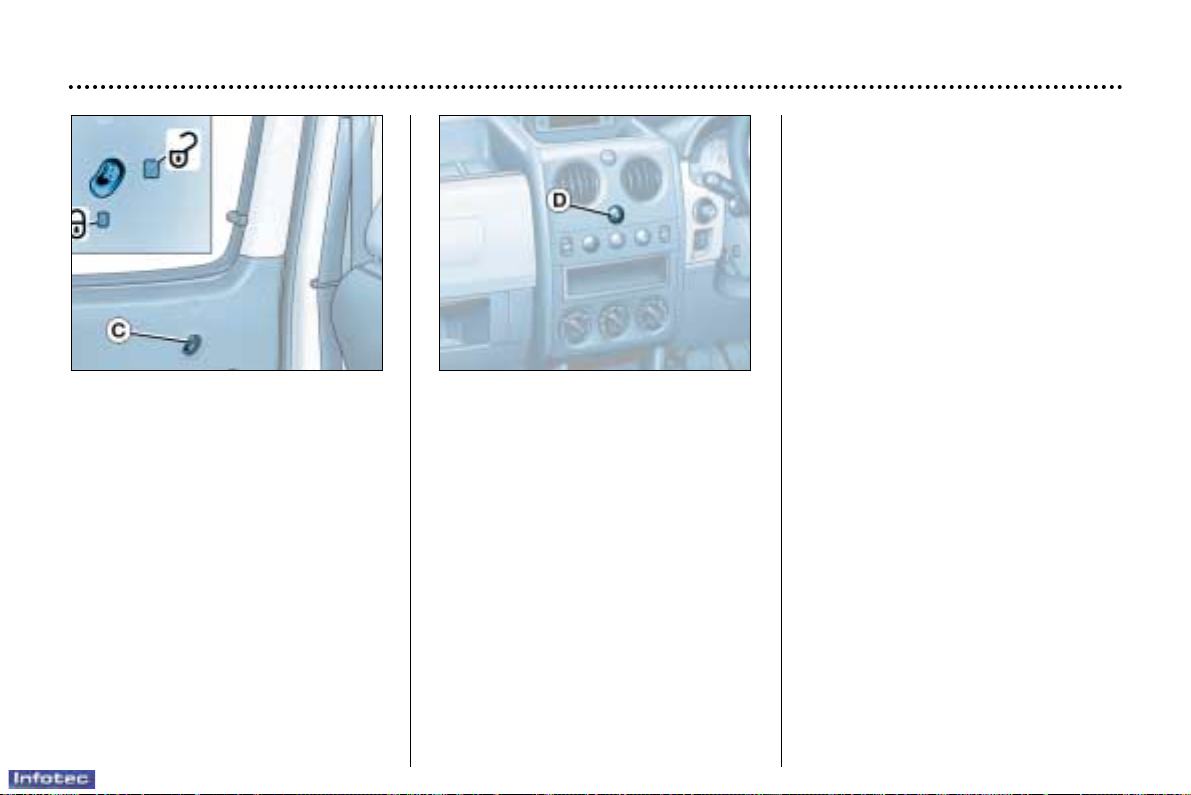
Locking from the inside
Lower or raise control C to lock or
unlock from the inside.
Locking from the inside
Pressing control D operates the
central locking, when the doors are
closed.
Unlocking from the inside
Press control D.
It is still possible to open the doors
from the inside.
Note:
– doors locked and ignition off: the
indicator light flashes,
– doors locked and ignition on: the
indicator light remains on.
Automatic central locking
Your vehicle can lock automatically
while driving (speed greater than
6 mph (10 km/h)). You can activate
or deactivate this function.
Activation
Press and hold control D.
Activation of the function is
accompanied by an audible signal.
Deactivation
Press and hold control D.
Deactivaton of the function is
accompanied by an audible signal.
Page 55
YOUR PARTNER IN DETAIL
66
22-12-2003
REAR DOORS
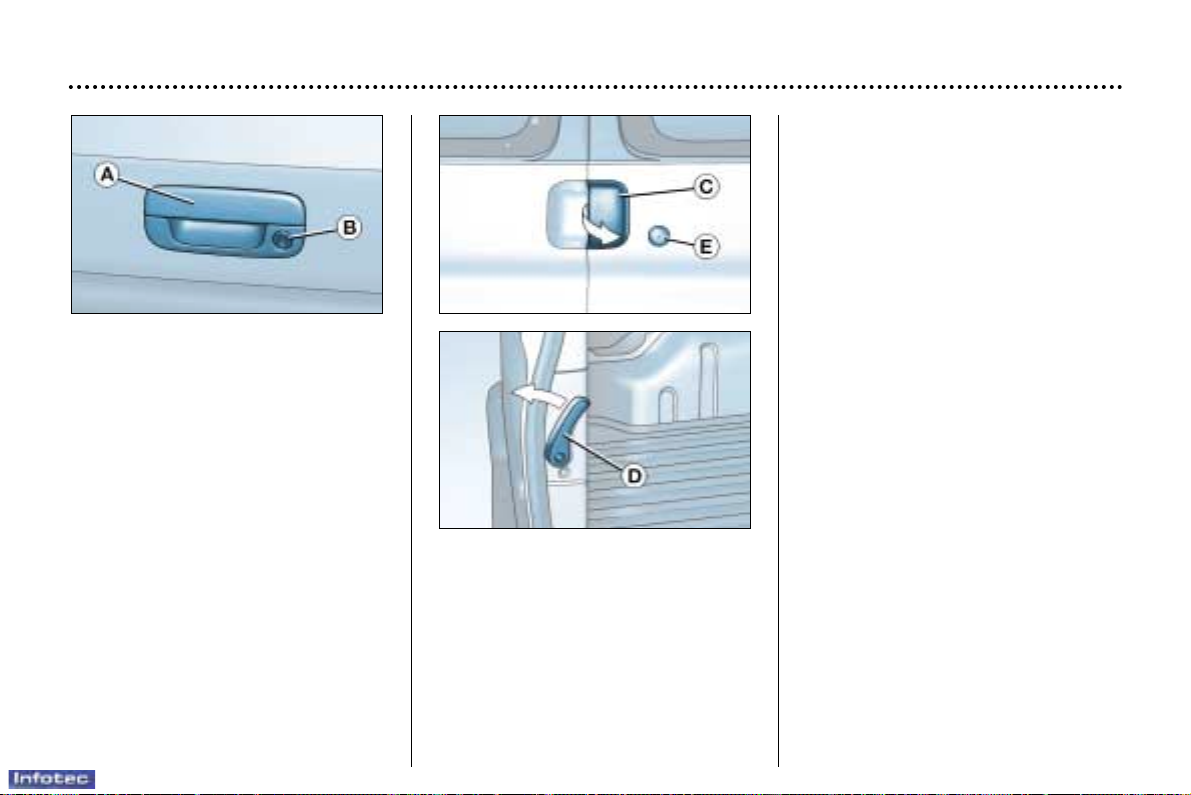
Opening the doors from outside
To open, pull the rear right door handle C towards you and open the rear
left door by pulling the lever D on the
inside.
You can unlock the rear doors by
inserting the key in the lock E.
LOCKING/UNLOCKING
THE TAILGATE
To open the tailgate, operate the
handle A and lift it.
You can unlock the tailgate by
inserting the key in the lock B.
Page 56
YOUR PARTNER IN DETAIL
67
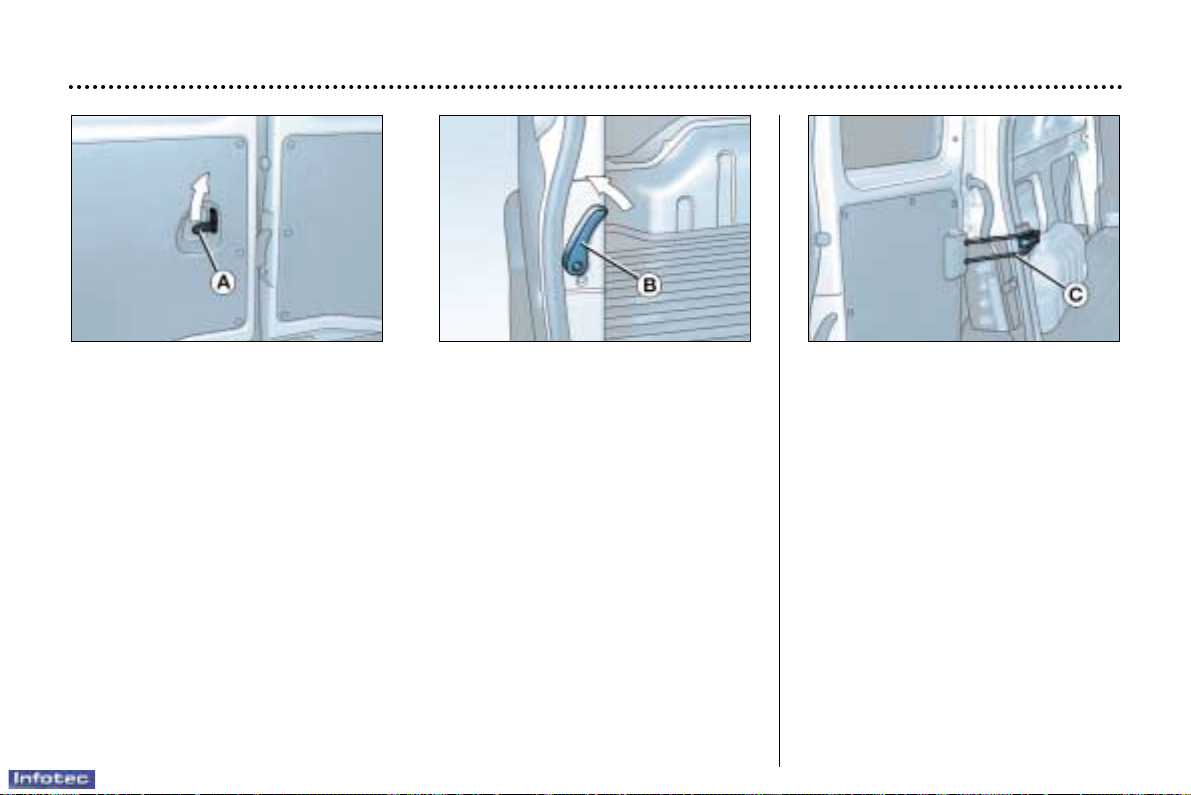
Opening the rear doors to 180°
To open the rear doors to 180°,
release the check strap C towards
you when the door is partially open.
When closing the door, the check
strap hooks itself in place again
automatically.
Opening the doors from inside
The rear door opening controls only unlock these doors.
To open, lift lever A.
To open the other door, push lever B.
Note: when closing from the inside, close the right-hand door first ensuring that
lever B is in the vertical position then close the left-hand door.
22-12-2003
Page 57
YOUR PARTNER IN DETAIL
66
22-12-2003
REAR DOORS
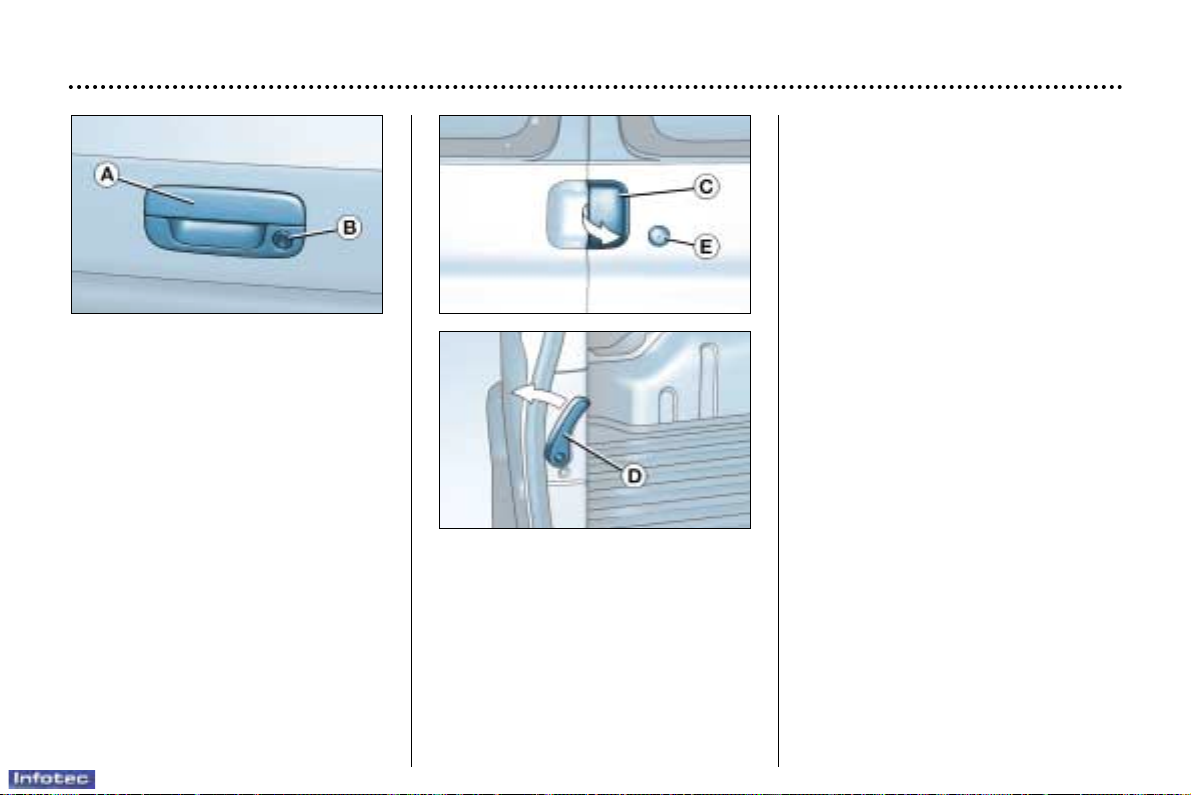
Opening the doors from outside
To open, pull the rear right door handle C towards you and open the rear
left door by pulling the lever D on the
inside.
You can unlock the rear doors by
inserting the key in the lock E.
LOCKING/UNLOCKING
THE TAILGATE
To open the tailgate, operate the
handle A and lift it.
You can unlock the tailgate by
inserting the key in the lock B.
Page 58
22-12-2003
YOUR PARTNER IN DETAIL
68
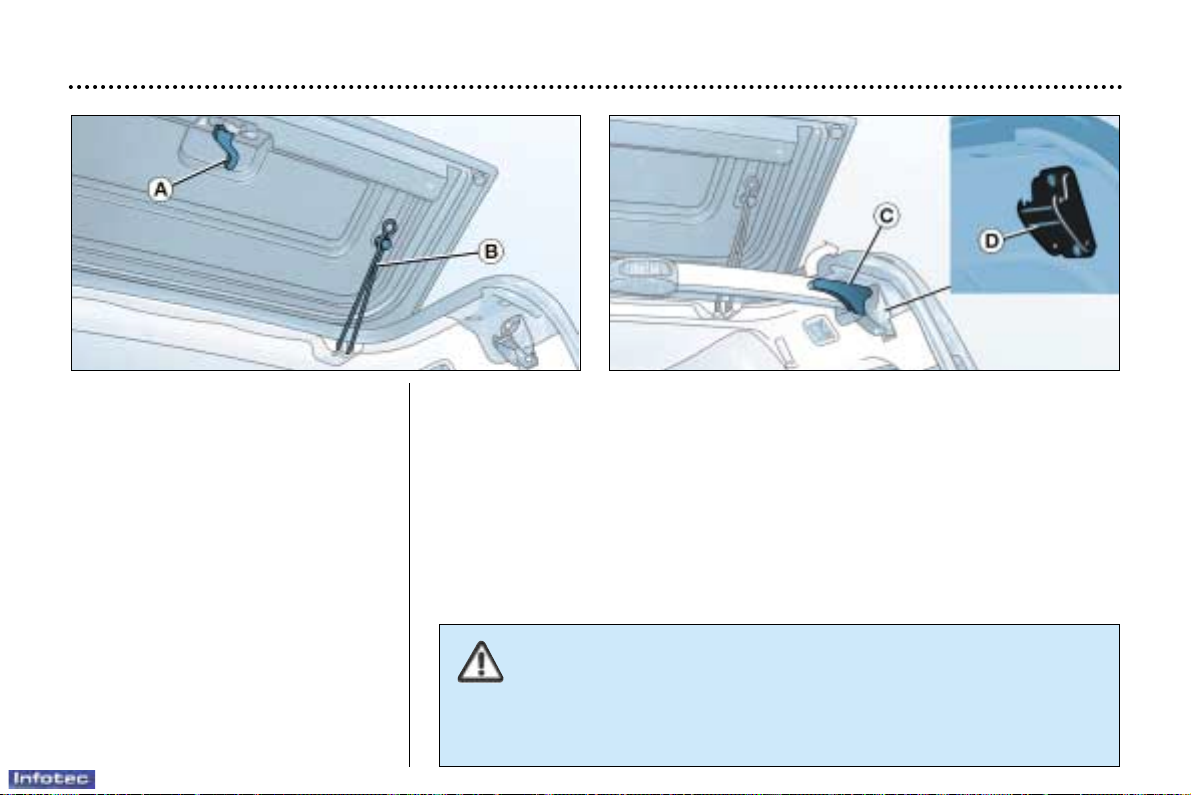
REAR ROOF FLAP
To open the rear flap:
– pull the lever A,
– lift the rear flap,
– pass the point of resistance to
secure it using the retaining struts
B.
To close the rear flap:
– check that the support bar is
secured correctly,
– lower the rear flap to lock it.
LONG LOAD SUPPORT BAR
A support bar is provided for transporting long loads, after opening the rear roof
flap.
Fold back the support bar by lifting the lever C.
Support it to the door pillar.
Support the long loads to be transported.
Reposition the support bar with one hand.
Ensure that it is secured correctly.
Notes:
– the side openings D can be used as hooking points.
– the rear bumper has been strengthened to serve as a footrest on entering the
vehicle.
Never drive without the support bar in place.
The rear doors only lock when the support bar is installed.
When the rear roof flap is open, take care when driving under over-
hangs of limited height.
Use a regulation device when a load protrudes from your vehicle by more than
one metre.
Never rest a load directly on the rear doors.
Page 59
YOUR PARTNER IN DETAIL
69
22-12-2003
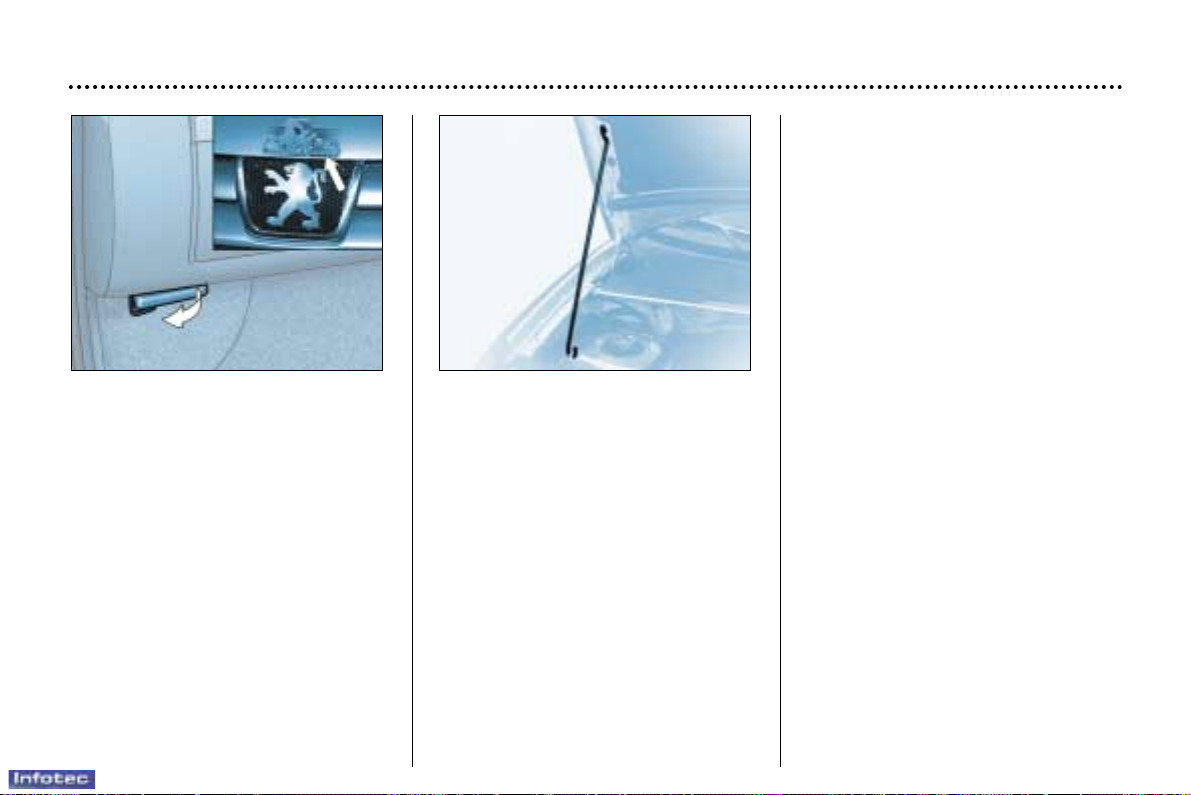
OPENING THE BONNET
Inside the vehicle: pull the handle on
the left-hand side, under the fascia.
Outside the vehicle: lift the catch
and raise the bonnet.
BONNET STRUT
Secure the strut to hold the bonnet
open.
Before closing the bonnet, replace
the strut in its housing.
To close
Lower the bonnet and release it at
the end of its travel. Check that the
bonnet is locked.
Page 60
7
YOUR PARTNER AT A GLANCE
22-12-2003
AIR BAGS
The air bag system has been
designed to maximise the safety
of the occupants in the event of
serious collisions. It works in conjunction with the pretensioning
seat belts.
Front air bags
These are folded in the centre of
the steering wheel for the driver
and in the fascia for the front passenger. They are deployed simultaneously, except in cases where the
passenger air bag is disarmed.
Precautions regarding
the passenger air bag
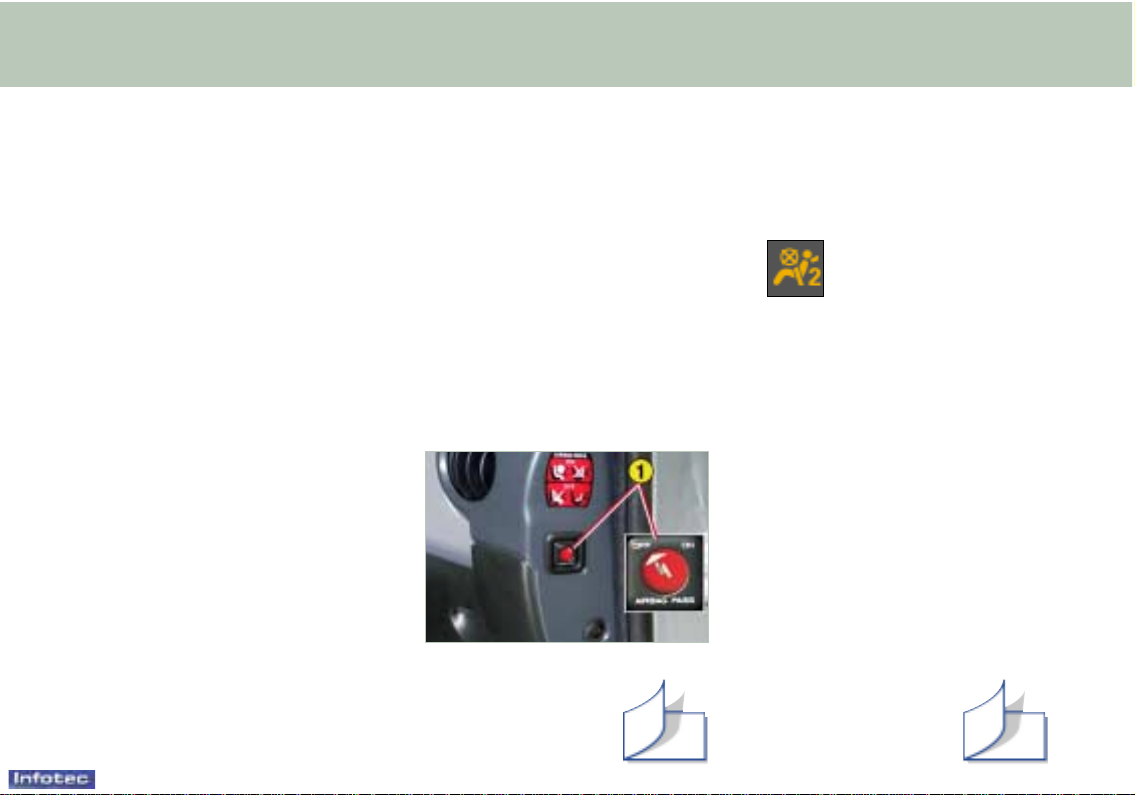
☞ disarm the air bag if you install
a rear-facing child seat,
☞ activate the air bag for an
adult passenger.
Disarming the passenger
air bag*
☞ With the ignition off, insert the
ignition key into the passenger air bag slot 1 and turn it to
the "OFF" position.
As soon as you remove the child
seat, turn the air bag switch to the
"ON" position to activate the air
bag again.
Operating check
With the ignition switched
on (2nd notch), illumination of this warning light
indicates that the passenger air bag is disarmed (slot in
the "OFF" position).
The warning light remains on
throughout the disarming process.
Side air bags*
Side air bags are incorporated
into the front seat back frame, on
the door side.
They are deployed independently
of each other, on whichever side
the collision occurs.
*
According to destination.
82 83
Page 61
YOUR PARTNER IN DETAIL
70
22-12-2003
FILLING WITH FUEL
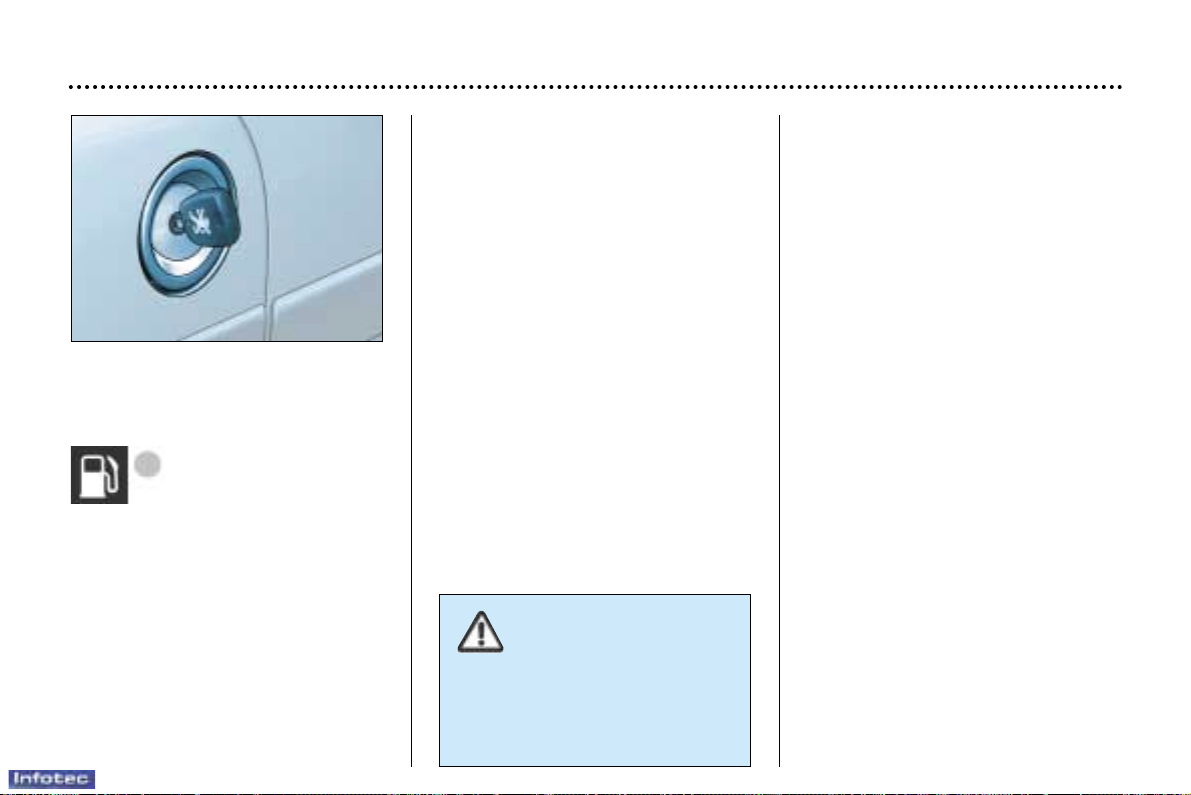
Low fuel level
When the minimum
fuel level in the tank is
reached, this warning
light comes on.
You have enough fuel remaining to
drive for approximately 30 miles
(50 km).
The engine must be switched off
when filling with fuel.
☞ Insert the key then turn it to the
left.
☞ Remove the cap.
An indication reminds you which
type of fuel to use.
When you fill your tank, do not continue after the third cut-off of the
pump. This could cause your vehicle
to malfunction.
The capacity of the tank is
approximately 55 litres for petrol
engines and 60 litres for Diesel
engines.
☞ After filling the tank, lock the cap.
When the cap is removed,
the right-hand sliding side
door cannot be opened.
The key cannot be removed from
the lock until the cap has been
replaced on the fuel tank.
Page 62
YOUR PARTNER IN DETAIL
71
THE LIGHTS STALK
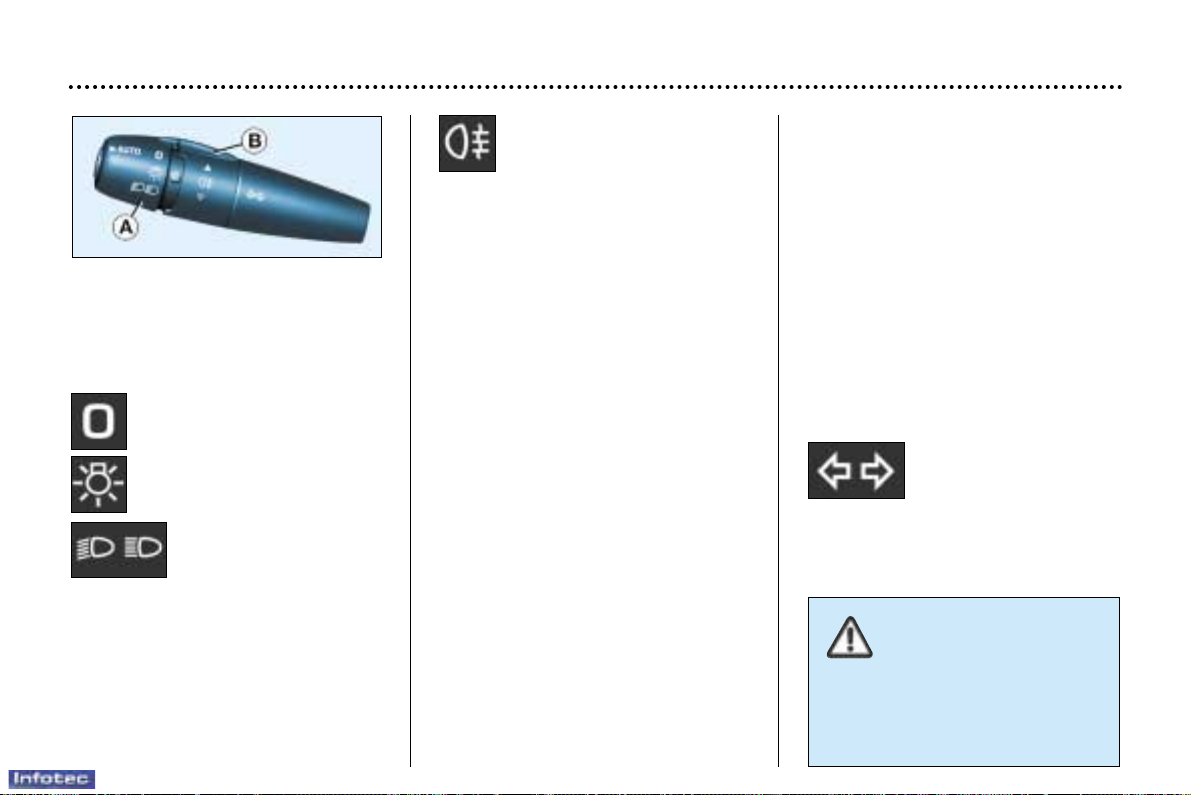
Front and rear lights
Selection is by turning ring A.
Lights off
Side lights
Dipped/main beam
headlamps
Dipped/Main beam change
Pull the stalk towards you.
Note: with the ignition off, when the
driver's door is opened, a buzzer
sounds if you have left your lights on.
Vehicles fitted with a rear fog
lamp only (ring B)
Rotate the ring forwards.
This only operates with the dipped/
main beam headlamps.
Vehicles fitted with front fog
lamps and a rear fog lamp
(ring B)
Front fog lamps (first rotation of the
ring forwards)
Front and rear fog lamps (2nd rotation of the ring forwards)
Note: to switch off the rear fog lamp
and the front fog lamps, turn the ring
backwards twice in succession.
"Follow-me-home" lighting
In poor light, or at night, if you leave
your vehicle, the side lights and
dipped headlamps may remain on
for approximately one minute.
To activate this function:
– place the key in the STOP posi-
tion,
– place the lights stalk in position O,
– flash the headlamps,
– exit the vehicle and lock it.
Direction indicators
(flashers)
Left: downwards.
Right: upwards.
Front fog lamps and
rear fog lamp
Rotate the ring forwards to switch on
and backwards to switch off. The
status is confirmed by the indicator
light on the instrument panel.
In good or rainy weather,
both day and night, the
front fog lamps and the
rear fog lamp are dazz-
ling and are prohibited.
Do not forget to switch them off
when they are no longer needed.
22-12-2003
Page 63
YOUR PARTNER IN DETAIL
72
22-12-2003
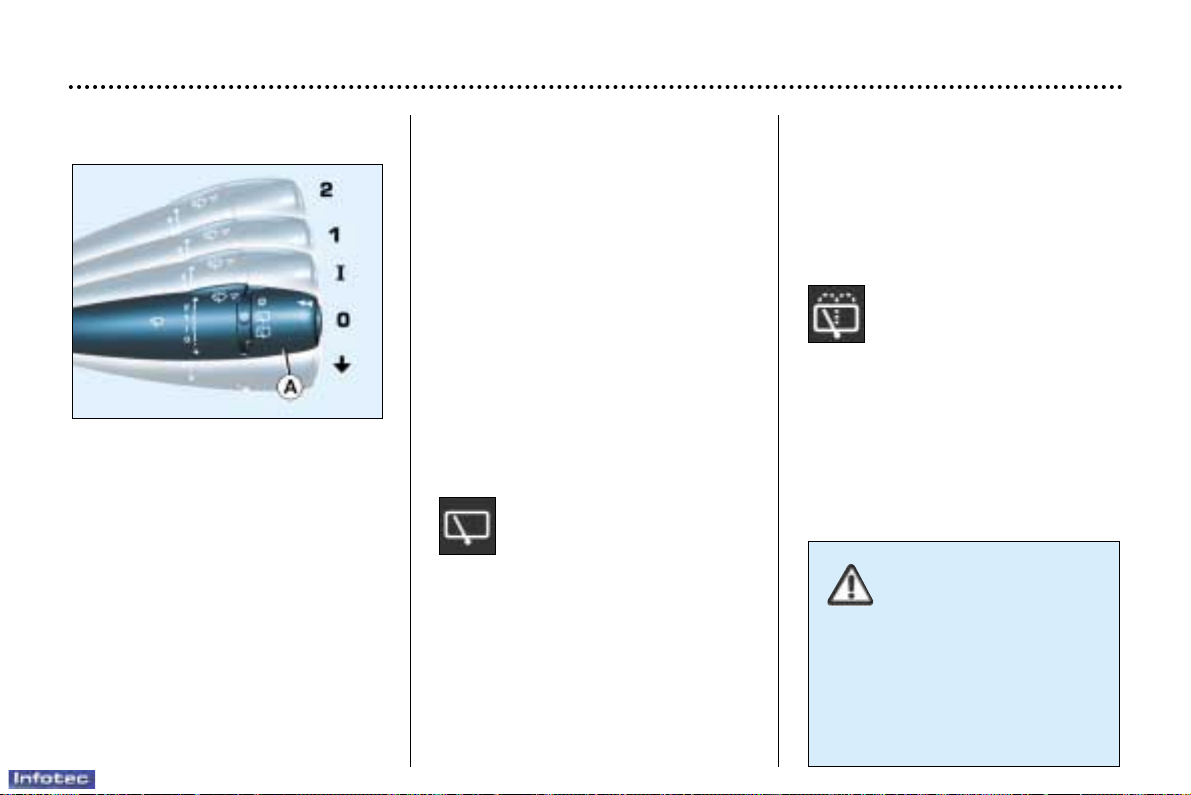
Front windscreen wiper
2 Fast wipe (heavy rain).
1 Normal wipe
(moderate rain).
I Intermittent wipe.
0 Off.
Single wipe
(press downwards).
Operation
In position 1 or 2, when the vehicle
stops, the windscreen wiper
changes to a lower wiping speed,
then resumes its initial speed when
the vehicle starts again.
In the Intermittent position, the wiping speed is proportional to the
speed of the vehicle.
Windscreen and headlamp wash
Pull the windscreen wiper stalk
towards you. The windscreen wash
then the windscreen wipers operate
for a fixed period.
The windscreen wash and headlamp wash operate simultaneously
for two seconds, only if the head-
lamps are on.
Note: if a bicycle carrier is used,
contact a PEUGEOT dealer to have
this function disarmed.
WINDSCREEN
WIPER STALK
Rear windscreen wash
Turn ring A past the first
notch: the windscreen wash
then the windscreen wiper
operate for a fixed time.
Rear windscreen wiper
Turn ring Ato the first notch.
The wiping speed is
inversely proportional to the
speed of the vehicle.
Automatic rear windscreen wiping
☞ place the front wipers stalk in a
position other than 0.
☞ engage reverse gear.
☞ the rear wiper operates with inter-
mittent wiping.
In winter, in the event of a
considerable amount of
snow or ice, switch on the
rear screen demister.
Once de-icing is complete,
remove the snow or ice which has
accumulated on the rear wiper
blade. You can now operate the
rear windscreen wiper.
Page 64
YOUR PARTNER IN DETAIL
73
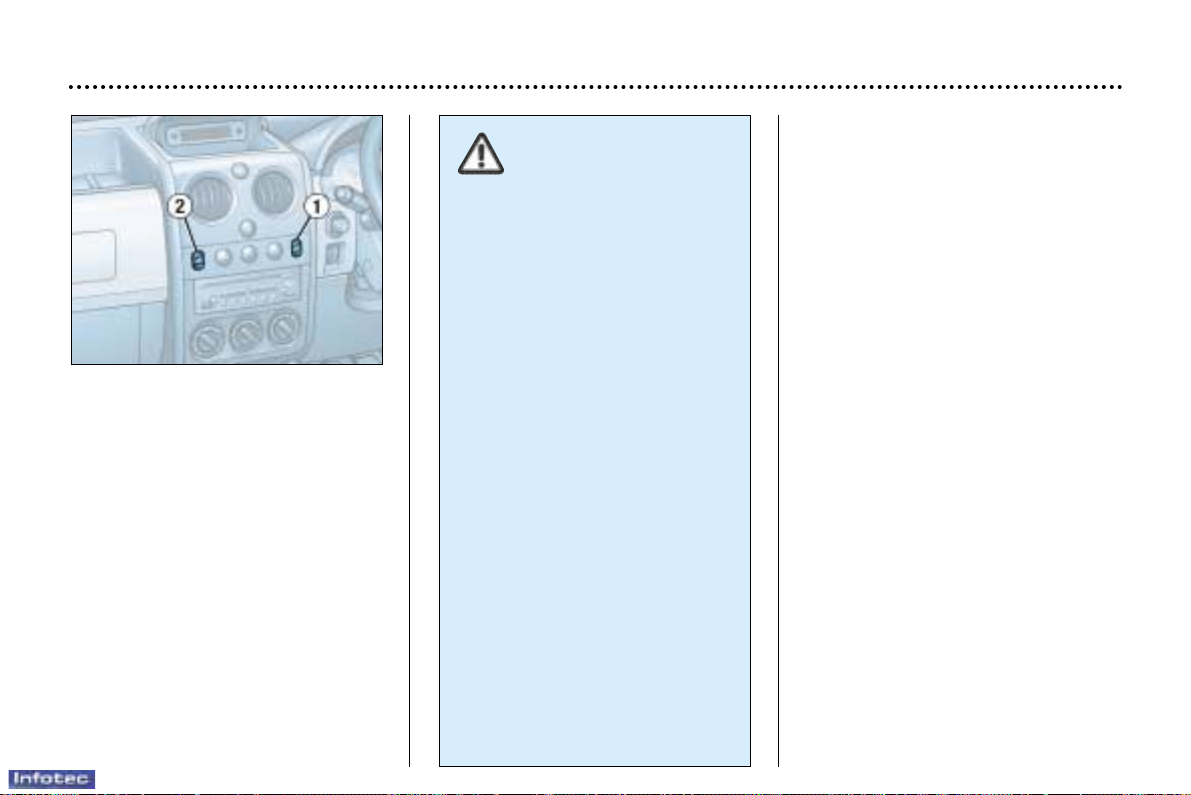
ELECTRIC WINDOWS
1. Driver's electric window
switch
2. Passenger electric window
switch
You have two options:
– Manual operation:
Press switch 1. The window stops
as soon as the switch is released.
– Automatic operation (driver):
Press and hold switch 1. One
touch completely opens or closes
the window.
Automatic closing only operates
when the engine is running.
Always remove the ignition key when leaving the
vehicle, even for a short
time.
If an obstacle is encountered
while the electric windows are in
use, you must reverse the movement of the window. To do this,
press the switch concerned.
When the driver operates the
passenger electric window
switches, he must ensure that no
one is preventing correct closing
of the windows.
The driver must ensure that passengers use the electric windows
correctly.
Be aware of children when operating the windows.
22-12-2003
Page 65
YOUR PARTNER IN DETAIL
75
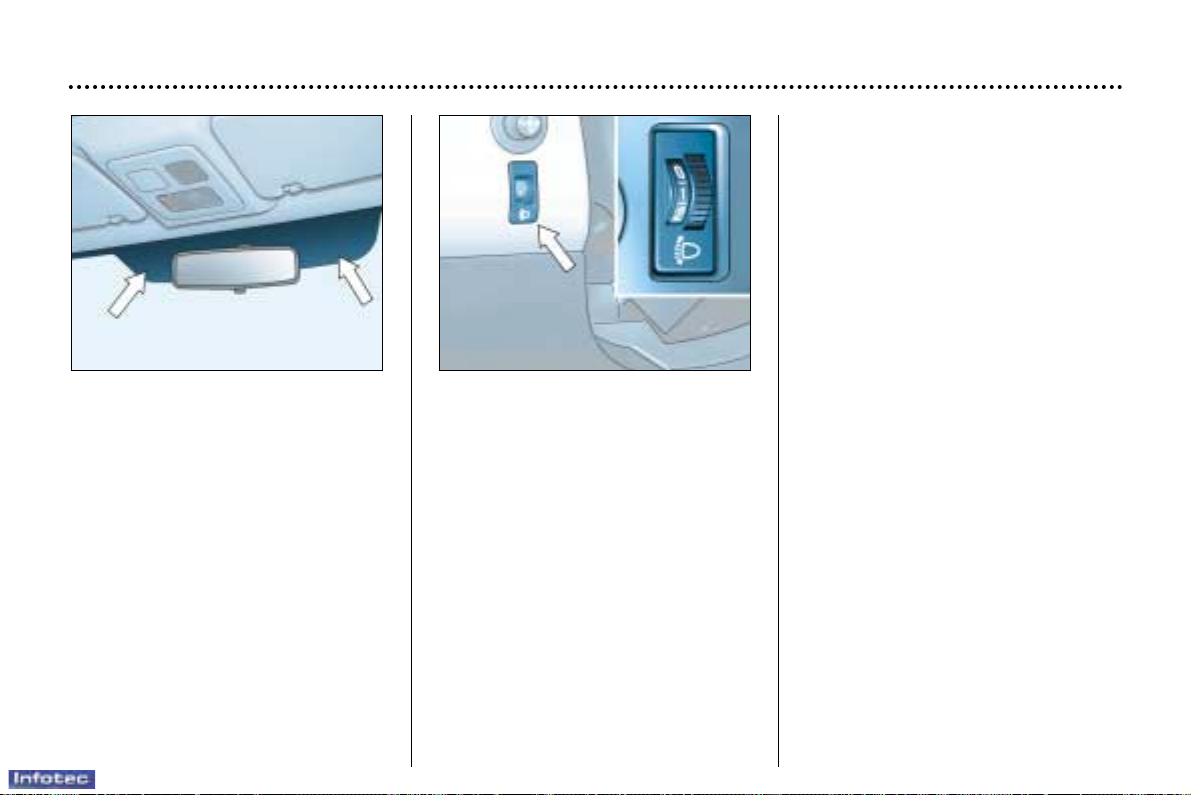
AREAS FOR TOLL CARDS/
CAR PARK TICKETS
The athermic windscreen has two
non-reflective zones located either
side of the base of the interior mirror.
They are intended for affixing toll
cards and/or car park tickets.
HEADLAMP ADJUSTMENT
Depending on the load in your vehicle, it is recommended that the
headlamp beam is adjusted.
0 1 or 2 people in the front seats.
– 3 people.
1 5 people.
2 5 people + maximum authorised
load.
3 Driver + maximum authorised
load.
Initial setting is position 0.
22-12-2003
Page 66
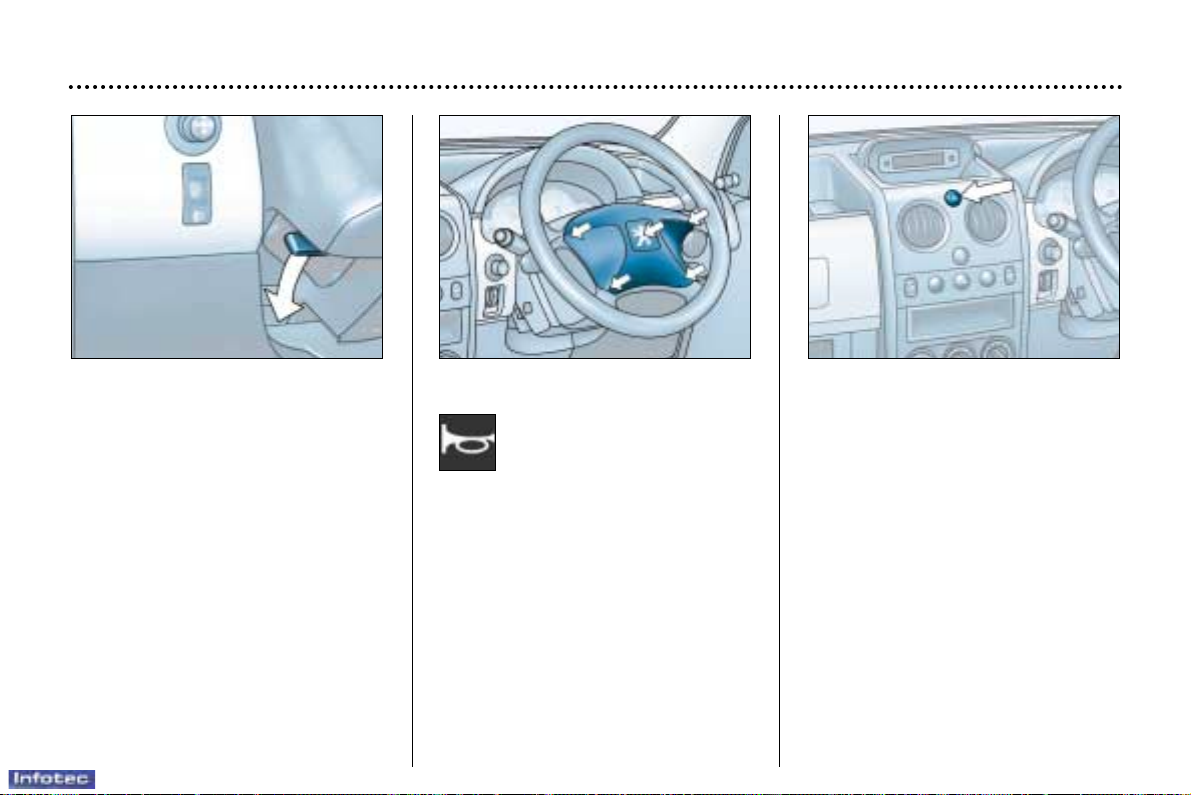
HORN
Press one of the spokes or
the centre of the steering
wheel.
YOUR PARTNER IN DETAIL
76
22-12-2003
STEERING WHEEL HEIGHT
ADJUSTMENT
When stationary, push the handle
fowards to unlock the steering
wheel.
Adjust it to the desired height.
Pull the handle towards you fully to
lock the steering wheel.
HAZARD WARNING LIGHTS
Press the button, the direction indicators flash.
They can operate with the ignition
off.
Page 67
YOUR PARTNER IN DETAIL
78
22-12-2003
Page 68

YOUR PARTNER IN DETAIL
79
22-12-2003
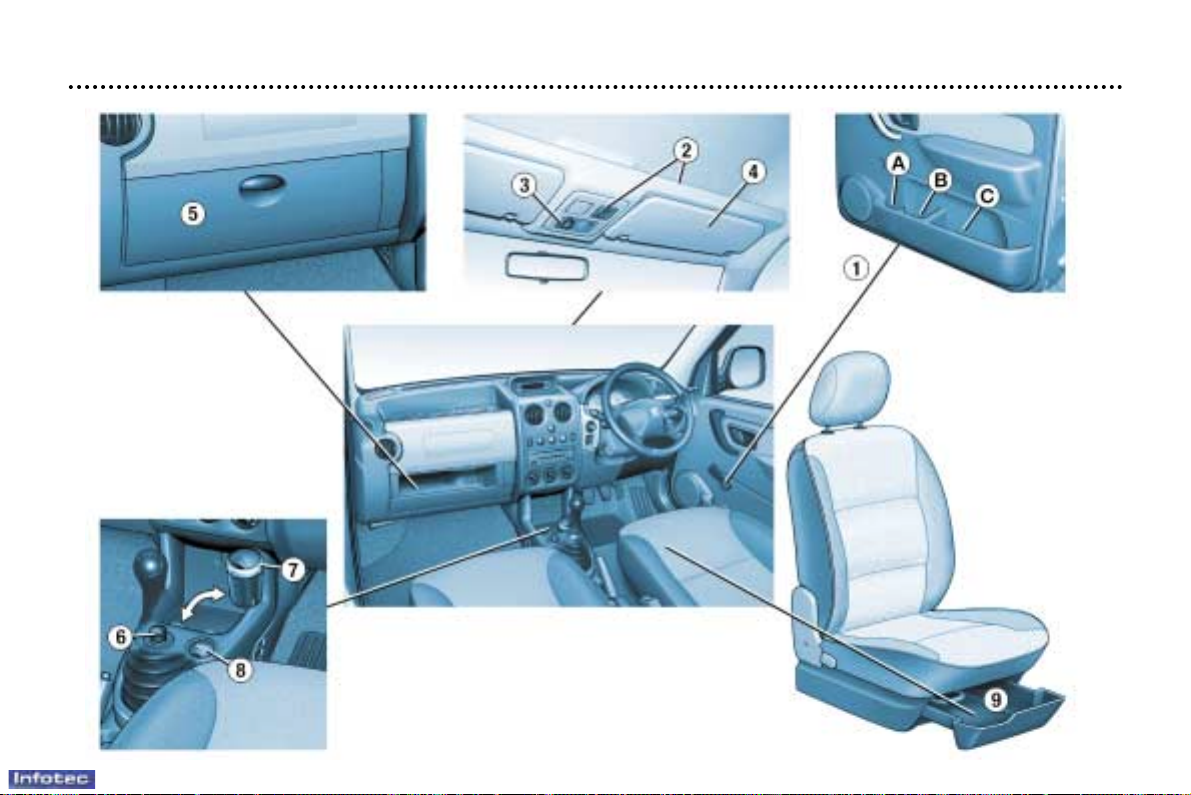
FRONT FITTINGS
1. Storage in the doors
A. Bottle holder.
B. Can holder.
C. Storage compartment.
2. Overhead storage with map reading light
Overhead storage maximum load: 5 kg.
3. Courtesy light
4. Sun visors
5. Glove box
To open the glove box with cover, lift the handle (version with air conditioning).
6. Lighter
7. Removable ashtray
Pull the cover to open the ashtray.
To empty, after opening, remove it by pulling upwards.
8. 12 V accessories socket
This is located at the bottom of the centre console.
It permits the connection of a telephone charger, a baby's bottle warmer, ...
9. Storage drawer
To open the drawer, lift it slightly and pull it forwards.
Page 69
8
22-12-2003
ELECTRIC WINDOWS
1 - Driver's electric window.
2 - Passenger's electric window.
Manual mode:
☞ Press the switch. The window stops as soon as the switch is released.
Automatic mode (driver):
☞ Press and hold the switch. One touch completely opens or closes the window.
73
☞ Move the manual control 3 in all four directions to adjust.
Electric control for the passenger's side mirror
☞ From the driver's seat, adjust in all four directions by operating the control 4.
74
YOUR PARTNER AT A GLANCE
EXTERIOR MIRRORS
Page 70
HANDBRAKE
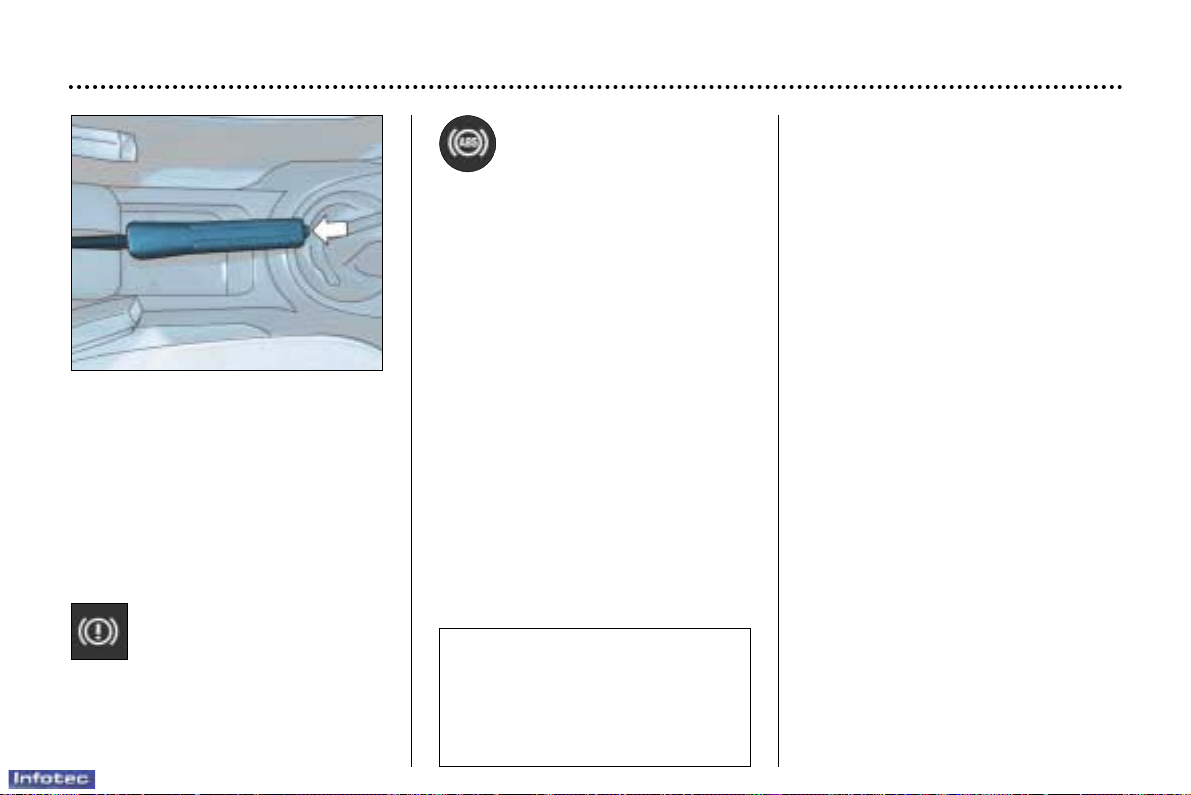
Applying
When parking, pull the handbrake to
immobilise your vehicle.
Releasing
Pull the handle and press the button
to release the handbrake.
Illumination of this warning
light and of the STOP warn-
ing light, accompanied by
an audible signal (while the
vehicle is moving), indicates that the
handbrake is still applied or has not
been released fully.
ANTI-LOCK BRAKING
SYSTEM (ABS)
The ABS with Electronic Brake
Force Distribution (EBFD) increases
the stability and manoeuvrability of
your vehicle, particularly on poor or
slippery road surfaces.
Note: when changing wheels (tyres
and rims), make sure that these are
approved.
The anti-lock braking system comes
into operation automatically when
there is a risk of wheel lock.
Illumination of this warning light,
accompanied by an audible signal,
indicates a malfunction of the electronic brake force distribution, which
can cause a loss of control of the
vehicle when braking.
Stop immediately.
Contact a PEUGEOT dealer.
YOUR PARTNER IN DETAIL
80
22-12-2003
Normal operation of the ABS may
make itself felt by slight vibrations
of the brake pedal.
In emergency braking, press
very firmly without releasing
the pressure.
Page 71
YOUR PARTNER IN DETAIL
81
22-12-2003
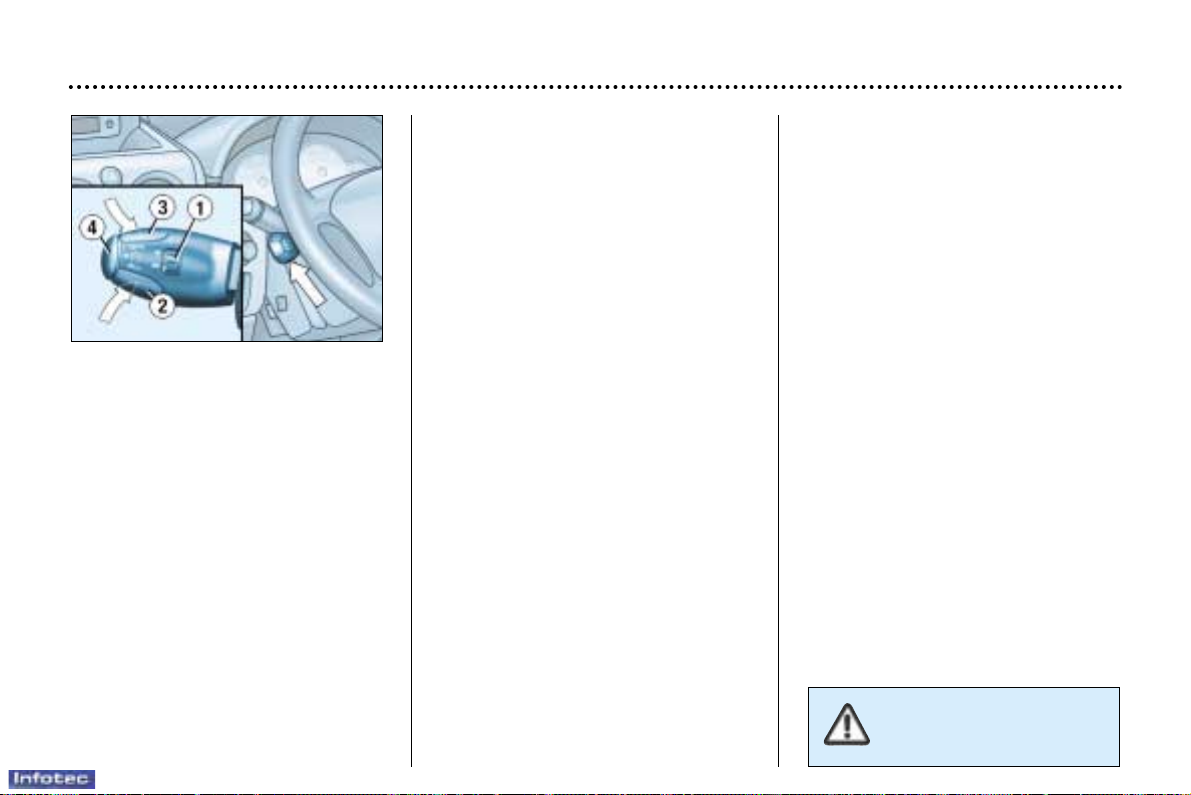
CRUISE CONTROL
Cruise control enables the vehicle to
maintain a steady speed programmed
by the driver, regardless of the road
characteristics and without the driver
having to touch the accelerator or
brake pedals.
In order for it to be memorised, the
vehicle speed must be greater than
25 mph (40 km/h), and fourth gear at
least must be engaged.
Operation
☞ Place switch 1in the ON position.
A speed can be memorised.
☞ Place switch 1 in the OFF position
to cancel.
Memorising a speed
As soon as you reach the chosen
speed, press button 2 or 3. This
memorises the speed, which will be
maintained automatically.
Note: It is possible to accelerate and
drive momentarily at a speed greater
than the memorised speed. When
the accelerator pedal is released, the
vehicle will return to the memorised
speed.
Cancelling the memorised
speed
If you wish to cancel the memorised
speed:
☞ press button 4 or the brake or clutch
pedal.
Recalling the memorised speed
After cancellation, press button 4.
Your vehicle will return to the last
memorised speed.
Changing a memorised speed
To memorise a speed higher than
the previous one:
☞ press button 3;
☞ release it when you have reached
the required speed.
To memorise a speed lower than the
previous one:
☞ press button 2;
☞ release it when you have reached
the required speed.
Cancelling the cruise control
☞ Place switch 1 in the OFF position
or switch off the ignition.
Do not use cruise control on
slippery roads or in heavy
traffic.
Page 72
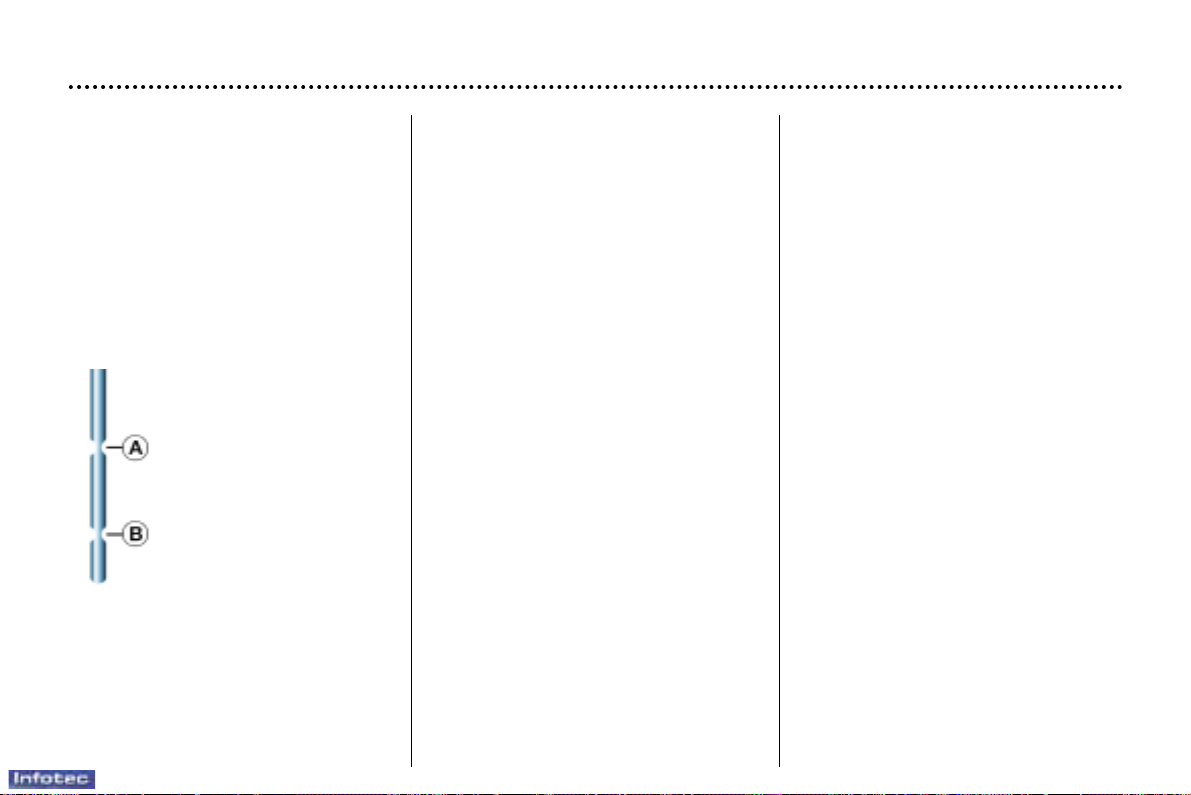
PRACTICAL INFORMATION
88
22-12-2003
CHECKING THE LEVELS
Oil level
☞ Check the level regularly and top
up between changes. The maximum consumption is 0.5 l per
600 miles (1 000 km).
Check the level with the vehicle
on level ground, engine cold,
using the oil level gauge on the
instrument panel or the dipstick.
Dipstick
There are two marks on
the dipstick:
A = maximum
Never fill past this mark.
B = minimum
To maintain the reliability
of engines and emission
control systems, the use
of additives in engine oil
is prohibited.
Viscosity selection
In all cases, the oil selected must
meet the manufacturer's requirements.
Brake fluid level:
– The level must always be
between the DANGER and MAXIMUM marks in the reservoir.
– If the level drops substantially,
contact a PEUGEOT dealer
immediately.
Fluid change:
– Must be carried out according to
the manufacturer's servicing
schedule.
– Use fluids recommended by the
manufacturer, which fulfil DOT4
standards.
Note: Brake fluid is harmful to health
and very corrosive. Avoid all contact
with the skin.
Cooling system
Use the fluid recommended by the
manufacturer.
When the engine is warm, the
temperature of the coolant is
controlled by the engine fan. As this
fan can operate with the ignition key
removed and because the cooling
system is pressurised, wait for at
least one hour after the engine has
stopped before carrying out any
work.
Slacken the cap to the first notch to
release the pressure to prevent any
risk of scalding. When the pressure
has dropped, remove the cap and
top up the level.
Note: The coolant does not need to
be changed.
Used oil
Do not dispose of used oil, brake
fluid or coolant into drains or into the
ground.
Power steering reservoir
☞ Open the reservoir, with the
engine at ambient temperature.
The level should always be
above the MIN. mark and close
to the MAX. mark.
Windscreen and headlamp*
wash level
For best quality cleaning and for
your safety, we would advise that
you use products recommended by
PEUGEOT.
* According to destination.
Oil change
According to the information given in
"PEUGEOT SERVICING".
Note: Avoid used oil from coming
into prolonged contact with the skin.
Page 73
Only use products recommended by PEUGEOT.
To ensure best performance from components as important as the power steering and the
braking system, PEUGEOT
selects and offers quite specific
products.
To prevent damage to the electrical units, avoid washing the
engine.
PRACTICAL INFORMATION
89
22-12-2003
RUNNING OUT OF FUEL
(DIESEL)
If you should run out of fuel, it is
necessary to re-prime the circuit:
– fill the fuel tank with at least five
litres of diesel,
– operate the manual re-priming
pump, under the bonnet under the
protective cover, until fuel
appears in the transparent pipe,
– operate the starter until the
engine starts.
FUEL SUPPLY CUT-OFF
(PETROL)
In a serious collision, a mechanism
prevents fuel from reaching the
engine.
To re-establish the fuel supply, press
the switch on the corner of the front
right-hand suspension assembly,
under the bonnet.
CHECKS
Battery
At the start of winter, have your
battery checked by a PEUGEOT
dealer.
Air filter and passenger
compartment filter
Have the filter elements replaced
regularly.If you drive in dusty con-
ditions, change them twice as
often.
Brake pads
Brake pad wear depends on the
style of driving, in particular for vehicles which are used in town, over
short distances.
It may be necessary to check the
thickness of the pads, even between
services.
Handbrake
Where the handbrake travel is too
great or there is a reduction in the
performance of the system, the
handbrake should be adjusted, even
between services.
Have the system checked by a
PEUGEOT dealer.
Oil filter
Change the filter regularly, in accordance with the servicing schedule.
Manual gearbox
This does not require an oil change.
Check the level in accordance with the
manufacturer's servicing schedule.
Page 74
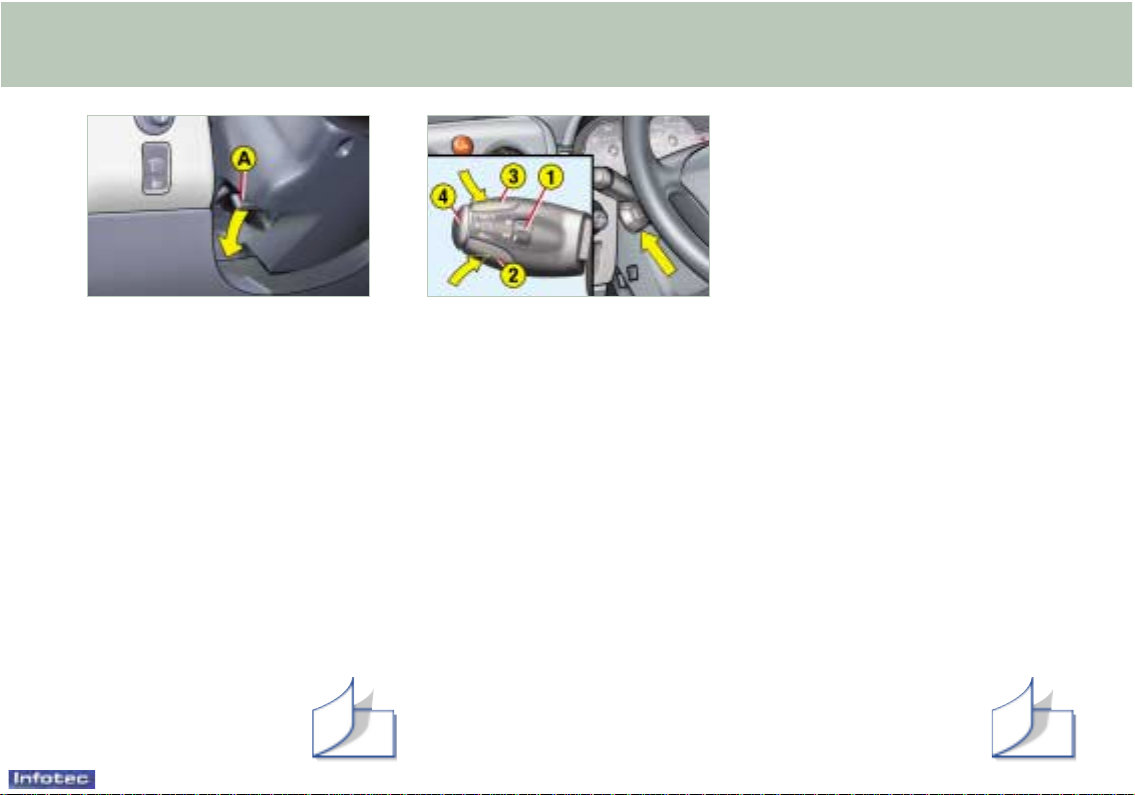
9
YOUR PARTNER AT A GLANCE
22-12-2003
9
STEERING WHEEL HEIGHT
ADJUSTMENT
☞ When stationary, push the
control A forwards to unlock
the steering wheel.
☞ Adjust the height of the steer-
ing wheel.
☞ Lock it by pulling control A
towards you fully.
76
CRUISE CONTROL
The cruise control makes it possible to maintain a constant vehicle
speed, programmed by the driver, irrespective of the profile of
the road and without any action
on the accelerator or the brake
pedal.
In order for the vehicle speed to be
memorised, it must be greater than
approximately 25 mph (40 km/h)
and fourth or fifth gear must be
engaged.
To activate
☞ Place the knob 1 in the ON
position.
A speed can now be memorised.
☞ Place the knob 1 in the OFF
position to deactivate the
system.
Memorising a speed
When you reach the required
speed, press button 2 or 3. The
speed is memorised and will be
maintained automatically.
Deactivating
the memorised speed
If you wish to deactivate the
memorised speed:
☞ press button 4 or the brake or
clutch pedal.
Recalling the memorised
speed
After deactivation, press button 4.
Your vehicle reverts to the last
memorised speed.
Cancelling the stored
speed
☞ Place the knob 1 in
the OFF position or
switch off the ignition.
81
Page 75
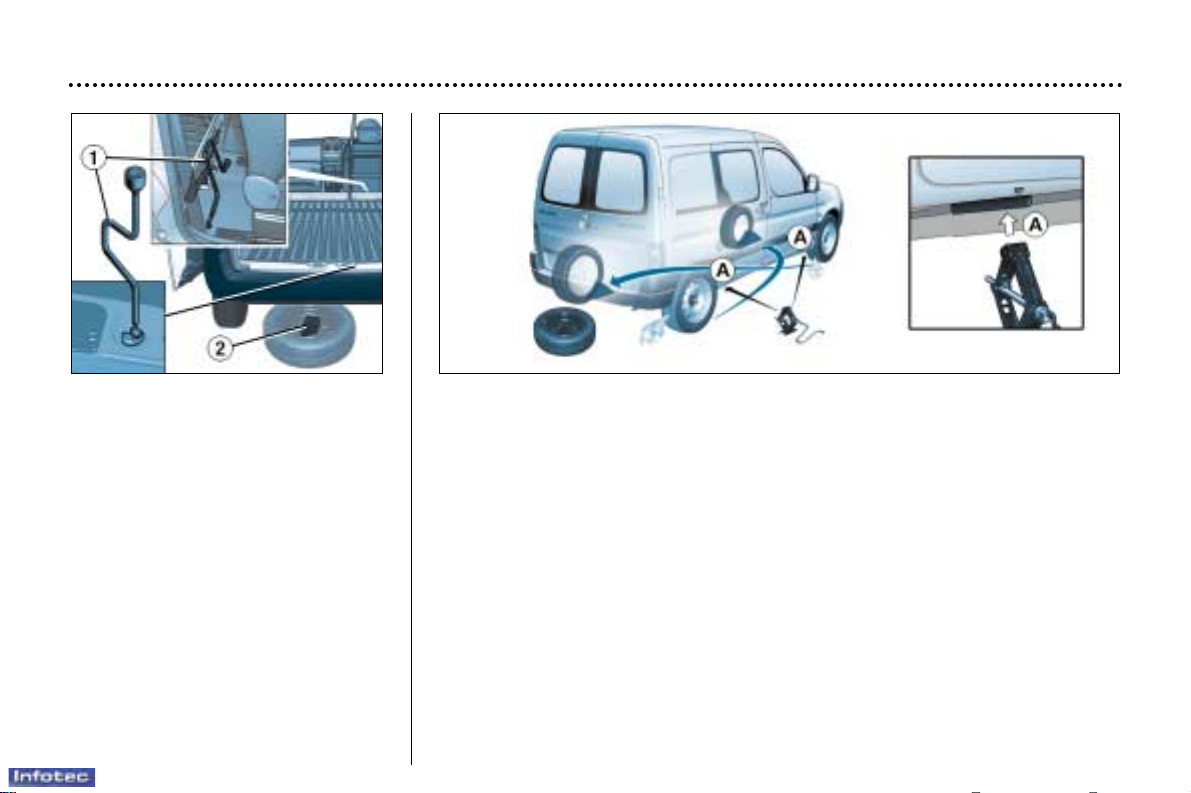
10-11-2003
PRACTICAL INFORMATION
90
CHANGING A WHEEL
Parking the vehicle
– If possible, park the vehicle on
level, stable and non-slippery
ground.
– Apply the handbrake, switch off
the ignition and engage first or
reverse gear.
Access to the spare wheel and
the jack
The wheel is located outside the
vehicle, under the rear floor, supported by a metal carrier.
– Remove the jack and the wheel-
brace 1, secured behind the driver's seat.
– Using the wheelbrace 1, slacken the spare wheel carrier retaining bolt, located
on the inside near the closing system.
– Lift the carrier to release the hook rearwards, then lower it.
– Remove the chock 2 located in the spare wheel.
Removing a wheel
– Chock the rear of the wheel diagonally opposite the wheel to be changed,
using the chock 2.
– Remove the wheel trim using the wheelbrace 1, by pulling at the valve pas-
sage hole.
– Slacken the wheel bolts.
– Place the jack under the locating point on the sub-frame A that is closest to
the wheel to be changed. Ensure that the entire surface of the jack base plate
is in contact with the ground.
– Extend the jack, completely unscrew the bolts and remove the wheel.
Page 76
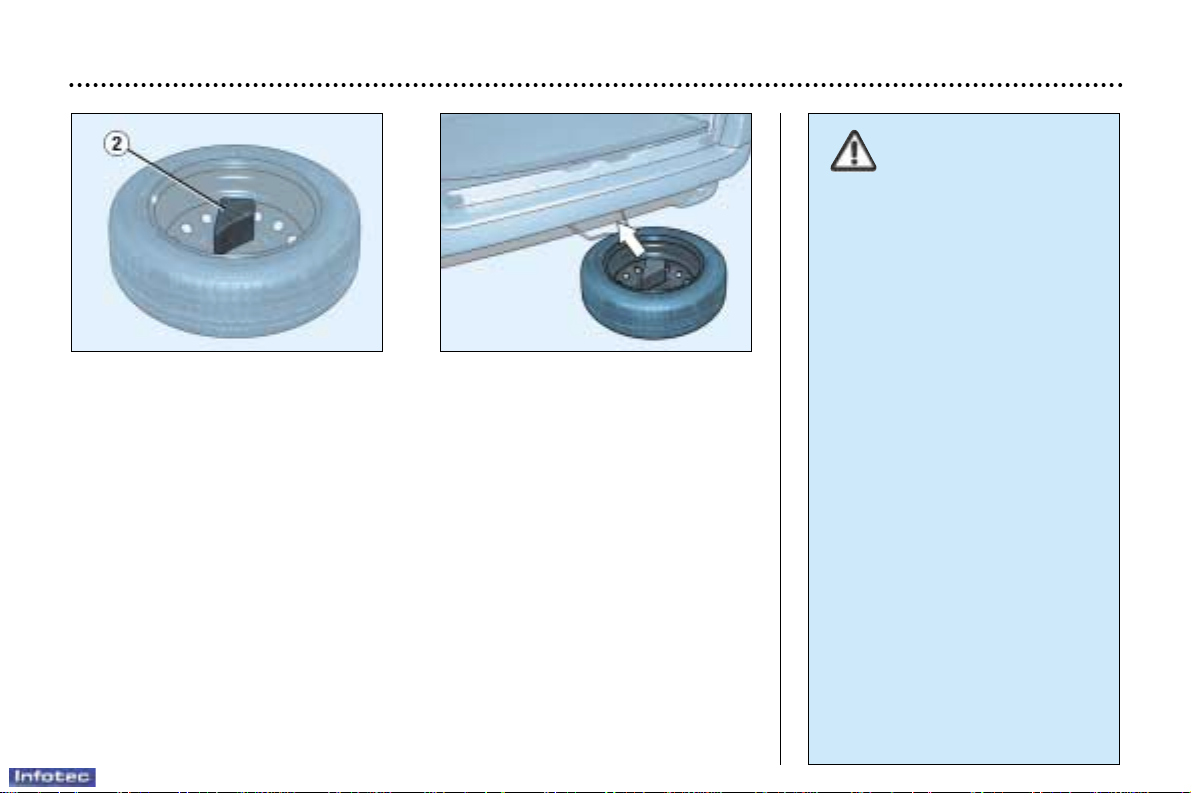
10-11-2003
PRACTICAL INFORMATION
91
Refitting the wheel
– After positioning the wheel, lightly pre-tighten the bolts using the wheelbrace.
– Compress the jack and release it.
– Fully tighten the bolts using the wheelbrace.
– Replace the trim, starting at the valve passage hole, and press it on using the
palm of the hand.
Replacing the wheel in the carrier
– Replace the chock 2 in the wheel.
– Replace the wheel in the carrier.
– Lift the wheel then the carrier and reposition the hook.
– Do not forget to fully tighten the spare wheel carrier retaining bolt.
– Stow the wheelbrace 1 and the jack.
For your safety, always
change a wheel:
– on level, stable and non slippery
ground,
– with the handbrake applied,
– wiith first or reverse gear
engaged,
– with the vehicle chocked,
– never go underneath a vehicle
raised using a jack (use an axle
stand).
After changing the wheel
– Have the tightening of the bolts
and the pressure of the spare
tyre checked as soon as possi-
ble by a PEUGEOT dealer.
– Have the punctured tyre
repaired and replace it on the
vehicle as soon as possible.
Page 77
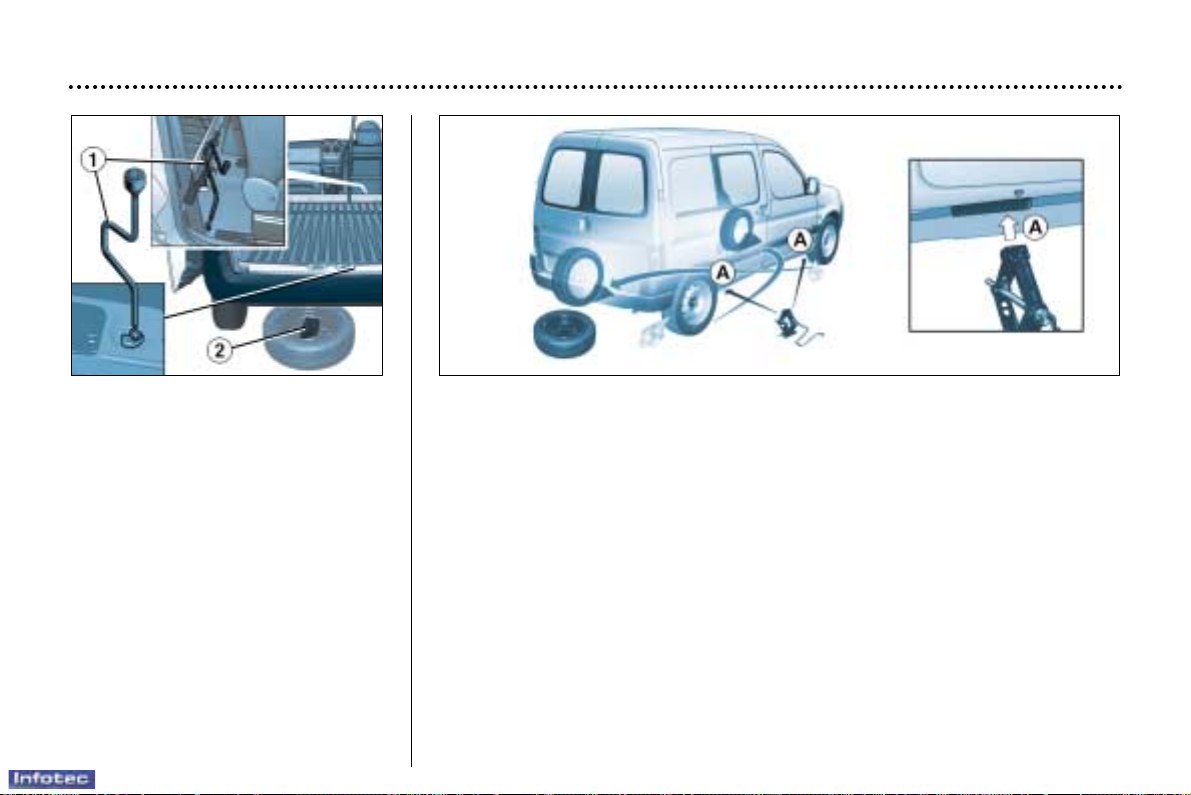
PRACTICAL INFORMATION
90
22-12-2003
CHANGING A WHEEL
Parking the vehicle
– If possible, park the vehicle on
level, stable and non-slippery
ground.
– Apply the handbrake, switch off
the ignition and engage first or
reverse gear.
Access to the spare wheel and
the jack
The wheel is located outside the
vehicle, under the rear floor, supported by a metal carrier.
– Remove the jack and the wheel-
brace 1, secured behind the driver's seat.
– Using the wheelbrace 1, slacken the spare wheel carrier retaining bolt, located
on the inside near the closing system.
– Lift the carrier to release the hook rearwards, then lower it.
– Remove the chock 2 located in the spare wheel.
Removing a wheel
– Chock the rear of the wheel diagonally opposite the wheel to be changed,
using the chock 2.
– Remove the wheel trim using the wheelbrace 1, by pulling at the valve pas-
sage hole.
– Slacken the wheel bolts.
– Place the jack under the locating point on the sub-frame A that is closest to
the wheel to be changed. Ensure that the entire surface of the jack base plate
is in contact with the ground.
– Extend the jack, completely unscrew the bolts and remove the wheel.
Page 78
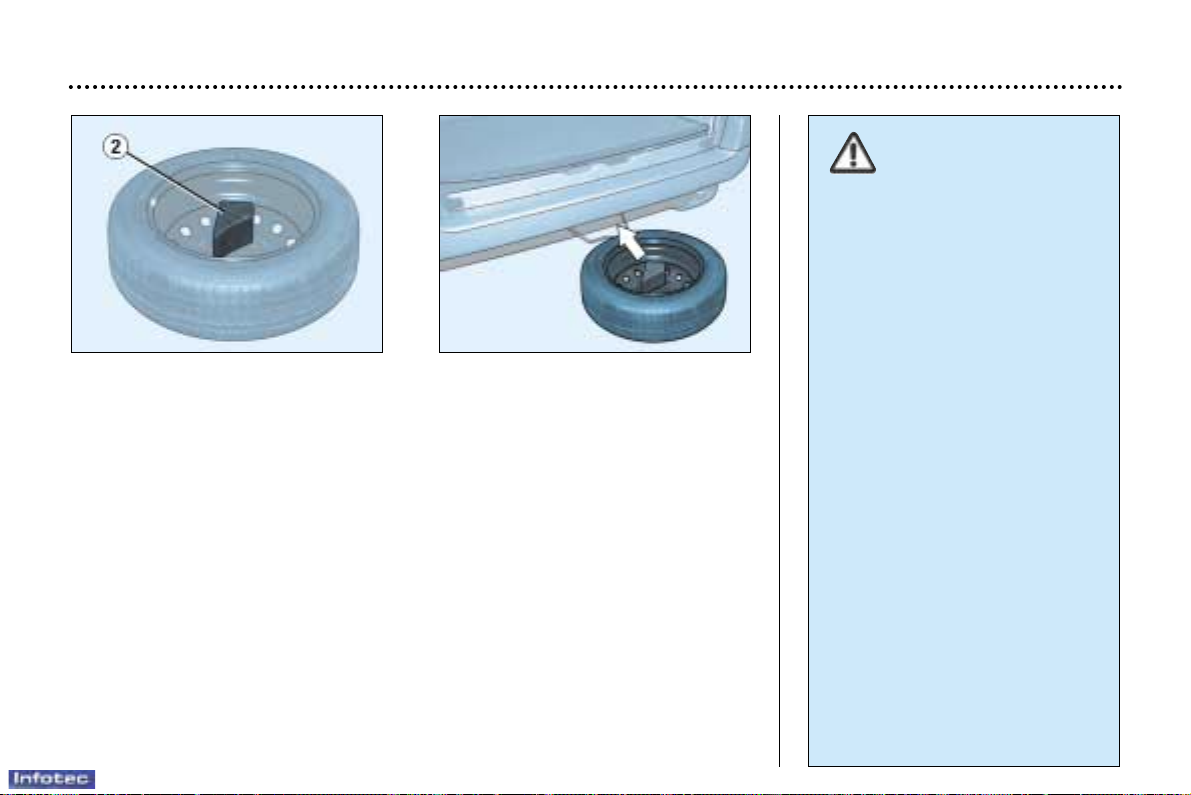
PRACTICAL INFORMATION
91
22-12-2003
Refitting the wheel
– After positioning the wheel, lightly pre-tighten the bolts using the wheelbrace.
– Compress the jack and release it.
– Fully tighten the bolts using the wheelbrace.
– Replace the trim, starting at the valve passage hole, and press it on using the
palm of the hand.
Replacing the wheel in the carrier
– Replace the chock 2 in the wheel.
– Replace the wheel in the carrier.
– Lift the wheel then the carrier and reposition the hook.
– Do not forget to fully tighten the spare wheel carrier retaining bolt.
– Stow the wheelbrace 1 and the jack.
For your safety, always
change a wheel:
– on level, stable and non slippery
ground,
– with the handbrake applied,
– with first or reverse gear
engaged,
– with the vehicle chocked,
– never go underneath a vehicle
raised using a jack (use an axle
stand).
After changing the wheel
– Have the tightening of the bolts
and the pressure of the spare
tyre checked as soon as possi-
ble by a PEUGEOT dealer.
– Have the punctured tyre
repaired and replace it on the
vehicle as soon as possible.
 Loading...