


10 - Familiarisation
AUTOMATIC AIR CONDITIONING (MONO ZONE)
Automatic program (comfort).
Temperature adjustment.
Air flow adjustment.
Air conditioning off.
Air distribution adjustment.
Front visibility control.
Intake of exterior air.
Recirculation of interior air.
Rear screen demisting.
: 110
 11-10-2004

108 - 407 saloon and 407 SW comfort
AUTOMATIC REGULATION OF THE AIR CONDITIONING
The automatic regulation of the air conditioning in the passenger compartment is controlled by various sensors (exterior temperature, interior temperature, sunshine), preventing the need for you to change your reference settings other than the temperature displayed. In addition, a humidity sensor anticipates the formation of condensation in the vehicle during its use.
Advice on operation
To obtain even ventilation, avoid closing the air diffuser grille 10.
In hot weather, to obtain increased ventilation, you can close the air diffuser grille 10 and use only the vents 1 and 6.
For even air distribution, take care not to obstruct the exterior air intake grille located at the bottom of the windscreen, the vents, the air outlets under the front seats and the air extractor located behind the flaps in the boot.
Do not block sensors 2 and 9.
When towing a trailer with a considerable load and when the exterior temperature is very high, the air conditioning may be cut off temporarily if the engine cooling makes this necessary.
Pull the blinds on the rear door windows and the rear screen.
1. Centre panel vents.
2. Temperature and humidity sensor.
3. Adjustment of the glove box air flow (see section "Interior layout").
4. Air outlet to passenger footwells.
5. Two ventilation vents at the rear at the base of the centre console between the passengers.
6. Side vents.
7. Front windows de-icing or demisting vents.
8. Windscreen de-icing or demisting vents.
9. Sunshine sensor.
10. Air diffuser grille.
Air diffuser
The air diffuser grille, located at the top of the centre console, significantly improves distribution and flows and prevents air currents, while maintaining an optimum temperature inside the passenger compartment.
 11-10-2004

407 saloon and 407 SW comfort - 109
 11-10-2004

Familiarisation - 11
AUTOMATIC AIR CONDITIONING (DUAL ZONE)
Driver and passenger automatic program (comfort).
Temperature adjustment, driver's side.
Temperature adjustment, passenger side.
Air flow adjustment.
Air conditioning off.
Passenger’s air distribution adjustment.
Driver’s air distribution adjustment.
Front visibility control.
Intake of exterior air.
Recirculation of interior air.
Rear screen demisting.
: 114
 11-10-2004

118 - 407 saloon and 407 SW comfort
THE ALARM
This provides two types of surveillance:
-exterior protection: it sounds if a door, the boot or the bonnet is opened,
-interior protection: it sounds if the volume inside the passenger compartment changes (breaking of a window or a movement inside the vehicle).
Setting the alarm
F Switch off the ignition and get out of the vehicle.
FSet the alarm, by locking or deadlocking using the remote control (button A indicator light flashes once per second).
If you wish to lock or deadlock your vehicle without setting the alarm, lock it (one turn of the key) or deadlock it (a second turn within five seconds maximum) using the lock.
When the alarm is triggered, the siren sounds and the direction indicator lights flash for approximately thirty seconds.
 11-10-2004
After triggering, the alarm remains set, ten times in succession.
On the eleventh time it will become inactive again, until the next cycle of disarming then setting of the alarm.
Warning: if button A indicator light flashes rapidly, the alarm has been triggered while you were away from your vehicle.
Note: if the alarm has been triggered in your absence, this flashing stops when the ignition is switched on.
Disarming
Unlock the vehicle with the remote control key.
The alarm is disarmed, indicator light A goes out when the ignition is switched on (unless the alarm has been triggered).
To set the alarm with exterior protection only
If, while you are away from the vehicle, you wish to leave a window partially open or a pet inside the vehicle, you should choose exterior protection only.
FSwitch off the ignition,
FIn the next ten seconds, press button A until the indicator light is on continuously,
FGet out of the vehicle,
FSet the alarm by locking or deadlocking using the remote control (button A indicator light flashes once a second).
Remote control failure, alarm set
FUnlock the doors with the key and open the door. The alarm is triggered.
FSwitch on the ignition. The alarm is disarmed.
Incorrect operation
When the ignition is switched on, if button A lights for ten seconds, there is a fault in the siren connection.
Contact a PEUGEOT dealer to have the system checked.
Automatic activation*
The alarm is activated automatically two minutes after the last closure of a door or the boot.
In order to avoid accidental triggering of the alarm when a door or the boot is opened, it is essential to press the unlocking button on the remote control again.
* According to country.
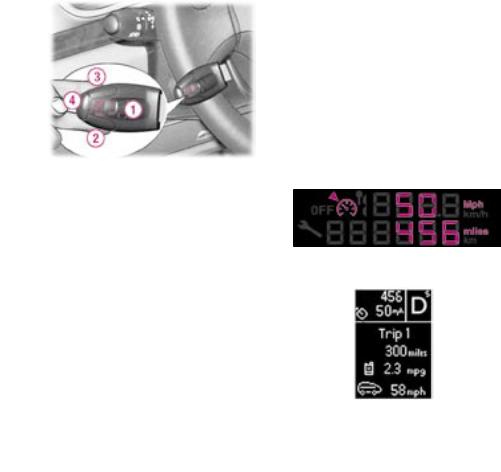
CRUISE CONTROL
The cruise control function allows you to choose and maintain a constant vehicle speed, called the "cruising speed", irrespective of the profile of the road and without any action on the part of the driver on the accelerator pedal or the brake pedal.
The "cruising speed" is chosen by the driver and must comply with the highway regulations in use at local and national level.
The cruise control function must not be used on slippery roads or in heavy traffic.
 11-10-2004
407 saloon and 407 SW comfort - 119
First activation
F Place the dial 1 in the "On" position to access the cruise control function.
F Position the speedometer needle at the speed required.
FPress button 2 "set-" or 3 "set+" to activate the cruise control.
At this moment, the vehicle speed is maintained without any intervention on your part. It is stored as the cruising speed which is displayed:
on the 4-dial instrument panel display
on the 5-dial instrument panel display
Warning: the vehicle speed must be above 25 mph (40 km/h) in order to be able to activate the cruise control.
On a vehicle fitted with a manual gearbox, it is also necessary to be in at least fourth gear.
On a vehicle fitted with an automatic gearbox, it is necessary to be either in position D, or in selective driving mode in a gear higher than or equal to position 2.
Adjust your selection
When the cruise control is activated, pressing button 3 "set+" increases the cruising speed displayed on the instrument panel.
Pressing button 2 "set-" reduces the cruising speed displayed on the instrument panel.
Short press: +/- 1 mph (1 km/h) Long press: +/- 5 mph (5 km/h)
Maintained press: continuous increase or decrease of the value in steps of 5 mph (5 km/h).
The vehicle gradually reaches the new cruising speed displayed on the instrument panel.
You can drive faster than the cruising speed at any time by pressing the accelerator pedal. This does not deactivate the cruise control. When you release the accelerator pedal, the vehicle returns to the cruising speed.
Pressing button 3 "set+" or 2 "set-" while you are driving faster than the cruising speed stores the current speed as a new cruising speed.

120 - 407 saloon and 407 SW comfort
Deactivating the cruise control
The cruise control is deactivated by the following actions:
-pressing cruise control button 4 "Cancel",
-pressing the brake pedal,
-pressing the clutch pedal on a vehicle fitted with a manual gearbox,
-selecting a gear which is not authorised on a vehicle fitted with an automatic gearbox.
The cruise control is also deactivated in the following circumstances:
-when the vehicle speed falls below 22 mph (35 km/h),
-when the ESP is activated.
Reactivating the cruise control
If the conditions necessary for activation are met (see § First activation), the cruise control can be reactivated:
-by pressing button 4 "Cancel" to regain the cruising speed stored,
-by pressing button 2 "set-" or 3
"set+" to store the current speed as the new cruising speed.
 11-10-2004
End of cruise control mode
F Place the dial in the "Off" position.
Note: after placing the dial 1 in the "Off" position or after switching off the engine, it is necessary to repeat the "First activation" stage in order to activate the cruise control.
Display on the instrument panel
When the dial is is in the "ON" position, the cruise control symbol is displayed on the instrument panel associated with a description "OFF" indicating that the speed reference value has not yet been entered.
To the right of the symbol, dashes indicate that a first activation has not yet taken place.
When the first activation takes place, the description "OFF" disappears and the dashes are replaced by the display of the cruising speed stored.
When the driver exceeds the cruising speed, it flashes on the instrument panel.
When the cruise control is deactivated, the description "OFF" appears; the cruising speed stored is still displayed.
When the cruise control is reactivated, flashing of the cruising speed for a few seconds indicates that the activation conditions have not been met.
When the cruise control is selected and a fault is present, a warning light comes on, an audible signal is heard and a message appears on the multifunction display. Contact a PEUGEOT dealer to have the system checked.
12 - Familiarisation
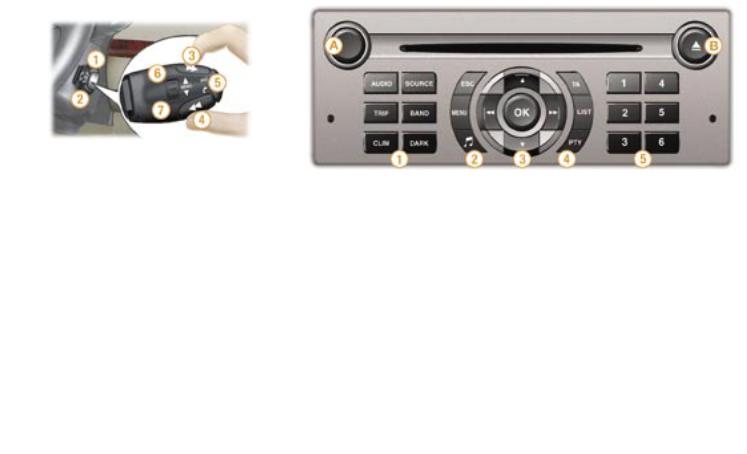
AUDIO EQUIPMENT |
RD4 CONTROL KEYPADS |
STEERING WHEEL CONTROL |
|
Volume adjustment
1 - Increase by pressing the back
2 - Decrease by pressing the back
1 + 2 - Press Mute (sound cut-off)
Search/Selection by pressing
3 - Higher radio frequency - CD/CD changer: next
4 - Lower radio frequency - CD/CD changer: previous
Sound sources
5 - Change of sound source
Selection of the stored stations/ CD in the changer (rotation)
6 - Higher stored station - Next CD
7 - Lower stored station - Previous CD
 11-10-2004
Button (A)
ON/OFF and volume adjustment.
Button (B)
CD eject.
Keypad (1)
AUDIO: access to the RD4 audio equipment displays.
SOURCE: changing of source between radio, CD, CD changer.
TRIP: trip computer display.
BAND: Selection of the frequency wavebands.
CLIM: access to the air conditioning displays.
DARK: 1st press: black screen under the banner - 2nd press: completely black screen - 3rd press: return to the display.
Keypad (2)
ESC (Escape): cancellation of the operation in progress.
MENU: displaying of the general menu.
¯: access to the musical ambience settings.
Keypad (3)
Navigator.
Keypad (4)
TA: function on/off - traffic information priority.
LIST: displaying of the list of stations received, of the tracks on the CD.
PTY: access to the PTY function.
Keypad (5)
Selection of the stored station, of the CD depending on the position in the
CD changer.
: 65

'PORSCHE TIPTRONIC
SYSTEM' AUTOMATIC GEARBOX
The four or six speed automatic gearbox offers, as required, the comfort of the auto-adaptive program enhanced by a selection suited to dynamic driving conditions: sport, or to driving on a slippery road: snow.
However, manual selection is still possible using the gear lever.
 11-10-2004
407 saloon and 407 SW comfort - 125
Gear selection gate
F Move the lever in the gate to select a position.
The indicator light corresponding to the position selected appears on the instrument panel screen.
Park: to immobilise the vehicle and to start the engine, with the handbrake on.
Reverse: to reverse (select this position with the vehicle stationary, engine at idle).
Neutral: to start the engine and to park, with the handbrake on.
Note: if position N is inadvertently engaged while driving, allow the engine to return to idle before engaging position D then accelerate.
Drive: to drive in automatic mode.
Manual: to drive selecting the gears.
S: sport program.
T: snow program.
Starting the engine
F with the handbrake on, select position P or N in the gate,
F turn the ignition key.
Moving Off
With the engine running, move off from position P:
Fto exit position P, it is essential to press the brake pedal,
Fselect position R, D or M, then gradually release the pressure on the brake pedal; the vehicle moves off immediately.
To move off from position N:
F with your foot on the brake, release the handbrake,
F select position R, D or M, then gradually release the pressure on the brake pedal; the vehicle moves off immediately.
WARNING
When the engine is at idle, brakes |
|
not applied, if position R, |
D or M |
is selected, the vehicle |
moves |
even without the accelerator being pressed.
Do not leave children unsupervised inside the vehicle, with position R, D or M selected, with the engine running, as the vehicle moves even without the accelerator being pressed.
With the ignition off, if the lever is not in position P, an audible signal is heard when the driver's door is opened, or after approximately
45 seconds. Move the lever to position P. The audible signal ceases.
When maintenance operations need to be carried out with the engine running, apply the handbrake and select the Park position.

126 - 407 saloon and 407 SW comfort
The auto-adaptive program
F select position D in the gate: the gearbox operates in auto-adap- tive mode, without any action on your part, taking into account the following parameters:
-the style of driving,
-the profile of the road,
-the vehicle load.
To obtain maximum acceleration without touching the lever, press the accelerator down fully (kick down). The program will change down automatically or will stay in the gear selected until the maximum engine speed is reached.
When the brake is applied, the program will change down automatically in order to provide efficient engine braking.
Note:
Releasing the accelerator sharply does not have any immediate effect on the speed of the vehicle.
WARNING
Never select position N when the vehicle is moving.
Never select positions P or R unless the vehicle is stationary.
Never change betwen positions to optimise braking on a slippery surface.
 11-10-2004
Sport and Snow programs
These are two special programs.
The program selected is displayed on the instrument panel screen.
Sport program
F Press button S once the vehicle has been started in position D, the auto-adaptive program favours dynamic driving.
Snow program
This program improves starting and drive when traction is poor.
F Press button T once the vehicle has been started and position D has been selected, the autoadaptive program adjusts the performance of the vehicle to the condition of the slippery road.
You can deactivate the Sport or Snow program at any time by pressing the button selected.
Operation with manual selection of the gears
Fselect position M in the gate,
Fpush the lever to the + sign to change up a gear and push again to change up another gear,
Fpull the lever to the - sign to change down a gear and pull again to change down another gear.
You can change from position D (driving in automatic mode) to position M (driving in manual mode) at any time.
Notes
It is only possible to change from one gear to another if the vehicle speed and engine speed permit. If they do not, the vehicle will operate temporarily in automatic mode.
When the vehicle is stationary or moving very slowly, the gearbox automatically selects gear M1.
Programs S (sport) and T (snow) do not operate in manual gear selection mode.
Operating check
Any operating abnormality is indicated by lighting of this warning light, accompanied by an audible signal and a
message on the multi-function display.
In this situation the gearbox operates in downgrade mode (locked in 3rd gear). You may feel a substantial knock when changing from P to R and from N to R (this will not cause any damage to the gearbox).
Do not exceed 60 mph (100 km/h) or keep within local speed limits.
Contact a PEUGEOT dealer as soon as possible.
If the battery is flat and the lever in is position P, it will be impossible to change to another position.
In particular, do not force the lever or there is a risk the gearbox may be damaged.
407 saloon and 407 SW comfort - 127
6-SPEED MANUAL GEARBOX
Reverse
To change to reverse gear, lift the ring under the gear lever knob and push the gear lever to the left then to the front.
Reverse gear can only be engaged when the vehicle is stationary with the engine idling.
THE HANDBRAKE
To apply
When parking on a slope, turn the wheels towards the kerb and apply the handbrake.
To release
Pull the handle and press the button to release the handbrake.
The handbrake must not be used to stop or brake the vehicle while it is moving.
 11-10-2004

128 - 407 saloon and 407 SW comfort
ANTI-LOCK BRAKING SYSTEM (ABS)
The ABS increases the stability and manoevrability of your vehicle on braking, in particular on poor or slippery road surfaces.
This system comes into operation automatically when there is a risk of wheel lock.
Normal operation of the ABS may make itself felt by slight vibrations of the brake pedal.
In emergency braking, press very firmly without releasing the pressure.
Note: when changing wheels (tyres and rims), make sure that these are approved.
This indicates that the ABS is faulty.
It comes on on the instrument panel screen also.
If it comes on permanently above 6 mph (10 km/h), it indicates an ABS malfunction.
However, the vehicle retains conventional servo-assisted braking.
Contact a PEUGEOT dealer.
EMERGENCY BRAKING
ASSISTANCE SYSTEM
In an emergency, this system enables the optimum braking pressure to be reached more quickly, thus reducing the stopping distance.
It is triggered by the speed at which the brake pedal is activated. The effect of this is a reduction in the resistance of the pedal and an increase in braking efficiency.
 11-10-2004
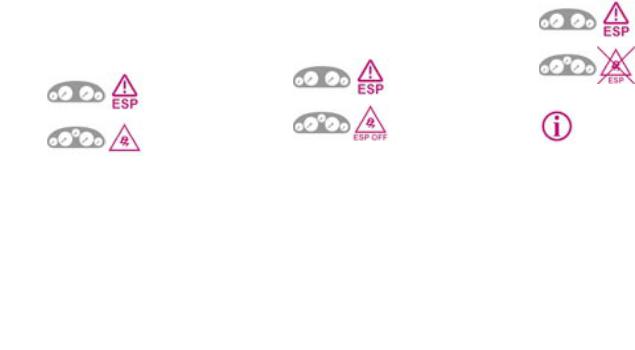
ELECTRONIC STABILITY CONTROL (ESP)
This system is linked and complementary to the ABS system.
In the event of a significant variation between the trajectory of the vehicle and the path required by the driver, the ESP monitors wheel by wheel and acts automatically on the engine and on the brake of one or more wheels, to put the vehicle back on course, within the limit of the laws of physics.
ESP operation
The indicator light flashes.
The indicator light comes on.
407 saloon and 407 SW comfort - 129
Disarming the ESP
In exceptional conditions (starting the vehicle when it is stuck in the mud, immobilised in snow, on unstable ground...), it may be advisable to disarm the ESP.
F Press the "ESP OFF" switch, located on the centre console.
The switch lights up and the warning light comes on: the ESP no longer acts on the operation of the engine.
Instrument panel indicator light.
Instrument panel indicator light.
The system is triggered again:
F automatically if the ignition is switched off,
Fautomatically above 30 mph (50 km/h),
Fmanually by pressing the switch again.
Operating check
When a malfunction of the system occurs, the warning light comes on, accompanied by an audible signal and a message on the multifunction display.
Contact a PEUGEOT dealer to have the system checked.
Instrument panel indicator light.
Instrument panel indicator light.
The ESP offers exceptional safety during normal driving, but this should not encourage the driver to take extra
risks (late braking) or drive at high speed.
Correct operation of the system depends on compliance with the manufacturer's recommendations regarding the wheels (tyres and rims), the braking components, the electronic components and the PEUGEOT assembly and operation procedures.
After an impact, have the system checked by a PEUGEOT dealer.
 11-10-2004

Familiarisation - 13
RT3 CONTROL KEYPADS
Button (A)
ON/OFF and volume adjustment.
Button (B)
CD eject.
Keypad (1)
AUDIO: access to the RT3 audio equipment displays.
TEL: access to the telephone displays. TRIP: trip computer displays.
NAV: displaying of the navigation - guidance welcome menu.
CLIM: displaying of the air conditioning settings welcome menu.
DARK: 1st press: black screen under the banner - 2nd press: completely black screen - 3rd press: return to the display.
 11-10-2004
Keypad (2)
ESC (Escape): cancellation of the operation in progress.
MENU: displaying of the general menu.
C: deletion of the last character entered or of the entire line.
Keypad (3)
Navigator.
Keypad (4)
TEL (green): pick up an incoming call.
LION:accesstothePEUGEOTservices menu.
TEL (red): hang up.
Keypad (5)
Selection of the stored radio station.
Selection of the station stored, of the CD depending on the position in the CD changer.
Telephone keypad - alphanumeric inputting keypad.
Keypad (6)
Audio - CD player controls bar.
: 78

130 - 407 saloon and 407 SW comfort
ELECTRONICALLY CONTROLLED SUSPENSION
The suspension adapts automatically and instantly to different driving styles and road characteristics, improving the comfort of the occupants and the vehicle's road holding capabilities. The suspension favours smooth shock absorption, ensuring a comfortable ride, but as soon as conditions demand a change (sporty driving, tight bends, avoidance action, etc.) it automatically selects firmer shock absorption, guaranteeing optimum road holding.
Manual selection of the SPORT position
F Press switch 1, the indicator light comes on and the SPORT warning light comes on.
In this position, the suspension is maintained in the SPORT position.
To return to automatic operation
FPress switch 1 again. The indicator light is switched off and the AUTO indicator light comes on.
Operating check
This is confirmed by the switch light and the indicator lights.
In the event of a fault, it comes on, accompanied by an audible signal and a message on the multifunction display.
Select automatic operation and contact a PEUGEOT dealer as soon as possible.
 11-10-2004

REAR PARKING ASSISTANCE
This system consists of four proximity sensors, located in the rear bumper.
This detects any obstacle (person, cyclist, vehicle, tree, gate, etc.) behind the vehicle. Nevertheless, it cannot detect obstacles located just below the bumper.
Warning: an object, such as a stake, a roadworks cone or any other similar object detected at the beginning of the manoeuvre may no longer be detected during the manoeuvre.
To make manoeuvres in reverse gear easier, adjust your mirrors in accordance with the "Automatic tilting of the mirrors in reverse gear" function.
Maintenance: ensure that the sensors are not covered with mud, frost or snow.
Activation
The system is activated as soon as reverse gear is engaged; an audible bleep shows that it is active.
The proximity information is given by an audible signal, which becomes more rapid as the vehicle approaches the obstacle.
 11-10-2004
407 saloon and 407 SW comfort - 131
Your vehicle's rear speakers emit an audible signal:
-on the right if an obstacle is detected on the right,
-on the left if an obstacle is detected on the left,
-on the right and left if an obstacle is detected in the centre.
When the distance between the rear of the vehicle and the obstacle is less than approximately twenty-five centimetres, the audible signal becomes continuous.
Switching the system off
F Change to neutral, the system is again inactive.
Deactivation
F Press the switch on the centre console.
The indicator light on the switch comes on and the system becomes completely inactive.
If there is an operating fault, on changing to reverse gear a warning light on the instrument panel, an audible signal
and a message on the multifunction display indicate that there is a system malfunction.
Contact a PEUGEOT dealer.

132 - 407 saloon and 407 SW comfort
TYRE UNDER-INFLATION DETECTION
Sensors check the tyre pressure during driving and trigger a warning in the event of malfunction.
Flat tyre
Instrument panel warning light.
This is accompanied by the message on the multifunction display locating the wheel concerned.
Instrument panel display warning light.
This is accompanied by the audible signal and the message on the multifunction display locating the wheel concerned.
If this warning light comes on, have the tyre pressure checked as soon as possible.
Puncture
This warning light, accompanied by the audible signal and the message on the multi-function display locating the wheel concerned, is followed by illumination of the 'STOP' warning light.
 11-10-2004
Stop immediately, avoiding any sudden movement of the steering wheel and the brakes.
Change the damaged wheel (punctured or very deflated tyre), and have the tyre pressure checked as soon as possible.
Sensor(s) not detected or faulty
Instrument panel warning light.
This is accompanied by the mesage on the multifunction display which indicates that under-inflation detection is absent from one (or several) wheel(s) or that there is a fault in the system.
Instrument panel display warning light.
This is accompanied by the audible signal and the message on the multi-function display which indicates that underinflation detection is absent from one (or several) wheel(s) or that there is a fault in the system.
Contact a PEUGEOT dealer to replace the faulty sensor(s).
Note: this message is also displayed when one of the wheels is away from the vehicle (being repaired) or when a wheel without a sensor is fitted.
All repairs and changing of tyres on a wheel fitted with this system must be carried out by a PEUGEOT dealer.
If, when changing a tyre, you install a wheel which is not detected by your vehicle, you must have the system reinitialised by a PEUGEOT dealer.
The tyre under-inflation detection system is an aid to driving which does not replace the need for the driver to be vigilant or to drive responsibly.
This system does not eliminate the need to have the tyre pressure checked regularly (see manufacturer's label on the door pillar) to ensure that the optimum dynamic performance of the vehicle is maintained and prevent premature wear of the tyres, particularly in arduous driving conditions (heavy load, high speed).
The tyre pressures must be checked cold, at least once a month.
Remember to check the pressure of the spare wheel.
The tyre under-inflation detection system may experience temporary interference due to radioelectric emissions on a frequency close to that used by the system.

407 saloon and 407 SW comfort - 133
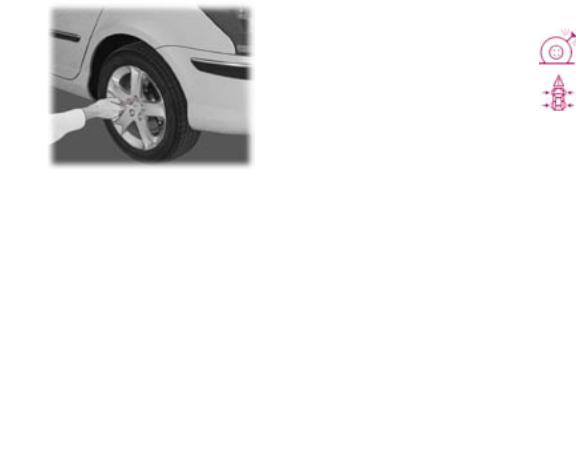
CHANGING A WHEEL
F Park the vehicle on level, stable and non-slippery ground.
F Apply the handbrake, switch off the ignition and engage first or reverse gear (position P for the automatic gearbox).
F Never go underneath a vehicle which is supported only by a jack.
Access to the spare wheel and the jack in the boot
F Lift the floor using the lifting handle. Secure the handle behind the boot seal.
Tools available
The following tools are located in the holder in the centre of the spare wheel:
1 - Wheelbrace.
2 - Centralising tool
(for alloy wheels only). 3 - Wheelbrace extension.
4 - Jack.
5 - Removable towing eye.
6 - Alloy wheel trim cover tool.
Removal
F For vehicles with steel wheels, detach the trim using extension 3 pulling at the valve passage hole.
F For vehicles with alloy wheels, remove the trim covers using tool 6.
FLoosen the wheel bolts.
FTake the jack from the tool kit.
FPlace the jack 4 in one of the four locations underneath the vehicle (the nearest one to the wheel to be changed).
FExtend the jack using wheelbrace 1 and the extension 3.
FRemove a wheel bolt at the top and fit the centralising tool 2 in its place.
FUnscrew the other bolts and remove the wheel.
 11-10-2004
134 - 407 saloon and 407 SW comfort
Fitting a wheel
F Position the wheel using the centralising tool to assist you.
F Tighten the bolts by hand and remove the centralising tool.
F Partly tighten the bolts using the wheelbrace.
FFold the jack and remove it.
FFully tighten the bolts using the wheelbrace.
FFor vehicles with steel wheels, refit the wheel trim starting by placing its notch facing the valve and press with the palm of the hand.
FFor vehicles with alloy wheels, refit the trim covers.
F Put the tool holder back in position. This helps to keep the boot floor in its correct position, to prevent any deformation of the floor when loaded.
F Tighten the spare wheel securing strap to prevent noise and for your safety in the event of impact.
Reminder: for your safety, always change a wheel:
-on level, stable, non-slippery ground,
-with the handbrake applied,
-with first or reverse gear engaged (position P for the automatic gearbox),
-never go underneath a vehicle which is supported only by a jack.
After changing the wheel:
-have the tightening of the bolts and the tyre pressure of the spare wheel checked as soon as possible,
-have the punctured wheel repaired and refit it to the vehicle as soon as possible,
-have the spare wheel checked and replace it in its boot recess.
Information on the instrument panel:
Punctured tyre warning light
Tyre under-inflation detection system warning light
These original wheels are fitted with a pressure sensor (see paragraph "Tyre under-inflation detection"). The alarm which detects the removal or absence of a wheel fitted with the indicator sensor signals the anomaly. Have the wheel repaired and checked by a PEUGEOT dealer.
 11-10-2004

Special features of alloy wheels
Bolt covers
Alloy wheel bolts are covered by chrome trims.
Use tool 6 to remove the trims before slackening the bolts.
 11-10-2004
407 saloon and 407 SW comfort - 135
Fitting the spare wheel
If your vehicle is fitted with a steel spare wheel, when fitting it, it is normal when tightening the bolts to notice that the washers do not come into contact with the rim. The spare wheel is secured by the cone shape of each bolt.
Fitting snow tyres
If you fit snow tyres mounted on steel wheels onto your vehicle, it is essential to use special bolts available from your PEUGEOT dealer.
Anti-theft bolts
Your wheels are fitted with antitheft bolts (one per wheel), placed under chrome trims which must be removed using tool 6, before the bolts are unscrewed using one of the two anti-theft sockets and the wheel brace 1.
Note: these anti-theft sockets were given to you on delivery of your vehicle with the duplicate keys and the confidential card. Make a careful note of the code number engraved on the head of the anti-theft socket. This will enable you to obtain a duplicate anti-theft socket from a PEUGEOT dealer. You are advised to do the same for the duplicate keys and not to leave the confidential card in the vehicle.
PARTIAL REMOVABLE CLOSER*
The partial removable closer is a cover which is clipped onto the air intake grille to prevent the accumulation of snow due to direct splashes.
Once it has been fitted on your vehicle, it is imperative that it is removed when the ambient temperature conditions rise above 10 °C again.
Contact a PEUGEOT dealer.
Tyres of size 215/55 R 17 cannot be fitted with standard snow chains, contact a
PEUGEOT dealer.
* According to country.
136 - 407 saloon and 407 SW comfort
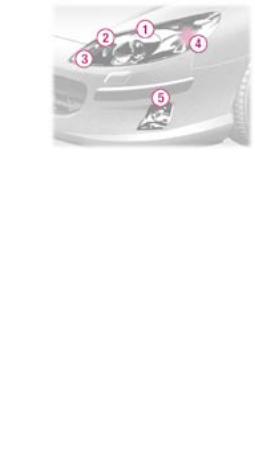
CHANGING A FRONT BULB
Handle the bulbs with a dry cloth.
Front lights
In the engine compartment, remove the cover secured by one or two butterfly screws, a plastic retainer clip and two quarter turn screws.
1 - Dipped beam headlamps:
H1-55 W or D2S-35 W Xenon bulb.
WARNING: RISK OF
ELECTROCUTION
Xenon bulbs must be replaced by a PEUGEOT dealer.
2 - Main beam headlamps:
H7-55 W.
F Remove the protective cover corresponding to the faulty bulb.
FDisconnect the connector.
FPress the end of the securing clips to free the bulb. Change the bulb.
FWhen fitting the new bulb, ensure that the direction notches are positioned correctly and the securing clips are fixed properly.
FReconnect the connector.
FRefit the protective cover.
3 - Side lights: W 5 W.
FRemove the protective cover, disconnect the connector and then remove the bulb and change it.
FPut the connector back in place.
FReconnect the connector.
FRefit the protective cover.
4 - Direction indicators:
PY 21 W (amber).
FTurn the bulb holder a quarter turn and remove it.
FChange the bulb.
Amber coloured bulbs (direction indicators and side repeaters) must be replaced with bulbs of identical specification and colour.
5 - Front fog lamps:
H11-55 W.
Turn the wheels to full lock.
Access to the bulb is via the flap in the front mud flap.
Contact a PEUGEOT dealer.
The headlamps are fitted with polycarbonate glass with a protective coating. Do not clean them with a dry or abrasive cloth, nor with a detergent or solvent product.
Ensure that the liquid used to fill the wash-wipe and headlamp wash reservoir is of good quality.
In certain climatic conditions (low temperature, humidity), condensation on the inside surface of the headlamp glass is normal; it disappears a few minutes after the lights are switched on.
 11-10-2004

407 saloon and 407 SW comfort - 137
Direction indicator side repeaters:
WY 5 W (amber).
F Push the repeater forwards or backwards and release the assembly.
F Hold the connector and turn the transparent cover a quarter turn.
F Change the bulb.
Amber coloured bulbs (direction indicators and side repeaters), must be replaced with bulbs of identical specification and colour.
 11-10-2004

14 - Familiarisation
MAIN FUNCTIONS OF THE RT3 GPS AUDIO/TELEPHONE
Telephone call |
Pick up |
Steering wheel control
1 - Higher stored station - Next CD - Next screen
2 - Pick up/Hang up, change of sound source, selection confirmation
3 - Lower stored station - Previous CD - Previous screen
- telephone menu: dial, directory, list of calls, voice mail
- accept an incoming call
|
Dial |
|
Installing the SIM card |
- |
dial the number of |
(not supplied) |
|
your contact using the |
Open the flap by pressing |
alphanumeric keypad |
|
|
||
the circular opening above |
|
|
it using the tip of a pencil. |
|
|
Insert your SIM |
card |
|
(available from a |
mobile |
|
telephone operator) in the |
|
|
holder as shown on the |
|
|
graphics, then re-insert the holder. |
|
|
|
Hang up |
|
|
- |
end of call |
|
- |
refuse an incoming |
|
|
call |
 11-10-2004
140 - 407 saloon comfort
REAR SEATS
To fold down the rear left seat or the rear right seat, always start with the seat, never with the seat back (risk of damage):
F move the front seat(s) forward if necessary,
F place the head restraints in the low position or remove them if necessary.
Check that the seat belt strap is positioned correctly at the side of the seat back.
Ensure that the side seat belt straps are fastened in their clasp (the centre seat belt must not be fastened):
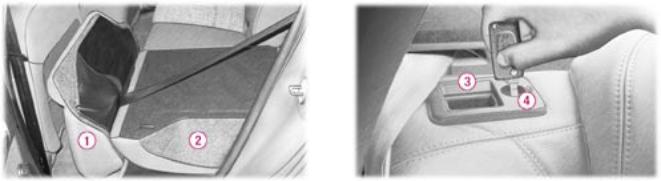
Flift the front of the seat cushion 1,
Ftilt the seat cushion 1 against the front seat(s),
Fpull control 3 forwards to unlock the seat back 2,
Ffold down the seat back 2.
 11-10-2004
Note: the seat cushion 1 can be removed with care to increase the volume of the load space.
Squeeze the seat cushion fixings to detach them from their fastenings.
When repositioning:
F fold up the seat back 2 and lock it (the red marker of control 3 should no longer be visible),
Ffold up the seat 1,
Frefit the head restraints if they were removed.
Take care not to trap the seat belt and to position the buckle of each strap correctly in its respective clasp before folding down the seat back. This will enable you to reposition the seat backs with their seat belts and clasps ready to accommodate your rear passengers.
Locking/unlocking the access to the boot via the rear seats
Your vehicle's boot can be isolated from the passenger compartment.
The red indicator on the control 3 should no longer be visible. If it is, push the seat fully.
Insert the ignition key in the lock 4.
SUNROOF
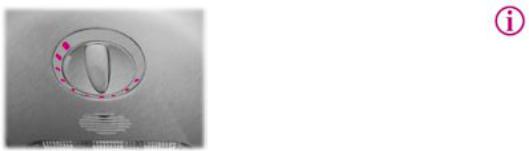
-To partially open the roof: Turn the switch to the right (three possible settings).
-To open the roof completely: Turn the switch to the left (six possible settings).
-To close it completely: Turn the switch back to position "O".
-Safety auto-reverse: When the sunroof is closing and meets an obstacle, it stops then partially opens again.
The sunroof shutter is manual.
Notes:
After reconnecting the battery, you must reinitialise the safety auto-reverse:
-place the control in the maximum partial opening position (3rd notch to the right),
-wait until the roof is in the maximum partially open position,
-press the control for at least one second.
In the event of unwanted opening of the roof on closing (for example, in the presence of ice), and immediately after the roof stops:
-move the control to the "O" position and press the control immediately,
-continue to press the control until the roof is fully closed.
In the partially open position, the roof closes automatically above 60 mph (100 km/h).
To partially open it again:
-move the control back to the "O" position,
-turn the control to the right.
The safety auto-reverse function is not active during these operations.
407 saloon comfort - 141
Always remove the key from the ignition when leaving the vehicle, even for a short time.
In the event of contact during operation of the roof, you must reverse the movement of the roof. To do this, press the switch concerned.
When the driver operates the roof switch, he must ensure that no one is preventing correct closing of the roof.
The driver must ensure that the passengers use the sunroof correctly.
Be aware of children when operating the roof.
 11-10-2004

142 - 407 SW comfort
REAR COURTESY LIGHT
1 - Courtesy light
2 - Map reading lights
With the key in the ignition on or starting position, operate the relevant switch.
The rear courtesy light comes on when the ignition key is removed, on unlocking the vehicle or on opening one of the doors.
It gradually goes off after the ignition has been switched on or the vehicle is locked.
F Pressing switch 1 turns on the rear courtesy light.
The courtesy light can be deactivated by pressing switch 1 with the door open. The map reading lights are not affected by this and may be switched on.
FTo re-activate the lights, press the switch, with the door open.
LUGGAGE COMPARTMENT LAYOUT
Lashing rings
Use the 4 lashing rings on the luggage compartment floor to secure your luggage.
Luggage retaining net
Hooked onto the lashing rings, this enables you to secure your luggage.
FITTING ROOF BARS
When fitting transverse roof bars, use the four quick-fit fixings provided for this purpose. Lift the concealing flaps and adjust the roof bar quick-fit fixings.
Maximum authorised weight on the roof rack, for a loading height not exceeding 40 cm (with the exception of bicycle carriers): 80 kg.
If the height exceeds 40 cm, adapt the speed of the vehicle to the profile of the road to avoid damaging the roof bars and the fixings on the roof.
Be sure to refer to national legisation in order to comply with the regulations for transporting objects which are longer than the vehicle.
 11-10-2004
CHANGING A REAR BULB
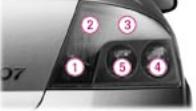
1 - Direction indicators:
PY 21 W (amber).
2 - Brake lights/side lights:
P21/4 W.
3 - Reversing lights: P 21 W.
4 - Fog lamps/side lights:
P 21/4 W.
5 - Side lights: P 21/4 W.
407 saloon comfort - 143
FDisconnect the connector.
FUnclip the two seal tabs.
FUnclip the bulb holder moving aside the 5 tabs.
FUnscrew the bulb and change it.
FLock the bulb holder in place. When refitting it, ensure that the lamp is correctly positioned and secured.
FReposition the two seal tabs.
FReconnect the connector.
Number plate lights: W 5 W.
FRemove the transparent cover using a screwdriver blade.
FChange the faulty bulb.
Third brake light:
Five W 5 W bulbs.
FRemove the plastic cover carefully by unclipping it on either side, perpendicular to its direction of engagement.
FPress on the two tabs.
FPull the red transparent cover outwards while maintaining the pressure on the tabs.
FChange the faulty bulb.
FWhen refitting, ensure that the tabs of the red transparent cover are engaged correctly and that the upper trim has been put back in place correctly.
 11-10-2004

407 SW comfort - 145
REAR SEATS
To fold down the rear left seat or the rear right seat, always start with the seat, never with the seat back (risk of damage):
F move the front seat(s) forward if necessary,
F place the head restraints in the low position or remove them if necessary,
Check that the seat belt strap is positioned correctly at the side of the seat back,
Ensure that side seat belt straps are fastened in their clasp (the centre seat belt must not be fastened),
Flift the front of the seat cushion 1,
Ftilt the seat cushion 1 against the front seat(s),
Fpull control 3 forwards to unlock the seat back 2,
Ffold down the seat back 2.
11-10-2004
Note: the seat cushion 1 can be removed with care to increase the volume of the load space.
Squeeze the seat cushion fixings to detach them from their fastenings.
When repositioning:
F fold up the seat back 2 and lock it (the red marker of control 3 should no longer be visible),
Ffold up the seat 1,
Frefit the head restraints if they were removed.
Take care not to trap the seat belt and to position the buckle of each strap correctly in its respective clasp before folding down the seat back. This will enable you to reposition the seat backs with their seat belts and clasps ready to accommodate your rear passengers.

146 - 407 SW comfort
TRANSPORTING LONG OBJECTS
Front passenger seat:
F Tilt the seat back approximately 25° towards the rear (in relation to the vertical position) using the seat back angle adjustment control (see corresponding paragraph).
F Lift control A upwards to release the seat back.
FWithout releasing control A, press on the top of the seat back and move with it until it is folded.
Rear seat (see corresponding paragraph):
FTilt the seat cushion,
FRemove the head restraints,
FTilt the seat back.
Note: when repositioning, ensure that the front and rear seat backs are secured correctly.
Precautions
-The long object must be placed on the end of the front seat back and on the rear seat cushion.
-Do not place a load in excess of 30 kg on the front of the seat back.
-Do not load sharp objects, this could damage the rear of the front seat back (storage pocket).
 11-10-2004
 Loading...