


DUAL ZONE AUTOMATIC AIR
CONDITIONING
The driver and his front passenger can each adjust the temperature to their requirements
t is preferable to use the automatic mode which optimises all of the functions: temperature, air flow, air distribution and air recirculation
1. |
Automatic comfort |
|
|
|
|
|
rogramme |
|
|
|
|
2. |
Driver’s temperature |
5. |
Air conditioning On/Off |
8. |
Air intake/Air |
|
adjustment |
|
|
|
recirculation |
3. |
Passenger temperature |
6. |
Air distribution |
9. |
Rear screen and |
|
adjustment |
|
adjustment |
|
mirrors demisting |
4. |
Automatic visibility |
7. |
Air flow adjustment. |
|
|
|
rogramme |
|
|
|
|
50
SPEED LIMITER*
This speed limiter, of the new generation, has a display on the instrument panel to indicate the programmed speed
t prevents exceeding of the vehicle speed programmed by the driver. When the programmed speed is reached, pressing the accelerator pedal no longer has any effect
The limiter operates with a programmed speed of at least 18 mph (30 km/h); it remains active regardless of any action on the brake and clutch pedals
The operating actions must be carried out
-when stationary, with the engine running,
r
- with the vehicle moving.
* According to country
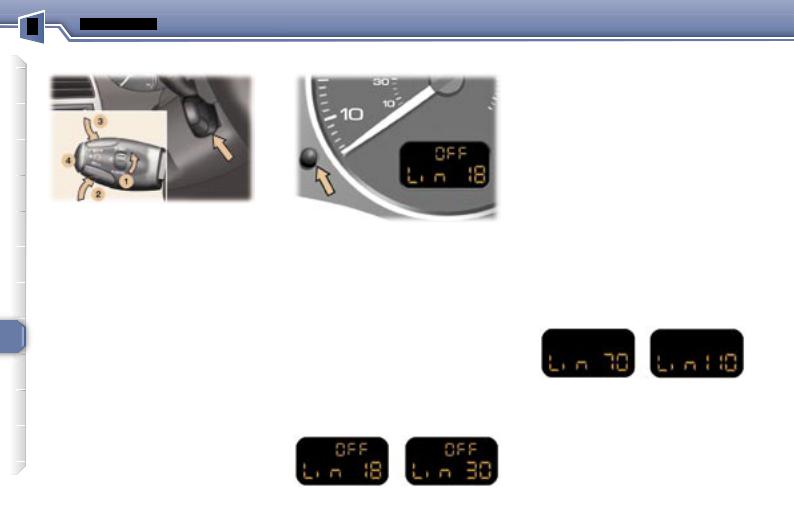
Instrument panel display
When the speed limiter function is active, pressing this button displays the distance recorders
After a few seconds or when this button is pressed again, the display returns to the speed limiter function
Selecting the function
 Place the dial
  in the LIMIT position. The limiter is not yet active.
By default, the display indicates
Storing a speed
A speed can be stored without activating the limiter
Press buttons 2 and 3 briefly to decrease or increase by 1 mph (1 km/h).
An extended press decreases or increases by 5 mph (5 km/h).
A maintained press decreases or increases the programmed speed in steps of 5 mph (5 km/h)
Activating/ deactivating the limiter
Pressing button 4 once activates the limiter, pressing the button again deactivates it
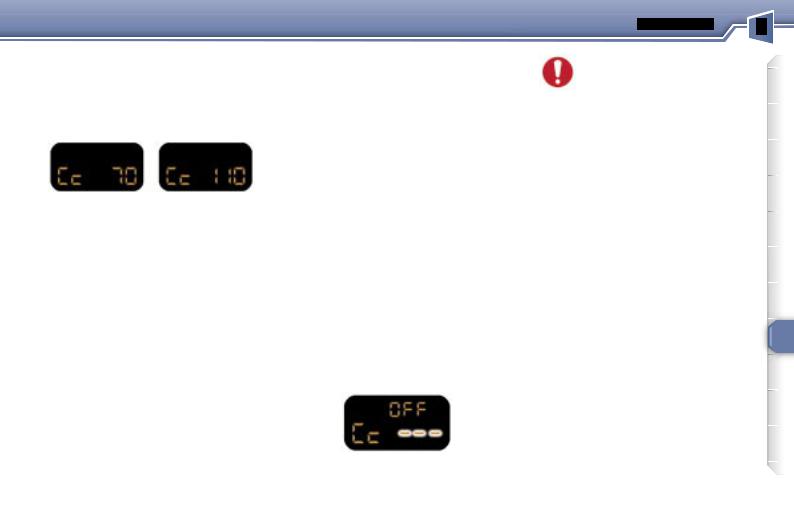
When the limiter is active, the display indicates (e.g. at 70 mph (110 km/h))
102
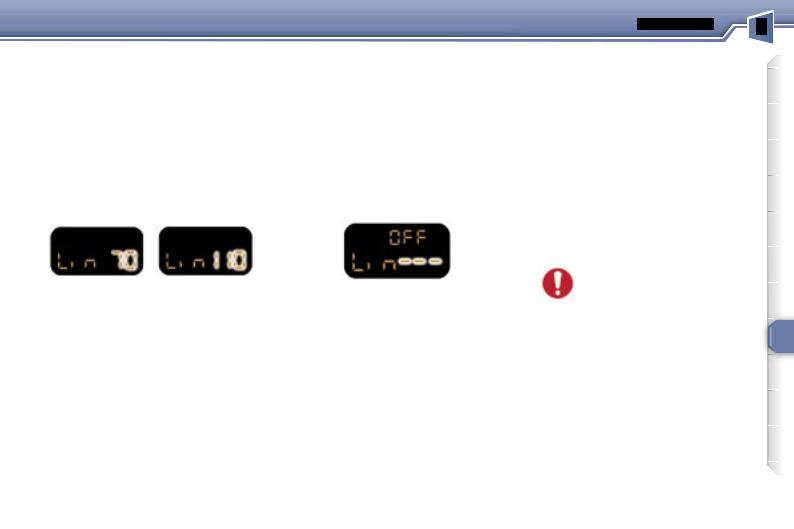
Exceeding the programmed speed
n exceptional circumstances, use this mode to exceed the programmed speed
Pressing the accelerator in order to exceed the programmed speed will have no effect unless you press the pedal firmly beyond the point of resistance
The limiter is deactivated temporarily and the speed displayed on the instrument panel flashes (e.g. at 70 mph (110 km/h))
Note: the speed also flashes when the limiter cannot prevent the vehicle from exceeding the programmed speed (on a steep descent, in the event of sharp acceleration).
To reactivate the limiter, release the accelerator to slow down to a speed below the programmed speed
Switching the function off
 Place dial
  in position 0 or switch off the ignition to switch the system off. The last programmed speed remains in the memory
Operating fault
n the event of a limiter malfunction, the programmed speed is cleared, the dashes flash for a few seconds
Contact a PEUGEOT dealer to have the system checked.
n the event of a steep descent or sharp acceleration, the speed limiter will not be able to prevent the vehicle
from exceeding the programmed speed
n any event, the speed limiter cannot replace the need to observe speed limits, nor can it replace the need for vigilance and responsibility on the part of the driver
To prevent the mat from becoming caught under the pedals
-ensure that the mat is positioned correctly
-never fit one mat on top of another
103
CRUISE CONTROL* |
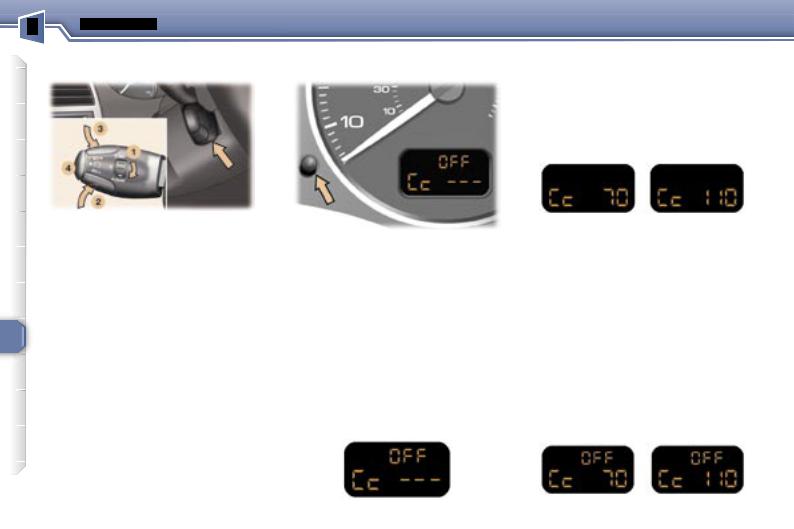
Instrument panel display |
This cruise control, of the new generation is linked with the speed limiter. It has a display on the instrument panel to indicate the memorised reference speed
t enables the vehicle to maintain a steady speed programmed by the driver
n order for it to be memorised or activated, the vehicle speed must be greater than 25 mph (40 km/h) with at least fourth gear engaged for vehicles fitted with a manual gearbox.
On vehicles fitted with an automatic gearbox, the lever must be in position D or in at least second gear in sequential mode
* According to country
When the cruise control function is activated, pressing this button enables you to display the distance recorders
After a few seconds or when this button is pressed again, the display returns to the cruise control function
Selecting the function
 Place switch 1 n the CRUISE position. The cruise control is not yet active and no speed has been memorised. The display indicates:
First activation/memorising a reference speed
As soon as you reach the chosen speed, press button 2 or 3 This memorises the speed and the display indicates (e.g. at 70 mph (110 km/h))
Note: t is possible to accelerate and drive momentarily at a speed greater than the memorised speed.
The value memorised flashes. When the accelerator pedal is released, the vehicle will return to the memorised speed
Cancelling the cruise control
f you wish to cancel the cruise control
 Press button 4 or the brake or clutch pedal.
The display indicates (e.g. at 70 mph (110 km/h))
104

Reactivating the cruise control
After cancellation of the cruise control, res button 4 Your vehicle will return to the last memorised speed.
The display indicates (e.g. at 70 mph (110 km/h))
Changing the memorised reference speed
To memorise a speed higher than the previous one, there are two options
Without using the accelerator
 press button 3
A brief press increases by 1 mph (1 km/h).
An extended press increases by
5 mph (5 km/h)
A maintained press increases in steps of 5 mph (5 km/h)
Using the accelerator
 exceed the memorised speed until the required speed is reached
 press button 2 r 3
To memorise a speed lower than the previous one
 press button 2
A brief press decreases by 1 mph (1 km/h).
An extended press decreases by
5 mph (5 km/h)
A maintained press decreases in steps of 5 mph (5 km/h)
Cancelling the memorised reference speed
 When the vehicle becomes stationary, after switching off the ignition, the system no longer memorises a speed
Switching the function off
 Place dial
  in position 0 to switch the system off
Operating fault
n the event of a cruise control malfunction, the memorised speed is erased, the dashes flash for a few seconds
Contact a PEUGEOT dealer to have the system checked
When changing the memorised reference speed by means of a maintained press, pay attention as the speed
can increase or decrease rapidly
Do not use the cruise control on slippery roads or in heavy traffic
n the event of a steep slope, the cruise control cannot prevent the vehicle from exceeding the programmed speed
n any event, the cruise control cannot replace the need to comply with speed limits, nor can it replace the need for vigilance and responsibility on the part of the driver
To prevent the mat from becoming caught under the pedals
-ensure that the mat is positioned correctly
-never fit one mat on top of another
105
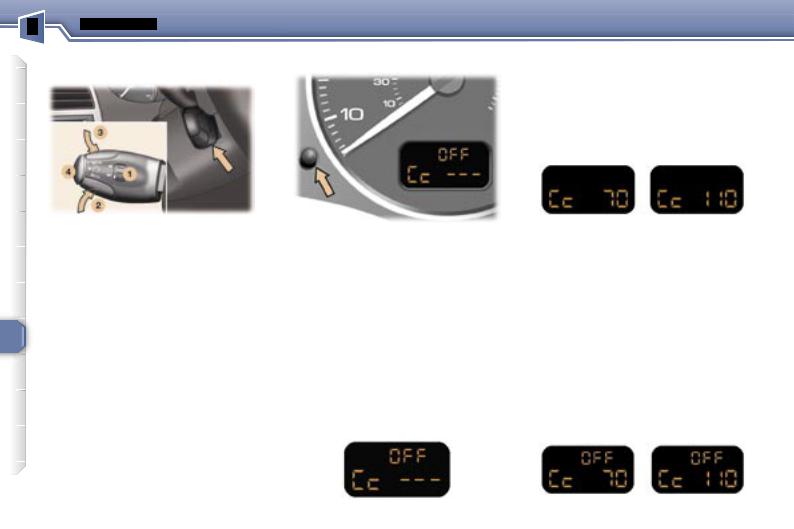
CRUISE CONTROL*
This cruise control has a display on the instrument panel to indicate the memorised reference speed.
t enables the vehicle to maintain a steady speed programmed by the driver
n order for it to be memorised or activated, the vehicle speed must be greater than 25 mph (40 km/h) with at least fourth gear engaged for vehicles fitted with a manual gearbox.
On vehicles fitted with an automatic gearbox, the lever must be in position D or at least second gear must be engaged in sequential driving mode
* According to country
Instrument panel display
When the cruise control function is activated, pressing this button enables you to display the distance recorder
After a few seconds or when this button is pressed again, the display returns to the cruise control function
Selecting the function
 Place switch 1 in the ON position. The cruise control is not yet active and no speed has been memorised. The display indicates:
First activation/
memorising a reference speed
As soon as you reach the chosen speed, press button 2 or 3 This memorises the speed and the display indicates (e.g. at 70 mph (110 km/h))
Note: t is possible to accelerate and drive momentarily at a speed greater than the memorised speed.
The value memorised flashes. When the accelerator pedal is released, the vehicle will return to the memorised speed
Cancelling the cruise control
f you wish to cancel the cruise control
 Press button 4 or the brake or clutch pedal.
The display indicates (e.g. at 70 mph (110 km/h))
106
Reactivating the cruise control
After cancellation of the cruise control, res button 4 Your vehicle will return to the last memorised speed.
The display indicates (e.g. at 70 mph (110 km/h))
Changing the memorised reference speed
To memorise a speed higher than the previous one, there are two options
Without using the accelerator
 press button 3
A brief press increases by 1 mph (1 km/h).
An extended press increases by
5 mph (5 km/h)
A maintained press increases in steps of 5 mph (5 km/h)
Using the accelerator
 exceed the memorised speed until the required speed is reached
 press button 2 r 3
To memorise a speed lower than the previous one
 press button 2
A brief press decreases by 1 mph (1 km/h).
An extended press decreases by
5 mph (5 km/h)
A maintained press decreases in steps of 5 mph (5 km/h)
Cancelling the memorised reference speed
 When the vehicle is stationary, after the ignition has been switched off, the system no longer stores any speed
Switching the function off
 Place dial
  in the OFF position to switch the system off
Operating fault
n the event of a cruise control malfunction, the memorised speed is erased, the dashes flash for a few seconds
Contact a PEUGEOT dealer to have the system checked
When changing the memorised reference speed by means of a maintained press, pay attention as the speed
can increase or decrease rapidly
Do not use the cruise control on slippery roads or in heavy traffic
n the event of a steep slope, the cruise control cannot prevent the vehicle from exceeding the programmed speed
n any event, the cruise control cannot replace the need to observe the speed limits, nor can it replace the need for vigilance and responsibility on the part of the driver
To prevent the mat from becoming caught under the pedals
-ensure that the mat is positioned correctly
-never fit one mat on top of another
107
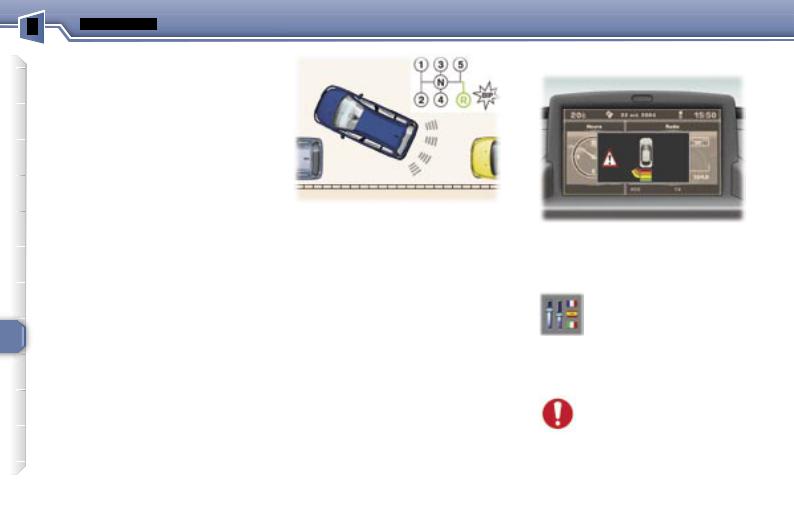
VISUAL AND AUDIBLE REAR PARKING ASSISTANCE
This system consists of four proximity sensors, located in the rear bumper
This detects any obstacle (person, vehicle, tree, gate, etc.) behind the vehicle. Nevertheless, it cannot detect obstacles located just below the bumper
An object, such as a stake, a roadworks cone or any other similar object may be detected at the beginning of the manoeuvre, but may no longer be detected when the vehicle comes close to it
Note: this function will be disarmed automatically when the vehicle is towing a trailer or when a bicycle carrier is fitted (vehicle fitted with towing attachment or bicycle carrier ecom mended by PEUGEOT).
n bad or wintry weather, ensure that the sensors are not covered with mud, frost or snow. When reverse gear is engaged, an audible signal
(long bleep) indicates that the sensors may be dirty
Activation
The system is activated as soon as reverse gear is engaged
This is accompanied by an audible signal and displaying of the vehicle, depending on the multifunction display.
Switching the system off
The proximity information is given by:
-an audible signal, which becomes more rapid as the vehicle approaches the obstacle
-a graphic on the multifunction display, with blocks which become progressively closer to the vehicle
Depending on the multifunction display, the audible signal is transmitted by a buzzer or by the rear speakers which transmit
-on the right if an obstacle is detected on the right
-on the left if an obstacle is detected on the left
-on the right and on the left if an obstacle is detected in the centre
When the distance between the rear of the vehicle and the obstacle is less than approximately thirty centimetres, the audible signal becomes continuous and the "Danger" symbol appears depending on the multifunction display
Change to neutral, the system is again inactive
Activation/Deactivation
The system can be activated or deactivated from the multifunction display configuration menu.
The activation and deactivation of the system are memorised when the engine is switched off
f there is an operating fault, when reverse gear is engaged, the service warning light comes on, accompanied
by an audible signal (short bleep) and a message on the multifunction display
Contact a PEUGEOT dealer
108

ELECTRIC WINDOWS |
ELECTRIC MIRRORS |
STEERING WHEEL HEIGHT |
|
|
AND DEPTH ADJUSTMENT |
1.Driver’s electric window
2.Passenger’s electric window.
3.Rear right electric window.
4.Rear left electric window.
5.Disarming the rear window switches.
Manual operation:
 Press or pull the switch lightly. The window stops as soon as the switch is released
Automatic operation
 Press or pull the switch firmly. One touch completely opens or closes the window
 Move control 6 to the right or left to select the mirror to be adjusted
 Move control 7 in all four directions to adjust
 Return control 6 to the centre position
When parking the vehicle, the mirrors can be folded back electrically, by pulling control 6 rearwards or automatically on locking the vehicle usng the remote control or the key
52
 When stationary, pull handle A to unlock the steering wheel
 Adjust the height and depth of the steering wheel
 Lock it by pushing handle A fully
53
68
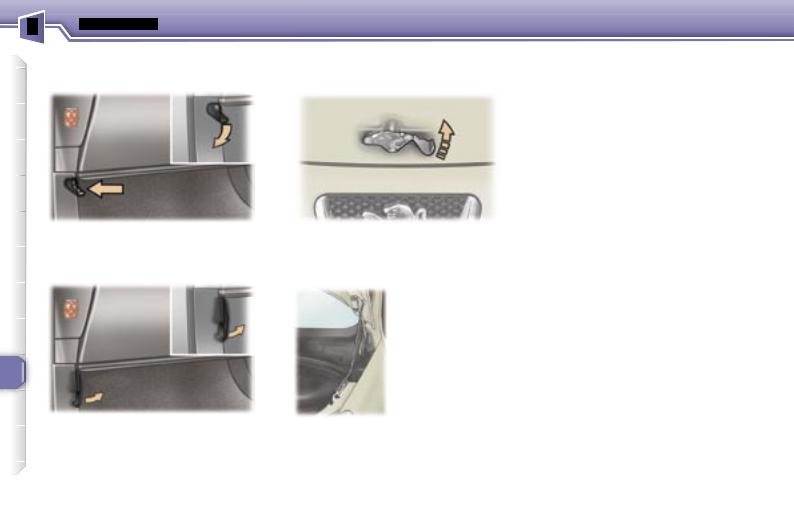
OPENING THE BONNET
From inside
Push the handle on the left-hand side under the fascia
r
Tilt the handle on the left-hand side under the fascia to the right*
* During the year
From outside
Lift the catch and raise the bonnet
Bonnet strut
Secure the strut to hold the bonnet
pen
Before closing the bonnet, replace the strut in its housing
To close
Lower the bonnet and release it at the end of its travel.
Check that the bonnet is properly locked.
RUNNING OUT OF FUEL (DIESEL)
f you should run out of fuel, it is necessary to re-prime the circuit
The repriming pump, the degas screw and the transparent pipe are located under the bonnet (see corresponding drawing)
1.6litre HDI 16V engine
-fill the fuel tank with at least five litres of diesel
-unclip the style cover to access the repriming pump
-squeeze and release the manual repriming pump until fuel appears n the transparent pipe with the green connector
-operate the starter until the engine starts
2 litre HDI 16V engine
-fill the fuel tank with at least five litres of diesel
-unclip the style cover to access the repriming pump
-unscrew the degas screw
-squeeze and release the manual repriming pump until diesel is seen escaping via the degas screw
-retighten the degas screw
-operate the starter until the engine starts
110
CHECKING THE LEVELS
Oil level
Check the level regularly and top up between changes. The maximum consumption is 0.5 l per 600 miles (1 000 km).
Check the level with the vehicle level, engine cold, using the oil level gauge on the instrument panel or the dipstick.
Dipstick
There are two marks on the dipstick
A = maximum
Never fill past this mark
B = minimum
To maintain the reliability of engines and emission control systems, the use of additives n engine oil is prohibited
Oil change
According to the information given in the servicing booklet
Viscosity selection
n all cases, the oil selected must meet the manufacturer’s requirements.
Brake fluid level
Replacement must be carried out according to the manufacturer’s servicing schedule
Use fluids recommended by the manufacturer, which fulfil DOT4 standards
Cooling system
Use the fluid recommended by the manufacturer
When the engine is warm, the temperature of the coolant is controlled by the engine fan. This fan can operate with the ignition off
In the case of vehicles fitted with a particle emission filter, the fan can operate after the vehicle has stopped, even when the engine is cold
n addition, as the cooling system is pressurised, wait for at least one hour after the engine has stopped before carrying out any work
Slacken the cap by two turns to release the pressure to prevent any risk of scalding. When the pressure has dropped, remove the cap and top up the level
The level should always be above the MIN mark and close to the MAX mark
Note: the coolant does not need to be changed
Power steering reservoir
Remove the style trim* (see § "Changing a bulb - Front lights").
Open the reservoir, with the engine at ambient temperature. The level should always be above the MIN. mark and close to the MAX. mark
Windscreen and headlamp wash level
For best quality cleaning and for your safety, we would advise that you use products recommended by PEUGEOT.
Diesel additive level (Diesel with particle emission filter)
f the service warning light comes on, accompanied by a message and an audible signal, this indicates a low diesel additive level
This additive must be topped up
Contact a PEUGEOT dealer as soon as possible
* According to engine.
117

Used products
Avoid all prolonged contact of the used oil with the skin
Brake fluid is harmful to health and very corrosive
Do not dispose of used oil, brake fluid or coolant into drains or onto the ground
Empty the used oil into the containers provided for this
purpose in the PEUGEOT network
CHECKS
Battery
At the start of winter, have your battery checked by a
PEUGEOT dealer
Air filter and passenger compartment filter
Have the filter elements replaced regularly If you drive industyconditions,change them twice as often.
Particle emission filter (Diesel)
t is imperative that the particle emission filter is maintained in accordance with the manufacturer’s servicing schedule, by a PEUGEOT dealer
Note following prolonged operation of the vehicle at very low speed or at idle, you may, in exceptional cases, notice discharges of water vapour at the exhaust on acceleration. This has no effect on the behaviour of the vehicle or on the environment
Brake pads
Brake pad wear depends on the style of driving, in particular for vehicles which are used in town, over short distances
t may be necessary to check the thickness of the pads, even between services
Disc and drum wear status
For any information relating to the wear status of the surfaces of the discs and drums, contact a PEUGEOT dealer
Handbrake
Where the handbrake travel is too great or there is a reduction in the performance of the system, the handbrake should be adjusted,
even between services
Have the system checked by a
PEUGEOT dealer
Oil filter
Change the filter regularly, in accordance with the servicing schedule
Manual gearbox
This does not require an oil change.Havethelevelchecked in accordance with the manufacturer’s servicing schedule.
To check the main levels and certain components, in accordance with the manufacturer’s servicing schedule,refertothepagesofthe
servicing booklet which correspond to your vehicle’s engine.
Only use products recommended by PEUGEOT or products of equivalent quality and characteristics
To ensure best performance from components as important as the power steering and the braking system, PEUGEOT selects and offers quite specific products
To prevent damage to the electrical units, high pressure washing to clean the engine compartment is strictly prohibited
118
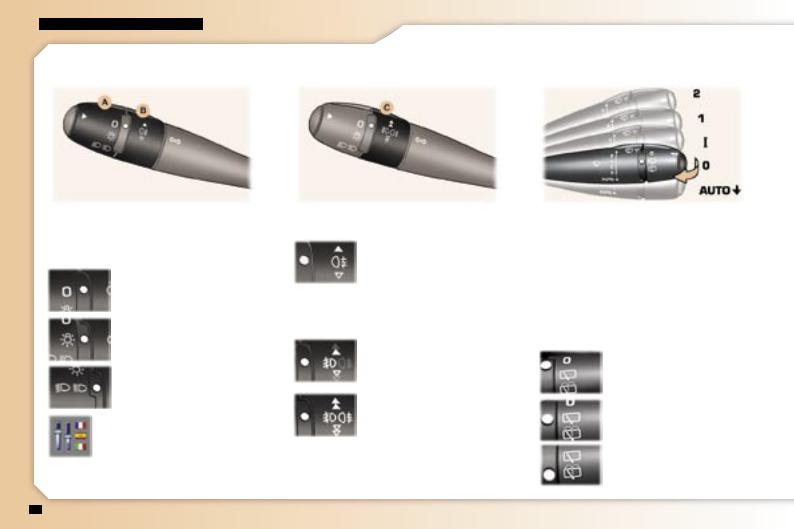
LIGHTS STALK |
WINDSCREEN |
|
WIPERS STALK |
The position is indicated on the instrument panel by the corresponding indicator light
Front and rear lights (ring A)
Lights off
Side lights.
Dipped/main beam headlamps
Automatic switching on of the lights
Activate or deactivate the function by going to the multifunction display configuration menu.
Vehicles fitted with a rear fog lamp (ring B)
Rear fog lamp (rotation of the ring forwards)
Vehicles fitted with front fog lamps and a rear fog lamp (ring C)
Front fog lamps (first rotation of the ring forwards)
Front fog lamps and rear fog lamp (second rotation of the ring forwards)
Switching off: rotation of the ring backwards
Front
2Rapid wipe
Normal wipe
Intermittent wipe
0Off
AUTO Automatic wipe or single wipe
Windscreen wash-wipe: pull the stalk towards you
Rear
Off
ntermittent wipe
Wash-wipe
74 |
77 |
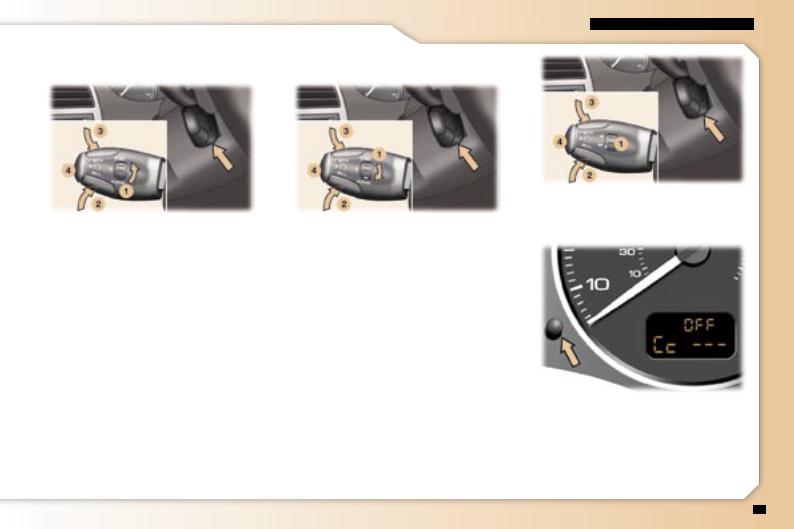
SPEED LIMITER
1.Function Selection/Off
2.Decreasing of the speed.
3.Increasing of the speed
4.Activation/Deactivation of the system
The values must be set with the engine running
102
CRUISE CONTROL
1.Function Selection/Off
2.Storing of a speed/Decreasing of the stored speed
3.Storing of a speed/Increasing of the stored speed
4.Deactivation/Reactivation of the cruise control
n order to be stored or activated, the vehicle speed must be above approximately 25 mph (40 km/h), with at least fourth gear engaged on the manual gearbox (second gear on the automatic gearbox).
104
106
Instrument panel display
The cruise control or speed limiter function appears on the instrument panel when it is activated
Pressing the button enables you to alternate between the activated function display and the distance recorder displays
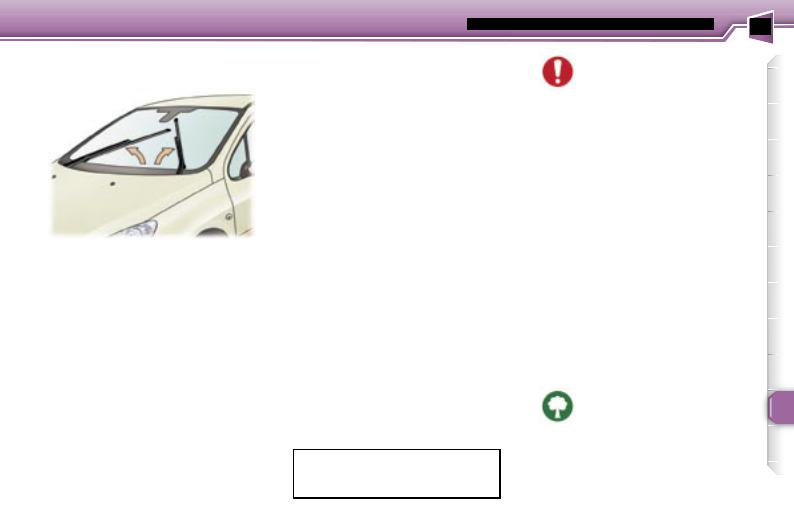
CHANGING A WINDSCREEN WIPER BLADE
Special front windscreen wiper position
 Within one minute of switching off the ignition, operate the wipers stalk to position the wiper blades in the centre of the windscreen (maintenance position).
Changing a wiper blade
 Lift the wiper arm, then unclip the blade and remove it
 Fit the new blade and push back the arm
Note: the shortest blade is fitted on the vehicle’s right-hand windscreen wiper arm
To return the windscreen wipers to their normal position, switch on the ignition and operate the wiper stalk.
BATTERY
To charge the battery using a battery charger:
-Disconnect the battery starting with the negative (-) terminal
-Follow the instructions for use given by the battery charger manufacturer
-Check that the terminals and connectors are clean; if they are covered with sulphate (white or greenish deposit), disconnect them and clean them
-Reconnect the battery starting with the negative (-) terminal.
To start the vehicle from another battery:
 Connect the red cable to the positive (+) terminals of the two batteries
-Connect one end of the green or black cable to the negative (-) terminal of the slave battery
-Connect the other end of the green or black cable to an earth point on the broken down vehicle as far as possible from the battery
-Operate the starter, let the engine
un
-Wait for the engine to return to idle, then disconnect the cables
Before disconnecting the battery, you must wait for 2 minutes after switching off the ignition
Never disconnect a terminal when the engine is running
Never charge a battery without first disconnecting the terminals
Close the windows and sunroof before disconnecting the battery. If they do not operate normally following reconnection of the battery, they must be reinitialised (see sections "Reinitialisation of the electric windows" and "Sunroof")
After every reconnection of the battery, switch on the ignition and wait
1 minute before starting to allow the electronic systems to be initialised. If slight difficulties are experienced after this, please contact a PEUGEOT dealer
Following disconnection of the battery, the remote control key and the
GPS satellite navigation system must be reinitialised (see corresponding section)
The batteries contain harmful substances such as sulphuric acid and lead. They must be disposed of in ac-
cordance with regulations and must never be discarded with household waste
Take used remote control and vehicle batteries to an approved collection point
135
ECONOMY MODE FUNCTION
After the engine has stopped, certain functions (windscreen wiper, electric windows, sunroof, courtesy lights, audio equipment, telephone, dipped headlamps, etc.) can only be used for a combined duration of approximately thirty minutes, to prevent discharging the battery
Once the thirty minutes are over, a switching to economy mode message appears on the multi-function display and the active functions are put on standby
These functions are reactivated automatically next time the vehicle is driven
n order to resume the use of these functions immediately, the engine must be started and left to run for a few minutes
The time available to you will then be double the duration for which the engine is left running. However, this period will always be between five and thirty minutes
Note: if the telephone is being used when economy mode starts, it will still be possible to finish the call.
A flat battery prevents the engine from starting
LOAD REDUCTION
FUNCTION
When driving, certain functions (air conditioning, heated rear screen, heating system for passenger compartment of diesel vehicles, etc.) may be switched off temporarily, depending on the level of battery charge.
Reactivation of these functions is automatic, once the battery charge is sufficient
Note at the risk of discharging the battery, the functions that have been switched off may be reactivated manually
136
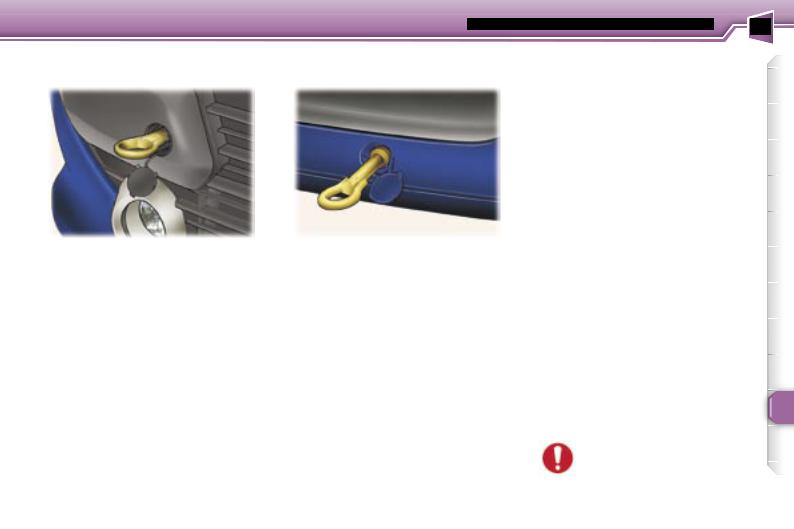
TOWING YOUR VEHICLE
Without lifting
(4 wheels on the ground)
You must always use a tow bar
The removable towing eye is inside the spare wheel
Estate the removable towing eye is inside the right-hand boot trim
From the front:
 Unclip the cover, by pressing the bottom part,
 Screw in the towing eye as far as it will go
From the rear:
 Unclip the top of the cover using a coin
 Screw in the towing eye as far as it will go
Lifting (2 wheels only on the ground)
t is preferable to raise the vehicle with a professional lifting device.
Special features of the automatic gearbox
When towing with four wheels on the ground, the following rules must be obeyed
-lever in position N
-tow the vehicle at less than 30 mph (50 km/h) over a maximum distance of 30 miles (50 km)
-do not add oil to the gearbox
When towing with the engine switched off, there is no brakng or steering assistance
137

TOWING A TRAILER,
CARAVAN, BOAT, etc.
We recommend the use of original PEUGEOT towbars that have been tested and approved from the design stage of your vehicle and that the fitting of the towbar is entrusted to a PEUGEOT dealer
Your vehicle is primarily designed for transporting people and luggage but it may also be used for towing a trailer
Driving with a trailer subjects the towing vehicle to more significant stress and its driver must be particularly careful
Air density decreases with altitude, thus reducing engine performance. Above 1 000 metres, the maximum towing load must be reduced by 10 % and so on for every 1 000 metres of altitude
The rear parking assistance function will be disarmed automatically when a towbar is fitted
Driving advice
Distribution of loads: Distribute the load in the trailer so that the heaviest tems are as close as possible to the axle and the nose weight approaches the maximum permitted without exceeding it
Cooling: towing a trailer on a slope increases the temperature of the coolant.
As the fan is electrically controlled, ts cooling capacity is not dependent on the engine speed
To lower the engine speed, reduce your speed
The maximum towing load on a long slope depends on the gradient and the outside temperature
n all cases, pay attention to the coolant temperature
f the warning light comes on, stop the vehicle and switch off the engine as soon as possible
Tyres: check the tyre pressures of the towing vehicle and of the trailer, observing the recommended pressures
Braking: towing increases the braking distance.
Lights check the electrical signalling on the trailer
Side wind: take into acount the increased sensitivity to side wind.
138
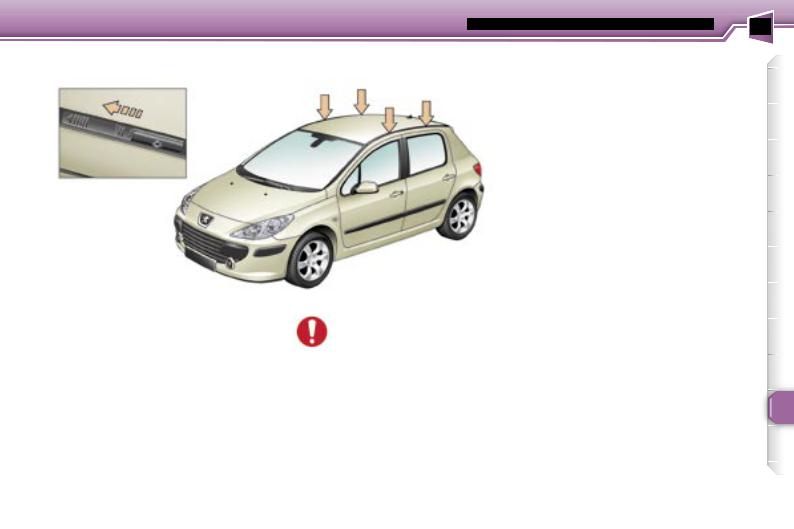
FITTING ROOF BARS
Saloon: when fitting transverse roof bars, use the four threads provided for this purpose. To access these, push the concealing flaps in the direction of the arrow
Estate: when fitting transverse roof bars, observe their positioning. This is indicated by marks on each of the longitudinal bars
Use accessories approved by
PEUGEOT and follow the manufacturer’s fitting instructions
Maximum authorised weight on the roof rack, for a loading height not exceeding
40 cm (with the exception of bicycle carriers): 75 kg (saloon), 100 kg (estate).
If the height exceeds 40 cm, adapt the speed of the vehicle to the profile of the road to avoid damaging the roof bars and the fixings on the roof.
139
VISUAL AND AUDIBLE REAR |
"PORSCHE TIPTRONIC |
PARKING ASSISTANCE |
SYSTEM" AUTOMATIC |
|
GEARBOX |
A.Switching on.
B.Detection
C.Activation/Deactivation
Activate or deactivate the system by going to the multifunction display configuration menu.
When reverse gear is engaged, you are guided by an audible signal, and a graphic depending on the multifunction display, during the reversing
anoeuvre
108
1.Gear lever
2."SPORT" button
3."SNOW" button
Instrument panel display
P: Park
R:Reverse
N:Neutral
D Drive
M:Manual mode
S:Sport programme
 Snow programme
1 2 3 4 5* 6*: gears engaged
Gear selection gate
Move the lever in the gate to select one of the positions
Once selected, the indicator light which corresponds to this position is shown on the instrument panel display
Switching on the engine
With the handbrake applied, select position P or N
Switch on the ignition.
Moving off
With the engine running, in position
P or N with your foot on the brake, release the handbrake
Select position R D or M
Gradually release the brake pedal; the vehicle moves off immediately
99
* According to model.

ACCESSORIES
FOR YOUR 307
A wide range of accessories recommended by PEUGEOT and original parts are offered by the network
They all benefit from PEUGEOT’s recommendation
These accessories and parts, having been tested and approved for reliability and safety, are all adapted to your PEUGEOT vehicle
The product range offered by PEUGEOT
Accessories is structured around 5 categories: PROTECTION - TOURING - N-CAR TECHNOLOGY - STYLING - UNIVERSAL, it is dedicated to
"Protection":
anti-theft alarm, window engraving, wheel locks, first aid kit, warning triangle, safety jacket, stolen vehicle tracking system, dog guard, snow chains
"Touring"
mats, boot tray, luggage net, fixed coat hook on head restraint, aluminium or PVC door sills
For leisure pursuits: roof bars, tailgate bicycle carrier* (estate), bicycle carrier on roof
bars, ski carrier, roof box, booster seats and child seats, audio/telephone console, side blinds and rear blind, front centre armrest, CD storage, under shelf storage (saloon).
Trailer towbar which must be fitted by the PEUGEOT network
Note
To prevent the mat from becoming caught under the pedals
-ensure that the mat is positioned and secured correctly
-never fit one mat on top of another
"In-car technology"
audio systems, audio/telephone, amplifiers, satellite navigation systems, handsfree kit, entertainment screen kit, CD changer, speakers, DVD player, con-
nection kit for MP3 player or portable CD player, rear parking assistance
"Styling":
seat covers compatible with side air bags, aluminium gear lever knob, fog lamps, door deflectors, spoiler (saloon), styling strips, alloy wheels, trims, sport exhaust
"Universal":
screenwash, interior and exterior maintenance and cleaning products
The fitting of electrical equipment or accessories which are not recommended by
PEUGEOT may result in a failure of your vehicle’s electronic system.
Please note this specific warning.
You are advised to contact a representative of the Marque to be shown the range of recommended equipment and accessories
*When using a tailgate bicycle carrier, deactivate the rear wiper via the multifunction display configuration menu
140
AUDIO EQUIPMENT |
RD4 CONTROL PANEL |
STEERING WHEEL CONTROL |
|
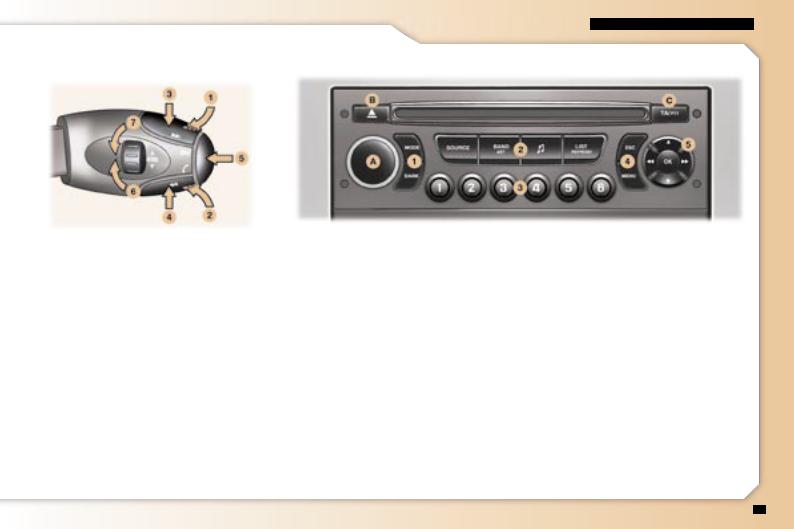
Volume adjustment
1.Increase by pressing the back
2.Decrease by pressing the back
1+2. Cutting off/Restoring of the sound
Search/Selection by pressing
3.Higher radio frequency - CD/CD changer: next track
4.Lower radio frequency - CD/CD changer previous track
Sound sources
5.Change of sound source
Access to the telephone displays
Selection of stations/CD in the changer by rotation
6.Higher stored station -
Next CD
7.Lower stored station -
Previous CD
Button (A)
ON/OFF and volume adjustment
Button (B)
CD eject
Keypad (1)
MODE: changing of the display of the permanent application (audio equipment, trip computer, ...)
DARK: 1st press: black screen under the banner - 2nd press: completely black screen - 3rd press: return to the display
Keypad (2)
SOURCE: change of source between radio, CD, CD changer
BAND AST: selection of the frequency wavebands
access to the musical ambience settings
LIST REFRESH: displaying and updating of the list of stations received, of the tracks on the CD
Keypad (3)
Storing of the radio station
Selection of the stored station, of the
CD in relation to the position in the CD changer
Keypad (4)
ESC (Escape): cancellation of the operation in progress
MENU: displaying of the general menu.
Keypad (5)
Navigator
Button (C)
TA: traffic information priority on/off PTY: access to the search by type of rogramme
180

DIMENSIONS (in mm)
saloon 3 and 5 door versions |
estate |
155
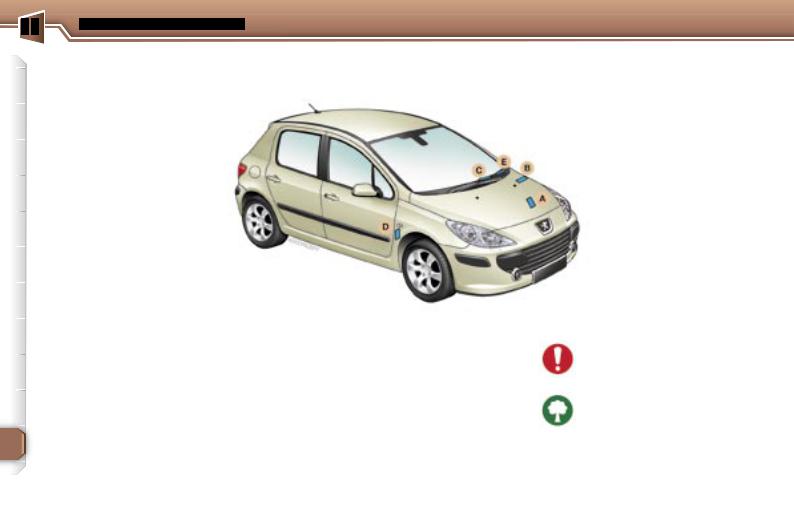
THE IDENTIFICATION FEATURES OF YOUR 307
A.Manufacturer’s plate.
B.Serial number on the bodywork.
C.Serial number on the fascia.
D.Tyres and paint colour reference.
The label D on the driver’s door pillar, near the hinges, indicates
-the wheel and tyre sizes
-the brands of tyres* approved by the manufacturer
-the tyre pressures
-the paint colour reference*.
The tyre pressure must be checked when the tyre is cold, at least once a month
Low tyre pressures increase fuel consumption
E.Fuel consumption* in the corner of the windscreen (saloon).
* According to country
156

REAR SEATS
To fold the left (2/3 part) or right (1/3 part) rear seat, always start with the seat cushion, never with the seat back (risk of damage)
-move the front seat(s) forward if ecessary
-tilt the seat cushion  against the front seat(s)
estate tilt using the handle
-check that the seat belt is positioned correctly on the side of the seat back
-pull control 2 forwards to release the seat back 3
-place the head restraints in the low position
-tilt the seat back 3
Note the seat cushion  can be removed to increase the loading vol-
me
When repositioning
-fold back the seat back and lock it (the red indicator on control 2 should no longer be visible)
-fold back the seat cushion.
Take care not to trap the seat belts.
56
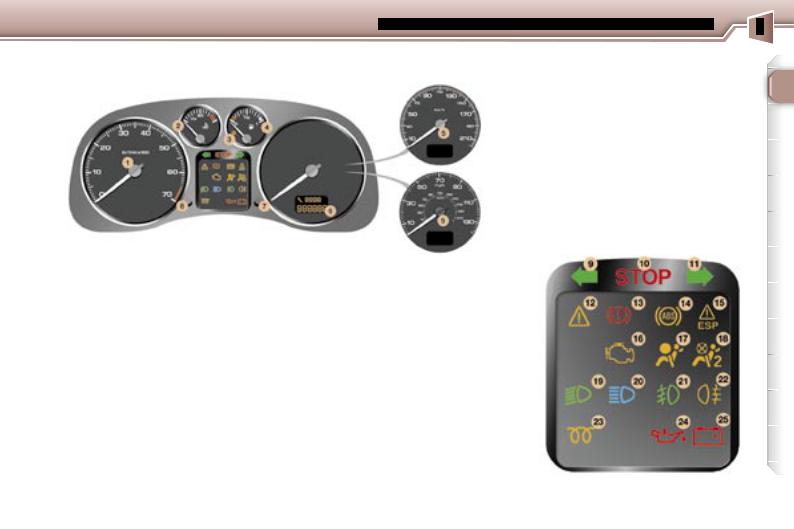
PETROL/DIESEL INSTRUMENT PANEL DIALS: |
19. |
Dipped beam headlamps |
MANUAL GEARBOX |
|
indicator light |
|
20. |
Main beam headlamps indicator |
|
|
light |
|
21. |
Front fog lamps indicator light |
|
22. |
Rear fog lamp indicator light. |
|
23. |
Diesel engine preheating light |
|
24. |
Engine oil pressure warning |
|
|
light* |
|
25. |
Battery charge warning light*. |
1. |
Rev counter |
11. |
Right-hand direction indicator |
2. |
Coolant temperature indicator |
12. |
Service warning light. |
3. |
Low fuel level warning light. |
13. |
Handbrake, brake fluid level |
4. |
Fuel gauge |
|
and electronic brake force |
|
distribution warning light |
||
5. |
Speedometer |
14. |
Anti-lock braking system (ABS) |
|
|
|
warning light |
6.Service indicator, oil level
|
indicator, distance recorder and |
15. |
Electronic stability control |
|
|
cruise control/speed limiter |
|
(ESP/ASR) warning light |
|
7. |
Trip recorder zero reset button |
16. |
Emission control system |
|
8. |
Lighting rheostat button |
|
warning light |
|
17. |
Air bags warning light |
|
||
9. |
Left-hand direction indicator |
|
||
18. |
Passenger air bag disarmed |
|
||
10. |
|
|
||
Central STOP warning light |
|
indicator light*. |
* According to country |
17
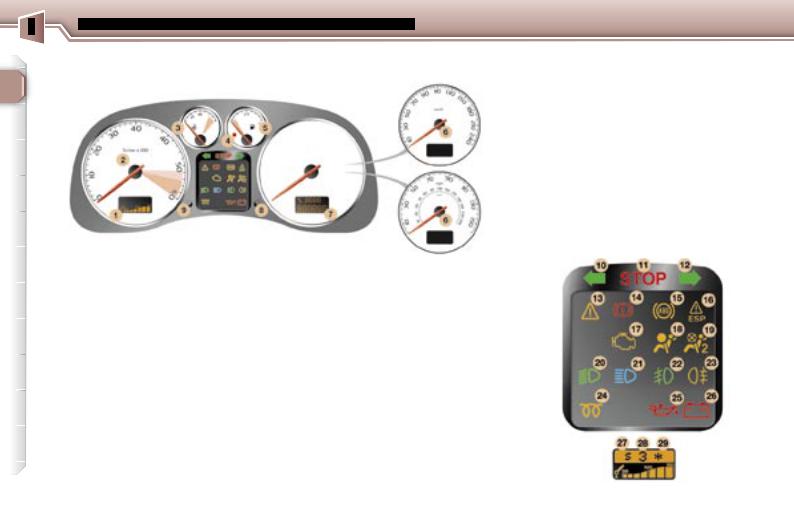
PETROL/DIESEL SPORT INSTRUMENT PANEL DIALS: MANUAL/AUTOMATIC GEARBOX
1.Engine oil temperature indicator
2.Rev counter
3.Coolant temperature indicator
4.Low fuel level warning light.
5.Fuel gauge
6.Speedometer
7.Service indicator, oil level indicator, distance recorder and cruise control/speed limiter
8.Trip recorder zero reset button
9.Lighting rheostat button
10.Left-hand direction indicator
11.Central STOP warning light.
12.Right-hand direction indicator
13.Service warning light.
14.Handbrake, brake fluid level and electronic brake force distribution warning light
15.Anti-lock braking system (ABS) warning light
16.Electronic stability control
(ESP/ASR) warning light
17.Emission control system warning light
18.Air bags warning light
19.Passenger air bag disarmed indicator light*.
20.Dipped beam headlamps indicator light
21.Main beam headlamps indicator light
22.Front fog lamps indicator light
23.Rear fog lamp indicator light.
24.Diesel engine preheating light
25.Engine oil pressure warning light*
26.Battery charge warning light*.
27.Sport programme indicator light.
28.Gear lever position indicator
29.Snow programme indicator light.
* According to country
18

PETROL INSTRUMENT PANEL DIALS: AUTOMATIC GEARBOX |
20. |
Air bags warning light |
|||
|
|
|
|
21. Passenger air bag disarmed |
|
|
|
|
|
|
indicator light*. |
|
|
|
|
22. |
Dipped beam headlamps |
|
|
|
|
|
indicator light |
|
|
|
|
23. Main beam headlamps indicator |
|
|
|
|
|
|
light |
|
|
|
|
24. Front fog lamps indicator light |
|
|
|
|
|
25. Rear fog lamp indicator light. |
|
|
|
|
|
26. Engine oil pressure warning |
|
|
|
|
|
|
light* |
|
|
|
|
27. Battery charge warning light*. |
|
1. |
Rev counter |
11. |
Gear lever position indicator |
|
|
2. |
Coolant temperature indicator |
12. |
Left-hand direction indicator |
|
|
3. |
Low fuel level warning light. |
13. |
Central STOP warning light. |
|
|
4. |
Fuel gauge |
14. |
Right-hand direction indicator |
|
|
5. |
Speedometer |
15. |
Service warning light. |
|
|
|
|
|
|
||
6. |
Service indicator, oil level |
16. |
Handbrake, brake fluid level |
|
|
|
and electronic brake force |
|
|
||
|
indicator, distance recorder and |
|
|
|
|
|
|
distribution warning light |
|
|
|
|
cruise control/speed limiter |
|
|
|
|
|
|
|
|
|
|
7. |
Trip recorder zero reset button |
17. |
Anti-lock braking system (ABS) |
|
|
|
warning light |
|
|
||
8. |
Lighting rheostat button |
18. |
Electronic stability control |
|
|
|
|
|
(ESP/ASR) warning light |
|
|
9.Snow programme indicator light.
19. |
Emission control system |
* According to country |
10. Sport programme indicator light. |
warning light |
19
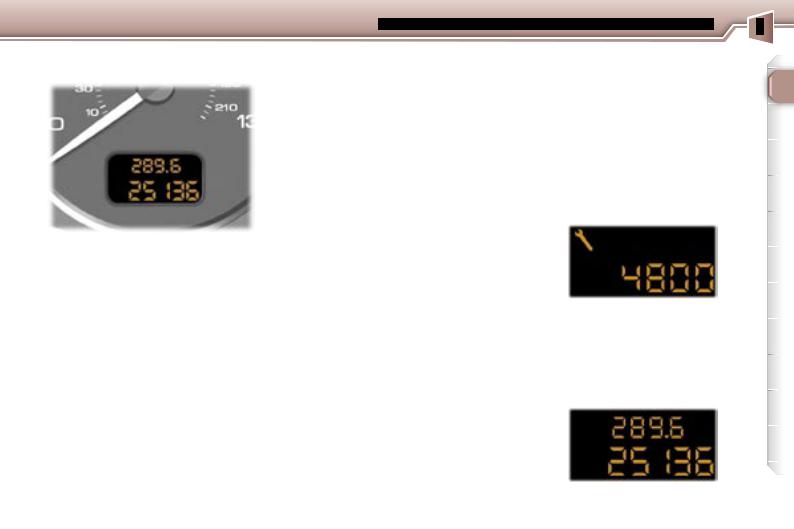
INSTRUMENT PANEL DISPLAY
After switching on the ignition, three functions are shown in succession
-service indicator
-engine oil level indicator
-total distance recorder (total and trip distances)
Note: the total and trip distances are displayed for 30 seconds when the ignition is switched off, on opening the driver’s door, as well as on locking and unlocking the vehicle.
t also displays the information relating to the cruise control or speed limiter, when either of these is activated (see corresponding section).
Service indicator
This indicates when the next service s due in accordance with the manufacturer’s servicing schedule.
The point at which the next service is due is calculated from the last indicator zero reset (see corresponding section). It is determined by two parameters
-the distance travelled
-the time which has elapsed since the last service
Note: the distance remaining before the next service may be weighted by the time factor, depending on the user’s driving habits
Operation
For 5 seconds after the ignition is switched on, the spanner symbolising the servicing operations comes on; the distance recorder display indicates the number of miles [kilometres] (rounded off) remaining until the next service
Example: 4,800 miles/km remain before the next service. For five seconds after the ignition is switched on, the display indicates
5 seconds after the ignition was switched on, the distance recorder resumes its normal operation and the display indicates the total and trip distance
25
 Loading...