


10
SPECIAL FEATURES
Some of your vehicle’s vital components have specific servicing schedules.
The airbags and the pretensioning seat belts must be replaced every 10 years.
The brake fluid must be replaced every 40 000 miles (60 000 km) or every 2 years.
The pollen filter must be checked during each regular service at the PEUGEOT dealer.
Timing belt replacement: consult a PEUGEOT dealer.
Note: the coolant does not need to be changed.
Arduous conditions of use
If the vehicle is used in certain particularly arduous conditions:
•Continuous door-to-door use.
•Town use (e.g. taxi).
•Repeated short journeys, with the engine cold in low temperatures.
Or in long stays in the following conditions:
•Hot countries with temperatures often above 30° C.
•Cold countries with temperatures often below minus 15° C.
•Countries with a dusty atmosphere.
•Countries whose lubricants or fuels do not conform to our recommendations.
It is necessary to follow an ‘Arduous conditions’ service schedule, which includes special operations and shorter service intervals:
•Every 12 000 miles (20 000 km) or every year for petrol vehicles.
•Every 6 000 miles (10 000 km) or every year for indirect injection diesel vehicles.
 06-05-2002
100
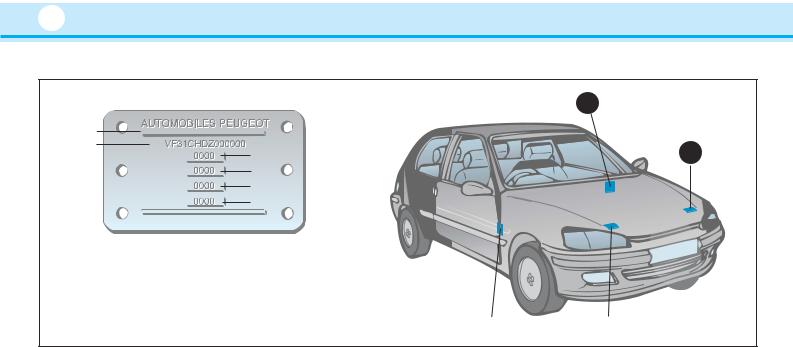
Identification
B
1
2
3
4
5
6
C
D |
|
A |
|
|
|
A.Manufacturer’s plate
1 : EU legislation*
2 : Serial number
3 : Maximum gross vehicle weight (GVW)
4 : Maximum gross train weight (GTW)
5 : Maximum front axle load
6 : Maximum rear axle load
B.Serial number on body
C.Legislation plate*
 06-05-2002
D. Tyres and paint reference
The label D affixed to the edge of the driver’s door indicates:
-the dimensions of the wheel rims and tyres,
-the brands of tyres approved by the manufacturer,
-the tyre inflation pressures (the inflation pressure must be checked when cold, at least once a month),
-the paint colour reference.
* According to specification

102
For your PEUGEOT, only use accessories and original parts approved by the manufacturer.
These accessories and parts are all suitable for your PEUGEOT, after being tested and approved for reliability and safety.
A wide choice of original accessories, approved by PEUGEOT, is available through the network. They all carry the PEUGEOT guarantee.
Security: Anti-theft alarms, engraving of windows, wheel anti-theft devices, fog lamps...
Comfort: Air conditioning, telephone console, seat covers, carpets, luggage compartment tray, mud
flaps, sun roof*, luggage net, armrest, door deflectors, storage under the rear parcel shelf...
Communication: Audio equipment, telephone, CB, loud speakers, CD changer, navigation...
Personalisation: Tailgate spoiler, alloy wheels, finishers, steering wheels, sport exhaust...
Leisure: Towbar, roof bars, roof box, carriers (for bicycles, skis...)
Children: Booster seats and child seats, side blinds and rear blind...
Maintenance products: Windscreen wiper fluid, internal and external cleaning and maintenance products...
*As the fitting of a sun roof may involve cutting the roof strengthener, it is imperative that only original PEUGEOT products are used.
 06-05-2002
PEUGEOT MAINTENANCE |
11 |
|
|
SERVICE LEVELS
Each vehicle has its own servicing cycle, based upon the engine type.
This cycle consists in alternating 3 types of service A, B and C, intermediate visits, and a few additional operations depending on your vehicle; these correspond to key stages in the life of your 106.
Your dealer will advise you of the type and content of the next service due, when the first service is carried out and at each subsequent service.
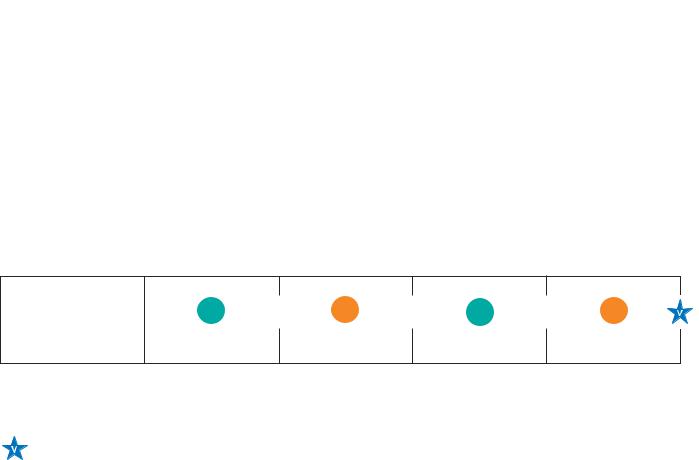
THE MAINTENANCE CYCLE FOR YOUR PETROL 106
Service every 20 000 miles (30 000 km) or 2 years
MILES (KM) |
20 000 (30 000)/ |
40 000 (60 000)/ |
60 000 (90 000)/ |
80 000 (120 000)/ |
|
100 000 (150 000) |
120 000 (180 000) |
140 000 (210 000) |
160 000 (240 000) |
||
|
|||||
|
|
|
|
|
1st service at
6 000 miles* (10 000 km) or 6 months*
This is necessary in order to benefit from the warranty.
A  C
C 
 C
C
Brake fluid replacement every 2 years or every 40 000 miles (60 000 km).
These services are carried out with synthetic based oil; Fuel Economy oil or synthetic oil may also be used.
Intermediate top-up visit incorporated in the fixed services.
* Whichever comes first  06-05-2002
12
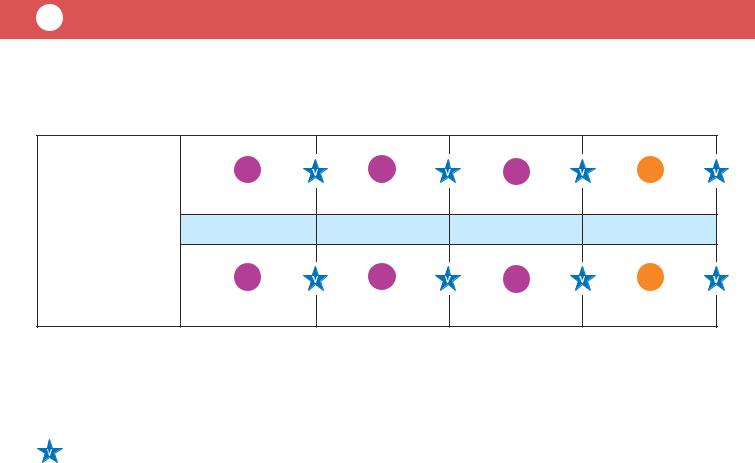
THE MAINTENANCE CYCLE FOR YOUR 106 DIESEL
Service every 10 000 miles (15 000 km) or 2 years
MILES (KM) |
10 000 (15 000) / |
20 000 (30 000) / |
30 000 (45 000) / |
40 000 (60 000) / |
|
90 000 (135 000) |
100 000 (150 000) |
110 000 (165 000) |
120 000 (180 000) |
||
|
|||||
|
|
|
|
|
1st service at
6 000 miles* (10 000 km) or 6 months*
This is necessary in order to benefit from the warranty.
B |
B |
|
C |
50 000 (75 000) / |
60 000 (90 000) / |
70 000 (105 000) / |
80 000 (120 000) / |
130 000 (195 000) |
140 000 (210 000) |
150 000 (225 000) |
160 000 (240 000) |
B |
B |
|
C |
Brake fluid replacement every 2 years or 40 000 miles (60 000 km)
These services are carried out with synthetic based oil; Fuel Economy oil or synthetic oil may also be used.
Intermediate top-up visit incorporated in the fixed services.
* Whichever comes first  06-05-2002

|
PEUGEOT MAINTENANCE |
|
|
|
13 |
|
PEUGEOT SERVICING LEVELS A, B AND C |
|
|
|
|
|
|
Operations |
Description of operations for 1st service |
Services |
|
|
Level |
|
|
A |
B |
C |
Intermediate visit |
||
|
|
|
||||
DRAIN AND REFILL |
- Engine drain and refill. |
|
|
|
|
|
- Fuel filter bleeding (Diesel). |
|
|
|
|
|
|
|
|
|||||
|
- Oil filter. |
|
|
|
|
|
REPLACEMENT |
- Fuel filter (Petrol). |
|
|
|
|
|
- Fuel filter element (Diesel). |
|
|
|
|
|
|
|
- Air filter element. |
|
|
|
|
|
|
- Spark plugs (Petrol). |
|
|
|
|
|
|
- Engine oil (check + top up). |
|
|
|
|
|
|
- Manual gearbox oil (check + top up). |
|
|
|
|
|
LEVEL |
- Battery (check + top up) if plug is removable. |
|
|
|
|
|
- Front/rear windscreen wash (check + top up). |
|
|
|
|
|
|
|
- Coolant (check + top up). |
|
|
|
|
|
|
- Brake fluid (check + top up). |
|
|
|
|
|
|
- Power steering fluid (check + top up according to specification). |
|
|
|
|
|
|
- Operation of lights and indicators. |
|
|
|
|
|
|
- Condition of glass, headlamp and light lenses and mirrors. |
|
|
|
|
|
|
- Horn. |
|
|
|
|
|
|
- Windscreen washer jets. |
|
|
|
|
|
|
- Condition of wiper blades. |
|
|
|
|
|
|
- Condition and tension of ancillary drive belts. |
|
|
|
|
|
|
- Handbrake. |
|
|
|
|
|
CHECK |
- Condition of hydraulic circuits (hoses and covers), check for leaks. |
|
|
|
|
|
- Condition of rubber boots and gaiters. |
|
|
|
|
|
|
|
- Brake pad wear. |
|
|
|
|
# |
|
- Clearances, hubs, rods, ball joints, flexible mountings. |
|
|
|
|
|
|
- Sealing of dampers. |
|
|
|
|
|
|
- Wear of rear linings. |
|
|
|
|
|
|
- Condition and pressure of tyres (including spare wheel). |
|
|
|
|
|
|
- Emission control check according to current legislation (Petrol). |
|
|
|
|
|
|
- Smoke opacity (Diesel). |
|
|
|
|
|
|
- Pollen filter check (according to specification). |
|
|
|
|
# |
|
- Visual check of the whole vehicle by a PEUGEOT dealer. |
|
|
|
|
|
ROAD TEST |
|
|
|
|
|
|
: All driving conditions |
# : Arduous conditions |
06-05-2002 |
|
14 |
|
|
|
|
|
|
|
|
|
|
|
|
|
|
|
|
|
|
|
|
|
|
|
|
|
|
|
|
|
|
|
|
|
|
|
|
|
|
|
|
|
|
|
|
|
|
|
|
|
|
|
|
|
|
|
|
|
|
|
|
|
|
|
|
|
|
|
|
|
|
|
|
|
|
|
|
|
|
|
|
|
|
|
|
|
|
|
|
|
|
|
|
|
|
|
|
|
|
|
|
|
|
|
|
|
|
|
|
|
|
|
|
|
|
|
|
|
|
|
|
|
|
|
|
|
|
|
|
|
|
|
|
|
|
|
|
|
|
|
|
|
|
|
|
|
|
|
|
|
|
|
|
|
|
|
|
|
|
|
|
|
|
|
|
|
|
|
|
|
|
|
|
|
|
|
|
|
|
|
|
|
|
|
|
|
|
|
|
|
|
|
|
TOTAL |
|
|||||||
|
|
|
|
|
|
|
|
|
|
|
|
|
|
|
|
|
|
|
|
|
|
|
|
|
|
|
|
|
|
|
|
|
|
|
|
|
|
|
|
|
|
|
|
|
10W |
|
40 |
|
|
40 |
|
|
|
|
|
|
|
10W |
|
40 |
|
|
|
|
|
|
|
|
|
|
|
|
|
|
|
|
|
|
|
|
|
|
|
|
|
|
|
|
|
|
|
|
|
|
|
|
|
|
|
|
|
|
|
|
|
|
|
|
|
|
|
|
|
|
|
|
|
|
|
|
|
|
|
|
|
|
|
|
|
|
|
|
|
|
|
|
|
|
|
|
|
|
|
|
|
|
5W |
|
|
|
|
|
|
|
|
|
|
|
|
|
|
|
|
|
|
|
|
|
|
|
|
|
|
|
|
|
|
|
|
|
|
|
|
|
|
|
|
|
|
|
|
|
|
|
|
|
|||||
|
|
|
|
|
|
|
|
|
|
|
|
|
|
|
|
|
|
|
|
|
|
|
|
|
|
|
|
|
|
|
|
|
|
|
|
40 |
|
|
|
|
|
|
|
|
|
|
|
|
|
|
|
|
|
|
|
|
|
|
|
|
|
|
|
|
|
|
|
|
|
|
|
|
|
|
|
|
|
|
|
|
|
|
|
|
|
|
|
|
|
|
|
|
|
|
|
|||||
|
|
|
|
|
|
|
|
|
|
|
|
|
|
|
|
|
|
|
|
|
|
|
|
|
10W |
|
40 |
|
|
|
|
|
|
5W |
|
|
|
|
|
7000 |
|
9000 |
|
30* |
|
|
|
|
|
7000 |
|
|
40 |
|
|
30* |
|
|
|
|
|
40 |
|
|
|
40 |
|
|
30* |
|
|
|
|
50 |
|
|
|
40 |
|
|
|
|
40 |
|
|
|
|
40 |
|
|
30* |
|
||||||||
|
|
|
|
|
|
|
|
|
|
|
|
|
|
|
|
|
|
|
|
|
|
|
|
|
|
|
|
|
|
|
|
|
|
|
|
|
|
|
|
|
|
|
|
|
|
|
|
5W |
|
5W |
|
|
|
10W |
|
|
|
|
|
|
|
15W |
|
10W |
|
|
0W |
|
|
5W |
|
5W |
|
|||||||||||||||||||||||||||
|
|
|
|
|
|
|
|
|
|
|
|
40 |
|
|
|
30 |
|
|
|
|
|
|
|
|
|
|
|
|
|
|
|
EL |
|
|
|
|
|
EL |
|
|
EL |
|
5W |
|
|
|
EL |
|
|
|
|
|
|
|
5W |
|
|
5W |
|
|
|
|
|
|
|
|
|
|
|
|||||||||||||||||||||||||||||||
|
|
|
|
40 |
|
|
|
30* |
|
|
|
|
|
|
|
|
|
|
|
|
SE |
L |
|
30* |
|
|
|
IE |
S |
|
|
|
|
IES |
IES |
|
|
|
|
IES |
|
9000 |
|
9000 |
|
|
|
7000 |
|
|
|
|
|
|
7000 |
7000 |
9000 |
|
|
9000 |
|
9000 |
|
|
||||||||||||||||||||||||||||||||||||
|
|
|
10W |
|
5W |
|
|
N |
5W |
|
N |
0W |
|
|
|
D |
IE |
|
|
|
5W |
|
|
N |
D |
|
|
|
|
D |
|
D |
|
9000 |
|
|
TZ |
D |
|
|
TZ |
|
TZ |
|
|
|
|
|
|
|
9000 |
|
|
|
9000 |
|
|
TZ |
|
TZ |
|
TZ |
|
|
TZ |
|
|
TZ |
|
|
|
|
||||||||||||||||||||||||||||
|
LTR |
A |
LTR |
A |
|
LTR |
O |
LTR |
O |
|
|
LTR |
A |
|
LTR |
A |
|
LTR |
O |
|
|
|
|
TIV |
A |
TIV |
A |
TIV |
A |
|
AR |
|
|
AR |
AR |
|
|
|
CTIV |
A |
TIV |
A |
|
TIV |
A |
|
AR |
AR |
AR |
|
R |
|
AR |
|
|
|
|
|||||||||||||||||||||||||||||||||||||||||||
|
|
|
|
|
|
|
|
|
|
|
|
|
|
|
|
|
|
|
|
|
|
|
C |
|
|
C |
|
U |
|
|
U |
|
U |
|
|
|
|
|
|
C |
|
U |
|
U |
|
U |
|
U |
A |
|
|
U |
|
|
|
|
|
|||||||||||||||||||||||||||||||||||||||||||
|
|
|
|
|
|
|
|
|
|
|
|
|
|
|
|
|
|
|
|
|
|
|
|
|
|
|
|
|
|
|
|
|
|
|
|
|
|
|
|
|
|
|
|
|
|
|
AC |
|
|
|
|
|
|
|
|
|
|
|
|
|
|
|
|
|
|
|
||||||||||||||||||||||||||||||||||
U |
|
|
U |
|
|
|
U |
|
|
|
U |
|
|
|
|
|
U |
|
|
|
|
U |
|
|
|
|
U |
|
|
|
|
|
|
|
|
|
|
|
A |
|
|
|
|
A |
|
|
|
Q |
|
|
|
|
Q |
|
|
|
Q |
|
|
|
|
|
|
A |
|
|
|
|
A |
|
|
|
Q |
|
|
|
Q |
|
|
|
Q |
|
|
|
Q |
|
|
|
|
|
Q |
|
|
|
|
|
|
|
|
|
F
B L
DK S
GB IRL
A
D
I
N
P
E
P E T R O L D I E S E L D I E S E L P E T R O L
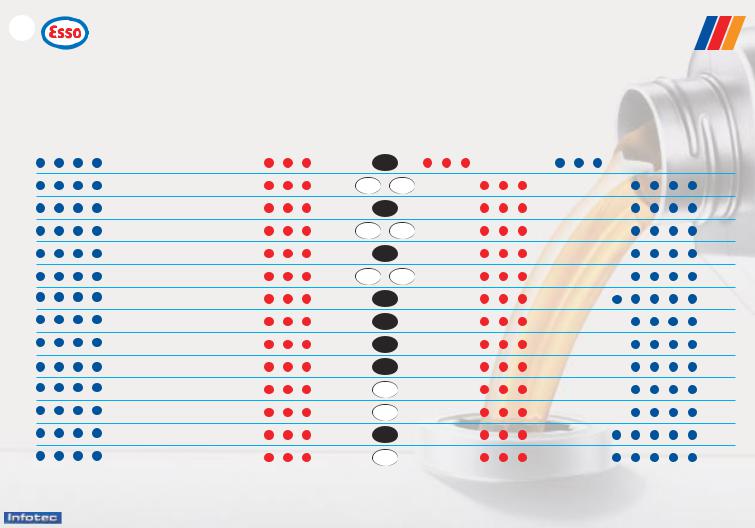
(1) Minimum quality level: petrol: ACEAA3 and API SH/SJ ; Diesel ACEA B3 and API CF/CD - ACEA = Association des Constructeurs Européens Automobiles (Association of European Automobile Manufacturers) - API = American Petroleum Institute. If oil is used which does not conform to the ACEAA3-B3 standards, this requires the "Arduous conditions" servicing schedule to be followed, which involves shorter intervals between services
* This Energy Saving oil may only be used in engines specifically designed for it (from 2000 Model Year).
06-05-2002
|
|
|
|
PEUGEOT MAINTENANCE |
15 |
||
Recommendations for |
|
|
|
|
|||
approved lubricants |
|
|
|
|
|||
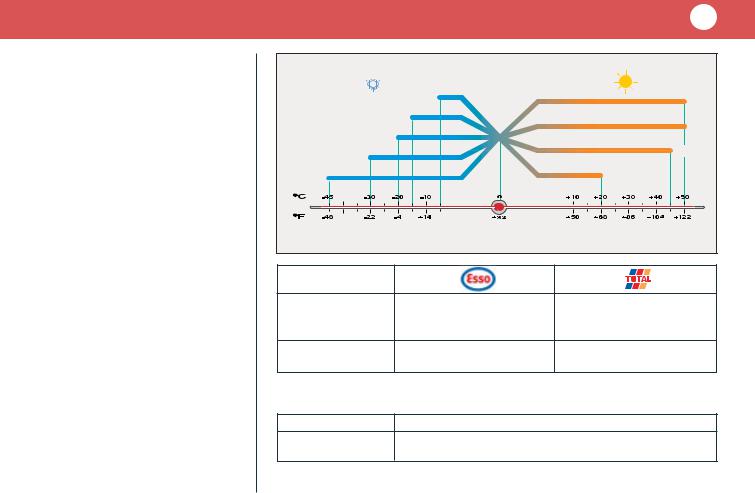
The oils which appear in the table |
|
|
|
||||
opposite are suitable for most pur- |
|
|
50 |
||||
poses. |
|
|
|
|
|
|
|
The diagram opposite states the |
|
|
40 |
||||
|
|
|
|||||
optimum range of viscosity depen- |
|
|
30 |
||||
ding on the temperatures at which |
|
|
|||||
the oils are to be used. |
|
|
|
|
|||
It is also possible to use synthetic |
0W |
|
|
||||
|
|
|
|||||
oils of ‘superior quality’. |
|
|
|
|
|||
In the absence of semi-synthetic or |
|
|
|
||||
synthetic oils, oils of API SH/SJ |
|
|
|
||||
quality (for petrol engines), or |
|
|
|
||||
CD/CF quality (for diesel engines) |
|
|
|
||||
may be used by following the |
|
|
|
||||
‘Arduous |
Conditions’ maintenance |
|
|
|
|||
schedule |
which |
specifies |
shorter |
|
|
|
|
intervals. |
|
|
|
|
|
|
|
Do not hesitate |
to ask for |
advice |
|
ESSENTIAL |
ESSENTIAL |
||
Manual gearbox |
ESSO GEAR OIL BV |
TOTAL TRANSMISSION BV |
|||||
from a Peugeot dealer to maintain |
|||||||
|
75W 80 PR 9736.41 |
75W-80 |
|||||
driving pleasure and to minimise |
|
||||||
the maintenance cost of your |
Power steering |
ESSO ATF D |
TOTAL FLUIDE AT42 |
||||
vehicle. |
|
|
|
||||
|
|
|
|
PR 9730.94 |
|
||
For countries outside Europe, plea- |
|
|
|||||
|
|
|
|||||
se contact a |
local PEUGEOT |
|
Other approved products |
||||
dealer. |
|
|
|
|
|||
|
|
|
|
|
|
||
|
|
|
|
Brake fluid |
PEUGEOT DOT4 |
||
|
|
|
|
Coolant |
PROCOR TM108 / GLYSANTIN G33 or REVKOGEL 2000 |
||
|
|
|
|
|
ESSENTIAL Protection to minus 35 °C |
||
 06-05-2002

18
1 |
2 |
3 |
4 |
5 |
6 |
7 |
8 |
9 |
10 |
11 |
|
21 |
20 |
19 |
18 |
17 |
16 |
15 |
14 |
13 |
|
12 |
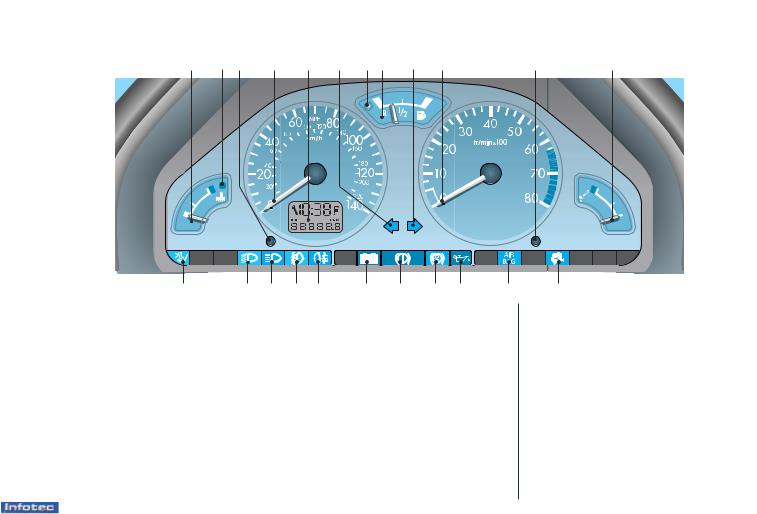
Instrument panel (Petrol) |
|
|
6 |
- Low fuel level |
|
|
16 |
- Battery charge |
|||
1 |
- Maximum coolant temperature |
|
|
7 |
- Fuel gauge |
|
|
|
17 |
- Rear fog lamp |
|
|
|
8 |
- Right-hand indicator |
|
|
||||||
2 |
- Display control: |
|
|
|
|
18 |
- Front fog lamps* |
||||
|
- total distance display |
|
|
9 |
- Rev. counter |
|
|
|
|||
|
|
|
|
|
|
19 |
- Main beam |
||||
|
- trip recorder - trip recorder reset |
|
10 |
- Clock adjustment, lighting rheostat |
|||||||
|
|
|
|
||||||||
|
- service indicator |
|
|
11 |
- Oil pressure |
|
|
|
20 |
- Dipped beam |
|
3 |
- Speedometer |
|
|
12 |
- Engine autodiagnostics* (petrol) |
21 |
- Passenger airbag disarm |
||||
4 |
- Display: |
|
|
13 |
- Front* and side** airbag warning |
|
|
||||
|
- digital clock |
|
|
|
light |
and |
passenger |
airbag |
|
|
|
|
- service indicator |
|
|
|
disarm* |
|
|
|
|
|
|
|
- total distance |
|
|
14 |
- ABS* (Anti-lock Braking System) |
|
|
||||
|
- trip recorder |
|
|
15 |
- Handbrake, low brake fluid level |
* According to specification or country. |
|||||
5 |
- Left-hand indicator |
|
|
|
and engine not running |
|
** According to model. |
||||
|
06-05-2002 |
|
|
|
|
|
|
|
|
|
|
INSTRUMENTS AND CONTROLS |
19 |
|
|
1 |
2 |
3 |
4 |
5 |
6 |
7 |
8 |
9 |
10 |
11 |
12 |
23 22 21 20 19 18 17 16 15 14
Instrument panel (Petrol) |
6 |
- Left-hand indicator |
||
1 |
- Coolant temperature gauge |
7 |
- Low fuel level |
|
2 |
- Maximum coolant temperature |
8 |
- Fuel gauge |
|
3 |
- Display control: |
|||
9 |
- Right-hand indicator |
|||
|
- total distance display |
|||
|
10 |
- Rev. counter |
||
|
- trip recorder - trip recorder reset |
|||
|
|
|
||
|
- service indicator |
11 |
- Clock adjustment, lighting rheostat |
|
4 |
- Speedometer |
12 |
- Oil temperature gauge |
|
5 |
- Display: |
13 |
- Engine autodiagnostics* (petrol) |
|
|
- digital clock |
|||
|
14 |
- Front* and side** airbag warning |
||
|
- service indicator |
|||
|
|
light and passenger airbag |
||
|
- oil level gauge |
|
||
|
|
disarm* |
||
|
- total distance |
|
||
|
- trip recorder |
15 |
- Oil pressure |
|
|
06-05-2002 |
|
|
|
13
16 - ABS* (Anti-lock Braking System)
17 - Handbrake, low brake fluid level and engine not running
18 - Battery charge
19 - Rear fog lamp
20 - Front fog lamps*
21- Main beam
22- Dipped beam
23- Passenger airbag disarm
*According to specification or country
**According to model
20
1 |
2 |
3 |
4 |
5 |
6 |
7 |
8 |
9 |
10 |
11 |
|
21 |
20 |
19 |
18 |
17 |
16 |
15 |
14 |
13 |
12 |
|
Instrument panel (Diesel) |
|
|
6 |
- Low fuel level |
|
|
16 |
- Battery charge |
|||
1 |
- Maximum coolant temperature |
|
|
7 |
- Fuel gauge |
|
|
|
17 |
- Rear fog lamp |
|
|
|
8 |
- Right-hand indicator |
|
|
||||||
2 |
- Display control: |
|
|
|
|
18 |
- Front fog lamps* |
||||
|
- total distance display |
|
|
9 |
- Rev. counter |
|
|
|
|||
|
|
|
|
|
|
19 |
- Main beam |
||||
|
- trip recorder - trip recorder reset |
|
10 |
- Clock adjustment, lighting rheostat |
|||||||
|
|
|
|
||||||||
|
- service indicator |
|
|
11 |
- Oil pressure |
|
|
|
20 |
- Dipped beam |
|
3 |
- Speedometer |
|
|
12 |
- Pre-heat (diesel) |
|
|
21 |
- Passenger airbag disarm |
||
4 |
- Display: |
|
|
13 |
- Front* and side** airbag warning |
|
|
||||
|
- digital clock |
|
|
|
light |
and |
passenger |
airbag |
|
|
|
|
- service indicator |
|
|
|
disarm* |
|
|
|
|
|
|
|
- total distance |
|
|
14 |
- ABS* (Anti-lock Braking System) |
|
|
||||
|
- trip recorder |
|
|
15 |
- Handbrake, low brake fluid level |
* According to specification or country. |
|||||
5 |
- Left-hand indicator |
|
|
|
and engine not running |
|
** According to model. |
||||
|
06-05-2002 |
|
|
|
|
|
|
|
|
|
|
INSTRUMENTS AND CONTROLS |
21 |
|
|
Warning lamps
Diesel engine pre-heat
Wait until the warning lamp goes out then operate the starter. On some models the warning lamp will not light when the engine is hot.
Battery charge warning lamp
Indicates either:
-faulty operation of the charging circuit, or
-loose battery or starter terminals, or
-broken or slack alternator belt, or
-a faulty alternator.
Consult a PEUGEOT dealer.
Anti-lock brake system warning lamp (ABS)*
Indicates faulty ABS operation.
The vehicle does, however, retain conventional braking.
Consult a PEUGEOT dealer.
 06-05-2002
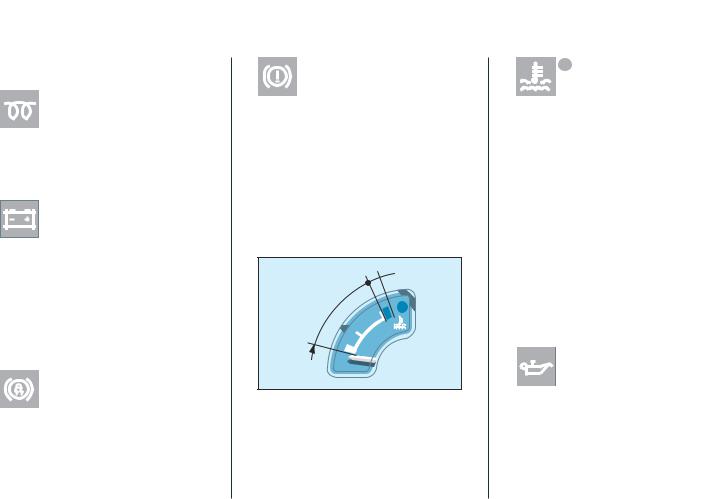
Handbrake and brake fluid level warning lamp
Indicates either:
-that the engine is not running,
-that the handbrake is on or has not been released correctly (engine running),
-an excessive drop in the brake
fluid level (engine running and handbrake released).
Note : with the engine running and the handbrake off, if the warning light remains lit then you must stop.
Consult a PEUGEOT dealer.
B
A
Coolant temperature gauge
-Needle in zone (A): temperature correct
-Needle in zone (B): the coolant temperature is too high
High coolant temperature warning lamp
It is essential to stop.
Indicates too high a temperature, caused by:
-a fan malfunction. Check the fuses and replace them if necessary,
-a coolant leak; the cooling system is pressurised, turn the cap to the 1st notch, or* unscrew the cap two turns, to let the pressure drop before topping up the level,
-a coolant pump malfunction.
Low engine oil
 pressure
It is essential to stop.
Indicates either:
-insufficient engine oil pressure, or
-lack of oil in the lubrication system.
Top up the oil level if necessary. Consult a PEUGEOT dealer.
22
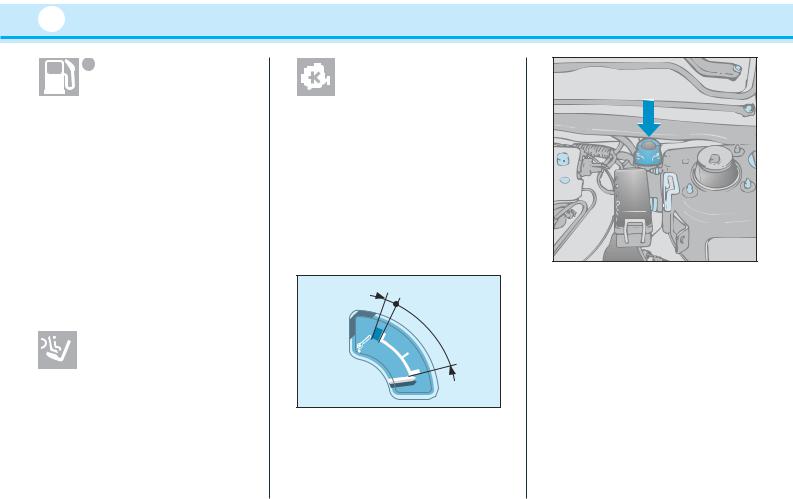
Low fuel level warning
Indicates that the quantity of fuel remaining is less than 1 gallon [5 litres] (Tank capacity approximately 10 gallons [45 litres]).
AIR |
Front and side* |
BAG |
airbags |
|
|
If the passenger airbag is armed or if your vehicle is not fitted with a passenger airbag, the warning light comes on for 6 seconds when the ignition is switched on.
Front airbag disarmed
If the passager airbag is disarmed, the indicator light remains on.
In all cases, if the warning light flashes, contact a PEUGEOT dealer.
 06-05-2002
Engine auto-diagnostics warning light*
It comes on each time the ignition is switched on.
If it comes on with the engine running it indicates a malfunction in the injection, ignition or emission control system. If your vehicle is fitted with a catalytic converter, there is a risk of damage to it.
Contact a PEUGEOT dealer rapidly.
Oil temperature gauge*
F
E
-If the needle is in zone E, the temperature is correct.
-If the needle is in zone F, the temperature is too high. To lower the temperature of the oil, reduce your speed.
Fuel supply cut-off*
If there is a major collision, a device switches off the supply of fuel to the engine.
To re-establish the supply to the engine, press the button.
* According to specification

22
Low fuel level warning
Indicates that the quantity of fuel remaining is less than 1 gallon [5 litres] (Tank capacity approximately 10 gallons [45 litres]).
AIR |
Front and side* |
BAG |
airbags |
|
|
If the passenger airbag is armed or if your vehicle is not fitted with a passenger airbag, the warning light comes on for 6 seconds when the ignition is switched on.
Front airbag disarmed
If the passager airbag is disarmed, the indicator light remains on.
In all cases, if the warning light flashes, contact a PEUGEOT dealer.
 06-05-2002
Engine auto-diagnostics warning light*
It comes on each time the ignition is switched on.
If it comes on with the engine running it indicates a malfunction in the injection, ignition or emission control system. If your vehicle is fitted with a catalytic converter, there is a risk of damage to it.
Contact a PEUGEOT dealer rapidly.
Oil temperature gauge*
F
E
-If the needle is in zone E, the temperature is correct.
-If the needle is in zone F, the temperature is too high. To lower the temperature of the oil, reduce your speed.
Fuel supply cut-off*
If there is a major collision, a device switches off the supply of fuel to the engine.
To re-establish the supply to the engine, press the button.
* According to specification
INSTRUMENTS AND CONTROLS |
23 |
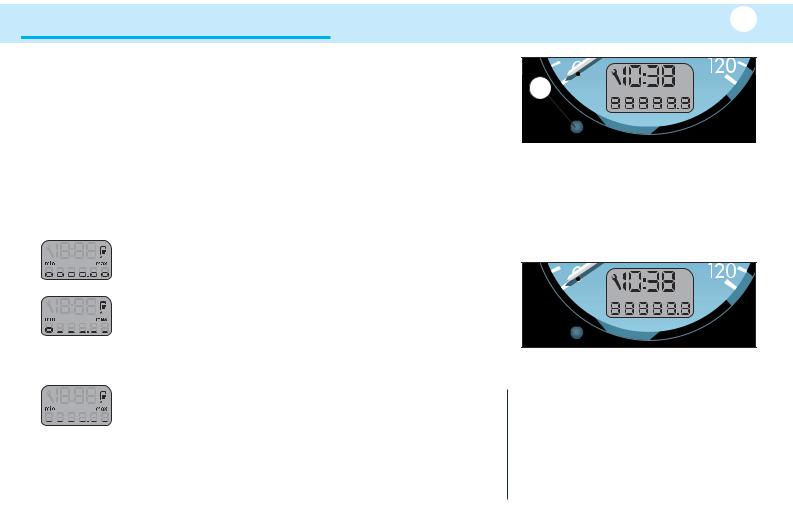
Instrument panel display
When the ignition is switched on, this display shows in turn, the following information:
-digital clock,
-service indicator,
-oil level indicator,*
-total distance.
Engine oil level
When the ignition is switched on, engine not running, the service indicator is displayed for a few seconds, then the engine oil level is indicated for approximately 10 seconds.
Maximum
Minimum
Check the level with the dipstick and top it up. The figure shown is only correct if the vehicle has been on stable, level ground, with the engine stopped, for 10 minutes.
No oil
When the LEDs flash, it is essential to top up the oil to the correct level, otherwise the engine will be damaged.
A
Total distance and trip recorder
One brief press on button A changes the display between total distance and the trip recorder.
Resetting the trip recorder to zero
A long press on the button resets the trip recorder to zero.
* According to specification
 06-05-2002
24
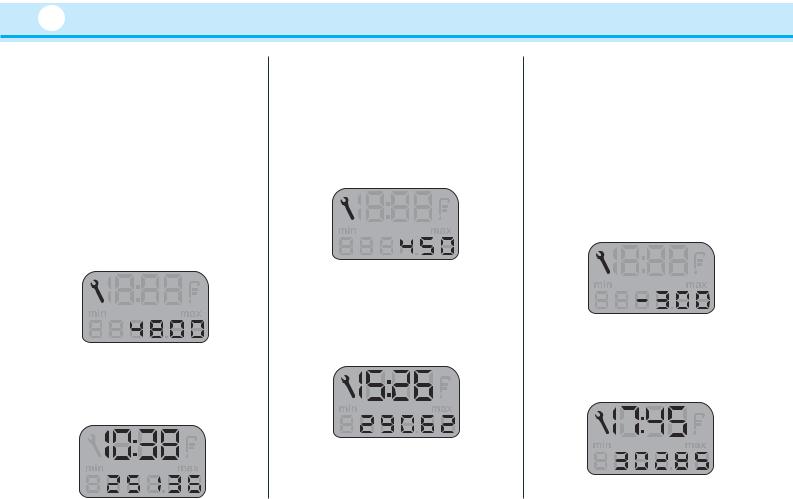
SERVICE INDICATOR
This is a reminder of when the next service is due in accordance with the manufacturer’s maintenance schedule.
Operation
When the ignition is switched on the display shows the distance remaining (rounded figures) before the next service is due.
Example: 4800 miles remain before the next service is due. For five seconds after the ignition is switched on, the display shows:
5 seconds after switching on the ignition the display resumes normal operation and shows the total and trip distances.
When the distance remaining before the next service is less than 500 miles.
Example: 450 miles remain before the next service is due.
For five seconds after the ignition is switched on, the display shows:
5 seconds after switching on the ignition the display resumes normal operation. This indicates that a service should be carried out shortly:
When a service is overdue.
For five seconds after the ignition is switched on, the service symbol and the excess distance flash.
Example: the service is overdue by 300 km The vehicle should be serviced very soon.
For 5 seconds after the ignition is switched on the display shows:
5 seconds after switching on the ignition the display resumes normal operation.
 06-05-2002
|
INSTRUMENTS AND CONTROLS |
25 |
|
|
|
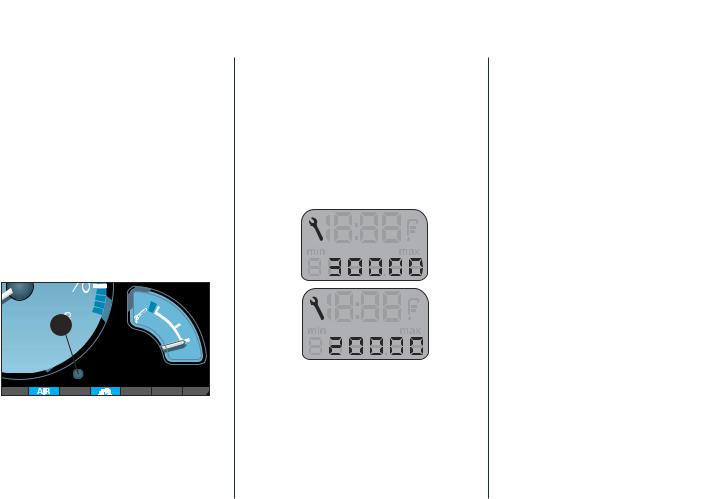
Service intervals
If your vehicle is used in certain particularly difficult conditions it is necessary to follow the "Arduous conditions" servicing schedule, which involves shorter intervals between services (see the Warranty and Maintenance Record booklet).
Comment: If the time limit between two services is reached before the relevant mileage limit, the service spanner symbol will light up and the display will show 0.
To change the service interval
1 

-Switch off the ignition.
-Press and hold button 1.
 06-05-2002
-Switch on the ignition.
-Release the button straight away.
-The service interval is displayed.
-Each time button 1 is pressed briefly, the service intervals are alternated.
Example
-When the required service interval is displayed, press button 1 for 10 seconds to confirm (the selected service interval flashes for 10 seconds).
Release the button to confirm when the display stops flashing.
Reset to zero
Your PEUGEOT dealer will carry out this operation after each service.
However, if you carry out your service yourself, the zero reset procedure is as follows:
-switch off the ignition,
-press and hold button 1,
-switch on the ignition,
- keep button 1 pressed for 10 seconds,
the display indicates [= 0] and the service spanner symbol disappears.

|
INSTRUMENTS AND CONTROLS |
25 |
|
|
|
Service intervals
If your vehicle is used in certain particularly difficult conditions it is necessary to follow the "Arduous conditions" servicing schedule, which involves shorter intervals between services (see the Warranty and Maintenance Record booklet).
Comment: If the time limit between two services is reached before the relevant mileage limit, the service spanner symbol will light up and the display will show 0.
To change the service interval
1 

-Switch off the ignition.
-Press and hold button 1.
 06-05-2002
-Switch on the ignition.
-Release the button straight away.
-The service interval is displayed.
-Each time button 1 is pressed briefly, the service intervals are alternated.
Example
-When the required service interval is displayed, press button 1 for 10 seconds to confirm (the selected service interval flashes for 10 seconds).
Release the button to confirm when the display stops flashing.
Reset to zero
Your PEUGEOT dealer will carry out this operation after each service.
However, if you carry out your service yourself, the zero reset procedure is as follows:
-switch off the ignition,
-press and hold button 1,
-switch on the ignition,
- keep button 1 pressed for 10 seconds,
the display indicates [= 0] and the service spanner symbol disappears.
26
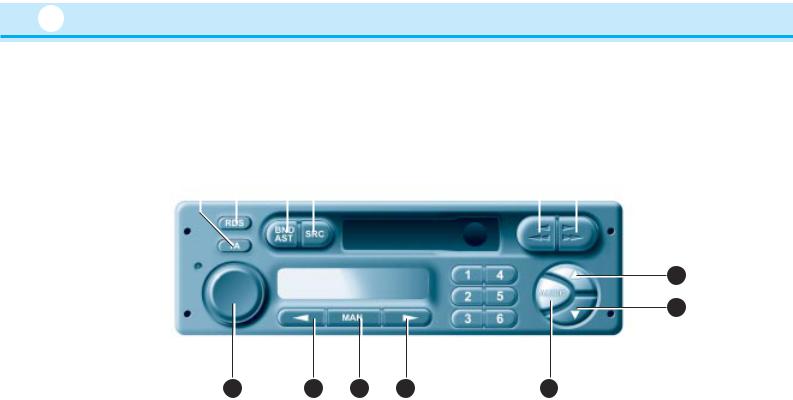
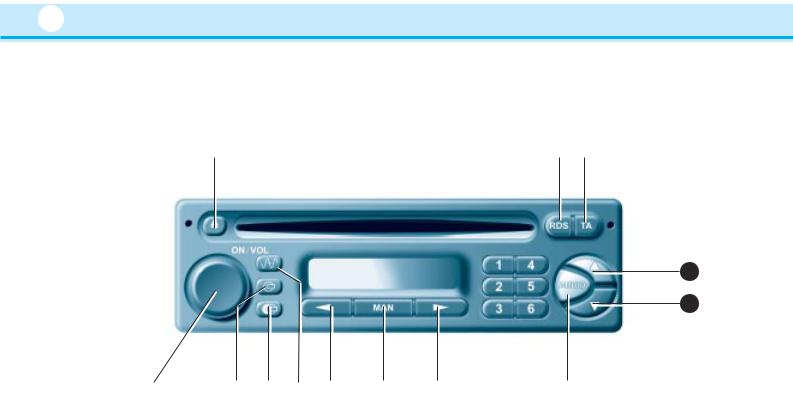
AUDIO RB1
A |
|
B |
|
|
|
|
D |
|
E |
|
F |
|||||
|
|
|
|
|
|
|
|
|
|
|
|
|
|
|
|
|
|
|
|
|
|
|
|
|
|
|
|
|
|
|
|
|
|
|
|
|
|
|
|
|
|
|
|
|
|
|
|
|
|
|
G
H
M
 06-05-2002

|
|
|
|
YOUR 106 IN DETAIL |
27 |
|
|
|
|
|
|
|
|
|
|
|
|
|
|
|
|
|
Button |
|
Function |
|
|
|
|
|
|
|
|
|
|
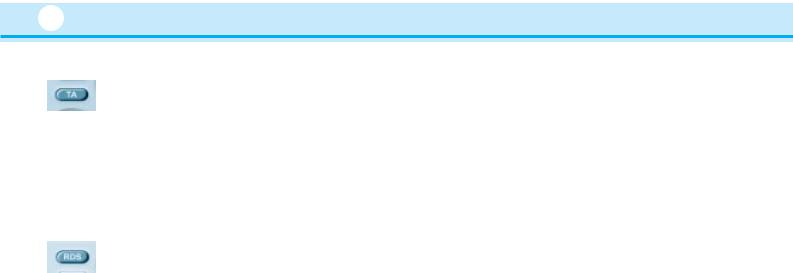
A |
TA |
|
Traffic information priority on/off. |
|
|
|
B |
RDS |
|
RDS on/off. |
|
|
|
|
|
|
Press for more than 2 seconds: regional following mode on/off. |
|
|
|
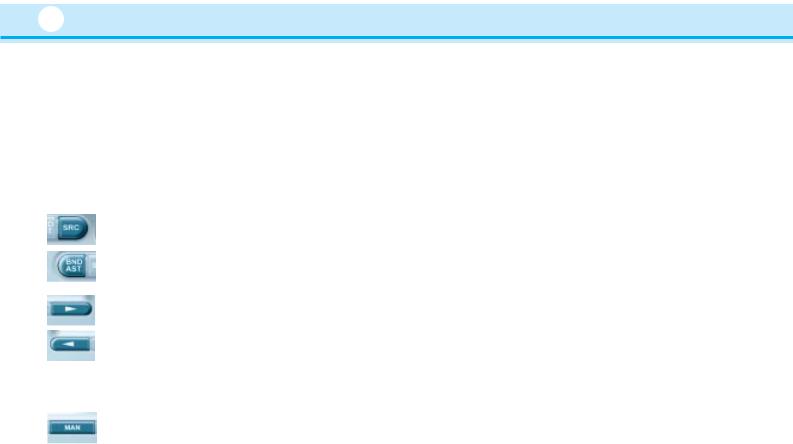
C |
BND/AST |
Selection of wavebands FM1, FM2, FM3, AM. |
|
|
|
|
|
|
|
Press for more than 2 seconds: autostore, automatic storing of stations. |
|
|
|
D |
SRC |
|
Source selection; radio, cassette or CD*. |
|
|
|
|
|
|
Press for more than 2 seconds: CD* shuffle. |
|
|
|
E |
j |
|
Press fully: cassette fast rewind. |
|
|
|
jj |
|
|
|
||
|
|
|
|
|
|
|
|
|
|
|
|
|
|
|
F |
k |
|
Press fully: cassette fast fowards. |
|
|
|
|
kk |
|
|
|
|
|
|
|
|
|
|
|
|
E + F |
j |
k |
Press half-way: reverses the direction of play of the cassette. |
|
|
|
|
jj |
kk |
Press fully: ejects the cassette. |
|
|
|
|
|
|
|
|
|
|
G |
▲ |
|
Increase the audio setting. |
|
|
|
|
|
|
|
|
|
|
H |
▼ |
|
Decrease the audio setting. |
|
|
|
|
|
|
|
|
|
|
I |
AUDIO |
Selects the bass, treble, loudness and sound distribution. |
|
|
|
|
|
|
|
|
|
|
|
J |
k |
|
Higher frequency automatic search. |
|
|
|
|
|
Selection of next CD* track. |
|
|
|
|
|
|
|
|
|
|
|
K |
j |
|
Lower frequency automatic search. |
|
|
|
|
|
Selection of previous CD* track. |
|
|
|
|
|
|
|
|
|
|
|
L |
MAN |
|
Manual/automatic operation of button J and K. |
|
|
|
M |
|
|
Audio system on/off. Volume adjustment. |
|
|
|
|
|
|
|
|
|
|
1 to 6 |
|
|
Selects a stored station. |
|
|
|
|
|
|
Press for more than 2 seconds: stores a station. |
|
|
|
|
|
|
Selects a CD*. |
|
|
|
|
|
|
|
|
|
* Available as an accessory.  06-05-2002
28
GENERAL FUNCTIONS
On / off
With the ignition key in the ACCESSORIES or IGNITION position, press the "M" button to switch the set on or off.
ANTI-THEFT SYSTEM
The first time you use the set following disconnection of the set or the battery, you must enter the confidential code which was given to you on handover of your vehicle.
Entering the code
Switch the set on.
The display shows "CODE" then the set changes over to code request mode and "- - - -" is displayed. Enter your four-digit code number using buttons "1" to "6".
For example : if your code is 5345 press buttons "5", "3", "4" and "5" in turn. When the fourth number has been entered correctly, the radio starts automatically.
Error in entering the code
If an error is made when entering one of the first three digits, do not continue the operation and switch off the radio to prevent blocking it.
Each incorrect code entry will result in the set being blocked for a period of from 5 seconds to 30 minutes, after the 7th incorrect entry.
To unblock the set, leave it switched on during the waiting period. When "- - - -" is displayed, you can enter the code again.
If the set is switched off during the waiting period, this waiting period will restart when the set is switched on again.
After 14 incorrect code entries, the radio will be permanently blocked and the message “END” will be displayed.
ADJUSTING THE SOUND
Adjusting the volume
Turn the "M" button to increase or decrease the volume of the set.
If the radio overheats, the volume will reduce.
Note: If you have a car-phone fitted with a “mute” signal output connected to the set, the set will automatically change to “mute” when the car-phone is used.
 06-05-2002

YOUR 106 IN DETAIL |
29 |
|
|
AUDIO SETTINGS
Press the “AUDIO” button several times in succession to access the bass (BASS), treble (TREB), loudness (LOUD), fader (FAD) and balance (BAL).
Exit from audio mode is automatic after a few seconds, without pressing any button or by pressing the “AUDIO” button after adjusting the balance.
Note: bass and treble settings are specific to each source. It is possible to set them differently for radio, cassette and CD.
Bass setting
When “BASS” is displayed, press the “G” or “H” buttons to vary the setting.
–“BASS –9” for a minimum bass setting,
–“BASS 0” for a normal position,
–“BASS +9” for a maximum bass setting.
Treble setting
When “TREB” is displayed, press the “G” or “H” buttons to vary the setting.
–“TREB –9” for a minimum treble setting,
–“TREB 0” for a normal position,
–“TREB +9” for a maximum treble setting.
Adjusting the loudness
This function automatically emphasises bass and treble tones when the volume is low.
Press the “G” or “H” buttons to switch this function on or off.
Setting the front/rear sound distribution (Fader)
When “FAD” is displayed, press the “G” or “H” buttons to vary the setting.
The “G” button increases the volume at the front.
The “H” button increases the volume at the rear.
This function can be deactived by pressing buttons “M” and “I” simultaneously.
Setting the right/left sound distribution (Balance)
When “BAL” is displayed, press the “G” or “H” buttons to vary the setting.
The “G” button increases the volume on the right-hand side.
The “H” button increases the volume on the left-hand side.
 06-05-2002
30
RADIO
Notes on radio reception
Your radio is subject to phenomena which do not affect domestic sets. Both MW/LW and FM reception are subject to various forms of interference which are no reflection on the quality of your set, but are due to the nature of the signals and the way in which they are transmitted.
On MW/LW, interference may be noticed when passing underneath high voltage power lines or bridges or through tunnels.
On FM, interference may be the result of increasing distance from the transmitter, reflection of the signal by obstacles (mountains, hills, buildings etc), or of being in an area which is not covered by a transmitter.
Selecting the radio
Press the "SRC" button, until the radio is selected.
Selecting a waveband
By short presses on the “BND/AST” button, you can select the FM1, FM2, FM3 and AM wavebands.
Automatic station search
Briefly press button “J” or “K” to search for the station immediately above or below. By continuing to press the button in the direction selected, you will obtain continous scrolling of the frequency.
The scrolling stops at the first station found as soon as you release the button.
If the TA traffic programme is selected, only stations broadcasting this type of programme are selected. Searching for a station occurs first in “LO” sensitivity (selection of the most powerful transmitters) during scanning of the waveband, then in “DX” sensitivity (selection of the weakest and most distant transmitters).
Manual station search
Press the “MAN” button.
Briefly press button “J” or “K” respectively to increase or reduce the frequency displayed.
By continuing to press the button in the direction selected, you will obtain continuous scrolling of the frequency.
Scrolling stops as soon as you release the button.
Pressing the “MAN” button again returns you to automatic station search.
 06-05-2002

YOUR 106 IN DETAIL |
31 |
|
|
Manual storing of stations in the memory
Select the station required.
Press for more than two seconds one of the buttons “1” to “6”.
The sound stops then becomes audible again, confirming that the station has been stored in memory.
Automatic storing of FM stations in the memory (autostore)
Press the “BND/AST” button for more than two seconds, to automatically store the 6 stations with the strongest signal in FM. These stations are stored in the FM3 waveband.
– If it is not possible to find 6 stations, the remaining memories are empty.
Recalling stations stored in the memory
For each waveband, briefly pressing the buttons “1” to “6” recalls the corresponding stored station.
RDS FUNCTION
Using the RDS (Radio Data System) function on FM
RDS allows you to continue to listen to the same station, whatever frequency it is using for the region you are going through.
Switch the function on or off by briefly pressing the “RDS” button.
RDS station following
The display indicates the name of the station selected. The radio is continually searching for the station which has the best reception and which is transmitting the same programme.
 06-05-2002
32
Traffic information programmes
Press the "TA" button to switch the function on or off.
Any traffic information flash will be given priority, whatever source you are listening to (radio, cassette or CD). If you wish to interrupt a message, press the "TA" button; this switches off the function.
Note: the volume of the traffic information announcements is independent of the volume of normal radio listening. You can adjust it using the volume button. The setting will be stored and will be used when the next messages are broadcast.
While traffic information is being broadcast, the display will alternately show “TRAFFIC” and the name of the station.
When the station selected cannot broadcast traffic information, the display shows “NO TA”.
Regional following mode (REG)
When they are part of a network, certain stations broadcast regional programmes in the various areas they serve.
With regional following mode you can keep listening to the same programme.
To do this press the “RDS” button for more than two seconds to switch this function on or off.
 06-05-2002

YOUR 106 IN DETAIL |
33 |
|
|
CASSETTE
Selecting cassette mode
When a cassette is inserted, the cassette player will start automatically.
If a cassette is already inserted, press the "SRC" button until the cassette is selected.
Ejecting the cassette
Fully press both buttons "E" and "F" to eject the cassette from the player.
Direction of play
The player will play sides 1 and 2 of the cassette alternately, by automatically reversing the direction of play at the end of a side.
To manually reverse the direction of play, press both buttons "E" and "F" part way.
Fast forward/rewind
Fully press one of the buttons "E" or "F" to fast forward or fast rewind the cassette. At the end of the fast forward rewind, the set plays the current side.
Note: During fast forwards or rewind of a cassette, the audio system will automatically play the last radio station.
Recommendations for using casssettes
-Use good quality cassettes.
-Avoid use of cassettes which play for longer than 90 minutes.
-Never expose the cassettes to heat or the direct rays of the sun.
-Re-tighten the tape if necessary before introducing the cassette in the player.
-Clean the playing head regularly with a damp type cleaning cassette.
 06-05-2002
34
CD MULTI-CHANGER (Available as an accessory)
Selecting the CD changer
Press the “SRC” button until the CD changer is selected.
Selecting a disc
Press a button from “1” to “6” to select the corresponding disc.
Selecting a track
Press button “J” to select the next track.
Press button “K” to return to the start of the current track or to select the previous track.
Accelerated play
Press the “MAN” button.
Keep button “J” or “K” pressed for forwards or backwards accelerated play. Accelerated play stops as soon as you release the button.
Buttons “J” and “K” resume the “track selection” function when the“MAN” button is pressed again.
Shuffle (RAND)
When the CD multi-changer is selected, keep the “SRC” button pressed for two seconds. The tracks will be played in random sequence. Pressing the “SRC” button again for two seconds returns you to normal play.
Note : Do not use blank CDs as these could damage your player.
 06-05-2002
36
AUDIO RD1
A |
|
B |
|
C |
|
|
|
|
|
D
E
M |
|
K |
|
L |
|
|
|
|
|
|
|
|
|
|
|
|
|
|
|
|
|
|
|
|
|
|
|
|
|
 06-05-2002
|
|
|
YOUR 106 IN DETAIL |
37 |
|
|
|
|
|
|
|
|
|
|
|
|
|
|
|
Button |
Function |
|
|
|
|
|
|
|
|
|
A |
i |
Ejection of the CD. |
|
|
|
|
|
|
|
|
|
B |
RDS |
RDS function on/off. |
|
|
|
|
|
Press for more than 2 seconds: regional station following on/off. |
|
|
|
|
|
|
|
|
|
C |
TA |
Traffic information priority on/off. |
|
|
|
|
|
Press for more than 2 seconds: PTY function on/off. |
|
|
|
|
|
|
|
|
|
D |
▲ |
Increase the audio setting. |
|
|
E▼ Decrease the audio setting.
FAUDIO Selects the bass, treble, loudness and sound distribution.
G |
k |
Automatic search of higher frequency. |
|
Selection of next CD track. |
|
|
|
|
|
|
|
H |
j |
Automatic search of lower frequency. |
|
Selection of previous CD track. |
|
|
|
|
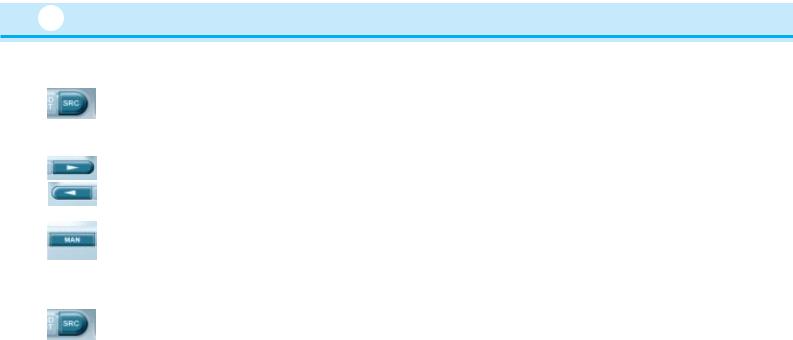
I |
MAN |
Manual/automatic operation of buttons G and H. |
|
|
|
J |
|
Source selection, radio. Selection of wavebands FM1, FM2, FM3, AM. |
|
|
Press for more than 2 seconds: automatic storing of stations (autostore). |
K |
|
Source selection, CD. |
|
|
Press for more than 2 seconds: shuffle. |
L |
|
Source selection: CD player. |
|
|
Press for more than 2 seconds: shuffle. |
M |
ON/VOL |
Audio system on/off. |
|
|
|
1 to 6 |
|
Selects a stored station. |
|
|
Press for more than 2 seconds: stores a station. |
|
|
Selects a CD. |
 06-05-2002

38
GENERAL FUNCTIONS On / off
With the ignition key in the ACCESSORIES or IGNITION position, press the "M" button to switch the set on or off.
The set can operate for 30 minutes without switching the ignition on.
ANTI-THEFT SYSTEM
The first time you use the set following disconnection of the set or the battery, you must enter the confidential code which was given to you on handover of your vehicle.
Entering the code
Switch the set on.
The display shows "CODE" then the set changes over to code request mode and "- - - -" is displayed.
Enter your four-digit code number using buttons "1" to "6".
For example: : if your code is 5345 press buttons "5", "3", "4" and "5" in turn. When the fourth number has been entered correctly, the radio starts automatically.
Error in entering the code
If an error is made when entering one of the first three digits, do not continue the operation and switch off the radio to prevent blocking it.
Each incorrect code entry will result in the set being blocked for a period of from 5 seconds to 30 minutes, after the 7th incorrect entry.
To unblock the set, leave it switched on during the waiting period. When "- - - -" is displayed, you can enter the code again.
If the set is switched off during the waiting period, this waiting period will restart when the set is switched on again.
After 14 incorrect code entries, the radio will be permanently blocked and the message “END” will be displayed.
ADJUSTING THE SOUND
Adjusting the volume
Turn the "M" button to increase or decrease the volume of the set.
If the radio overheats, the volume will reduce.
Note: If you have a car-phone fitted with a “mute” signal output connected to the set, the set will automatically change to “mute” when the car-phone is used.
 06-05-2002
 Loading...