


®
®
User’sGuide
Shop online at omega.com®
e-mail: info@omega.com For latest product manuals: omegamanual.info
MADE IN UNITED KINGDOM
MPS10, MPS20
Melting Point Apparatus

|
|
|
|
® |
|
|
|
|
|
|
OMEGAnet® Online Service |
|
Internet e-mail |
|
|
|
omega.com |
|
info@omega.com |
|
|
|
|
|
U.S.A.: |
Servicing North America: |
|||
OMEGA Engineering, Inc. |
|
|||
ISO 9001 Certified |
One Omega Drive |
|
||
|
|
P.O. Box 4047 |
|
|
|
|
Stamford, CT 06907-0047 USA |
|
|
|
|
Toll-Free: 1-800-826-6342 |
TEL: (203) 359-1660 |
|
|
|
FAX: (203) 359-7700 |
e-mail: info@omega.com |
|
Canada: |
976 Bergar |
|
||
|
|
Laval (Quebec), H7L 5A1 Canada |
|
|
|
|
Toll-Free: 1-800-826-6342 |
TEL: (514) 856-6928 |
|
|
|
FAX: (514) 856-6886 |
e-mail: info@omega.ca |
|
For immediate technical or application assistance:
U.S.A. and Canada: Sales Service: 1-800-826-6342/1-800-TC-OMEGA® Customer Service: 1-800-622-2378 /1-800-622-BEST® Engineering Service: 1-800-872-9436/1-800-USA-WHEN®
Mexico/ |
En Español: 001 (203) 359-7803 |
FAX: 001 (203) 359-7807 |
Latin America |
info@omega.com.mx |
e-mail: espanol@omega.com |
Servicing Europe:
Benelux: |
Managed by the United Kingdom Office |
|
|
Toll-Free: 0800 099 3344 |
TEL: +31 20 347 21 21 |
|
FAX: +31 20 643 46 43 |
e-mail: sales@omegaeng.nl |
Czech Republic: |
Frystatska 184 |
|
|
733 01 Karviná, Czech Republic |
|
|
Toll-Free: 0800-1-66342 |
TEL: +420-59-6311899 |
|
FAX: +420-59-6311114 |
e-mail: info@omegashop.cz |
France: |
Managed by the United Kingdom Office |
|
|
Toll-Free: 0800 466 342 |
TEL: +33 (0) 161 37 29 00 |
|
FAX: +33 (0) 130 57 54 27 |
e-mail: sales@omega.fr |
Germany/Austria: |
Daimlerstrasse 26 |
|
|
D-75392 Deckenpfronn, Germany |
|
|
Toll-Free: 0800 6397678 |
TEL: +49 (0) 7056 9398-0 |
|
FAX: +49 (0) 7056 9398-29 |
e-mail: info@omega.de |
United Kingdom: OMEGA Engineering Ltd. |
|
|
ISO 9001 Certified |
One Omega Drive, River Bend Technology Centre, Northbank |
|
|
Irlam, Manchester M44 5BD United Kingdom |
|
|
Toll-Free: 0800-488-488 |
TEL: +44 (0) 161 777-6611 |
|
FAX: +44 (0) 161 777-6622 |
e-mail: sales@omega.co.uk |
It is the policy of OMEGA Engineering, Inc. to comply with all worldwide safety and EMC/EMI regulations that apply. OMEGA is constantly pursuing certification of its products to the European New Approach Directives. OMEGA will add the CE mark to every appropriate device upon certification.
The information contained in this document is believed to be correct, but OMEGA accepts no liability for any errors it contains, and reserves the right to alter specifications without notice.
WARNING: These products are not designed for use in, and should not be used for, human applications.
Melting Point
Apparatus
SMP10, SMP20
Instructions for use Manuel d’utilisation Istruzioni per l’uso
Instrucciones de funcionamiento Bedienungsanweisung
|
ºC |
heating |
|
plateau |
|
ramping |
|
start/stop |
set |
|
plateau |
|
stop |
|
ramp |
|
hold |
Version 2.0

English
ºC ºC
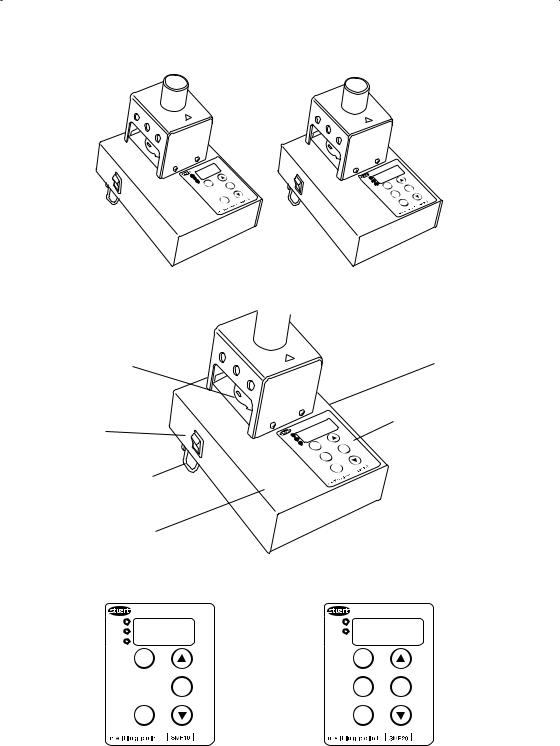
SMP10
Sample tube holder
Mains on/off
Extendible feet
Instruction fascia
SMP10 Fascia
heating
plateau
ºC
ramping
stop
SMP20
|
ºC |
heating |
|
plateau |
|
ramping |
|
start/stop |
set |
|
plateau |
|
stop |
|
ramp |
|
hold |
Eye viewer
IEC connector
Temperature display
Control panel
SMP20 Fascia
heating
plateau
ºC
ramping
start/stop
plateau set |
ramp stop |
plateau set |
start |
hold |
|
2

Melting Point Apparatus
SMP10, SMP20
Introduction
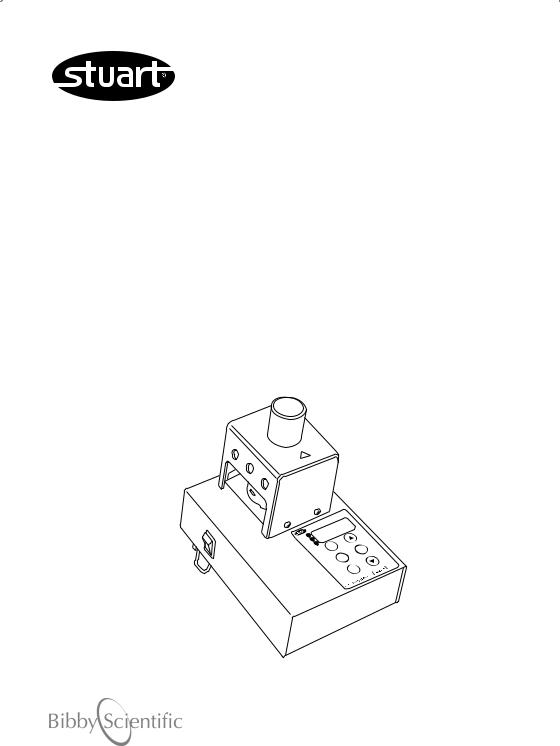
Thank you for purchasing this piece of Stuart equipment. To get the best performance from the equipment and for your own safety, please read these instructions carefully before use. Before discarding the packaging check that all parts are present and correct.
This equipment is designed to operate under the following conditions:
ϖFor indoor use only
ϖUse in a well ventilated area
ϖAmbient temperature range +5°C to +40°C
ϖAltitude to 2000m
ϖRelative humidity not exceeding 80%
ϖMains supply fluctuation not exceeding 10%
ϖOvervoltage category II IEC60364-4-443
ϖPollution degree 2 IEC664
If the equipment is not used in the manner described in this manual and with accessories other than those recommended by Stuart, the protection provided may be impaired.
Electrical Installation
THIS EQUIPMENT MUST BE EARTHED
Before connection please ensure that the line supply corresponds to that stated on the rating label. Power consumption is 70W.
There is an IEC socket at the rear of the right hand side of the instrument for connection to the mains supply, (see figure 1). The unit is supplied with two mains leads fitted with IEC plugs for connection to the instrument. One has a U.K. 3 pin plug and the other has a 2 pin “Shuko” plug for connection to the mains supply. Choose the lead appropriate for your electrical installation and discard the other. Should neither lead be suitable you should obtain a moulded lead locally. If this is not possible, take the lead with the U.K. plug and replace the plug with a suitable alternative. See the enclosed instruction sheet for advice on how to carry out this procedure. Should the mains lead require replacement a cable of 1mm2 of harmonised code H05W-F connected to an IEC 320 plug should be used. N.B. The U.K. mains lead is protected by a 10A fuse mounted in the plug top. The mains lead should be connected to the instrument BEFORE connection to the main supply.
THIS OPERATION SHOULD ONLY BE UNDERTAKEN BY A QUALIFIED ELECTRICIAN
General Description
The Stuart SMP10 and SMP20 have been designed for maximum safety and ease of use. The temperature is selected, measured and displayed digitally ensuring accuracy and avoiding the need for a glass thermometer. Two samples can be tested
simultaneously. They are viewed via a magnifying lens with clear observation aided by built in illumination. Extendible feet allow the unit to be operated at the optimum viewing angle. Full access to the block allows easy cleaning and maintenance.
Before using the unit for the first time
Once the unit is unpacked, select the appropriate choice of self adhesive instruction label from the multilanguage set provided. Peel off the backing and stick the label onto the left side of the fascia. Apply the label carefully using a flat object to smooth away air bubbles.
Principle of Operation
The SMP10 and SMP20 melting point apparatus has been designed to give both quick and accurate results as well as maximum convenience in use. Melting point samples are placed in a glass capillary tube which is placed in the aluminium block inside the sample chamber. This block is heated and the sample observed through the magnifying lens until the melt occurs.
The melting point temperature may then be easily read from the large LED display. In order to avoid the necessity to continually watch the sample the SMP10 is equipped with a “plateau” function. This allows
a temperature to be set a few degrees below the expected melting point. The SMP10 will then heat to this temperature very rapidly (20°C per minute) and hold it until the operator is ready to begin measuring. It can safely be left to do this unattended.
SMP10 only
Once measuring is started the SMP10 will heat slowly (2°C per minute) from the plateau temperature until the melt occurs. This slow rate of heating allows very accurate melting points to be obtained.
SMP20 only
It is possible to adjust the ramp rate of the SMP20, between 1ºC per minute and 10ºC per minute. This allows either a fast result to be obtained or a more accurate slow one
Before Use
Place the unit on a firm, level surface and extend the feet at the rear of the instrument so that the unit is at a convenient viewing angle. Connect to the mains
electricity supply and switch on by means of the mains on/off switch. The actual block temperature will now be shown on the LED display and the illumination in the sample chamber will come on.
3

Measuring a Melting Point
N.B. If the unit has been used recently the block may be too hot for your sample. If this is the case press the stop button and allow the unit to cool before proceeding.
1.Prepare sample by placing a small amount in the end of a glass capillary tube.
2.Decide on a suitable plateau temperature. This should be approximately 10°C below the expected melting point of the sample.
3.Check that all 3 function lights are extinguished. If not, press the stop button.
4.Press and hold the plateau set button (the plateau light will flash). The display will now show the current plateau temperature.
5.The desired plateau temperature may now be set using the arrow keys to scroll the display up
or down as required.
6.Release the set button. The new plateau temperature is now set and all function lights
will go out (The plateau setting can be checked at any time during operation by pressing and holding the plateau set button). This action will not interfere with the operation of the unit).
7.SMP20 only – Decide on an appropriate ramp rate, between 1ºC per minute and 10ºC/min. Results obtained at 1ºC per minute will be the most accurate, while more approximate results can
be obtained faster at higher ramp rates.
Setting the ramp rate is the same procedure as setting the plateau except you need to use the ramp set button instead of the plateau set button.
8.Insert the tube into the side of the heating block via the holes provided. For convenience this can be done from either side of the block. Look down the magnifier and position the tube so that the sample can be observed clearly.
Caution: The heating block may be HOT.
9.Press the start or stat/stop key. The unit will quickly heat up to the plateau temperature (the heating light will be illuminated - see figure 1)
10.Once the plateau temperature has been reached the plateau light will be illuminated as well as the heating light - see figure 1.
N.B. At low plateau temperatures there may be some overshoot. Wait until the plateau light comes on before proceeding in order to ensure that the temperature has stabilised.
11.Press the start button again. The block will begin to heat at the pre-set ramp rate (SMP20)
or at the fixed 2°C per minute on the SMP10 (the plateau light will go out and the ramping and heating lights will both be illuminated - see figure 1.)
12.Observe the sample until the melt occurs and record the temperature from the digital display.
13.SMP20 only – It is possible to freeze the temperature display on the SMP20 using the hold button. Once pressed the temperature display will hold (ramping light flashing) to allow more time to record the melt temperature. Press hold again to return to the actual block temperature.
14.After the melt has occurred press the stop or start/ stop button. All function lights will go out and the unit will cool to ambient temperature.
15.Pressing the start button again will cause the unit to return to the plateau temperature
instead of ambient. The heating light will come on even if the temperature is above the plateau and the unit is, in fact, cooling.
Cleaning & Servicing
WARNING: Ensure the unit is disconnected from the mains electricity supply and allowed to cool before attempting any cleaning or servicing.
Cleaning
Periodically clean the instrument using a damp cloth and mild detergent solution. Do not use harsh or abrasive cleaning agents. Broken melting point tubes may be removed from the block simply by pushing them through with a piece of wire or similar tool.
For access to the block for more thorough cleaning the sample chamber cover must be removed.
1.Remove the 3 retaining screws and lift off the cover.
2.Loosen the screw retaining the metal plate but do not remove completely.
3.Push the plate to one side.
4.The glass window in the top of the block may now be removed.
Servicing
Any repairs or replacement of parts MUST only be undertaken by suitably qualified personnel. There are two replaceable fuses on the rear of the IEC mains connector. The cause of any fuse failure should be investigated and corrected.
Proceed as follows:
1)Ensure the unit is disconnected from the mains supply.
2)Unscrew the four screws on the base of the unit and remove the base plate. Do not disconnect or pull on the base earth bonding wire.
4

3)Two fuses are mounted on the rear of the IEC connector (both ‘Live’ and ‘Neutral’ mains supply leads are fused). These fuses can be removed and replaced by hand. ALWAYS replace the fuse by ones of the correct values shown below:
For 230V, 50Hz - T1A For 120V, 60Hz - T1.6A
4)Refit the base and four securing screws.
5)It is advisable to perform a ‘PAT’ (Portable Appliance Test) electrical safety test, or equivalent, before the unit is put back into operation.
For a comprehensive list of parts and a Service Manual required by service engineers conducting internal repairs, please contact the Technical Service Department of Bibby Scientific Ltd. quoting both the model and serial number.
Only spare parts supplied or specified by Bibby Scientific Ltd. or its agents should be used. Fitting of nonapproved parts may affect the performance and safety features designed into the instrument. If in any doubt, please contact the Technical Service Department of Bibby Scientific Ltd. or the point of sale.
Bibby Scientific Ltd.
Stone, Staffordshire ST15 0SA United Kingdom
Tel: +44 (0)1785 812121 Fax: +44 (0)1785 813748
e-mail info@bibby-scientific.com www.bibby-scientific.com
Warranty
Bibby Scientific Ltd. warrants this instrument to be free from defects in material and workmanship, when used under normal laboratory conditions, for a period of three (3) years. In the event of a justified claim Bibby Scientific will replace any defective component or replace the unit free of charge. This warranty does NOT apply if damage is caused by fire, accident, misuse, neglect, incorrect adjustment or repair, damage caused by incorrect installation, adaptation, modification, fitting of non-approved parts or repair by unauthorised personnel.
Technical Specification
|
SMP10 |
SMP20 |
Number of samples |
Two |
Two |
Temperature range |
Ambient to 300°C |
Ambient to 300°C |
Temperature resolution |
1°C |
0.1ºC |
Temperature accuracy |
±1°C |
±1°C |
Display |
Three digit LED |
Four digit LED |
Sensor |
PT100 |
PT100 |
Ramp rates |
20°C / minute to plateau |
20°C / minute to plateau |
|
2°C /minute to melt |
Between 1 and 10ºC/min |
Dimensions (WxDxH) |
160 x 220 x 170 mm |
160 x 220 x 170 mm |
Net weight |
1.8 Kg |
1.8 Kg |
5
Français
ºC ºC
SMP10
Support tube echantillon
Narche /
Arret
Pieds anovibles
Nobe operatoire
SMP10 Fascia
heating
plateau
ºC
ramping
stop
plateau set
start
SMP20
 Loupe d’observation
Enbase cee
|
ºC |
heating |
|
plateau |
|
ramping |
|
start/stop |
set |
|
plateau |
|
stop |
|
ramp |
|
hold |
Affichabe temperature
 Panneau de controle
SMP20 Fascia
heating
plateau
ºC
ramping
start/stop
ramp stop |
plateau set |
hold
6

Appareil de mesure du point de fusion
SMP10, SMP20
Manuel d’utilisation
Nous vous remercions d’avoir acheté cet appareil Bibby Scientific. Afin d’en obtenir satisfaction, et pour votre sécurité, nous vous invitons à lire avec attention les instructions ci-dessous avant l’utilisation Le matériel Bibby Scientific est conçu pour fonctionner dans les conditions suivantes :
ϖUtilisation en intérieur uniquement
ϖUtilisation dans une pièce bien aérée
ϖTempérature ambiante de +5 °C à +40 °C
ϖAltitude inférieure à 2 000m
ϖHumidité relative n’excédant pas 80%
ϖFluctuations de l’alimentation électrique n’excédant pas 10% de la valeur nominale
ϖSurtension de catégorie II selon la norme CEI 60364-4-443
ϖDegré 2 de pollution selon la norme CEI 664
Si l’équipement n’est pas utilisé de la façon décrite dans ce manuel, la protection fournie par l’appareil peut être altérée.
Installation Électrique
CET ÉQUIPEMENT DOIT ÊTRE RELIÉ À LA TERRE
Avant le raccordement, assurez-vous que l’alimentation électrique correspond à celle indiquée sur l’étiquette de spécifications. La puissance est de 70 W.
Une embase CEE est située à l’arrière du côté droit de l’instrument pour le raccordement à l’alimentation électrique, (voir le schéma 1). L’appareil est fourni avec deux cordons d’alimentation équipés de fiches CEE pour le raccordement. L’un de ces cordons est équipé d’une fiche britannique à 3 broches et l’autre est équipé d’une fiche « Shuko » à deux broches. Choisissez le cordon d’alimentation adapté à votre installation électrique et mettez l’autre de côté. Si ni
l’un ni l’autre ne conviennent, vous devrez alors obtenir le cordon d’alimentation utilisé dans le pays où vous vous trouvez. Si ce n’est pas possible, prenez celui avec la prise anglaise, coupez-la et remplacez-la par celle correspondant au pays d’utilisation. Voir la feuille d’instructions incluse pour le montage de cette prise. Si le cordon d’alimentation doit être remplacé, utilisez un câble d’ 1mm2 de type H05W-F (code harmonisé), connecté à une fiche CEI 320.
Remarque : Le cordon d’alimentation équipé d’une fiche britannique est protégé par un fusible de 10 A monté dans la partie supérieure de la fiche. Il doit être connecté à l’appareil AVANT de le connecter à une prise secteur.
EN CAS DE DOUTE, CONSULTER UN ÉLECTRICIEN QUALIFIÉ
Description Générale
Les appareils Stuart SMP10 et SMP20 ont été conçus pour une sécurité et une facilité d’utilisation maximales. La sélection de la température, la mesure et l’affichage sont numériques, ce qui assure une parfaite précision et permet de ne pas utiliser de thermomètre. Deux échantillons peuvent être examinés simultanément.
Ils sont visualisés à l’aide d’une lentille grossissante et d’un éclairage intégré. Les pieds arrières ajustables permettent d’incliner l’appareil pour obtenir un champ de vision optimal. Accès total au bloc pour un nettoyage aisé.
Avant d’utiliser l’appareil pour la première fois:
Une fois déballée, choisissez l’étiquette d’instructions adhésive appropriée à la langue du pays d’utilisation parmi celles fournies. Décollez l’étiquette de son support et collez-la sur le côté gauche de la face avant de l’appareil. Appliquez celle-ci avec précaution, en employant un objet plat pour lisser les bulles d’air.
Principe de Fonctionnement
Les appareils à point de fusion SMP10 et SMP20 ont été conçus pour donner des résultats rapides et précis et fournir un confort d’utilisation maximal. Les échantillons sont placés dans un tube capillaire en
verre, qui est ensuite placé dans le bloc en aluminium à l’intérieur de la chambre de mesure. Ce bloc est chauffé et l’échantillon est observé à travers la loupe jusqu’à ce que la fusion se produise. La température du point de fusion peut alors être facilement relevée sur le grand affichage digital. Afin d’éviter une observation continue de l’échantillon, les deux appareils sont équipés d’une fonction “plateau”. Ceci permet de sélectionner une température située quelques degrés en dessous du point de fusion prévu. Ces appareils chaufferont alors très rapidement jusqu’à cette température (20°C par minute) et la maintiendront jusqu’à ce que l’opérateur soit prêt à commencer l’analyse. Durant cette montée en température, l’appareil ne nécessite pas de surveillance particulière.
SMP10 uniquement
Une fois la mesure commencée, le SMP10 chauffera lentement (2°C par minute), de la température
de plateau jusqu’à ce que la fusion se produise. Cette lente montée en température permet une détermination précise des points de fusion.
7
 Loading...