


DIGITAL VOICE RECORDER
VN-7800PC
VN-6800PC
VN-6500PC
VN-5500PC
VN-3500PC
EN INSTRUCTIONS
Thank you for purchasing an Olympus Digital Voice Recorder. Please read these instructions for information
about using the product correctly and safely. Keep the instructions handy for future reference.
To ensure successful recordings, we recommend that you test the record function and volume before use.
Shinjuku Monolith, 3-1 Nishi-Shinjuku 2-chome, Shinjyuku-ku, Tokyo 163-0914, Japan. Tel. +81 (0)3-3340-2111 http://www.olympus.com
(Premises/Goods delivery) Wendenstrasse 14-18, 20097 Hamburg, Germany. Tel. +49 (0)40-237730 (Letters) Postfach 10 49 08. 20034 Hamburg, Germany. http://www.olympus-europa.com
Vision House 19 Colonial Way Watford Hertfordshire WD24 4JL. Tel. +44 (0)1923 831000 http://www.olympus.co.uk
For customers in Europe:
“CE” mark indicates that this product complies with the European requirements for safety, health,environment and customer protection.
This symbol [crossed-out wheeled bin WEEE Annex IV] indicates separate collection of waste electrical and electronic equipment in the EU countries. Please do not throw the equipment into the domestic refuse. Please use the return and collection systems available in your country for the disposal of this product.
Applicable Product : VN-7800PC/VN-6800PC/VN-6500PC/VN-5500PC/VN- 3500PC
This symbol [crossed-out wheeled bin Directive 2006/66/EC Annex II] indicates separate collection of waste batteries in the EU countries. Please do not throw the batteries into the domestic refuse. Please use the return and collection systems available in your country for the disposal of the waste batteries.
Introduction
•The contents of this document may be changed in the future without advanced notice. Contact our Customer Support Center for the latest information relating to product names and model numbers.
•The utmost care has been taken to ensure the integrity of the contents of this document. In the unlikely event that a questionable item, error, or omission is found, please contact our Customer Support Center.
•Any liability for passive damages or damage of any kind occurred due to data loss incurred by a defect of the product, repair performed by the third party other than Olympus or an Olympus authorized service station, or any other reason is excluded.
Trademarks and registered trademarks:
•Microsoft, Windows and Windows Media are registered trademarks of Microsoft Corporation.
•Macintosh is the trademark of Apple Inc.
Other product and brand names mentioned herein may be the trademarks or registered trademarks of their respective
owners.
hSafe and Proper Usage
Before using your new recorder, read this manual carefully to ensure that you know how to operate it safely and correctly. Keep t
his manual in an easily accessible location for future reference.
•The warning symbols indicate important safety related information. To protect yourself and others from personal injury or damage to property, it is essential that you always read the warnings and information
provided. |
EN-BD2245-03 |
|
|
- - |
AP0904 |

Getting Started
hIdentification of Parts
1 Built-in Microphone |
1 |
2 MIC (Microphone) |
jack |
2 |
|
3 HOLD switch |
||
|
||
4 USB terminal |
|
|
5 STOP (4) button |
|
|
6 PLAY/OK (`) |
|
|
button |
3 |
|
7 0(Rewind) |
||
|
||
button |
|
8Battery cover
9FOLDER/INDEX 4
button
5
6
7
8
9
00 EAR (Earphone) jack
!Display (LCD panel)
@ Record/play indicator light
# REC (s) button $ + button
! % 9(Fast Forward) button
^ – button
& DISP/MENU button
@* ERASE (s) button
# ( Strap hole
$
% ^
&
(
*
•Strap is not supplied. Use the optional accessory.
Display (LCD panel):
1 |
|
|
|
|
|
|
|
|
|
5 |
|
|
|
|
|
|
|
||||||
2 |
|
|
|
|
|
|
|
|
|
|
6 |
|
|
|
|
|
|
|
|
|
|
||
|
|
|
|
|
|
|
|||||
|
|
|
|
|
|
|
|
|
|
||
3 |
|
|
|
|
|
|
|
|
|||
|
|
|
|
|
|
||||||
|
|
|
|
|
|
|
|
|
|
7 |
|
4 |
|
|
|
|
|
|
|
||||
|
|
|
|
|
|
||||||
|
|
|
|
|
|
|
|
|
|
|
|
|
|
|
|
|
|
|
|
|
|
|
|
1 Folder indicator |
3 Guide indicator |
||||||||||
2 [X] Microphone sensitivity |
4 Character information display |
||||||||||
indicator |
Recording level meter |
||||||||||
[Y] LowCut filter indicator* |
5 Battery indicator |
||||||||||
[Z] Variable Control Voice |
6 Erase lock indicator |
||||||||||
Actuator indicator |
7 Current file number |
||||||||||
[_] Record mode indicator |
|
|
|
|
|
|
|||||
[K] Fast playback indicator |
* For VN-7800PC/VN-6500PC only. |
||||||||||
[J] Slow playback indicator |
|
|
|
|
|
|
|||||
[[] Segment repeat playback |
|
|
|
|
|
|
|||||
indicator*
hInserting Batteries
1Lightly press down on the arrow and slide the battery cover open.
2Insert two size-AAA alkaline batteries, observing the correct polarity.
3Close the battery cover completely.
• When the HOLD switch is set to the direction of the arrow, the display is turned off after [HOLD] is displayed. Follow the next step without regard to it.
An optional Ni-MH Rechargeable Battery (BR401) from Olympus can be used for the recorder.
- -
Replacing the Batteries:
When [N] appears on the display, replace the batteries as soon as possible. Size-AAA alkaline batteries are recommended. When the batteries are depleted, [O] appears on the display, and the recor-der shuts off.
•To replace the battery, make sure that you set the HOLD switch to the opposite direction of the arrow before replacing.
hPower Supply
Poweron:SlidetheHOLDswitchinthedirection opposite that indicated by the arrow.
Power off: Slide the HOLD switch in the direction indicated by the arrow while the recorder is not in operation.
Standby Mode and Display Shut Off:
If the recorder is stopped for 5 minutes or longer during recording or playing, it goes into Standby (power-save) mode, and the display shuts off. To exit Standby mode and turn on the display, press any button.
hHold
Setting the HOLD switch to the direction of the arrow holds the current status, and all button operations are disabled. Remember to release the HOLD switch to use the recorder.
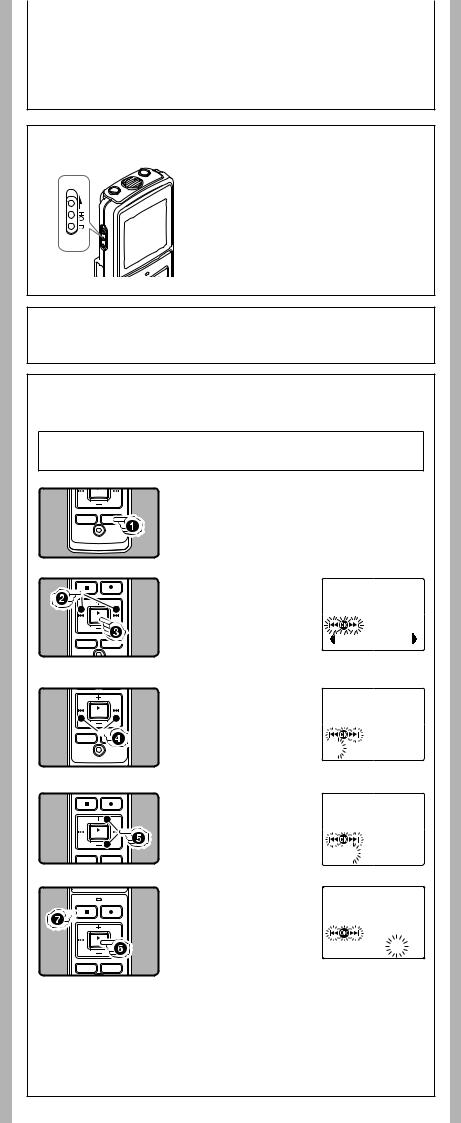
hSetting Time and Date [Time & Date]
If you have set the time and date, information as to when a sound file was recorded is stored automatically with that file.
When you install batteries for the first time or each time you replace the batteries, the “Month” indication will flash. In such a case, be sure to set the time and date by following steps 4through 6described below.
1Press and hold the DISP/MENU button for 1 second or longer to go to the main menu.
2Press the 9or 0
button to select [Sub Menu].
3Press the PLAY/OK (`) |
Time & Date |
button. |
•[Time & Date] appears on the display, and [\^]] flashes.
4Press the 9 or 0 button to select the item to set.
•Select the item from “Month”, “Day”, “Year”, “Hour” and “Minute” with a flashing
point.
5Press the +or – button to set.
•Follow the same steps by pressing the 9or 0button to elect the next item, and press the + or – button to set.
6Press the PLAY/OK (`) button to complete the setup screen.
•The clock will start from the set date and time.
•Press the PLAY/OK (`) button according to the time signal.
 1.
1. 1‘08 12:00AM
1. 1‘08 12:00AM
7.25‘08 3:00PM
7Press the STOP (4) button to close the menu mode.
• This completes the time and date setup procedure.
Notes:
•You can choose between 12 and 24 hour display by pressing the DISP/MENU button while setting the hour and minute.
•You can change the order of the date indication by pressing the DISP/MENU button while you are setting the year, month, or day.
--
Recording
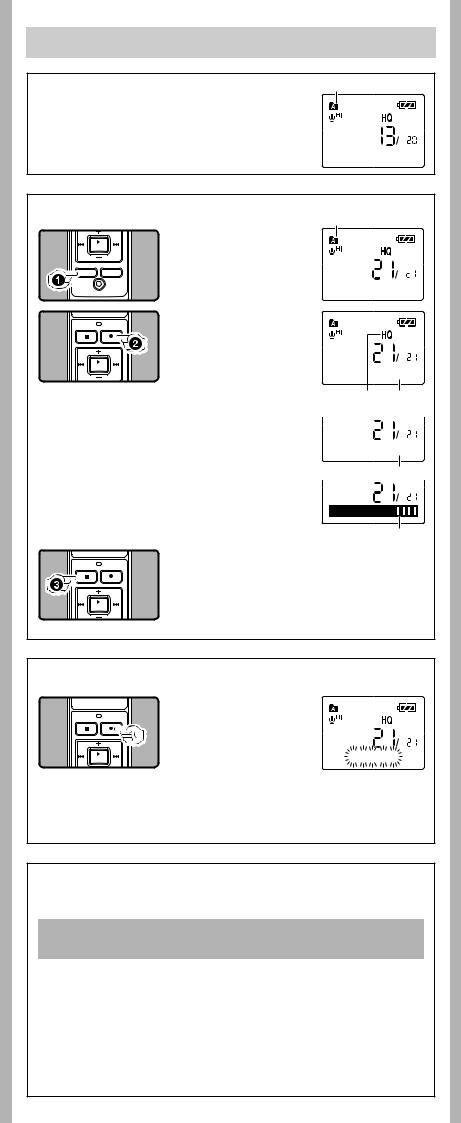
hNotes on the Folders
The recorder provides five folders, [F], [G], [H], [I] and [W]. To change the folder selection, press the FOLDER/INDEX button while the recorder is stopped.
Note:
• Up to a total of 200 files can be recorded in each folder.
Current folder
15m15s 14m15s
hRecording
A
1Press the FOLDE R / INDEX button to select
the desired folder.
A Current folder
2Press the REC (s) button to start recording.
•The record/play indicator light turns red, and recording starts.
•If you start recording after inserting the earphone into the earphone jack on the recorder, you can hear the sound being recorded. The sound volume on the recording monitor can be adjusted by pressing the + or – button.
B Current recording mode C Current file number
D Recording time
E Remaining recording time F Recording level meter
15m15s 14m15s
15m15s 
 14m15s
BC D
Remain 22h52m46s
E
F
3Press the STOP (4) button to stop recording.
• New recordings are saved as the last file in the folder.
hTo Pause Recording
To Pause:
While the recorder is during recording mode, press the REC
(s) button.
• [Rec Pause] appears on the display. Rec Pause
To Resume Recording:
Press the REC (s) button again.
• Recording will resume at the point of interruption.
hLCD Display Information
You can select an option for the display of the recorder. This will help review and confirm different recorder settings and file information.
State of the |
Operation |
Display |
|
recorder |
|||
|
|
||
|
|
|
|
While in stop |
Press and hold the |
Whileholdingthebuttondown,“Remainingrecording |
|
mode |
STOP (4) button |
time” and “Remaining memory” are displayed. |
|
|
|
|
|
While in record |
Press the DISP/ |
Each press switches the display in the order |
|
mode |
MENU button |
of “Recording elapsed time”, “Remaining |
|
|
|
recording time” and “Recording level meter”. |
|
|
|
|
|
While in stop |
Press the DISP/ |
Each press switches the display in the order of |
|
mode or |
MENU button |
“Playback elapsed time”, “Remaining playback |
|
playback mode |
|
time”, “Date of recording” and “Time at |
|
|
|
recording”. |
|
|
|
|
--
 Loading...