


XA 1
ProSeal Instructions for All Olympus XA style Cameras
Please read these instructions completely before you start. Knowledge will increase your
confidence, and like most jobs, this is better done right the first time. I’ve tried to keep things
as easy and logical as possible while still providing a great amount of detail for you. Sealing your
camera is one of the best ways to restore it to like-new performance, and these are excellent
cameras. You have been given this set of instructions for any of several reasons. You should
have already read and understood the general directions which accompany my light seal kits.
You may need: (1) a safe surface to work on—cardboard, fiberboard, newspaper or anything else
handy—it is important to protect the surface beneath you. (2) Solvent. Naphtha (cigarette
lighter fluid) or denatured alcohol are my two favorites. (3) 2 or 3 paper towels. (4) some
toothpicks or your bamboo tool—a wooden cuticle stick is also handy. (5) a safety razor blade,
hobby knife, or small scissors and a metal straightedge. (6) a small screwdriver (7) a pair of
tweezers. Now, let's discuss the differences between the different XA styles. Please
understand it is not uncommon to find variations of light seal design or application within the
same style. The images below represent what I’ve observed as the most commonly occurring
light seal architecture within each XA model style or group:
~~XA Model~~
~~XA1 and XA2 Models~~
~~XA3 and XA4 Models~~
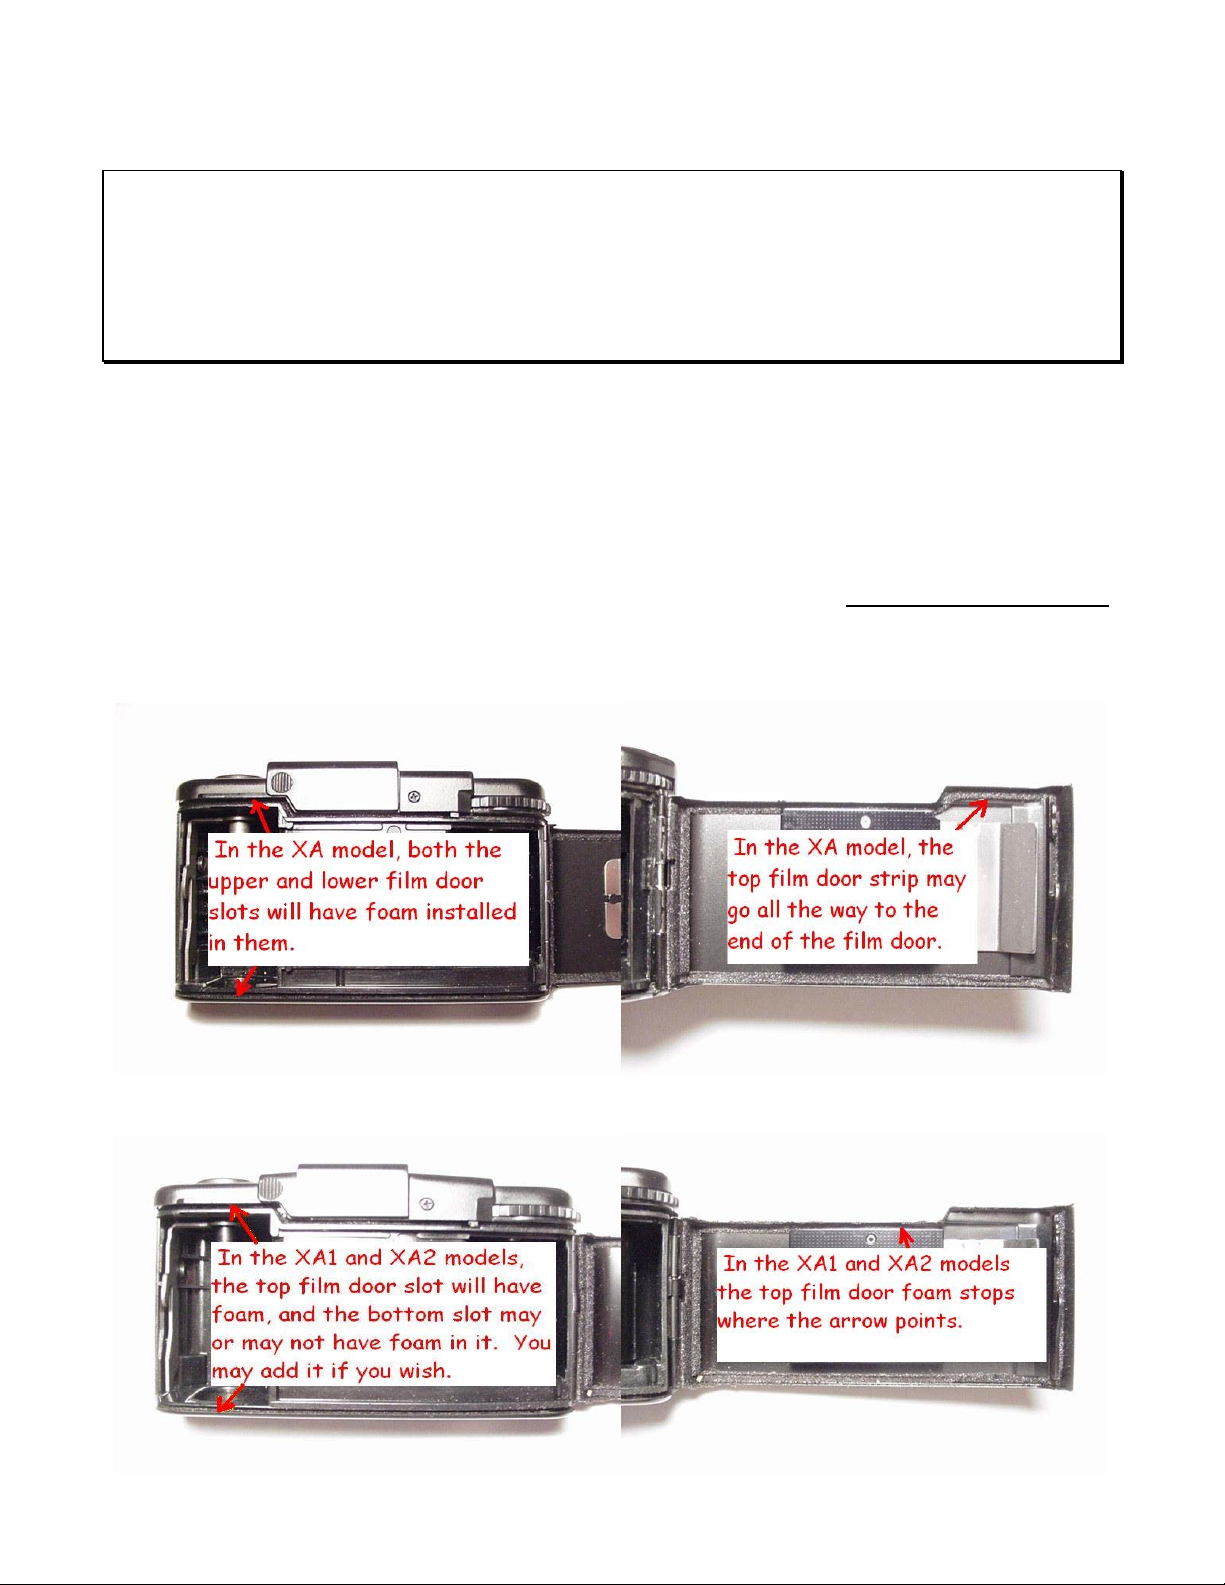
As you can see above, the differences in the XA, XA1 and XA2 are relatively minor. Your XA2
may or may not have seal material in the bottom film door slot (but you can add this if you wish).
The XA may have seal material running along the top side of the film door all the way to the end
of the door, or it may be like the XA1 and XA2 and this seal may stop around the film pressure
plate. If you want to duplicate the “full door seal” design used in the XA for the XA1 or XA2,
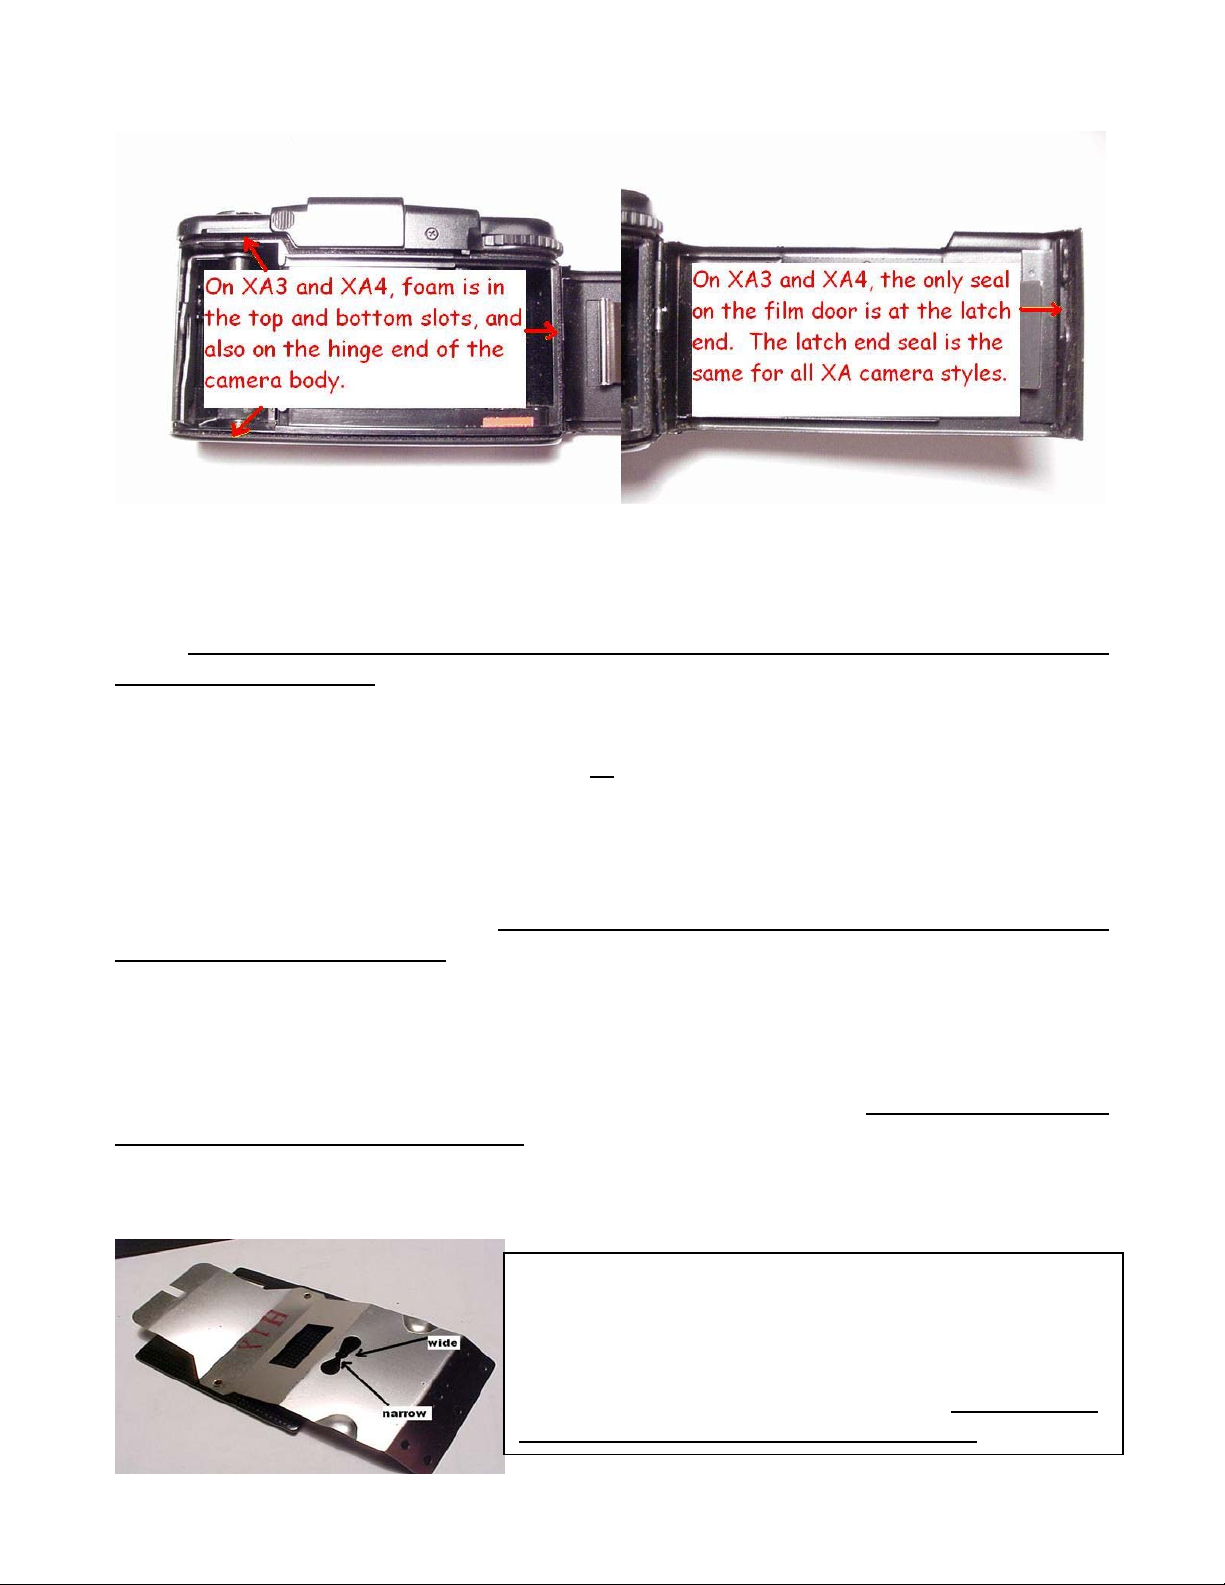
please feel free to do so. The design of the XA3 and XA4 cameras was completely different.
There is a hinge end seal on the camera body, but not on the film door. Both upper and lower
body slots are sealed, and there is no seal on the camera’s film door…except for the latch end.
Please note the latch end seal is the same for all
XA styles.
~~What Kind Of Seal Material Should I Use?~~
The Olympus XA cameras were designed with very close and precise tolerances. It is important
to respect those tolerances when choosing a seal material. You may use 1mm self-adhesive
fabric, 1mm self-adhesive foam, but please do not exceed a thickness of 1mm with any style of
material in the XA, XA1 or XA2. In the XA3 and XA4, the hinge end seal should be 1.5mm thick.
If this is unclear to you, please contact me (Jon_Goodman@yahoo.com) with your questions
before you go any further. See the end of the instructions for an interesting demonstration…
~~A Special Message for XA, XA1 and XA2 Owners~~
At this point, I want you to consider removing your film pressure plate. If you have the XA3 or
XA4, please IGNORE THIS SECTION. But for you others, here is how to remove it: With a
thumb on the bottom edge of the pressure plate and another thumb on the film canister tab,
press upward gently until the plate clip frees itself from its retaining button. You will feel a
little “click.” Now, lift up slightly and slide the rear tab off its retaining button.
Notice the “hourglass shape” in the metal. The retaining
tab can only slide in one direction (toward the wide end),
because the other passage is too narrow. Small
indentations (dimples) in the metal hold the plate
suspended above the film door’s surface. THE XA3 and
XA4 pressure plate should not be removed.

Now, if you have model XA, XA1 or XA2 and you want to go one step further and remove the
film door entirely, here’s how I do that: First, look at the bottom plate of your camera…
(you may also remove the door of the XA3 and XA4, but unless you need to repaint the door, I
seldom find this necessary)
Okay, now let’s clean your camera. Take your small screwdriver or an old dropper bottle and use
it to carefully drop naphtha (lighter fluid) or denatured alcohol on the areas that have seal
material attached. Please remember your camera’s body is plastic…some solvents will
damage
plastic, so never
use solvents like acetone, MEK, toluol, fingernail polish, etc. I normally drop
enough solvent on the old seal to saturate it. Let this sit about 2 minutes and then begin
scraping it off. You may use a toothpick with the end broken off, your bamboo tool, or a wooden
cuticle stick. Work carefully and try not to scratch the painted surface. In some cases you may
find the adhesive doesn’t turn loose easily. It may take the paint off with it (see picture below).
If this occurs, you may touch it up with semi-gloss black paint and a small paint brush, or you
may re-paint the inner door with the paint I mention in “notes.” The main thing is to be patient
and give the solvent time to dissolve and loosen the old adhesive. IMPORTANT NOTE:
Observe the precautions on the solvent. Work in a well-ventilated area and avoid too
Remove the carrying strap, revealing the stainless
steel rod (arrow number 1). Using the edge of a
small knife, catch the rod and slide it downward.
You should see the metal rod start to slide out of
the bottom hinge (arrow number 2). When you can
catch this rod with a small pair of pliers, slide it out.
Your door will now come off easily, and to replace,
you will simply reverse this process.
(1) remove battery cover and batteries and set aside (2)
move lever to “self timer” and remove all 5 phillips head
screws. 3 are long and 2 are short. You can see where they
go. (3) carefully lift up on the bottom plate using your
fingernail to pull it up near the lever. It may be resistant,
but if you’re patient, it will come off.
To the left, a visual example of how I remove the pressure
plate in the first series XA models. Gentle pressure until
you feel a “click.” It will replace in the opposite fashion.
 Loading...