


VN 8100PC
DIGITAL VOICE RECORDER
VN-8100PC
VN-8000PC
EN
INSTRUCTIONS
Thank you f or purchasing a n Olympus Digital Voice R ecorder.
Please read these inst ructions for i nformation
about using the product correctl y and safely.
Keep the i nstruction s handy for future reference.
To ensure successfu l recordings, we recom mend that
you test the record func tion and volume be fore use.
Register your product on www.olympus-consumer.com/register and get
additional benefits from Olympus!
Shinjuku Monolith, 3-1 Nishi-Shinjuku 2-chome, Shinjyuku-ku, Tokyo 163-0914, Japan. Tel. +81 (0)3-3340-2111
3500 Corporate Parkway, P.O. Box 610, Center Valley, PA 18034-0610, U.S.A. Tel. 1-888-553-4448
For customers in North and South America:
http://www.olympus.com
http://www.olympusamerica.com
Declaration of Conformity
Model Number: VN-8100PC/VN-8000PC
Trade Name: DIGITAL VOICE RECORDER
Responsible Party: OLYMPUS IMAGING AMERICA INC.
Address: 3500 Corporate Parkway, P.O. Box 610, Center Valley,
PA 18034-0610,U. S. A.
Telephone Number: 1-888-553-4448
This device Complies with Part 15 of the FCC Rules. Operation is subject to the following two conditions: (1) This device may not cause harmful interference, and (2)
this device must accept any interference received, including interference that may
cause undesired operation.
Tested To Comply
With FCC Standards
FOR HOME OR OFFICE USE
Canadian RFI:
This digital a pparatus does not exceed th e Class B limits for radio noise e missions from digital
apparatus as set out in the Radio Interference Regulations of the Canadian Department of
Communications.
Cet appareil n umérique ne dépasse pa s les limites de la Catégorie B p our les émissions de brui t
radio émanant d ’appareils numériques, tel que prévu dans les Règlements sur l’Inter férence
Radio du Département Canadien des Communications.
Introduction
• The conte nts of this doc ument may be chang ed in the futur e without adv anced notice .
Contact our Customer Support Center for the latest information relating to product
names and model numbers.
• The screen and recor der illustrations show n in this manual were produced durin g the
develop ment stages an d may differ f rom the actu al product . The utmost c are has been
taken to en sure the inte grity of the c ontents of th is document . In the unlike ly event that
a questionable item, error, or omission is found, p lease contac t our Customer Supp ort
Center.
• Any liability for passive damages or damage of any kind occurred due to data loss
incurred by a defect of the product, repair performed by the third party other than
Olympus or an Oly mpus authorized service stat ion, or any other reason is excluded.
Trademarks and registered trademarks
• IBM and PC/AT are the trademarks or registered trademarks of International
Business Machines Corporation.
• Microsoft, Windows and Windows Media are registered trademarks of Microsoft
Corporation.
• Macintosh is a trademark of Apple Inc.
• MPEG Layer-3 audio coding technology licensed from Fraunhofer IIS and
Thomson.
Other p roduct and b rand names ment ioned herei n may be the trade marks or reg istered
trademarks of their respective owners.
h Safety precautions
Before using your new recorder, read this manual carefully to ensure that you know how to operate
it safely and cor rectly. Keep this manua l in an easily accessible location for future refere nce.
• Th e warning symb ols indicate imp ortant saf ety related inf ormation. To protec t yourself and o thers from
pe rs on al i nj ur y or da mag e t o pr op er ty , it is e ss ent ia l th at you al way s r ead th e wa rn ing s a nd i nf or mat io n
provided.
--
1
U1-BS 0507-01
AP1006

Getting started
h Identification of parts
%
1
2
3
6
7
8
9
0
1
2
$
#
@
!
EAR
MIC
(Microphone)
(Earphone) jack
jack
3 Built-in microphone
4 Recording indicator
light
5 Built-in speaker
6
+
button
7
8 9button
9
0
!
@
`
4
5
REC
(s ) (Record)
button
FOLDER/INDEX /SCENE
button
–
button
ERASE
button
OK/MENU
button
*
(
# 0 button
$
STOP
(4) button
% Display (LCD panel)
^
POWER/HOLD
& USB connector
* Battery cover
( Strap hole
&
switch
Display (LCD panel):
The displayed charac ter size on the screen can be changed. (please see “Font Size” ☞ P. 13)
When the [Font Size] is set to [Large]. When the [Font Size] is set to [Small].
1
2
3
4
5
6
7
8
9
0
!
2
8
3
9
5
7
6
1
@
4
#
0
^
1 Current file
[0] Low Cut Filter
number/ Total
number of recorded
[$] Voice Filter
files in the folder
2 Folder indicator
3 Recorder status
indicator
6 File lock indicator
7 Battery indicator
8 Recording mode
4 During recording
mode:
Elapsed recording time
9 During recording
During playback
mode:
Elapsed playback time
During playback or
5 [?] Microphone
Sensitivity indicator
[!] VCVA
indicator
h Inserting batteries
indicator
indicator
*1
0 Playback mode
indicator
! File name
*2
@ During recording
mode:
Remaining memory bar
*2
indicator
indicator
mode:
Remaining recording
time
During playback or
stop mode:
Playback position bar
*2
indicator
# Recording date and
time
*2
stop mode:
File length
*1 For VN-8100PC only.
*2 This item will be displayed
when the [Font Size] is set
to [Small] only.
1 Lightly press down on the arrow and
slide the battery cover open.
• Manganese batteries may not be used in this
recorder.
• Be sure to stop the recorder before replacing
the batteries. Unloading the batteries while the
recorder is in use may cause a malfunction such
as corrupting the file, etc.
- -
2
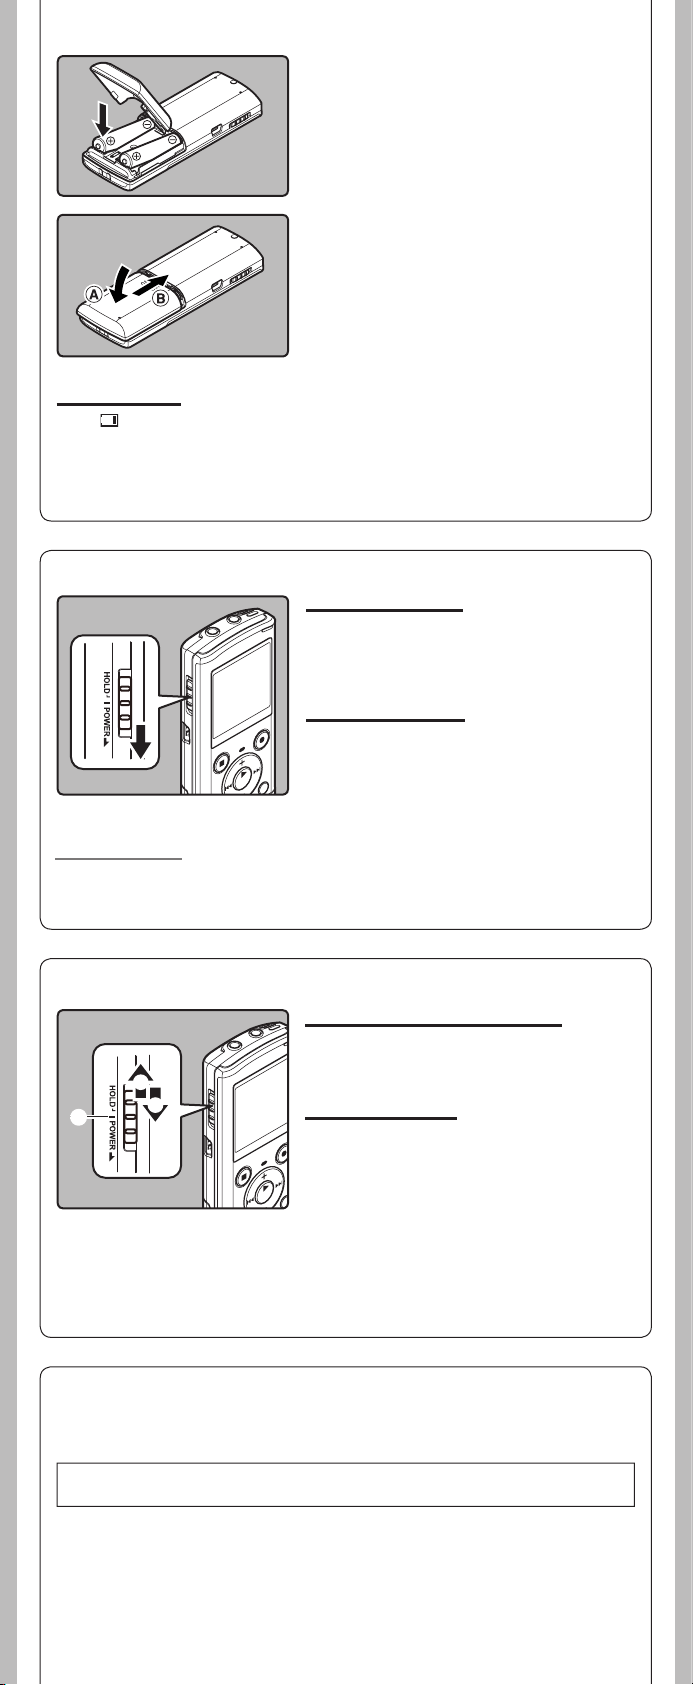
2 Insert size-AAA alkaline battery,
C
A
B
observing the correct = and polarities.
3 Close the battery cover completely
by pressing to the direction A, then
sliding to the direction B
Battery indicator:
When [ ] appear s on the display, repla ce the batterie s as soon as possib le. When the bat teries are
too weak, [s] and [Batter y Low] appears on the display and the recorder shuts down.
• Remove the batteries if you are not going to use the recorder for an extended period of time.
• When changing batteries, AAA alkaline batteries or Olympus Ni-MH rechargeable batteries are
recommended.
.
h Turning on/off the power
Turning on the power:
While the recorder is turned off, slide the
POWER/HOLD
by the arrow.
• The display will turn on, and the power will be turned
on.
Turning off the power:
Slide the
indicated by the arrow for 1 seconds or longer.
• The display shuts o , and the power will be turned
o .
• The resume function remembers the stop position
before the power is turned o .
switch in the direction indicated
POWER/HOLD
switch in the direction
Power save mode
If the recorder is stopped/not used for over 5 minutes after it is turned on, it goes into standby
(power-save) mode, and the display shuts off.
• To exit standby mode and turn on the display, press any button.
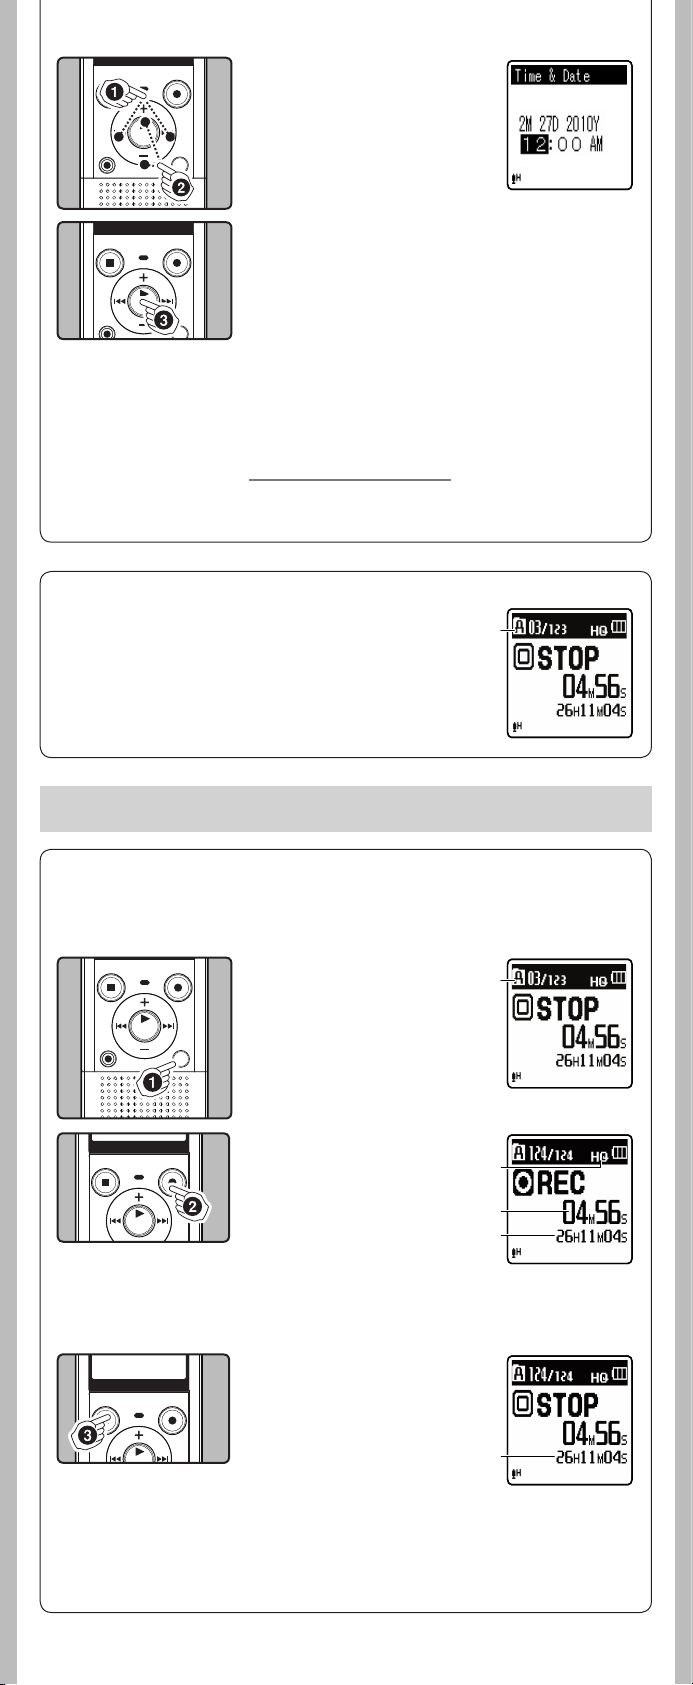
h HOLD
Set the recorder to HOLD mode (A):
Slide the
position.
• After [Hold] app ears on the display, the re corder is set
POWER/HOLD
to HOLD mode.
switch to the HOLD
Exit HOLD mode (B):
Slide the
POWER/HOLD
switch to the C posi-
tion.
Notes:
• If you press any button in HOLD mode, the clock display ashes for 2 seconds, but it will not
operate the recorder.
• If HOLD is applied during playb ack (recording), operati on is disabled with the playback (recording)
state unchanged (When play back has ended and the recording has ended due to the remaining
memory being used up, it will stop).
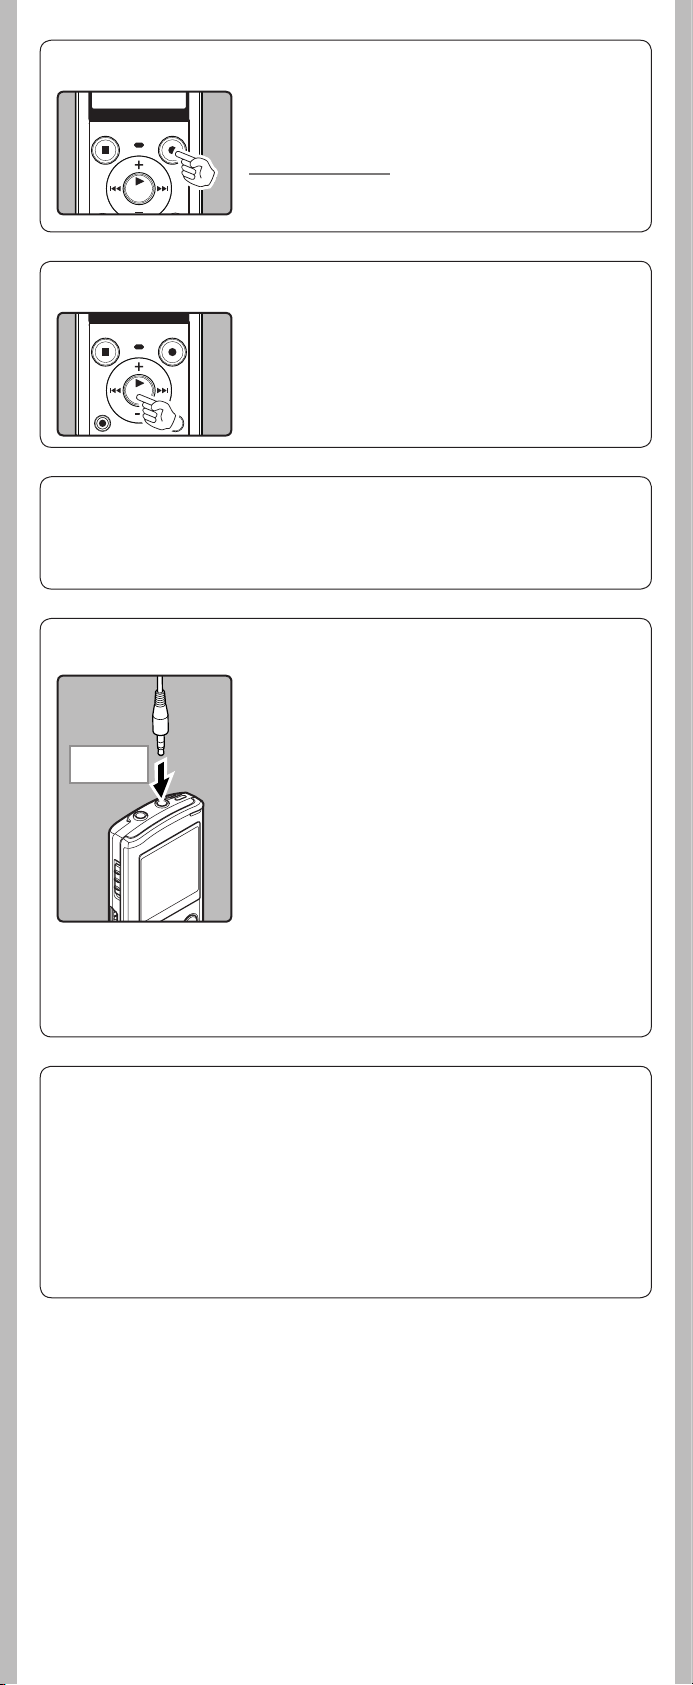
h Setting time and date [Time & Date]
If you set the time and date b eforehand, the inf ormation when the f ile is recorded is automaticall y
stored for each file. Setting the time and date beforehand enables easier file management.
When you i nstall ba tteries fo r the firs t time or eac h time you rep lace the bat teries, th e
“Hour” indication will flash.
- -
3
1 Press the 9 or 0
button to select the item
to set.
• Selec t the item from the “hour”,
“minute”, “ year”, “ month” and
“day” with a flashing point.
2 Press the + or – button to
set.
• Follow the same s teps by pressing the 9 or 0 button
to select the next item, and press the
• You can select b etween 12 and 24 hour display by p ressing
the FOLDER/INDEX/SCENE but ton while setting the hour
and minute.
• You can selec t the order of th e “month”, “day” and “ year” by
pressing the FOLDER/INDEX/SCENE button while setting
them.
3 Press the `
OK/MENU
button to complete the
setting.
• The clock will start from the set date and time. Press the
` OK/MENU button according to the time signal.
• While the recorder is during stop mode, press and hold
the STOP (4) button to display the [Time & Date], and
[Remain].
Changing the time and date
Select [
Time & Dat e
(please see “Menu setting” ☞ P.9, “Time & Date” ☞ P. 14)
] from th e menu on the [
h Notes on the Folders
The record er provides fi ve folders, [F], [G], [H], [I] and [ W]. To change
the folde r selectio n, press the FOLDER/INDEX/SCENE button while the
recorder is stopped.
a Folder indicator
+
or − button to set.
Device Menu
a
].
Note:
• Each folder can store up to 200 les.
About recording
h Recording
Before s tarting recording, select a folder between [&] to [*]. These five folders can be selectively
used to distinguish the kind of recording; for example, Folder [&] might be used to store private
information, while Folder ['] might be dedicated to holding business information.
1 Press the
SCENE
desired folder.
a Folder indicator
• Newly recorded audio will be
saved as the last file in the selected folder.
2 Press the
to start recording.
• Turn the microphone in the
direction of the source to be
recorded.
b Recording mode/ c Elapsed
recording time/ d Remaining
recording time
• [Rec Mode] cannot be
changed in the recording
standby mode or while
recording. Configure this while
the recorder is stopped.
FOLDER/ INDEX/
bu tt on to s el ec t th e
REC
(s ) button
a
b
c
d
3 Press the
STOP
(4) button
to stop recording.
e File length
e
Note:
For VN- 8100PC only
• If a recor ding is made in stere o modes ([192 kb ps] or [128 k bps ]), it will be a monaur al recording
through th e built-in microp hone, and the sam e audio will be reco rded on both Lef t channel (Lch)
and Right channel (Rch).
4
--
h Pause
While the recorder is during recording mode, press the
REC
(s) button.
• The record er will time out af ter 60 minutes when le ft in “Rec
Pause”.
Resume Recording:
REC
Press the
• Recording will resume at the point of interruption.
(s) button again.
h To quickly check on the recorded contents
While the recorder is during recording mode, press the
`
OK/MENU
• Stop recording and the file that was just recorded will be
button.
played back.
h Microphone sensitivity
Microphone sensitivity is adjustable to meet recording needs.
Select [
Mic Sense
(please see“Menu setting” ☞ P. 9, “ Mic Sense” ☞ P.11)
] from th e menu on the [
Rec Menu
].
h Recording from external microphone or other devices
The external microphone and other devices can be connected
and the sound can be recorded. Co nnect as follows by the device
to be used.
• Do not plug and unplug devices into the re corder’s jack while it
is recording.
To MIC jack
Recording with external microphone:
Connect an external microphone to the
MIC
jack of
the recorder.
Notes:
• The built-in microphone will become inoperable when an
external microphone is plugged into the recorder ’s MIC jack.
• Microphones supported by plug-in power can also be used.
• When t he external ste reo microphone i s used while [Rec Mode]
is set to a monaural recording mode, audio will be recorded to
the L channel only
• When an external monaural microphone is used while
[Rec Mode] is set to a stereo re cording mode , it enables reco rding
only with the L channel microphone
*
For VN-8100PC only.
Notes:
• To ensure re cording from th e beginning, s tart recor ding after you s ee the display and t he recording
indicator lights on.
• When remaining recording time is less than 60 seconds, the recording indicator light start s ashing.
When the recording time is decreasing to 30 or 10 seconds, the light ashes faster.
• [Folder Full] will appear whe n the recording cann ot be made any furthe r. Sel ect on other folde r
or delete any unnecessary les before recording.
• [Memory Full] will appear when the memory is full. Delete any unnecessary les before recording
any further.
• When ex ternal devices are conn ected, perfo rm a test recording and th en adjust the output leve l
for the external devices.
• Whe n you adjust the var ious sound quali ty setting s related to playbac k on the recorder, the aud io
output signal sent out from the EAR jack will change as well.
*
.
*
.
- -
5
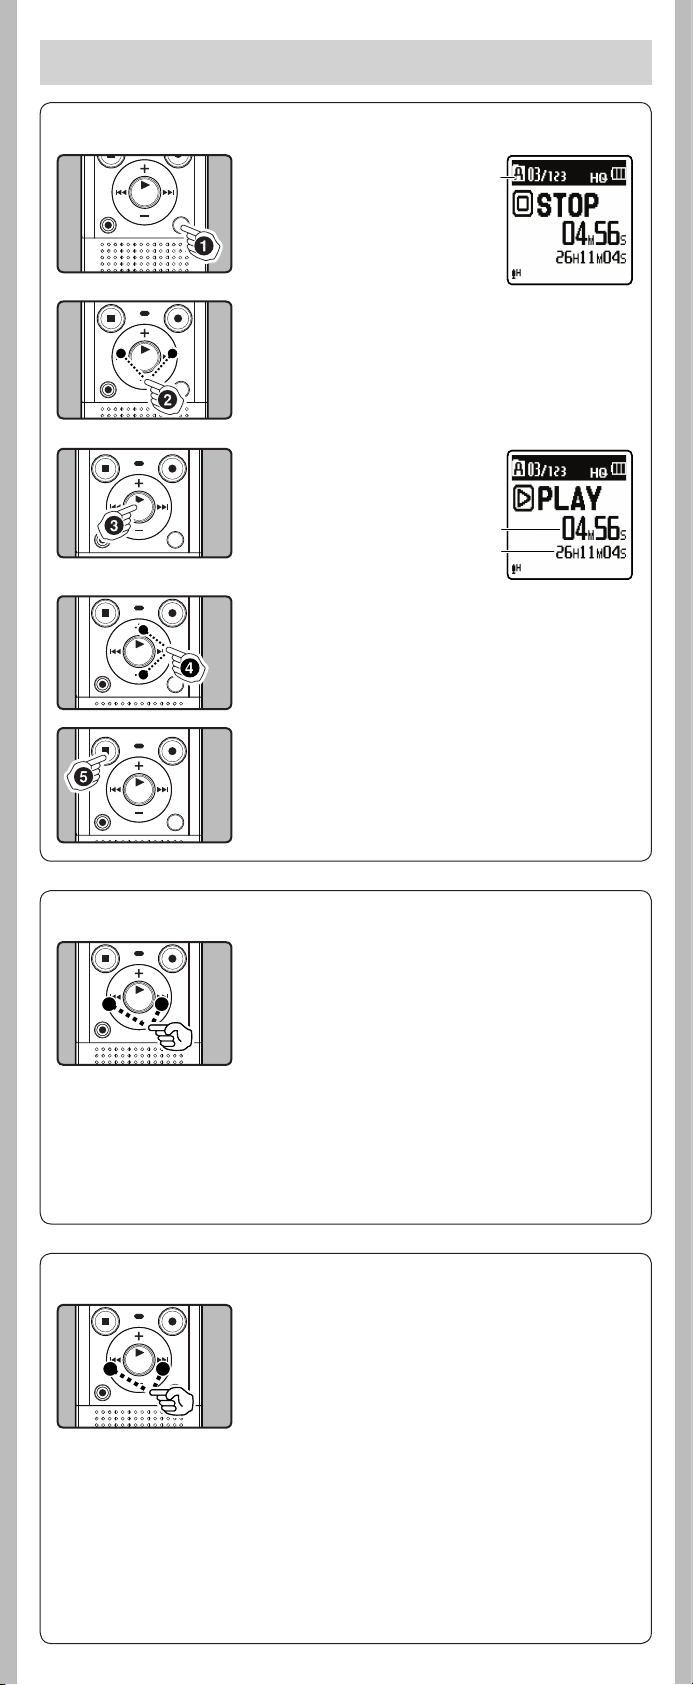
About playback
h Playback
1 Press the
SCENE
FOLDER/ INDEX/
bu tt on to s el ec t th e
a
desired folder.
a Folder indicator
2 Press the 9 or 0
button to select the file
to playback.
3 Press t he `
OK/MENU
button to start playback.
b Elapsed playback time/
c File length
b
c
4 Press t he + or − button to adjust to a
comfortable listening volume.
• The volume can be adjusted within a range from [00] to
[30].
5 Press the
STOP
(4 ) button at any point you
want to stop the playback.
• This will stop the file being playe d back midway. When the
resume function is activated the stopped location will be
registered, even if the power is turned of f. The next time
the power is t urned on, playb ack may be resumed fr om the
registered stopped location.
h Forwarding and Rewinding
While the recorder is during stop mode, press and hold
the 9 or 0 button.
• If you release th e button, it will sto p. Press the `
button to start playback from where it was stopped.
OK/MENU
While the recorder is during playback mode, press and
hold the 9 or 0 button.
• When you release the button the recorder will resume
normal playback.
• If there is an index mark or temp mark in the middle of the
file, the recorder will stop at that location.
• 9: The recorder stops when it reaches the end of the
file. Continue pressing the 9 button to proceed
with the cue from the beginning of the nex t file.
0 : The recorder stops when it reaches the beginning
of the file. Continue pressing the 0 button
to proceed with the review from the end of the
previous file.
h Locating the beginning of the file
While the recorder is during stop mode or playback
mode, press the 9 button.
• The recorder skips to the beginning of the next file.
While the recorder is during playback mode, press the
0 button.
• The recorder skips to the beginning of the current file.
While the recorder is during stop mode, press the 0
button.
• The reco rder skips to the b eginning of the p revious fil e. If the
recorder s top the midway of th e file, return to t he beginning
of the file.
While the recorder is during playback mode, press the
0 button twice.
Notes:
• When y ou skip to the begin ning of the le duri ng p lay bac k, t he r eco rde r wi ll st ar t pl ayb ack a t th e
position of an index mark or temp mark. The index mark and temp mark will be skipped when
you perform the operation in stop mode.
• When [Skip Space] set to othe r than [File Skip], the recorder will skip forward/reverse the speci ed
time, then will star t playback.
• The recorder skips to the beginning of the previous file.
- -
6
 Loading...