


WS-802
Register your product on www.olympus-consumer.com/register
and get additional benefits from Olympus!
DETAILED
INSTRUCTIONS
DIGITAL VOICE
RECORDER
Thank you for purchasing an Olympus
Digital Voice Recorder.
Please read these instructions for information
about using the product correctly and safely.
Keep the instructions handy for future reference.
To ensure successful recording, we recommend that
you test the record function and volume before use.
EN

2
EN
Introduction
• The contents of this document are subject to change without notice. Contact our
Customer Support Center for the latest information relating to product names and model
numbers.
• Illustrations of the screen and the recorder shown in this manual may dif fer from the
actual product. The utmost care has been taken to ensure the integrity of this document
but should you happen to find a questionable item, error or omission, please contact our
Customer Support Center.
• Olympus does not accept any liability for passive damages or damage of any kind incurred
due to data loss resulting from a defect of the product, repair performed by a third party
other than Olympus or an Olympus authorized service station, or for any other reason.
Trademarks and registered trademarks
• IBM and PC/AT are trademarks or registered trademarks of International Business
Machines Corporation.
• Microsoft, Windows and Windows Media are registered trademarks of Microsoft
Corporation.
• Macintosh and iTunes are trademarks of Apple Inc.
• microSD and microSDHC are trademarks of SD Card Association.
• MPEG Layer-3 audio coding technology is licensed from Fraunhofer IIS and Thomson.
• The product was developed based on noise-canceling technology under license from NEC
Corporation.
• Voice Activity Detection technology is licensed from NTT Elec tronics Corporation.
Other product and brand names mentioned herein are the trademarks or registered
trademarks of their respec tive owners.

3
1
2
3
4
5
6
Introduction
Safet y precaut ions ............................................ 4
1 Getting started
Main fe atures .................................................... 8
Identi ficatio n of parts ......................................10
Display (LC D panel) .................................................. 11
Power sup ply .................................................... 14
Inser ting the bat tery ...............................................14
Batte ry setti ngs .......................................................15
Chargin g by connecti ng to a computer v ia USB ...... 16
Connec ting the USB-t ype AC adapter
(optiona l) to charge ..........................................17
Turning on/o ff the power ........................................19
HOLD ................................................................20
Setti ng the time an d date [Time & D ate] ...........21
Changin g the time and dat e ....................................22
Inser ting and ej ecting a mic roSD card ...............23
Inser ting a microSD c ard .........................................23
Eject ing a microSD car d ........................................... 24
[Home] dis play operat ions ................................25
Notes on t he folders .........................................26
About th e folders fo r voice record ings .................... 26
About th e folders fo r music playba ck .....................27
Selec ting fold ers and fi les ................................28
2 About recording
Record ing .........................................................29
Changin g the recordi ng scene [Rec Sc ene] .............32
Recomme nded sett ings accordi ng to
the reco rding condi tions ................................... 33
Record ing from an ex ternal micr ophone or
other dev ice .......................................................34
3 About playback
Playback ..........................................................36
Search ing for a file ..................................................40
Changin g the playback s ound .................................41
Sett ing an index mar k or a temp mark ................... 42
How to beg in segment rep eat playback .................43
Changin g the playback s cene [Play Scene] .............44
Erasi ng .............................................................45
Erasing f iles .............................................................45
Erasing a f older ........................................................45
4 About the FM radio
(WS-803 only)
Using th e FM radio ............................................47
FM radio mo de operati ons ............................... 48
Preset ting radio s tations aut omatically
[Auto-pr eset] ....................................................49
Changin g the recepti on mode ................................50
Adding a r adio statio n .............................................51
Record ing from th e FM radio.............................52
5 Menu setting
Menu set ting meth od ....................................... 53
+ File Menu ............................................................55
, Rec Menu ............................................................56
- Play Menu ...........................................................61
. LCD/Sound M enu................................................64
/ Device Me nu .......................................................65
FM Menu .............................................................67
Extr act voice po rtions fro m file [Voice D etect] .......6 8
Rearra nging file s [Replace] .....................................69
Moving /Copying fil es [Move/Copy] ........................70
Dividi ng files [Fil e Divide] .......................................72
Changin g the USB class [USB Se ttings] ...................73
Format ting the rec order [Forma t] ..........................74
6 Using the recorder on your PC
Opera ting envir onment ....................................77
Connec ting to your P C .......................................79
Discon necting f rom your PC ....................................80
Transfe r voice file s to your PC ...........................81
Usage as e xternal m emory of th e PC .................82
7 Other information
Alarm m essage lis t ...........................................83
Trouble shooti n g ...............................................85
Access ories (optio nal) ...................................... 88
Speci ficatio ns...................................................89
Technic al assist ance and sup port ......................94
7
EN
Table of contents

4
EN
Before using you r new recorder, read this
manual c arefully to ens ure that you know
how to operate it safely and correctly.
Keep thi s manual in an easily accessible
location for future reference.
• The warning symbols indicate important
safety related information. To protect
yourself and others from per sonal injury
or damage to property, it is essential
that you always read the warnings and
information provided.
Cautions relating to the operating
environment
• To protect the high-precision
technology contained in this
product, never use or store the
recorder in any of the following
environments:
• Places where temperatures and/or
humidit y are high or undergo extreme
changes, such as direct sunlight,
beaches, locked cars, or near other
heat sources (stove, radiator, etc.) or
humidifiers.
• In sandy or dusty environments.
• Near flammable items or explosives.
• In wet places, such as bathrooms or in
the rain.
• In places prone to strong vibration.
• Never drop the recorder or subject
it to severe shock or vibration.
• The recorder may malfunction
if it is used in a location where
it is subject to a magnetic/
electromagnetic field, radio waves,
or high voltage, such as near a
TV set, microwave, video game,
loud speakers, large monitor unit,
TV/radio tower, or transmission
towers. In such cases, momentarily
turn the recorder off before further
operation.
• Avoid recording or playing back
near cellular phones or other
wireless equipment, as they may
cause interference and noise. If
you experience noise, move the
recorder further away from such
equipment.
• Do not use organic solvents such
as alcohol and lacquer thinner to
clean the unit.
Safety precautions
f Danger
If the product is used without
observing the information given
under this symbol, serious injury
or death may result.
f Warning
If the product is used without
observing the information given
under this symbol, injury or
death may result.
f Caution
If the product is used without
observing the information
given under this symbol, minor
personal injury, damage to the
equipment, or loss of valuable
data may result.

5
EN
Safety precautions
Precautions r elating to reception:
• Radio reception will vary substantially
depending on where you are using the
radio. If the reception is poor, try moving
the recorder near to a window and away
from electrical products such as cellular
phones, televisions, fluorescent lights etc.
Warning r egarding data l oss:
• Recorded content in memory may be
destroyed or erased by operating errors,
unit malfunction, or during repair work.
It is recommended to back up and save
important content to other media such as
a computer hard disk.
• Olympus does not accept any liability for
passive damages or damage of any kind
incurred due to data loss resulting from a
defect of the product, repair performed
by a third par ty other than Olympus or an
Olympus authorized service station, or
for any other reasons.
Handling the recorder
f Warning:
• Do not use the recorder near
flammable or explosive gases.
• Keep young children and infants
away from the recorder.
Always use and store the recorder out of
the reach of young children and infants
to prevent the following dangerous
situations which could cause serious
injury:
1 Becoming entangled in the recorder
strap, causing strangulation.
2 Accidentally swallowing the battery,
cards or other small parts.
3 Accidentally being injured by the
moving par ts of the recorder.
• Do not use or store the recorder in
dusty or humid places.
• Do not disassemble, repair or
modify the unit yourself.
• Use microSD/microSDHC memory
cards only. Never use other types
of cards.
If you accidentally insert another type
of card into the recorder, contact an
authorized distributor or service center.
Do not try to remove the card by force.
• Do not operate the unit while
driving or riding a vehicle (such as
a bicycle, motorcycle, or car).
f Caution:
• Stop using the recorder
immediately if you notice any
unusual odors, noise, or smoke
emanating from it.
Never remove the batteries with bare
hands. Doing so may cause a fire or burn
your hands.
• Be careful with the strap.
Be careful with the strap when carrying
the recorder. It could easily catch on
something and cause serious damage.
• Do not leave the recorder where it
may be subject to extremely high
temperatures.
Doing so may cause parts to deteriorate
and, in some circumstances, cause the
recorder to catch fire. Do not cover (such
as with a blanket) the charger or AC
adapter while it is being used. This could
cause overheating, resulting in fire.
• Handle the recorder with care to
avoid getting a low-temperature
burn.
• If the recorder contains metal par ts,
overheating can result in a low-
temperature burn. Note the following:
• When used for a long period, the
recorder will get hot. If you hold the
recorder while it is hot, you may suffer
a low-temperature burn.

6
EN
Safety precautions
• In places subject to ex tremely cold
temperatures, the temperature of
the recorder may be lower than the
ambient temperature. If possible, wear
gloves when handling the recorder in
cold temperatures.
Battery handling precautions
Follow these important guidel ines
to prevent batteries from l eaking,
overheating, burning, exploding, or
causin g electrical shock or b urns.
f Danger:
• Do not attempt to recharge
alkaline, lithium or any other non-
rechargeable batteries.
• Batteries should never be exposed
to flame, heated, short-circuited or
disassembled.
• Never heat or incinerate batteries.
• Take precautions when carrying or
storing batteries to prevent them
from coming into contact with any
metal objects such as jewelry, pins,
fasteners, etc.
• Never store batteries where they
will be exposed to direct sunlight,
or subjected to high temperatures
in a hot vehicle, near a heat source,
etc.
• To prevent causing battery leaks
or damaging their terminals,
carefully follow all instructions
regarding the use of batteries.
Never attempt to disassemble a
battery or modify it in any way by
soldering it, etc.
• Do not connect the battery directly
to a power outlet or the cigarette
lighter in an automobile.
• If battery fluid gets into your eyes,
flush your eyes immediately with
clean, cold running water and seek
medical attention immediately.
f Warning:
• Keep batteries dry at all times.
• If rechargeable batteries have
not been recharged within the
specified time, do not use them.
• Do not use a battery if it is cracked
or broken.
• Never subject batteries to strong
shock or continuous vibration.
• If a battery leaks, becomes
discolored or deformed, or
becomes abnormal in any other
way during operation, stop using
the recorder.
• If a battery leaks fluid onto your
clothing or skin, remove the
clothing and flush the affected
area with clean, cold running water
immediately. If the fluid burns
your skin, seek medical attention
immediately.
• Keep batteries out of the reach of
children.
• If you notice anything unusual
when using this product, such as
abnormal noise, heat, smoke, or a
burning odor:
1 remove the battery immediately,
taking care not to burn yourself, and;
2 call your dealer or local Olympus
representative for service.

7
EN
Safety precautions
f Caution:
• Please recycle batteries to help
save our planet’s resources. When
disposing of dead batteries, be
sure to cover their terminals and
always observe local laws and
regulations.
• Always charge a rechargeable
battery before using it for the first
time, or if it has not been used for a
long period.
• Rechargeable batteries have a
limited life. When the recorder's
operating time becomes
notably shorter even after the
rechargeable battery is fully
charged under the specified
conditions, replace the battery
with a new one.

8
1
EN
Main features
Main features
s The Built-in Stereo FM tuner
means you can use the recorder
as a radio (WS-803 only) ( ☞ P. 4 7).
s It supports the linear PCM format,
which is capable of recording
sound quality equivalent to
that of CDs (WS-803, WS-802
only) ( ☞ P. 5 6 ) .
s It supports a wide range of
recording formats, including the
MP3 format (MPEG-1/MPEG-2
Audio Layer 3) and the Windows
Media Audio (WMA) format
( ☞ P. 56).
s You can play back WAV*, WMA,
and MP3 format files transferred
from a computer in addition to
files recorded by the device itself.
This allows you to use this recorder as a
music player.
* WS- 803, WS-802 only.
s It supports high capacity
recording media. Besides the
internal memory, you can also
record into a microSD card
( ☞ P. 23) .
s A directional microphone feature
has been included that allows
switching between broad stereo
recording and recording with a
highly directional quality
(WS-803 only) ( ☞ P. 57 ) .
s It is equipped with a variety
of features that support audio
recording.
With this recorder you can customize a
variety of recording functions such as the
recording sensitivity to suit the recording
conditions and personal preferences
( ☞ P. 5 6 ) .
s It has a built-in Variable Control
Voice Actuator (VCVA) function
( ☞ P. 57) .
s The Low Cut Filter minimizes air
conditioner noise and similar
noises while recording ( ☞ P. 57 ) .
s It has recording scene setting and
playback scene setting functions
to register the best setting
according to the use ( ☞ P.32,
P.4 4, P. 59, P. 63 ).
s It is equipped with the [
Calendar
Search
] function, convenient for
searching for files ( ☞ P. 4 0) .
s It features a [
Voice Detect
]
function, which extracts just the
voice portions from a recorded
audio file, and a [
Voice Play back
]
function, which plays back just
the extracted voice portions
( ☞ P.61, P.6 8).
s It also features a [
Voice Balance r
]
function, which compensates
for the low-volume portions of a
recorded audio file, making them
louder and therefore easier to
understand ( ☞ P. 6 1) .
Getting started

9
1
EN
Main features
Main features
s A Noise Cancel function ( ☞ P.61)
and a Voice Filter function*
( ☞ P.61) cut noise and enable
clear audio playback.
* WS-801 only.
s It features various repeat
functions ( ☞ P.43, P. 62 ).
s You can change the playback
equalizer settings ( ☞ P.62) .
s You can move or copy files
between the internal memory
and microSD card, and within the
folders in the memory (WS-803,
WS-802 only) ( ☞ P. 70).
s You can divide files (PCM*, MP3)
that have been recorded with this
recorder into two files ( ☞ P. 7 2 ).
* WS- 803, WS-802 only.
s Index mark and temp mark
features allow you to quickly find
desired locations ( ☞ P. 42 ) .
s The playback speed and tone*
can be controlled ( ☞ P.41).
* WS- 803, WS-802 only.
s This recorder is compatible
with USB 2.0, enabling fast data
transfer to a computer.
s It has a USB charging function
(WS-803, WS-802 only) ( ☞ P.16 ) .
s It has a backlight full-dot display
(LCD panel).
10
1
*
7
8
6
4
(
w
1
2
)
-
q
=
5
3
$
^
&
%
9
0
!
@
#
EN
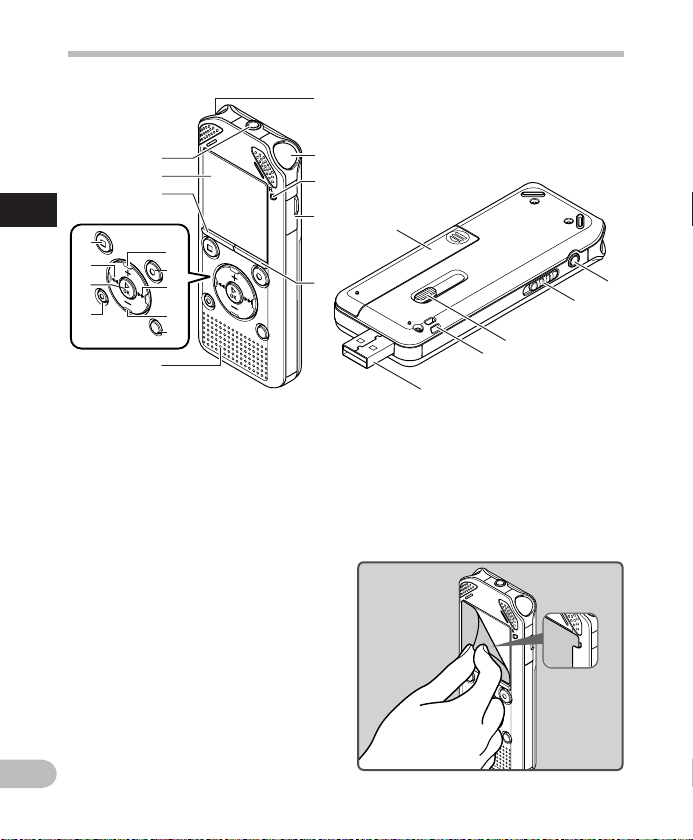
Identification of parts
Identification of parts
1 Built-in stereo microphone (L)
2 Built-in stereo microphone (R)
3 LED indicator light (LED)
4 Card cover
5
LIST
button
6
MIC
(Microphone) jack
7 Display (LCD panel)
8
MENU
button
9
+
button
0
REC
( s ) (Record) button
! 9 button
@
–
button
#
SCENE
/
INDEX
button
$
STOP
( 4 ) button
% 0 button
^ `
OK
button
&
ERASE
button
* Built-in speaker
( Battery cover
)
EAR
(Earphone) jack
-
POWER
/
HOLD
switch
= USB connector slide lever
q Strap hole
w USB connector
• Remove the screen protector from the
display.

11
1
12 3
4
7
5
6
8
9
0
!
EN
Identification of parts
4
12 3
4
12 3
Identification of parts
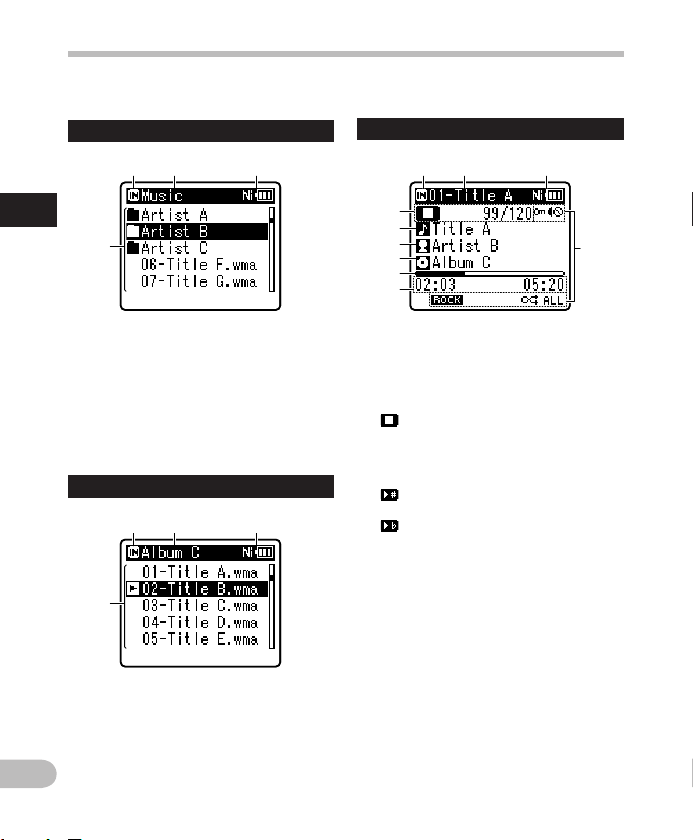
Display (LCD panel)
4 [
Recorder
] mode display:
Folder list display
1 Recording media indicator
[ l ]: Internal memory
[ m ]: microSD card
2 Current folder name
3 Battery indicator
4
Folder name
Fil e list disp lay
1 Recording media indicator
2 Current folder name
3 Battery indicator
4
File name
File display
1 Recording media indicator
2 Current file name
3 Battery indicator
4 Folder indicator, Recording mode
indicator, File Lock indicator
5 Recorder status indicator
[ K ]: Record indicator
[ ≠ ]: Pause indicator
[
]: Stop indicator
[ • ]: Play indicator
[ ß ]: Forwarding indicator
[ ™ ]: Rewinding indicator
[ N ]: F. Play indicator
[ M ]: S. Play indicator
[
]: Change playback tone indicator
(sharp)
[
]: Change playback tone indicator
(flat)
6 Remaining memory bar indicator,
Playback position bar indicator
7 Icon display ( ☞ P.13)
8 Current file number/ Total
number of recorded files in the
folder
9 Elapsed recording time,
Elapsed playback time
0 Remaining recording time,
File length
! Level meter,
Recording date and time
12
1
4
12 3
12 3
5
4
6
9
0
7
8
EN
Identification of parts
12 3
4
Identification of parts
1 Recording media indicator
[ l ]: Internal memory
[ m
]: microSD card
2 Current folder name
3 Battery indicator
4 Folder name, File name
File display
4 [
Music
] mode display:
Lis t display 1
When t here are files a nd
folder s in the folder
Lis t display 2
1 Recording media indicator
2 Current folder name
3 Battery indicator
4 File name
When t here are only fi les in
the folder
1 Recording media indicator
2 Current file name
3 Battery indicator
4 Recorder status indicator
[ • ]: Play indicator
[
]: Stop indicator
[ ß ]: Forwarding indicator
[ ™ ]: Rewinding indicator
[ N ]: F. Play indicator
[ M ]: S. Play indicator
[
]: Change playback tone indicator
(sharp)
[ ]: Change playback tone indicator
(flat)
Current file number/ Total
number of recorded files in the
folder
5 T i t l e n a m e
6 Artist name
7 Album name
8 Playback position bar indicator
9 Elapsed playback time,
File length
0 Icon display ( ☞ P.13)
13
1
EN
Identification of parts
Identification of parts
4
3
5
6
1 2
Icon display (For all modes)
[ Ø ]: Speaker muting
[
]: Voice Playback *1
[
]: Voice Detect *1
[ ? ]: Rec Level
[ û ]: VCVA
[ Æ ]: Voice sync
[ ù ]: Equalizer
*1 WS- 803, WS-802 only. *2 WS -803 only. *3 WS- 801 only.
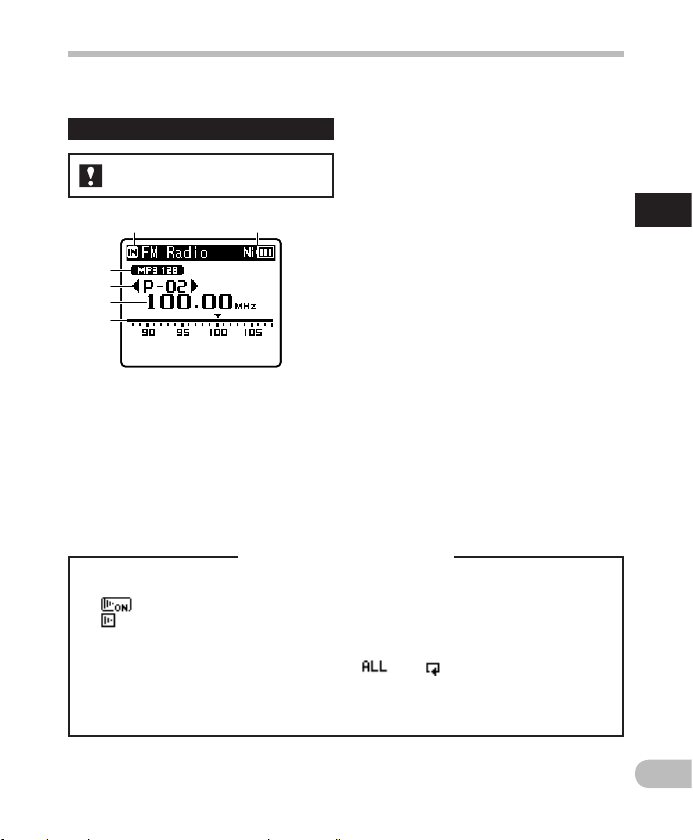
1 Recording media indicator
2 Battery indicator
3 Recording mode indicator
4 Preset number
5 Tuning frequency
6 Frequency bar indicator
4 [ FM Radio ] mode display:
Rad io recept ion displ ay
[ 0 ]: Low Cut Filter
[ ≤ ]: Zoom Mic *2
[ % ]: Noise Cancel
[ $ ]: Voice Balancer *1
Voice Filter *3
[
] [ á ] [ ]: Playback mode
For WS-803:
14
1
EN
Power supp ly
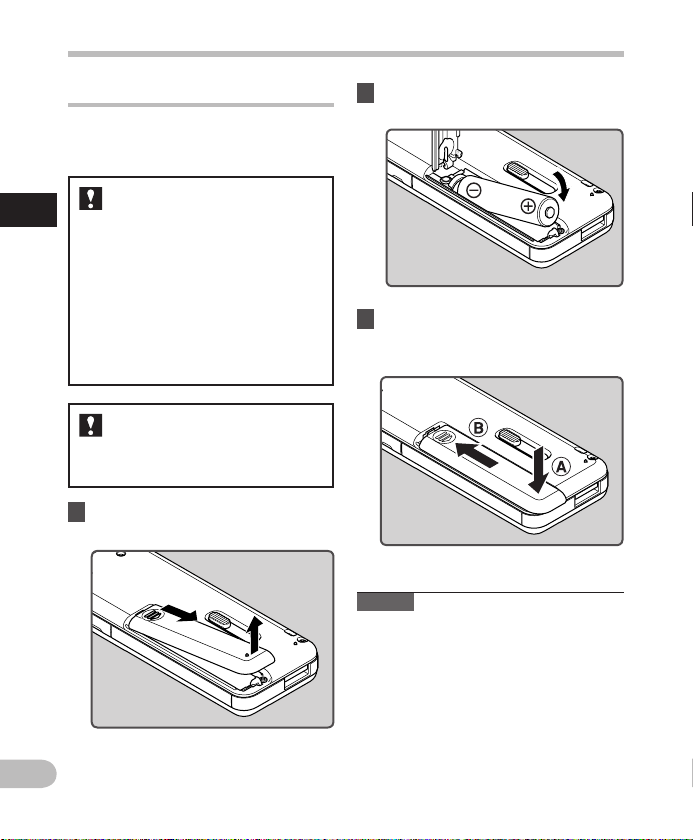
2 Insert the battery, observing the
= and - polarities.
3 Close the batt ery cover comple tely
by pressing down at A , then
sliding the cover towards B .
Power supply
Inserting the battery
This recorder can be used with either a
Ni-MH rechargeable battery or AAA alkaline
battery.
• When charging the recorder, make
sure that the supplied Ni-MH
rechargeable battery (BR404) is in
place.
• The supplied rechargeable battery
is not fully charged. Before using
the recorder or after long periods of
disuse, it is recommended that you
continuously charge the batter y until
full ( ☞ P.16 ).
For WS-803, WS-802:
This recorder cannot charge the
rechargeable battery.
For WS-801:
1 Lightly press down on the arrow
and slide the battery cover open.
Notes
• A manganese batter y cannot be used in
this recorder.
• When the battery is changed, a AAA
alkaline batter y or Olympus Ni-MH
rechargeable battery is recommended.
• Be sure to stop the recorder before
replacing the battery. Unloading the
batter y while the recorder is in use may
cause a malfunction resulting in the
corruption of the file, etc. If you take out
the battery during recording, you will
lose your currently recorded file because
the file header will not be able to close.
15
1
EN
Power supp ly
Power supply
Battery indicator
• When [ ] appears on the display,
charge or replace the battery as soon
as possible. When the battery has
insuff icient power to operate the
recorder, [
] and [ Battery low ]
appear on the display and the
recorder shuts down.
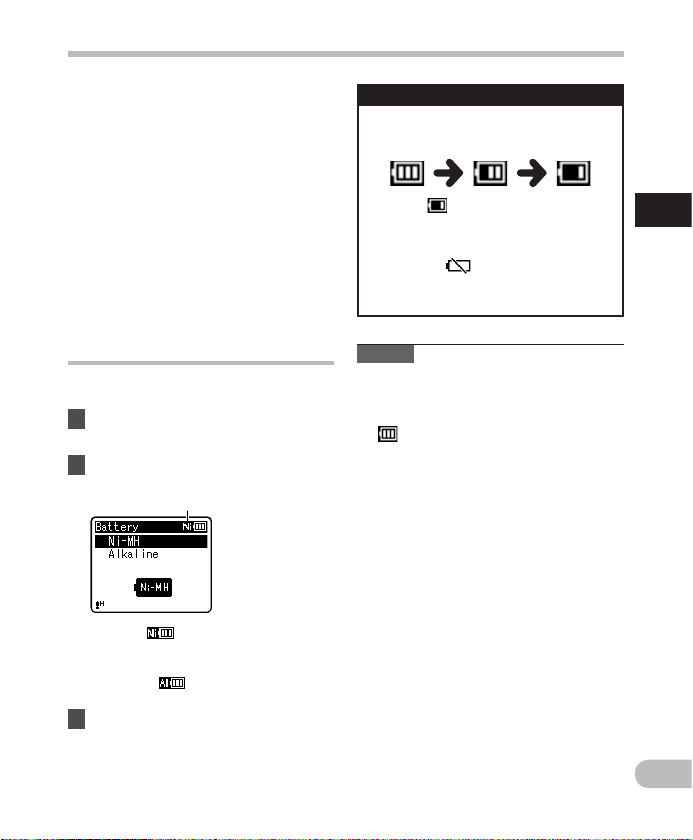
Battery settings
Select the battery type to match the bat tery
you are using.
1 Replace the battery and turn on
the recorder ( ☞ P.14, P.19) .
2 Press the + or − button to change
the setting.
[ Ni-MH ] ( ):
Select when using the Olympus
Ni-MH rechargeable battery (BR404).
[ Alkaline ] (
):
Select when using an alkaline batter y.
3 Press the `
OK
button to
complete the setting.
• If the “ Hour ” indicator f lashes in the
display, see “ Setti ng the time and
date [ Time & Date ] ” ( ☞ P. 21).
The battery indicator on the display
changes as the batter y loses power.
Battery type
Note
• When a voice/music file is played,
depending on the volume level the
recorder may be reset due to a drop in
the voltage output of the batter y even if
[
] is displayed in the battery indicator.
In this case, lower the volume of the
recorder.
• If it takes longer than 15 minutes to
replace the dead battery or if you take
the battery in and out repeatedly at shor t
intervals, you may have to re-enter the
batter y and time settings. In this case,
[ Battery ] screen will appear. For more
details, see “ Battery settings ”.
• Remove the battery if you are not going
to use the recorder for an ex tended
period of time.
• When replacing the rechargeable battery,
be sure to use a Ni-MH rechargeable
batter y (optional). The use of other
manufac turers’ products can damage the
recorder and should be avoided.
16
1
EN
Power supply
Power supp ly
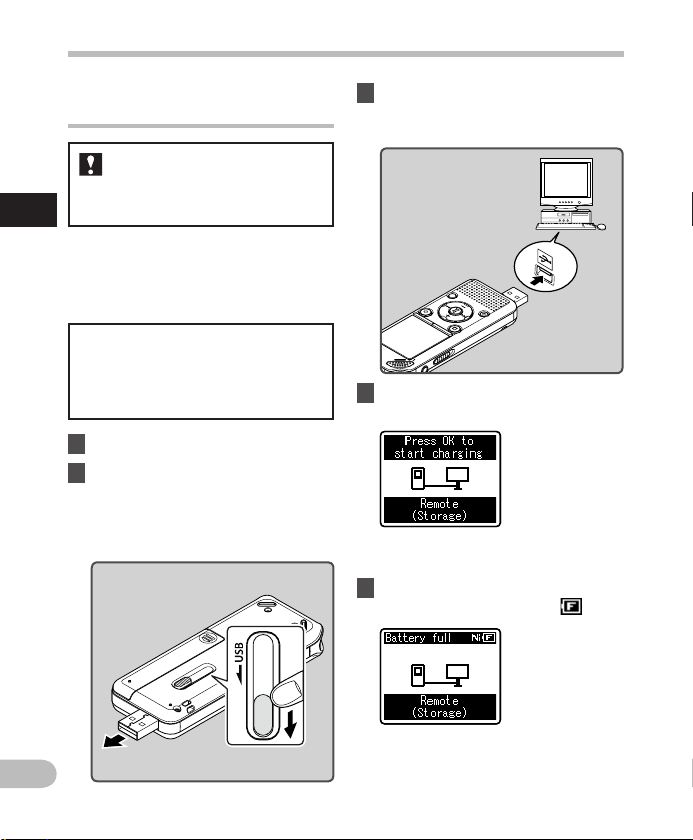
Charging by connecting to a
computer via USB
You can charge the battery by connecting
to a PC’s USB port. When charging, be sure
to place the rechargeable batter y (supplied)
correctly into the recorder ( ☞ P.14 ).
1 Boot the PC.
2 Slide the USB connector slide
lever in the direction indicated
by the arrow so that the USB
connector protrudes from the
recorder.
Do not cha rge a primary battery such
as an alka line or lithium batter y. It
may cause b attery leakage or heating,
which may c ause the recorder to
malfunction.
For WS-803, WS-802:
3 Make sure that the recorder is in
stop mode, and connect to the
PC’s USB port.
4 Press the `
OK
button to start
charging.
• While [ Press OK to start chargi ng ] is
flashing, press the ` OK button.
5 Charging is completed when the
battery indicator shows [ ].
Before connecting via USB, exit HOLD
mode ( ☞ P. 20) .
Charging time: approximately 3 hours *
* This is the approximate time when
charging the rechargeable battery
fully from flat at room temperature.
17
1
EN
Power supp ly
Power supply
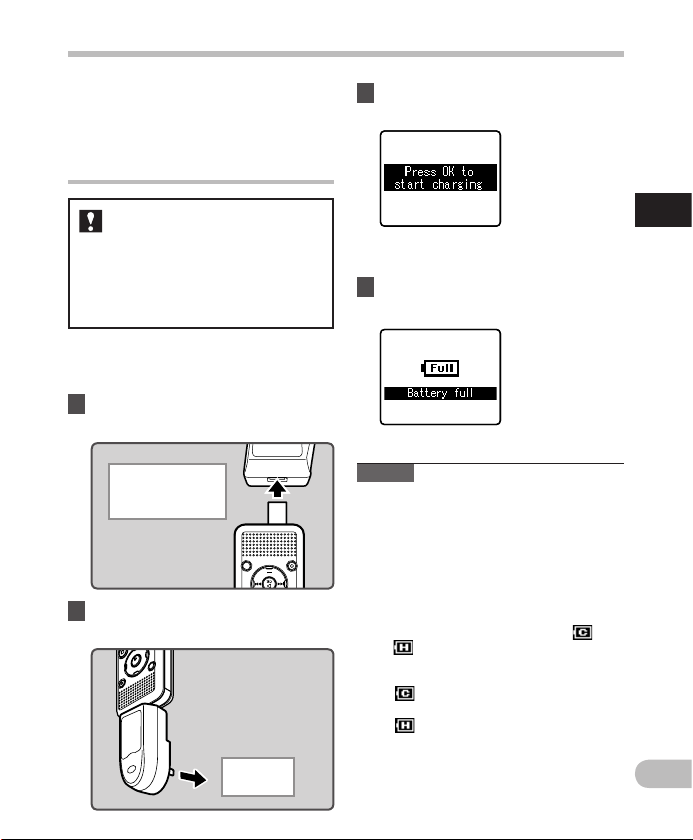
Connecting the USB-type AC
adapter (optional) to charge
You can charge the recorder by connecting
it to the USB-t ype AC adapter (A514)
(opti onal).
For WS-803, WS-802:
2 Plug the AC adapter into the AC
outlet.
To the AC
outlet
To the USB- type AC
adapter ’s (A514)
USB connector
• Before connecting the AC adapter,
switch the USB connection setting to
[ AC Adapter ] ( ☞ P. 7 3).
• Before connecting via USB, exit HOLD
mode ( ☞ P. 20) .
1 Plug the recorder into the AC
adapter’s USB port.
3 Press the `
OK
button to start
charging.
• While [ Press OK to start chargi ng ] is
flashing, press the ` OK button.
4 Charging is completed when
[
Batter y full
] is displayed.
The charging time depends on the
amount of remaining power and the
state of the battery.
Notes
• The recorder cannot be charged if the PC
is not turned on, or if the PC is in standby,
hibernate, or sleep mode.
• Do not charge the recorder with the USB
hub connected.
• Insert the supplied rechargeable battery
and set [ Battery ] to [ Ni-MH ]. If [ Battery ]
is set to [ Alkaline ], you cannot recharge
( ☞ P.15 , P. 65 ).
• You cannot charge the battery if [
] *1
or [
] *2 is blinking. Charge the batter y
at a temperature in the range of 5°C to
35°C (41°F to 95°F).
*1 [
]: The surrounding temperature is
too low.
*2 [ ]: The surrounding temperature is
too high.
• When the recorder’s operating time
becomes notably shorter even af ter
the battery is fully charged, replace the
batter y with a new one.

18
1
EN
Power supply
Power supp ly
Cautions concerning the rechargeable
battery
Read the following descriptions carefully
before using the Ni-MH rechargeable
battery.
Discharging:
The rechargeable battery self-discharges
while not in use. Be sure to charge it fully
before use.
Operating temperature:
The rechargeable battery is a chemical
product. The efficiency of the rechargeable
batter y may fluctuate even when
the battery is operating within the
recommended temperature range. This is an
inherent nature of such products.
Recommended t emperature ra nge:
When operating the reco rder:
0°C - 42°C/ 32°F - 107.6°F
Charging:
5°C - 35°C/ 41°F - 95°F
Storage f or a long period:
–20°C - 30°C/ –4°F - 86°F
Using the rechargeable batter y outside
the above temperature range may result in
declining efficiency and a shorter battery
life. In order to prevent battery leakage or
rust, remove the rechargeable battery from
the recorder when you will not be using it
for a long time, and store it separately.
Notes
• This recorder is designed to fully charge
the battery regardless of its energy level.
However, for best results when charging
a newly purchased rechargeable batter y
or a battery that has not been used for
a long time (more than one month), it
is recommended to repeat the process
of fully charging the battery and then
letting it discharge 2 to 3 times.
• Use the dedicated USB cable. If any other
company’s cable is used, it may lead to
malfunc tion of the recorder. Also, never
use this dedicated cable with any other
company’s products.
• If you would like to charge the recorder
using the [ Composite ] setting, select
[ Optional ] in the USB connection
settings, then connect the recorder to a
PC. Selecting [ AC Adapte r ] in the
[ USB Connection ] display will enable you
to charge the recorder ( ☞ P. 7 3 ).

19
1
EN
Power supp ly
Power supply
Turning on/off the power
When the recorder is not being used,
turn the power off to reduce battery
consumption. Existing data, mode settings,
and clock settings are not lost when the
power is turned off.
Turn ing on the powe r
While the recorder is turned off,
slide the
POWER
/
HOLD
switch in the
direction of the arrow.
• The power turns on.
Power save mo de
If the recorder is on but is not used for 10
minutes or longer (default), the display
shuts of f and the recorder goes into
power save mode ( ☞ P. 6 5).
• To exit power save mode, press any
button.
Turn ing off the p ower
Slide the
POWER
/
HOLD
switch in the
direction of the arrow, and hold it
for 0.5 seconds or longer.
• The power turns off.
• The resume function rememb ers the stop
position before the power is turned off.
• When disposing of the rechargeable
batter y, always observe the local laws and
regulations. Contact your local recycling
center for proper disposal methods.
• If the Ni- MH rechargeable battery is not
fully discharged, protect against short-
circuiting (e.g. by taping the contacts)
before disposal.

20
1
EN
HOLD
If you set the recorder to HOLD mode, the current settings will be preserved and all buttons
will be disabled. This feature is useful when the recorder has to be carried in a bag or pocket.
This mode can also prevent you from accidentally stopping recording.
Set ting the re corder to HO LD mode
Slide the
POWER
/
HOLD
switch to the
[
HOLD
] position.
• After [ Hold ] appears on the display, the
recorder is set to HOLD mode.
Notes
• If you press any button while the recorder is in HOLD mode, the clock display lights for 2
seconds, but the recorder does not operate.
• If HOLD is applied during playback (recording), operation is disabled with the playback
(recording) state unchanged (When playback has ended or recording has ended due to
the remaining memor y being used up, the recorder stops).
HOLD
Ex iting HOLD mod e
Slide the
POWER
/
HOLD
switch to the
A position.
21
1
EN
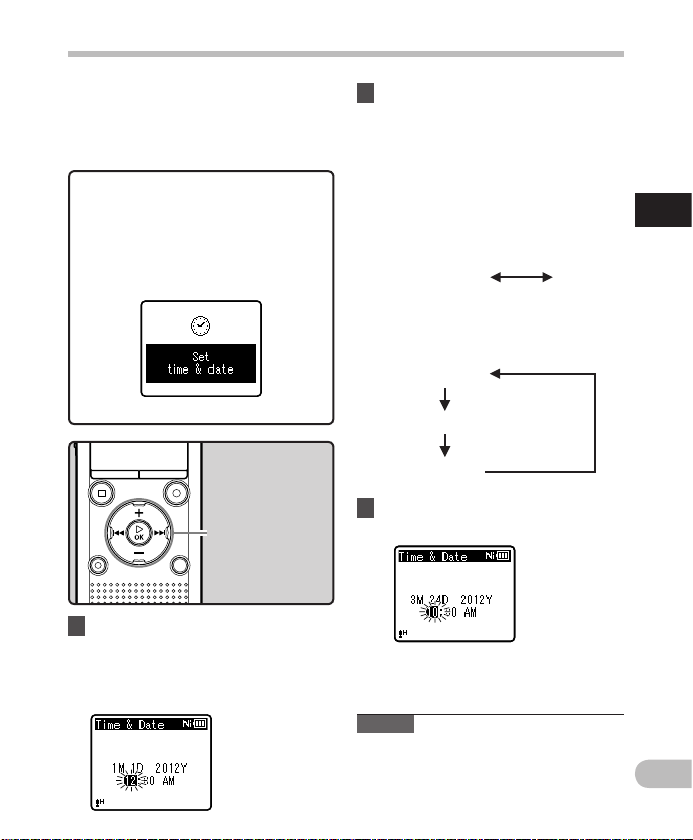
Setti ng the time and d ate
If you set the time and date before using
the recorder, recording time and date
information is automatically stored for each
file. Setting the time and date beforehand
enables easier file management.
When you use the recorder for the
first t ime, or when the batter y is
inser ted after the recorde r has not
been used for a long time, [
Set t ime
& date
] will app ear. When “
Hour
” is
flashing, conduct setup from Step 1.
1 Press the 9 or 0 button to
select the item you want to set.
• Select “ Hour ”, “ Minute ”, “ Ye ar ”,
“ Month ” or “ Day ” by moving the
flashing position.
2 Press the
+
or
−
button to change
the value.
• Follow the same steps by pressing the
9 or 0 button to select the next
item, and pressing the
+
or
−
button
to change the value.
• You can selec t between 12 and 24
hour display by pressing the LIST
button while setting the hour and
minute.
Exa mple: 10:38 P.M
10:38 PM
(Initial sett ing)
22:38
• You can selec t the order of “ Month ”,
“ Day ” and “ Ye ar ” by pressing the
LIST button while setting these items.
Exa mple: March 24, 2012
3M 24D 2 012Y
(Initial sett ing)
24D 3M 2 012Y
2012Y 3M 24D
Setting the time and date [ Time & Date ]
• The clock will star t from the set date
and time. Press the ` OK button when
you want the clock to star t.
Note
• If you press the ` OK button during the
setup operation, the recorder will save
the items that were set to that point.
3 Press the `
OK
button to
complete the setting.
+
−
button
9 0 button
`
OK
button

22
1
EN
Setti ng the time and d ate
Setting the time and date [Time & Date]
Changing the time and date
5 Press the `
OK
button.
• [ Time & Date ] appears on the display.
• “ Hour ” flashes on the display,
indicating the start of the Time and
Date setup process.
3 Press the `
OK
button to move
the cursor to the item you want
to set.
• [ Device Menu ] appears on the
display.
4 Press the
+
or
−
button to select
[
Time & Date
].
1 While the recorder is in stop
mode, press the
MENU
button.
• The menu will appear on the display
( ☞ P. 53 ) .
2 Press the
+
or
−
button to select
[
Device Menu
] tab.
• You can change the menu display by
moving the settings tab cursor.
While the recorder is in stop mode,
press and hold the STOP ( 4 ) button to
display [ Time & date ] and [ Remain ].
If the current time and date are not
correct, set them using the procedure
below.
The following steps are the same as
Step 1 through Step 3 of “ Setting the
time and d ate [ Time & Date ] ” ( ☞ P. 21).
6 Press the
STOP
( 4 ) button to
close the menu screen.
+
−
button
9 0 button
`
OK
button
STOP
( 4 ) but ton
MENU
button

23
1
EN
Inser ting and ejec ting a micr oSD card
The “microSD” indicated in the instruction
manual refers to both microSD and
microSDHC. This recorder enables you to
store data not only to the internal memory
but also to a commercially available microSD
card.
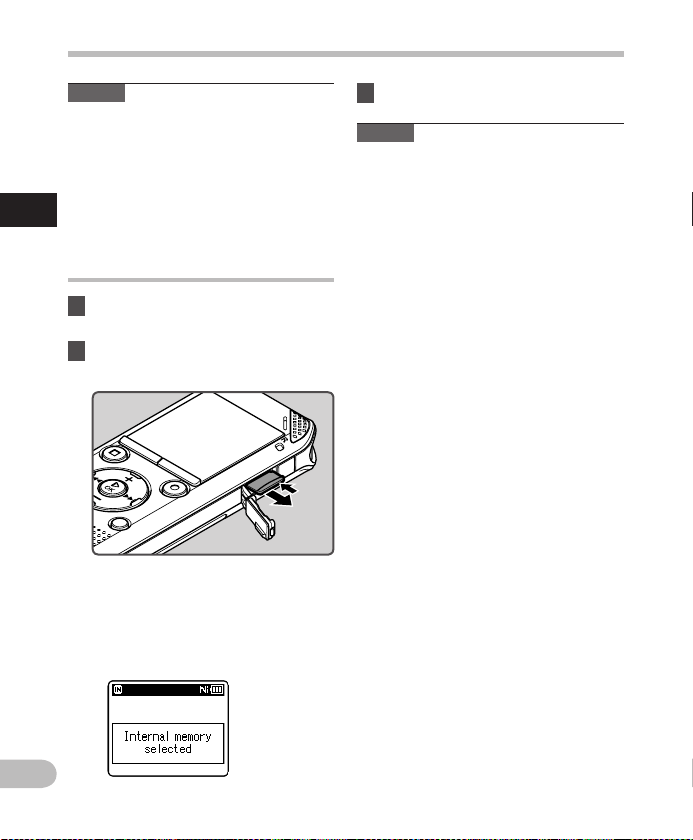
Inserting a microSD card
1 While the recorder is in stop
mode, open the card cover.
3 Close the card cover securely.
2 With the microSD card facing the
correct way, insert it into the card
slot as shown in the diagram.
• Insert the microSD card, keeping it
straight.
• Inserting the microSD card in the
wrong way or at an angle could
damage the contact area or cause the
microSD card to jam.
• If the microSD card is not inserted all
the way, data may not be recorded on
the microSD card.
• When you insert the microSD card,
the recording media changeover
display will appear.
4 To record on a microSD card,
press the
+
or
−
button and
select [
Yes
].
5 Press the `
OK
button to
complete the setting.
Inserting and ejecting a microSD card
24
1
EN
Inser ting and ejec ting a micr oSD card
Inserting and ejecting a microSD card
Notes
• It is possible to switch the recording
media over to the internal memory
( ☞ P. 65 ) .
• In some cases microSD cards that have
been formatted (initialized) by another
device, such as a computer, may not be
recognized. Be sure to format microSD
cards with this recorder before using
them ( ☞ P.74).
Ejecting a microSD card
1 While the recorder is in stop
mode, open the card cover.
2 Push the microSD card inward to
unlock it, and let it eject partially.
• The microSD card is visibly out of the
slot and can b e removed safely.
• If you ejec t the microSD card when
[ Memory Select ] is set to
[ microSD card ], [ Memory Select ]
will automatically change to
[ Internal memory selected ].
3 Close the card cover securely.
Notes
• Quickly moving your f inger away after
pushing the microSD card inward may
cause it to eject forcefully out of the slot.
• Some microSD cards or microSDHC
cards may not be recognized correc tly
depending on the manufacturer or type
of card due to compatibility issues with
this recorder.
• See the Olympus website for a list
of microSD cards that have been
confirmed to operate with this recorder
in conditions prescribed by Olympus.
The website http://olympus-imaging.
jp/ introduces manufacturers and
types of microSD cards confirmed to be
compatible. Please note, however, this
is not meant to guarantee that microSD
cards will operate. Some microSD cards
may not be recognized correctly due
to circumstances such as changes in
manufacturer specifications.
• If a microSD card is not recognized,
remove the microSD card and then insert
it again to see if the recorder recognizes
the microSD card.
• Always read the instruc tions that come
with your microSD card before using.
• Processing speed may be slower with
some types of microSD cards. Processing
performance may also be reduced due
to repeated writing and deleting. If that
happens, reformat the microSD card
( ☞ P. 7 4).
25
1
EN
[Home] display operations
[Home] display operations
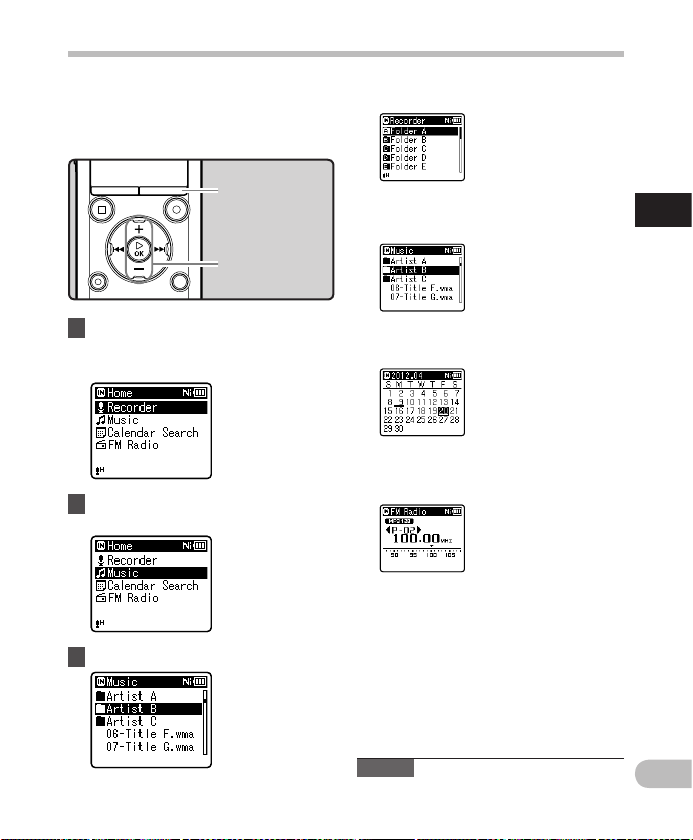
1 Press the
LIST
button repeatedly
to set the [
Home
] display.
• [ Home ] appears on the display.
When [
Recorder
] is selected: You can use the recorder not only as a voice
recorder and a music player but also as a
radio * .
* WS-803 only.
2 Press the
+
or
−
button to select
the mode.
When [
Calendar Search
]* is selected :
The re corder will go int o
[ Recorder ] mode. You wi ll
be able to r ecord and play
back fi les recorded by th e
recorder ( ☞ P. 2 9 , P. 3 6 ).
3 Press the `
OK
button.
Note
• During recording, you cannot switch the
mode without stopping the recorder.
LIST
button
+
−
button
`
OK
button
When [
Music
] is selected:
When [
FM Radio
]* is selected :
The re corder will go int o
[ Music ] mode , and you will
be able to p lay back music
files t ransferred to t he
recorder ( ☞ P. 3 6 ) .
The re corder will go int o
[ Calendar Search ] mo de,
and you can s earch for
files a ccording to the
recording date ( ☞ P. 4 0 ).
* WS- 803, WS-802 only
The re corder will go int o
[ FM Radio ] mode , and you
will be ab le to receive FM
radio ( ☞ P. 4 7).
* WS- 803 only
26
1
Home
Folder A
Folder B
Folder C
Folder D
001
002
003
004
200
Folder File
Recorder
Radio
Folder
Folder E
EN
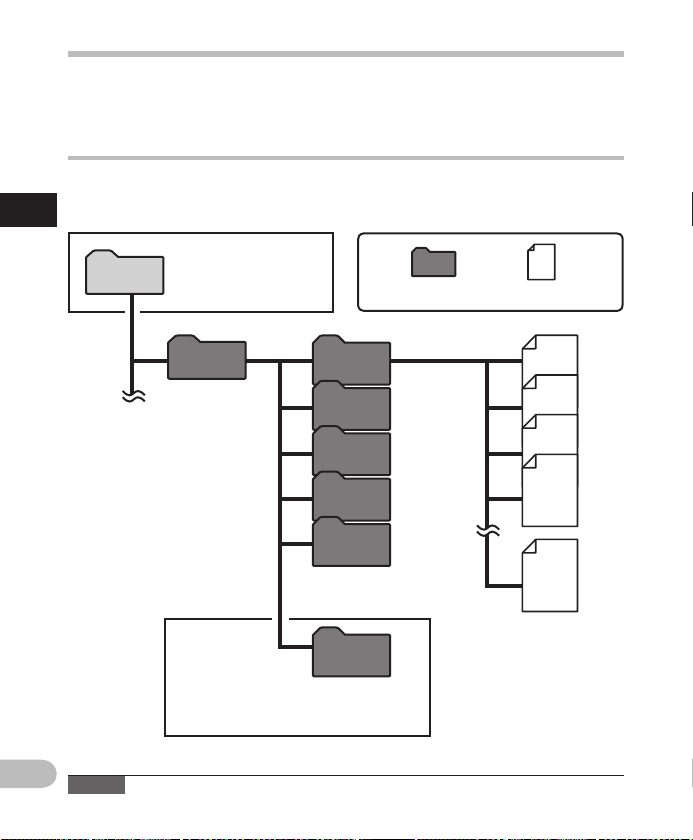
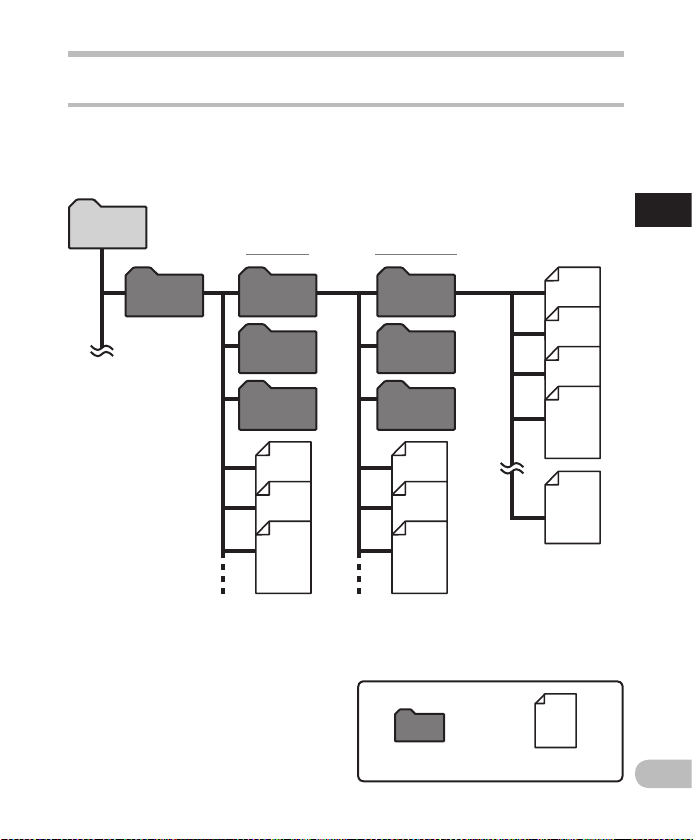
Notes on th e folders
Notes on the folders
The internal memory or a microSD card can be used as the recording media. Voice files and
music files are separated into folders for voice recordings and folders for music playback that
are organized and saved in a branching tree.
About the folders for voice recordings
[ Folder A ] - [ Folder E ] within the [ Recorder ] folder are the folders for voice recordings. When
recording with this recorder, select any one of the five folders and then record.
When yo u record from th e radio, the recor ded
file
will be st ored automatic ally in the
[ Radio Folder ] fol der (WS-803 o nly).
Beco mes the destinat ion for
microphone recording.
Note
• Files or folders located under the [ Recorder ] folder will not be indicated on the recorder.
You can chan ge the mode
on the [ Home ] display.
Each fo lder can store u p to
200 files .
27
1
Artist 01
Artist 02
Artist 03
001
002
003
004
200
Folder
File
Album 01
Home
Music
Album 02
Album 03
EN
Notes on th e folders
Notes on the folders
About the folders for music playback
When music f iles are transferred to the device using Windows Media Player, a folder is
automatically created within the music playback folder which has a layered structure as
shown in the diagram below. Music files that are in the same folder can be rearranged in
preferential order and replayed ( ☞ P. 69) .
Each fo lder can store
up to 200 f iles.
Up to 300 * folder s can be created un der the [ Music ]
folder, including [ Music ].
* For WS -801: 128 folder s.
First layer Second layer
28
1
EN
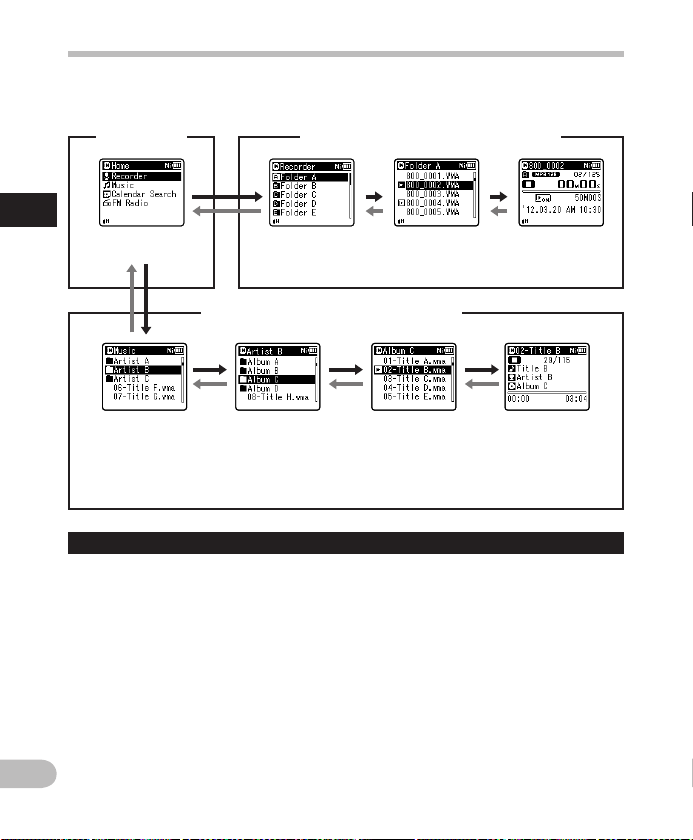
Selec ting folde rs and files
Change folders while the recorder is stopped or during play. For information on the layered
structure of the folders, see the sec tion entitled “ Notes on the folders ” (
☞ P. 26) .
Mov ing throug h the levels
}
Return
:
LIST
button
Each time you press this button, you
move up one level. The 0 button can
also ser ve as the LIST button on a list
display.
• If you press and hold the LIST button
while moving in a hierarchy of folders,
you will return to the file display.
{
Proceed
: `
OK
button
Each time you press this button, you
open the folder or f ile selected in the list
display and proceed down one level.
• The 9 button can also serve as the
` OK button on a list display.
Selecting folders and files
Ope ration of the f olders for vo ice recordi ngs
Ope ration of the f olders for mu sic playbac k
[
Home
] display
Folder list
display
File list displ ay File display
Folder list
display
(First layer)
Folder list
display
(Second l ayer)
File list displ ay File disp lay
Example:
WS-803
When [ Music ] folder is selected.
+
or
–
button
Select a folder or file.
[
Home
] display:
This display allows the mode of the
recorder to be changed ( ☞ P. 2 5 ) .
List display:
The folders and files stored in the
recorder are displayed.
File display:
Information about the selec ted file is
displayed. The recorder is in playback
standby mode.

2
29
d
b
a
c
a
e
f
EN
Recording
About recording
Notes
• To ensure that you do not lose the
beginning of the recording, verify that
the LED indicator light or the mode
indicator is lit on the display.
• When the remaining recording time is
less than 60 seconds, the LED indicator
light starts flashing. When the remaining
recording time drops to 30 and then 10
seconds, the light flashes faster.
1 Select a recording folder
( ☞ P. 26).
2 Press the
REC
( s ) button to start
recording.
• The LED indicator light turns on and
[ K ] appears on the display.
• Turn the microphone in the direction
of the source to be recorded.
a Recording mode indicator
b Elapsed recording time
c Remaining memory bar indicator
d Remaining recording time
e Level meter (changes according to
the recording level and recording
function settings)
f File length
Before starting recording, select a folder
among [ & ] to [ * ]. These five folders can be
used to categorize recorded information
according to t ype; for example, Folder [ & ]
might be used to store private information,
while Folder [ ' ] might be dedicated to
holding business information.
Recording
REC
( s ) button
STOP
( 4 ) but ton
• [ Rec Mode ] cannot be changed in
recording standby mode or while
recording. Configure this while the
recorder is stopped ( ☞ P. 5 6) .
• The proper position of the built-in
stereo microphone for performing
stereo recording is over the display. If
the microphone is below the display
during recording, proper stereo
recording is impossible because the
original sound will be recorded in
reverse phase.
3 Press the
STOP
( 4 ) button to stop
recording.
• [ L ] appears on the display.
 Loading...