


DIGITAL VOICE RECORDER
WS-500M/WS-400S
EN INSTRUCTIONS
FR MODE D’EMPLOI
ES INSTRUCCIONES
PT INSTRUÇÕES
Thank you for purchasing an Olympus Digital Voice Recorder. Please read these instructions for information about using the product correctly and safely. Keep the instructions handy for future reference. To ensure successful recordings, we recommend that you test the record function and volume before use.
Gracias por haber comprado la grabadora digital de voz Olympus Digital Voice Recorder. Lea estas instrucciones para obtener información sobre el uso correcto de este producto y para su seguridad. Guarde estas instrucciones en un lugar a mano para su referencia en el futuro. Para tener éxito en las
grabaciones se recomienda hacer un ensayo previo de la función de grabación y su volumen.
Merci d’avoir porté votre choix sur cet enregistreur vocal numérique. Lisez ce mode d’emploi pour une utilisation correcte et sûre de l’appareil. Conservez-le à portée de la main pour toute consultation ultérieure. Nous vous recommandons de tester la fonction d’enregistrement et le volume avant l’utilisation pour obtenir de bons enregistrements.
Obrigado por ter adquirido um Gravador de Voz Digital da OLYMPUS. Leia por favor estas instruções para obter informação sobre como utilizar correctamente e em segurança este produto. Mantenha as instruções em local acessível para futuras consultas.
Declaration of Conformity
Model Number |
: WS-500M/WS-400S |
Trade Name |
: DIGITAL VOICE RECORDER |
Responsible Party |
: OLYMPUS IMAGING AMERICA INC. |
Address |
: 3500 Corporate Parkway, P.O. Box 610, Center Valley, PA 18034-0610, |
|
U.S.A. |
Telephone Number |
:1-888-553-4448 |
This device Complies with Part 15 of the FCC Rules. Operation is subject to the following two conditions:
(1) This device may not cause harmful interference, and (2) this device must accept any interference received, including interference that may cause undesired operation.
Tested To Comply
With FCC Standards
FOR HOME OR OFFICE USE
Canadian RFI
This digital apparatus does not exceed the Class B limits for radio noise emissions from digital apparatus as set out in the Radio Interference Regulations of the Canadian Department of Communications.
Cet appareil numérique ne dépasse pas les limites de la Catégorie B pour les émissions de bruit radio émanant d’appareils numériques, tel que prévu dans les Règlements sur l’Interférence Radio du Département Canadien des
Communications.
|
|
1 |
|
|
|
|
2 |
|
|
|
|
3 |
|
|
8 |
4 |
|
|
|
|
|
|
||
|
|
5 |
|
|
* |
0 |
6 |
( |
|
& |
! |
|
|
|
|
|
|
||
^ |
|
|
|
|
@ |
|
|
|
|
|
|
|
) |
|
% |
# |
|
|
|
|
|
- |
||
|
$ |
|
|
|
|
|
|
|
|
9 |
|
|
= |
|
7 |
|
|
||
|
|
q |
|
|
|
|
|
|
|
A |
|
C |
|
E |
1 |
1 |
|
1 |
|
|
2 |
|
2 |
6 |
|
|
3 |
||
2 |
|
|
||
|
|
7 |
||
|
|
|
||
|
|
|
|
|
|
|
|
4 |
8 |
|
|
|
9 |
|
|
|
|
5 |
|
B |
|
D |
|
F |
3 |
3 |
|
|
|
4 |
4 |
|
0 |
% |
|
|
|
||
|
|
|
! |
|
|
|
|
@ |
|
|
|
|
# |
^ |
|
|
|
$ |
& |
|
|
|
|
1 |
|
2 |
4 |
5 |
6
a
 b
b
 c
c  d
d
e
 f
f

7 |
p |
a
b
 c
c
 d
d  e
e
q
8
9

EN Introduction
•This manual is a basic version. Please refer to the complete advanced manual either from the stored data in the [OL_MANUAL] folder of the recorder or download the data from the OLYMPUS website.
•The contents of this document may be changed in the future without advanced notice. Contact our Customer Support Center for the latest information relating
to product names and model numbers.
•The utmost care has been taken to ensure the integrity of the contents of this document. In the unlikely event that a questionable item, error, or omission is found, please contact our Customer Support Center.
•Any liability for passive damages or damage of any kind occurred due to data loss incurred by a defect of the product, repair performed by the third party other than Olympus or an Olympus authorized service station, or any other reason is excluded.
Trademarks and registered trademarks:
•IBM and PC/AT are the trademarks or registered trademarks of International Business Machines Corporation.
•Microsoft, Windows and Windows Media are registered trademarks of Microsoft Corporation.
•Macintosh and iTunes are the trademarks of Apple Inc.
•MPEG Layer-3 audio coding technology licensed from Fraunhofer IIS and Thomson.
•WOW XT, SRS and }symbol are trademarks of SRS Labs, Inc.
•WOW XT technology is incorporated under license from
SRS Labs, Inc
•The product was developed based on noise-canceling technology under license from NEC Corporation.
6 EN
Other product and brand names mentioned herein may be the trademarks or registered trademarks of their respective owners.
Safe and Proper Usage
Before using your new recorder, read this manual carefully to ensure that you know how to operate it safely and correctly. Keep this manual in an easily accessible location for future reference.
•The warning symbols indicate important safety related information. To protect yourself and others from personal injury or damage to property, it is essential that you always read the warnings and information provided.
General precautions
•Do not leave the recorder in hot, humid locations such as inside a closed automobile under direct sunlight or on the beach in the summer.
•Do not store the recorder in places exposed to excessive moisture or dust.
•Do not use organic solvents such as alcohol and lacquer thinner to clean the unit.
•Do not place the recorder on top of or near electric appliances such as TVs or refrigerators.
•Avoid recording or playing back near cellular phones or other wireless equipment, as they may cause interference and noise. If you experience noise, move to another place, or move the recorder further away from such equipment.
•Avoid sand or dirt. These can cause irreparable damage.
•Avoid strong vibrations or shocks.
•Do not disassemble, repair or modify the unit yourself.
•Do not operate the unit while operating a vehicle (such as a bicycle, motorcycle, or go-cart).
•Keep the unit out of the reach of children.
Warning regarding data loss:
Recorded content in memory may be destroyed or erased by operating mistakes, unit malfunction, or during repair work.
It is recommended to back up and save important content to other media such as a computer hard disk. Any liability for passive damages or damage of any kind occurred due to data loss incurred by a defect of the product, repair performed by the third party other than Olympus or an Olympus authorized service station, or any other reasons is excluded from the Olympus’s liability.
Batteries
fDanger:
•Batteries should never be exposed to flame, heated, short-circuited or disassembled.
•Never store batteries where they will be exposed to direct sunlight, or subjected to high temperatures in a hot vehicle, near a heat source, etc.
fWarning:
•Do not solder lead wires or terminals directly onto a battery or modify it.
•Do not connect the = and - terminals together. This may cause fire, overheating or electric shock.
•When carrying or storing the batteries, be sure to put it in the provided case to protect its
terminals. Do not carry or store the batteries with any metal objects (such as key rings).
If this warning is not followed, fire, overheating or electric shock may occur.
•Do not connect the batteries directly to a power outlet or a cigarette lighter of an automobile.
•Do not insert the batteries with their = and - terminals reversed.
•If any liquid from a battery gets into your eyes, promptly wash it off with clean water and consult your doctor at once.
•Do not attempt to recharge alkaline, lithium or any other nonrechargeable batteries.
•Never use any batteries with a torn or cracked outer cover.
•Keep batteries out of the reach of children.

•If you notice anything unusual when using this product such as abnormal noise, heat, smoke, or a burning odor:
1 remove the batteries immediately while being careful not to burn yourself, and;
2call your dealer or local Olympus representative for service.
•Do not expose the batteries to water. Do not allow water to contact the terminals.
•Do not remove or damage the batteries insulating sheet.
•Do not use the batteries if you find something wrong with them such as leakage, color change or deformity.
•Unplug the charger if the charging is still incomplete after the specified time it should take.
•Should any batteries liquid get on skin or clothing, promptly wash it off with clean water.
•Keep batteries away from fire. fCaution:
•Do not subject batteries to strong shocks.
•When using rechargeable batteries that have not been used for a while, be sure to recharge them before use.
•Rechargeable batteries have limited lifetime. When the operating time becomes shorter even if the rechargeable battery is fully charged under the specified condition, replace it with a new one.
Getting started
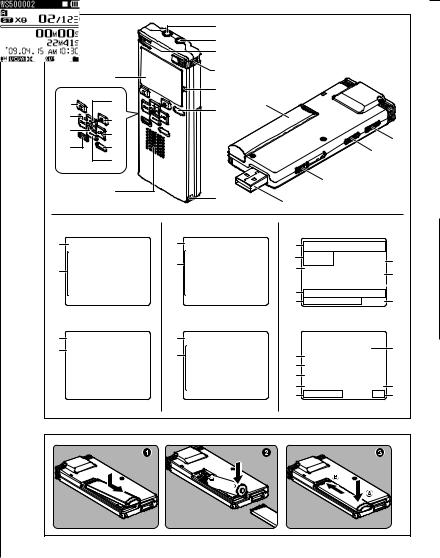
Identification of parts
1EAR (Earphone) jack
2MIC (Microphone) jack
3Built-in stereo microphone (L)
4Built-in stereo microphone (R)
5Recording indicator light
6LIST button
7Strap hole
8Display (LCD panel)
9Built-in speaker
0 + button
! REC s(Record) button @ 0button
# MENU button
$ – button
% INDEX/ERASE button
^ OK `button & 9button * STOP 4button ( Battery cover ) HOLD switch
-Mode (VOICE/MUSIC) switch*
MIC SENSE CONF/DICT switch**
= USB connector slide lever
qUSB connector
* For WS-500M only.
**For WS-400S only.
Display (LCD panel):
Folder list display:
"For WS-500M: A
When [VOICE] mode is selected:
"For WS-400S: A
1[VOICE] mode indicator Record/ Playback status indicator Battery indicator
2Folder name
"For WS-500M: B
When [MUSIC] mode is selected:
3[MUSIC] mode indicator Record/ Playback status indicator Battery indicator
4Folder name
File list display:
"For WS-500M: C
When [VOICE] mode is selected:
"For WS-400S: C
1Folder name
Record/ Playback status indicator Battery indicator
2File name
"For WS-500M: D
When [MUSIC] mode is selected:
3Folder name
Record/ Playback status indicator Battery indicator
4File name
File display:
"For WS-500M: E
When [VOICE] mode is selected:
"For WS-400S: E
1 File name
Record/ Playback status indicator Battery indicator
2 Folder indicator
Recording mode indicator 3 During recording mode:
Remaining memory bar indicator
During playback mode:
Playback position bar indicator
4 Recording date and time
5 [?] Microphone Sensitivity indicator
[!] VCVA indicator [%] Noise Cancel indicator [$] Voice Filter indicator [0] Low Cut Filter indicator
6Current file number/ Total number of recorded files in the folder
7During recording mode:
Elapsed recording time
During playback mode:
Elapsed playback time
8During recording mode:
Remaining recording time
During playback or stop mode:
File length
9Playback mode indicator
"For WS-500M: F
When [MUSIC] mode is selected:
0 Title name ! Artist name @ Album name
# Elapsed playback time $ [#] WOW XT indicator
["] Equalizer indicator
%Current file number/ Total number of recorded files in the folder
^ File length
& Playback mode indicator
EN 7

Inserting batteries (Fig. 1)
"For WS-500M:
•When charging with the recorder, be sure to use the supplied specified Ni-MH rechargeable (BR401) batteries.
"For WS-400S:
•This recorder cannot charge rechargeable batteries.
1Lightly press down on the arrow and slide the battery cover open.
2Insert size-AAA alkaline battery, observing the correct =and
-polarities.
3Close the battery cover completely by pressing to the direction A,
then sliding to the direction B.
•If the “hour” indicator flashes in the display, see “Setting Time and Date [Time & Date]”.
Charging by connecting to a computer
via USB (Fig. 2)
" For WS-500M:
1Boot the PC.
2Slide the USB connector slide lever in the direction indicated by the arrow to eject the USB connector out of the recorder.
3While pressing the STOP4button,
connect to the PC’s USB port.
Note:
•If [Cannot charge] is displayed, it means that a battery that cannot be charged is in the recorder.
Replace the batteries with supplied ones at once.
Turning on/off the power (Fig. 3)
Turning on the power:
Slide the HOLD switch in the opposite direction that indicated by the arrow.
Turning off the power:
While the recorder is during stop mode, slide the HOLD switch in the direction indicated by the arrow.
Power save mode:
If the recorder is stopped/not used for over 5 minutes after it is turned on, it goes into standby (power-save) mode, and the display shuts off. To exit standby mode and turn on the display, press any button.
8 EN
Setting time and date
[Time & Date] (Fig. 4)
When you use the recorder for the first time after purchasing it, or when the batteries have been inserted without the device having been used in a long time, the [Set Time & Date] will appear. When the “hour” is flashing, conduct the setup from Step 5.
1While the recorder is during stop mode, press the MENU button.
2Press the + or − button to select [Device Menu] tab.
•You can change the menu display by moving the settings tab cursor.
3Press the OK `or 9button to move the cursor to the item to set.
4Press the OK `or 9button.
•The “hour” will flash on the display, indicating the start of the Time and Date setup process.
5Press the 9or 0button to select the item to set.
6Press the + or − button to set.
•Follow the same steps by pressing the 9or 0button to select the next item, and press the + or − button to set.
•You can select between 12 and 24 hour display by pressing the LIST button while setting the hour and minute.
•You can select the order of the “month”, “day” and “year” by pressing the LIST button while setting them.
7Press the OK `button to complete the setting.
•The clock will start from the set date and time. Press the OK ` button according to the time signal.
[VOICE] mode and [MUSIC] mode
(Fig. 5)
" For WS-500M:
[VOICE] mode:
Slide the mode switch to [VOICE] position.
[MUSIC] mode:
Slide the mode switch to [MUSIC] position.
Recording (Fig. 6)
"For WS-500M:
•If the RECsbutton is pressed while the mode switch is set to [MUSIC], [Music Mode] will flash on the display. Set the mode switch to [VOICE] before recording.
1Select the recording folder.
•Pressing the LIST button at the file display while stopped will return you to the next higher level. Pressing the LIST button repeatedly will bring you to the folder list display.
•Pressing button + or − at the folder list display will select the folders for voice recordings.
2Press the RECsbutton to start recording.
•The recording indicator light glows and [7] will appear on the display.
aRecording mode
bRemaining memory bar indicator
cRemaining recording time dElapsed recording time
eLevel meter (change according to the recording level and recording function settings)
3Press the STOP4button to stop recording.
• [4] will appear on the display.
fFile length

Playback (Fig. 7)
"For WS-500M:
•When playing back files transferred from a PC, set the mode switch according to the folder type.
•When playing back files recorded on the recorder, set the mode switch to [VOICE].
1Select the folder which contains the files to be played back.
•Pressing the LIST button at the file display during playback or while stopped will return you to the next higher level. Pressing the LIST button repeatedly
will bring you to the folder list display.
•Pressing button + or − at the folder list display will select the folders for voice recordings and press the OK `or 9button.
2In the File list display, press the + or − button to select the file that you want to playback.
•In the File display, press the 9 or 0button to select a file.
3Press the OK `button to start playback.
•[6] will appear on the display.
aFile name
bFolder indicator
cPlayback position bar indicator dElapsed playback time
eFile length
4Press the + or − button to adjust to a comfortable listening volume.
•The volume can be adjusted within a range from [00] to [30].
5Press the STOP 4button at any point you want to stop the playback.
•[4] will appear on the display.
Setting an index mark or a temp mark (Fig. 8)
1While the recorder is during recording mode or playback mode, press the INDEX/ERASE button.
•Even after an index or temp mark is placed, recording or playback will continue so you can place index or temp marks in other locations in a similar manner.
Clearing an Index Mark or a Temp Mark (Fig. 9):
1Locate the index or temp mark youwant to clear.
2Press the 9or 0button to select the index or temp mark to erase.
3While the index or temp number appears for approximately 2 seconds on the display, Press the
INDEX/ERASE button .
•The index or temp mark is erased.
Note:
•Up to 16 index and temp marks can be set in a file. If you try to place more than 16 index or temp marks, [Index Full] message
will appear for index marks, and [Temp Mark Full] for temp marks.
How to begin segment repeat playback (Fig. p)
1Select a file that has a segment you would like to play back repeatedly.
2In the file list display, press the + or − button to select the file you want to clear.
3Press the OK `button to start playback.
4Press the RECsbutton at the point you want to start segment repeat
playback.
• [w] will flash on the display.
5Press the RECsbutton again at the position where you want to end segment repeat playback.
• The recorder repeatedly plays back the segment until the segment repeat playback is cancelled.
Note:
•As in regular play mode, playback speed can be changed during segment repeat playback as well. If an index mark and temp mark are inserted or eliminated during segment repeat playback, segment repeat playback will be canceled and it will return to regular play mode.
Erasing (Fig. q)
1Select the folder or file you want to erase.
2In the file list display, press the + or − button to select the file you want to erase.
3.While the recorder is during stop mode, press the INDEX/ERASE button.
4Press the + button to select [Erase in Folder] or [File Erase].
5Press the OK `button.
6Press the + button to select [Start].
7Press the OK `button.
•The display changes to [Erase!] and erasing will start.
•[Erase Done] is displayed when the file is erased. File numbers will be reassigned automatically.
Notes:
•The locked files and files set as read-only cannot be erased.
•If an action is not selected within 8 seconds, the recorder will return to stop status.
•It may take over 10 seconds to complete processing. Never remove batteries during this time because data may be corrupted. In addition, replace the batteries with new ones in order to ensure that the batteries will not run out while processing.
•For WS-500M only:
You can delete other than [Music] folders when the recorder is set to [MUSIC] mode. However, you cannot delete any folders when the recorder is set to [VOICE] mode.
•For WS-400S only:
You cannot delete folders through therecorder.
EN 9

Using the recorder on your PC
Operating environment
Windows:
Operating system:
Microsoft Windows 2000/XP/Vista (Standard Installation)
Compatible PC’s:
Windows PC’s equipped with more than one free USB port
Macintosh:
Operating system:
Mac OS X 10.2.8 -10.5 (Standard Installation)
Compatible PC’s:
Apple Macintosh series equipped with more than one free USB port
Notes:
•This is an operational environment for saving the files recorded by this recorder to your PC with USB connection.
•Even if operational environment is satisfied, we do not support such as upgraded OS, the multi-boot
environment and self-modified PC’s.
Connecting to your PC
1Boot the PC.
2Slide the USB connector slide lever in the direction indicated by the arrow to eject the USB connector out of the recorder.
3Connect to the PC's USB port or to a USB hub.
Windows:
When you open [My Computer], it will be recognized by the drive name of the product name.
Macintosh:
When you connect the recorder to a Mac OS, it will be recognized by the drive name of the product name on the desktop.
•[Remote] is appeared on recorder if the USB cable is connected.
Notes:
•Refer to the user’s manual for your PC regarding the USB port on your PC.
•Be sure to push the cable connector all the way in.
10 EN
Otherwise, the recorder may not operate properly.
•Use the supplied USB extension cable depending on situations.
•Do not use USB extension cables other than the supplied cable.
Using cables from other manufacturers could result in damage to the recorder. Do not use the supplied USB extension cable with devices from other manufacturers.
•If you are using Windows 2000, Windows Media Player must be installed on the PC.
Disconnecting from your PC
Windows:
1Click [  ] on the task bar located at the lower-right corner of the screen. Click [Safely remove USB Mass Storade Device].
•The drive letter will differ depending on the PC being used.
2When the safe to remove hardware window appears, click [OK].
3Disconnect the recorder from the PC.
Macintosh:
1Move the drive icon for this recorder that is appear on the desktop to the garbage bin by Drag & Drop it.
•When you connect the recorder to a Mac OS, it will be recognized by the drive name of the product name on the desktop.
2Disconnect the recorder from the PC.
Note:
•NEVER disconnect the USB while the recording indicator light is flashing. If you do, the data will be destroyed.
Specifications
General points
Recording format:
WMA (Windows Media Audio)
Input level:
- 70 dBv
Sampling frequency:
[ST XQ] mode: 44.1 kHz [ST HQ] mode: 44.1 kHz [ST SP] mode: 22 kHz [HQ] mode: 44.1 kHz [SP] mode: 22 kHz
[LP] mode: 8 kHz
Frequency response:
During recording mode (Microphone jack):
[ST XQ] mode: 50 Hz to 19 kHz [ST HQ] mode: 50 Hz to 15 kHz [ST SP] mode: 50 Hz to 9 kHz [HQ] mode: 50 Hz to 13 kHz [SP] mode: 50 Hz to 7 kHz [LP] mode: 50 Hz to 3 kHz
During recording mode (Built-in stereo microphone):
80 Hz to 20 kHz During playback mode:
20 Hz to 20 kHz
Maximum working output:
60 mW (8 Ω speaker)
Recording medium:
Built-in NAND FLASH memory WS-500M: 2 GB
WS-400S: 1 GB
Speaker:
Built-in ø 16 mm round dynamic speaker
MIC jack:
ø 3.5 mm mini-jack, impedance 2 kΩ
EAR jack:
ø 3.5 mm mini-jack, impedance 8 Ω or more
Input power requirement:
Batteries: AAA battery (LR03) or Olympus Ni-MH rechargeable battery
External dimensions:
94.8 mm × 38 mm × 11 mm (without protrusions)
Weight:
46 g (including battery)
 Loading...