


 Loading...
DIGITAL VOICE RECORDER
WS-853 WS-852
USER MANUAL
Getting started
Recording
Playback
Menu
Use with a PC
Other information
1
2
3
4
5
6
Thank you for purchasing an Olympus digital voice recorder. |
|
|
Please read these instructions for information about using the product |
|
|
correctly and safely. |
|
|
Keep the instructions handy for future reference. |
|
|
To ensure successful recording, we recommend that you test the record |
EN |
|
function and volume before use. |
||
|

EN
2
Table of contents
Names of parts ........................................................ |
4 |
|
Recorder ........................................................................... |
4 |
|
Display (Normal mode)..................................................... |
5 |
|
Display (Simple mode)...................................................... |
6 |
|
1 |
Getting started |
|
Setup |
...................................................................... |
7 |
Inserting the battery......................................................... |
8 |
|
Turning the power ON....................................................... |
9 |
|
Setting the inserted battery.............................................. |
9 |
|
Setting the time/date ..................................................... |
10 |
|
Selecting the mode......................................................... |
10 |
|
Charging the battery .............................................. |
11 |
|
Charging the battery by connecting to a PC’s USB |
|
|
connector ....................................................................... |
11 |
|
Batteries................................................................ |
13 |
|
Inserting/removing a microSD card.......................... |
15 |
|
Inserting a microSD card................................................. |
15 |
|
Removing a microSD card ............................................... |
16 |
|
Preventing accidental operation.............................. |
17 |
|
Setting HOLD mode ........................................................ |
17 |
|
Releasing HOLD mode..................................................... |
17 |
|
Turning the power OFF ............................................ |
18 |
|
Selecting folders and files ....................................... |
19 |
|
Using the Calendar Search function to search for a file.... |
19 |
|
2 |
Recording |
|
Recording............................................................... |
21 |
|
Basic recording procedure............................................... |
21 |
|
Pausing/resuming recording........................................... |
23 |
|
Quickly checking a recording........................................... |
23 |
|
Monitoring while recording ............................................ |
24 |
|
Changing the recording scene [Rec Scene] ................ |
25 |
|
Changing the recording scene......................................... |
25 |
|
Recording with an external microphone................... |
27 |
|
Recording with an external microphone ......................... |
27 |
|
Recording from another connected device................ |
28 |
|
Recording audio from another device with this recorder ...28
3 |
Playback |
|
Playback ................................................................ |
30 |
|
Basic playback procedure................................................ |
30 |
|
Fast-forwarding.............................................................. |
31 |
|
Rewinding ...................................................................... |
31 |
|
Skipping to the beginning of a file ................................. |
32 |
|
Playback through the earphones .................................... |
33 |
|
Changing the playback speed ......................................... |
35 |
|
A-B repeat playback........................................................ |
36 |
|
Index marks/temp marks ........................................ |
37 |
|
Writing an index mark/temp mark ................................. |
37 |
|
Erasing an index mark/temp mark.................................. |
37 |
|
Erasing files............................................................ |
38 |
|
Erasing files..................................................................... |
38 |
|
4 |
Menu |
|
Setting menu items ................................................ |
40 |
|
Basic operation ............................................................... |
40 |
|
File menu [File Menu] ............................................. |
43 |
|
Preventing accidental file erasure [File Lock] .................. |
43 |
|
Dividing a file [File Divide].............................................. |
43 |
|
Displaying file information [Property] ........................... |
43 |
|
Recording menu [Rec Menu] .................................... |
44 |
|
Selecting the recording level [Rec Level]......................... |
44 |
|
Setting the recording mode [Rec Mode] ......................... |
44 |
|
Reducing noise during recording [Low Cut Filter] ........... |
45 |
|
Voice-activated recording function [VCVA] ..................... |
45 |
|
Voice sync recording function [V-Sync. Rec].................... |
46 |
|
Playback menu [Play Menu]..................................... |
48 |
|
Reducing noise during playback [Noise Cancel] .............. |
48 |
|
Emphasizing voice more clearly [Voice Filter] ................. |
48 |
|
Adjusting low volume portions during playback |
|
|
[Voice Balancer] ............................................................. |
48 |
|
Selecting playback modes [Play Mode]........................... |
49 |
|
Setting a skip space [Skip Space] .................................... |
49 |
|
LCD/Sound menu [LCD/Sound Menu] ........................ |
51 |
|
Adjusting the contrast [Contrast] .................................... |
51 |
|
Setting the LED indicator light [LED]............................... |
51 |
|
Turning beeping sound ON/OFF [Beep]........................... |
51 |
|
Changing the display language [Language] ................... |
51 |
|

Table of contents
Device menu [Device Menu] .................................... |
52 |
Selecting the recording media [Memory Select]............. |
52 |
Setting the battery in use [Battery] ................................ |
52 |
Setting the time/date [Time & Date] .............................. |
52 |
Selecting the mode [Mode Select].................................. |
53 |
Restoring the default settings [Reset Settings]............... |
53 |
Formatting a recording media [Format].......................... |
54 |
Checking recording media information [Memory Info.]... |
55 |
Checking voice recorder information [System Info.] ....... |
55 |
5 Use with a PC |
|
PC operating environment ...................................... |
56 |
PC connection/disconnection................................... |
58 |
Connecting the voice recorder to a PC ............................. |
58 |
Disconnecting the voice recorder from a PC .................... |
60 |
Transferring files to a PC.......................................... |
61 |
6 Other information |
|
Alarm message list.................................................. |
63 |
Troubleshooting .................................................... |
65 |
Recorder care ......................................................... |
68 |
Accessories (optional) ............................................. |
69 |
Copyright and trademark information ..................... |
70 |
Safety precautions.................................................. |
71 |
Specifications......................................................... |
75 |
Indications used in this manual
NOTE
Describes precautions and operations that should be absolutely avoided in using the voice recorder.
TIP
Describes useful information and hints that will help you getting the most out of your voice recorder.
Indicates reference pages describing details or related information.
EN
3

parts of Names
Names of parts
Recorder
1 |
8 |
|
|
|
|
|
|
^ |
|
|
|
|
9 |
|
|
) |
- |
2 |
% |
|
& |
|
|
|
|
|
|||
3 |
0 |
|
* |
|
|
|
( |
|
|
||
|
|
|
|
||
|
! |
|
|
|
|
|
|
|
|
|
|
4 |
|
|
|
|
|
5 |
@ |
|
|
|
|
|
|
|
|
|
|
6 |
# |
|
|
|
q= |
$ |
|
|
|
||
7 |
|
|
|
|
|
|
|
e |
|
w |
|
|
|
|
|
|
1 Built-in stereo microphone (L)
2 Display
3 LED indicator light (LED)
4 STOP (4) button
5 ERASE button
6 MENU button
7 Built-in speaker
8USB connector/USB connector cover (retractable)
9 Built-in stereo microphone (R)
0 POWER switch ! Card cover
@ REC (record) (s) button
EN
# FOLDER/INDEX button
$CALENDAR/SCENE button
%0button
^ + button & 9button * `OK button ( – button ) Stand
- USB connector slide lever
= Microphone jack ( |
) |
q Earphone jack ( |
) |
w Battery cover |
|
e Strap hole |
|
4

Names of parts
Display (Normal Mode)
During recording mode
12
3 |
8 |
4 |
|
5 |
|
6 |
0 |
|
|
7 |
|
1 File name |
|
2 Battery indicator |
|
[ ]: Ni-MH*1 [
 ]: Alkaline*1
3Folder indicator, Current file number in folder/Total number of recorded files in folder and file lock indicator
4 Voice recorder status indicator
[ ]: Recording indicator
[ ]: Recording pause indicator [
 ]: Stop indicator
[]: Playback indicator
[ ]: Fast playback indicator [ ]: Slow playback indicator [ ]: Fast-forward indicator [ ]: Fast-rewind indicator
5Elapsed recording time or playback time
6 Recording media indicator
[l]: Internal memory [m]: microSD card
Possible recording time remaining
During stop mode or playback mode
12
3 |
8 |
4 |
9 |
5 |
|
6 |
! |
|
|
7 |
|
Rec Scene:
[ ]: Dictation
[ ]: Meeting [
 ]: Conference
[ ]: Duplication (Cassette) [
 ]: Duplication (CD)
[ ]: Duplication (Timer) [
 ]: Telephone Rec
[ ]: DNS
[ ] [
] [ ] [
] [ ]: Rec Level [
 ]: VCVA
[ ]: V-Sync. Rec [
 ]: Low Cut Filter
[ ]: Voice Balancer*1 Voice Filter*2
[ ]: Noise Cancel*1 Play Mode:
[ ]: Folder [
 ]: File
[ ]: Repeat
8 Recording format indicator
9 File length
0 Level meter
! Playback position bar indicator
7 Meanings of indicators shown in |
* 1 WS-853 model only |
indicator display area |
* 2 WS-852 model only |
parts of Names
EN
5

Names of parts
Display (Simple Mode)
ofNames |
During recording mode |
|
1 |
2 |
|
parts |
3 |
|
|
|
|
|
4 |
|
|
|
6 |
|
5 |
8 |
1 Folder indicator, Current file number in folder/Total number of recorded files in folder and file lock indicator
2 Battery indicator
[ ]: Ni-MH*1 [
 ]: Alkaline*1
3 Voice recorder status indicator
[ ]: Recording indicator
[ ]: Recording pause indicator [
 ]: Stop indicator
[]: Playback indicator
[ ]: Fast playback indicator [ ]: Slow playback indicator [ ]: Fast-forward indicator [ ]: Fast-rewind indicator
4Elapsed recording time or playback time
5 Recording media indicator
[l]: Internal memory [m]: microSD card
Possible recording time remaining
EN 6 Level meter
6
During stop mode or playback mode
1 |
2 |
3 |
|
4 |
|
|
7 |
5 |
8 |
7File length (During stop mode), Playback position bar indicator (During playback mode)
8 Rec Scene
* 1 WS-853 model only
TIP
•Pressing and holding the STOP (4) button while the voice recorder is in stop mode displays the settings [Time & Date] and [Remain] (amount of possible recording time remaining). If the current time/date is set incorrectly, see “Setting the time/date [Time & Date]” ( P.52).

Getting started
Setup
After unpacking the voice recorder, follow the steps below to have it ready for use.
Getting |
1 |
Inserting the battery |
started |
|
|
3 |
|
|
Getting |
2 |
Turning the power ON |
started |
|
|
3 |
|
|
Getting |
3 |
Selecting the battery setting (WS-853 model only) |
started |
Select the battery setting to match the inserted battery. Select the setting |
|
|
|
3for a nickel-metal hydride rechargeable battery or the setting for an alkaline battery.
Getting |
4 |
Setting the time/date |
started |
Set the voice recorder’s clock for use with file management. |
|
3 |
|
|
|
|
|
Getting |
5 |
Selecting the mode |
started |
Select either normal mode or simple mode. |
|
3 |
|
|
|
|
|
Getting |
6 |
Charging the recorder (WS-853 model only) |
started |
|
Remove the screen protector on the display.
1
Setup
EN
7

Setup
Inserting the battery
1 |
Before using the voice recorder, insert the battery in the battery compartment of the voice |
|
|
|
recorder. |
Setup
1Slide open the battery cover while pressing down on it.
3Slide the battery cover completely closed.
2Insert AAA batteries, making sure to place the positive and negative terminals correctly.
Insert the battery’s negative terminal first
EN
8

Setup
Turning the power ON
1Slide the POWER switch to the [ON] position.
Setting the inserted battery
 WS-853 model only
1Press the + or – button to select the type of battery you inserted.
Battery type
1
Setup
POWER switch
TIP
•When [Language] appears in the display after turning the power ON, press the + or – button to change the display language and press the `OK button to finalize the setting.
[Ni-MH] ( )
)
Select if you inserted an Olympus nickel-metal hydride rechargeable battery (model BR404).
[Alkaline] ( )
)
Select if you inserted an alkaline battery.
2Press the `OK button to finalize the setting.
NOTE
•The mode can be switched even after setting “Setting the battery in use [Battery]” ( P.52).
EN
9

1
Setup
Setup
Setting the time/date |
Selecting the mode |
1Press the 9or 0button to select the item to set.
2Press the + or – button to change the number.
•To change the setting of another item, press the 9or 0button to move the blinking cursor, then press the + or
– button to change the number.
3Press the `OK button to finalize the setting.
1Press the + or – button to change the mode.
[Normal Mode]:
This is the standard mode in which all functions are available.
[Simple Mode]:
This mode lists frequently used functions. Displayed text becomes larger for easier viewing.
2Press the `OK button to finalize the setting.
TIP
•You can press the `OK button during the setting procedure to set the items entered so far and start the clock.
TIP
•The mode can be switched even after setting. “Selecting the mode [Mode Select]” ( P.53)
•Once the mode is set after purchase, the [Mode Select] screen is not displayed again, even if the batteries are replaced.
EN
10
Charging the battery
Charging the battery by connecting to a PC’s USB connector
WS-853 model only |
|
3 |
After making sure the voice |
||
|
|
|
recorder is stopped, connect the |
||
|
|
|
|
|
|
|
|
|
|
|
USB connector to a USB port on a |
NOTE |
|
|
|
|
PC. |
•Before charging the battery, insert the rechargeable battery provided and set [Battery] to [Ni-MH] ( P.8, P.52).
1 Start the PC.
2 Slide the USB connector slide lever in the direction of the arrow.
4 Press the `OK button to start charging the battery.
1
battery the Charging
•When [Battery] ( P.52) is set to [Ni-MH], [Press OK to start charging] appears on the display. Press the `OK button while this message is blinking.
EN
11

1
battery the Charging
EN
Charging the battery
5Charging has finished when the battery indicator changes to [ ].
].
Charging time: About 3 hours*
*Approximate time needed to fully charge a completely flat battery at room temperature.
Battery charging time will depend on the amount of remaining power and the state of the battery.
NOTE
•Never attempt to charge an alkaline battery, lithium battery or other primary cell battery. Fluid leakage or overheating may cause the recorder to malfunction.
•The power of the PC must be ON to charge the battery using the USB connector.
You cannot charge the battery when the power of the PC is OFF, or the PC is in standby, sleep or auto power OFF mode.
•Do not use a USB hub when charging the battery by connecting to the PC.
•You cannot charge the battery if [ ]*1 or [
 ]*2 is blinking. Charge the battery in an ambient temperature of between 5 and 35°C (41 and 95°F).
*1 [ ] Ambient temperature is too low.
*2 [ ] Ambient temperature is too high
•If battery life has become noticeably short on a full charge, replace the battery with a new one.
•Insert the USB connector securely all the way. Operation will not be normal if the connection is not made properly.
•Use the optional USB extension cable (KP19) if needed.
•Use only a compatible Olympus USB extension cable (KP19). Operation is not guaranteed if another manufacturer’s cable is used. Only use the Olympus USB extension cable with the voice recorder and never use if a product from another manufacturer is used.
12

Batteries
Battery indicator
As the battery loses its remaining charge, the battery indicator on the display changes as follows:
•[ ] indicates there is little remaining battery charge. Charge the battery or
replace it with a fresh one. When the
battery has run out [ ] and [Battery low] appear, and operation stops.
Battery precautions
•The voice recorder does not support manganese batteries.
•Always turn the power off before replacing the battery. Files may be damaged if the battery is removed while the voice recorder is recording or performing an operation such as erasing a file.
•If the batteries are removed from the voice recorder, the [Time & Date] screen is displayed automatically when the power is turned on. See “Setting the time/
date [Time & Date]” ( P.52) for the procedure.
•When not using the voice recorder for an extended period, always remove the battery before storage.
•The continuous battery usage time is reduced when using a microSD card ( P.76).
•The continuous battery usage time will vary depending on the performance of the battery in use ( P.76).
Rechargeable batteries
 WS-853 model only
Read the information below carefully when using a nickel-metal hydride rechargeable battery (model BR404).
4 Discharging
Rechargeable batteries discharge naturally when not in use. Be sure to charge the battery before use.
4 Operating temperature
Rechargeable batteries are chemical-based products. Their performance can vary even when used within the recommended
operating temperature range. This variation is normal.
4Recommended temperature ranges
When powering voice recorder: 0 to 42°C (32 to 107.6°F)
When being charged: 5 to 35°C (41 to 95°F) During long-term storage: -20 to 30°C (-4 to 86°F)
Use of a rechargeable battery outside the temperature ranges above may result reduced in battery performance or life. When not using the voice recorder for an extended period, remove the rechargeable battery before storage to prevent fluid leakage or rust.
1
Batteries
EN
13

1
Batteries
EN
Batteries
NOTE
•Due to the nature of nickel-metal hydride rechargeable batteries, new batteries and batteries not used for an extended period (one month or more) may not charge completely. The battery should become fully charged after charging and discharging the battery up to three times.
•When buying rechargeable batteries, always select model BR404 nickelmetal hydride rechargeable batteries. Operation is not guaranteed, if batteries from another manufacturer is used.
•Always dispose rechargeable batteries in the legally prescribed manner. Before disposing rechargeable batteries that are not fully discharged, take steps to prevent shorting such as insulating their terminals with tape.
•The continuous battery usage time of a nickel-metal hydride rechargeable battery that has been used repeatedly will be reduced due to battery degradation ( P.76).
•The [Battery] screen appears automatically after you have replaced the battery. You can also use a menu operation to display this screen and set the battery ( P.52).
14
Inserting/removing a microSD card
The voice recorder has its own internal memory, and also supports standard microSD cards (microSD, microSDHC) sold separately.
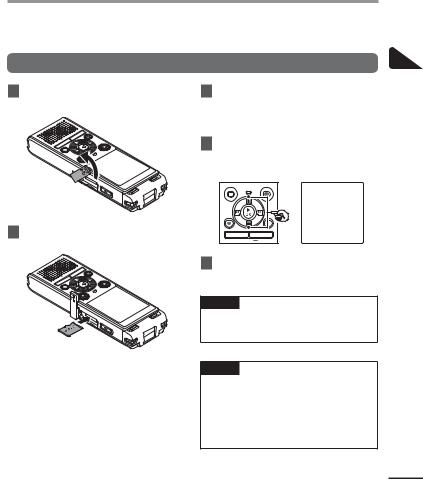
Inserting a microSD card
1While the voice recorder is in stop mode, open the card cover.
2Insert a microSD card, making sure it is placed correctly as shown.
•Insert the microSD card straight, avoiding crooked insertion.
•Inserting a microSD card the wrong way or crookedly could damage its contact surface or cause it to jam in the slot.
•A microSD card not inserted fully (until it clicks into place) might not record data.
3Close the card cover.
•The recording media selection screen appears after a microSD card has been inserted.
4To record onto the microSD card, press the + or – button and select [Yes].
5Press the `OK button to finalize the setting.
TIP
•You can also select the internal memory as the recording media ( P.52).
NOTE
•The voice recorder may not be able to recognize a microSD card formatted (initialized) for a PC or other device. Before using a microSD card, always initialize it on the voice recorder
( P.54).
1
card microSD a Inserting/removing
EN
15

1
card microSD a Inserting/removing
EN
Inserting/removing a microSD card
Removing a microSD card
1While the voice recorder is in stop mode, open the card cover.
2Release the microSD card by pressing it inward, then letting it slowly return.
•The microSD card moves outward and stops. Pull the microSD card out with your fingertips.
•If [Memory Select] was set to [microSD card], [Internal memory selected] is displayed after removing a microSD card.
3Close the card cover.
NOTE
•MicroSD cards may pop out forcefully on removal if you flick or release your finger too quickly after pressing the card in.
•Depending on the card’s manufacturer and type, some microSD cards and microSDHC cards may not be fully compatible with the voice recorder and not be recognized properly.
•For microSD card compatibility under Olympus verification, please contact our customer support at:
http://www.olympusamerica.com Note that our customer support will provide information on microSD card manufacturers and card types for which Olympus has verified operation, but will not guarantee it's performance. Also note that some cards may
no longer be recognized correctly by the voice recorder in case card manufacturer changes card specifications.
•Read the operating instructions provided with the card when using a microSD card.
•If a microSD card is not recognized by the voice recorder, try removing and reinserting the card to have the voice recorder recognizing the card again.
•Processing speed may be low for some microSD card types. Processing performance may also be reduced by writing or deleting data repeatedly from a microSD card. In this case, reinitialize the card ( P.54).
16

Preventing accidental operation
Setting the voice recorder to HOLD mode maintains the current operation and disables button operations. HOLD mode is a handy feature for preventing unintentional operation from accidentally pressing the button when the voice recorder is carried in a bag or pocket. It is also useful for preventing the voice recorder being accidentally stopped during recording.
Setting HOLD mode |
Releasing HOLD mode |
1 While the recorder is in recording |
1 Slide the POWER switch to the |
mode or playback mode, slide |
[ON] position. |
the POWER switch to the [OFF/ |
|
HOLD] position. |
|
1
operation accidental Preventing
•[Hold] appears in the display, and the recorder enters HOLD mode.
NOTE
•When any button is pressed during HOLD mode, [Hold] appears in the display for 2 seconds. No other operation is performed.
•Setting HOLD mode during voice recorder playback (or recording) continues the playback (or recording) operation and prevents any other operation from being performed (The
power turns off when playback ends or when recording ends because, for example, there |
|
is no remaining memory space). |
EN |
|
17

1
OFF power the Turning
EN
Turning the power OFF
Existing data, menu settings and the clock setting are saved when the power is turned OFF.
1While the recorder is in stop mode, slide the POWER switch to the [OFF/HOLD] position.
Power Save mode
When the voice recorder has been stopped for at least 5 minutes after power ON, the display disappears and the voice recorder automatically enters the Power Save mode.
•Pressing any button releases the Power Save mode.
•The playback stop position at power OFF is stored in the memory.
TIP
•Turning the power OFF whenever the voice recorder is not in use minimizes battery consumption.
18
Selecting folders and files
The recorder provides five folders, [ ], [
], [ ],[
],[ ], [
], [ ] and [
 ]. Each folder can store up to 200 files.
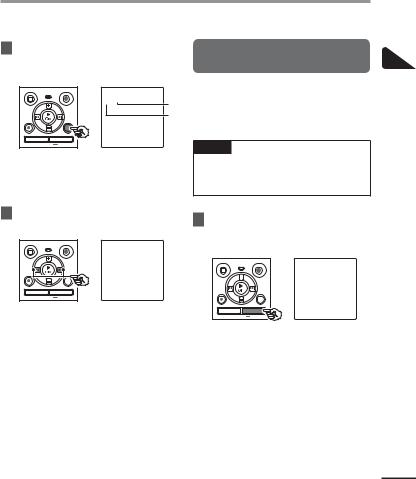
1Press the FOLDER/INDEX button while the voice recorder is in stop mode.
a b
a File number b Folder indicator
•The folder changes each time you press the FOLDER/INDEX button.
2Press the 9or 0button to select the desired file.
Using the Calendar Search function to search for a file
You can search for voice files by specifying a recording date. If you have forgotten in which folder a file has been saved, this feature lets you access it quickly by entering its recording date.
NOTE
•To perform a calendar search, you need to set [Time & Date] in advance ( P.52).
1 Press the CALENDAR/SCENE button while the voice recorder is in stop mode.
•Immediately after a file is selected, the recorded date and time is displayed for 2 seconds only.
1
lesfi and folders Selecting
EN
19
1
lesfi and folders Selecting
Selecting folders and files
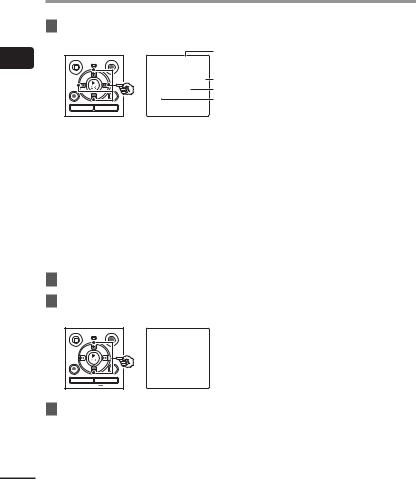
2Press the +, –, 9or 0 button to select the desired date.
a
b c d
aNumber of files saved (recorded) on selected date
b Date file was recorded c Selected date
d Today’s date
•Dates on which files were saved are underlined.
9or 0button:
Move to the previous/next date. Press and hold to skip to the next date on which a file was recorded.
+or – button:
Move to the previous/next week.
3Press the `OK button.
4Press the + or – button to select the desired file.
5Press the `OK button to start playback.
EN
20
Recording
Recording
The voice recorder has five folders ([ ] to [
 ]) in which recorded files can be saved. These folders provide a handy way to sort recordings into separate categories (such as business and leisure).
Basic recording procedure
1Select the folder to save the recording in ( P.19).
•Each new voice recording file is saved in the selected folder.
2Point the built-in microphone in the direction of the sound to record.
•When necessary, you can use the voice recorder with the stand extended as shown in the figure.
3Press the REC (s) button to start recording.
a
b
c
d

 e a Rec Mode
b Elapsed recording time
cLevel meter (changes according to recording volume and recording function setting)
d Remaining possible recording time e Recording level
• The LED indicator light lights.
4Press the STOP (4) button when you want to stop recording.
f
f File length
2
Recording
EN
21

2
Recording
EN
Recording
Sound files recorded with the voice recorder are automatically given a file name in the format below.
151001_0001.MP3
1 2 3
1 Date recorded
Indicates the year, month and day the recording was made.
2 File number
Appended file numbers are consecutive regardless of whether the recording media has been switched.
3 Extension
Indicates that the file is in MP3 format.
TIP
•[Rec Mode] must be set with the voice recorder stopped ( P.44).
NOTE
•To prevent the beginning of the recording being cut off, start recording after the LED indicator light has lit or recording indicator has appeared in the display.
•When the remaining possible recording time is 60 seconds, the LED indicator light starts flashing. It flashes more rapidly as the remaining time decreases (at the 30and 10-second points).
•When [Folder full] appears, no more recording can be done. To record more, you will need to select a different folder or delete unneeded files ( P.38).
•If [Memory full] appears, the voice recorder has no more available memory space. You will need to delete unneeded files to record more ( P.38).
•When using a microSD card in the voice recorder, be sure the desired recording media setting ([Internal memory]
or [microSD card]) has been selected ( P.52).
•Processing performance may be reduced when data has been repeatedly written to or deleted from the recording media. Please initialize the recording media in this case ( P.54).
22

Recording
Pausing/resuming recording
1Press the REC (s) button during recording.
•Recording pauses, and the blinking message [75 PAUSE] appears in the display.
•Recording is stopped automatically after being paused for at least 60 minutes.
2Press the REC (s) button again while recording is paused.
•Recording resumes from the position it was paused at.
Recording settings
Various recording settings are available, letting you tailor recording to different recording conditions.
[Rec Level] |
Sets the recording level. |
|
( P.44) |
||
|
||
[Rec Mode] |
Sets the recording sound |
|
( P.44) |
quality. |
|
[Low Cut Filter] |
Reduces humming sounds |
|
from equipment such as |
||
( P.45) |
||
air-conditioners or projectors. |
||
|
||
[VCVA] |
Sets the trigger level for |
|
voice-activated recording |
||
( P.45) |
||
(VCVA). |
||
|
||
[V-Sync. Rec] |
Sets the trigger level for |
|
( P.46) |
voice-synchronized recording. |
|
|
Used to select one of |
|
|
multiple pre-registered |
|
|
templates of recording |
|
[Rec Scene] |
settings. When selected, |
|
each template enters |
||
( P.25) |
||
several settings tailored to a |
||
|
||
|
particular recording location |
|
|
or condition all in a single |
|
|
operation. |
Quickly checking a recording
1Press the `OK button during recording.
2
Recording
EN
23
2
Recording
Recording
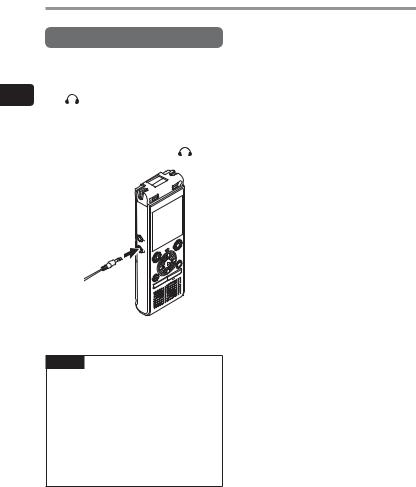
Monitoring while recording
You can monitor the recording as you are making it by listening on the earphones
into the voice recorder’s earphone ). Use the + or – button to adjust the
recording monitor volume.
• The earphones are optional.
1 |
Connect the earphones |
voice |
|
recorder’s earphone jack |
). |
To earphone jack
•Changing the volume will not affect the recording level.
NOTE
•To avoid unpleasantly loud sound, set the volume to [00] before plugging in the earphone.
•To prevent feedback, do not place the earphone near the microphone while recording.
•When [Rec Level] ( P.44) is set to [Auto], the effect of the level setting will not be reflected in the recording
EN |
monitor audio. |
24
Loading...