


DIGITAL VOICE RECORDER
VN-8700PC
VN-8600PC
VN-8500PC
EN INSTRUCTIONS
Thank you for purchasing an Olympus Digital Voice Recorder. Please read these instructions for information
about using the product correctly and safely. Keep the instructions handy for future reference.
To ensure successful recordings, we recommend that you test the record function and volume before use.
Register your product on www.olympus-consumer.com/register and get additional benefits from Olympus!
OLYMPUS IMAGING CORP.
Shinjuku Monolith, 3-1 Nishi-Shinjuku 2-chome, Shinjyuku-ku, Tokyo 163-0914, Japan. Tel. +81 (0)3-3340-2111 http://www.olympus.com
OLYMPUS EUROPA HOLDING GMBH
(Premises/Goods delivery) Wendenstrasse 14-18, 20097 Hamburg, Germany. Tel. +49 (0)40-237730 (Letters) Postfach 10 49 08. 20034 Hamburg, Germany.
http://www.olympus-europa.com
For customers in Europe
“CE” mark indicates that this product complies with the European requirements for safety, health,environment and customer protection.
This symbol [crossed-out wheeled bin WEEE Annex IV] indicates separate collection of waste electrical and electronic equipment in the EU countries. Please do not throw the equipment into the domestic refuse. Please use the return and collection systems available in your country for the disposal of this product.
Applicable Product : VN-8700PC/VN-8600PC/VN-8500PC
This symbol [crossed-out wheeled bin Directive 2006/66/EC Annex II] indicates separate collection of waste batteries in the EU countries. Please do not throw the batteries into the domestic refuse. Please use the return and collection systems available in your country for the disposal of the waste batteries.
Introduction
•The contents of this document may be changed in the future without advanced notice. Contact our Customer Support Center for the latest information relating to product names and model numbers.
•The screen and recorder illustrations shown in this manual were produced during the development stages and may differ from the actual product. The utmost care has been taken to ensure the integrity of the contents of this document. In the unlikely event that a questionable item, error, or omission is found, please contact our Customer Support Center.
•Any liability for passive damages or damage of any kind occurred due to data loss incurred by a defect of the product, repair performed by the third party other than Olympus or an Olympus authorized service station, or any other reason is excluded.
Trademarks and registered trademarks
•IBM and PC/AT are the trademarks or registered trademarks of International Business Machines Corporation.
•Microsoft, Windows and Windows Media are registered trademarks of Microsoft Corporation.
•Macintosh is a trademark of Apple Inc.
•MPEG Layer-3 audio coding technology licensed from Fraunhofer IIS and Thomson.
Other product and brand names mentioned herein may be the trademarks or registered trademarks of their respective owners.
hSafety precautions
Before using your new recorder, read this manual carefully to ensure that you know how to operate it safely and correctly. Keep this manual in an easily accessible location for future reference.
•The warning symbols indicate important safety related information. To protect yourself and others from personal injury or damage to property, it is essential that you always read the warnings and information provided.
EN-BD2717-01
- - AP1006
1

Getting started
hIdentification of parts
|
|
1 |
|
|
|
2 |
|
|
% |
3 |
|
|
|
||
$ |
6 |
4 |
|
|
|
||
# |
7 |
|
|
@ |
8 |
^ |
|
|
& |
||
! |
9 |
||
|
|||
|
0 |
* |
|
|
|
||
|
|
5 |
|
|
|
( |
1 EAR (Earphone) jack |
7 REC (s) (Record) |
# 0button |
|
2 MIC (Microphone) |
|
button |
$ STOP (4) button |
jack |
8 |
9button |
% Display (LCD panel) |
3 Built-in microphone |
9 FOLDER/INDEX/SCENE |
^ POWER/HOLD switch |
|
4 Recording indicator |
|
button |
& USB connector |
light |
0 |
– button |
* Battery cover |
5 Built-in speaker |
! ERASE button |
( Strap hole |
|
6 + button |
@ `OK/MENU button |
|
|
Display (LCD panel):
The displayed character size on the screen can be changed. (please see “Font Size” P.13)
When the [Font Size] is set to [Large]. |
When the [Font Size] is set to [Small]. |
|||
1 |
6 |
! |
7 |
|
2 |
7 |
|
6 |
|
|
|
2 |
||
|
8 |
|
||
3 |
8 |
1 |
||
|
||||
|
|
|
@ |
|
4 |
|
3 |
4 |
|
|
9 |
|
||
|
|
|
||
|
9 |
|
# |
|
5 |
0 |
5 |
0 |
|
1Current file number/ Total number of recorded files in the folder
2Folder indicator
3Recorder status indicator
4During recording mode:
Elapsed recording time
During playback mode:
Elapsed playback time
5[?] Microphone
Sensitivity indicator [!] VCVA indicator
[0] Low Cut Filter indicator
[$] Voice Filter indicator*1
6File lock indicator
7Battery indicator
8Recording mode indicator
9During recording mode:
Remaining recording time
During playback or stop mode:
File length
0Playback mode indicator
! File name*2
@During recording mode:
Remaining memory bar indicator*2
During playback or stop mode:
Playback position bar
indicator*2
#Recording date and time*2
*1 For VN-8700PC, VN-8600PC only.
*2 This item will be displayed when the [Font Size] is set to [Small] only.
hInserting batteries
1Lightly press down on the arrow and slide the battery cover open.
• Manganese batteries may not be used in this recorder.
• Be sure to stop the recorder before replacing the batteries. Unloading the batteries while the recorder is in use may cause a malfunction such as corrupting the file, etc.
- 2 -
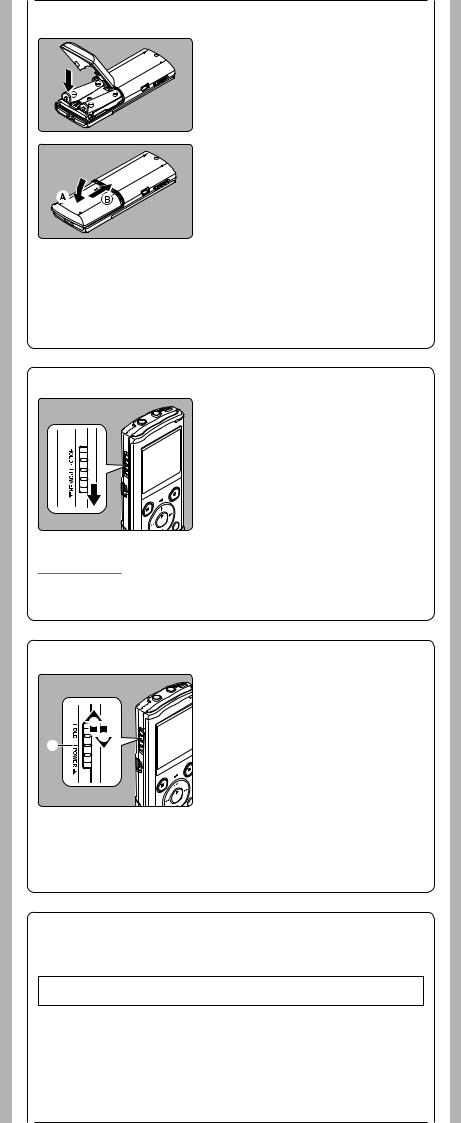
2Insert size-AAA alkaline battery, observing the correct =and - polarities.
3Close the battery cover completely by pressing to the direction A, then sliding to the direction B.
Battery indicator:
When [  ] appears on the display, replace the batteries as soon as possible. When the batteries are too weak, [s] and [Battery Low] appears on the display and the recorder shuts down.
•Remove the batteries if you are not going to use the recorder for an extended period of time.
•When changing batteries, AAA alkaline batteries or Olympus Ni-MH rechargeable batteries are recommended.
hTurning on/off the power
Turning on the power:
While the recorder is turned off, slide the POWER/HOLD switch in the direction indicated by the arrow.
• The display will turn on, and the power will be turned on.
Turning off the power:
Slide the POWER/HOLD switch in the direction indicated by the arrow for 1 seconds or longer.
• The display shuts off, and the power will be turned off.
• The resume function remembers the stop position before the power is turned off.
Power save mode
If the recorder is stopped/not used for over 5 minutes after it is turned on, it goes into standby (power-save) mode, and the display shuts off.
• To exit standby mode and turn on the display, press any button.
hHOLD
Set the recorder to HOLD mode (A):
Slide the POWER/HOLD switch to the HOLD position.
• After [Hold] appears on the display, the recorder is set to HOLD mode.
C |
B |
Exit HOLD mode (B): |
|
|
Slide the POWER/HOLD switch to the Cposition.
Notes:
•If you press any button in HOLD mode, the clock display flashes for 2 seconds, but it will not operate the recorder.
•If HOLD is applied during playback (recording), operation is disabled with the playback (recording) state unchanged (When playback has ended and the recording has ended due to the remaining memory being used up, it will stop).
hSetting time and date [Time & Date]
If you set the time and date beforehand, the information when the file is recorded is automatically stored for each file. Setting the time and date beforehand enables easier file management.
When you install batteries for the first time or each time you replace the batteries, the “Hour” indication will flash.
- 3 -

1Press the 9 or 0 button to select the item to set.
• Select the item from the “hour”, “minute”, “year”, “month” and “day” with a flashing point.
2Press the + or – button to set.
•Follow the same steps by pressing the 9or 0button to select the next item, and press the + or − button to set.
•You can select between 12 and 24 hour display by pressing
the FOLDER/INDEX/SCENE button while setting the hour and minute.
• You can select the order of the “month”, “day” and “year” by pressing the FOLDER/INDEX/SCENE button while setting them.
3Press the `OK/MENU button to complete the setting.
•The clock will start from the set date and time. Press the `OK/MENU button according to the time signal.
•While the recorder is during stop mode, press and hold the STOP (4) button to display the [Time & Date], and [Remain].
Changing the time and date
Select [Time & Date] from the menu on the [Device Menu].
(please see “Menu setting” P.9, “Time & Date” P.14)
hNotes on the Folders
The recorder provides five folders, [F], [G], [H], [I] and [W]. To change the folder selection, press the FOLDER/INDEX/SCENE button while the a recorder is stopped.
aFolder indicator
Note:
• Each folder can store up to 200 files.
About recording
hRecording
Before starting recording, select a folder between [&] to [*]. These five folders can be selectively used to distinguish the kind of recording; for example, Folder [&] might be used to store private information, while Folder ['] might be dedicated to holding business information.
1Press the FOLDER/INDEX/
SCENE button to select the desired folder.
aFolder indicator
•Newly recorded audio will be saved as the last file in the selected folder.
2Press the REC (s) button to start recording.
•Turn the microphone in the direction of the source to be recorded.
bRecording mode/ cElapsed recording time/ dRemaining recording time
•[Rec Mode] cannot be changed in the recording standby mode or while recording. Configure this while the recorder is stopped.
a
b
c d
3Press the STOP (4) button to stop recording.
eFile length
e
Note:
For VN-8700PC/VN-8600PC only
•If a recording is made in stereo modes ([192 kbps] or [128 kbps]), it will be a monaural recording through the built-in microphone, and the same audio will be recorded on both Left channel (Lch) and Right channel (Rch).
-4 -

hPause
While the recorder is during recording mode, press the REC (s) button.
• The recorder will time out after 60 minutes when left in “Rec Pause”.
Resume Recording:
Press the REC (s) button again.
• Recording will resume at the point of interruption.
hTo quickly check on the recorded contents
While the recorder is during recording mode, press the
`OK/MENU button.
• Stop recording and the file that was just recorded will be played back.
hMicrophone sensitivity
Microphone sensitivity is adjustable to meet recording needs.
Select [Mic Sense] from the menu on the [Rec Menu].
(please see “Menu setting” P.9, “Mic Sense” P.11)
hRecording from external microphone or other devices
The external microphone and other devices can be connected and the sound can be recorded. Connect as follows by the device to be used.
•Do not plug and unplug devices into the recorder’s jack while it is recording.
To MIC jack
Recording with external microphone:
Connect an external microphone to the MIC jack of the recorder.
Notes:
• The built-in microphone will become inoperable when an external microphone is plugged into the recorder’s MIC jack.
• Microphones supported by plug-in power can also be used.
• When the external stereo microphone is used while [Rec Mode] is set to a monaural recording mode, audio will be recorded to the L channel only*.
•When an external monaural microphone is used while [Rec Mode] is set to a stereo recording mode, it enables recording only with the L channel microphone*.
* For VN-8700PC/ VN-8600PC only.
Notes:
•To ensure recording from the beginning, start recording after you see the display and the recording indicator lights on.
•When remaining recording time is less than 60 seconds, the recording indicator light starts flashing. When the recording time is decreasing to 30 or 10 seconds, the light flashes faster.
•[Folder Full] will appear when the recording cannot be made any further. Select on other folder or delete any unnecessary files before recording.
•[Memory Full] will appear when the memory is full. Delete any unnecessary files before recording any further.
•When external devices are connected, perform a test recording and then adjust the output level for the external devices.
•When you adjust the various sound quality settings related to playback on the recorder, the audio output signal sent out from the EAR jack will change as well.
- 5 -

About playback
hPlayback
1Press the FOLDER/INDEX/
SCENE button to select the desired folder.
aFolder indicator
2Press the 9 or 0 button to select the file to playback.
3Press the `OK/MENU button to start playback. bElapsed playback time/
cFile length
a
b
c
4Press the + or − button to adjust to a comfortable listening volume.
• The volume can be adjusted within a range from [00] to [30].
5Press the STOP (4) button at any point you want to stop the playback.
• This will stop the file being played back midway. When the resume function is activated the stopped location will be registered, even if the power is turned off. The next time the power is turned on, playback may be resumed from the registered stopped location.
hForwarding and Rewinding
While the recorder is during stop mode, press and hold the 9or 0button.
• If you release the button, it will stop. Press the `OK/MENU button to start playback from where it was stopped.
While the recorder is during playback mode, press and hold the 9or 0button.
• When you release the button the recorder will resume normal playback.
•If there is an index mark or temp mark in the middle of the file, the recorder will stop at that location.
•9: The recorder stops when it reaches the end of the file. Continue pressing the 9button to proceed with the cue from the beginning of the next file.
0: The recorder stops when it reaches the beginning of the file. Continue pressing the 0button
to proceed with the review from the end of the previous file.
hLocating the beginning of the file
While the recorder is during stop mode or playback mode, press the 9button.
• The recorder skips to the beginning of the next file.
While the recorder is during playback mode, press the 0button.
• The recorder skips to the beginning of the current file.
While the recorder is during stop mode, press the 0 button.
•The recorder skips to the beginning of the previous file. If the recorder stop the midway of the file, return to the beginning of the file.
While the recorder is during playback mode, press the 0button twice.
• The recorder skips to the beginning of the previous file.
Notes:
•When you skip to the beginning of the file during playback, the recorder will start playback at the position of an index mark or temp mark. The index mark and temp mark will be skipped when you perform the operation in stop mode.
•When [Skip Space] set to other than [File Skip], the recorder will skip forward/reverse the specified time, then will start playback.
-6 -
 Loading...