


 Loading...
Chapter 0
Front Cover
ML395 ( 96-02-07 )
Chapter 1
Setup - Preliminaries
Setup - Preliminaries
After unpacking the printer, there are a few minor tasks that must be performed before you can begin.
Removing the Shipping Restraint
1.Open front cover of printer.
2.Remove shipping restraint located under printhead. Note:
It's a good idea to save the shipping restraint and the packing material in case you ever need to ship the printer.Unpack your printer and make sure you have the following items:
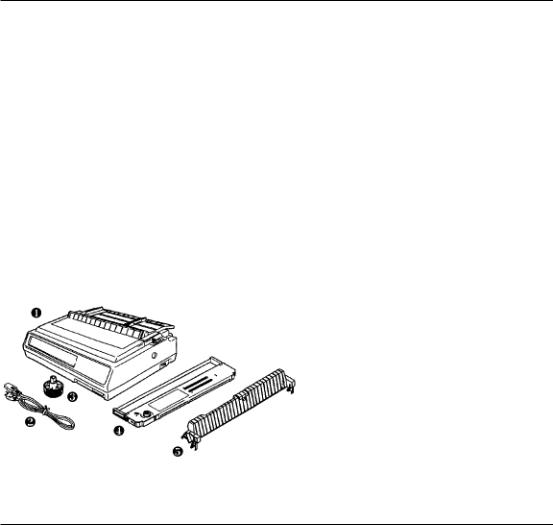
1)ML 395 Printer
2)Power cord
3)Platen knob
4)Ribbon cartridge
5)Sheet Separator
If you are missing any of these items, contact your dealer.
ML395 ( 96-02-07 )

Preliminaries - Removing the Shipping Restraint
Preliminaries
After unpacking the printer, there are a few minor tasks that must be performed before you can begin.
Removing the Shipping Restraint
1.Open front cover of printer.
2.Remove shipping restraint located under printhead.
Note: It's a good idea to save the shipping restraint and the packing material in case you ever need to ship the printer.
ML395 ( 96-02-07 )

Installing the Platen Knob
Installing the Platen Knob
You will notice that the shaft on the platen knob has a flat side that matches the flat side of the shaft in the printer. Line up these two flat sides and push the knob into place.
ML395 ( 96-02-07 )

Installing/Replacing the Ribbon
Installing/Replacing the Ribbon
1.Make sure printer is turned off.
2.Holding the posts, move printhead to center of platen.
Caution! If you are replacing the ribbon, printhead may be HOT!
3.If you are replacing the ribbon: slide ribbon off printhead posts, remove cartridge from printer, and discard used cartridge.
4. Unpack ribbon, remove its shipping restraint, and push idler roller latch in.
5.Place ribbon cartridge in printer: pins on either end of car-tridge fit in notches in plates on either side of printer platen. Push down on cartridge until it clicks into place (see diagram on cartridge).
Note Turn knob in direction of arrow if cartridge does'nt fit into place easily.
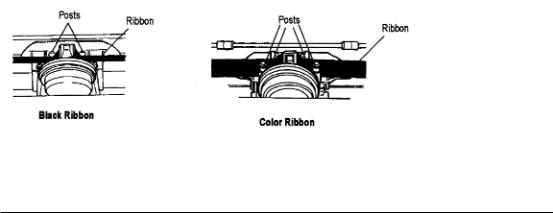
5.Thread ribbon around posts as shown, then turn take-up knob clockwise to eliminate ribbon slack.Making Connections
ML395 ( 96-02-07 )
The power cable and the interface cable have to be connected before you can use your printer.
Caution! Before you begin, make sure power switch is OFF.
ML395 ( 96-02-07 )

Power Connection
Power Connection
Plug the power cord into the printer, but do not plug it into an electrical outlet until setup is complete.
ML395 ( 96-02-07 )
Computer Connection
Computer Connection
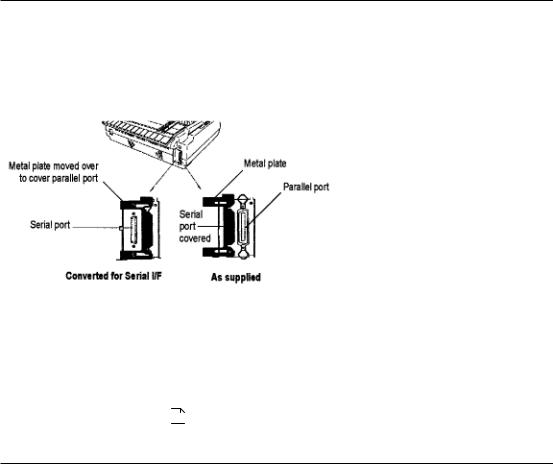
Your printer has both a parallel and a serial port: you can only use one at a time. When you take the printer out of the box, there will be a metal plate over the serial port.
Using the Parallel Port
Plug in your parallel cable and fasten the printer's clips to it.
Using the Serial Port
To use the serial interface, loosen the metal plate with a Phillips screwdriver and slide it to the right to cover the parallel port. Plug your cable into the serial port and fasten it in place by screwing it in. Then tighten the screws on the plate.
If you use the serial port, you may need to enter the Menu Select mode and adjust the menu settings (see Chapter 5)(
 ).
).
ML395 ( 96-02-07 )
Adjusting the Head Gap
Adjusting the Head Gap
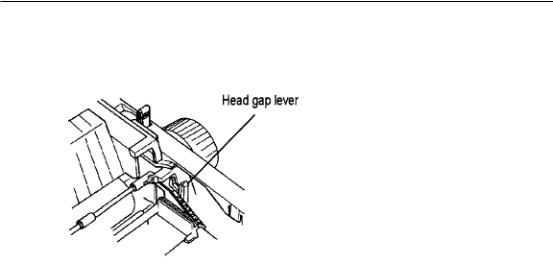
The head gap is the distance between the printhead and the platen. When you use envelopes or multi-part forms, you need a larger head gap than when you use plain paper.
To adjust the head gap, open the access cover. The blue head gap lever is located on the right side of the printer. Use the recommended head gap from the table below to ensure the best print quality and proper paper feeding.
|
Adjusting the Head Gap |
Headgap Setting |
|
|
|
|
|
|
12-20 lb paper |
1 |
|
|
|
|
|
|
20-24 lb bond |
2 |
|
|
|
|
|
|
Labels |
3-4 |
|
|
|
|
|
|
Envelopes |
5-9 |
|
|
|
|
|
|
|
|
|
|
Form (w/carbon) |
Headgap Setting |
|
|
|
|
|
|
Two-part |
3-4 |
|
|
|
|
|
|
Three-part |
4-5 |
|
|
|
|
|
|
Four-part |
7 |
|
|
|
|
|
|
|
|
|
ML395 ( 96-02-07 )

Chapter 2
Loading Paper
Loading Paper
Your printer has two standard paper handling configurations: rear-feed continuous forms and top-feed single sheets. You can also use bottom-feed continuous forms if you install the op-tional push tractor unit and/or the optional pull tractor.
You can also expand top-feed convenience by installing one of the optional cut sheet feeders on top of the printer platen. These cut sheet feeders automatically feed in single pages one after another from a stack of over 100 sheets (see Accessories in Appendix B)(
 ).
).
ML395 ( 96-02-07 )

Loading Rear-Feed Continuous Forms
Loading Rear-Feed Continuous Forms
1. Pull paper lever forward to continuous forms position.
2. Open rear cover and locate tractors.
3. Open both tractor covers and pull forward on right-hand lock lever to unlock right tractor.
4. Insert paper under rear cover and pull it through.
5. Slide right-hand tractor to adjust it to width of paper, then set paper on tractor pins at either end and
ML395 ( 96-02-07 )
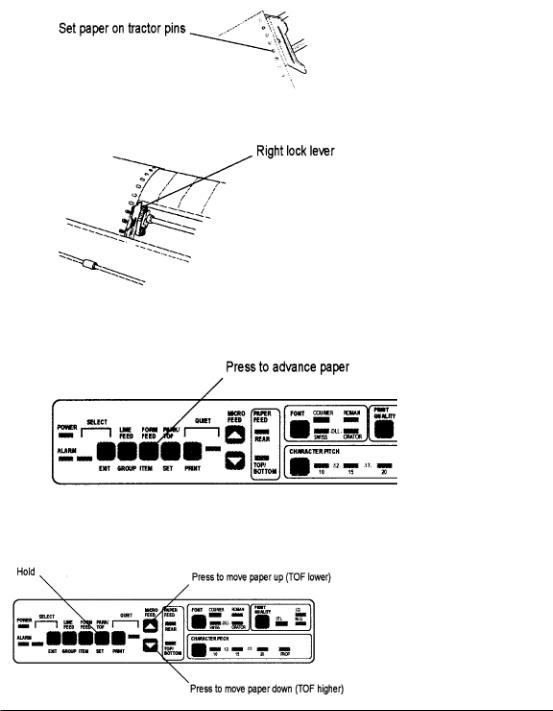
close tractor covers.
6. Push right lock lever back to lock tractor in position. Don't stretch paper tightly it can cause paper to tear.
7.Close rear cover.
8.Press FORM FEED button to advance paper.
9. Set Top of Form (TOF) by holding PARK button while pressing appropriate MICRO FEED button. Paper will advance up or down in direction of arrow on button youre pressing. (For more details, see Setting Top of Form later in this chapter.)
ML395 ( 96-02-07 )
Loading Single-Sheet Paper
Loading Single-Sheet Paper
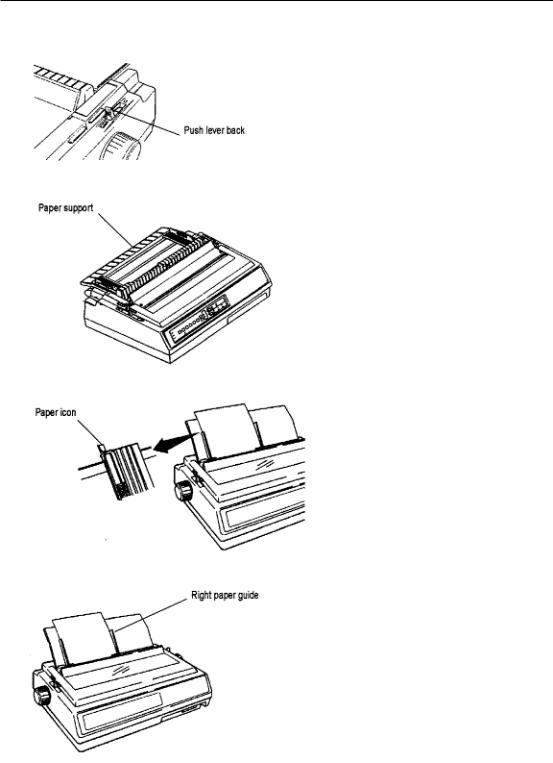
1. Push paper lever back to single-sheet position.
2. Lift paper support to upright position.
3. Align left paper guide with paper icon on support.
4. Insert a piece of single-sheet paper and adjust right paper guide to width of paper.
5. Press FORM FEED button to feed sheet into printer.
ML395 ( 96-02-07 )

6.Set top of form by holding PARK button while pressing appropriate MICRO FEED button. Paper will advance up or down in direction of arrow on button youre pressing.
ML395 ( 96-02-07 )

Changing Paper Paths
Changing Paper Paths
You don't have to remove continuous-form paper in order to print a single sheet.
To change from continuous forms to single sheets:
1.Remove any printed pages from printer.
2.Press PARK button to retract continuous forms paper from paper path.
3.Move paper lever to single sheet position if you're switching from rear feed.
4.Lift paper support to upright position and align left paper guide with paper icon on support.
5.Insert a piece of single-sheet paper and adjust right paper guide to width of paper.
6.Press FORM FEED button to feed sheet into printer.
ML395 ( 96-02-07 )

To switch back to continuous forms:
To switch back to continuous forms:
1.Remove any single-sheet paper in printer.
2.Move paper lever to continuous forms position if you're switching to rear feedleave it set for single sheets if you're switching to bottom feed.
3.Lower paper support.
4.Press FORM FEED button to feed continuous forms paper into printer.
ML395 ( 96-02-07 )
Setting Top of Form
Setting Top of Form
The top of form is the place on the page where printing starts. When the printer advances to the next page, it stops at the top of form.
Your printer stores the top of form position independently for the three standard types of paper feeding: top, rear, and bottom.
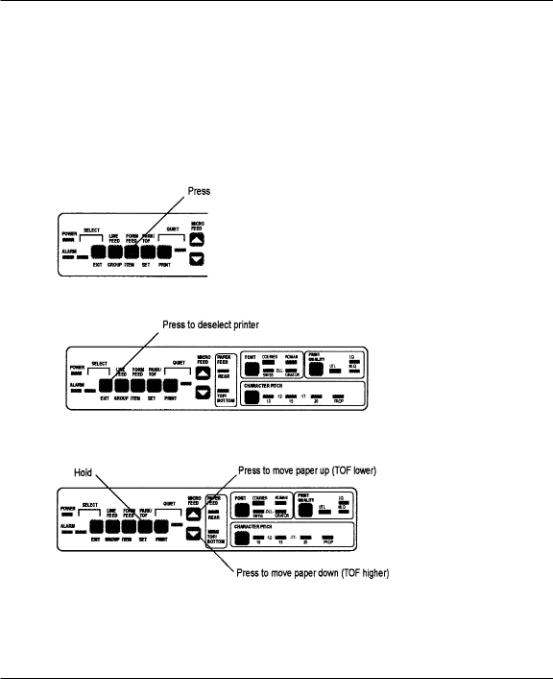
The method of setting top of form is the same for all types of paper:
1. Feed a page into printer by pressing FORM FEED button.
2. Make sure printer is deselected (SELECT light off). If it's not, press SELECT/EXIT button to deselect it.
3. Press and hold PARK button while you adjust page up or down using MICRO FEED buttons. Red line on plastic ribbon shield marks base of printing line: use this as a guide.
4. When you release PARK button, position will be registered in printer's memory until you change it.
ML395 ( 96-02-07 )
Resetting Top of Form
Resetting Top of Form
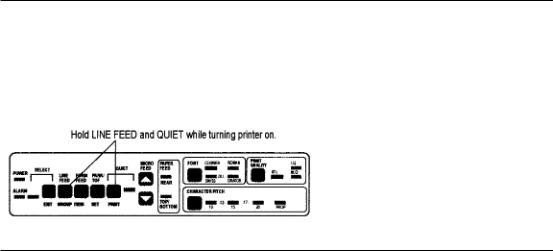
To reset the Top of Form to the factory default:
1.Turn off printer.
2.Hold down LINE FEED and QUIET buttons while turning printer back on.
ML395 ( 96-02-07 )

Paper Handling
Paper Handling
Your printer has the following handy paper handling features:
-Form Tear Off
-Paper Park
ML395 ( 96-02-07 )

Form Tear Off Feature (Continuous-Form Paper Only)
Form Tear Off Feature (Continuous-Form Paper Only)
Caution! Do not use Form Tear Off when printing on labels.
The Form Tear-Off feature allows you to remove a printed continuous-form page without wasting paper. It does this by automatically advancing the continuous-form paper to the tear bar position when printing stops.
The printer is shipped with this feature turned off. To activate the feature, you need to enter the Menu Mode (see Chapter 5) and select a setting other than Off for the Form Tear-Off item under General Control. Each setting is explained below.
Settings 300 ms, 2 sec & 4 sec
These settings activate the Form Tear-Off feature so that the print paper automatically advances to the tear bar position shortly after printing stops: the interval between the time the printer stops and the time the paper advances is determined by the setting you select. When data is received again, the continuous-form paper will automatically move back down for printing
Note: When running continuous invoices, select the 300 ms setting. The printer will print the invoices without stopping. If the last invoice does'nt print, add the Form Feed command at the end of the program.
Offline: This setting causes the printer to go offline (deselected) after it moves the paper up to the tear-off position. The paper will then remain in the tear-off position until you place the printer back on line by pressing the SELECT button.
In Point of Sale situations, this setting permits you to tear off each individual receipt before the next receipt is printed.
Settings: 300 ms (ML393PLUS), 2 sec (ML393PLUS), & 4 sec (ML393PLUS)
These settings are similar to the 300 ms/2 sec/4 sec settings above, but are specifically for use with programs written for the former MICROLINE 393/393C Plus printer. They provide backward compatibility for those who have replaced their Microline 393/393C Plus printer with the Microline 395/395C.
Note: Some programs, such as high resolution graphics packages, pause occasionally while sending data to the printer. If the pause lasts more than the selected interval, the paper will advance to the tear-off position until more data is received. No data will be lost, but this extra paper movement can cause uneven print registration in graphics. If you have this problem, use the menu to set the Form Tear Off feature to OFF.
ML395 ( 96-02-07 )
Paper Park
Paper Park
If you have continuous-form paper loaded and you wish to switch to another paper path, first tear off the printed pages, then simply press the PARK button. The continuous-form paper will immediately retract from the paper path.
ML395 ( 96-02-07 )

Chapter 3
Font Test & Rolling ASCII Test
Important! Use only continuous forms paper to run tests.
Font Test
Note: The top of the Font Test and Rolling ASCII Test contains information on your printer model. Be sure to have a copy of the printout handy if you call for service.
The Font Test prints samples of the available fonts.
To run the Font Test:
1.Be sure paper is loaded, then turn off printer
2.Hold LINE FEED button while turning printer back on. Note If printer turns on without starting to print, you didnt hold LINE FEED button long enough.
To stop the Font Test:
Press the SELECT button or turn off the printer.
Rolling ASCII Test
The Rolling ASCII Test produces a continuous printout of all 96 ASCII characters in a rolling pattern using the default type style. Heres a sample portion of a Rolling ASCII Test:
To run the Rolling ASCII Test:
1.Be sure paper is loaded, then turn off printer
2.Hold PARK button while turning printer back on.
Note: If printer turns on without starting to print, you did'nt hold PARK button long enough.
To stop the Rolling ASCII Test:
Press the SELECT button or turn off the printer.
ML395 ( 96-02-07 )

Chapter 4
Printer Commands
Printer Commands
Note: If you're using commercial software with an appropriate printer driver (see Printer Drivers below), the printer commands will normally be sent to the printer by your software and you won't need to think about them.
Printer commands are signals sent by your PC to the printer which guide and control its operation. They usually begin with the ESC character and can be sent in decimal, ASCII, or hexadecimal form (see Appendix C for a listing of commands).
ML395 ( 96-02-07 )

Emulations
Emulations
Your printer has three emulations:
Epson LQ (factory default) IBM Proprinter
IBM AGM
ML395 ( 96-02-07 )
Loading...