


 Loading...
D DRIVELINE/AXLE
A
SECTION RFD B
REAR FINAL DRIVE C
|
RFD |
|
|
CONTENTS |
E |
|
PRECAUTIONS ......................................................... |
2 |
Service Notice or Precautions ................................. |
2 |
PREPARATION .......................................................... |
3 |
Special Service Tools .............................................. |
3 |
Commercial Service Tools ....................................... |
5 |
NOISE, VIBRATION AND HARSHNESS (NVH) |
|
TROUBLESHOOTING ............................................... |
6 |
NVH Troubleshooting Chart .................................... |
6 |
DESCRIPTION ........................................................... |
7 |
Cross-Sectional View .............................................. |
7 |
DIFFERENTIAL GEAR OIL ....................................... |
8 |
Changing Differential Gear Oil ................................ |
8 |
DRAINING ............................................................ |
8 |
FILLING ................................................................ |
8 |
Checking Differential Gear Oil ................................. |
8 |
OIL LEAKAGE AND OIL LEVEL .......................... |
8 |
FRONT OIL SEAL ..................................................... |
9 |
Removal and Installation ......................................... |
9 |
REMOVAL ............................................................ |
9 |
INSTALLATION .................................................... |
9 |
SIDE OIL SEAL ........................................................ |
11 |
Removal and Installation ........................................ |
11 |
REMOVAL ........................................................... |
11 |
INSTALLATION ................................................... |
11 |
ELECTRIC CONTROLLED COUPLING .................. |
12 |
Removal and Installation ....................................... |
12 |
REMOVAL .......................................................... |
12 |
INSTALLATION .................................................. |
13 |
REAR FINAL DRIVE ASSEMBLY ........................... |
14 |
Removal and Installation ....................................... |
14 |
COMPONENTS .................................................. |
14 |
REMOVAL .......................................................... |
14 |
INSTALLATION .................................................. |
15 |
Disassembly and Assembly ................................... |
16 |
COMPONENTS .................................................. |
16 |
ASSEMBLY INSPECTION AND ADJUSTMENT... |
17 |
DISASSEMBLY .................................................. |
21 |
INSPECTION AFTER DISASSEMBLY ............... |
24 |
ASSEMBLY ........................................................ |
25 |
SERVICE DATA AND SPECIFICATIONS (SDS) ..... |
34 |
General Specifications ........................................... |
34 |
Inspection and Adjustment .................................... |
34 |
DRIVE GEAR RUNOUT ..................................... |
34 |
DIFFERENTIAL SIDE GEAR CLEARANCE ...... |
34 |
PRELOAD TORQUE .......................................... |
34 |
BACKLASH ........................................................ |
34 |
COMPANION FLANGE RUNOUT ...................... |
34 |
SELECTIVE PARTS ........................................... |
34 |
F
G
H
I
J
K
L
M
Revision: 2005 March |
RFD-1 |
2005 X-Trail |

PRECAUTIONS
PRECAUTIONS
Service Notice or Precautions
PFP:00001
ADS0015Z
●Check for the correct installation status prior to removal or disassembly. If matching marks are required, be certain they do not interfere with the function of the parts when applied.
●Overhaul should be done in a clean work area, it is preferable to work in dustproof area.
●Before disassembly, using steam or white gasoline, completely remove sand and mud from the exterior of the unit, preventing them from entering into the unit during disassembly or assembly.
●Check appearance of the disassembled parts for damage, deformation, and unusual wear. Replace them with a new ones if necessary.
●Gaskets, seals and O-rings should be replaced any time when the unit is disassembled.
●In principle, tighten bolts or nuts gradually in several steps working diagonally from inside to outside. If tightening sequence is specified, observe it.
●Clean and flush the parts sufficiently and blow-dry them.
●Be careful not to damage sliding surfaces and mating surfaces.
●When applying sealant, remove the old sealant from the mounting surface; then remove any moisture, oil, and foreign materials from the application and mounting surfaces.
●Always use shop paper for cleaning the inside of components.
●Avoid using cotton gloves or shop rags to prevent entering of lint.
●During assembly, observe the specified tightening torque, and apply new differential oil, petroleum jelly, or multi-purpose grease as specified for each vehicle, if necessary.
Revision: 2005 March |
RFD-2 |
2005 X-Trail |

|
PREPARATION |
|
|
PREPARATION |
PFP:00002 |
Special Service Tools |
ADS00160 |
The actual shapes of Kent-Moore tools may differ from those of special service tools illustrated here.
Tool number
(Kent-Moore No.) Description Tool name
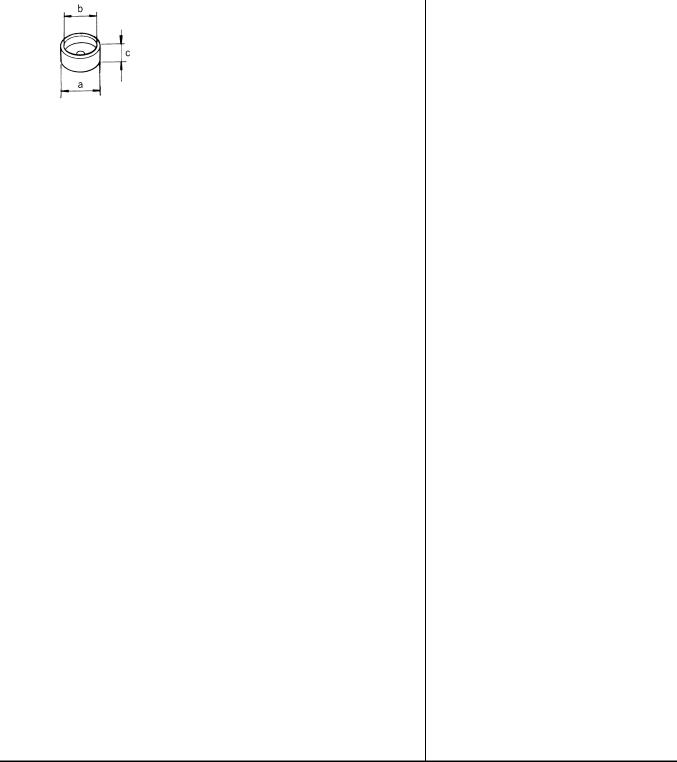
ST27861000 |
Installing final drive front oil seal |
||
( |
— |
) |
|
Drift |
|
|
|
a:62 mm (2.44 in) dia.
b:52 mm (2.05 in) dia.
|
ZZA0832D |
|
|
|
|
KV38100200 |
● Installing final drive front oil seal |
|
(J-26233) |
● Installing final drive side oil seal |
|
Drift |
||
|
a:65 mm (2.56 in) dia.
b:49 mm (1.93 in) dia.
|
ZZA1143D |
|
|
ST3127S000 |
Measuring preload torque |
(J-25765-A) |
|
Preload gauge |
|
|
|
|
ZZA0503D |
|
|
||
ST33052000 |
Removing side bearing inner race |
||
( |
— |
) |
|
Drift |
|
|
|
a:22 mm (0.87 in) dia.
b:28 mm (1.10 in) dia.
|
ZZA1023D |
|
|
KV40100610 |
● Removing and installing gear carrier and |
(J-26089) |
rear cover (2 pieces are used) |
Drift |
● Installing pinion front bearing inner race |
|
a:63 mm (2.48 in) dia.
b:54.3 mm (2.138 in) dia.
|
|
|
ZZA0810D |
|
|
||
ST23550000 |
Removing and installing lock pin |
||
( |
— |
) |
|
Pin punch |
|
|
|
a: 4.5 mm (0.177 in) dia. |
|
||
|
|
|
NT410 |
|
|
||
ST17130000 |
Installing pinion rear bearing outer race |
||
( |
— |
) |
|
Drift |
|
|
|
a:31.8 mm (1.252 in) dia.
b:58 mm (2.28 in) dia.
ZZA0836D
A
B
C
RFD
E
F
G
H
I
J
K
L
M
Revision: 2005 March |
RFD-3 |
2005 X-Trail |
|
PREPARATION |
|
|
|
|
Tool number |
|
(Kent-Moore No.) |
Description |
Tool name |
|
|
|
ST33230000 |
Installing pinion front bearing outer race |
(J-25805-01) |
|
Drift |
|
a:51 mm (2.01 in) dia.
b:41 mm (1.61 in) dia.
c:28.5 mm (1.122 in) dia.
|
|
|
ZZA1046D |
|
|
||
ST23860000 |
● Installing pinion rear bearing inner race |
||
( |
— |
) |
● Installing pinion front bearing inner race |
Drift |
|
|
|
|
|
|
|
a:38 mm (1.50 in) dia.
b:33 mm (1.30 in) dia.
|
|
|
ZZA0534D |
|
|
||
ST38220000 |
Installing pinion front bearing inner race |
||
( |
— |
) |
|
Press stand |
|
||
a:63 mm (2.48 in) dia.
b:65 mm (2.56 in)
|
|
|
ZZA1058D |
|
|
||
KV40105020 |
Installing side bearing inner race |
||
( |
— |
) |
|
Drift |
|
|
|
a:39.7 mm (1.563 in) dia.
b:35 mm (1.38 in) dia.
c:15 mm (0.59 in)
|
ZZA1133D |
|
|
ST35271000 |
Installing center oil seal |
(J-26091) |
|
Drift |
|
a:72 mm (2.83 in) dia.
b:63 mm (2.48 in) dia.
|
ZZA0814D |
|
|
ST22360002 |
Installing coupling front bearing |
(J-25679-01) |
|
Drift |
|
a:29 mm (1.14 in) dia.
b:23 mm (0.91 in) dia.
c:150 mm (5.91 in)
ZZA0546D
Revision: 2005 March |
RFD-4 |
2005 X-Trail |

PREPARATION
Tool number |
|
|
|
A |
||
(Kent-Moore No.) |
|
Description |
||||
Tool name |
|
|
|
|
|
|
|
|
|
|
|
||
KV381086S1 |
|
● Checking backlash |
B |
|||
( |
— |
) |
|
● Checking drive gear runout |
||
Dummy cover set |
|
|
||||
|
● Checking tooth contact |
|
||||
1. KV38108610 |
|
|
||||
|
|
|
|
|||
( |
— |
) |
|
|
|
C |
Dummy cover |
|
|
|
|
||
2. KV38108621 |
|
|
|
|
||
|
|
|
|
|||
( |
— |
) |
|
|
|
RFD |
Dummy cover spacer |
|
|
|
|||
|
|
|
|
|||
3. KV38108630 |
SDIA2313E |
|
|
|
||
|
||||||
|
|
|
|
|||
( |
— |
) |
|
|
|
E |
Dummy cover shim |
|
|
|
|||
|
|
|
|
|
||
KV38108500 |
|
● Measuring preload torque |
|
|||
( |
— |
) |
|
● Removing and installing drive pinion nut |
|
|
Drive pinion socket |
|
F |
||||
|
|
|
||||
|
|
|
|
|
|
G |
|
|
|
ZZA1205D |
|
|
|
|
|
|
|
|
||
KV38108400 |
|
● Measuring preload torque |
|
|||
( |
— |
) |
|
● Removing drive pinion nut |
H |
|
Pinion nut wrench |
|
|||||
|
|
|
|
|||
|
|
|
|
|
|
I |
|
|
|
ZZA1206D |
|
|
|
|
|
|
|
|
|
|
Commercial Service Tools |
ADS0018A |
|
|
Tool name |
Description |
|
|
Flange wrench |
Removing and installing companion flange |
|
lock nut |
|
NT771 |
|
|
Power tool |
Loosening nuts and bolts |
PBIC0190E
J
K
L
M
Revision: 2005 March |
RFD-5 |
2005 X-Trail |

NOISE, VIBRATION AND HARSHNESS (NVH) TROUBLESHOOTING
NOISE, VIBRATION AND HARSHNESS (NVH) TROUBLESHOOTING
NVH Troubleshooting Chart
PFP:00003
ADS00161
Use the chart below to help you find the cause of the symptom. If necessary, repair or replace these parts.
|
|
. |
|
|
|
. |
|
|
|
|
|
|
|
|
|
|
|
|
|
|
|
|
|
|
Reference page |
|
"INSPECTION24,-RFDtoReferAFTER DISASSEMBLY" |
|
Contact""Tooth18,-RFDtoRefer. |
|
|
"INSPECTION24,-RFDtoReferAFTER DISASSEMBLY" |
|
"Backlash"20,-RFDtoRefer. |
|
|
"Companion20,-RFDtoReferFlange Runout" . |
|
|
Differential"Checking8,-RFDtoRefer Gear Oil" . |
|
|
section.PRinNVH |
andFSURAX,FAX,inNVHRSU sections. |
section.WTinNVH |
section.WTinNVH |
section.RAXandFAXinNVH |
section.BRinNVH |
section.PSinNVH |
|
|
|
|
|
|
|
|
|
|
|
||||||||||||||
|
|
|
|
|
|
|
|
|
||||||||||||||||
|
|
|
|
|
|
|
||||||||||||||||||
|
|
|
|
|
||||||||||||||||||||
|
|
|
|
|
|
|
|
|
|
|
|
|
|
|
|
|
|
|
|
|
|
|
|
|
|
|
|
|
|
|
|
|
|
|
|
|
|
|
|
|
|
|
|
|
|
|
|
||
|
|
roughtoothGear |
|
impropercontactGear |
|
|
wornsurfacesTooth |
|
incorrectBacklash |
|
|
runout |
improperoilGear |
SHAFTPROPELLER |
SUSPENSIONANDAXLE |
|
WHEELROAD |
SHAFTDRIVE |
|
|
||||
Possible cause and SUSPECTED PARTS |
|
|
|
|
|
|
flangeCompanionexcessive |
TIRES |
BRAKES |
STEERING |
||||||||||||||
|
|
|
|
|
|
|
|
|
|
|
|
|
|
|
|
|
|
|
|
|
|
|
||
|
|
|
|
|
|
|
|
|
|
|
|
|
|
|
|
|
|
|
|
|||||
Symptom |
Noise |
× |
|
× |
|
|
× |
|
× |
|
× |
× |
× |
× |
× |
× |
× |
× |
× |
|
||||
|
|
|
|
|
|
|
|
|
|
|
|
|
|
|
|
|
|
|
|
|
|
|
|
|
× : Applicable
Revision: 2005 March |
RFD-6 |
2005 X-Trail |

DESCRIPTION
DESCRIPTION
Cross-Sectional View
PFP:00000
A
ADS0018B
B
C
RFD
E
F
G
H
I
SDIA0141E
J
K
L
M
Revision: 2005 March |
RFD-7 |
2005 X-Trail |
DIFFERENTIAL GEAR OIL
DIFFERENTIAL GEAR OIL
Changing Differential Gear Oil
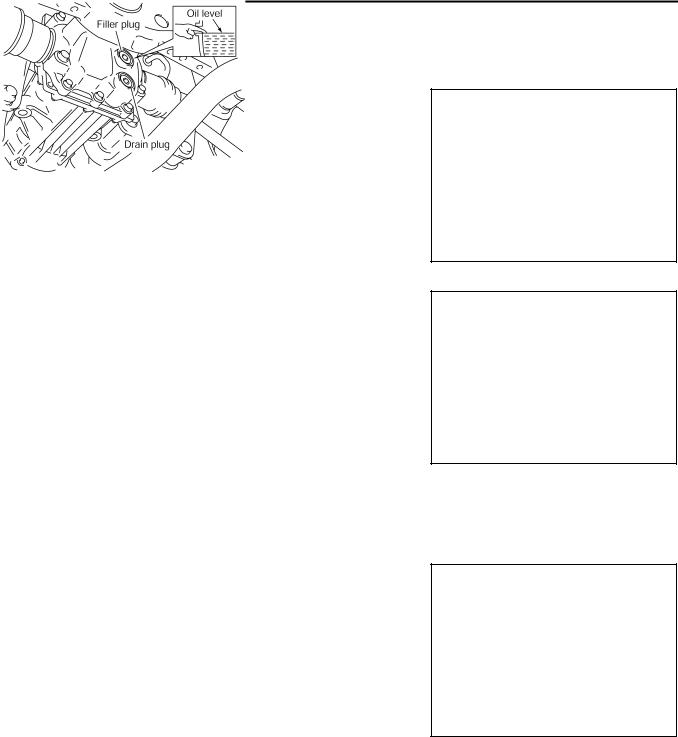
DRAINING
1.Stop engine.
2.Remove drain plug and drain oil.
3.Set a gasket on drain plug and install it to final drive assembly and tighten to the specified torque. Refer to RFD-16, "COMPONENTS" .
CAUTION:
Do not reuse gasket.
FILLING
1.Remove filler plug. Fill with new oil until oil level reaches the specified level near filler plug mounting hole.
Oil grade and Viscosity:
Refer to MA-11, "Fluids and Lubricants" .
Oil capacity:
Approx. 0.55 (1-1/8 US pt, 1 Imp pt)
2.After refilling oil, check oil level. Set a gasket to filler plug, then install it to final drive assembly. Refer to RFD-16, "COMPONENTS" .
CAUTION:
Do not reuse gasket.
PFP:KLD30
ADS0018C
PDIA0454E
PDIA0453E
Checking Differential Gear Oil |
ADS0018D |
OIL LEAKAGE AND OIL LEVEL
●Make sure that oil is not leaking from final drive assembly or around it.
●Check oil level from filler plug mounting hole as shown in the figure.
CAUTION:
Do not start engine while checking oil level.
●Set a gasket on filler plug and install it on final drive assembly. Refer to RFD-16, "COMPONENTS" .
CAUTION:
Do not reuse gasket.
PDIA0453E
Revision: 2005 March |
RFD-8 |
2005 X-Trail |
FRONT OIL SEAL
FRONT OIL SEAL
Removal and Installation
REMOVAL
1.Remove propeller shaft. Refer to PR-4, "Removal and Installation" .
2.Put matching mark on the thread edge of electric controlled coupling. The matching mark should be in line with the matching mark on companion flange.
CAUTION:
For matching mark, use paint. Do not damage electric controlled coupling.
3.Remove companion flange lock nut, using a flange wrench. Then remove companion flange.
4.Remove front oil seal from coupling cover, using a flat-bladed screwdriver.
CAUTION:
Be careful not to damage coupling cover.
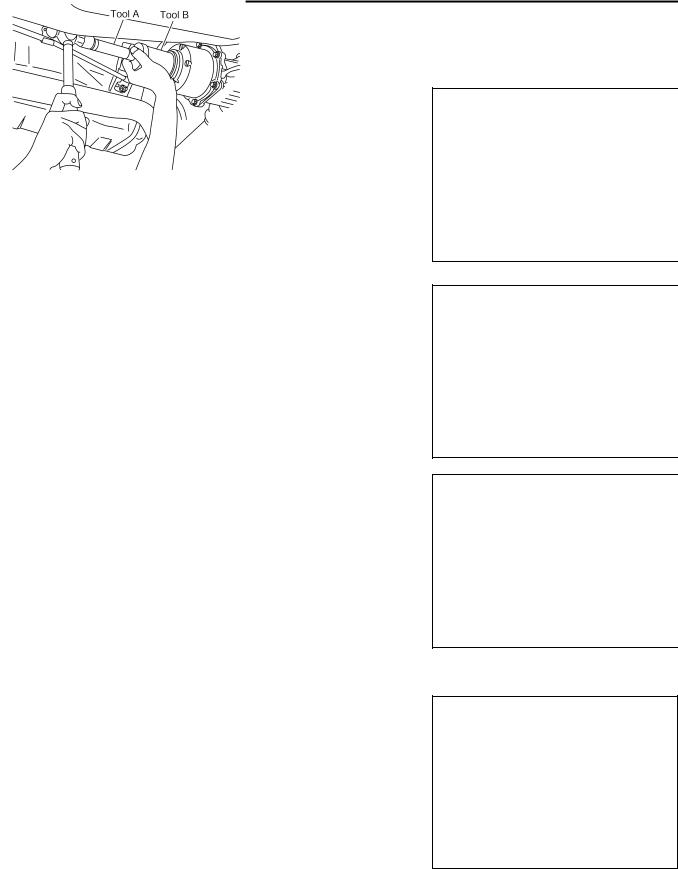
INSTALLATION
1.Apply multi-purpose grease to front oil seal lips.
2.Install front oil seal until it becomes flush with the case end, using the drifts.
Tool number |
A: KV38100200 (J-26233) |
|
B: ST27861000 ( — ) |
CAUTION:
●Do not reuse oil seal.
●When installing, do not incline oil seal.
PFP:38189
|
|
A |
ADS0016K |
|
|
|
|
B |
|
|
C |
|
|
|
|
|
RFD |
|
|
|
|
|
E |
PDIA0455E |
|
|
|
|
F |
|
|
|
|
|
G |
|
|
H |
PDIA0456E |
|
I |
|
|
J |
|
|
|
|
|
K |
|
|
L |
PDIA0457E |
|
|
|
|
M |
PDIA0038E
Revision: 2005 March |
RFD-9 |
2005 X-Trail |

FRONT OIL SEAL
3.Align the matching mark of electric controlled coupling with the matching mark of companion flange, then install the companion flange.
4.Install companion flange lock nut with a flange wrench, tighten the to the specified torque. Refer to RFD-16, "COMPONENTS" .
CAUTION:
Do not reuse companion flange lock nut.
5.Install propeller shaft. Refer to PR-4, "Removal and Installation"
.
PDIA0455E
Revision: 2005 March |
RFD-10 |
2005 X-Trail |
|
SIDE OIL SEAL |
|
|
|
|
SIDE OIL SEAL |
PFP:38343 |
|
Removal and Installation |
|
A |
ADS0016L |
||
REMOVAL |
|
|
1.Remove rear drive shaft with power tool. Refer to RAX-20, "REAR DRIVE SHAFT" .
2.Remove side oil seal, using a flat-bladed screwdriver.
CAUTION:
Be careful not to damage gear carrier and rear cover.
PDIA0431E
B
C
RFD
E
INSTALLATION
1.Apply multi-purpose grease to side oil seal lips.
2.Install side oil seal until it becomes flush with the case end, using the drift.
Tool number |
: KV38100200 (J-26233) |
CAUTION:
●Do not reuse oil seal.
●When installing, do not incline oil seal.
3. Install rear drive shaft. Refer to RAX-20, "REAR DRIVE SHAFT" .
F
G
H
I
PDIA0432E
J
K
L
M
Revision: 2005 March |
RFD-11 |
2005 X-Trail |
Loading...