

Page 1

MANUAL TRANSAXLE
C TRANSMISSION/TRANSAXLE
A
B
SECTION
CONTENTS
PRECAUTIONS .......................................................... 3
Caution ..................... ................................................ 3
PREPARATION ..................................... ...................... 4
Special Service Tools ............................................... 4
Commercial Service Tools ........................................ 6
NOISE, VIBRATION AND HARSHNESS (NVH)
TROUBLESHOOTING .......................... ...................... 8
NVH Troubleshooting Chart ..................................... 8
MANUAL TRANSAXLE ......................................... 8
DESCRIPTION ......................... ................................... 9
Cross-Sectional View ............................................... 9
DOUBLE-CONE SYNCHRONIZER .................... 10
TRIPLE-CONE SYNCHRONIZER ...................... 10
REVERSE GEAR NOISE PREVENTION FUNC-
TION (SYNCHRONIZING METHOD) ................. 10
M/T OIL ......................................................................11
Changing M/T Oil ............................................ ........11
DRAINING ................................ ............. ...............11
FILLING .............................. ...... ............................11
Checking M/T Oil .....................................................11
OIL LEAKAGE AND OIL LEVEL ..........................11
SIDE OIL SEAL ........................................................ 12
Removal and Installation ........................................ 12
REMOVAL ........................................................... 12
INSTALLATION ................................................... 12
POSITION SWITCH .................................................. 13
Checking ................................................................ 13
BACK-UP LAMP SWITCH .................................. 13
PARK/NEUTRA L PO SI TION SWITCH ............... 13
CONTROL LINKAGE ............................................... 14
Components of Control Device and Cable ............. 14
Removal and Installation ........................................ 15
AIR BREATHER HOSE ............................................ 16
Removal and Installation ........................................ 16
TRANSAXLE ASSEMBLY ........................................ 17
Removal and Installation ........................................ 17
REMOVAL ........................................................... 17
INSTALLATION ................................................... 18
Component Parts (RS5F51A) ................................ 19
MANUAL TRANSAXLE
CASE AND HOUSING COMPONENTS ..............19
GEAR COMPONENTS .......................................20
SHIFT CONTROL COMPONENTS .....................22
FINAL DRIVE COMPONENTS ...........................23
Component Parts (RS6F51A) .................................24
CASE AND HOUSING COMPONENTS ..............24
GEAR COMPONENTS ....................................... 25
SHIFT CONTROL COMPONENTS .....................27
FINAL DRIVE COMPONENTS ...........................28
Disassembly and Assembly (RS5F51A) .................28
DISASSEMBLY ................................................... 28
ASSEMBLY ......................................................... 32
Disassembly and Assembly (RS6F51A) .................37
DISASSEMBLY ................................................... 37
ASSEMBLY ......................................................... 41
Adjustment (RS5F51A) ...........................................47
INPUT SHAFT END PLAY .................................. 47
MAINSHAFT END PLAY .....................................48
DIFFERENTIAL SIDE BEARING PRELOAD ......48
REVERSE IDLER GEAR END PLAY .................. 49
Adjustment (RS6F51A) ...........................................50
INPUT SHAFT END PLAY .................................. 50
MAINSHAFT END PLAY .....................................51
DIFFERENTIAL SIDE BEARING PRELOAD ......52
REVERSE IDLER GEAR END PLAY .................. 53
INPUT SHAFT AND GEARS ....................................54
Assembly and Disassembly (RS5F51A) .................54
DISASSEMBLY ................................................... 54
INSPECTION AFTER DISASSEMBLY ................55
ASSEMBLY ......................................................... 57
Assembly and Disassembly (RS6F51A) .................61
DISASSEMBLY ................................................... 61
INSPECTION AFTER DISASSEMBLY ................62
ASSEMBLY ......................................................... 64
MAINSHAFT AND GEARS ....................................... 68
Assembly and Disassembly (RS5F51A) .................68
DISASSEMBLY ................................................... 68
INSPECTION AFTER DISASSEMBLY ................69
MT
D
E
F
G
H
I
J
K
L
M
MT-1
Page 2

ASSEMBLY .........................................................72
Assembly and Disassembly (RS6F51A) .................76
DISASSEMBLY ...................................................76
INSPECTION AFTER DISASSEMBLY ................77
ASSEMBLY .........................................................80
REVERSE IDLER SHAFT AND GEARS ........... ....... 85
Assembly and Disassembly (RS5F51A) .................85
DISASSEMBLY ...................................................85
INSPECTION AFTER DISASSEMBLY ................85
ASSEMBLY .........................................................86
Assembly and Disassembly (RS6F51A) .................86
DISASSEMBLY ...................................................86
INSPECTION AFTER DISASSEMBLY ................87
ASSEMBLY .........................................................87
FINAL DRIVE ............................................................89
Assembly and Disassembly (RS5F51A) .................89
PRE-INSPECTION ..............................................89
DISASSEMBLY ...................................................89
INSPECTION AFTER DISASSEMBLY ................90
ASSEMBLY .........................................................90
Assembly and Disassembly (RS6F51A) .................92
PRE-INSPECTION ..............................................92
DISASSEMBLY ...................................................92
INSPECTION AFTER DISASSEMBLY ................93
ASSEMBLY .........................................................94
SHIFT CONTROL ...................................................... 96
Inspection (RS5F51A) ............................................96
SHIFT FORK .......................................................96
Inspection (RS6F51A) ............................................97
SHIFT FORK .......................................................97
SERVICE DATA AND SPECIFICATIONS (SDS) ......98
General Specifications ............................................98
TRANSAXLE ................... ....... ...... ....... ...... ....... ....98
FINAL GEAR ........................................................99
End Play ..................................................................99
Baulk Ring Clearance .............................................99
Available Snap Rings ............................................100
INPUT SHAFT BEARING SPACER ...................100
6TH INPUT GEAR BUSHING ............................100
5TH MAIN GEAR ...............................................100
Available C-Rings .................................................100
MAINSHAFT C-RING ........................................100
Available Thrust Washer .......................................101
INPUT SHAFT THRUST WASHER ...................101
DIFFERENTIAL SIDE GEAR THRUST WASHER
.101
Available Adjusting Shims .....................................101
4TH MAIN GEAR ADJUSTING SHIM ................101
INPUT SHAFT REAR BEARING ADJUSTING
SHIM ......................... .........................................102
MAINSHAFT REAR BEARING ADJUSTING
SHIM ......................... .........................................102
REVERSE IDLER GEAR ADJUSTING SHIM ....102
6TH MAIN GEAR ADJUSTING SHIM ................102
Available Shims ....................................................103
BEARING PRELOAD .........................................103
DIFFERENTIAL SIDE BEARING ADJUSTING
SHIM(S) .............................................................103
MT-2
Page 3

PRECAUTIONS
PRECAUTIONS PFP:00001
Caution ECS008BM
● Do not reuse transaxle oil, once it has been drained.
● Check oil level or replace oil with vehicle on level ground.
● During removal or installation, keep inside of transaxle clear of dust or dirt.
● Check for the correct installatio n status prior to rem oval or d isassembly. If mating marks are requ ired, be
certain they do not interfere with the function of the parts they are applied to.
● In principle, tighten bolts or nuts gradually in several steps working diagonally from inside to outside. If
tightening se quence is specified, ob serve it.
● Be careful no t to damage sliding surfaces and mating surfaces.
A
B
MT
D
E
F
G
H
K
M
I
J
L
MT-3
Page 4
PREPARATION
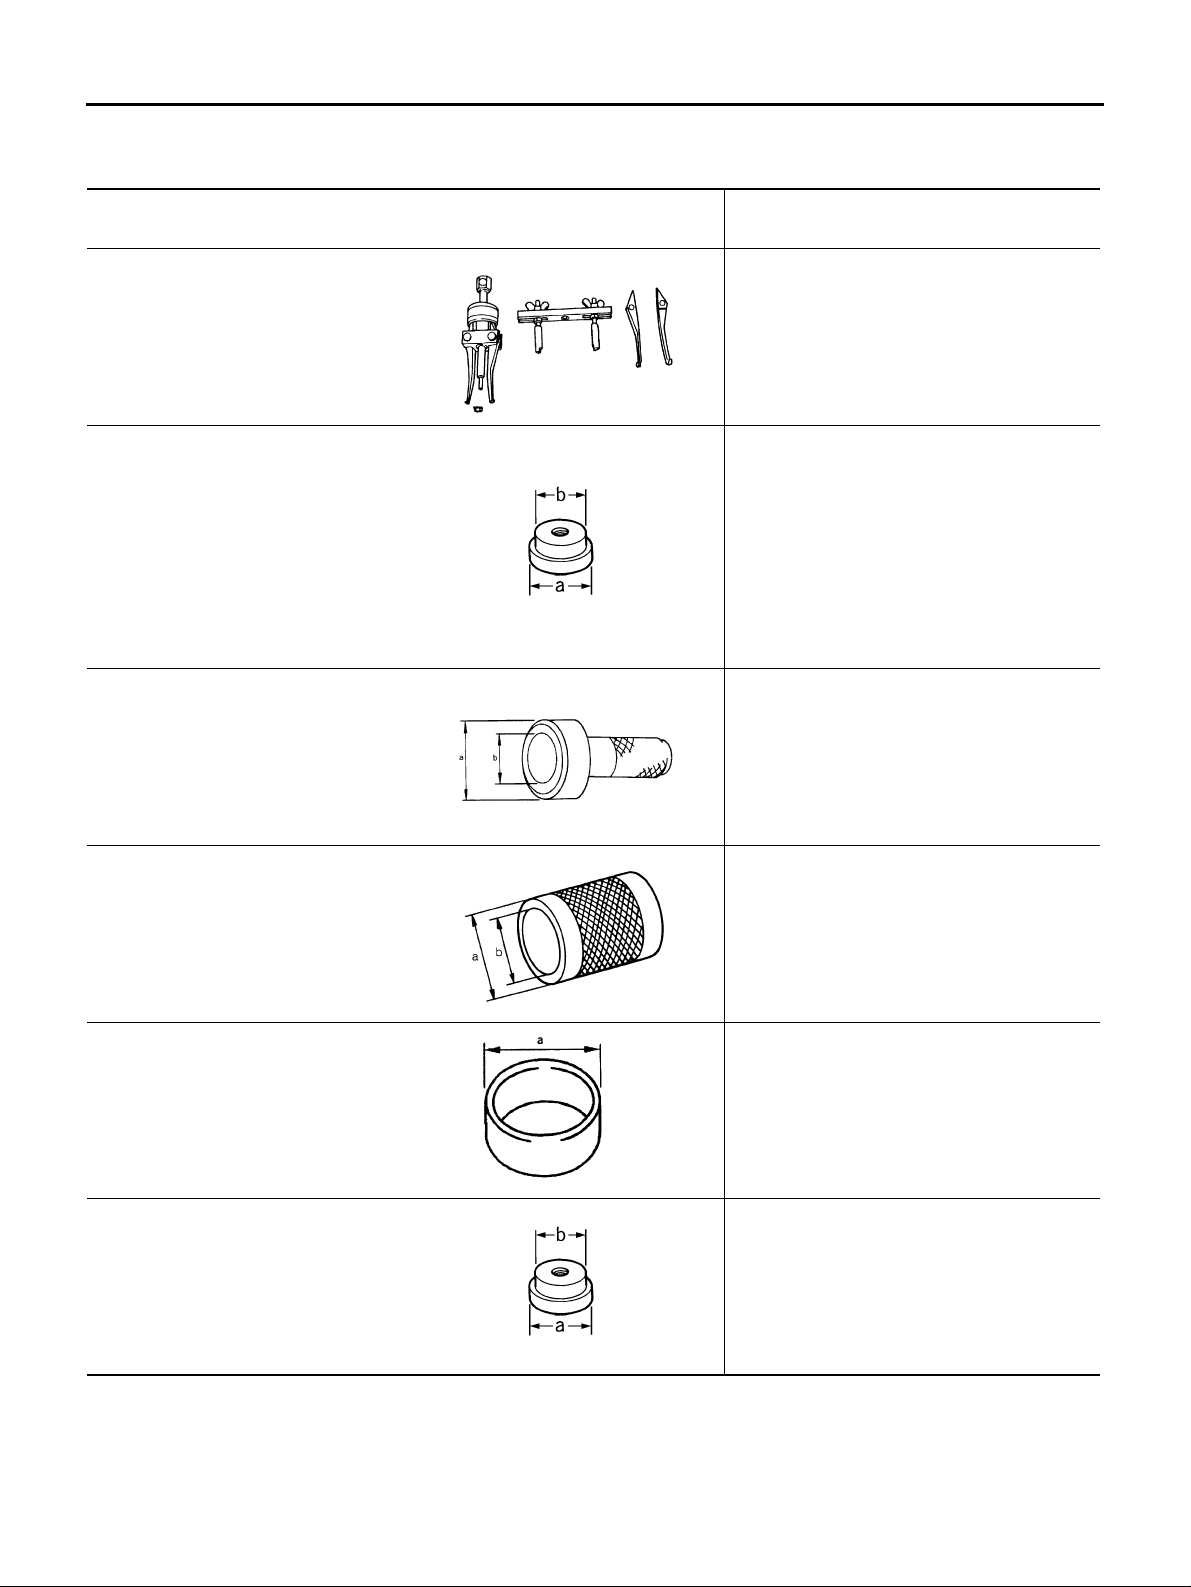
PREPARATION PFP:00002 Special Service Tools ECS008BN
Tool number
Tool name
KV381054S0
Puller
ST35321000
Drift
a: 49 mm (1.93 in) dia.
b: 41 mm (1.61 in) dia.
ST30720000
Drift
a: 77 mm (3.03 in) dia.
b: 55.5 mm (2.185 in) dia.
ZZA0601D
ZZA1000D
Description
● Differential side bearing outer race removal
● Mainshaft front bearing removal
● Input shaft oil seal installation
● Reverse main gear installation
● 1st main gear bushing installation
● 1st-2nd synchronizer hub assemb ly
installation
● 2nd main gear bushing installation
● 3rd main gear installation
● Differential side bearing (clutch housing
side) removal
● Differential oil seal installation
● Differential side bearing outer race
installation
● Mainshaft rear bearing installation
● Differential side bearing installation
ST33200000
Drift
a: 60 mm (2.36 in) dia.
b: 44.5 mm (1.752 in) dia.
KV40105320
Drift
a: 88 mm (3.46 in) dia.
ST33061000
Drift
a: 38 mm (1.50 in) dia.
b: 28.5 mm (1.122 in) dia.
ZZA0811D
ZZA1002D
ZZA0898D
ZZA1000D
● Mainshaft front bearing installation
● 6th input gear bushing installation
(RS6F51A)
● 4th main gear installation
● 5th main gear installation
● 6th main gear installation (RS6F51A)
Differential side bearing outer race installation
● Bore plug i nstallation
● Differential side bearing (transaxle case
side) removal
MT-4
Page 5
PREPARATION
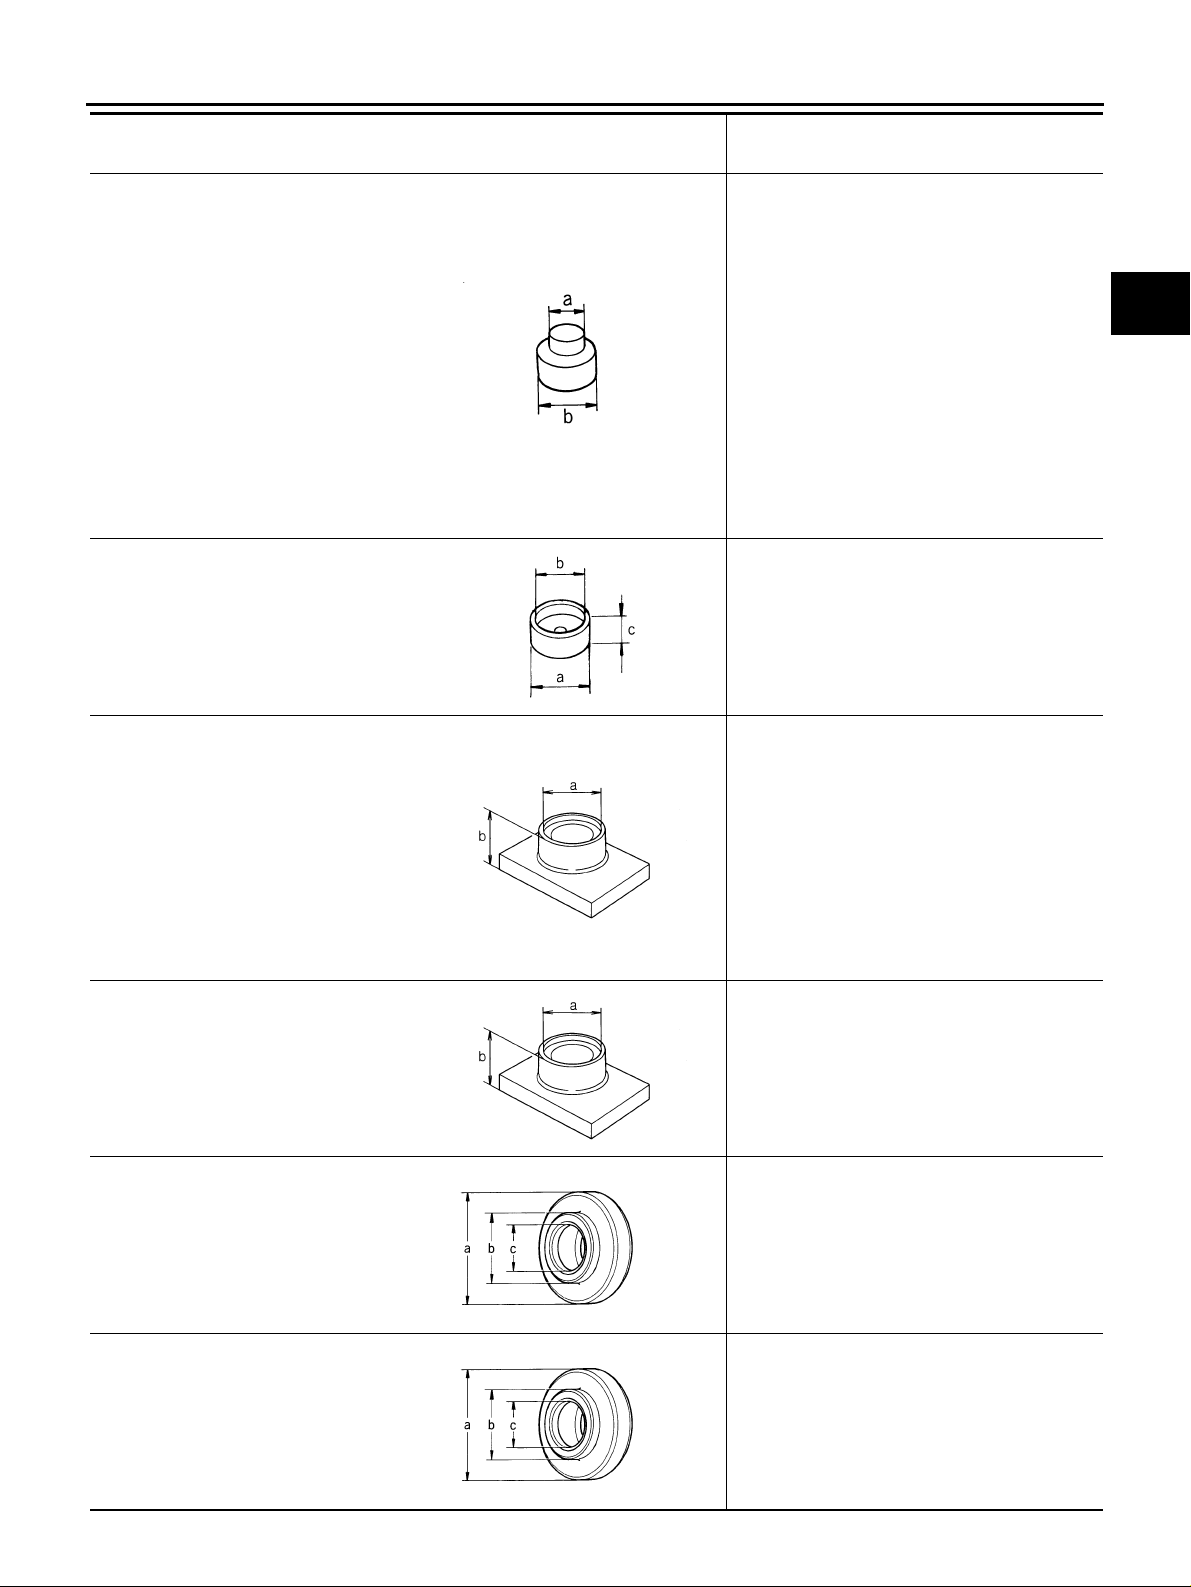
Tool number
Tool name
ST33052000
Drift
a: 22 mm (0.87 in) dia.
b: 28 mm (1.10 in) dia.
KV40105020
Drift
a: 39.7 mm (1.563 in) dia.
b: 35 mm (1.38 in) dia.
c: 15 mm (0.59 in)
KV40105710
Press stand
a: 46 mm (1.81 in) dia.
b: 41 mm (1.61 in)
ST38220000
Press stand
a: 63 mm (2.48 in) dia.
b: 65 mm (2.56 in)
ZZA1023D
ZZA1133D
ZZA1058D
Description
● Welch plug installation
● Input shaft rear bearing removal
● Input shaft bearing spacer and 5th stopper
removal (RS5F51A)
● 5th input gear bushing, thrust washer, 4th
input gear, 4th gear bushing, 3rd-4th
synchronizer hub assembly and 3rd input
gear removal
● Input shaft front bearing installation
● 6th input gear and 6th input gear bushing
removal (RS6F51A)
● Mainshaft rear bearing removal
● 4th main gear and 5th main gear removal
● 6th main gear removal (RS6F51A)
● 5th input gear and 5th synchronizer hub
assembly removal
● 3rd main gear, 2nd main gear, 2nd main
gear bushing, 1st-2nd synchronizer hub
assembly, 1st main gear, reverse main gear
and 1st main gear bushing removal
● 3rd-4th synchronizer hub assembly
installation
● 4th input gear bushing installation
● 5th input gear bushing installation
● 5th synchronizer hub assembly installation
(RS5F51A)
● 5th-6th synchronizer hub assembly
installation (RS6F51A)
● 2nd main gear bushing installation
● 3rd main gear installation
● Reverse main gear installation
● 1st main gear bushing installation
● 1st-2nd synchronizer hub assembly
installation
A
B
MT
D
E
F
G
H
I
J
K
L
M
ST30032000
Drift
a: 80 mm (3.15 in) dia.
b: 38 mm (1.50 in) dia.
c: 31 mm (1.22 in) dia.
ST30901000
Drift
a: 79 mm (3.11 in) dia.
b: 45 mm (1.77 in) dia.
c: 35.2 mm (1.386 in) dia.
ZZA1058D
● 5th stopper and input shaft bearing spacer
installation (RS5F51A)
● Input shaft front bearing installation
ZZA0978D
● Input shaft rear bearing installation
● 4th main gear installation
● 5th main gear installation
● 6th main gear installation (RS6F51A)
● Mainshaft rear bearing installation
ZZA0978D
MT-5
Page 6
PREPARATION
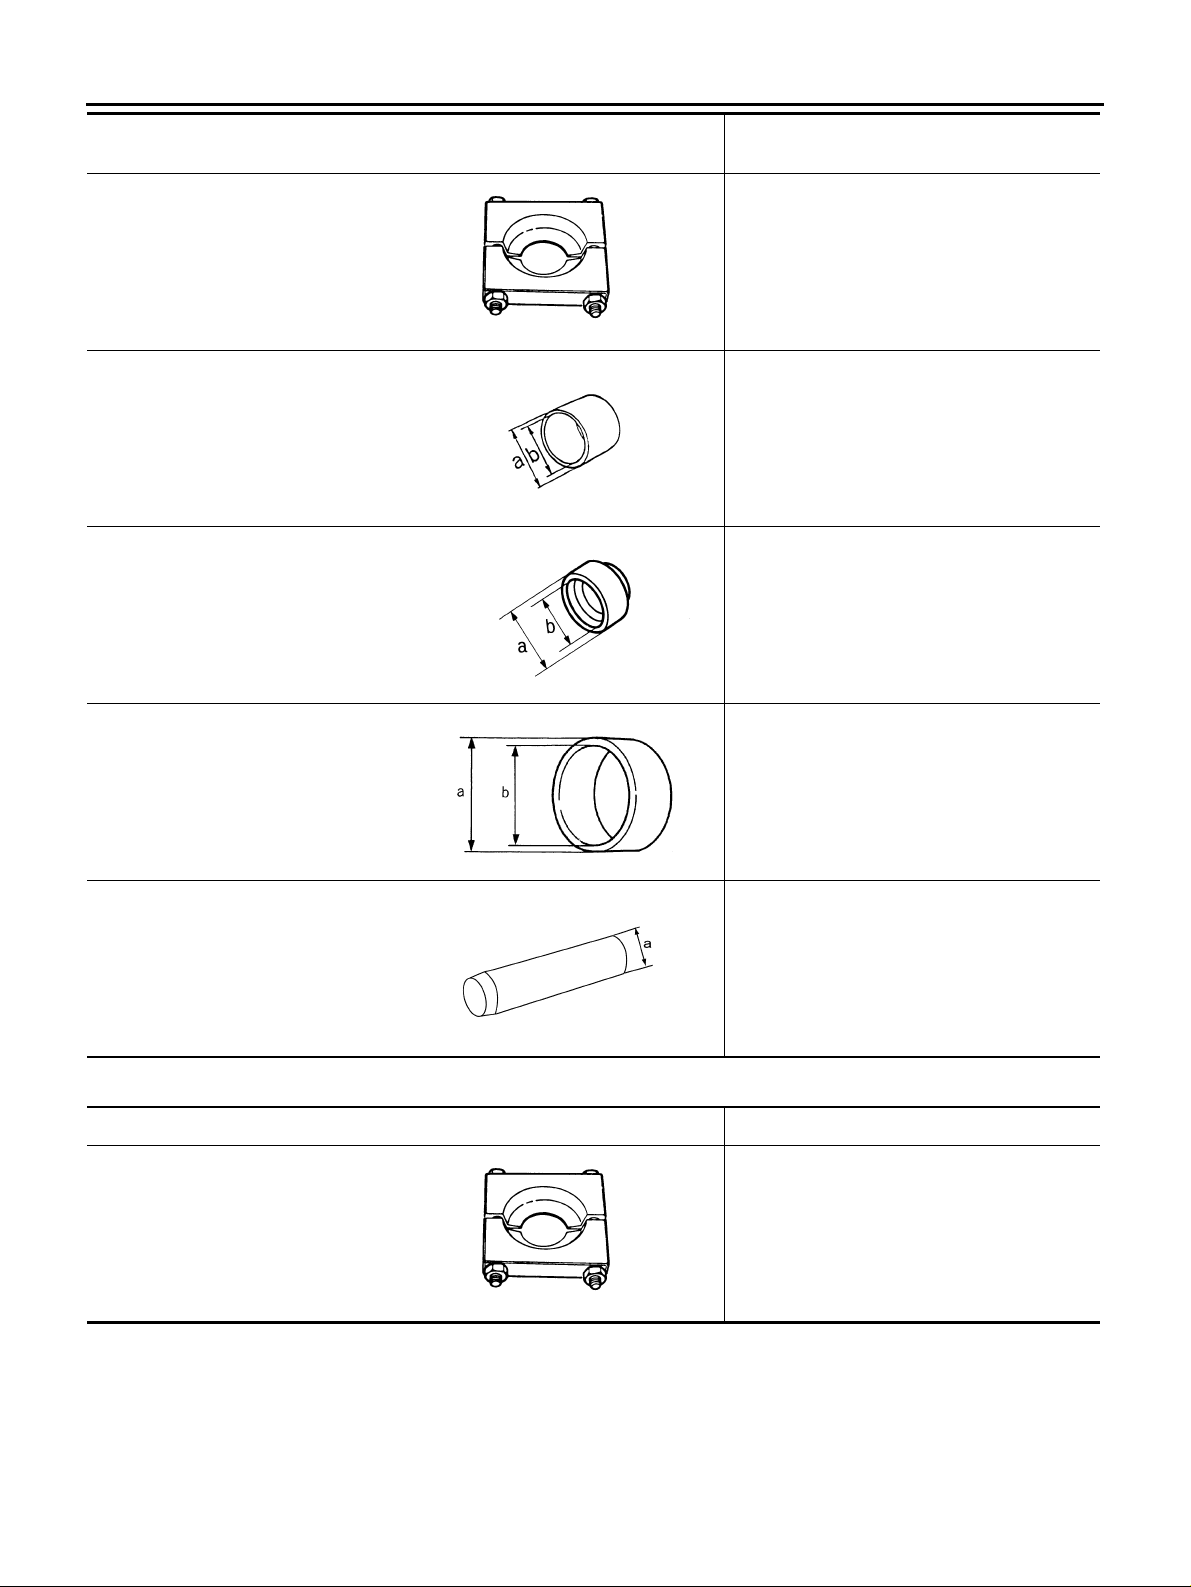
Tool number
Tool name
ST30031000
Puller
KV40101630
Drift
a: 68 mm (2.68 in) dia.
b: 60 mm (2.36 in) dia.
KV38102510
Drift
a: 71 mm (2.80 in) dia.
b: 65 mm (2.56 in) dia.
KV40104830
Drift
a: 70 mm (2.76 in) dia.
b: 63.5 mm (2.500 in) dia.
Description
Measuring wear of inner baulk ring
ZZA0537D
Reverse main gear installation
ZZA1003D
● 1st main gear bushing installation
● 1st-2nd synchronizer hub assemb ly
installation
● Differential side bearing (transaxle case
side) installation
ZZA0838D
Differential side bearing (clutch housing side)
installation
ZZA0936D
ST15243000
Measuring end play of side gear
Drift
a: φ 30mm
SCIA1088J
Commercial Service Tools ECS008BO
Tool name Description
Puller Each bearing, gear and bushing removal
ZZA0537D
MT-6
Page 7
PREPARATION
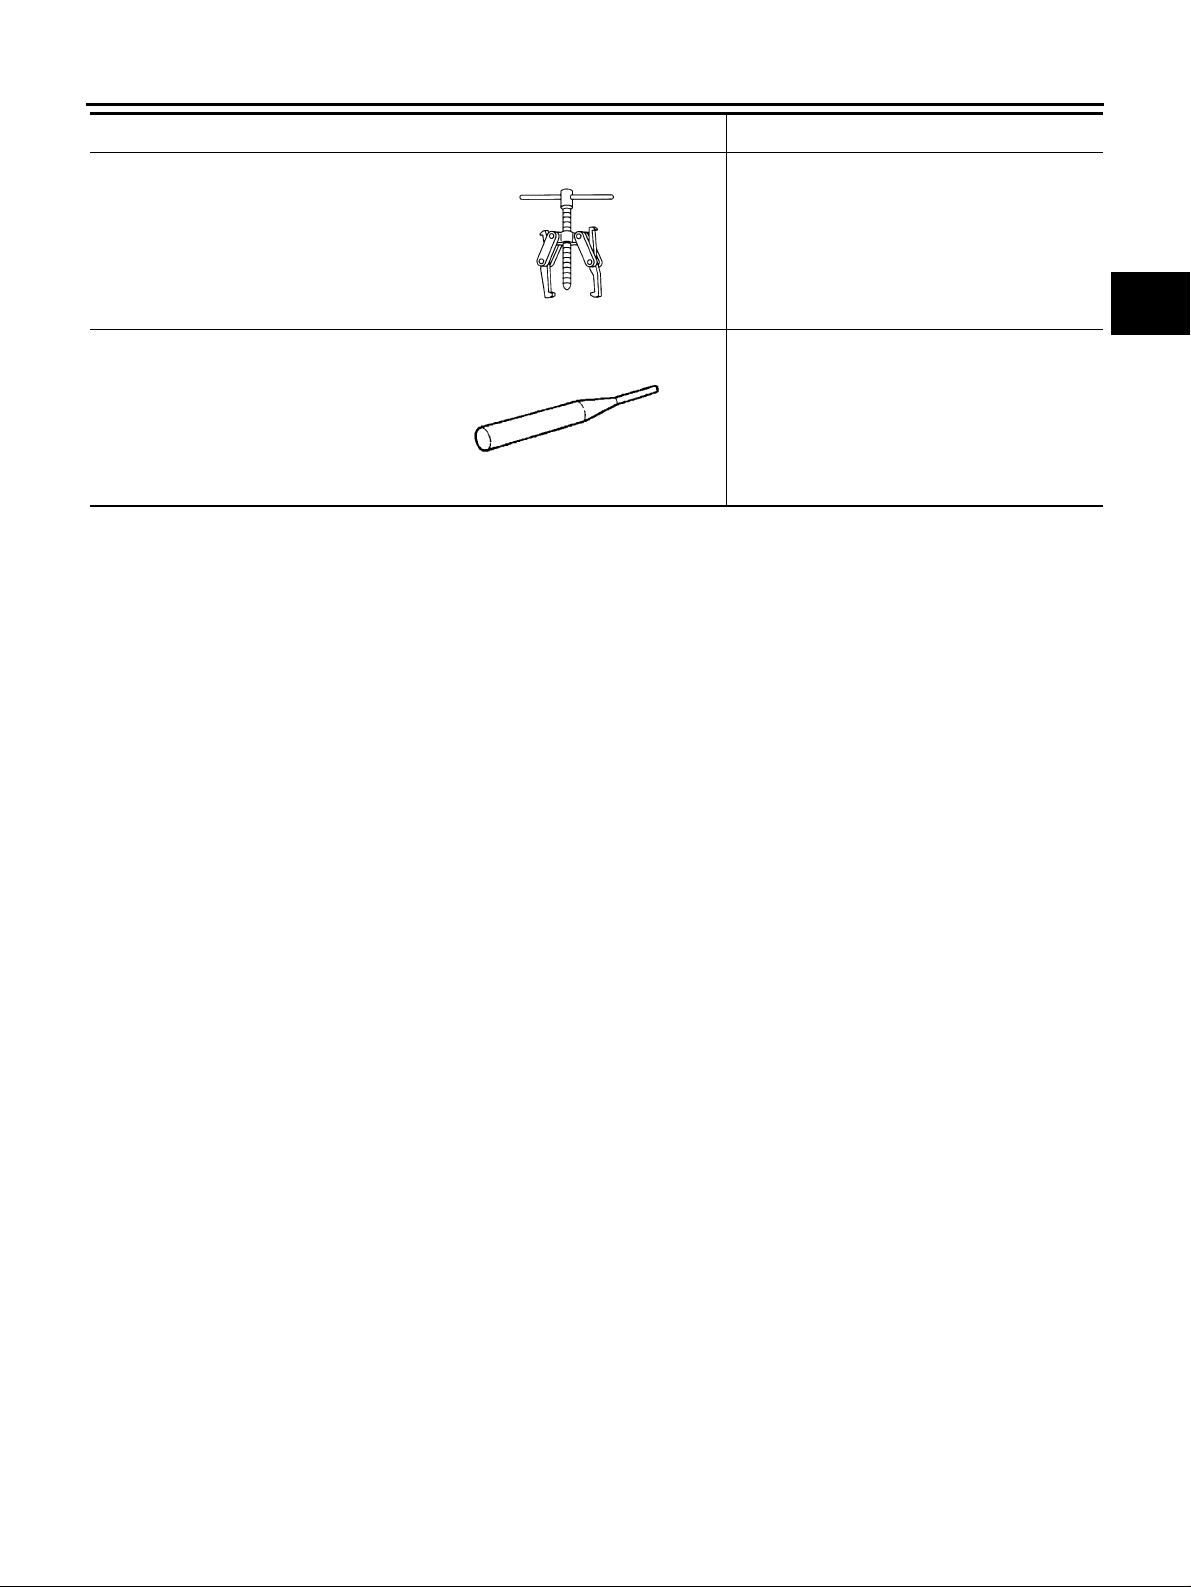
Tool name Description
Puller Each bearing, gear and bushing removal
NT077
Pin punch
Tip diameter: 4.5 mm (0.177 in) dia.
ZZA0815D
Each retaining pin removal and installation
A
B
MT
D
E
F
G
H
K
M
I
J
L
MT-7
Page 8

NOISE, VIBRATION AND HARSHNESS (NVH) TROUBLESHOOTING
NOISE, VIBRATION AND HARSHNESS (NVH) TROUBLESHOOTING PFP:00003 NVH Troubleshooting Chart ECS008BP
Use the chart below to help you find the cause of the symptom. The numbers indicate the order of the inspection. If necessary, repair or replace these parts.
MANUAL TRANSAXLE
Reference page
SUSPECTED PARTS
(Possible cause)
MA-37
(RS5F51A), MT-24 (RS6 F 51A )
MT-19(RS5F51A), MT-24 (RS6F51A)
MT-19
MT-14
(RS5F51A), MT-24 (RS6 F 51A )
MT-19
(RS5F51A), MT-27 (RS6 F 51A )
(RS5F51A), MT-25 (RS6 F 51A )
(RS5F51A), MT-25 (RS6 F 51A )
(RS5F51A), MT-25 (RS6 F 51A )
(RS5F51A), MT-25 (RS6 F 51A )
MT-22(RS5F51A), MT-27 (RS6F51A)
MT-22
MT-20
MT-20
MT-20
MT-20
Symptoms
OIL (Oil level is low.)
OIL (Wrong oil.)
OIL (Oil level is high.)
GASKET (Damaged)
OIL SEAL (Worn or damaged)
O-RING (Worn or damaged)
SHIFT CONTROL LINKAGE (Worn)
CHECK PLUG RETURN SPRING AND CHECK BALL (Worn or damaged)
SHIFT FORK (Worn)
GEAR (Worn or damaged)
BEARING (Worn or damaged)
BAULK RING (Worn or damaged)
Noise 1 2 3 3
Oil leakage 31222
Hard to shift or will not shift 1 1 2 3 3
Jumps out of gear 1 2 3 3
MT-8
INSERT SPRING (Damaged)
Page 9
DESCRIPTION
DESCRIPTION PFP:00000
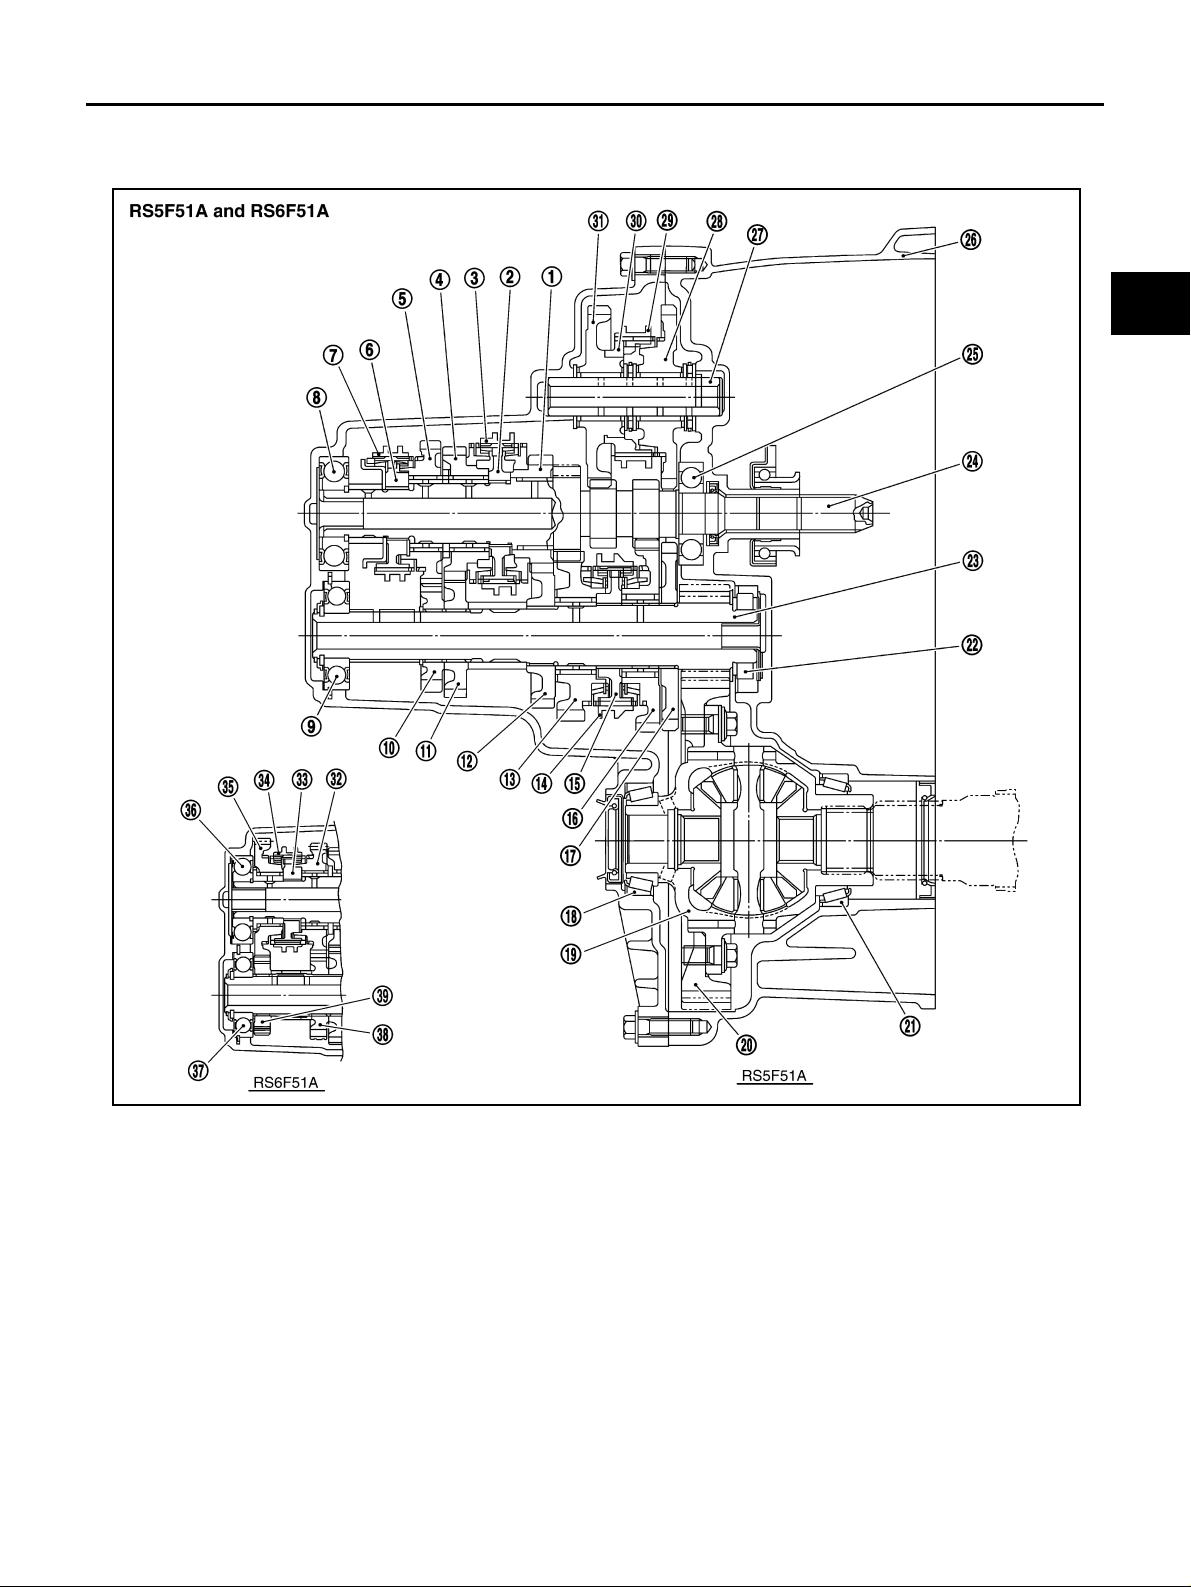
Cross-Sectional View ECS008BQ
A
B
MT
D
E
F
G
1. 3rd input gear 2. 3rd-4th synchronizer hub 3. 3rd-4th coupling sleeve
4. 4th input gear 5. 5th input gear 6. 5th synchronizer hub
7. 5th coupling sleeve 8. Input shaft rear bearing 9. Mainshaft rear bearing
10. 5th main gear 11. 4th main gear 12. 3rd main gear
13. 2nd main gear 14. 1st-2nd coupling sleeve 15. 1st-2nd synchronizer hub
16. 1st main gear 17. Reverse main gear 18. Differential side bearing
19. Differential case 20. Final gear 21. Differential side bearing
22. Mainshaft front bearing 23. Mainshaft 24. Input shaft
25. Input shaft front bearing 26. Clutch housing 27. Reverse idler shaft
28. Reverse idler gear (Front) 29. Reverse coupling sleeve 30. Reverse synchronizer hub
31. Reverse idler gear (Rear) 32. 5th input gear 33. 5th-6th syn chr oni zer hub
34. 5th-6th coupling sleeve 35. 6th input gear 36. Input shaft rea r bea ring
37. Mainshaft rear bearing 38. 5th main gear 39. 6th main gear
PCIB0773E
H
I
J
K
L
M
MT-9
Page 10
DESCRIPTION
DOUBLE-CONE SYNCHRONIZER
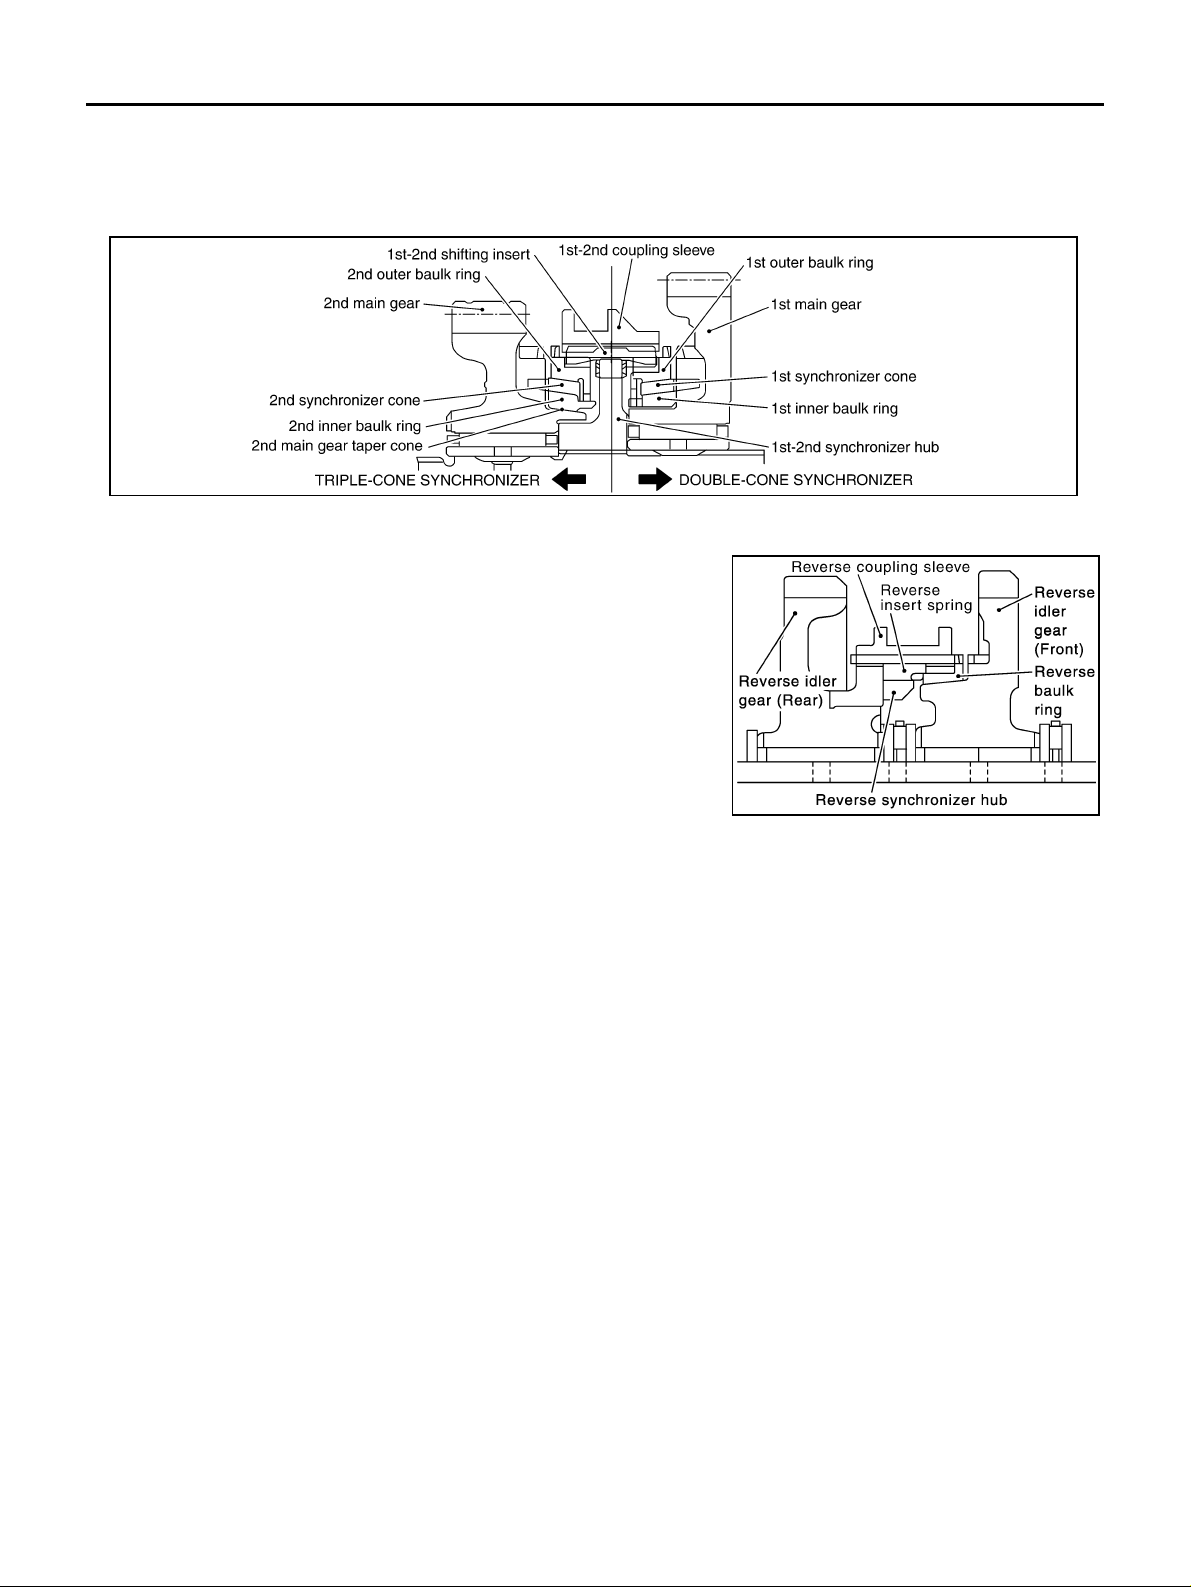
Double-cone synchronizer is adopted for 1st gear to reduce operating force of the shift lever.
TRIPLE-CONE SYNCHRONIZER
Triple-cone synchronizer is ad op ted for 2nd gear to red uc e op era tin g forc e of the shi ft lev er.
REVERSE GEAR NOISE PREVENTION FUNCTION (SYNCHRONIZING METHOD)
Reverse gear can be matc hed sm ooth ly in a struc ture b y set ting syn chronizer hub, coupling sleeve, baulk ring and insert spring to
reverse gear, and letting reverse gear be synchronized.
PCIB0774E
PCIB0775E
MT-10
Page 11
M/T OIL
M/T OIL PFP:KLD20
Changing M/T Oil ECS008BR
DRAINING
1. Start engine and let it run to warm up transaxle.
2. Stop engine. Remove drain plug and drain oil.
3. Set a new gask et on d rain p lug an d install i t to t ransaxl e. Ref er to MT-19, "
PONENTS" , MT-24, "CASE AND HOUSING COMPONENTS" .
CAUTION:
Do not reuse gasket.
CASE AND HOUSING COM-
A
B
MT
FILLING
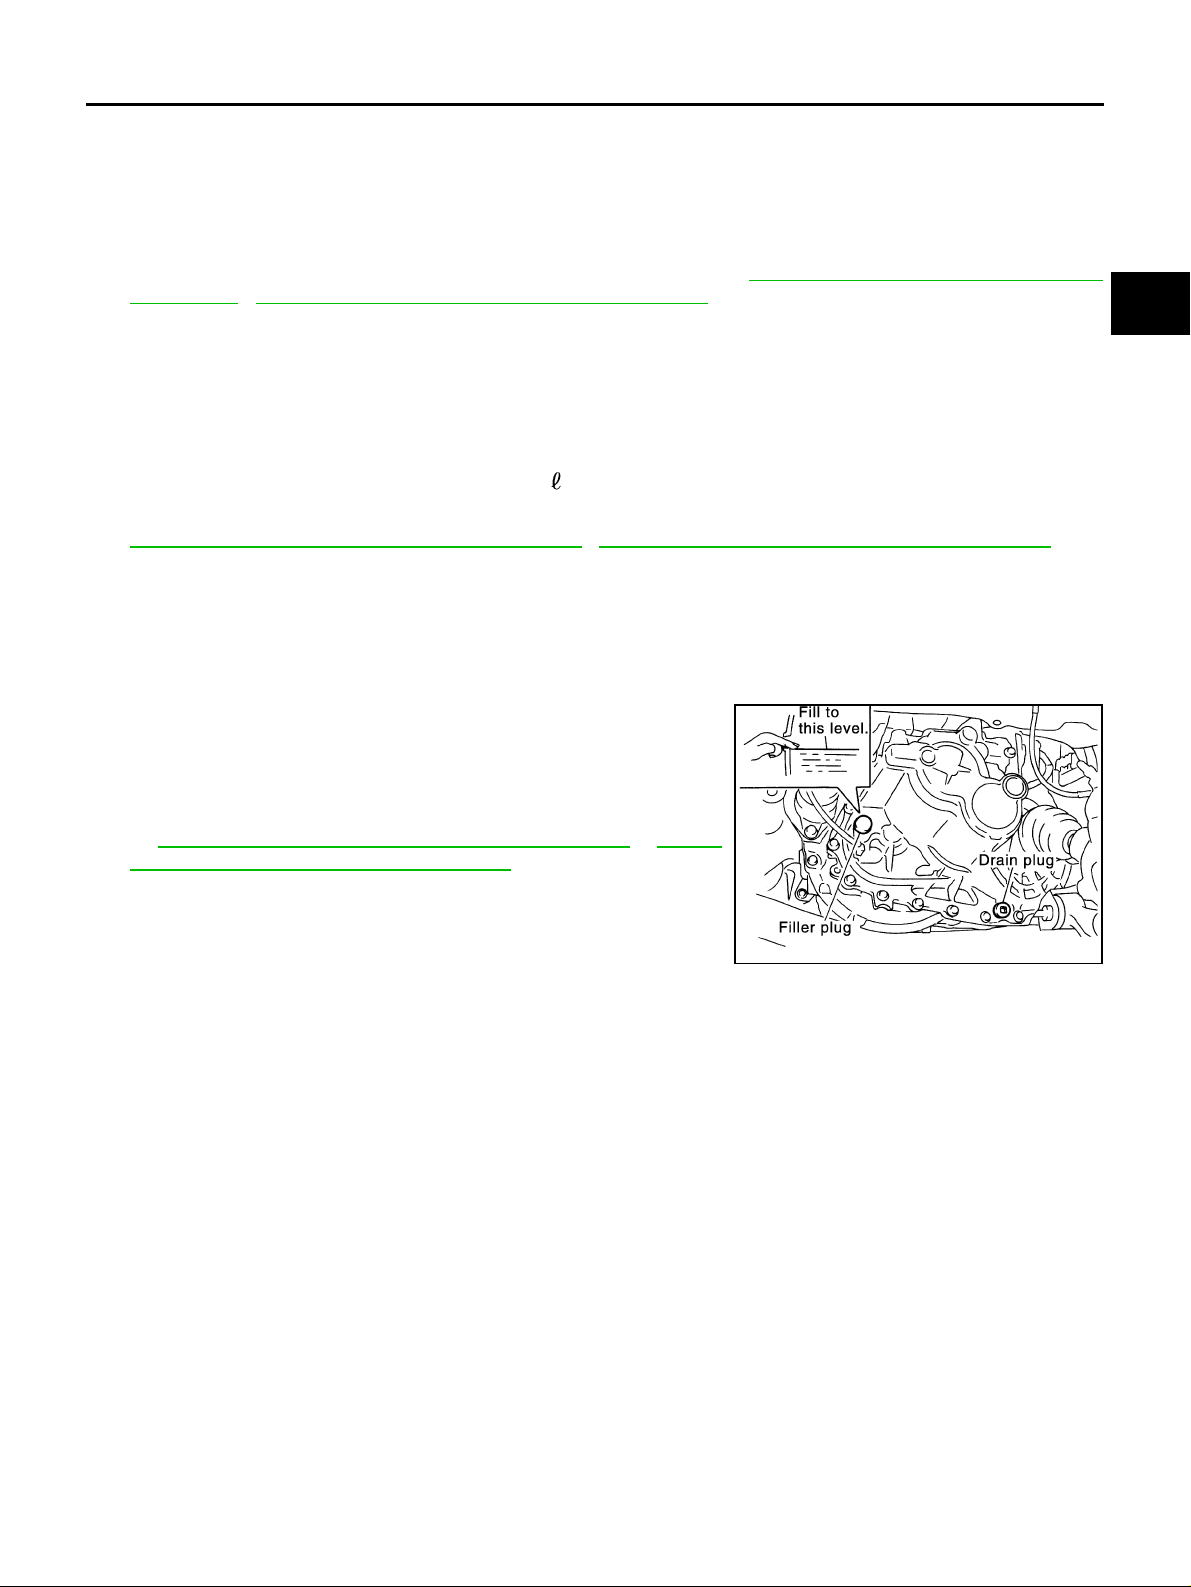
1. Remove filler plug. Fill with new oil until oil level reaches the specified limit near filler plug mounting hole.
Oil grade : API GL-4
Oil cap acity (reference)
: Approx. 2.3 (4 lmp pt)
2. After refillin g oil, check oil le vel. Assem ble a new gasket to filler plug, the n install it to transaxl e. Refer to
MT-19, "
CASE AND HOUSING COMPONENTS" , MT-24, "CASE AND HOUSING COMPONENTS" .
CAUTION:
Do not reuse gasket.
Checking M/T Oil ECS008BS
OIL LEAKAGE AND OIL LEVEL
● Check that oil is not leaking from transaxle or around it.
● Check oil level from filler plug mounting hole as shown in the fig-
ure.
CAUTION:
Never start engine while checking oil level.
● Set a new gasket on fill er plug and install it on transaxle . Refer
to MT-19, "
"CASE AND HOUSING COMPONENTS" .
CAUTION:
Do not reuse gasket.
CASE AND HOUSING COMPONENTS" , MT-24,
SCIA0361E
D
E
F
G
H
I
J
K
L
M
MT-11
Page 12
SIDE OIL SEAL
SIDE OIL SEAL PFP:32113 Removal and Installation ECS008BT
REMOVAL
● Clutch housing side oil seal used on 4WD vehicles is attached to transfer. Be sure to replace it
when transfer is removed.
1. Remove drive shaft from transaxle. Refer to FAX-11, "
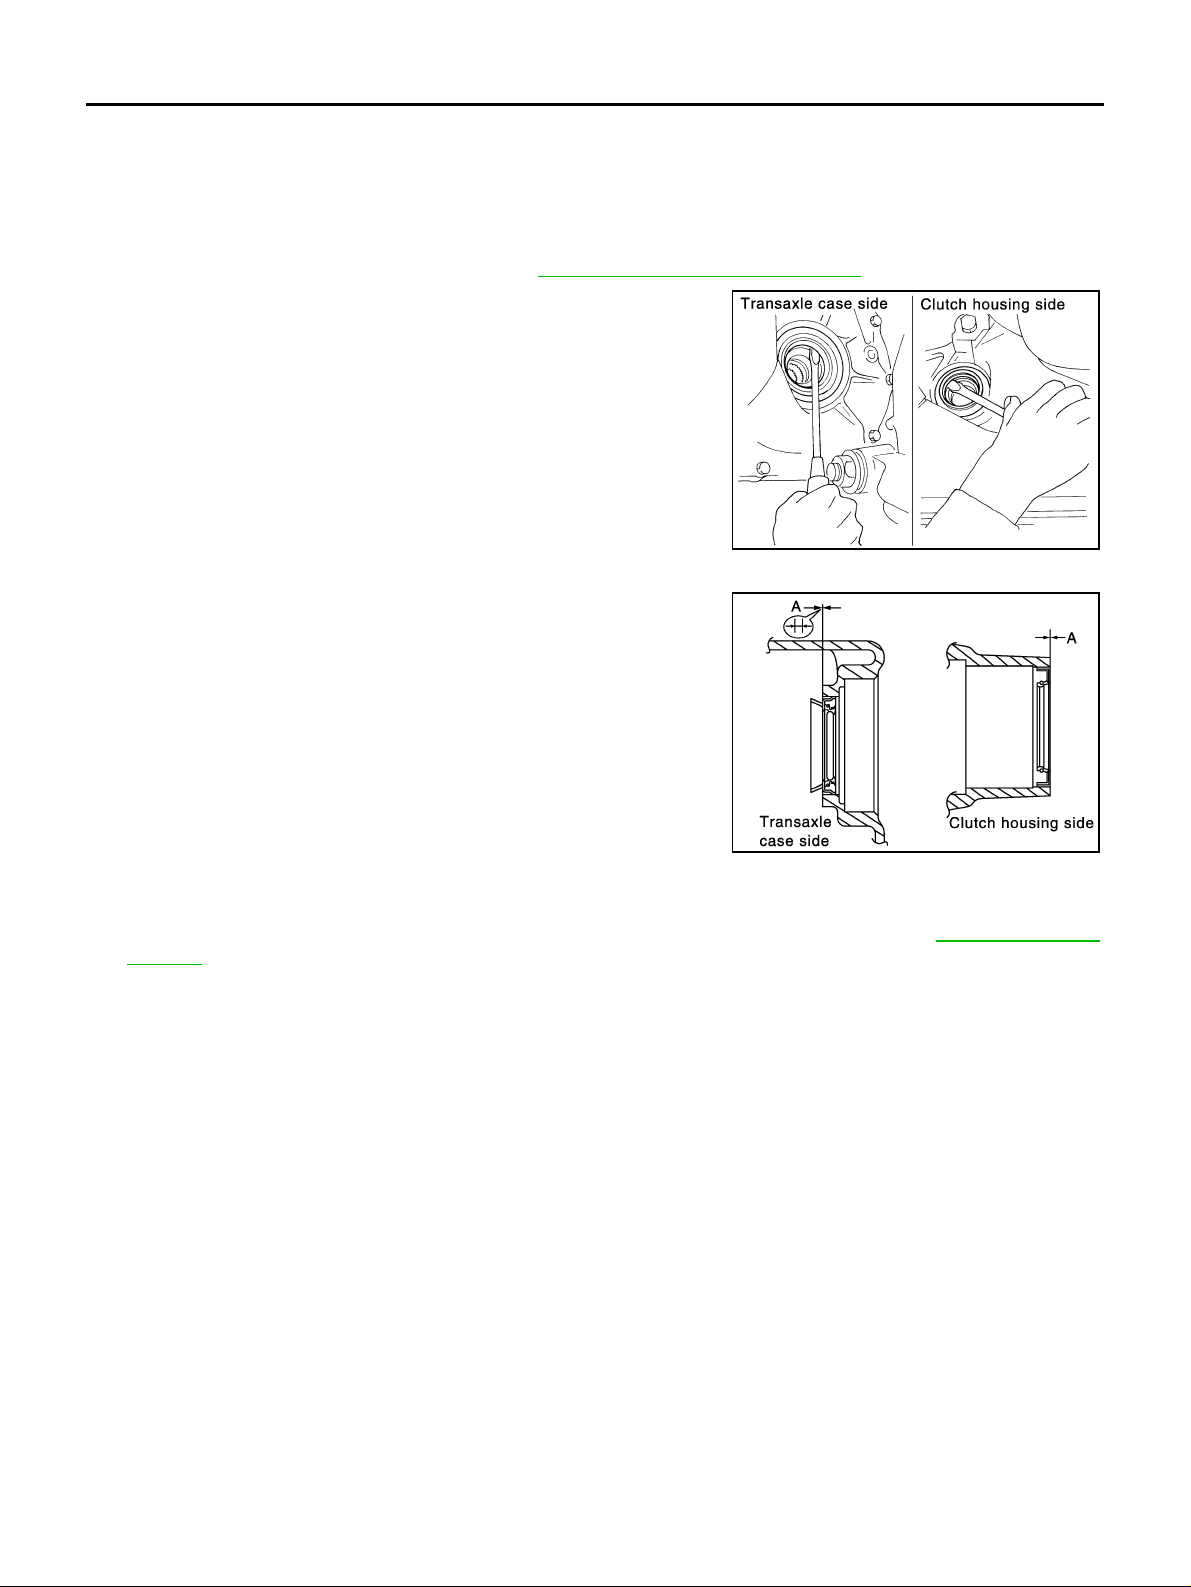
2. Remove oil seal with a flat-bladed scr ewdriver.
CAUTION:
Be careful not to damage the case surface when removing
oil seal.
INSTALLATION
1. Using a drift, drive the oil seal straight until it protrudes from the
case end equal to dimension A shown in the figure.
Dimension "A":
Within 0.5 mm (0.020 in) of flush with the case.
Removal and I nstallation" .
SCIA0824E
Drift to be used:
Transaxle case side: ST30720000
Clutch housing side: ST30720000
CAUTION:
● When installing oil seals , apply multi-purpose grea se to
oil seal lips.
● Oil seals are not reusable. Never reuse them.
2. Install all parts in reverse order of removal and check oil level after installation. Refer to MT-11, "
M/T Oil" .
SCIA0352E
Checking
MT-12
Page 13
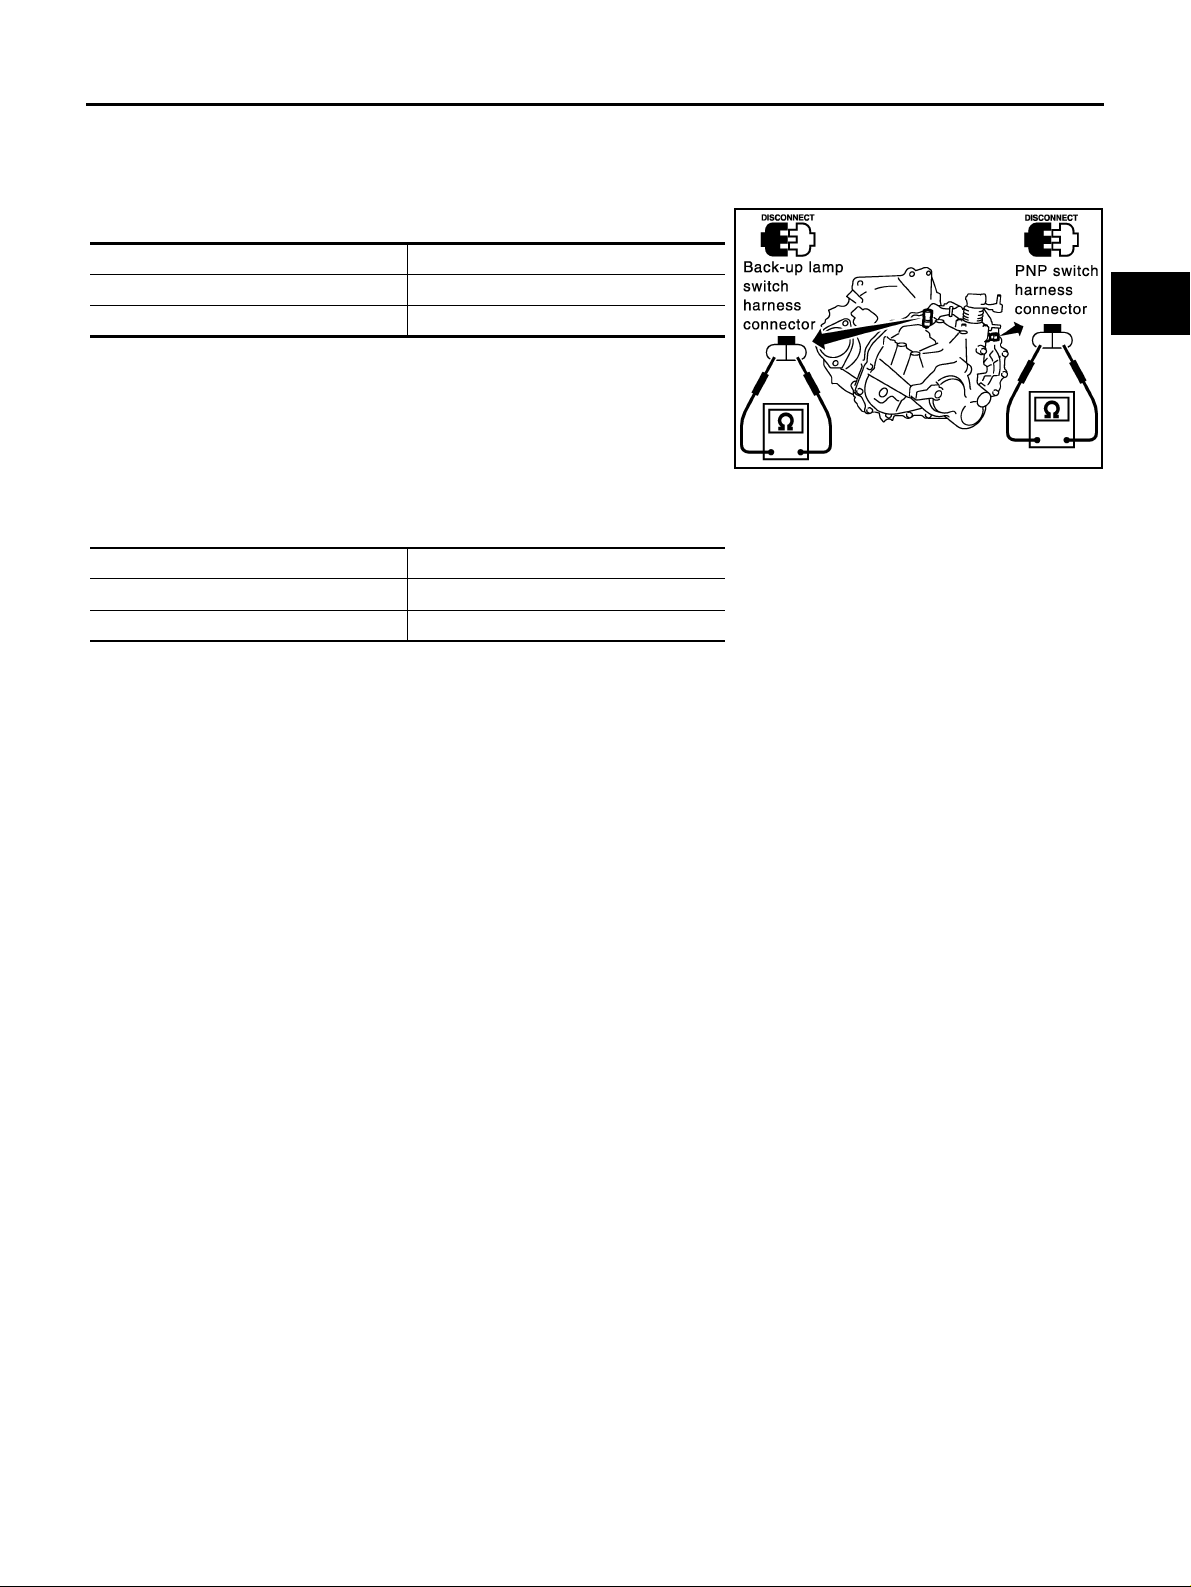
POSITION SWITCH
POSITION SWITCH PFP:32005
Checking ECS008BU
BACK-UP LAMP SWITCH
● Check continuity.
Gear position Continuity
Reverse Yes
Except reverse No
A
B
MT
D
PARK/NEUTRAL POSITION SWITCH
● Check continuity.
Gear position Continuity
Neutral Yes
Except neutral No
SCIA0708E
E
F
G
H
I
J
K
L
M
MT-13
Page 14
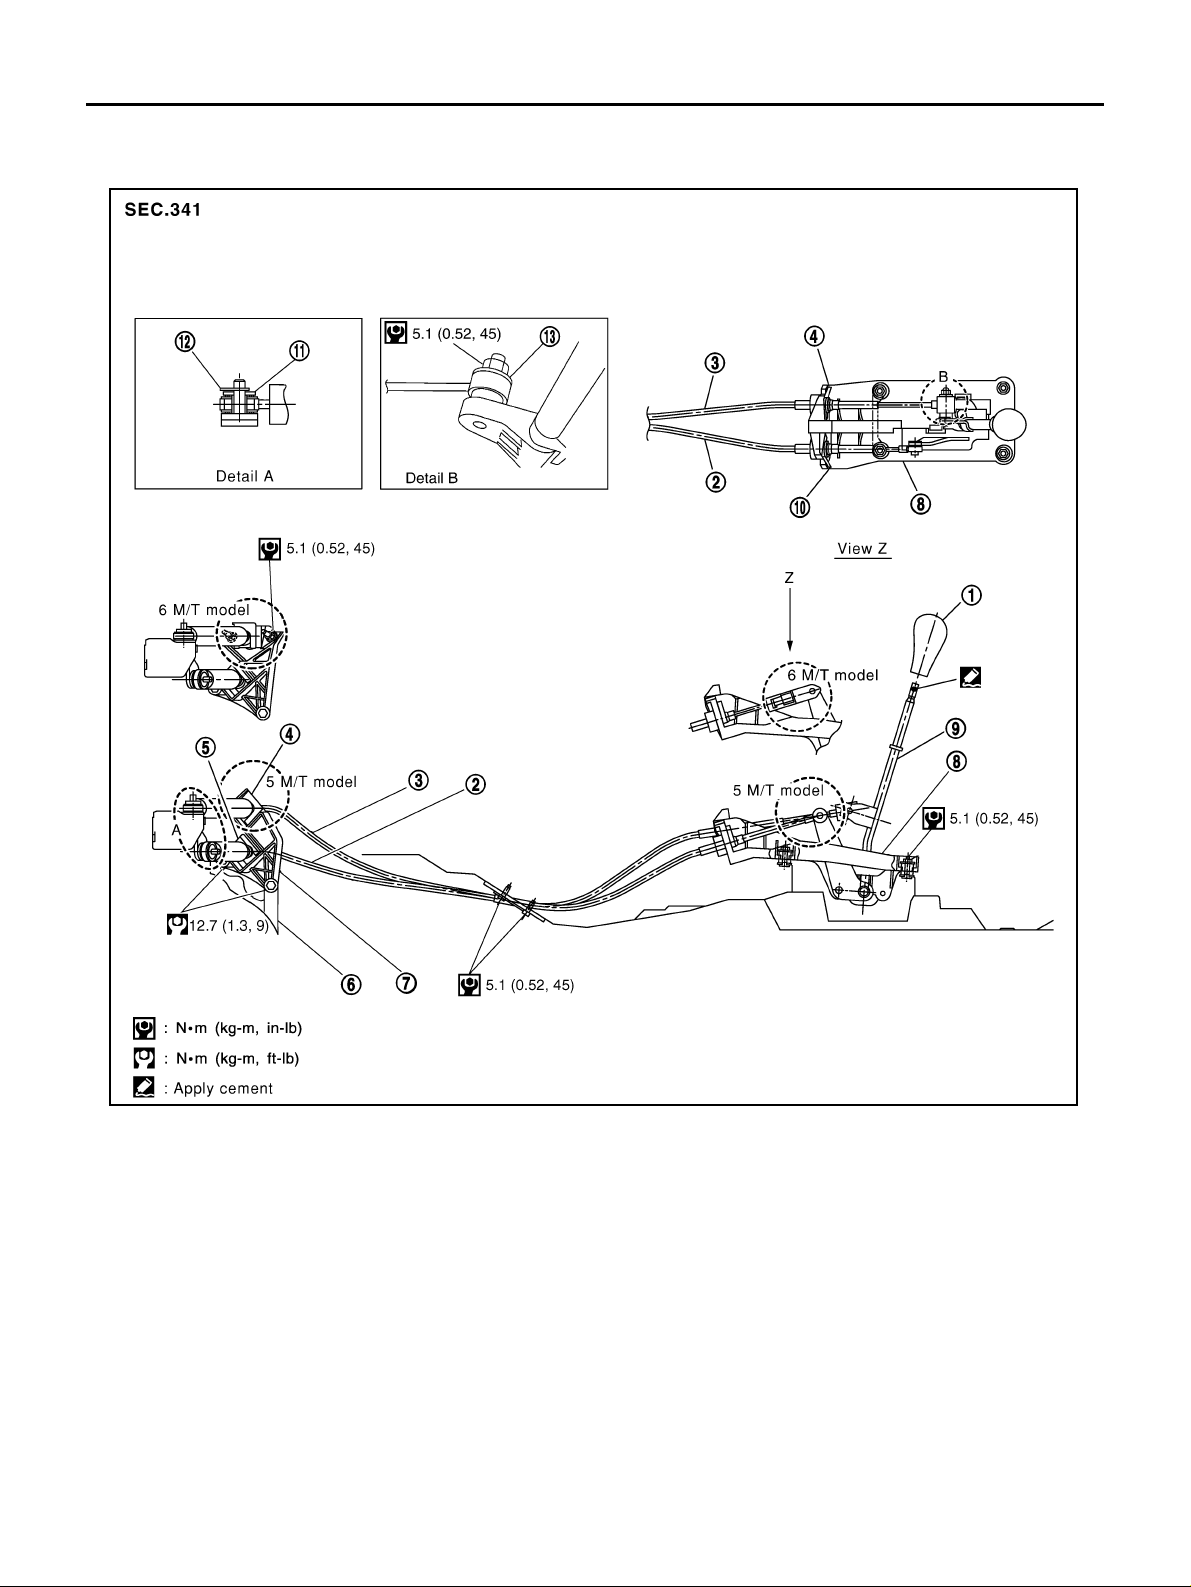
CONTROL LINKAGE
CONTROL LINKAGE PFP:34103 Components of Control Device and Cable ECS008BV
1. Control lever knob 2. Select cable 3. Shift cable
4. Lock plate 5. Lock plate 6. Clutch housing
7. Cable mounting bracket 8. Control device assembly 9. Control lever
10. Lock plate 11. Washer 12. Snap pin
13. Washer
MT-14
PCIB0777E
Page 15
CONTROL LINKAGE
Removal and Installation ECS00CY6
CAUTION:
● Keep in mind that the select side lock plate for securing control cable is different from the one on
the shift side.
● After assembly, make sure selector leve r automa ticall y retu rns to Ne utral wh en it is move d to 1st,
2nd, or Reverse.
● Shift control lever to the neutral position for removal.
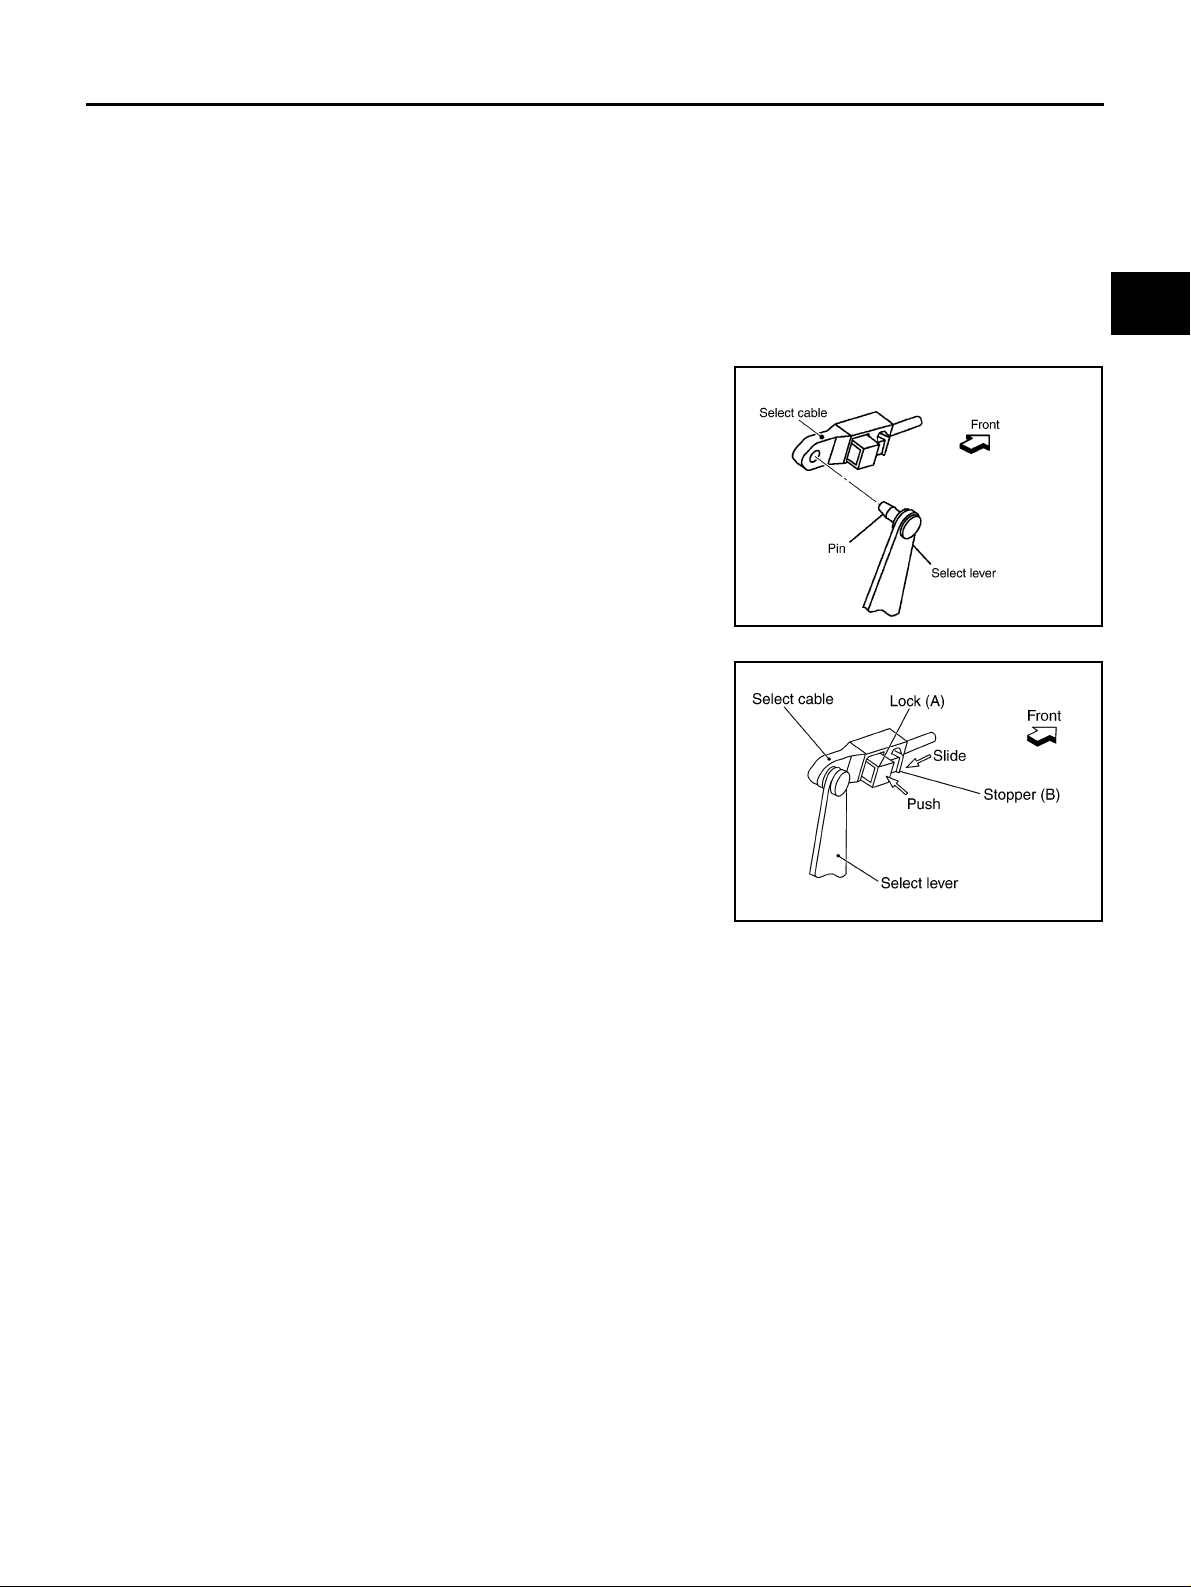
Install select cable according to the following procedure.
1. Install select cable of transaxle side to control assembly.
2. Install sele ct cable to pin on select lever part of control devi ce
assembly.
A
B
MT
D
E
F
3. Push lock part (A) of select cable all the way to the direction of
the arrow. (6 M/T model only)
4. Slide stopp er part (B) all the way to lock part (A) as shown by
the arrow. (6 M/T model only)
CAUTION:
Make sure that select cable and select lever are installed
securely.
PCIB0815E
PCIB0817E
G
H
I
J
K
L
M
MT-15
Page 16
AIR BREATHER HOSE
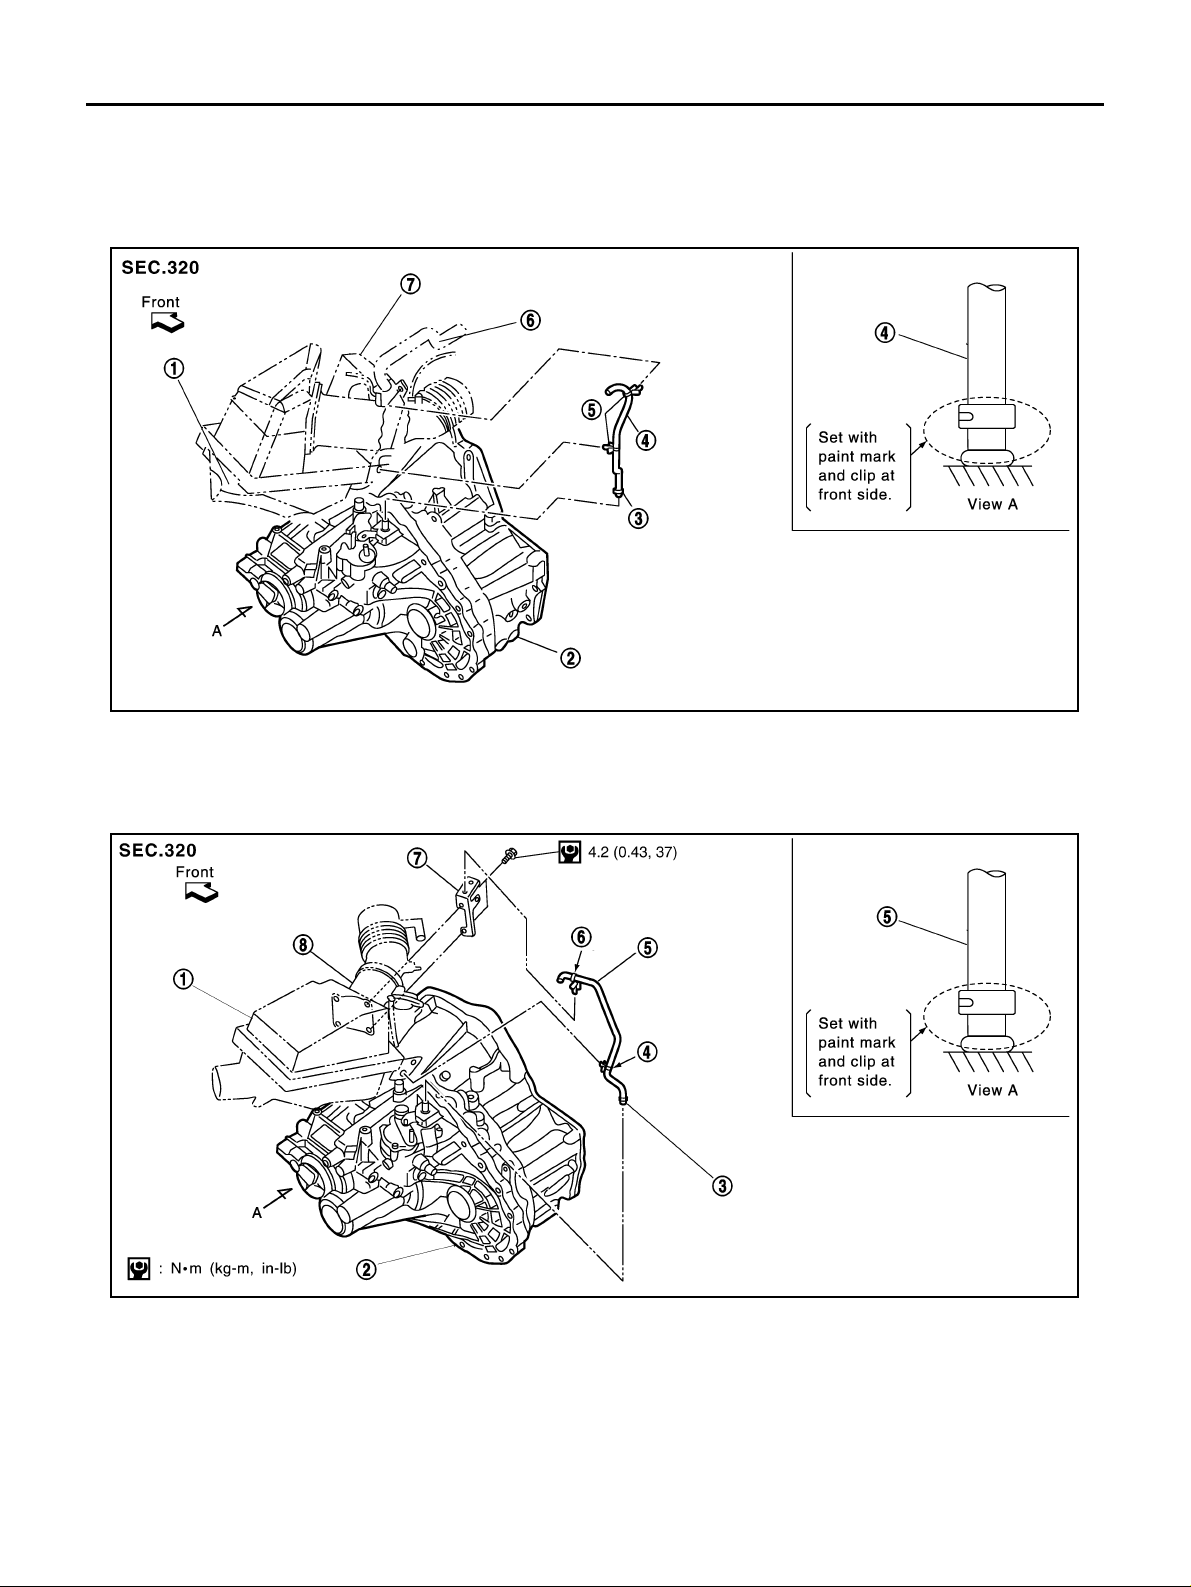
AIR BREATHER HOSE PFP:31098 Removal and Installation ECS008BW
Refer to the figure for air breather hose removal and installation information.
QR engine model
1. Air cleaner case 2. Transaxle 3. Clip
4. Air breather hose 5. Clip 6. PCV hose
7. Resonator
YD engine model
PCIB0778E
PCIB0779E
1. Air cleaner case 2. Transaxle 3. Clip
4. Clip 5. Air breather hose 6. Clip
7. Bracket 8. Mass air flow sensor
CAUTION:
● Make sure there are n o pinched or restricted areas on air bre ather hose caused by bending or
winding when installing it.
● Be sure to insert hose into transaxle tube until overlap area reaches the spool.
MT-16
Page 17
TRANSAXLE ASSEMBLY
TRANSAXLE ASSEMBLY PFP:32010
Removal and Installation ECS008BX
A
B
MT
D
E
F
G
PCIB0780E
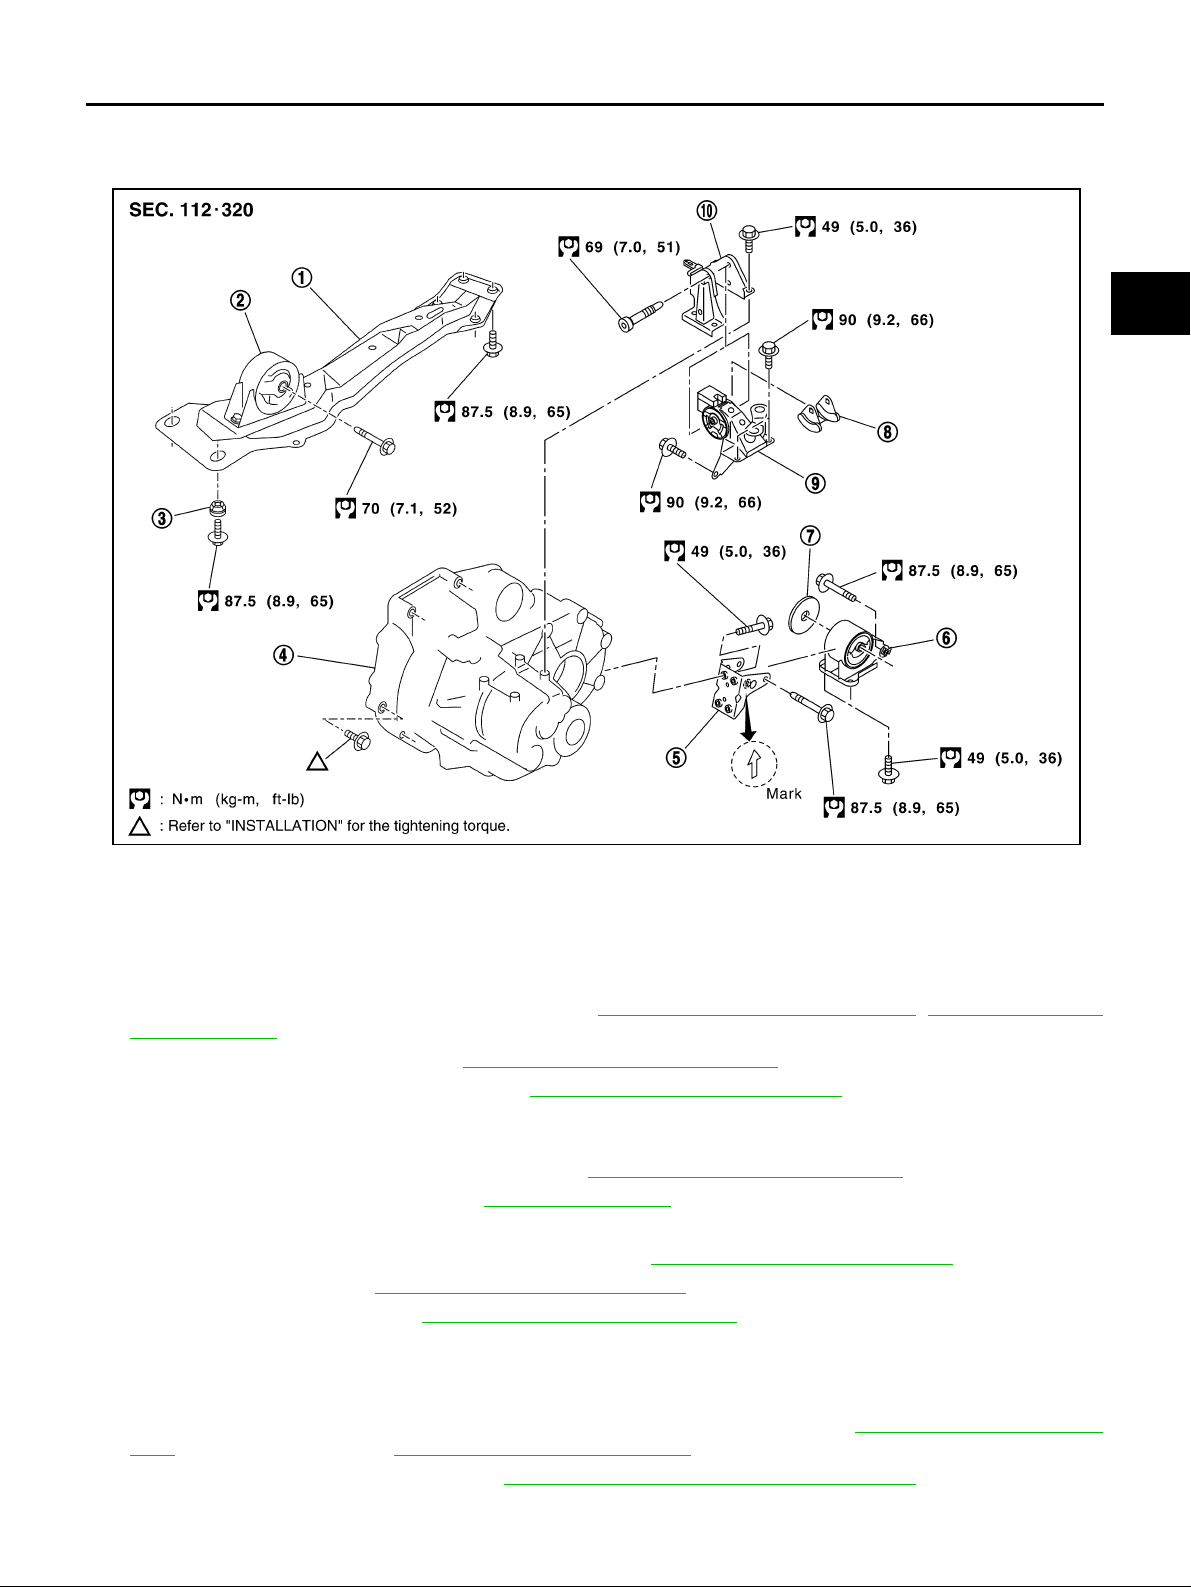
1. Center member 2. Insulator assembly 3. Grommet
4. Transaxle 5. Rear engi ne m ounting bracket 6. Rear engine mounting insulator
7. Stopper rubber (YD engine model) 8. Stopper 9. LH engine mount i ng in sulat or
10. LH engine mounting bracket
REMOVAL
1. Remove air cleaner, air duct, and battery. Refer to EM-15, "Removal and Installation" ,EM-133, "Removal
and Instal lation"
2. Remove air breather hose. Refer to MT-16, "Removal and Installation" .
3. Remove clutc h op era ting cylinder. Refer to CL-10, "
CAUTION:
Do not depress clutch pedal during removal procedure.
4. Disconnect control cable from transaxle. Refer to MT-15, "
5. Drain gear oil from transaxle. Refer to MT-11, "
6. Disconnect park/neutral position switch, back-up lamp swi tch, and ground harness co nnectors.
7. Remove exhaust front tube and the drive shaft. Refer to EX-2, "
8. Remove transfer. Refer to TF-55, "
9. Remove starter motor. Refer to SC-25, "
Removal and Installation" .
Removal and Installation" .
10. Place a jack onto transaxle.
CAUTION:
When setting jack, be careful not to bring it into contact with switch.
11. Remove center member, engine insulator and engine mount bracket. Refer to EM-78, "
BLY" (QR engine model) or EM-208, "ENGINE ASSEMBLY" (YD engine model).
12. Remove suspension members. Refer to FSU-12, "
13. Su pport engine by placing a jack under oil pan.
Removal and Installation" .
Removal and Installation" .
DRAINING" .
Removal and Ins tallation" .
ENGINE ASSEM-
FRONT SUSPENSION MEMBER" .
H
I
J
K
L
M
MT-17
Page 18
TRANSAXLE ASSEMBLY
14. Remove bolts securing transaxle to engine.
15. Remove transaxle from vehicle.
INSTALLATION
Paying attention to the following items, install in the reverse order of removal.
● When installing transaxle to engine, tigh ten bolts to the specified torque.
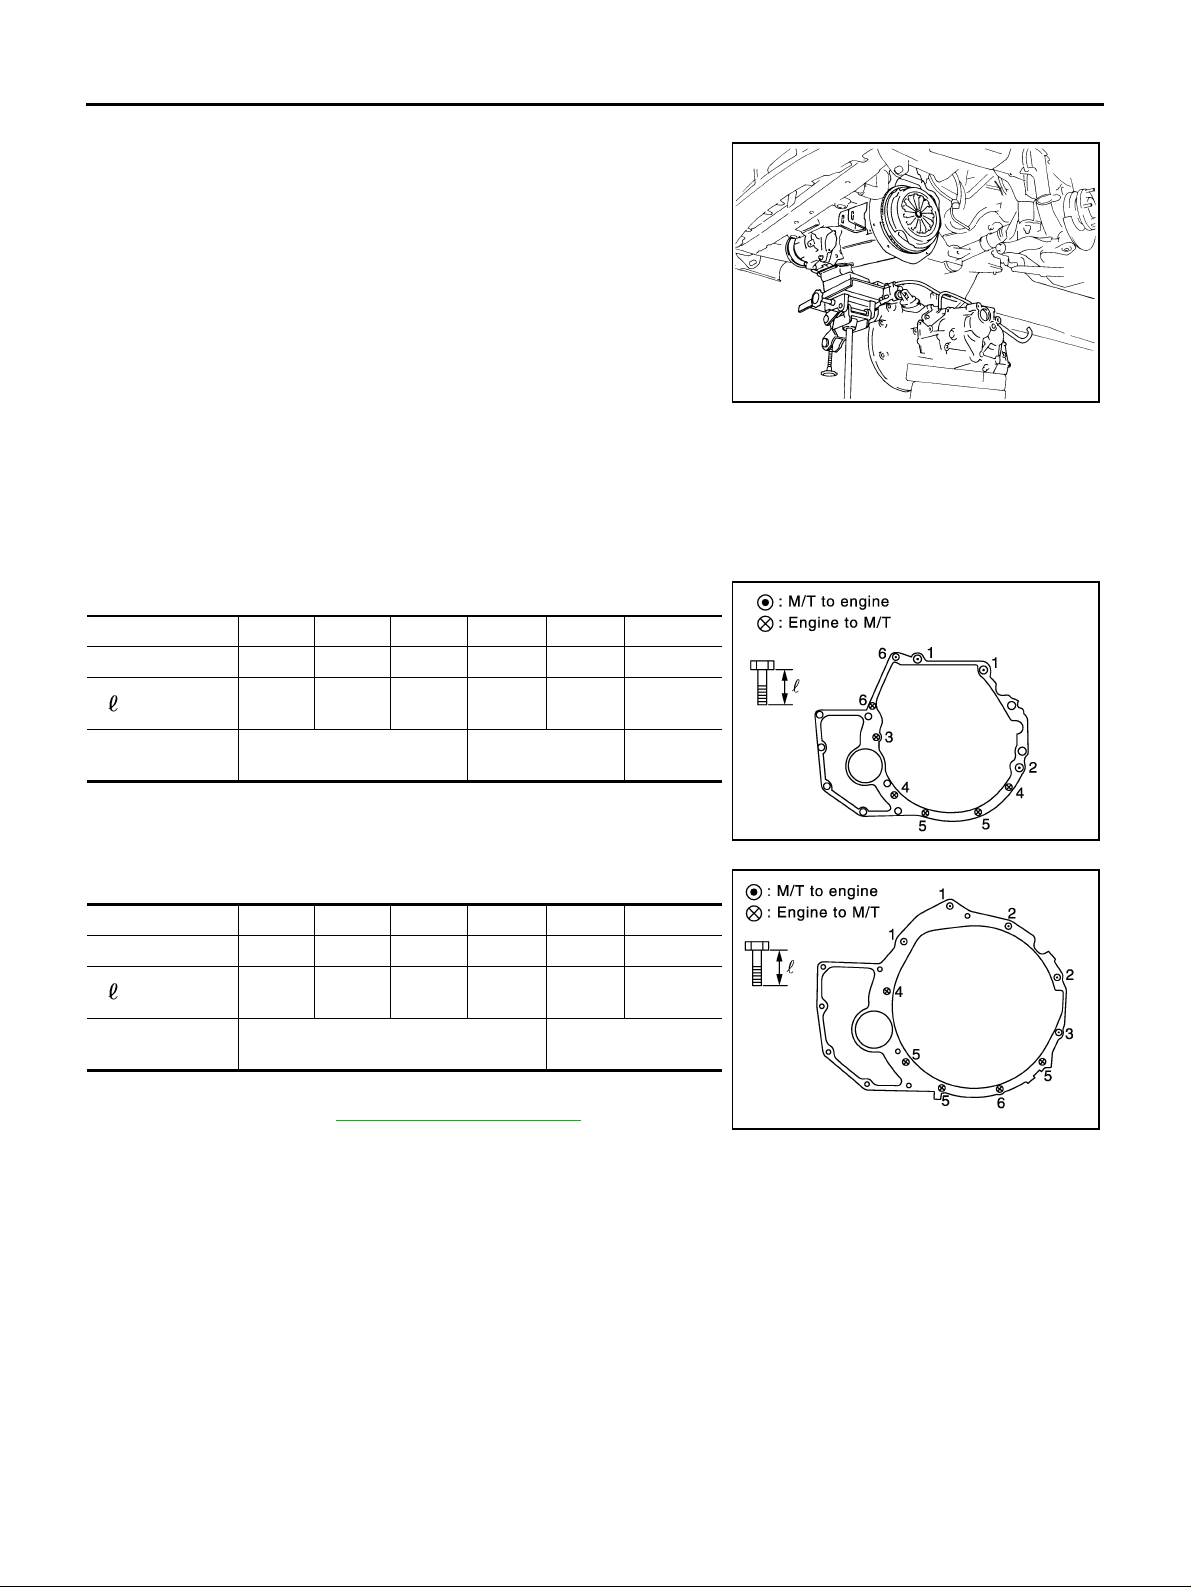
CAUTION:
When installing transaxle, be careful not to bring transaxle input shaft into contact with clutch
cover.
QR engine model:
Bolt No. 1 2 3 4 5 6
Quantity 2 1 1 2 2 2
“ ” mm (in)
Tightening torque
N·m (kg - m, ft- lb)
40
(1.57)75(2.95)45(1.77)40(1.57)30(1.18)
74.5
(7.6, 55)
42.7
(4.4, 31)
40
(1.57)
35.3
(3.6, 26 )
MTD0062D
YD engine model:
Bolt No. 1 2 3 4 5 6
Quantity 2 2 1 1 3 1
“ ” mm (in)
Tightening torque
N·m (kg - m, ft- lb)
● Afte r installation, chec k oil level, and check for leaks and loose
55
(2.17)50(2.76)
mechanisms . Refer to MT-11, "
120
(4.72)45(1.77)40(1.57)
44
(4.5, 32)
Checking M/T Oil" .
35
(1.38)
33.5
(3.4, 25)
SCIA0353E
SCIA0748E
MT-18
Page 19
TRANSAXLE ASSEMBLY
Component Parts (RS5F51A) ECS008BY
CASE AND HOUSING COMPONENTS
A
B
MT
D
E
F
G
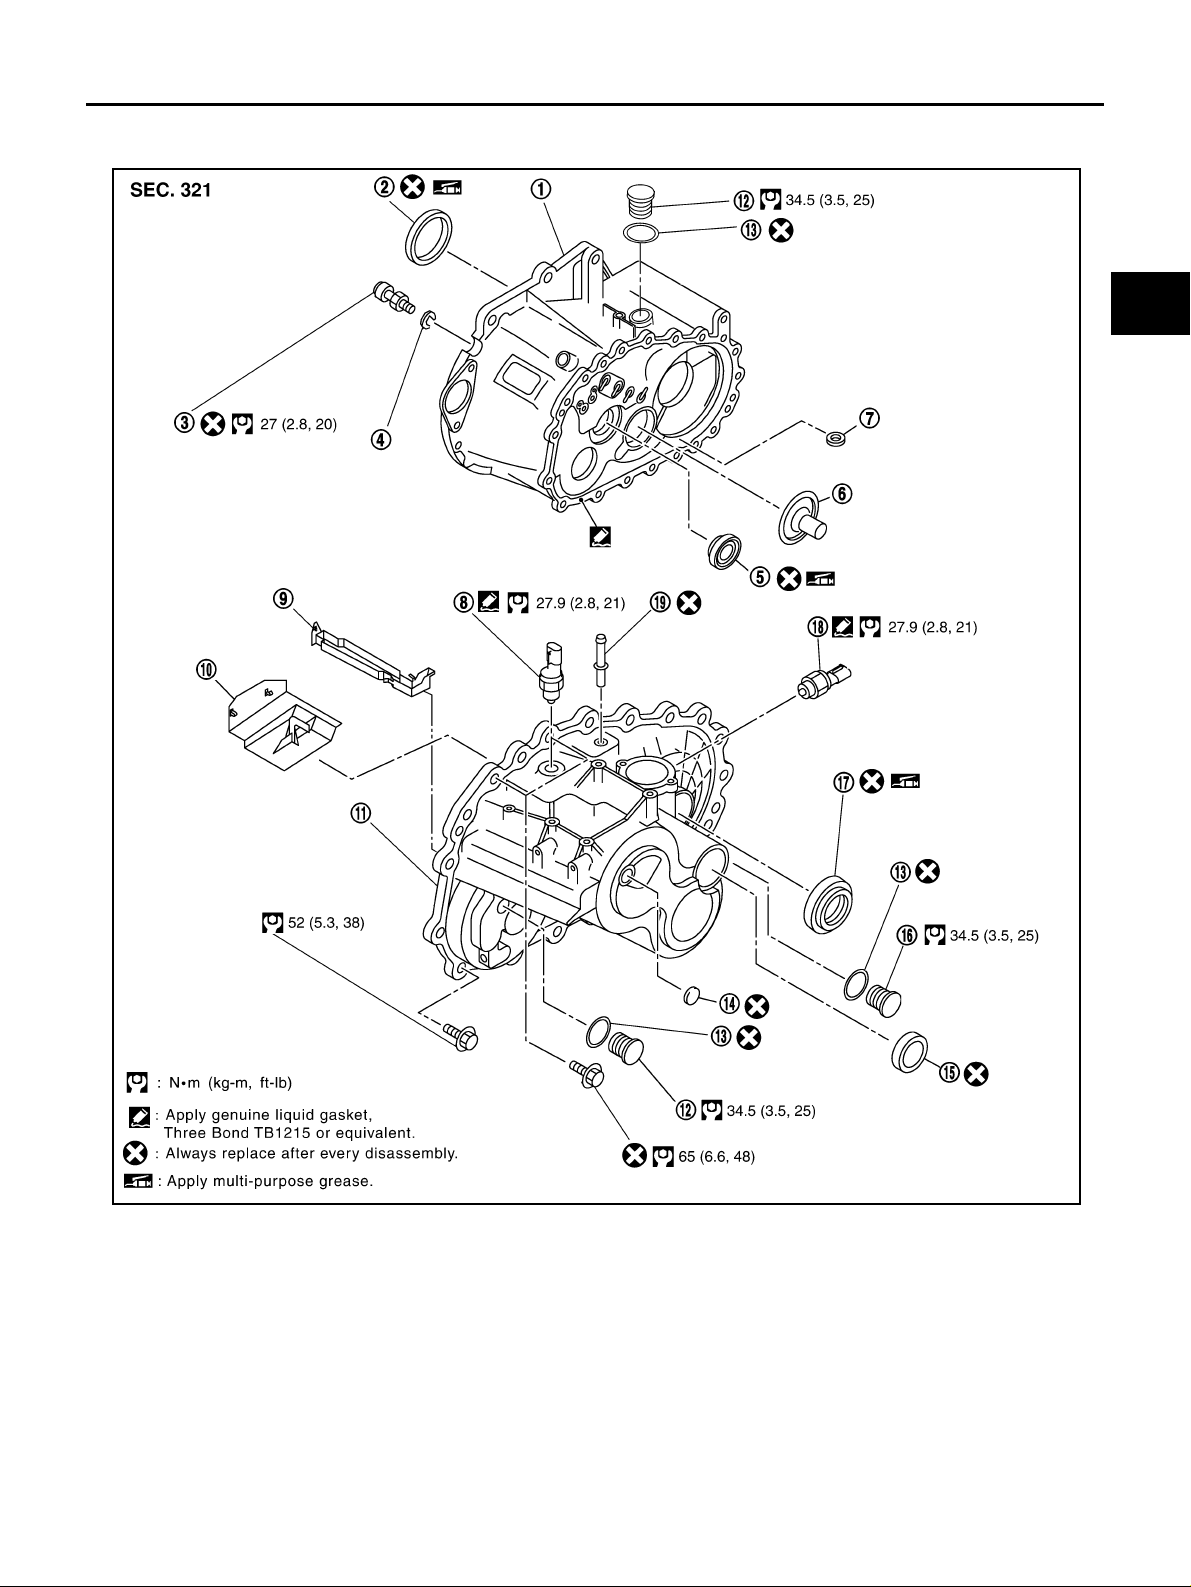
1. Clutch housing 2. Differential oil seal 3. Ball pin
4. Washer 5. Input shaf t oil sea l 6. Oil channel
7. Ma gnet 8. Back-up lam p sw itch 9. Oil gutter
10. Baffle plate 11. Transaxle case 12. Filler plug
13. Gasket 14. Welch plug 15. Bore plug
16. Drain plug 17. Differential oil seal 18. Park/Neutral position switch
19. Air breat her tube
H
I
J
K
L
M
PCIB0781E
MT-19
Page 20
GEAR COMPONENTS
TRANSAXLE ASSEMBLY
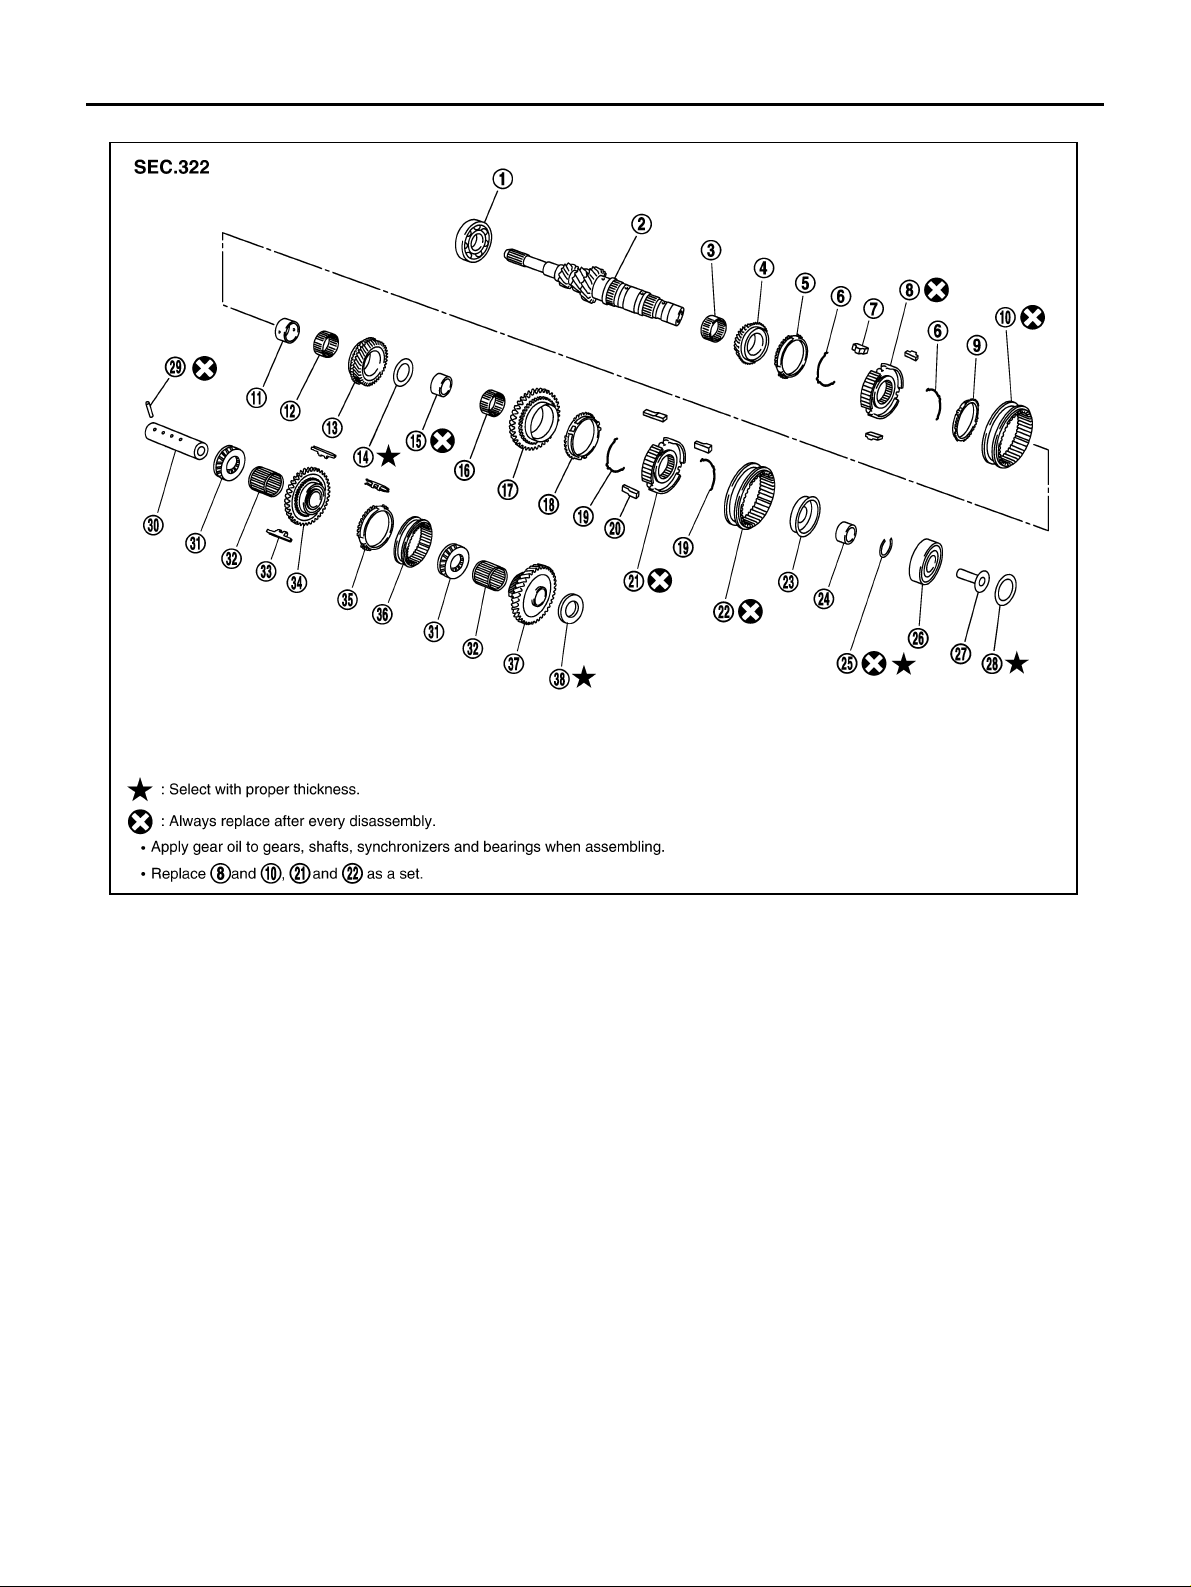
1. Input shaft front bearing 2. Input shaft 3. 3rd needle bearing
4. 3rd input gear 5. 3rd baulk ring 6. 3rd-4th sprea d spring
7. 3rd-4th shifting inse rt 8. 3rd-4th synchr onizer hub 9. 4th baulk ring
10. 3rd-4th coupling sleeve 11. 4th input gear bushing 12. 4th needle bearing
13. 4th input gear 14. Thrust washer 15. 5th input gear bushing
16. 5th needle bearing 17. 5th input gear 18. 5th baulk ring
19. 5th spread spring 20. 5th shifting insert 21. 5th synchronizer hub
22. 5th coupling sleeve 23. 5th stopper 24. Input shaft bearing spacer
25. Snap ring 26. Input shaft rear bearing 27. Oil channel
28. Input shaft rear bearing adjusting
shim
31. Thrust needle bearing 32. Reverse idler gear needle bearing 33. Reverse insert spring
34. Reverse idler gear (Fron t) 35. Reverse baulk ring 36. Reverse coupling sleeve
37. Reverse idler gear (Rear) 38. Reverse idler gear adjusting shim
29. Retaining pin 30. Reverse idler shaft
PCIB0782E
MT-20
Page 21
TRANSAXLE ASSEMBLY
A
B
MT
D
E
F
G
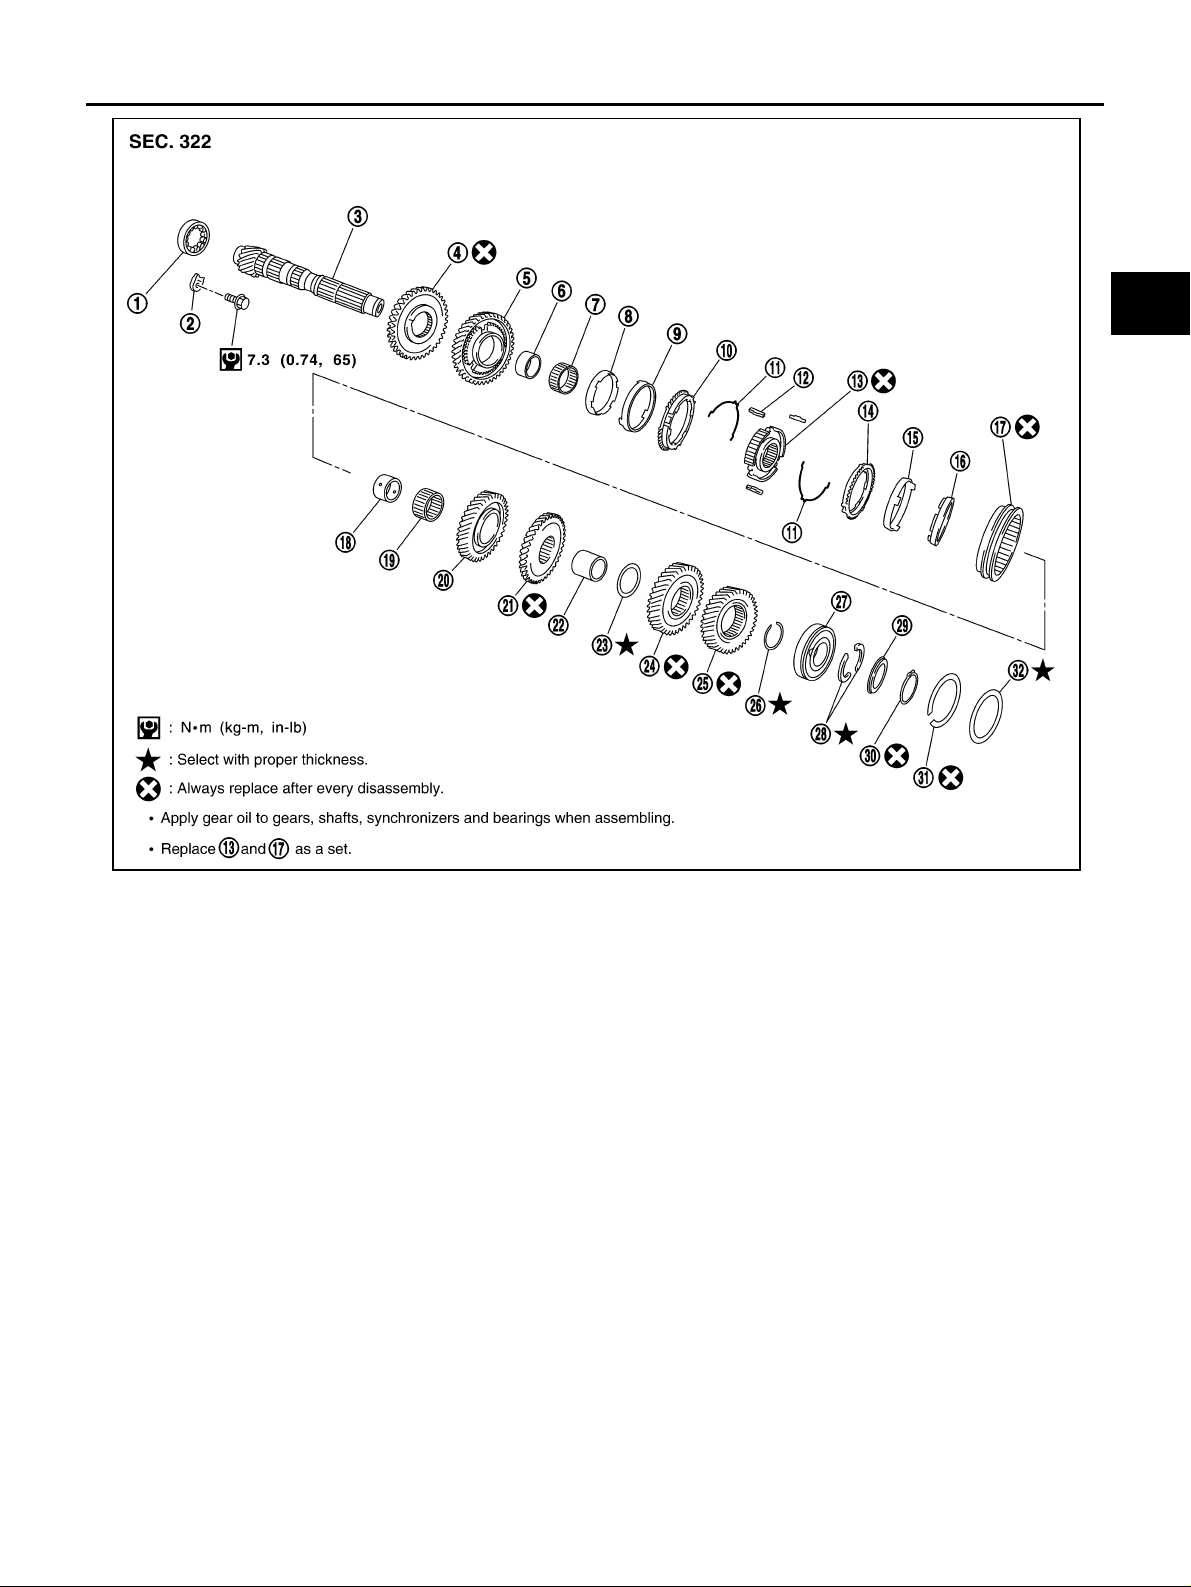
1. Mainshaft front bearing 2. Mainshaft bearing retainer 3. Mainshaft
4. Reverse main gear 5. 1st main gear 6. 1st main gear bushing
7. 1st needle bearing 8. 1st inner baulk ring 9. 1st gear synchro ni zer cone
10. 1st outer baulk ring 11. 1st-2nd spread spring 12. 1st-2nd shifting insert
13. 1st-2nd synchronizer hub 14. 2nd outer baulk ring 15. 2nd gear synchronizer cone
16. 2nd inner baulk ring 17. 1st-2nd coupling sleeve 18. 2nd main gear bushing
19. 2nd needle bearing 20. 2nd ma in ge ar 21. 3rd main gear
22. 3rd-4th mainshaft spacer 23. 4th main gear adjusting shi m 24. 4th ma in gear
25. 5th main gear 26. Snap ring 27. Mainshaft rear bearing
28. Mainshaft C-ring 29. C-ring holder 30. Snap ring
31. Snap ring 32. Mainsh aft rea r bea ring adj ust ing shi m
PCIB0783E
H
I
J
K
L
M
MT-21
Page 22
SHIFT CONTROL COMPONENTS
TRANSAXLE ASSEMBLY
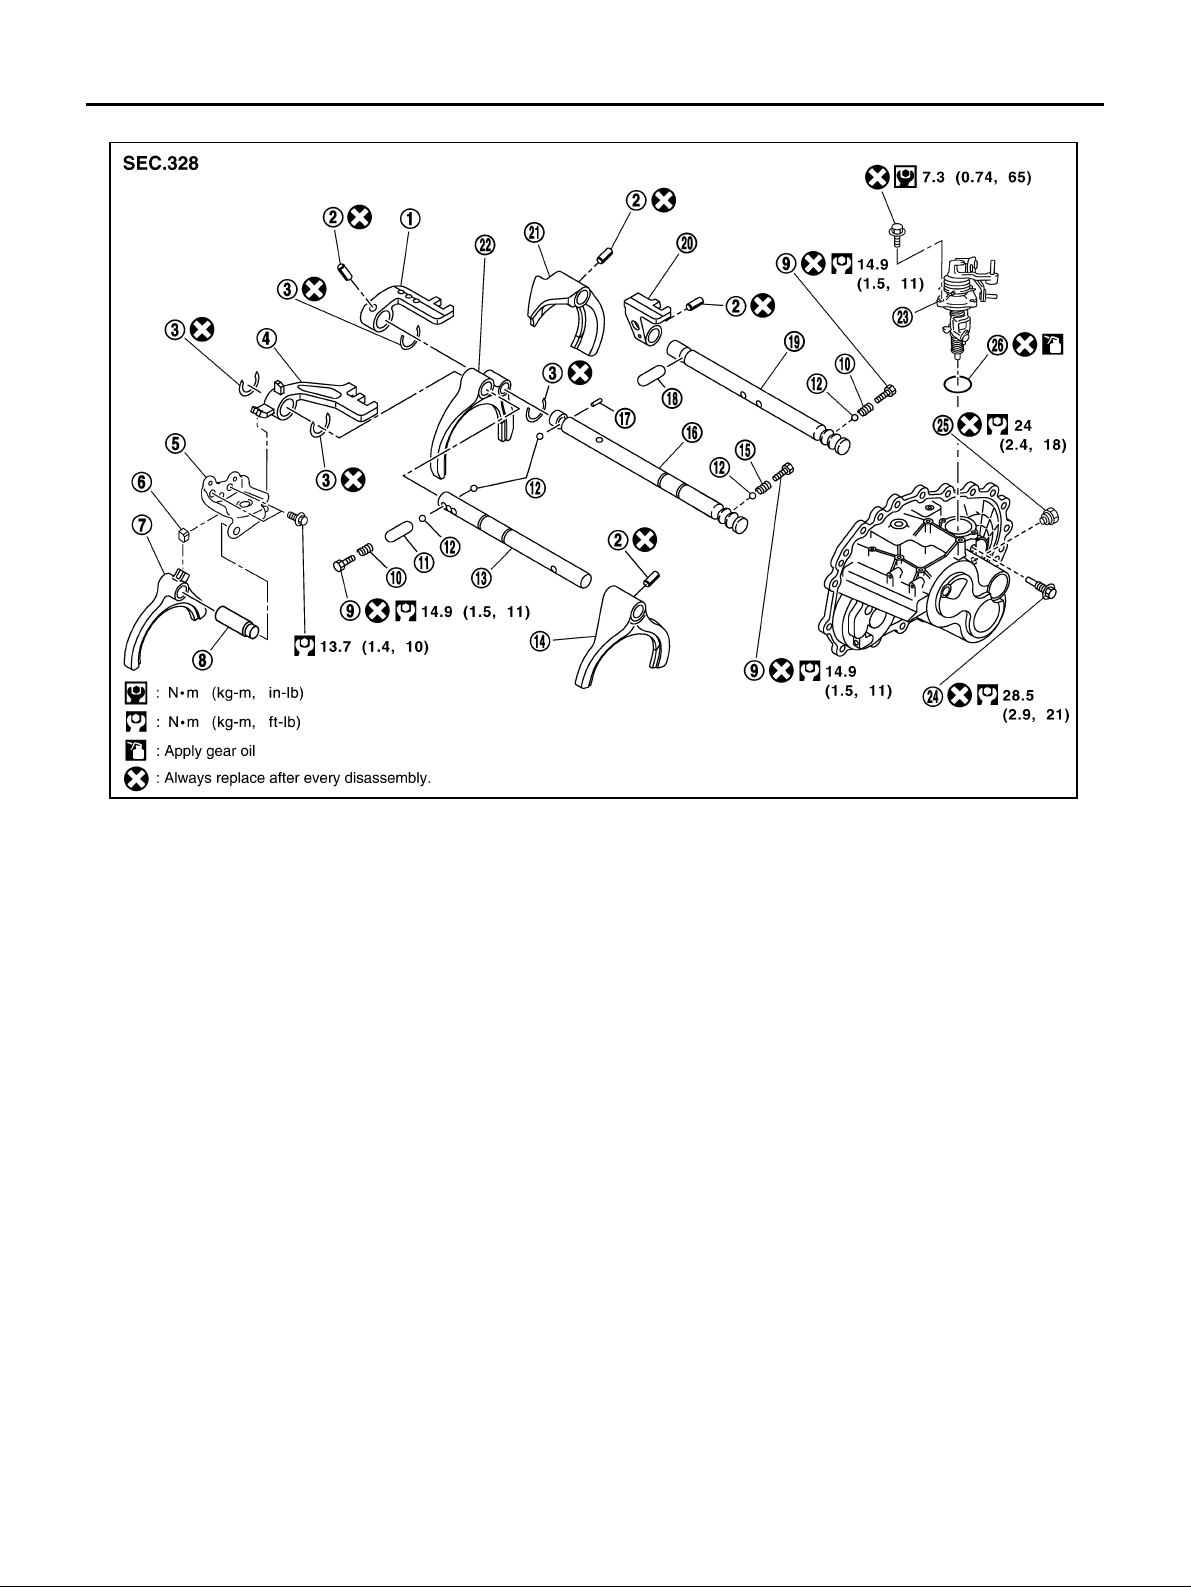
1. 3rd-4th brack et 2. Retaining pin 3. Stopper ring
4. 5th-reverse bracket 5. Reverse lever assembly 6. Shifter cap
7. Reverse shift fork 8. Reverse fork rod 9. Check plug
10. Check spring 11. Shift chec k sl eeve 12. Check ball
13. 5th-reverse fork rod 14. 5th shift fork 15. Check spring
16. 3rd-4th fork rod 17. Interlock pin 18. Shift check sleeve
19. 1st-2nd fork rod 20. 1st-2nd bracket 21. 1st-2nd shift fork
22. 3rd-4th shift fork 23. Control assembly 24. Stopper bolt
25. Shift check 26. O-ring
PCIB0784E
MT-22
Page 23
FINAL DRIVE COMPONENTS
TRANSAXLE ASSEMBLY
A
B
MT
D
E
F
G
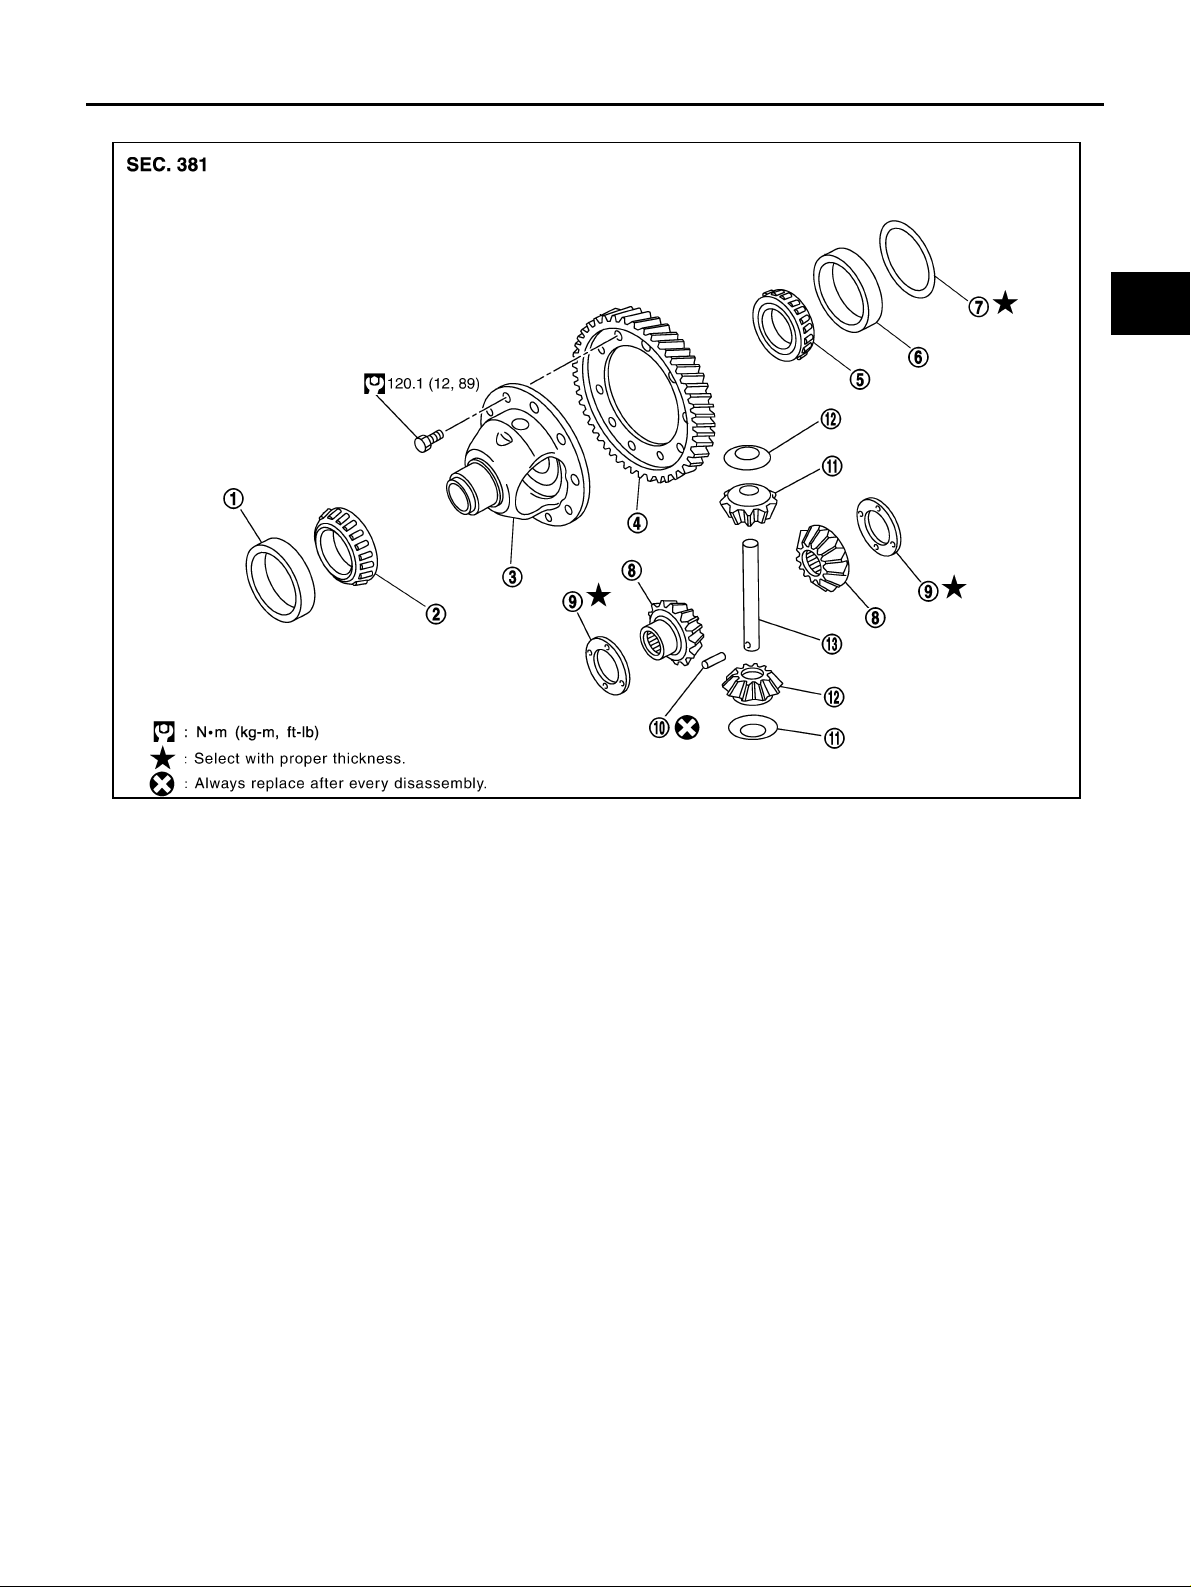
1. Differential side bearing outer race 2. Differential side bearing (clutch
housing side)
4. Final gear 5. Differential side bearing (transaxle
case side)
7. Differential side bearing adjusting
shim
10. Retaining pin 11. Pinion mate thrust washer 12. Pinion mate gear
13. Pinion mate shaft
8. Side gear 9. Side gear thrust washer
3. Differential case
6. Differential side bearing outer race
PCIB0785E
H
I
J
K
L
M
MT-23
Page 24
TRANSAXLE ASSEMBLY
Component Parts (RS6F51A) ECS008BZ
CASE AND HOUSING COMPONENTS
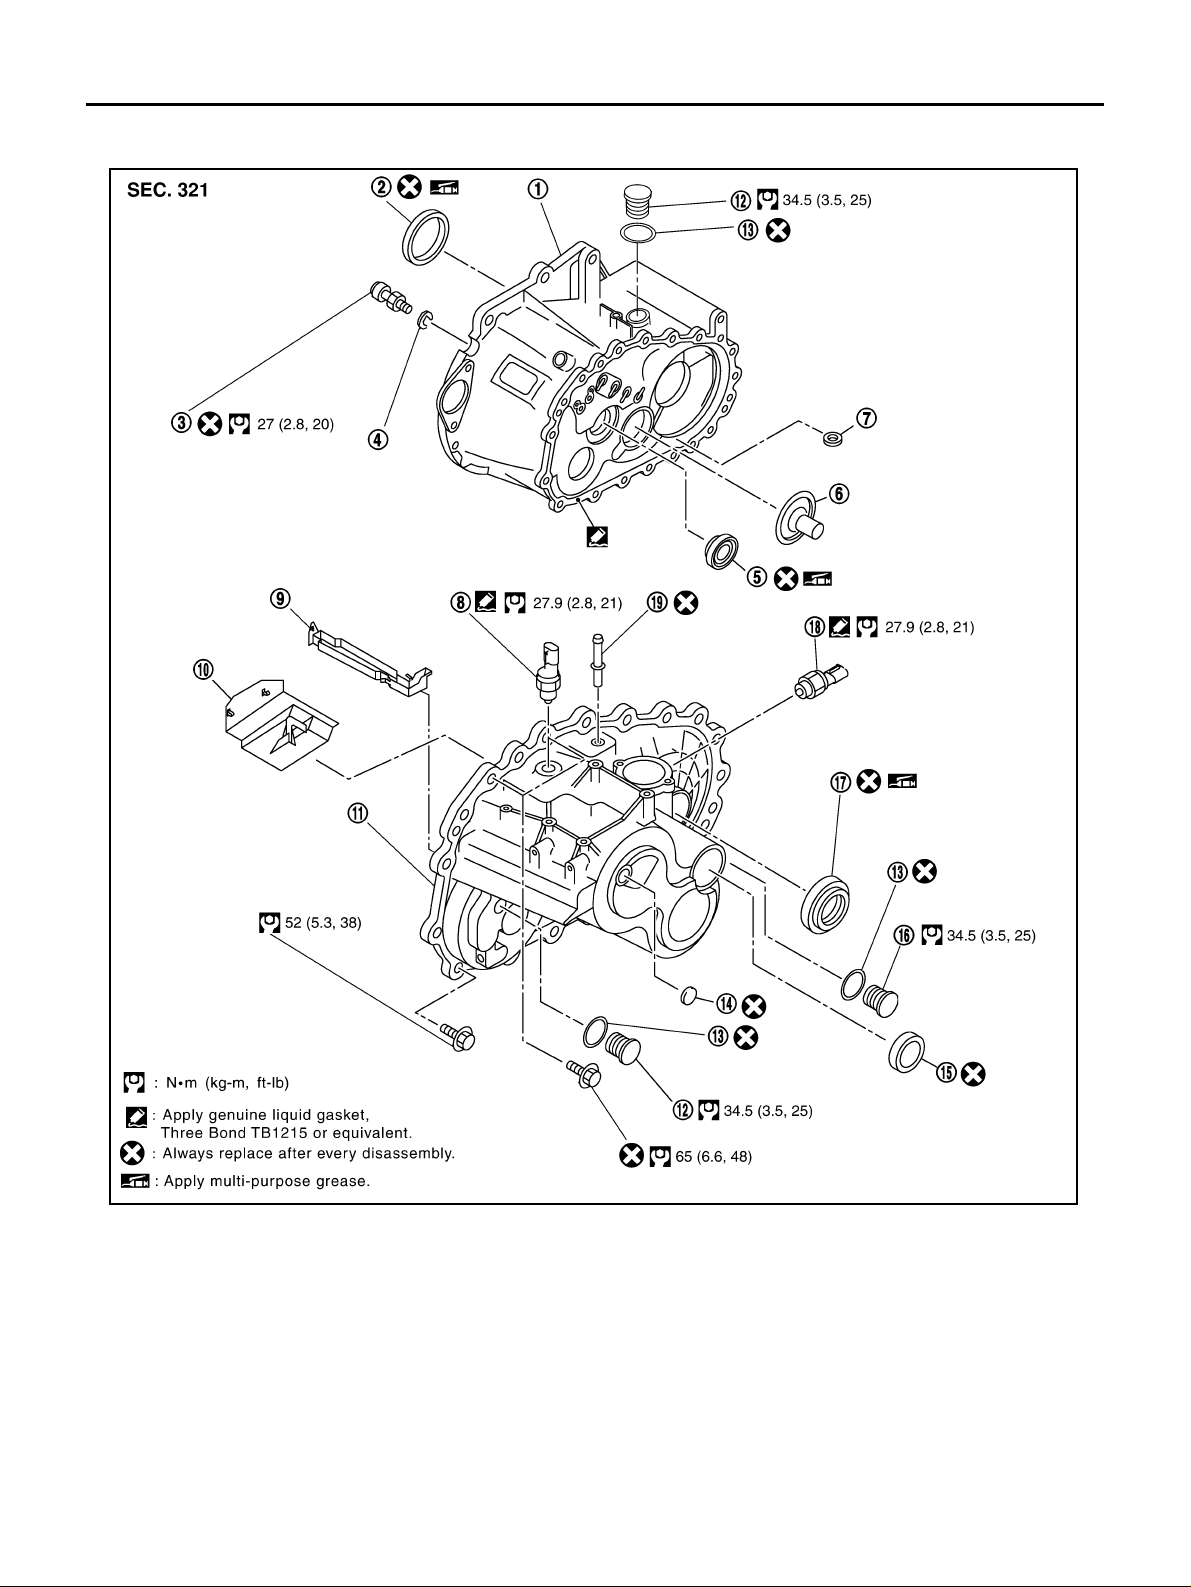
1. Clutch housing 2. Differential oil seal 3. Ball pin
4. Washer 5. Input shaft oil seal 6. Oil channel
7. Magnet 8. Back-up lamp swi tc h 9. Oil gutter
10. Baffle plate 11. Transaxle case 12. Filler plug
13. Gasket 14. Welch plug 15. Bore plug
16. Drain plug 17. Differential oil seal 18. Park/ N eut ral posit io n sw itch
19. Air breather tube
MT-24
PCIB0781E
Page 25
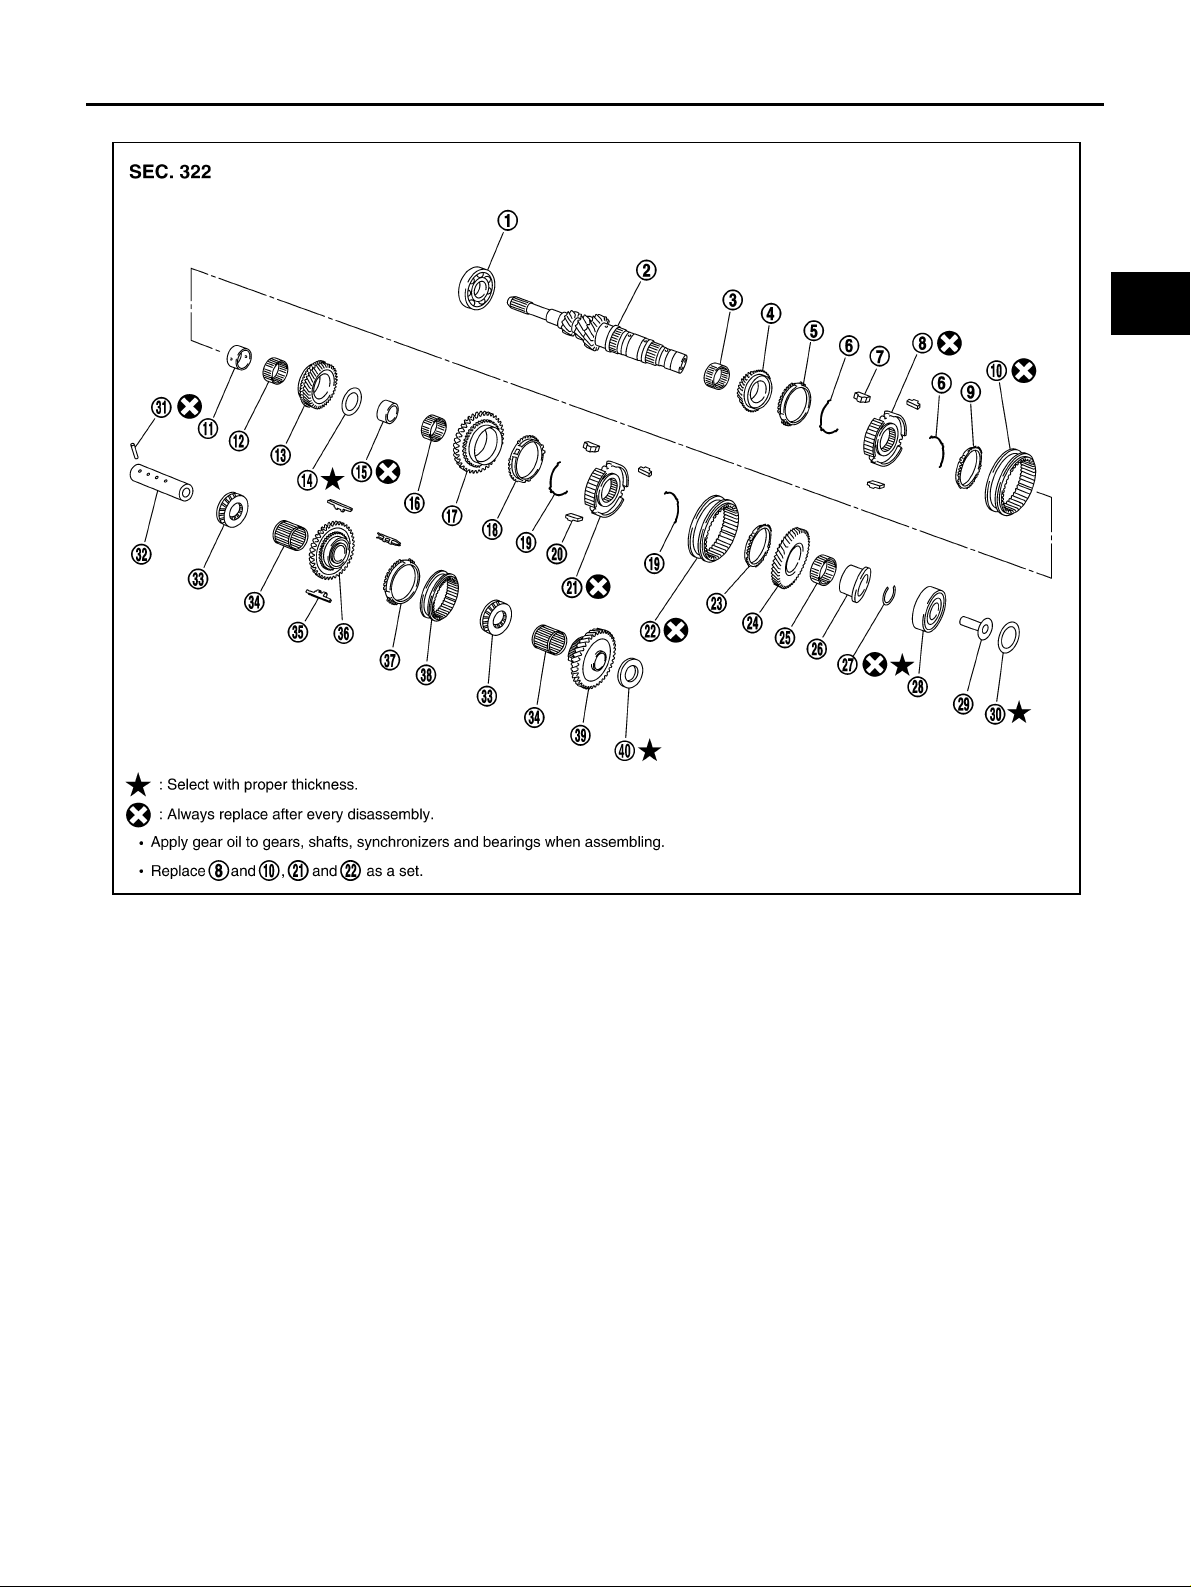
GEAR COMPONENTS
TRANSAXLE ASSEMBLY
A
B
MT
D
E
F
G
PCIB0786E
1. Inp ut sh aft front bear in g 2. Input shaf t 3. 3rd needle bearing
4. 3rd input gear 5. 3rd baulk ring 6. 3rd-4th spread spring
7. 3rd- 4t h shif ting i nser t 8. 3rd-4th synchronizer hub 9 . 4th baulk ring
10. 3rd-4th coup ling sleeve 11. 4th input gear bushing 1 2. 4th needle bearing
13. 4th input gear 14. Thrust washer 15. 5th input gear bushing
16. 5th needle bearing 17. 5th input gear 18. 5th baulk ring
19. 5th-6th spread spring 20. 5th-6th shifting i nsert 21. 5th-6th synchronizer hub
22. 5th-6th coupling sleeve 23. 6th baulk ring 24. 6th input gear
25. 6th needle beari ng 26. 6th input gear bushing 27. Snap ring
28. Input shaft rear bearing 2 9. Oil channel 3 0. Input shaft rear bearing adjusting
shim
31. Retaining pin 32. Rever se i dler shaft 33. Thrust needle bearing
34. Reverse idle r gea r need le bearing 35. Reverse insert spring 36. Reverse idler gear (Front)
37. Reverse balk ring 38. Re ver se coupling sleeve 39. Reverse idler gear (Rear)
40. Reverse idle r gea r adjust i ng shi m
H
I
J
K
L
M
MT-25
Page 26
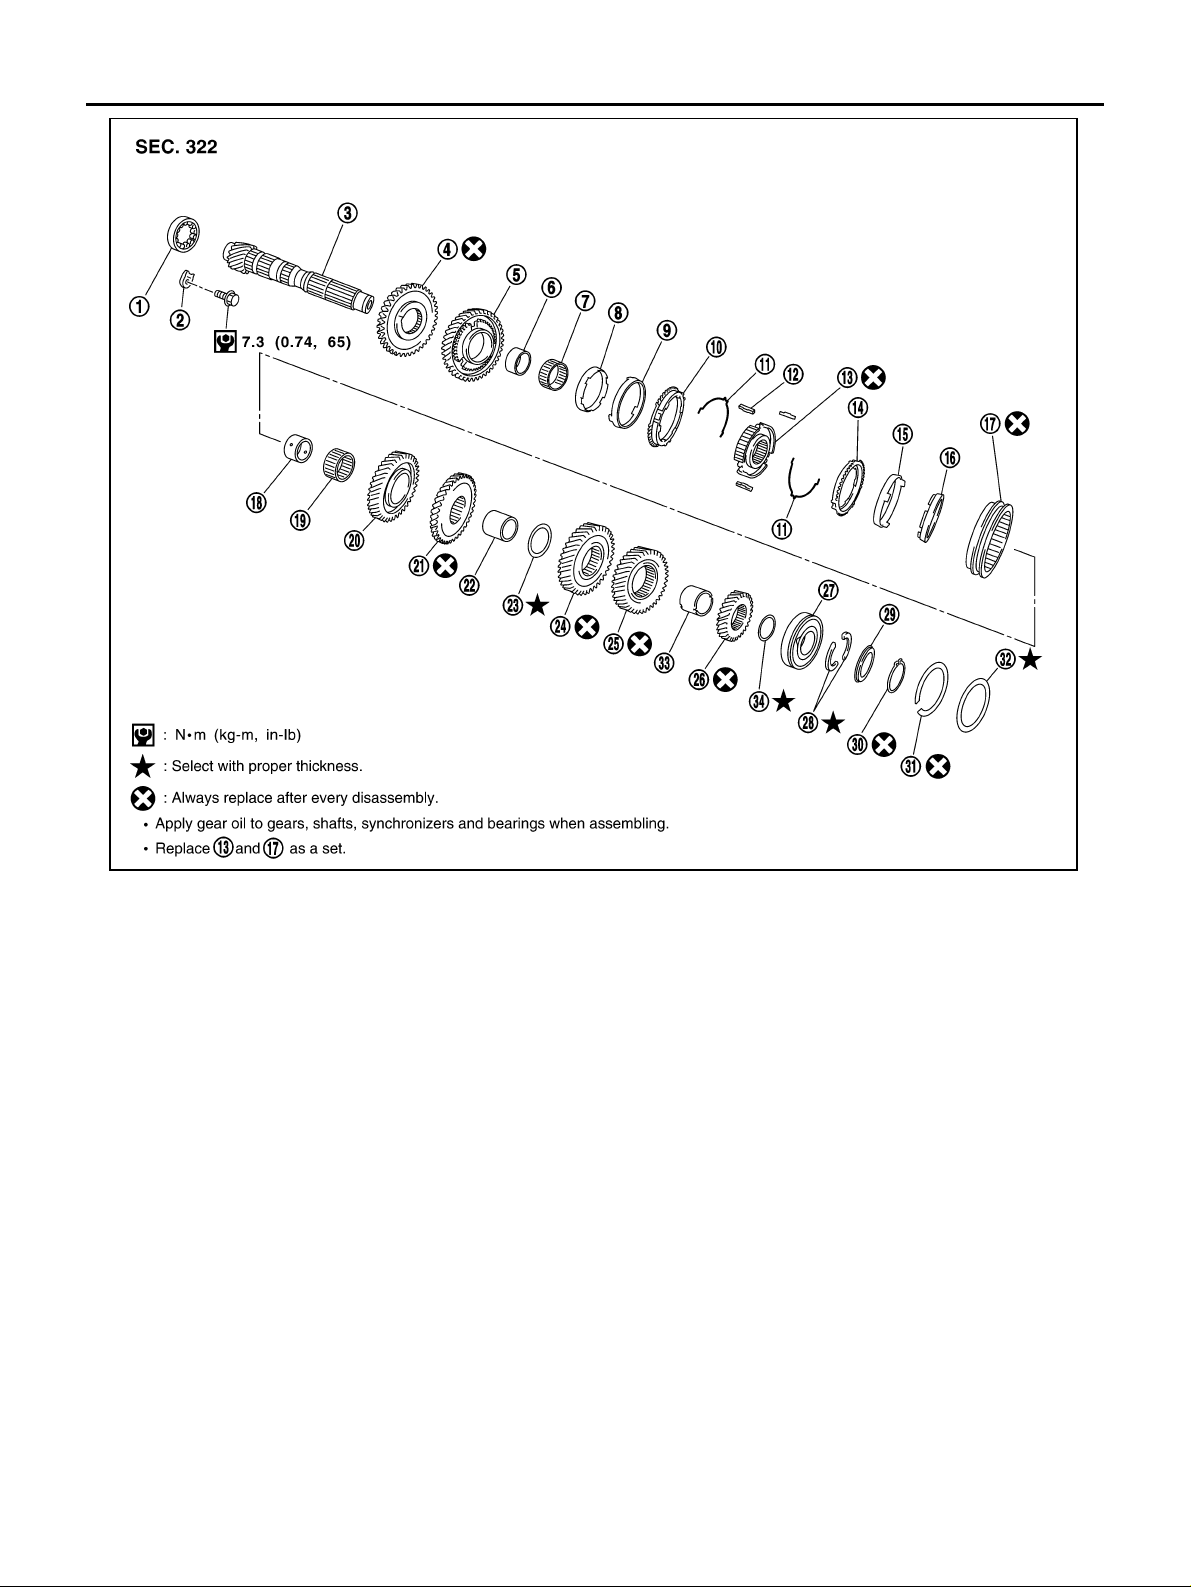
TRANSAXLE ASSEMBLY
1. Mainshaft front bearing 2. Mainshaft bearing retainer 3. Mainshaft
4. Reverse main gear 5. 1st main gear 6. 1st main gear bushing
7. 1st needle bearing 8. 1st inner baulk ring 9. 1s t gear sync hronizer cone
10. 1st outer baulk ring 11. 1st-2nd spread spring 12. 1st-2nd shifting insert
13. 1st-2nd synchronizer hub 14. 2nd outer baulk ring 15. 2nd gear synchronizer cone
16. 2nd inner baulk ring 17. 1st-2nd coupling sleeve 18. 2nd main gear bushing
19. 2nd needle bearing 20. 2nd ma in ge ar 21. 3rd main gear
22. 3rd-4th mainshaft spacer 23. 4th main adjusting shim 24. 4th main gear
25. 5th main gear 26. 6th m ai n gear 27. Mainshaft rear bearing
28. Mainshaft C-ring 29. C-ring holder 30. Snap ring
31. Snap ring 32. Mainshaft rea r bea ring adj ust ing shi m 33. 5th- 6th mainshaft spacer
34. 6th main adjusting shim
PCIB0787E
MT-26
Page 27
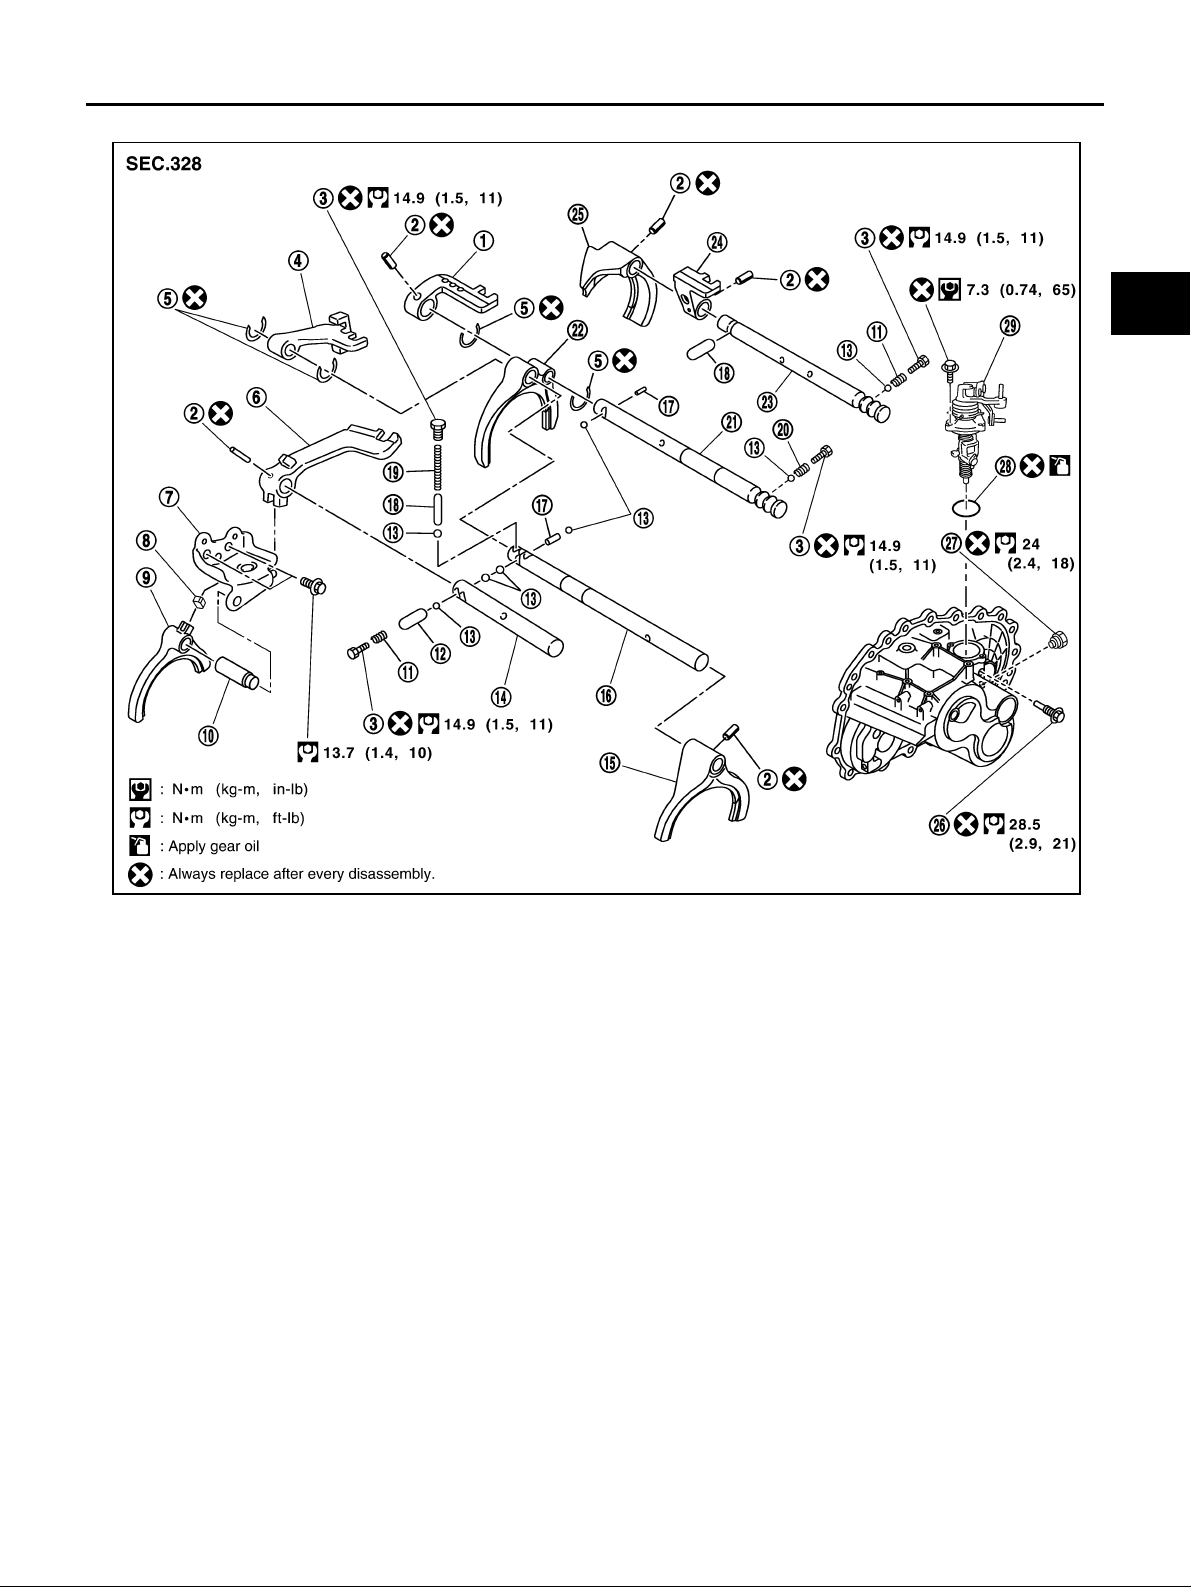
SHIFT CONTROL COMPONENTS
TRANSAXLE ASSEMBLY
A
B
MT
D
E
F
G
1. 3rd-4th bracket 2. Retaining pin 3. Check plug
4. 5th -6th br acket 5. Stopper ring 6. Reverse bracket
7. Re ver se l ever assembly 8. Shifter cap 9. Reverse shift fork
10. Reverse fork rod 11. Check spring 12. Shift check sleeve
13. Check ball 1 4. Reverse bracket fork rod 15. 5th-6th shift fork
16. 5th-6th fork rod 17. Interlock pin 18. Shift check sleeve
19. Check spri ng 20. Check spring 21 . 3rd-4th f ork rod
22. 3rd-4th shif t fork 23. 1st-2nd fork rod 24. 1st-2nd fork rod bracket
25. 1st-2nd shift fork 26. Stopper bolt 27. Shift check
28. O-ring 29. Control assembly
H
I
J
PCIB0788E
K
L
M
MT-27
Page 28
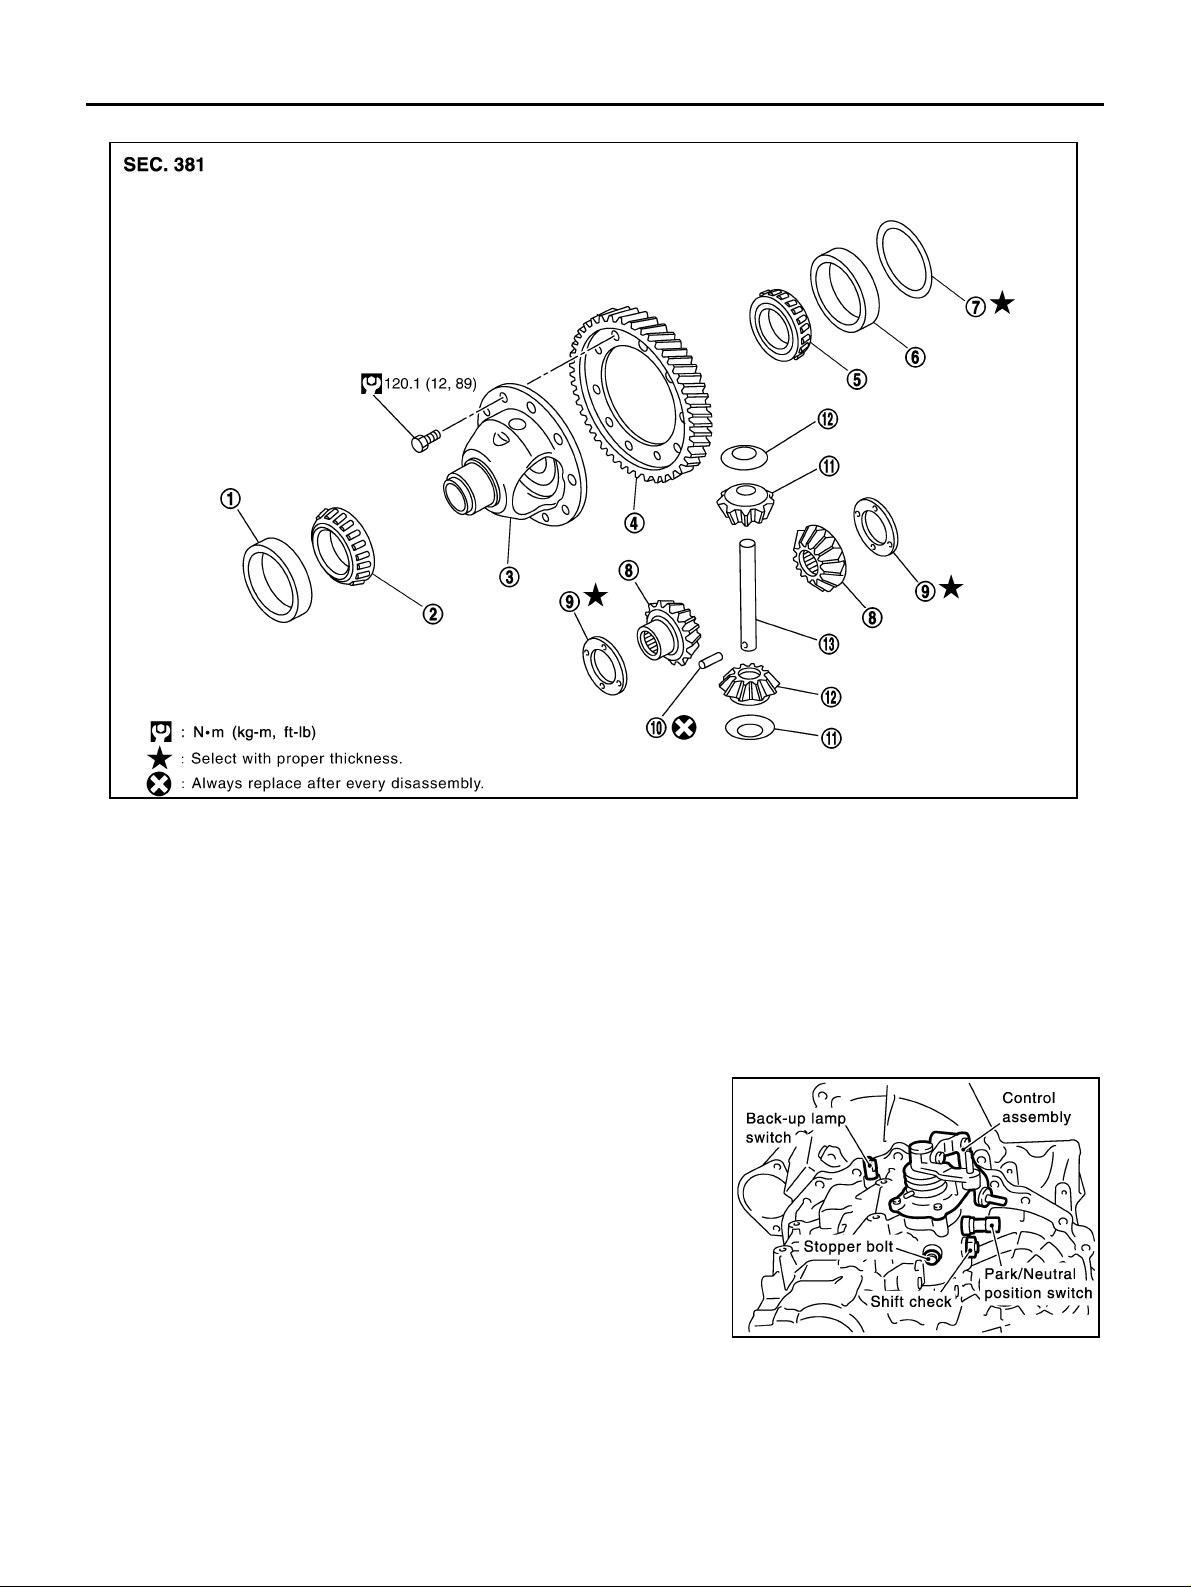
FINAL DRIVE COMPONENTS
TRANSAXLE ASSEMBLY
PCIB0785E
1. Differential side bearing outer race 2. Differential side bearing (c lu tch
housing side)
4. Final gear 5. Differential side bearing (tra nsaxle
case side)
7. D ifferential side bearing adjusting shim 8. Side gear 9. Side gear thrust washer
10. Retaining pin 11. Pinion mate thrust washer 12. Pinion m at e gear
13. Pinion mate shaft
3. Differential case
6. Differential side bearing out er race
Disassembly and Assembly (RS5F51A) ECS008C0
DISASSEMBLY
1. Remove drai n plug and filler plug from transaxle case.
2. Remove park/neutral position switch and back-up lamp switch
from transaxle case.
3. Remove shift check and stopper bolt from transaxle case, and
then remove control assembly from transaxle case.
SCIA0389E
MT-28
Page 29
TRANSAXLE ASSEMBLY
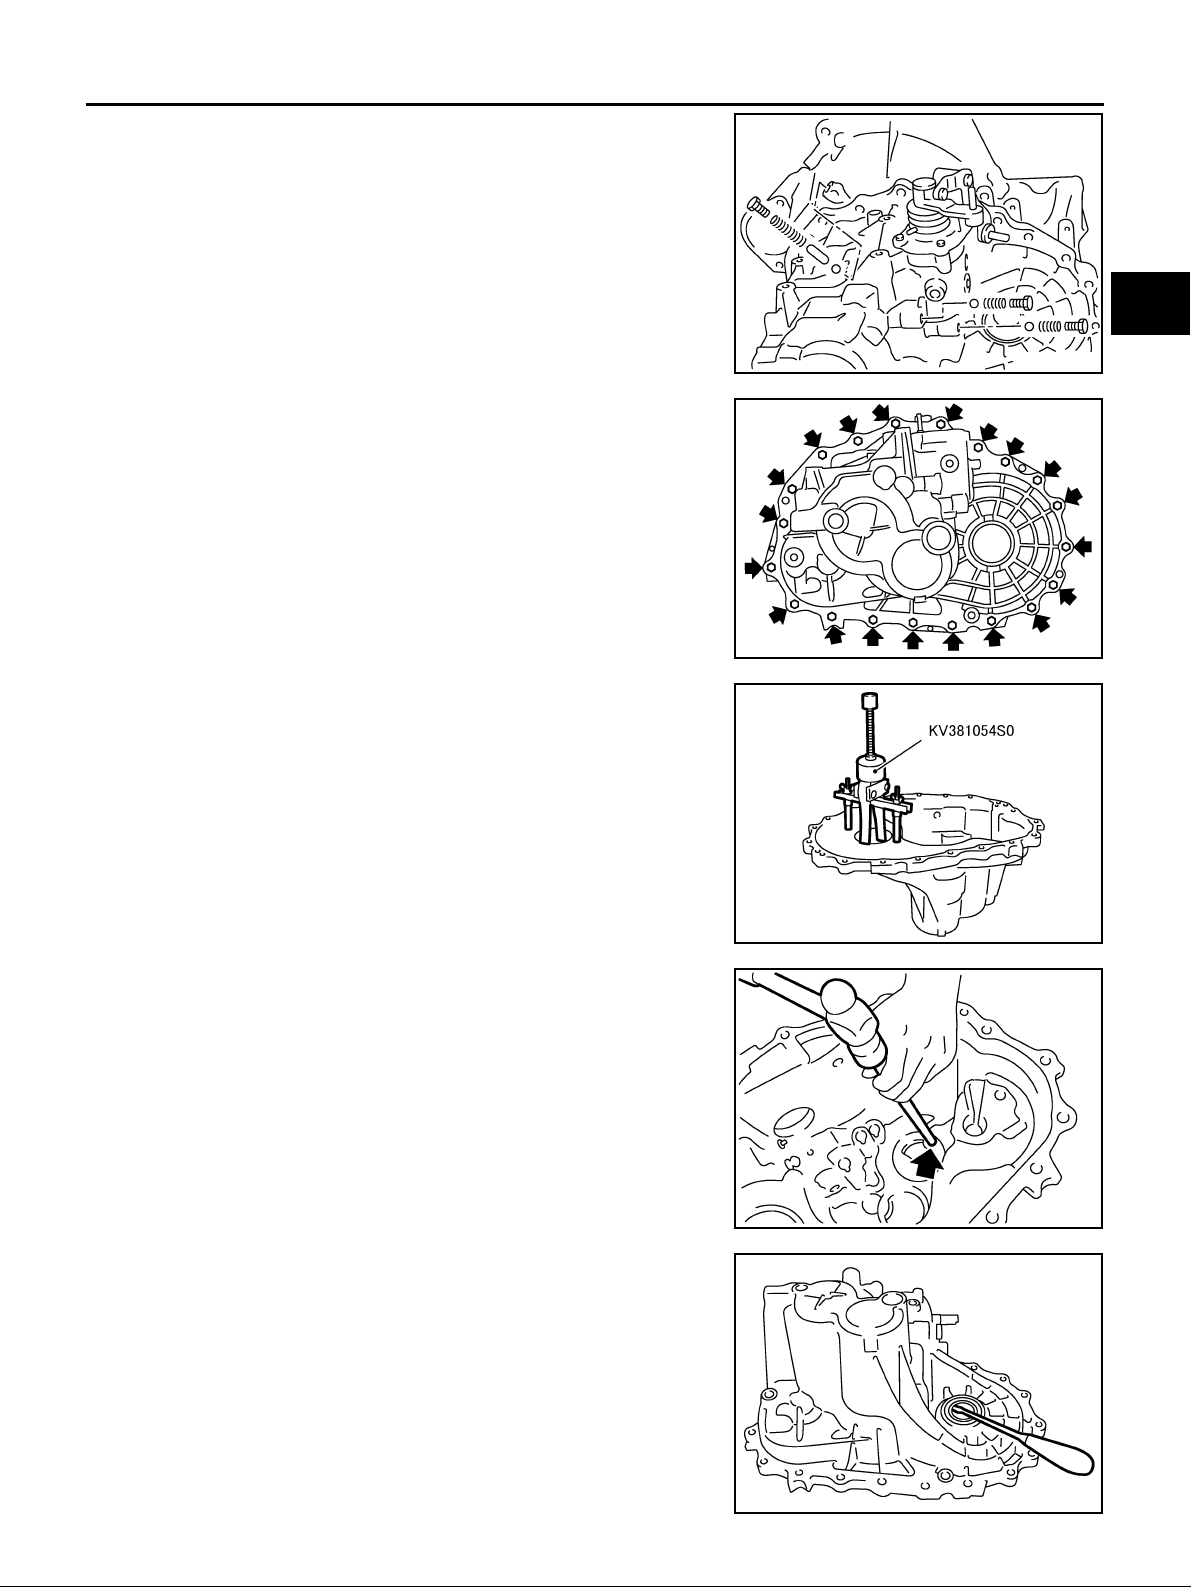
4. Remove check plugs ( 3 pi ec es), c he ck sp rin gs (3 p ie ce s), chec k
balls (3 pieces) and shift check sleeve (1 piece) from transaxle
case.
5. Remove transaxle case mounting bolts.
6. Remove bore plug from transaxle case.
CAUTION:
Be careful not to damage transaxle case.
7. While spreading the snap ring of mainshaft rear bearing located
at bore plug hole, remove transaxle case from clutch housing.
8. Remove oil gutter, baffle plate from transaxle case .
9. Remove snap ring, mainshaft rear bearing adjusting shim and
input shaft rear bearing adjusting shim from transaxle case.
A
B
MT
SCIA0396E
D
E
F
G
SCIA0983E
10. Remove differential side bearing outer race (transaxle case
side) from transaxle case using the puller, and then remove differential side bearing adjusting shim from transaxle case.
11. Remove welc h pl ug from tran saxle case.
12. Remove differential oil seal (tansaxle case side) from transaxle
case.
13. Remove magnet from clutch housing.
SCIA0897E
SCIA0402E
H
I
J
K
L
M
SCIA0397E
MT-29
Page 30
TRANSAXLE ASSEMBLY
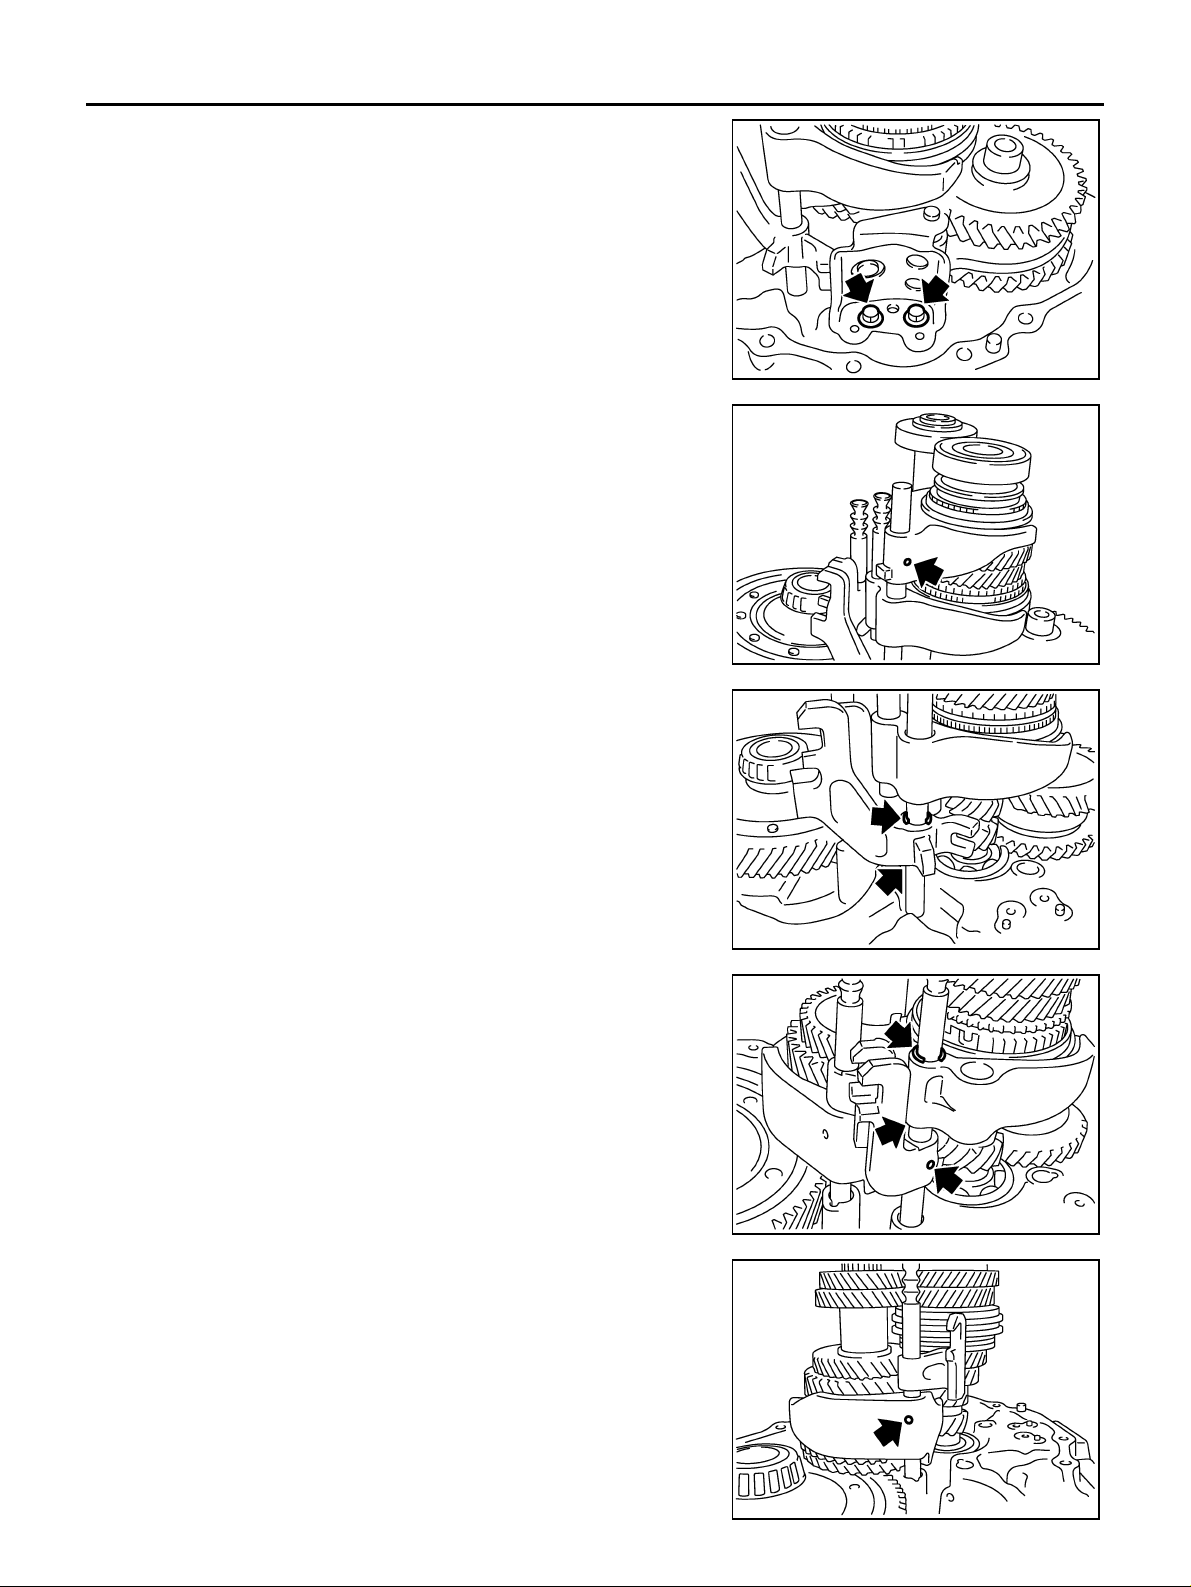
14. With shift lever in 5th position, remove mounting bolts from
reverse lever assembly. Lift reverse lever assembly to remove.
CAUTION:
Be careful not to lose shifter cap.
15. Pull out reverse fork rod then remove reverse shift fork.
16. Shift 3rd-4t h f ork ro d to 3 r d posi t io n. R emov e r e ta i ni ng pin o f 5 th
shift fork using a pin punch.
SCIA0390E
17. Remove stopper rings for 5th-reverse bracket.
18. Pull out 5th-reverse fork rod and remove 5th shift fork and 5threverse bracket.
19. Remove check balls (2 pieces) from clutch housing.
20. Remove retaining pin of 3rd-4th bracket using a pin punch.
21. Remove stopp er rings for 3rd-4th shift fork.
22. Pull out 3r d-4th fork rod and remove 3rd-4 th shift fork an d 3rd4th bracket.
23. Remove interlock pin and shift ch eck sleeve from clutch housing.
SCIA0391E
SCIA0392E
SCIA0393E
24. Remove retaining pin of 1st-2nd shift fork using a pin punch.
25. Pull out 1st-2nd fork rod with 1st-2nd bracket.
26. Remove 1st-2nd shift fork.
27. Remove retaining pin of 1st-2nd bracket using a pin punch and
separate 1st-2nd fork rod and 1st-2nd bracket.
MT-30
SCIA0394E
Page 31
TRANSAXLE ASSEMBLY
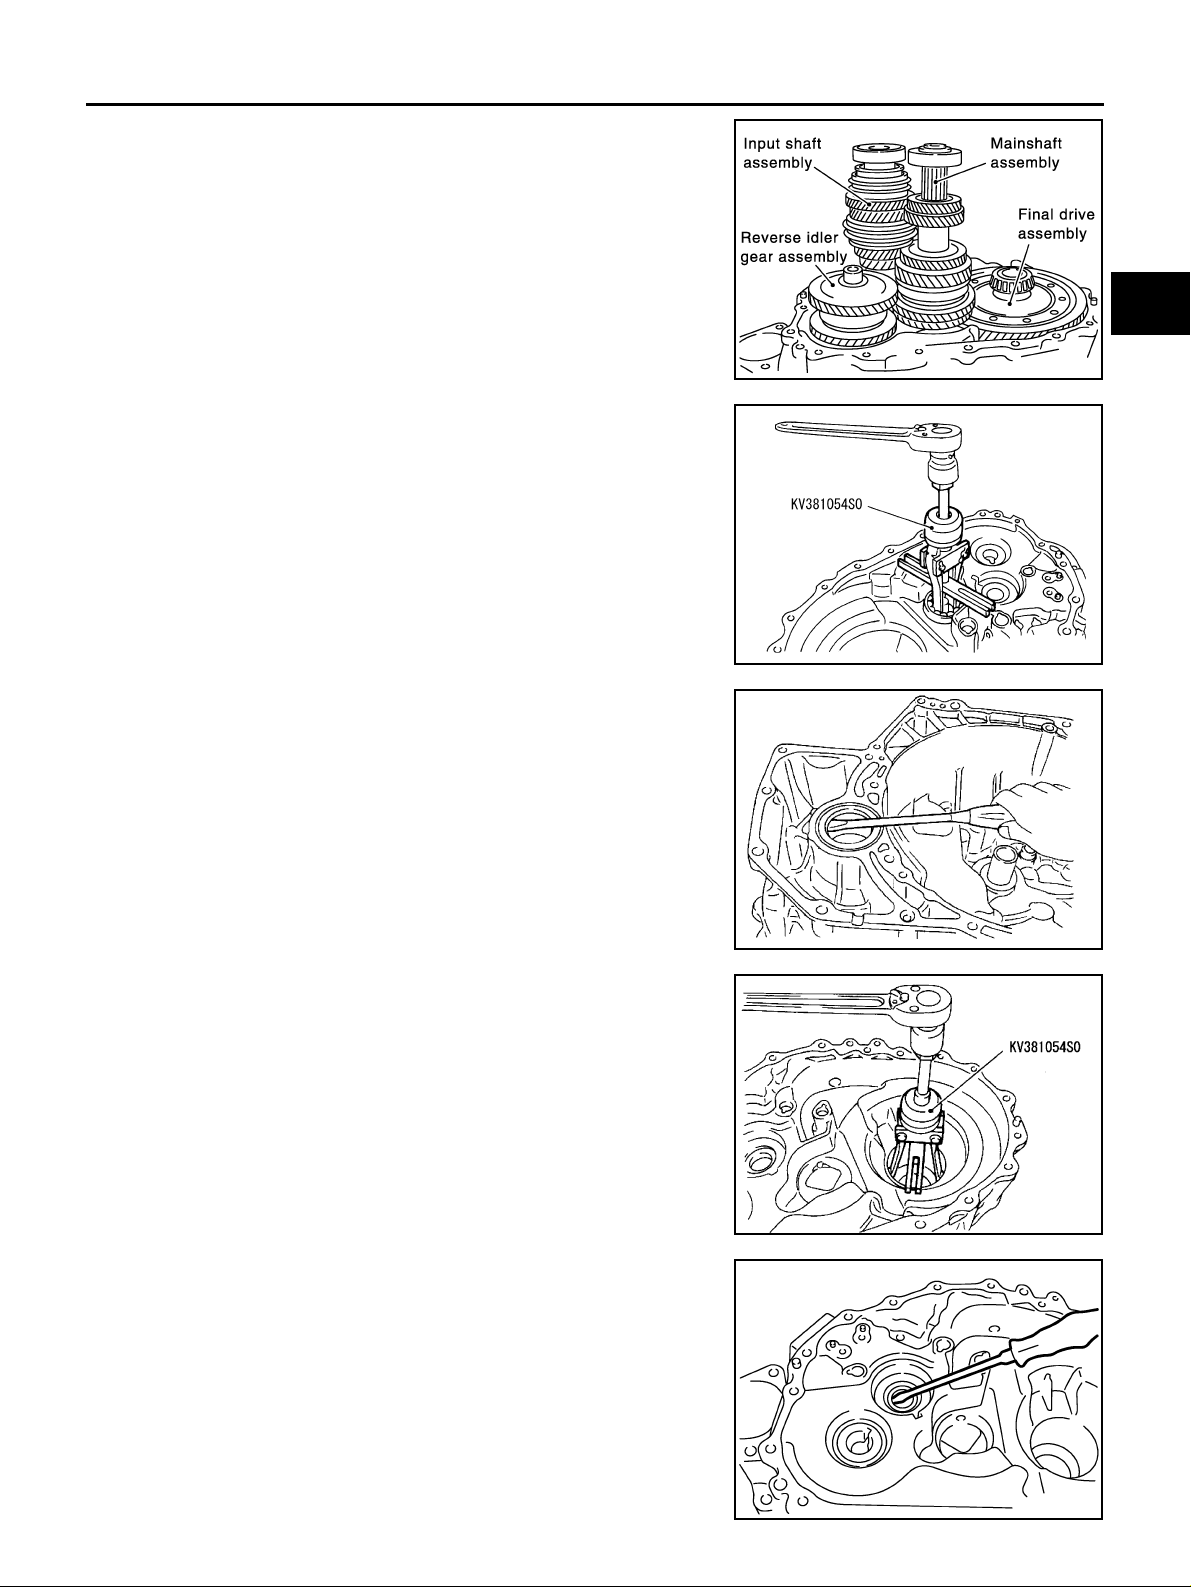
28. Remove gear components from clutch housing in the following
procedure.
a. Remove input shaft assembly, mainshaft assembly and reverse
idler gear assembly as a set, tapping input shaft with plastic
hammer.
CAUTION:
Always withdraw mainshaft straight out. Failure to do so
can damage resin oil channel on clu tch hou sing side.
b. Remove final drive assembly.
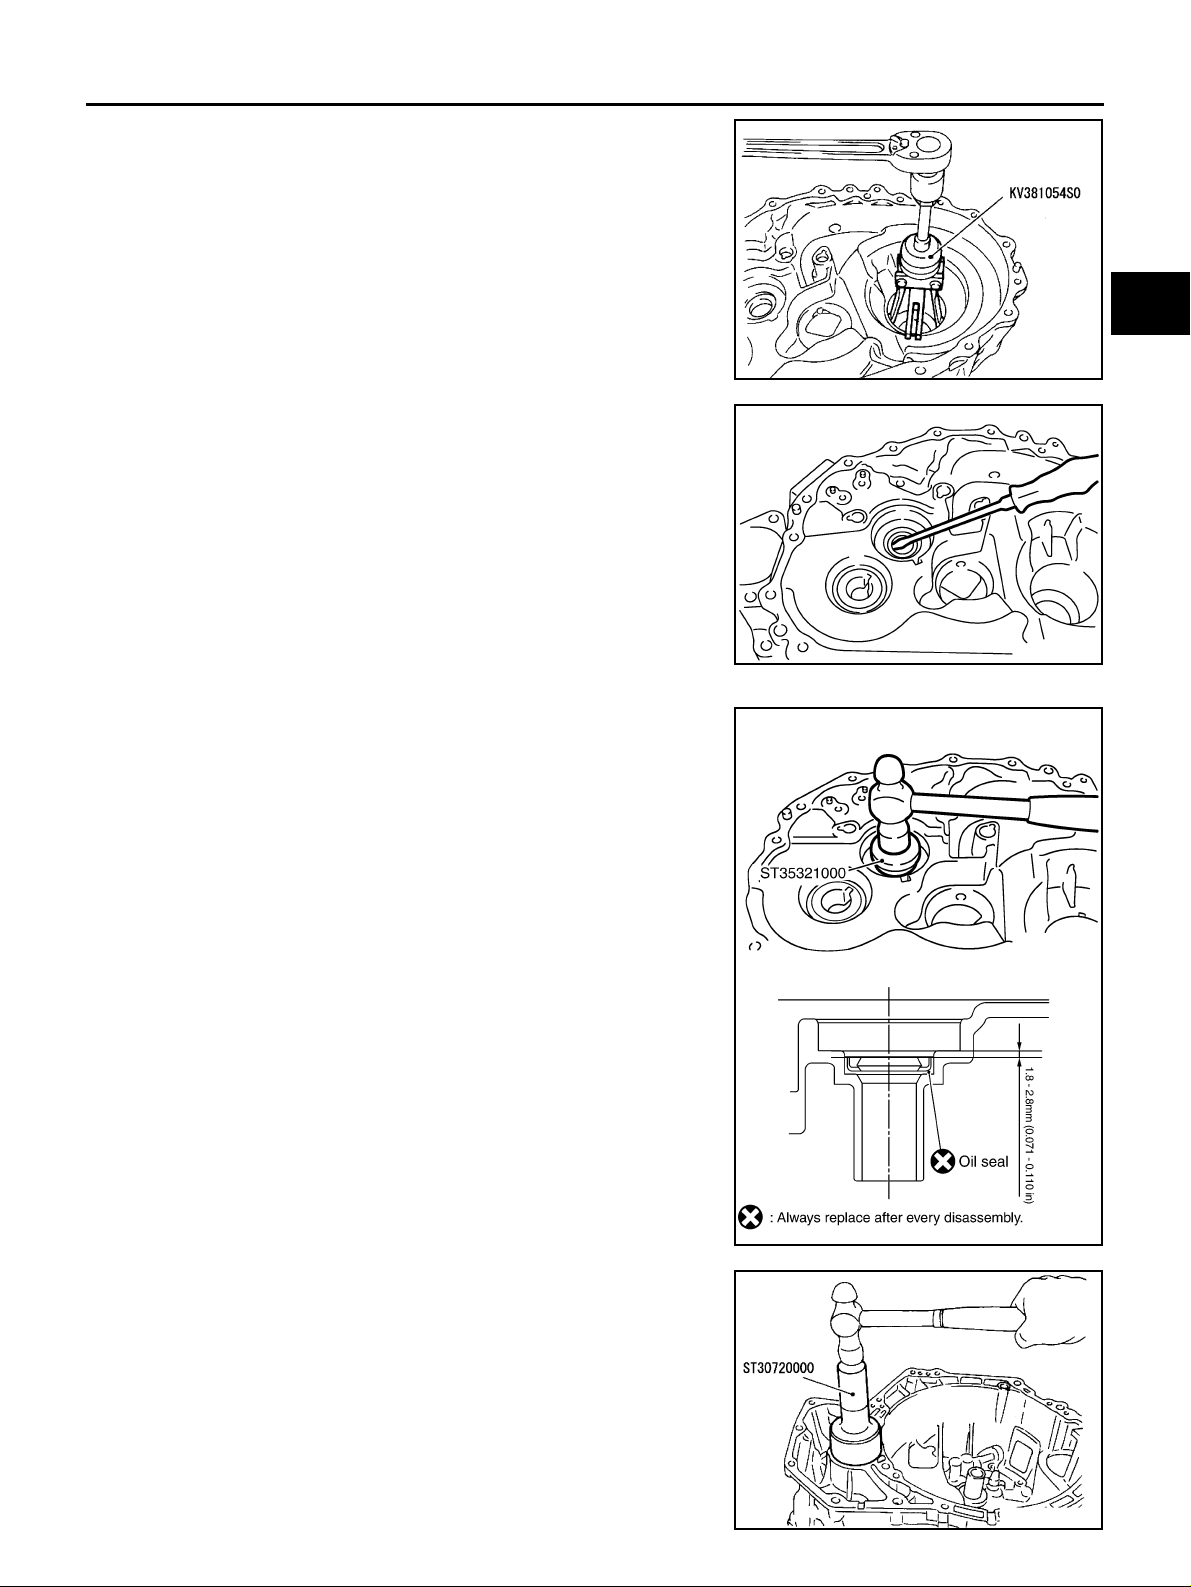
29. Remove mainshaft bearing retainer and then mainshaft front
bearing from clutch housing using the pu ller.
30. Remove oil channel from clutch housing.
31. Remove differential oil seal (clutch housing side) from clutch
housing.
CAUTION:
Be careful not to damage clutch housing.
A
B
MT
SCIA0395E
D
E
F
G
SCIA1077J
H
I
32. Remove differential side bearing outer race (clutch housing
side) from clutch housing using the puller.
33. Remove input shaft oil seal from clutch housing.
CAUTION:
Be careful not to damage clutch housing.
SCIA1068J
SCIA1069J
J
K
L
M
SCIA0398E
MT-31
Page 32
TRANSAXLE ASSEMBLY
ASSEMBLY
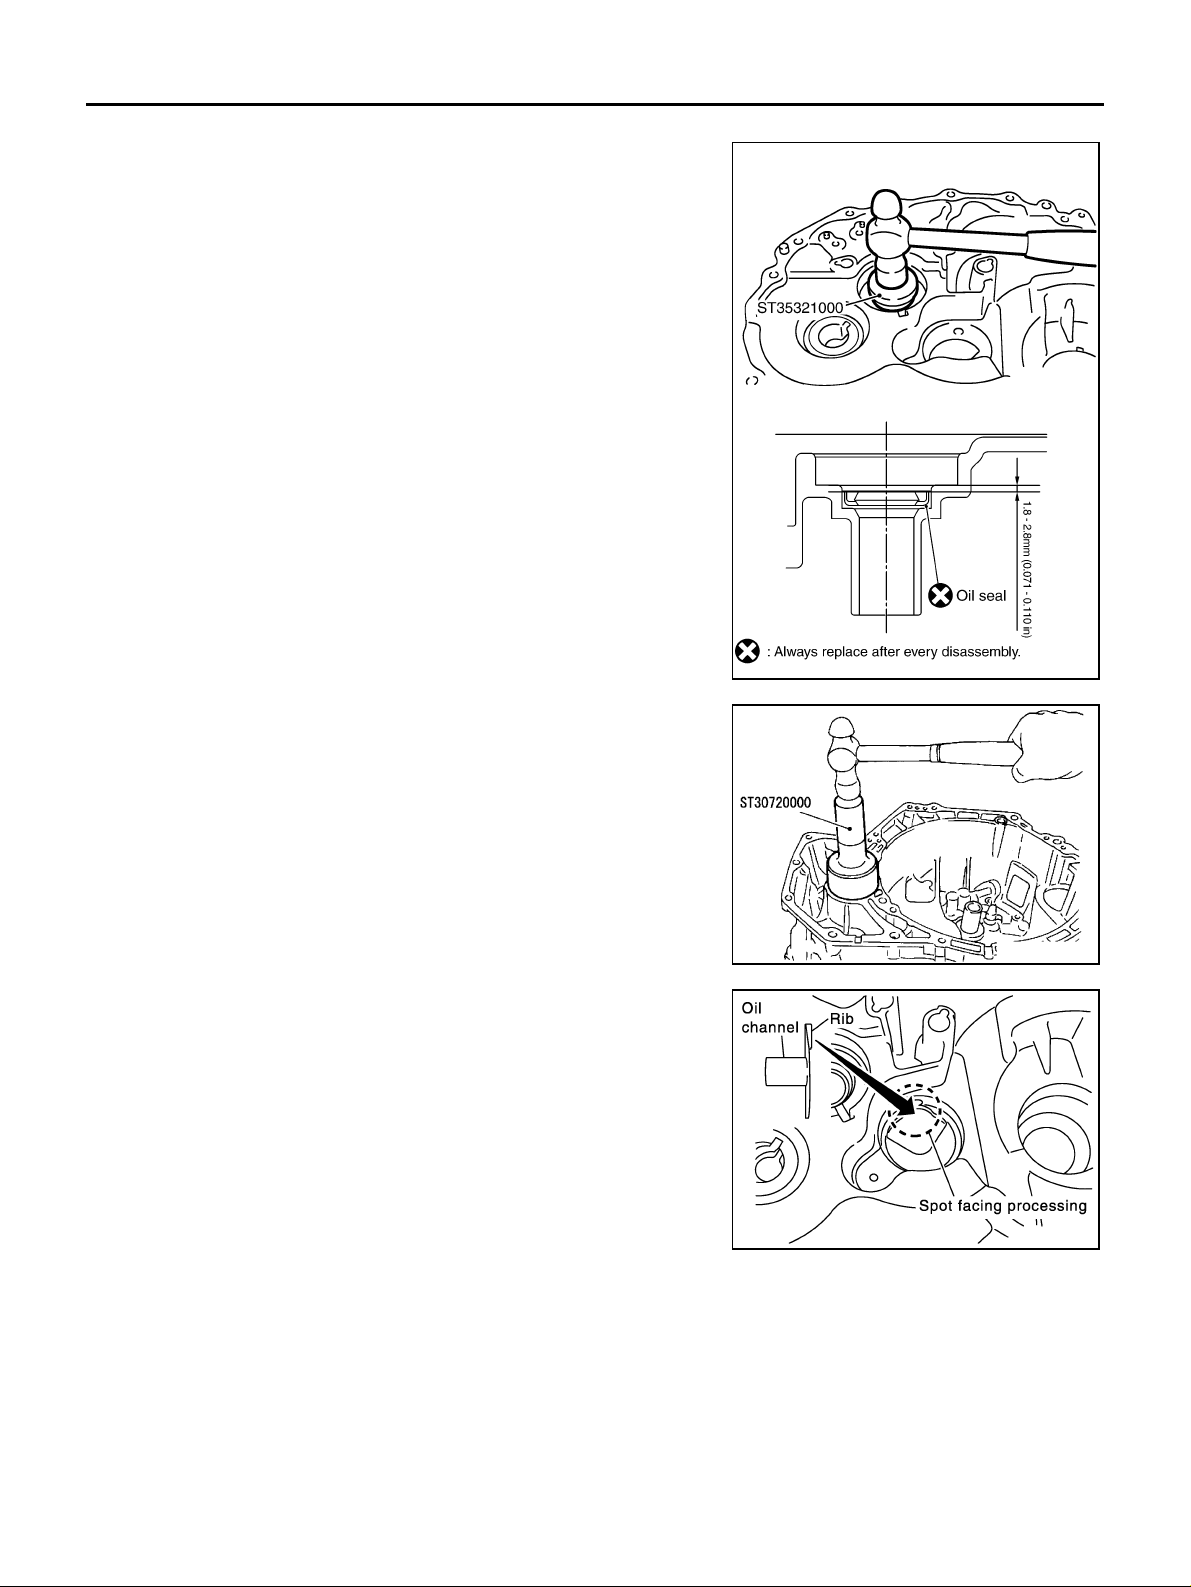
1. Apply multi-purpose grease to input shaft oil seal lip. Install a
new input shaft oil seal 1.8-2.8mm (0.071-0.110 in) above from
clutch housing edge surface using the drift.
CAUTION:
Do not reuse oil seals.
2. Apply multi-purp ose grease to differential oil seal lip, and then
install a new oil seal to clutch housing using the drift.
CAUTION:
Do not reuse oil seals.
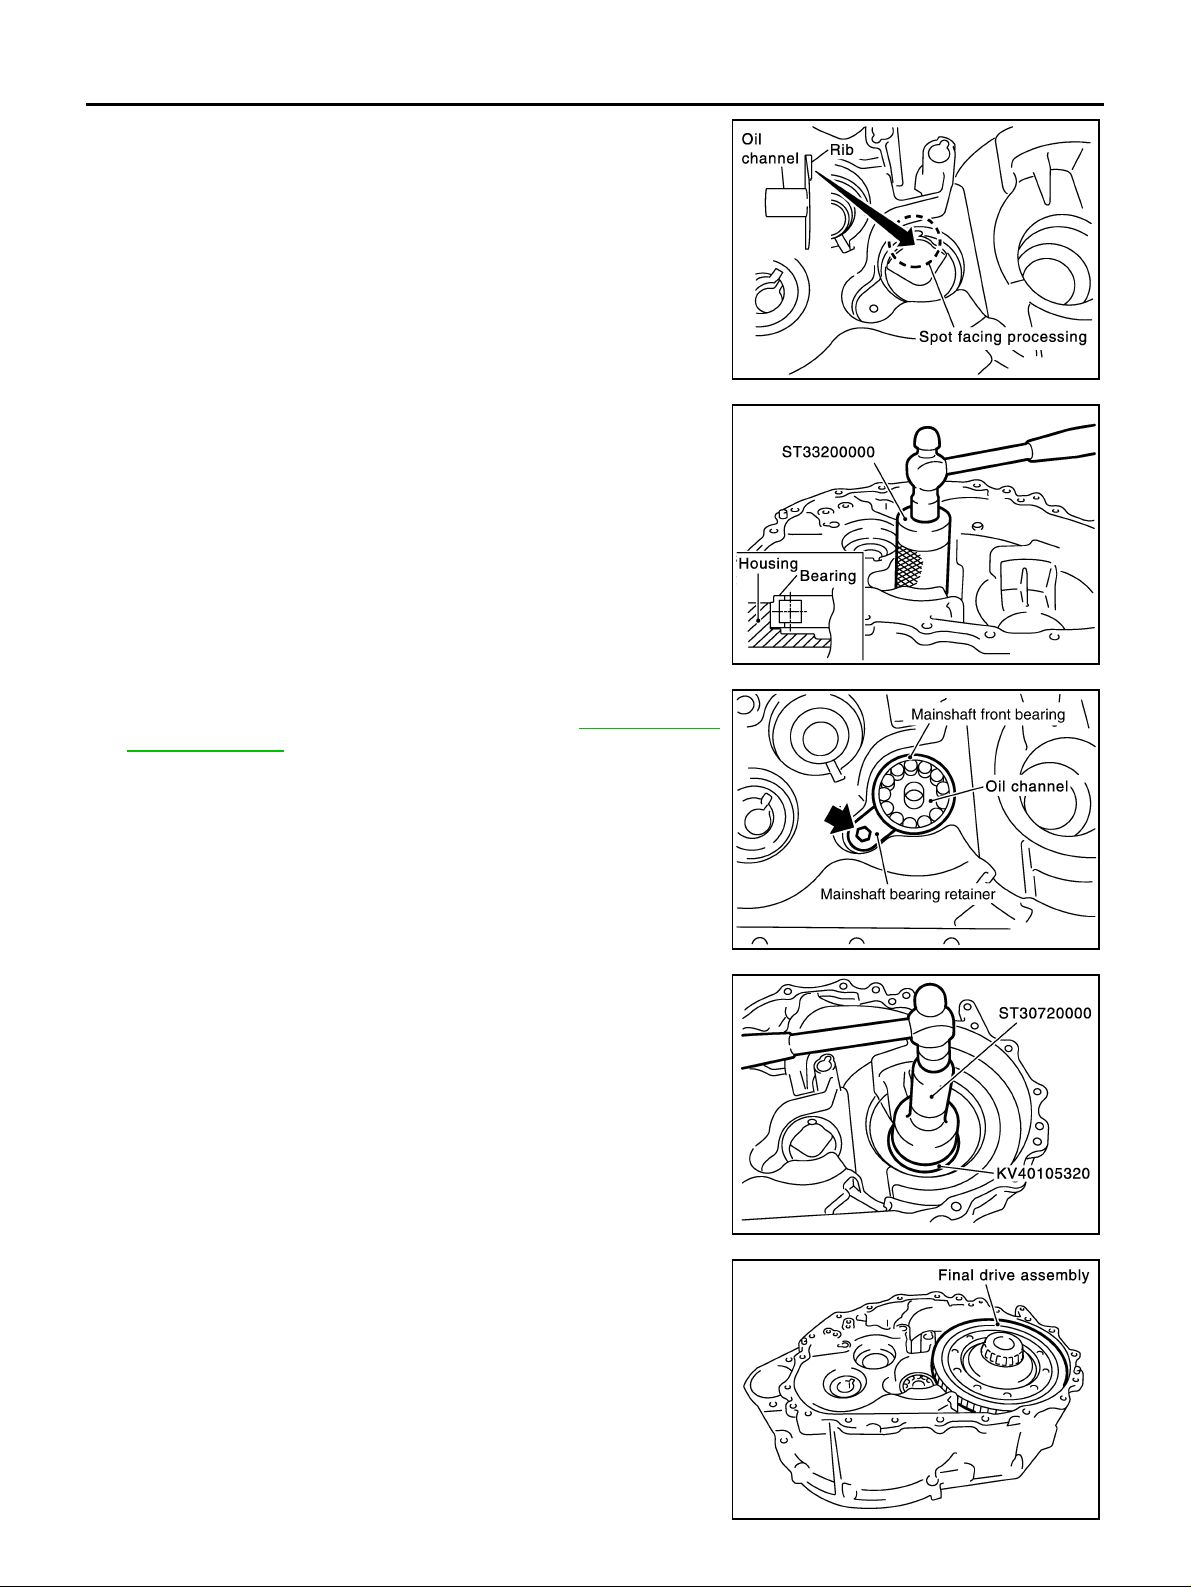
3. Install oil channel on mainshaft side.
CAUTION:
Be careful with the orientation of installation.
PCIB0807E
SCIA1070J
SCIA0986E
MT-32
Page 33
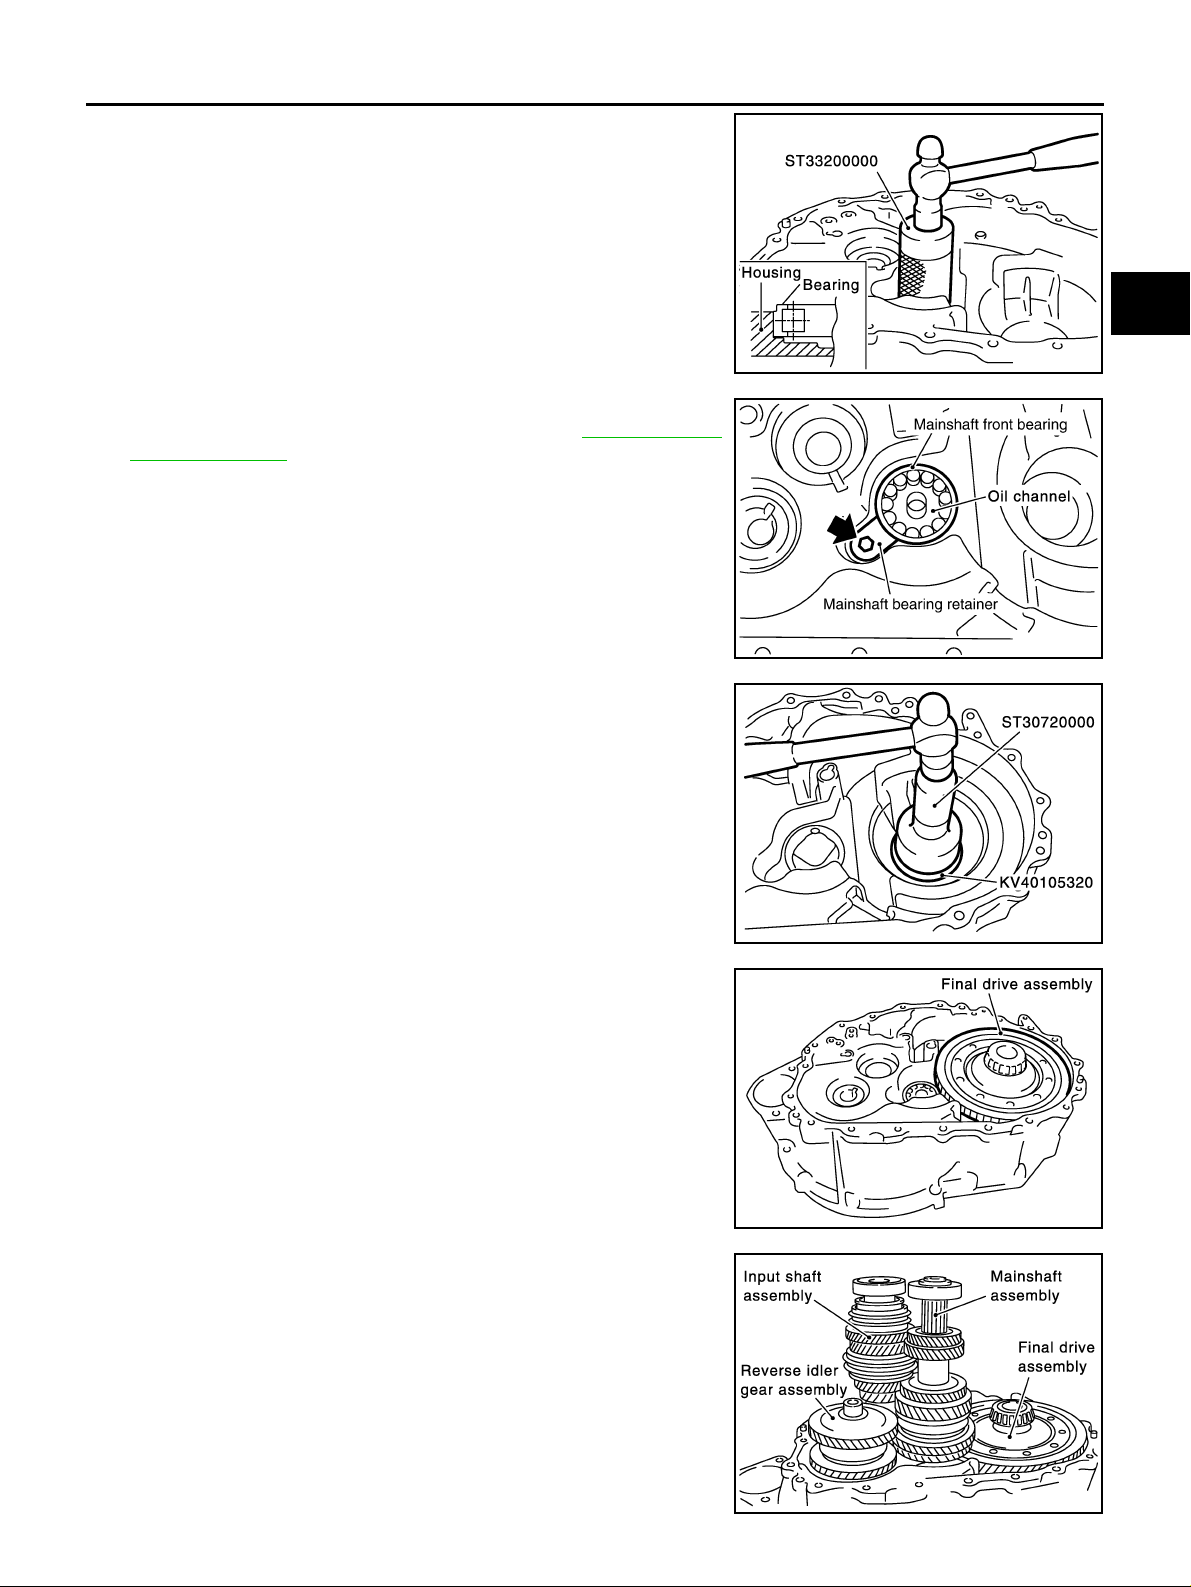
TRANSAXLE ASSEMBLY
4. Install mainshaft front bearing to clutch housing using the drift.
CAUTION:
Be careful with the orientation of installation.
5. Install mains haft bearing retainer to clut ch housing and tighten
mounting bolt to the specified torque . Refer to MT-20, "
COMPONENTS" .
CAUTION:
Install with punched surface facing up.
GEAR
A
B
MT
SCIA0401E
D
E
F
G
PCIB0789E
6. Install di f f ere nt i al side be ar ing ou te r rac e t o c lu tch h ou si ng us in g
the drift s.
7. Install fi nal drive assembly into clutch housing.
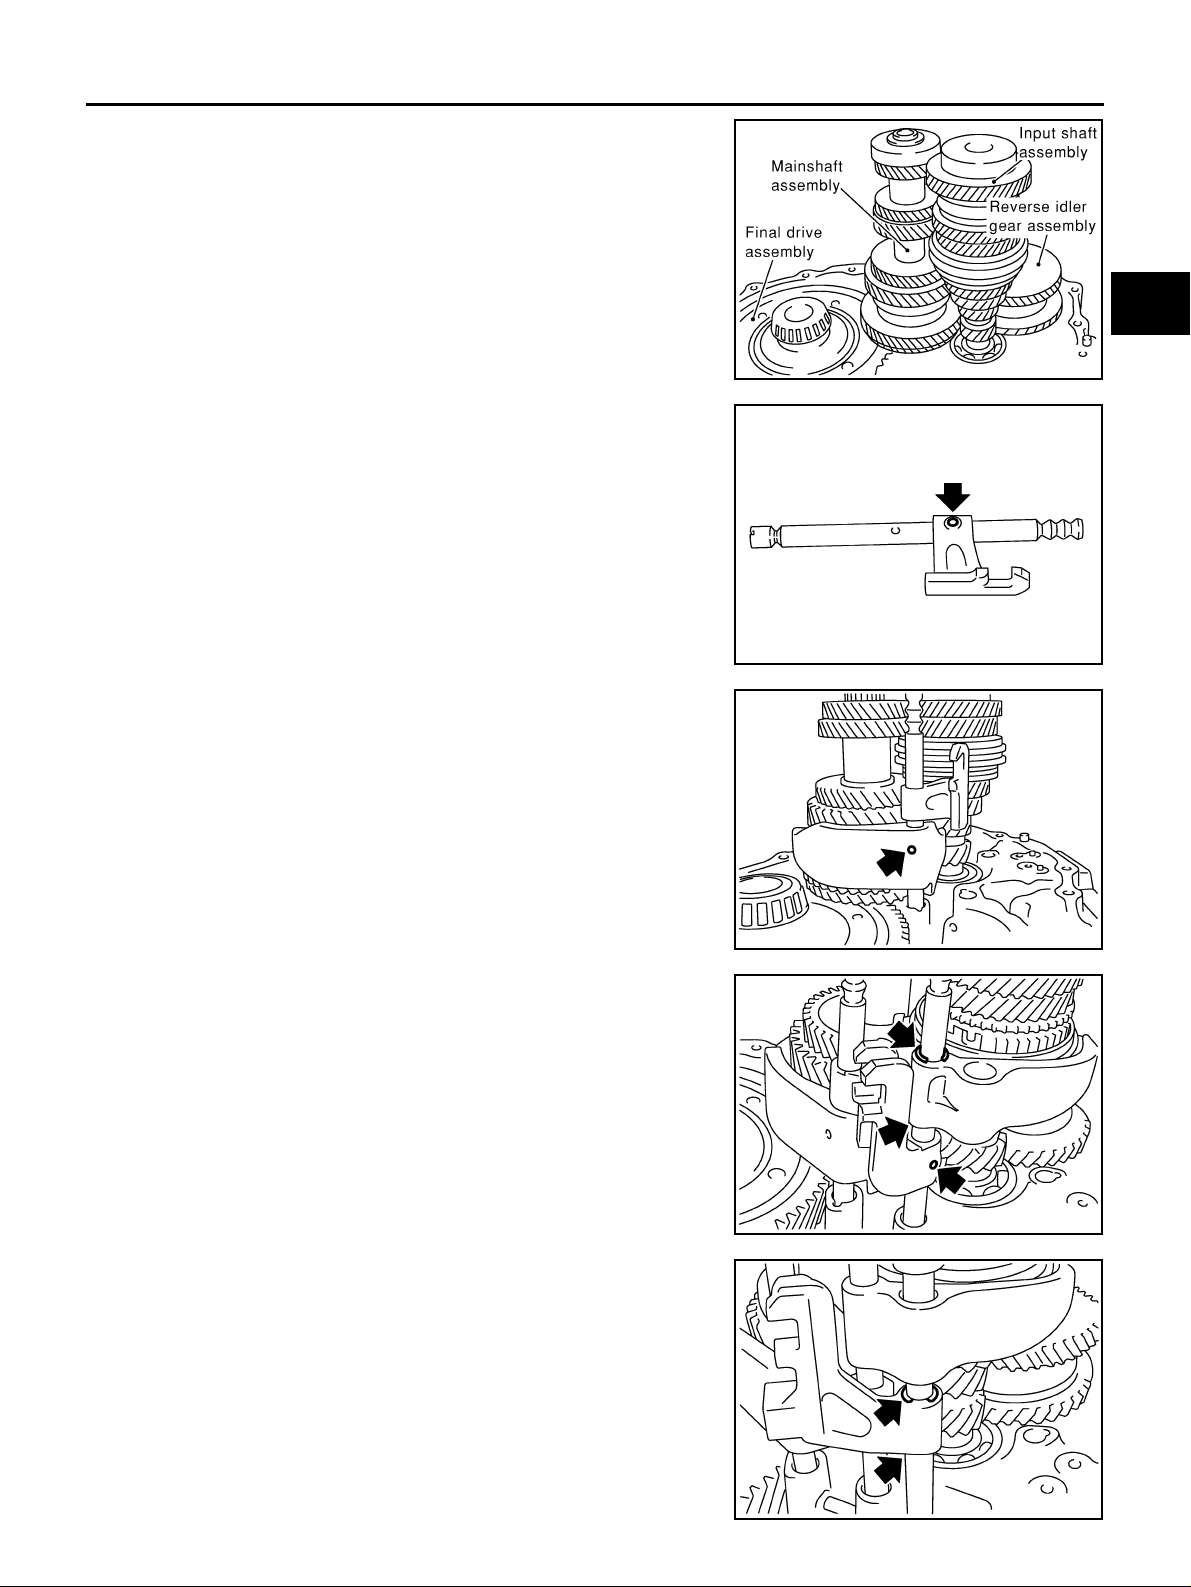
8. Install input shaft assembly, mainshaft assembly, and reverse
idler gear assembly into clutch housing.
CAUTION:
Be sure not to damage input shaft oil seal.
SCIA0987E
SCIA0888E
H
I
J
K
L
M
SCIA0395E
MT-33
Page 34
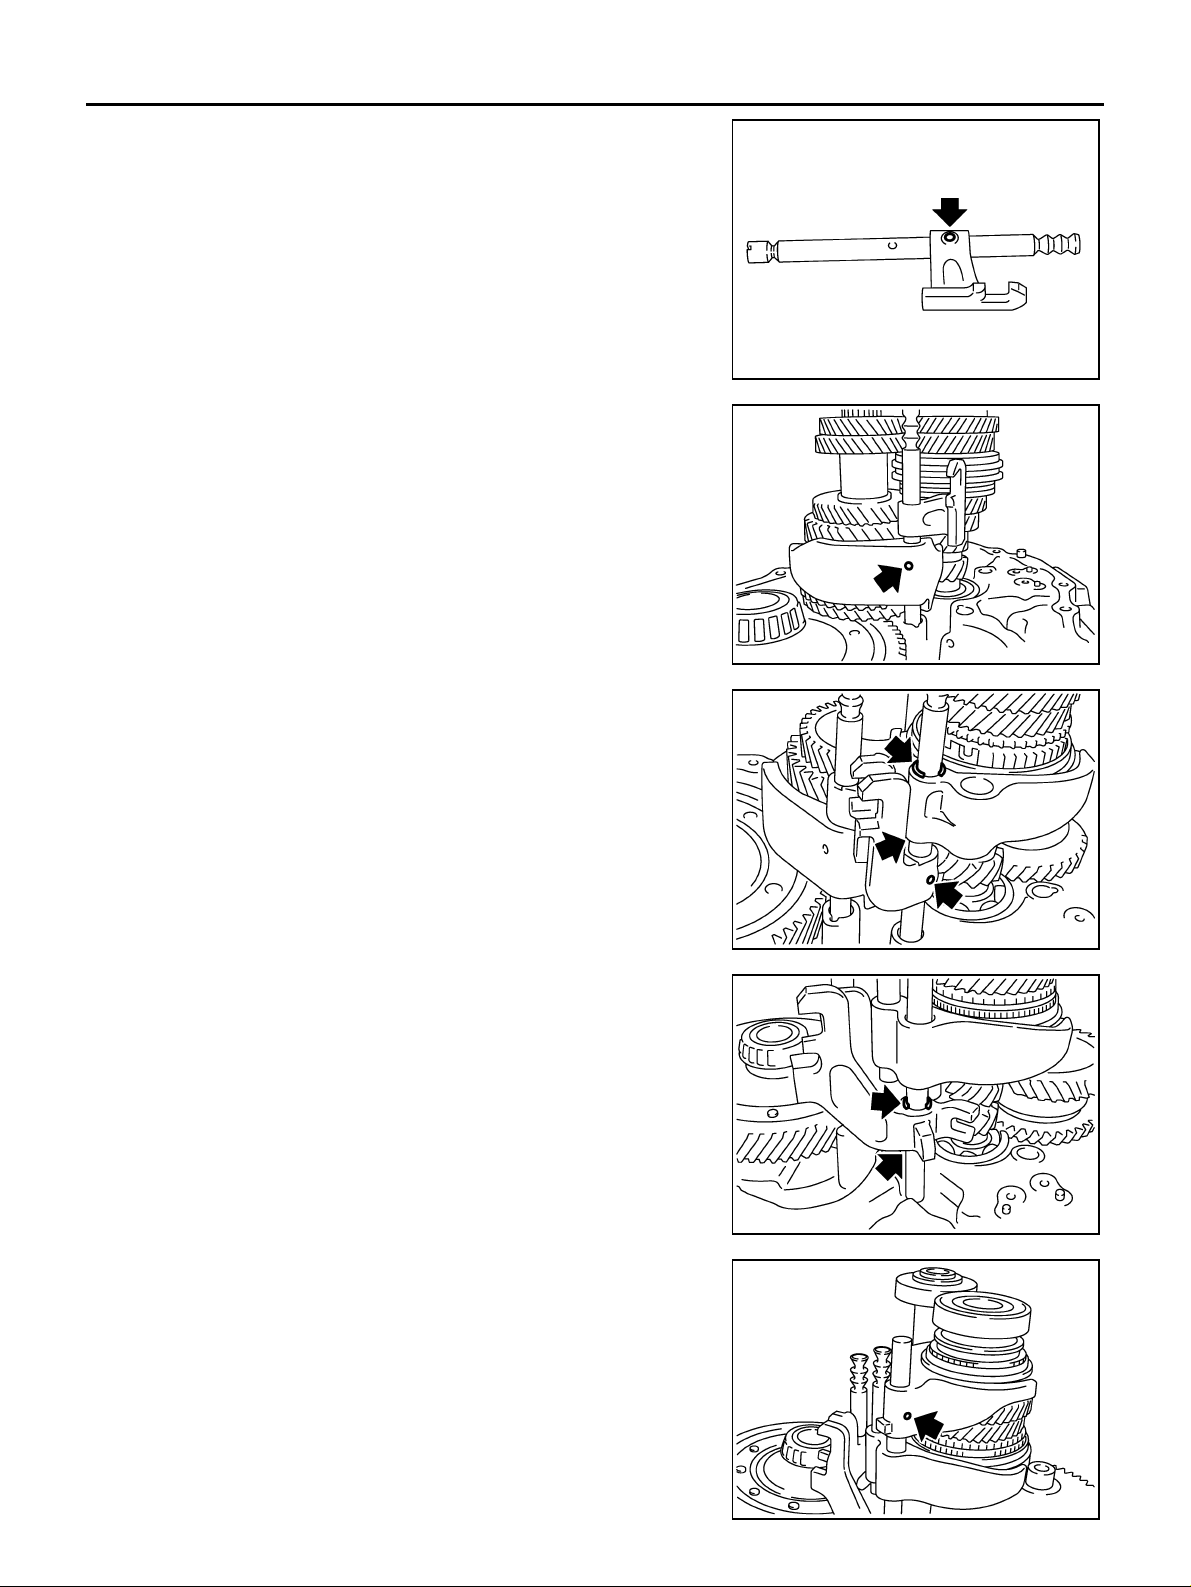
TRANSAXLE ASSEMBLY
9. Install 1st-2nd bracket onto 1st-2nd fork rod, and then install a
new retaining pin to 1st-2nd bracket.
CAUTION:
Do not reuse retaining pins.
10. Install 1st-2nd fork rod and 1st-2nd shift fork, and then install a
new retaining pin to1st-2nd shift fork.
CAUTION:
Do not reuse retaining pins.
11. Install shift check sleeve to clutch housing.
SCIA0889E
12. Install interlock pin to 3rd-4th fork rod.
13. Install 3rd-4th bracket, 3rd-4th shift fork, and 3rd-4th fork rod.
14. Install a new stopper ring onto 3rd-4th shift fork.
CAUTION:
Do not reuse stopper ring.
15. Install a new retaining pin onto 3rd-4th bracket.
CAUTION:
Do not reuse retaining pins.
16. Install 2 check balls to clutch housing.
17. Install 5th-reverse bracket, 5th shift fork, and 5th-reverse fork
rod.
18. Install a new stopper ring onto 5th-reverse bracket.
CAUTION:
Do not reuse stopper ring.
SCIA0394E
SCIA0393E
SCIA0392E
19. Install a new retaining pin onto 5th shift fork.
CAUTION:
Do not reuse retaining pins.
20. Install reverse shift fork and reverse fork rod.
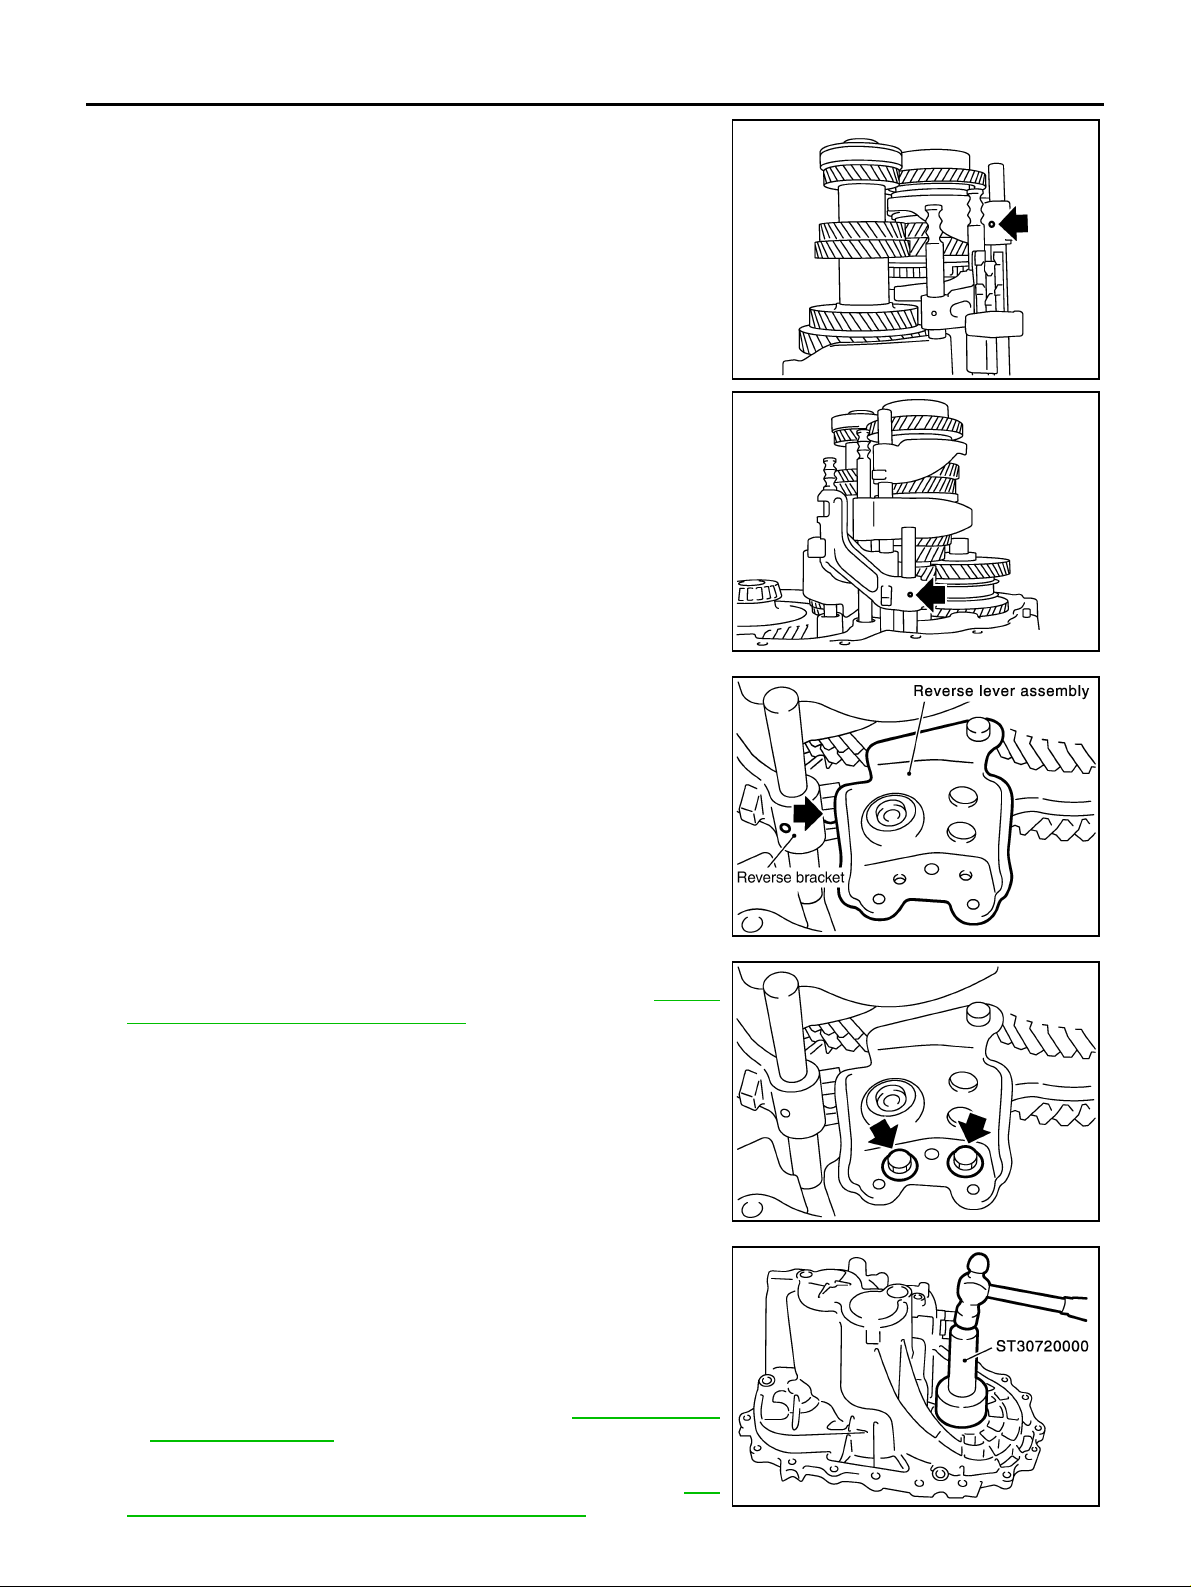
21. Install reverse lever assembly fo llowing the procedures below.
a. Install shifter cap onto reverse lever assembly cam, and then
install them onto reverse shift fork.
CAUTION:
Do not drop shifter cap.
MT-34
SCIA0391E
Page 35
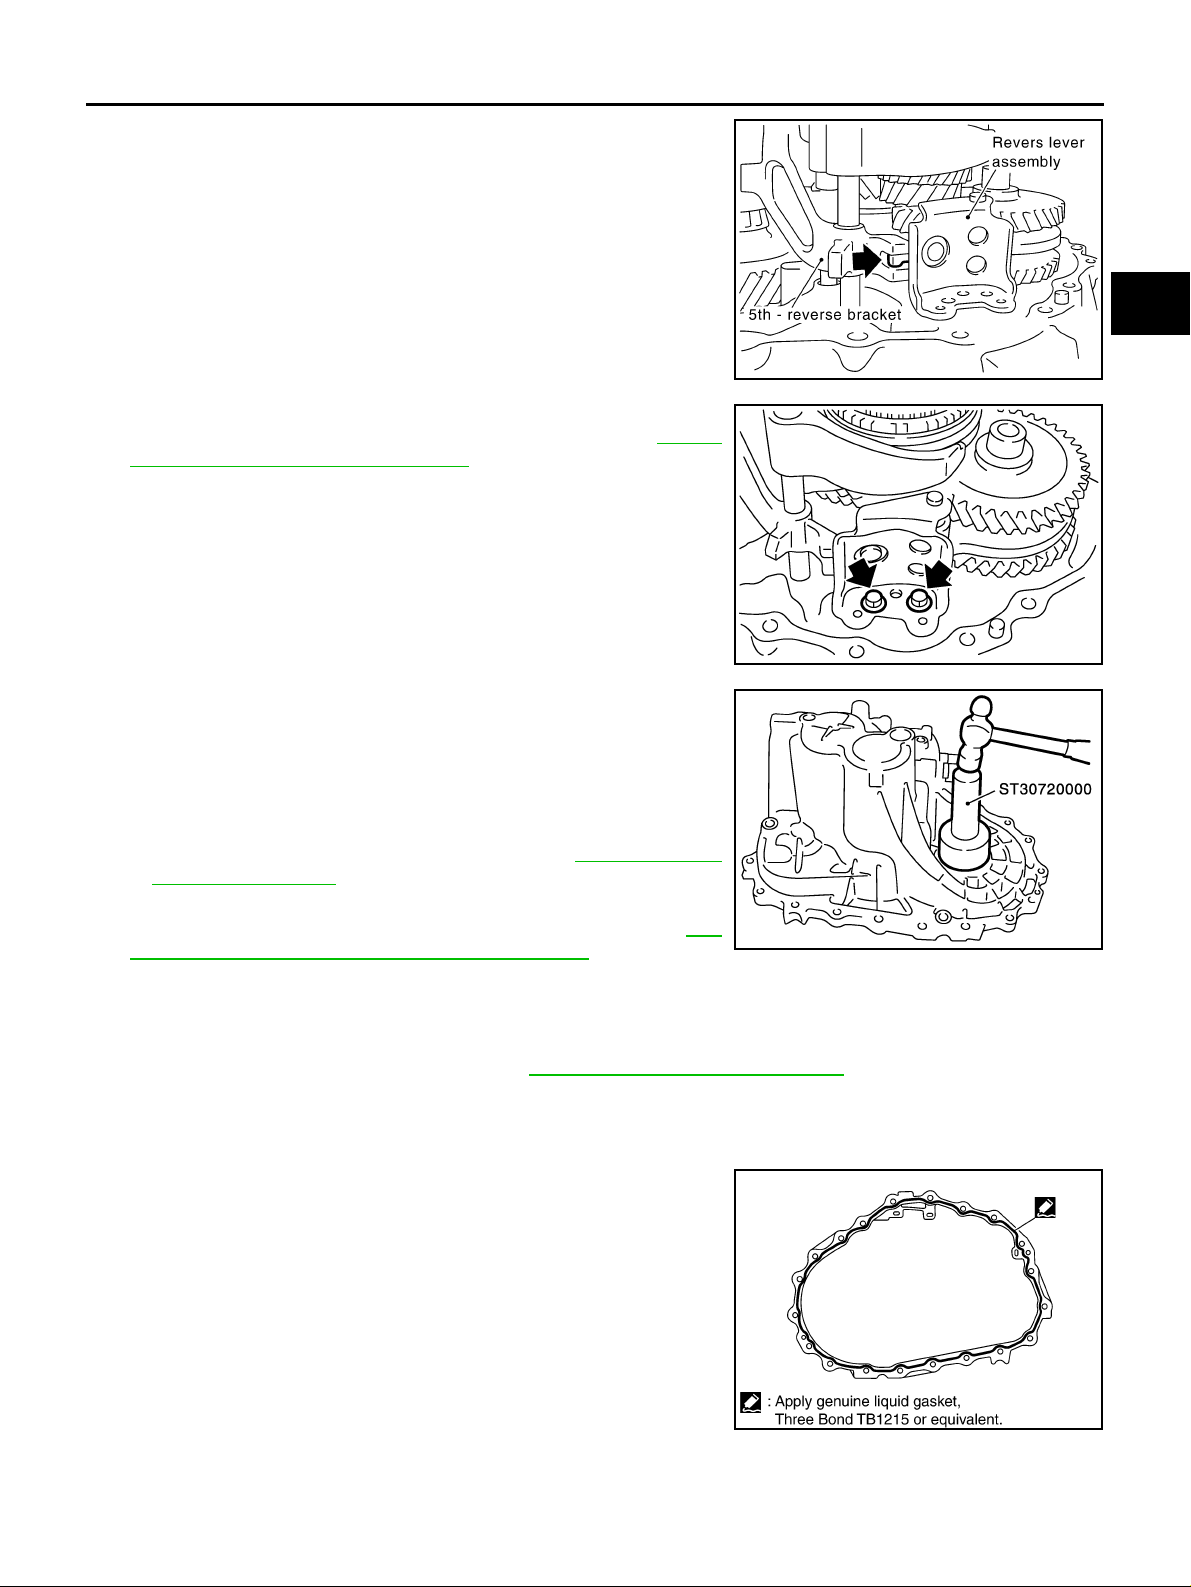
TRANSAXLE ASSEMBLY
b. While lifting reverse shift fork, align cam with 5th-reverse
bracket.
c. Install reverse lever assembly to clutch housing, and then
tighten mounting bolts to the specified torque. Refer to MT-22,
"SHIFT CONTROL COMPONENTS" .
22. Install check ball, shift check sleeve, check spring and a new
check plug to clutc h hous in g.
CAUTION:
● Do not reuse check plug.
● Do not drop check ball.
23. Install the magnet onto clutch housing.
24. App ly multi-purpose grease to differential oil seal lip, and then
install a new differential oi l seal to transaxle case using the drift.
CAUTION:
Do not reuse differential oil seals .
25. Install sele ct ed i nput sh aft re ar bear i ng adj u st ing sh im o nto i np ut
shaft.
● For selection of adjusting shims, refer to MT-47, "INPUT
SHAFT END PLAY" .
26. Ins tall selected differential si de bearing adjusting s him and differential side bearing. For selection adjusting shim, refer to MT-
48, "DIFFERENTIAL SIDE BEARING PRELOAD" .
27. Install baffle plate and oil gutter to transaxle case.
28. Install transaxle case following the procedures below.
a. Install selected mainshaft rear bearing adjusting shim into transaxle case.
● For selection of adjusting shims, refer to MT-48, "MAINSHAFT END PLAY" .
b. Temporarily install a new snap ring of mainshaft rear bearing into transaxle case.
CAUTION:
Do not reuse snap ring.
c. Apply recommended sealant to mating surfaces of transaxle
case and clutch housing.
CAUTION:
Remove old sealant adhering to mounting surfaces. Also
remove any moisture, oil, or foreign material adhering to
application and mounting surfaces.
PCIB0790E
SCIA0390E
SCIA0887E
A
B
MT
D
E
F
G
H
I
J
K
L
M
PCIB0816E
MT-35
Page 36
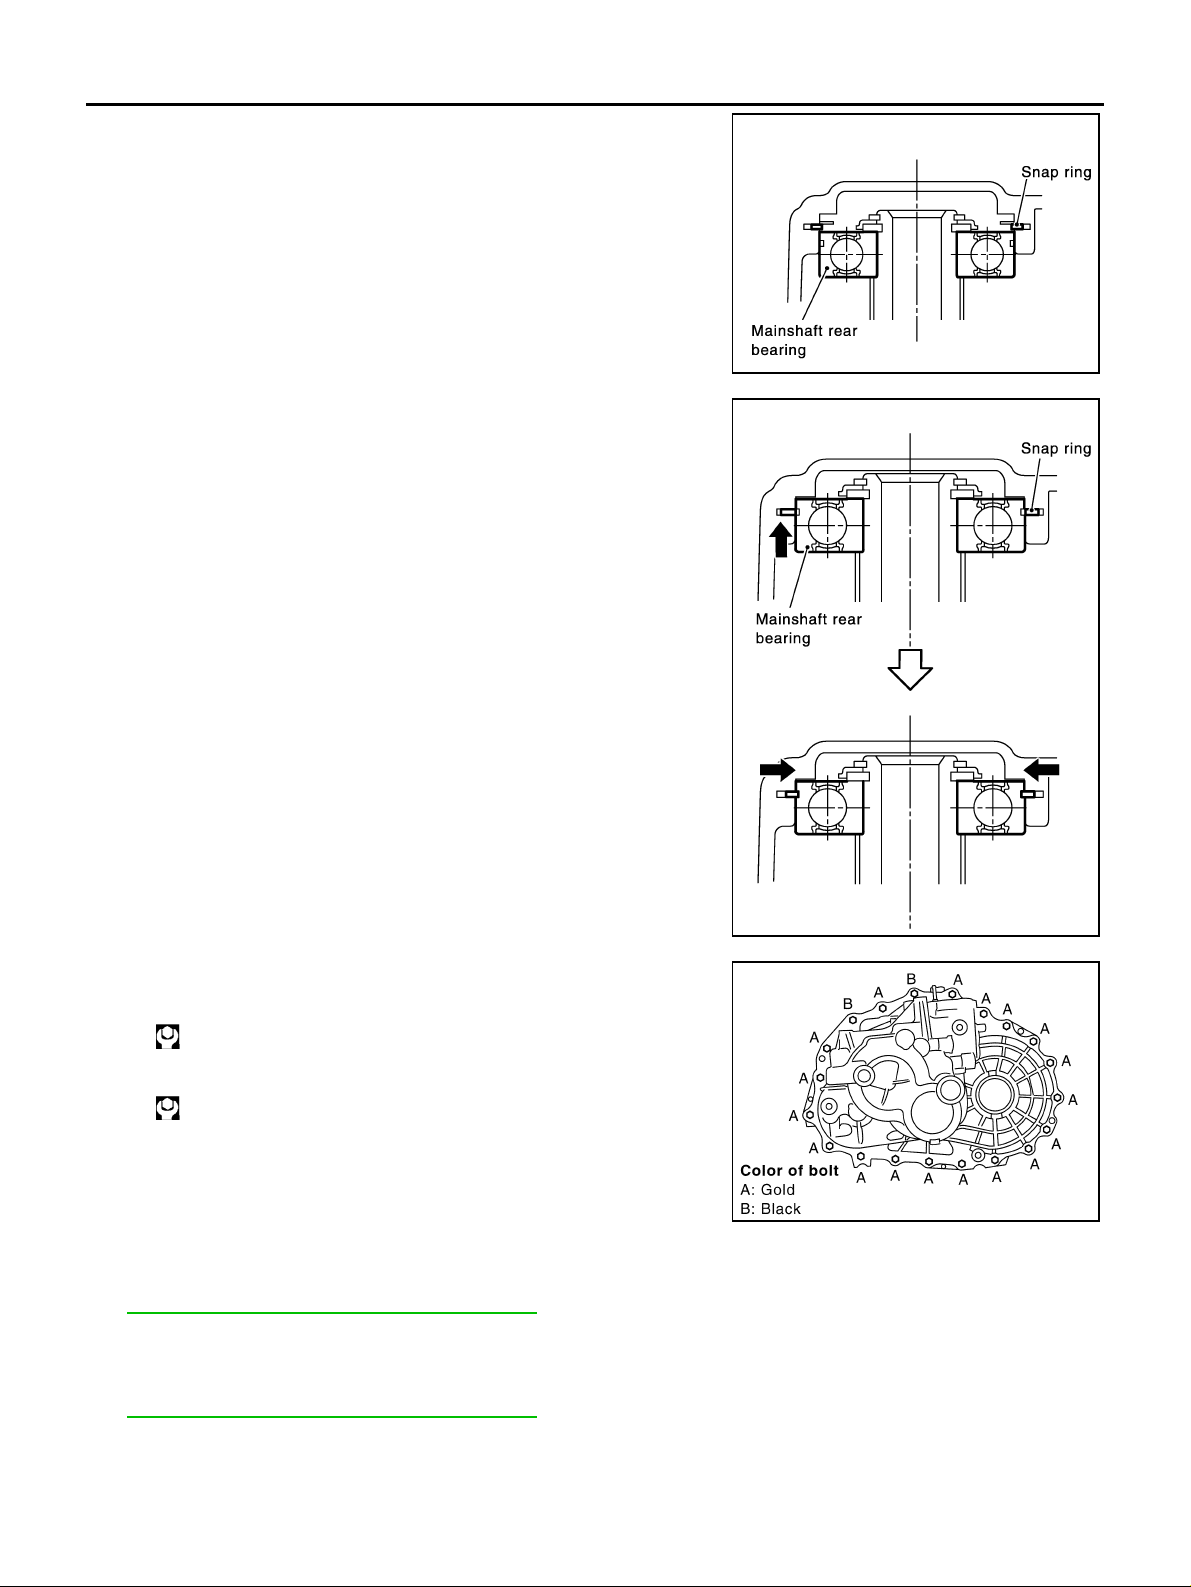
TRANSAXLE ASSEMBLY
d. With snap ring of mainshaft rear bearing temporarily installed,
place transaxle case over clutch housing.
e. Through bore plug mounting hole, with snap ring stretched, and
lift up mainshaft assembly from the cont rol assembly mounting
hole.
f. Securely install snap ring onto main shaft rear bearing.
SCIA0892E
SCIA0893E
g. Tighten mounting bolts to the specified torque.
Bolt A:
: 52 N·m (5.3 kg-m, 38 ft-lb)
Bolt B:
: 65 N·m (6.6 kg-m, 48 ft-lb)
CAUTION:
Always replace bolts B as they are self-sealing bolts.
h. Install control assembly to transaxle case.
SCIA1064E
CAUTION:
Do not reuse O-ring.
i. Install a new shift check to transaxle case, and then tighten shift check to the specified torque. Refer to
MT-22, "
SHIFT CONTROL COMPONENTS" .
CAUTION:
Do not reuse shift check.
j. Install a new st opper bolt to transax le ca se , an d t he n ti ghten stopper bolt to th e s pe ci fied torque. Refer to
MT-22, "
SHIFT CONTROL COMPONENTS" .
CAUTION:
Do not reuse stopper bolt.
MT-36
Page 37
TRANSAXLE ASSEMBLY
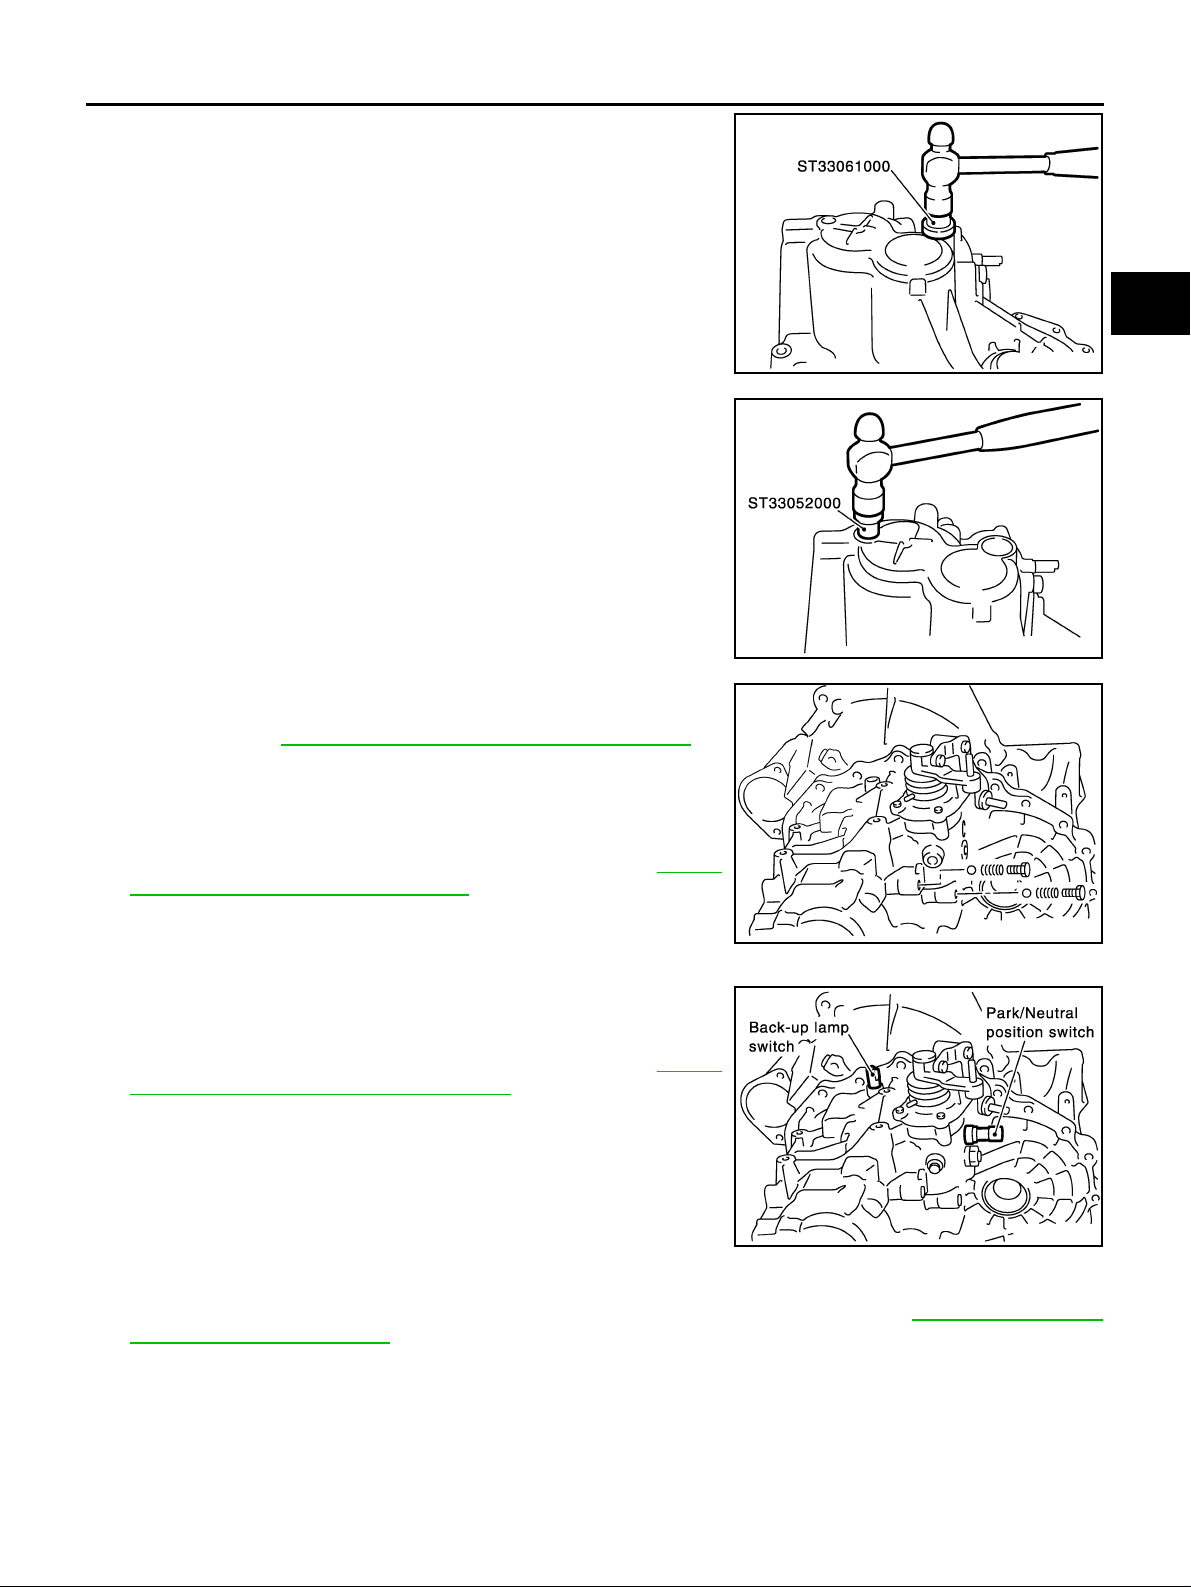
29. Install a new bore plug to transaxle case using the drift.
CAUTION:
Do not reuse bore plug.
30. Install a new w elch plug to transaxle case using the drift.
CAUTION:
Do not reuse welch plug.
A
B
MT
SCIA0894E
D
E
F
G
SCIA0403E
31. Install 2 check balls, 2 check springs and 2 new check plugs to
transaxle case, and then tighten check plug to the specified
torque. Refer to MT-22, "
SHIFT CONTROL COMPONENTS" .
CAUTION:
Do not reuse check plug.
32. Install new O-ring applied gear oil on control assembly. And then
install control assembly on transaxle case. After the previous
service tighten bolts to the specified torque. Refer to MT-22,
"SHIFT CONTROL COMPONENTS" .
CAUTION:
Do not reuse O-ring.
33. Apply genuine liqui d gas ket or eq uiva len t to thre ads of pa rk/ne utral positio n switch and back- up lamp switch. T hen install them
into transaxle case. Tighten park/neutral position switch and
back-up lamp switch to the specified torque. Refer to MT-19,
"CASE AND HOUSING COMPONENTS" .
SCIA1668J
SCIA0895E
H
I
J
K
L
M
34. Ins tall n ew ga sk e ts onto drain plug a nd filler plug, an d th en in sta ll th em i nto transaxle ca se . Tighten park/
neutral position switch and back-up lamp switch to the specified torque. Refer to MT-19, "
CASE AND
HOUSING COMPONENTS" .
CAUTION:
● Do not reuse gasket.
● After oil is filled, tighten filler plug to specified torque.
Disassembly and Assembly (RS6F51A) ECS008C1
DISASSEMBLY
1. Remove dra in plug and filler plug from transa x le ca se .
MT-37
Page 38
TRANSAXLE ASSEMBLY
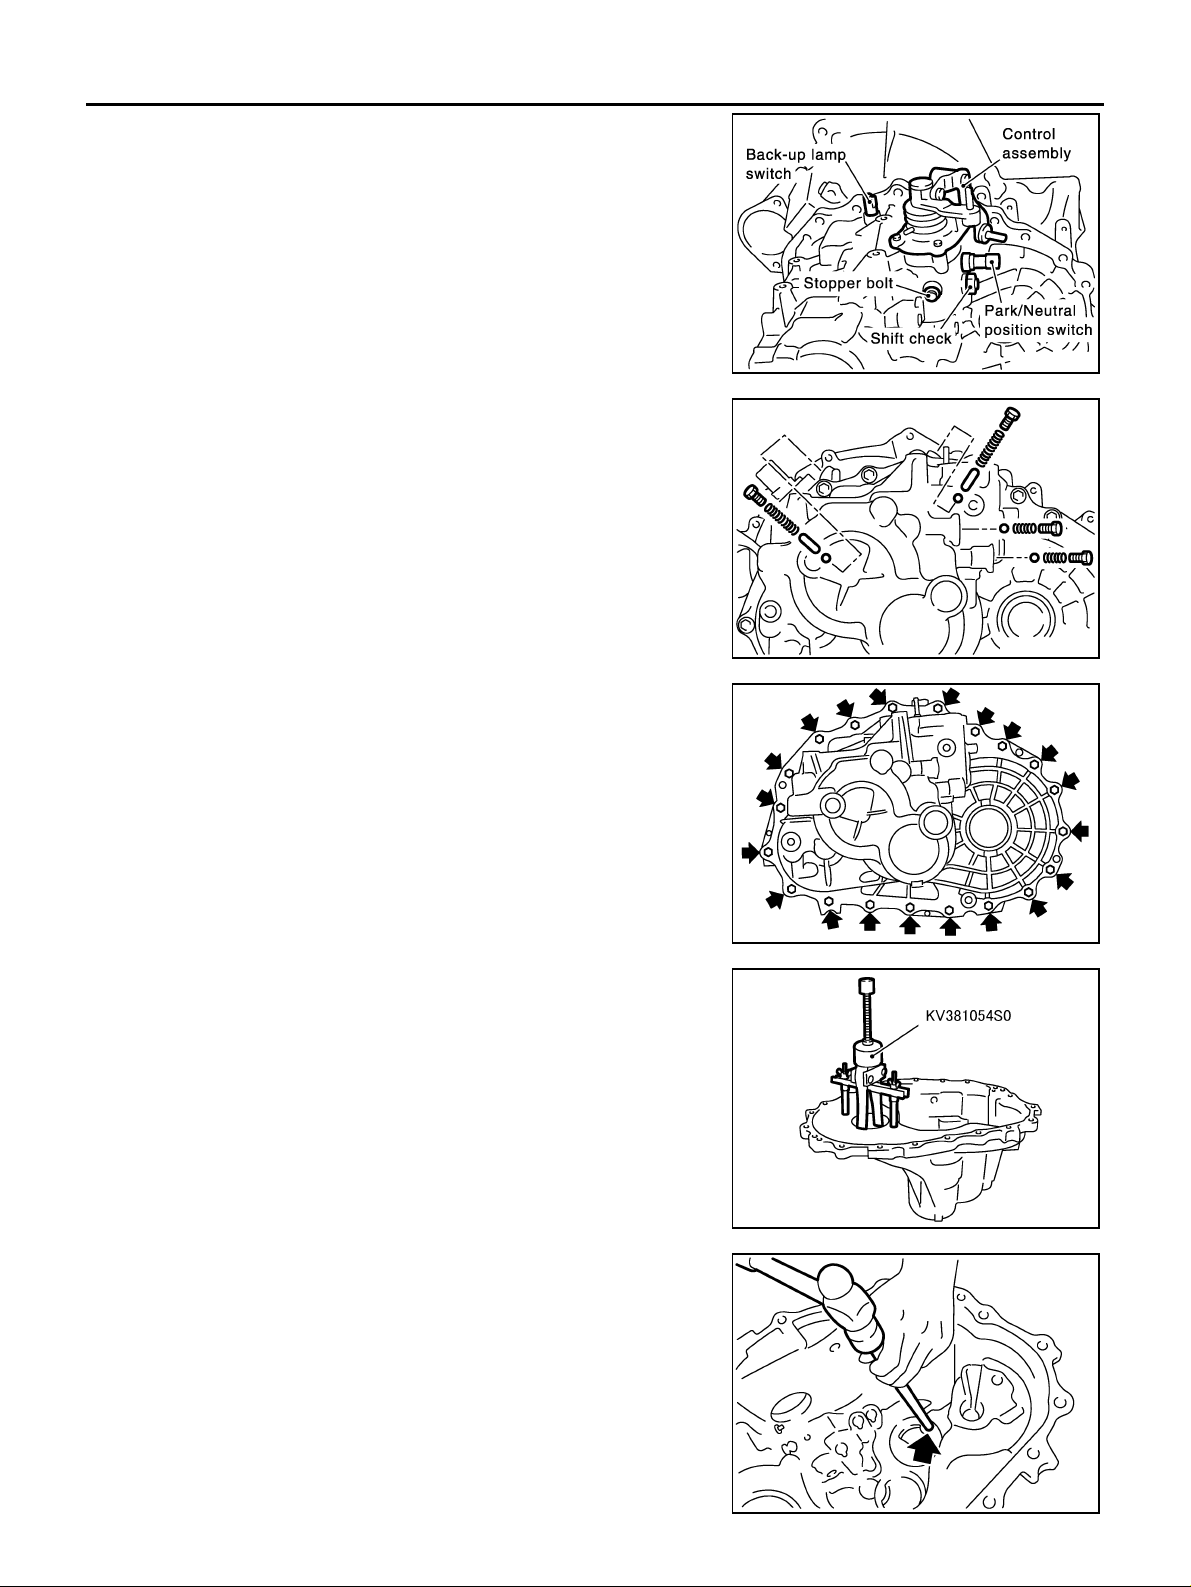
2. Remove park/neutral position switch and back-up lamp switch
from transaxle case.
3. Remove shift check and stopper bolt from transaxle case, and
then remove control assembly from transaxle case.
4. Remove check pl ugs ( 4 pie ce s), ch ec k s pri ng s (4 pi eces ) , ch eck
balls (4 pieces) and shift check sleeve (2 pieces) from transaxle
case.
SCIA0389E
5. Remove transaxle case mounting bolts.
6. Remove bore plug fro m tr an sa xl e case.
CAUTION:
Be careful not to damage transaxle case.
7. While spreading the s nap ri ng of main shaf t rear beari ng lo cate d
at bore plug hole, remove transaxle case from clutch housing.
8. Remove oil gutter, baffle plate from transaxle case.
9. Remove snap ring, mainshaft rear bearing adjusting shim and
input shaft rear bearing adjusting shim from transaxle case.
10. Remove differential side bearing outer race (transaxle case
side) from transaxle case usin g the puller, and then remove di fferential side bearing adjusting shim from transaxle case.
SCIA0959E
SCIA0983E
SCIA0897E
11. Remove welch plug from transaxle case.
SCIA0402E
MT-38
Page 39
TRANSAXLE ASSEMBLY
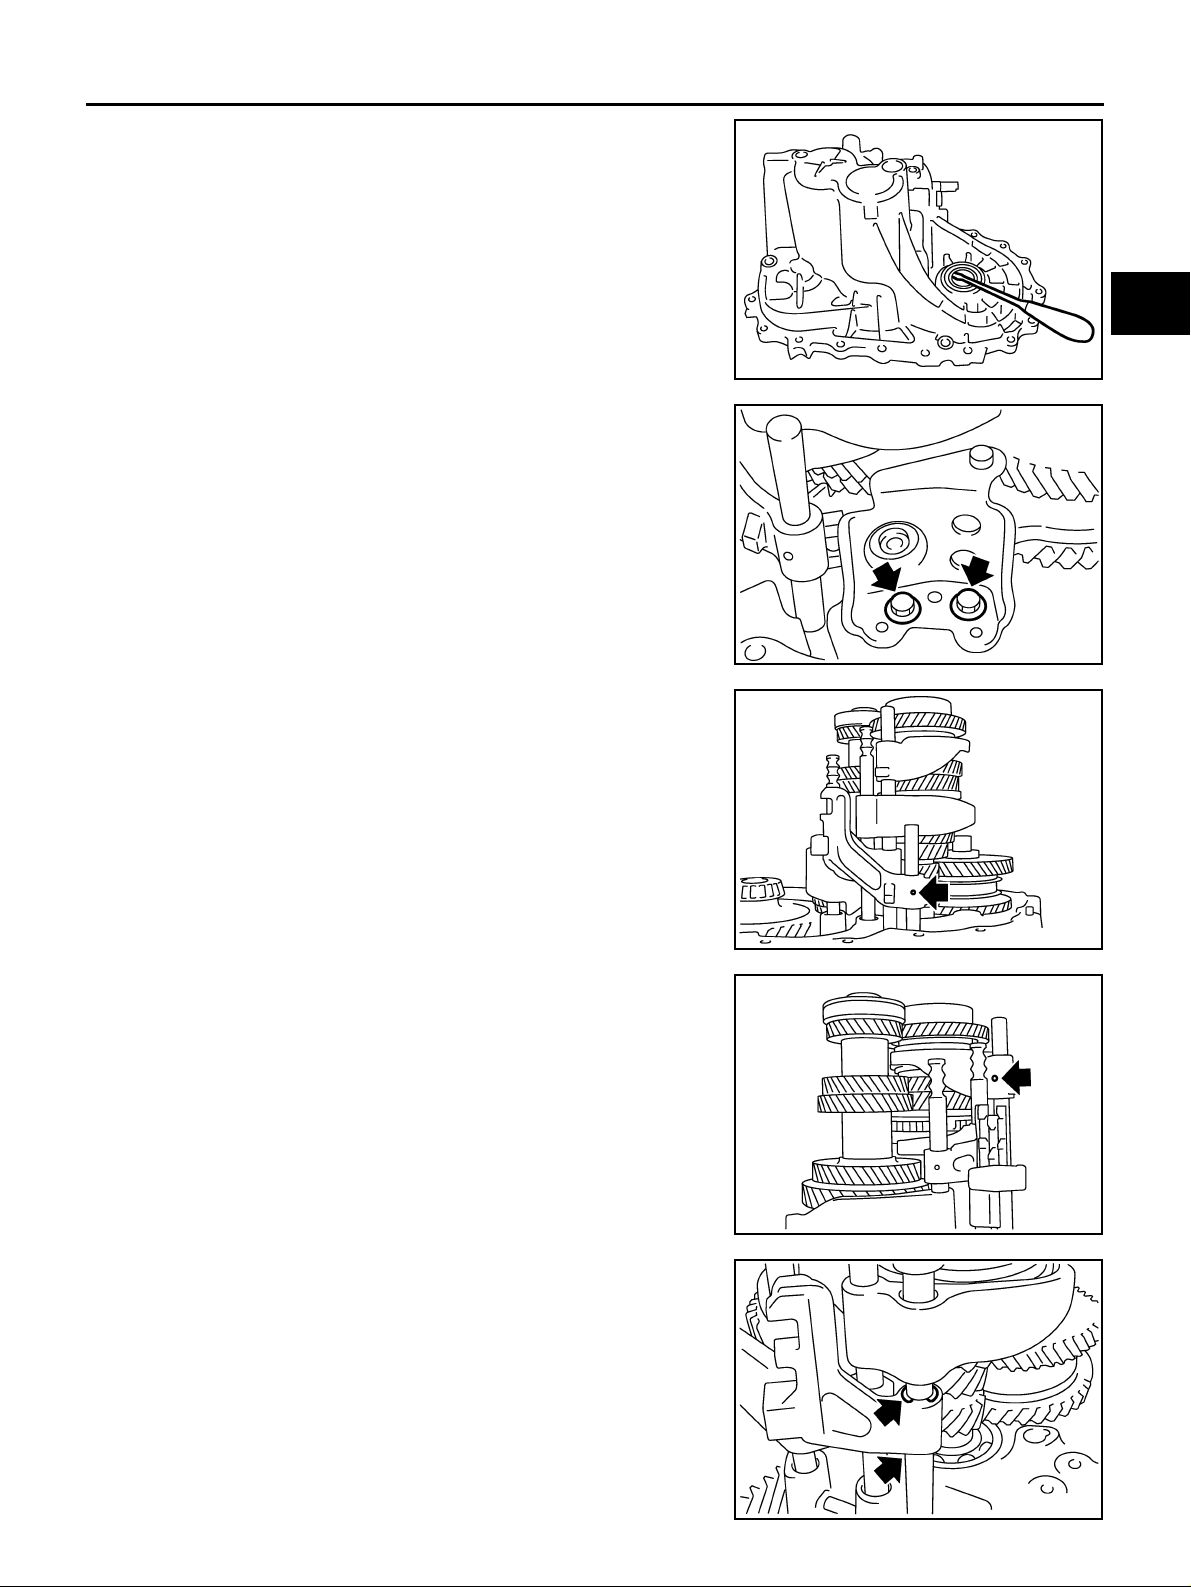
12. Remove differential oil seal (transaxle case side) from transaxle
case.
13. Remove magnet from clutch housing.
14. With shift lever in 5th position, remove mounting bolts from
reverse lever assembly. Lift reverse lever assembly to remove.
CAUTION:
Be careful not to lose shifter cap.
15. Pull out reverse fork rod then remove reverse shift fork.
16. Remove retai ning pin of reverse bracket using a pin punch.
17. Pull out reverse bracket and reverse bracket fork rod.
18. Remove check ball (2 pieces) and interlock pin from clutch
housing.
A
B
MT
SCIA0397E
D
E
F
G
SCIA0960E
H
I
19. Shift 3rd-4th f ork r od to 3rd pos it i on. R e mo ve re taining pin of 5th
- 6th shift fork using a pin punch.
20. Remove stopper rings for 5th-6th bracket.
21. Pul l out 5th-6th fork rod and remo ve 5th-6th shift fork and 5th6th bracket.
22. Remove check balls (2 pieces) and interlock pin.
SCIA0961E
SCIA0962E
J
K
L
M
SCIA0963E
MT-39
Page 40
TRANSAXLE ASSEMBLY
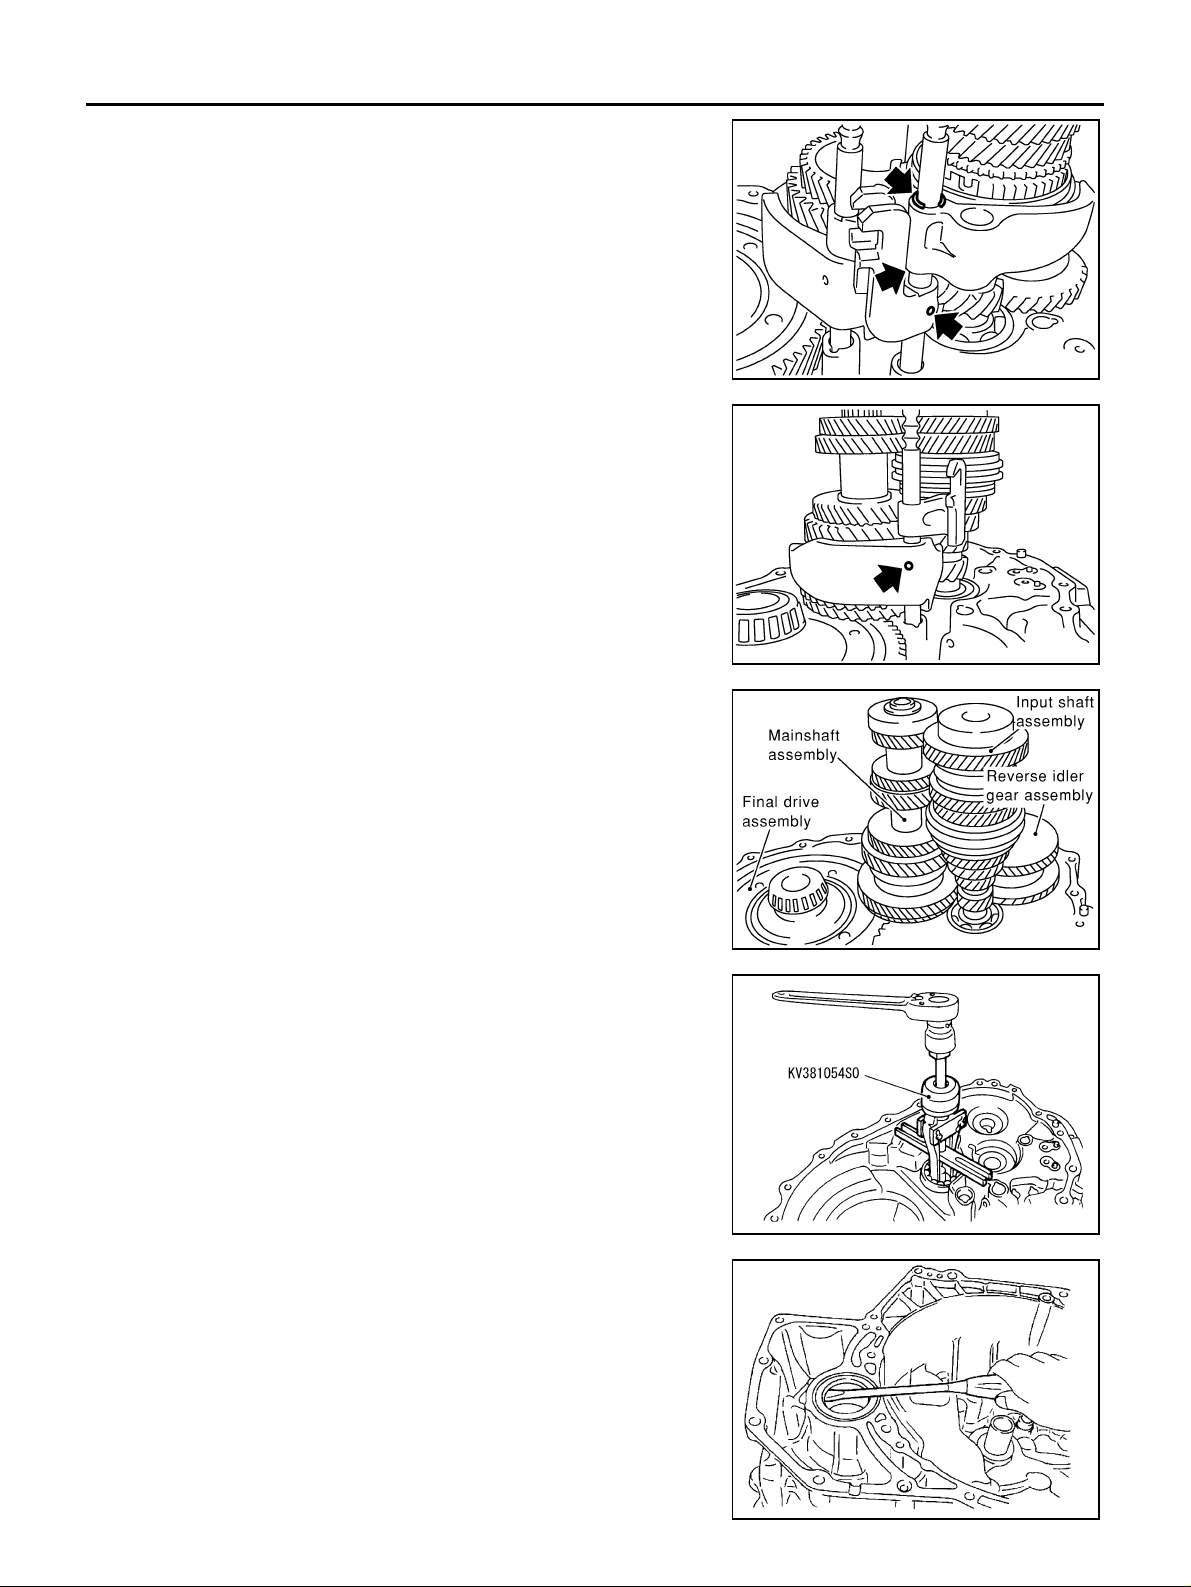
23. Remove retaining pin of 3rd-4th bracket using a pin punch.
24. Remove stopp er rings for 3rd-4th shift fork.
25. Pull out 3rd-4th fork rod and remove 3rd-4th shift fork and 3rd4th bracket.
26. Remove shift check sleeve from clutch housing.
27. Remove retaining pin of 1st-2nd shift fork using a pin punch.
28. Pull out 1st-2nd fork rod with 1st-2nd bracket.
29. Remove 1st-2nd shift fork.
30. Remove retaining pin of 1st-2nd bracket using a pin punch and
separate fork rod and 1st-2nd bracket.
SCIA0393E
31. Remove gear components from clutch housing in the following
procedure.
a. Remove input shaft assembly, mainshaft assembly and reverse
idler gear assembly as a set, tapping input shaft with plastic
hammer.
CAUTION:
Always withdraw mainshaft straight out. Failure to do so
can damage resin oil channel on clutch housing side.
b. Remove final drive assembly.
32. Remove mainshaft bearing retainer and then mainshaft front
bearing from clutch housing using the puller.
33. Remove oil channel from clutch housing.
SCIA0394E
SCIA0964E
SCIA1077J
34. Remove differential oil seal (clutch housing side) from clutch
housing.
CAUTION:
Be careful not to damage clutch housing.
MT-40
SCIA1068J
Page 41
TRANSAXLE ASSEMBLY
35. Remove differential side bearing outer race (clutch housing
side) from clutch housing using the puller.
36. Remove input shaft oil seal from clutch housing.
CAUTION:
Be careful not to damage clutch housing.
ASSEMBLY
1. Apply multi-purpose grease to input shaft oil seal lip. Install a
new input shaft oil seal 1.8-2 .8 mm (0. 071-0.110 in) above from
clutch housing edg e surface using the drift.
CAUTION:
Do not reuse oil seals.
A
B
MT
SCIA1069J
D
E
F
G
SCIA0398E
H
I
2. Apply multi-purpose grease to differential oil seal lip, and then
install a ne w oil seal to clutch housing using the drift.
CAUTION:
Do not reuse oil seals.
J
K
L
M
PCIB0807E
SCIA1070J
MT-41
Page 42
TRANSAXLE ASSEMBLY
3. Install oil channel on mainshaft side.
CAUTION:
Be careful with the orientation of installation.
4. Install mainshaft front bea ring to clutch housing using the drift.
CAUTION:
Be careful with the orientation of installation.
SCIA0986E
5. Install mainsh aft bearing retainer to cl utch housing and tigh ten
mounting bolt to the specified torque . Refer to MT-25, "
GEAR
COMPONENTS" .
CAUTION:
Install with punched surface facing up.
6. Instal l di fferential side bear i ng oute r ra ce t o cl ut c h hous in g u si ng
the drifts.
SCIA0401E
PCIB0789E
SCIA0987E
7. Install final drive assembly into clutch housing.
SCIA0888E
MT-42
Page 43
TRANSAXLE ASSEMBLY
8. Install input shaft assembly, mainshaft assembly, and reverse
idler gear assembly into clutch housing.
CAUTION:
Be sure not to damage input shaft oil seal.
9. Install 1st-2nd bracket onto 1st-2nd fork rod, and then install a
new retaini ng pin to 1st-2nd bracket.
CAUTION:
Do not reuse retaining pin.
10. Install 1s t-2nd fork rod and 1s t-2nd shift fork, and th en install a
new retaining pin to 1st-2nd shift fork.
CAUTION:
Do not reuse retaining pin.
11. Install shift check sleeve to clutch housing.
A
B
MT
SCIA0964E
D
E
F
G
SCIA0889E
H
I
12. Install int erlock pin to 3rd-4th fork rod.
13. Install 3rd-4th bracket, 3rd-4th shift fork, and 3rd-4th fork rod.
14. Install a new stopper ring onto 3rd-4th shift fork.
CAUTION:
Do not reuse stopper ring.
15. Install a new retaining pin onto 3rd-4th bracket.
CAUTION:
Do not reuse retaining pin.
16. Install 2 check balls to clutch housing.
17. Install 5th-6th bracket, 5th-6th shift fork, and 5th-6th fork rod
with interlock pin.
18. Install a new stopper ring onto 5th-6th bracket.
CAUTION:
Do not reuse stopper ring.
SCIA0394E
SCIA0393E
J
K
L
M
SCIA0963E
MT-43
Page 44
TRANSAXLE ASSEMBLY
19. Install a new retaining pin onto 5th-6th shift fork.
CAUTION:
Do not reuse retaining pin.
20. Install 2 chec k ba lls .
21. Install check ball, shift check sleeve, check spring and a new
check plug.
CAUTION:
● Do not reuse check plug.
● Do not drop check ball.
22. Install reverse bracket fork rod and reverse bracket.
23. Install a new retaining pin onto reverse bracket.
CAUTION:
Do not reuse retaining pin.
24. Install reverse shift fork and reverse fork rod.
25. Install reverse lever assembly fo llowing the procedures below.
a. Install shifter cap onto reverse lever assembly cam, and then
install them onto reverse shift fork.
CAUTION:
Do not drop shifter cap.
SCIA0962E
SCIA0961E
b. While lifting reverse shift fork, align cam with reverse bracket.
c. Install reverse lever assembly to clutch housing, and then
tighten mounting bolts to the specified torque. Re fer to MT-27,
"SHIFT CONTROL COMPONENTS" .
26. Install check ball, shift check sleeve, check spring and a new
check plug to clutch housing.
CAUTION:
● Do not reuse check plug.
● Do not drop check ball.
27. Install the magnet onto clutch housing.
28. Apply mul ti-purpose grease to differential oil seal lip, and then
install a new differential oil seal to transaxle case using the drift.
CAUTION:
Do not reuse differential oil seals.
29. Install selected input shaft rear bearing adjusting shim onto input
shaft.
● For selection of adjusting shims, refer to MT-50, "INPUT
SHAFT END PLAY" .
30. Install selected differential side bearing adjusting shim and differential side bearin g. For select ion adjusti ng shim , refe r to MT-
52, "DIFFERENTIAL SIDE BEARING PRELOAD" .
PCIB0791E
SCIA0960E
SCIA0887E
MT-44
Page 45
TRANSAXLE ASSEMBLY
31. Install baffle plate and oil gutter to transaxle case.
32. Install transaxle case following the procedures below.
a. Install selected mainshaft rear bearing adjusting shim into transaxle case.
● For selection of adjusting shims, refer toMT-51, "MAINSHAFT END PLAY" .
b. Temporarily install a new snap ring of mainshaft rear bearing into transaxle case.
CAUTION:
Do not reuse snap ring.
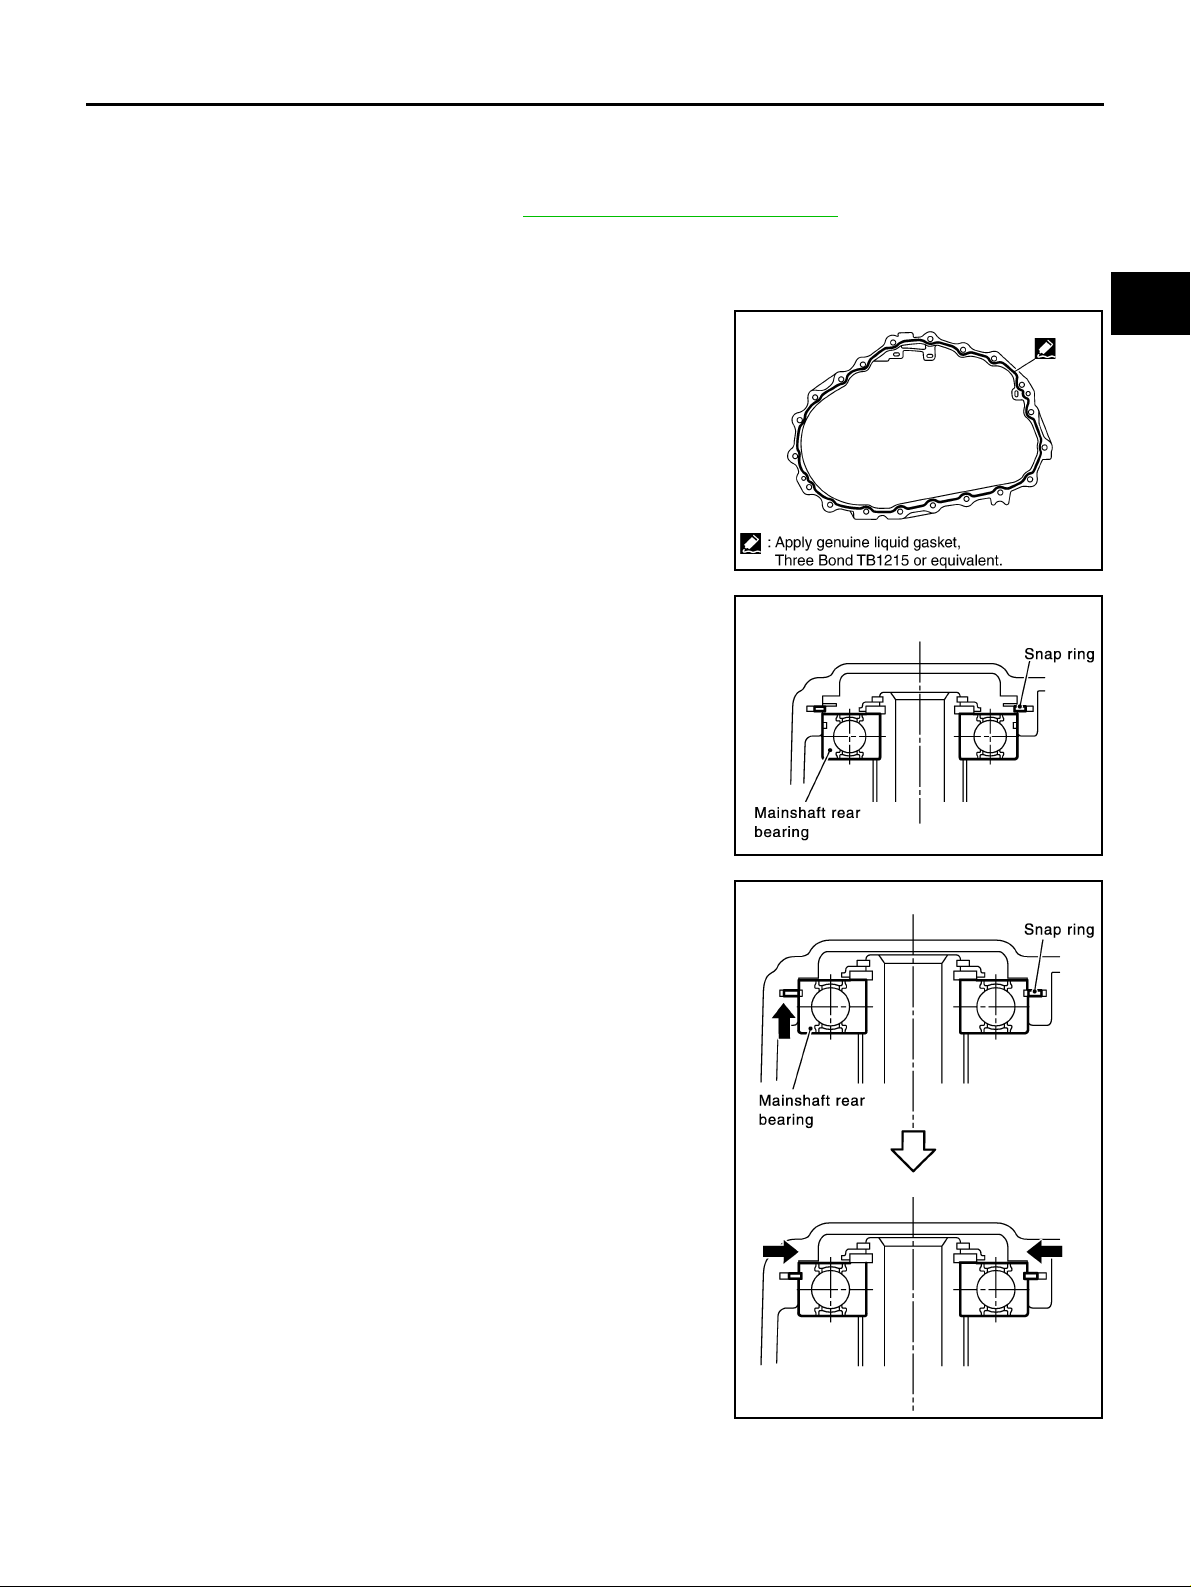
c. Apply recommended sealant to mating surfaces of transaxle
case and clutch housing.
CAUTION:
Remove old sealant adhering to mounting surfaces. Also
remove any moisture, oil, or foreign material adhering to
application and mounting surfaces.
A
B
MT
D
E
d. With snap ring of mainshaft rear bearing temporarily installed,
place transaxle case over clutch housing.
e. Through bo re plug moun ting hole , with snap rin g stretch ed, and
lift up mainshaft assembly from the control assembly mounting
hole.
f. Securely install snap ring onto mainshaft rear bearing.
PCIB0816E
SCIA0892E
F
G
H
I
J
K
L
M
SCIA0893E
MT-45
Page 46
TRANSAXLE ASSEMBLY
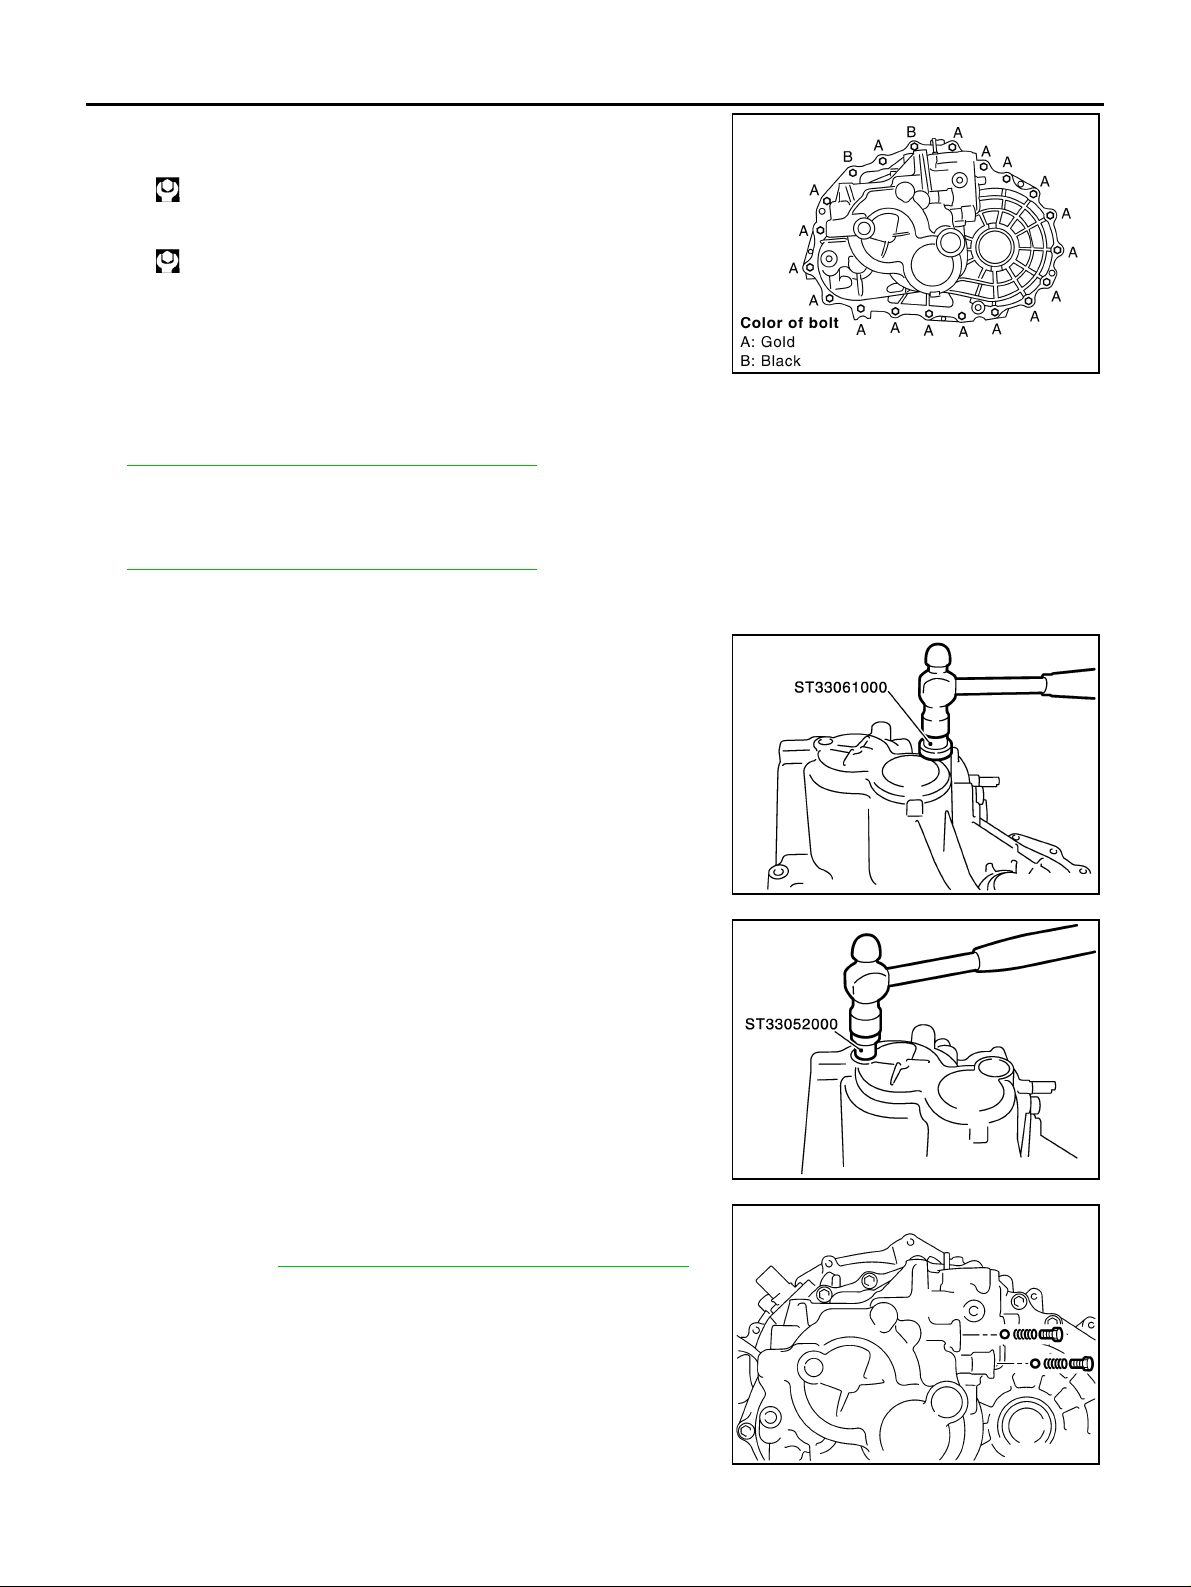
g. Tighten mounting bolts to the specified torque.
Bolt A:
: 52 N·m (5.3 kg-m, 38 ft-lb)
Bolt B:
: 65 N·m (6.6 kg-m, 48 ft-lb)
CAUTION:
Always replace bolts B as they are self-sealing bolts.
h. Install control assembly to transaxle case to transaxle case.
CAUTION:
Do not reuse O-ring.
i. Install a new shift check to transaxle case, and then tighten shift check to the specified torque. Refer to
MT-27, "
SHIFT CONTROL COMPONENTS" .
CAUTION:
Does not reuse shift check.
j. Install a new st opper bolt to transax le ca se , an d t he n ti ghten stopper bolt to th e s pe ci fied torque. Refer to
MT-27, "
SHIFT CONTROL COMPONENTS" .
CAUTION:
Do not reuse stopper bolt.
33. Install a new bore plug to transaxle case using the drift.
CAUTION:
Do not reuse bore plug.
SCIA1064E
34. Install a new welch plug to transaxle case using the drift.
CAUTION:
Do not reuse welch plug.
35. Install 2 check balls, 2 check springs and 2 new check plugs to
transaxle case, and then tighten check plug to the specified
torque. Refer to MT-27, "
SHIFT CONTROL COMPONENTS" .
CAUTION:
Do not reuse check plug.
SCIA0894E
SCIA0403E
SCIA1667E
MT-46
Page 47
TRANSAXLE ASSEMBLY
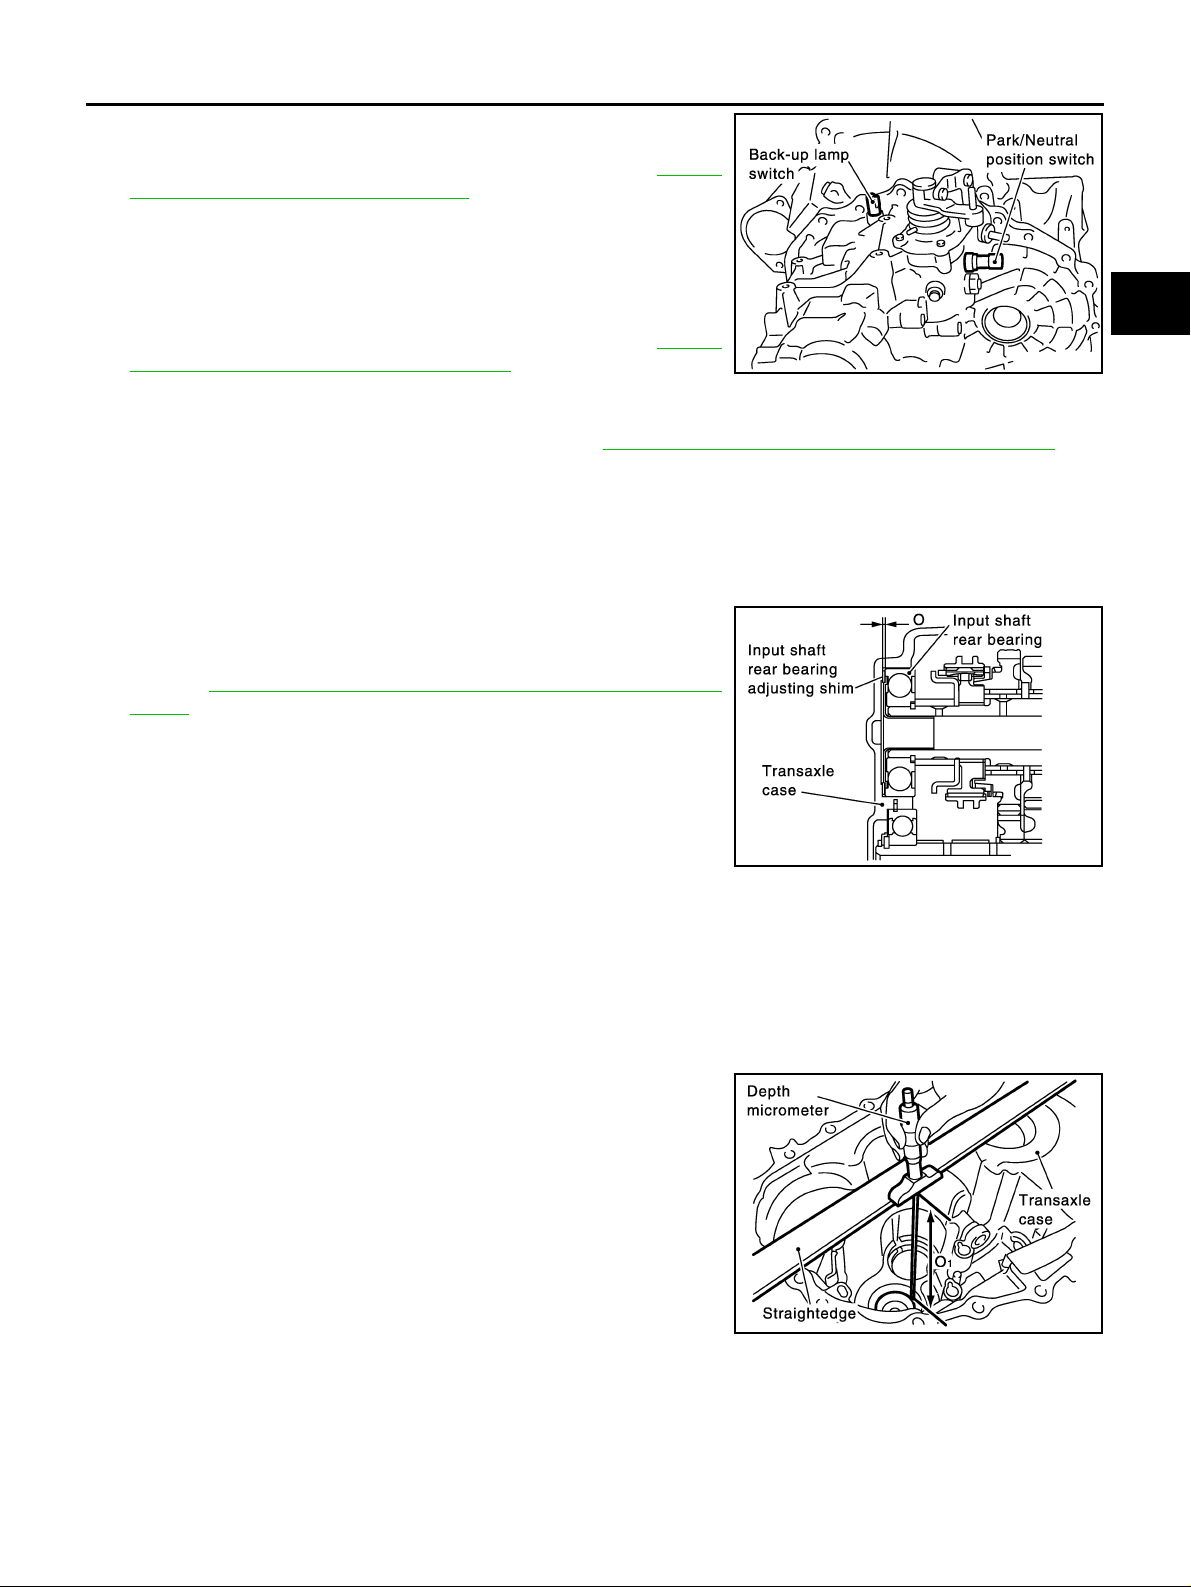
36. Install new O-ring applied gear oil on control assembly. And then
install control assembly on transaxle case. After the precious
service tighten bolts to the specified torque. Refer to MT-27,
"SHIFT CONTROL COMPONENTS" .
CAUTION:
Do not reuse O-ring.
37. Apply genuine liqui d gas ket or eq uiva len t to thre ads of pa rk/ne utral positio n switch and back- up lamp switch. T hen install them
into transaxle case. Tighten park/neutral position switch and
back-up lamp switch to the specified torque. Refer to MT-24,
"CASE AND HOUSING COMPONENTS" .
SCIA0895E
38. Ins tall n ew ga sk ets o nt o d r ai n plug and filler pl ug , and then instal l th em i nto transaxle ca se. Tighten drain
plug and filler plug to the specified torque. Refer to MT-24, "
CASE AND HOUSING COMPONENTS" .
CAUTION:
● Do not reuse gasket.
● After oil is filled, tighten filler plug to specified torque.
Adjustment (RS5F51A) ECS008C2
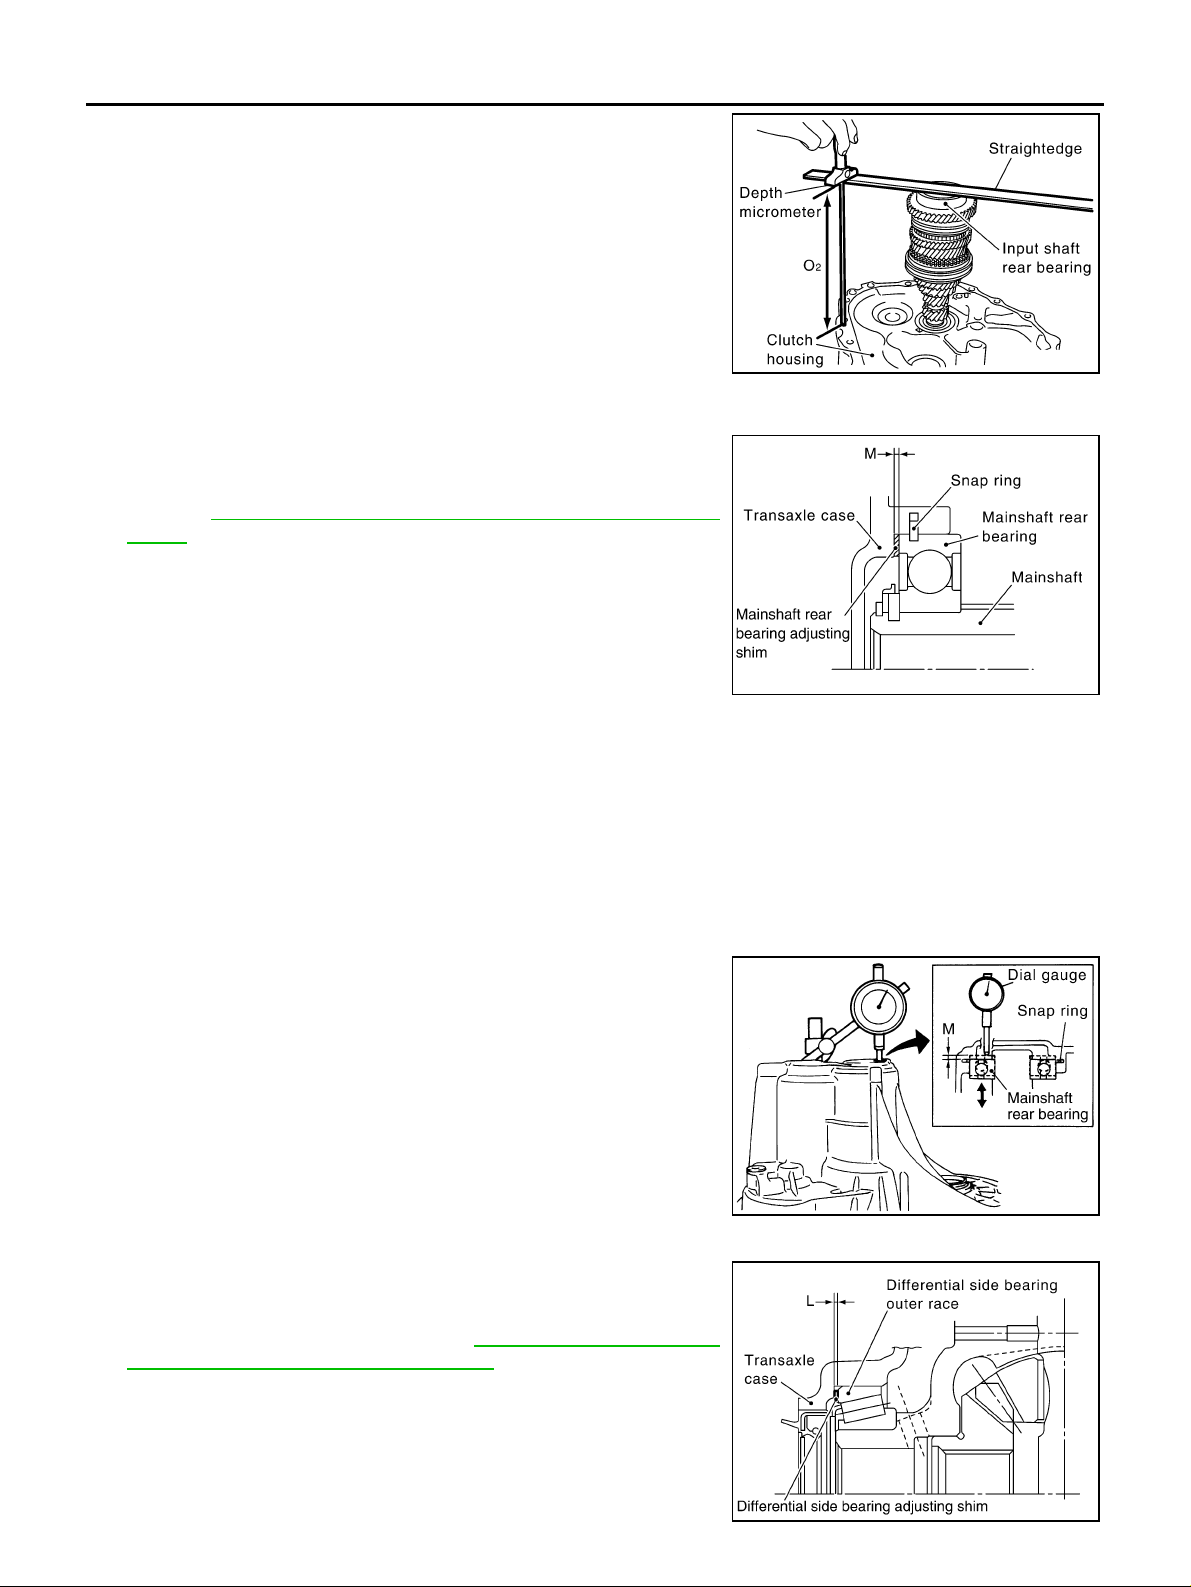
INPUT SHAFT END PLAY
● When adjusting input shaft end play, select adjusting shim for
input shaft rear bearing. To select adjusting shim, measure
clearance between transaxle case and input shaft rear bearing.
Refer to MT-10 2, "
SHIM" .
CAUTION:
Only 1 adjusting shim can be selected.
● Calculate dime nsion "O" (thickness of ad justin g shim) using the
following procedure to satisfy specification of end play for input
shaft rear bearing.
End play: 0 - 0.06 mm (0 - 0.0024 in)
Dimension“O” = (O
O: Thickness of adjusting sh im
1 : Dista nce betwee n transaxle case end fac e and
O
2 : Distance between clutch housing end face
O
INPUT SHAFT REAR BEARING ADJUSTING
SCIA1006E
1 - O2 ) - End play
mounting face of adjusting shim
and end face of input shaft rear bearing
A
B
MT
D
E
F
G
H
I
J
K
L
1. Using de pth micrometer and straig htedge, measure dimensi on
"O
1 " between transaxle case end face and mounting face of
adjusting shim.
MT-47
M
SCIA1002E
Page 48
TRANSAXLE ASSEMBLY
2. Using depth micrometer and straightedge as shown in the figure, measure dime nsion " O
and end face of input shaft rear bearing.
3. Install selected input shaft rear bearing adjusting shim onto input
shaft.
MAINSHAFT END PLAY
● When adjusting mainshaft end play, select adjusting shim for
mainshaft rear bearing. T o select adjusting shim, measure clearance “M” between t ransaxle case and mainshaft rear bearing.
Refer to MT-102, "
SHIM" .
CAUTION:
Only 1 adjusting shim can be selecte d.
● C alculate dim ension "P" (thi ckness of adjus ting shim) us ing the
following procedure to satisfy specification of end play for mainshaft rear bearing.
End play: 0 - 0.06 mm (0 - 0.0024 in)
Dimension“P” = "M" - End play
P: Thickness of adjustin g shim
M: Distance between mainshaft rear bearing end
MAINSHAFT REAR BEARING ADJUSTING
face and transaxle case end face
2 " between clutch housing end face
PCIB0792E
PCIB0793E
1. Install mainshaf t ass em bl y to cl utch housing.
2. Install snap ring to transax le cas e.
3. Install transaxle case to clutch housing, and temporarily assemble them with fixing bolts. Install temporarily snap ring to mainshaft rear bearing.
4. Install dial gauge to bore plug mounting hole, and expand snap
ring. Lift mainsha ft assembly thro ugh control assemb ly installation hole, and push it ag ai nst t ransa x le ca se. T his s tate shal l be
defined as bas e. Moving distance of mainsh aft assembly, with
snap ring fit on main rear bearing, becomes “M”.
PCIB0794E
DIFFERENTIAL SIDE BEARING PRELOAD
● When adjusting differential side bearing preload, select adjust-
ing shim for differenti al side bearing. To select adjust ing shim,
measure clearanc e “L” between transaxle ca se and differential
side bearing outer race. Refer to MT-103, "
SIDE BEARING ADJUSTING SHIM(S)" .
CAUTION:
Up to 2 adjusting shims can be selected.
● C alculate dimension “L ” (thickness of adjusting shi m) using the
following proce dure to satisfy s pecification of p reload for differential side bearing .
DIFFERENTIAL
PCIB0795E
MT-48
Page 49
TRANSAXLE ASSEMBLY
Preload: 0.15 - 0.21 mm (0.0059 - 0.0083 in)
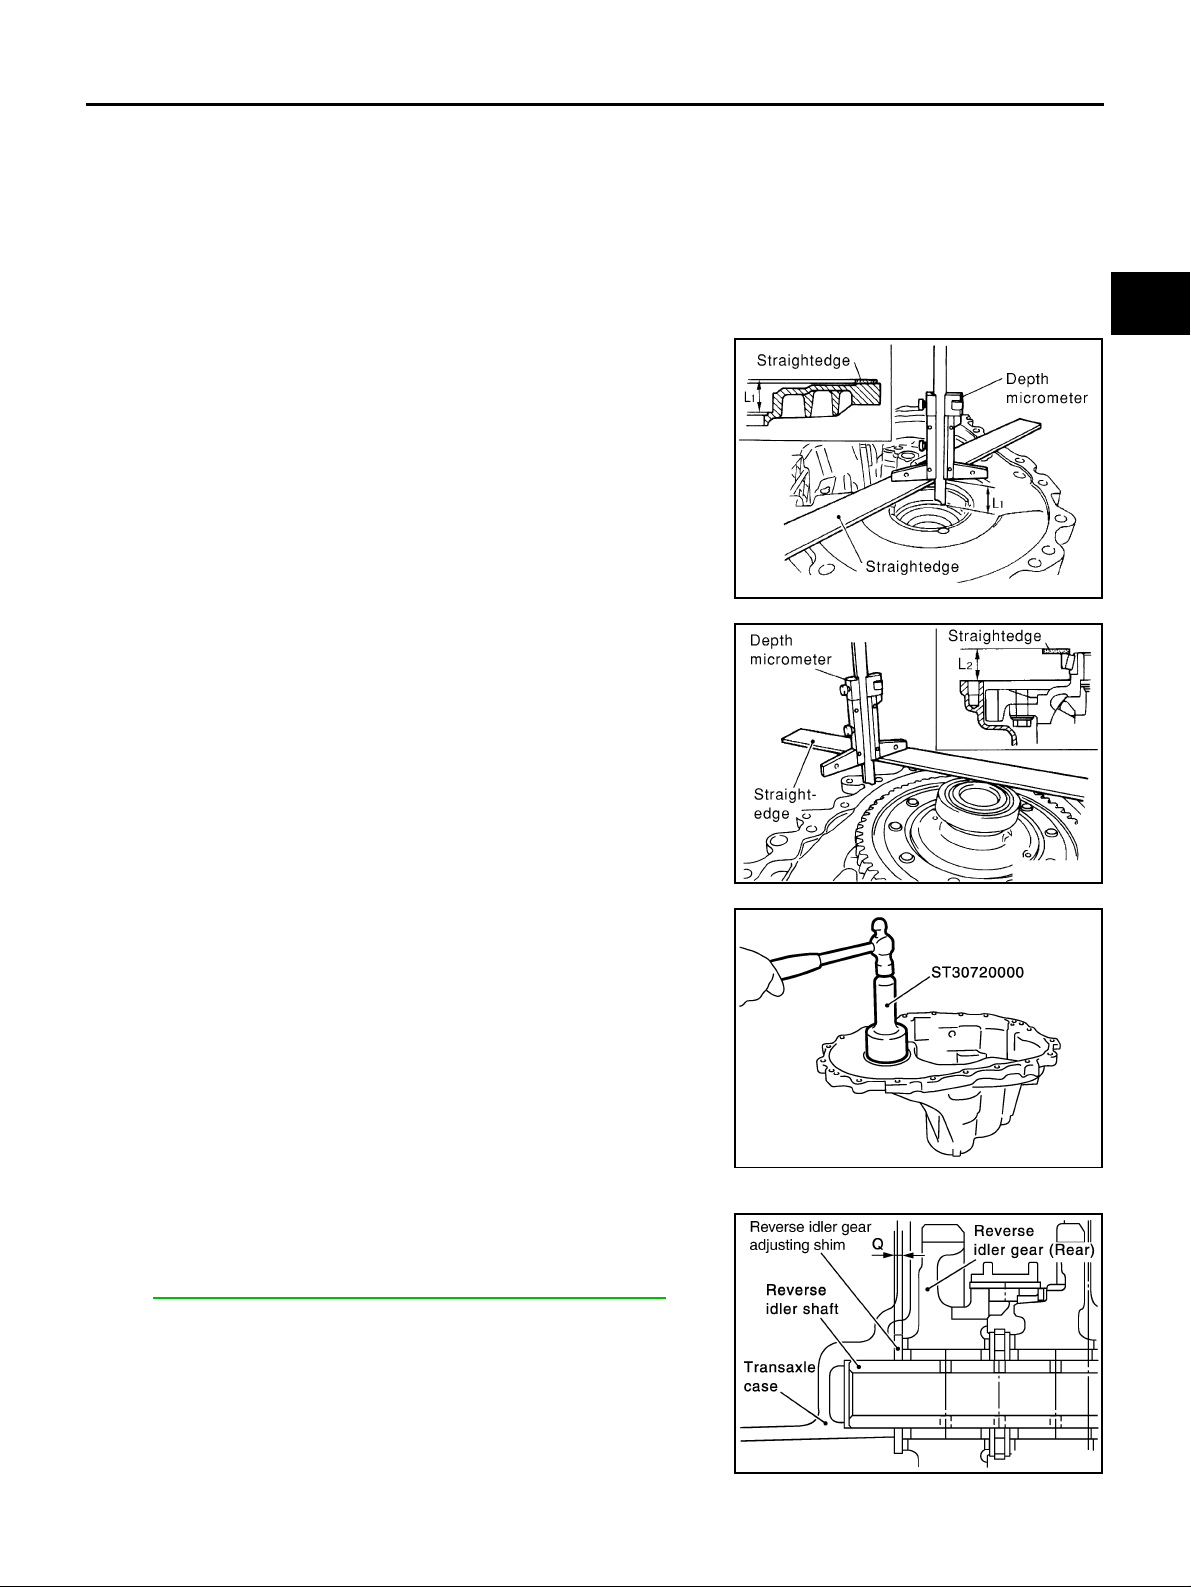
Dimension“L” = (L
1 - L2 ) + Preload
L: Thickness of adjusting shim
L
1 : Distance between transaxle case end face and
mounting face of adjusting shim
2 : Distance between differential side bearing
L
outer race and clutch housing end face
1. Using de pth micrometer and straig htedge, measure dimensi on
"L
1 " between transaxle case end face and mounting face of
adjusting shim.
2. Install differential side bering outer race onto differential side
bearing on final gear side. Holding lightly differential side bearing outer race ho r izon tally by hand, rota te fina l gea r five ti me s or
more (for smooth movement of bearing roller).
3. Using dep th micrometer and straightedge as sh own in the figure, measure dimension "L
2 " between differential side bearing
outer race and clutch housing end face.
A
B
MT
D
E
F
SCIA1078E
G
H
4. Install selected differential side bearing adjusting shim, and then
install differential side bearing outer race using the drift.
REVERSE IDLER GEAR END PLAY
● When adjusting reverse idler gear end play, select adjusting
shim for reverse idler gear. To select adjusting shim, meas ure
clearance betw een transa xle cas e and reve rse idle r gear. Refer
to MT-102, "
CAUTION:
Only 1 adjusting shim can be selected.
● Calculate dime nsion "Q" (thickness of ad justin g shim) using the
following procedure to satisfy specification of end play for
reverse idler gear.
REVERSE IDLER GEAR ADJUSTING SHIM" .
SCIA1079E
SCIA0898E
I
J
K
L
M
End play: 0.04 - 0.10 mm (0.0016 - 0.0039 in)
Dimension“Q” = (Q
1 - Q2 ) - End play
MT-49
PCIB0796E
Page 50
TRANSAXLE ASSEMBLY
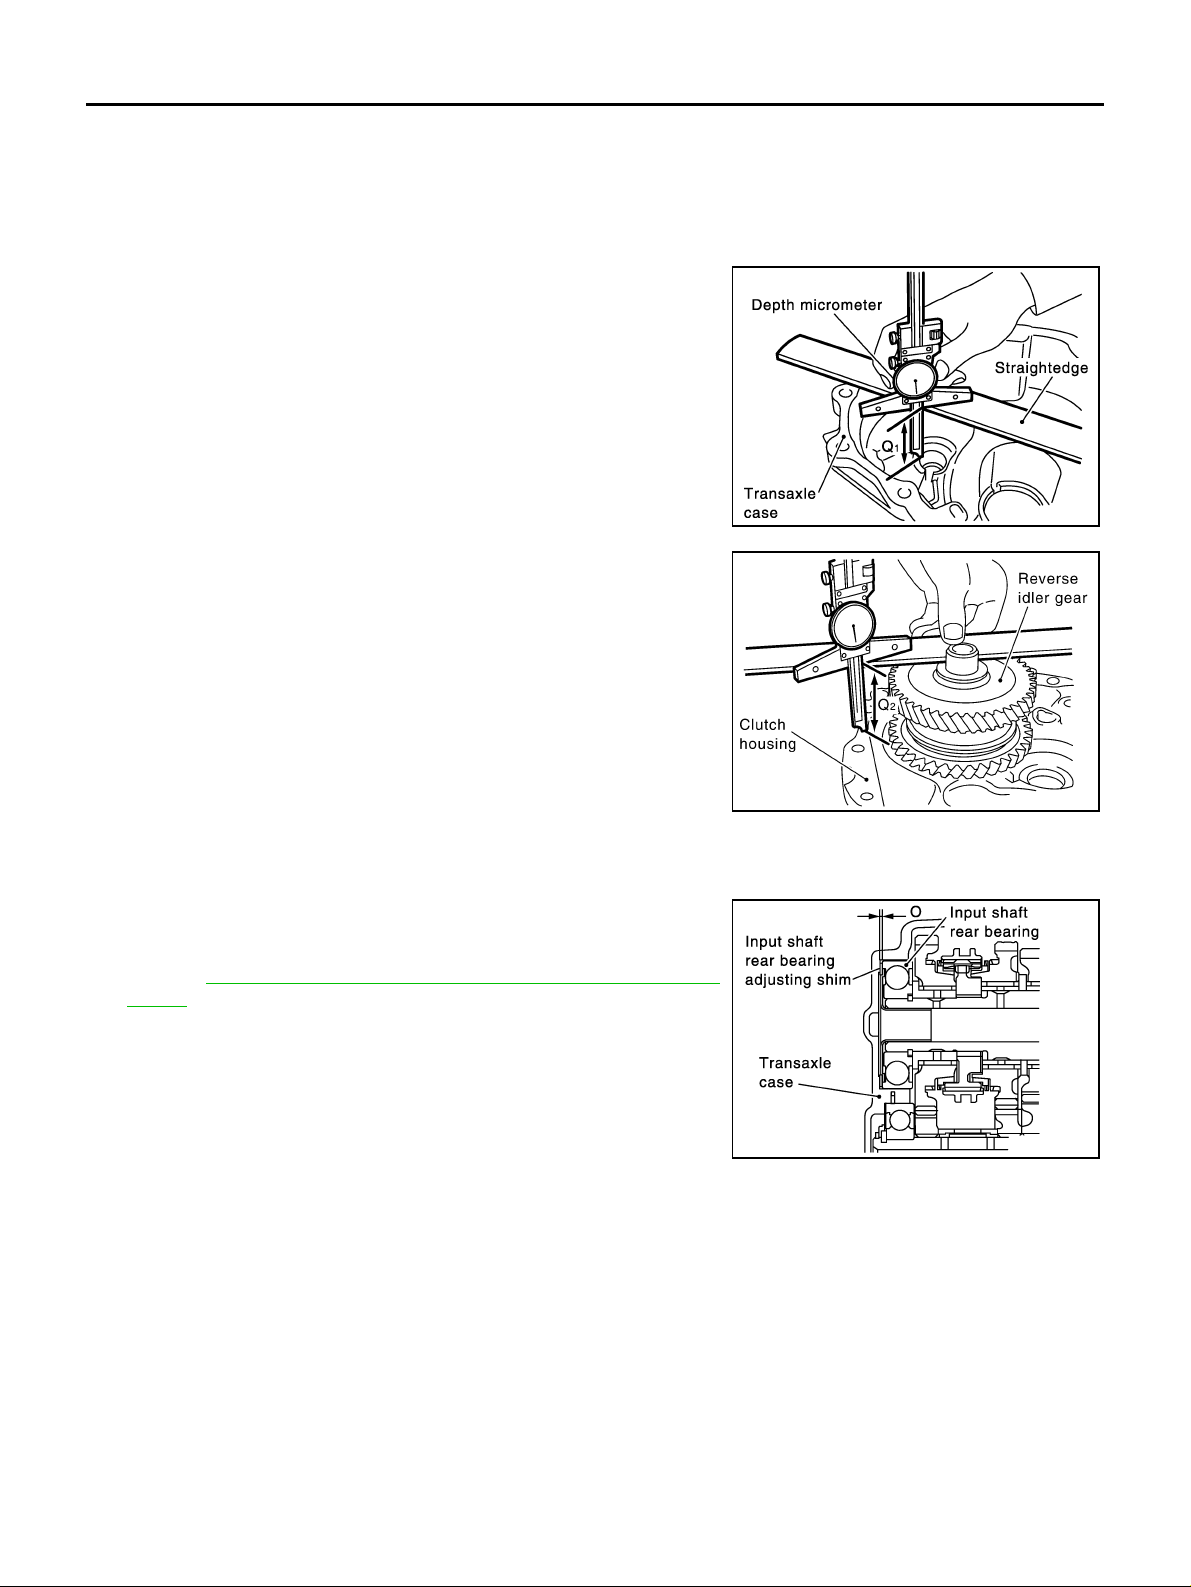
Q: Thickness of adjusting shim
1 : Distance between transaxle case end face and
Q
mounting face of adjusting shim
2 : Distance between clutch housing end face
Q
and end face of reverse idler gear (Rear)
1. Using depth m icrometer and straight edge, measure dimension
"Q
1 " between transaxle case end face and mounting face of
adjusting shim.
2. Using depth micrometer and straightedge as shown in the figure, measure dime nsion " Q
and end face of reverse idler gear (Rear).
3. Install selected reverse idler gear adjusting shim onto reverse
idler gear assembly.
2 " between clutch housing end face
SCIA1003E
PCIB0797E
Adjustment (RS6F51A) ECS008C3
INPUT SHAFT END PLAY
● When adjusting input shaft end play, select adjusting shim for
input shaft rear bearing. To select adjusting shim, measure
clearance betwee n transaxle case and input shaft rear bearing.
Refer to MT-102, "
SHIM" .
CAUTION:
Only 1 adjusting shim can be selecte d.
● C alculate di mension "O" (thicknes s of adjusting s him) using th e
following procedure to satisfy specification of end play for input
shaft rear bearing.
End play: 0 - 0.06 mm (0 - 0.0024 in)
Dimension“O” = (O
O: Thickness of adjusting shim
1
O
:
2
O
:
INPUT SHAFT REAR BEARING ADJUSTING
SCIA1001E
1 - O2 ) - End play
Distance between transaxle case end face and
mounting face of adjusting shim
Distance between clutch housing end face
and end face of input shaft rear bearing
MT-50
Page 51
TRANSAXLE ASSEMBLY
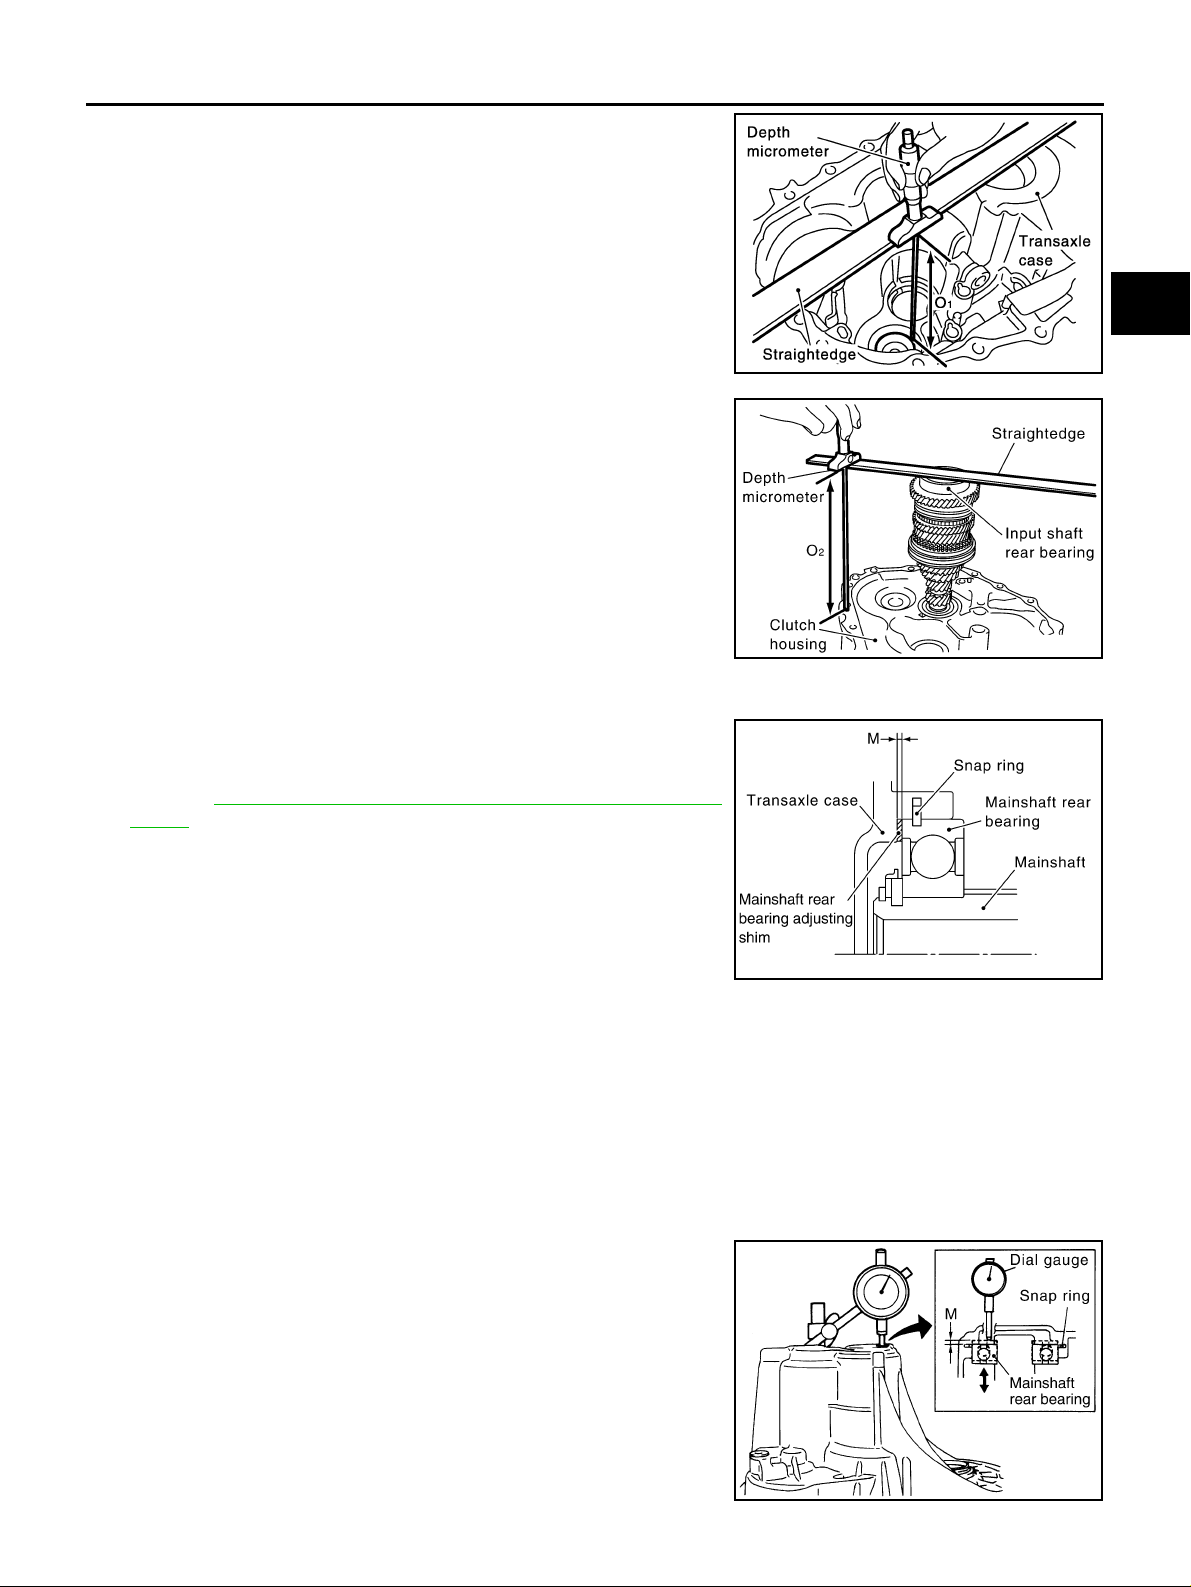
1. Using de pth micrometer and straig htedge, measure dimensi on
"O
1 " between transaxle case end face and mounting face of
adjusting shim.
2. Using dep th micrometer and straightedge as sh own in the figure, measure dimension "O
and end face of input shaft rear bearing.
3. Install sel e ct ed inp ut shaf t re ar be ar ing a dj u stin g sh im o nto i np ut
shaft.
2 " between clutch housin g end face
A
B
MT
SCIA1002E
D
E
F
G
PCIB0792E
MAINSHAFT END PLAY
● When adjusting mainshaft end play, select adjusting shim for
mainshaft rear be ari ng . To select adjusting shi m, meas ur e clear ance “M” between transaxle case and mainshaft rear bearing.
Refer to MT-102, "
SHIM" .
CAUTION:
Only 1 adjusting shim can be selected.
● Calculate dime nsion "P" (thic kness of adjus ting shim) usi ng the
following proc edure to s atisf y specif ication of end play for mainshaft rear bearing.
End play: 0 - 0.06 mm (0 - 0.0024 in)
Dimension“P” = "M" - End play
P: Thickness of adjusting shim
M: Distance between mainshaft rear bearing end
face and tran saxle case end face
1. Install mainshaft assembly to clut ch housing.
2. Install snap ring to transaxle case.
3. Install transaxle case to clutch housing, and temporarily assemble them with fixing bolts. Install temporarily snap ring to mainshaft rear bearing.
4. Install dia l gauge to bore p lug moun ting hole , and expan d snap
ring. Lift mainshaft assembly through control assembly installation hole, an d push it ag ai nst trans axl e cas e. Th is s tate sha ll be
defined as base. Moving distance of mainshaft assembly, with
snap ring fit on main rear bearing, becomes “M”.
MAINSHAFT REAR BEARING ADJUSTING
PCIB0793E
H
I
J
K
L
M
PCIB0794E
MT-51
Page 52
TRANSAXLE ASSEMBLY
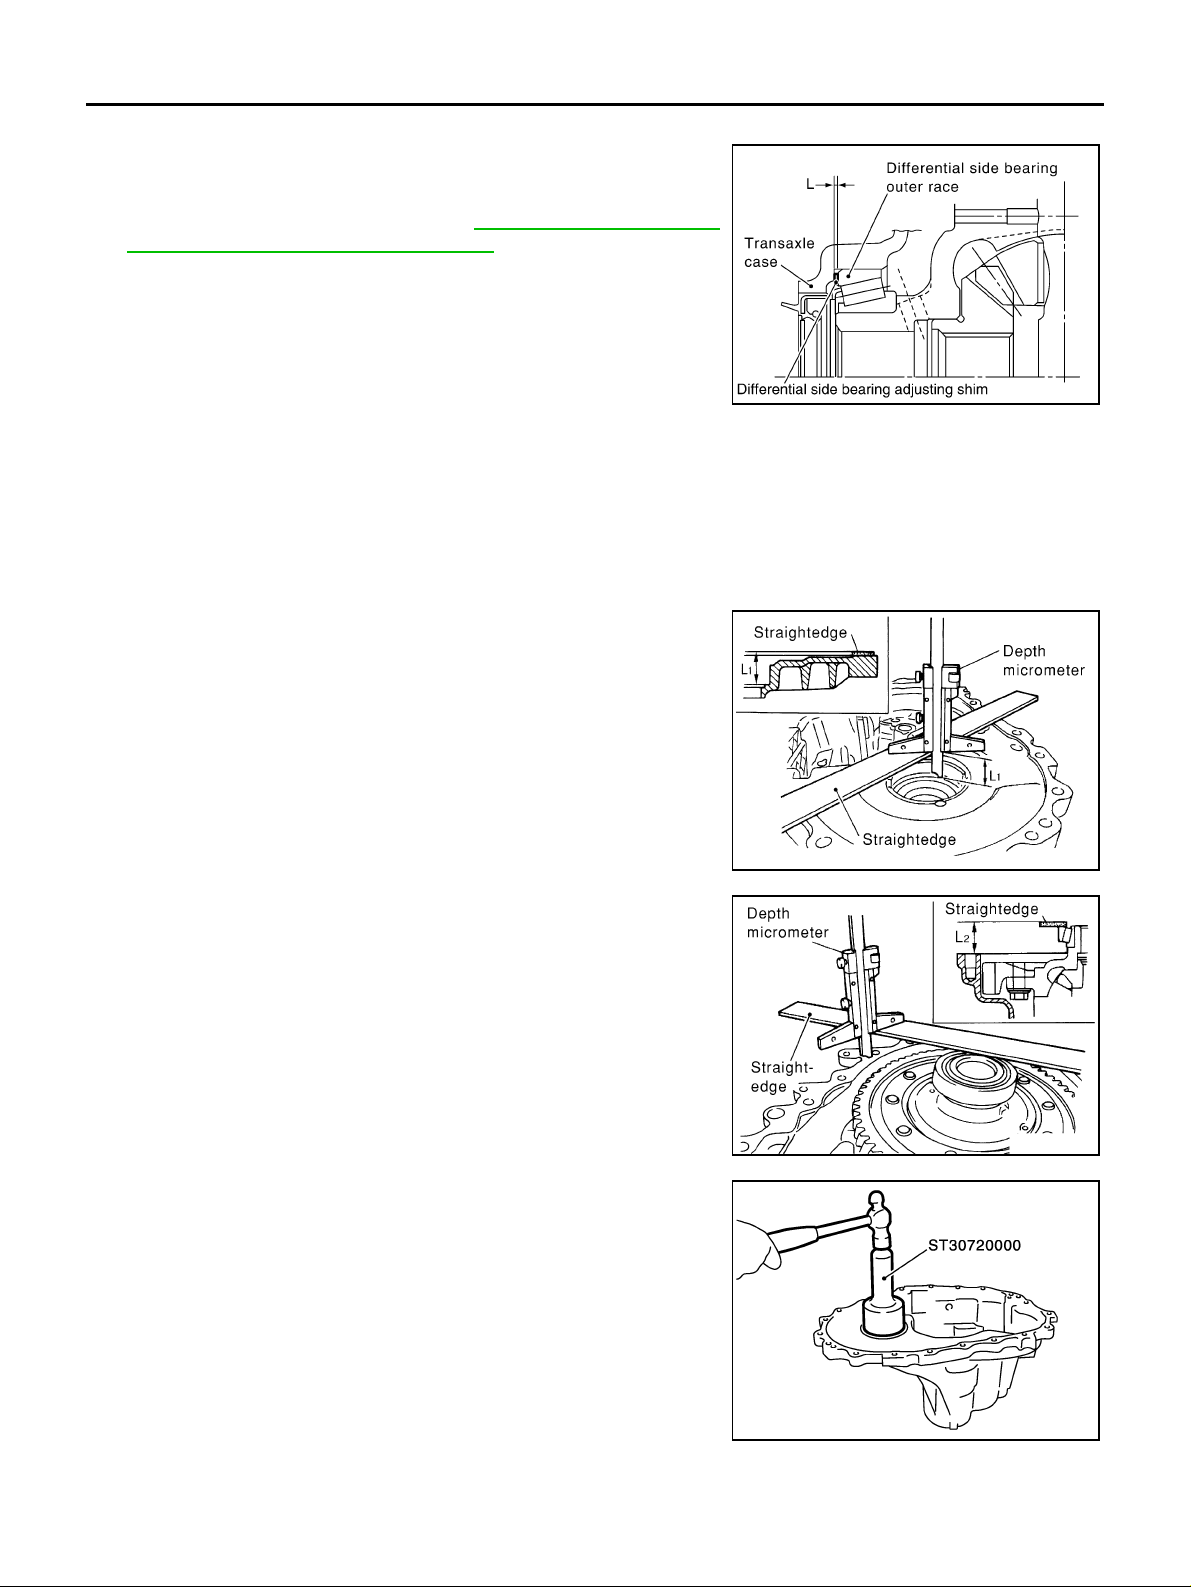
DIFFERENTIAL SIDE BEARING PRELOAD
● When adjusting differential side bearing preload, select adjust-
ing shim for differenti al side bearing. To select adjust ing shim,
measure clearanc e “L” between transaxle ca se and differential
side bearing outer race. Refer to MT-103, "
SIDE BEARING ADJUSTING SHIM(S)" .
CAUTION:
Up to 2 adjusting shims can be selected.
● C alculate dimension “L ” (thickness of adjusting shi m) using the
following proce dure to satisfy s pecification of p reload for differential side bearing .
Preload: 0.15 - 0.21 mm (0.0059 - 0.0083 in)
Dimension“L” = (L
1 - L2 ) + Preload
L: Thickness of adjusting shim
1 : Distance between transaxle case end face
L
and mounting face of adjusting shim
2 : Distance between differential side bearing
L
outer race and clutch housing end face
1. Using depth m icrometer and straight edge, measure dimension
"L
1 " between transaxle case end face and mounting face of
adjusting shim.
2. Install differential side bearing outer race onto differential side
bearing on final gear side. Holding lightly differential sid e bearing outer race ho ri zo nt a l ly by ha nd , rotate final gear five tim es or
more (for smooth movement of bearing rolle r).
DIFFERENTIAL
PCIB0795E
3. Using depth micrometer and straightedge as shown in the figure, measure dimension "L
2 " between differential side b earing
outer race and clutch hous in g end face .
4. Install selected differential side bearing adjusting shim, and then
install differential side bearing outer race using the drift.
SCIA1078E
SCIA1079E
SCIA0898E
MT-52
Page 53
TRANSAXLE ASSEMBLY
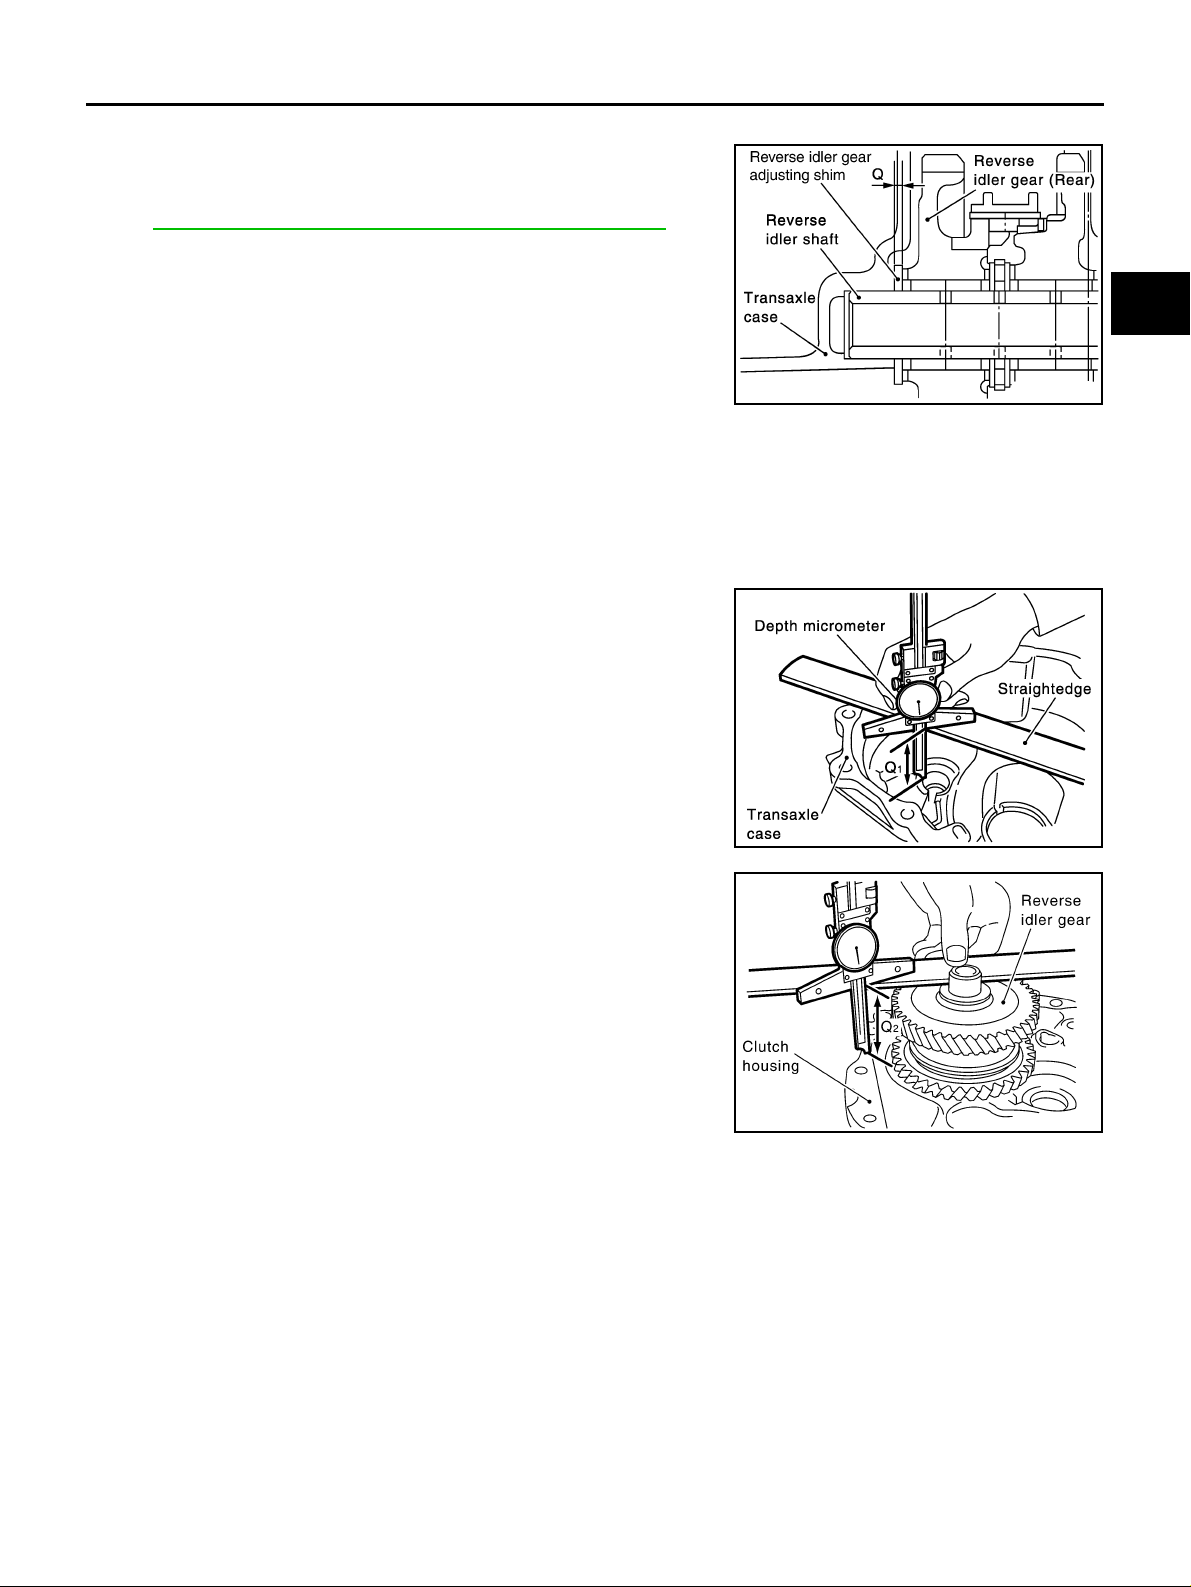
REVERSE IDLER GEAR END PLAY
● When adjusting reverse idler gear end play, select adjusting
shim for reverse idler gear. To select adjusting shim, meas ure
clearance betw een transa xle cas e and reve rse idle r gear. Refer
to MT-102, "
CAUTION:
Only 1 adjusting shim can be selected.
● Calculate dime nsion "Q" (thickness of ad justin g shim) using the
following procedure to satisfy specification of end play for
reverse idler gear.
REVERSE IDLER GEAR ADJUSTING SHIM" .
A
B
MT
End play: 0.04 - 0.10 mm (0.0016 - 0.0039 in)
Dimension“Q” = (Q
1 - Q2 ) - End play
Q: Thickness of adjusting shim
1 : Distance bet ween tra nsaxl e ca se en d fa ce and
Q
mounting face of adjusting shim
2 : Distance between clutch housing end face and
Q
end face of reverse idler gear (Rear)
1. Using de pth micrometer and straig htedge, measure dimensi on
1 " between transaxle case end face and mounting face of
"Q
adjusting shim.
2. Using dep th micrometer and straightedge as sh own in the figure, measure dimension "Q
2 " between clutch housin g end face
and end face of reverse idler gear (Rear).
3. Install selected reverse idler gear adjusting shim onto reverse
idler gear assembly.
PCIB0796E
SCIA1003E
D
E
F
G
H
I
J
K
L
M
PCIB0797E
MT-53
Page 54
INPUT SHAFT AND GEARS
INPUT SHAFT AND GEARS PFP:32200 Assembly and Disassembly (RS5F51A) ECS008C4
DISASSEMBLY
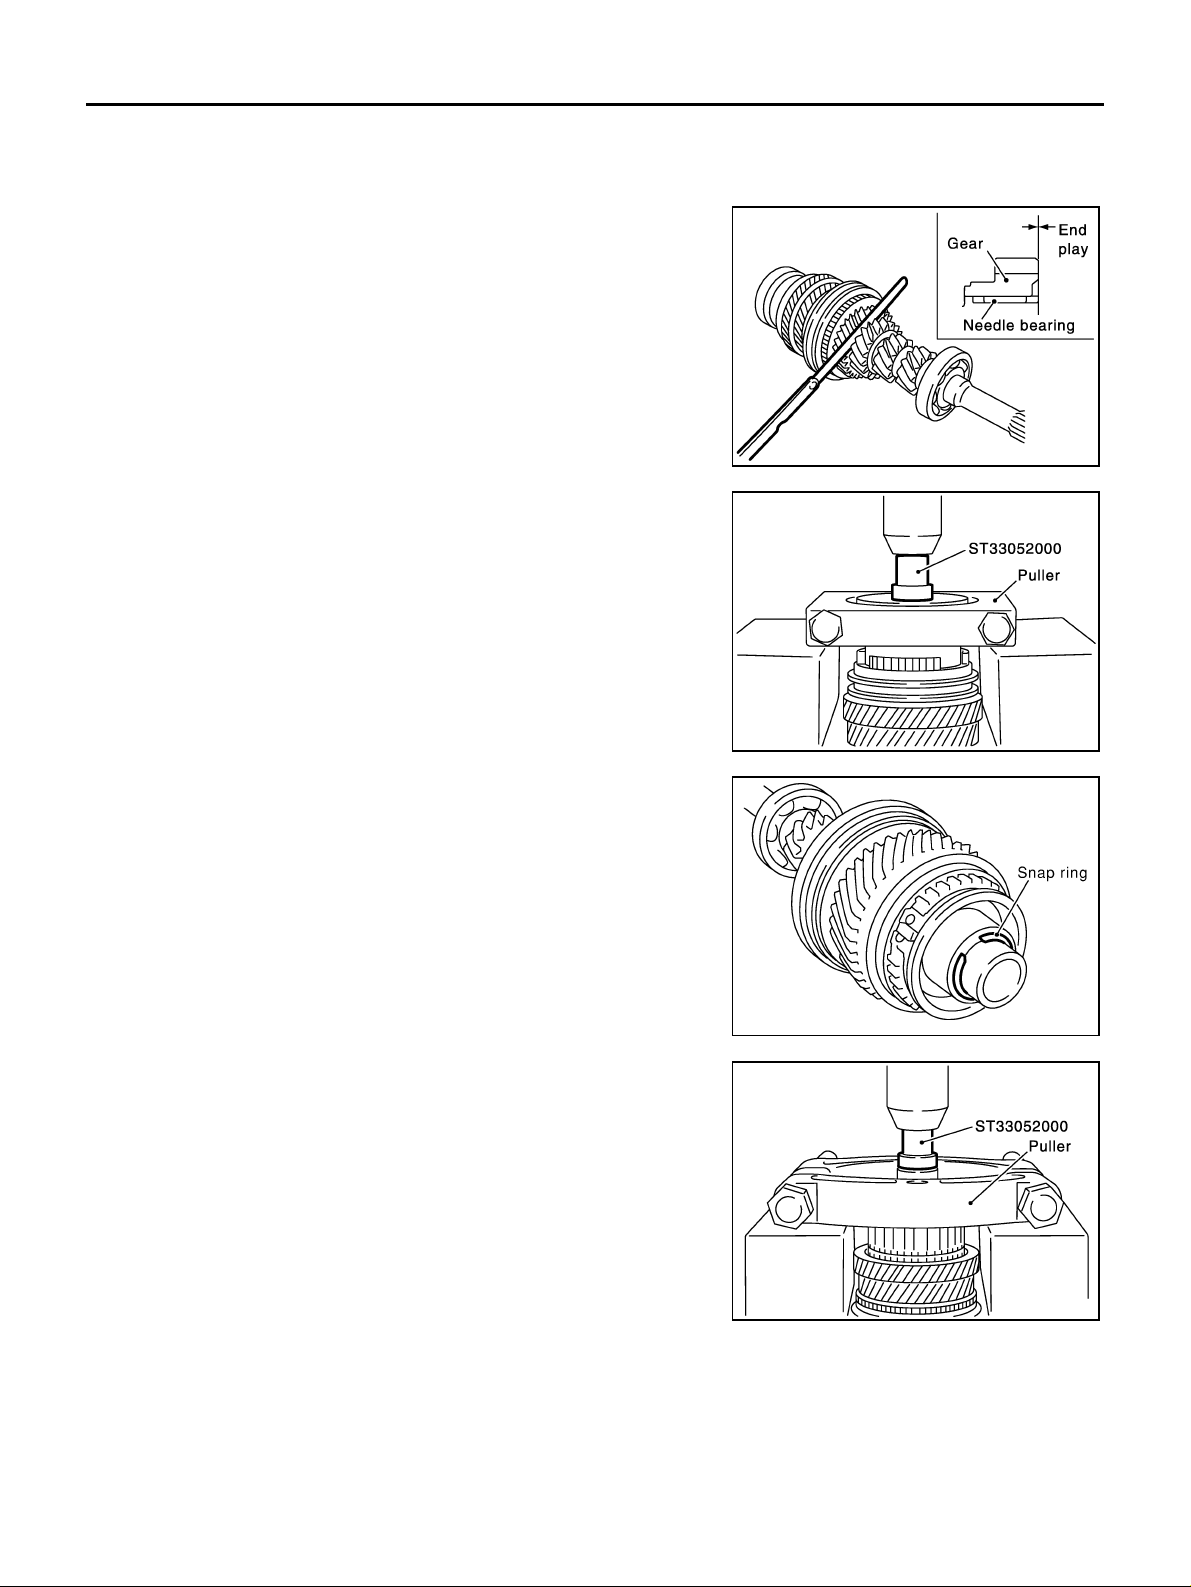
1. Before disassembling, measure end play for 3rd, 4th, and 5th
input gears.
End play standard value
3rd gear : 0.18 - 0.31 mm (0.0071 - 0.0122 in)
4th gear : 0.20 - 0.30 mm (0.0079 - 0.0118 in)
5th gear : 0.06 - 0.16 mm (0.0024 - 0.0063 in)
2. Remove oil channel.
SCIA0914E
3. Press out input shaft rear bearing using the drift and a puller.
4. Remove the snap ring.
5. Press out input sh aft bearing spacer and 5t h stopper using the
drift and a puller.
SCIA0915E
SCIA0916E
SCIA0917E
MT-54
Page 55
INPUT SHAFT AND GEARS
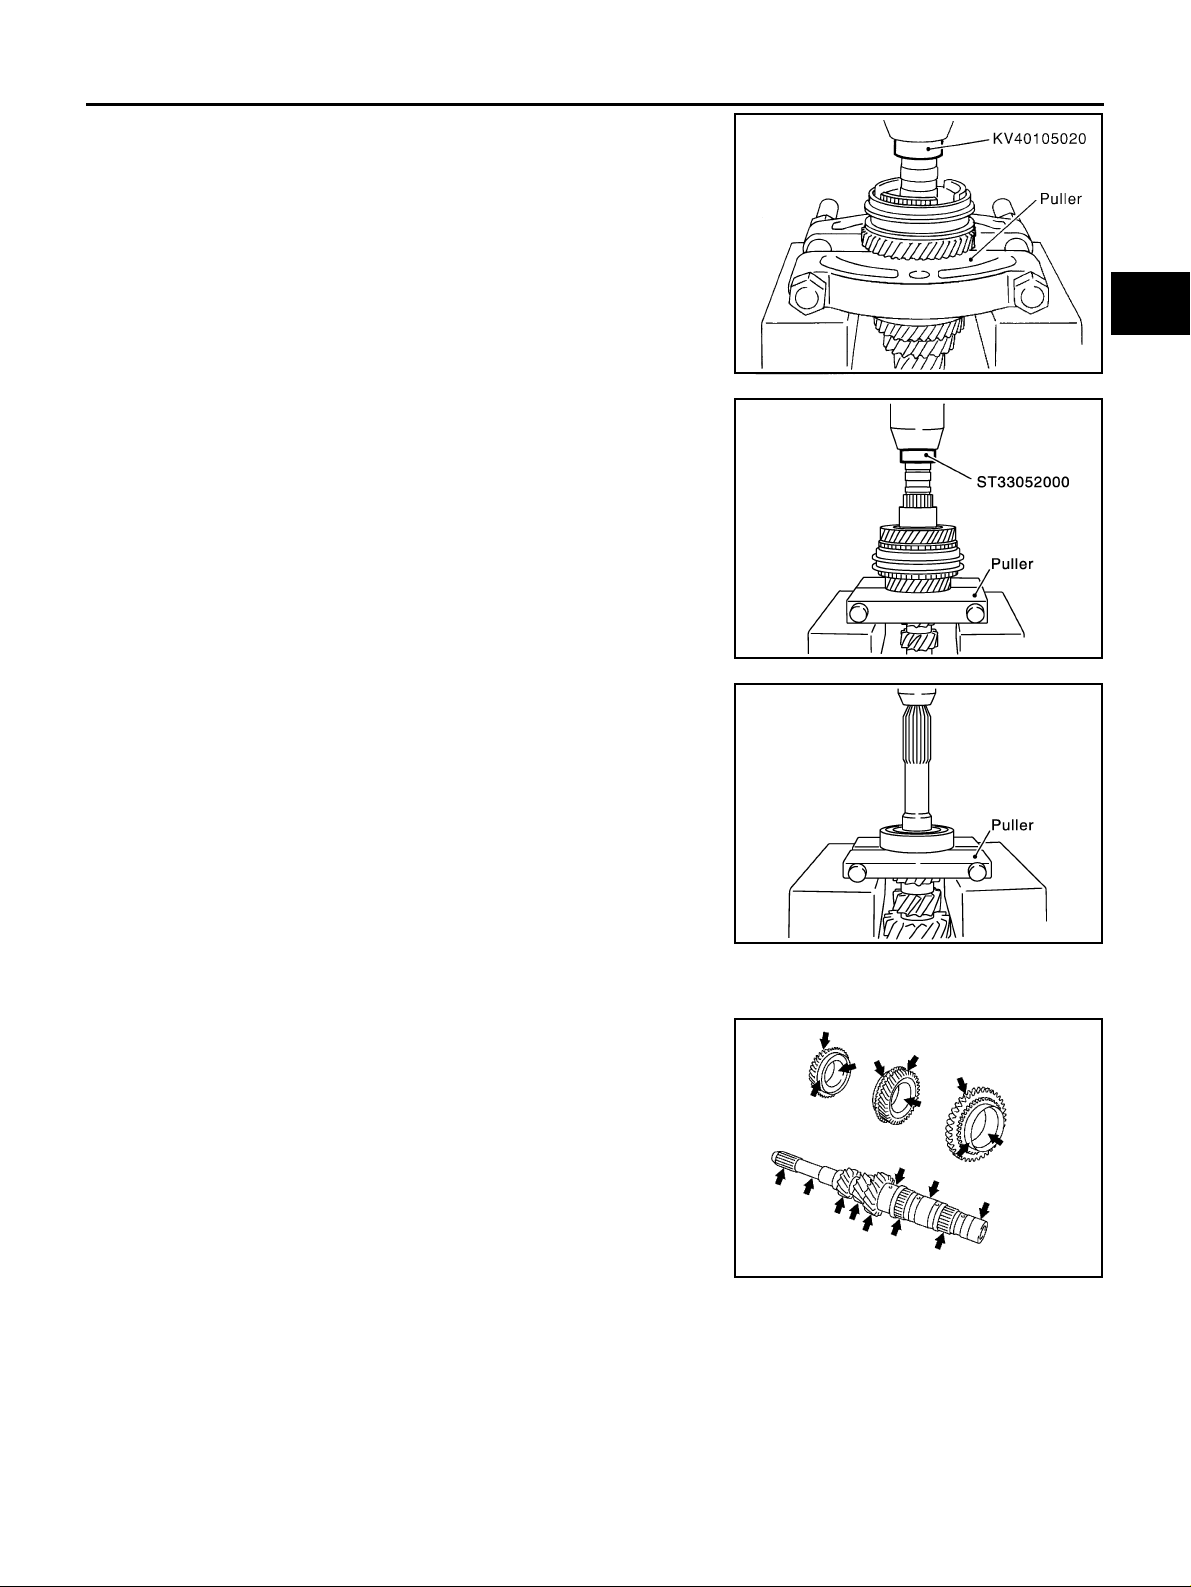
6. Press out 5th input gear and 5th synchronizer hub assembly
using the drift and a puller .
7. Remove 5th needle bearing.
8. Press out 5 th input gear bushing, thrus t washer, 4th input gear,
4th needle bearing, 4th input gear bushing, 4th baulk ring, 3rd4th synchronizer hub assembly, 3rd baulk ring and 3rd input
gear using the drift and a puller.
9. Remove 3rd needle bearing.
A
B
MT
SCIA0918E
D
E
F
G
SCIA0919E
10. Pres s out inp ut sh aft front bearing using a puller.
INSPECTION AFTER DISASSEMBLY
Input Shaft and Gears
Check items below. If necessary, replace them with new ones.
● Damage, peeling , den t, un ev en wear, bending, etc. of shaft
● Excessive wear, damage, peeling, etc. of gears
SCIA0920E
SCIA1073J
H
I
J
K
L
M
MT-55
Page 56
INPUT SHAFT AND GEARS
Synchronizer
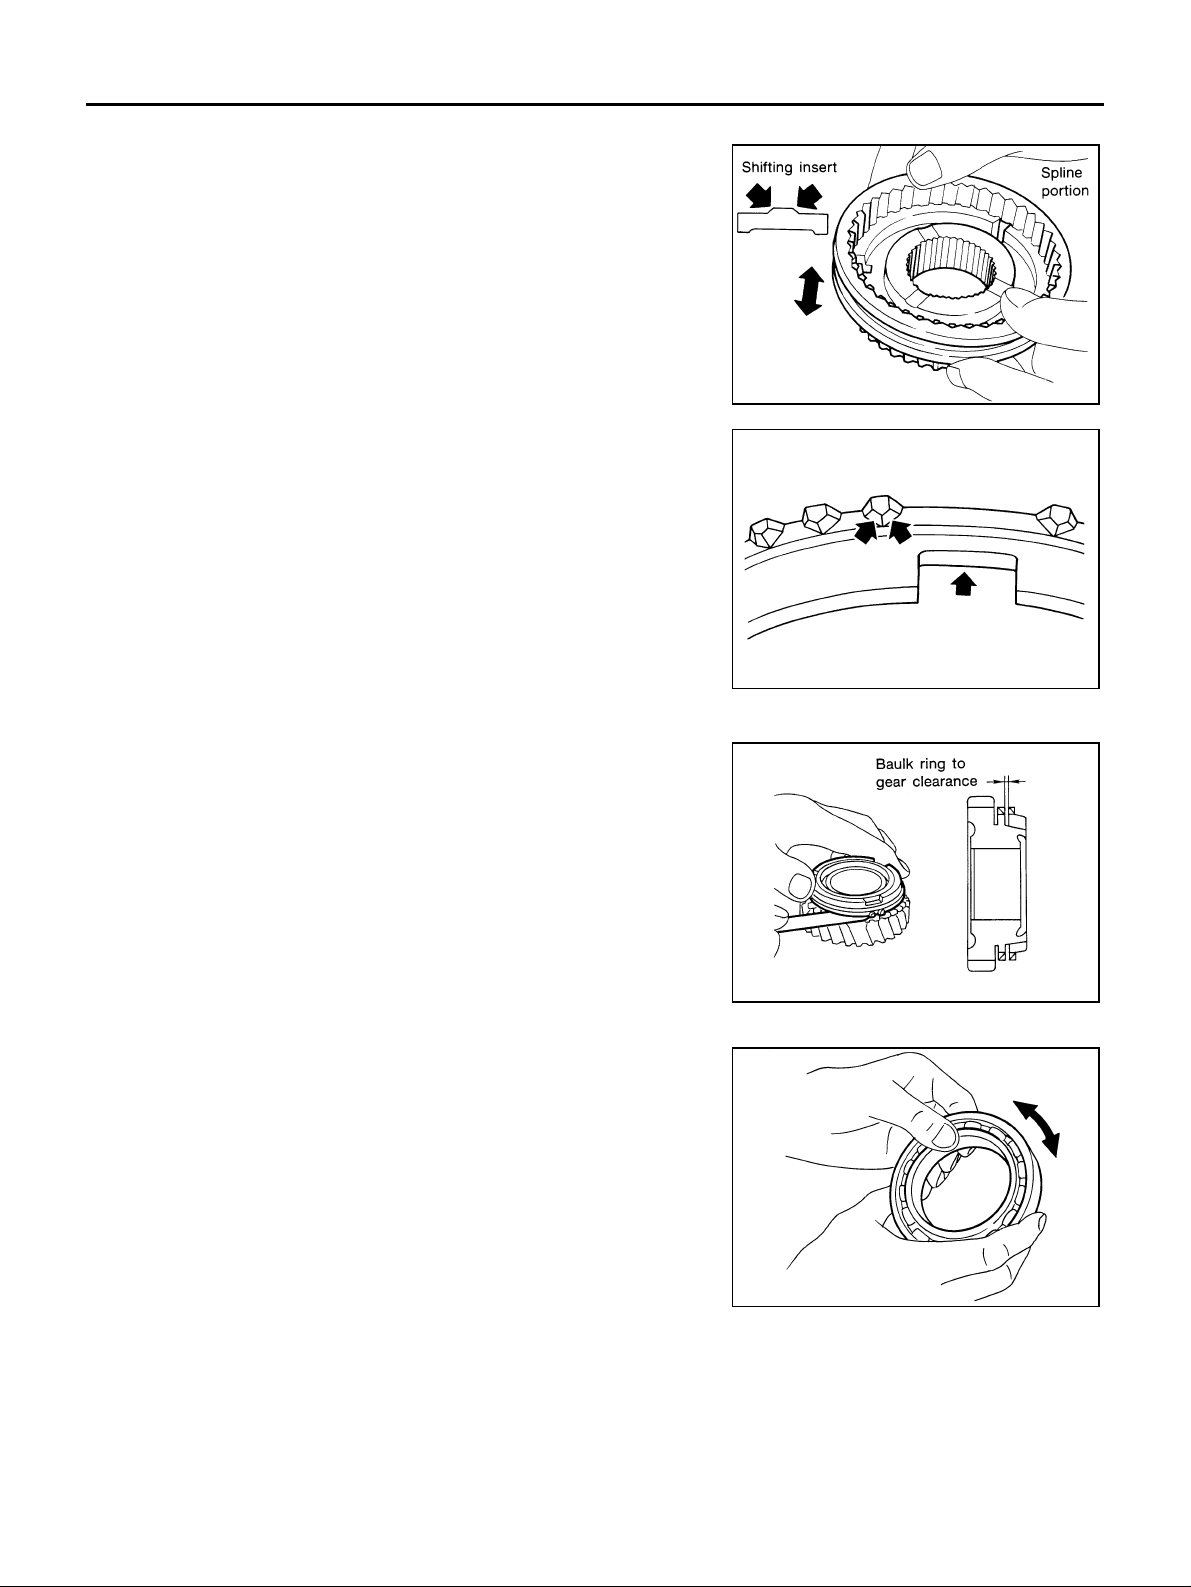
Check items belo w. If necessary, replace them with new ones.
● Damage and excessive wear of contact surfaces of coupling
sleeve, synch ronizer hub, and shifting insert
● Coupling sleeve and synchronizer hub must move smoothly.
● If any crack, damage, or exces sive wea r is f ou nd on cam fa ce of
baulk ring or working face of insert, replace it.
SMT387A
Baulk ring clearance
● Push baulk ring on the cone, and measure the clearance
between baulk ring and cone. If measurement is below limit,
replace it with a new one.
Clearance
Standard value
3rd and 4th : 0.9 - 1.45 mm (0.035 - 0.057 in)
5th : 0.95 - 1.4 mm (0.037 - 0.055 i n)
Limit value : 0.7 mm (0.028 in)
Bearing
Check items belo w. If necessary, replace them with new ones.
● D am ag e an d roug h rotatio n of be ari ng
SMT867D
SMT140
MTF0041D
MT-56
Page 57
INPUT SHAFT AND GEARS
ASSEMBLY
1. Install 3rd needle bearing to input shaft.
2. Install 3rd input gear and 3rd baulk ring to input shaft.
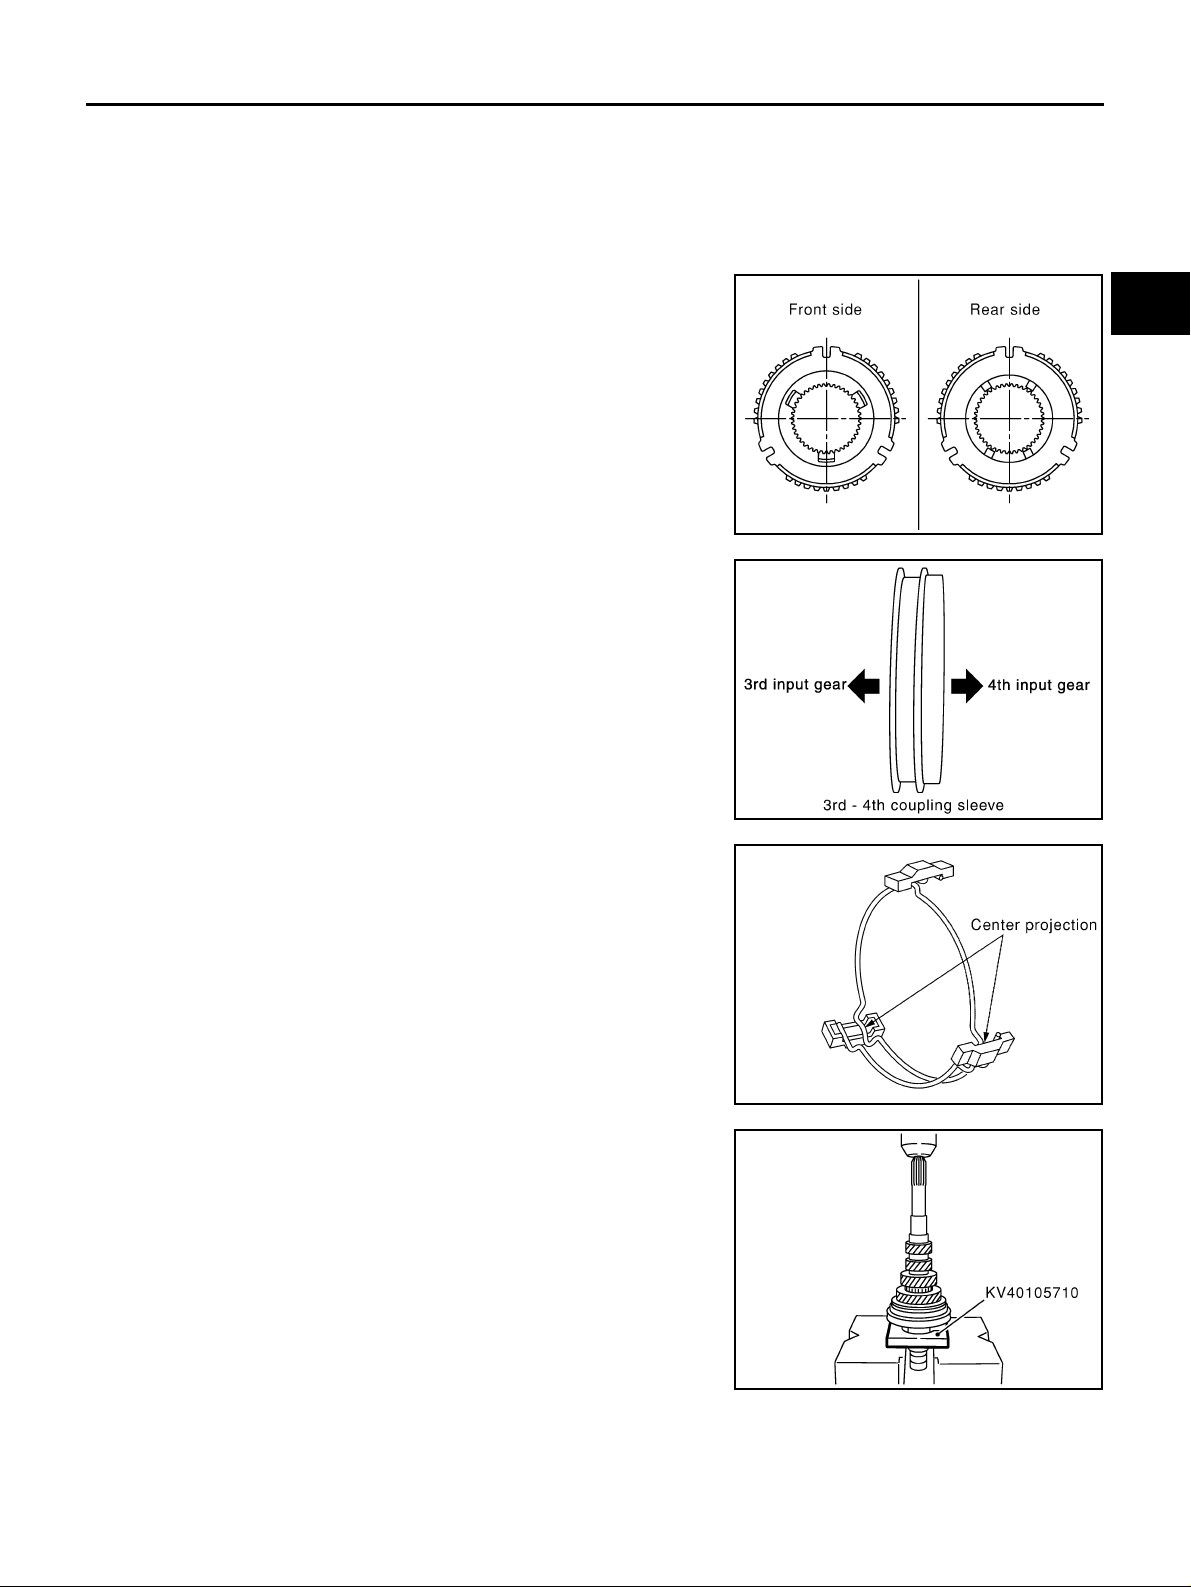
3. Install 3rd-4th spread spring, 3rd-4th shifting insert and a new 3rd-4th synchronizer hub onto a new 3rd4th coupling sleeve.
CAUTION:
● Be careful with orientation of 3rd-4th synchronizer hub.
● Do not reuse 3rd-4th synchronizer hub.
SCIA0921E
● Be careful with orientation of 3rd-4th coupling sleeve.
● Do not reuse 3rd-4th coupling sleeve.
A
B
MT
D
E
F
G
● Be sure not to hook center projection of 2 spread springs
on same shifting insert.
4. Press in 3rd-4th synchronizer hub assembly using the press
stand.
CAUTION:
Align grooves of 3rd-4th shifting insert and 3rd baulk ring.
PCIB0799E
SCIA1083E
H
I
J
K
L
M
SCIA0922E
MT-57
Page 58
INPUT SHAFT AND GEARS
5. Press in 4th input gear bushing using the press stand.
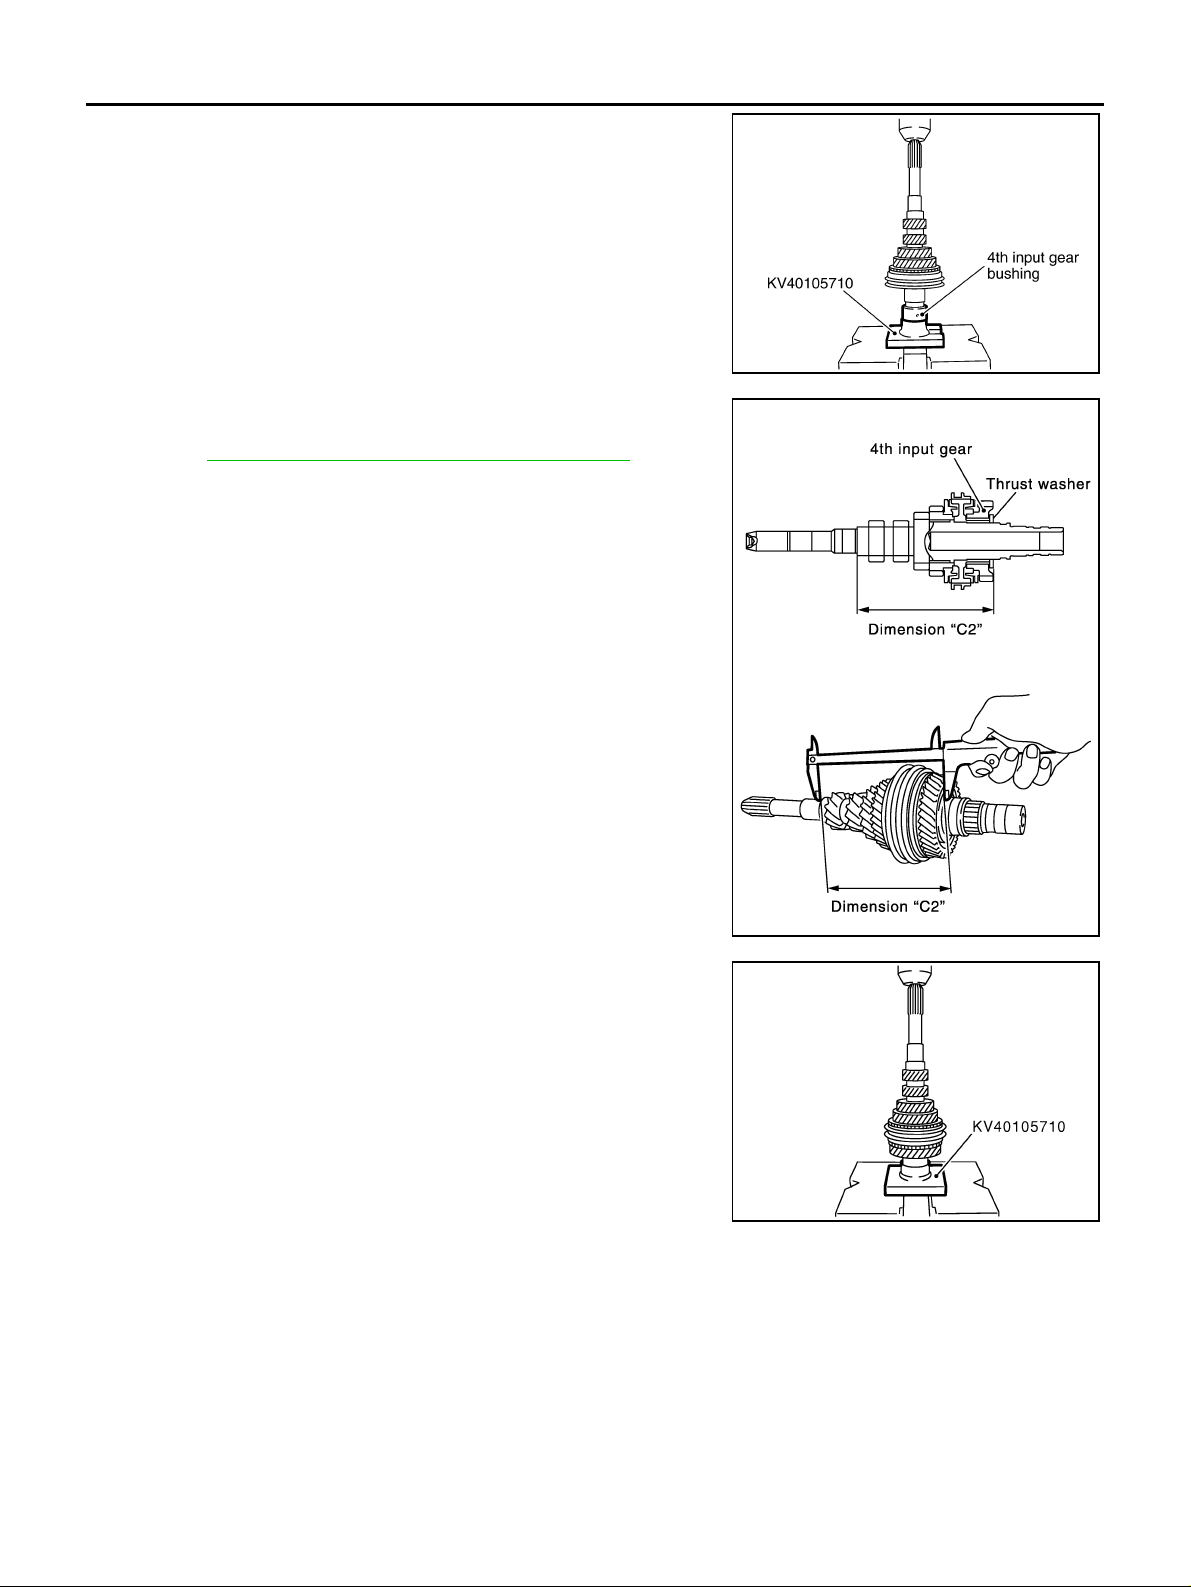
6. Install 4th baulk ring.
7. Instal l 4th needle bearing and 4t h input gear to input shaft.
8. Select thrust washer so that dimension “C2” satisfies the standard value below. Then install thrust washer onto input shaft.
Refer to MT-101, "
Standard for dimension C2
: 154.7 - 154.8 mm (6.091 - 6.094 in)
CAUTION:
Only one thrust washer can be selected.
INPUT SHAFT THRUST WASHER" .
PCIB0800E
SCIA0925E
9. Press in a new 5th input gear bushing using the press stand.
CAUTION:
Do not reuse 5th input gear bushing.
10. Install 5th needle bearing and 5th input gear to input shaft.
11. Install 5th baulk ring.
SCIA0926E
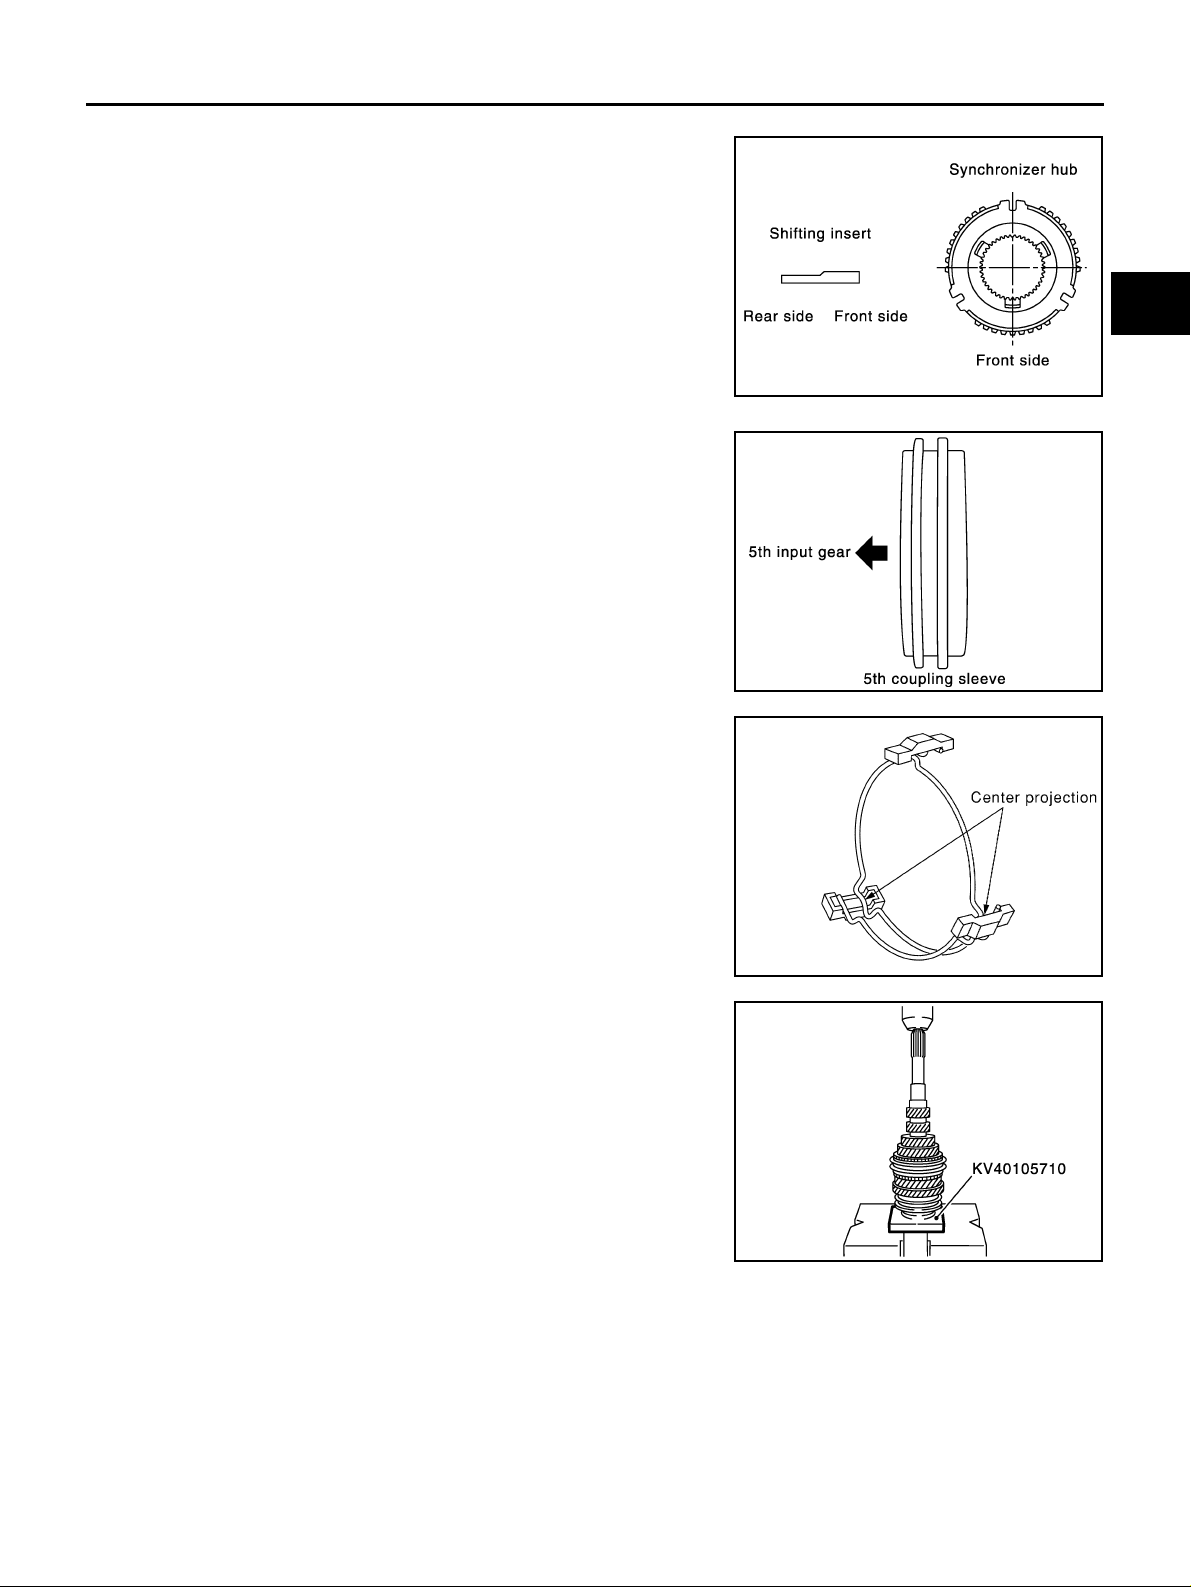
12. Install a new 5th synchronizer hub and 5th spread spring, 5th shifting insert onto a new 5th coupling
sleeve.
MT-58
Page 59
INPUT SHAFT AND GEARS
CAUTION:
● Be careful with ori entation of 5th synchronizer hub and
shifting insert.
● Do not reuse 5th synchronizer hub.
A
B
MT
● Be careful with orientation of 5th coupling sleeve.
● Do not reuse 5th coupling sleeve.
● Be sure not to hook center projection of 2 spread springs
on same shifting insert.
SCIA0927E
SCIA0994E
SCIA1083E
D
E
F
G
H
I
J
K
13. Press in 5th synchronizer hub assembly using the press stand.
CAUTION:
Align grooves of 5th shifting insert and 5th baulk ring.
MT-59
L
M
SCIA0928E
Page 60
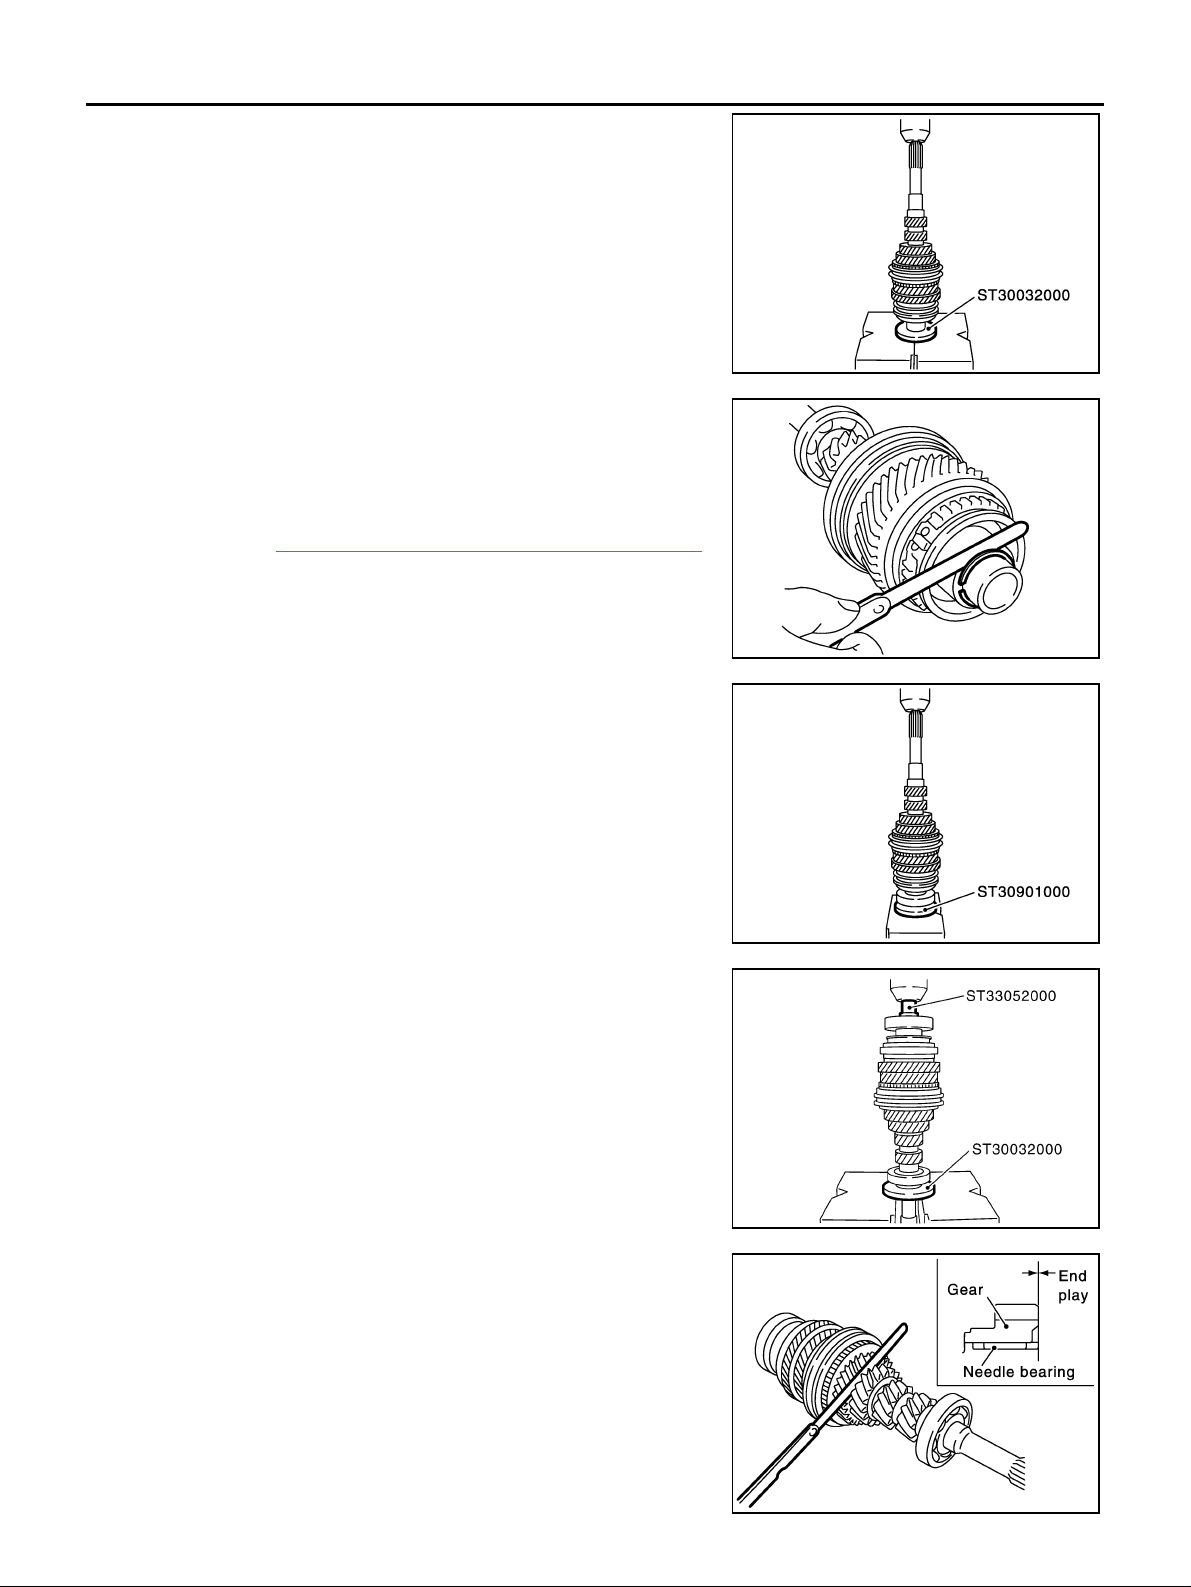
INPUT SHAFT AND GEARS
14. Press in 5th stopper and then input shaft be aring spacer using
the drift.
15. Install a new snap ring on to inpu t shaft, an d chec k that end play
(gap between snap ring and groove) of input shaft bearing
spacer satisfies the standard value.
End play standard value : 0 - 0.1 mm (0 - 0.004 in)
● If measurement is outside the standard range, select snap
ring. Refer to MT-100, "
CAUTION:
Do not reuse snap ring.
INPUT SHAFT BEARING SPACER" .
SCIA0929E
16. Press in input shaft rear bearing using the drift.
CAUTION:
Install input shaft rear bearing with its brown surface facing
the input gear side.
17. Press in input shaft front bearing using the drifts.
18. Install oil channel onto input shaf t.
SCIA0930E
SCIA0931E
PCIB0825E
19. Check end play of 3rd, 4th, and 5th input gears.
End play standard value
3rd gear : 0.18 - 0.31 mm (0.0071 - 0.0122 in)
4th gear : 0.20 - 0.30 mm (0.0079 - 0.0118 in)
5th gear : 0.06 - 0.16 mm (0.0024 - 0.0063 in)
SCIA0914E
MT-60
Page 61
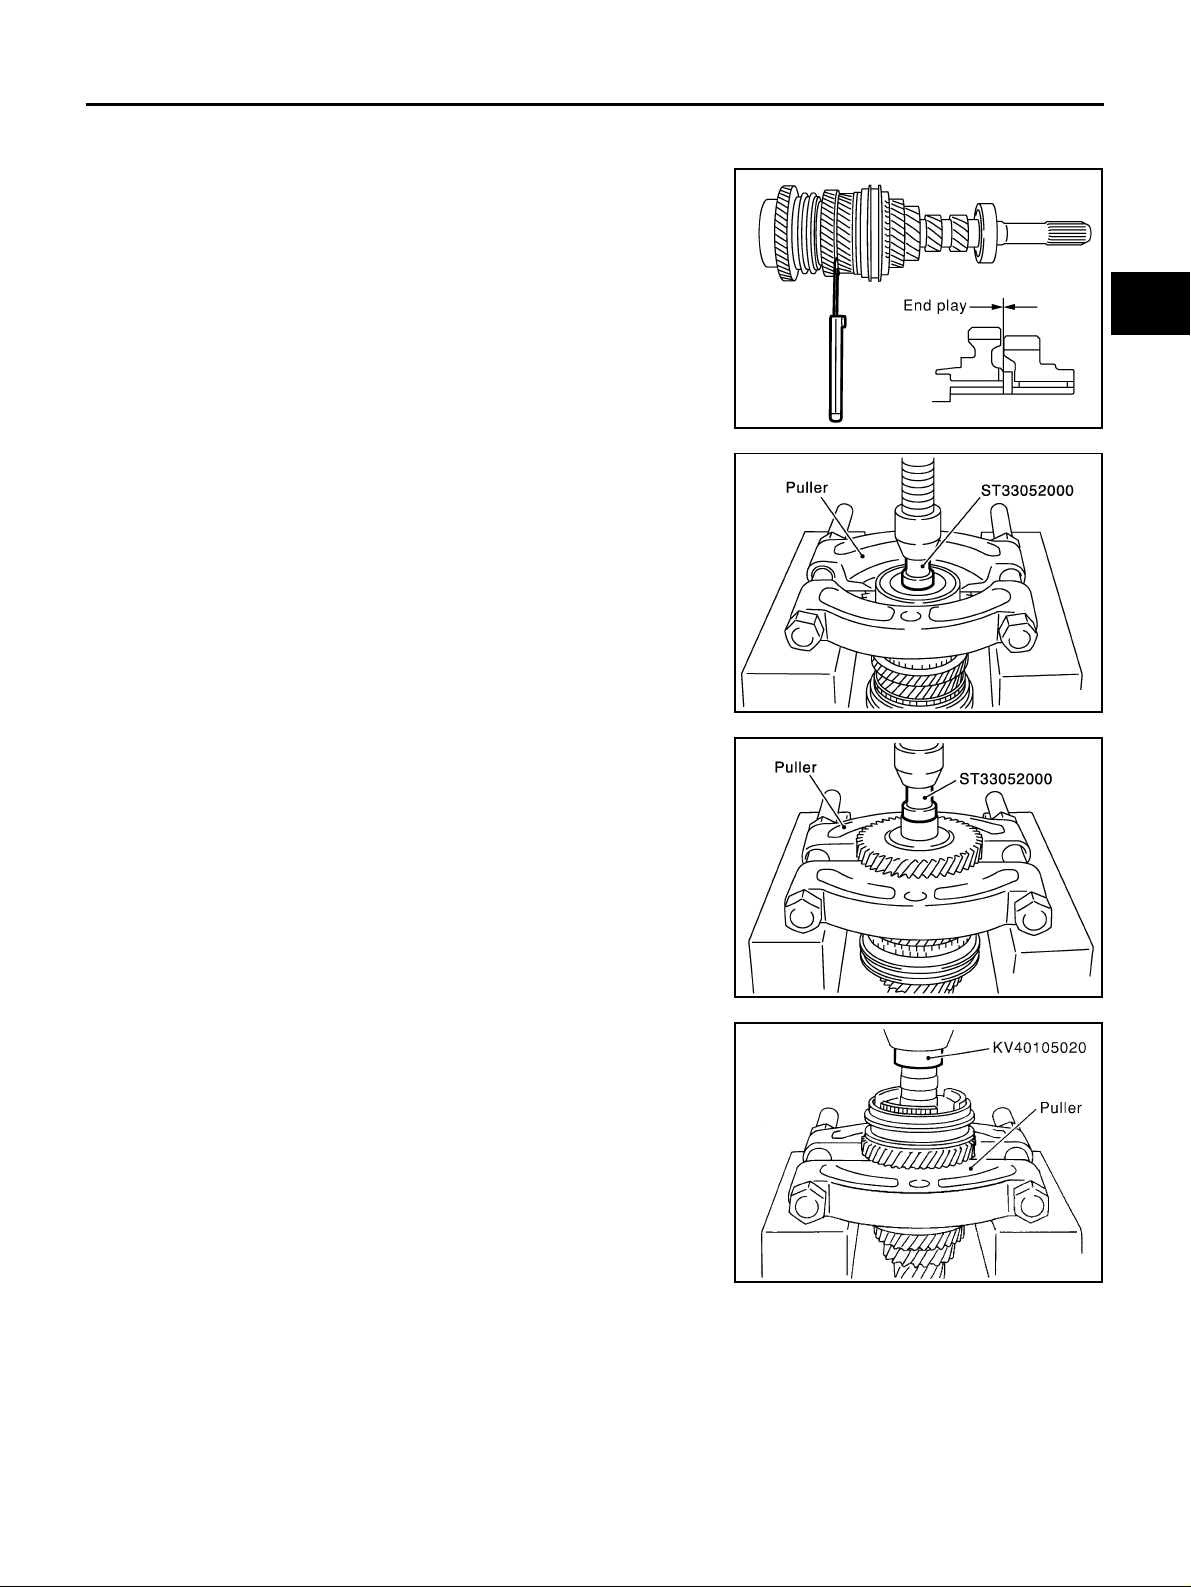
INPUT SHAFT AND GEARS
Assembly and Disassembly (RS6F51A) ECS008C5
DISASSEMBLY
1. Before disassembling, measure end play for 3rd, 4th, 5th and
6th input gears.
End play standard value
3rd gear : 0.18 - 0.31 mm (0.0071 - 0.0122 in)
4th gear : 0.20 - 0.30 mm (0.0079 - 0.0118 in)
5th gear : 0.06 - 0.16 mm (0.0024 - 0.0063 in)
6th gear : 0.06 - 0.16 mm (0.0024 - 0.0063 in)
2. Remove oil channel.
SCIA0966E
A
B
MT
D
3. Press out input shaft rear bearing using the drift and a puller.
4. Remove snap ring.
5. Press out 6th input gear, 6th needle bearing and 6th input gear
bushing using the drift and a puller.
6. Remove 6th baulk ring.
7. Press out 5th input gear and 5th- 6th synchronizer hub assembly
using the drift and a puller .
8. Remove 5th needle bearing.
SCIA0967E
SCIA0968E
E
F
G
H
I
J
K
L
M
SCIA0918E
MT-61
Page 62
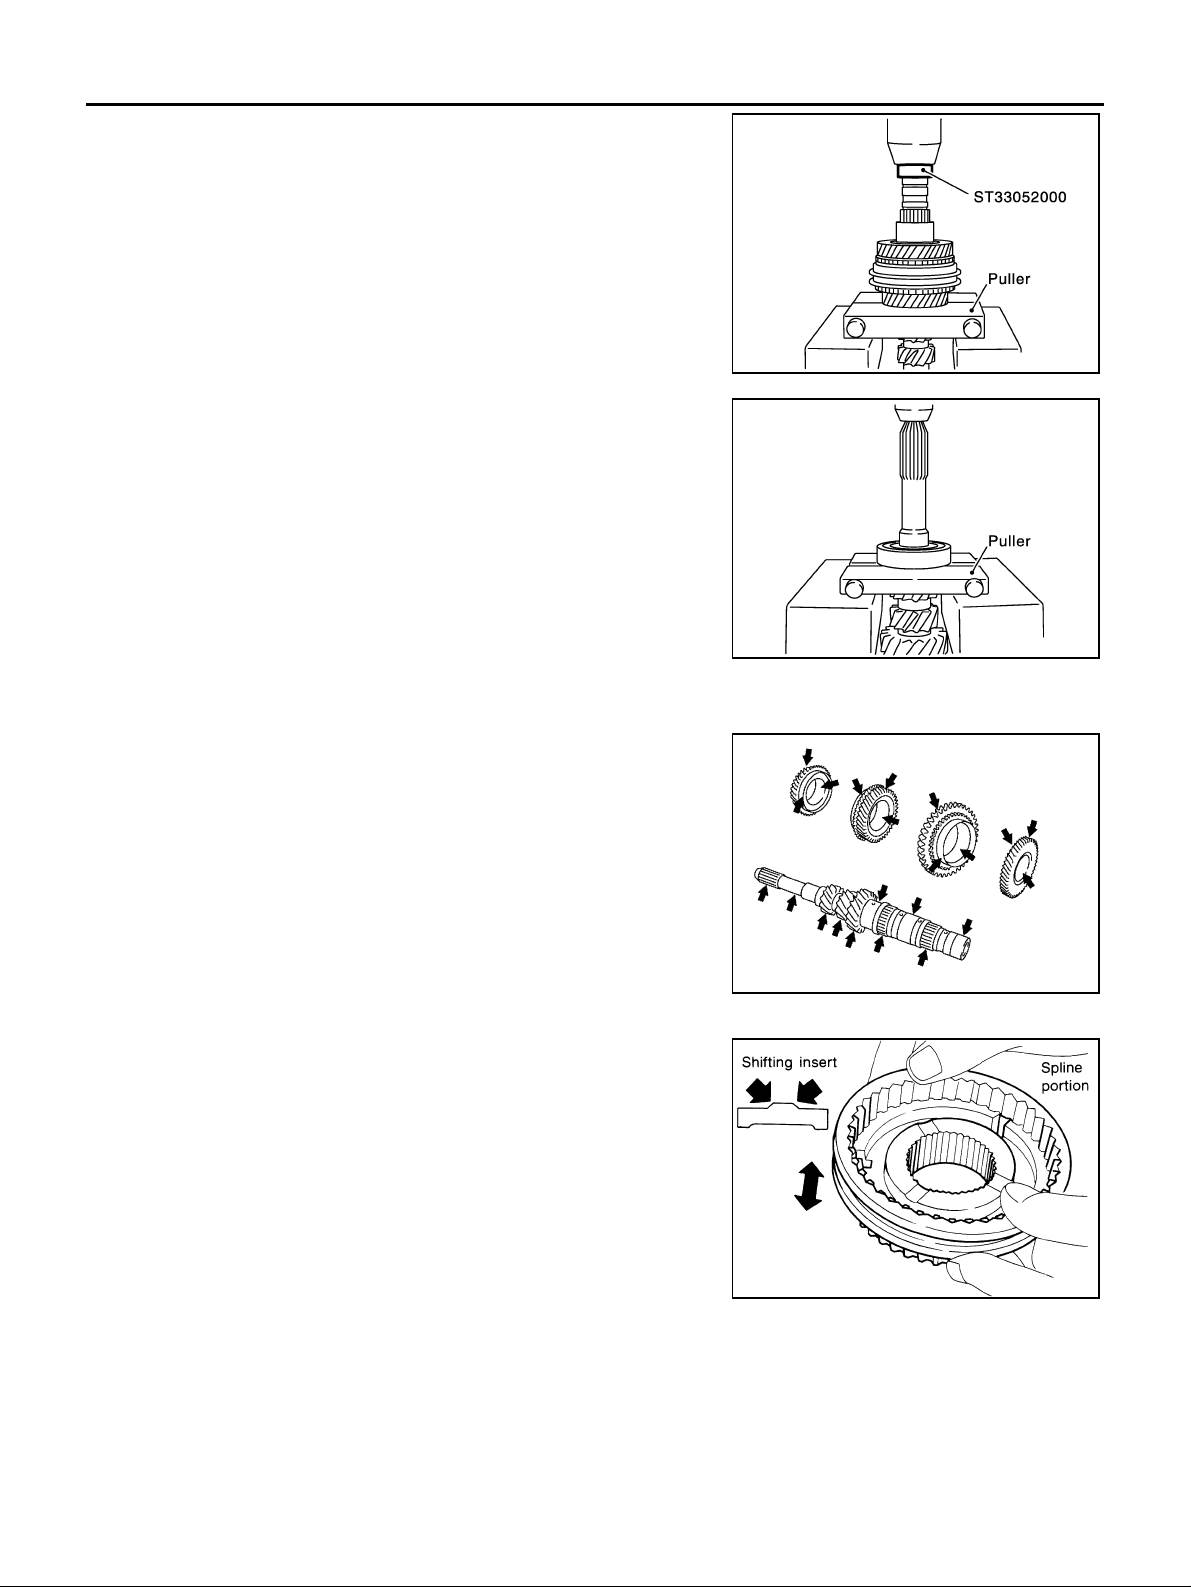
INPUT SHAFT AND GEARS
9. Press out 5th input gear bushing, thrust washer, 4th input gear,
4th needle bearing, 4th input gear bushing, 4th baulk ring, 3rd4th synchronizer hub assembly, 3rd baulk ring and 3rd input
gear using the drift and a puller.
10. Remove 3rd needle bearing.
11. Press out input shaft front bearing using a puller.
SCIA0919E
INSPECTION AFTER DISASSEMBLY
Input Shaft and Gears
Check items belo w. If necessary, replace them with new ones.
● Damage, peeling, dent, uneven wear, bending, etc. of shaft
● Excessive wear, damage, peeling, etc. of gears
Synchronizer
Check items belo w. If necessary, replace them with new ones.
● Damage and excessive wear of contact surfaces of coupling
sleeve, synch ronizer hub, and shifting insert
● Coupling sleeve and synchronizer hub must move smoothly.
SCIA0920E
SCIA1074J
SMT387A
MT-62
Page 63
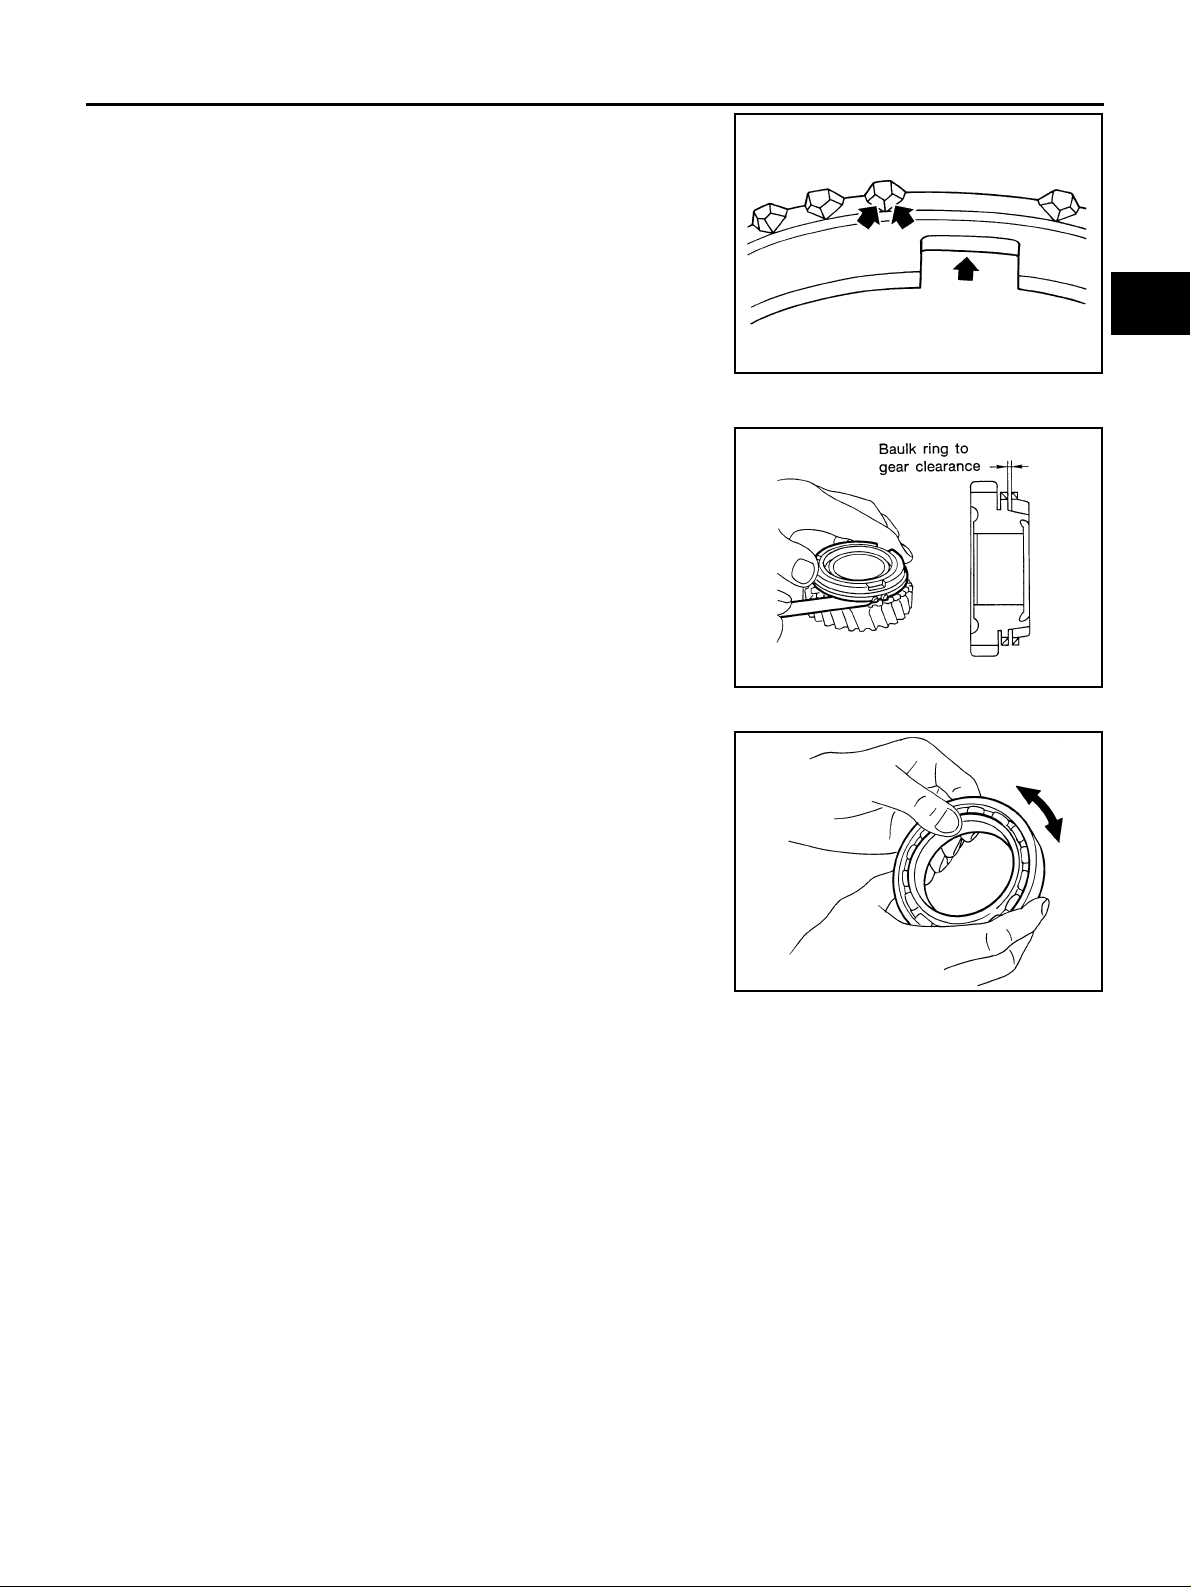
INPUT SHAFT AND GEARS
● If any crack, dam ag e, or ex ce ssiv e w ear is foun d o n ca m f ace of
baulk ring or working face of insert, replace it.
Baulk ring clearance
● Push baulk ring on the cone, and measure the clearance
between baulk ring and cone. If measurement is below limit,
replace it with a new one.
Clearance
Standard value
3rd and 4th : 0.9 - 1.45 mm (0 .035 - 0.057 in)
5th and 6th : 0.95 - 1.4 mm (0.037 - 0.055 in)
Limit value : 0.7 mm (0.028 in)
Bearing
Check items below. If necessary, replace them with new ones.
● Damage and rough rotation of bearing
A
B
MT
SMT867D
D
E
F
G
SMT140
H
I
MTF0041D
J
K
L
M
MT-63
Page 64
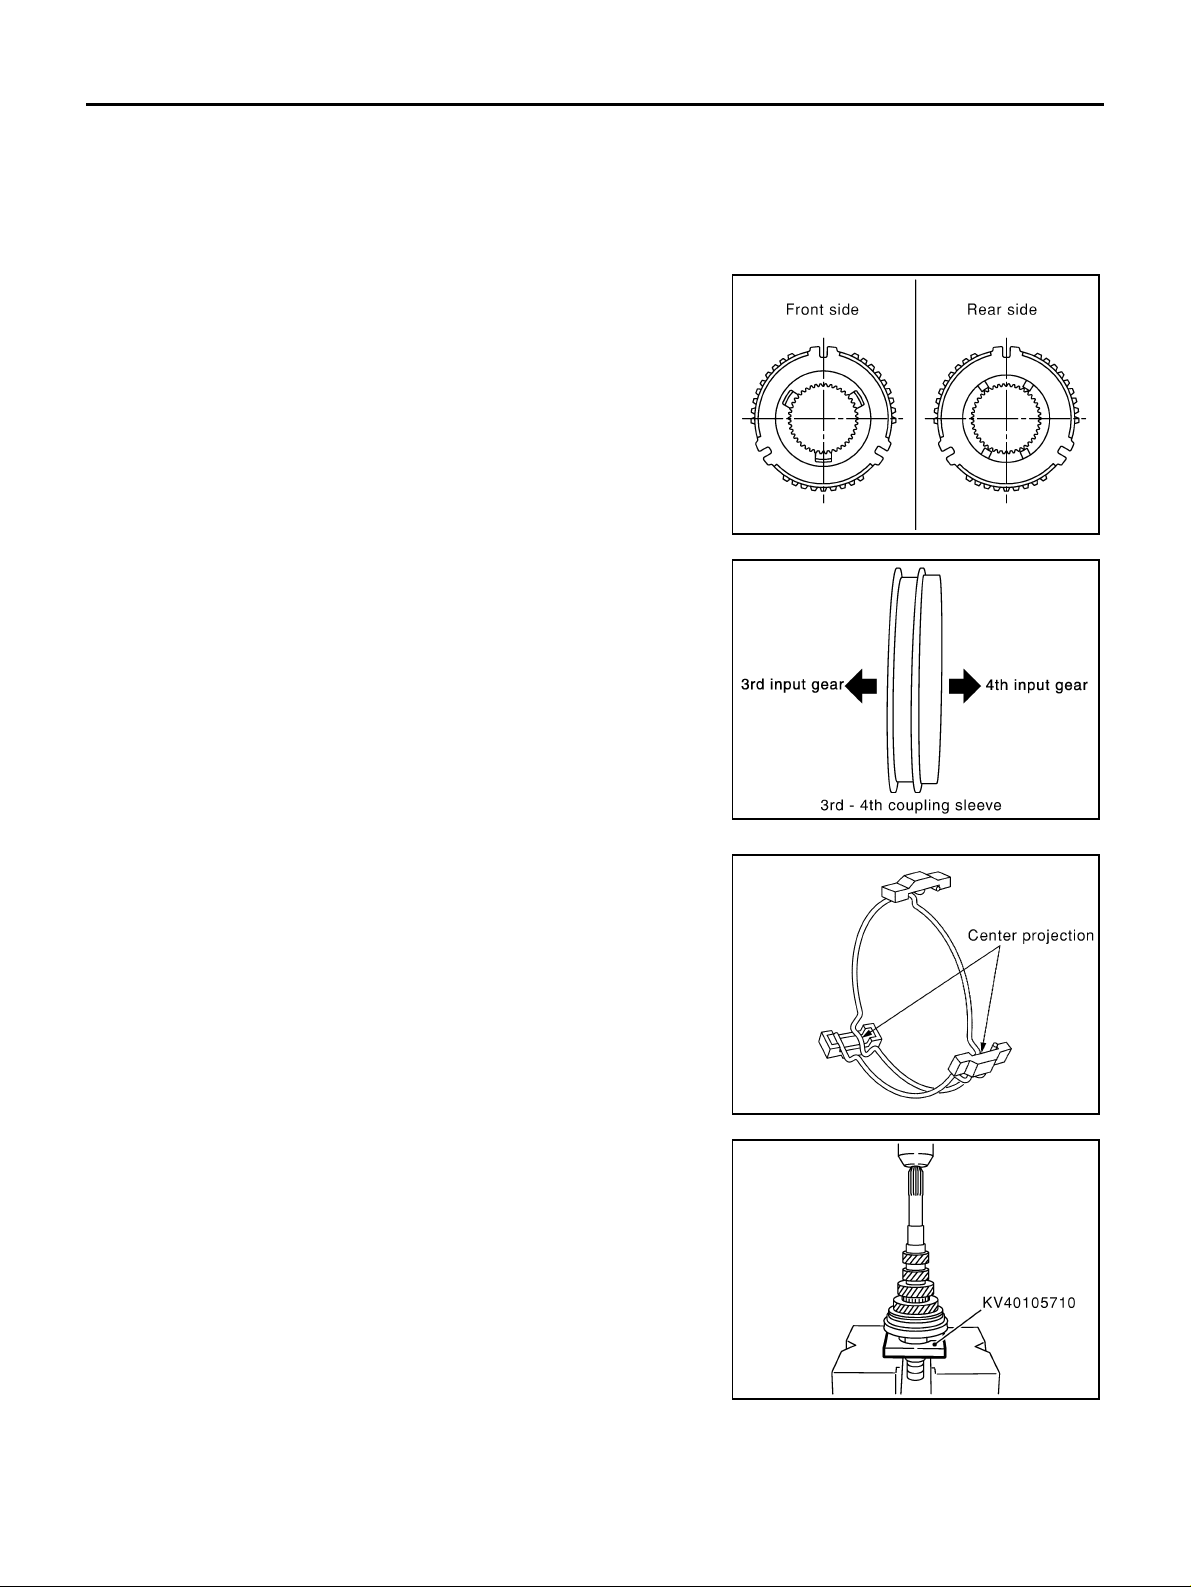
INPUT SHAFT AND GEARS
ASSEMBLY
1. Install 3rd needle bearing to input shaft.
2. Install 3rd input gear and 3rd baulk ring to inpu t shaft.
3. Install 3rd-4th sprea d spr ing,3 rd-4 th sh ift ing ins ert and a new 3rd- 4th sy nchr oni zer hub onto a new 3r d-4t h
coupling sleeve.
CAUTION:
● Be careful with orientation of 3rd-4th synchronizer hub.
● Do not reuse 3rd-4th synchronizer hub.
SCIA0921E
● Be careful with orientation of 3rd-4th coupling sleeve.
● Do not reuse 3rd-4th coupling sleeve.
● Be sure not to hook center projection of 2 spread springs
on same shifting insert.
4. Press in 3rd-4th synchronizer hub assembly using the press
stand.
CAUTION:
Align grooves of 3rd-4th shifting insert and 3rd baulk ring.
PCIB0799E
SCIA1083E
SCIA0922E
MT-64
Page 65
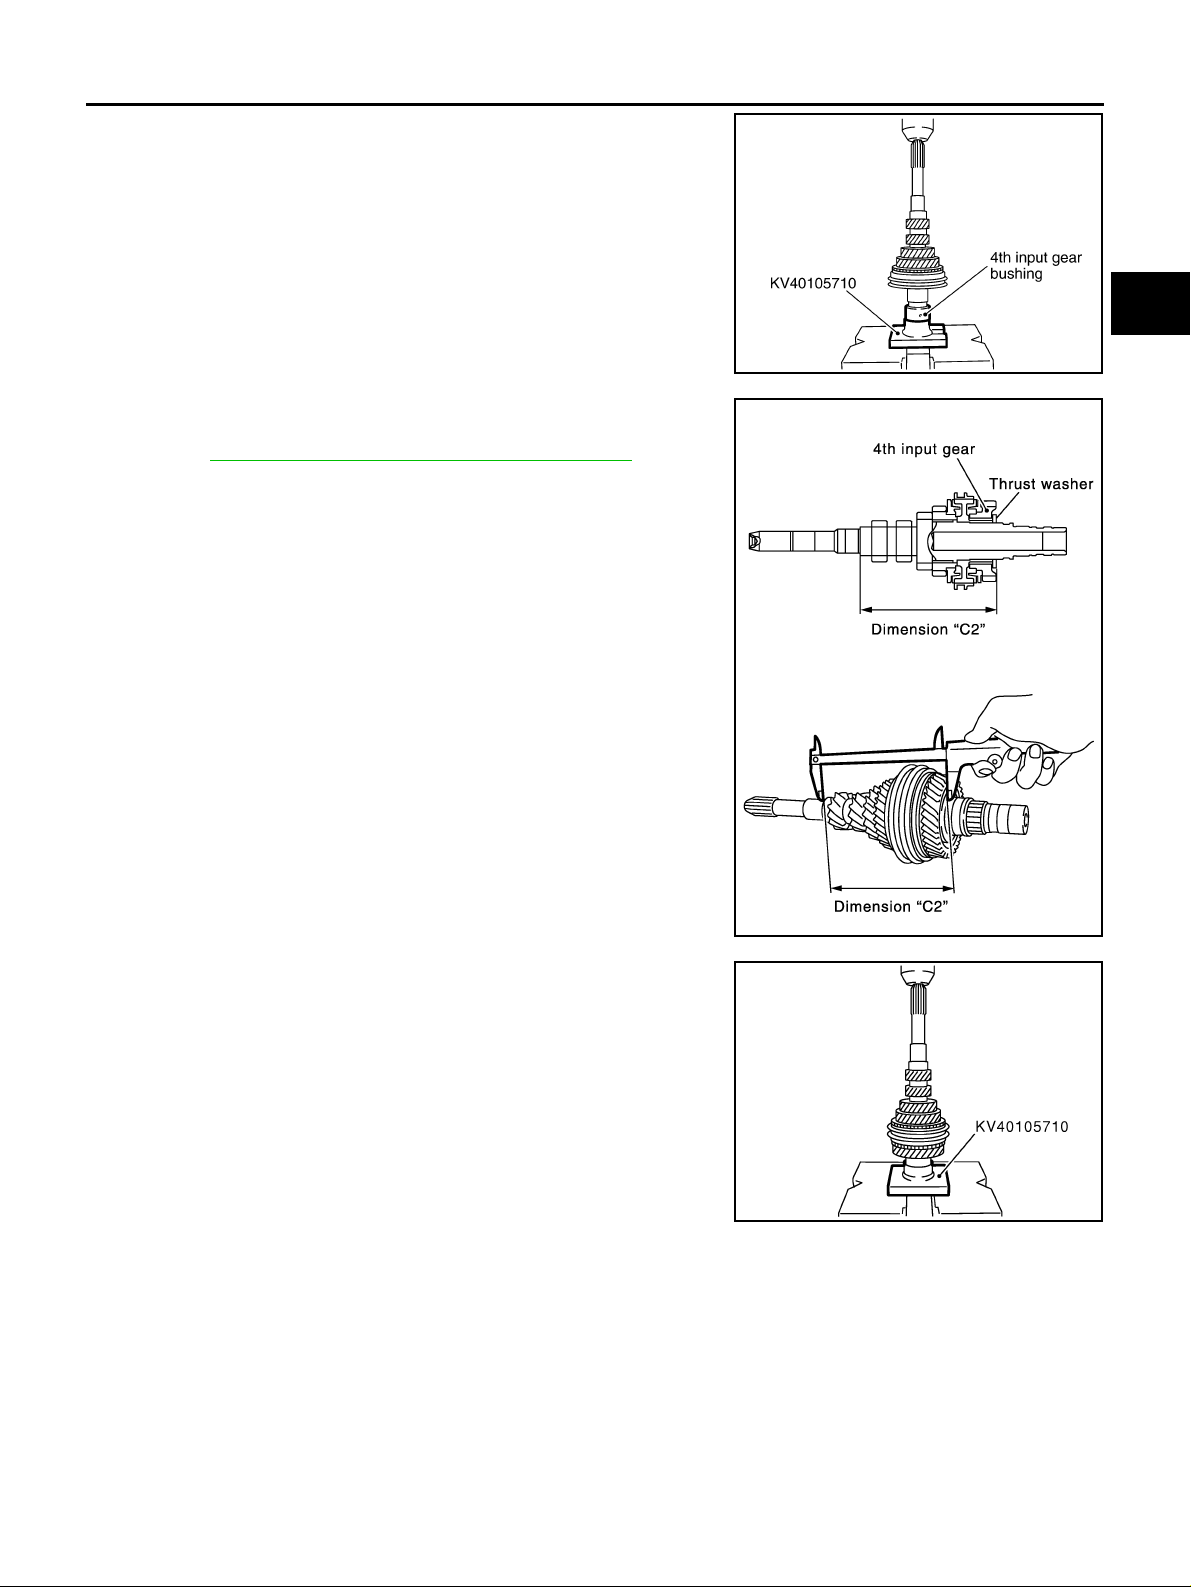
INPUT SHAFT AND GEARS
5. Press in 4th in put gear bushing using the press stand.
6. Install 4th baulk ring.
7. Install 4th needle bearing and 4th input gear to input shaft.
8. Select thrust washer so that dimension “C2” satisfies the standard value below. Then install thrust washer onto input shaft.
Refer to MT-101, "
Standard value for dimension C2
: 154.7 - 154.8 mm (6.091 - 6.094 in)
CAUTION:
Only one thrust washer can be selected.
INPUT SHAFT THRUST WASHER" .
A
B
MT
PCIB0800E
D
E
F
G
SCIA0925E
9. Press in a new 5th input gear bushing using the press stand.
CAUTION:
Do not reuse 5th input gear bushing.
10. Install 5th needle bearing and 5th input gear to input shaft.
11. Install 5th baulk ring.
SCIA0926E
12. Install a new 5 th-6 th sy nchro nize r hu b, 5th -6th s pre ad spri ng a nd 5th- 6th sh ift ing in ser t onto a new 5 th- 6th
coupling slee ve .
H
I
J
K
L
M
MT-65
Page 66
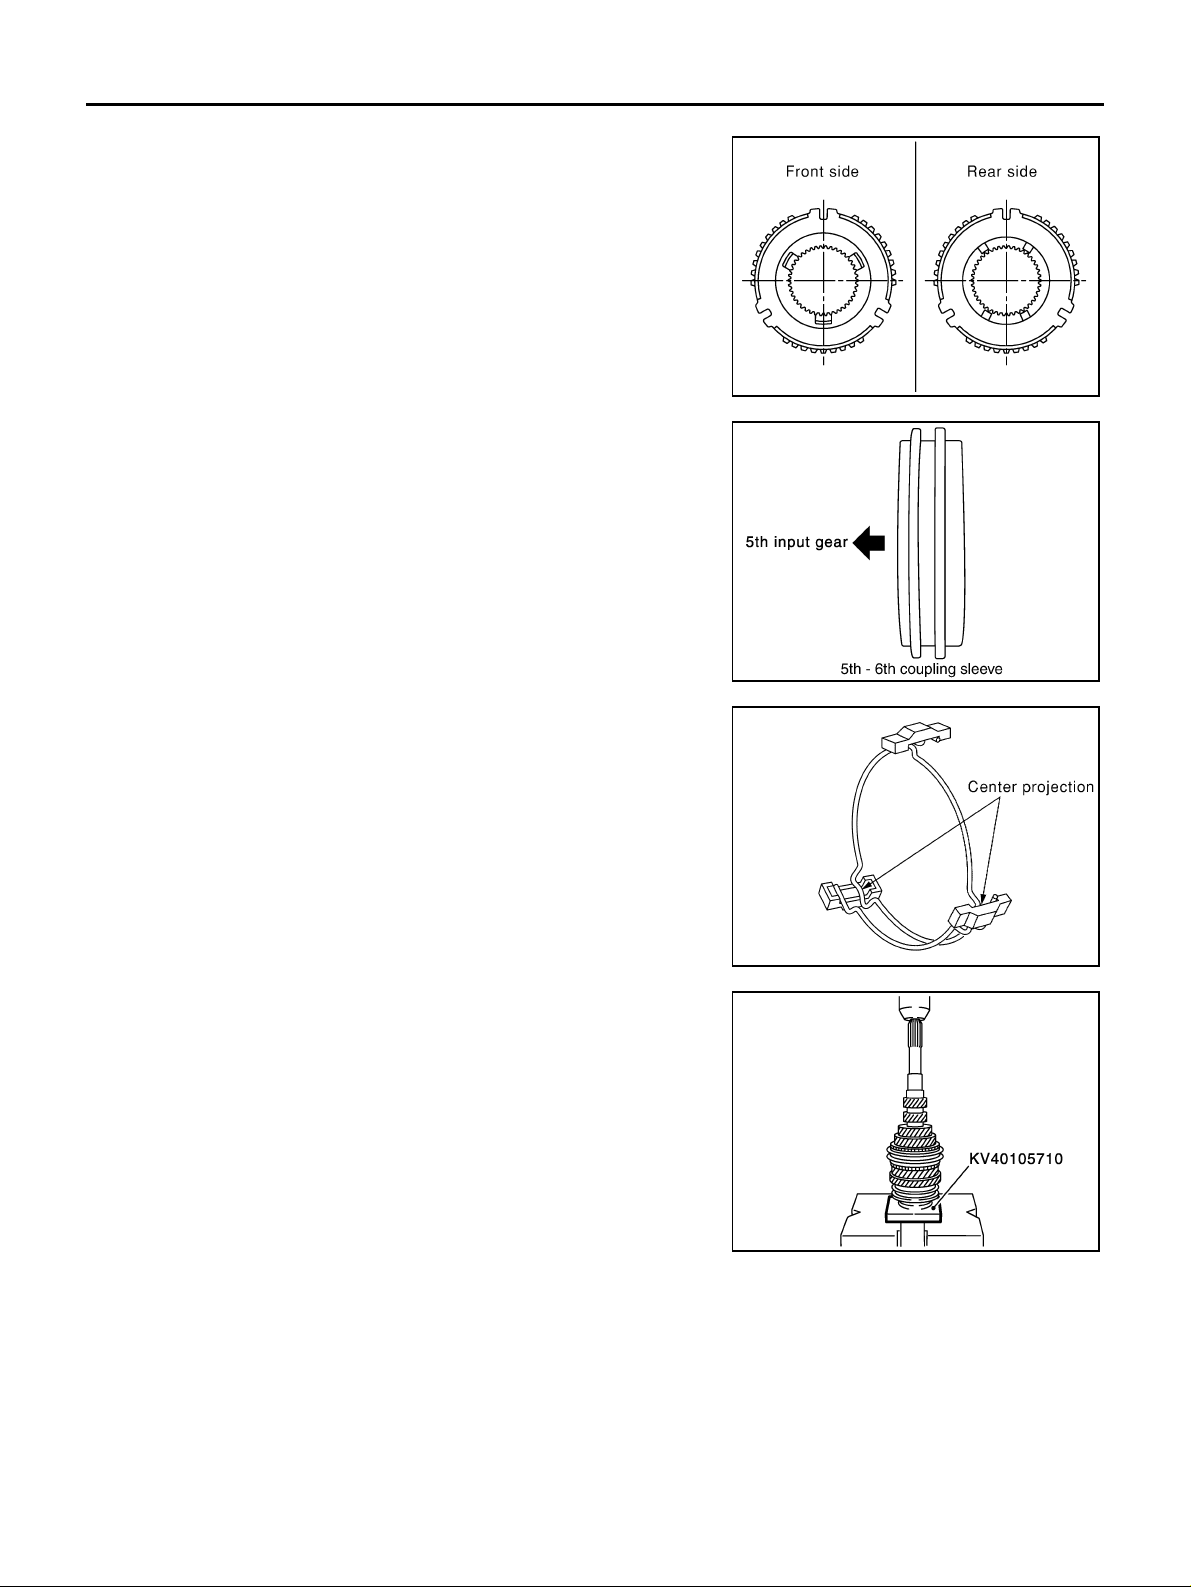
INPUT SHAFT AND GEARS
CAUTION:
● Be careful with orientation of 5th-6th synchronizer hub.
● Do not reuse 5th-6th synchronize r hub.
● Be careful with orientation of 5th-6th coupling sleeve.
● Do not reuse 5th-6th coupling sleeve.
SCIA0921E
● Be sure not to hook center projection of 2 spread springs
on same shifting insert.
13. Press in 5th-6th synchronizer hub assembly using the press
stand.
CAUTION:
Align grooves of 5th-6t h shifting insert and 5th baulk ring
and 6th baulk ring.
PCIB0801E
SCIA1083E
SCIA0928E
MT-66
Page 67
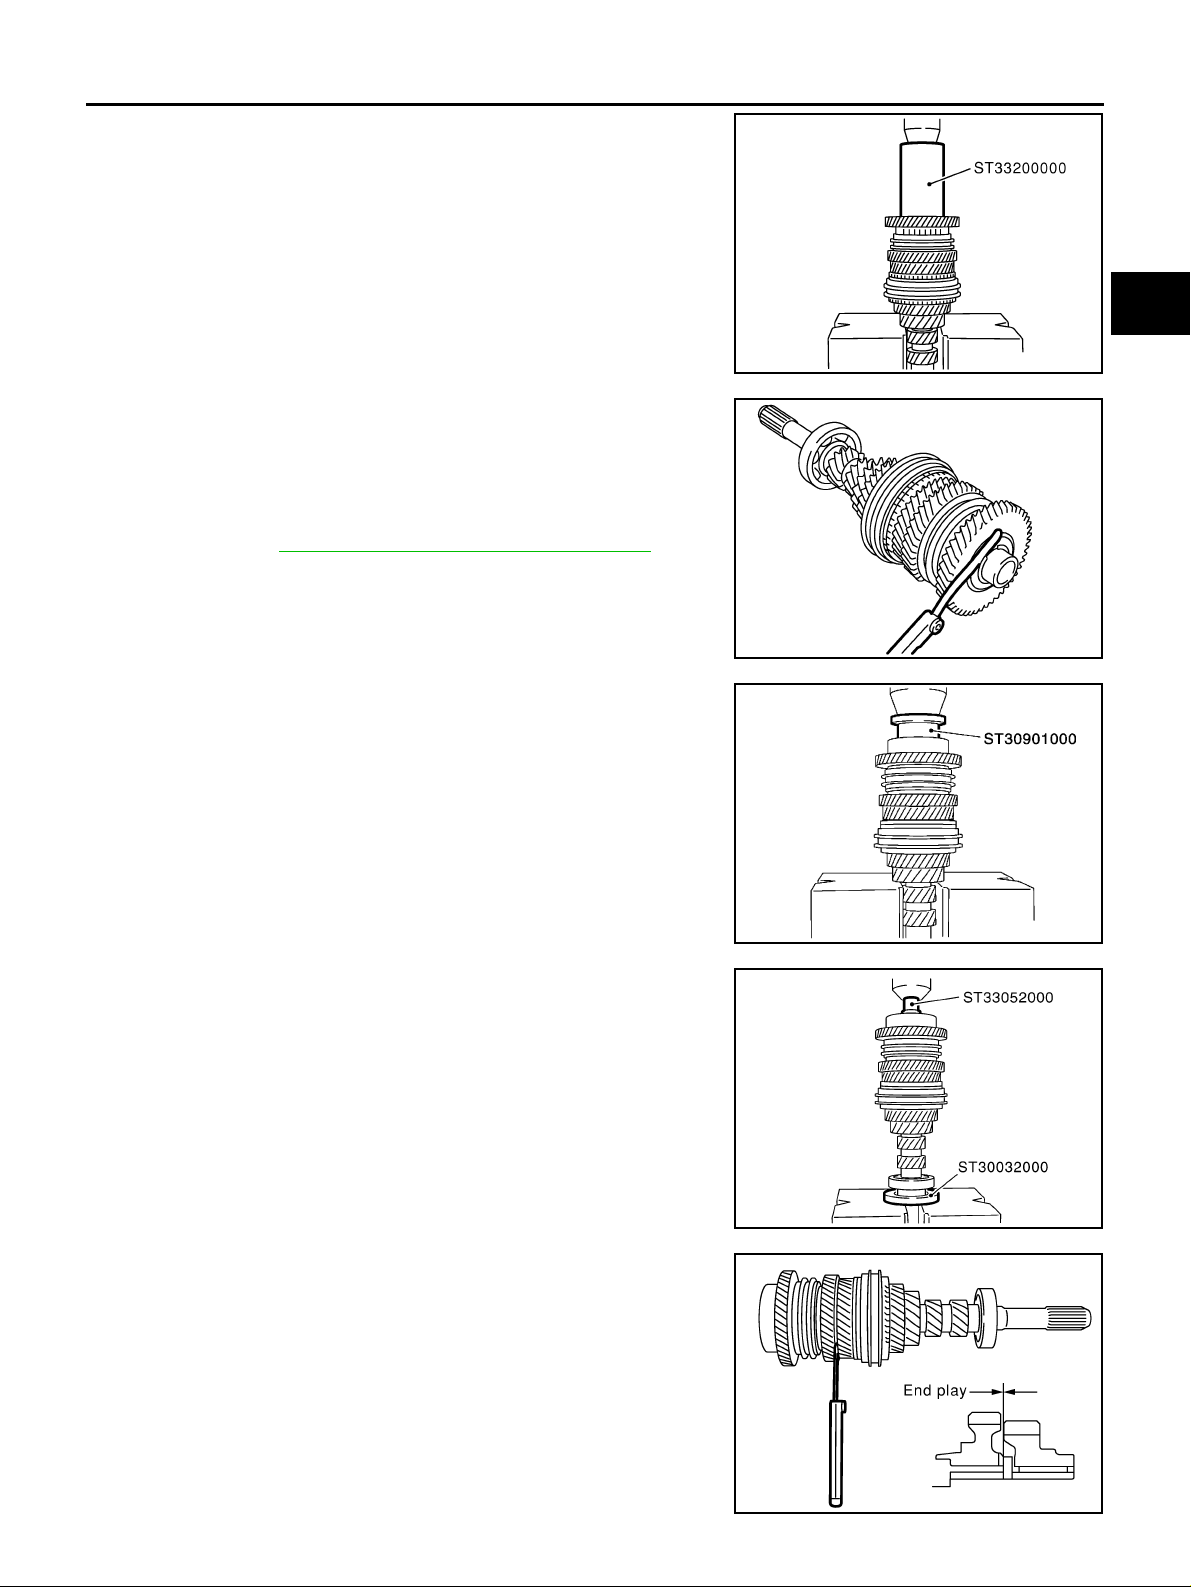
INPUT SHAFT AND GEARS
14. Install 6th needle bearing, 6th input gear, 6th baulk ring onto 6th
input gear bushing, and then press in 6th bushing onto input
shaft using the drift.
15. Install a new snap ring onto input shaft, and check that end play
(gap between snap ring and groove) of 6th input gear bushing
satisfies the standard value.
End play standard value : 0 - 0.1 mm (0 - 0.004 in)
● If measurement is outside the standard range, select snap
ring. Refer to MT-100, "
CAUTION:
Do not reuse snap ring.
6TH INPUT GEAR BUSHING" .
A
B
MT
SCIA0969E
D
E
F
G
SCIA0970E
16. Press in input shaft rear bearing using the drift.
CAUTION:
Install input shaft rear bearing with its brown surface facing
the 6th input gear side.
17. Press in input shaft front bearing using the drifts.
18. Install oil channel onto input shaft.
19. Check end play of 3rd, 4th, 5th and 6th input gears.
SCIA0971E
PCIB0826E
H
I
J
K
L
M
End play standard value
3rd gear : 0.18 - 0.31 mm (0.0071 - 0.0122 in)
4th gear : 0.20 - 0.30 mm (0.0079 - 0.0118 in)
5th gear : 0.06 - 0.16 mm (0.0024 - 0.0063 in)
6th gear : 0.06 - 0.16 mm (0.0024 - 0.0063 in)
SCIA0966E
MT-67
Page 68
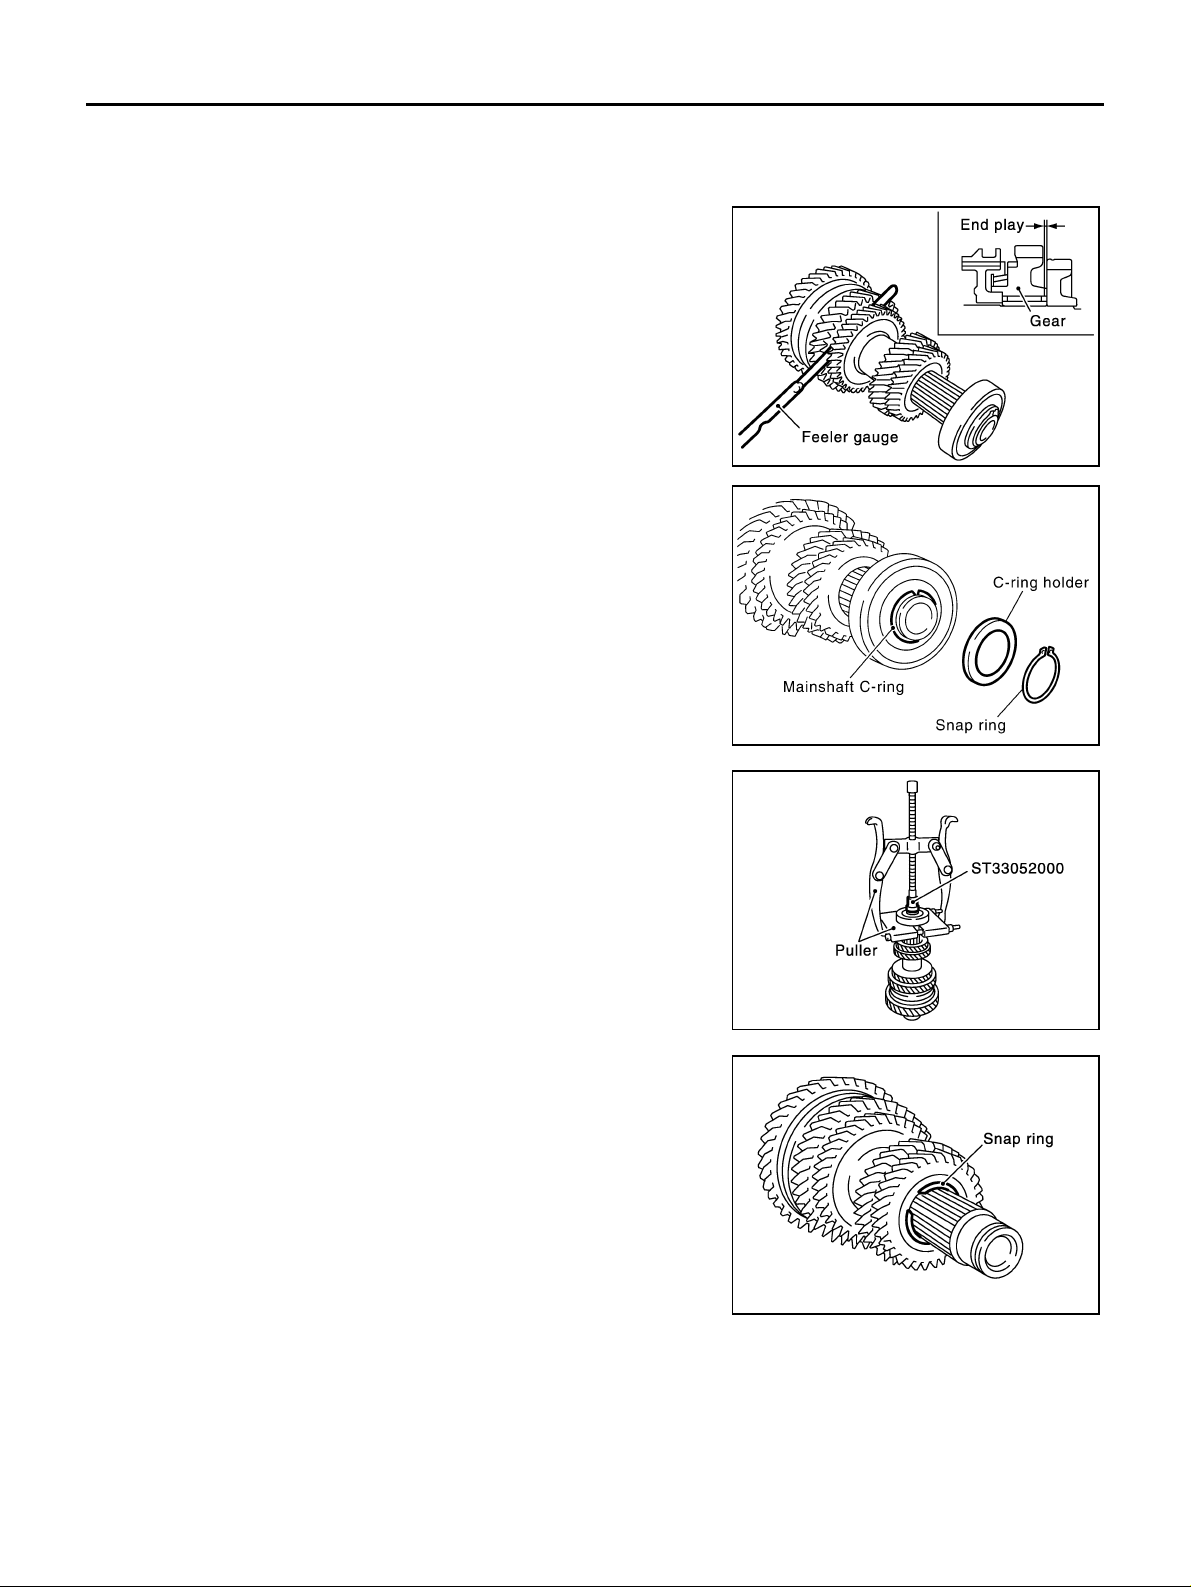
MAINSHAFT AND GEARS
MAINSHAFT AND GEARS PFP:32241 Assembly and Disassembly (RS5F51A) ECS008C6
DISASSEMBLY
1. Before disassembling, measure the end play of 1st and 2nd
main gears.
End play standard value
1st main gear : 0.20 - 0.30 mm (0.0079 - 0.0118 in)
2nd main gear : 0.06 - 0.16 mm (0.0024 - 0.0063 in)
SCIA0933E
2. Remove snap ring.
3. Remove C-ring holder, and then remove mainshaft C-ring.
4. Remove mainshaft rear bearing using the drift and pullers.
5. Remove snap ring.
PCIB0802E
SCIA0935E
SCIA0936E
MT-68
Page 69
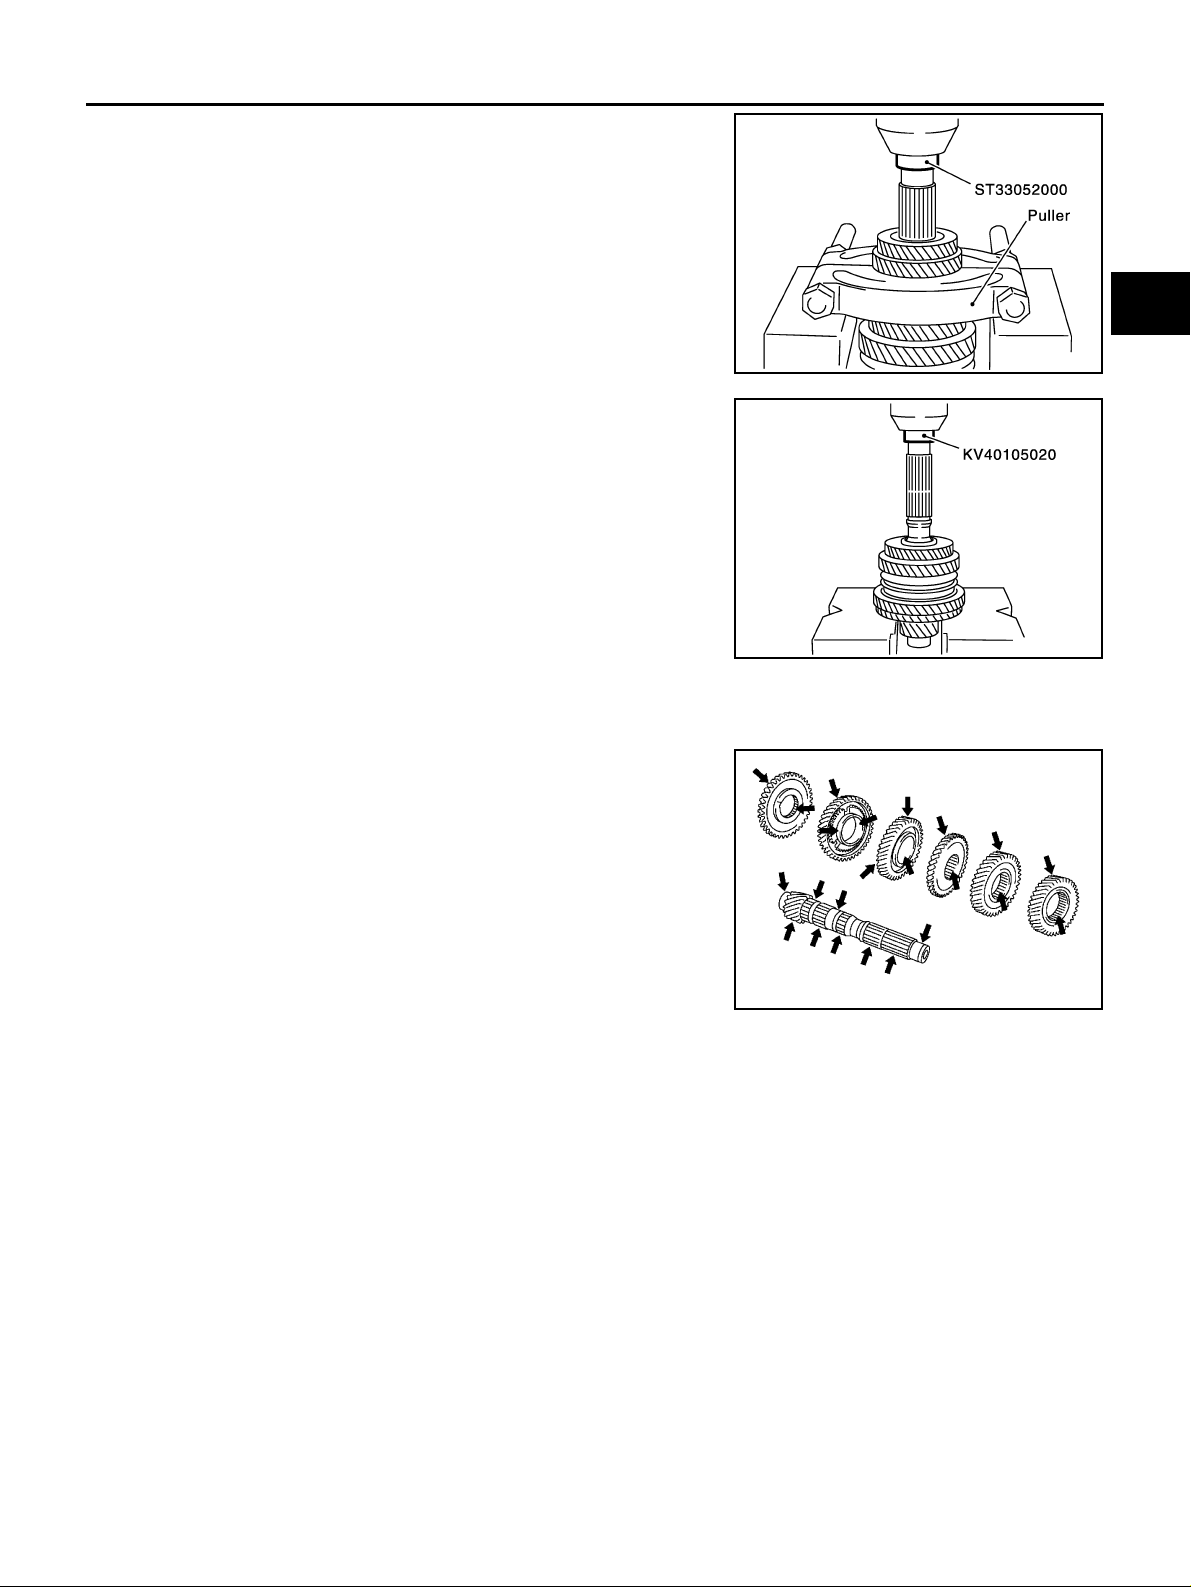
MAINSHAFT AND GEARS
6. Press ou t 4 th ma in ge ar an d 5th ma in g ear us ing the dr ift and a
puller.
7. Remove 4th main gear adjusting shim.
8. Remove 3rd-4th mainshaft spacer.
9. Press out 3rd main gear, 2nd main gear, 2nd needle bearing ,
2nd main gear bushing, 1st-2nd synchronizer hub assembly, 1st
main gear, 1st needle bearing, and 1st main gear bushing
reverse main gear using the drift.
A
B
MT
SCIA0937E
D
E
F
G
SCIA0938E
INSPECTION AFTER DISASSEMBLY
Mainshaft and Gears
Check items below. If necessary, replace them with new ones.
● Damage, peelin g, dent, uneven wear, bending, and other non-
standard conditions of the shaft.
● Excessive wear, damage, peeling, and other non-standard con-
ditions of the gears.
H
I
J
K
SCIA1075J
L
M
MT-69
Page 70
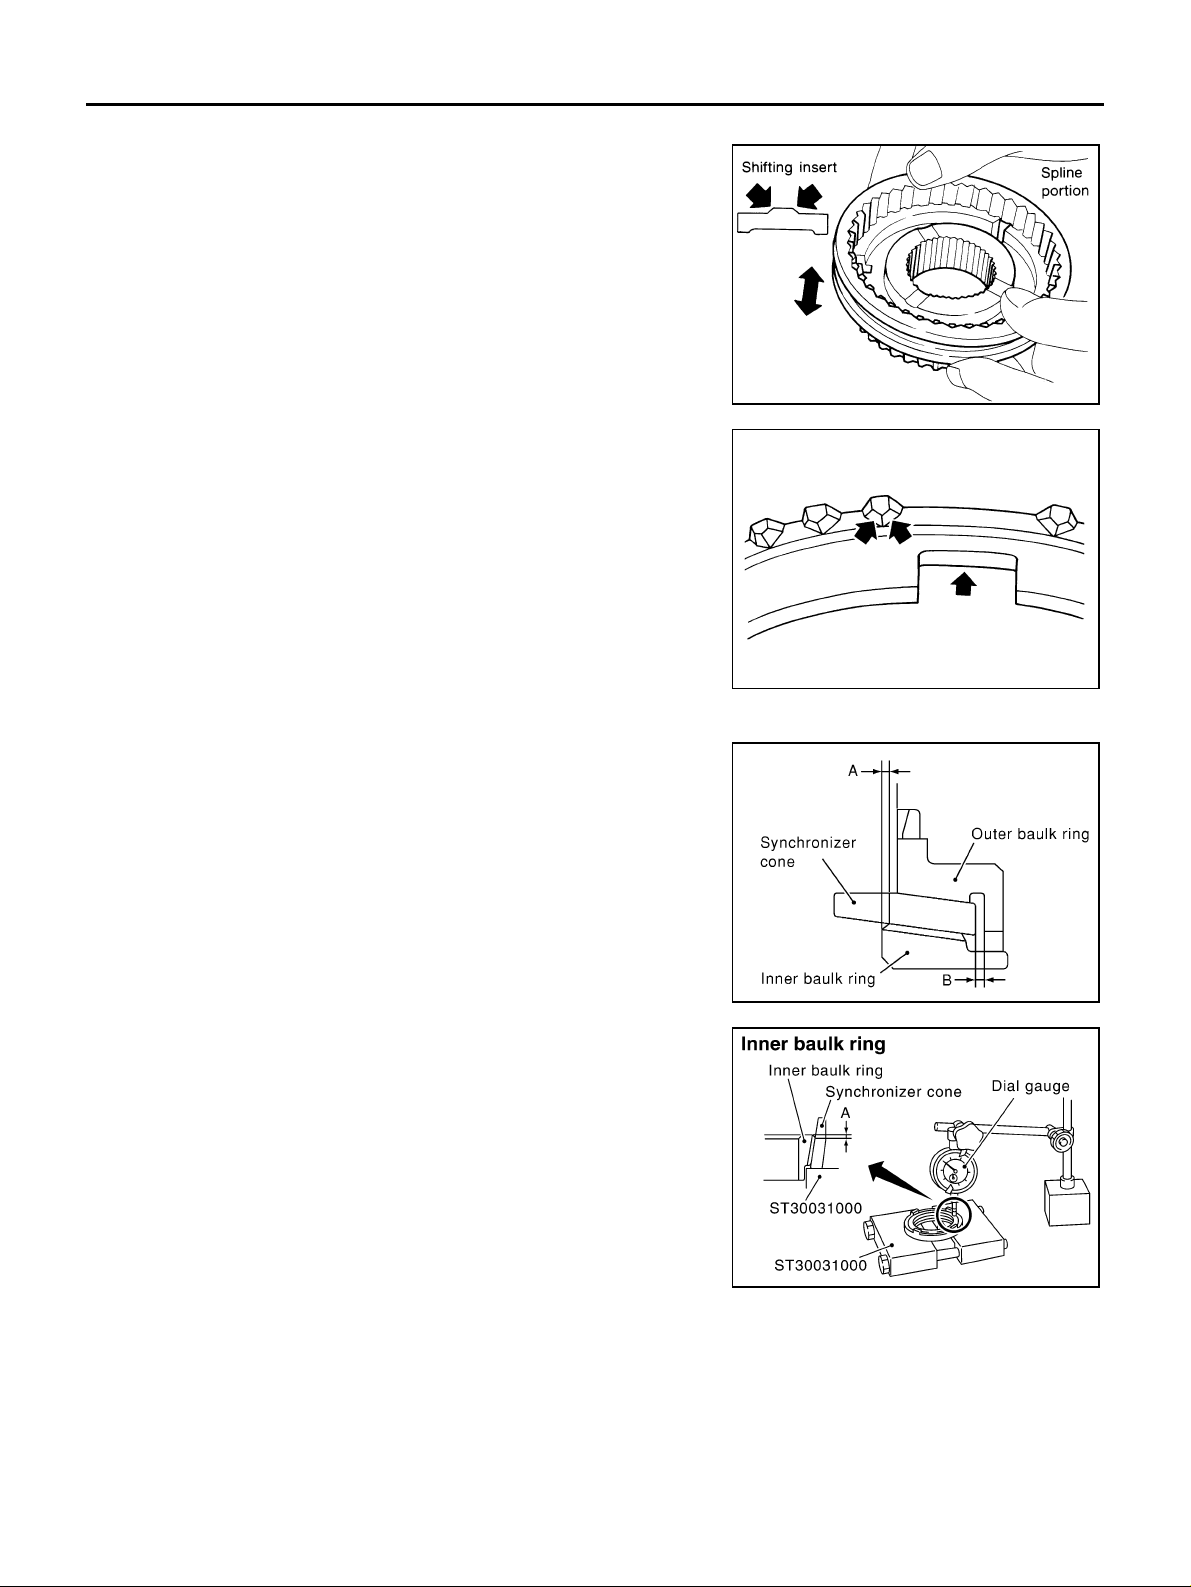
MAINSHAFT AND GEARS
Synchronizer
Check items belo w. If necessary, replace them with new ones.
● Damage and unusual wear on contact surfaces of coupling
sleeve, synch ronizer hub, and shifting insert.
● Coupling sleeve and synchronizer hub must move smoothly.
● If any crack, damage, or exces sive wea r is f ou nd on cam fa ce of
baulk ring or working face of insert, replace it.
SMT387A
Baulk ring clearance
● Double cone synchronizer (1st)
Follow the instructions below and inspect the clearance of outer
baulk ring, synchronizer cone, inner baulk ring.
CAUTION:
Outer baulk ring, synchronizer cone and inner baulk ring
control clearance s “A” an d “B” as a set . Repl ace the m as a
set if they are outside the limit value.
1. Measure clearance A at 2 or more points diagonally opposite
using a dial ga uge, and calculate mean value.
Clearance A
Standard value : 0.6 - 0.8 mm (0.024 - 0.031 in)
Limit value : 0.2 mm (0.008 in)
SMT867D
SCIA0950E
PCIB0818E
MT-70
Page 71
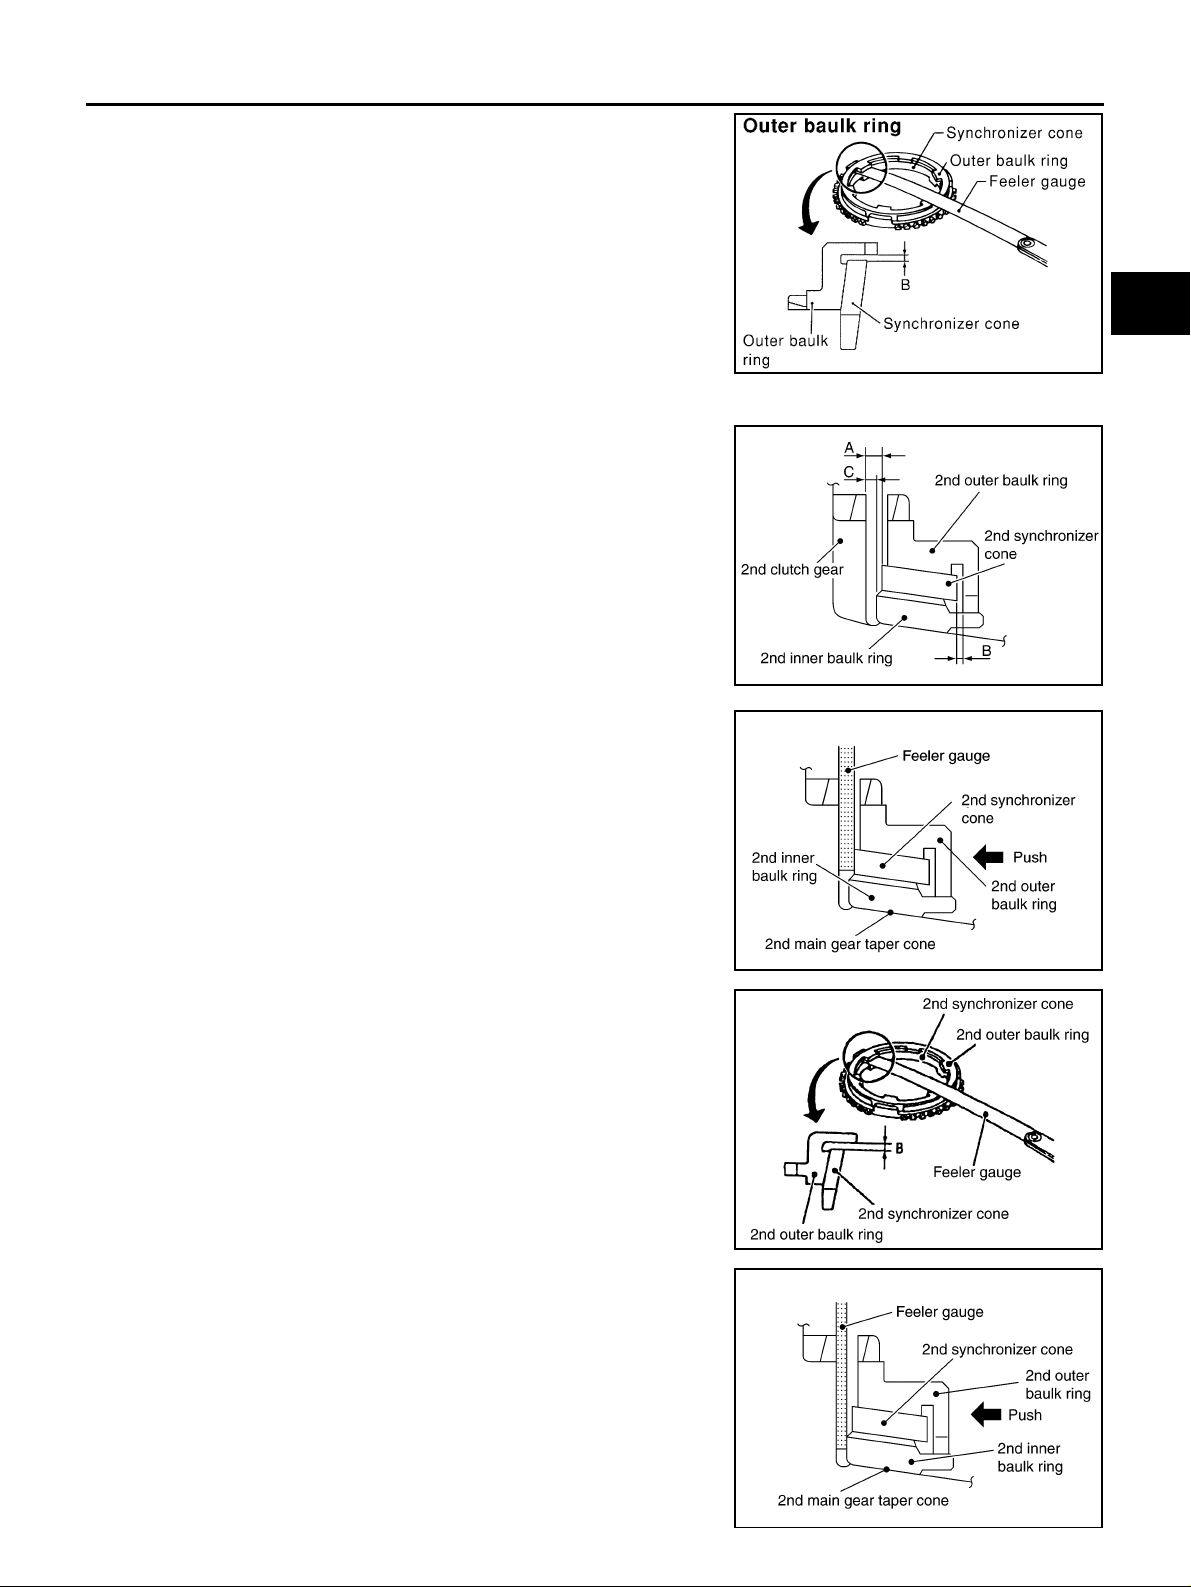
MAINSHAFT AND GEARS
2. Measure clearance B at 2 or more points diagonally opposite
using a feeler gauge, and calculate mean value.
Clearance B
Standard value : 0.6 - 1.1 mm (0.024 - 0.043 in)
Limit value : 0.2 mm (0.008 in)
● Triple cone synchronizer (2nd)
Follow the instructions below and inspect the clearance of
outer baulk ri ng, synchronizer cone, inner baulk ring.
CAUTION:
Outer baulk ring, synchron izer cone and i nner baulk ring
control clearances “A”, “B” and “C” as a set. Replace
them as a set if they are outside the limit value.
A
B
MT
SCIA1084E
D
E
F
G
1. Measure clearance “A” at 2points or more on the opposite side
using a feeler gauge when pressing baulk ring toward clutch
gear taper cone. Then calculate the average.
Clearance “A”
Standard value : 0.6 - 1.2 mm (0.024 - 0.047 in)
Limit value : 0.3 mm (0.012 in)
2. Measure c learanc e “B” at 2 poi nts or more o n the op posite si de
using a feeler gauge. Then calculate the average.
Clearance “B”
Standard value : 0.6 - 1.1 mm (0.024 - 0.043 in)
Limit value : 0.2 mm (0.008 in)
PCIB0603E
H
I
J
K
PCIB0808E
L
M
PCIB0605E
3. Measure clearance “C” at 2 points or more on the opposite side
using a feeler gauge when pressing baulk ring toward clutch
gear taper cone. Then calculate the average.
Clearance “C”
Standard value : 0.7 - 1.1 mm (0.028 - 0.043 in)
Limit value : 0.3 mm (0.012 in)
MT-71
PCIB0809E
Page 72
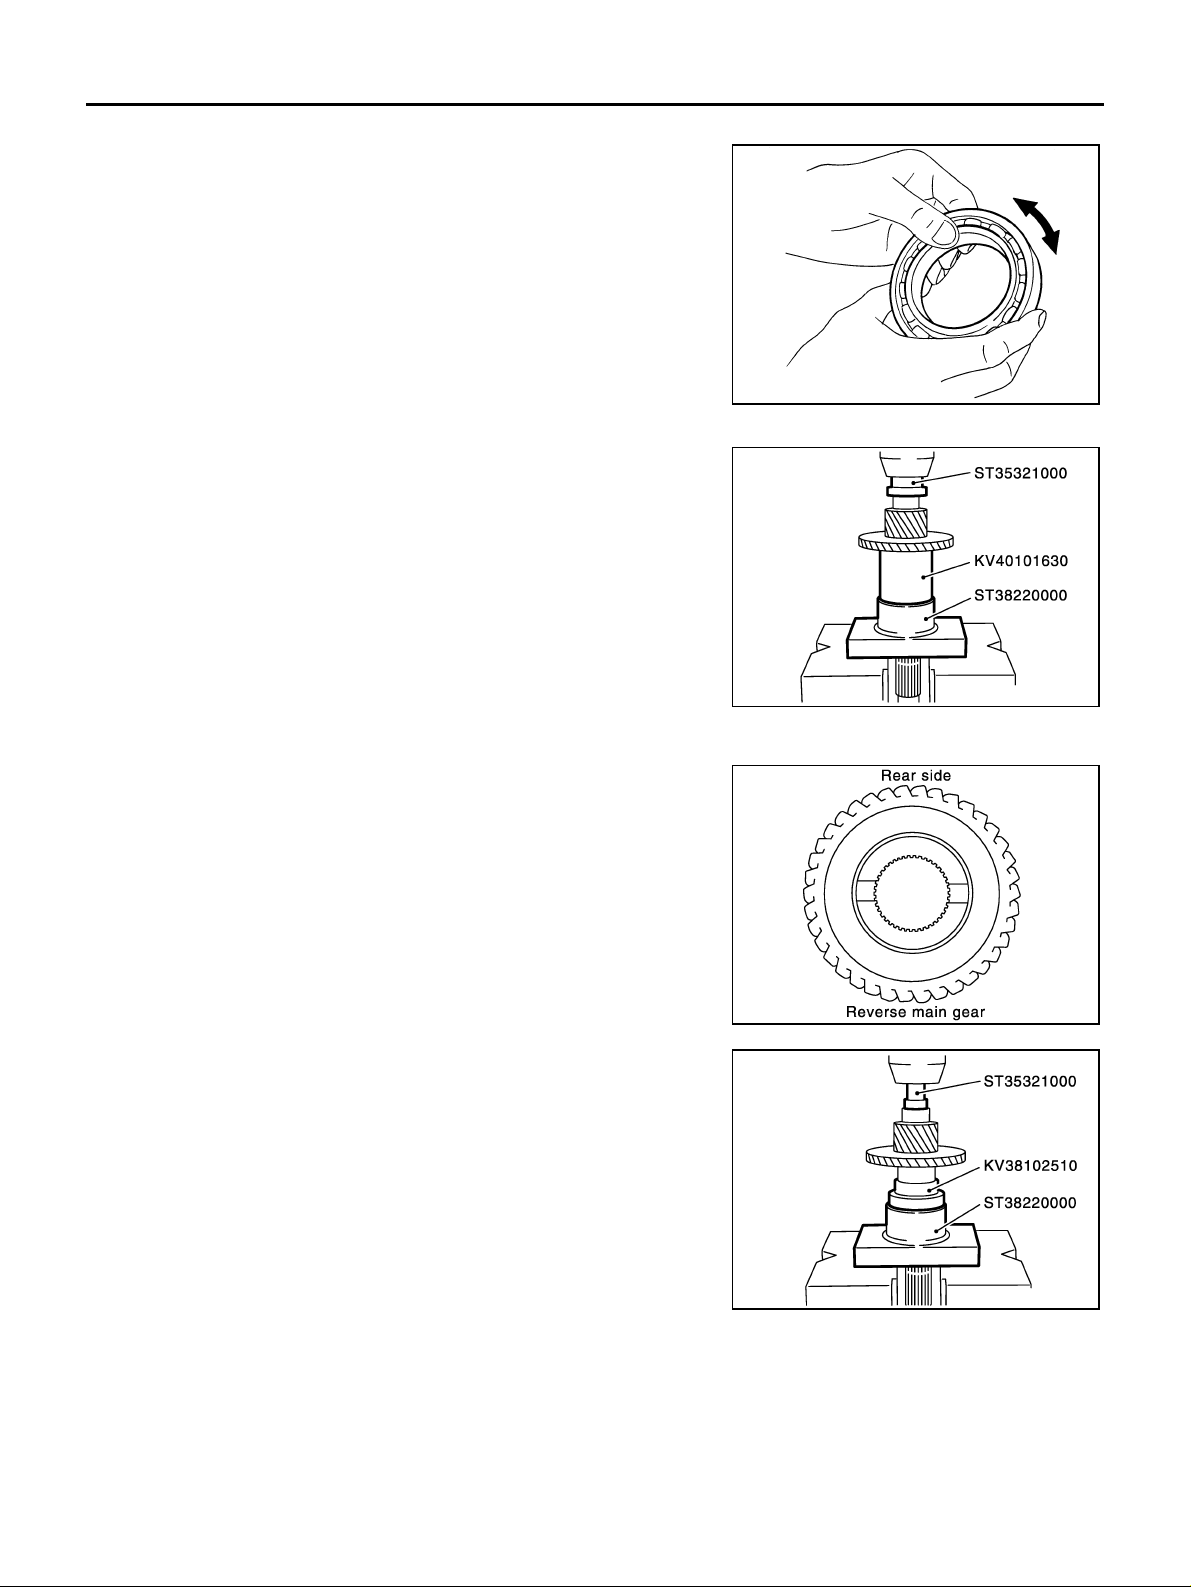
MAINSHAFT AND GEARS
Bearing
Check items belo w. If necessary, replace them with new ones.
● D am ag e an d roug h rotatio n of be ari ng
ASSEMBLY
1. Press in reverse main gear using the drifts and the press stand.
MTF0041D
CAUTION:
● Be careful with orientation of reverse main gear.
● Do not reuse reverse main gear.
2. Press in 1st main gear bushing using the drifts and the press
stand.
3. Install 1st needle be aring, and then 1st main gear.
SCIA0939E
SCIA0992E
SCIA0940E
4. Install 1st-2nd spread spring, 1st-2nd shifting insert and a new 1st-2nd synchronizer hub onto a new 1st2nd coupling slee ve.
MT-72
Page 73
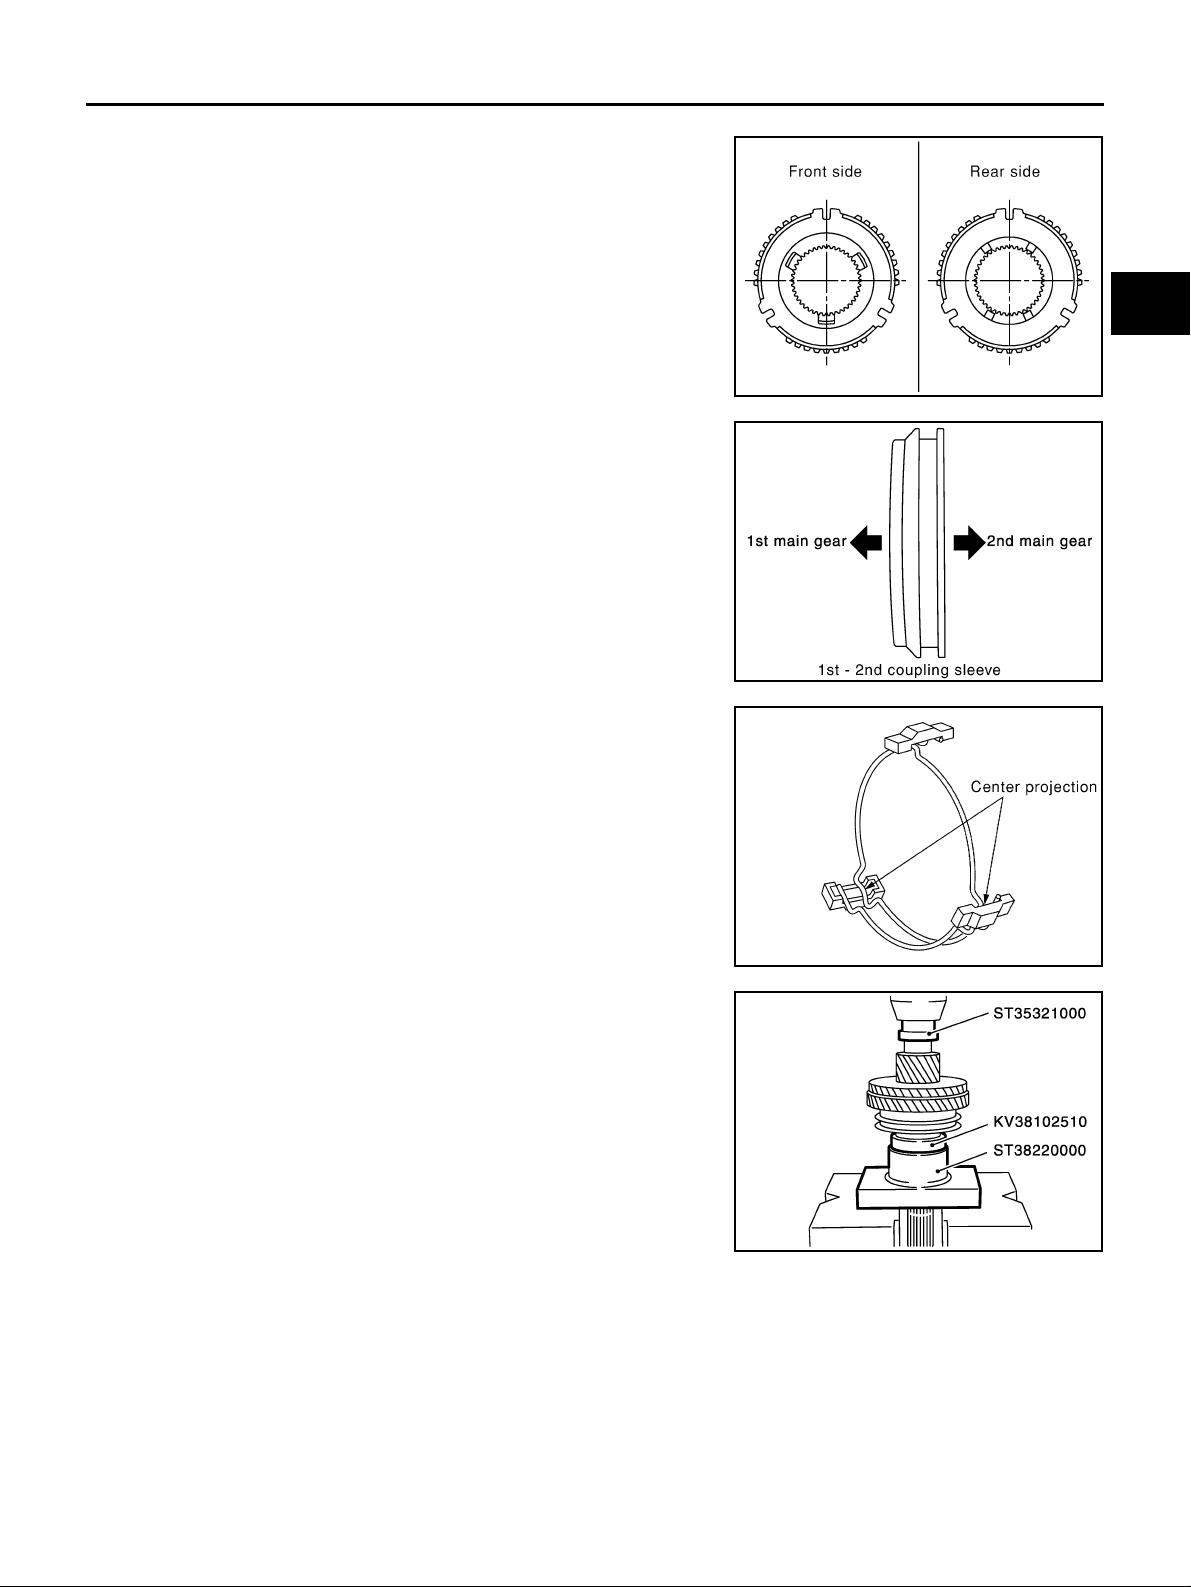
MAINSHAFT AND GEARS
CAUTION:
● Be careful with orientation of 1st-2nd synchronizer hub.
● Do not reuse 1st-2nd synchronizer hub.
A
B
MT
● Be careful with orientation of 1st-2nd coupling sleeve.
● Do not reuse 1st-2nd coupling sleeve.
● Be sure not to hook center projection of 2 spread springs
on same 1st-2nd shifting insert.
SCIA0921E
PCIB0803E
SCIA1083E
D
E
F
G
H
I
J
K
5. Install 1st inner baulk ring, 1st synchronizer cone, 1st outer
baulk ring onto mainshaft, and then press in 1st-2nd synchronizer hub assembly onto mainshaft using the drifts and the press
stand.
CAUTION:
● Outer baulk ring, synchronizer cone, and inner baulk ring
on 2nd gear-side must have been removed.
● Be careful with orientation of coupling sleeve.
MT-73
L
M
SCIA0941E
Page 74
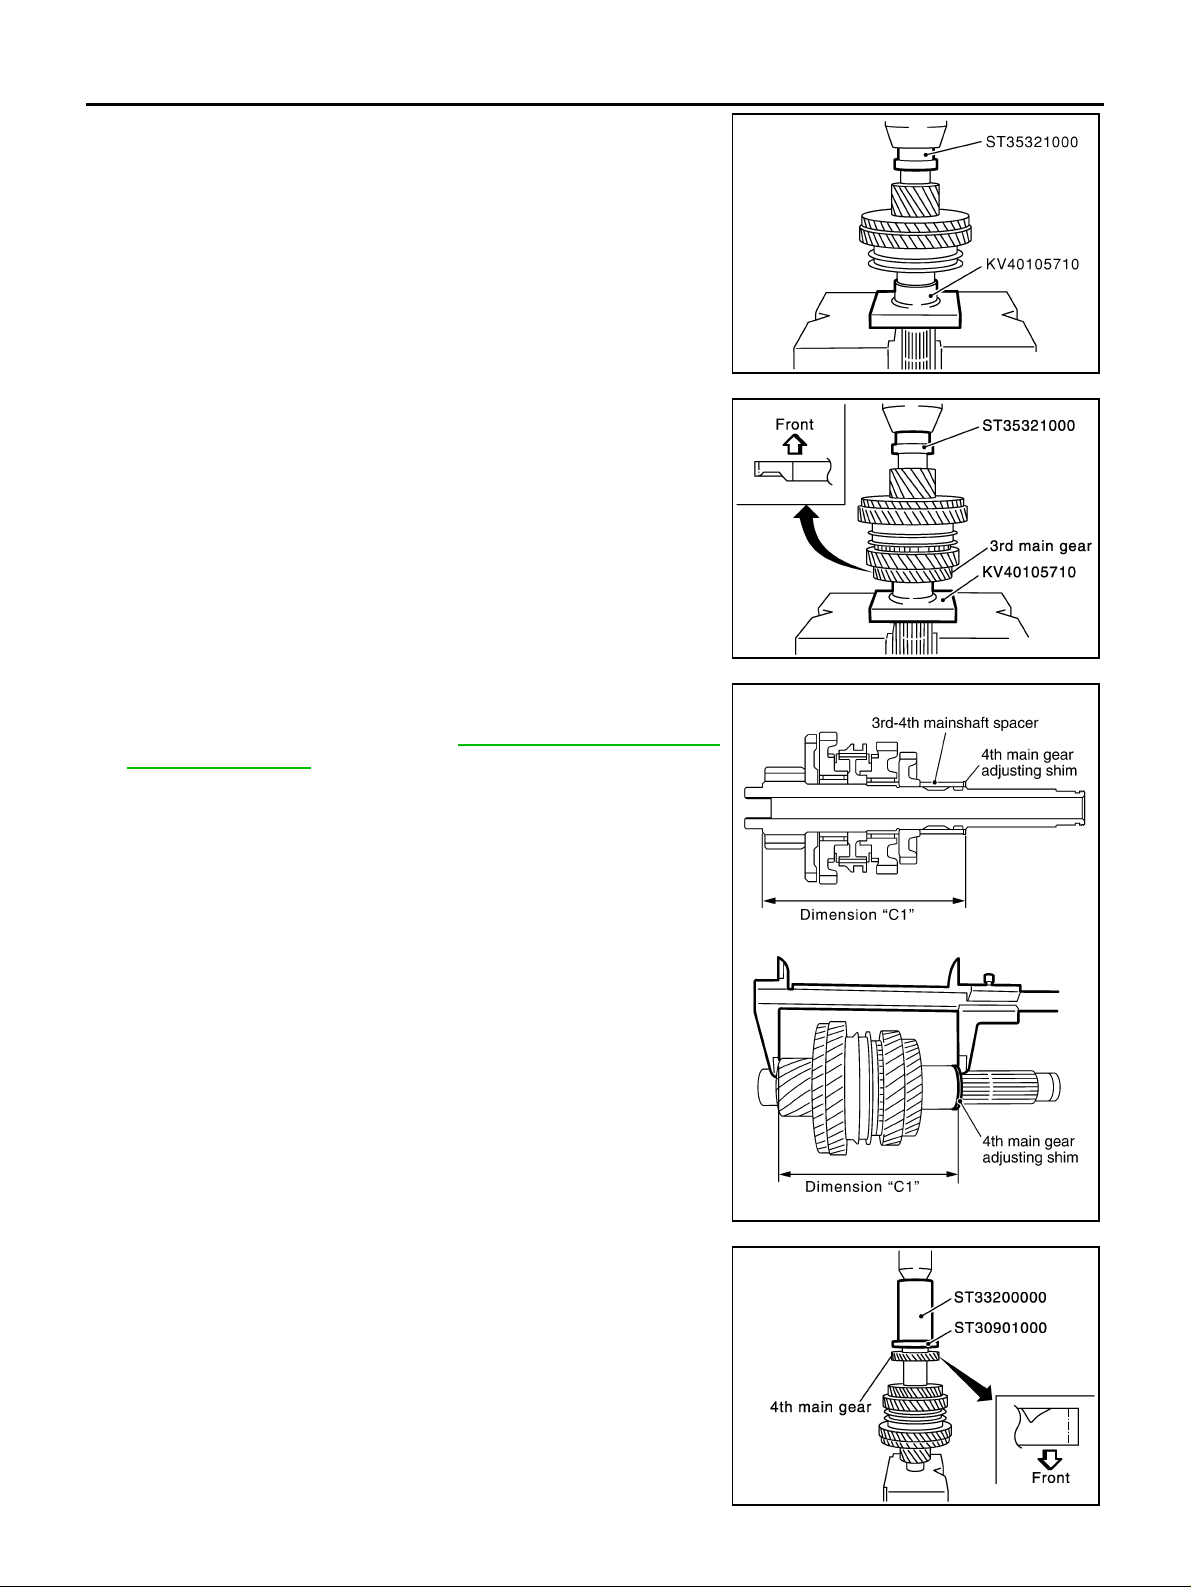
MAINSHAFT AND GEARS
6. Press in 2nd main gear bushing using the drift and the press
stand.
7. Install 2nd outer baulk ring, 2nd synchronizer cone, and 2nd
inner baulk ring.
8. Install 2nd needle be arin g an d 2nd mai n gear.
9. Press in a new 3rd main gear us ing the dri ft and t he pre ss st an d.
CAUTION:
● Be careful with orientation of 3rd main gear.
● Do not reuse 3rd main gear.
10. Install 3rd-4t h mai ns ha ft spac er.
SCIA0942E
11. Select 4th main g ear adjus ting shim so tha t di mens ion “C1 ” sa tisfies the standard value below, and install 4th main gear adjusting shim onto mainshaft. Refer to MT-101, "
4TH MAIN GEAR
ADJUSTING SHIM" .
Standard value for dime nsion C1
: 173.85 - 173.95 mm (6.844 - 6.848 in)
CAUTION:
Only one adjusting shim can be selected.
SCIA0943E
PCIB0804E
12. Press in a new 4th main gear using the drifts.
CAUTION:
● Be careful with orientation of 4th main gear.
● Do not reuse 4th main gear.
SCIA0945E
MT-74
Page 75
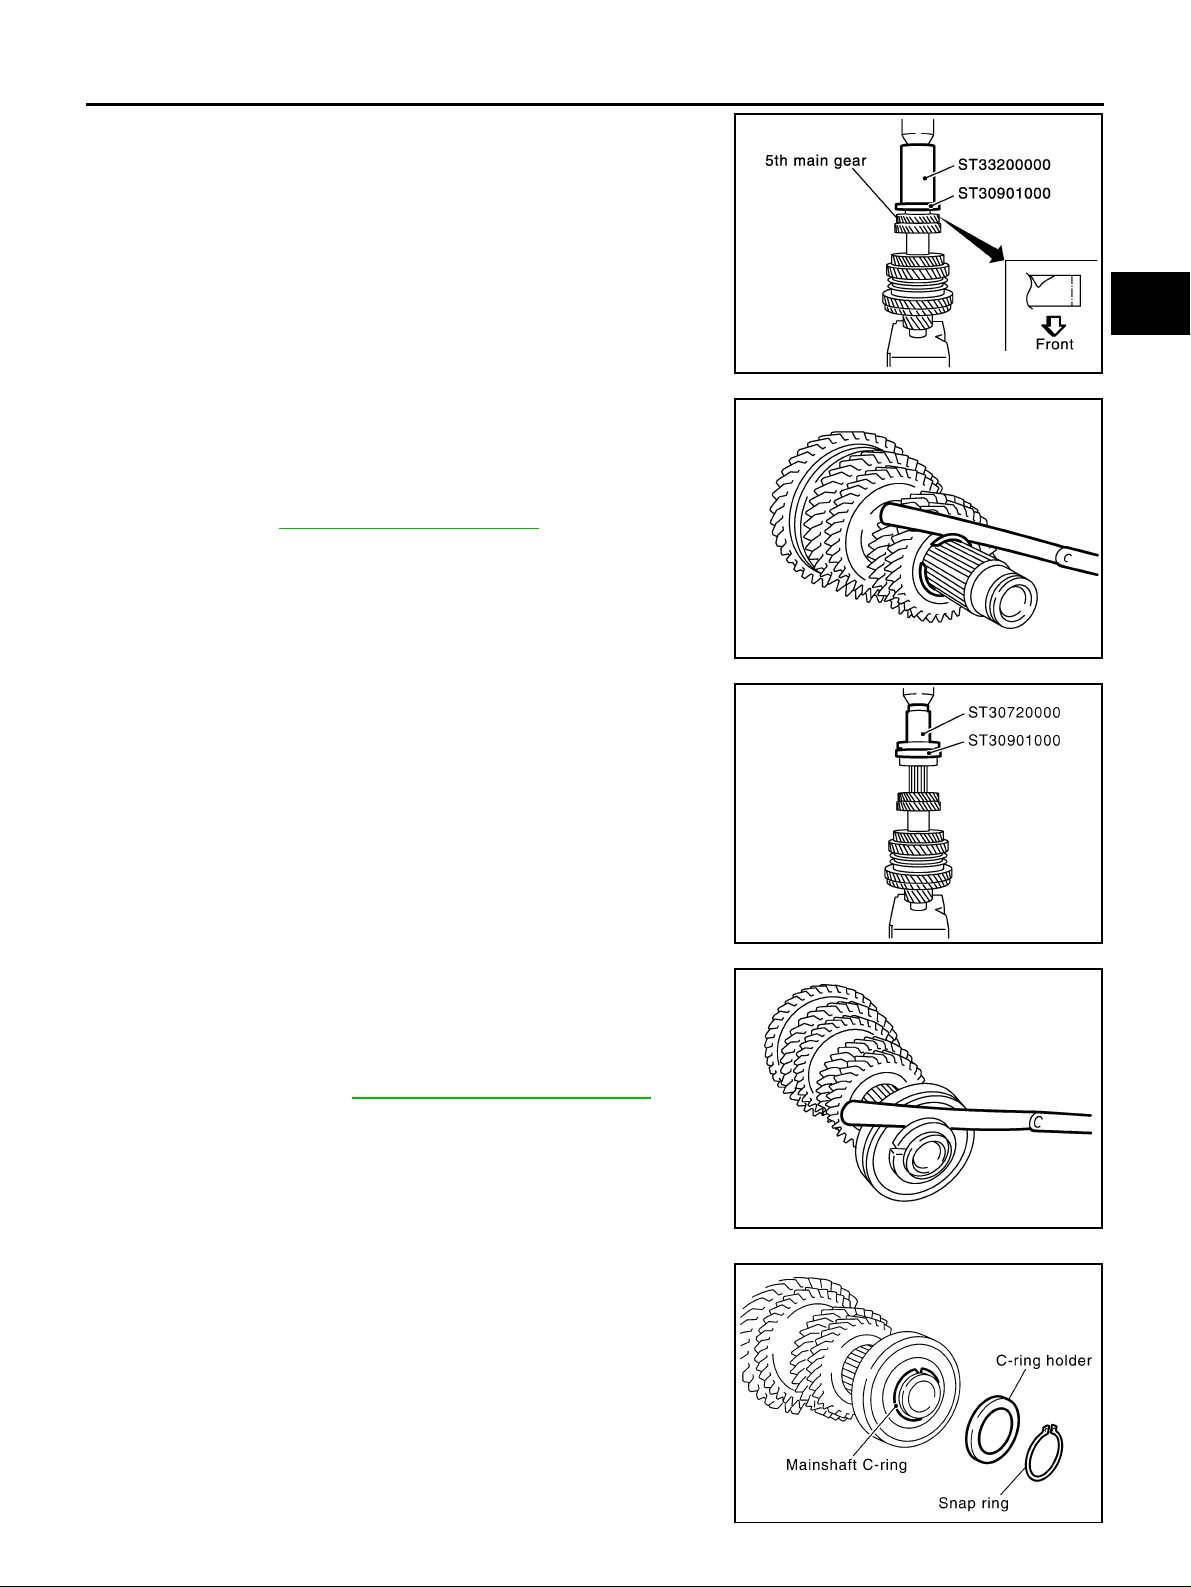
MAINSHAFT AND GEARS
13. Press in a new 5th main gear using the drifts.
CAUTION:
● Be careful with orientation of 5th main gear.
● Do not reuse 5th main gear.
14. Ins tall snap ring ont o mainshaft, and check that en d play of 5th
main gear satisfies the standard value.
End play standard value : 0 - 0.1 mm (0 - 0.004 in)
● If measurement is outside the standard range, reselect snap
ring. Refer to MT-100, "
5TH MAIN GEAR" .
A
B
MT
SCIA0946E
D
E
F
G
SCIA0947E
15. Press in mainshaft rear bearing using the drifts.
16. Ins tall main shaf t C-ring onto m ains haft, an d che ck tha t end pl ay
of mainshaft rear bearing satisfies the standard value.
End play standar d value : 0 - 0. 06 mm (0 - 0.00 24 i n)
● If measurement is outside the standard range, reselect main-
shaft C-ring. Refer to MT-100, "
MAINSHAFT C-RING" .
17. Install C-ring holder, and then install a new snap ring.
CAUTION:
Do not reuse snap ring.
SCIA0948E
SCIA0949E
H
I
J
K
L
M
PCIB0802E
MT-75
Page 76
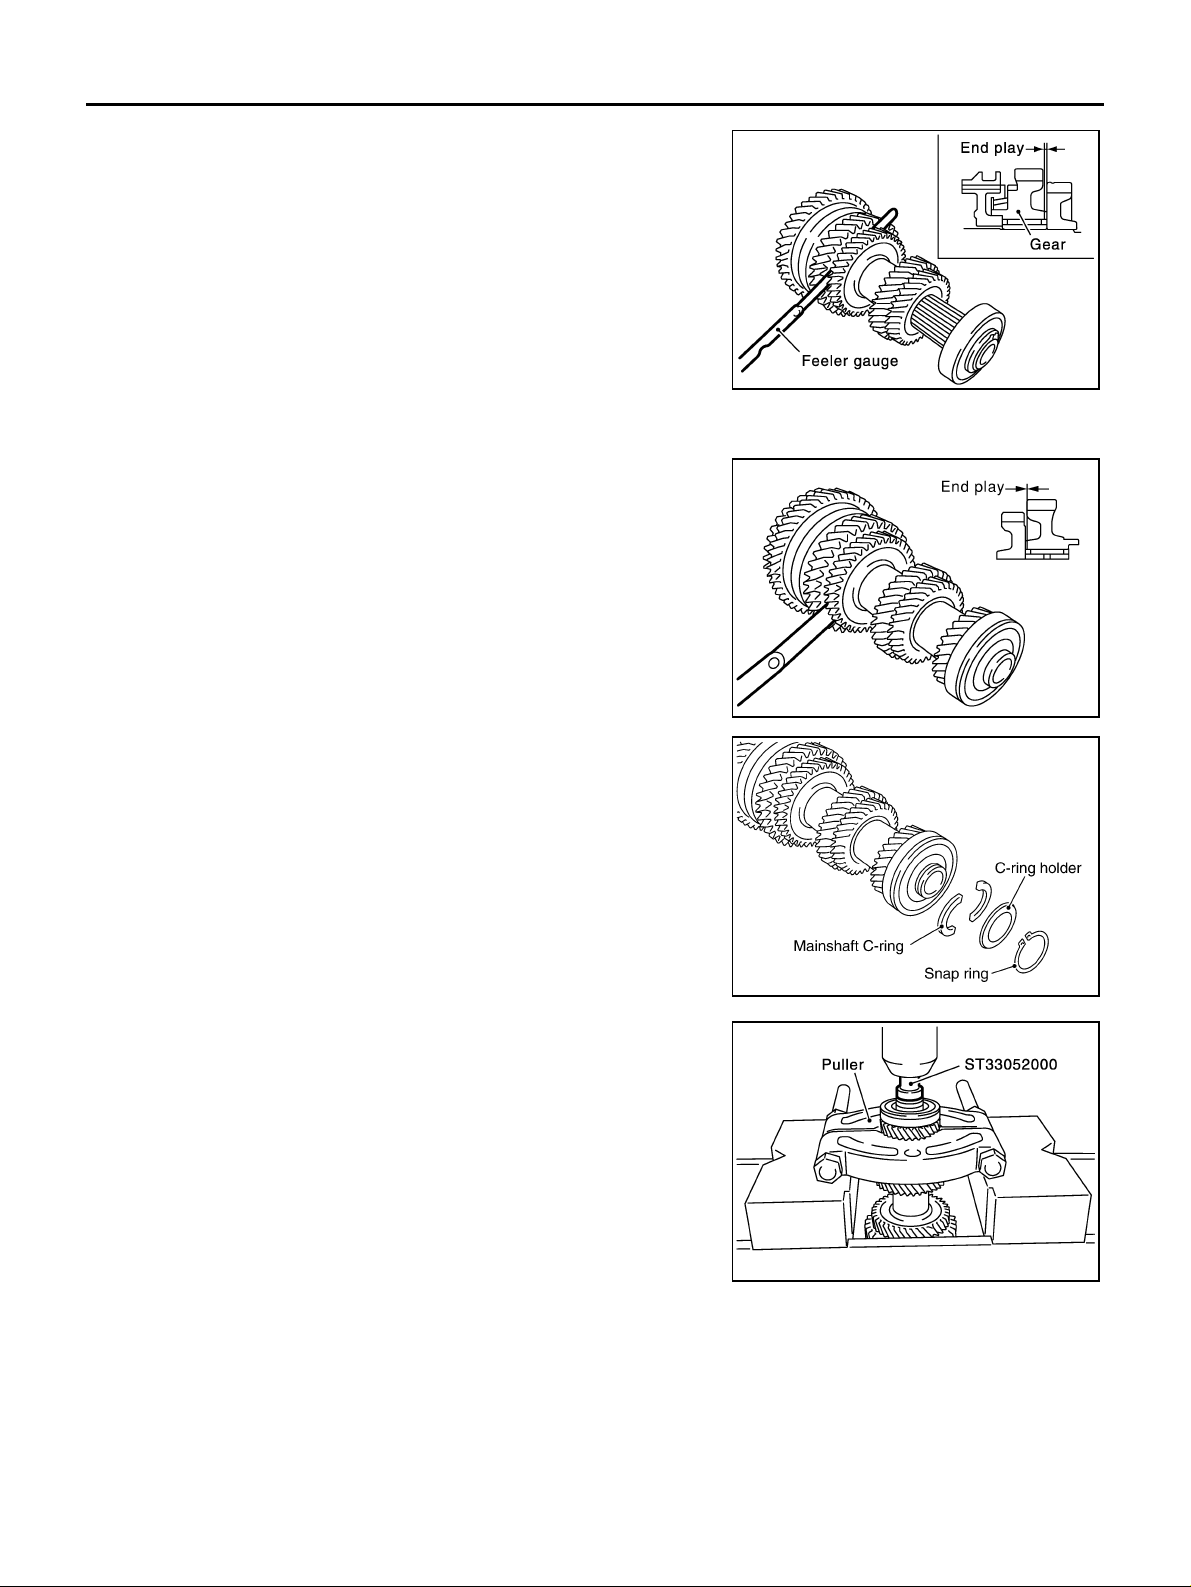
MAINSHAFT AND GEARS
18. Check end play of 1st and 2nd main gears.
End play standard value
1st main gear : 0.20 - 0.30 mm (0.0079 - 0.0118 in)
2nd main gear : 0.06 - 0.16 mm (0.0024 - 0.0063 in)
SCIA0933E
Assembly and Disassembly (RS6F51A) ECS008C7
DISASSEMBLY
1. Before disassembling, measure the end play of 1st and 2nd
main gears.
End play standard value
1st main gea r : 0.20 - 0.30 mm (0.0079 - 0.01 18 in)
2nd main gear : 0.06 - 0.16 mm (0.0024 - 0.0063 in)
2. Remove snap ring.
3. Remove C-ring holder, and then remove mainshaft C-ring.
4. Press out mainshaft rear bearing, 6th main adjusting shim and
6th main gear using the drift and a puller.
5. Remove 5th-6th mainshaft spacer.
SCIA0973E
PCIB0805E
SCIA0976E
MT-76
Page 77
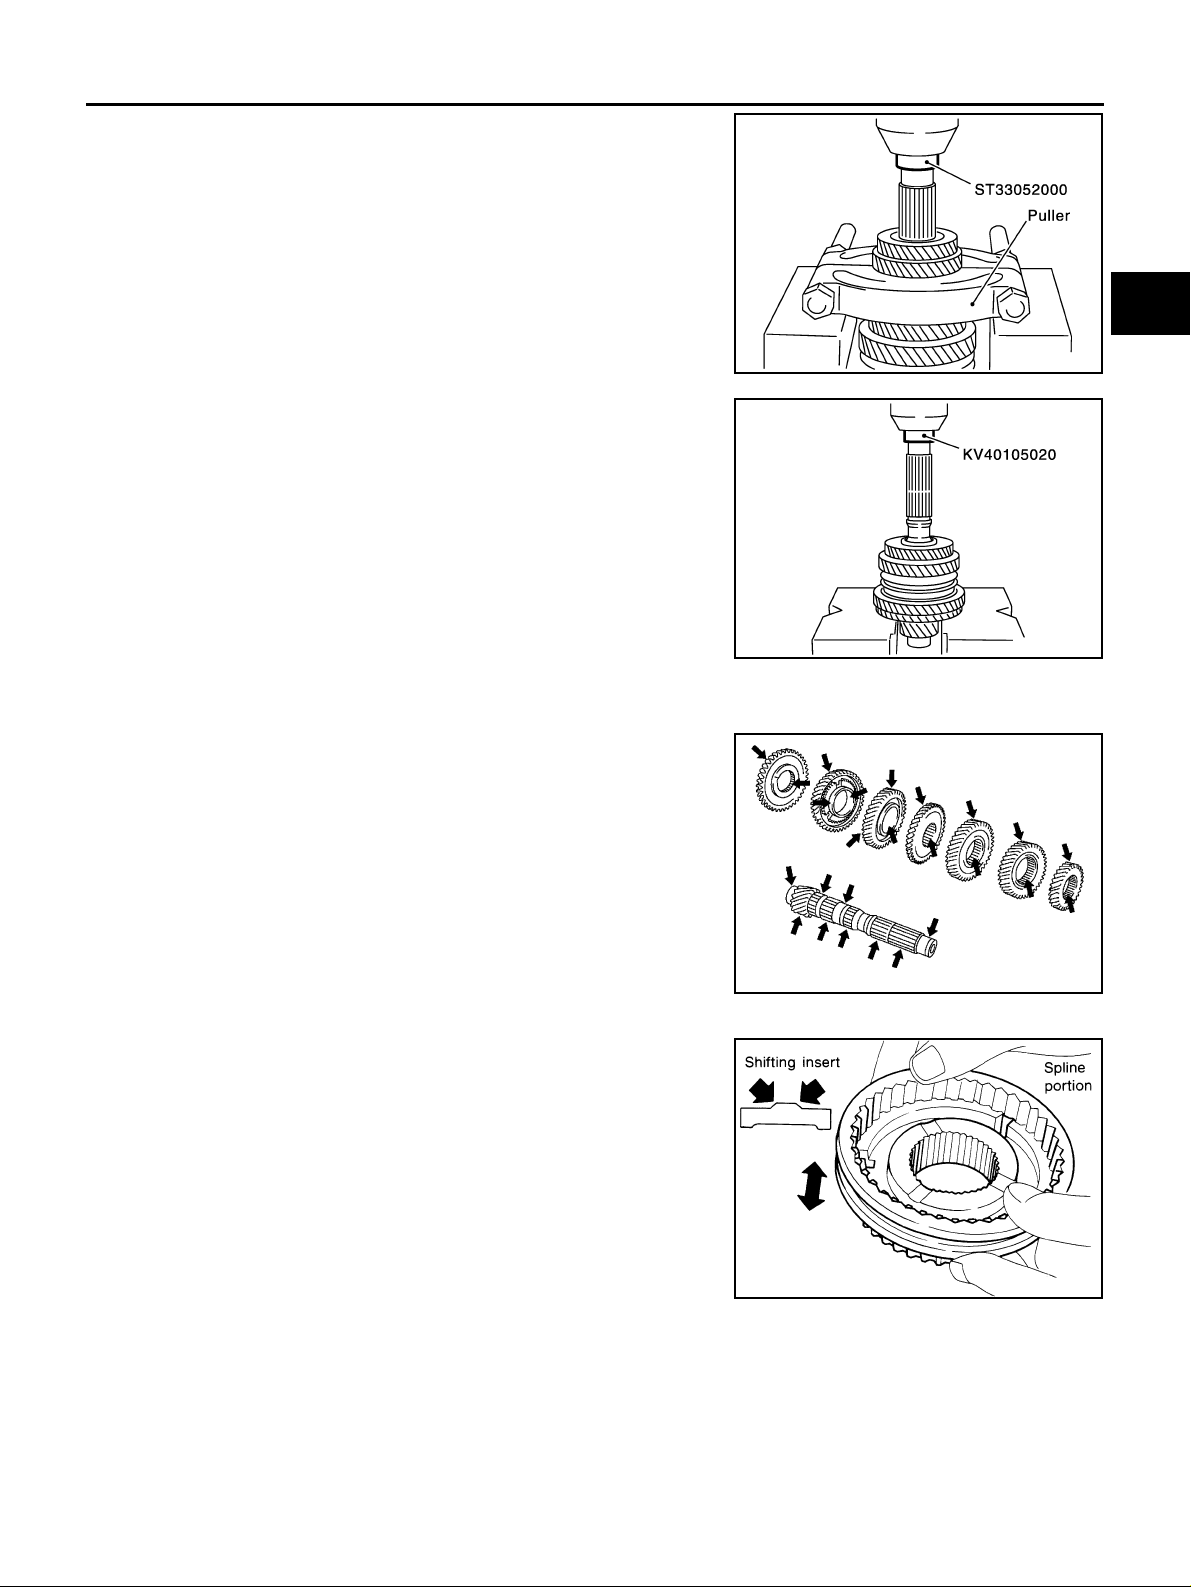
MAINSHAFT AND GEARS
6. Press ou t 4 th ma in ge ar an d 5th ma in g ear us ing the dr ift and a
puller.
7. Remove 4th main gear adjusting shim.
8. Remove 3rd-4th mainshaft spacer.
9. Press out 3rd main gear, 2nd main gear, 2nd needle bearing ,
2nd main gear bushing, 1st-2nd synchronizer hub assembly, 1st
main gear, 1st needle bearing, and 1st main gear bushing
reverse main gear using the drift.
A
B
MT
SCIA0937E
D
E
F
G
SCIA0938E
INSPECTION AFTER DISASSEMBLY
Mainshaft and Gears
Check items below. If necessary, replace them with new ones.
● Damage, peelin g, dent, uneven wear, bending, and other non-
standard conditions of the shaft.
● Excessive wear, damage, peeling, and other non-standard con-
ditions of the gears.
Synchronizer
Check items below. If necessary, replace them with new ones.
● Damage and unusual wear on contact surfaces of coupling
sleeve, synchronizer hub, and shifting insert.
● Coupling sleeve and synchronizer hub must move smoothly .
H
I
J
K
SCIA1076J
L
M
SMT387A
MT-77
Page 78
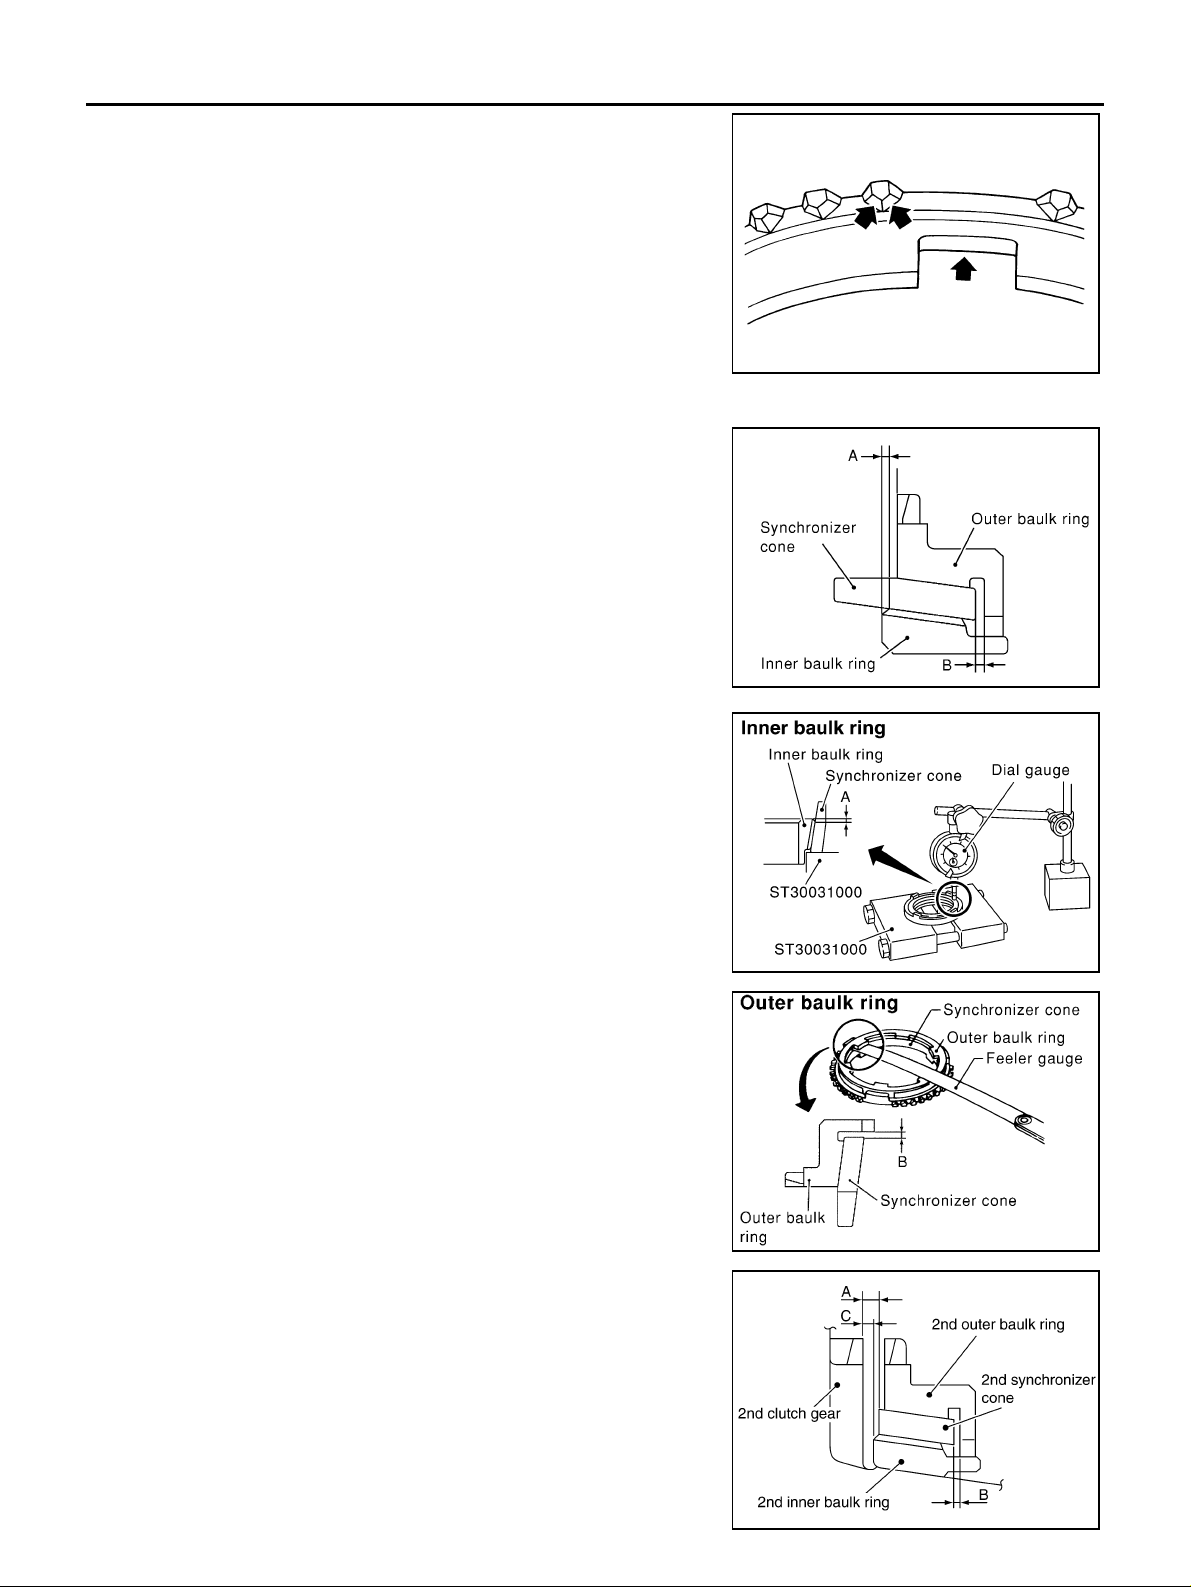
MAINSHAFT AND GEARS
● If any crack, damage, or exces sive wea r is f ou nd on cam fa ce of
baulk ring or working face of insert, replace it.
Baulk ring clearance
● Double cone synchronizer (1st)
Follow the instructions below and inspect the clearance of outer
baulk ring, synchronizer cone, inner baulk ring.
CAUTION:
Outer baulk ring, synchronizer cone, and inner baulk ring
control clearance s “A” an d “B” as a set . Repl ace the m as a
set if they are outside the limit value.
SMT867D
1. Measure clearance A at 2 or more points diagonally opposite
using a dial ga uge, and calculate mean value.
Clearance A
Standard value : 0.6 - 0.8 mm (0.024 - 0.031 in)
Limit value : 0.2 mm (0.008 in)
2. Measure clearance B at 2 or more points diagonally opposite
using a feeler gauge, and calculate mean value.
Clearance B
Standard value : 0.6 - 1.1 mm (0.024 - 0.043 in)
Limit value : 0.2 mm (0.008 in)
SCIA0950E
PCIB0818E
SCIA1084E
● Triple cone synchronizer (2nd)
Follow the instructions below and inspect the clearance of outer
baulk ring, synchronizer cone, inner baulk ring.
CAUTION:
Outer baulk ring, synchronizer cone and inner baulk ring
control clearanc es “ A ” , “B” and “C” as a set. Replace the m
as a set if they are outside the limit value.
MT-78
PCIB0603E
Page 79
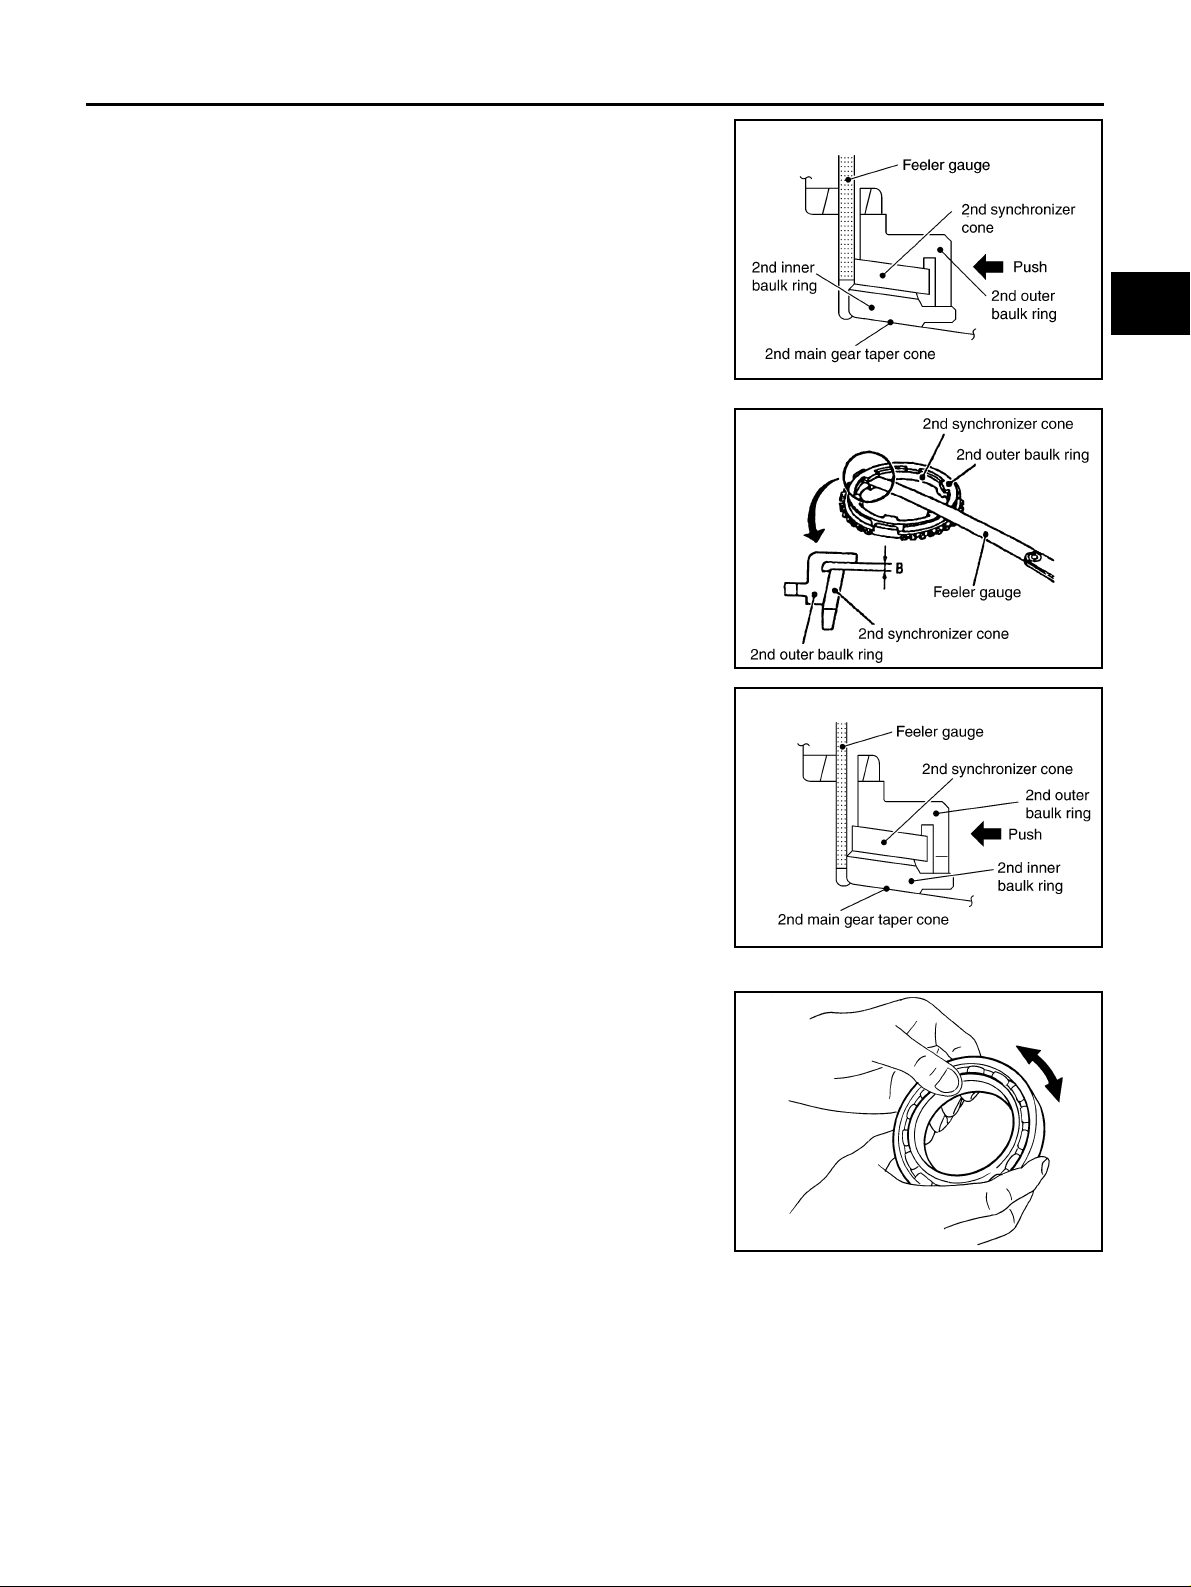
MAINSHAFT AND GEARS
1. Measure c learanc e “A” at 2 poi nts or more o n the op posite si de
using a feeler gauge when pressing baulk ring toward clutch
gear taper cone. Then calculate the average.
Clearance “A”
Standard value : 0.6 - 1.2 mm (0.024- 0.047)
Limit value : 0.3 mm (0.012 in)
2. Measure c learanc e “B” at 2 poi nts or more o n the op posite si de
using a feeler gauge. Then calculate the average.
Clearance “B”
Standard value : 0.6 - 1.1 mm (0.02 4 - 0.043)
Limit value : 0.2 mm (0.008 in)
3. Measure clearance “C” at 2 points or more on the opposite side
using a feeler gauge when pressing baulk ring toward clutch
gear taper cone. Then calculate the average.
A
B
MT
PCIB0808E
D
E
F
G
PCIB0605E
H
Clearance “C”
Standard value : 0.7 - 1.1 mm (0.028 - 0.043 in)
Limit value : 0.3 mm (0.012 in)
Bearing
Check items below. If necessary, replace them with new ones.
● Damage and rough rotation of bearing
PCIB0809E
MTF0041D
I
J
K
L
M
MT-79
Page 80
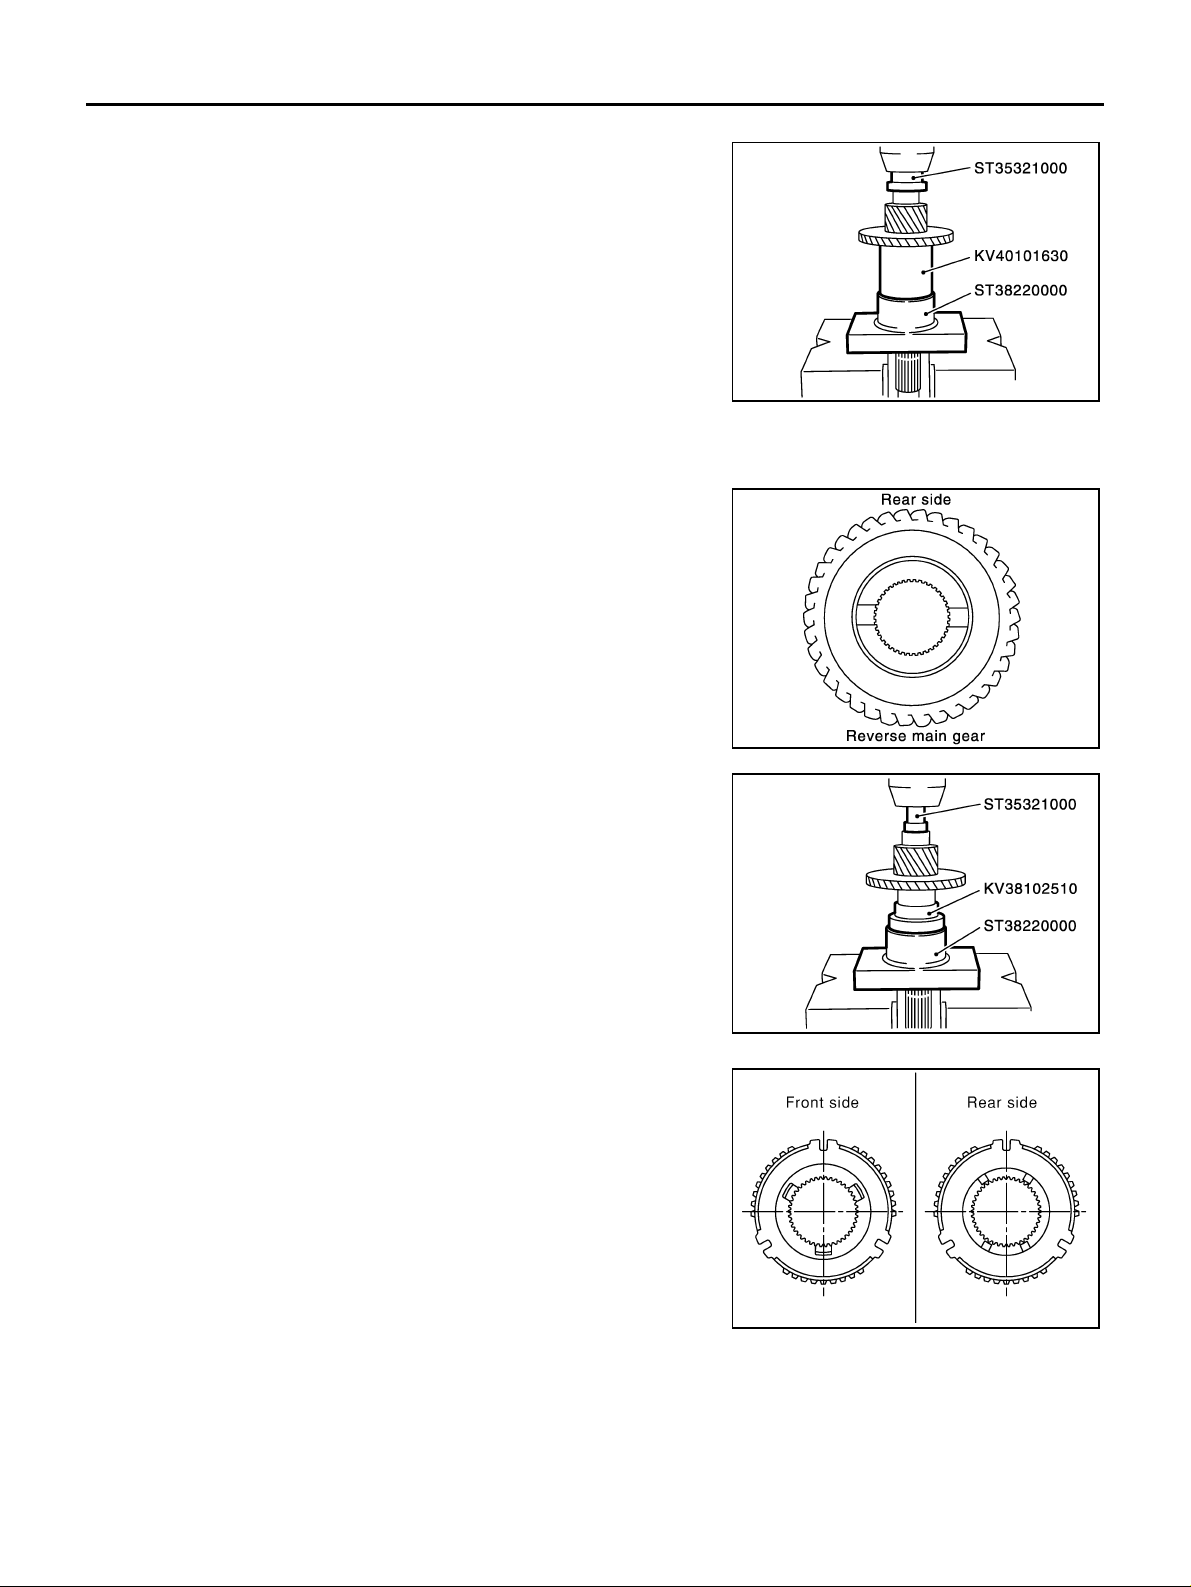
MAINSHAFT AND GEARS
ASSEMBLY
1. Press in reverse main gear using the drifts and the press stand.
CAUTION:
● Be careful with orientation of reverse main gear.
● Do not reuse reverse main gear.
SCIA0939E
2. Press in 1st main gear bushing using the drifts and the press
stand.
3. Install 1st needle be aring, and then 1st main gear.
4. Install 1st-2nd sp read spring, 1st-2nd s hifting insert and a new
1st-2nd synchronizer hub onto a new 1st-2nd coupling sleeve.
CAUTION:
● Be careful with orientation of 1st-2nd synchronizer hub.
● Do not reuse 1st-2nd synchronizer hub.
SCIA0992E
SCIA0940E
SCIA0921E
MT-80
Page 81
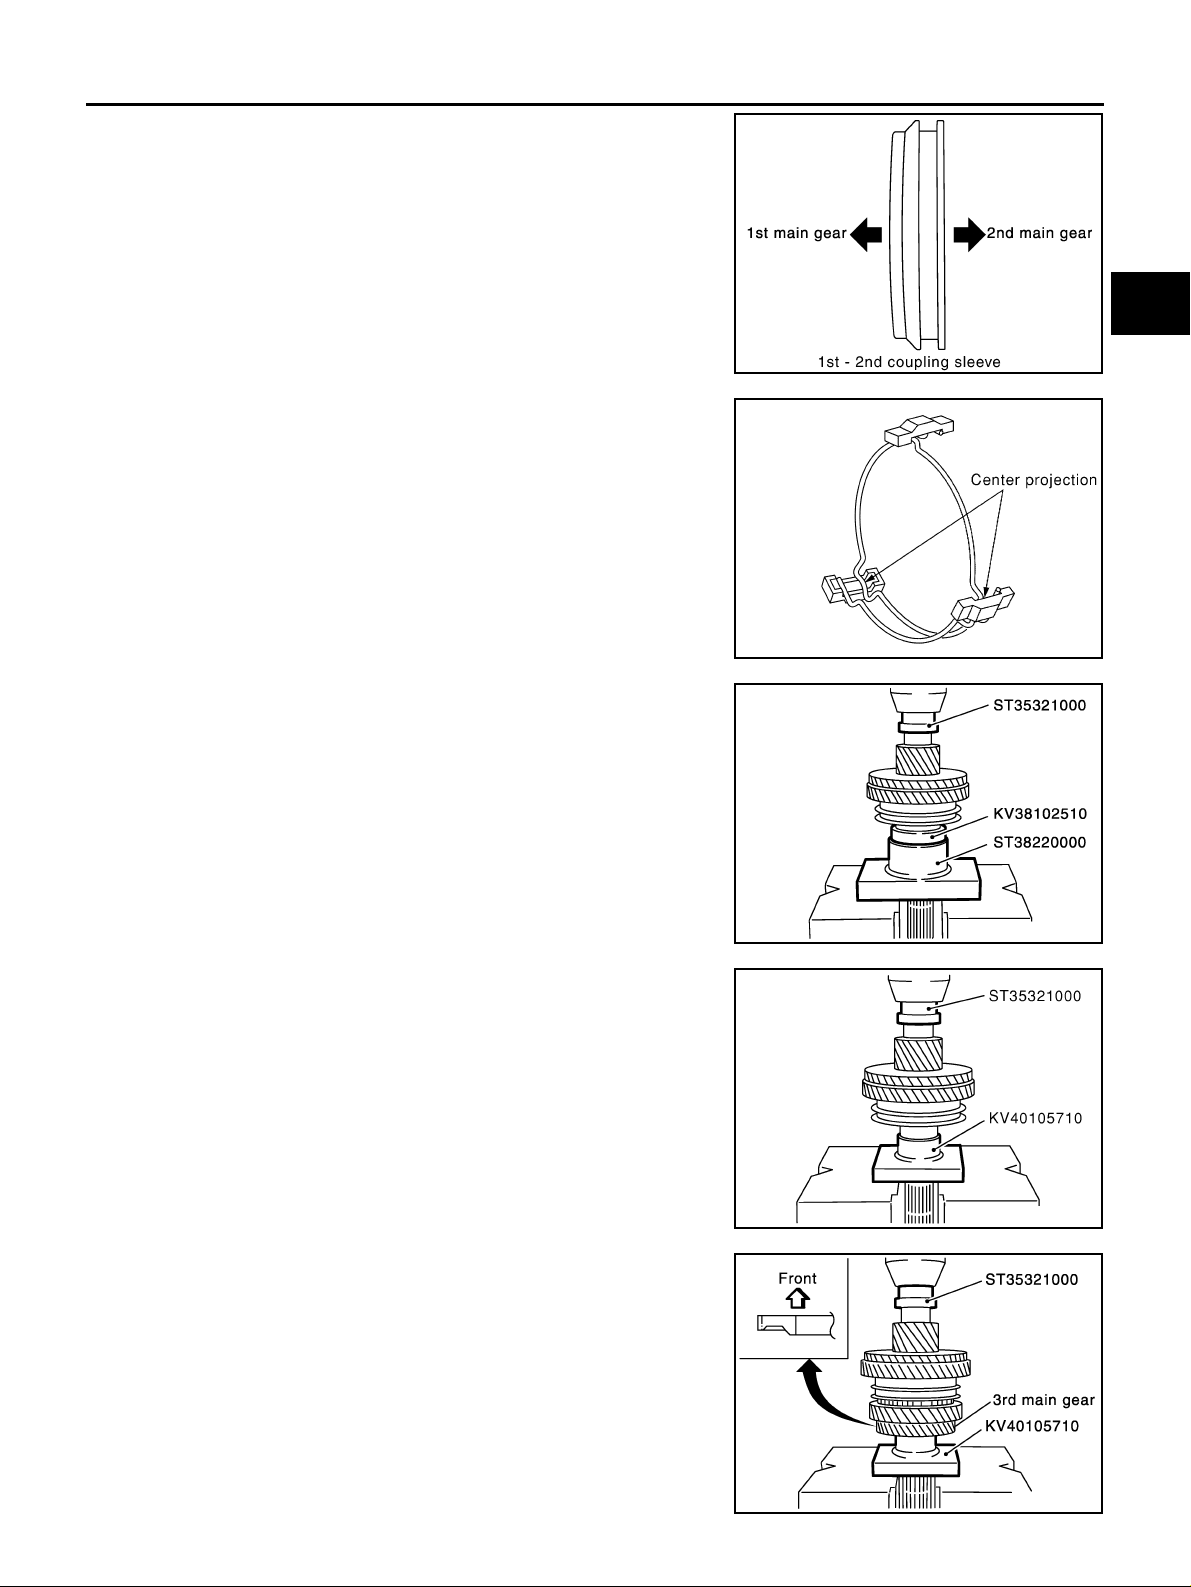
MAINSHAFT AND GEARS
● Be careful with orientation of 1st-2nd coupling sleeve.
● Do not reuse 1st-2nd coupling sleeve.
● Be sure not to hook center projection of 2 spread springs
on same 1st-2nd shifting insert.
A
B
MT
PCIB0803E
D
E
F
G
SCIA1083E
5. Install 1st inner baulk ring, 1st synchronizer cone, 1st outer
baulk ring onto mainshaft, and then press in 1st-2nd sync hronizer hub assembly onto mainshaft using the drifts and the press
stand.
CAUTION:
● Outer baulk ring, synchronizer cone, and inner baulk ring
on 2nd gear-side must have been removed.
● Be careful with orientation of coupling sleeve.
6. Press in 2nd main gear bushing using the drift and the press
stand.
7. Install 2nd outer baulk ring, 2nd synchronizer cone, and 2nd
inner baulk ring.
8. Install 2n d needle bearing and 2nd main gear.
9. Press in a new 3r d mai n gear u sing the dr ift a nd th e pr ess st and.
CAUTION:
● Be careful with orientation of 3rd main gear.
● Do not reuse 3rd main gear.
10. Install 3rd- 4th mainshaft spacer.
SCIA0941E
SCIA0942E
H
I
J
K
L
M
SCIA0943E
MT-81
Page 82
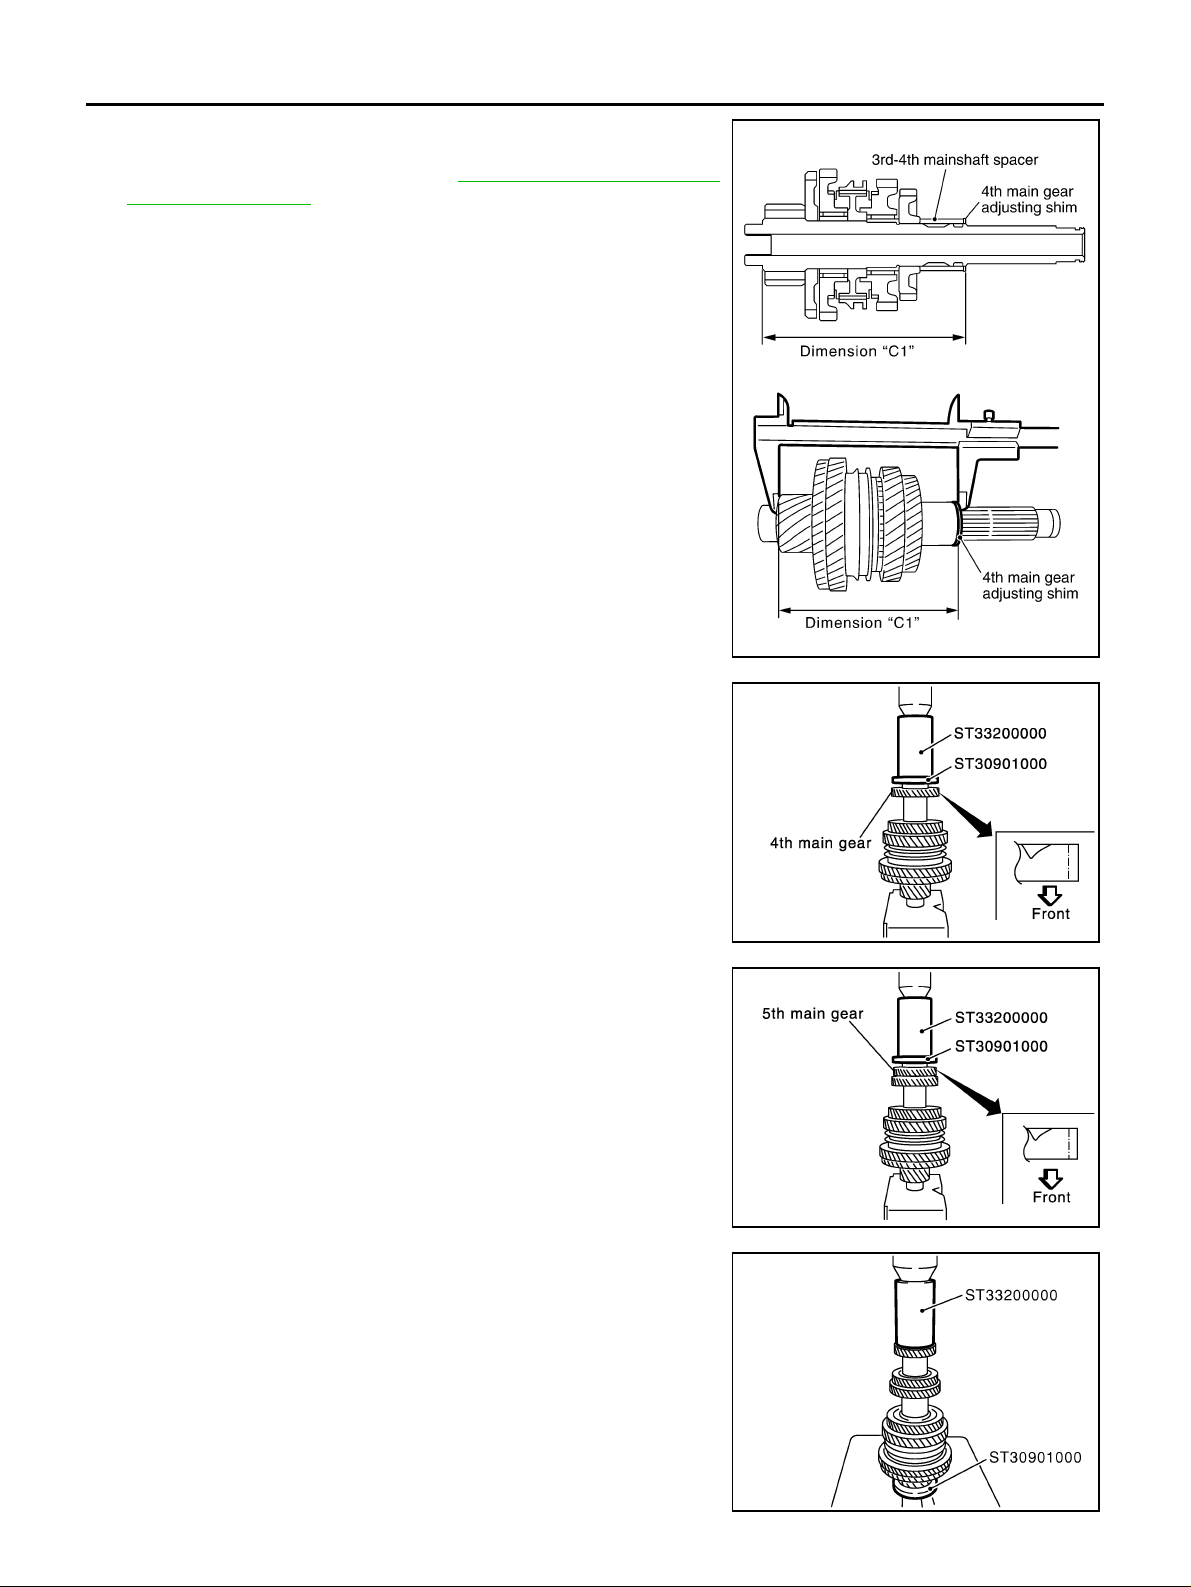
MAINSHAFT AND GEARS
11. Select 4th main g ear adjus ting shim so tha t di mens ion “C1 ” sa tisfies the standard value below, and install 4th main gear adjusting shim onto mainshaft. Refer to MT-101, "
ADJUSTING SHIM" .
Standard value for dime nsion C1
: 173.85 - 173.95 mm (6.844 - 6.848 in)
CAUTION:
Only one adjusting shim can be selected.
4TH MAIN GEAR
12. Press in a new 4th main gear using the drifts.
CAUTION:
● Be careful with orientation of 4th main gear.
● Do not reuse 4th main gear.
13. Press in a new 5th main gear using the drifts.
CAUTION:
● Be careful with orientation of 5th main gear.
● Do not reuse 5th main gear.
14. Install 5th-6th mainshaft spacer.
PCIB0804E
SCIA0945E
SCIA0946E
15. Press in 6th main gear using the drifts.
CAUTION:
Do not reuse 6th main gear.
SCIA0977E
MT-82
Page 83
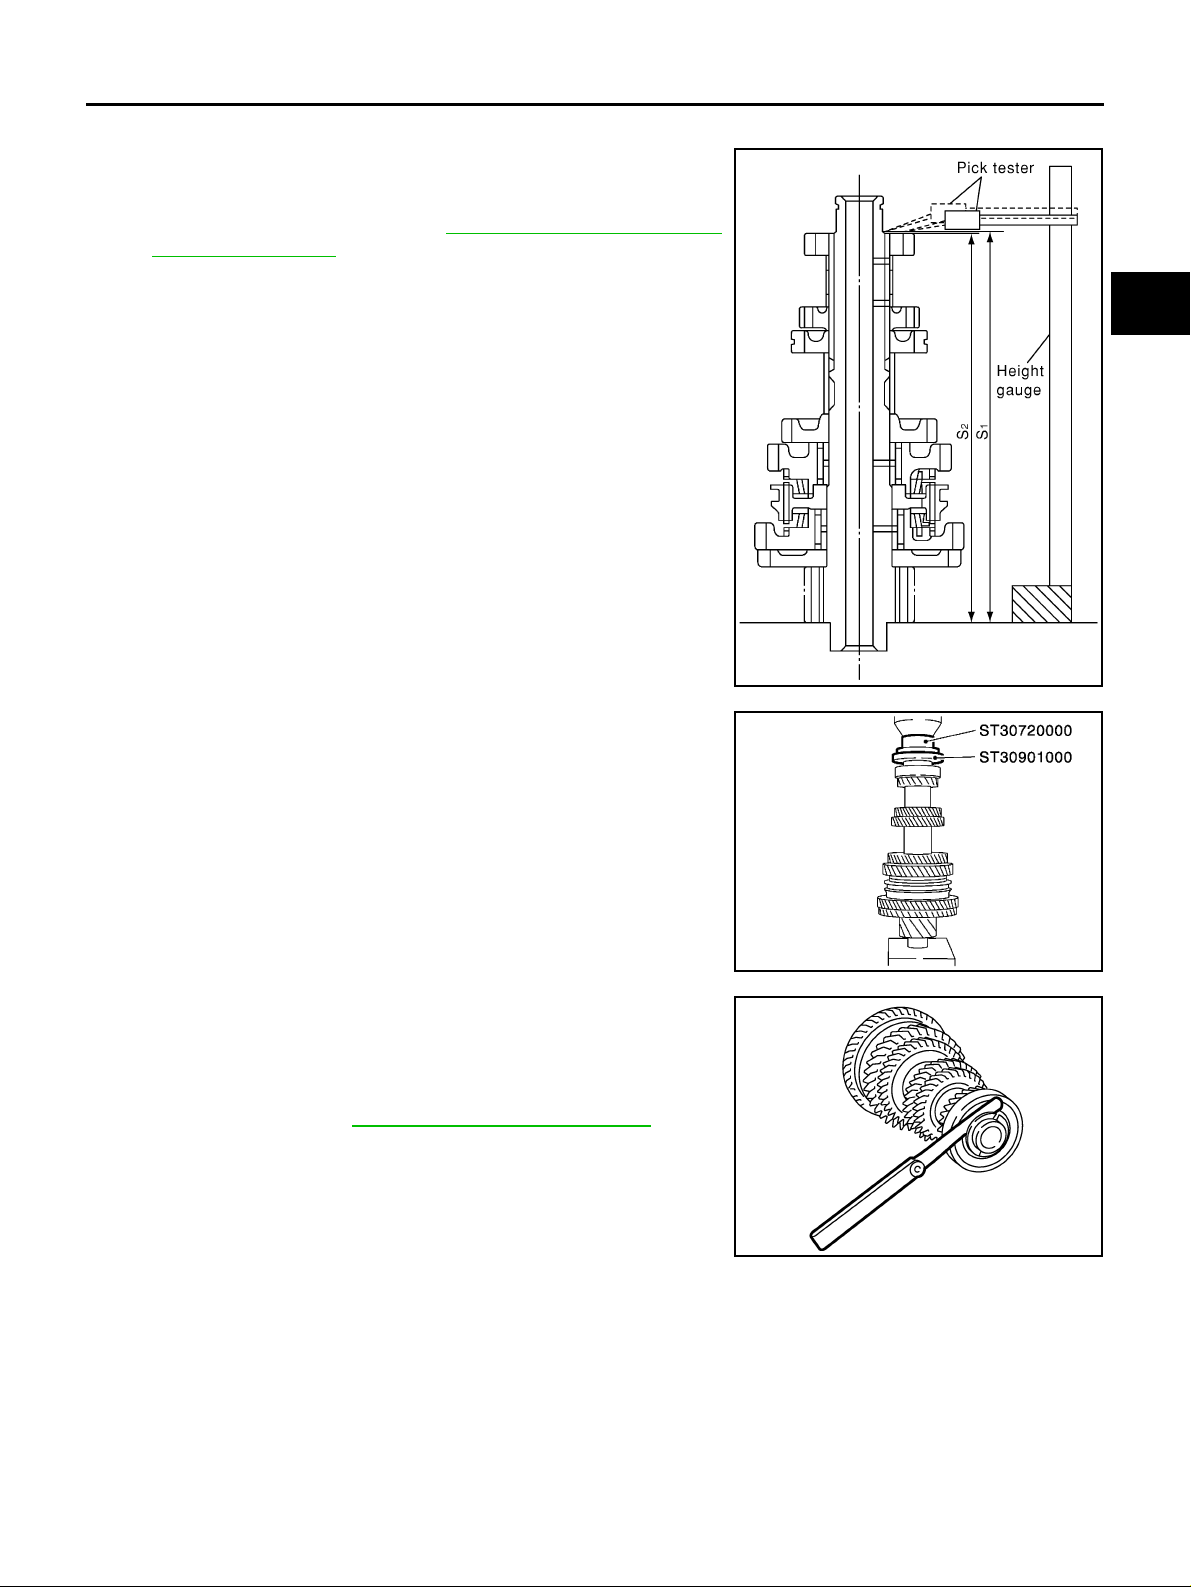
MAINSHAFT AND GEARS
16. Select 6th main adjusting shim and then install it onto mainshaft.
● Calculate thickness “S” of 6th main adjusting shim following
the procedure be low so that end pl ay dime nsion b etween 6th
main gear and mainshaft rear bearing becomes the dimension shown below. Refer to MT-102, "
6TH MAIN GEAR
ADJUSTING SHIM" .
End play: 0 - 0.1 mm (0 - 0.004 in)
Dimension“S” = (S
1 - S2 ) - End play
S: Thickne ss of adjus t ing sh im
1 : Dimension from mainshaft standard face to
S
mainshaft rear bearing press-fit end face
2 : Dimension from mainshaft standard face to
S
6th main gear end face
CAUTION:
Only one adjusting shim can be selected.
a. Using heig ht ga ug e, me as ure dimension “S
1 ” and “S2 ”.
b. Install selected 6th main adjusting s him to mainshaft.
17. Press in mainshaft rear bearing using the drifts.
A
B
MT
D
E
F
G
SCIA0995E
H
18. Ins tall main shaf t C-ring onto m ains haft, an d che ck tha t end pl ay
of mainshaft rear bearing satisfies the standard value.
End play standar d value : 0 - 0.06 mm (0 - 0.0024 in)
● If measurement is outside the standard range, reselect main-
shaft C-ring. Refer to MT-100, "
MAINSHAFT C-RING" .
I
J
K
SCIA0978E
L
M
SCIA0979E
MT-83
Page 84
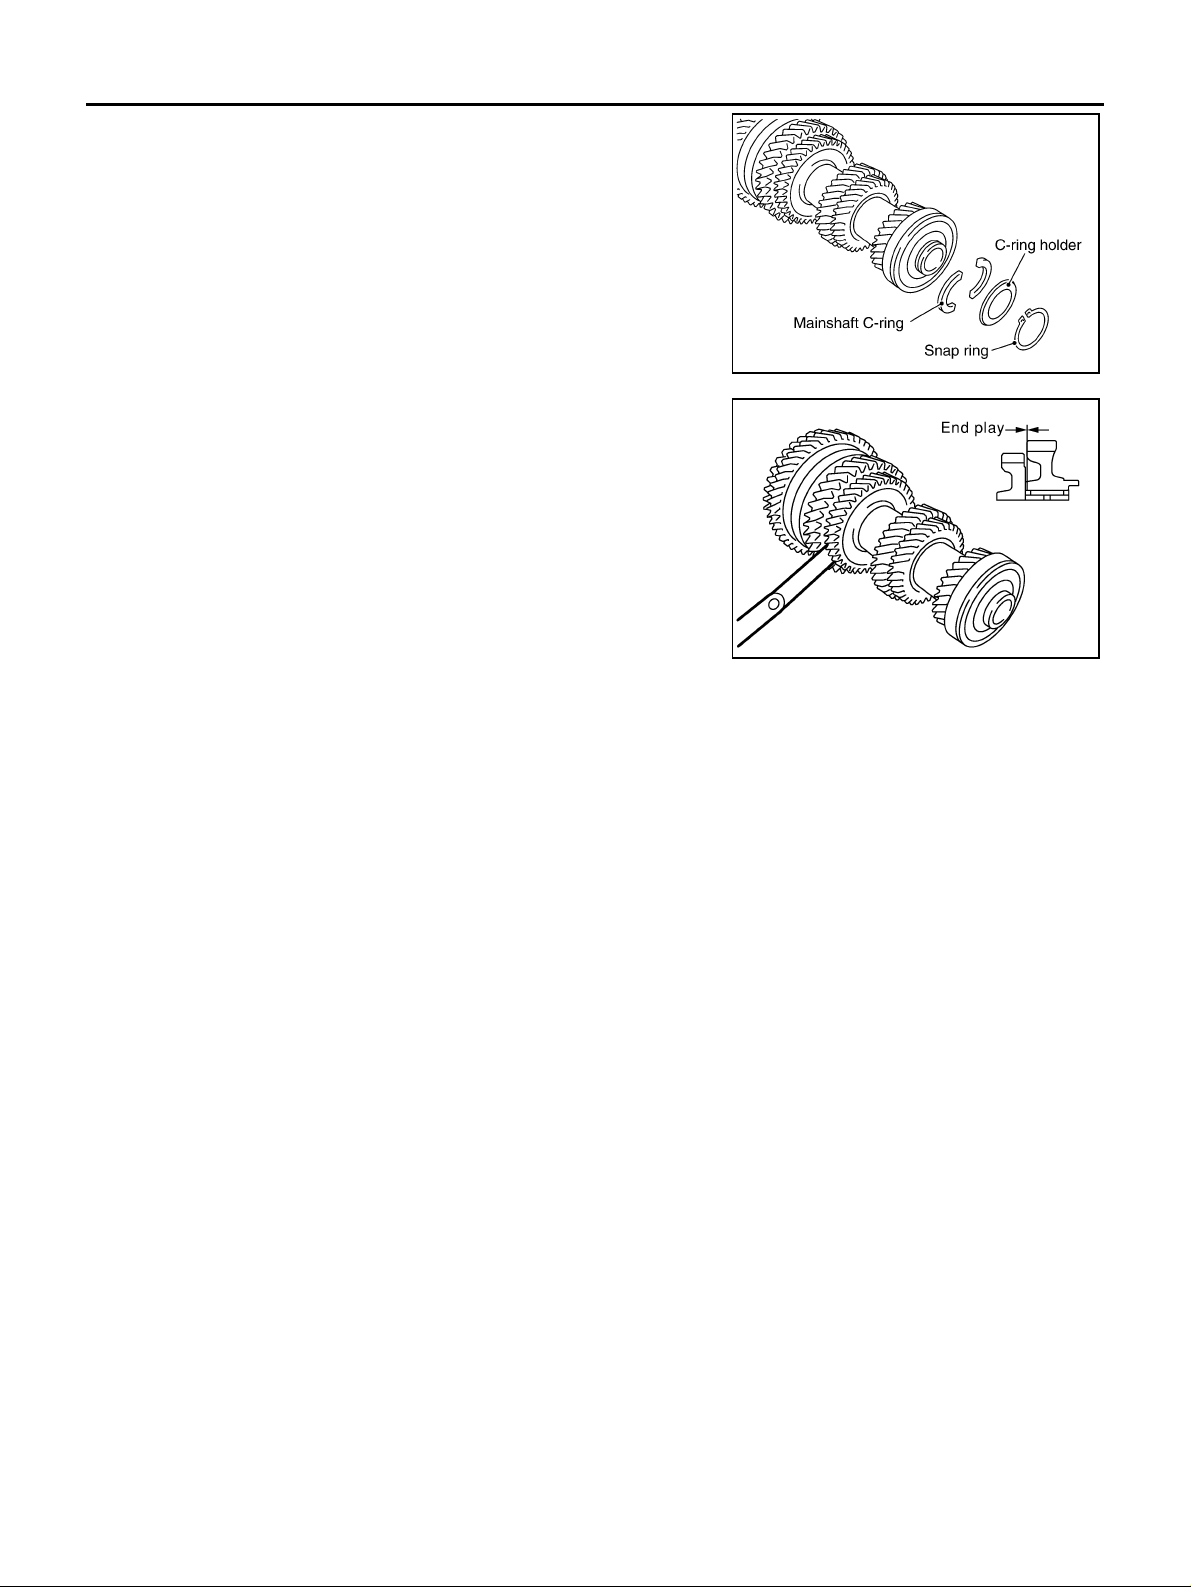
MAINSHAFT AND GEARS
19. Install C-ring holder, and then install a new snap ring.
CAUTION:
Do not reuse snap ring.
20. Check end play of 1st and 2nd main gears.
End play standard value
1st main gear : 0.20 - 0.30 mm (0.0079 - 0.0118 in)
2nd main gear : 0.06 - 0.16 mm (0.0024 - 0.0063 in)
PCIB0805E
SCIA0973E
MT-84
Page 85
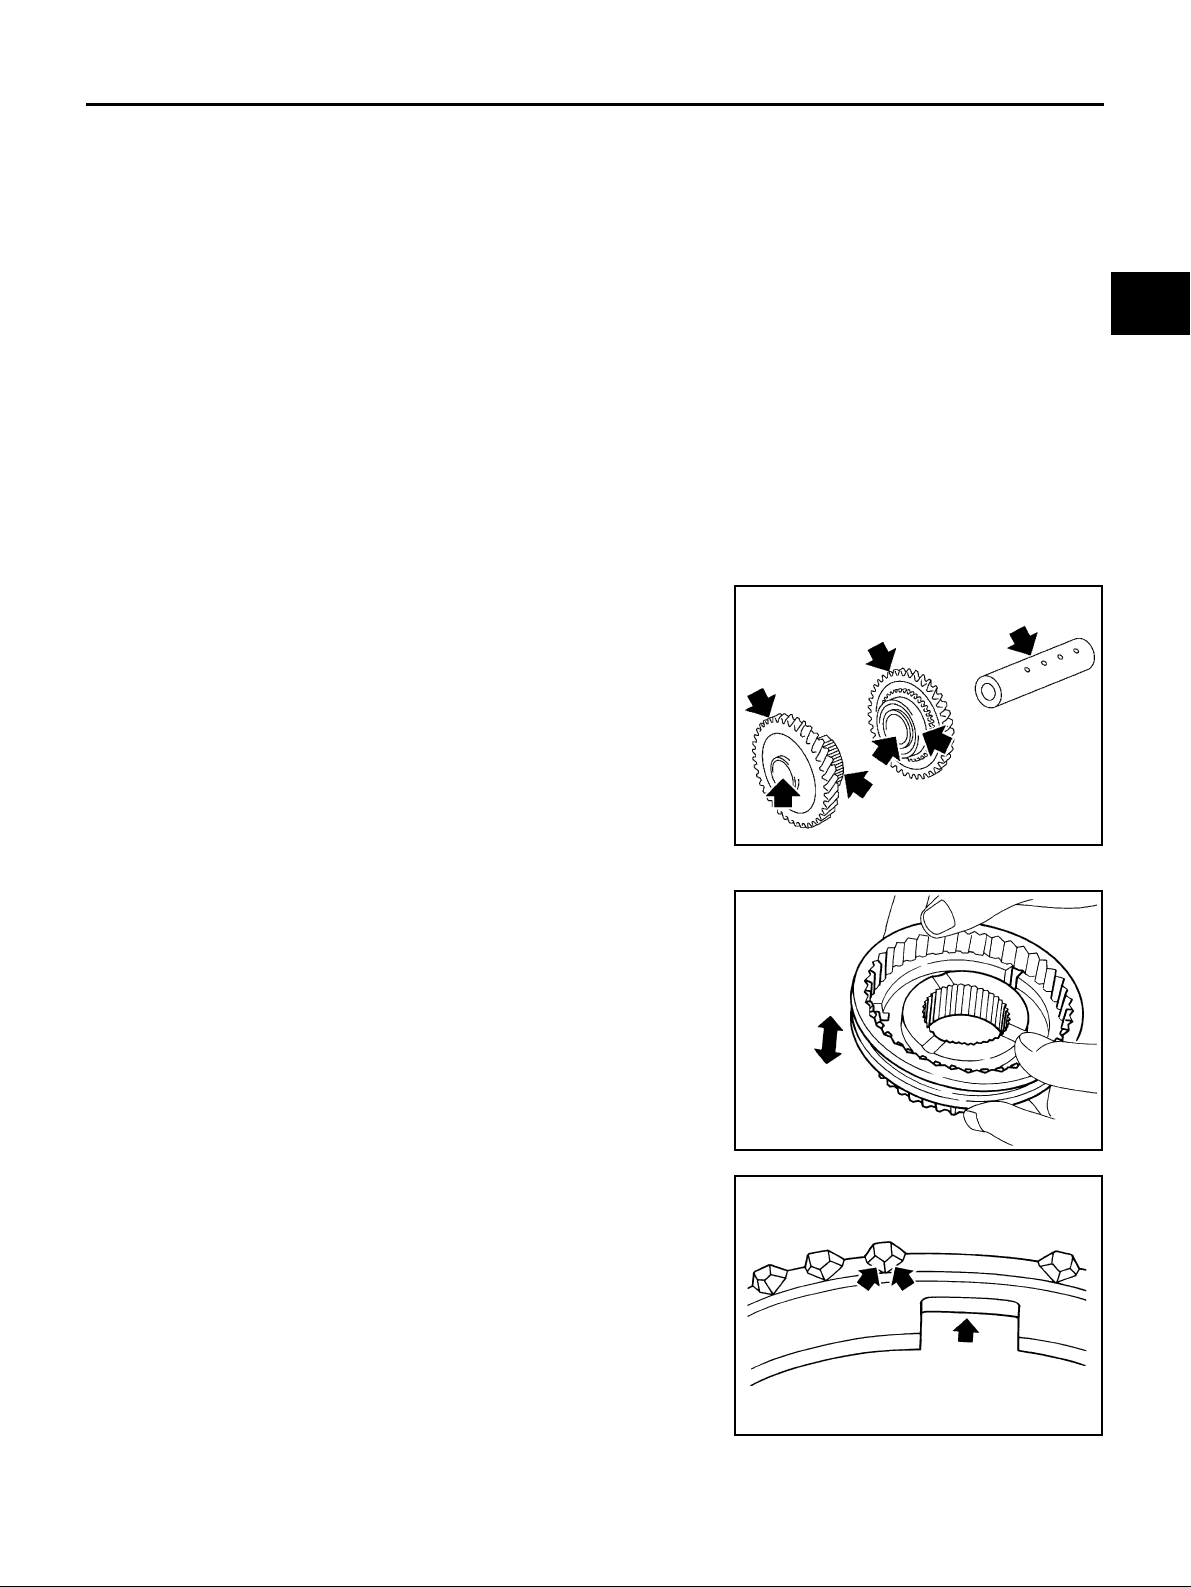
REVERSE IDLER SHAFT AND GEARS
REVERSE IDLER SHAFT AND GEARS PFP:32281
Assembly and Disassembly (RS5F51A) ECS008C8
DISASSEMBLY
1. Remove reverse idler gear adjusting shim.
2. Remove reverse idler gear (rear), reverse coupling sleeve and reverse insert spring simultaneously.
3. Remove revers e idl er ge ar nee dl e be arin g.
4. Remove thrust needle bearing.
5. Remove reverse baulk ring.
6. Remove reverse idler gear (fron t).
7. Remove revers e idl er ge ar nee dl e be arin g.
8. Remove thrust needle bearing.
9. Remove retaining pin from reverse idler shaft.
CAUTION:
Do not reuse retaining pin.
A
B
MT
D
E
INSPECTION AFTER DISASSEMBLY
Reverse Idler Shaft and Gears
Check items below. If necessary, replace them with new ones.
● Damage, peelin g, dent, uneven wear, bending, and other non-
standard conditions of the shaft.
● Excessive wear, damage, peeling, and other non-standard con-
ditions of the gears.
Synchronizer
Check items below. If necessary, replace them with new ones.
● Damage and unu sual wear on co ntact surfaces of reverse cou-
pling sleeve, reverse synchronizer hub, and reverse insert
spring.
● Reverse coupling sleeve and reverse synchronizer hub must
move smoothly.
F
G
H
I
SCIA0953J
J
K
L
M
● If any crack, dam ag e, or ex ce ssiv e w ear is foun d o n ca m f ace of
reverse baulk ring or workin g fac e of in se rt, repl ac e it.
MT-85
SMT637A
SMT867D
Page 86
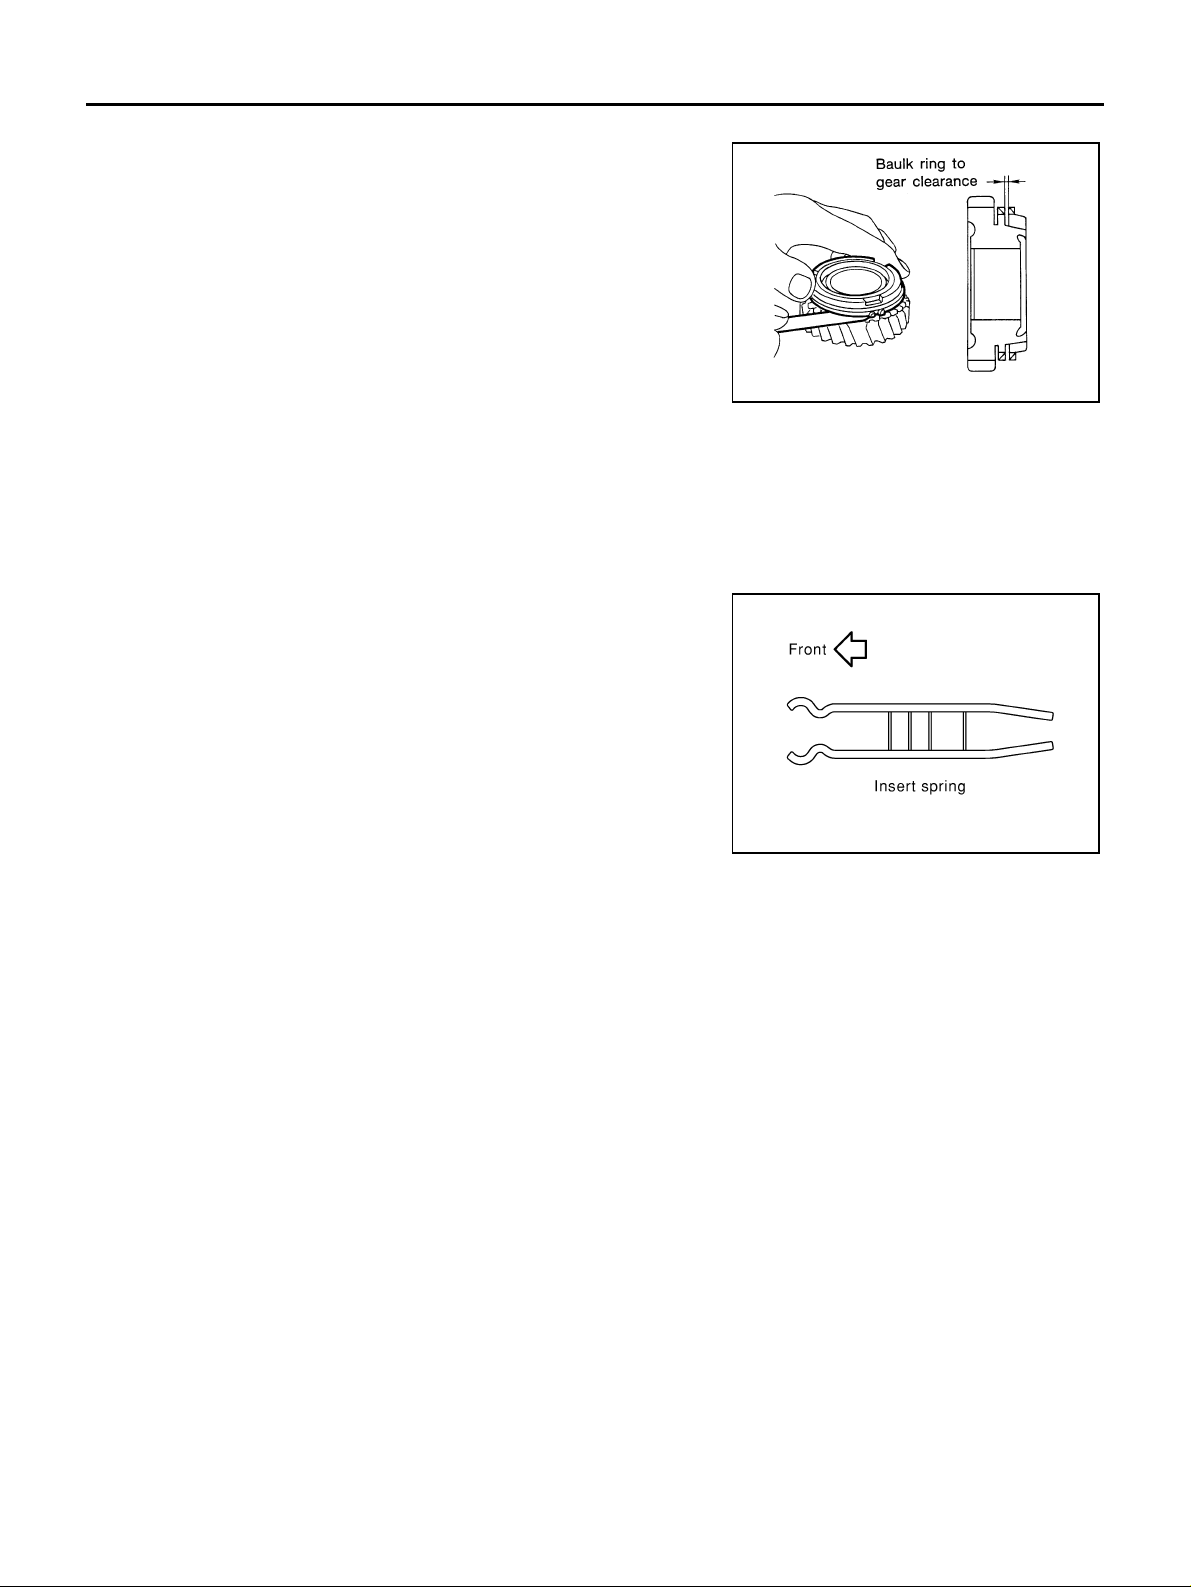
REVERSE IDLER SHAFT AND GEARS
Baulk ring clearance
● Push baulk ring on the cone, and measure the clearance
between baulk rin g and cone. If th e measurement i s be lo w li mi t,
replace it with a new one.
Clearance
Standard value : 0.95 - 1.4 mm (0.037 - 0.055 in)
Limit value : 0.7 mm (0.028 in)
Bearing
Check items belo w. If necessary, replace them with new ones.
● D am ag e an d roug h rotatio n of be ari ng .
ASSEMBLY
Paying attention to the following work, assemble in reverse order of disassembly.
CAUTION:
● Be careful with orientation of reverse insert spring.
SMT140
SCIA0954E
Assembly and Disassembly (RS6F51A) ECS008C9
DISASSEMBLY
1. Remove reverse idler gear adjusting shim.
2. Remove reverse idler gear (rear), reverse coupling sleeve and reverse insert spring simultaneously.
3. Remove reverse idler gear needle bearing.
4. Remove thrust needle bearing.
5. Remove reverse baulk ring.
6. Remove reverse idler gear (front).
7. Remove reverse idler gear needle bearing.
8. Remove thrust needle bearing.
9. Remove retaining pin fr om reverse idler shaft.
CAUTION:
Do not reuse retaining pin.
MT-86
Page 87
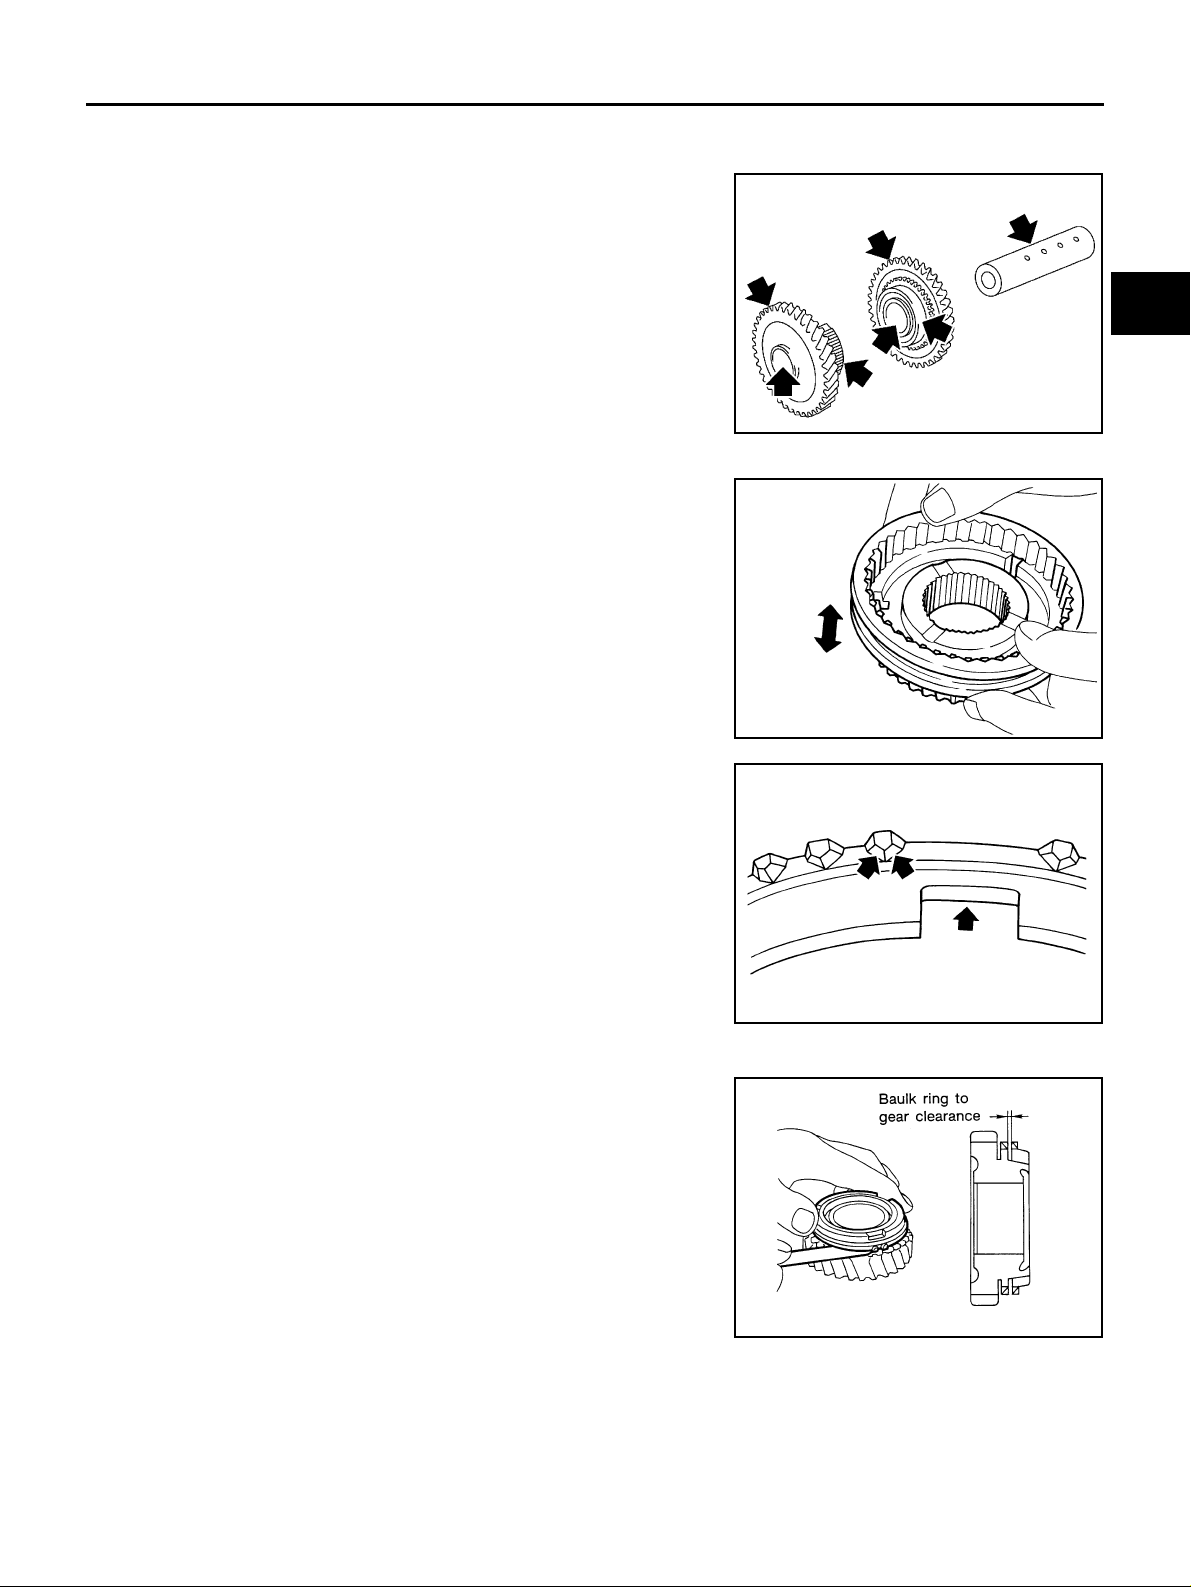
REVERSE IDLER SHAFT AND GEARS
INSPECTION AFTER DISASSEMBLY
Reverse Idler Shaft and Gears
Check items below. If necessary, replace them with new ones.
● Damage, peelin g, dent, uneven wear, bending, and other non-
standard conditions of the shaft.
● Excessive wear, damage, peeling, and other non-standard con-
ditions of the gears.
A
B
MT
D
SCIA0953J
Synchronizer
Check items below. If necessary, replace them with new ones.
● Damage and unu sual wear on co ntact surfaces of reverse cou-
pling sleeve, reverse synchronizer hub, and reverse insert
spring.
● Reverse coupling sleeve and reverse synchronizer hub must
move smoothly.
● If any crack, dam ag e, or ex ce ssiv e w ear is foun d o n ca m f ace of
reverse baulk ring or workin g fac e of in se rt, repl ac e it.
SMT637A
SMT867D
E
F
G
H
I
J
K
L
Baulk ring clearance
● Push baulk ring on the cone, and measure the clearance
between baulk ring and cone. If the measurement is below limit,
replace it with a new one.
Clearance
Standard value : 0.95 - 1.4 mm (0.037 - 0.055 in)
Limit value : 0.7 mm (0.028 in)
Bearing
Check items below. If necessary, replace them with new ones.
● Damage and rough rotation of bearing .
ASSEMBLY
Paying attention to the following work, assemble in reverse order of disassembly.
MT-87
M
SMT140
Page 88
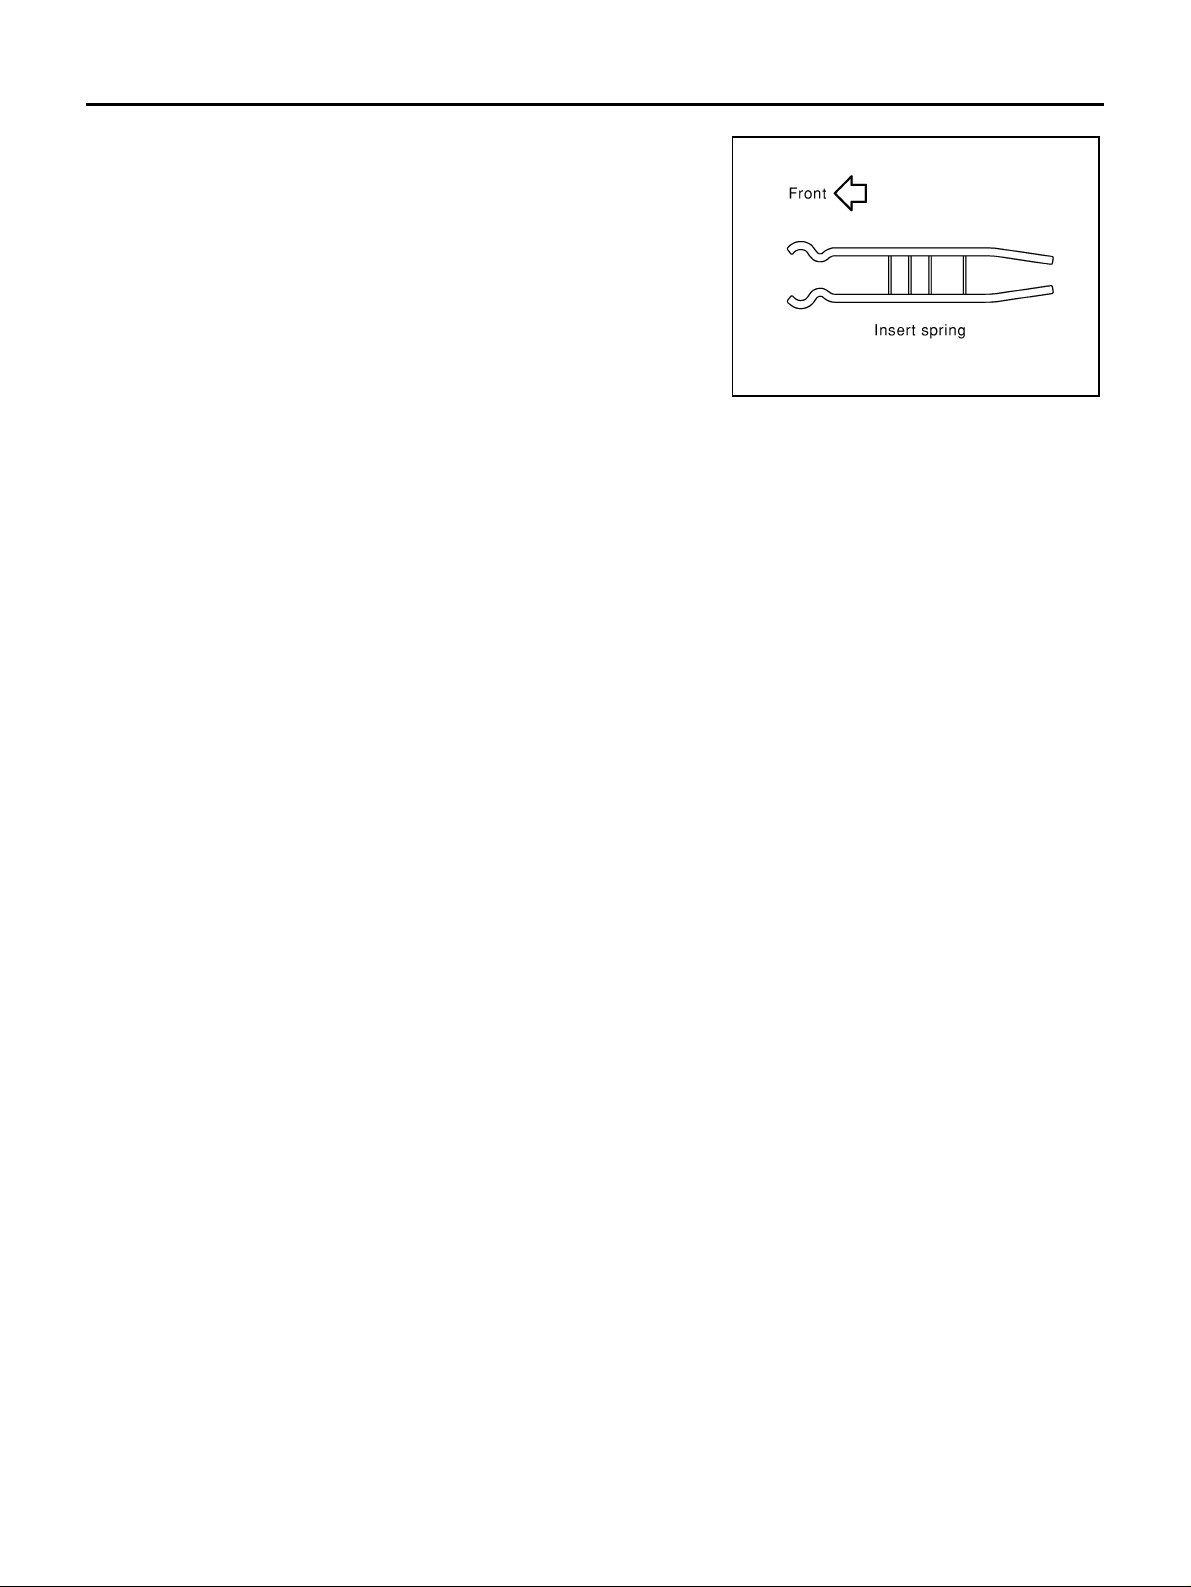
REVERSE IDLER SHAFT AND GEARS
CAUTION:
● Be careful with orientation of reverse insert spring.
SCIA0954E
MT-88
Page 89
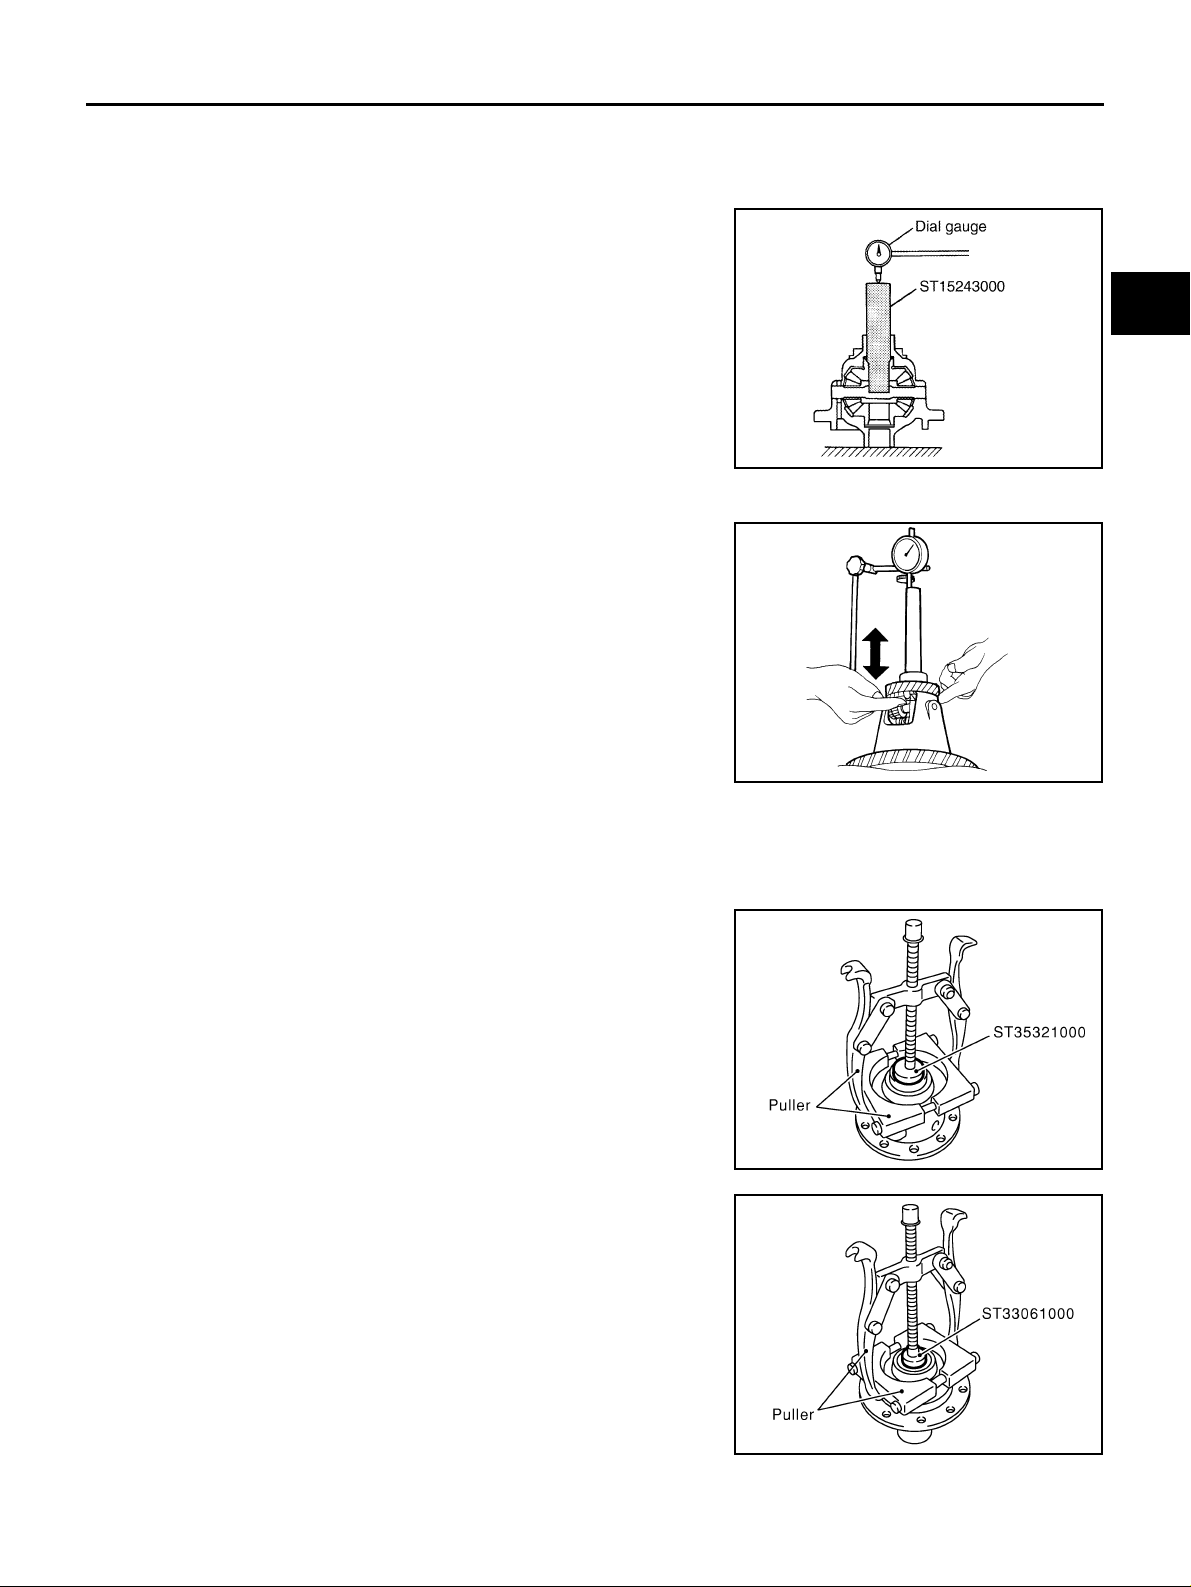
FINAL DRIVE
FINAL DRIVE PFP:38411
Assembly and Disassembly (RS5F51A) ECS008CA
PRE-INSPECTION
● Check the cle aranc e be tween si de ge ar an d differ entia l case as
follows.
1. Clean final drive assembly sufficiently to prevent side gear thrust
washer, differential ca se, s i de ge ar, and other parts from stick ing
by gear oil.
A
B
MT
D
2. Upright differential case so that side gear to be measured faces upward.
3. Place the drift below and a dial gauge onto side gear. Move side
gear up and down, and measure the clearance.
Clearance between side gear and differential case
: 0.1 - 0.2 mm (0. 004 - 0.008 in)
CAUTION:
There should be no resistance and gears should rotate
freely.
4. If not wi thin s peci fica tion, a dj ust th e cle aran ce by chan gi ng si de
gear thrust washer thickness.
5. Turn differential case upside down, and measure the clearance
between side g ear and d ifferential cas e on the ot her side in the
same way.
DISASSEMBLY
1. Remove final g ear mounting bolts, and then separate the final gear from dif ferential case.
2. Remove differential side bearing (clutch housing side) using the
drift and pulle rs.
PCIB0806E
SMT611A
E
F
G
H
I
J
K
L
3. Remove differential side bearing (transaxle case side) using the
drift and pulle rs.
MT-89
M
SCIA0906E
SCIA0907E
Page 90
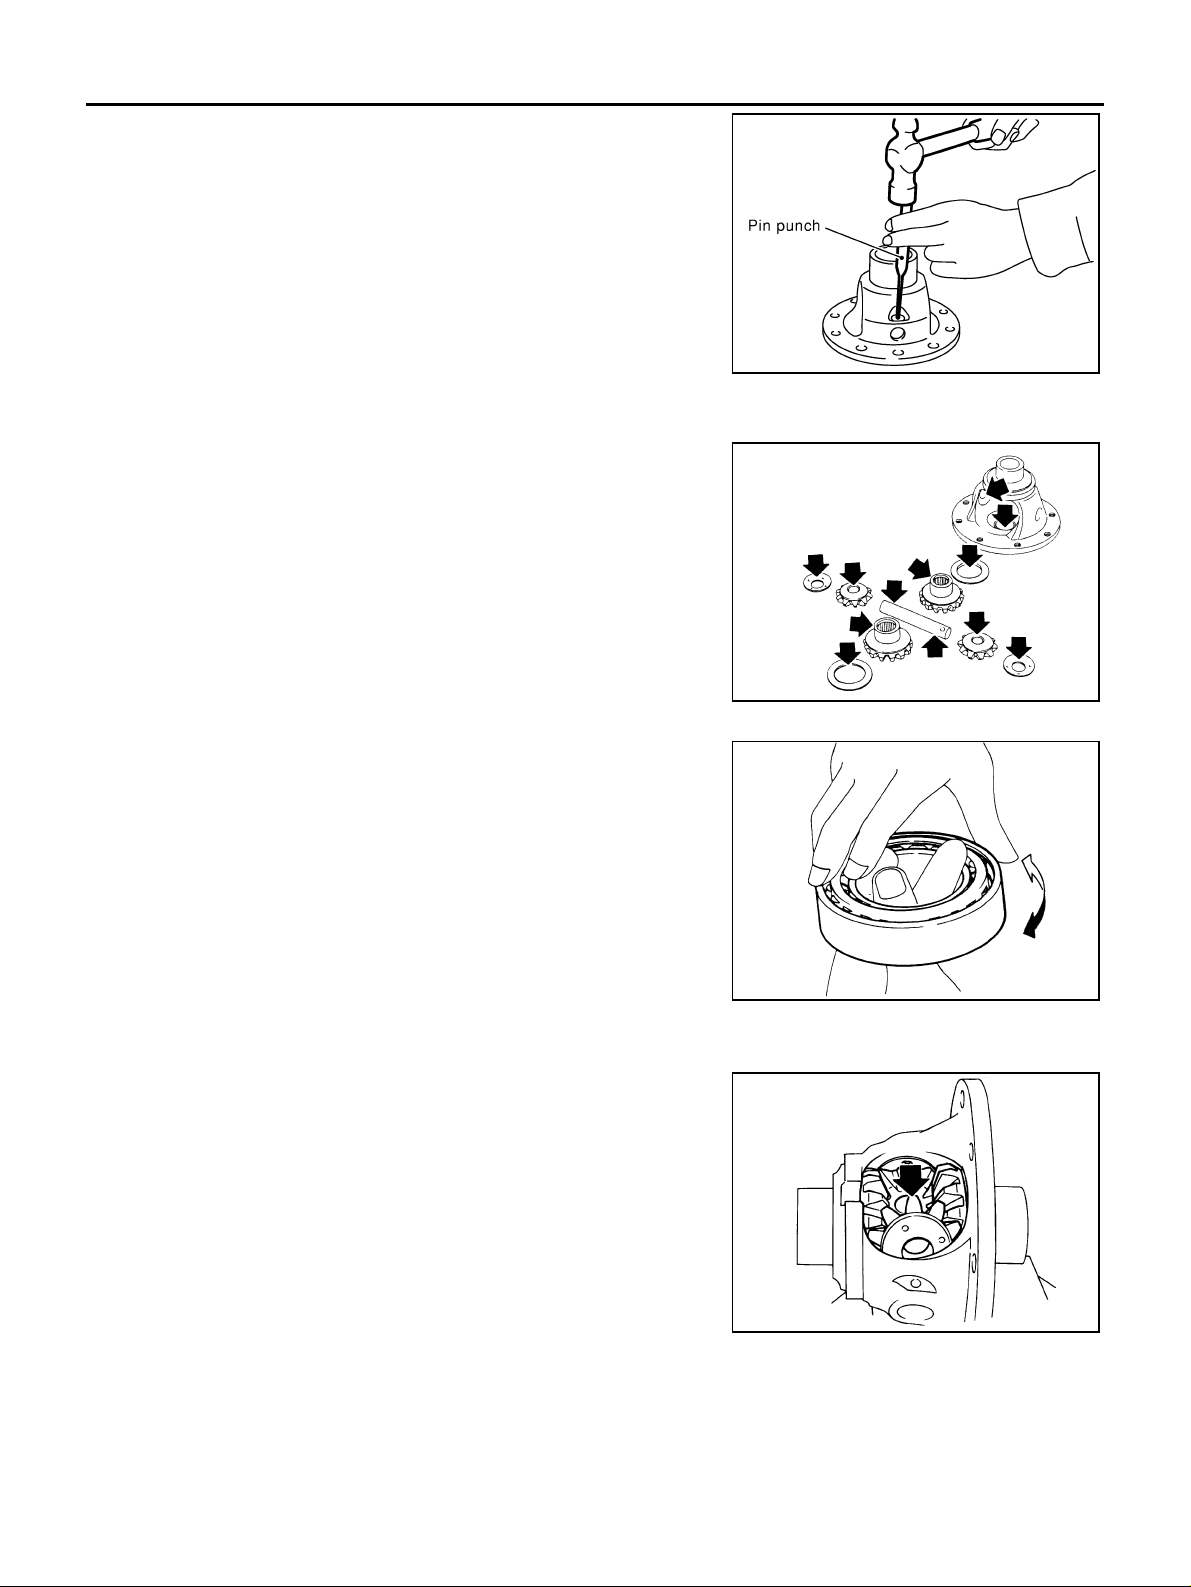
FINAL DRIVE
4. Remove retaining pin from differential case, and then remove
pinion mate shaft using a pin punch.
5. Rotate pinion mate g ea rs, an d re mo ve p i nion ma te ge ars , pi nion
mate thrust washers, side gears, and side gear thrust washers
from differential case.
INSPECTION AFTER DISASSEMBLY
Gear, Washer, Shaft and Case
● Check side gears, side gear thrust washers, pinion mate shaft,
pinion mate gears, pinion mate thrust washers and differential
case. If necessary, replace with a new one.
SCIA0908E
Bearing
● Check for bearing damage and rough rotation. If necessary,
replace with a new one.
CAUTION:
When replacing tapered roller beari ng, replace outer and inner
races as a set.
ASSEMBLY
1. Apply gear oil to sliding area of differential case, each gear, and thrust washer.
2. Install side gear thrust washers and side gears into differential
case.
3. While rotating pinion mate thrust washers and pinion mate
gears, aligning them diagonally, install them into differential
case.
MTK0135D
SPD715
SMT839
MT-90
Page 91
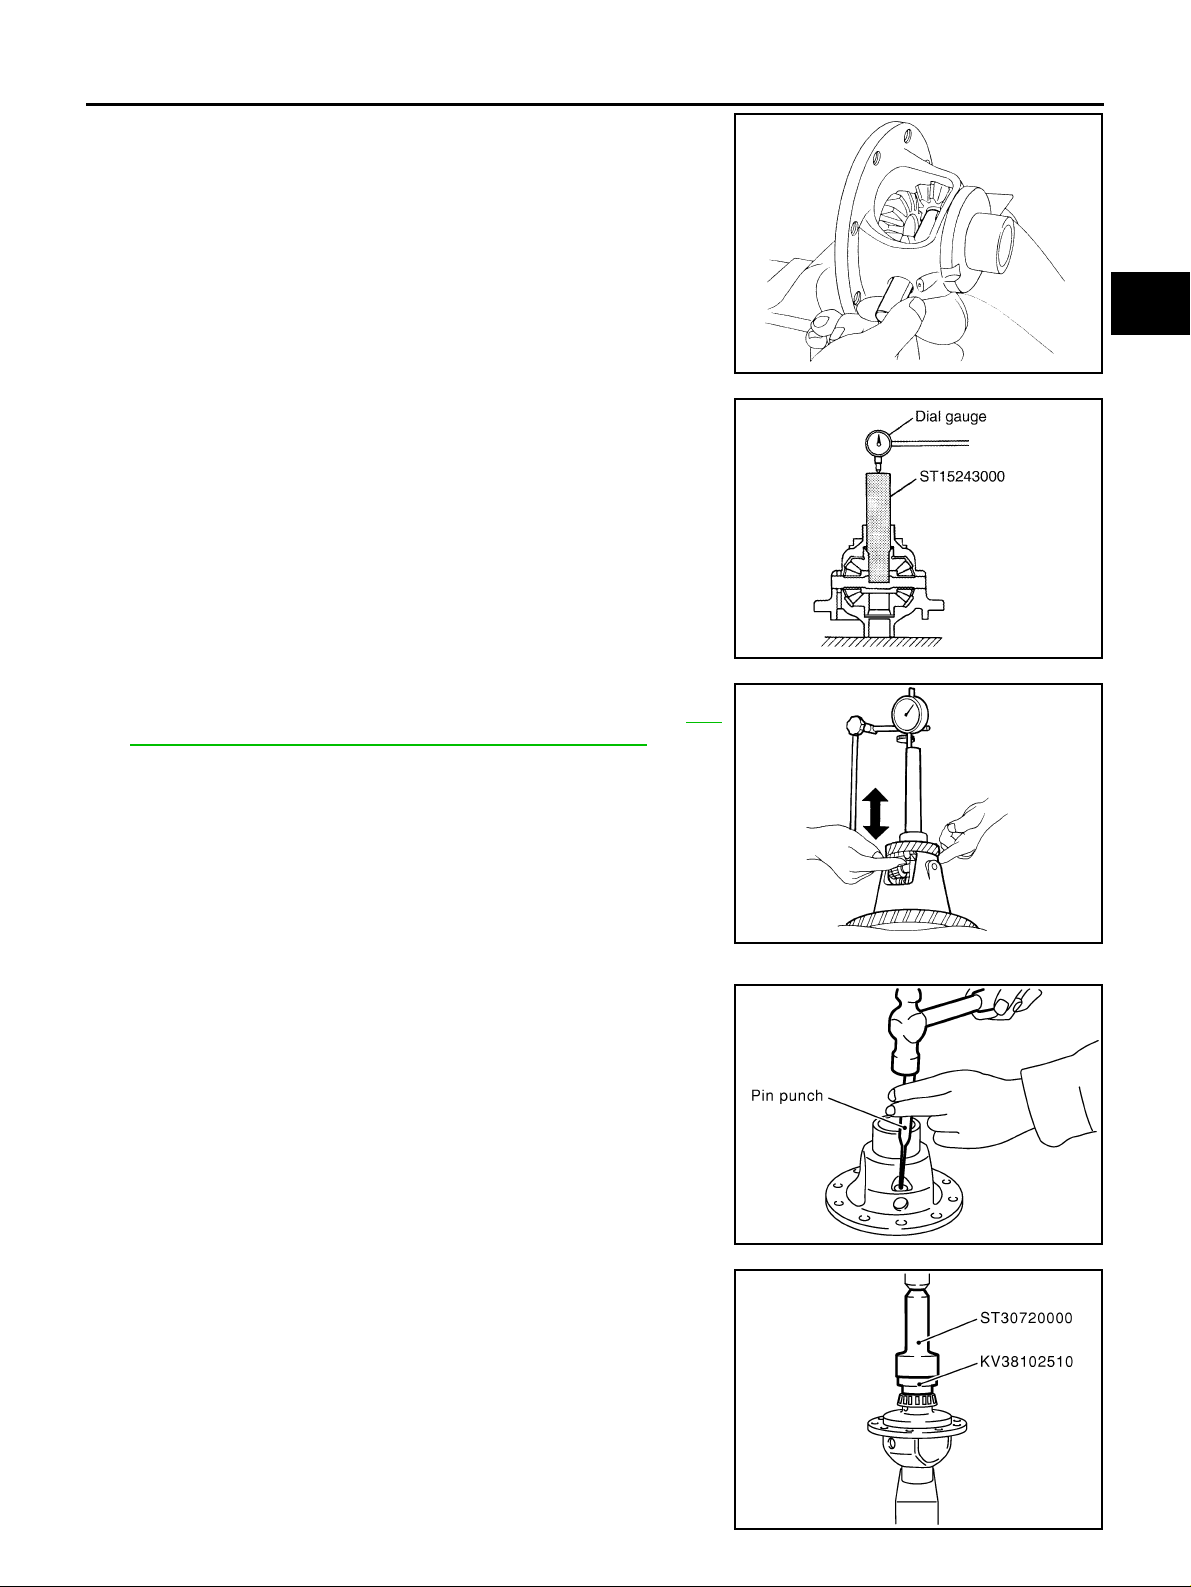
FINAL DRIVE
4. Insert pinion mate shaft into differential case.
CAUTION:
Be sure not to damage pinion mate thrust washers.
5. Measure end play of side gears following the procedure below.
Then select side gear thrust washer.
a. Upright the differential case so that its side gear to be measured
faces upward.
b. Place the dri ft below and a dial gauge onto side gears.
A
B
MT
MTK0132D
D
E
F
G
PCIB0806E
c. Move side gears up and down to m easure end play, and select
thrust washer so tha t it sat isfi es the st anda rd val ue. Re fer to MT-
101, "DIFFERENTIAL SIDE GEAR THRUST WASHER" .
End play standard value
: 0.1 - 0.2 mm (0.004 - 0.008 in)
CAUTION:
● There should be no resistance and gears should rotate
freely.
● Place differential case upside down. Be sure to measure
end play for opposite side-gears likewise.
● Only one thrust washer can be selected.
6. Install a new retaining pin into pinion mate shaft using a pin
punch.
CAUTION:
Do not reuse retaining pin.
SMT611A
SCIA0908E
H
I
J
K
L
M
7. Press in differential side bearing (transaxle case side) to differential case using the drifts.
MT-91
SCIA0910E
Page 92
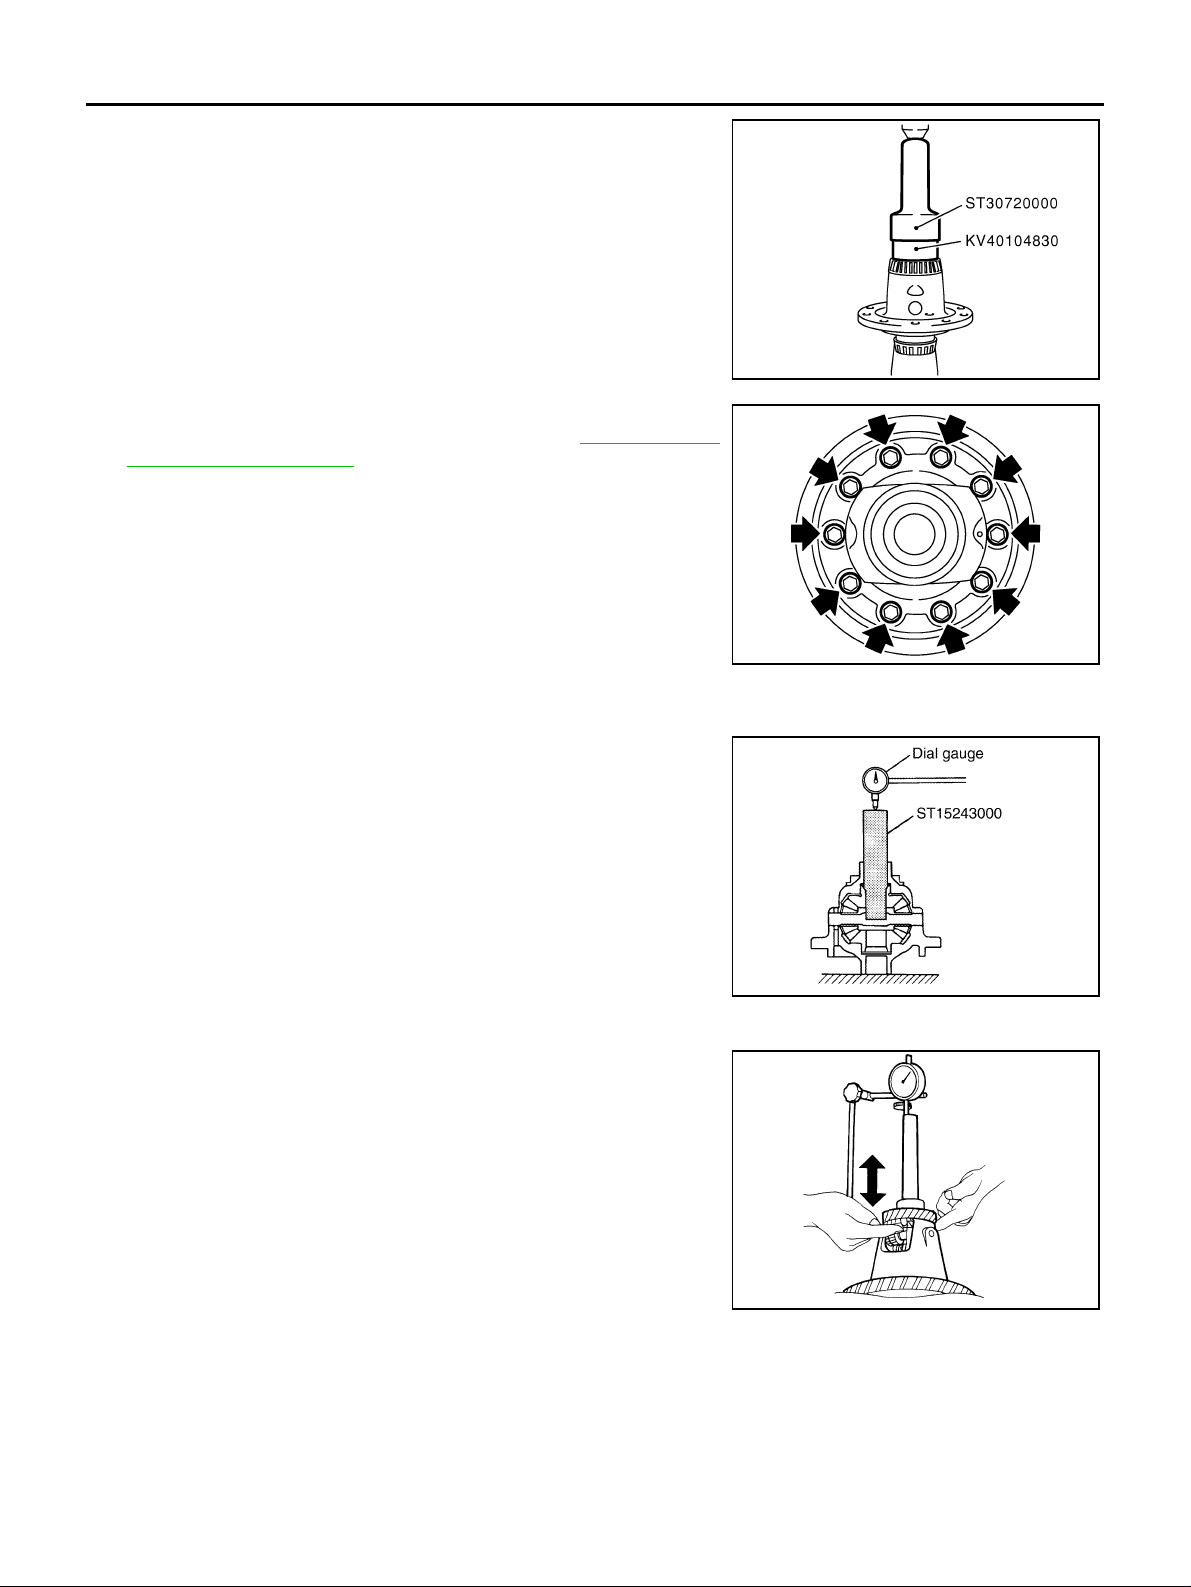
FINAL DRIVE
8. Press in differential side bearing (clutch housing side) to differential case using the drifts.
9. Install final gear into differential case, and tighten final gear
mounting bolts to t he specified torque . Refer to MT-23, "
DRIVE COMPONENTS" .
FINAL
SCIA0911E
SCIA0912E
Assembly and Disassembly (RS6F51A) ECS008CB
PRE-INSPECTION
● C heck the clea rance betw een side gea r an d differen ti al ca se a s
follows.
1. Clean final drive asse mb ly s ufficiently to pre ve nt s i de g ea r t hru st
washer, differenti al c as e, s id e g ea r, and other parts from sticki ng
by gear oil.
PCIB0806E
2. Upright differential case so that side gear to be measured faces upward.
3. Place the drift below and a dial gauge onto side gear. Move side
gear up and down, and measure the clearance.
Clearance between side gear and differential case
: 0.1 - 0.2 mm (0.004 - 0.008 in)
CAUTION:
There should be no resistance and gears should rotate
freely.
4. If not within specification, adjust the clearance by changing side
gear thrust washer thickness.
5. Turn differential case upside down, and measure the clearance
between side ge ar and differe ntial case on the othe r side in th e
same way.
SMT611A
DISASSEMBLY
1. Remove final gear mounting bolts, and then separate the final gear from differential case.
MT-92
Page 93
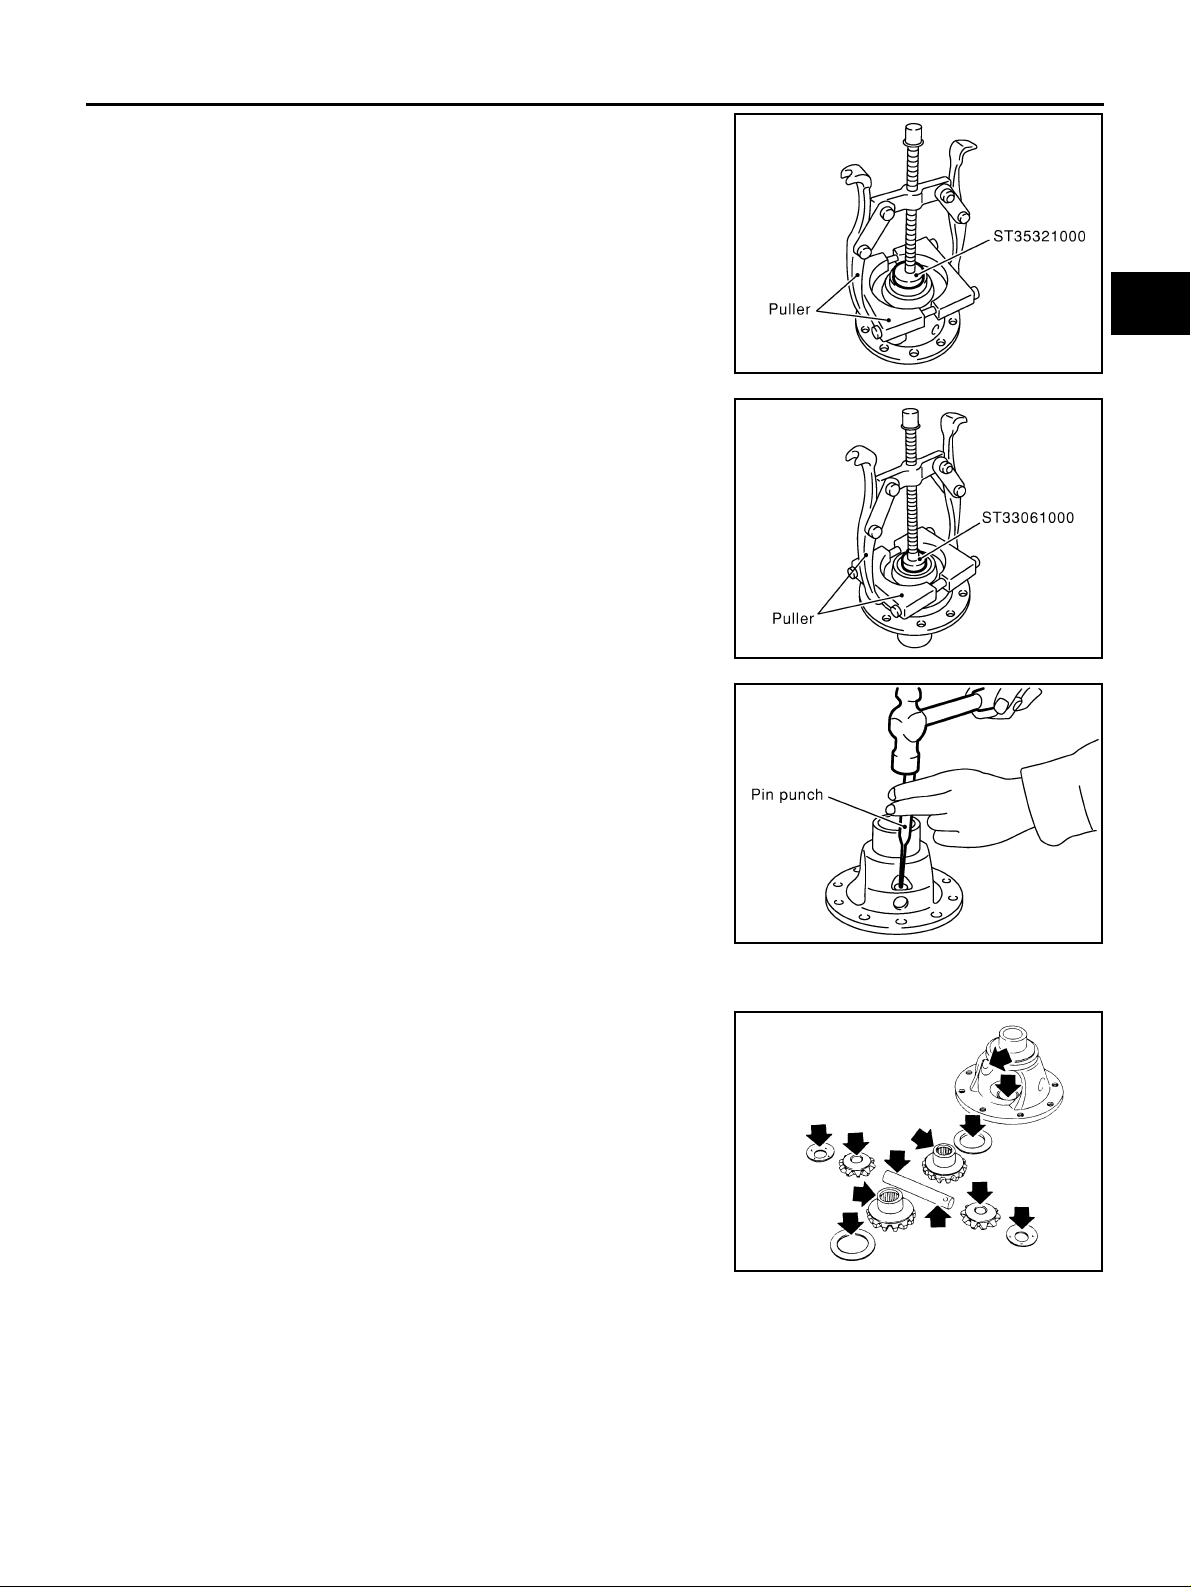
FINAL DRIVE
2. Remove differential side bearing (clutch housing side) using the
drift and pulle rs.
3. Remove differential side bearing (transaxle case side) using the
drift and pulle rs.
A
B
MT
SCIA0906E
D
E
F
G
SCIA0907E
4. Remove retaining pin from differential case, and then remove
pinion mate shaft using a pin punch.
5. Rotate pini o n m ate g ea r s, an d re mo ve pini o n ma te g ea r s, pi n io n
mate thrust washers, side gears, and side gear thrust washers
from differential case.
INSPECTION AFTER DISASSEMBLY
Gear, Washer, Shaft and Case
● Check side gea rs, side gear thrust w ashers, pinion ma te shaft,
pinion mate gears , p inion mate thrust was hers an d different ial
case. If necessary, repl ace with a new one.
SCIA0908E
MTK0135D
H
I
J
K
L
M
MT-93
Page 94
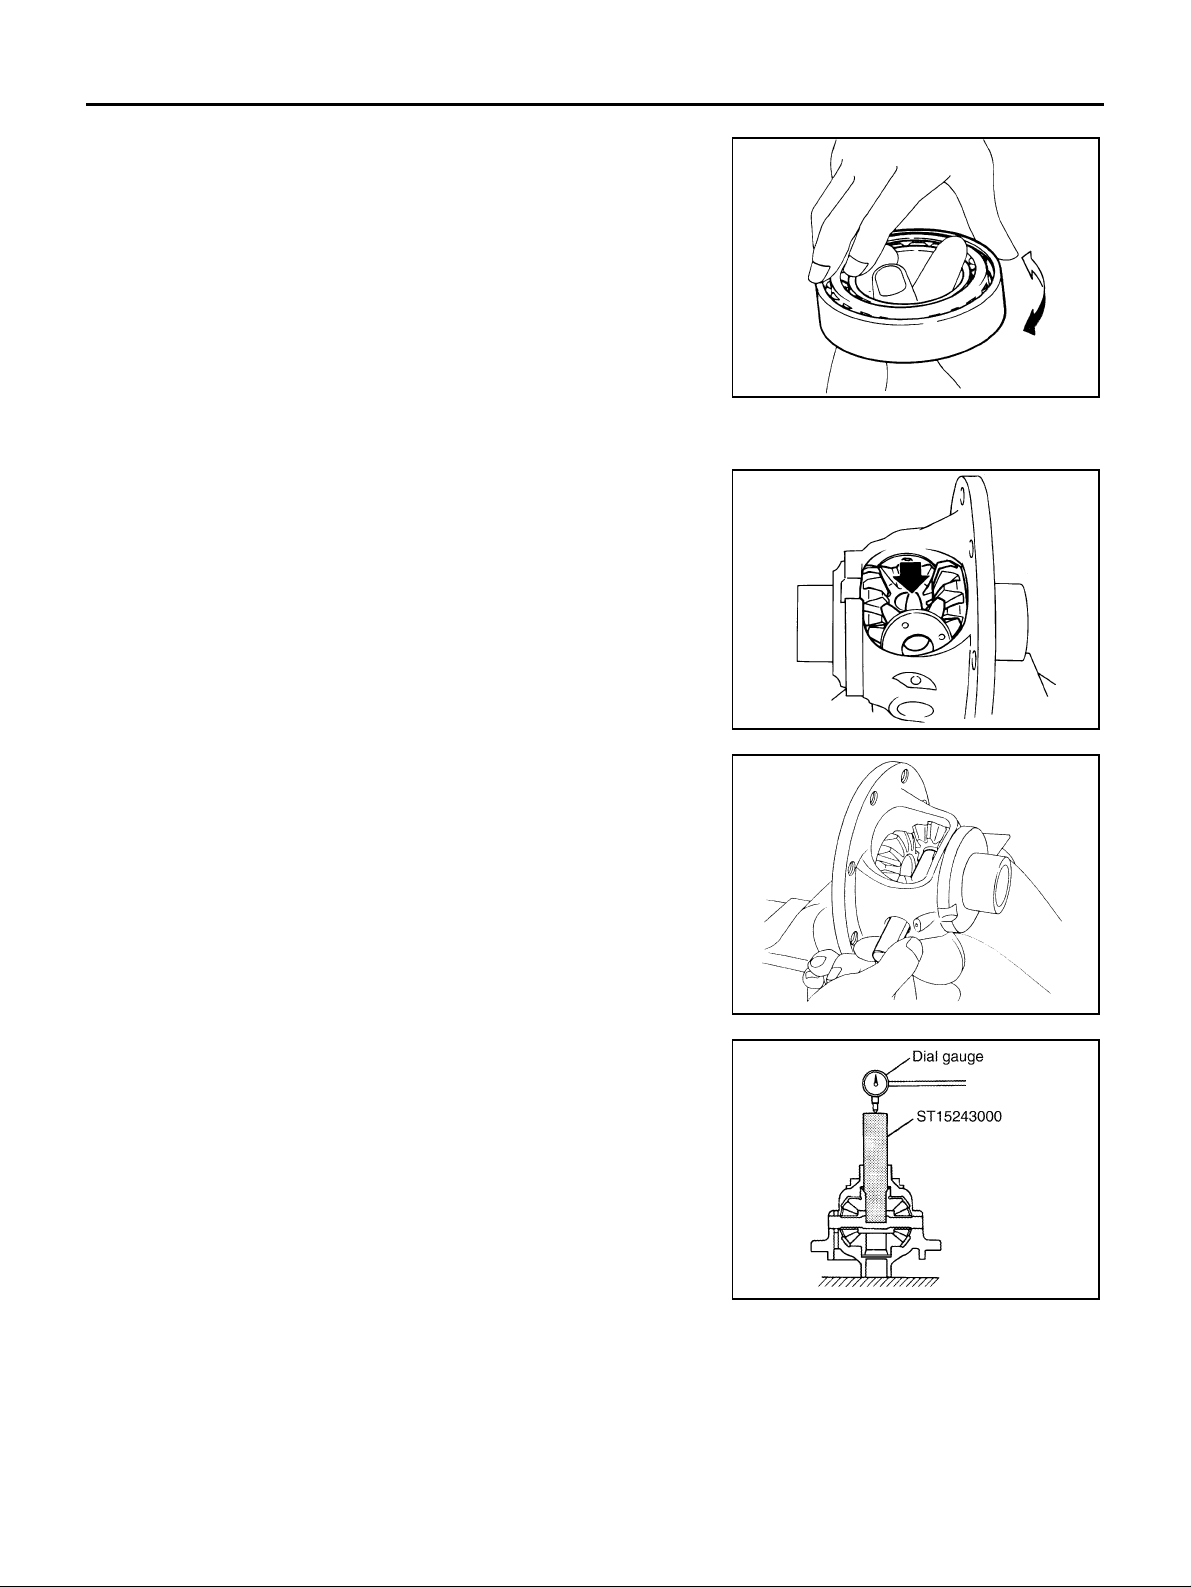
FINAL DRIVE
Bearing
● Check for bearing damage and rough rotation. If necessary,
replace with a new one.
CAUTION:
When replacing tapered roller beari ng, replace outer and inner
races as a set.
ASSEMBLY
1. Apply gear oil to sliding area of differential case, each gear, and thrust washer.
2. Install side gear thrust washers and side gears into differential
case.
3. While rotating pinion mate thrust washers and pinion mate
gears, aligning them diagonally, install them into differential
case.
SPD715
4. Insert pinion mate shaft into differential case.
CAUTION:
Be sure not to damage pinion mate thrust washers.
5. Measure end play of side gears following the procedure below.
Then select side gear thrust washer.
a. Upright the differential case so that its side gear to be measured
faces upward .
b. Place the drift below and a dial gauge onto side gears.
SMT839
MTK0132D
PCIB0806E
MT-94
Page 95
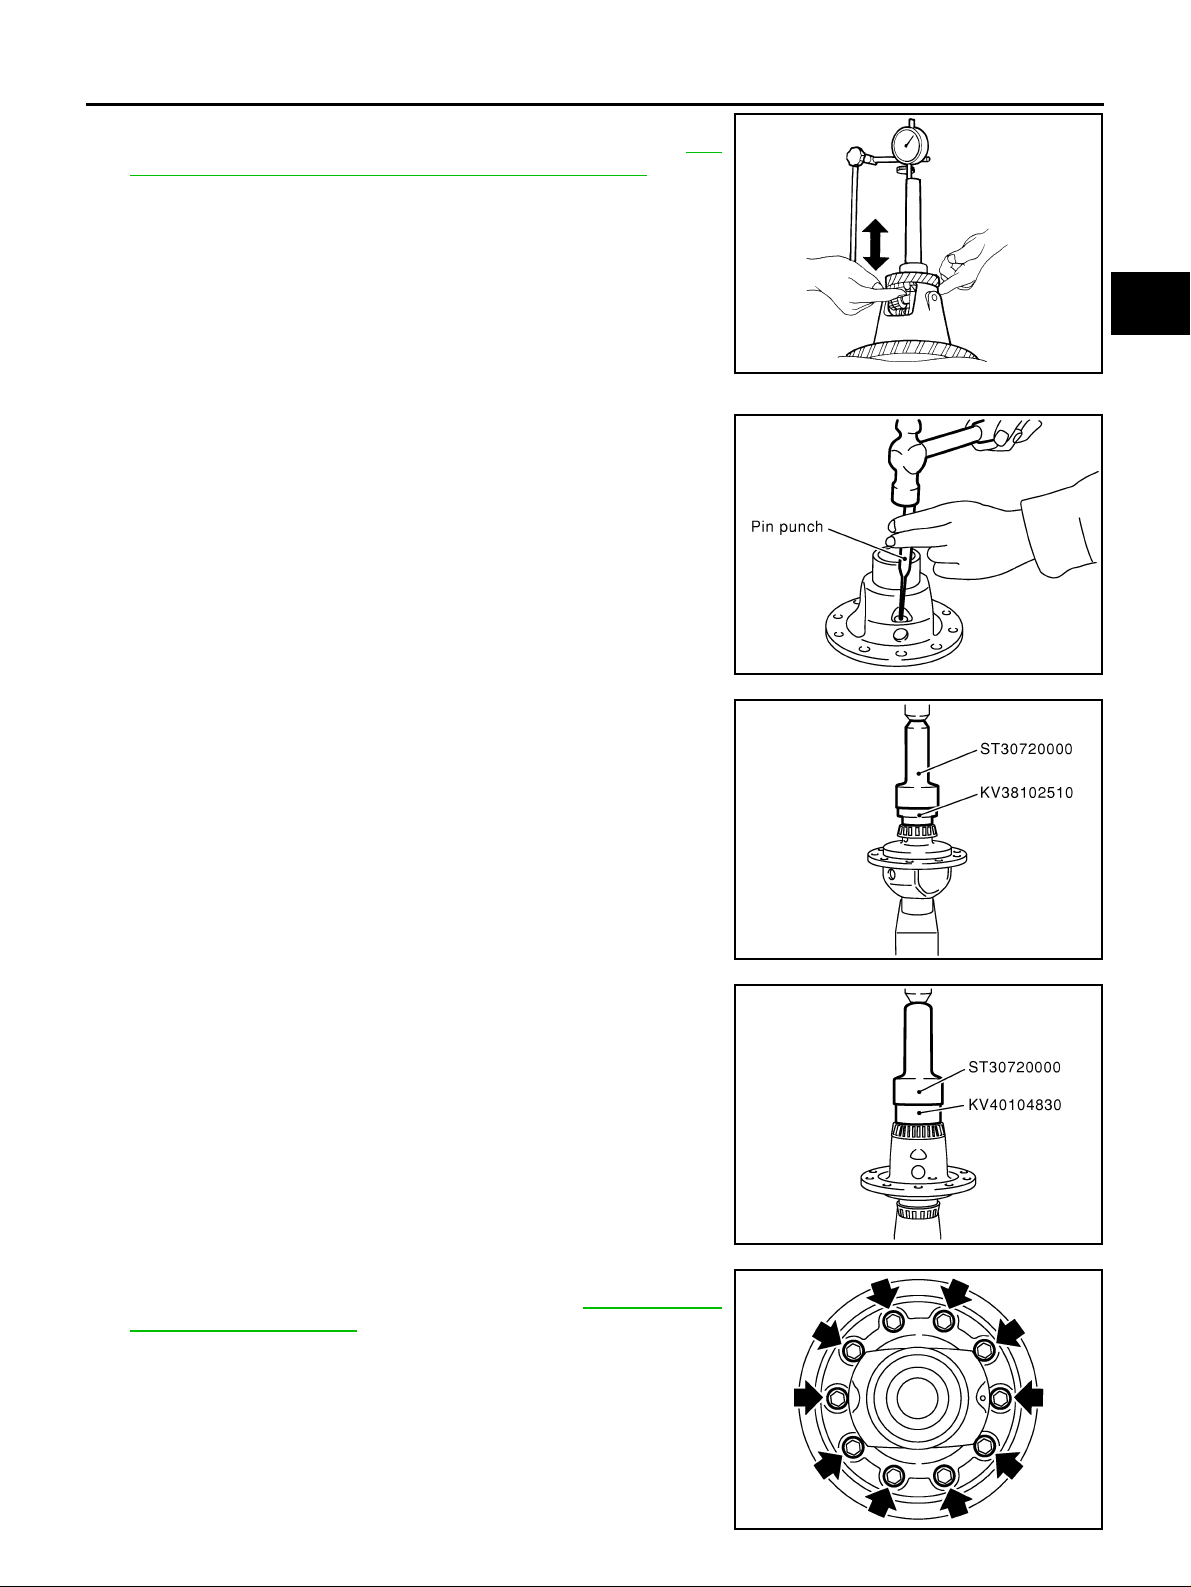
FINAL DRIVE
c. Move side gears up and down to m easure end play, and select
thrust washer so tha t it sat isfi es the st anda rd val ue. Re fer to MT-
101, "DIFFERENTIAL SIDE GEAR THRUST WASHER" .
End play standard value
: 0.1 - 0.2 mm (0.004 - 0.008 in)
CAUTION:
● There should be no resistance and gears should rotate
freely.
● Place differential case upside down. Be sure to measure
end play for opposite side-gears likewise.
● Only one thrust washer can be selected.
6. Install a new retaining pin into pinion mate shaft using a pin
punch.
CAUTION:
Do not reuse retaining pin.
A
B
MT
SMT611A
D
E
F
G
7. Press in differential side bearing (transaxle case side) to differential case using the drifts.
8. Press in differential side bearing (clutch housing side) to differential case using the drifts.
SCIA0908E
SCIA0910E
SCIA0911E
H
I
J
K
L
M
9. Install final gear into differential case, and tighten final gear
mounting bolts to the specified torq ue. Refer to MT-28, "
FINAL
DRIVE COMPONENTS" .
MT-95
SCIA0912E
Page 96
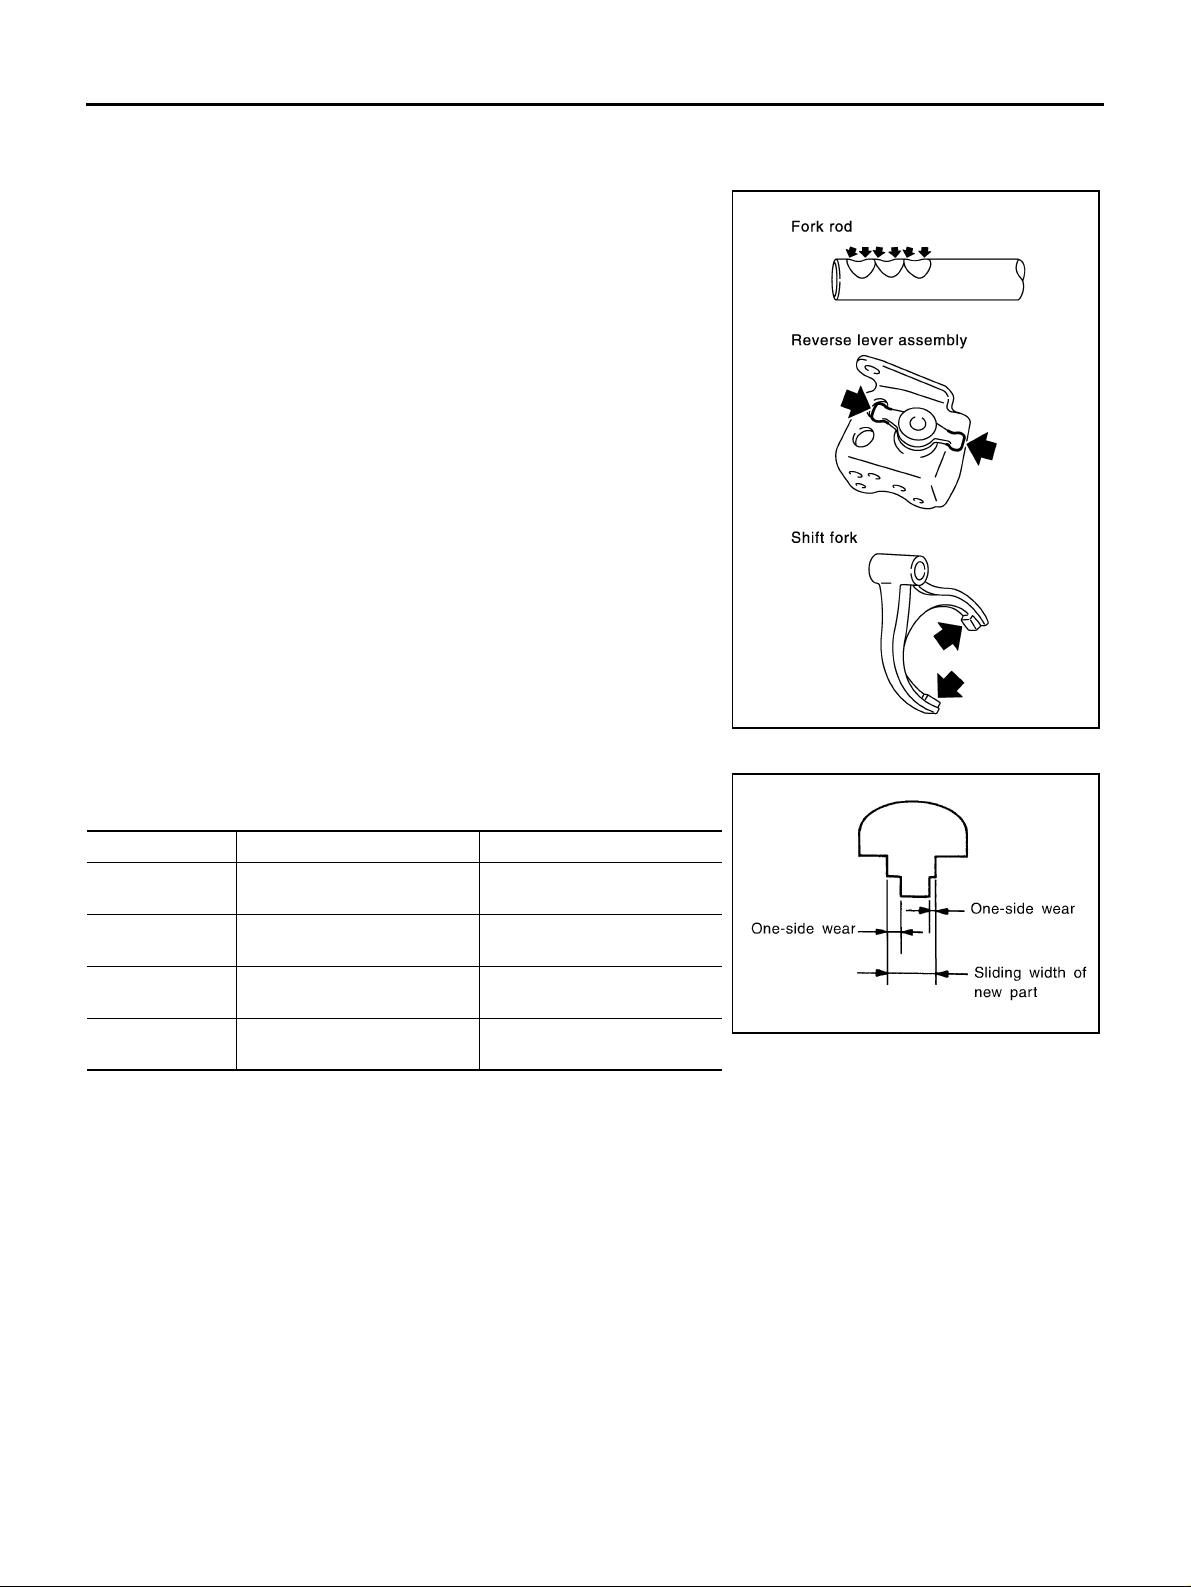
SHIFT CONTROL
SHIFT CONTROL PFP:32982 Inspection (RS5F51A) ECS008CC
● Check contact surfaces and sliding area for wear, damage,
bending, etc. If necessary, replace parts.
SHIFT FORK
● Check if the width of shift fork hook (sliding area with coupling
sleeve) is within allowable specification below.
Item One-side wear specification Sliding width of new part
1st-2nd 0 .2 mm (0 .0 0 8 in)
3rd-4th 0.2 mm (0.008 in)
5th 0.2 mm (0.008 in)
Reverse 0.2 mm (0.008 in)
7.80 - 7.93 m m
(0.3071 - 0.3122 in)
7.80 - 7.93 m m
(0.3071 - 0.3122 in)
6.10 - 6.23 m m
(0.2402 - 0.2453 in)
12.80 - 12.93 mm
(0.5039 - 0.5091 in)
SCIA0913E
SMT801D
MT-96
Page 97
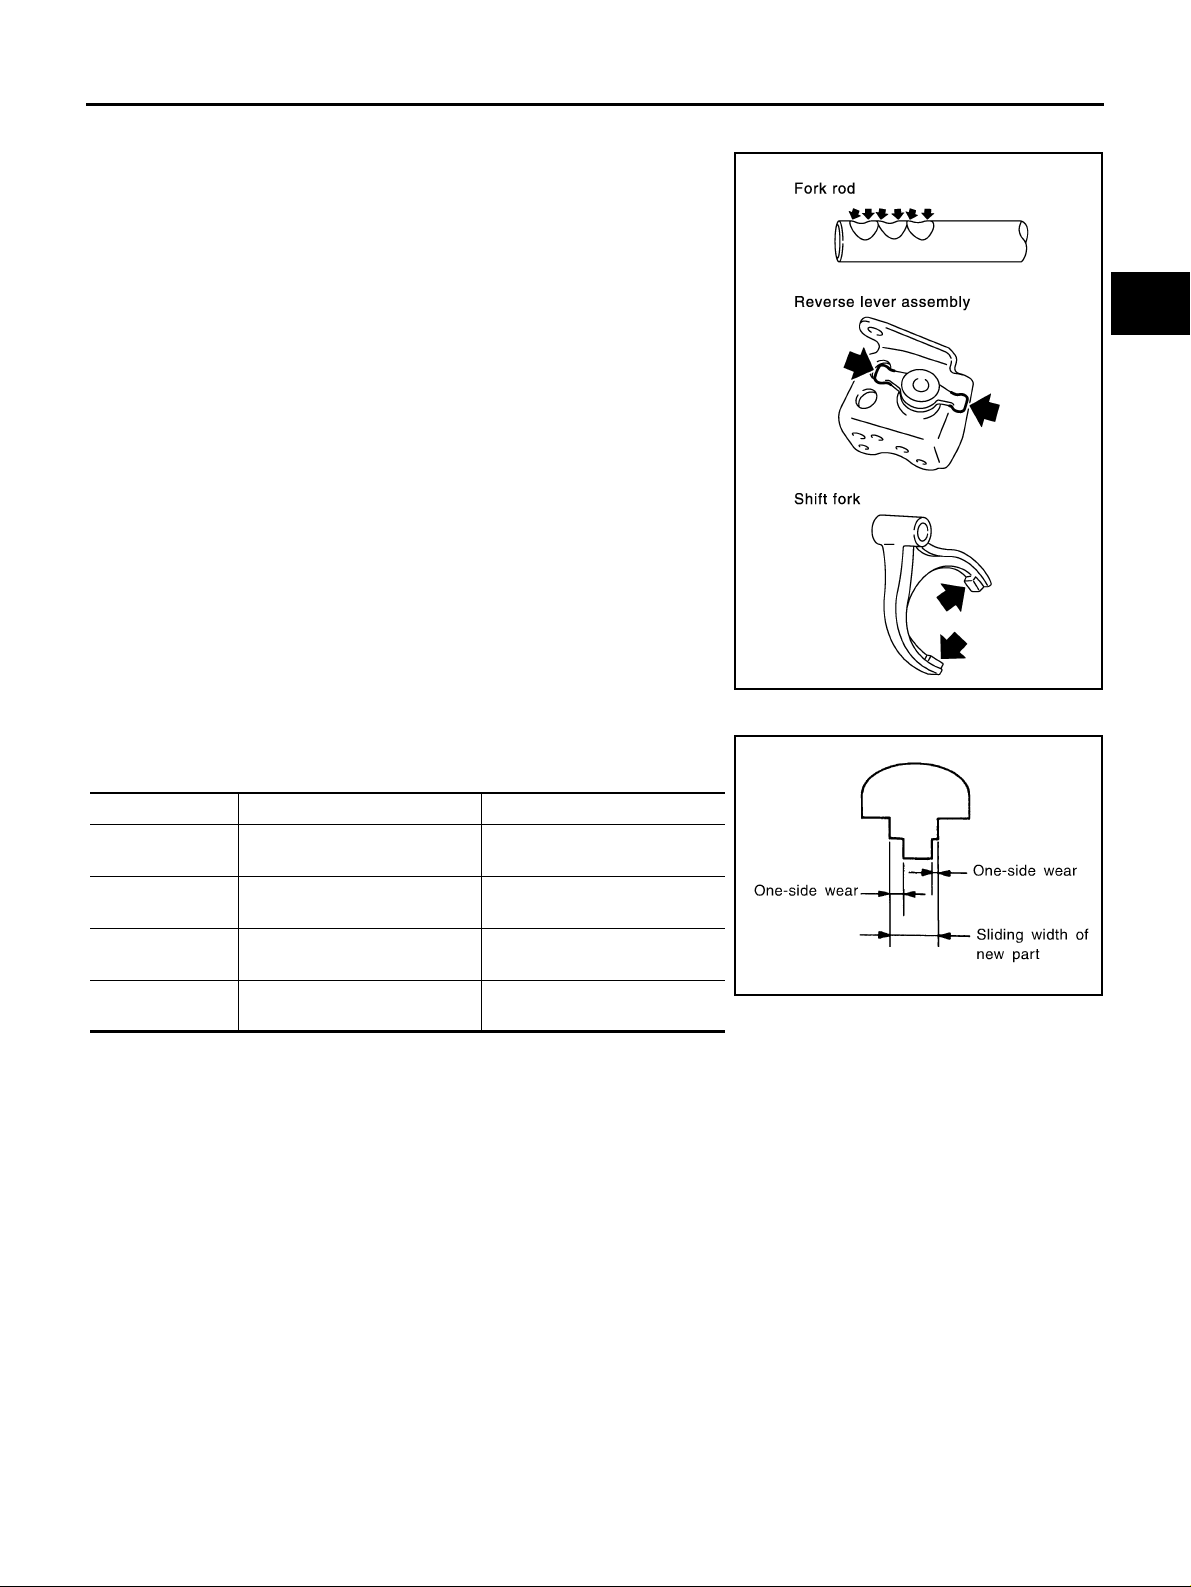
SHIFT CONTROL
Inspection (RS6F51A) ECS008CD
● Check contact surfaces and sliding area for wear, damage,
bending, etc. If necessary, replace parts.
A
B
MT
D
E
F
G
SHIFT FORK
● Check if the width of shift fork hoo k (sliding area with coupling
sleeve) is within allowable specifi c ation below.
Item One-side wear specificati on Sliding width of new part
1st-2nd 0.2 mm (0.008 in)
3rd-4th 0.2 mm (0.008 in)
5th-6th 0.2 mm (0.008 in)
Reverse 0.2 mm (0.008 in)
7.80 - 7.93 mm
(0.3071 - 0.3122 in)
7.80 - 7.93 mm
(0.3071 - 0.3122 in)
6.10 - 6.23 mm
(0.2402 - 0.2453 in)
12.80 - 12.93 mm
(0.5039 - 0.5091 in)
SCIA0913E
H
I
J
K
SMT801D
L
M
MT-97
Page 98
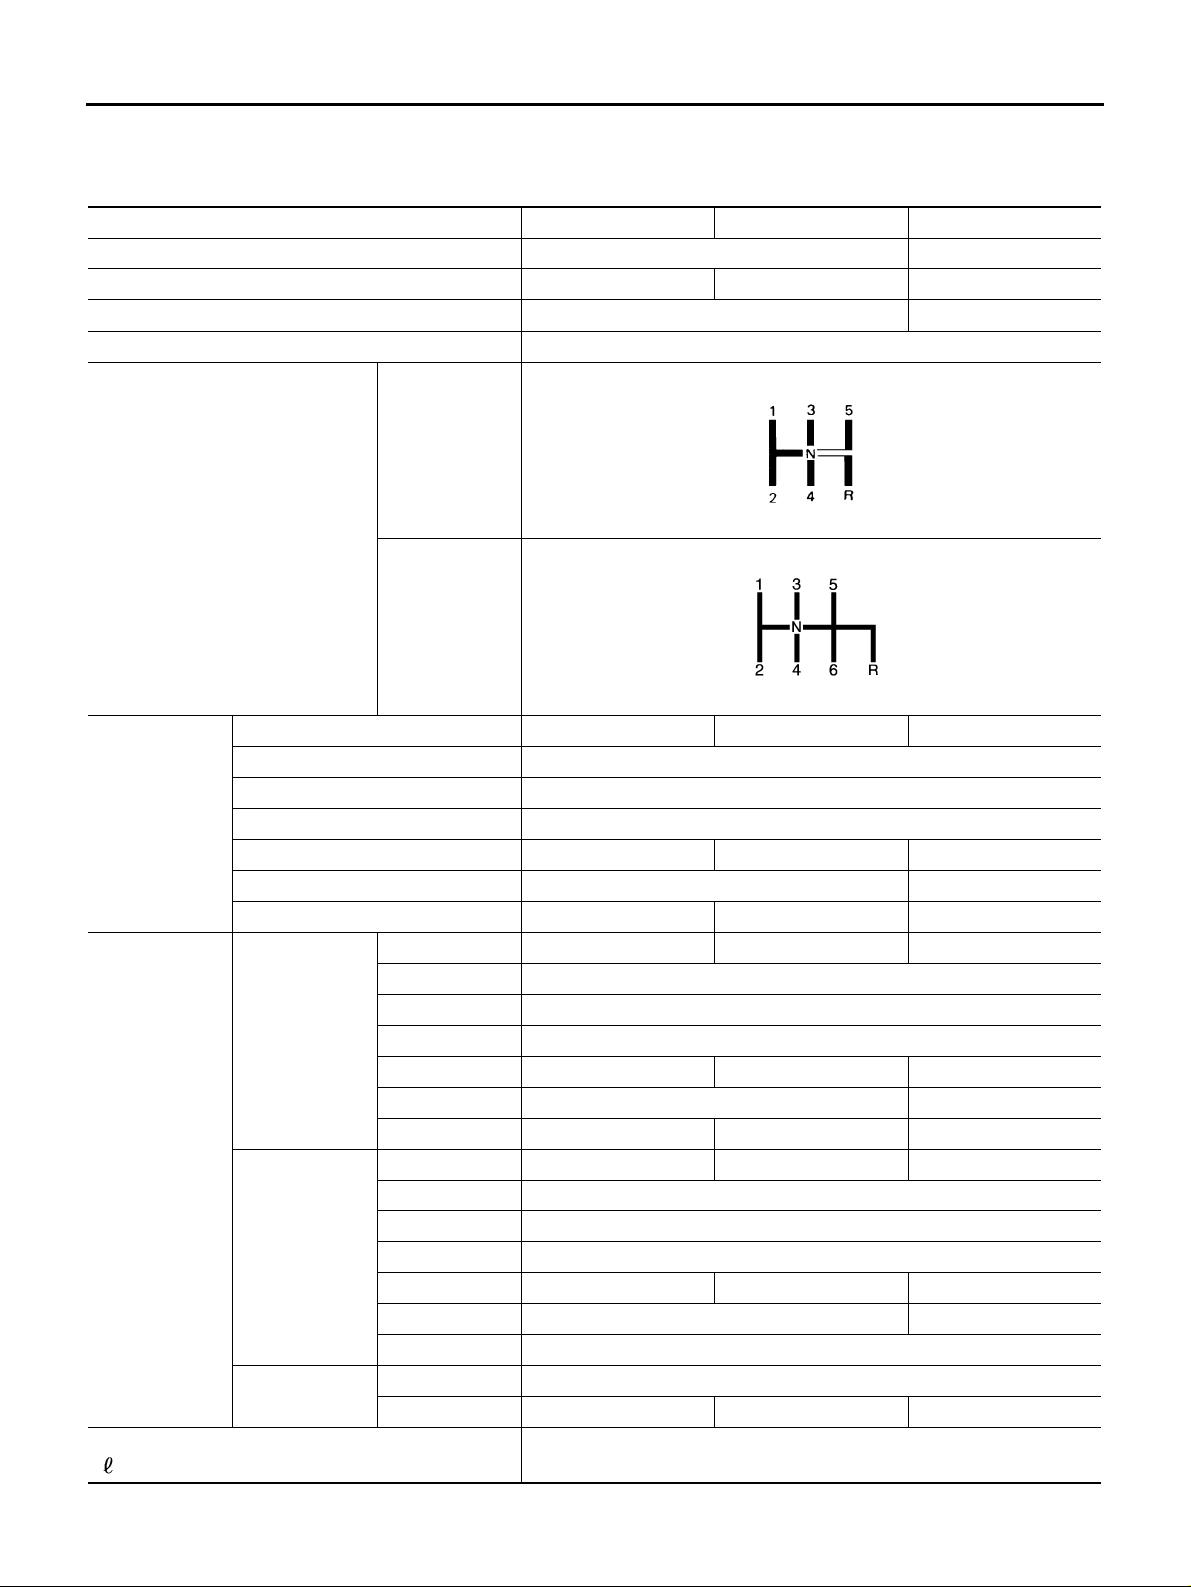
SERVICE DATA AND SPECIFICATIONS (SDS)
SERVICE DATA AND SPECIFICATIONS (SDS) PFP:00030 General Specifications EC S 008CE
TRANSAXLE
Engine QR20DE QR25DE YD22DDTi
Transaxle model RS5F51A RS6F51A
Model code number EQ000 EQ008 EQ068
Number of speed 5 6
Synchromesh type Warner
Shift pattern
5 speed
SCIA0821E
6 speed
SCIA0955E
Gear ratio 1st 3.500 3.416 3.500
2nd 1.944
3rd 1.258
4th 0.947
5th 0.772 0.733 0.772
6th — 0.630
Reverse 3.374 3.252 3.374
Number of teeth Input gear 1st 14 12 14
2nd 18
3rd 31
4th 38
5th 444544
6th — 46
Reverse141214
Main gear 1st 49 41 49
2nd 35
3rd 39
4th 36
5th 343334
6th — 29
Reverse 38
Reverse idler
gear
Oil capacity
(Imp pt)
Front 37
Rear 46 38 46
2.3 (4)
MT-98
Page 99
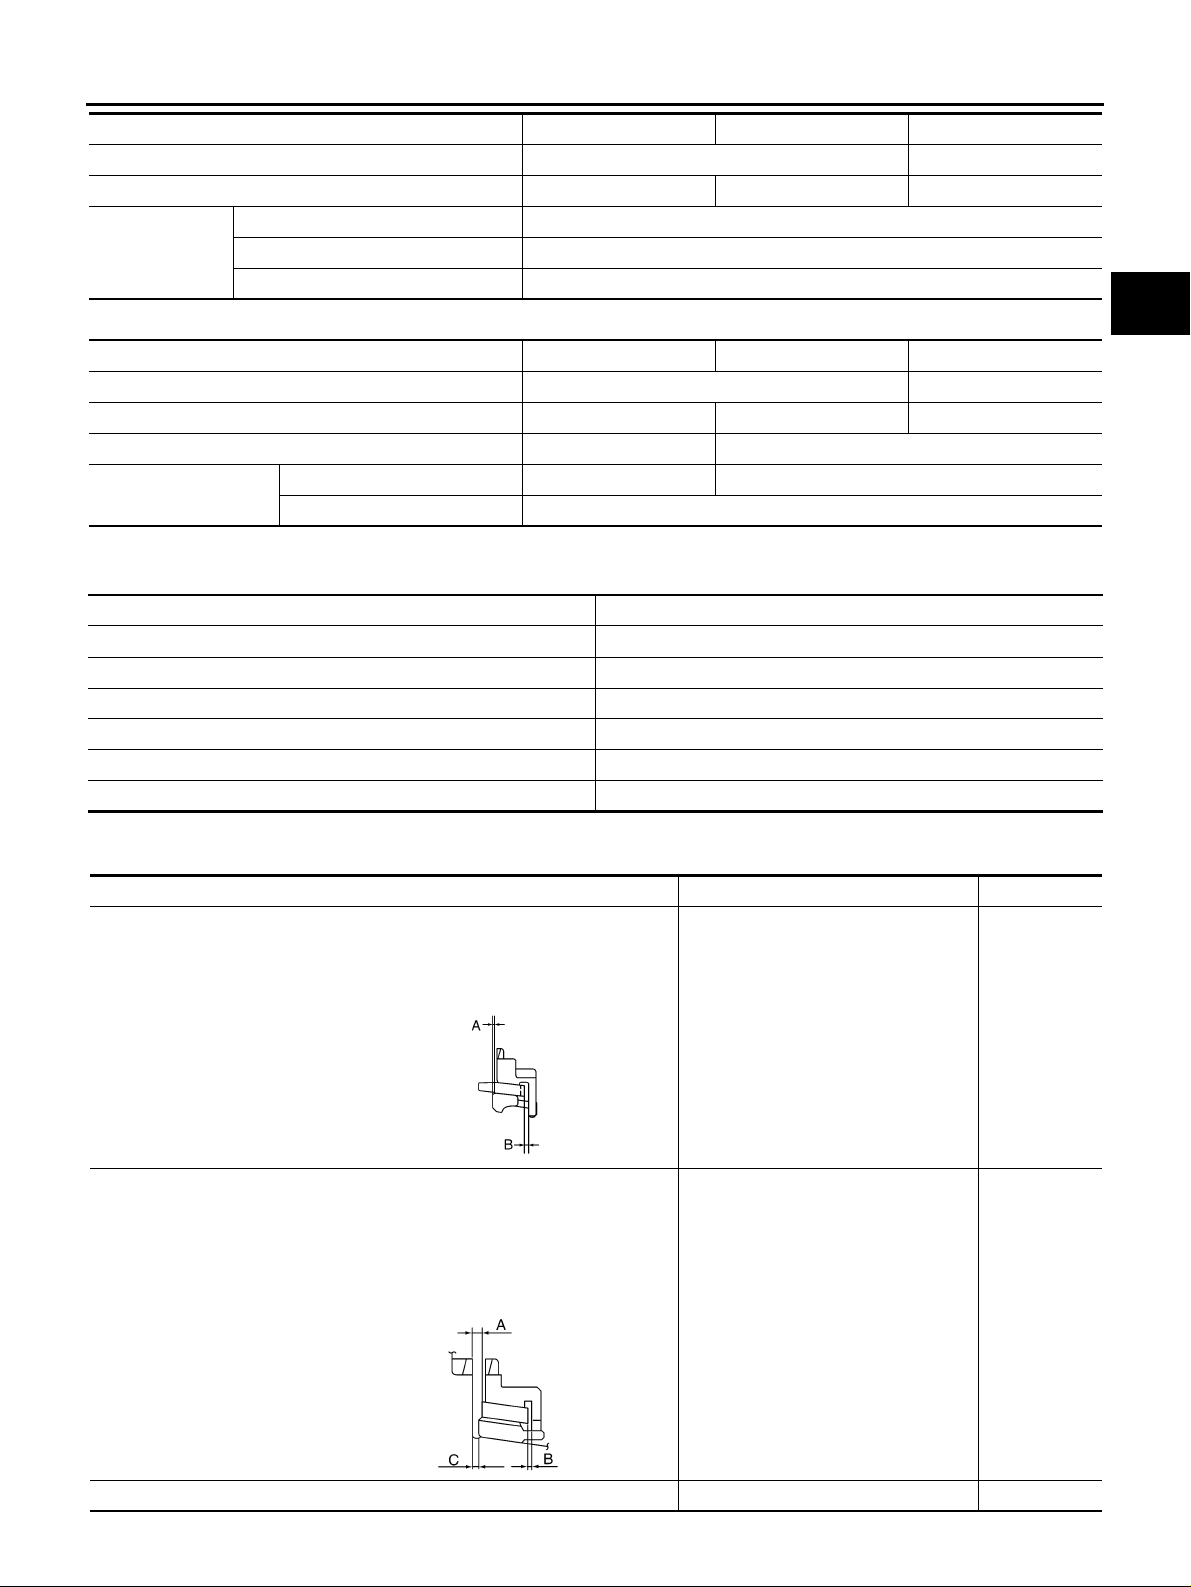
SERVICE DATA AND SPECIFICATIONS (SDS)
Engine QR20DE QR25DE YD22DDTi
Transaxle model RS5F51A RS6F51A
Model code number EQ000 EQ008 EQ068
Remarks Reverse synchronizer Installed
Double-cone synchronizer 1st
Triple-cone synchronizer 2nd
FINAL GEAR
Engine QR20DE QR25DE YD22DDTi
Transaxle model RS5F51A RS6F51A
Model code number EQ000 EQ008 EQ068
Final gear ratio 4.750 4.428
Number of teeth Fi nal gear /Pini on 76/ 16 62/14
Side gear/Pinion mate gear 14/10
End Play ECS008CF
Unit: mm (in)
Gear End play
1st main gear 0.20 - 0.30 (0.0079 - 0.0118)
2nd main gear 0.06 - 0.16 (0.0024 - 0.0063)
3rd input gear 0.18 - 0.31 (0.0071 - 0.0122)
4th input gear 0 .2 0 - 0.30 (0.0079 - 0.0118)
5th input gear 0.06 - 0.16 (0.0024 - 0.0063)
6th input gear (For RS6F51A model) 0.06 - 0.16 (0.0024 - 0.0063)
A
B
MT
D
E
F
G
H
I
Baulk Ring Clearance ECS00CV4
Unit: mm (in)
Measurement point Standard Limit value
1st
(Double-cone synchronizer)
2nd
(Triple-cone synchronizer)
● Clearance between synchronizer co ne
and inner baulk ring end face “A”
● Clearance between outer baulk ring pawl
and synchronizer cone “B”
PCIB0249E
● Clearance between synchronizer co ne
and clutch gear end face “A”
● Clearance between outer baulk ring pawl
and synchronizer cone “B”
● Clearance between inner baulk ring and
clutch gear end face “C”
A: 0.6 - 0.8 (0.024 - 0.031)
B: 0.6 - 1.1 (0.024 -0.043)
A: 0.6 - 1.2 (0.024 - 0.047)
B: 0.6 - 1.1 (0.024 - 0.043)
C: 0.7 - 1.1 (0.028 - 0.043)
0.2 (0.008)
0.2 (0.008)
0.3 (0.012)
0.2 (0.008)
0.3 (0.012)
J
K
L
M
PCIB0772E
3rd&4th 0.9 - 1.45 (0.035 - 0.057) 0.7 (0.028)
MT-99
Page 100
SERVICE DATA AND SPECIFICATIONS (SDS)
Measurement point Standard Limit value
5th 0.95 - 1.4 (0.037 - 0.055) 0.7 (0.028)
6th (For RS6F51A model) 0.95 - 1.4 (0.037 - 0.055) 0.7 (0.028)
Reverse 0.95 - 1.4 (0.037 - 0.055) 0.7 (0.028)
Available Snap Rings ECS008CH
INPUT SHAFT BEARING SPACER
—For RS5F51A Model—
End play 0 - 0.1 mm (0 - 0.004 in)
Thickness mm (in) Part number* Thickness mm (in) Part number*
1.71 (0.0673)
1.76 (0.0693)
1.81 (0.0713)
1.86 (0.0732)
1.91 (0.0752)
1.96 (0.0772)
*: Always check with the Parts Department for the latest parts information.
6TH INPUT GEAR BUSHING
—For RS6F51A Model—
End play 0 - 0.1 mm (0 - 0.004 in)
Thickness mm (in) Part number* Thickness mm (in) Part number*
1.76 (0.0693)
1.81 (0.0713)
1.86 (0.0732)
1.91 (0.0752)
1.96 (0.0772)
*: Always check with the Parts Department for the latest parts information.
32204 8H510
32204 8H511
32204 8H512
32204 8H513
32204 8H514
32204 8H515
32204 8H511
32204 8H512
32204 8H513
32204 8H514
32204 8H515
2.01 (0.0791)
2.06 (0.0811)
2.11 (0.0831)
2.16 (0.0850)
2.21 (0.0870)
2.26 (0.0890)
2.01 (0.0791)
2.06 (0.0811)
2.11 (0.0831)
2.16 (0.0850)
2.21 (0.0870)
32204 8H516
32204 8H517
32204 8H518
32204 8H519
32204 8H520
32204 8H521
32204 8H516
32204 8H517
32204 8H518
32204 8H519
32204 8H520
5TH MAIN GEAR
—For RS5F51A Model—
End play 0 - 0.1 mm (0 - 0.004 in)
Thickness mm (in) Part number* Thickness mm (in) Part number*
1.85 (0.0728)
1.90 (0.0748)
1.95 (0.0768)
2.00 (0.0787)
*: Always check with the Parts Department for the latest parts information.
32204 8H500
32204 8H501
32204 8H502
32204 8H503
2.05 (0.0807)
2.10 (0.0827)
2.15 (0.0846)
2.20 (0.0866)
32204 8H504
32204 8H505
32204 8H506
32204 8H507
Available C-Rings ECS008CI
MAINSHAFT C-RING
End play 0 - 0.06 mm (0 - 0.0024 in)
Thickness mm (in) Part number* Thickness mm (in) Part number*
2.535 (0.0998)
2.565 (0.1010)
2.595 (0.1022)
2.625 (0.1033)
2.655 (0.1045)
2.685 (0.1057)
2.715 (0.1069)
2.745 (0.1081)
2.775 (0.1093)
2.805 (0.1104)
*: Always check with the Parts Department for the latest parts information.
32348 8H800
32348 8H801
32348 8H802
32348 8H803
32348 8H804
32348 8H805
32348 8H806
32348 8H807
32348 8H808
32348 8H809
2.835 (0.1116)
2.865 (0.1128)
2.895 (0.1140)
2.925 (0.1152)
2.955 (0.1163)
2.985 (0.1175)
3.015 (0.1187)
3.045 (0.1199)
3.075 (0.1211)
32348 8H810
32348 8H811
32348 8H812
32348 8H813
32348 8H814
32348 8H815
32348 8H816
32348 8H817
32348 8H818
MT-100
 Loading...