


 Loading...
Getting Started

Disclaimer
The information in this document is subject to change without notice and does not represent a commitment on the part of Native Instruments GmbH. The software described by this document is subject to a License Agreement and may not be copied to other media. No part of this publication may be copied, reproduced or otherwise transmitted or recorded, for any purpose, without prior written permission by Native Instruments GmbH, hereinafter referred to as Native Instruments.
“Native Instruments”, “NI” and associated logos are (registered) trademarks of Native Instruments GmbH.
Mac, Mac OS, GarageBand, Logic, iTunes and iPod are registered trademarks of Apple Inc., registered in the U.S. and other countries.
Windows, Windows Vista and DirectSound are registered trademarks of Microsoft Corporation in the United States and/or other countries.
All other trade marks are the property of their respective owners and use of them does not imply any affiliation with or endorsement by them.
Document authored by: Native Instruments GmbH
Software version: 2.6 (10/2012)
Special thanks to the Beta Test Team, who were invaluable not just in tracking down bugs, but in making this a better product.

Contact
Germany
Native Instruments GmbH
Schlesische Str. 29-30
D-10997 Berlin
Germany
www.native-instruments.de
USA
Native Instruments North America, Inc. 6725 Sunset Boulevard
5th Floor
Los Angeles, CA 90028 USA www.native-instruments.com
© Native Instruments GmbH, 2012. All rights reserved.

Table of Contents
Table of Contents
1 |
Welcome to the World of TRAKTOR 2! ......................................................................... |
8 |
||
|
1.1 |
What Is TRAKTOR 2? ................................................................................................................... |
8 |
|
|
1.2 |
Manual Conventions ................................................................................................................... |
8 |
|
|
1.3 |
System Requirements and Compatibility .................................................................................... |
9 |
|
2 |
Upgrading (from TRAKTOR PRO, TRAKTOR LE, and TRAKTOR ME) .................................. |
11 |
||
|
2.1 |
Backup |
....................................................................................................................................... |
11 |
|
2.2 |
Installation ................................................................................................................................. |
11 |
|
|
2.3 |
Importing ...................................................................................................................Your Data |
12 |
|
3 |
TRAKTOR's Setup ...........................................................................................Wizard |
13 |
||
4 |
The User Interface ....................................................................................(Overview) |
21 |
||
5 |
Importing Your ................................................................................................Music |
24 |
||
|
5.1 |
What Is .....................................................................................................the Track Collection? |
24 |
|
|
5.2 |
Importing .............................................................................................................Music Folders |
25 |
|
|
5.3 |
Tracks Managed .........................................................................................................by iTunes |
26 |
|
|
|
5.3.1 ............................................................................ |
Playing Tracks Managed by iTunes |
26 |
|
|
5.3.2 .............................................................. |
Importing a Selection of Tracks from iTunes |
27 |
|
|
5.3.3 ......................................................................................... |
Importing iTunes Playlists |
27 |
6 |
Tutorials ................................................................................................................... |
|
28 |
|
|
6.1 |
Prerequisites .............................................................................................................................. |
28 |
|
|
6.2 |
Goals of .................................................................................................the Following Chapters |
29 |
|
|
6.3 |
Playing ..............................................................................................................Your First Track |
30 |
|
|
|
6.3.1 ............................................................................................... |
Quick Loading a Track |
30 |
|
|
6.3.2 ....................................................................................................... |
Playing the Track |
32 |
|
|
6.3.3 ........................................................................................ |
If You Don’t Hear the Track |
33 |
|
6.4 |
Mixing In ............................................................................................................a Second Track |
35 |
|
|
|
6.4.1 ................................................... |
Pre - listening a Second Track in the Preview Player |
35 |
TRAKTOR - Getting Started - 4

|
|
|
Table of Contents |
|
|
|
|
|
6.4.2 |
Loading and Playing the Second Track ...................................................................... |
37 |
|
6.4.3 |
Using Headphones to Prepare the Mix ....................................................................... |
37 |
|
6.4.4 |
Synchronizing the Second Track ................................................................................ |
38 |
|
6.4.5 |
Setting a Cue Point as Starting Point ........................................................................ |
39 |
|
6.4.6 |
Snapping to the Beats ............................................................................................... |
42 |
|
6.4.7 |
Sticking to the Beats ................................................................................................. |
42 |
|
6.4.8 |
Interlude: In Case the Left Track Is Over… ............................................................... |
43 |
|
6.4.9 |
Mixing In the Track by Using the Channel EQ and Filter ............................................ |
43 |
|
6.4.10 |
Manual Beat-matching ............................................................................................. |
45 |
6.5 |
Adjusting Levels ......................................................................................................................... |
48 |
|
|
6.5.1 |
The Theory… ............................................................................................................. |
48 |
|
6.5.2 |
…and the Practice .................................................................................................... |
48 |
6.6 |
Looping and Cueing .................................................................................................................... |
51 |
|
|
6.6.1 |
Playing with Loops ..................................................................................................... |
51 |
|
6.6.2 |
Using Hotcues ........................................................................................................... |
54 |
6.7 |
Adding FX |
................................................................................................................................... |
56 |
|
6.7.1 |
Assigning a Deck to an FX Unit .................................................................................. |
57 |
|
6.7.2 |
Group Mode ............................................................................................................... |
58 |
|
6.7.3 |
Getting the FX Unit Ready .......................................................................................... |
58 |
|
6.7.4 |
Controlling the FX Unit .............................................................................................. |
59 |
|
6.7.5 |
Single Mode ............................................................................................................... |
60 |
|
6.7.6 |
Storing a Snapshot .................................................................................................... |
60 |
6.8 |
Using the Remix Decks in Your Mix ............................................................................................. |
61 |
|
|
6.8.1 |
Loading a Sample from the Collection ....................................................................... |
62 |
|
6.8.2 |
Triggering the Sample ............................................................................................... |
63 |
|
6.8.3 |
Capturing a Sample from a Track .............................................................................. |
65 |
|
6.8.4 |
More Sample Controls ................................................................................................ |
66 |
|
6.8.5 |
Saving A Remix Set .................................................................................................... |
69 |
TRAKTOR - Getting Started - 5

|
|
|
Table of Contents |
|
|
|
|
6.9 |
Using the Loop Recorder ............................................................................................................. |
69 |
|
|
6.9.1 |
Choosing a Source ..................................................................................................... |
70 |
|
6.9.2 |
Recording a Loop ....................................................................................................... |
71 |
|
6.9.3 |
Overdubbing .............................................................................................................. |
73 |
|
6.9.4 |
Further Uses of the Recorded Loop ............................................................................ |
73 |
6.10 |
Synchronization .......................................................................................................................... |
74 |
|
|
6.10.1 |
Introduction ............................................................................................................... |
74 |
|
6.10.2 |
The Tempo Master ..................................................................................................... |
74 |
|
6.10.3 |
The Beatgrid .............................................................................................................. |
79 |
|
6.10.4 |
Other Useful Tools for Synching ................................................................................. |
80 |
7 Using TRAKTOR SCRATCH PRO 2 ................................................................................ |
83 |
||
7.1 |
Enabling the Decks ..................................................................................................................... |
83 |
|
7.2 |
Calibration ................................................................................................................................. |
83 |
|
7.3 |
Tracking Modes .......................................................................................................................... |
84 |
|
|
7.3.1 |
Absolute Tracking Mode ............................................................................................. |
84 |
|
7.3.2 |
Relative Tracking Mode ............................................................................................. |
85 |
|
7.3.3 |
Internal Playback Mode ............................................................................................. |
85 |
7.4 |
Timecode Preferences ................................................................................................................. |
86 |
|
7.5 |
TRAKTOR SCRATCH PRO 2 Troubleshooting ................................................................................ |
87 |
|
|
7.5.1 |
Calibration Troubleshooting ...................................................................................... |
87 |
|
7.5.2 |
Audio Troubleshooting ............................................................................................... |
100 |
8 Customizing TRAKTOR 2 ............................................................................................ |
101 |
||
8.1 |
Routing |
....................................................................................................................................... |
103 |
8.2 |
Switching .........................................................................................................the Deck Flavors |
103 |
|
8.3 |
Effects (TRAKTOR .......................................................................PRO 2 / SCRATCH PRO 2 Only) |
104 |
|
8.4 |
Adjusting .........................................TRAKTOR’s Look (TRAKTOR PRO 2 / SCRATCH PRO 2 Only) |
105 |
|
8.5 |
MIDI and ....................................................................................................................Mappings |
106 |
|
8.6 |
Profiles ...................................................................................................................and Backup |
107 |
|
TRAKTOR - Getting Started - 6

|
|
|
Table of Contents |
|
|
||
9 Appendix — Common Setups ..................................................................................... |
108 |
||
9.1 |
TRAKTOR with an On-board Sound Card and Fallback ................................................................ |
108 |
|
9.2 |
TRAKTOR with an External Audio Interface ................................................................................. |
109 |
|
9.3 |
TRAKTOR with an External Mixer ................................................................................................. |
110 |
|
9.4 |
TRAKTOR with a Controller .......................................................................................................... |
111 |
|
|
9.4.1 |
Controllers with Mixer Controls (and Optionally a Built-In Audio Interface) ............... |
112 |
|
9.4.2 |
Controllers without Mixer Controls ............................................................................. |
113 |
9.5 |
TRAKTOR KONTROL S4 with TRAKTOR SCRATCH PRO 2 ............................................................... |
114 |
|
9.6 |
Adding a Microphone .................................................................................................................. |
114 |
|
|
9.6.1 |
Using Your Microphone with the Loop Recorder ......................................................... |
115 |
|
9.6.2 |
Using Your Microphone as a Live Input and with TRAKTOR FX ................................... |
115 |
9.7 |
Recording Setup ......................................................................................................................... |
116 |
|
|
9.7.1 |
Recording from the Internal Source ........................................................................... |
116 |
|
9.7.2 |
Recording from an External Source ............................................................................ |
117 |
Index |
........................................................................................................................ |
|
120 |
TRAKTOR - Getting Started - 7

Welcome to the World of TRAKTOR 2!
What Is TRAKTOR 2?
1Welcome to the World of TRAKTOR 2!
We are delighted that you have chosen TRAKTOR 2! This Getting Started guide is intended to help you set up and use your TRAKTOR system correctly.
1.1What Is TRAKTOR 2?
TRAKTOR 2 is the most powerful and versatile DJ software on the market. With TRAKTOR 2, you can mix your tracks traditionally as well as combine your tracks and loops in a non-linear way using it as a powerful live remixing tool.
Differences Between Versions
TRAKTOR Light Edition 2 and TRAKTOR Manufacturer Edition 2 are limited in certain features compared to the full TRAKTOR (SCRATCH) PRO 2 version. The differences will be documented at the appropriate places in this manual.
You're TRAKTOR version is a Manufacturer Edition 2 version if you obtained it as part of one of the following bundled products:
▪Pioneer DDJ-T1 (Traktor Pioneer DDJ-T1 Edition)
▪Numark 4TRAK (Traktor Numark 4TRAK Edition)
▪Velocity MIDI Station (Traktor Velocity MIDI Station Edition)
1.2Manual Conventions
Document Conventions
This manual uses particular formatting to point out special facts and to warn you of potential issues. The icons introducing these notes let you see what kind of information is to be expected:
TRAKTOR - Getting Started - 8
Welcome to the World of TRAKTOR 2!
System Requirements and Compatibility
Whenever this exclamation mark icon appears, you should read the corresponding note carefully and follow the instructions and hints given there if applicable.
This light bulb icon indicates that a note contains useful extra information. This information may often help you to solve a task more efficiently, but does not necessarily apply to the setup or operating system you are using; however, it's always worth a look.
Furthermore, the following formatting is used:
▪Text appearing in (drop-down) menus (such as Open…, Save as… etc.), in paths to locations on your hard drive or other storage devices, and in Preferences paths is printed in italics.
▪Text appearing elsewhere (labels of buttons, controls, text next to checkboxes etc.) is printed in blue. Whenever you see this formatting applied, you will find the same text appearing somewhere on the screen.
▪Important names and concepts are printed in bold.
►Single instructions are introduced by this play button type arrow.
→Results of actions are introduced by this smaller arrow.
Pet Names for the Software
Throughout the documentation, we will refer to the TRAKTOR (SCRATCH) PRO 2 software as “TRAKTOR 2” or simply “TRAKTOR.”
TRAKTOR Manufacturer Edition 2 will hereinafter be referred to as "TRAKTOR ME 2" or simply "ME 2." TRAKTOR Light Edition 2 will hereinafter be referred to as "TRAKTOR LE 2" or simply "LE 2."
1.3System Requirements and Compatibility
For the minimum system requirements your computer needs to meet, see the TRAKTOR section of the Native Instruments website:
http://www.native-instruments.com/#/en/products/dj/traktor-pro-2/specifications/?page=2050
TRAKTOR - Getting Started - 9
Welcome to the World of TRAKTOR 2!
System Requirements and Compatibility
Please note that meeting the system requirements does not guarantee running all TRAKTOR 2 features hassle-free. You might be forced to tweak your system following Native Instruments’ tuning tips for audio computers. You can find these tuning tips in the Knowledge Base—see the TRAKTOR 2 Manual's "Getting Help" chapter for more information.
To check the compatibility with several operating systems, please have a look at: http:// www.native-instruments.com/compatibility
TRAKTOR - Getting Started - 10
Upgrading (from TRAKTOR PRO, TRAKTOR LE, and TRAKTOR ME)
Backup
2Upgrading (from TRAKTOR PRO, TRAKTOR LE, and TRAKTOR ME)
When upgrading from one of the aforementioned versions, you will need to import your user data and mappings. This is a straightforward process assisted by the TRAKTOR software; however, there are a few things to be observed when upgrading. See the following sections for more info.
2.1Backup
Before installing TRAKTOR 2 over you're previous version, backup the following folders and files:
▪your TRAKTOR folder, per default found in [User]\My Documents\Native Instruments \Traktor (Windows) and User:Documents:Native Instruments:Traktor (Mac OS X)
▪your Music folders as defined in Preferences > Data Location > Music Folders
▪any other data that is not stored in the aforementioned places because you have chosen another location for them.
At this point, it is a good idea to remove all unnecessary files from your TRAKTOR folder, e.g,. mappings for controllers you don’t use anymore, etc.
2.2Installation
Follow the instructions from the Setup Guide carefully.
As a general rule: start with the software installation before you install the hardware (TRAK-
TOR AUDIO 6/10, TRAKTOR KONTROL X1, TRAKTOR KONTROL S4, etc.)!
TRAKTOR - Getting Started - 11

Upgrading (from TRAKTOR PRO, TRAKTOR LE, and TRAKTOR ME)
Importing Your Data
The installation creates a new User Folder in [User]\My Documents\Native Instruments\Traktor 2.x.x (Windows) and User:Documents:Native Instruments:Traktor 2.x.x (Mac OS X). Also, your previous TRAKTOR version will not be uninstalled. This means that from now on you’ll always be able to easily return to the last version if needed.
2.3Importing Your Data
▪When you start TRAKTOR 2 for the first time, the Setup Wizard greets you with some simple questions regarding your setup. This will adjust TRAKTOR’s look and Preferences accordingly. Read more about the Setup Wizard in ↑3, TRAKTOR's Setup Wizard.
▪Next, TRAKTOR will ask if you want to import your previous data by copying the existing user content to a new folder in your user folder. Your previous data will not be altered if you copy it to the new default folder.
Importing Your MIDI and Hotkey Mappings
For TRAKTOR 2, the mapping system has been changed. While some mappings created with previous versions of TRAKTOR may still work, others will not be imported correctly.
We recommend double-checking your imported mappings before you use them in a live situation.
TRAKTOR - Getting Started - 12
TRAKTOR's Setup Wizard
3TRAKTOR's Setup Wizard
The Setup Wizard lets you configure TRAKTOR in a few simple steps. It also is a convenient way to restart with a fresh out-of-the-box setup. The Setup Wizard does two things:
▪It lets you choose from a few basic audio, MIDI, and general setup configurations and automatically sets the available options accordingly.
▪It resets all other TRAKTOR 2 settings to their default values.
Depending on the version of TRAKTOR software you have (e.g., LE 2, ME 2), the Setup
Wizard may not offer all shown screens or selections.
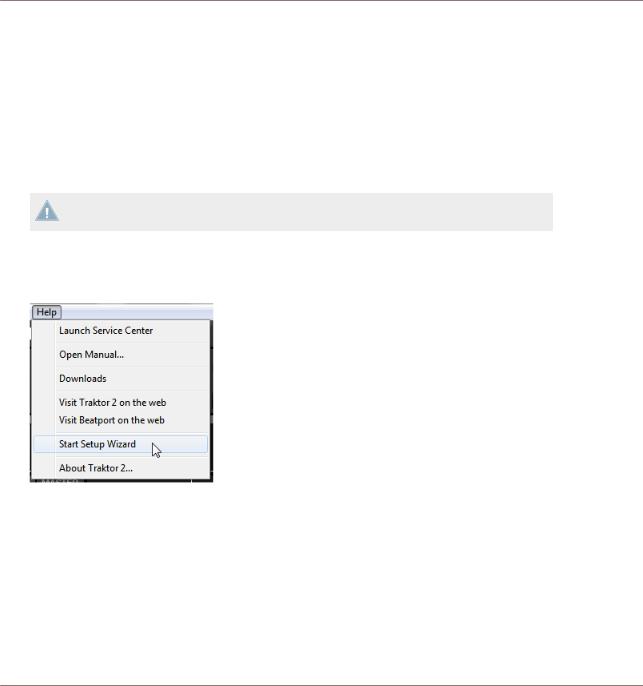
You can start the Setup Wizard in two ways:
►Select Start Setup Wizard in the Help menu of the Application Menu Bar (to see this bar, Fullscreen mode must be deactivated).
►Or click the Setup Wizard button at the bottom left corner of the Preferences window.
Exemplary Setup
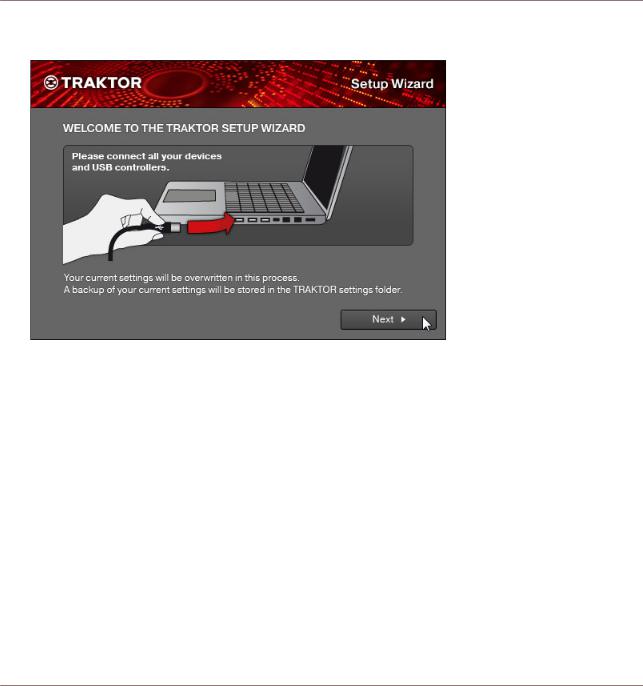
Let's walk you through an exemplary configuration using the Setup Wizard:
TRAKTOR - Getting Started - 13
TRAKTOR's Setup Wizard
1.On the welcome screen, click Next to confirm you have connected any TRAKTOR controllers to your computer via USB (if you are using any).
TRAKTOR - Getting Started - 14
TRAKTOR's Setup Wizard
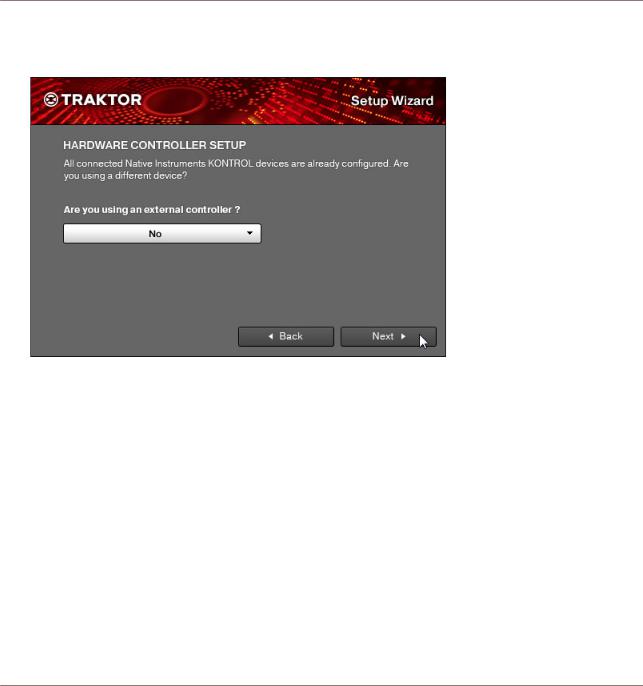
2.Select whether or not you want to use TRAKTOR with a MIDI controller and proceed with Next. If you are using one of NI's "KONTROL" models (S4, S2, F1, X1, etc.), select No here as TRAKTOR is already pre-configured for use with these.
TRAKTOR - Getting Started - 15
TRAKTOR's Setup Wizard
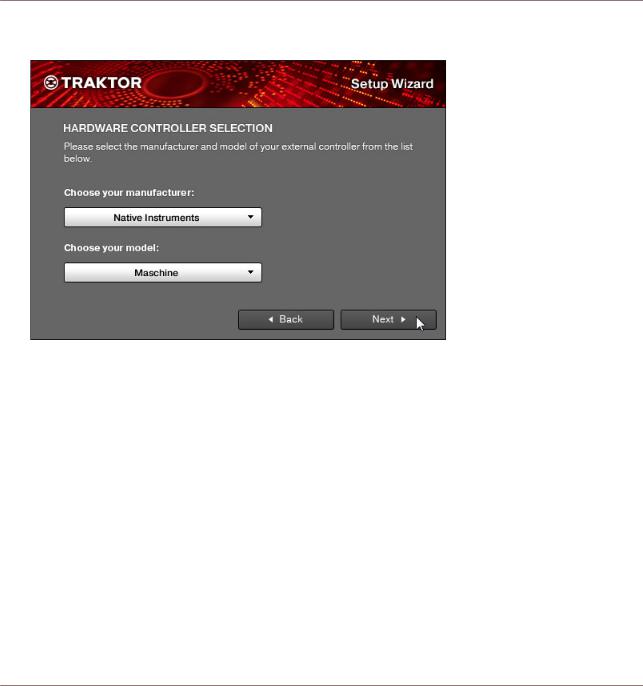
3.If you previously selected to use TRAKTOR with a controller, choose the controller manufacturer and model from the drop-down lists and confirm with Next.
TRAKTOR - Getting Started - 16
TRAKTOR's Setup Wizard
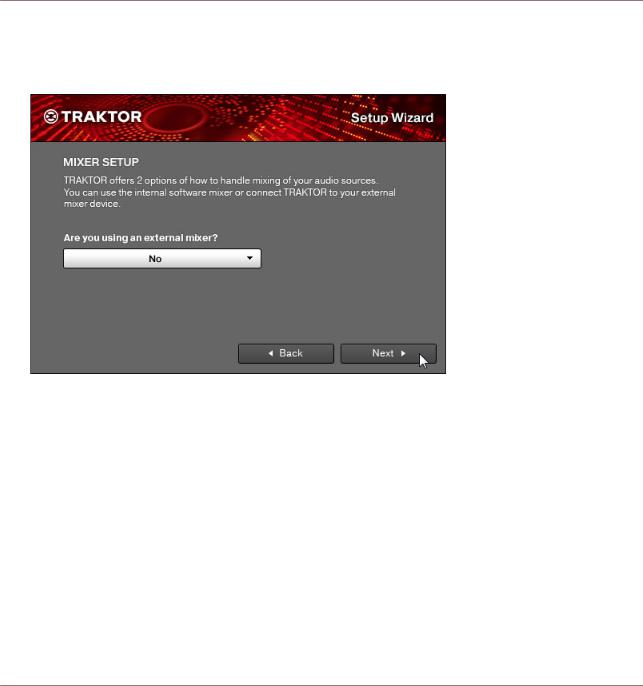
4.In case your TRAKTOR version is TRAKTOR PRO, ME, or LE, select whether you want to use an external DJ mixer or TRAKTOR's internal software mixer in your setup. Confirm with Next. In case of TRAKTOR SCRATCH PRO, this screen is skipped and external mixing is auto-selected.
TRAKTOR - Getting Started - 17
TRAKTOR's Setup Wizard
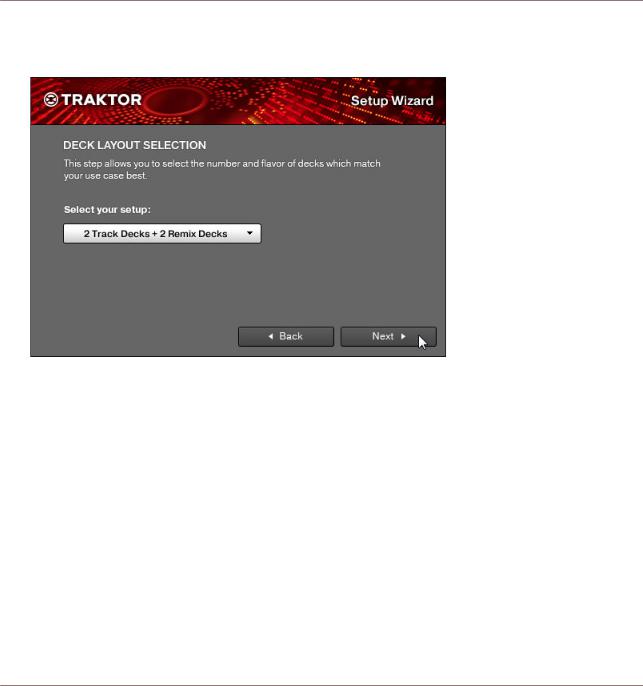
5.Select a basic setup for your Decks (how many Decks and what Deck Flavors to use). This can later be easily changed from within the software. The available options can vary, depending on your TRAKTOR version.
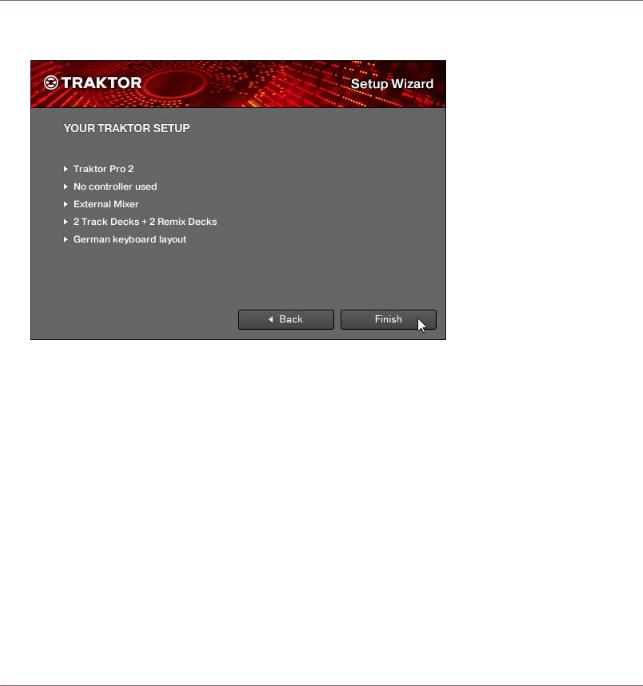
6.The last screen of the Setup Wizard sums up your selection of options. Below you see a summary screen with an exemplary configuration of TRAKTOR with: four Decks (two Track Decks and two Remix Decks); an external DJ mixer; a German keyboard layout (derived
TRAKTOR - Getting Started - 18
TRAKTOR's Setup Wizard
from the system settings).You can click Back to change the settings made, Cancel to cancel the Setup Wizard completely, or Finish, which confirms your selections.
TRAKTOR - Getting Started - 19

TRAKTOR's Setup Wizard
→TRAKTOR starts with the selected settings and a matching interface layout, e.g., if you selected to use an external DJ mixer, TRAKTOR's software mixer will be hidden. You can always change the Layout of the user interface with the Layout selection menu in TRAKTOR's header.
To change the Deck Flavors, click on the Deck letter in a Deck's upper right corner and select a Flavor from the drop-down menu:
TRAKTOR - Getting Started - 20
The User Interface (Overview)
4The User Interface (Overview)
This chapter will introduce you to TRAKTOR 2’s user interface.
Take the time to read these few pages, as they will familiarize you with the way TRAK-
TOR 2 works and provide insight to the power of its design.
Preparation
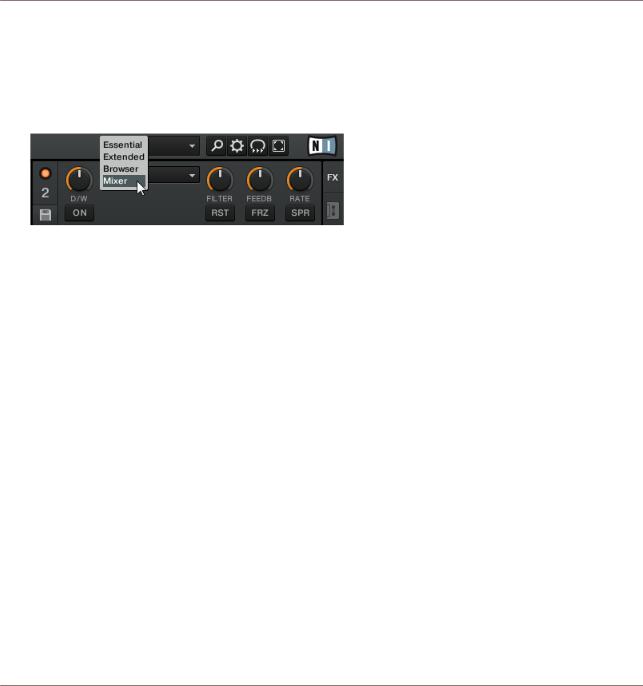
TRAKTOR uses a set of user interface layouts to organize its graphical user interface. Accordingly, these are called "Layouts" in TRAKTOR terminology. You can access them from TRAKTOR's Layout drop-down menu in the software's Header.
Use the Layout selection drop-down menu to select a Layout.
Depending on which Layout you select, certain elements of the user interface will be displayed while others will remain hidden.
When you start TRAKTOR 2 for the first time, it opens the "Essential" Layout, which shows all TRAKTOR Decks and navigational elements, but it hides the Mixer.
To make all elements described hereafter visible:
►Open the layout named "Mixer" by selecting it from the drop-down menu.
 TRAKTOR ME 2 note: The contained layouts differ for ME 2.
If you are using TRAKTOR SCRATCH PRO 2, you will most likely use an external mixer instead of TRAKTOR's internal software mixer; however, to follow the explanations in this manual, you should also open the Mixer layout.
TRAKTOR - Getting Started - 21
The User Interface (Overview)
The Big Picture
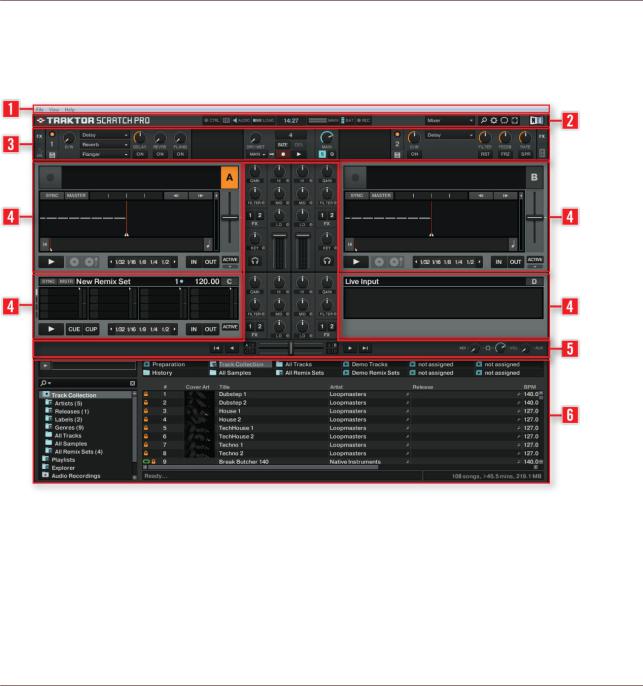
The picture below shows the interface of TRAKTOR SCRATCH PRO 2. Your graphical user interface will look slightly different if you are using TRAKTOR LE 2.
The main areas of the software.
(1) Application Menu Bar: The Application Menu Bar provides access to basic functions and information about the software.
(2) Header: Here you can find various status indicators and useful functions and buttons, e.g. the Preferences button.
(3) Global section: The Global section contains the FX Units, Master Clock, the Audio Recorder as well as the new Loop Recorder.
TRAKTOR - Getting Started - 22

The User Interface (Overview)
(4) Decks: TRAKTOR provides you with four virtual Decks. The Decks are the place where tracks, Samples, and live input are played back. The Decks can be seen as the virtual equivalent to good old vinyl or CD decks.
(5) Mixer: Sitting in the middle of your TRAKTOR 2 window is the Mixer. It receives on its four channels the audio signals coming from the four Decks described above. There is one channel for each Deck. As with any DJ mixer, the Mixer’s basic purpose is to adjust the relative level of each channel, to control the channels’ frequency content, possibly feeding them into the FX Units, before sending the overall result to your audience.
(6) Browser: The Browser manages all your tracks in a database called the Track Collection. You can group tracks in Playlists, sort them according different attributes, and search within Playlists as well as in the whole Collection.
 TRAKTOR LE 2 note: The Audio Recorder is not available in LE 2.
For further details, please refer to the TRAKTOR 2 Manual.
TRAKTOR - Getting Started - 23
Importing Your Music
What Is the Track Collection?
5Importing Your Music
Most likely you already have a collection of music files on your computer. For those of you who can’t wait to start mixing your tracks, this chapter is for you! You will learn here how to quickly import your music into the powerful Track Collection of TRAKTOR.
5.1What Is the Track Collection?
The Track Collection (or simply “Collection”) represents the music that you have used, that you are using, or that you plan to use in TRAKTOR 2.
Based on the music files on your computer, the Collection makes it easy to organize, tag, and prepare your tracks for being played as part of your mix.
Worth noting is that the Track Collection doesn’t care about the actual file structure on your hard disk, nor will it alter this structure in any way (as long as you don’t delete your files from within TRAKTOR 2).
The Track Collection is:
▪A database storing numerous information about your music files.
▪A convenient way to filter your music files by many of their characteristics (tags) like title, artist name, BPM, genre, etc.
▪The place where TRAKTOR-specific information about your tracks is stored.
▪The basis on which you can create your Playlists.
The Track Collection is not:
▪Moving, copying, or converting any audio file to some secret location.
▪Modifying in any way the hierarchic structure of your files on your hard disk.
To make use of the Track Collection, you have to populate it by importing your music files.
TRAKTOR reads existing song tags during the import of the music and writes tags to the tracks immediately when you change some property of one or more track(s), like changing the Genre of a song.
TRAKTOR - Getting Started - 24
Importing Your Music
Importing Music Folders
5.2Importing Music Folders
TRAKTOR offers an easy import function for tracks stored on your hard drive:
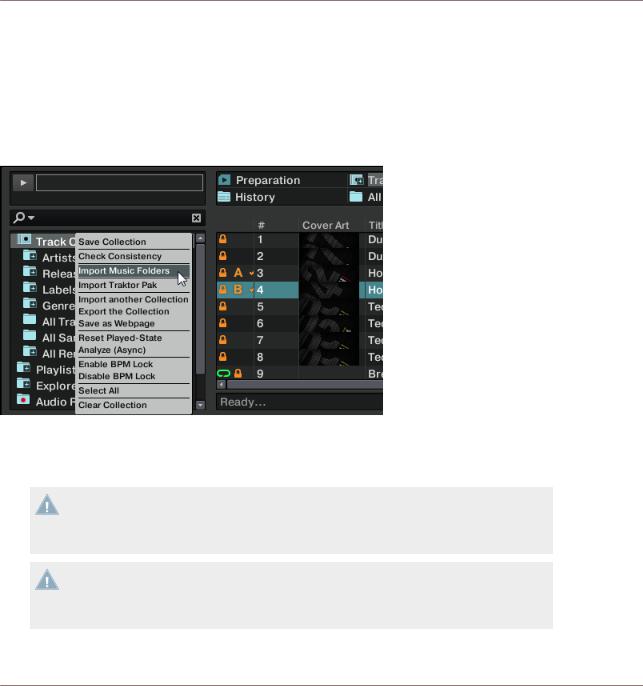
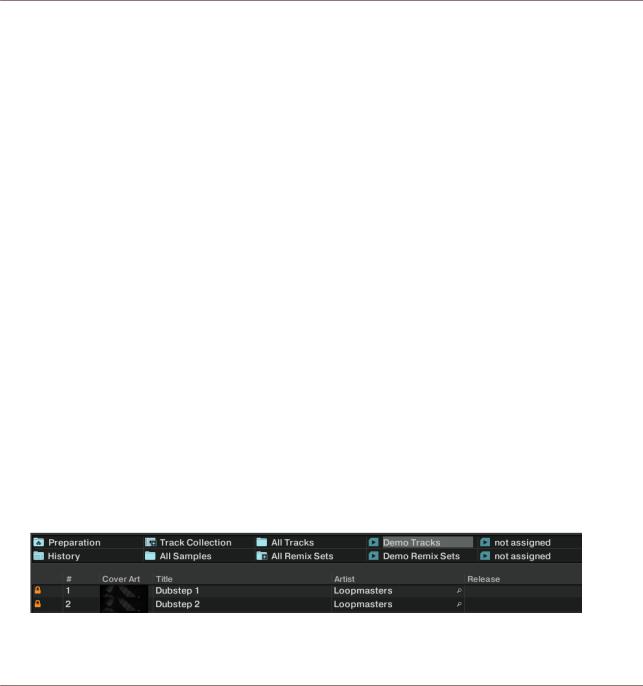
►Right-click (Windows) or [Ctrl]+click (Mac OS X) on the Collection icon in the Browser Tree and select Import Music Folders from the menu.
The contextual menu for the Track Collection, with the Import Music Folders entry selected.
By default, this process imports all music files contained in the My Music folder of your operating system.
TRAKTOR analyzes music for certain characteristics (BPM, length, etc.) when loaded into a Deck for the first time. This function takes some time to process. Be sure to prepare the tracks you want to use in a DJ set beforehand if you want to use features such as syncing or Auto Looping with them without having to wait for this analysis process.
If your Track Collection contains more than 10,000 files, it is recommended to have TRAKTOR 2 analyze your Track Collection in smaller chunks of only a few thousand files each. As this procedure may take quite a while, it is a good idea to let TRAKTOR perform the analysis while you are not working with your computer such as overnight.
TRAKTOR - Getting Started - 25
Importing Your Music
Tracks Managed by iTunes
The Status Bar at the bottom of the Browser window will provide a visual indication of the analysis process and alert you to any problems.
Adding Files from Other Folders
If you have stored tracks in other folders or on external storage devices, you can add these folders to the list of TRAKTOR Music Folders as follows:
1.Open Preferences > File Management.
2.Click Add… at the bottom of the Music Folders section.
3.Navigate to a folder you want to add.
4.Confirm with Choose (Mac OS X) or OK (Windows).
5.Click Close to apply the changes.
Repeat to add all of your music folders.
Subfolders are automatically included in the scan. Hence, you don’t need to add them to this list.
5.3Tracks Managed by iTunes
If you have organized your music collection with iTunes, TRAKTOR 2 offers direct access to your iTunes Library and your iTunes Playlists.
5.3.1Playing Tracks Managed by iTunes
You can browse your iTunes Library and Playlists directly from TRAKTOR.
The iTunes tree node represents a read-only view on your iTunes Library and Playlists. Editing functions are not available in this view.
To browse your iTunes content from within TRAKTOR:
1.Click the iTunes icon in the Browser Tree to open that node.
2.Browse through the Library and Playlists as you would in iTunes.
3.Load a track into a Deck as you would do from a normal TRAKTOR Playlist—for example by dragging the track onto that Deck.
TRAKTOR - Getting Started - 26

Importing Your Music
Tracks Managed by iTunes
5.3.2Importing a Selection of Tracks from iTunes
You can import a selection of tracks from your iTunes Library into the Track Collection via the TRAKTOR 2 user interface:
1.Click the iTunes icon in the Browser Tree to open the iTunes node.
2.Select the tracks to import into the Track Collection.
3.Drag the selection onto the Track Collection icon in the Browser Tree.
4.Alternatively, right-click (Windows) or [Ctrl]-click (Mac OS X) on the selection and choose Import to Collection in the contextual menu.
5.3.3Importing iTunes Playlists
You can directly import iTunes Playlists as TRAKTOR Playlists via the TRAKTOR 2 user interface:
1.Click the iTunes icon in the Browser Tree to open the iTunes node.
2.Select the Playlist to be imported.
3.Drag the Playlist onto the Playlists icon. Alternatively right-click (Windows) or [Ctrl]-click (Mac OS X) on the Playlist and choose Import to Playlists in the contextual menu.
→A dialog box will appear asking for a name for the new Playlist. Type in a name and click OK.
TRAKTOR - Getting Started - 27
Tutorials
Prerequisites
6Tutorials
This chapter will guide you through the most common tasks that you will encounter during your work with TRAKTOR.
The tutorials are workflow-oriented. They start with the simplest tasks and progressively lead you to more complex operation, helping you to get more and more familiar with TRAKTOR 2. After reading this, you should have the basic know-how allowing you to mix with TRAKTOR 2.
If you are using TRAKTOR LE 2 or TRAKTOR Manufacturer Edition 2, some of the instructions do not apply due to the limitations of your software flavor.
6.1Prerequisites
These tutorials can be read in a linear manner from the first to the last tutorial. However, if you have used previous TRAKTOR versions and are already familiar with certain tasks, you can skip the first tutorials and continue reading the later tutorials. Or, if you want to experiment more with TRAKTOR and come back to the tutorials later, you can find the needed prerequisites for every tutorial here.
Even if you’re already familiar with TRAKTOR, all tutorials are worth a read as every chapter may have little workflow hints of which you weren’t aware.
The tutorials make use of the included demo tracks which were copied to your hard disk during the installation procedure. Thus, you can follow these tutorials even if you haven’t imported your own music into the Track Collection yet. For more info on how to import your music into the Track Collection, please refer to chapter ↑5.2, Importing Music Folders.
We assume that your TRAKTOR is already up and running. If it’s not the case, please follow the instructions in the Setup Guide and come back here when you have set up your system correctly!
In case you already changed some settings in TRAKTOR before you started with these tutorials, we strongly recommend you to reset TRAKTOR to the factory settings:
TRAKTOR - Getting Started - 28
Tutorials
Goals of the Following Chapters
1.Click the Help menu in the menu bar at the top of your screen (on Mac OS X) or at the top of the window (on Windows), and select Help > Start Setup Wizard.
2.Follow the instructions of the Setup Wizard to incorporate your equipment (read more about the Setup Wizard in ↑3, TRAKTOR's Setup Wizard). TRAKTOR is now reset to the factory settings.
3.Choose the Mixer Layout from the available options in the Layout Selector menu.
6.2Goals of the Following Chapters
The following sections describe the goals and prerequisites for every chapter. This way you can jump into a desired tutorial whenever you like!
Chapter ↑6.3, Playing Your First Track to ↑6.7, Adding FX
Read the instructions below. If you feel unsure about any step, read the respective chapter. If you can accomplish the task without assistance, you can ignore the relevant chapter and continue with the subsequent step.
1.Load the track Techno 1 from the included Demo Tracks Playlist onto to Deck A and start playback (chapter ↑6.3, Playing Your First Track).
2.Load the track Techno 2 from the included Demo Tracks Playlist onto Deck B and start playback. Deck A should be the tempo master (chapter ↑6.4, Mixing In a Second Track).
3.Synchronize the tempo of the track in Deck B with the tempo of the track in Deck A (chapter ↑6.5, Adjusting Levels).
4.From chapter ↑6.6, Looping and Cueing on, a new track will be loaded and played back in Deck A: House 1. Deck B should now be tempo master.
5.If you know how to store Loops and Cue Points, do so in both tracks and skip chapter ↑6.6, Looping and Cueing.
TRAKTOR - Getting Started - 29
Tutorials
Playing Your First Track
6.If you know how to assign an FX Unit to a Deck, and if you know the difference between Single and Group FX mode, and how to change FX, you can also skip chapter ↑6.7, Adding FX.
Chapter ↑6.8, Using the Remix Decks in Your Mix to ↑6.10, Synchronization
Chapters ↑6.8, Using the Remix Decks in Your Mix and ↑6.9, Using the Loop Recorder introduce the Remix Decks and the Loop Recorder. Read these tutorials for a comprehensive introduction to the versatile Remix Deck and Loop Recorder features!
Chapter ↑6.10, Synchronization is about Master Clock modes and syncing tracks. Since the Master Clock/Syncing concept has been changed and improved in TRAKTOR 2, we strongly recommend you to read this chapter carefully, even if you were familiar with the syncing concept in older versions of TRAKTOR!
6.3Playing Your First Track
This first tutorial will show you how to load and play a track, how to check the needed audio outputs, and how to quickly troubleshoot your system if no music can be heard.
Prerequisites
In case you already changed some settings in TRAKTOR 2 before you started with these tutorials, we strongly recommend you to reset TRAKTOR 2 to the factory settings by doing as described above in chapter ↑6.1, Prerequisites.
6.3.1Quick Loading a Track
Let’s load the track Techno 1 from the included demo tracks on to Deck A:
1.Click on the Demo Tracks Favorite. The tracks of the Demo Tracks Playlist appear below:
2.Click on the track Techno 1 in the Playlist. The track will be highlighted.
TRAKTOR - Getting Started - 30
Loading...