


Operating Instructions
Washer-Extractor
WS 5240
WS 5320
To prevent accidents
and machine damage read these instructions before installing or using the machine.
UV
M.-Nr. 05 649 900

Contents
Warning and Safety Instructions . . . . . . . . . . . . . . . . . . . . . . . . . . . . . . . . . . . . . . . . . . . . . . . 3 Caring for the environment . . . . . . . . . . . . . . . . . . . . . . . . . . . . . . . . . . . . . . . . . . . . . . . . . . . . 5 Guide to the washer-extractor. . . . . . . . . . . . . . . . . . . . . . . . . . . . . . . . . . . . . . . . . . . . . . . . . . 6 Control panel . . . . . . . . . . . . . . . . . . . . . . . . . . . . . . . . . . . . . . . . . . . . . . . . . . . . . . . . . . . . . . . . 7 Special options buttons . . . . . . . . . . . . . . . . . . . . . . . . . . . . . . . . . . . . . . . . . . . . . . . . . . . . . . . 10 Operation . . . . . . . . . . . . . . . . . . . . . . . . . . . . . . . . . . . . . . . . . . . . . . . . . . . . . . . . . . . . . . . . . 12 Language selection* . . . . . . . . . . . . . . . . . . . . . . . . . . . . . . . . . . . . . . . . . . . . . . . . . . . . . . . . . 12 Setting current time and date* . . . . . . . . . . . . . . . . . . . . . . . . . . . . . . . . . . . . . . . . . . . . . . . . . . 12 Start up. . . . . . . . . . . . . . . . . . . . . . . . . . . . . . . . . . . . . . . . . . . . . . . . . . . . . . . . . . . . . . . . . . . . 13 Program selection . . . . . . . . . . . . . . . . . . . . . . . . . . . . . . . . . . . . . . . . . . . . . . . . . . . . . . . . . . . 13 Changing temperaure and spin speed . . . . . . . . . . . . . . . . . . . . . . . . . . . . . . . . . . . . . . . . . . . 14 Adding detergent . . . . . . . . . . . . . . . . . . . . . . . . . . . . . . . . . . . . . . . . . . . . . . . . . . . . . . . . . . . . 14 Program end display . . . . . . . . . . . . . . . . . . . . . . . . . . . . . . . . . . . . . . . . . . . . . . . . . . . . . . . . . 15 Program end - opening the drum door . . . . . . . . . . . . . . . . . . . . . . . . . . . . . . . . . . . . . . . . . . . 15 Delayed Start W. . . . . . . . . . . . . . . . . . . . . . . . . . . . . . . . . . . . . . . . . . . . . . . . . . . . . . . . . . . . . 16 Notes . . . . . . . . . . . . . . . . . . . . . . . . . . . . . . . . . . . . . . . . . . . . . . . . . . . . . . . . . . . . . . . . . . . . . 17 Prewash T. . . . . . . . . . . . . . . . . . . . . . . . . . . . . . . . . . . . . . . . . . . . . . . . . . . . . . . . . . . . . . . . . 17 Starch U. . . . . . . . . . . . . . . . . . . . . . . . . . . . . . . . . . . . . . . . . . . . . . . . . . . . . . . . . . . . . . . . . . . 17 Without spin V. . . . . . . . . . . . . . . . . . . . . . . . . . . . . . . . . . . . . . . . . . . . . . . . . . . . . . . . . . . . . . 18 Skipping program cycles . . . . . . . . . . . . . . . . . . . . . . . . . . . . . . . . . . . . . . . . . . . . . . . . . . . . . . 19 Program cancellation . . . . . . . . . . . . . . . . . . . . . . . . . . . . . . . . . . . . . . . . . . . . . . . . . . . . . . . . . 19 Liquid dispensing. . . . . . . . . . . . . . . . . . . . . . . . . . . . . . . . . . . . . . . . . . . . . . . . . . . . . . . . . . . 20 Peak load cut-out / PCPrinter connection . . . . . . . . . . . . . . . . . . . . . . . . . . . . . . . . . . . . . . 25 Problem solving guide . . . . . . . . . . . . . . . . . . . . . . . . . . . . . . . . . . . . . . . . . . . . . . . . . . . . . . . 26 Power failure - Emergency door release . . . . . . . . . . . . . . . . . . . . . . . . . . . . . . . . . . . . . . . . . . 26 Problem solving guide . . . . . . . . . . . . . . . . . . . . . . . . . . . . . . . . . . . . . . . . . . . . . . . . . . . . . . . 27 Fault messages . . . . . . . . . . . . . . . . . . . . . . . . . . . . . . . . . . . . . . . . . . . . . . . . . . . . . . . . . . . . . 27 After sales service . . . . . . . . . . . . . . . . . . . . . . . . . . . . . . . . . . . . . . . . . . . . . . . . . . . . . . . . . . 29 Cleaning and Care . . . . . . . . . . . . . . . . . . . . . . . . . . . . . . . . . . . . . . . . . . . . . . . . . . . . . . . . . . 30 After each use . . . . . . . . . . . . . . . . . . . . . . . . . . . . . . . . . . . . . . . . . . . . . . . . . . . . . . . . . . . . . . 30 Cleaning the exterior . . . . . . . . . . . . . . . . . . . . . . . . . . . . . . . . . . . . . . . . . . . . . . . . . . . . . . . . . 30 Cleaning the dispenser box and siphon . . . . . . . . . . . . . . . . . . . . . . . . . . . . . . . . . . . . . . . . . . 30 Cleaning the cooling fan . . . . . . . . . . . . . . . . . . . . . . . . . . . . . . . . . . . . . . . . . . . . . . . . . . . . . . 30 Cleaning the filters . . . . . . . . . . . . . . . . . . . . . . . . . . . . . . . . . . . . . . . . . . . . . . . . . . . . . . . . . . . 31 Cleaning the drum . . . . . . . . . . . . . . . . . . . . . . . . . . . . . . . . . . . . . . . . . . . . . . . . . . . . . . . . . . . 31 Maintaining the drum . . . . . . . . . . . . . . . . . . . . . . . . . . . . . . . . . . . . . . . . . . . . . . . . . . . . . . . . . 31 Guide to the symbols on the data plate . . . . . . . . . . . . . . . . . . . . . . . . . . . . . . . . . . . . . . . . . 32 Installation . . . . . . . . . . . . . . . . . . . . . . . . . . . . . . . . . . . . . . . . . . . . . . . . . . . . . . . . . . . . . . . . 33 Plumbing . . . . . . . . . . . . . . . . . . . . . . . . . . . . . . . . . . . . . . . . . . . . . . . . . . . . . . . . . . . . . . . . . . 34 Electrical connection . . . . . . . . . . . . . . . . . . . . . . . . . . . . . . . . . . . . . . . . . . . . . . . . . . . . . . . . . 35 Steam connection . . . . . . . . . . . . . . . . . . . . . . . . . . . . . . . . . . . . . . . . . . . . . . . . . . . . . . . . . . . 35
2

Warning and Safety Instructions
WARNING
Read all instructions before installation or use to prevent injury and machine damage.
This washer-extractor is only intended for laundry not impregnated with dangerous or flammable substances.
Dry cleaning solvents must not be used in this machine. Such solvents could cause a fire or explosion.
This appliance conforms to all uniform safety codes and regulations. The manufacturer cannot be held responsible for damage or injury caused by improper use of this appliance.
All personnel working with this machine must be fully trained in its use and safety.
SAVE THESE INSTRUCTIONS AND REVIEW THEM PERIODICALLY
Electrical Safety
Installation, repair and maintenance work should be by a Miele authorized
service technician. Work by unqualified persons could be dangerous.
Before installation make sure that the voltage and frequency listed on the
data plate correspond with the site electrical supply. This data must correspond to prevent injury and machine damage. Consult a qualified electrician if in doubt.
Be certain your appliance is properly installed and grounded by a qualified
technician.
To guarantee the electrical safety of this appliance, continuity must exist between the appliance and an effective grounding system. It is imperative that this basic safety requirement be met. If there is any doubt, have the electrical system of the house checked by a qualified electrician. The manufacturer cannot be held responsible for damages caused by the lack, or inadequacy of, an effective grounding system.
The appliance is only completely isolated from the electrical supply when
the fuse is withdrawn, the circuit breaker has been tripped, or the unit has been unplugged.
Do not damage, remove or bypass the safety features and controls of the ma-
chine.
If there is any damage to the machine or to the cable insulation, the machine must not be used until it has been repaired.
Any removable outer panels must be in place, and all moving or electrical parts
shielded before the machine is operated.
Use
Never use or store gasoline or gasoline based substances or any easily flam-
mable substances near the machine. Do not use the machine lid as a storage area.
Danger of fire or explosion.
Only machine wash articles with a care label stating they are suitable for ma-
chine washing.
Never attempt to force open the door of the washer extractor. As a safety feature
the door handle has been designed with a break line.
Never allow children to play in, on or near the washer extractor, or to operate
it themselves. Please supervise its use by the elderly or infirm.
The door porthole glass can become hot during use of the machine. Do not
allow children to touch the glass.
Always make sure the drum is stationary before reaching in to remove laun-
dry. Reaching into a moving drum is extremely dangerous.
Waste water from washing and rinsing must not be used as drinking water. It must be discharged into a proper sewage
system.
The machine should only be operated unsupervised if there is a floor drain
(gully) in the direct vicinity of the machine.
3

Warning and Safety Instructions
Only use genuine Miele accessories. If unapproved parts are used, guarantee,
performance and product liability claims may become void.
Chlorine or agents containing chlorine are corrosive, and can under certain
conditions lead to permanent damage to components.
Disinfecting and cleaning agents often contain chloride (salts). If these sub-
stances dry on steel surfaces the residual chlorides can attack the steel and cause rusting.
To protect your machine from rust damage, only use chloride free disinfecting and cleaning agents for washing and disinfecting, and for cleaning the machine. If you accidentally spill an agent containing chloride on the machine it should be rinsed off with water and dried using a soft cloth.
Always follow the instructions of the chemical manufacturer when using cleaning agents and special application
chemicals. Only use such chemicals for the purpose and in the situation specified by the manufacturer in order to avoid the danger of adverse chemical reactions and material damage. If in doubt check the suitability of the product for use in this machine with the manufacturer before using it.
Where a chemical cleaning agent is recommended on technical application
grounds, this does not imply that the manufacturer of the machine takes responsibility for the effect of the chemical on the material of the items being cleaned or on the machine. Please be aware that changes in formulation, storage conditions etc., which may not be published by the chemical producer, can have a negative effect on the cleaning result.
Dyes, dye removers and descaling agents may only be used in this ma-
chine if the manufacturer expressly states that they are suitable for use in a washing machine. There may be the danger of fire or explosion.
Do not use high pressure cleaners to hose down the machine.
Maintenance
Faulty components should only be replaced with genuine Miele spare parts.
The safety standards of the machine can only be guaranteed when Miele spare parts are used.
Over time deterioration of parts can occur, especially rubber components
such as hoses. Check the inlet hoses regularly for signs of deterioration or leaks, to prevent water or machine damage.
Local regulations regarding regular inspection and maintenance of this ma-
chine must be observed.
Noise level |
|
|
|
Wash cycle |
Spin cycle |
WS 5240 |
60.3 dB |
82.2 dB |
WS 5320 |
60.0 dB |
80.3 dB |
Disposal of an old appliance
When disposing of an appliance first make it unusable. Disconnect it from electricity, cut off the power cord and re-
move the plug.
Disable the door lock, so children cannot accidentally shut themselves in. Make appropriate arrangements for the safe disposal of the appliance.
KEEP THESE INSTRUCTIONS IN A SAFE PLACE.
4

Caring for the environment
Disposal of the packing material
The transport and protective packing materials are environmentally friendly for disposal and can normally be recycled. Please recycle.
Ensure that any plastic wrappings, bags etc. are disposed of safely and kept out of the reach of babies and young children. Danger of suffocation!
Disposal of an old appliance
Old appliances contain materials that may be recyclable. Please contact your local recycling authority about potential recycling, before disposing of the appliance.
5
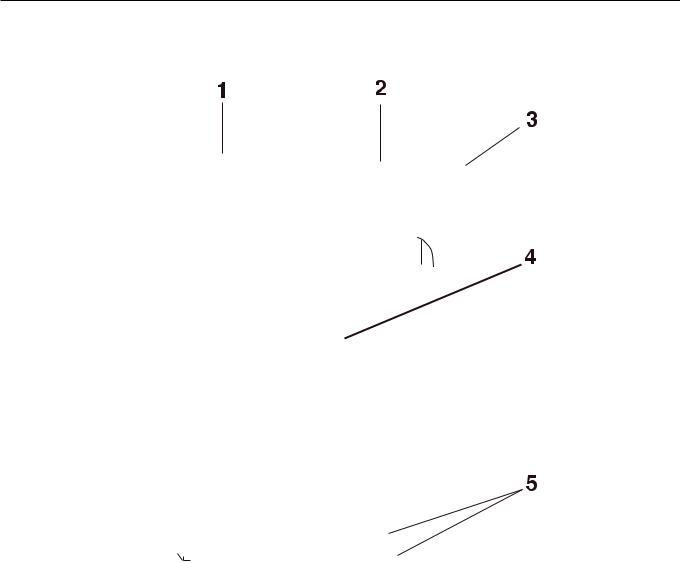
Guide to the washer-extractor
1 Detergent dispenser
2 Control panel
3 Emergency Stop button
4 Drum door
5 Service panel with plinth
6

Guide to the washer-extractor
Control panel
6 |
Display |
12 |
Cursor and input buttons |
7 |
Program selector |
13 |
Delay Start button |
8 |
Y Power on button |
14 |
X Start |
9 |
Z Power off button |
15 |
7 End |
10 |
Access lock |
16 |
Optic interface |
11 |
Special options buttons |
|
|
7
Guide to the washer-extractor
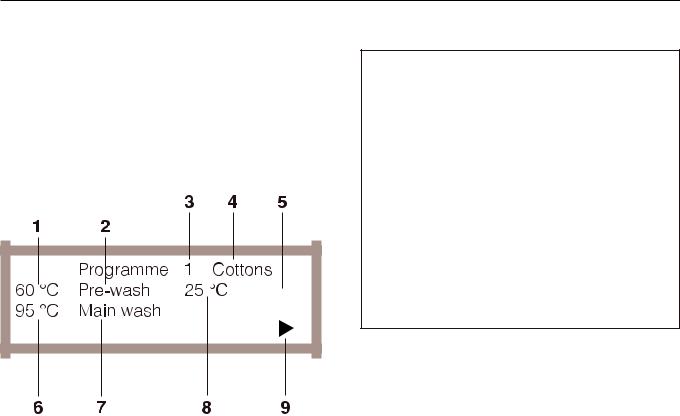
Display
The display content will appear once the machine is turned on. It is up to four lines and 40 digits long, showing which program has been selected.
Display during a program
1 Planned temperature for the current cycle
2 Name of the current cycle
3 Program number
4 Program name
5 Time line for the current cycle
6 Planned temperature of the next cycle
7 Name of the next cycle
8 Actual temperature
9 Points to a further display line
Program selector
Program numbers 1 - 24 can be selected directly.
Program numbers 25 - 99 can be selected using selector position 24 and the 4 "Plus" button.
The name of the selected program and its corresponding number appear in the display. Program positions 1 - 10 are standard programs.
The subsequent program positions vary according to the version of the model, and are set out in the Programming Instruction. If the program selector switch is turned to another position after the start of the program, the first line of the display flashes. The program does not however change.
Main buttons
Y "Power on" button
Z "Power off" button
8

Guide to the washer-extractor
Key access lock
Position A - Free access
Programs which have been allocated free access can be run.
See Programming Instructions for allocation of free access.
Position B - Operation
All programs can be started in this position. The display will show the selected program information.
Position C - Programming
At this position, programming, copying, deleting, printing, altering, giving or barring free access, and creating new program sequences can be done. See Programming Instructions.
Position D - Unlocking
At this operating level barred programs can be unlocked. Locked Programs (e.g. Disinfection programs) can not be cancelled once they have started. If the key switch is turned to position D in such a program, the program running is unlocked and can be cancelled. See Programming Instructions.
Access keys
Key 1 (2 supplied) for operating levels A and B.
Key 2 for operating levels A, B, C.
Key 3 for operating levels A, B, C, D.
9

Guide to the washer-extractor
Special options buttons
The indicator above each button will light when a special option is selected.
T "Prewash"
Press this button to add a cycle to a program. A Prewash is added to the program. Press the button a second time to deselect the function.
U "Starch"
Press this button for starched laundry.
V "Spin-stop"
Press this button if a final spin is not required after the final rinse.
Cursor buttons and Delay Start
12 "Cursor"
The cursor buttons are used to pass backwards or forwards into the input fields or into the next display, (this appears as > < flashing in the display).
Pressing continuously on the button runs quickly through the display screens.
34 "Minus-/-Plus"
The Minus/Plus buttons allow you to modify an input field. Pressing continuously on the buttons makes rapid changes.
W "Delay start"
The display indicates that a start time should be selected. If the button is pressed again the Delay start option is cancelled.
If the button is pressed after the start of a program the current time of day and date are shown.
^Press this button to delay the start of a program.
10
Guide to the washer-extractor
X "Start"
Press this button to start the selected program.
7 "End"
Press this button to stop a program. Immediately press once again to terminate a program. A stopped program can be restarted by pressing the Start button.
9 Optic interface
Emergency Stop Switch
Only to be used in an emergency.
The switch can be reset by turning the ribbed disc clockwise.
After resetting the following appears in the display:
PROGRAMME 1 COTTONS
PROGRAMME STOP
THROUGH POWER CUT
Please press the Start button.
^ Press X "Start" to continue the program.
Data transfer to and from the machine’s controls and a PC can take place using relevant software. The optic interface on the machine’s control panel provides the connection point.
Conversion of °C to °F
°C |
°F |
°C |
°F |
10 |
50 |
70 |
158 |
|
|
|
|
20 |
68 |
80 |
176 |
|
|
|
|
30 |
86 |
90 |
194 |
|
|
|
|
40 |
104 |
100 |
212 |
|
|
|
|
50 |
122 |
110 |
230 |
|
|
|
|
60 |
140 |
120 |
248 |
|
|
|
|
11
 Loading...