


 Loading...
Kodak EasyShare Z612
zoom digital camera
User’s guide
www.kodak.com
For interactive tutorials, www.kodak.com/go/howto
For help with your camera, www.kodak.com/go/z612support

Eastman Kodak Company
Rochester, New York 14650
© Eastman Kodak Company, 2006
All screen images are simulated.
Kodak, EasyShare, and Perfect Touch are trademarks of Eastman Kodak Company. Schneider-Kreuznach and Xenar are trademarks of Jos. Schneider Optische Werke GmbH used under license by Eastman Kodak Company.
P/N 4J4801_en
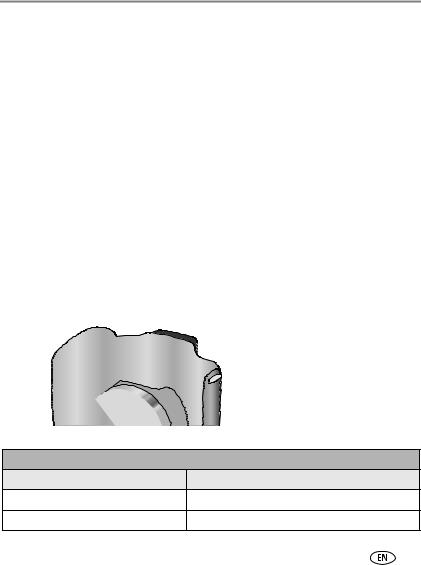
Product features
Front View
|
8 |
9 |
10 |
11 |
12 |
|
|
|
|
||
|
|
|
|
|
13 |
7 |
|
|
|
|
|
6 |
|
|
|
|
14 |
|
|
|
|
15 |
|
5 |
|
|
|
|
|
4 |
|
|
|
|
|
3 |
|
|
|
|
|
|
2 |
|
1 |
|
|
|
|
|
|
|
|
1 |
Lens |
|
|
9 |
On/Off switch |
2 |
Grip |
|
|
10 |
Self-Timer/AF Assist light |
3 |
Shutter button |
|
|
11 |
Flash hood |
4 |
Flash button ( |
) |
|
12 |
Flash |
5 |
Focus button ( |
|
) |
13 |
Strap post |
6 |
Drive button ( |
|
) |
14 |
Speaker |
7 |
Mode dial |
|
|
15 |
Microphone |
8Mode-dial-indicator light
www.kodak.com/go/support |
i |

Product features
Back View
|
2 |
|
3 |
4 |
|
|
|
|
|
5 |
|
|
|
|
|
|
|
|
1 |
|
|
|
6 |
|
|
|
|
|
7 |
|
|
|
|
|
8 |
|
|
|
|
|
9 |
|
|
|
|
|
10 |
|
|
|
|
|
11 |
18 |
|
|
|
|
12 |
|
17 |
|
|
|
13 |
|
|
16 |
15 |
14 |
|
1 |
LCD Screen |
10 |
OK button (press) |
|
|
2 |
EVF/LCD toggle button |
11 |
4-way |
|
button |
3 |
EVF (Electronic Viewfinder) |
12 |
Share button |
|
|
4 |
Zoom lever/Review magnifier |
13 |
Menu button |
|
|
5 |
Jog dial |
14 |
Delete button |
|
|
6 |
Info button |
15 |
Slot for optional SD or MMC card |
||
7 |
Review button |
16 |
Battery compartment |
||
8 |
USB, A/V Out |
17 |
Tripod socket |
|
|
9 |
DC-In (3V) |
18 |
Dock connector |
|
|
ii |
www.kodak.com/go/support |

Table of contents |
|
|
1 |
Setting up your camera ......................................................................... |
1 |
|
Attaching the lens cap and camera strap ....................................................... |
1 |
|
Charging the battery ..................................................................................... |
2 |
|
Loading the battery ....................................................................................... |
2 |
|
Turning on the camera .................................................................................. |
3 |
|
Setting the language and date/time, first time ............................................... |
3 |
|
Setting the language and date/time, other times............................................ |
4 |
|
Storing pictures on an SD or MMC card ......................................................... |
4 |
2 |
Taking pictures and videos .................................................................... |
5 |
|
Taking a picture ............................................................................................ |
5 |
|
Reviewing pictures and videos....................................................................... |
9 |
|
Using optical zoom ..................................................................................... |
12 |
|
Using the flip-up flash ................................................................................. |
13 |
|
Protecting pictures and videos from deletion................................................ |
14 |
|
Deleting pictures and videos........................................................................ |
14 |
3 |
Transferring and printing pictures ....................................................... |
15 |
|
Installing the software................................................................................. |
15 |
|
Transferring pictures.................................................................................... |
16 |
|
Printing pictures.......................................................................................... |
17 |
|
Dock compatibility for your camera.............................................................. |
20 |
4 Doing more with your camera ............................................................. |
21 |
|
|
Picture-taking modes .................................................................................. |
21 |
|
Changing the flash settings ......................................................................... |
25 |
|
Using the focus button ................................................................................ |
26 |
|
Using self-timer, burst, and exposure bracketing.......................................... |
27 |
|
Using the histogram to view picture brightness............................................ |
29 |
|
Using exposure compensation with exposure bracketing .............................. |
29 |
|
PASM modes .............................................................................................. |
30 |
|
Changing picture-taking settings ................................................................. |
32 |
www.kodak.com/go/support |
iii |
|

Table of contents |
|
|
|
Customizing your camera ............................................................................ |
36 |
|
Viewing picture/video information ............................................................... |
39 |
|
Copying pictures and videos ........................................................................ |
40 |
|
Making a video action print or picture ......................................................... |
41 |
|
Using Kodak Perfect Touch technology ........................................................ |
43 |
|
Cropping pictures........................................................................................ |
43 |
|
Running a slide show .................................................................................. |
44 |
|
Pre-tagging for album names ...................................................................... |
45 |
|
Sharing your pictures................................................................................... |
48 |
5 |
Troubleshooting .................................................................................. |
54 |
|
Camera problems........................................................................................ |
54 |
|
Computer/connectivity problems.................................................................. |
56 |
|
Picture quality problems .............................................................................. |
56 |
|
Mode-dial-light indicator status................................................................... |
57 |
|
Direct printing (PictBridge) problems............................................................ |
58 |
6 |
Getting help ........................................................................................ |
59 |
|
Helpful links................................................................................................ |
59 |
|
Telephone customer support ....................................................................... |
60 |
7 Appendix ............................................................................................. |
61 |
|
|
Camera specifications ................................................................................. |
61 |
|
Storage capacities ....................................................................................... |
65 |
|
Power-saving features................................................................................. |
67 |
|
Important safety instructions ....................................................................... |
68 |
|
Battery information ..................................................................................... |
70 |
|
Upgrading your software and firmware........................................................ |
71 |
|
Additional care and maintenance ................................................................ |
71 |
|
Warranty..................................................................................................... |
72 |
|
Regulatory compliance ................................................................................ |
74 |
iv |
www.kodak.com/go/support |
1 Setting up your camera
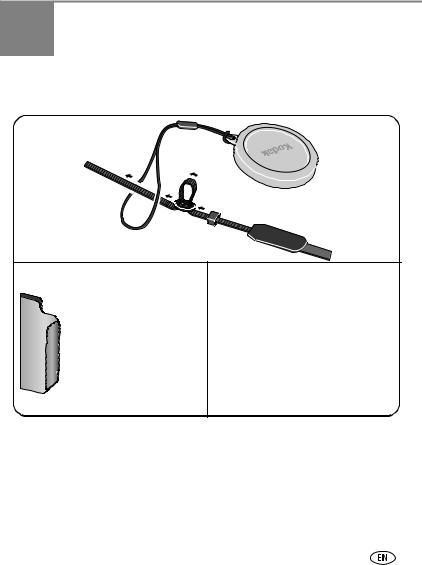
Attaching the lens cap and camera strap
www.kodak.com/go/support |
1 |
Setting up your camera
Charging the battery
Charge the Li-Ion rechargeable battery before first use.
Red—charging
Green—complete
Approximately 3 hours for full charge
You can also charge the battery using a Kodak EasyShare printer dock or camera dock. Purchase these and other accessories at a dealer of Kodak products or visit www.kodak.com/go/z612accessories.
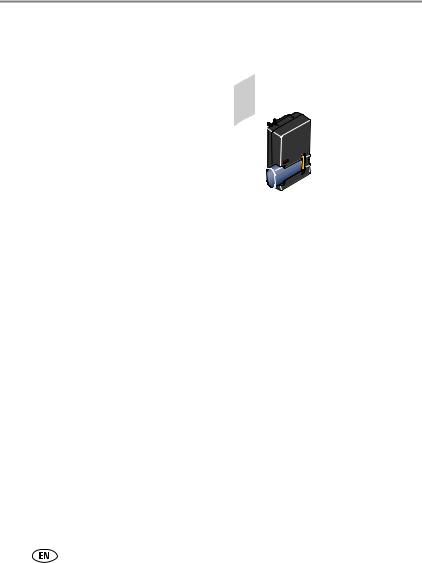
Loading the battery
battery-release tab |
Li-Ion |
(rechargeable) |
For more battery information, see page 70.
CRV3 lithium (non-rechargeable)
2 |
www.kodak.com/go/support |

Setting up your camera
Turning on the camera
Setting the language and date/time, first time
Language: |
|
Move |
to choose |
a Language, then press OK.
Date & Time:
1 Press OK.
2 |
|
to change. |
 for previous/next field.
3 Press OK to accept.
www.kodak.com/go/support |
3 |

Setting up your camera
Setting the language and date/time, other times
1 |
Press Menu. |
2 |
to highlight Setup Menu , |
|
then press OK. |
3 |
to highlight Language |
or Date/Time, then press OK.
If setting the date/time:
to change.
 for previous/next field. OK to accept.
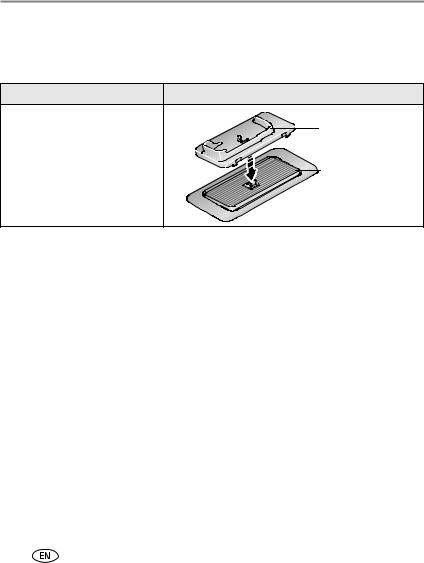
Storing pictures on an SD or MMC card
Your camera has internal memory. You can purchase an SD or MMC card to conveniently store more pictures and videos.
NOTE: When using the card for the first time, format it in this camera before taking pictures (see table on page 36). We recommend Kodak SD or MMC cards.
1 |
Turn off the camera. |
2 |
Insert card. |
Notched corner |
SD or MMC card (optional) |
|
 CAUTION:
A card can only be inserted one way; forcing it may cause damage.
See page 65 for storage capacities. Purchase SD or MMC cards at a dealer of Kodak products or www.kodak.com/go/z612accessories.
4 |
www.kodak.com/go/support |
2 Taking pictures and videos
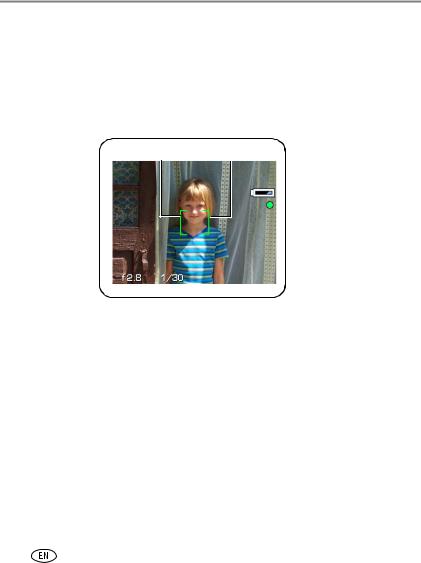
Taking a picture
1
EVF
2
or
LCD
Taking a video
1
EVF
2
or
LCD
AF/AE indicator:
Green–successful
Red–failed failed focus failed exposure
3
Press the Shutter button halfway to set the AF/AE (Auto Focus /Auto Exposure).
When the AF/AE indicator turns green, press the Shutter button completely down.
3
Press the Shutter button completely down and release.
To stop recording, press and release the Shutter button again.
www.kodak.com/go/support |
5 |

Taking pictures and videos
Capture modes in liveview
Focus mode |
|
Flash Drive Picture |
|
|
|
|
|
|
|
|
|
|
||||||||||||||||
|
mode mode size |
|
Compression |
|||||||||||||||||||||||||
Date stamp |
|
|
|
|
|
|
|
|
|
|
|
|
|
|
|
|
|
|
Pictures/time remaining |
|||||||||
|
|
|
|
|
|
|
|
|
|
|
|
|
|
|
||||||||||||||
Camera mode |
|
|
|
|
|
|
|
|
|
|
|
|
|
|
|
|
|
|
|
|
|
|
|
|
|
Storage location |
||
|
|
|
|
|
|
|
|
|
|
|
|
|
|
|
|
|
|
|
|
|
|
|||||||
Album name |
|
|
|
|
|
|
|
|
|
|
|
|
|
|
|
|
|
|
|
|
|
|
|
|
|
Zoom indicator |
||
|
|
|
|
|
|
|
|
|
|
|
|
|
|
|
|
|
|
|
|
|
|
|
|
|
|
|||
|
|
|
|
|
|
|
|
|
|
|
|
|
|
|
|
|
|
|
|
|
|
|||||||
|
|
|
|
|
|
|
|
|
|
|
|
|
|
|
|
|
|
|
|
|
|
|
|
|
|
|
|
Low battery |
|
|
|
|
|
|
|
|
|
|
|
|
|
|
|
|
|
|
|
|
|
|
|
|
|
|
|
||
|
|
|
|
|
|
|
|
|
|
|
|
|
|
|
|
|
|
|
|
|
|
|
|
|
|
|
|
Focus zone |
|
|
|
|
|
|
|
|
|
|
|
|
|
|
|
|
|
|
|
|
|
|
|
|
|
|
|
|
|
Framing marks |
|
|
|
|
|
|
|
|
|
|
|
|
|
|
|
|
|
|
|
|
|
|
|
Exposure metering |
||||
|
|
|
|
|
|
|
|
|
|
|
|
|
|
|
|
|
|
|
|
|
|
|||||||
|
|
|
|
|
|
|
|
|
|
|
|
|
|
|
|
|
|
|
|
White balance |
||||||||
|
|
|
|
|
|
|
|
|
|
|
|
|
|
|
|
|
|
|
|
|||||||||
|
|
|
|
|
|
|
|
|
|
|
|
|
|
|
|
|
|
|
|
|
|
|
|
|
|
|
|
|
|
|
|
|
|
|
|
|
|
|
|
|
|
|
|
|
|
|
|
|
|
|
|
|
|
|
|
||
|
|
|
|
|
|
|
|
|
|
|
|
|
|
|
|
|
|
|
|
|
|
|
|
|
|
|
|
Image stabilizer |
|
|
|
|
|
|
|
|
|
|
|
|
|
|
|
|
|
|
|
|
|
|
|
|
|
|
|
|
|
|
|
|
|
|
|
|
|
|
|
|
|
|
|
|
|
|
|
|
|
|
|
|
|
|
|
|
|
ISO |
|
|
|
|
|
|
|
|
|
|
|
|
|
|
|
|
|
|
|
|
|
|
|
|
|
|
|
||
Aperture |
|
|
|
|
|
|
|
|
|
|
|
|
|
|
|
|
|
|
|
|
|
|
Flash compensation |
|||||
|
|
|
|
|
|
|
|
|
|
|
|
|
|
|
|
|
|
|
|
|
|
|||||||
|
Shutter speed |
|
|
|
|
|
|
|
|
|
|
|
|
|
|
|||||||||||||
|
|
|
|
|
|
|
|
|
|
|
|
Exposure compensation |
||||||||||||||||
|
|
|
|
|
|
|
|
|||||||||||||||||||||
Capture modes—shutter pressed halfway
Slow shutter speed warning
Low battery
AF/AE indicator:
Green–successful Red–failed
failed focus failed exposure
Aperture |
|
|
|
|
|
|
|
|
|
ISO |
|
|
|
|
|
|
|
|
|
||
|
|
|
|
|
|
|
Flash compensation |
|||
|
|
|
|
|
|
|
||||
|
|
|
|
|
|
|
||||
Shutter speed |
|
|
|
|
|
Exposure compensation |
||||
|
||||||||||
|
|
|
|
|||||||
6 |
www.kodak.com/go/support |

Taking pictures and videos
Reviewing a quickview of the picture or video just taken
After you take a picture or video, the EVF/LCD screen displays a quickview for approximately 5 seconds. To view pictures and videos anytime, see page 9.
If you press no buttons, the picture/video is saved.
Delete
Press OK to play/pause video.  to adjust the volume.
 to rewind or fast forward.
Tag a picture/video for email or as a favorite, or tag a picture for print.
NOTE: You can change the Quickview default from On to Off in the Setup menu (page 36).
Viewing multi-up (thumbnails)
1Press Review. (Press again to exit.)
2Press  .
.
3 |
to view previous/ |
|
next picture or video. |
NOTE: You can also press Menu, highlight
Multi-up, then press OK.
4 Press OK to display a single view.
www.kodak.com/go/support |
7 |
Taking pictures and videos
Using the Auto-Focus (AF) framing marks (pictures)
When using the EVF/LCD screen as a viewfinder, framing marks indicate where the camera is focusing. For the best pictures, the camera attempts to focus on foreground subjects, even if the subjects are not centered in the scene.
1Press the Shutter button halfway. When the framing marks turn green, focus is accomplished.
Framing marks
2If the camera is not focusing on the desired subject (or if the framing marks disappear), release the Shutter button and recompose the scene.
3 Press the Shutter button completely down to take the picture.
NOTE: Framing marks do not appear in Landscape, Night Landscape, or Video mode. When you use AF Zone (see table on page 32) and set Center Zone, the framing marks are fixed at a center wide location.
8 |
www.kodak.com/go/support |

Taking pictures and videos
Reviewing pictures and videos
Press Review to view and work with your pictures and videos.
Pictures
1 |
|
Press Review. |
||||
(Press again to exit.) |
||||||
|
|
|
|
|
2 |
View previous/next. |
|
|
|
|
|
||
|
|
|
|
|
||
|
|
|
|
|
|
|
|
|
|
|
|
|
|
NOTE: Pictures taken at the 5.3 MP (3:2) quality setting are displayed at a 3:2 aspect ratio with a black bar at the top and bottom of the screen.
Videos
1 Press OK to play/pause.
2 During playback:
 Adjust volume.
Playback forward at 2X speed; press again for 4X.
Playback reverse at 2X speed; press again for 4X.
During pause:
 Rewind/forward by frame.
End video play.
To save battery power, use the optional Kodak EasyShare camera or printer dock, or Kodak 3-volt AC adapter. (See www.kodak.com/go/z612accessories.)
www.kodak.com/go/support |
9 |
Taking pictures and videos
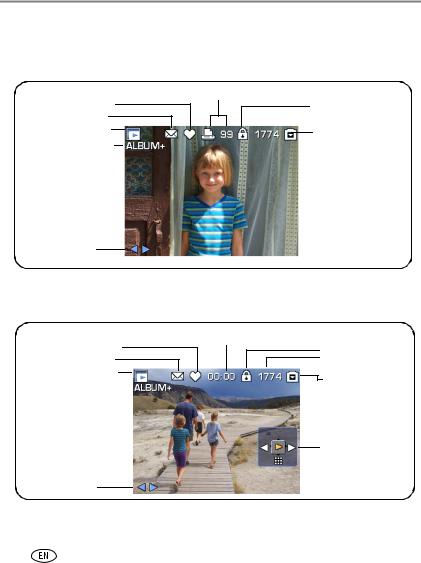
Identifying the review icons
Picture
Favorite tag
Email tag
Review mode 
Album name 
Scroll arrows
Video
Favorite tag
Email tag
Review mode 

Album name 
Print tag/number of prints
Protect
 Picture number
Image storage location
Video length
Protect
 Video number
Image storage location
Video controller
Scroll arrows
10 |
www.kodak.com/go/support |

Taking pictures and videos
Review options
In Review, press the Menu button to access review options for pictures and videos. Some settings may be unavailable in some modes.
|
Album (page 45) |
Slide Show (page 44) |
|
Perfect Touch tech. (page 43) |
Copy (page 40) |
|
Crop (page 43) |
Image Storage (see table on |
|
|
page 32) |
|
Make Picture (page 42) |
Multi-up (page 7) |
|
Action Print (page 41) |
Setup Menu (page 36) |
|
Protect (page 14) |
|
Checking camera and picture status |
||
1 |
Press Review. |
|
|
(Press again to exit.) |
|
2 |
Repeatedly press for: |
|
|
• Status icons on |
|
|
• Status icons off |
|
• Histogram and
picture/video info
www.kodak.com/go/support |
11 |

Taking pictures and videos
Magnifying a picture during review
Use this feature to view the magnification of the picture.


 to view other parts of the picture.
Press OK to return to 1X.
Magnify 1X–8X.
Using optical zoom
Use optical zoom to get up to 12X closer to your subject. You can use optical zoom for pictures and videos.
Zoom indicator
|
|
Optical |
|
|
|
|
Digital |
|||
|
|
zoom |
|
|
|
|
zoom |
|||
|
|
range |
|
|
|
|
range |
|||
|
|
|
|
|
|
|
|
|
|
|
|
|
|
|
|
|
|
|
|
|
|
|
|
|
|
|
|
|
|
|
|
|
1 Use the EVF or LCD screen to frame your subject.
2Press Telephoto (T) to zoom in. Press Wide Angle
(W) to zoom out.
The Zoom indicator shows zoom status.
3Press the Shutter button halfway to set the exposure and focus, then press completely down to take the picture. (When taking videos, press and release the Shutter button.)
12 |
www.kodak.com/go/support |
Taking pictures and videos
Using advanced digital zoom
Use digital zoom in any Still mode to get up to an additional 4.2X magnification beyond optical zoom. Combined zoom settings are from 12X to 50X.
1Change the default setting from None to Continuous or Pause in the Setup menu, page 36.
2Press the Telephoto (T) button to the optical zoom limit (12X). Release the button, then press it again to enter digital zoom range.
The Zoom indicator shows zoom status.
3 Take the picture or video.
NOTE: You cannot use digital zoom for video recording. You may notice decreased image quality when using digital zoom for pictures. The blue slider on the zoom indicator pauses and turns red when the picture quality reaches the limit for an acceptable 4 x 6 in. (10 x 15 cm) print.
Using the flip-up flash
Use the flash when you take pictures at night, indoors, or outdoors in heavy shadows. Make sure you are within the flash range.
Flash
To change the flash settings, see page 25.
When you press the Shutter button halfway and flash is needed, the flash automatically opens.
Press the cover to close.
Flash-to-subject distance |
|
Zoom position |
Flash distance |
Wide angle |
1.6–15.4 ft (0.5–4.7 m) @ ISO, Auto |
Telephoto |
3.9–8.9 ft (1.2–2.7 m) @ ISO, Auto |
www.kodak.com/go/support |
13 |

Taking pictures and videos
Protecting pictures and videos from deletion
1 Press the Review button. (Press again to exit.)
2 Press  for previous/next.
3 Press the Menu button.
4 Press  to highlight Protect, then press the OK button.
5 To remove protection, press the OK button again.
6 Press the Menu button to exit.
The picture or video is protected and cannot be deleted. The Protect icon appears with the protected picture or video.
 CAUTION:
Formatting internal memory or an SD or MMC card deletes all (including protected) pictures, videos. (Formatting internal memory also deletes email addresses, album names, and favorites. To restore them, see EasyShare software Help.)
Deleting pictures and videos
1 Press the Review button. (Press again to exit.)
2 Press  for previous/next.
3 Press the Delete button.
4 Follow the screen prompts.
PICTURE or VIDEO—deletes the displayed picture or video.
EXIT—exits the Delete screen.
ALL—deletes all pictures and videos from your current storage location. NOTE: To delete protected pictures and videos, remove protection before deleting.
14 |
www.kodak.com/go/support |
3Transferring and printing pictures
Installing the software
 CAUTION:
Install Kodak EasyShare software before connecting the camera or optional dock to the computer. Failure to do so may cause the software to load incorrectly.
1Close all software applications that are open on your computer (including anti-virus software).
2 Place the Kodak EasyShare software CD into the CD-ROM drive.
3Load the software:
Windows OS—if the install window does not appear, choose Run from the Start menu and type d:\setup.exe where d is the drive letter that contains the CD.
Mac OS X—double-click the CD icon on the desktop, then click the Install icon.
4Follow the on-screen instructions to install the software.
Windows OS—select Complete to automatically install the most commonly used applications. Select Custom to choose the applications you wish to install.
Mac OS X—follow the on-screen instructions.
NOTE: When prompted, register your camera and software. Registering lets you sign up for information that keeps your system up-to-date. To register later, visit www.kodak.com/go/register.
5If prompted, restart the computer. If you turned off anti-virus software, turn it back on. See the anti-virus software manual for details.
For information on the software applications included on the Kodak EasyShare software CD, click the Help button in the Kodak EasyShare software.
www.kodak.com/go/support |
15 |

Transferring and printing pictures
Transferring pictures
You can transfer pictures to your computer using a USB cable (U-8), EasyShare dock, or Kodak multi-card reader/Kodak SD multimedia card reader-writer.
Purchase these and other accessories at a dealer of Kodak products or www.kodak.com/go/z612accessories.
Transferring pictures with a USB cable, model U-8
If your package does not include an EasyShare dock, use the USB cable (model U-8) that came with your camera.
1 Turn off the camera.
2 Plug the labeled  end of the USB cable into the labeled USB port on your computer. See your computer user’s guide for details.
3 Plug the other end of the USB cable into the labeled USB port on the camera.
4 Turn on the camera.
Kodak EasyShare software opens on your computer.
The software prompts you through the transfer process.
NOTE: Visit www.kodak.com/go/howto for an online tutorial on connecting.
Also available for transferring
You can also use these Kodak products to transfer your pictures and videos.
■Kodak EasyShare camera dock, Kodak EasyShare printer dock
■Kodak multi-card reader, Kodak SD multimedia card reader-writer
Purchase these and other accessories at a dealer of Kodak products or www.kodak.com/go/z612accessories.
16 |
www.kodak.com/go/support |

Transferring and printing pictures
Printing pictures
Printing with a Kodak EasyShare printer dock
Dock your camera to the Kodak EasyShare printer dock and print directly—with or without a computer. Purchase this and other accessories at a dealer of Kodak products or www.kodak.com/go/z612accessories.
Printing from an optional SD or MMC card
■Automatically print tagged pictures when you insert your card into a printer with an SD or MMC card slot. See your printer user’s guide for details.
■Make prints at an SD or MMC card-capable Kodak picture maker/picture kiosk. (Contact a location prior to visiting. See www.kodak.com/go/picturemaker.)
■Take the card to your local photo retailer for professional printing.
Direct printing with a PictBridge enabled printer
Your camera is compatible with PictBridge technology, which lets you print directly to PictBridge enabled printers, without a computer. You need:
■ Camera with fully charged batteries, or |
■ |
PictBridge enabled printer |
with optional Kodak 3-volt AC adapter |
■ |
USB cable (U-8) |
Connecting the camera to the printer
1 Turn off the camera and printer.
2Optional: If you have a Kodak 3-volt AC adapter (optional accessory), plug it into the camera and into an electrical outlet.
3Connect the appropriate USB cable from the camera to the printer. (See your printer user guide or www.kodak.com/go/z612accessories for details.)
www.kodak.com/go/support |
17 |

Transferring and printing pictures
Printing pictures
NOTE: Print size is dependant on printer capabilities.
1 Turn the Mode dial to Auto or Favorites.
2Turn on the printer.
The PictBridge logo is displayed, followed by the current picture and menu. (If no pictures are found, a message is displayed.) If the menu interface turns off, press any button to redisplay it.
3 Move  to choose a printing option, then press the OK button. NOTE: During direct printing, pictures are not transferred or saved to the computer or printer.
Current Picture |
Move |
|
to choose a picture. Move |
to choose the |
|
||||
|
number of copies. |
|
||
|
|
|
||
Tagged Pictures |
If your printer is capable, print pictures that you tagged for |
|||
|
printing (see page 48). |
|
||
|
|
|
||
Index Print |
Print thumbnails of all pictures. This option requires one or more |
|||
|
sheets of paper. |
|
||
|
|
|
||
All Pictures |
Print all pictures in internal memory, on a memory card, or in |
|||
|
Favorites. Choose the number of copies. |
|
||
|
|
|
||
Image Storage |
Access internal memory, a memory card, or Favorites. |
|||
|
|
|
|
|
NOTE: During direct printing, pictures are not permanently transferred or saved to the computer or printer. To transfer pictures to your computer, see page 16. In Favorites mode, the current favorite picture is displayed.
Disconnecting the camera from a PictBridge printer
1 Turn off the camera and printer.
2 Disconnect the USB cable from the camera and the printer.
18 |
www.kodak.com/go/support |

Transferring and printing pictures
Ordering prints online
Kodak EasyShare Gallery, www.kodakgallery.com, (formerly Ofoto) is one of the many online print services offered in the Kodak EasyShare software. You can easily:
■Upload your pictures.
■Edit, enhance, and add borders to your pictures.
■Store pictures, and share them with family and friends.
■Order high-quality prints, photo greeting cards, frames, and albums—and have them delivered to your door.
Printing pictures from your computer
For details on printing pictures from your computer, click the Help button in the Kodak EasyShare software.
www.kodak.com/go/support |
19 |
Transferring and printing pictures
Dock compatibility for your camera
You can also check dock compatibility for your camera at
www.kodak.com/go/dockcompatibility.
Kodak EasyShare dock |
Docking configuration |
■ series 3 printer docks and |
|
camera docks |
Custom |
■ photo printer 500 |
camera insert |
|
|
|
Dock |
Purchase camera docks, printer docks, and other accessories at a dealer of Kodak products or www.kodak.com/go/z612accessories.
20 |
www.kodak.com/go/support |

4 Doing more with your camera
Picture-taking modes
Choose the mode that best suits your subjects and surroundings.
Use this mode |
For |
Auto |
General picture-taking—offers an excellent balance of image quality |
|
and ease of use. |
|
|
Sport |
Subjects that are in motion. Shutter speed is fast. |
|
|
Night |
Reduces red eye of people in night scenes or low-light conditions. |
Portrait |
Place the camera on a flat, steady surface or use a tripod. |
|
|
Scene |
Point-and-shoot simplicity when taking pictures under special |
|
conditions (see page 23). |
|
|
Program |
Controlling the exposure compensation, flash compensation (how |
|
much light enters the camera), and ISO speed. The camera |
|
automatically sets the shutter speed and aperture (f-number) based |
|
on the scene lighting. Program mode offers the ease of auto shooting |
|
with full access to all menu options. Use the Jog dial to select and |
|
adjust settings (see page 31). Press the Menu button to change other |
|
settings. |
|
|
www.kodak.com/go/support |
21 |
Loading...