


T300
DE EN NL IT ES
DE Benutzerhandbuch Feinhackmaschine T300
EN Use for instructions Micro-cultivator T300
NL Gebruikershandleiding Microploeg T300
IT Manuale dell’utilizzatore Microsarchiatrice T300
ES Guía de utilización Micro-binadora T300
0500070032 10/2007
505 49 95-02

1
DE
EN
NL
IT
ES
Sicherheitsvorschriften
Sicherheitsvorschriften . . . . . . . . . . . . . 3 - 4 - 5 - 6 - 7 - 8 - 9
Aufkleber und ihr jeweiliger Ort
Aufkleber und ihr jeweiliger Ort . . . . . . . . . . . . . . . . . . . . . 10
Beschreibung der Aufkleber
Aufkleber und ihr jeweiliger Ort. . . . . . . . . . . . . . . . . . . . . . 11
Beschreibung
Beschreibung der einzelnen Elemente . . . . . . . . . . . . . . . . 12
Typenschild des Geräts . . . . . . . . . . . . . . . . . . . . . . . . . . . 12
Vorbereitung des Geräts
Öleinfüllen und Ölstand . . . . . . . . . . . . . . . . . . . . . . . . 13 - 14
Benzineinfüllen . . . . . . . . . . . . . . . . . . . . . . . . . . . . . . 15 - 16
Verwendung des Geräts
Verwendungsempfehlung . . . . . . . . . . . . . . . . . . . . . . . . . . 17
Vor dem Anlassen des Motors . . . . . . . . . . . . . . . . . . 22 - 23
Motorstart . . . . . . . . . . . . . . . . . . . . . . . . . . . . . . . . . . 24 - 25
Schaltung/Gas . . . . . . . . . . . . . . . . . . . . . . . . . . . . . . . . . . 26
Motorstopp . . . . . . . . . . . . . . . . . . . . . . . . . . . . . . . . . . . . . 26
Arbeiten mit dem Gerät. . . . . . . . . . . . . . . . . . . . . . . . . . . . 27
Anwendungstipps . . . . . . . . . . . . . . . . . . . . . . . . . . . . . . . . 27
Transport. . . . . . . . . . . . . . . . . . . . . . . . . . . . . . . . . . . . . . . 28
Transport in einem Fahrzeug . . . . . . . . . . . . . . . . . . . 29 - 30
Lagerung des Geräts
Lagerung. . . . . . . . . . . . . . . . . . . . . . . . . . . . . . . . . . . . . . . 31
Safety instructions
Safety instructions . . . . . . . . . . . . . . . . 3 - 4 - 5 - 6 - 7 - 8 - 9
Stickers and locations
Stickers and locations. . . . . . . . . . . . . . . . . . . . . . . . . . . . . 10
Definition of stickers
Stickers and locations . . . . . . . . . . . . . . . . . . . . . . . . . . . . . 11
Specification
Key . . . . . . . . . . . . . . . . . . . . . . . . . . . . . . . . . . . . . . . . . . . 12
Identification plate. . . . . . . . . . . . . . . . . . . . . . . . . . . . . . . . 12
Preparing the machine
Filling with oil and oil level. . . . . . . . . . . . . . . . . . . . . . 13 - 14
Filling with petrol . . . . . . . . . . . . . . . . . . . . . . . . . . . . . 15 - 16
Operating the machine
Recommended usage. . . . . . . . . . . . . . . . . . . . . . . . . . . . . 18
Before starting the engine . . . . . . . . . . . . . . . . . . . . . . 22 - 23
Starting the engine . . . . . . . . . . . . . . . . . . . . . . . . . . . 24 - 25
Accelerating . . . . . . . . . . . . . . . . . . . . . . . . . . . . . . . . . . . . 26
Stopping the engine . . . . . . . . . . . . . . . . . . . . . . . . . . . . . . 26
Working with the machine. . . . . . . . . . . . . . . . . . . . . . . . . . 27
Operation tips . . . . . . . . . . . . . . . . . . . . . . . . . . . . . . . . . . . 27
Transportation. . . . . . . . . . . . . . . . . . . . . . . . . . . . . . . . . . . 28
Transportation in a vehicle . . . . . . . . . . . . . . . . . . . . . 29 - 30
Storing the machine
Storage . . . . . . . . . . . . . . . . . . . . . . . . . . . . . . . . . . . . . . . . 31
Veiligheidsinstructies
Veiligheidsinstructies . . . . . . . . . . . . . . 3 - 4 - 5 - 6 - 7 - 8 - 9
Stickers en symbolen
Stickers en symbolen . . . . . . . . . . . . . . . . . . . . . . . . . . . . . 10
Betekenis van de stickers
Stickers en symbolen . . . . . . . . . . . . . . . . . . . . . . . . . . . . . 11
Tekening
Beschrijving van de onderdelen . . . . . . . . . . . . . . . . . . . . . 12
Identificatieplaat van de machine . . . . . . . . . . . . . . . . . . . . 12
Voorbereiden van de machine
Vullen met olie en oliepeil . . . . . . . . . . . . . . . . . . . . . . 13 - 14
Vullen met benzine . . . . . . . . . . . . . . . . . . . . . . . . . . . 15 - 16
Gebruik van de machine
Gebruiksinformatie . . . . . . . . . . . . . . . . . . . . . . . . . . . . . . . 19
Voor het starten van de motor. . . . . . . . . . . . . . . . . . . 22 - 23
De motor starten . . . . . . . . . . . . . . . . . . . . . . . . . . . . . 24 - 25
Koppeling/gashendel . . . . . . . . . . . . . . . . . . . . . . . . . . . . . 26
De motor uitschakelen . . . . . . . . . . . . . . . . . . . . . . . . . . . . 26
Werken met de machine. . . . . . . . . . . . . . . . . . . . . . . . . . . 27
Tips voor gebruik . . . . . . . . . . . . . . . . . . . . . . . . . . . . . . . . 27
Transport. . . . . . . . . . . . . . . . . . . . . . . . . . . . . . . . . . . . . . . 28
Transport in een voertuig . . . . . . . . . . . . . . . . . . . . . . 29 - 30
Opslag van de machine
Opslag. . . . . . . . . . . . . . . . . . . . . . . . . . . . . . . . . . . . . . . . . 31
Norme di sicurezza
Norme di sicurezza. . . . . . . . . . . . . . . . 3 - 4 - 5 - 6 - 7 - 8 - 9
Autoadesivi e Posizioni
Autoadesivi e Posizioni. . . . . . . . . . . . . . . . . . . . . . . . . . . . 10
Definizione degli autoadesivi
Autodesivi e Posizioni . . . . . . . . . . . . . . . . . . . . . . . . . . . . . 11
Caratteristiche
Descrizione degli elementi . . . . . . . . . . . . . . . . . . . . . . . . . 12
Placca di identificazione della macchina . . . . . . . . . . . . . . 12
Preparazione della macchina
Pieno d’olio e livello. . . . . . . . . . . . . . . . . . . . . . . . . . . 13 - 14
Pieno di benzina . . . . . . . . . . . . . . . . . . . . . . . . . . . . . 15 - 16
Uso della macchina
Raccomandazioni per l’uso. . . . . . . . . . . . . . . . . . . . . . . . . 20
Prima di accendere il motore . . . . . . . . . . . . . . . . . . . 22 - 23
Accensione del motore . . . . . . . . . . . . . . . . . . . . . . . . 24 - 25
Frizione/acceleratore . . . . . . . . . . . . . . . . . . . . . . . . . . . . . 26
Arresto del motore . . . . . . . . . . . . . . . . . . . . . . . . . . . . . . . 26
Operazioni con la macchina . . . . . . . . . . . . . . . . . . . . . . . . 27
Consigli per l’uso . . . . . . . . . . . . . . . . . . . . . . . . . . . . . . . . 27
Trasporto. . . . . . . . . . . . . . . . . . . . . . . . . . . . . . . . . . . . . . . 28
Trasporto in un veicolo . . . . . . . . . . . . . . . . . . . . . . . . 29 - 30
Rimessaggio della macchina
Rimessaggio . . . . . . . . . . . . . . . . . . . . . . . . . . . . . . . . . . . . 31
Consignas de seguridad
Consignas de seguridad. . . . . . . . . . . . 3 - 4 - 5 - 6 - 7 - 8 - 9
Autoadhesivos y ubicación
Autoadhesivos y ubicación . . . . . . . . . . . . . . . . . . . . . . . . . 10
Definición de los autoadhesivos
Autoadhesivos y ubicación . . . . . . . . . . . . . . . . . . . . . . . . . 11
Descriptivo
Descripción de los elementos. . . . . . . . . . . . . . . . . . . . . . . 12
Placa de identificación de la máquina . . . . . . . . . . . . . . . . 12
Preparación de la máquina
Llenado de aceite y nivel. . . . . . . . . . . . . . . . . . . . . . . 13 - 14
Llenado de gasolina . . . . . . . . . . . . . . . . . . . . . . . . . . 15 - 16
Uso de la máquina
Preconización de uso . . . . . . . . . . . . . . . . . . . . . . . . . . . . . 21
Antes de poner en marcha el motor . . . . . . . . . . . . . . 22 - 23
Arranque del motor . . . . . . . . . . . . . . . . . . . . . . . . . . . 24 - 25
Embrague / acelerador . . . . . . . . . . . . . . . . . . . . . . . . . . . . 26
Parada del motor . . . . . . . . . . . . . . . . . . . . . . . . . . . . . . . . 26
Trabajo con la máquina . . . . . . . . . . . . . . . . . . . . . . . . . . . 27
Consejos de utilización . . . . . . . . . . . . . . . . . . . . . . . . . . . . 27
Transporte. . . . . . . . . . . . . . . . . . . . . . . . . . . . . . . . . . . . . . 28
Transporte en un vehículo. . . . . . . . . . . . . . . . . . . . . . 29 - 30
Almacenamiento de la máquina
Almacenamiento . . . . . . . . . . . . . . . . . . . . . . . . . . . . . . . . . 31
INHALTSVERZEICHNIS
TABLE OF CONTENTS
INHOUDSOPGAVE
SOMMARIO
CONTENIDO

2
DE
EN
NL
IT
ES
INHALTSVERZEICHNIS
TABLE OF CONTENTS
Maintenance
Table of maintenance periodicity . . . . . . . . . . . . . . . . . . . . 33
Maintaining the air filter . . . . . . . . . . . . . . . . . . . . . . . . 37 - 38
Maintaining the spark plug . . . . . . . . . . . . . . . . . . . . . 39 - 40
Maintaining the petrol filter . . . . . . . . . . . . . . . . . . . . . 41 - 42
Changing the oil . . . . . . . . . . . . . . . . . . . . . . . . . . . . . 43 - 44
Cleaning after use. . . . . . . . . . . . . . . . . . . . . . . . . . . . . . . . 45
Inspecting and replacing the rotating blade
assembly. . . . . . . . . . . . . . . . . . . . . . . . . . . . . . . . . . . . . . . 46
Dismantling the rotating blade assembly . . . . . . . . . . . . . . 46
Assembling new blade assembly . . . . . . . . . . . . . . . . . . . . 46
Troubleshooting
Problem / Causes / Action . . . . . . . . . . . . . . . . . . . . . . . . . 48
Options
Edger . . . . . . . . . . . . . . . . . . . . . . . . . . . . . . . . . . . . . . . . . 52
Furrower . . . . . . . . . . . . . . . . . . . . . . . . . . . . . . . . . . . . . . . 52
Cultivating tines . . . . . . . . . . . . . . . . . . . . . . . . . . . . . . . . . 53
Lawn dethatcher . . . . . . . . . . . . . . . . . . . . . . . . . . . . . . . . . 53
Transporting wheel . . . . . . . . . . . . . . . . . . . . . . . . . . . . . . . 54
Technical specification
Table . . . . . . . . . . . . . . . . . . . . . . . . . . . . . . . . . . . . . . . . . . 55
Wartung und Pflege
Wartungstabelle . . . . . . . . . . . . . . . . . . . . . . . . . . . . . . . . . 32
Pflege des Luftfilters . . . . . . . . . . . . . . . . . . . . . . . . . . 37 - 38
Pflege der Zündkerze . . . . . . . . . . . . . . . . . . . . . . . . . 39 - 40
Pflege des Benzinfilters. . . . . . . . . . . . . . . . . . . . . . . . 41 - 42
Erneuerung des Öls . . . . . . . . . . . . . . . . . . . . . . . . . . 43 - 44
Reinigung nach dem Gebrauch . . . . . . . . . . . . . . . . . . . . . 45
Kontrolle und Austausch der Drehwerkzeuge . . . . . . . . . . 46
Abnehmen der Drehwerkzeuge . . . . . . . . . . . . . . . . . . . . . 46
Montage neuer Werkzeuge . . . . . . . . . . . . . . . . . . . . . . . . 46
Störungsbeseitigung
Störungen / Ursachen / Abhilfe. . . . . . . . . . . . . . . . . . . . . . 47
Optionen
Option Randschneider . . . . . . . . . . . . . . . . . . . . . . . . . . . . 52
Option Häufler. . . . . . . . . . . . . . . . . . . . . . . . . . . . . . . . . . . 52
Option Jäter . . . . . . . . . . . . . . . . . . . . . . . . . . . . . . . . . . . . 53
Option Moosvernichter . . . . . . . . . . . . . . . . . . . . . . . . . . . . 53
Option Transportrad . . . . . . . . . . . . . . . . . . . . . . . . . . . . . . 54
Technische Eigenschaften
Übersicht. . . . . . . . . . . . . . . . . . . . . . . . . . . . . . . . . . . . . . . 55
INHOUDSOPGAVE
I N D I C E
Onderhoud
Tabel voor periodiek onderhoud. . . . . . . . . . . . . . . . . . . . . 34
Onderhoud van het luchtfilter . . . . . . . . . . . . . . . . . . . 37 - 38
Onderhoud van de bougie. . . . . . . . . . . . . . . . . . . . . . 39 - 40
Onderhoud van het benzinefilter . . . . . . . . . . . . . . . . . 41 - 42
Vervangen van de olie. . . . . . . . . . . . . . . . . . . . . . . . . 43 - 44
Reiniging na gebruik . . . . . . . . . . . . . . . . . . . . . . . . . . . . . . 45
Controleren en vervangen van de draaiende delen . . . . . . 46
Demontage van de draaiende delen . . . . . . . . . . . . . . . . . 46
Montage van nieuwe onderdelen . . . . . . . . . . . . . . . . . . . . 46
Reparatiewerkzaamheden
Probleem / oorzaak / oplossing . . . . . . . . . . . . . . . . . . . . . 49
Accessoires
Accessoire graskantsteker . . . . . . . . . . . . . . . . . . . . . . . . . 52
Accessoire aanaarder. . . . . . . . . . . . . . . . . . . . . . . . . . . . . 52
Accessoire wiedmes . . . . . . . . . . . . . . . . . . . . . . . . . . . . . . 53
Accessoire gazonbeluchter. . . . . . . . . . . . . . . . . . . . . . . . . 53
Accessoire transportwiel. . . . . . . . . . . . . . . . . . . . . . . . . . . 54
Technische gegevens
Tabel . . . . . . . . . . . . . . . . . . . . . . . . . . . . . . . . . . . . . . . . . . 56
Manutenzione
Quadro periodico di manutenzione. . . . . . . . . . . . . . . . . . . 35
Manutenzione del filtro dell’aria. . . . . . . . . . . . . . . . . . 37 - 38
Manutenzione della candela di accensione . . . . . . . . 39 - 40
Manutenzione del filtro carburante . . . . . . . . . . . . . . . 41 - 42
Cambio dell’olio . . . . . . . . . . . . . . . . . . . . . . . . . . . . . . 43 - 44
Pulizia dopo l’uso . . . . . . . . . . . . . . . . . . . . . . . . . . . . . . . . 45
Controllo e sostituzione degli attrezzi rotanti . . . . . . . . . . . 46
Smontaggio degli attrezzi rotanti . . . . . . . . . . . . . . . . . . . . 46
Montaggio di nuovi attrezzi . . . . . . . . . . . . . . . . . . . . . . . . . 46
Ricerca guasti
Incidenti / cause / rimedi. . . . . . . . . . . . . . . . . . . . . . . . . . . 50
Accessori
Accessorio Tagliabordi . . . . . . . . . . . . . . . . . . . . . . . . . . . . 52
Accessorio Rincalzatore . . . . . . . . . . . . . . . . . . . . . . . . . . . 52
Accessorio Coltello di diserbamento. . . . . . . . . . . . . . . . . . 53
Accessorio Demuschiatore . . . . . . . . . . . . . . . . . . . . . . . . . 53
Accessorio Ruota di trasporto . . . . . . . . . . . . . . . . . . . . . . 54
Caratteristiche tecniche
Quadro . . . . . . . . . . . . . . . . . . . . . . . . . . . . . . . . . . . . . . . . 56
SUMARIO
Mantenimiento
Cuadro de periodicidad de mantenimiento. . . . . . . . . . . . . 36
Mantenimiento del filtro del aire . . . . . . . . . . . . . . . . . 37 - 38
Mantenimiento de la bujía de arranque . . . . . . . . . . . 39 - 40
Mantenimiento del filtro de gasolina . . . . . . . . . . . . . . 41 - 42
Cambio de aceite . . . . . . . . . . . . . . . . . . . . . . . . . . . . 43 - 44
Limpieza tras el uso . . . . . . . . . . . . . . . . . . . . . . . . . . . . . . 45
Control y sustitución de las herramientas rotativas . . . . . . 46
Desmontaje de las herramientas rotativas . . . . . . . . . . . . . 46
Montaje de las herramientas nuevas . . . . . . . . . . . . . . . . . 46
Localización de averías
Incidentes /causas / remedios . . . . . . . . . . . . . . . . . . . . . . 51
Opciones
Opción corta-bordes . . . . . . . . . . . . . . . . . . . . . . . . . . . . . . 52
Opción aporcadora . . . . . . . . . . . . . . . . . . . . . . . . . . . . . . . 52
Opción escardadora . . . . . . . . . . . . . . . . . . . . . . . . . . . . . . 53
Opción embotador . . . . . . . . . . . . . . . . . . . . . . . . . . . . . . . 53
Opción rueda de transporte . . . . . . . . . . . . . . . . . . . . . . . . 54
Características técnicas
Cuadro . . . . . . . . . . . . . . . . . . . . . . . . . . . . . . . . . . . . . . . . 57

3
DE
EN
NL
IT
ES
Achten Sie besonders auf die Erläuterungen, denen folgende Hinweise vorausgehen:
ACHTUNG
Dieses Zeichen weist Sie darauf hin, bei bestimmten Schritten vorsichtig
zu sein. Bedeutet eine hohe Wahrscheinlichkeit schwerer Körperverletzungen bzw. sogar eine tödliche Gefahr, wenn die Anweisungen nicht
befolgt werden.
VORSICHT:
. Weist auf die Möglichkeit von Körperverletzungen oder Beschädigun-
gen des Geräts hin, wenn die Anweisungen nicht befolgt werden.
HINWEIS:
Enthält nützliche Hinweise.
Bei Problemen und Rückfragen zum Gerät wenden Sie sich bitte an
Ihren Händler.
Das Gerät so konzipiert, dass bei anweisungsgerechtem Gebrauch ein sicherer und zuverlässiger Betrieb garantiert werden kann.
Vor dem Gebrauch Ihres jeweiligen Geräts lesen sie bitte aufmerksam den Inhalt dieses Handbuchs. Andernfalls laufen Sie Verletzungsgefahr und riskieren die Beschädigung des Geräts.
1. Machen Sie sich vor dem Gebrauch mit der Betriebsweise und
den Kommandos des Geräts vertraut. Informieren Sie sich, wie
man die Werkzeuge und den Motor schnell anhält und machen
SICHERHEITSBESTIMMUNGEN
Pay particular attention to information preceded by the
following indications:
DANGER
This sign urges you to be careful when carrying out certain operations.
Indicates a strong possibility of serious physical injury, even death, if the
instructions are not followed.
PRECAUTION:
. Indicates a possibility of physical injury or damage to the equipment
if the instructions are not followed. .
NOTE :
Provides useful information.
In case of problems arising or for any questions regarding the acces-
sory, please contact your distributor.
This machine is designed to ensure a safe and reliable service, if the machine is used in accordance with the instructions.
Before using your machine, please read and make sure you
understand the contents of this manual. If you do not do this,
you run the risk of causing injury and the equipment can be
damaged.
1. Familiarise yourself with how the machine works and how to
SAFETY PRECAUTIONS
Let met name op aanwijzingen die vooraf worden
gegaan door de volgende aanduidingen:
LET OP
Dit symbool spoort aan tot voorzichtigheid tijdens
het uitvoeren van bepaalde handelingen. Het duidt op het risico van ernstig lichamelijk, mogelijk zelfs fataal letsel, indien de
instructies niet worden opgevolgd.
WAARSCHUWING:
. Dit symbool duidt op de mogelijkheid van lichamelijk letsel of schade
aan de machine, indien de instructies niet worden opgevolgd.
NB:
Nuttige informatie voor de gebruiker.
Neem contact op met uw dealer indien er zich problemen voordoen of
als u vragen hebt over de machine.
De machine is veilig en betrouwbaar indien deze wordt gebruikt
conform de instructies. Lees voor gebruik van de machine deze
handleiding aandachtig door en volg de instructies nauwkeurig
op. Indien dit wordt nagelaten, bestaat risico op lichamelijk letsel
en schade aan de machine.
1. Stel uzelf voor gebruik van de machine goed op de hoogte van de
werking en de bedieningsknoppen. Zorg ervoor dat u weet hoe de
onderdelen en de motor snel kunnen worden uitgeschakeld en
VEILIGHEIDSVOORSCHRIFTEN
Prestare particolare attenzione alle indicazioni
precedute dalle seguenti diciture:
ATTENZIONE
Questo simbolo vi richiama alla prudenza durante determinate operazioni. Segnala un elevato rischio di lesioni corporali gravi, e persino un pericolo mortale, in caso di mancata osservanza delle istruzioni.
PRECAUZIONE :
. Segnala il rischio di lesioni corporali o di danni all’attrezzatura in caso
di mancata osservanza delle istruzioni.
NOT
A :
Fornisce informazioni utili.
In caso di problemi, o per qualsiasi domanda concernente la macchi-
na, rivolgetevi al vostro rivenditore di fiducia.
La macchina è concepita per assicurare un servizio sicuro ed affidabile in condizioni di utilizzo conformi alle istruzioni. Prima di
usare la macchina, leggere e comprendere il contenuto di questo
manuale. In caso contrario, vi esporrete al rischio di ferite e di
danneggiare l’attrezzatura.
1. Prendere conoscenza del funzionamento e dei comandi della
macchina prima dell’uso. Accertarsi di saper arrestare rapidamen-
CONSEGNE DI SICUREZZA
Preste especial atención a las indicaciones
precedidas por las referencias siguientes:
ATENCIÓN
Esta señal le exige prudencia cuando realice ciertas operaciones. Indica
una posibilidad elevada de daños corporales graves, incluso peligro de
muerte, si no se siguen las instrucciones.
PRECAUCIÓN:
Indica la posibilidad de daños corporales o deterioro del equipo si
no se siguen las instrucciones.
NOTA :
Ofrece información de utilidad.
En caso de problemas, o para cualquier otra cuestión relacionada con
la máquina, le rogamos se dirija a su distribuidor.
La máquina ha sido creada para garantizar un servicio seguro y
fiable en las condiciones de uso conformes a las instrucciones.
Antes de utilizar su máquina, le rogamos lea y asimile el contenido del presente manual. De lo contrario, se expondría a posibles
riesgos y el equipo podría verse dañado.
1. Familiarícese con el funcionamiento y los mandos de la máquina
antes de utilizarla. Aprenda cómo parar las herramientas y el
motor rápidamente y entienda correctamente el funcionamiento
CONSIGNAS DE SEGURIDAD

4
DE
EN
NL
IT
ES
Sie sich mit der Funktionsweise aller Steuerungen vertraut.
2. Verwenden Sie das Gerät für seinen vorgesehenen Zweck, d.h.
die Bearbeitung des Bodens. Der zweckentfremdete Einsatz des
Geräts kann gefährlich sein bzw. die Maschine zerstören.
3. Ihr Gerät wurde gemäß der geltenden europäischen Sicherheitsnormen, EN 709-ANSI OPEI B 71.8-1996-07/97 konzipiert. Zu
Ihrer eigenen Sicherheit empfehlen wir, die Eigenschaften ihres
Geräts nicht zu verändern.
4. Seien Sie stets aufmerksam. Achten Sie stets darauf, was Sie tun
und gehen Sie überlegt vor. Verwenden Sie das Gerät nicht, wenn
Sie müde sind.
5. Kleiden Sie sich stets entsprechend. Tragen Sie keinen Schmuck
und keine weite Kleidung, die sich in den Drehteilen verfangen
könnte. Tragen Sie anliegende Kleidung, festes und rutschfestes
Schuhwerk, das den Fuß ganz einfasst. Tragen Sie widerstandsfähige Handschuhe. Die Handschuhe dämpfen die Übertragung
der Vibrationen auf ihre Hände.
6. Lassen Sie niemals Kinder oder nicht mit den Anweisungen vertraute Personen die Maschine benutzen. Die jeweiligen Landesvorschriften können das Alter des Benutzers begrenzen.
7. Verwenden Sie die Maschine nicht:
- Wenn sich Personen, insbesondere Kinder, oder Tiere in der
Nähe befinden.
- Nach der Einnahme von Medikamenten oder Substanzen, die
dafür bekannt sind, das Reaktionsvermögen oder die Aufmerksamkeit zu beeinträchtigen.
- Ohne den mittleren Schutz der Drehwerkzeuge bzw. die rechte
und linke Schutzabdeckung des optionalen Moosver-nichterzu-
operate it before using it for the first time. Make sure you
know how to quickly stop the blade assembly and the engine.
You should also know what happens with the machine when
you perform all the different operations.
2. Only use the machine for the purpose for which it is intended
– soil cultivation. All other usage can prove to be dangerous
or lead to damage to the machine.
3. Your machine is designed in accordance with the applicable
European safety standards: EN 709-ANSI OPEI B 71.8-199607/97. For your own safety, we recommend that you do not
modify the characteristics of your machine.
4. Always be vigilant. Look what you are doing and show good
judgement. Do not use the machine when you are tired.
5. Always dress appropriately. Do not wear jewellery or baggy
clothing since these can be trapped by moving parts. Wear
tight-fitting clothes, and sturdy, gripped shoes, which completely cover the foot. Use resilient gloves. Gloves reduce the
transmission of vibrations to your hands.
6. Never allow children or persons not familiar with the instructions to use the machine. National regulations may set a minimum age limit of the user
7. Do not use the machine:
- When persons, especially children, or animals are in close
proximity.
- After having taken medicine or other substances that can
have a negative effect on reflexes and vigilance.
ken de functie van elke knop.
2. Gebruik de machine waarvoor deze is bedoeld, namelijk het
bewerken van de bodem. Elk ander gebruik kan gevaar opleveren
of schade aan de machine veroorzaken.
3. De machine is ontwikkeld conform de geldende Europese veiligheidsnormen, EN 709-ANSI OPEI B 71.8-1996-07/97. Voor uw
eigen veiligheid is het raadzaam niets aan de machine te veranderen.
4. Neem te allen tijde voorzichtigheid in acht. Kijk goed uit bij alles
wat u doet. Het wordt afgeraden met de machine te werken als u
vermoeid bent.
5. Draag geschikte, veilige kleding tijdens het werken met de machine. Draag geen sieraden of wijde kledingstukken. Ze kunnen worden gegrepen door bewegende delen. Kies voor nauwe kleding
en stevige schoenen met antislipzolen die de voeten compleet
omsluiten. Gebruik stevige handschoenen. De handschoenen
verminderen de overdracht van trillingen naar uw handen.
6. De machine mag in geen enkel geval worden gebruikt door kinderen of door personen die niet bekend zijn met de instructies. De
nationale regelgeving kan een minimumleeftijd voorschrijven.
7. Gebruik de machine niet:
- indien zich personen, met name kinderen, of dieren in de buurt
bevinden.
- indien u medicijnen gebruikt die het reactievermogen kunnen
beïnvloeden.
- zonder de beschermende voorzieningen voor draaiende delen of
de b
eschermkappen voor de optionele gazonbeluchter.
te gli attrezzi e il motore e di aver ben compreso il funzionamento
di tutti i comandi.
2. Usare la macchina solo per lo scopo a cui è destinata, cioè la coltura del terreno. Qualsiasi altro uso può dimostrarsi pericoloso o
provocare danni alla macchina.
3. La macchina è stata concepita conformemente alle vigenti norme
di sicurezza europee, EN 709-ANSI OPEI B 71.8-1996-07/97 .
Per la vostra sicurezza vi consigliamo di non modificare le caratteristiche della vostra macchina.
4. Agite sempre con cautela. Osservate quel che fate e date prova
di buon senso. Non usate la macchina quando siete stanchi.
5. Indossate sempre indumenti adatti. Non indossate gioielli o abiti
larghi che potrebbero impigliarsi nei pezzi in movimento. Indossa-
re abiti aderenti al corpo, scarpe robuste e antisdrucciolo, che
coprano completamente il piede. Usare guanti resistenti. I guanti
riducono la trasmissione delle vibrazioni alle mani.
6. Non consentire mai l’uso della macchina a bambini o a persone
non a conoscenza delle istruzioni. La legislazione nazionale può
porre un limite all’età dell’operatore.
7. Non usare la macchina:
- Quando ci sono persone, in particolar modo bambini, o animali
nelle vicinanze.
- Dopo l’assunzione di medicinali o sostanze in grado di ridurre la
prontezza di riflessi e di reazione.
- Senza la protezione centrale degli attrezzi rotanti o carter di protezione destro e sinistro
dell’accessorio demuschiatore.
de todos los mandos.
2. Utilice la máquina para el uso al que está destinada, es decir, al
cultivo del suelo. Cualquier otro uso puede ser peligroso o conllevar el deterioro de la máquina.
3. Su máquina ha sido creada de conformidad con la normativa
europea en vigor de seguridad, EN 709-ANSI OPEI B 71.8-199607/97. Por su seguridad, le recomendamos no alterar las características de su máquina.
4. Sea siempre precavido. Preste atención a lo que hace y sea prudente. No utilice la máquina cuando esté cansado.
5. Lleve la ropa adecuada. No lleve joyas o ropa amplia que puedan
ser atrapadas por las piezas en movimiento. Utilice ropa ajustada,
zapatos sólidos, antideslizantes, que cubran completamente el
pie. Utilice guantes resistentes. Los guantes disminuyen la trans-
misión de vibraciones a sus manos.
6. Nunca permita el uso de la máquina a niños o a personas que no
estén familiarizadas con las instrucciones. La normativa nacional
puede limitar la edad de uso.
7. No utilice la máquina:
- Cuando haya animales o personas cerca, particularmente niños.
- Después de haber ingerido medicamentos o sustancias que
puedan disminuir su capacidad de reflejo y atención.
- Sin la protección central de las herramientas rotativas o las fundas de p
rotección derecha e izquierda del equipo embotador
opcional.
8. El usuario es responsable de valorar los posibles riesgos del terreno que va a trabajar y de tomar las precauciones necesarias
SICHERHEITSBESTIMMUNGEN
SAFETY PRECAUTIONS
VEILIGHEIDSVOORSCHRIFTEN
CONSEGNE DI SICUREZZA
CONSIGNAS DE SEGURIDAD

5
DE
EN
NL
IT
ES
behörs.
8. Die Verantwortung, die potentiellen Gefahren des Geländes, das
bearbeitet werden soll, abzuschätzen und die entsprechenden
Schutzmaßnahmen zu seiner Sicherheit zu ergreifen, und zwar
insbesondere bei Steigungen, unebenen, rutschigen oder losen
Geländen, liegt beim Anwender.
9 Beim Arbeiten an Hängen achten Sie darauf, dass der Benzintank
weniger als halbvoll ist, um die Menge auslaufenden Benzins zu
minimieren. Geben Sie acht, wenn Sie an einem Hang die Richtung wechseln. Nutzen Sie die Bodenfräse nicht an Abhängen, die
steiler als 10º (17 %) sind.
10. Vergessen Sie nicht, dass der Besitzer bzw. der Benutzer für
Unfälle oder Gefahren durch Dritte oder deren Güter haftbar ist.
11. Überprüfen Sie den Allgemeinzustand des Geräts vor dem Ein-
satz. So vermeiden Sie Unfälle bzw. Beschädigungen der Maschine.
12. Vergewissern Sie sich, dass alle Befestigungsvorrichtungen gut
festgezogen sind.
13. ACHTUNG GEFAHR! Das Benzin ist leicht entzündlich.
- Bewahren Sie den Treibstoff in extra für diesen Zweck vorgese-
henen Behältern.
- Füllen Sie nur draußen und stets vor dem Starten des Motors
und ohne zu rauchen oder den Treibstoff zu bearbeiten, Benzin
ein.
- Entfernen Sie niemals den Tankdeckel oder füllen Benzin ein,
während der Motor läuft oder noch warm ist.
- Starten Sie den Motor nicht, wenn Benzin ausgelaufen ist: Ent-
- Without the central protection of the rotating blade assembly
or the left and right protective
covers included in the optional
lawn dethatcher accessory.
8. It is the user’s responsibility to evaluate the potential risks that
may arise in the area to be cultivated. It is also the user’s responsibility to take all the necessary precautions to ensure
his/her safety, in particular in slopes, and on land that has
varying characteristics, is slippery or which is littered with
objects.
9 In cases where you are cultivating on slopes, keep the petrol
tank no more than half full to reduce the amount of spilled
petrol. Always pay attention when changing direction on a
slope. Do not use the walking tractor on a gradient of more
than 10° (17 %).
10. Bear it in mind that the owner or the user is responsible for
accidents or damage suffered by third parties or their property.
11. Inspect the condition of the machine before using it. As such,
you can avoid an accident or damaging the machine.
12. Ensure that all the fastening points are fully tightened.
13. DANGER ! Petrol is highly inflammable.
- Store the fuel in containers specially intended for this pur-
pose
- Only fill the machine with petrol outdoors and before starting
the engine. Do not smoke during this operation or on any
other occasion when you are handling petrol.
8. De gebruiker is zelf verantwoordelijk voor het inschatten van de
potentiële risico’s van het werkterrein, zoals hellingen, stukken
land met vrij grote hoogteverschillen, gladde of losse ondergronden, en dient zelf de nodige voorzorgsmaatregelen te nemen om
zijn/haar veiligheid te garanderen.
9 Bij het werken op hellingen dient het benzinereservoir voor minder
dan de helft te zijn gevuld om zo min mogelijk brandstof te morsen. Let altijd op als u op een helling van richting verandert.
Gebruik de motorploeg niet op een helling met een percentage
hoger dan 17% (10°).
10. De eigenaar of gebruiker is aansprakelijk voor de ongevallen of
risico’s die zijn veroorzaakt door derden of hun eigendommen.
11. Controleer de toestand van de machine voor gebruik. Zo voorkomt u ongevallen of schade aan de machine.
12. Controleer of alle bevestigingsvoorzieningen goed zijn vastgedraaid.
13. LET OP: GEVAAR! Benzine is zeer licht ontvlambaar.
- Bewaar de brandstof in speciaal daarvoor bestemde vaten.
- Vul het brandstofreservoir uitsluitend buiten en voor het starten
van de motor. Het is verboden te roken tijdens het vullen van het
reservoir of tijdens andere handelingen waarbij brandstof wordt
gebruikt.
- Draai de dop van het brandstofreservoir nooit los en vul het
reservoir nooit bij als de motor draait of nog warm is.
- Start de motor niet als er benzine is gemorst: Zet de machine ver
van de plek waar de brandstof is gemorst en voorkom iedere
vorm van vuur zolang de brandstof niet is verdampt en de dam-
8. È responsabilità dell’operatore valutare i rischi potenziali del terreno da lavorare e prendere tutte le precauzioni necessarie per
garantire la propria sicurezza, in particolare sui pendii, sui terreni
accidentati, scivolosi o mobili.
9 In caso di aratura sui pendii, riempire il serbatoio carburante fino
a meno di metà per ridurre lo spargimento di benzina. Agire
sempre con cautela cambiando direzione su un pendio. Non utilizzare la motocoltivatrice su terreni con pendenza superiore a 10°
(17 %).
10. Ricordare che il proprietario o l’operatore è responsabile degli
incidenti o dei rischi incorsi da terzi o da beni di loro proprietà.
11. Verificare lo stato della macchina prima di usarla. Eviterete così
eventuali incidenti o danni alla macchina.
12. Accertarsi che tutti i dispositivi di fissaggio siano ben serrati.
13. ATTENZIONE PERICOLO! La benzina è estremamente infiam-
mabile.
- Conservare il carburante in recipienti specialmente concepiti a
questo proposito.
- Fare il pieno esclusivamente all’esterno, prima di accendere il
motore ed evitare di fumare sia durante questa operazione che
durante qualsiasi altra operazione con il carburante.
- Evitare di togliere il tappo del serbatoio carburante o di fare il
pieno a motore acceso o ancora caldo.
- Non accendere il motore in caso di perdite di benzina: allontanare la macchina dalla zona in cui è stato versato il carburante
para garantizar su seguridad, en particular, en pendientes, suelos
accidentados, deslizantes o móviles.
9 En caso de arada sobre pendientes, mantenga el depósito de
gasolina lleno a menos de la mitad para disminuir la cantidad de
gasolina derramada. Preste siempre atención a los cambios de
dirección sobre una pendiente. No utilice el tractor agrícola sobre
una pendiente superior a 10º (17%).
10. Recuerde siempre que el propietario o el usuario es responsable
de los accidentes o riesgos sufridos por terceras personas o por
sus bienes.
11. Compruebe el estado de la máquina antes de utilizarla. Con ello
evitará accidentes o daños a la máquina.
12. Asegúrese de que todos los dispositivos de fijación están bien
apretados.
13. ¡ATENCIÓN PELIGRO! La gasolina es altamente inflamable.
-
Conserve el carburante en recipientes especialmente destinados
a tal efecto.
- Llene el depósito en el exterior únicamente, antes de poner en
marcha el motor y no fume mientras realice esta operación o
manipule carburante.
- Nunca quite el tapón del depósito de carburante o lo llene cuando el motor está en funcionamiento o mientras está aún caliente.
- No ponga en marcha el motor si se ha derramado gasolina: aleje
la máquina de la zona en la que se derramó el carburante y no
provoque ninguna ignición hasta que el carburante se haya evaporado y los vapores se hayan disipado.
SICHERHEITSBESTIMMUNGEN
SAFETY PRECAUTIONS
VEILIGHEIDSVOORSCHRIFTEN
CONSEGNE DI SICUREZZA
CONSIGNAS DE SEGURIDAD

6
DE
EN
NL
IT
ES
fernen Sie das Gerät aus dem Bereich, in dem sich der Treibstoff befindet und zünden Sie solange nichts an, bis der Treibstoff
nicht verdampft ist und sich der Dampf aufgelöst hat.
- Schließen Sie den Tank und den Behälter wieder richtig, indem
Sie die jeweiligen Deckel entsprechend zuschrauben.
14. Lassen Sie den Motor vorsichtig anlaufen. Halten Sie dabei sämtliche Anwendungshinweise ein und achten Sie darauf, dass die
Füße sich nicht in der Nähe der Drehwerkzeuge befinden.
15. Zum Anlassen ziehen Sie langsam an der Schnur des Starters,
bis Sie einen Widerstand spüren. Ziehen Sie anschließend
schnell an der Schnur, um ein Zurückschnellen zu vermeiden und
Verletzungen am Arm oder der Hand zu vermeiden.
16. Lassen Sie den Motor nicht in geschlossenen Räumen, in denen
sich die Kohlenmonoxidhaltigen Abgase ansammeln und zu
einem Verlust des Bewusstseins führen und tödlich sein können,
laufen. Stellen Sie eine gute Lüftung sicher.
19. Halten Sie den Motor in folgenden Fällen an:
- Immer, wenn das Gerät ohne Aufsicht bleibt.
- Vor dem Einfüllen von Treibstoff.
20. Stoppen Sie den Motor und lösen Sie das Kabel der Zündkerze in folgenden Fällen:
- Vor jedem Eingriff an den Drehteilen.
- Vor allen Reinigungs-, Prüf- und Reparaturarbeiten an der
Maschine.
- Sobald Sie eine übermäßige Ansammlung von Pflanzenteilen
auf der Höhe der Werkzeuge bemerken.
- Wenn Sie auf einen Fremdkörper gestoßen sind. Überprüfen
Sie, ob das Gerät beschädigt ist. Nehmen Sie vor jedem neuen
- Never remove the fuel tank cap or fill with petrol when the
engine is running or whilst it is still hot.
- Do not start the engine if petrol has been spilt: take the
machine away from the area where the fuel was spilt and do
not cause any sparks, etc. until the fuel has fully evaporated
and the fumes have dispersed.
- Ensure that the tank and the container are properly closed
by replacing the caps firmly.
14. Start the engine with caution, respecting the operating instructions and by keeping your feet a safe distance from the
rotating blades.
15. To start, always pull the start cord gently until you feel some
resistance. Then pull the cord quickly to avoid jerks and to
prevent injuries to the arm or hand.
16. Do not start the engine in an enclosed space where the
exhaust emissions, which contain carbon monoxide, can
accumulate and lead to unconsciousness and even death.
Ensure that there is good ventilation.
19. Stop the engine in the following cases:
- Every time the machine has to be left unattended.
- Before filling with fuel.
20. Stop the engine and disconnect the spark plug cable in
the following cases:
- Before attending to the rotating blade assembly.
- Before cleaning, inspecting or repairing the machine.
- As soon as you notice an excessive stuffing of vegetation
pen niet zijn vervluchtigd.
- Hersluit het reservoir en het vat goed door de doppen stevig vast
te draaien.
14. Start de motor voorzichtig. Neem daarbij de voorschriften in acht
en houd de voeten op afstand van de draaiende delen.
15. Trek om de motor te starten altijd langzaam aan het startkoordje
totdat een weerstand voelbaar is. Trek vervolgens snel aan het
koord om stoten te vermijden en verwondingen aan armen of handen te voorkomen.
16. Laat de motor niet lopen in gesloten ruimtes waar uitlaatgassen
die koolmonoxide bevatten niet kunnen ontsnappen. Door de
hoge concentratie kunnen deze gassen bewusteloosheid veroorzaken of zelfs dodelijk zijn. Zorg voor voldoende ventilatie.
19. Schakel de motor uit als:
- de machine onbeheerd wordt achtergelaten.
- de brandstof wordt bijgevuld.
20. Schakel de motor uit en verbreek het contact met de bougie:
- voordat er werkzaamheden aan de draaiende delen worden verricht.
- voordat de machine wordt schoongemaakt, gecontroleerd of
gerepareerd.
- zodra een verstopping wordt veroorzaakt door overtollige plan-
tenresten ter hoogte van de verwisselbare delen.
- na contact met een vreemd voorwerp. Controleer of er schade
aan de machine is ontstaan. Voer de noodzakelijke werkzaamheden uit voordat u de machine weer gaat gebruiken. Neem
e non provocare alcuna accensione fino a che il carburante non
sia evaporato e i vapori non si siano dispersi.
- Richiudere correttamente serbatoio e recipiente avvitando accuratamente i tappi.
14. Accendere il motore con precauzione, rispettando le istruzioni per
l’uso e mantenendo i piedi lontani dagli attrezzi rotanti.
15. Per mettere in moto, tirare sempre lentamente la cordicella di
avviamento fino a sentire una certa resistenza. Tirare poi la cordicella rapidamente per evitare i contraccolpi che potrebbero causare ferite al braccio o alla mano.
16. Non far funzionare il motore in ambienti chiusi in cui l’accumulo di
gas di scappamento contenenti monossido di carbonio, potrebbe
comportare la perdita di conoscenza dell’operatore con conse-
guenze anche letali. Assicurare una buona ventilazione.
19. Spegnere il motore nei casi seguenti:
- Tutte le volte in cui la macchina dev’essere lasciata incustodita.
Prima di fare il pieno di carburante.
20. Spegnere il motore e staccare il filo della candela nei casi
seguenti:
- Prima di qualsiasi intervento sugli attrezzi rotanti.
- Prima di qualsiasi operazione di pulizia, di verifica o di riparazio-
ne della macchina.
- Se si verifica un eccessivo intasamento di vegetazione a livello
degli attrezzi.
- Dopo aver colpito un corpo estraneo. Ispezionare la macchina
per verificare eventuali danni. Eseguire le riparazioni necessarie
- Cierre correctamente el depósito y el recipiente apretando correctamente los tapones.
14. Ponga en marcha el motor con precaución, respetando las consignas de uso y con los pies alejados de las herramientas rotativas.
15. Para la puesta en marcha, tire siempre de la cuerda de arranque
lentamente hasta que sienta una resistencia. A continuación, tire
rápidamente de la cuerda para evitar rebotes y prevenir daños en
el brazo o la mano.
16. No ponga en funcionamiento el motor en un lugar cerrado en el
que los gases de escape con monóxido de carbono pueden acumularse con la consiguiente pérdida de conocimiento y peligro de
muerte. Asegure una buena ventilación.
19. Detenga el motor en los casos siguientes:
- Siempre que la máquina deba dejarse sin vigilancia.
- Antes de llenar de carburante.
20. Detenga el motor y desenchufe el cable de bujía en los casos
siguientes:
- Antes de cualquier operación en las herramientas rotativas.
- Antes de cualquier operación de limpieza, comprobación o repa-
ración de la máquina.
- En cuanto vea un atasco de hierba excesivo a la altura de las
herramientas.
- Después de haber tropezado con un objeto extraño. Inspeccio-
ne la máquina para comprobar si está dañada. Efectúe las reparaciones necesarias antes de utilizarla de nuevo. Si es necesario, vaya al servicio de reparaciones más cercano.
SICHERHEITSBESTIMMUNGEN
SAFETY PRECAUTIONS
VEILIGHEIDSVOORSCHRIFTEN
CONSEGNE DI SICUREZZA
CONSIGNAS DE SEGURIDAD

7
DE
EN
NL
IT
ES
Einsatz die ggf. notwendigen Reparaturen vor. Wenden Sie sich
bei Bedarf an den nächsten Kundendienst in Ihrer Nähe.
- Wenn das Gerät anfängt, ungewöhnlich zu vibrieren, suchen Sie
sofort die Ursache und lassen Sie vom nächsten Kundendienst
die erforderlichen Reparaturarbeiten vornehmen.
21. Sichern Sie Ihre Schritte an Steigungen. Bearbeiten Sie Steigungen stets schräg und niemals auf- oder abwärts.
22. Wenn sie Drehelemente ankuppeln, achten Sie darauf, dass sich
niemand vor bzw. in der Nähe der Maschine befindet. Halten Sie
die Lenkstange gut fest; sie geht beim Einkuppeln leicht nach
oben.
23 Halten Sie beim Arbeiten den durch die Länge der Lenkstange
vorgegebenen Sicherheitsabstand zu den Drehwerkzeugen ein.
24. Entfernen Sie sämtliche Steine, Drähte, Glas, großen Teile, Metall-
gegenstände etc. von der Arbeitsfläche.
26. Verändern Sie auf keinen Fall die Einstellung des Motors und überlasten Sie ihn nicht.
27. Die Drehwerkzeuge schneiden und rotieren mit hoher Geschwindigkeit. Sie können schwere Unfälle verursachen.
- Halten Sie Hände und Füße von den Drehwerkzeugen fern,
während der Motor in Betrieb ist.
- Halten Sie den Motor an, bevor Sie die Drehwerkzeuge untersu-
chen oder warten.
- Lösen Sie den Deckel der Zündkerze, um zu vermeiden, dass
der Motor aus Versehen anspringt. Als Schutz während der Reinigung, Inspektion oder Erneuerung der Werkzeuge tragen Sie
dicke Handschuhe.
around the blade assembly.
- After having run into a foreign object. Inspect the machine to
check if it is damaged. Carry out all necessary repairs before using the machine again. If necessary, contact your nearest after-sales.
- If the machine starts to vibrate in an abnormal way, immediately try to locate the cause of the vibration and carry out
the necessary repair work at your nearest after-sales.
21. Make sure you have a firm foothold when working on slopes.
Work transversely on slopes, never ascending or descending.
22. When you engage the rotating blade assembly, make sure
that nobody is in front of or close to the machine. Take a firm
grip of the handlebars; they have a tendency to lift up as the
blade assembly are engaged.
23 Whilst working, maintain a safe distance as regards the rota-
ting blade assembly. This distance is provided by the length
of the handlebars.
24. Remove all stones, wires, glass, bulky objects and metal
objects, etc. from the work surface.
26. Never modify the engine settings or put the engine on overboost.
27. The rotating blade assembly is sharp and turns at a very
high speed. They can cause very serious injury.
- Keep hands and feet well clear of the rotating blade assem-
bly while the engine is running.
indien nodig contact op met de klantenservice bij u in de buurt.
- indien de machine ongewoon begint te trillen, zoek dan meteen
de oorzaak hiervan en laat de machine repareren bij de dichtstbijzijnde klantenservice.
21. Garandeer de werking van de machine op hellingen. Bewerk hellingen uitsluitend overdwars, nooit van boven naar beneden of
andersom.
22. Zorg ervoor dat er zich bij het aankoppelen van de draaiende
delen geen personen achter of in de buurt van de machine bevinden. Houd het stuur stevig vast; het heeft tijdens het aankoppelen
de neiging omhoog te gaan.
23 Blijf tijdens de werkzaamheden op een veilige afstand van de
draaiende delen. Houd daarvoor de lengte van de stuurstang aan.
24. Verwijder stenen, draden, glas, metalen voorwerpen en dergelijke
van het te bewerken terrein.
26. Wijzig nooit iets aan de motorinstellingen en laat de motor nooit
met een te hoog toerental draaien.
27. De draaiende delen zijn scherp en draaien met hoge snelheid.
Ze kunnen zeer ernstige ongevallen veroorzaken.
- Houd handen en voeten op veilige afstand van de draaiende
delen als de motor is ingeschakeld.
- Zet de motor uit voordat u begint met controle- of onderhoud-
swerkzaamheden aan de draaiende delen.
- Verbreek het contact met de bougiekap om onbedoeld starten
van de motor te voorkomen. Draag dikke handschoenen om de
handen te beschermen tijdens schoonmaak-, controle- en ver-
prima di usare nuovamente la macchina. Se necessario, rivolgersi alla più vicina officina di assistenza.
- Se la macchina comincia a vibrare in modo anomalo, individuare immediatamente la causa della vibrazione ed eseguire la riparazione necessaria presso la più vicina officina di assistenza.
21. Agire con cautela sui pendii. Operando sui pendii, lavorare in
senso trasversale, mai in salita o in discesa.
22. Al momento di azionare gli attrezzi rotanti, accertarsi che non ci
sia nessuno davanti o nelle vicinanze della macchina. Tenere saldamente il manubrio che tende a sollevarsi al momento dell’azionamento.
23 Durante il lavoro, mantenere la distanza di sicurezza dagli attrez-
zi rotanti; questa equivale alla lunghezza del manubrio.
24. Eliminare tutti i sassi, fili, vetri, oggetti voluminosi, corpi metallici
ecc ...dalla superficie di lavoro.
26. Non modificare mai la registrazione del motore e non impostare
mai il motore su un regime eccessivo.
27. Gli attrezzi rotanti sono taglienti e girano ad alta velocità. Possono provocare incidenti estremamente gravi.
- Non avvicinare mani e piedi agli attrezzi rotanti mentre il motore
gira.
- Spegnere il motore prima di procedere al controllo o alla manu-
tenzione degli attrezzi rotanti.
- Staccare il cappellotto della candela di accensione per impedire
un avviamento accidentale del motore. Indossare guanti robusti
per proteggersi le mani durante la pulizia, il controllo o la sosti-
- Si la máquina comienza a vibrar de forma anormal, investigue
inmediatamente la causa de la vibración y efectúe la reparación
necesaria en el servicio se reparaciones más cercano.
21. Refuerce estos pasos en las pendientes. Trabaje las pendientes
en sentido transversal, nunca en sentido ascendente o descendente.
22. En el momento de embragar las herramientas rotativas, evite que
haya personas delante o cerca de la máquina. Sostenga con firmeza el manillar; éste tiende a elevarse cuando se embraga.
23 Mientras trabaje, mantenga la distancia de seguridad con respec-
to a las herramientas rotativas, distancia dada por la longitud del
manillar.
24. Retire todos los cables, piedras, vidrio, elementos voluminosos,
objetos de metal, etc... de la superficie que va a trabajar.
26. Nunca modifique la alineación del motor, ni sobrecargue el motor.
27. Las herramientas rotativas son cortantes y giran a una gran
velocidad. Pueden provocar accidentes extremadamente
graves.
- No acerque ni las manos ni los pies a las herramientas rotativas
mientras el motor está en marcha.
- Detenga el motor antes de pasar al control o al mantenimiento
de las herramientas rotativas.
- Desconecte el tapón de la bujía de arranque para impedir la
puesta en marcha accidental del motor. Utilice guantes gruesos
para proteger las manos durante la limpieza, el control o la sustitución de las herramientas.
- En caso de emergencia, sepa cómo detener rápidamente el
SICHERHEITSBESTIMMUNGEN
SAFETY PRECAUTIONS
VEILIGHEIDSVOORSCHRIFTEN
CONSEGNE DI SICUREZZA
CONSIGNAS DE SEGURIDAD

8
DE
EN
NL
IT
ES
- Haben Sie für Notfälle im Kopf, wie man den Motor und die Drehwerkzeuge schnell anhält.
28. Arbeiten Sie nur bei Tageslicht oder bei guter künstlicher Beleuchtung.
29. Nutzen Sie das Gerät nicht mit beschädigten oder verschlissenen
Teilen Die Einzelteile dürfen nicht repariert sondern müssen
erneuert werden. Verwenden Sie Originalteile. Ersatzteile nicht
minderwertiger Qualität können das Gerät beschädigen und Ihre
Sicherheit beeinträchtigen. Ersetzen Sie defekte Auspuffdämpfer.
30. Um jegliche Brandgefahr zu vermeiden, lassen Sie den Moor
abkühlen, bevor Sie das Gerät unterstellen.
31. Befreien Sie das Gerät, insbesondere den abgekühlten Motor, vor
dem Abstellen von Pflanzenresten. Um die Brandgefahr zu verringern halten Sie den Auspuff und den Lagerbereich des Benzins
frei von Pflanzen- und Fettresten.
32. Wenn der Treibstofftank geleert werden muss, nehmen Sie diesen
Vorgang draußen und bei abgekühltem Motor vor.
33 Stellen Sie die Maschine in trockener Umgebung ab. Stellen Sie
das Gerät mit Treibstoff im Tank niemals an einem Ort ab, an dem
die Benzindämpfe eine Flamme, einen Funken oder eine starke
Hitzequelle erreichen könnten.
34. Halten Sie den Motor für den Transport des Geräts ab. Für den
Transport der Maschine in Ihrem Fahrzeug muss sich zunächst
der Motor abkühlen und der Treibstofftank geleert werden. Schützen Sie Ihre Hände mit Arbeitshandschuhen und achten Sie
darauf, das Gleichgewicht der Maschine zu wahren.
35. Für einen sicheren Betrieb müssen alle Schrauben und Muttern
fest zugeschraubt sein. Regelmäßige Wartung ist entscheidend
- Stop the engine before inspecting or maintaining the rotating
blade assembly.
- Disconnect the spark plug cover to prevent accidental starting of the engine. Wear strong gloves to protect your hands
during cleaning, inspecting or replacing blades.
- In case of emergency, make sure you know how to quickly
stop the engine and the blade assembly.
28. Only work during daylight or with good quality artificial lighting.
29. Do not use the machine with damaged or worn parts. Parts
must be replaced, not repaired. Only use original spare parts.
Non-original spare parts can damage the machine and jeopardise your safety. Replace a defective exhaust silencer.
30. To avoid all risk of fire, allow the engine to cool down before
storing the machine.
31. Before storing the machine, clear it, in particular the engine
when it has cooled, of all vegetation. To reduce the risk of fire,
keep the silencer and the petrol storage area free from vegetation or excess grease.
32. If the fuel tank has to be drained, do this outdoors and when
the engine has cooled down.
33 Store the machine in a dry place. Never store the machine
with fuel in the tank in an area where the fumes can cause a
flame, a spark or a strong heat source.
34. Stop the engine when you transport the machine. When transporting the machine in your car, it is necessary beforehand to
vangingswerkzaamheden.
- Zorg ervoor dat u weet hoe de motor en de draaiende delen in
noodgevallen zo snel mogelijk kunnen worden uitgeschakeld.
28. Werk alleen bij daglicht of bij het licht van krachtige bouwlampen.
29. Gebruik de machine niet als onderdelen beschadigd of versleten
zijn. Deze delen dienen te worden vervangen in plaats van ze te
repareren. Gebruik originele onderdelen. Reserveonder-delen
van mindere kwaliteit kunnen schade aan de machine veroorzaken en kunnen uw veiligheid in gevaar brengen. Vervang een
defecte uitlaatdemper.
30. Laat voordat de machine wordt weggezet de motor afkoelen om
brand te voorkomen.
31. Verwijder alle plantenresten, met name uit de motor als deze is
afgekoeld, voordat de machine wordt weggezet. Controleer de uitlaatdemper en het benzinereservoir en verwijder plantenresten of
overtollige olie om brandgevaar te voorkomen.
32. Ingeval het brandstofreservoir dient te worden geleegd, dient dit
buiten te worden gedaan bij een afgekoelde motor.
33 Stal de machine in een droge ruimte. Zet de machine nooit met
brandstof in het reservoir in een ruimte waar de benzinedampen
in contact kunnen komen met vlammen, vonken of een sterke
warmtebron.
34. Schakel de motor uit tijdens vervoer van de machine. Als u de
machine in de auto wilt vervoeren, dient eerst de motor af te zijn
gekoeld en het benzinereservoir te zijn geleegd. Bescherm uw
handen met onderhoudshandschoenen en zorg ervoor dat de
machine niet uit balans raakt.
tuzione degli attrezzi.
- In caso di urgenza, saper come arrestare rapidamente il motore
e gli attrezzi rotanti.
28. Lavorare unicamente alla luce del giorno o con un’illuminazione
artificiale di buona qualità.
29. Non utilizzare la macchina con dei componenti danneggiati o usurati. I componenti non devono essere riparati ma sostituiti. Usare
pezzi originali. I pezzi di ricambio di qualità non equivalente possono danneggiare la macchina e nuocere alla vostra sicurezza.
Sostituire la marmitta se è difettosa.
30. Per evitare qualsiasi rischio d’incendio, lasciar raffreddare il motore prima del rimessaggio della macchina.
31. Prima del rimessaggio, rimuovere i detriti di vegetazione dalla
macchina, in particolare dal motore quando è freddo. Per ridurre
i rischi d’incendio, mantenere la marmitta e la zona di deposito
della benzina libere da detriti o da eccessi di grasso.
32. Se dovete vuotare il serbatoio carburante, eseguire questa operazione all’esterno e a motore freddo.
33 Situare la macchina in un luogo asciutto. Non immagazzinare mai
la macchina con carburante nel serbatoio in un locale in cui i
vapori della benzina potrebbero venire in contatto con fiamme,
scintille o una forte fonte di calore.
34. Spegnere il motore durante il trasporto della macchina. Prima di
trasportare la macchina nel vostro veicolo è necessario lasciar raffreddare il motore e vuotare il serbatoio carburante. Proteggersi le
mani con dei guanti da manutenzione e assicurarsi che la macchina possa restare in equilibrio.
motor y las herramientas rotativas.
28. Trabaje únicamente a la luz del día o con una luz artificial de calidad.
29. No use la máquina con piezas dañadas o utilizadas. Las piezas
no deben ser reparadas sino sustituidas. Utilice piezas originales.
Las piezas de repuesto de calidad no equivalente pueden dañar
la máquina y poner en peligro su seguridad. Sustituya el silenciador de descarga defectuoso.
30. Para evitar cualquier riesgo de incendio, deje que el motor se
enfríe antes de guardar la máquina.
31. Limpie la máquina, en particular el motor cuando esté frío, de restos vegetales antes de guardarla. Para reducir los peligros de
incendio, mantenga el silenciador y la zona de almacenamiento
de gasolina sin hierbas o exceso de grasa.
32. Si debe vaciar el depósito de carburante, hágalo al aire libre y
cuando el motor esté frío.
33 Almacene la máquina en un lugar seco. Nunca almacene la
máquina con carburante en el depósito en un local donde el vapor
de gasolina pudiera alcanzar una llama, una chispa o una intensa fuente de calor.
34. Detenga el motor cuando transporte la máquina. Para transportar
la máquina en su coche, es necesario dejar previamente que el
motor se enfríe y vaciar el depósito de gasolina. Protéjase las
manos con guantes de manipulación y asegure el equilibrio de la
máquina.
35. Mantenga todos los tornillos y tuercas apretados con el fin de
garantizar unas condiciones de uso seguras. La realización de un
mantenimiento regular es esencial para la seguridad y continua-
SICHERHEITSBESTIMMUNGEN
SAFETY PRECAUTIONS
VEILIGHEIDSVOORSCHRIFTEN
CONSEGNE DI SICUREZZA
CONSIGNAS DE SEGURIDAD

9
DE
EN
NL
IT
ES
für die Sicherheit und eine gleichbleibende Leistung. Verwenden
Sie ausschließlich die Werkzeuge und Accessoires, die der Hersteller empfiehlt.
36. Beim Einsatz an Hängen muss der Anwender sicherstellen, dass
sich im Umkreis von 20 m um die Maschine niemand befindet. Er
selbst muss an den Steuerungen verbleiben.
37. Das Gerät kann mit manchem Zubehör verwendet werden. Die
Verantwortung dafür, dass diese Werkzeuge bzw. Dieses Zubehör
den geltenden europäischen Sicherheitsvorschriften entspricht,
liegt beim Besitzer. Der Einsatz nicht entsprechend zertifizierten
Zubehörs kann Ihre Sicherheit beeinträchtigen.
38 Verwenden Sie das Gerät nicht als Antrieb für nicht passendes
Zubehör (wie Anhänger). Siehe auch die Wartungshinweise im
Handbuch zum Motor und im Benutzerhandbuch der Maschine.
39. Lesen Sie vor der Inbetriebnahme stets aufmerksam das Montage- und Benutzerhandbuch zur Maschine bzw. zu dem Zubehör.
40. Mit der Maschine gehen, niemals rennen
41. Auf abschüssigem Gelände sehr vorsichtig die Richtung wechseln
42. Die Fahrtrichtung sehr vorsichtig wechseln, bzw. die Maschine
sehr vorsichtig zu sich ziehen
cool down the engine and empty the fuel tank. Protect your
hands with strong gloves and ensure that the machine is correctly balanced upright.
35. Keep all nuts and screws tightened to ensure safe operating
conditions. Regular maintenance is essential for safety reasons and for maintaining a high performance level. Only use
blades or accessories recommended by the manufacturer.
36. When operating the machine on slopes, the user must ensure that nobody is located within a radius of 20 metres from the
machine. The user must be in complete control of the machine.
37. The machine can be used equipped with certain accessories.
It is the owner’s responsibility to ensure that these tools
conform to applicable European safety regulations. Using
non-certified accessories can jeopardise your safety.
38 Do not use the machine as a means of traction for non-adap-
ted accessories (e.g. towing). See the maintenance advice in
the engine manual and the machine’s user manual.
39. Before each use, always read carefully the assembly manual
and operating manual that accompany the machine or the
accessories.
40. Always walk, don't run with the machine
41. Change direction very carefully on sloping ground
42. Take great care when reversing direction or pulling the machine towards you
35. Controleer of alle moeren en bouten goed zijn vastgedraaid zodat
de machine op een veilige manier kan worden gebruikt. Regelmatig onderhoud is van wezenlijk belang voor de veiligheid en de
handhaving van het hoge prestatievermogen van de machine.
Gebruik uitsluitend door de fabrikant aanbevolen gereedschap of
accessoires.
36. Tijdens werkzaamheden op hellingen dient de gebruiker ervoor te
zorgen dat er zich niemand binnen een straal van 20 meter om de
machine bevindt. De gebruiker zelf mag uitsluitend achter de
stuurstang staan.
37. De machine kan worden gebruikt in combinatie met verschillende
accessoires. De eigenaar dient er zelf voor te zorgen dat deze
onderdelen of accessoires zijn gecertificeerd conform de geldende Europese veiligheidsvoorschriften. Het gebruik van niet-gecer-
tificeerde accessoires kan uw veiligheid in gevaar brengen.
38 Gebruik de machine niet als aandrijfmiddel voor ongeschikte
accessoires (slepen). Zie de onderhoudstips in de motorhandleiding en de gebruikershandleiding.
39. Lees voor gebruik altijd aandachtig de montage- en gebruikshandleiding die met de machine of de accessoires wordt meegeleverd
40. Nooit rennen, maar altijd gewoon lopen met de machine.
41. Op hellende terreinen heel voorzichtig van richting veranderen
42. Heel voorzichtig van rijrichting veranderen of de machine naar u
toetrekken
35. Mantenere tutte le viti e i bulloni serrati per garantire condizioni di
esercizio sicure. Una manutenzione regolare è essenziale per la
sicurezza e il mantenimento del livello delle prestazioni. Usare
esclusivamente gli attrezzi e gli accessori raccomandati dal costruttore.
36. In caso di uso su terreni scoscesi, l’operatore deve assicurarsi che
non ci sia nessuno entro un raggio di 20 metri intorno alla macchina. L’operatore deve assolutamente rimanere ai comandi.
37. La macchina può essere equipaggiata con diversi accessori. È
responsabilità del proprietario accertarsi che questi attrezzi o
accessori siano omologati conformemente alla normativa di sicurezza europea in vigore. L’uso di accessori non omologati può
nuocere alla vostra sicurezza.
38 Non usare la macchina come mezzo di traino per accessori non
adatti (tipo rimorchio). Vedere i consigli per la manutenzione nel
manuale del motore e nel manuale delle istruzioni per l’uso della
macchina.
39. Prima di qualsiasi messa in opera, leggere sempre attentamente
le istruzioni per il montaggio e l’uso in dotazione alla macchina o
agli accessori.
40. Camminare, non correre mai con la macchina
41. Cambiare direzione prestando la massima attenzione su terreni in
pendenza
42. Invertire il senso di marcia o tirare la macchina verso di sé con
precauzione
ción del nivel de rendimiento. Utilice sólo las herramientas o
accesorios recomendados por el fabricante.
36. Cuando se usa la máquina en terrenos en pendiente, el usuario
debe asegurarse de que no hay nadie en un radio de 20 metros
alrededor de la máquina. Debiendo permanecer imperativamente
él mismo al mando.
37. La máquina puede usarse equipada con ciertos accesorios. El propietario es responsable de garantizar que estas herramientas o
accesorios están homologados y son conformes con la normativa
europea de seguridad en vigor. El uso de accesorios sin homologar puede poner en peligro su seguridad.
38 No utilice la máquina como medio de tracción de accesorios no
adaptados (tipo remolque). Vea los consejos de mantenimiento
en el manual del motor y el manual del usuario de la máquina.
39. Antes de la puesta en marcha, lea en todo momento y detenidamente el manual de montaje y el de uso que se suministran con
la máquina o los accesorios.
40. Andar, no correr nunca con la máquina
41. Cambiar de dirección con mucho cuidado en los terrenos inclinados
42. Invertir el sentido de la marcha o tirar de la máquina con mucho
cuidado
SICHERHEITSBESTIMMUNGEN
SAFETY PRECAUTIONS
VEILIGHEIDSVOORSCHRIFTEN
CONSEGNE DI SICUREZZA
CONSIGNAS DE SEGURIDAD
10
...................
...........
.......
................................
. .
. .
KW
. . . .
(mn)
-1
. .
Kg
llllllllllllllllll
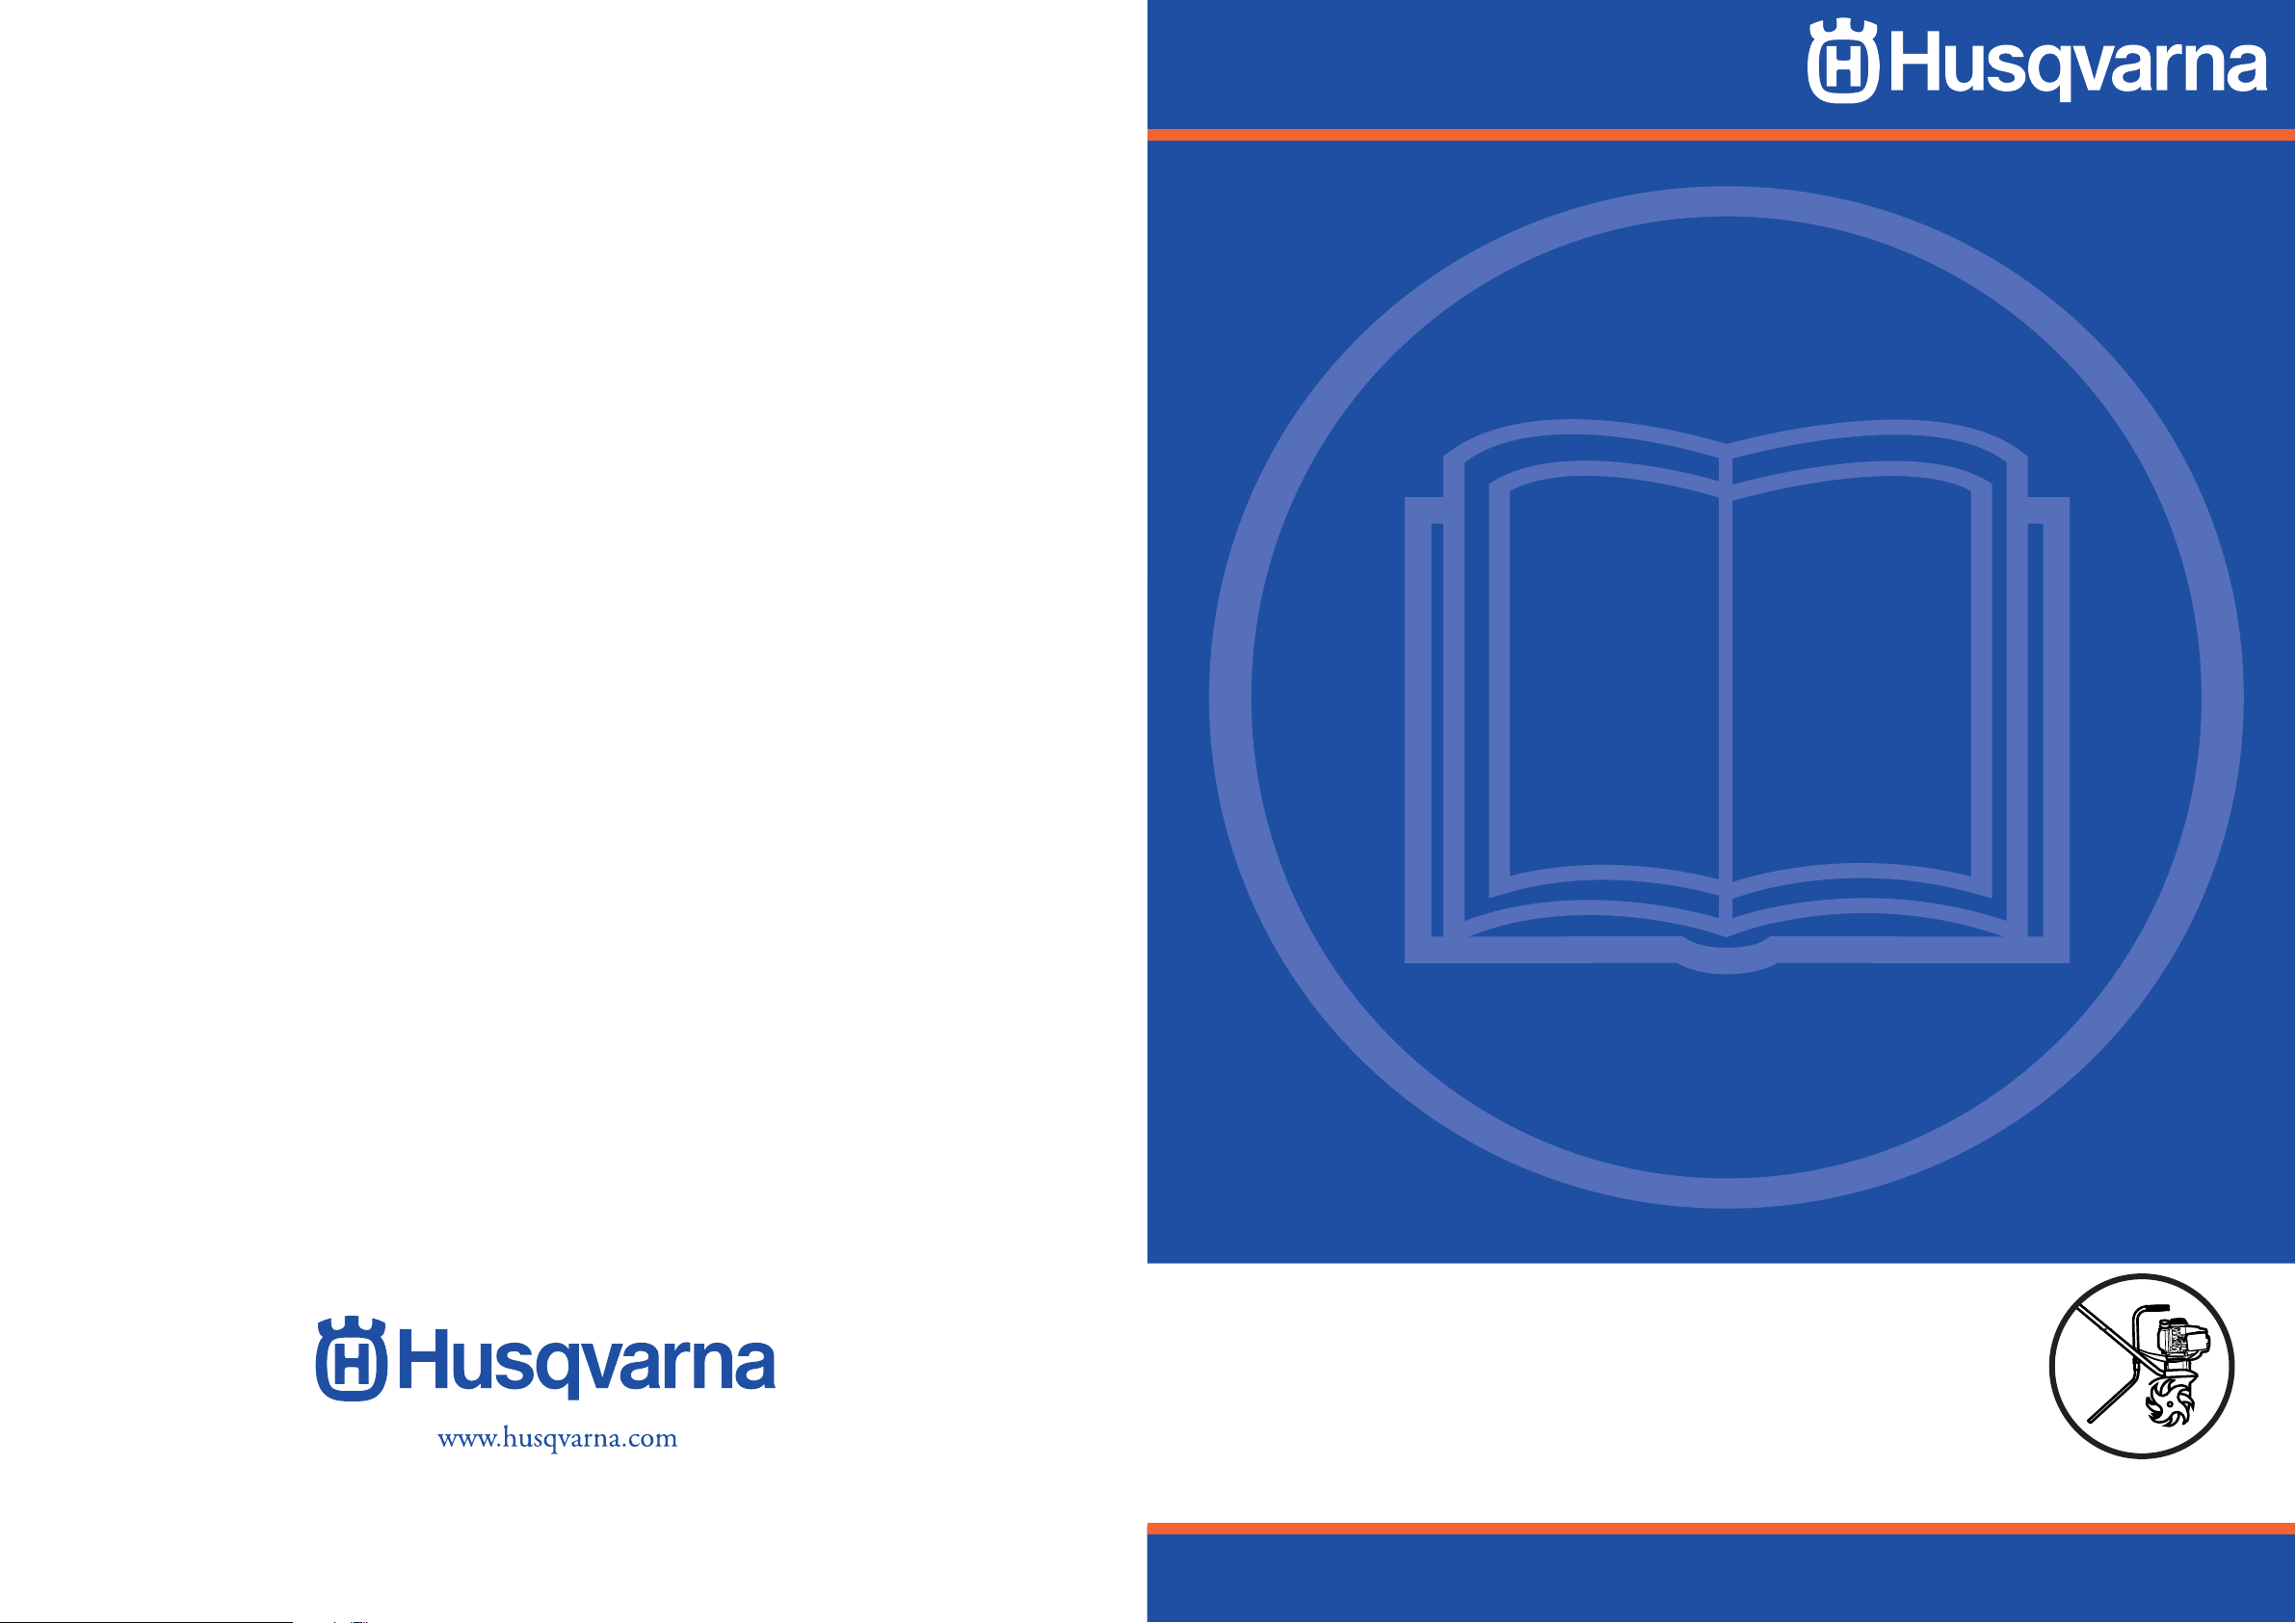
AUFKLEBER UND IHR JEWEILIGER ORT
DE
EN
NL
IT
ES
STICKERS AND LOCATIONS
STICKERS EN SYMBOLEN
AUTOADESIVI E POSIZIONI
AUTOADHESIVOS Y UBICACIÓN

11
DE
EN
NL
IT
ES
WAARSCHUWING
Lees de gebruikshandleiding
GEVAAR
Draaiende frezen
GEVAAR
WAARSCHUWING
-
Raadpleeg de gebruikshandleiding en koppel de bougie los
alvorens werkzaamheden aan de machine uit te voeren.
- Niet gebruiken zonder bescherming (draaiende
onderdelen).
¡ ATENCION !
lea la guía de utilización
PELIGRO
herramientas giratorias
PELIGRO
¡ ATENCION !
- Consulte la guía de utilización y desconecte
la bujía previamente a cualquier intervención
- Nunca utilice sin protector (elementos
giratorios)
ACHTUNG
Bedienungsanweisung lesen
GEFAHR
Drehteile
GEFAHR
BESCHREIBUNG DER AUFKLEBER
ACHTUNG
-
Vor jedem Eingriff, Bedienungsanweisung
lesen und Kerze abklemmen.
- Nicht ohne Schutz benutzen (Drehteile)
Sicherung
Stop
Stop
On
DEFINITION OF STICKERS
BETEKENIS VAN DE STICKERS
DEFINIZIONE DEGLI AUTOADESIVI
DEFINICIÓN DE LOS AUTOADHESIVOS
Schalipegel
Kupplungshebel
Ausgekuppelt
Eingekuppelt
...................
...........
.......
................................
. .
. .
KW
. . . .
(mn)
-1
. .
Kg
llllllllllllllllll
Acoustic pressure
level
Clutch lever
Urkopplad
Engaged
...................
...........
.......
................................
. .
. .
KW
. . . .
(mn)
-1
. .
Kg
llllllllllllllllll
Geluidsdrukniveau
Koppelingshendel
Losgekoppeld
Ingekoppeld
...................
...........
.......
................................
. .
. .
KW
. . . .
(mn)
-1
. .
Kg
llllllllllllllllll
Livello di pressione
acustica
Leva d’innesto
Disinnestato
Innestato
...................
...........
.......
................................
. .
. .
KW
. . . .
(mn)
-1
. .
Kg
llllllllllllllllll
Nivel presion
acustica
Manilla de embrague
Desembragada
Embragada
...................
...........
.......
................................
. .
. .
KW
. . . .
(mn)
-1
. .
Kg
llllllllllllllllll
DANGER
Rotating blades
DANGER
WARNING
Read the instruction manual
WARNING
-
Consult the instruction manual and disconnect the spark plug before starting work.
- Do not use without protective cover (rotating parts)
ATTENZIONE
Leggere il manuale d’utilizzazione
PERICOLO
Utensili rotativi
PERICOLO
ATTENZIONE
-
Consultare il manuale d’utilizzazione e staccare la candela prima di qualsiasi intervento.
- Non utilizzare senza protezione (elementi
girevoli).
Typenschild des Geräts
Reinigung Luftfilter
Ignition key
Stop
Stop
Go
Air filter Cleaning
Identification plate of the machine
Reinigen luchtfilter
Identificatieplaat van de machine
Kortsluiter
Stop
Stop
Aan
Interruzione del circuito
Stop
Stop
Marcia
Pulizia filtro dell’aria
Placca di identificazione della macchina
Corta - circuito
Stop
Stop
Marcha
Limpieza del filtro de aire
Placa de identificación de la máquina
12
DE
EN
NL
IT
ES
6
1
13
2
2
7
8
6
3
12
15
4
11
10
9
5
14
2
13
2
E
A
H B
G
D
C
...................
...........
.......
................................
. .
. .
KW
. . . .
(mn)
-1
. .
Kg
lllllllllllllllll
F
I
21
21
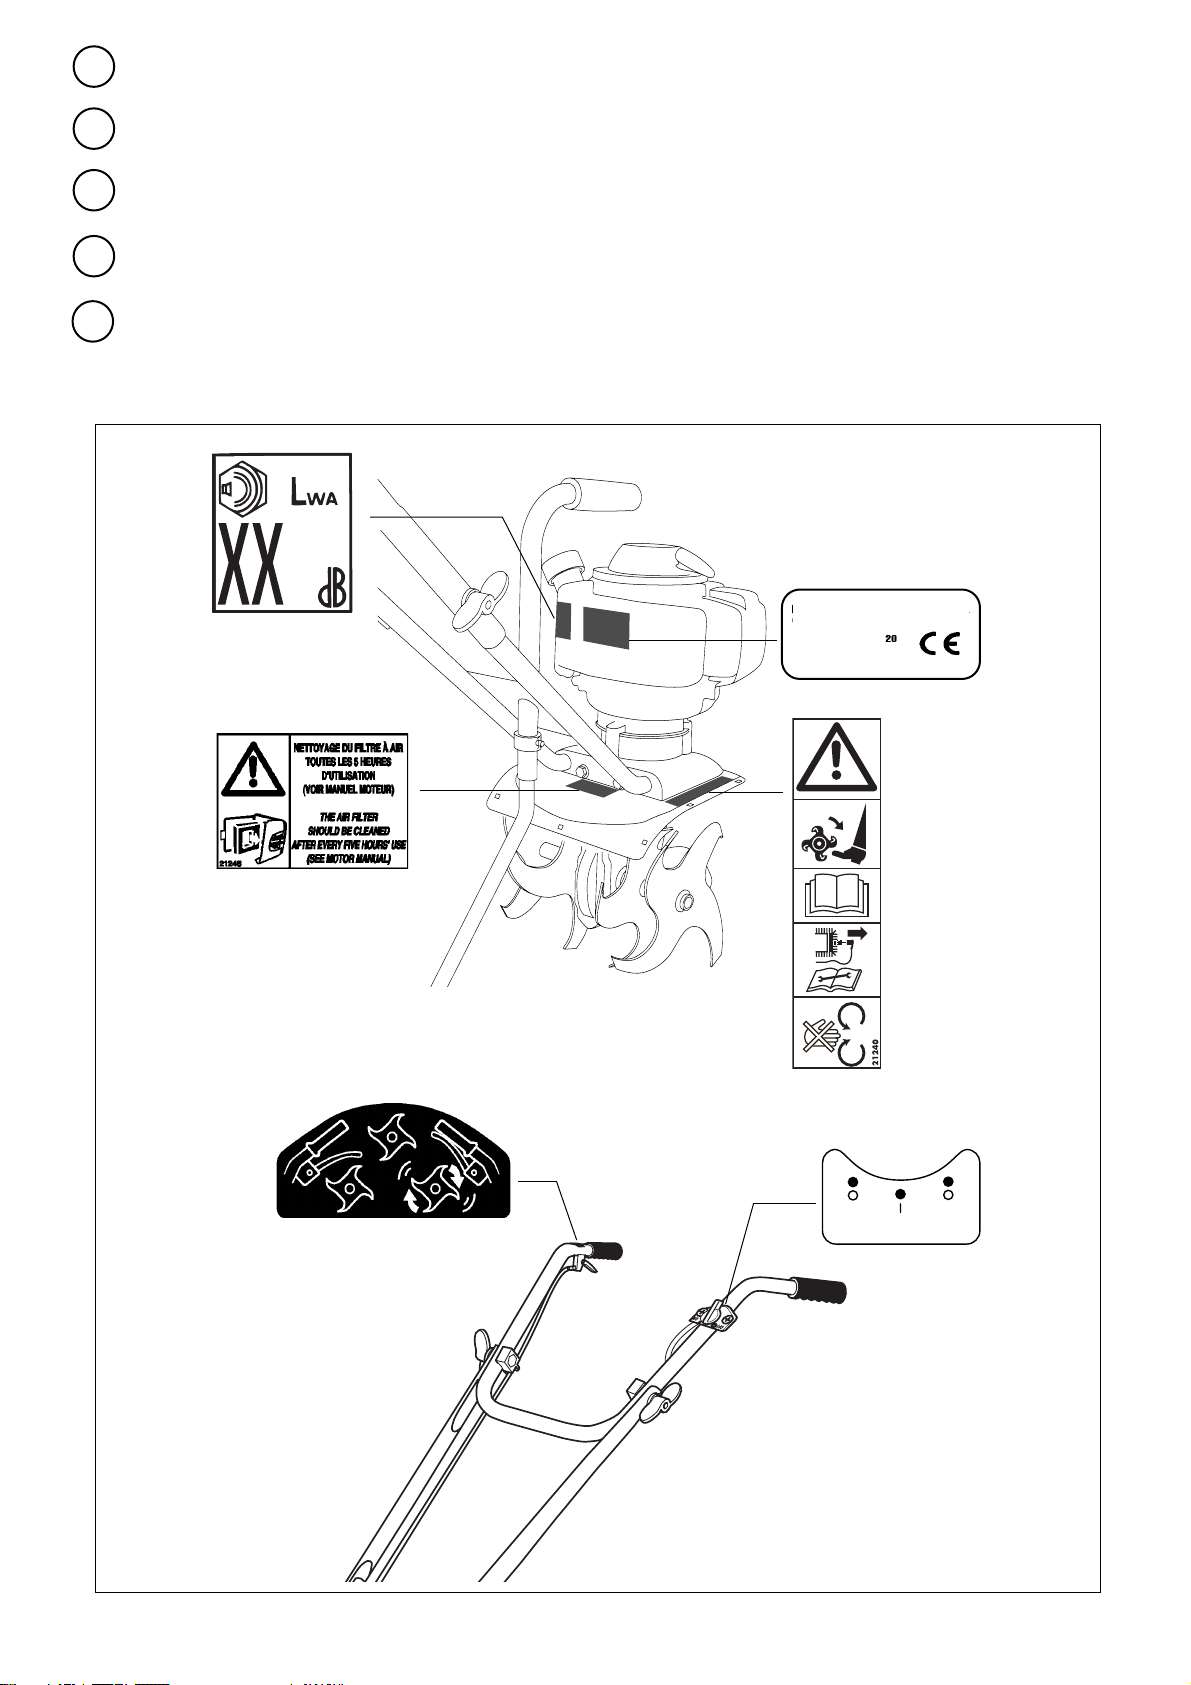
BESCHREIBUNG
1- Antriebsschalter
2- Flügelmuttern
3- Luftfilter
4- Tankdeckel
5- Starter
6- Griffe der Lenkstange
7- Öldeckel
8- Gashebel
9- Stütze
10- Mittleres Schutzblech
11- Fräse links
12- Fräse rechts
13- Lenkstange Mitte
14- Transportgriff
15- Zündpumpe
Beschreibung der einzelnen Elemente
Typenschild des Geräts
A - Nennleistung
B - Masse in kg
C - Seriennummer
D - Herstellungsjahr
E - Modell
F - Name und Adresse des Herstellers
G - CE Identifikation
H - Max. Motorleistung
I - Gemessener Lärmpegel
21
SPECIFICATION
1- On/Off switch
2- Butterfly nuts
3- Air filter
4- Fuel tank cap
5- Start cord
6- Handles
7-
Oil fill cap and level indicator
8- Throttle lever
9- Jackleg
10- Central protection cover
11- Left blade
12- Right blade
13- Intermediary handlebar
14- Transportation handle
15- Priming pump
Key
Identity plate
A - Nominal power
B - Mass in kilograms
C - Serial number
D - Year of manufacture
E - Type of machine
F -
Name and address of the manufacturer
G - Identification CE
H - Maximum engine rating
I - Level of acoustic output measured
21
BESCHRIJVING
1- Aan-/uitschakelaar
2- Vleugelmoeren
3- Luchtfilter
4-
Dop van het benzinereservoir
5- Starter
6- Stuurstanggrepen
7-
(Bij)vuldop voor olie en oliepeil
8- Gashendel
9- Steunstang
10-
Centrale beschermingskap
11- Linkerfrees
12- Rechterfrees
13- Tussenstuurstang
14- Transporthendel
15- Ontstekingspomp
Beschrijving van de onderdelen
Identificatieplaat van de machine
A - Nominaal vermogen
B - Gewicht in kilogram
C - Serienummer
D - Productiejaar
E - Type machine
F - Naam en adres van de fabrikant
G - CE-keurmerk
H - Maximaal motortoerental
I - Gemeten niveau geluidsvermogen
21
CARATTERISTICHE
1- Commutatore ON/OFF
2- Dado a farfalla
3- Filtro dell’aria
4-
Tappo del serbatoio della benzina
5- Dispositivo di avviamento
6- Impugnature del manubrio
7-
Tappo di rifornimento olio e livello
8- Leva dell’acceleratore
9- Supporto
10-
Cofano centrale di protezione
11- Fresa sinistra
12- Fresa destra
13- Manubrio intermedio
14- Impugnatura di trasporto
15- Pompa di accensione
Beschreibung der einzelnen Elemente
Placca di identificazione della macchina
A - Potenza nominale
B - Massa in chilogrammi
C - Numero di serie
D - Anno di fabbricazione
E - Tipo della macchina
F - Nome e indirizzo del costruttore
G - Identificazione CE
H - Regime motore massimo
I - Livello di potenza acustica misurata
21
DESCRIPTIVO
1- Conmutador marcha / parada
2- Tuercas de mariposa
3- Filtro de aire
4-
Tapón del depósito de gasolina
5- Arranque
6- Puños del manillar
7-
Tapón de llenado de aceite y nivel
8- Control de velocidad
9- Soporte
10- Funda central de protección
11- Fresa izquierda
12- Fresa derecha
13- Manillar intermedio
14- Puño de transporte
15- Bomba de mano
Descripción de los elementos
Placa de identificación de la máquina
A - Potencia nominal
B - Masa en kilogramos
C - Número de serie
D - Año de fabricación
E - Tipo de máquina
F - Nombre y dirección del fabricante
G - Identificación CE
H - Marcha máxima del motor
I - Nivel de potencia acústica medido
13
DE
EN
NL
IT
ES
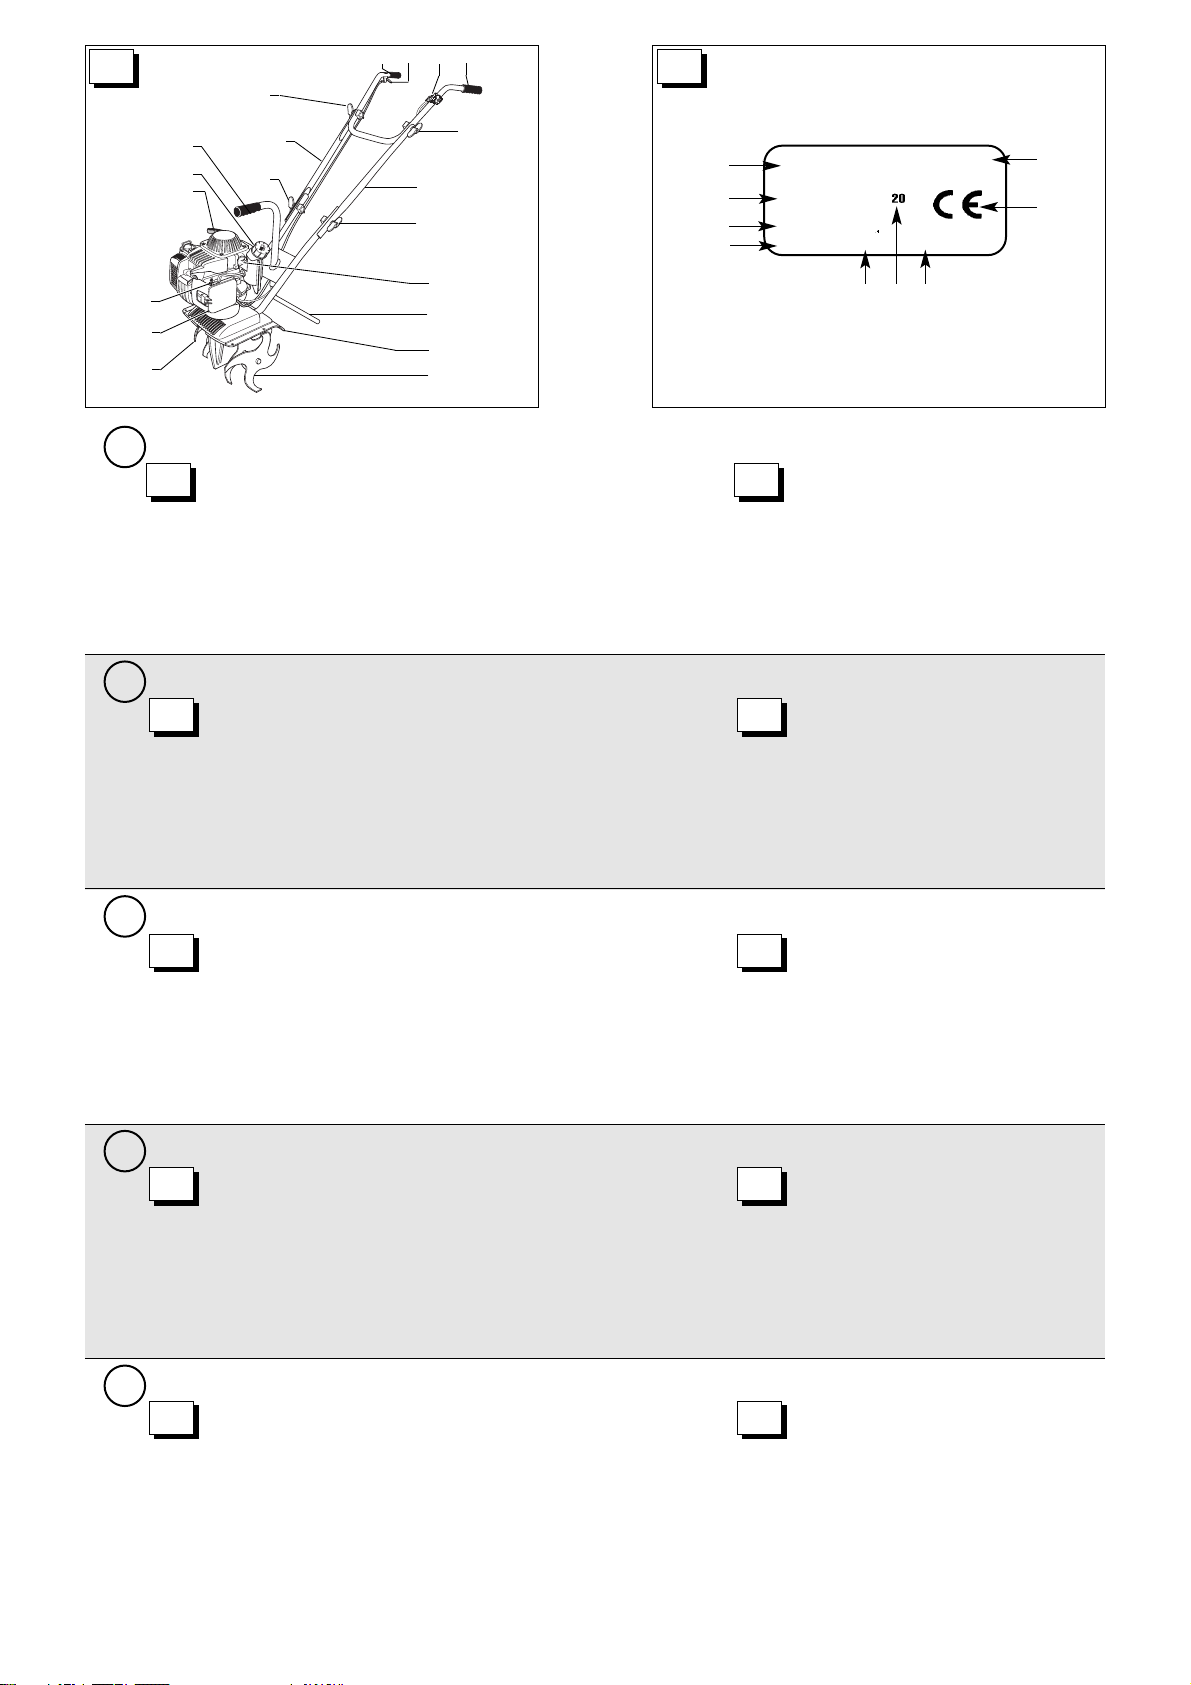
VORBEREITUNG DES GERÄTS
Öleinfüllen und Ölstand
ACHTUNG
• Ihr Gerät wird ohne Motoröl geliefert. Sie müssen das
Öl daher mit dem mitgelieferten Dosierkanister einfüllen. Diese Dosis darf auf keinen Fall überschritten werden, da
sonst der Motor schwer beschädigt werden kann.
1- Die Maschine waagerecht stellen.
2- Schrauben Sie den Deckel (1) auf und füllen Sie den gesamten
Motorgehäuse.
3- Heben Sie den Dosierkanister auf, weil Sie ihn noch für das alle
10 Betriebsstunden erforderliche Ölnachfüllen brauchen.
- Motorölkapazität:
0,1 Liter max..Inhalt des Dosierkanisters in das
- Emfpohlenes Öl:
PREPARING THE MACHINE
Filling with oil and oil level
DANGER
• Your machine is delivered without engine oil. You
must fill with oil using the measure container that
accompanies the machine. You must, in no case, exceed this
measure since this can result in serious damage to the engine.
1- Place your machine on a level surface.
2- Unscrew the cap (1) and pour the entire contents of the contai-
ner into the engine housing.
3- Keep the measuring container as it will be useful when you need
to refill the engine oil. This must be done after every 10 hours of
use.
- Engine oil capacity:
0.1 litres maximum .
- Recommended oil:
VOORBEREIDEN VAN DE MACHINE
Vullen met olie en oliepeil
1- Uw machine wterpas zetten.
2- Draai de dop (1) los en giet de olie in het carter.
3- Bewaar de doseerverpakking; deze hebt u nodig voor het verver-
sen van de motorolie, wat om de 10 bedrijfsuren dient te gebeuren.
- Hoeveelheid motorolie:
maximaal 0,1 liter.
- Aanbevolen olie:
LET OP
• De machine wordt zonder motorolie geleverd. U dient
daarom de tank met olie te vullen met behulp van de
met de machine meegeleverde doseerjerrycan. Houd u aan
deze dosering, want een overschrijding ervan kan ernstige
schade aan de motor veroorzaken.
PREPARAZIONE DELLA MACCHINA
Pieno d’olio e livello
1- Porre la vostra macchina di livello.
2- Svitare il tappo (1) e vuotare completamente la tanica di dosaggio
nel carter motore.
3- Conservare la tanica di dosaggio che sarà indispensabile per il
cambio dell’olio motore, da eseguire obbligatoriamente ogni 10
ore di esercizio.
- Capacità serbatoio olio motore:
0,1 litri max.
- Olio consigliato:
ATTENZIONE
• La macchina viene consegnata senza olio motore. È
dunque necessario fare il pieno d’olio con la tanica di
dosaggio in dotazione, ma evitare assolutamente di superare
la dose indicata poiché questo rischierebbe di danneggiare
gravemente il motore.
PREPARACIÓN DE LA MÁQUINA
Llenado de aceite y nivel
1- Colocar su máquina a nivel.
2- Desenrosque el tapón (1) y vacíe todo el dosificador en el cárter
del motor.
3- Conserve el dosificador, le será indispensable para el cambio de
aceite del motor que deberá realizar obligatoriamente cada 10
horas de uso.
- Capacidad de aceite del motor:
0,1 litros máx.
- Aceite recomendado:
ATENCIÓN
• Su máquina se entrega sin aceite del motor. Por
tanto, usted debe llenar el aceite con el dosificador
facilitado con la máquina, pero en ningún caso deberá sobrepasar esta dosis pues podría dañar gravemente el motor.
1
EH035
0,1L
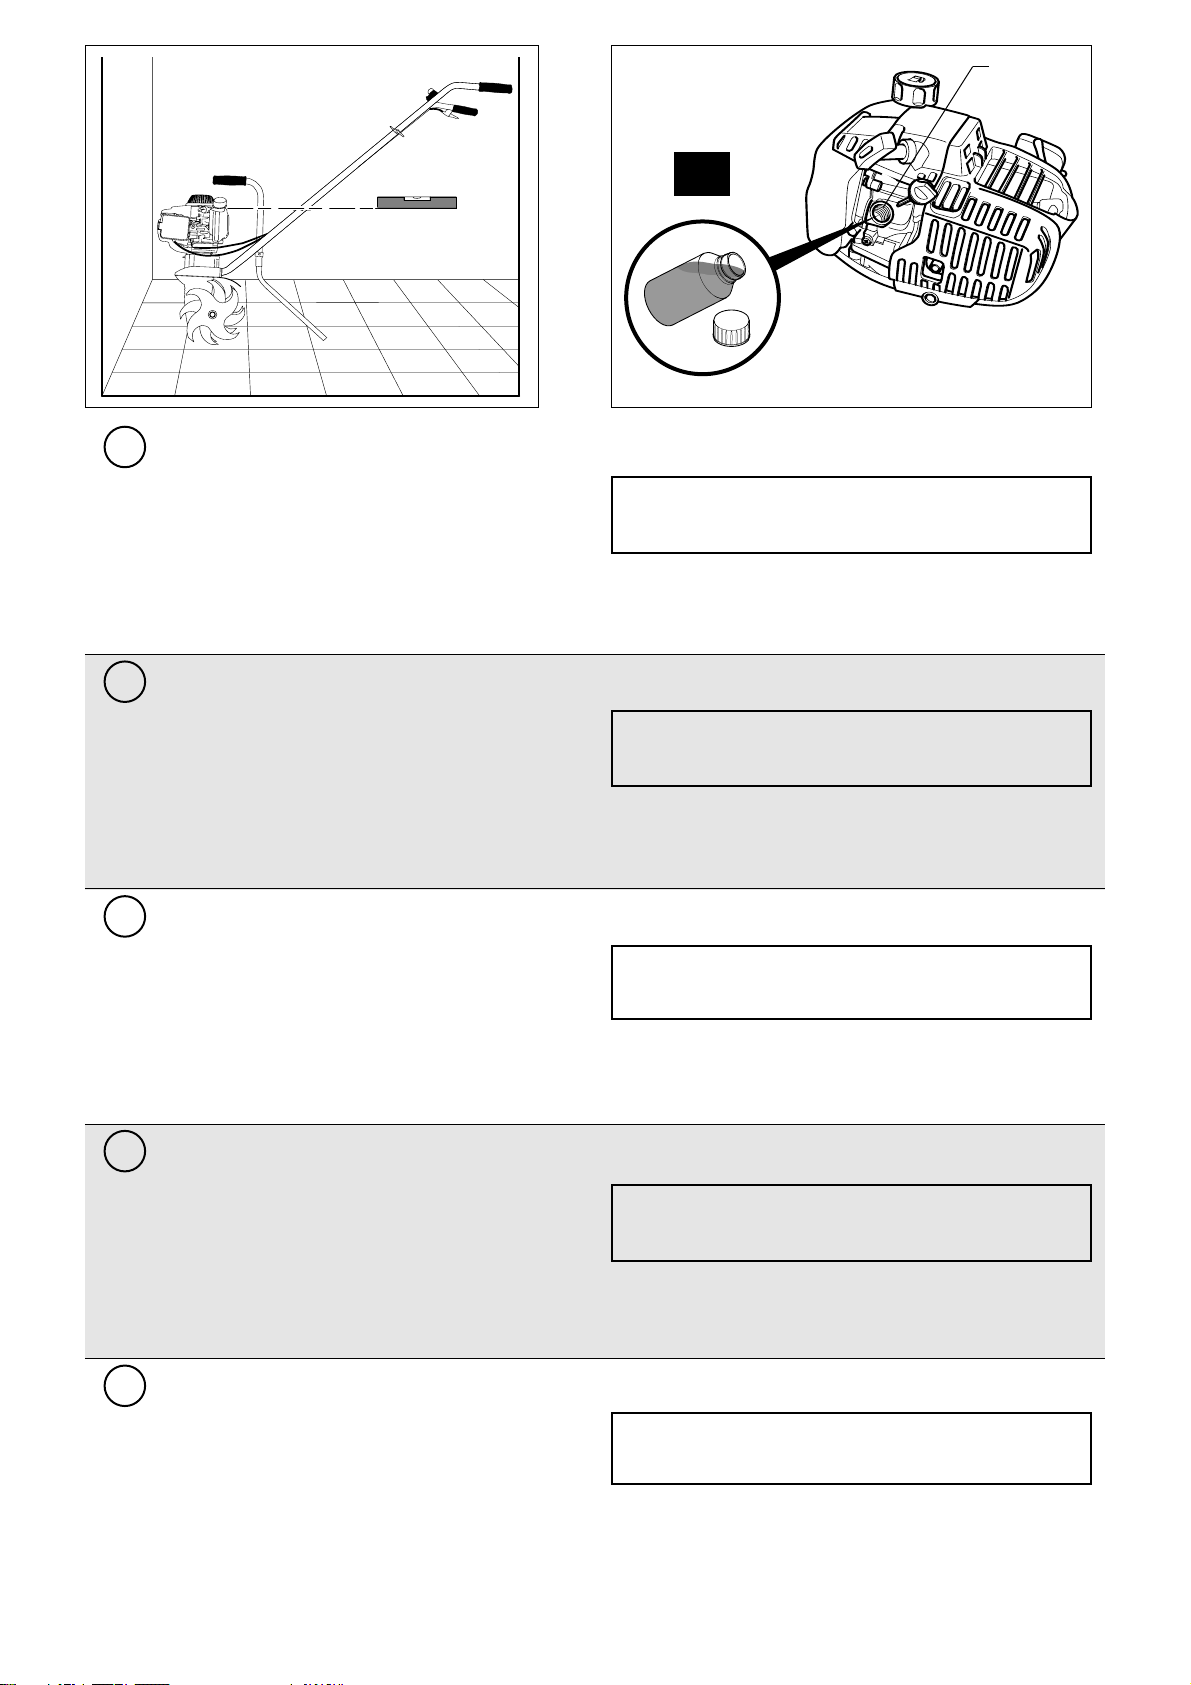
14
DE
EN
NL
IT
ES
VORBEREITUNG DES GERÄTS
VORSICHT:
. Der Einsatz eines nicht waschaktiven Öls oder eines 2- fach Öls
kann die Lebenszeit Ihres Motors verkürzen.
PREPARING THE MACHINE
• Use a highly detergent, premium quality 4-stroke oil.
• The oil SAE 10W-30 API: SG/FG is recommended for general
usage in all temperatures.
PRECAUTION :
. Using a non-detergent oil or a 2-stroke oil can shorten the ope-
rational life of the engine.
VOORBEREIDEN VAN DE MACHINE
• Gebruik 4-taktolie van eersteklas kwaliteit.
• SAE 10W-30 API SG/FG-olie wordt aanbevolen voor algemeen
gebruik bij alle temperaturen.
WAARSCHUWING:
. Het gebruik van een niet-reinigende olie of van 2 taktolie kan de
levensduur van de motor verkorten.
PREPARAZIONE DELLA MACCHINA
• Usare un olio per motori a 4 tempi altamente detergente e di
prima qualità.
• L’olio SAE 10W-30 API SG/FG è consigliato per l’uso a qualsiasi
temperatura.
PRECAUZIONE :
. L’uso di un olio non detergente o di un olio per motori a 2 tempi
può ridurre la durata del motore.
PREPARACIÓN DE LA MÁQUINA
• Utilice un aceite 4 tiempos altamente detergente y de primera
calidad.
• Se recomienda aceite SAE 10W-30 API SG/FG de uso general a
todas las temperaturas.
PRECAUCIÓN:
. El uso de un aceite no detergente o de un aceite 2 tiempos puede
acortar la vida útil del motor.
1
EH035
0,1L
• Verwenden Sie ein 4-fach reinigendes Öl erster Qualität.
• Das Öl SAE 10W-30 API SG/FG ist für den allgemeinen Gebrauch bei allen Temperaturen geeignet.
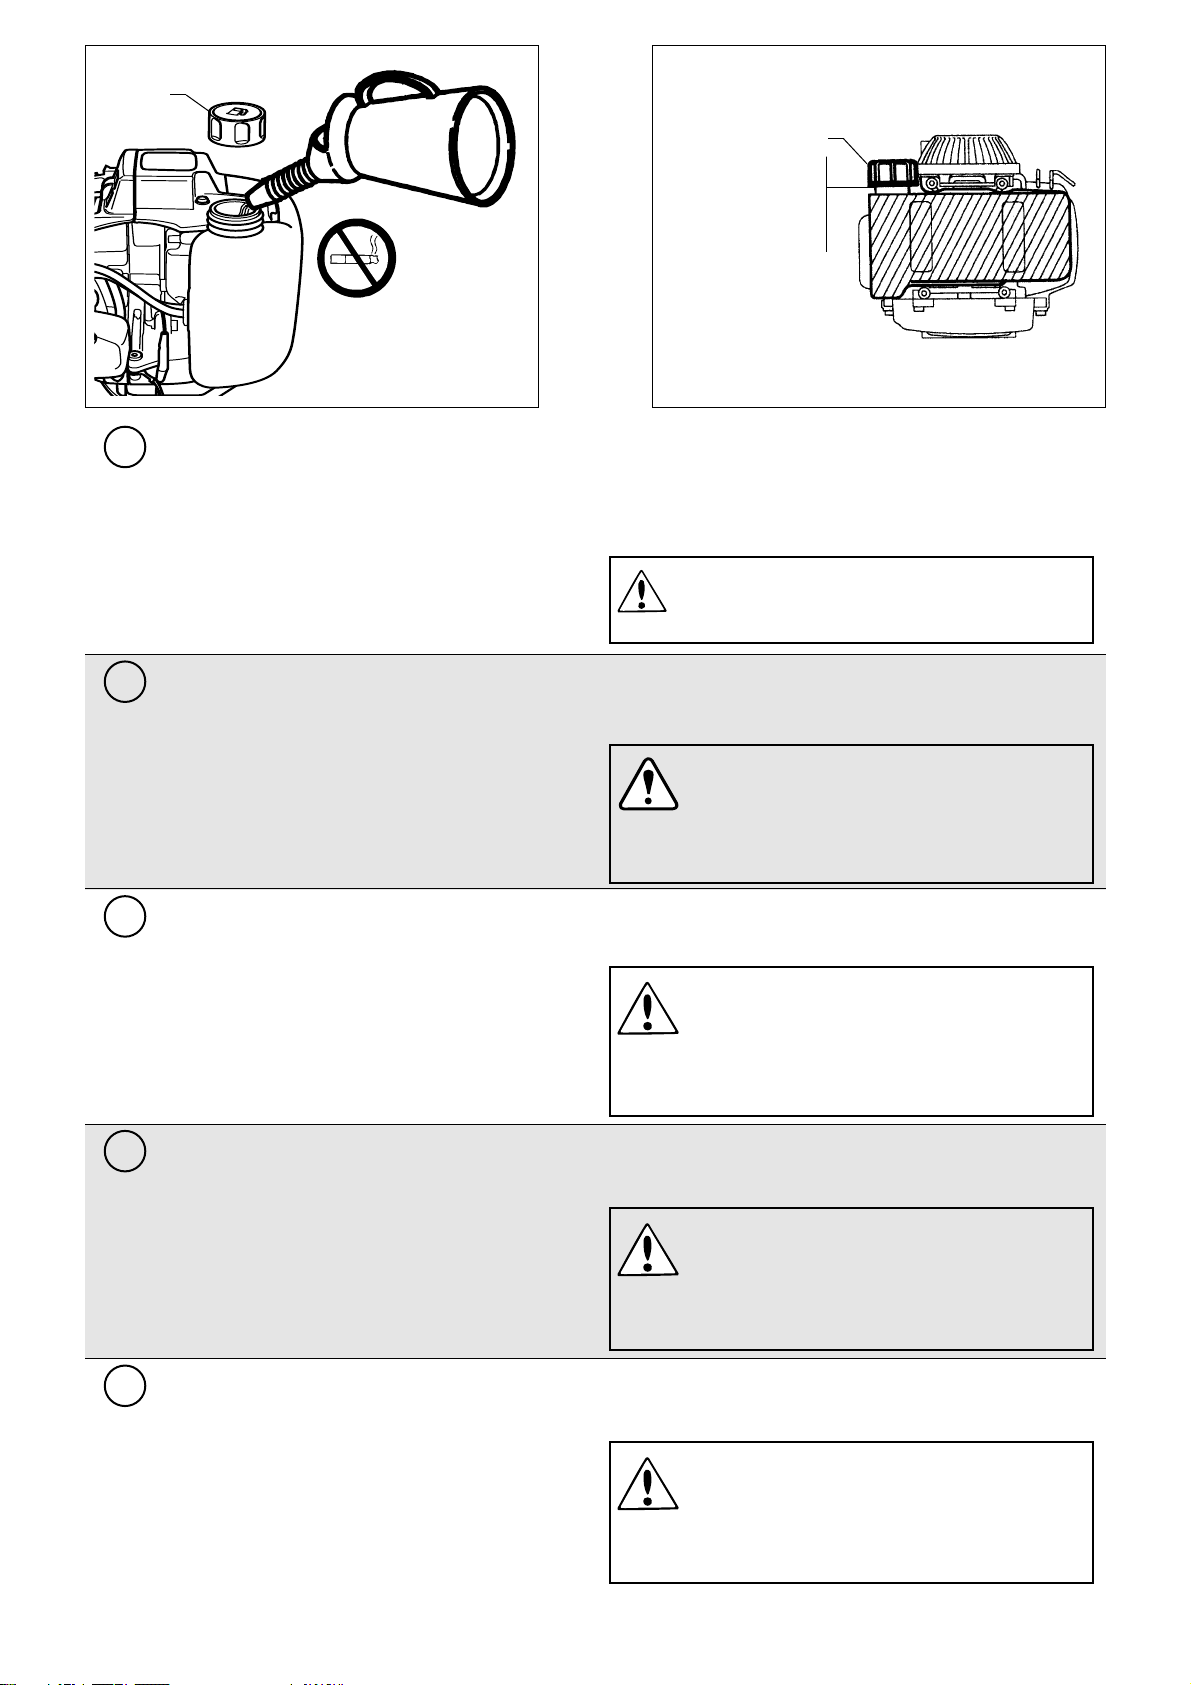
2
Max. Stand
Maximum level
Maximaal niveau
Livello Maxi
Nivel máx.
15
DE
EN
NL
IT
ES
2
VORBEREITUNG DES GERÄTS
PREPARING THE MACHINE
VOORBEREIDEN VAN DE MACHINE
PREPARAZIONE DELLA MACCHINA
PREPARACIÓN DE LA MÁQUINA
- Nehmen Sie den Tankdeckel (2) ab und füllen Sie das Benzin ein.
- Verwenden Sie Autobenzin (am besten bleifrei oder bleiarm), um
Ablagerungen in der Verbrennungskammer zu vermeiden.
- Verwenden Sie keine Mischungen aus Öl und Benzin oder unreines
Benzin. Achten Sie darauf, dass kein Schmutz, Staub oder Wasser in
den Benzintank gelangt.
- Kapazität des Treibstofftanks:
0,6 Liter.
Benzineinfüllen
ACHTUNG
• Benzin ist ein leicht entzündliches Produkt, das unter bestimmten Bedingungen explodieren kann.
- Nehmen Sie das Einfüllen in einer gut gelüfteten Umgebung und
- Remove the petrol tank cap (2) and start to fill.
- Use car petrol (preferably unleaded or low-leaded petrol) in order to
reduce the deposits in the combustion chamber.
- Never use a mix of oil/petrol or unclean petrol. Ensure
that dirt, dust
or water does not enter into the petrol tank.
- Fuel tank capacity:
0.6 litres.
Filling with petrol
DANGER
• Petrol is a highly inflammable product that explodes in
certain conditions.- Fill with petrol in a well-aired location
with the engine switched off. Do not smoke and avoid having naked
flames or sparks near to where you fill with petrol or where the
- Verwijder de dop (2) en vul het reservoir.
- Gebruik autobenzine (bij voorkeur ongelood of met een laag loodgehalte) om aanslag in de brandstofkamer te voorkomen.
- Gebruik nooit vervuilde benzine of een mengsel van olie en benzine.
Zorg ervoor dat er geen vuil, stof of water in het benzinereservoir
terechtkomt.
- Capaciteit brandstofreservoir:
0,6 liter.
Vullen met benzine
LET OP
• Benzine is zeer licht ontvlambaar en kan onder bepaalde
omstandigheden exploderen.
- Vul het reservoir op een goed geventileerde plek met de motor uitgeschakeld. In de buurt van de plek waar het reservoir wordt gevuld
- Togliere il tappo (2) del serbatoio e procedere al rifornimento.
- Utilizzare benzina per auto (preferibilmente senza piombo o a basso
tenore di piombo) per ridurre i depositi nella camera di combustione.
- Non usare mai miscela olio/benzina o benzina sporca. Evitare di far
entrare sporcizia, polvere o acqua nel serbatoio della benzina.
- Capacità del serbatoio carburante:
0,6 l.
Pieno di benzina
ATTENZIONE
• La benzina è un prodotto estremamente infiammabile,
capace di esplodere in determinate condizioni.
- Fare il pieno in un luogo ben ventilato, a motore spento. Non fuma-
Llenado de gasolina
- Deje el tapón (2) del depósito y proceda al llenado de éste.
- Utilice gasolina para automóviles (sin plomo o con bajo contenido en
plomo preferentemente) con el fin de reducir la cantidad de restos en
la cámara de combustión.
- Nunca utilice una mezcla de aceite / gasolina o gasolina sucia. Evite
que entre suciedad, polvo o agua en el depósito de gasolina.
- Capacidad del depósito de carburante:
0,6 litros.
ATENCIÓN
• La gasolina es un producto altamente inflamable y que
puede explotar bajo determinadas condiciones.
- Llene el depósito en un lugar bien aireado con el motor parado. No
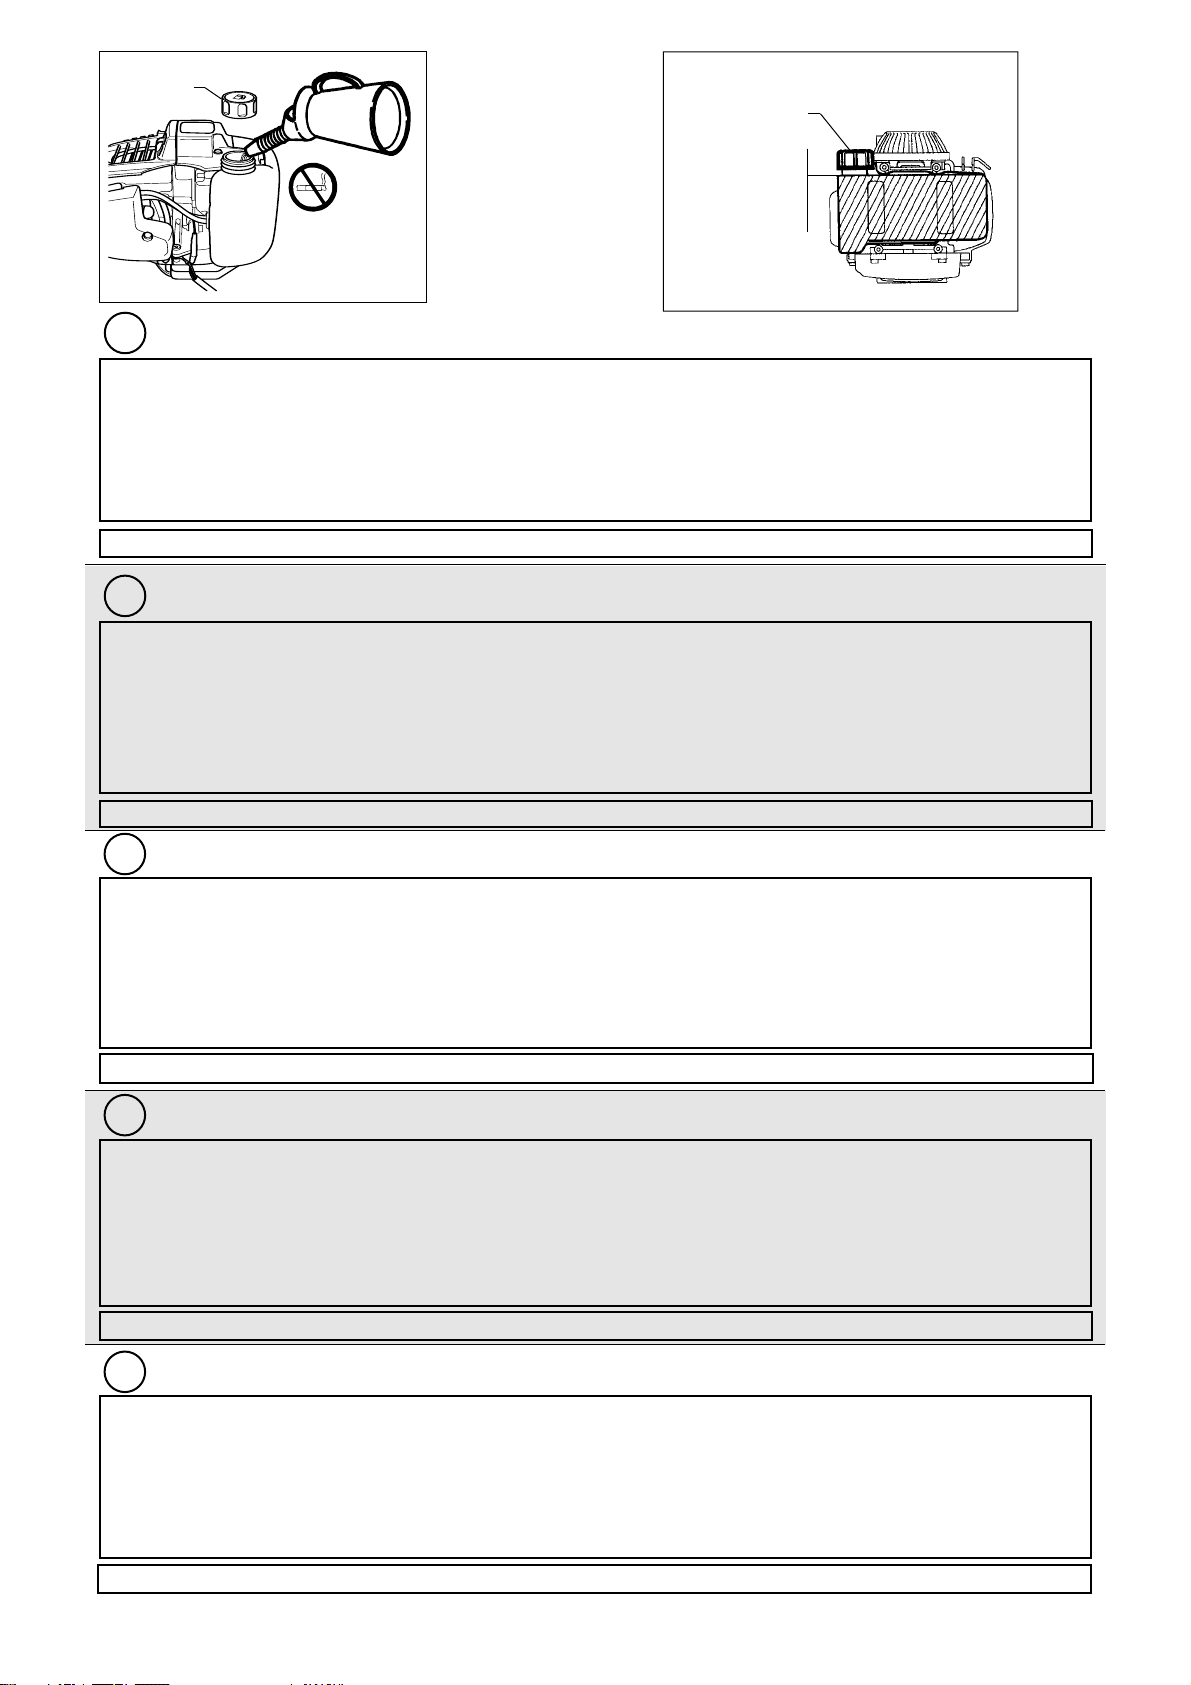
16
DE
EN
NL
IT
ES
bei angehaltenem Motor vor. In der Nähe des Ortes, in dem das Benzin eingefüllt oder gelagert wird, nicht rauchen und keine offenen
Flammen oder Funken in die Nähe bringen.
- Füllen Sie den Tank nicht zu sehr (im Einfüllhals darf sich kein
Benzin befinden). Überprüfen Sie nach dem Benzineinfüllen, ob der
Tankdeckel gut geschlossen ist.
- Achten Sie darauf, während des Einfüllens kein Benzin zu ver-
schütten. Benzinspritzer oder -dämpfe können sich entzünden.
Bevor Sie den Motor anlassen, gehen Sie sicher, dass sich das verschüttete Benzin getrocknet hat bzw. sich die Dämpfe aufgelöst
haben.
- Vermeiden Sie den direkten Kontakt von Benzin mit der Haut und
das Einatmen der Dämpfe. NICHT IN DER NÄHE VON KINDERN
LASSEN.
VORBEREITUNG DES GERÄTS
PREPARING THE MACHINE
VOORBEREIDEN VAN DE MACHINE
PREPARAZIONE DELLA MACCHINA
PREPARACIÓN DE LA MÁQUINA
petrol is stored.
- Do not overfill the tank (there should not be any petrol in the neck
of the tank). After having filled with petrol, make sure that the petrol
tank cap is correctly closed.
- Avoid spilling petrol whilst filling the tank. Petrol splashes and
fumes can catch fire. Before starting the engine, make sure that any
spilt petrol has dried and that the fumes have evaporated.
- Avoid direct skin contact with the petrol and avoid inhaling the
fumes. KEEP OUT OF REACH OF CHILDREN.
of waar de benzine wordt opgeslagen is het verboden te roken en
dient contact met vlammen of vonken te worden vermeden.
- Giet het reservoir niet te vol (er mag geen benzine in de vulpijp
staan). Controleer na het vullen of de dop van het reservoir goed is
vastgedraaid.
- Mors geen benzine tijdens het vullen van het reservoir. Benzinespetters of -dampen kunnen vlam vatten. Controleer voor het starten
van de motor of de gemorste benzine is opgedroogd en of de dampen zijn vervluchtigd.
- Voorkom direct contact van benzine met de huid of inademing van
de dampen. BUITEN BEREIK VAN KINDEREN HOUDEN.
re e non avvicinare fiamme vive o scintille al luogo in cui viene effettuato il pieno o al luogo di deposito della benzina.
- Non riempire troppo il serbatoio (non dev’esserci benzina nel collo
del bocchettone). Dopo aver fatto il pieno, verificare che il tappo del
serbatoio sia chiuso correttamente.
- Fare attenzione a non versare benzina fuori dal serbatoio durante
il rifornimento. Gli spruzzi o i vapori della benzina rischierebbero di
prender fuoco. Prima di mettere in moto il motore, accertarsi che la
benzina versata sia asciutta e che i vapori si siano dispersi.
- Evitare il contatto diretto della benzina sulla pelle o di respirarne i
vapori. NON LASCIARLA ALLA PORTATA DEI BAMBINI.
fume o acerque llamas vivas o chispas al lugar en el que realiza el
llenado ni cerca del lugar en el que guarda la gasolina.
- No llene demasiado el depósito (no debe haber gasolina en el orificio de llenado). Una vez realizado el llenado, compruebe que el
tapón del depósito está correctamente cerrado.
- Tenga cuidado de no derramar gasolina durante el llenado del
depósito. Las salpicaduras o los vapores de gasolina podrían arder.
Antes de poner el motor en marcha, asegúrese de que la gasolina
derramada esté seca y que los vapores se hayan disipado.
- Evite el contacto directo de la gasolina con la piel y respirar el
vapor. NO LA DEJE AL ALCANCE DE NIÑOS.
2
2
Max. Stand
Maximum level
Maximaal niveau
Livello Maxi
Nivel máx.
Im Tank verbliebender Kraftstoff muss innerhalb von einem Monat aufgebraucht werden. Er muss in einem geeigneten Kanister gelagert werden.
Do not use fuel that has been sitting in the tank for more than a month. It should be stored in an appropriate jerry-can.
Geen brandstof gebruiken die al meer dan een maand in de tank zit, de brandstof moet worden opgeslagen in een adequate jerrycan.
Il carburante presente nel serbatoio va utilizzato entro 1 mese. Il carburante va stoccato in un’apposita tanica.
No utilizar más allá de un mes el carburante que ha quedado en el depósito, debe estar almacenado en un bidón de reserva apropiado.

17
VERWENDUNG DER MASCHINE
Verwendungsempfehlungen
In diesem Abschnitt geht es um die Verwendung Ihres Gerätes. In der unten abgebildeten Tabelle sind alle Daten und Hinweise zur Anwendung der
verschiedenen Accessoires, die je nach auszuführender Arbeit und Gelände mit Ihrem Gerät benutzt werden können, dargestellt.
Festes und feuchtes Gelände
Hartes Gelände
Brachland
Leicht kieseliges
Gelände
Gelände mit harter Oberfläche
Gepflegtes und lockeres
Gelände
Gang zwischen zwei Reihen, um das Unkraut auszureißen
Gang zwischen zwei Reihen
auf hartem Gelände
Lockeres Gelände
Festes Gelände
Rasenhöhe über 5 cm
Stark moosbewachsener
Rasen
Zwischen Allee und Rasen
Montieren Sie die Fräsen mit der Spitze nach hinten,
ohne sich auf die Stütze aufzustützen.
Montieren Sie die Fräsen mit der Spitze nach vorne.
Drücken Sie die Lenkstange leicht nach unten,
damit das Gerät besser in die Erde eindringen kann.
Verwenden Sie geeignetes Material für die Reinigung des
Geländes. Montieren Sie die Fräsen mit den Spitzen nach
vorne, um das Unkraut vorzuschneiden und auszureißen.
Für die Endbearbeitung des Geländes montieren Sie die Fräsen mit den Spitzen nach hinten.
Montieren Sie die Spitzen nach hinten und drücken Sie leicht
auf die Lenkstange, um das Gerät gut steuern zu können.
Vermeiden Sie den Einsatz des Geräts auf stark kieselhaltigem
Gelände.
Richten Sie die Spitzen nach vorne und üben Sie einen leichten
Druck auf die Lenkstange aus.
Spitzen nach hinten und mit Druck auf die Lenkstange.
Richten Sie die Spitzen nach hinten und üben Sie keinen Druck
auf die Lenkstange aus.
Richten Sie die Spitzen nach vorne und üben Sie Druck auf die
Lenkstange aus.
Montieren Sie die Fräsen mit der Spitze nach hinten, und wenn
das Gerät einsinkt, heben Sie den Häufler leicht an.
Montieren Sie die Fräsen mit den Spitzen nach vorne. Üben
Sie einen leichten Druck auf die Lenkstange aus.
Mähen Sie zunächst den Rasen.
Verwenden Sie den Moosvernichter nicht, wenn die Gefahr
besteht, den Rasen zu beschädigen.
Montieren Sie den Randschneider wie nebenseitig abgebildet:
Bei geringster Motorleistung und möglichst auf trockenem
Gelände anwenden.
WERKZEUGE BEDINGUNGEN HINWEISE RICHTUNG
FRÄSEN
4-ZACKIGE
FRÄSEN
HACKMASCHINEN
6-ZACKIGE
FRÄSEN
JÄTER
HÄUFLER
TRANSPORT-
RAD
RAND-
SCHNEIDER
MOOSVER-
NICHTER
OPTIONEN
Für die optimale Leistung des Moosvernichters, ist es am besten,
dass das Gelände leicht feucht ist und das Transportrad montiert ist, um den Rasen
nicht zu beschädigen.
Gashebel ganz durchgedrückt.
DE
 Loading...