


ROYAL 49SE |
ROYAL 49S/BBC |
ROYAL 49S |
|
R O Y A L |
4 9 S |
R O Y A L |
4 9 S E |
R O Y A L 4 9 S / B B C |
|
Operator’s Manual
GB Read the operator’s manual carefully and make sure that you understand the contents before using the lawnmower.
Käyttöopas
SF Lue käyttöopas huolella ja varmista, että ymmärrät sen sisällön ennen kuin käytät tätä ruohonleikkuria.
Betriebsanleitung
D Diese Betriebsanleitung muß sorgfältig durchgelesen werden. Stellen Sie sicher, daß Sie deren Inhalt vor Verwendung des Rasenmähers verstehen.
F |
Manuel de l’Utilisateur |
Lire attentivement le manuel de |
|
|
l’utilisateur et veiller à bien comprendre |
|
son contenu avant d’utiliser la tondeuse. |
Handleiding voor de gebruiker
NL Lees de handleiding aandachtig door zodat u de inhoud goed begrijpt voordat u de grasmaaimachine in gebruik neemt.
Bruksanvisning
N Les bruksanvisningen grundig og vær sikker på at du forstår innholdet før du bruker gressklipperen.
Bruksanvisning
S Läs bruksanvisning noggrannt och se till att du förstår innehållet innan du använder gräsklipparen.
Brugsvejledning
DK Læs brugervejledningen grundigt, og sørg for at forstå indholdet, inden De tager plæneklipperen i brug.
Manual del operador
E Lea el manual del operador con atención y asegúrese de que comprende el contenido antes de utilizar el cortacésped.
Manual do Operador
P Leia cuidadosamente o manual do operador e certifique-se de que compreende todo o seu conteúdo antes de usar a máquina de cortar relva.
Manuale d’uso
I Leggere con attenzione il manuale d’uso e accertarsi di capirne il contenuto prima di usare il tosaerba.
5118973-01
Technical data |
|
|
Tekniske data |
|
|
|
|
Especifieaciones técnicas |
|||||||||||||||||||||||||
Technische Daten |
|
|
Teknisiä tietoja |
|
|
|
|
||||||||||||||||||||||||||
|
|
|
|
|
|
Dados técnicos |
|||||||||||||||||||||||||||
Données techniques |
|
|
Tekniska data |
|
|
|
|
||||||||||||||||||||||||||
|
|
|
|
|
|
Dati Tecnici |
|
|
|
|
|
|
|
|
|
|
|||||||||||||||||
Technische gegevens |
|
|
|
|
|
|
|
|
|
|
|
|
|
|
|
|
|
|
|
|
|
||||||||||||
|
|
Tekniske specifikationer |
|
|
|
|
|
|
|
|
|
|
|||||||||||||||||||||
|
|
|
|
|
|
|
|
|
|
|
|
|
|
|
|
|
|
|
|
|
|
|
|
|
|
|
|
|
|
|
|
|
|
|
|
|
|
|
ROYAL 49S |
|
|
|
|
|
ROYAL 49SE |
|
|
|
|
ROYAL 49S/BBC |
|
||||||||||||||||
|
|
|
|
|
|
|
|
|
|
|
|
|
|
|
|
|
|
|
|
|
|
|
|
|
|
|
|
|
|
|
|
|
|
|
|
|
|
|
|
|
|
|
|
|
|
|
|
|
|
|
|
|
|
|
|
|
|
|
|
|
|
|
|
|
|
|
|
|
|
|
|
|
|
|
|
|
|
|
|
|
|
|
|
|
|
|
|
|
|
|
|
|
|
|
|
|
|
||||
|
|
|
|
|
Briggs & Stratton |
|
|
|
|
|
Briggs & Stratton |
|
|
|
|
|
Briggs & Stratton |
|
|||||||||||||||
|
|
|
|
|
XTL55 + CAT |
|
|
|
|
|
XTL55 + CAT |
|
|
|
|
|
XTL55 |
|
|||||||||||||||
|
|
|
|
|
|
|
|
|
|
|
|
|
|
|
|
|
|
|
|
|
|
|
|
|
|
|
|
|
|
|
|||
|
|
|
|
|
|
|
|
|
|
|
|
|
|
|
|
|
|
|
|
|
|
|
|
|
|
|
|
|
|
|
|
|
|
|
|
|
|
|
|
|
|
|
|
|
|
|
|
|
|
|
|
|
|
|
|
|
|
|
|
|
|
||||||
|
|
|
|
|
2.5 - 5 km/h |
|
|
|
|
|
|
2.5 - 5 km/h |
|
|
|
|
|
2.5 - 5 km/h |
|||||||||||||||
|
|
|
|
|
|
|
|
|
|
|
|
|
|
|
|
|
|
|
|
|
|
|
|
|
|
|
|
|
|
|
|||
|
|
|
|
|
|
|
|
|
|
|
|
|
|
|
|
|
|
|
|
|
|
|
|
|
|
|
|
|
|
|
|
|
|
|
|
|
|
|
|
|
|
|
|
|
|
|
|
|
|
|
|
|
|
|
|
|
|
|
|
||||||||
|
|
|
|
|
35.5 kg |
|
|
|
|
|
|
39.5 kg |
|
|
|
|
|
|
|
39.5 kg |
|||||||||||||
1kg |
|
|
|
|
|
|
|
|
|
|
|
|
|
|
|
|
|
|
|
|
|
|
|
|
|
|
|
|
|
|
|
|
|
|
|
|
|
|
|
|
|
|
|
|
|
|
|
|
|
|
|
|
|
|
|
|
|
|
|
|
|
|
|
|
|
|
|
|
|
|
|
|
|
|
|
|
|
|
|
|
|
|
|
|
|
|
|
|
|
|
|
|
|
|
|
|
|
|
|||
|
|
|
|
|
|
|
|
|
|
|
|
|
|
|
|
|
|
|
|
|
|
|
|
|
|||||||||
|
|
|
|
|
48 cm |
|
|
|
|
|
|
48 cm |
|
|
|
|
|
|
|
48 cm |
|||||||||||||
|
|
|
|
|
|
|
|
|
|
|
|
|
|
|
|
|
|
|
|
|
|
|
|
|
|
|
|
|
|
|
|||
|
|
|
|
|
|
|
|
|
|
|
|
|
|
|
|
|
|
|
|
|
|
|
|
|
|
|
|
|
|
|
|
|
|
|
|
|
|
|
|
|
|
|
|
|
|
|
|
|
|
|
|
|
|
|
|
|
|
||||||||||
|
|
|
|
|
17 - 65 mm |
|
|
|
|
|
|
17 - 65 mm |
|
|
|
|
17 - 65 mm |
||||||||||||||||
|
|
|
|
|
|
|
|
|
|
|
|
|
|
|
|
|
|
|
|
|
|
|
|
|
|
|
|
|
|
|
|||
|
|
|
|
|
|
|
|
|
|
|
|
|
|
|
|
|
|
|
|
|
|
|
|
|
|
|
|
|
|
|
|
|
|
|
|
|
|
|
|
|
|
|
|
|
|
|
|
|
|
|
|
|
|
|
|||||||||||||
|
|
|
|
|
82.4 dB(A) |
|
|
|
|
|
82.4 dB(A) |
|
|
|
|
|
82.4 dB(A) |
||||||||||||||||
|
|
|
|
|
|
|
|
|
|
|
|
|
|
|
|
|
|
|
|
|
|
|
|
|
|
|
|
|
|
|
|||
|
|
|
|
|
|
|
|
|
|
|
|
|
|
|
|
|
|
|
|
|
|
|
|
|
|
|
|
|
|
|
|
|
|
|
|
|
|
|
|
|
|
|
|
|
|
|
|
|
|
|
|
|
|||||||||||||||
|
|
|
|
|
7.03 m/s2 |
|
|
|
|
|
7.03 m/s2 |
|
|
|
|
7.03 m/s2 |
|||||||||||||||||
|
|
|
|
|
|
|
|
|
|
|
|
|
|
|
|
|
|
|
|
|
|
|
|
|
|
|
|
|
|
|
|
|
|
|
|
|
|
|
|
|
|
|
|
|
|
|
|
|
|
|
|
|
|
|
|
|
|
|
|
|
|
|
|
|
|
|
|

IMPORTANT! Read operating instructions
GB carefully before using the mower. Fill the engine with oil. The manufacturer reserves the right to carry out product modifications without further notice.
Guarantee, complaint Guarantee and complaint matters are dealt with in accordance with the Sale of Goods Act. Further information may be obtained from your dealer or the supplier.
WICHTIG! Lesen Sie die Gebrauchsanweisung
Dgenau durch, bevor Sie den Rasenmäher verwenden. Füllen Sie Öl in den Motor. Der
Hersteller behält sich das Recht vor, ohne vorherige Anzeige Fabrikationsänderungen durchzuführen, die dem neuesten Stand der Technik entsprechen.
Garantieab, wicklung Garantieund Beanstandungsfragen werden durch das Verbraucherschutzgesetz und das Recht derAllgemeinen Geschäftsbedingungen geregelt. Genauere Informationen erhalten Sie beim Husqvarna Service Center
IMPORTANT! Lire la notice avec attention avant
Fde mettre la tondeuse en service. Mettre de l'huile dans le moteur. Le fabricant se réserve le droit de modifier sans préavis les produits. Garantie, réclamations: pour toutes questions de garantie et de réclamation, il convient de se référer à la garantie légale couvrant toutes les conséquences des défauts ou vices cachès. Pour plus amples informations, s'adresser à son revendeur agréé ou bien au fournisseur.
BELANGRIJK! Lees de gebruiksaanwijzing NL nauwkeurig voordat u de grasmaaier in gebruik
neemt. Vul de motor met olie. De producent behoudt zich het recht voor, zonder kennisgeving wijzigingen in het produkt aan te brengen.
Garantie, klachten
Garantie en klachten worden in overleg met de Husqvarna Dealer door de importeur beoordeeld.
VIKTIG!
NLes bruksanvisningen nøye før klipperen taes i bruk. Fyll olje på motoren. Produsenten forbeholder seg retten til å gjøre produktendringer uten ytterligere varsel. Garanti, reklamasjon
Garantiog reklamasjonsspørsmål reguleres av kjøpsloven.
TÄRKEÄÄ! Lukekaa käyttöohje tarkasti ennen SF kuin leikkuri otetaan käyttöön. Täyttäkää
moottorin öljysäiilö. Valmistaja pidättää itselleen oikeuden tuotemuutoksiin ilman erillistä varoitusta.
Takuu
Voimassa oleva laki määrittelee takuuta koskevat määräykset. Enemmän tiedoja saat jälleenmyyjältäsi.
VIKTIGT! Läs bruksanvisningen noggrant
Sinnan klipparen tas i bruk. Fyll olja i motorn.
Tillverkaren förbehåller sig rätten att göra produktändringar utan föregående meddelande.
Reklamation Reklamationsfrågor regleras för enskild konsument av Konsumentköplagen, och för näringsidkare enligt särskilda leveransvillkor. Närmare upplysningar lämnas av din återförsäljare eller av leverantören:
Husqvarna Skog & Trädgård Telefon: 036-14 66 00
VIGTIGT! Læs brugsanvisningen nøje inden DK klipperen tages i brug. Fyld olie på motoren.
Producenten forbeholder sig ret til produktændringer uden forudgående varsel.
Garanti, reklamation
Garanti og reklamationsspørgsmål i overensstemmelse med Købeloven.
IMPORTANTE! Es muy importante que Vd.
Elea estas instrucciones con mucha atención antes de estrenar el cortacésped. El fabricante se reserva el derecho de poder cambiar los productos sin aviso previo. Garantías y reclamaciones
En cuanto a asuntos que se refiren a garantías y reclamaciones, por favor dirigirse en primer lugar a su vendedor habitual y después al importador.
IMPORTANTE! Leggete accuratamente le
Iistruzioni d'uso prima di cominciare ad usare il rasaerba. Il produttore si riserva il diritto di effettuare modifiche al prodotto senza preavviso.
Garanzia; reclami
Le questioni riguardanti la garanzia ed eventuali reclami vengono trattate al momento della vendita. Per ulteriori informazioni rivolgersi al proprio rivenditore o al fornitore.
IMPORTANTE! Ler minuciosamente o
Pmanual de instruçõnes antes de utilizador o cortador. Encher óleo no motor. O
Produtor reserva-se o direito de fazer alterações no produto sem aviso prévio. Garantia, reclamações
As questões de garantia e reclamações são reguladas pela Lei das Compras Comerciais. Poderá obter mais informações dirigindo-se ao revendedor ou fornecedor.

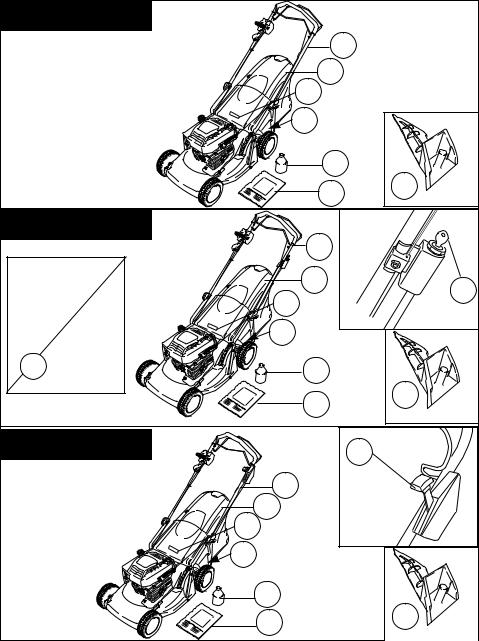
GB - CONTENTS
1.Handle Assembly
2.Grassbox
3.Bottle of oil
4.Instruction Manual
5.Mulching Plug
6.Key Start (Royal 49SE)
7.BBC Lever (Royal 49S/BBC)
8.Warning Label
9.Rating Label
10.Battery Charger (Royal 49SE)
D - INHALT
1.Griffeinheit
2.Grasauffangbehälter
3.Ölflasche
4.Bedienungsanweisung
5.Einsatzteil zur Mulchgewinnung
6.Schlüsselstart (Royal 49SE)
7.BBC-Hebel (Royal 49S/BBC)
8.Warnetikett
9.Produkttypenschild
10.Batterieladegerät (Royal 49SE)
F - TABLE DES MATIÈRES
1.Guidon
2.Bac de ramassage
3.Bidon d’huile
4.Manuel d’Instructions
5.Insert broyeur
6.Démarreur à clé (Royal 49SE)
7.Levier d’embrayage de lame (BBC) (Royal 49S/BBC)
8.Etiquette d’avertissement
9.Plaquette d’identification
10.Chargeur (Royal 49SE)
NL - INHOUD
1.Handgreep, compleet
2.Grasopvangbak
3.Fles olie
4.Handleiding
5.Afsluitstop voor mulchen
6.Contactslot (Royal 49SE)
7.BBC-hendel (Royal 49S/BBC)
8.Waarschuwingsetiket
9.Productlabel
10.Acculader (Royal 49SE)
N - INNHOLD
1.Håndtak
2.Oppsamler
3.Oljeflaske
4.Bruksanvisning
5.BioClip plugg
6.Nøkkel(Royal 49SE)
7.BBC (blad, brems, clutch) kontrollspak (Royal 49S/BBC)
8.Advarselsetikett
9.Typeetiketten
10.Batterilader (Royal 49SE)
SF - SISÄLLYSLUETTELO
1.Kahva
2.Ruohonkerääjä
3.Öljypullo
4.Käyttöopas
5.BioClip-tulppa
6.Käynnistysavain (Royal 49SE)
7.Leikkuuterän jarru (Royal 49S/BBC)
8.Varoitusnimike
9.Tuotteen arvokilpi
10.Akkulaturi (Royal 49SE)
S - INNEHÅLL
1.Montering av handtag
2.Gräsuppsamlare
3.Flaska med olja
4.Bruksanvisning
5.Bioklipp-plugg
6.Självstart (Royal 49SE)
7.BBK-handtag (Royal 49S/BBK)
8.Varningsetikett
9.Identifieringsetikett
10.Batteriladdare (Royal 49SE)
DK - INDHOLD
1.Håndtagskonstruktion
2.Opsamler
3.Flaske med olie
4.Brugsvejledning
5.Bioprop
6.Nøglestart (Royal 49SE)
7.KBK-greb (Royal 49S/BBC)
8.Advarselsmœrkat
9.Produktmærkat
10.Batterilader (Royal 49SE)
E - CONTENIDO
1.Conjunto del mango
2.Recogedor
3.Botella de aceite
4.Manual de instrucciones
5.Tapón bloqueador (Mulching)
6.Arranque con llave (Royal 49SE)
7.Palanca BBC (Royal 49S/BBC)
8.Etiqueta de Advertencia
9.Etiqueta indicadora del producto
10.Cargador de batería (Royal 49SE)
P - LEGENDA
1.Conjunto da Pega
2.Caixa da Relva
3.Garrafa de Óleo
4.Manual de Instrucções
5.Tampão de Distribuição de Adubo Natural
6.Arranque com Chave (Royal 49SE)
7.Alavanca BBC (Royal 49S/BBC)
8.Etiqueta de Aviso
9.Etiqueta de Especificações do Produto
10.Carregador de Bateria (Royal 49SE)
I - INDICE CONTENUTI
1.Impugnatura
2.Cesto raccoglierba
3.Flacone di olio
4.Manuale di istruzioni
5.Tappo per taglio “mulching”
6.Avviamento a chiave (Royal 49SE)
7.Leva BBC (Royal 49S/BBC)
8.Etichetta di pericolo
9.Etichetta con dati prodotto
10.Caricabatterie (Royal 49SE)
(S) |
FÖRPACKNINGENS |
(GB) |
|
(E) |
CONTENIDO DE LA |
|
INNEHÅLL |
CARTON CONTENTS |
|
CAJA |
|
(N) |
KARTONGENS |
(D) |
KARTONINHALT |
(I) |
CONTENUTO DEL |
|
INNHOLD |
(F) |
CONTENU DU CARTON |
|
CARTONE |
(DK) |
KARTONINDHOLD |
(NL) |
INHOUD |
(P) |
LEGENDAS DOS |
(SF) |
PAKETIN SISÄLTÖ |
|
|
|
DESENHOS |
|
|
|
|
|
|
(A) ROYAL 49S |
|
|
|
|
|
|
1 |
|
|
2 |
|
|
|
8 |
|
|
|
9 |
|
|
|
3 |
|
|
|
4 |
5 |
|
|
|
|
(A) ROYAL 49SE |
|
|
|
|
|
1 |
|
UK ONLY |
|
2 |
|
|
|
6 |
|
|
|
8 |
|
|
|
|
|
|
|
9 |
|
10 |
|
3 |
|
|
|
|
|
|
|
4 |
5 |
|
|
|
|
(A) ROYAL 49S/BBC |
|
|
7 |
|
|
|
|
|
|
1 |
|
|
2 |
|
|
|
8 |
|
|
|
9 |
|
|
|
3 |
|
|
|
4 |
|
5 |
|
|
|

SAFETY PRECAUTIONS
If not used properly this lawnmower can be dangerous! This lawnmower can cause serious injury to the operator and others, the warnings and safety instructions must be followed to ensure reasonable safety and efficiency in using this lawnmower. The operator is responsible for following the warning and safety instructions in this manual and on the lawnmower.
Never use the mower unless the grassbox or guards provided by the manufacturer are in position.
Explanation of Symbols on your Husqvarna Royal 49S, 49SE & 49SBBC
|
Warning |
|
Read the user instructions |
|
carefully to make sure you |
|
understand all the controls and |
|
what they do. |
|
Always keep the lawnmower on |
|
the ground when mowing. Tilting |
|
or lifting the lawnmower may |
|
cause stones to be thrown out |
|
Keep bystanders away. Do not |
|
mow whilst people especially |
|
children or pets are in the |
|
mowing area |
|
Beware or severing toes or |
|
hands. Do not put hands or feet |
|
near a rotating blade. |
|
Disconnect the spark plug before |
|
attempting any maintenance, |
|
cleaning or adjustment, or if you are |
|
going to leave the lawnmower |
|
unattended for any period. |
|
Blade continues to rotate after |
|
the machine is switched off. |
|
Wait until all machine |
STOP |
components have completely |
|
stopped before touching them. |
General
1.Never allow children or people unfamiliar with these instructions to use the mower. Local regulations may restrict the age of the operator.
2.Only use the lawnmower in the manner and for the functions described in these instructions.
3.Never operate the lawnmower when you are tired, ill or under the influence of alcohol, drugs or medicine.
4.The operator or user is responsible for accidents or hazards occurring to other people or their property.
Fuel Safety
WARNING - Petrol is highly flammable
-Store fuel in a cool place in a container specifically designed for the purpose. In general plastic containers are unsuitable
-refuel outdoors only and do not smoke while refuelling
-add fuel BEFORE starting the engine. Never remove the cap of the fuel tank or add fuel while the engine is running or when the engine is hot
-if petrol is spilled, do not attempt to start the engine but move the machine away from the area of spillage and avoid creating any source of ignition until petrol vapours have dissipated
-replace all fuel tanks and container caps securely
-move the product away from the fuelling area before starting
Safety Procedures when Charging the Battery (ROYAL 49SE)
1.Check the charger cable regularly for damage or deterioration due to age.
2.Do not use the lawnmower if the charging cable is not in good condition.
3.Do not attempt to charge other products with the charger from this unit.
4.Do not attempt to use this battery with any other charger.
5.Charging should only be carried out in a safe location where neither battery nor cord cable can be trodden on or tripped over.
6.Location should be well-ventilated.
7.During charging, the battery charger becomes warm. This is normal and means the charger is operating properly.
8.Do not cover the battery charger with anything during charging.
9.Ensure that neither the charger nor the battery are exposed to moisture.
10.Avoid extreme temperatures.
11.The charger will not operate below freezing point nor above 40oC.
12.Do not short circuit the battery terminals.
English - 1

SAFETY PRECAUTIONS
Preparation
1.Do not mow barefoot or in open sandals. Always wear suitable clothing, gloves, and stout shoes.
2.The use of ear protection is recommended.
3.Make sure the lawn is clear of sticks, stones, bones, wire and debris; they could be thrown by the blade.
4.Before using always visually inspect to see that blades, blade bolts and cutter assembly are not worn or damaged. Replace worn or damaged blades together with their fixings in sets to preserve balance.
5.Replace faulty silencers.
Use
1.Do not operate the engine in a confined space where exhaust fumes (carbon monoxide) can collect.
2.Use the lawnmower only in daylight or good artificial light.
3.Avoid operating your lawnmower in wet grass, where feasible.
4.Take care in wet grass, you may lose your footing.
5.On slopes, be extra careful of your footing and wear non-slip footwear.
6.Mow across the face of slopes, never up and down.
7.Exercise extreme caution when changing direction on slopes.
8.Mowing on banks and slopes can be dangerous. Do not mow on banks or steep slopes.
9.Do not walk backwards when mowing, you could trip. Walk never run.
10.Never cut grass by pulling the mower towards you.
11.Stop the engine before pushing the mower across surfaces other than grass and when transporting the lawnmower to and from the area to be mowed.
12.Never operate the lawnmower with damaged guards or without guards in place.
13.Do not overspeed the engine or alter governor settings. Excessive speed is dangerous and shortens lawnmower life.
14.Disengage all blade and drive clutches before starting.
15.Always start the lawnmower carefully with feet well away from the blades.
16.Do not tilt lawnmower when starting the engine
17.Do not put hands near the grass discharge chute whilst engine is running.
18.Never pick up or carry a lawnmower while the engine is running
19.Spark plug wire may be hot - handle with care.
20.Do not attempt any maintenance on your lawnmower when the engine is hot.
21.Stop the engine, and wait until the blade has stopped:-
-before leaving the mower unattended for any period;
-before refuelling
22.Stop the engine, wait until the blade has stopped and disconnect the spark plug lead:-
-before clearing a blockage;
-before checking, cleaning or working on the appliance;
-if you hit an object. Do not use your lawnmower until you are sure that the entire lawnmower is in a safe operating condition.;
-if the lawnmower starts to vibrate abnormally. Check immediately. Excessive vibration can cause injury.
23.Reduce the throttle setting during engine shut down and, if the engine is provided with a shut-off valve, turn the fuel off at the conclusion of mowing.
Maintenance and storage
1.Keep all nuts, bolts and screws tight to be sure the lawnmower is in safe working condition.
2.Check the grassbox/grassbag frequently for wear or deterioration.
3 Replace worn or damaged parts for safety.
4.Only use the replacement blade, blade bolt, spacer and impeller specified for this product.
5.Never store the lawnmower with fuel in the tank inside a building where fumes can reach an open flame or spark.
6.Allow the engine to cool before storing in any enclosure.
7.To reduce fire hazard, keep the engine, silencer, battery compartment and fuel storage area free of grass, leaves or excessive grease.
8.If the fuel tank has to be drained, this should be done outdoors.
9.Be careful during adjustment of the machine to prevent entrapment of the fingers between moving blades and fixed parts of the machine.
2 - English

PRODUCT RATING LABEL
B
Product Number . . . . . . . . . . . . . . . . . .
Model Number . . . . . . . . . . . . . . . . . . .
Serial Number. . . . . . . . . . . . . . . . . . . .
Date of Purchase . . . . . . . . . . . . . . . . .
Place of Purchase. . . . . . . . . . . . . . . . .
•PLEASE KEEP PROOF OF PURCHASE•
Your product is uniquely identified by a silver and black product rating label. To ensure you have full product information when obtaining spares or advice from one of our approved service centres or if you need to contact our customer service department you should make a note in the space provided of the information shown in Fig B
|
ASSEMBLY INSTRUCTIONS |
|
||
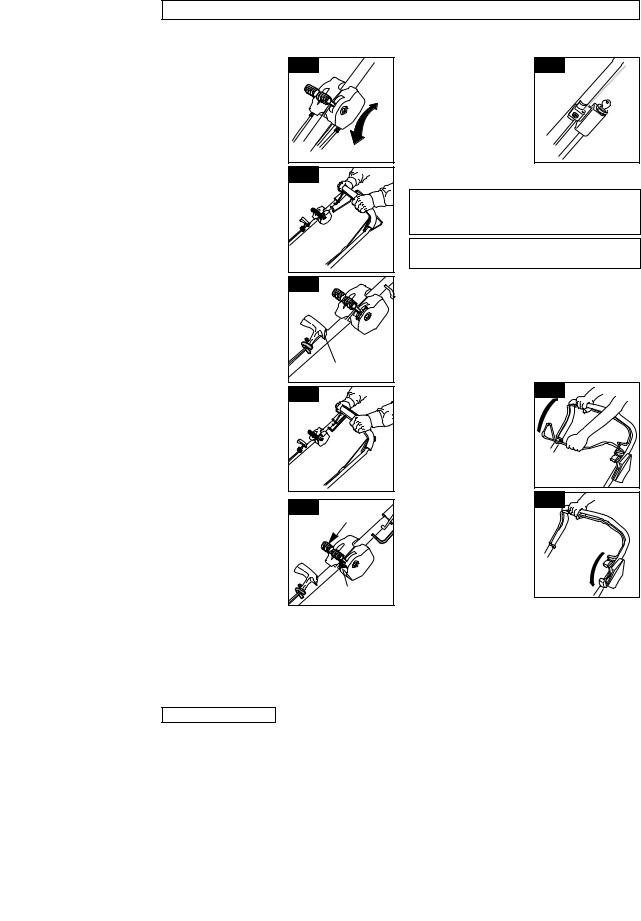
Handle Assembly |
C1 |
3. Locate cord in the pull |
D2 |
|
|
|
|||
1. Your product is supplied |
|
cord guide on the lower |
|
|
with the handles folded |
|
handle. (D2) |
|
|
over the product. (C1) |
|
ROYAL 49S AND |
|
|
|
|
ROYAL 49S/BBC |
|
|
|
|
ONLY |
|
|
2. Loosen handle |
C2 |
|
D3 |
|
adjusters (C2) on both |
4. Locate cord in the pull |
|||
sides of the product |
|
|
||
and lift handle |
|
cord guide on the |
|
|
assembly up. |
|
upper handle. (D3) |
|
|
|
|
handle |
|
|
3. Adjust handle assembly |
|
adjuster |
|
|
|
|
|
||
to the most comfortable |
C3 |
Fitting the Grassbox |
E1 |
|
operating position (C3) |
|
1.Lift safety flap. (E1) |
|
|
and tighten handle |
|
2. Locate grassbox to |
|
|
adjusters (C2) on both |
|
machine. (E2) |
|
|
sides of the product |
|
3. Locate safety flap onto |
|
|
|
|
the top of the grassbox. |
|
|
|
|
(E3). Ensure the |
|
|
Recoil Starter |
|
grassbox is securely |
|
|
1. Disconnect the spark |
|
located. |
|
|
plug lead. |
D1 |
E2 |
E3 |
|
|
||||
2. Pull the Operator |
|
|
|
|
Presence Control (D1) |
|
|
|
|
to release the brake on |
|
|
|
|
the engine. |
|
|
|
|
ROYAL 49S AND |
|
|
|
|
ROYAL 49SE ONLY |
|
|
|
|
You must release the |
|
|
|
|
brake by pulling the |
Please Note :- Ensure no gap remains between the safety flap and the |
|||
OPC lever to the |
||||
grassbox |
|
|
||
handle before pulling |
|
|
||
|
|
|
||
out the cord. |
Where grass collection is not required you can use the lawnmower |
|||
|
||||
English - 3 |
without the grassbox. Ensure the safety flap is fully closed |
|||
|
|
|
||

ENGINE NOTES
Oil
1.Check oil level periodically and after every five hours of operation.
2.Add oil as necessary to keep the level to the FULL mark on the dipstick.
3.Use a good quality SAE 30 four stroke oil.
4. To fill with oil:- |
F1 |
|
a) Remove oil filler |
||
|
||
cap. (F1) |
|
|
b) Fill to the FULL |
|
|
mark on the dipstick. |
|
|
(F2) |
|
|
5. Change the oil after |
|
|
the first five hours |
|
|
operation and |
|
|
thereafter every 25 |
F2 |
|
working hours. |
||
6. Always change the oil |
|
|
while the engine is |
|
|
warm - but not hot - |
|
|
never attempt any |
|
|
maintenance on a hot |
|
|
engine. |
|
Petrol
1.Use fresh regular grade lead free petrol.
2.Do not fill the fuel tank when the engine is hot.
3.Do not fill the fuel tank while smoking.
4.Do not fill the fuel tank while the engine is
|
running. |
G1 |
|
5. |
To avoid introducing |
||
|
|||
|
dirt into the fuel |
|
|
|
system, wipe all |
|
|
|
grass and dirt from |
|
|
|
the petrol filler cap |
|
|
|
before unscrewing it. |
|
|
|
(G1) |
|
|
6. |
It is recommended |
|
|
|
that you fill the tank |
|
|
|
through a funnel with G2 |
||
|
a filter. (G2) |
|
|
7. |
Wipe away spillages |
|
|
|
before starting. |
|
|
Please Note :- move the product away from the fuelling area before starting
STARTING - PRIMING THE ENGINE
Please Note:- When starting the engine for the first time, fill with oil and petrol as described above in the Oil and Petrol section.
Priming is usually unnecessary when restarting a warm engine. However, cool weather may require priming to be repeated.
Starting the engine for the first time |
Starting engine thereafter |
1. Advance engine speed control to FAST ‘+’ |
1. Move engine speed control to FAST ‘+’ |
as illustrated in the Use - starting and stopping section.
H
2. Push primer bulb (H) firmly five times
3. Follow instructions in the Use - starting and stopping section.
position and push primer bulb firmly three times before starting engine. (if engine stopped because it ran out of fuel, refuel engine - push primer bulb three times.
4.If engine fails to start after three pulls of the pull cord, push primer bulb three times and repeat step 3.
4 - English
|
USE - STARTING AND STOPPING |
|
||
Starting & Stopping Royal 49S |
|
Starting & Stopping Royal 49SE |
||
Starting |
J1 |
|
Starting |
K1 |
1. Connect the spark plug |
|
1. Follow steps 1-3 for the |
||
lead. |
|
|
Royal 49S |
|
2. Move the Engine |
|
- |
2. Turn the key and hold |
|
Speed Control to the |
|
until the engine starts |
|
|
|
|
|
||
FAST ‘+’ position |
|
|
(K1). The key will |
|
before starting. (J1) |
|
|
return to the original |
|
3. Pull the operator |
|
+ |
position when |
|
presence control (OPC) |
|
released. |
|
|
to release the brake on |
|
3. If the engine fails to |
|
|
the engine and the |
J2 |
|
start when you turn the |
|
blade.(J2) |
|
key your battery may need charging. |
||
|
|
|||
4. Pull the recoil starter |
|
|
Please note:- Your Royal 49SE can be started |
|
fully towards you until |
|
|
||
you feel the full |
|
|
manually by following steps 1-5 in |
|
resistance, return the |
|
|
Starting & Stopping Royal 49S |
|
handle slowly then pull |
|
|
Key Start Only - During mowing, your engine |
|
the handle firmly |
|
|
||
towards you to its full |
|
|
will recharge the battery |
|
extent. (J3) |
J3 |
|
|
|
5. After the engine has |
|
Engaging the Drive - See Royal 49S |
||
started, allow to run for |
|
|
|
|
30 seconds before |
|
|
Stopping - See Royal 49S |
|
commencing to use. |
|
|
|
|
|
|
|
Starting & Stopping Royal 49S/BBC |
|
Engaging the Drive |
|
|
(BBC - Blade, Brake , Clutch) |
|
1. Forward drive is |
|
|
1. Follow steps 1 - 2 - 4 and 5 for the Royal |
|
engaged and |
|
recoil starter |
49S. |
|
disengaged with the |
|
2. Pull the BBC arm to the handle (L1). |
||
|
|
|||
Powerdrive lever at the |
J4 |
|
3. While holding the BBC |
L1 |
top of the handle (J4). |
|
arm, push forward BBC |
||
|
|
|
||
2. Drive speed can be |
|
|
control lever until a |
|
altered with the drive |
|
|
click is heard (L2). |
|
speed control. (J5) |
|
|
4. Release the BBC |
|
3. Releasing the |
|
|
control lever which will |
|
Powerdrive Lever stops |
|
|
return to its original |
|
the forward drive |
|
|
position. |
|
automatically. |
|
|
5. Releasing the BBC arm |
|
Stopping |
J5 |
|
will stop the blade from |
L2 |
drive speed |
rotating. |
|
||
1. Release the |
|
control |
Please Note: |
|
powerdrive lever. |
|
|
Leaving the engine |
|
2. Release the OPC |
|
|
running without the |
|
lever. |
|
|
blade rotating for an |
|
|
|
|
extended length of time |
|
|
|
|
could lead to the engine |
|
|
|
engine speed |
overheating. |
|
|
|
|
|
|
|
|
control |
Engaging the Drive - See Royal 49S |
|
|
|
|
||
|
|
|
Stopping |
|
|
|
|
1. Release the powerdrive lever. |
|
|
|
|
2. Release the BBC arm. |
|
|
|
|
3. Move Engine Speed Control to the ‘-’ |
|
|
|
|
position. |
|
English - 5

USE - MOWING
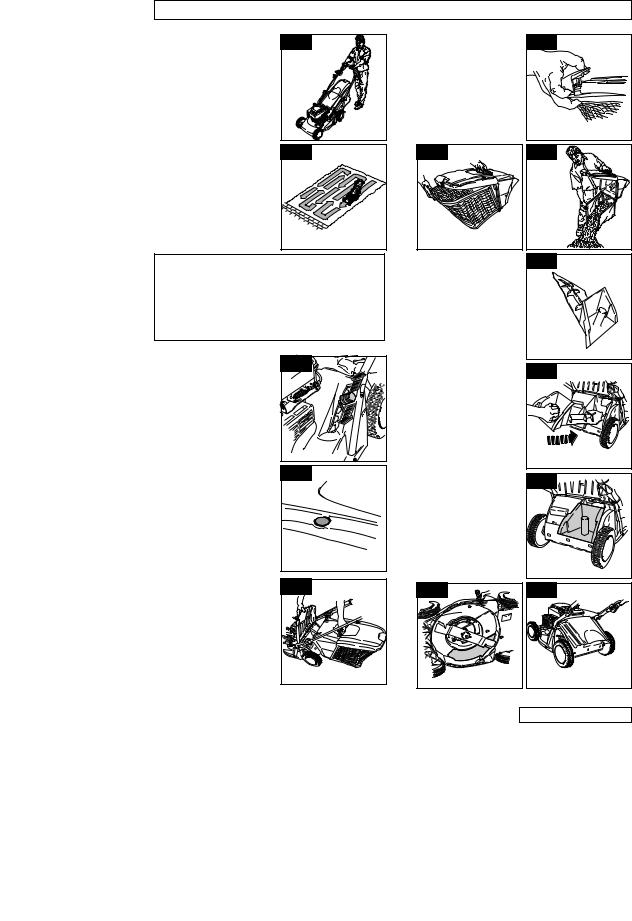
How to Mow |
M1 |
|
1. Always use the correct |
|
|
mowing position (M1). |
|
|
2. Start mowing from the |
|
|
outside edge of the |
|
|
lawn, mowing in strips |
|
|
in alternate directions |
|
|
(M2). |
|
|
3. Mow twice a week in |
|
|
the growing season, |
M2 |
|
your lawn will suffer if |
||
|
||
more that one third of |
|
|
its length is cut at one |
|
|
time and this may also |
|
|
result in poor |
|
|
collection. |
|
Please Note:-
Do not overload your Lawnmower
When mowing in long thick grass a first cut with the cutting height adjusted to its highest setting, see Cutting Height, will help reduce engine overload and will help prevent damage to your lawnmower.
Cutting Height |
M3 |
Adjustment |
|
1. The height of cut is |
|
altered by pulling the |
|
adjustment lever away |
|
from the location slots |
|
and moving to the |
|
selected position (M3). |
|
Grass Collection |
|
Indicator |
|
1. Your lawnmower has a |
M4 |
grass collection |
|
indicator which tells |
|
you when the grassbox |
|
needs emptying. (M4) |
|
2. When the indicator is |
|
at the top of the tube, |
|
grass is being |
|
collected. |
|
3. When the indicator |
M5 |
starts to drop, it’s time |
|
to empty the grassbox. |
|
Adopt a stationary |
|
position, keeping the |
|
lawnmower running for |
|
10 seconds. Release |
|
the OPC lever or BBC |
|
arm and remove the |
|
grassbox for |
|
emptying.(M5) |
|
Emptying the Grassbox
1. Release the latch on the grassbox. (M6)
2.Release collection bag from grassbox frame.
(M7)
3.Empty grassbox. (M8)
M7 |
Using as a mulcher
M6 |
M8 |
M9
1. Your lawnmower is |
|
|
supplied with a |
|
|
mulching plug. (M9) |
|
|
2. Stop your lawnmower |
|
|
as described in Use - |
|
|
starting and |
|
|
stopping, and |
M10 |
|
disconnect the spark |
||
|
||
plug. |
|
|
3. Lift safety flap. Twist |
|
|
and slide mulching plug |
|
|
into rear discharge |
|
|
chute. (M10) |
|
|
4. Ensure mulching plug |
|
|
is securely fitted. (M11) |
|
|
5. The mulching plug |
M11 |
|
prevents grass from |
||
being collected by |
|
|
blocking the collection |
|
|
chute on the underside |
|
|
of the deck. (M12) |
|
|
6. Ensure the safety |
|
|
flap is positioned |
|
|
correctly. (M13) |
|
M12 |
M13 |
|
6 - English |

MAINTENANCE
IMPORTANT
Do not attempt any maintenance on your lawnmower when the engine is hot.
Cleaning
IMPORTANT
Never use water for cleaning your lawnmower. Do not clean with chemical, including petrol, or solvents - some can destroy critical plastic parts.
1.Remove grass from under the deck with a brush (N1 and N2).
N1 |
N2 |
2. Using a soft brush - |
N3 |
remove grass clippings |
|
from the engine air |
|
intakes and exhaust |
(N3), |
cutting height adjustment |
|
area. (N4), around the |
|
wheels (N5) and the |
|
grassbox (N6 & N7). |
|
3. Wipe over the surface of your lawnmower with a dry cloth.
N4 |
N6 |
N5 |
N7 |
Cutting System
Removing the Blade P1 or P2 BBC Only
• Disconnect the spark plug lead.
1. Use spanner to loosen blade bolt by turning anti-clockwise.
2. Remove the blade bolt, blade and spacer washer.
3. Inspect for damage and clean as necessary.
Fitting the Blade P1 or P2 BBC Only 1. Fit the blade to the machine with the sharp
edges pointing away from the machine.
2.Re-assemble blade bolt through blade and spacer washer.
3.Hold firmly and tighten blade bolt firmly with a spanner. Do not over tighten.
Please note
If you have a machine fitted with BBC then you must remove both blade bolts with a hexagonal drive key.
Always handle the blade with care - sharp edges could cause injury.
USE GLOVES
Renew your metal blade after 50 hours mowing or 2 years whichever is the sooner - regardless of condition. If the blade is cracked or damaged replace it with a new one.
How to Charge the Battery (49SE ONLY) |
|
|
|
||||
1. Stop your lawnmower. |
|
|
|
|
|
|
|
2. Disconnect the spark plug. |
Q |
|
|
|
|
|
|
3. Remove the cap from the |
|
|
|
|
|
|
|
Wiring Loom |
|
|
|
|
|||
charging point at the bottom |
|
|
|
|
|||
|
|
|
|
|
|
|
|
of the wiring loom (Q). |
|
|
|
|
|
|
|
4. Plug charger lead into |
|
|
|
|
|
|
|
connection on battery |
|
|
|
|
|
|
|
|
|
charging |
|
|
|
||
|
|
|
cap |
|
|||
loom |
|
|
point |
|
|
||
|
|
|
|
|
|||
5.Plug the battery charger
into a domestic electric socket.
6.Charging will then commence.
7.Charge for 24 hours.
8.After charging, disconnect the charger from the socket and charging point.
9.Replace the cap on the charging point.
10.The unit is now ready for use.
ENVIRONMENTAL INFORMATION
Electrolux Outdoor Products are manufactured under an Environmental Management System (ISO 14001) using, where practical, components manufactured in the most environmentally responsible manner, according to company procedures, and with the potential for recycling at the end of the products’ life.
•Packaging is recyclable and plastic components have been labelled (where practical) for categorised recycling.
•Awareness of the environment must be considered when disposing of ‘end-of-life’ product.
•If necessary, contact your local authority for disposal information.
BATTERY DISPOSAL
•The battery should be taken to an Approved Service Centre or your local Recycling Station.
•Do NOT dispose of used battery with household waste
•Lead/Acid batteries can be harmful and should be disposed of through the recognised recycling facility in accordance with European Regulation
•Do NOT dispose of battery to water.
•Do NOT incinerate
DISPOSAL OF FUELS AND LUBRICATING OILS
•Wear protective clothing when handling any fuels and lubricants.
•Avoid contact with skin.
•Remove petrol and engine oil before transporting the product.
•Contact your local authority for information of your nearest Recycling/Disposal Station.
•Do NOT dispose of used fuels/oils with household waste
•Waste fuels/oils are harmful, but can be recycled and should be disposed of through the recognised facilities.
•Do NOT dispose of used fuels/oils to water.
•Do NOT incinerate
English - 7

MAINTENANCE
Battery Replacement
1.The battery is located underneath a cover behind the engine.
2.Stop the lawnmower and disconnect the spark plug.
3.Remove the screws from the cover.
4.Remove cover to gain access to the battery.
IMPORTANT:-Replacement batteries will need to be charged before use.
Ensure that neither the charger nor the battery are exposed to moisture
The battery pack can be replaced by unclipping the battery from its housing and disconnecting the battery pack from the battery leads.
General Guidance on Rechargeable Battery
1.Charging time is 24 hours.
2.Under normal usage the battery will be charged during the running of the engine.
3.To keep in prime condition the battery should be charged at least once every six months.
4.Exceeding the charging period may shorten the battery life.
5.Protect electric cable. Never carry the battery charger by the electric cable only.
6.If after an extended usage period the battery quickly runs down after a full 24 hour charging period, a replacement battery is probably needed.
7.Do not attempt to open the main body casing.
8.Clean only with a dry soft cloth.
9.Never use a damp cloth or flammable liquids such as petrol, white spirits, thinners etc.
10.Dispose of old batteries safely.
The engine brake cable should always be adjusted to stop the engine within 3 sec. CAUTION! For adjustment contact your authorized service dealer.
At the End of the Mowing Season
1.Replace blade, bolts, nuts or screws, if necessary.
2.Clean your lawnmower thoroughly.
3.Ask your local Service Centre to clean the air filter thoroughly and carry out any service or repairs required.
4.Drain engine of oil and petrol.
Storing your Lawnmower
1. Do not store your lawnmower immediately after use. 2. Wait until the engine has cooled to avoid a potential
fire hazard.
3.Clean your lawnmower
4.Store in a cool, dry place where your lawnmower is protected from damage.
Service Recommendations
We strongly recommend that your product is serviced at least every twelve months, more often in a professional application.
Engine Maintenance Schedule
Follow the hourly or calendar intervals, whichever occur first. More frequent service is required when operating in adverse conditions
First 5 hours - Change oil.
Every 5 hours or daily - Check oil lever. Clean finger guard. Clean around muffler.
Every 25 hours or every season - Change oil if operating under heavy load or high ambient temperature. Service air cleaner.
Every 50 hours or every season - Change oil. Inspect spark arrester, if equipped.
Every 100 hours or every season - Clean cooling system*. Replace spark plug.
*Clean more often under dusty conditions, or when airborne debris is present or after prolonged operation cutting tall, dry grass.
Engine Servicing & Guarantee
The engine fitted to your lawnmower is guaranteed by the Engine Manufacturer. To obtain further information contact your dealer.
Fault Finding
Engine Will Not Start
1.Ensure OPC Lever /BBC arm is in the start position.
2.Check that the control lever is in the '+' position
3. Check that there is sufficient fuel in the tank and the cap air vent is clear.
4.Remove and dry the spark plug.
5.Petrol may be stale. Replace.
6.Check that the blade bolt is tight. A loose bolt could cause difficult starting.
7.If the engine will still not start, immediately disconnect the spark plug lead.
8.CONSULT YOUR LOCAL APPROVED SERVICE CENTRE.
Engine Will Not Turn Over (49SE only)
1. Ensure OPC Lever /BBC arm is in the start position. 2. Battery flat - start your lawnmower manually.
3.If the engine will still not turn over, immediately disconnect the spark plug lead.
4.CONSULT YOUR LOCAL APPROVED SERVICE CENTRE.
Lack of Engine Power and/or Overheating
1.Check that the control lever is in the 'normal' position.
2.Disconnect the spark plug lead and allow the engine to cool down.
3.Clean grass clippings and debris from around the engine and air inlets and the underside of the deck including the chute.
4.Clean the engine air filter (Ask your local Approved Service Centre to clean the engine air filter thoroughly).
5.Petrol may be stale replace.
6.If the engine still lacks power and/or is overheating, immediately disconnect the spark plug lead.
7.CONSULT YOUR LOCAL APPROVED SERVICE CENTRE.
Excessive Vibration
1.Disconnect the spark plug lead.
2.Check that the blade is correctly fitted see page 7.
3.If the blade is damaged or worn replace it with a new one.
4.If vibration persists, immediately disconnect the spark plug lead.
5.CONSULT YOUR LOCAL APPROVED SERVICE CENTRE.
8 - English

SICHERHEITSMAßNAHMEN
Bei nicht ordnungsgemäßer Verwendung kann dieser Rasenmäher gefährlich sein! Dieser Rasenmäher kann den Bediener und andere schwer verletzen; die Warnhinweise und Sicherheitsvorschriften müssen unbedingt beachtet werden, damit eine angemessene Sicherheit und Leistung beim Gebrauch dieses Rasenmähers gewährleistet werden kann. Der Bediener ist dafür verantwortlich, die in dieser Betriebsanleitung und am Rasenmäher gegebenen Warnund Sicherheitshinweise zu beachten.
Den Rasenmäher niemals verwenden, wenn die vom Hersteller gelieferte Grasauffangvorrichtung oder die Schutzvorrichtungen nicht angebracht sind.
Erklärung der am Husqvarna Royal 49S, 49SE & 49SBBC befindlichen Symbole
Achtung
Die Betriebsanleitung muß sorgfältig durchgelesen werden, um sicherstellen zu können, daß alle Steuerelemente und deren Funktion verstanden werden.
Der Rasenmäher muß während des Mähens immer auf dem Boden bleiben. Durch Kippen oder Anheben des Rasenmähers können Steine fortgeschleudert werden.
Es dürfen sich keine Personen in der Nähe befinden. Es darf nicht gemäht werden, wenn sich Personen, insbesondere Kinder, oder Haustiere im Mähbereich befinden.
Nehmen Sie sich davor in acht, daß der Rasenmäher nicht in Ihre Zehen oder Hände schneiden kann. Hände oder Füße dürfen sich nicht in der Nähe des rotierenden Messers befinden.
Die Zündkerzenzuleitung muß getrennt werden, bevor Wartungsarbeiten, Reinigungen oder Einstellungen ausgeführt werden oder der Rasenmäher unbeaufsichtigt bleibt.
|
Das Messer wird sich noch |
|
weiterdrehen, nachdem die Maschine |
|
ausgeschaltet wurde. |
STOP |
Warten, bis alle Maschinenteile zum |
vollständigen Stillstand gekommen |
sind, bevor diese berührt werden.
Allgemeines
1.Kinder oder Personen, die nicht mit der ordnungsgemäßen Benutzung dieses Rasenmähers vertraut sind, dürfen auf keinen Fall, den Rasenmäher benutzen. Örtliche Vorschriften enthalten ggf. Altersbeschränkungen.
2.Den Rasenmäher in der in dieser Betriebsanleitung beschriebenen Art und Weise und nur für die vorgesehenen Funktionen verwenden.
3.Den Rasenmäher nie verwenden, wenn Sie müde oder krank sind oder unter dem Einfluß von Alkohol, Drogen oder Arzneimitteln stehen.
4.Der Bediener oder Benutzer ist für Unfälle anderer Personen, und für die Gefahr, der sie oder deren Eigentum ausgesetzt werden, verantwortlich.
Angaben zur Sicherheit bei der Verwendung von Kraftstoff
1. ACHTUNG - Benzin ist leicht entzündbar
-Kraftstoff an einem kühlen Ort in einem Behälter, der speziell für diesen Zweck vorgesehen ist, aufbewahren. Im allgemeinen sind Plastikbehälter nicht geeignet.
-Nur draußen auftanken und während des Nachfüllens nicht rauchen.
-Kraftstoff einfüllen, BEVOR der Motor gestartet wird. Niemals den Einfüllverschluß entfernen oder Kraftstoff einfüllen, während der Motor läuft oder noch heiß ist.
-Falls Benzin verschüttet wird, darf der Motor nicht gestartet werden. Die Maschine muß vom Bereich, in dem das Benzin verschüttet wurde, entfernt werden; es muß darauf geachtet werden, daß keine Entflammungsmöglichkeit geschaffen wird, bis sich die Benzindämpfe vollständig aufgelöst haben.
-Alle Kraftstofftankund Behälterdeckel wieder an ihrer korrekten Position anbringen.
-Den Rasenmäher vor dem Starten vom Bereich, an dem er aufgetankt wurde, entfernen.
Sicherheitsmaßnahmen beim Aufladen des Akkus (Royal 49SE)
1.Das Kabel des Ladegeräts regelmäßig auf Beschädigungen oder Abnutzungserscheinungen überprüfen.
2.Den Rasenmäher nur dann verwenden, wenn das Kabel des Ladegeräts in gutem Zustand ist.
3.Es darf nicht versucht werden, andere Produkte mit dem für diese Einheit vorgesehenen Ladegerät aufzuladen.
4.Es darf nicht versucht werden, ein anderes Ladegerät zum Aufladen des Akkus zu verwenden.
5.Das Aufladen darf nur an einem sicheren Ort ausgeführt werden, wo Personen nicht auf den Akku oder die Schnur treten oder darüber stolpern können.
6.Der Ort sollte eine gute Belüftung haben.
7.Während des Aufladens wird das Ladegerät warm. Dies ist ganz normal und weist nur darauf hin, daß das Ladegerät in Betrieb ist.
8.Das Ladegerät darf während des Betriebs mit nichts bedeckt werden.
9.Es muß sichergestellt werden, daß weder
Ladegerät noch Akku Feuchtigkeit ausgesetzt sind.
10.Es müssen extreme Temperaturen vermieden werden.
11.Das Ladegerät ist nicht unter dem Gefrierpunkt oder über 40°C betriebsfähig.
12.Die Akkuklemmen dürfen nicht kurzgeschlossen werden.
DEUTSCH - 1

SICHERHEITSMAßNAHMEN
Vorbereitung
1.Nicht barfuß oder mit offenen Sandalen mähen. Immer geeignete Kleidung, Handschuhe und feste Schuhe tragen.
2.Es wird empfohlen, einen gehörschutz zu tragen.
3.Sicherstellen, daß keine Stecken, Steine, Knochen, Draht oder Schutt auf dem Rasen liegen; sie könnten durch das Messer fortgeschleudert werden.
4.Vor der Benutzung des Rasenmähers muß immer eine Sichtprüfung ausgeführt werden, um sicherstellen zu können, daß die Messer, Messerbefestigungsschrauben und das Schneidwerk nicht abgenutzt oder beschädigt sind. Abgenutzte oder beschädigte Messer müssen zusammen mit ihren Befestigungen als ganze Sätze ausgewechselt werden, um das Gleichgewicht beizubehalten.
5.Fehlerhafte Schalldämpfer auswechseln.
Verwendung
1.Den Motor nicht in einem geschlossen Bereich laufen lassen, wo sich Abgase (Kohlenmonoxid) ansammeln können.
2.Den Rasenmäher nur bei Tageslicht oder guter künstlicher Beleuchtung verwenden.
3.Rasenmäher sollten, wenn möglich, nicht in nassem Gras verwendet werden.
4.In nassem Gras ist Vorsicht geboten, da Sie leicht Ihren Halt verlieren können.
5.An Hängen muß sichergestellt werden, daß Sie einen sicheren Halt haben und rutschfeste Schuhe tragen.
6.Hänge nie von oben nach unten, sondern immer quer zum Hang mähen.
7.Seien Sie besonders vorsichtig, wenn Sie die Richtung am Hang ändern.
8.Das Mähen an Bänken und Hängen kann gefährlich sein. Mähen Sie nicht an Bänken oder steilen Hängen.
9.Beim Mähen nicht rückwärtsgehen, da Sie stolpern könnten. Beim Mähen nur gehen, niemals laufen.
10.Beim Mähen den Rasenmäher nie in Ihre Richtung ziehen.
11.Den Motor ausschalten, bevor er über andere Oberflächen als Gras geschoben oder zu und vom zu mähenden Bereich transportiert wird.
12.Den Rasenmäher niemals mit beschädigten oder nicht angebrachten Schutzvorrichtungen verwenden.
13.Den Motor nicht überdrehen oder die Reglereinstellungen ändern. Eine übermäßige Geschwindigkeit ist gefährlich und reduziert die Benutzungsdauer des Rasenmähers.
14.Vor dem Starten alle Messerund Antriebskupplungen ausrücken.
15.Den Rasenmäher immer vorsichtig starten und dabei sicherstellen, daß sich Ihre Füße weit weg von den Messern befinden.
16.Den Rasenmäher beim Starten des Motors nicht kippen.
17.Während der Motor läuft, dürfen sich Ihre Hände niemals in der Nähe der Grasauslaßöffnung befinden.
18.Einen Rasenmäher niemals anheben oder tragen, wenn der Motor noch läuft.
19.Die Zündkerzenzuleitung kann heiß sein - deshalb ist beim Umgang damit Vorsicht geboten.
20.Es dürfen keine Wartungsarbeiten an Ihrem Rasenmäher ausgeführt werden, solange der Motor noch heiß ist.
21.Den Motor ausschalten und warten, bis das Messer zum vollständigen Stillstand gekommen ist:
-bevor der Rasenmäher unbeaufsichtigt bleibt;
-bevor Benzin nachgefüllt wird;
22. Den Motor ausschalten, warten, bis das Messer zum vollständigen Stillstand gekommen ist und die Zündkerzenzuleitung trennen:
-bevor eine Blockierung entfernt wird;
-bevor der Rasenmäher überprüft oder gereinigt wird oder Arbeiten daran ausgeführt werden;
-wenn Sie einen Gegenstand treffen. Der Rasenmäher darf erst dann wieder verwendet werden, wenn absolut sichergestellt wurde, daß sich der gesamte Rasenmäher in einem sicheren Betriebszustand befindet;
-wenn der Rasenmäher anfängt, ungewöhnlich stark zu vibrieren. In diesem Falle muß er sofort überprüft werden. Ein übermäßiges Vibrieren kann Verletzungen verursachen.
23.Während der Motor abgestellt ist, die Gashebeleinstellung reduzieren, und falls der
Motor mit einem Absperrventil versehen ist, die Kraftstoffzufuhr nach dem Mähen abschalten.
Wartung und Lagerung
1.Alle Muttern, Bolzen und Schrauben müssen fest angezogen sein, damit ein sicherer Betriebszustand des Rasenmähers gewährleistet ist.
2.Die Grasauffangvorrichtung häufig auf Verschleiß und schlechten Zustand überprüfen.
3.Abgenutzte oder beschädigte Teile müssen für einen sicheren Zustand ausgewechselt werden.
4.Nur für dieses Produkt spezifizierte Messer, Messerbefestigungsschrauben, Distanzscheiben und Gebläserad beim Auswechseln verwenden.
5.Den Rasenmäher niemals mit Kraftstoff im Tank in einem Gebäude abstellen, wo Dämpfe eine offene Flamme oder einen Funken erreichen können.
6.Der Motor muß zuerst abgekühlt sein, bevor der Rasenmäher in einen geschlossenen Bereich gestellt wird.
7.Um die Brandgefahr zu reduzieren, müssen Motor, Schalldämpfer, Gehäuse und Kraftstoffaufbewahrungsbereich frei von Gras, Blättern oder übermäßig viel Schmierfett gehalten werden.
8.Falls der Kraftstofftank entleert werden muß, sollte dies draußen geschehen.
9.Bei der Einstellung des Rasenmähers darauf achten, daß Sie Ihre Finger nicht zwischen den beweglichen Messern und feststehenden Teilen der Maschine einklemmen.
Gemäß den Vorschriften zur Lärmverhütung dürfen Rasenmäher werktags nicht von 13.00 Uhr bis 15.00 Uhr und von 19.00 Uhr bis 7.00 Uhr und auch nicht an Sonnund Feiertagen verwendet werden. Bitte beachten Sie außerdem mögliche zusätzliche örtliche Vorschriften.
2 - DEUTSCH

Produkttypenschild
B
Produktnummer ...................
Modellnummer .....................
Seriennummer .....................
Kaufdatum ...........................
Kaufort .................................
•Bewahren Sie bitte einen Kaufnachweis auf•
Ihr Produkt ist durch ein silberfarbiges und schwarzes Produkttypenschild gekennzeichnet. Damit sichergestellt werden kann, daß Sie über alle Produktangaben verfügen, wenn Sie Ersatzteile bestellen wollen, Rat von einer unserer zugelassenen Kundendienstzentralen benötigen oder sich mit Husqvarnas eigener Kundendienstabteilung in Verbindung setzen, sollten Sie im zur Verfügung stehenden Platz Notizen der in Abbildung B gezeigten Angaben machen.
|
|
MONTAGEANWEISUNGEN |
|
||
|
C1 |
|
3. Die Schnur an der |
D2 |
|
Griffeinheit |
|
Zugschnurführung am |
|||
|
|
|
|||
1. Bei Lieferung sind die |
|
|
unteren Griff |
|
|
Griffe des Rasenmähers |
|
|
festmachen. (D2) |
|
|
auf das Produkt |
|
|
GILT NUR FÜR |
|
|
heruntergeklappt. (C1) |
|
|
ROYAL 49S UND |
|
|
|
|
|
ROYAL 49S/BBC. |
|
|
|
|
|
4. Die Schnur an der |
|
|
|
|
|
Zugschnurführung am |
|
|
2. Die Griffeinstell- |
C2 |
|
oberen Griff |
D3 |
|
vorrichtungen (C2) auf |
|
festmachen. (D3) |
|||
beiden Seiten des |
|
|
|
|
|
Rasenmähers lockern |
|
|
Anbringen des |
|
|
und die Griffeinheit |
|
|
Grasauffangbehälters |
|
|
anheben. |
|
|
1. Die Schutzklappe |
|
|
|
|
|
anheben. (E1) |
|
|
|
Griffeinstellvorrichtung |
2. Den Grasauffangbe- |
|
||
3. Die Griffeinheit in die |
hälter an der Maschine |
|
|||
|
|
|
|||
Position bringen, die für |
|
|
anbringen. (E2) |
|
|
Sie am bequemsten ist |
C3 |
|
3. Die Schutzklappe über |
E1 |
|
(C3) und die Griffeinstell- |
|
den Grasauffangbe- |
|||
vorrichtungen (C2) auf |
|
|
hälter positionieren. |
|
|
beiden Seiten des |
|
|
(E3). Dabei muß |
|
|
Rasenmähers anziehen. |
|
|
sichergestellt werden, |
|
|
|
|
|
daß der Grasauffang- |
|
|
Zugstarter |
|
|
behälter richtig |
|
|
1. Die Zündkerzen- |
|
|
positioniert ist. |
|
|
zuleitung trennen. |
|
|
|
|
|
2. Die Bedienerpräsenz- |
D1 |
|
E2 |
E3 |
|
Kontrollvorrichtung |
|
||||
(OPC)(D1) ziehen, um |
|
|
|
|
|
die Bremse am Motor |
|
|
|
|
|
zu lösen. |
|
|
|
|
|
GILT NUR FÜR |
|
|
|
|
|
ROYAL 49S UND |
|
|
|
|
|
ROYAL 49SE. |
|
|
|
|
|
Die Bremse muß durch |
|
|
|
|
|
Ziehen des OPC-Bügels |
Hinweis: Es muß sichergestellt werden, daß kein Zwischenraum zwischen |
||||
zum Griff gelöst werden, |
|||||
Schutzklappe und Grasauffangvorrichtung vorhanden ist. |
|
||||
bevor die Schnur |
|
||||
|
|
|
|
||
herausgezogen wird. |
Wenn kein Grasauffang erforderlich ist, kann der Rasenmäher ohne |
||||
DEUTSCH - 3 |
Grasauffangvorrichtung verwendet werden. Dabei muß sichergestellt werden, daß |
||||
die Schutzklappe vollständig geschlossen ist. |
|
||||

ANGABEN ZUM MOTOR
Öl
1.Den Ölstand regelmäßig nach jeweils 5 Betriebsstunden überprüfen.
2.Je nach Erfordernis Öl hinzufügen, um den Ölstand auf der VOLL-Markierung am Pegelstab zu halten.
3.Ein hochwertiges SAE 30 Viertaktöl verwenden.
4.Wenn Öl nachgefüllt
werden muß: |
F1 |
|
a) Den Öleinfüllverschluß |
|
|
entfernen. (F1) |
|
|
b) Öl bis zur VOLL- |
|
|
Markierung am Pegelstab |
|
|
einfüllen.(F2) |
|
|
5. Das Öl nach den ersten |
|
|
fünf Betriebsstunden und |
|
|
danach nach jeweils 25 |
|
|
Betriebsstunden |
|
|
wechseln. |
F2 |
|
6. Das Öl immer dann |
||
|
||
wechseln, wenn der |
|
|
Motor noch warm - |
|
|
jedoch nicht zu heiß - ist. |
|
|
Es dürfen niemals |
|
|
Wartungsarbeiten bei |
|
|
heißem Motor ausgeführt |
|
|
werden. |
|
Benzin
1.Frisches bleifreies Normalbenzin verwenden.
2.Den Kraftstofftank nicht füllen, wenn der Motor heiß ist.
3.Während des Auffüllens des Tanks darf nicht geraucht werden.
4. |
Den Kraftstofftank nicht |
G1 |
|
füllen, während der Motor |
|
|
läuft. |
|
5. |
Damit kein Schmutz in |
|
|
das Kraftstoffsystem |
|
|
gelangen kann, muß Gras |
|
|
und Schmutz vom |
|
|
Benzineinfüllverschluß |
|
|
entfernt werden, bevor |
|
|
dieser aufgeschraubt |
|
|
wird.(G1) |
|
6. |
Es wird empfohlen, den |
G2 |
|
Tank über einen Trichter |
|
|
mit Filter zu füllen.(G2) |
|
7. |
Vor dem Starten des |
|
|
Motors muß verschüttetes |
|
|
Benzin entfernt werden. |
|
Hinweis: Der Rasenmäher muß vor dem Starten vom Bereich, an dem er aufgetankt wurde, entfernt werden.
STARTEN IHRES RASENMÄHERS - FLUTEN DES MOTORS
Hinweis: Wenn der Motor zum ersten Mal gestarten wird, muß Öl und Benzin gemäß den im Abschnitt Öl und Benzin gegebenen Anweisungen eingefüllt werden.
Ein vorpumpen ist gewöhnlich nicht erforderlich, wenn ein warmer Motor erneut gestartet wird. Bei kaltem Wetter muß das pumpen jedoch ggf. wiederholt werden.
Erstmaliges Starten des Motors
1. Den Gashebel auf SCHNELL ‘+’ gemäß den Anweisungen im Abschnitt Verwendung - Starten und Stoppen einstellen.
|
H |
2. |
Den Fluter (H) |
|
fünfmal fest drücken. |
3. |
Die Anweisungen im |
|
Abschnitt |
|
Verwendung - |
|
Starten und Stoppen beachten. |
4.Falls der Motor nach dreimaligem Ziehen des Zugstarters noch immer nicht startete, muß der Fluter dreimal gedrückt und Schritt 3 wiederholt werden.
Wiederholtes Starten des Motors
1.Den Gashebel auf SCHNELL ‘+’ einstellen und den Fluter dreimal fest drücken, bevor der Motor gestartet wird. (Falls der Motor stoppte, da das Benzin ausging, muß der Tank nachgefüllt und der Fluter dreimal gedrückt werden.)
4 - DEUTSCH

VERWENDUNG - STARTEN UND STOPPEN
Starten und Stoppen, Royal 49S |
||
Starten Ihres Rasenmähers |
|
|
1. Die Zündkerzen- |
J1 |
|
zuleitung anschließen. |
||
|
||
2. Den Gashebel vor dem |
- |
|
Starten auf SCHNELL |
||
‘+’ einstellen. (J1) |
||
3. Die Bedienerpräsenz- |
|
|
Kontrollvorrichtung |
|
|
(OPC) ziehen, um die |
+ |
|
Bremse am Motor und |
||
|
||
Messer zu lösen. (J2) |
J2 |
|
4. Den Zugstarter so weit |
||
herausziehen, bis Sie |
|
|
den vollen Widerstand |
|
|
spüren. Die Zugschnur |
|
|
wieder langsam |
|
|
aufwickeln lassen und |
|
|
dann den Zugstarter so |
|
|
weit wie möglich |
|
|
herausziehen. (J3) |
|
|
5. Nachdem der Motor |
J3 |
|
startete, muß dieser 30 |
||
Sekunden lang laufen, |
|
|
bevor mit dem Mähen |
|
|
begonnen wird. |
|
|
Einschalten des Antriebs |
|
|
1. Der Vorwärtsantrieb |
|
|
wird mit dem |
Zugstarter |
|
Motorantriebshebel |
||
|
||
oben am Griff einund |
J4 |
|
ausgeschaltet. (J4) |
||
2. Die Antriebsge- |
|
|
schwindigkeit kann mit |
|
|
der |
|
|
Antriebsgeschwindig- |
|
|
keitssteuerung reguliert |
|
|
werden. (J5) |
|
|
3. Durch Loslassen des |
|
|
Motorantriebsbügels |
|
|
wird der Vorwärtsan- |
J5 |
|
trieb automatisch |
||
gestoppt. |
Antriebsgeschwindig- |
|
|
keitssteuerung |
|
Stoppen Ihres |
|
|
Rasenmähers |
|
|
1. Den Motorantrie- |
|
|
bsbügel loslassen. |
|
|
2. Den OPC-Bügel |
Gashebe |
|
loslassen. |
||
|
Starten und Stoppen, Royal 49SE Starten Ihres Rasenmähers
1. Schritte 1 - 3 für den K1 Royal 49S befolgen.
2.Den Schlüssel drehen und solange halten, bis
der Motor startet (K1). Der Schlüssel wird auf seine ursprüngliche Position zurückkehren, wenn er losgelassen wird.
3.Wenn der Motor bei Drehen des Schlüssels nicht startet, muß wahrscheinlich Ihr Akku aufgeladen werden.
Hinweis: Ihr Royal 49SE kann manuell gestartet werden. Dazu müssen Schritte 1 - 5 des Abschnitts Starten & Stoppen, Royal 49S beachtet werden.
Gilt nur für Schlüsselstart - Während des Mähens wird Ihr Akku aufgeladen.
Einschalten des Antriebs - Siehe Royal 49S
Stoppen Ihres Rasenmähers - Siehe Royal 49S
Starten und Stoppen, Royal 49S/BBC (BBC - Messer, Bremse, Kupplung)
1.Schritte 1 - 2 - 4 und 5 für Royal 49S befolgen.
2.Den BBC-Hebel zum Griff ziehen. (L1)
3. Den BBC-Hebel halten |
L1 |
|
und den BBC- |
||
|
||
Steuerhebel so weit |
|
|
nach vorne drücken, bis |
|
|
ein Klicken zu hören ist. |
|
|
(L2) |
|
|
4. Den BBC-Steuerhebel |
|
|
loslassen. Dieser wird |
|
|
dann zu seiner |
|
|
ursprünglichen Position |
L2 |
|
zurückkehren. |
||
5. Durch Loslassen des |
|
|
BBC-Hebels wird die |
|
|
Messerrotation stoppen. |
|
|
Hinweis: |
|
|
Wenn der Motor für |
|
|
längere Zeit ohne |
|
|
rotierendes Messer läuft, |
|
|
kann dies zu einem |
|
|
Überhitzen des Motors |
|
|
führen. |
|
Einschalten des Antriebs - Siehe Royal 49S
Stoppen Ihres Rasenmähers
1.Den Motorantriebsbügel loslassen.
2.Den BBC-Hebel loslassen.
3.Den Gashebel in die ‘-’ Position bringen.
DEUTSCH - 5
VERWENDUNG - MÄHEN
Mähen |
M1 |
1. Es muß immer die |
|
korrekte Mähposition |
|
angewendet werden. |
|
(M1) |
|
2. Am Rasenrand mit dem |
|
Mähen beginnen und den |
|
Rasen in Streifen mit |
|
abwechselnder Richtung |
|
mähen (M2). |
|
3. Den Rasen während der |
|
Vegetationszeit zweimal |
M2 |
pro Woche mähen. Ihr |
|
Rasen wird Schaden |
|
erleiden, wenn mehr als |
|
ein Drittel seiner |
|
Halmlänge auf einmal |
|
geschnitten wird. |
|
Überdies kann dies zu |
|
einem schlechten |
|
Aufsammeln des |
|
Schnittguts führen. |
|
Hinweis:
Ihr Rasenmäher darf nicht überlastet werden.
Beim Mähen von langem Gras sollte das erste Mal die höchste Schnitthöheneinstellung verwendet werden (siehe Schnitthöhe), um die Belastung des Motors zu reduzieren und eine Beschädigung des Rasenmähers verhindern zu können.
Einstellung der |
M3 |
|
Schnitthöhe |
||
1. |
Die Schnitthöhe kann |
|
|
geändert werden, indem |
|
|
der Einstellungshebel aus |
|
|
der Positionierungs- |
|
|
vertiefung gezogen und in |
|
|
die ausgewählte Position |
|
|
bewegt wird. (M3) |
|
Anzeige für vollen |
|
|
Grasauffangbehälter |
|
|
1. |
Ihr Rasenmäher verfügt |
M4 |
|
über eine Vorrichtung, die |
|
|
anzeigt, wann Ihr |
|
|
Grasauffangbehälter |
|
|
geleert werden muß.(M4) |
|
2. Wenn sich die Anzeige |
|
|
|
oben am Rohr befindet, |
|
|
wird Gras aufgesammelt. |
|
3. |
Wenn die Anzeige |
|
|
anfängt zu fallen, muß |
|
|
der Grasauffangbehälter |
|
|
geleert werden. Den |
M5 |
|
Rasenmäher nicht mehr |
|
|
verwenden und weitere |
|
|
10 Sekunden laufen |
|
|
lassen. Den OPC-Bügel |
|
|
oder BBC-Hebel loslassen |
|
|
und den Grasauffang- |
|
|
behälter abnehmen, |
|
|
damit dieser geleert |
|
|
werden kann. (M5) |
|
Leeren des Grasauffangbehälters
1. |
Die Falle am |
M6 |
|
Grasauffangbehälter |
|
|
|
|
|
lösen. (M6) |
|
2. |
Den Auffangbehälter vom |
|
|
Rahmen lösen. (M7) |
|
3. |
Den Grasauffangbehälter |
|
|
leeren. (M8) |
|
M7 |
Verwendung des
Rasenmähers zur
Mulchgewinnung
1.Ihr Rasenmäher ist mit einem Einsatzteil zur Mulchgewinnung ausgestattet. (M9)
2.Den Rasenmäher gemäß den Anweisungen im Abschnitt Verwendung -
Starten und Stoppen stoppen und die Zündkerzenzuleitung trennen.
3.Die Schutzklappe anheben. Das Einsatzteil durch Drehen und Schieben in die Auslaßöffnung bringen. (M10)
4.Sicherstellen, daß das Einsatzteil sicher befestigt ist. (M11)
5.Das Einsatzteil verhindert, daß Gras aufgesammelt wird, indem die Sammelschurre auf der Unterseite der Haube blockiert wird. (M12)
6.Sicherstellen, daß die Schutzklappe richtig positioniert ist. (M13)
M8
M9
M10 |
M11 |
M12 |
M13 |
|
6 - DEUTSCH |

WARTUNG
WICHTIG
Es dürfen keine Wartungsarbeiten an Ihrem Rasenmäher ausgeführt werden, solange der Motor noch warm ist.
Reinigung
WICHTIG
Es darf nie Wasser zum Säubern Ihres Rasenmähers verwendet werden. Es dürfen auch keine Chemikalien, einschließlich Benzin oder Lösungsmittel verwendet werden - einige davon können wichtige Kunststoffteile beschädigen.
1. Gras unter der Haube mit einer Bürste entfernen (N1 & N2).
N1 |
N2 |
2. Mit einer weichen Bürste das N3 

 Schnittgut von den


 Motorlufteinlässen, dem


 Auspuff (N3), dem


 Schnitthöheneinstellungs-


 bereich (N4), dem Bereich um


 die Räder (N5) und vom


 Grasauffang-behälter


 entfernen (N6 & N7).
3.Mit einem trockenen Tuch über die Oberfläche Ihres Rasenmähers wischen.
N4 |
N6 |
N5 |
N7 |
Schneidwerk
Messer ausbauen P1 oder P2, nur BBC
• Die Zündkerzen-zuleitung trennen. 1. Mit einem Schrauben-schlüssel
die Messer-befestigungsschraube gegen den Uhrzeigersinn drehen und somit lockern.
2. Die Messerbefestigungsschraube, das Messer und die
Distanzscheiben entfernen
3. Die Teile auf Beschädigung-en überprüfen und je nach Erfordernis reinigen.
Messer einbauen P1 oder P2, nur BBC 1. Das Messer an der Maschine anbringen. Die scharfen Kanten
müssen dabei von der Maschine weg zeigen.
2.Die Messerbefestigungsschraube wieder durch das Messer und die Distanzscheiben bringen.
3.Gut festhalten und die Messerbefestigungsschraube mit einem Schraubenschlüssel fest anziehen. Die Schraube darf dabei nicht zu fest angezogen werden.
Hinweis
Bei einer Maschine mit BBC müssen beide
Messerbefestigungsschrauben mit einem
Sechskantstiftschlüssel entfernt werden.
Beim Umgang mit dem Messer ist immer Vorsicht geboten - scharfe Kanten können Verletzungen verursachen. HANDSCHUHE VERWENDEN
Das Metallmesser muß nach 50 Betriebsstunden oder 2 Jahren, je nachdem, welches eher zutrifft, ausgewechselt werden. Dies trifft auch dann zu, wenn das Messer noch in gutem Zustand ist.
Wenn das Messer abgenutzt oder beschädigt ist, muß es durch ein neues Messer ersetzt werden.
Aufladen des Akkus (NUR 49SE) |
Q |
|
|
|
|
1. |
Den Rasenmäher stoppen. |
|
|
|
|
2. |
Die Zündkerzenzuleitung trennen. |
Kabelbaum |
|
|
|
|
|
|
|
||
3. |
Die Kappe vom Ladepunkt |
|
|
|
|
|
unten am Kabelbaum |
|
|
|
|
|
entfernen (Abb. Q). |
|
|
|
|
4. |
Die Ladegerätzuleitung in den |
Ladepunkt |
Kappe |
|
|
|
Anschluß am Akkukabelbaum |
|
|
|
|
|
|
|
|
|
|
|
|
|
|
|
|
|
stecken. |
|
|
|
|
5.Das Ladegerät an eine Steckdose anschließen.
6.Der Akku wird nun aufgeladen.
7.Den Akku 24 Stunden lang aufladen.
8.Nach dem Aufladen muß der Ladegerätstecker aus der Steckdose gezogen und vom Ladepunkt getrennt werden.
9.Die Kappe wieder am Ladepunkt anbringen.
10.Die Einheit kann nun verwendet werden.
UMWELTINFORMATION
Electrolux Outdoor Products stellt Produkte unter einem Umweltmanagementsystem (ISO 14001) her. Hierbei werden Fertigungsverfahren angewandt, welche es ermöglichen, Teile auf eine umweltfreundliche Weise (soweit dies durchführbar ist) und unter der Berücksichtigung der Wiederverwertung am Ende ihrer Benutzungsdauer, herzustellen.
•Die Verpackung kann wiederverwertet werden. Kunststoffteile wurden (wo durchführbar) für eine nach Kategorien geordnete Wiederverwertung gekennzeichnet.
•Beim Entsorgen von nicht mehr zu gebrauchenden Produkten muß die Umwelt berücksichtigt werden.
•Falls erforderlich, setzen Sie sich bitte mit Ihrer örtlichen Behörde in Verbindung. Diese kann Ihnen Einzelheiten
zur Entsorgung mitteilen.
BATTERIENENTSORGUNG
•Die Batterie muß zu einer zugelassenen Kundendienststation oder Ihrer örtlichen Recyclingstation gebracht werden.
•Nicht mehr verwendbare Batterien dürfen NICHT mit dem Hausmüll entsorgt werden.
•Blei-/Säurebatterien können umweltschädigend sein und müssen deshalb über eine zugelassene Recyclingstation gemäß europäischer Vorschriften entsorgt werden.
•Die Batterie darf NICHT in Gewässern entsorgt werden.
•Nicht vebrennen.
KRAFTSTOFFUND SCHMIERÖLENTSORGUNG
•Beim Umgang mit Kraftstoffen und Schmiermitteln muß Schutzkleidung getragen werden.
•Hautkontakt vermeiden.
•Benzin und Motorenöl vor dem Transportieren des Produkts ablassen.
•Setzen Sie sich bitte mit Ihrer örtlichen Behörde in Verbindung, die Ihnen Einzelheiten über die nächstgelegene Recycling-/Entsorgungsstation geben kann.
•Verwendete Kraftstoffe/Öle dürfen NICHT mit dem Hausmüll entsorgt werden.
•Verwendete Kraftstoffe/Öle sind umweltschädigend, sie können jedoch wiederverwertet werden und sollten deshalb über eine zugelassene Einrichtung entsorgt werden.
•Verwendete Kraftstoffe/Öle dürfen NICHT in Gewässer abgeleitet werden.
•Nicht vebrennen.
DEUTSCH - 7
 Loading...